By: Trend Micro
August 15, 2023
Read time: 4 min (1157 words)
The unveiling of the first-ever Open Worldwide Application Security Project (OWASP) risk list for large language model AI chatbots was yet another sign of generative AI’s rush into the mainstream—and a crucial step toward protecting enterprises from AI-related threats.
For more than 20 years, the Open Worldwide Application Security Project (OWASP) top 10 risk list has been a go-to reference in the fight to make software more secure. So it’s no surprise developers and cybersecurity professionals paid close attention earlier this spring when OWASP published an all-new list focused on large language model AI vulnerabilities.
OWASP’s move is yet more proof of how quickly AI chatbots have swept into the mainstream. Nearly half (48%) of corporate respondents to one survey said that by February 2023 they had already replaced workers with ChatGPT—just three months after its public launch. With many observers expressing concern that AI adoption has rushed ahead without understanding of the risks involved, the OWASP top 10 AI risk list is both timely and essential.
Large language model vulnerabilities at a glance
OWASP has released two draft versions of its AI vulnerability list so far: one in May 2023 and a July 1 update with refined classifications and definitions, examples, scenarios, and links to additional references. The most recent is labeled ‘version 0.5’, and a formal version 1 is reported to be in the works.
We did some analysis and found the vulnerabilities identified by OWASP fall broadly into three categories:
- Access risks associated with exploited privileges and unauthorized actions.
- Data risks such as data manipulation or loss of services.
- Reputational and business risks resulting from bad AI outputs or actions.
In this blog, we take a closer look at the specific risks in each case and offer some suggestions about how to handle them.
1. Access risks
Of the 10 vulnerabilities listed by OWASP, four are specific to access and misuse of privileges: insecure plugins, insecure output handling, permissions issues, and excessive agency.
According to OWASP, any large language model that uses insecure plugins to receive “free-form text” inputs could be exposed to malicious requests, resulting in unwanted behaviors or the execution of unauthorized remote code. On the flipside, plugins or applications that handle large language model outputs insecurely—without evaluating them—could be susceptible to cross-site and server-side request forgeries, unauthorized privilege escalations, hijack attacks, and more.
Similarly, when authorizations aren’t tracked between plugins, permissions issues can arise that open the way for indirect prompt injections or malicious plugin usage.
Finally, because AI chatbots are ‘actors’ able to make and implement decisions, it matters how much free reign (i.e., agency) they’re given. As OWASP explains, “When LLMs interface with other systems, unrestricted agency may lead to undesirable operations and actions.” Examples include personal mail reader assistants being exploited to propagate spam or customer service AI chatbots manipulated into issuing undeserved refunds.
In all of these cases, the large language model becomes a conduit for bad actors to infiltrate systems.
2. Data risks
Poisoned training data, supply chain vulnerabilities, prompt injection vulnerabilities and denials of serviceare all data-specific AI risks.
Data can be poisoned deliberately by bad actors who want to harm an organization. It can also be distorted inadvertently when an AI system learns from unreliable or unvetted sources. Both types of poisoning can occur within an active AI chatbot application or emerge from the large language model supply chain, where reliance on pre-trained models, crowdsourced data, and insecure plugin extensions may produce biased data outputs, security breaches, or system failures.
With prompt injections, ill-meaning inputs may cause a large language model AI chatbot to expose data that should be kept private or perform other actions that lead to data compromises.
AI denial of service attacks are similar to classic DOS attacks. They may aim to overwhelm a large language model and deprive users of access to data and apps, or—because many AI chatbots rely on pay-as-you-go IT infrastructure—force the system to consume excessive resources and rack up massive costs.
3. Reputational and business risks
The final OWASP vulnerability (according to our buckets) is already reaping consequences around the world today:overreliance on AI. There’s no shortage of stories about large language models generating false or inappropriate outputs from fabricated citations and legal precedents to racist and sexist language.
OWASP points out that depending on AI chatbots without proper oversight can make organizations vulnerable to publishing misinformation or offensive content that results in reputational damage or even legal action.
Given all these various risks, the question becomes, “What can we do about it?” Fortunately, there are some protective steps organizations can take.
What enterprises can do about large language model vulnerabilities
From our perspective at Trend Micro, defending against AI access risks requires a zero-trust security stance with disciplined separation of systems (sandboxing). Even though generative AI has the ability to challenge zero-trust defenses in ways that other IT systems don’t—because it can mimic trusted entities—a zero-trust posture still adds checks and balances that make it easier to identify and contain unwanted activity. OWASP also advises that large language models “should not self-police” and calls for controls to be embedded in application programming interfaces (APIs).
Sandboxing is also key to protecting data privacy and integrity: keeping confidential information fully separated from shareable data and making it inaccessible to AI chatbots and other public-facing systems. (See our recent blog on AI cybersecurity policies for more.)
Good separation of data prevents large language models from including private or personally identifiable information in public outputs, and from being publicly prompted to interact with secure applications such as payment systems in inappropriate ways.
On the reputational front, the simplest remedies are to not rely solely on AI-generated content or code, and to never publish or use AI outputs without first verifying they are true, accurate, and reliable.
Many of these defensive measures can—and should—be embedded in corporate policies. Once an appropriate policy foundation is in place, security technologies such as endpoint detection and response (EDR), extended detection and response (XDR), and security information and event management (SIEM) can be used for enforcement and to monitor for potentially harmful activity.
Large language model AI chatbots are here to stay
OWASP’s initial work cataloguing AI risks proves that concerns about the rush to embrace AI are well justified. At the same time, AI clearly isn’t going anywhere, so understanding the risks and taking responsible steps to mitigate them is critically important.
Setting up the right policies to manage AI use and implementing those policies with the help of cybersecurity solutions is a good first step. So is staying informed. The way we see it at Trend Micro, OWASP’s top 10 AI risk list is bound to become as much of an annual must-read as its original application security list has been since 2003.
Next steps
For more Trend Micro thought leadership on AI chatbot security, check out these resources:
- Generative AI: What Every CISO Needs to Know
- How to Write a Cybersecurity Policy for Generative AI
- ChatGPT Shared Links and Information Protection: Risks and Measure Organizations Must Understand
Source :
https://www.trendmicro.com/en_us/research/23/h/top-ai-risks.html


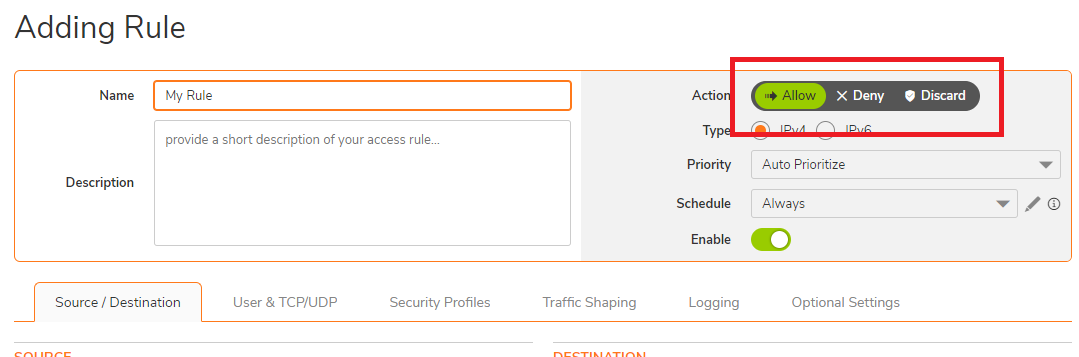
 NOTE: When creating a new access rule, the default Action on your firewall is set to Allow.
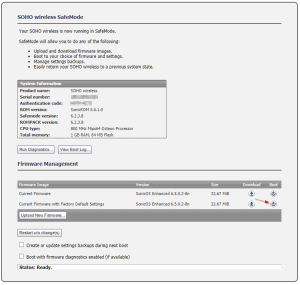
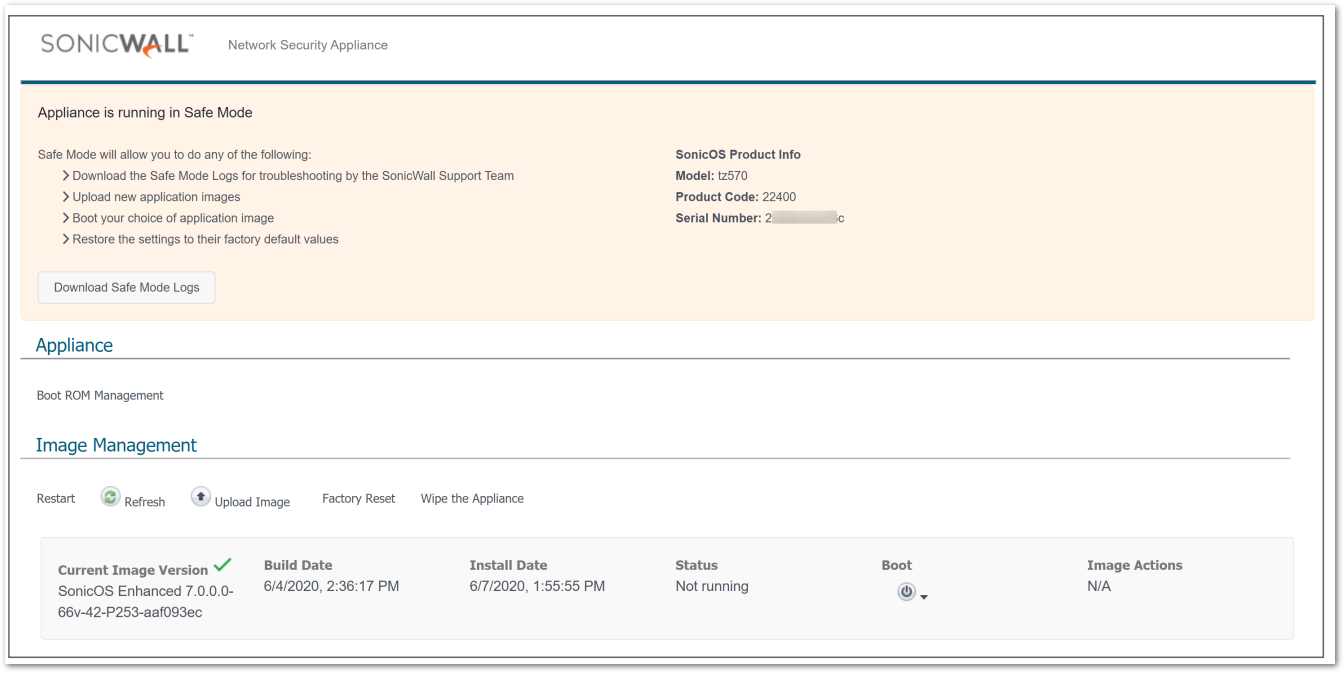
  CAUTION: Safemode is only available via HTTP so you have to manually type http:// otherwise the browser will automatically take you to https://.

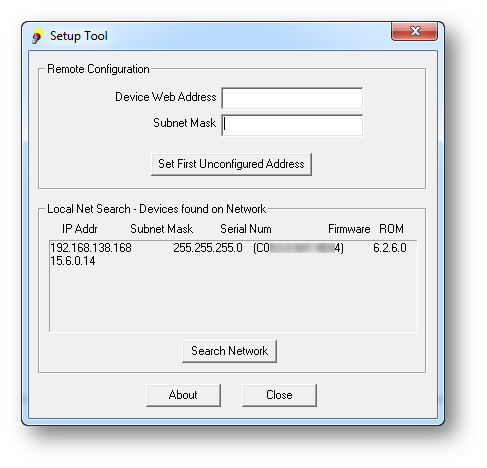
 EXAMPLE:192.168.168.2 with subnet mask of 255.255.255.0.
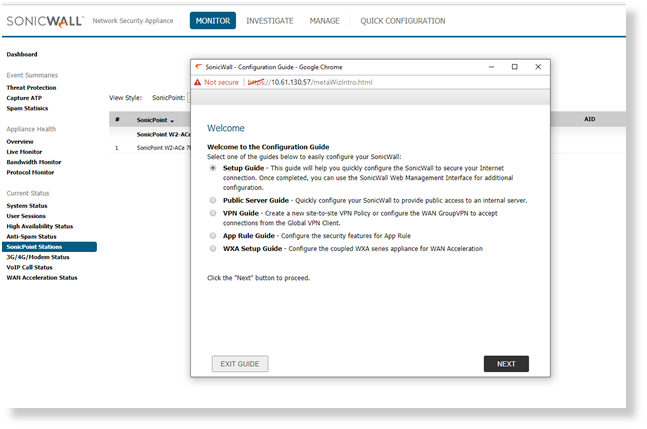
 TIP: If physical connection has been established but the user is unable to access the management interface try doing a ping to the IP address 192.168.168.168 from the computer.