Qnap QuTS hero h5.1.0 | Release Notes

QuTS hero h5.1.0
2023-05-29

QuTS hero h5.1.0 brings many important new features to further enhance security, improve performance, and boost productivity for your QNAP NAS. You can now log in with more secure verification methods, delegate administrative tasks to general users, and centrally manage NAS devices via AMIZ Cloud. You can also benefit from smarter disk migration, smoother file browsing and search in File Station, more powerful SMB signing and file sharing, more convenient storage pool expansion, and much more. See What’s New to learn about main features and Other Changes to learn about other features, enhancements, and changes.

We also include fixes for reported issues and provide information about known issues. For details, see Fixed and Known Issues. You should also see Important Notes before updating QuTS hero.

What’s New

Storage pool expansion by adding disks to an existing RAID group

Users can now expand a storage pool by adding disks to expand an existing RAID group within the pool. When expanding the RAID group, users can also migrate the RAID group to a different RAID type.

To use this function, go to Storage & Snapshots > Storage > Storage/Snapshots, select a storage pool, click Manage > Storage Pool > Action > Expand Pool to open the Expand Storage Pool Wizard, and then select Add new disk(s) to an existing RAID group.

Support for SMB multichannel

Users can now allow SMB 3.x clients to establish multiple network connections simultaneously to an SMB file share. Multichannel can increase the network performance by aggregating network bandwidth over multiple NICs and mitigating network disruption by increasing network fault tolerance.

To enable SMB multichannel, go to Control Panel > Network & File Services > Win/Mac/NFS/WebDAV > Microsoft Networking, and then select Enable SMB Multichannel.

SMB multichannel is only supported on the following clients using SMB 3.0 or later:

  • Windows 8.1 and later
  • Windows Server 2012 and later
  • macOS Big Sur 11.3.1 and later

AES-128-GMAC algorithm support for SMB signing

QuTS hero h5.1.0 now supports the Advanced Encryption Standard (AES) Galois Message Authentication Code (GMAC) cipher suite for SMB signing. SMB signing can use this algorithm to encode and decode using 128-bit keys and can automatically negotiate this method when connecting to a client device that also supports the same algorithm standard.

To enable SMB signing, go to Control Panel > Network & File Services > Win/Mac/NFS/WebDAV > Microsoft Networking > Advanced Settings, and then configure the SMB signing settings. Make sure that you select the highest SMB version as SMB 3.

Delegated Administration for better organization flexibility and productivity

In modern organizations, IT administrators are often overwhelmed by a sheer number of tasks and responsibilities. QuTS hero h5.1.0 now supports Delegated Administration, which allows administrators to delegate various roles to general users, so that they can perform routine tasks, control their data, manage system resources, and monitor device status even when IT administrators are not available. You can choose from a wide range of roles, including System Management, Application Management, Backup Management, Shared Folder Management, and many more. To ensure system security, we recommend only granting permissions that are essential for performing required tasks.

This feature not only helps reduce the workloads of administrators but also greatly enhances productivity and flexibility for your organization. You can also easily view the roles currently assigned to each user and change their roles anytime according to your needs. To configure these settings, go to Control Panel > Privilege > Delegated Administration. To learn more about Delegated Administration, check QuTS hero h5.1.0 User Guide.

2-step verification and passwordless login for enhanced account security

QuTS hero now supports passwordless login, which replaces your password with a more secure verification method. Instead of entering a password, you can scan a QR code or approve a login request with your mobile device to verify your identify. QuTS hero now also supports more verification methods for 2-step verification. In addition to a security code (TOTP), you can also choose to scan a QR code, approve a login request, or enter an online verification code to add an extra layer of security to protect your NAS account.

To configure these settings, go to the NAS desktop, click your username on the taskbar, and then select Login and Security. You can download and install QNAP Authenticator from App Store or Google Play and pair this mobile app with your NAS to secure your NAS account. Note that you cannot use 2-step verification and passwordless login at the same time.

Centralized NAS management with AMIZ Cloud

You can now add the NAS to an organization when setting up the myQNAPcloud service for your NAS. This allows organization administrators to remotely access, manage, and monitor various system resources on the NAS via AMIZ Cloud, a central cloud management platform designed for QNAP devices.

To manage the NAS via AMIZ Cloud, you must enable AMIZ Cloud Agent in myQNAPcloud. This utility communicates with AMIZ Cloud and collects the data of various resources on your device for analytics purposes without any identifiable person information.

Automatic disk replacement with Predictive Migration before potential failure

Predictive Migration is a major improvement over the original Predictive S.M.A.R.T. Migration feature in Storage & Snapshots. This upgrade now allows users to specify multiple trigger events that prompt the system to automatically replace a disk before it fails.

Besides S.M.A.R.T. warnings, users can also specify trigger events from other monitoring systems such as Western Digital Device Analytics (WDDA), IronWolf Health Management (IHM), DA Drive Analyzer, and SSD estimated remaining life. When a specified trigger event occurs—for example, a disk ‘s Galois WDDA status changes to “Warning” or the SSD estimated remaining life reaches 3%—the system automatically replaces the disk and migrates all its data to a spare disk. This process protects your data better and is safer than manually initiating a full RAID rebuild after the disk fails.

To configure Predictive Migration, go to Storage & Snapshots > Global Settings > Disk Health.

Lists of recent files in File Station for easier file browsing

With the new Recent Files feature in File Station, you can now easily locate files that were recently uploaded, opened, or deleted. These three folders are conveniently grouped together under the Recent File folder at the upper left portion of File Station.

File content search in File Station with Qsirch integration

The original search function in File Station could only search for file names of a specific file type. With the integration of Qsirch into File Station, you can now search for file content using keywords, and also search for multiple file types using these keywords at the same time. To use this feature, you need to install Qsirch, an app that can index the files on your device and greatly facilitate your file search.

Other Changes

Control Panel

  • Users can now configure an individual folder to inherit permissions from its parent folder or to remove the inherited permissions anytime. Users can also make a folder extend its permissions to all its subfolders and files. To configure permission inheritance on a folder, go to Control Panel > Privilege > Shared Folders, and then click the Edit Shared Folder Permissions icon under Action.
  • Added additional specification information for memory slots in Control Panel > System Status > Hardware Information.
  • Changed the behavior and the description of certain permission settings as we do not recommend using the default administrator account “admin”.
  • Optimized the process of restoring the LDAP database.
  • The “Network Recycle Bin” feature has been renamed to “Recycle Bin” in Network & File Services.
  • The automatic firmware update settings have been streamlined with the following changes: – The selectable options for automatic firmware updates have been greatly simplified. Users now select one of three firmware types to automatically update their system with: quality updates, critical updates, or latest updates. – “Security updates” are now “critical updates”. Critical updates include security fixes as well as critical system issue fixes. – “Quality updates” now include security fixes and critical issue fixes in addition to bug fixes.- “Feature updates” are now “latest updates” and include quality and critical updates in addition to new features, enhancements, and bug fixes. – Update notifications no longer need to be enabled separately for each firmware type. Notifications are now either enabled or disabled for all firmware types.
  • The time interval for observing successive failed login attempts can now be configured to be between 0 and 600 minutes. Moreover, a time interval of 0 minutes means that failed login attempts are never reset.
  • You can now include more information from account profiles when importing and exporting user accounts.
  • You can now select the direction to append the custom header for the reverse proxy rule.
  • Users can now edit and enable or disable existing power schedules in Control Panel > System > Power > Power Schedule. Previously, users could only add or remove power schedules.
  • The “Network Recycle Bin” feature has been renamed to “Recycle Bin” in Network & File Services.

Desktop & Login

  • You can now log out of your account on all devices, browsers, and applications at once. To use this feature, go to the desktop, click your username on the taskbar, and then go to Login and Security > Password.
  • Added an icon on the top-right corner of the desktop to indicate whether the device has enabled myQNAPcloud and been associated with a QNAP ID or whether the device has joined AMIZ Cloud.
  • Users can now save their QuTS Hero login credentials in their web browser. To enhance the security of your QuTS Hero user account, we recommend enabling 2-step verification.

App Center

  • Users can now configure a schedule for automatic installations of app updates.

File Station

  • Added prompt banners to remind users to turn on related browsing functions for multimedia files.
  • Enhanced the Background Tasks display UI.
  • Improved File Station performance and enhanced file browsing experience.

Help Center

  • Redesigned the user interface of Help Center for a better user experience.

Initialization

  • You can now purchase licenses during QuTScloud installation.

iSCSI & Fibre Channel

  • Added a new settings page for managing default iSCSI CHAP authentication settings, which you can use for multiple iSCSI targets. You can find these settings in iSCSI & Fibre Channel > Global Settings > Default iSCSI CHAP. When creating or editing a target, you can choose to use the default CHAP settings or configure unique settings for the target.
  • Added the client umask feature to assign default permissions for existing and new files and folders.
  • When creating an iSCSI target, you can now select the network interfaces that an iSCSI target will use for data transmission. Previously, users could only do so after the target was created.

Network & Virtual Switch

  • Network & Virtual Switch can now record event logs when the system identifies conflicting IP addresses between the local device and another device on the same network.
  • Users can now configure the MAC address when creating or modifying a virtual switch.
  • When selecting the system default gateway automatically, you can now configure the checking target by specifying the domain name or IP address.

NFS

  • NFS service now supports both NFSv4 and NFSv4.1 protocols.
  • Users can now set the rcpbind to assign fixed ports to RPC services. Make sure that you configure the firewall rules accordingly to allow connections only on the fixed ports.

PHP System Module

  • Updated the built-in PHP version to 8.2.0.

Resource Monitor

  • Resource Monitor now displays the space used by files created from Qsync file versioning.

SAMBA

  • Updated Samba to version 4.15.
  • You can now aggregate up to 50 shared folders on a Windows network.

Storage & Snapshots

  • Added support for disk failure prediction from ULINK’s DA Drive Analyzer. Registered users of DA Drive Analyzer can now also monitor disk failure prediction statuses in Storage & Snapshots > Storage > Disks/VJBOD > Disks.
  • Added support for Seagate dual-actuator disks. These disks appear with a “Seagate DA” tag in Storage & Snapshots > Storage > Disks/VJBOD > Disks.
  • Added support for Western Digital Device Analytics (WDDA) for Western Digital (WD) disks. To view WDDA information, go to Storage & Snapshots > Storage > Disks/VJBOD > Disks, select a WD disk, and click Health > View Details.
  • Improved the “Enable Read Acceleration” feature so that it not only improves the read performance of new files added to a shared folder (starting in QuTS hero h5.0.1), but also improves the read performance of existing files (starting in QuTS hero h5.1.0). This feature can be enabled for shared folders after upgrading from QuTS hero h5.0.0 or earlier to QuTS hero h5.0.1 or later.
  • Increased the maximum number of disks in RAID-TP from 16 to 24.
  • Redesigned the presentation of disk information into tabular format for enhanced user experience, now viewable in Storage & Snapshots > Storage > Disks/VJBOD > Disks.
  • Renamed the function “Replace & Detach” to “Replace” and added the option for users to choose whether to designate the replaced disk as a spare disk or to detach it from the system.
  • You can now select up to 24 disks for a single RAID-TP group.
  • Encrypted LUNs are now supported in VJBOD, SnapSync, Snapshot Replica, and snapshot import/export operations.
  • Improved the user interface on various snapshot-related screens.
  • Users can now change the destination IP address in Snapshot Replica jobs.
  • Added a new window that automatically appears when you insert new disks and helps you decide what to do with them. You can also access this window any time by going to Storage & Snapshots > Storage > Disks/VJBOD > Disks > More > Manage Free Disks.
  • After rebuilding a RAID group with a spare disk, the failed disk’s slot becomes reserved for a spare disk. To free up this slot for other purposes, go to Storage & Snapshots > Storage > Disks/VJBOD > Disks, select the disk slot, and click Action > Free Up Spare Disk Slot.
  • Users can now enable and disable QNAP SSD Antiwear Leveling (QSAL) on an existing SSD storage pool any time. Richer information is also available for QSAL-enabled pools, including replacement priority recommendation and charts showing the remaining capacity and life of the SSDs in the pool. To configure QSAL or view QSAL information, go to Storage & Snapshots > Storage > Storage/Snapshots, click an SSD storage pool, and then click Manage > QSAL.

System

  • You now need to enter a verification code when resetting your password if you forgot your password. This extra step helps enhance your account security.

Important Note

  • In QuTS Hero h5.0.1 or earlier, users can no longer create new VJBOD disks from a remote NAS if the remote NAS is running QuTS Hero h5.1.0 or later. If there are existing VJBOD disks connections to the remote NAS before it is updated to QuTS Hero h5.1.0 or later, these VJBOD disks are unaffected and remain operational after the update. In QuTS Hero h5.1.0 or later, users can still create VJBOD disks from a remote NAS running QuTS Hero h5.0.1 or earlier.
  • Removed support for CO Video.


Source :
https://www.qnap.com/en/release-notes/quts_hero/overview/h5.1.0

How To Stop Windows From Updating Graphics Drivers

Updated on January 12, 2023

Marlo Strydom

You may have noticed that Windows 10 is very eager to keep your system software up to date. The OS will automatically download and install new drivers for your graphics card, sound card, modem, or other hardware components.

Table Of Contents

While this can be convenient, it also risks breaking previous driver configurations and introducing bugs to your system through the updated driver. 

Here’s how to stop windows from updating graphics drivers:

  1. Click on the Start menu.
  2. Double click on Advanced System Settings.
  3. On the System Properties window, select the Hardware tab.
  4. Select Device Installation Settings.
  5. Save to apply the setting.

In this article, I’ll take you through the quickest way to stop Windows from updating graphics drivers on your computer.

0 of 34 secondsVolume 0%

00:01

00:16

00:34

1. Click on the Start Menu

An open Start Menu in Windows.

The Start menu provides easy access to commonly used programs and system settings. You can click on the Start button from the taskbar or press the Windows key on your keyboard.

The Windows Start Menu (as shown above) should pop up whichever approach you take, allowing you to proceed to the next step.

2. Double click on Advanced System Settings 

Type in advanced system and open advanced system settings.

In the search bar, you can find it in the Windows menu, type in Advanced System, and select Advanced System Settings from the options that appear.

Windows 10 comes with a range of system settings that you can access to control how the operating system and its apps behave. 

3. On the System Properties Window, select the Hardware tab

The Hardware tab in the Advanced System Properties windows is selected.

Windows provides a variety of built-in system properties, which are attributes that describe specific features of the system.

You can view and change these properties on the System Properties window. Specifically, you’ll want to access the Hardware tab, which you can do by selecting it in the menu that pops up.

4. Select Device Installation Settings

Click on the Device Installation Button.

Windows 10 users can now set their device installation settings to receive important updates.

No is selected to stop Windows from updating graphics drivers.

Here, the system will ask you whether you want to automatically download the manufacturer’s apps and custom icons available for your device.

Select No (your device might not work as expected).

5. Save to apply the setting

Hit the Save Changes button to save the settings.

Lastly, click Save to apply the new settings.

Using the Device Installation Settings is one of the easiest ways to prevent your Windows device from automatically updating drivers.

If that doesn’t work, there’s no need to worry. There are a few other alternative solutions you can try.

How to stop Windows from updating graphics drivers in alternative ways

Windows Update automatically downloads and installs software updates that are released from time to time.

These updates introduce new features, fix problems with existing apps, or improve the operating system’s performance.

If you have an OEM computer or a pre-installed version of Windows on your computer, you might not have much control over what updates get installed on your system.

Sometimes these updates can cause stability issues and lead to blue screen crashes.

If this happens to you after installing graphics driver updates, here are some alternative ways to stop Windows from updating graphics drivers in the future:

Stop Automatic Updates through the Local Group Policy Editor

Windows Local Group Policy Editor (LGPE) is a snap-in that can be used to manage local group policy objects on Windows operating systems.

In Windows, the traditional system controller isn’t always enough for managing user settings and other configurations.

Administrators can use the Local Group Policy Editor to: 

  • Manage the operating system and user behavior.
  • Set restrictions on user applications.
  • Control what software the computer can install.
  • Restrict their access to certain programs and folders, and much more. 

In this section, we’ll focus on how to use it to stop Windows from automatically updating graphics drivers.

Exclude driver updates for Windows updates in Group Policy Editor.
  1. Click the Start button on your keyboard.
  2. Copy gpedit.msc and paste it into the search box at the bottom left corner.
  3. Open the Local Group Policy Editor.
  4. Click Computer Configuration.
  5. Navigate to Administrative TemplatesWindows Components.
  6. Scroll down to Windows Update.
  7. Navigate to Do not include drivers with Windows Update and double click.
  8. You should see three options: Not ConfiguredEnabled, and Disabled.
  9. Select Enabled and click on Apply.
  10. Click OK.

Windows will still receive other updates but will exclude drivers from being installed on your computer. In that case, you may have to download and install drivers manually.

Stop graphics drivers update with Windows Registry

The Windows Registry is a central location for storing configuration information and user settings for Windows and its applications.

The registry stores information about user preferences, operating system settings, and application configurations to help your computer run smoothly and efficiently.

The Windows registry is organized into different categories known as keys. Each key stores specific information in the form of values, which are either numbers or text strings.

Create a new folder under the Windows folder in Windows Registry.

Here’s how to use the registry to stop automatic driver updates:

  1. Click the Start button on your keyboard.
  2. Type Regedit on the search box and open the Registry Editor app.
  3. Allow the application to make changes to your computer.
  4. Navigate to HKEY_LOCAL_MACHINE, go to SOFTWARE and scroll down to Policies.
  5. Select Microsoft and right-click Windows.
  6. Select New > Key.
  7. Rename your newly created key, preferably as Windows Updates.
  8. Right-click your newly created key, and go to New > DWORD (32-bit) Value.
  9. Right-click the DWORD and rename it as ExcludeWUDriversInQualityUpdate.
  10. Right-click the new DWORD and select Modify. Set the value data from 0 to 1 and click OK.
Windows key and value added to the Registry to stop Windows updating graphics card driver.

Using the Microsoft Show or Hide Updates Troubleshooter

The Microsoft Show or Hide Updates Troubleshooter is a lightweight, portable tool that can be used to identify and hide problematic updates on your computer.

Unfortunately, if you’re using Windows 10, you’re bound to run into some issues.

You might find yourself in a situation where an update messes up something essential to your workflow.

Perhaps an upcoming update has broken some functionality or compatibility with other programs.

In that case, try the Show or Hide Updates Troubleshooter to block automatic updates for a problematic driver:

  1. Download the Microsoft Show or Hide Updates Troubleshooter.
  2. Run the troubleshooter to select the drivers that will install automatically.
  3. Click Next and wait as the system detects problems.
  4. Select Hide Updates.
  5. Choose your graphics drivers from the list.

Hidden drivers will be temporarily blocked from automatic updates. If this tool does not work, you may always roll back to the previous version of the driver.

In that case, you may have to uninstall the driver, reinstall the previous one, and download it from the vendor’s website.

Troubleshooting graphics drivers on Windows

We don’t normally think of graphics cards as independent units, but if you’re an avid gamer or a professional video editor, you know how important they are in your work.

Graphics drivers are programs that tell your computer how to efficiently operate its graphical user interface (GUI). 

If you recently updated graphics drivers and are experiencing issues with your Windows 10 computer, you may want to revert back to the previous version of the graphics driver.

Updating graphics drivers may differ depending on your system’s manufacturer and graphics card type.

Here are some things to check if you’re having trouble with your graphics driver:

  • Low-performance computer: A slow computer is one of the most common graphics driver issues. While many computers experience some slowdown over time, poor graphics drivers can worsen this issue. Playing games, editing videos, or performing other tasks requiring high graphics levels with problematic graphics drivers is virtually impossible.
  • Display issues: Display issues can be caused by several culprits, including a faulty computer or a faulty graphics driver. While a faulty computer is less likely, a faulty graphics driver is much more common. You can tell that your graphics drivers are not working properly by checking for distorted images, colors that look washed out, or black and white screen issues.
  • Video card issues: A video card is responsible for converting your computer’s instructions into images that appear on your monitor. If your video card is misconfigured or damaged, it can cause various issues, including distorted images, poor color quality, or even a blank or black screen. 
  • Failed driver updates and installs: A failed driver update is one of the most common graphics driver issues. Fortunately, this problem is easy to spot and usually has an easy fix. Download and reinstall your graphics driver.

A graphics driver issue can cause various subsequent problems, including low performance, display issues, and video card issues.

To troubleshoot these issues, start by ensuring that your computer’s display is set up properly. Then, if your computer has display issues, check your computer’s graphics settings.

Check for Windows Updates

Performing Windows updates check and updating Windows.

When looking for potential issues with your Windows 10 computer, don’t forget to check whether any Windows updates are interfering with your graphics drivers.

When your computer installs a Windows update, it may modify the driver file associated with your graphics card, which can cause your computer to malfunction. 

To check for pending Windows updates:

  1. Open the Windows 10 Start Menu
  2. Go to Settings > Update & Security > Windows Update.
  3. Select Check for updates.

Windows users are always at risk of a virus, trojan horse, or other malicious software. Windows updates are the solution to all these issues.

It’s up to you to keep your computer secure. Check for updates regularly and install them as soon as possible to avoid problems that can slow down or crash your computer.

Reinstall the current version of the graphics driver

Uninstalling the device driver in the Device Manager in Windows.

If you’ve recently installed new graphics drivers and are having issues, it might be best to uninstall them and reinstall the older version.

To remove the current graphics driver:

  1. Open the Start Menu and search for Device Manager. You can also open the Control Panel and search for Device Manager
  2. Once there, select Display adapters and right-click the installed graphics driver
  3. Select Properties.
  4. Navigate to the Driver tab.
  5. Select Uninstall Device and reboot your computer.

Once you’ve uninstalled the driver, go back to the manufacturer’s website and download it. Next, check out this video on how to install the driver manually:

YouTube video

Roll back to an earlier version of the graphics driver

If you’ve tried installing a different graphics driver and the issues persist, you can roll back to an earlier version of the driver. 

  1. Open the Device Manager and scroll down to Graphics adapters.
  2. Right-click your installed graphics driver (under Display Adapters) and select Properties
  3. Navigate to the Driver tab.
  4. Select Roll Back Driver and follow the on-screen instructions to return to an earlier version of the graphics driver.

If none of the above solutions work, it may be best to completely uninstall your current graphics driver, restart your computer, and then manually reinstall the latest version of the driver.

Check your Device Manager

If your computer is running slowly and you suspect that the graphics driver may be to blame, one thing to check is the Device Manager.

In the Device Manager, you can see a list of all the hardware installed on your computer. 

If there is a yellow ! or red X next to a device, it means the computer is having some issues with it.

If there is an exclamation mark next to your graphics card, it means there’s a problem with the device driver, which can slow down your computer.

Check for hardware compatibility issue(s) and update(s)

If you recently installed a new driver accompanied by a new device and are experiencing issues when using it, you could be experiencing a hardware compatibility issue.

To check for compatibility issues, you can browse through the supported devices list for the program or device you’re using. 

As for updating the device driver, you should do this to ensure it is compatible with your computer and operating system.

If you’re using a brand-new device, it may not yet have a working third-party graphics driver installed on your computer. Check the manufacturer’s website to see if a compatible version has been released.

Ensure your computer is using the latest software

Last but not least, ensure that your computer has the latest updates. If your computer runs slow or has issues, it could result from the old software.

While some updates are crucial and address important computer security issues, others may create more problems than they solve. 

Windows will automatically prompt you to install new updates when available. However, you might need to check for updates yourself in some instances. 

Installing the latest updates for your computer’s operating system, browser, and other programs keeps your computer safe from cyber criminals who try to exploit outdated software.

Updating software regularly also helps prevent crashes, reduce blue screen errors and increase system performance.

Final thoughts

If you’ve had enough of Windows automatically updating your graphics drivers, the good news is there are several simple solutions to this issue.

By reading through the previous sections, you’ll be able to obtain a much higher control level over your device.

Source :
https://computerinfobits.com/how-to-stop-windows-from-updating-graphics-drivers/

How to use CHATGPT to write a blog post: easy step-by-step guide

By Emily Brookes
Last updated: May 5, 2023

In this article, we’re going to show you how to use ChatGPT to write a blog post. If you’re new to using AI content generators, don’t worry. We will be walking you through the entire process step-by-step.

ChatGPT is a game-changer for marketers and bloggers—in fact, pretty much anyone that does anything online, in fact, ChatGPT can even help you brainstorm. And although it might sound like AI will take everyone’s jobs, we should embrace AI technology and use it to create better content more quickly.

Before we jump into this topic, it’s worth noting here that it is highly likely that OpenAI will be adding a digital watermark to content generated by ChatGPT.

If you intend to publish this content online, you should either rewrite the output in your own words or use a more comprehensive AI writing tool like Jasper to write or rewrite the paragraphs for you, based on the outline and ideas generated by ChatGPT (and check out our thoughts on the future of white-collar work in the age of AI here)

You Can Try Jasper for Free Right Here


CONTENTS[SHOW]

HOW TO USE CHAT GPT TO WRITE A BLOG POST

Writing a blog post is somewhere ChatGPT can excel. But the thing is, it won’t simply produce the perfect blog post at the click of a button. ChatGPT needs detailed instructions to produce good content.

And of course, when it comes to creativity and original ideas, you will still need to add a human touch.

That being said, ChatGPT can be used for pretty much every part of the writing process when guided carefully by a human writer.

Often, blog articles are relatively short and focused pieces that center primarily around one topic. Because of this, Chat GPT will happily suffice for short blog posts on simple topics.

However, a higher standard can often be achieved by augmenting the process with Jasper’s AI writing capabilities.

Here’s how to use ChatGPT to write a blog post.

BRAINSTORM TOPICS AND TITLE IDEAS

Chat GPT has emerged as a useful brainstorming tool. It’s becoming increasingly popular with bloggers and copywriters to help them with writer’s block.

It offers a quick and convenient way of generating relevant topics and title suggestions. To get started, you must create a free account with OpenAI. There is a paid version available, too—ChatGPT Plus.

In this guide, we’re going to be using the free version, but you can use either.

Once you’re signed in, you can enter a prompt in the chat box at the bottom of the page. For example: “Generate 12 new topic ideas and titles for a dog training blog.”

If you’re happy with the generated text, you can move on to the next step. Alternatively, you can also ask ChatGPT to regenerate the response for more ideas.

USE CHATGPT TO HELP YOU WRITE A SOLID OUTLINE

Once you have established a topic, the next step is to use ChatGPT to write an outline for your blog post.

Doing this manually can be a time-consuming process. But the good news is, ChatGPT will make it a lot easier.

It will provide you with a detailed outline which you can then edit or add to yourself with your own ideas.

First, you will need to enter your command into ChatGPT.

Command example: Create a detailed outline for a blog post titled “Mastering Recall: Tips and Techniques for Training Your Dog to Come When Called”.

ChatGPT will then provide you with a detailed outline that you can tweak as needed.

Now that you’ve got an outline, you can either use ChatGPT, or another tool like Jasper to create content for each section of your blog post.

HOW TO USE CHATGPT TO HELP WRITE EACH SECTION OF YOUR BLOG POST

If you want to use ChatGPT to write a blog post, you’re going to need to break down what you want into different sections and categories. That way, you can ask ChatGPT to write each section for you as you go.

After that, you can piece them all together at the end to create a long-form blog post you can publish.

If you’re writing a shorter piece of content of up to 500 words, then technically, you could just ask it to write a whole blog post in one go.

However, in general, breaking this down into sections is the best way to go about this. This will ensure that the topic is covered thoroughly and in the appropriate order.

Doing this is also essential if you want to create long-form content.

ASK CHATGPT TO WRITE YOUR INTRODUCTION

A strong start to any blog post is a must. This is why you want to start by asking ChatGPT to write your introduction for you.

Ask ChatGPT to write an introduction to your blog post.

Example prompt:

Write an introduction for a blog post titled “Mastering Recall: Tips and Techniques for Training Your Dog to Come When Called”.

And here’s what ChatGPT generated based on that prompt:

As you can see, it has done a pretty good job in just a few seconds.

You can now tweak this introduction if required. This is a good time to add your own expertise and introduce yourself as an authority on the topic.

ENTER EACH SUBHEADING IN CHATGPT AS A QUESTION

The next step is to create content for each subheading detailed in your outline.

ChatGPT is designed to be an AI chatbot rather than exclusively an article writer. Because of this, it works well if you enter your prompts as questions.

If you make the headings within your article a question, then you can ask GPT to answer this question for you. Then you can use the answer it generates as a basis for each paragraph of your blog post.

So for the first subheading, “Explanation of the importance of recall training”, you would enter a prompt of “Explain the importance of recall training for dogs”.

ChatGPT will then respond to this prompt, providing another section of your blog post.

Note: If you intend to publish this content online, you should either rewrite the output in your own words. You could also use a more comprehensive tool like Jasper to write or rewrite the paragraphs for you, based on the outline created by ChatGPT.

 Try Jasper Here Free

ASK CHATGPT TO WRITE A CONCLUSION PARAGRAPH

Ending any blog post on a high is a great idea. Once you are certain your blog post has thoroughly covered the topic at hand, it’s time to close things off.

Simply ask ChatGPT to create a conclusion based on the topic you’re already writing about. You can even go one step further and ask it to include things like a call to action or next steps.

You might want to change things a little to ensure your brand and/or name is mentioned. However, asking ChatGPT to write you a conclusion paragraph gives you a solid starting point.

When you start by asking ChatGPT to write you a conclusion, it will tell you that it needs to know the topic of the blog and the main points you have mentioned in the post, so it can conclude your blog post accurately.

REVIEW AND EDIT YOUR BLOG POST

Just because ChatGPT (or indeed any AI writing software) has created a post for you, that doesn’t mean you should use it as it is. It’s important to thoroughly review and edit the content. Make sure that it reads well and keeps in line with your existing brand voice. 

Most people won’t respond well to content they think has been auto-generated, so putting across your voice and ensuring that it sounds in line with the rest of your content is essential.

This is something that you should be double-checking in the review stage of your blog post.

FACT-CHECKING 

ChatGPT’s knowledge generally ends in the latter part of 2021. This means that some of the facts it gives may be outdated and, therefore, inaccurate.

Before you publish a post, while you’re reviewing it, you should make sure that any facts mentioned are accurate and edit them if they’re not.

It’s all well and good having a well-written article, but if the information within it is inaccurate, it could destroy any trust you have built with your readers or audience.

Instead, spend some time checking all of the facts for yourself. This way, you can be sure that the content you are putting out there is going to be well received by its intended audience.

CHECK FOR PLAGIARISM WITH GRAMMARLY

While your text should be unique when generated with ChatGPT, that’s not always true. It’s always a good idea to double-check it. Grammarly is a popular free tool for checking spelling and grammar in written content, and it has a built-in plagiarism checker.

It’s worth spending a couple of minutes copying and pasting your AI-generated content into Grammarly’s Plagiarism Checker just to give it the once over before it goes live.

Get Grammarly Here

IS CHATGPT GOOD FOR BLOGGING?

Overall, ChatGPT is a super useful tool for digital marketers and bloggers to have as part of their content creation toolkit.

You can use it for everything from blog writing to writing a meta description and even generating social media captions. It can also be used for keyword research and to help you generate new keyword ideas.

The main thing to bear in mind is that it’s likely that content generated with ChatGPT is watermarked or soon will be.

This means that Google and other search engines, along with AI content detection tools like Originality.ai, will usually be able to tell if your content is AI-generated.

However, that doesn’t mean you should dismiss ChatGPT altogether. But it does mean you need to be savvy and do what you can to get the most out of the tool.

Teaming up ChatGPT with other tools like Jasper can be a great way to get the most out of your content marketing efforts. This can also help you to get around the potential ‘Watermarking’ issues that you may come across in the future with Chat GPT.

ChatGPT isn’t really designed for long-form content writing, so you probably won’t use it to create entire blog posts in one go. However, there’s nothing to say that facility won’t come in the future. And there are already awesome courses like AI for blogging that are helping students profit from this new technology.

What it does is offer a quick and easy way to get blog post ideas, expand on ideas you already have, and even get an idea of what other people might be writing about within your niche.

You can then use the information you have gathered from ChatGPT in Jasper to create a unique, high-quality long-form blog post that you would be proud to publish on your platform.

Try Jasper Here Free

Source :
https://www.nichepursuits.com/how-to-use-chatgpt-to-write-a-blog-post/

Credential-Stealing Server Side Request Forgery Patched in Getwid

Ram Gall
June 6, 2023

On April 6, 2023, the Wordfence Threat Intelligence team initiated the responsible disclosure process for two vulnerabilities in Getwid – Gutenberg Blocks, a plugin installed on over 50,000 WordPress sites. The plugin’s developers responded immediately, and we sent over the full disclosure the same day. A patched version of the plugin, 1.8.4, was released on April 13, 2023.

The most serious vulnerability had a high severity because it allows authenticated users to perform Server Side Request Forgery (SSRF), which can result in full access to the hosted instance on some cloud configurations. Additionally, it may allow further penetration into internal networks in some enterprise configurations. The other vulnerability is much lower in severity and allows authenticated users to clear and update the site’s template cache.

Wordfence PremiumWordfence Care, and Wordfence Response customers received a firewall rule protecting against the Server Side Request Forgery (SSRF) on April 6, 2023. Wordfence Free users received the same protection on May 6, 2023.

Vulnerability Summary from Wordfence Intelligence

Description: Getwid – Gutenberg Blocks <= 1.8.3 – Authenticated(Subscriber+) Server Side Request Forgery
Affected Plugin: Getwid – Gutenberg Blocks
Plugin Slug: getwid
Affected Versions: <= 1.8.3
CVE ID: CVE-2023-1895
CVSS Score: 8.8 (High)
CVSS Vector: CVSS:3.1/AV:N/AC:L/PR:L/UI:N/S:C/C:H/I:L/A:N
Researcher/s: Ramuel Gall
Fully Patched Version: 1.8.4

The Getwid – Gutenberg Blocks plugin for WordPress is vulnerable to Server Side Request Forgery via the get_remote_content REST API endpoint in versions up to, and including, 1.8.3. This can allow authenticated attackers with subscriber-level permissions or above to make web requests to arbitrary locations originating from the web application and can be used to query and modify information from internal services.

Description: Getwid – Gutenberg Blocks <= 1.8.3 – Improper Authorization via get_remote_templates REST endpoint
Affected Plugin: Getwid – Gutenberg Blocks
Plugin Slug: getwid
Affected Versions: <= 1.8.3
CVE ID: CVE-2023-1910
CVSS Score: 4.3 (Medium)
CVSS Vector: CVSS:3.1/AV:N/AC:L/PR:L/UI:N/S:U/C:N/I:L/A:N
Researcher/s: Ramuel Gall
Fully Patched Version: 1.8.4

The Getwid – Gutenberg Blocks plugin for WordPress is vulnerable to unauthorized modification of data due to an insufficient capability check on the get_remote_templates function in versions up to, and including, 1.8.3. This makes it possible for authenticated attackers with subscriber-level permissions or above to flush the remote template cache. Cached template information can also be accessed via this endpoint but these are not considered sensitive as they are publicly accessible from the developer’s site.

Technical Analysis

Getwid – Gutenberg Blocks is a plugin offering a library of pre-generated blocks which it makes available to plugin users and retrieves remotely from the developer’s server. Unfortunately, this remote retrieval functionality, which utilized the REST API, only required an authenticated user in vulnerable versions, meaning that even subscriber-level users could make use of it.

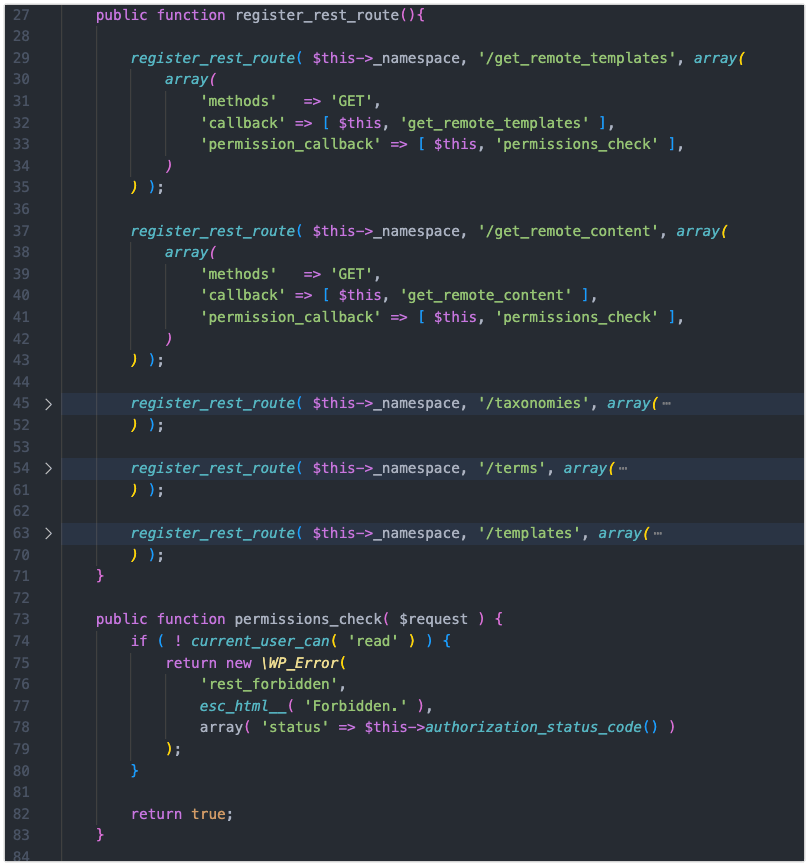
While the rest routes for both vulnerabilities used a capability check in the permissions_check function, the capability checked was read, which all users, even subscribers, are assigned.

code block showing REST route registration
Pictured: The REST API Endpoints and the permissions_check function

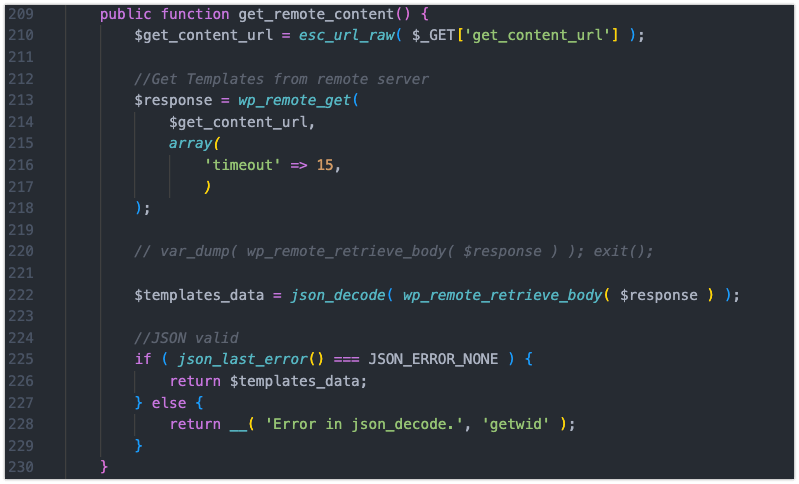
On its own this was not a significant issue, but the get_remote_content function also failed to validate the URL passed in, meaning it could be used to retrieve information from any location via the server.

code block showing the get_remote_content function
Pictured: The get_remote_content function

Only GET requests can be performed and the response data will only be rendered if it is JSON-formatted. However, sites hosted on Amazon AWS EC2 instances all have an endpoint which can be accessed internally and returns JSON-formatted credentials that can be used to access the instance.


Pictured: EC2 Credentials on a test box retrieved using this exploit. Click on the image to see it at full size

Sites running on AWS EC2 instances using IMDS (Instance Metadata Service) version 1 are vulnerable to this attack, while IMDSv2 offers preventative measures that prevent successful exploitation.

The second issue was significantly less severe and made use of the minimal capability check on the ‘get_remote_templates’ function. While this would likely have minimal impact on a site, it still compromises the site’s integrity to some extent.

Disclosure Timeline

April 6, 2023 – The Wordfence Threat Intelligence team releases a firewall rule to Wordfence PremiumWordfence Care, and Wordfence Response users and begins the responsible disclosure process. We send over the full disclosure to the developers.
April 13, 2023 – The plugin developers release a patch in version 1.8.4 of Getwid.
May 6, 2023 – Wordfence Free users receive the firewall rule.

Conclusion

In this blog post, we detailed a Server Side Request Forgery (SSRF) vulnerability in Getwid version 1.8.3 and earlier. This vulnerability allows authenticated attackers with subscriber-level permissions or higher to send arbitrary GET requests from the website, which can be used to obtain critically sensitive information in some configurations. We also described a lower-severity vulnerability allowing subscribers to clear the local template cache.

Wordfence PremiumWordfence Care, and Wordfence Response users received a firewall rule to protect against any exploits targeting the SSRF vulnerability on April 6, 2023. Sites still using the free version of Wordfence received the same protection on May 6, 2023.

If you know someone who uses this plugin on their site, we recommend sharing this advisory with them to ensure their site remains secure, as the SSRF vulnerability poses a significant risk. If you or someone you know is hosted on AWS we also highly recommend migrating to IMDSv2 if you have not already, as it offers protection from not only this but the vast majority of SSRF vulnerabilities.

For security researchers looking to disclose vulnerabilities responsibly and obtain a CVE ID, you can submit your findings to Wordfence Intelligence and potentially earn a spot on our leaderboard.

Did you enjoy this post? Share it!

Source :
https://www.wordfence.com/blog/2023/06/credential-stealing-server-side-request-forgery-patched-in-getwid/

Critical Security Update: Directorist WordPress Plugin Patches Two High-risk Vulnerabilities

Alex Thomas – June 7, 2023

Alongside our usual work to discover, report, and remediate vulnerabilities in the WordPress ecosystem, the WordPress Threat Intelligence team has been conducting a deep-dive into WordPress plugin code with the objective of finding methods to bypass authentication and gain elevated privileges in WordPress plugins so we can help developers patch these vulnerabilities before threat actors can exploit them.

One such plugin we examined recently is Directorist, a popular tool used by over 10,000 WordPress sites to manage directory listings and classified ads.

On April 3, 2023, our team uncovered two significant vulnerabilities – an Arbitrary User Password Reset to Privilege Escalation, and an Insecure Direct Object Reference leading to Arbitrary Post Deletion. Both vulnerabilities were found to affect Directorist versions 7.5.4 and earlier.

Wordfence PremiumWordfence Care, and Wordfence Response customers received a firewall rule to protect against any exploits targeting these vulnerabilities on April 4, 2023. Sites still using the free version of Wordfence received the same protection on May 4, 2023.

Unfortunately, on June 1, 2023, the plugin was closed due to developer unresponsiveness, and it currently remains unavailable for download from the repository. This presents an issue as site owners are unable to request an update directly via their WordPress dashboard. Given this situation, we advise site owners to either temporarily uninstall the plugin, or manually download the patched version, 7.5.5, and upload it to their sites for optimal protection. For this reason, we have intentionally kept specific vulnerability details to a minimum in this post.

Vulnerability Summaries from Wordfence Intelligence

Authenticated (Subscriber+) Arbitrary User Password Reset to Privilege Escalation

Affected Software: Directorist – WordPress Business Directory Plugin with Classified Ads Listings
Affected Versions: <= 7.5.4
CVE ID: CVE-2023-1888
CVSS Score: 8.8 (High)
CVSS Vector: CVSS:3.1/AV:N/AC:L/PR:L/UI:N/S:U/C:H/I:H/A:H
Researcher: Alex Thomas
Fully Patched Version: 7.5.5

The Directorist plugin for WordPress is vulnerable to an arbitrary user password reset in versions up to, and including, 7.5.4. This is due to a lack of validation checks within login.php. This makes it possible for authenticated attackers, with subscriber-level permissions and above, to reset the password of an arbitrary user and gain elevated (e.g., administrator) privileges.

Authenticated (Subscriber+) Insecure Direct Object Reference to Arbitrary Post Deletion in listing_task

Affected Software: Directorist – WordPress Business Directory Plugin with Classified Ads Listings
Affected Versions: <= 7.5.4
CVE ID: CVE-2023-1889
CVSS Score: 7.2 (High)
CVSS Vector: CVSS:3.1/AV:N/AC:L/PR:L/UI:N/S:U/C:N/I:H/A:N
Researcher: Alex Thomas
Fully Patched Version: 7.5.5

The Directorist plugin for WordPress is vulnerable to an Insecure Direct Object Reference in versions up to, and including, 7.5.4. This is due to improper validation and authorization checks within the listing_task function. This makes it possible for authenticated attackers, with subscriber-level permissions and above, to delete arbitrary posts.

Technical Analysis

Password Reset Vulnerability

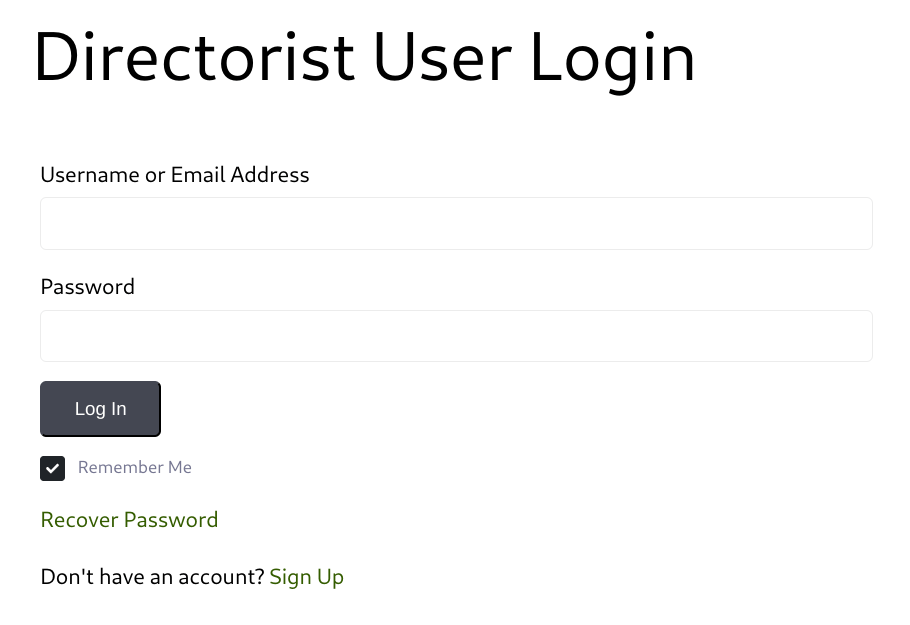
Directorist, created by wpWax, is designed to help businesses establish directory listings and classified ads on their WordPress sites. It includes a Login and Registration form that can be enabled using the [directorist_user_login] shortcode.


The Directorist Login and Registration form

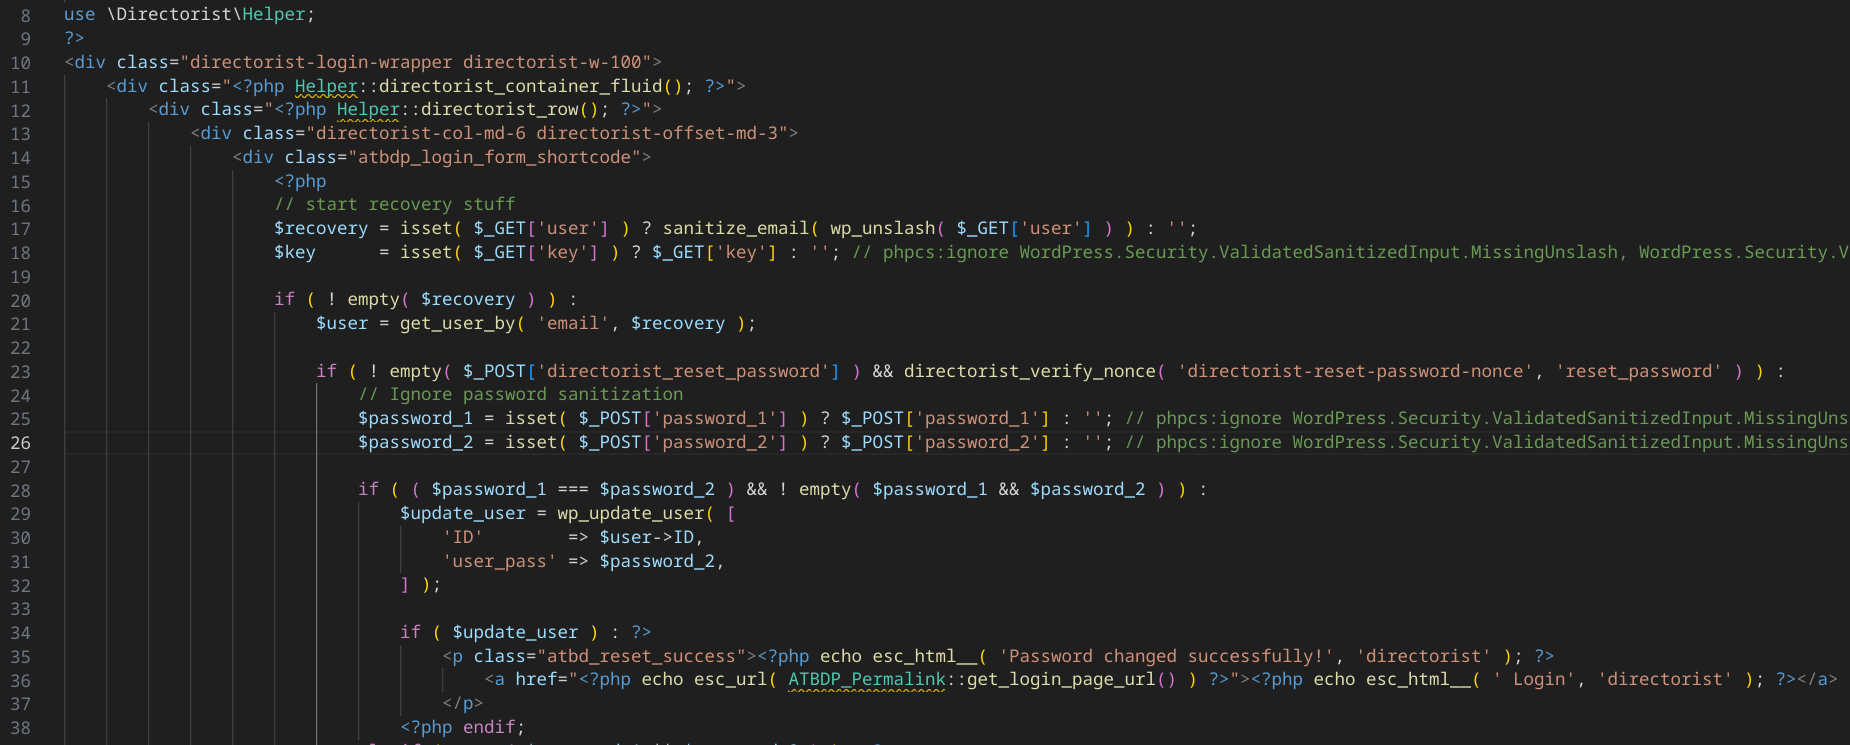
This form features a “Recover Password” function, akin to the default WordPress “lost your password?” feature. In vulnerable versions, the underlying code lacks essential validation checks to ensure that the user attempting to reset a password is indeed the account owner. This could allow attackers with subscriber-level permissions or higher to reset the passwords of other users, including administrators, thereby gaining unauthorized elevated privileges and taking over the site.


Directorist “Recover Password” logic

Arbitrary Post Deletion Vulnerability

In addition, we found an arbitrary post deletion vulnerability in the plugin. Directorist listings are essentially custom WordPress posts. In vulnerable versions, the code designed to manage listing deletions lacks the necessary authorization checks to confirm the user is permitted to delete the listing and does not verify that the post being deleted is a Directorist listing. Consequently, this could enable threat actors with subscriber-level and above permissions to delete any post on a WordPress instance, including posts by administrators.


Directorist directory listing deletion logic

Disclosure Timeline

April 3, 2023 – The Wordfence Threat Intelligence team discovers and documents two vulnerabilities in Directorist.
April 4, 2023 – The Wordfence Threat Intelligence team releases firewall rules to Wordfence Premium, Wordfence Care, and Wordfence Response users and begins the responsible disclosure process.
May 4, 2023 – Wordfence Free users receive the firewall rules.
June 1, 2023 – The plugin developers release a patch in version 7.5.5 of Directorist.

Conclusion

In this blog post, we reviewed two vulnerabilities in our ongoing vulnerability research focused on bypassing authentication and gaining elevated privileges – an Arbitrary User Password Reset to Privilege Escalation that allows threat actors to gain full control of a WordPress instance, and a less-severe Insecure Direct Object Reference to Arbitrary Post Deletion, both in Directorist versions 7.5.4 and prior.

The Wordfence Threat Intelligence team reported these vulnerabilities to the Directorist team on April 4, 2023, following responsible disclosure protocols. The Directorist team addressed these vulnerabilities and released the patch in Directorist version 7.5.5 on June 1, 2023.

We recommend all users update their Directorist plugin to the newest version available, which is 7.5.5 at the time of this writing, immediately to secure their websites.

Wordfence PremiumWordfence Care, and Wordfence Response customers received a firewall rule to protect against any exploits targeting these vulnerabilities on April 4, 2023. Sites still using the free version of Wordfence received the same protection on May 4, 2023.

If you know someone who uses this plugin on their site, we recommend sharing this advisory with them to ensure their site remains secure, as these vulnerabilities pose a significant risk.

For security researchers looking to disclose vulnerabilities responsibly and obtain a CVE ID, you can submit your findings to Wordfence Intelligence and potentially earn a spot on our leaderboard.

Did you enjoy this post? Share it!

Source :
https://www.wordfence.com/blog/2023/06/critical-security-update-directorist-wordpress-plugin-patches-two-high-risk-vulnerabilities/

PSWindowsupdate: Automated Windows Updates with PowerShell

brandon.lee 02 June 2023

The process to install Windows Updates can be a pain. Managing WSUS servers can be a headache too. However, with PowerShell, a special module, and some automation, we can schedule and automate the installation process of Windows Updates. Let’s look at PSWindowsupdate automated Windows Updates with PowerShell and see how it can come to the rescue for keeping your Windows environment up-to-date.

Table of contents

What is PSWindowsUpdate?

PSWindowsUpdate is a PowerShell third-party module found in the PowerShell gallery repository available for download designed to help administrators manage Windows updates and install updates flexibly and precisely.

Unlike the standard Windows Update Service Manager (WSUS) interface, the PSWindowsUpdate module provides commands for downloading, installing, and managing updates in an automated way. However, it can work in conjunction with WSUS or pull updates directly from Microsoft.

Admins can control every aspect of Windows updates with this module – from viewing available updates and initiating installations to setting update schedules. It includes advanced features like installing specific updates, managing hidden updates, or even automating the entire update process using the Windows Task Scheduler.

Why is Installing Windows Updates Important?

Before diving into the PSWindowsupdate module, why is installing Windows updates important? Installing Windows updates is essential to maintaining a secure and stable system. These updates often contain security patches that protect your systems from vulnerabilities and threats. By regularly installing these updates, you’re ensuring your system’s defenses are up-to-date.

Updates also introduce new features, improve system stability, and fix existing system and software bugs. This can lead to better performance, fewer errors, and a smoother overall user experience. As such, regular updates can go a long way in minimizing downtime and reducing the need for troubleshooting.

If you are a system administrator, it may seem like a headache to patch systems constantly. However, you will thank yourself later for having a fully patched system when the next ransomware variant takes advantage of known patched vulnerabilities. Also, if you are looking at introducing any new integration or software into the environment, it is always best practice to be on the latest version of Windows, patches installed, etc.

Installing the PSWindowsUpdate Module

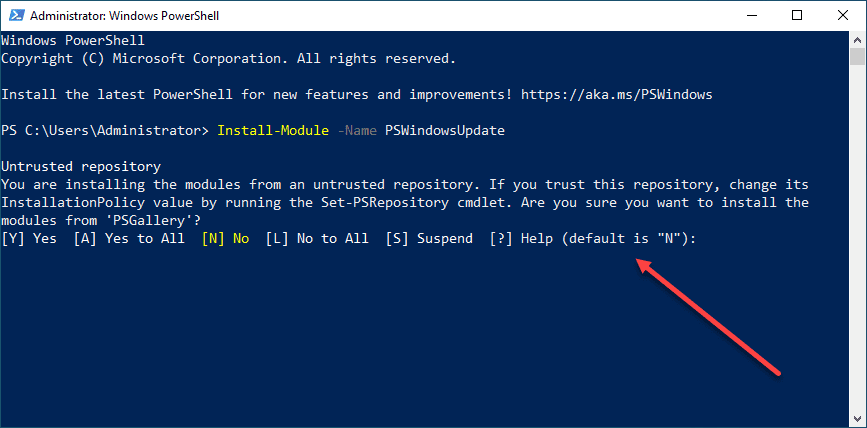
The installation process for the PSWindowsUpdate module starts with the command line in your PowerShell console. You need to install the module from the PowerShell gallery by typing:

Install-Module -Name PSWindowsUpdate

This command will download and install the module on your local system. However, it’s critical to note that you may need administrator privileges to install modules. Open the PowerShell prompt as an admin and run the command.

You will be prompted to trust the untrusted repository, which is normal.

Installing the PSWindowsupdate PowerShell module

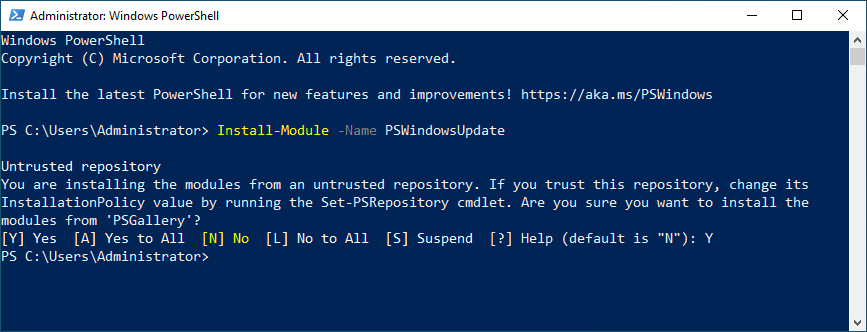
Type “Y” to trust the PSGallery repository.

Accept the untrusted repository to install the module

Importing the PSWindowsUpdate Module

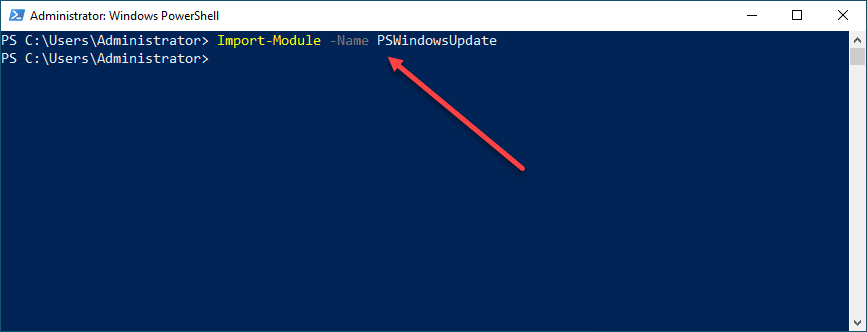
Once installed, you need to import the module PSWindowsUpdate to begin using it. Use the following command:

Import-Module -Name PSWindowsUpdate

It loads the module into your active PowerShell session, making the related cmdlets available for use.

Importing the module in PowerShell

Checking for Available Updates

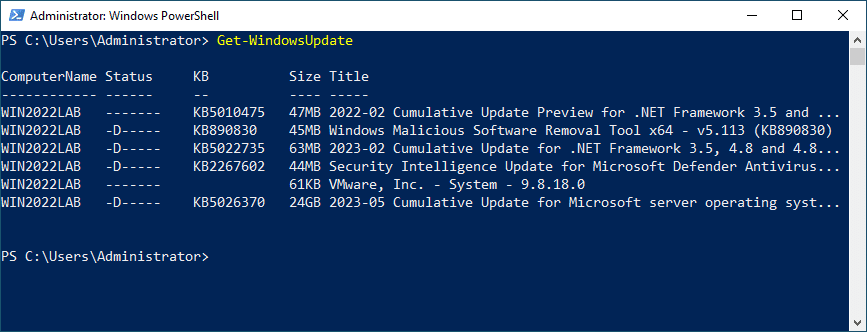
Upon successful import of the PSWindowsUpdate module, you can quickly check for available updates using the command:

Get-WindowsUpdate

This command will query your machine’s Windows Update Client settings and connect to the Microsoft Update servers to fetch the list of all available updates. You can see critical updates, security updates, and all other types of updates that your system can download and install.

Using the Get WindowsUpdate to see available updates

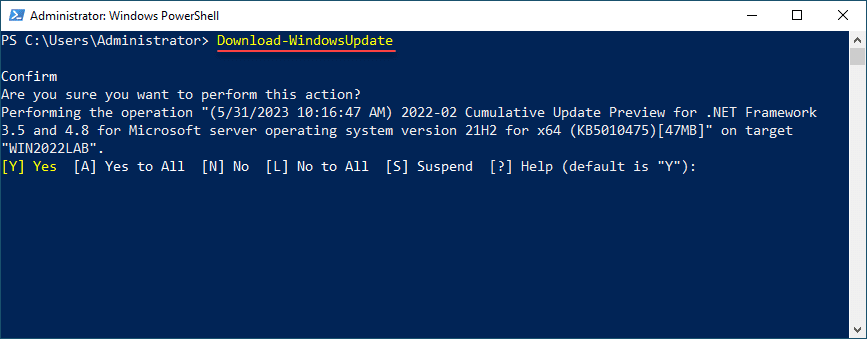
Downloading Windows Updates

The PSWindowsUpdate module offers the command:

Download-WindowsUpdate

Use this to download Windows updates. Depending on your settings, this command initiates the download process for all approved updates from the Windows Server Update Service (WSUS) or Microsoft Update.

Download Windows Update with PowerShell

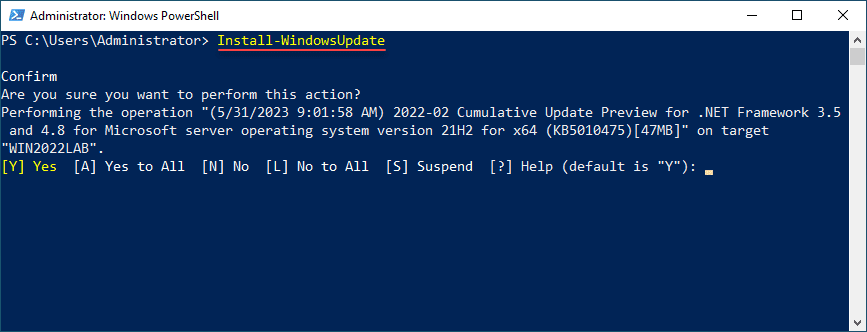
Installing Windows Updates

With the updates downloaded, you can install them using the ‘Install-WindowsUpdate‘ command. This command installs all downloaded updates, following which your system might need to reboot.

Install-WindowsUpdate
Running the Install WindowsUpdate command

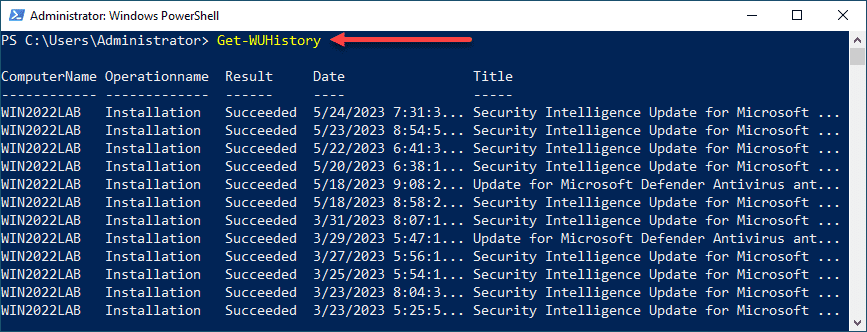
Managing Windows Update History

The PSWindowsUpdate module provides an opportunity to access your system’s update history. You can use the ‘Get-WUHistory‘ command to get a detailed log of all installed updates.

Get-WUHistory

This command returns a detailed list, including the KB number, update title, and the status of the installed updates.

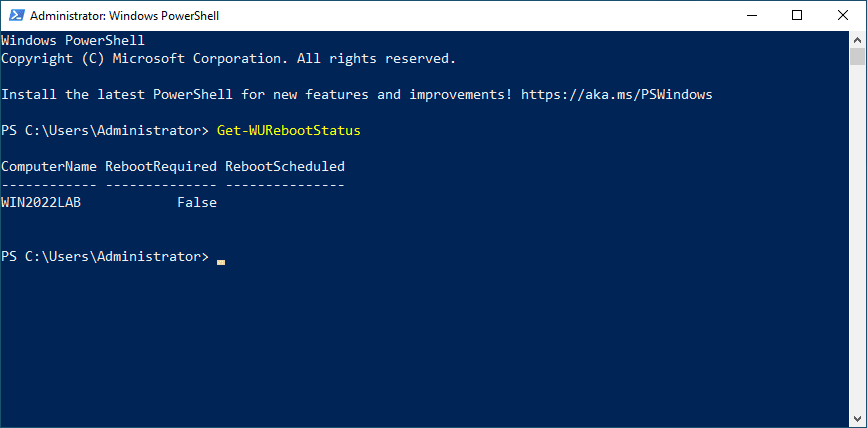
Get the reboot status of your Windows Server

Customizing Update Installation with an XML File

Advanced users might appreciate the ability to customize update installations using XML files. These files can specify category names to include or exclude from the update process. You can also use them to specify whether to include or exclude updates marked for automatic installation.

Scheduling Updates with Task Scheduler

In many environments, you may want to run the PSWindowsupdate command in an automated way. One way you can do this is by leveraging the power of the Windows Task Scheduler in conjunction with the PSWindowsUpdate module.

Using this combination, you can automate the download and install process at specific intervals, ensuring your system stays updated without manual intervention. We will take a look below at a script you can schedule with the Task Manager to run on a regular interval.

Installing Specific Updates

You can install specific updates using their unique KB number with the Install-WindowsUpdate command. For example, suppose you only want to install the update with the KB number KB4012606, you can do so with the following command:

Install-WindowsUpdate -KBArticleID KB4012606 -AcceptAll -AutoReboot

This command will only install the specified update and perform an automatic reboot if necessary.

Installing Only Security Updates

If you wish only to install security updates, you can do so with the following command:

Get-WindowsUpdate -Category 'SecurityUpdates' | Install-WindowsUpdate

This command first fetches only the security updates and then pipes them into the Install-WindowsUpdate command, installing only the security updates.

Hiding Specific Updates

There may be times when you want to hide a problematic update. If you want to hide Windows updates, maybe because it’s causing issues on your system, you can do so with the Hide-WindowsUpdate command. Suppose you want to hide the update with the KB number KB4012606, you can do so with the following command:

Hide-WindowsUpdate -KBArticleID KB4012606

This command will hide the specified update, preventing it from appearing in future searches for updates.

Checking if a Reboot is Required

You may want to see if there is a pending reboot required. If you want to check if a reboot is required after installing updates, you can do so with the Get-WURebootStatus command like so:

Get-WURebootStatus

This command will check and let you know if any installed updates require a reboot.

In the example, replace the placeholder KB numbers in the commands with the actual KB number of the update you’re interested in. Also, always ensure to run these commands in a safe and controlled environment, particularly when executing them on production systems or remote computers.

Get Windows Update history using PSWindowsupdate

Automate Windows Updates using PSWindowsUpdate

Automation is one of the powerful features of PowerShell and by extension, the PSWindowsUpdate module. In this section, we’ll cover an example of how to write a script for automating Windows updates using PSWindowsUpdate.

# Import the PSWindowsUpdate module
Import-Module PSWindowsUpdate

# Get all available updates
$updates = Get-WindowsUpdate -MicrosoftUpdate

# Filter out optional updates
$importantUpdates = $updates | Where-Object {$_.IsDownloaded -eq $true -and $_.IsMandatory -eq $true}

# Install important updates
$importantUpdates | Install-WindowsUpdate -AcceptAll -AutoReboot

In this script, we first import the PSWindowsUpdate module. We then fetch all available updates using Get-WindowsUpdate. Using Where-Object, we filter out only the important (mandatory and already downloaded) updates, ignoring the optional ones. Lastly, we install these important updates using Install-WindowsUpdate, automatically accepting EULAs and rebooting if necessary.

You can automate the execution of this script using Task Scheduler. Here’s a basic example of how you can do this:

  1. Open Task Scheduler and create a new task.
  2. In the Triggers tab, set the schedule for the task according to your needs (for example, daily at 3 AM).
  3. In the Actions tab, select ‘Start a program’ and input powershell.exe as the program.
  4. In the ‘Add arguments’ field, input -ExecutionPolicy Bypass -File “c:your script file path.ps1” where <your script file path> is the path to your PowerShell script.
  5. Finish the wizard and the task will be scheduled.

Remember to replace the path to the script with the actual path of your script file. The system will automatically execute the update script at the specified time.

This script and scheduling are basic examples. You may need to modify the script and task parameters according to your specific requirements, such as filtering updates based on criteria or sending a report by email after installation.

Also, be sure to test these scripts in a safe and controlled environment before deploying them in production, especially when executing them on remote computers.

PSWindowsupdate Frequently Asked Questions

Can I use the PSWindowsUpdate module to manage updates on remote computers?

Using the PSWindowsUpdate module, you can manage updates both locally and on remote computers. You must ensure you have all the necessary permissions as you would normally to administer and manage a remote machine.

Can I automate the update process using the PSWindowsUpdate module?

One of the strong suits of the PSWindowsUpdate module is the ability you have to automate the process of applying Windows Updates. You can easily create a simple PowerShell script to download and install Windows Updates. It can also apply various logic such as hiding updates, downloading only certain types of updates, etc. Using Task Scheduler, it is easy to have a way to trigger the automation of PSWindowsUpdate.

How do I view hidden updates using PSWindowsUpdate?

You can use the Get-WUHiddenUpdate command to view all hidden updates on your system. If you wish to unhide an update, use the UnHide-WindowsUpdate command with the appropriate KB number.

How can I install specific categories of updates using the PSWindowsUpdate module?

You can filter updates based on a particular category using PSWindowsUpdate. It is common to see administrators only install the “security updates” available for an operating system. You can easily accomplish this with the following command:

Get-WindowsUpdate -Category 'SecurityUpdates' | Install-WindowsUpdate.

Wrapping up

The PSWindowsUpdate module is a great way for system administrators to manage single or multiple Windows servers using a fully automated solution built on top of PowerShell. It provides many capabilities that give you full control over the Windows Update service. You can use it to review available updates, download approved updates, or manage the update history. The PSWindowsupdate PowerShell module can help streamline your system’s update process, including all Windows PCs and Servers across the board.

Fixing WSUS – When the Best Defense is a Good Offense

By Johan Arwidmark / April 12, 2018

This week started pretty harsh, a ton of customers reaching out to our team having WSUS issues. Everything from the “traditional” CPU and Memory spikes, to severe network traffic over port 8530 to the WSUS/SUP server. Basically Clients downloading massive amount of info, some customers reporting up to 700 MB per endpoint.

Note #1: One ongoing issue right now seem to be that the Windows version next updates contains a ton of metadata, causing a massive headache for WSUS admins. See below for scripts to help cleanup the mess, and to perform needed maintenance tasks. Also, if you are missing some info here, let me know. I’m @jarwidmark on Twitter.

WARNING: Whatever solution you pick for the maintenance of your WSUS/SUP server, ensure that you do not sync your WSUS/SUP during the maintenance process!

WSUS Housekeeping

Until Microsoft replaces WSUS with something better, you have to do some housekeeping for WSUS to behave. Your mileage is going to vary, but you simply have to keep the WSUS database in shape, as well as declining unused updates. Here are a few resources that can help when WSUS goes bad.

Update:
The network traffic from WSUS can also be heavily loaded due an out-dated Microsoft Compatibility Appraiser version on the machines. See this KB:

Unexpected high network bandwidth consumption when clients scan for updates from local WSUS server
http://support.microsoft.com/en-us/help/4163525/high-bandwidth-use-when-clients-scan-for-updates-from-local-wsus-serve

I have also published a PowerShell script you can run, either via remote PowerShell, or via the “Run Script” feature in ConfigMgr:

Checking the Microsoft Compatibility Appraiser version to prevent unwanted network traffic
https://deploymentresearch.com/666/Checking-the-Microsoft-Compatibility-Appraiser-version-to-prevent-unwanted-network-traffic

Step 1 – Buy you some time

When all 8 CPU’s on your site site server are constantly at 95-100 percent, there is little room for any admin work, nor cleanup. So make sure to throttle CPU on the WsusPool application pool, to give you some working room.

image
WsusPool application pool.

Here is a good write-up of the preceding steps.

ConfigMgr Software Update Point: Out-of-Control App Pool
http://www.windowsmanagementexperts.com/configmgr-software-update-point-out-of-control-app-pool/configmgr-software-update-point-out-of-control-app-pool.htm

Step 2 – More application pool settings, and the WSUS web.config file

Next step is to configure everything else in the application pool, together with the web.config file. I was lazy so I “borrowed” some settings from Sherry’s post below, and added them to a PowerShell script: http://github.com/DeploymentResearch/DRFiles/blob/master/Scripts/Invoke-WSUSConfiguration.ps1

The script came from a series of ConfigMgr Configuration Items posted by Sherry Kissinger 

WSUS Administration, WSUSPool, web.config, settings enforcement via Configuration Items
http://www.mnscug.org/blogs/sherry-kissinger/512-wsus-administration-wsuspool-web-config-settings-enforcement-via-configuration-items    

Step 3 – Decline weird stuff

Use any or all of the listed solutions to get rid of junk in your WSUS database:

Tip: Before starting to run decline scripts, PowerShell / SQL etc., make sure your SUSDB is not heavily fragmented. Use the Maintenance Solution from Ola Hallengren to optimize the SUSDB indexes: http://ola.hallengren.com/

Optional Speed Tip: If you don’t mind going totally unsupported, you can create additional indexes in the WSUS database that speeds up the cleanup dramatically. More info here: http://kickthatcomputer.wordpress.com/2017/08/15/wsus-delete-obsolete-updates, a great post by Scott Williams (@ip1). Again, not supported by Microsoft so don’t blame me if something happens 🙂 Fun fact: In my environment that change made the deletions go 30 times faster!!!
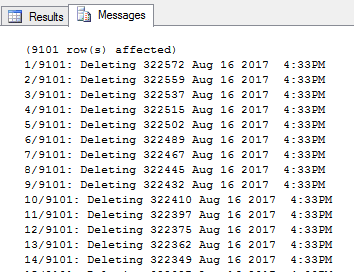
Here is a copy of the “code”: http://github.com/DeploymentResearch/DRFiles/blob/master/Scripts/Create-WSUS-Index.sql

Decline weird stuff #1 – Fully Automate Software Update Maintenance in Configuration Manager

As the title implies, a script that automates software updates, including cleanup, optimization and more. Written by Bryan Dam (@bdam555).
https://damgoodadmin.com/2017/11/05/fully-automate-software-update-maintenance-in-cm/

Update April 17, 2018: Bryan recently updated the script to support standalone WSUS too, below you find a sample syntax for that:

.\Invoke-DGASoftwareUpdateMaintenance.ps1 -UpdateListOutputFile .\UpdateListOutputFile.csv -StandaloneWSUS WSUS01 -RunCleanUpWizard -DeclineSuperseded -DeclineByTitle @('*Itanium*','*ia64*','*Beta*') -DeclineByPlugins -Force

Decline weird stuff #2 – SQL Cleanup scripts

Some shiny SQL scripts from paul salwey @psalwey

Especially checkout the WSUSSQLMaintenance_4_DeclineUpdates_XML_Lengthover5000.sql one. I had not seen that before.

http://drive.google.com/drive/folders/11dNPRZgqlultZql7rVHZZm3Dom8eKlVJ

Tip on usage:

  1. Reindex
  2. Obsolete script
  3. Superseded script
  4. XML script
  5. Reindex again
  6. Reboot server

Tip #1:  If you have a lot of obsolete updates (Script 2.), consider using an alternate version below that runs in batches, and also shows total number of updates. The script is from Scott Williams (see Resource #6 further down this post). I just added a comment on where to change the batch numbers.

http://github.com/DeploymentResearch/DRFiles/blob/master/Scripts/WSUSSQLMaintenance_2_RemoveObsoleteUpdates_BatchVersion.sql

Tip #2: If you just want to quickly see how many obsolete updates you have, use this script:

http://github.com/DeploymentResearch/DRFiles/blob/master/Scripts/Get-WSUSObsoleteUpdatesNumber.sql

Tip #3: Benjamin Reynolds (@SqlBenjamin), with Microsoft, has put together a combination of creating indexes for speed with a more optimized version of cleaning up obsolete updates, and Steve Thompson (@Steve_TSQL), has it all explained and published here: http://stevethompsonmvp.wordpress.com/2018/05/01/enhancing-wsus-database-cleanup-performance-sql-script/

Decline weird stuff #3 – Decline Updates Script by Jeff Carreon

In the same post as the SQL script to view updates with large metadata (In the “Additional Resources” section” further down this post), you find a great decline update scripts by Jeff Carreon (@jeffctangsoo10). It’s in the same post as the SQL script, but kind of hidden if you don’t look carefully. Here is a direct link:

https://www.tcsmug.org/images/carryon/Run-DeclineUpdate-CleanupV5.zip

By default the script run in “What-If” mode ($TrialRun set to $True). Here is a syntax to run it in declining mode, without sending an email report:  

.\Run-DeclineUpdate-CleanupV3.ps1 -Servers CM01 -TrialRun:$false -EmailReport:$false

Decline weird stuff #4 – WSUS Automated Maintenance (Formerly Adamj Clean-WSUS

I have not personally tested this one, but the community seems to like it quite a bit. Cleanup and DB script from Adam Marshall (@Adamj_1)

http://community.spiceworks.com/scripts/show/2998-wsus-automated-maintenance-formerly-adamj-clean-wsus

Additional Resources

Here follows some additional resources that I found useful:

Resource #1 – Script to view updates with large metadata

Here is another contribution from Sherry’s team. This SQL script was put together by Jeff Carreon, after working with Microsoft support on a WSUS performance issue. Very shiny.

The script is used to identify and measure the metadata that the clients are downloading, it tells you what articles (fancy word for update metadata) the are deployable and the size of each article.

What’s SUP???

http://mnscug.org/blogs/jeff-carreon/513-what-s-sup

Resource #2 – The complete guide to Microsoft WSUS and Configuration Manager SUP maintenance

Info from Microsoft. The title is a bit misleading, since it’s not actually a complete guide. But there is still lots of good info.

http://blogs.technet.microsoft.com/configurationmgr/2016/01/26/the-complete-guide-to-microsoft-wsus-and-configuration-manager-sup-maintenance/

Resource #3 – Clients cannot report Scan Results back to WSUS

During the day, Matthew Krause (@MatthewT_Krause) also provided info on an issue he was having: Quite many clients, 75 percent out of 6500,were not reporting back the scan results to WSUS. Basically the server got overloaded with IIS 500 errors as the clients kept trying to report scan results, fail, and then try again. In the WindowsUpdate.log on the client they found that clients would get the error message stating invalid parameter but the sub message was Message:parameters.InstalledNonLeafUpdateIDs (see below).

6G6vXV6c

WindowsUpdate.log on a client failing to report back scan results.

So if you are running into the non-leaf error message, one solution that proved to be working was changing the maxInstalledPrerequisites value in the WSUS Web.config file, and then do an IIS Reset. Doing this change made 90% of clients report scan results back within one day for this environment.

Change WSUS Web.config from:

<add key=”maxInstalledPrerequisites” value=”400″/>

to:

<add key=”maxInstalledPrerequisites” value=”800″/>

Resource #4 – Optimizing WSUS with Configuration Manager, via Adaptiva

Good WSUS overview article with a few technical tricks in it. Written by Matt Tinney (@mnt2556) from Windows Management Experts.

https://insights.adaptiva.com/2018/wsus-configuration-manager/

Resource #5 – Unleash WSUS performance, via Pawel Jarosz

Here is another reading I found useful.

Simon says – unleash WSUS performance

http://paweljarosz.wordpress.com/2018/03/23/simon-says-unleash-wsus-performance

Resource #6 – WSUS Delete Obsolete Updates, via Scott Williams

Yet another useful resources. Written by Scott Williams (@ip1).

WSUS Delete Obsolete Updates
http://kickthatcomputer.wordpress.com/2017/08/15/wsus-delete-obsolete-updates

That all for now,

Happy Deployment / Johan

Source :
https://www.deploymentresearch.com/fixing-wsus-when-the-best-defense-is-a-good-offense/

WSUS Delete Obsolete Updates

Posted: August 15, 2017
in Configuration Manager, Information, SQL, Windows Update
Tags: delete obsolete updates, deleteobsoleteupdates, index, wsus

NOTE: Usual warnings apply. Do a backup before making any changes. If you are unsure about anything in the post then ask or look for more information or help before attempting it.

Over time WSUS will accumulate update metadata that can create performance issues for clients. In large environments this can be quite an issue.

There is a script Microsoft often provides during Premier Support calls to cleanup this update metadata, however there are a few issues:

  • The query can take a *really* long time to run if there are a lot of updates to cleanup. In some cases it can take *days*
  • You need to stop all the WSUS services while it runs
  • If it fails for whatever reason, it will have to start all over because it doesn’t commit the changes until it completes successfully
  • While it runs, the TEMPDB and Transaction logs will grow quite significantly until the data is committed
  • It gives no useful information on progress

There is a TechNet article (This is essential reading and has LOTS of important stuff) and a Forum Post where an improved version was written that gave progress of the cleanup, however it didn’t address the temp/transaction growth issues or the time issues. To this end I have applied my very rudimentary SQL scripting skills.

To find out just how many updates are waiting to be cleaned up, run this stored procedure:

EXEC spGetObsoleteUpdatesToCleanup

Firstly, when the script runs on a default WSUS install it can take over a minute to process *each* record. If there are thousands or tens of thousands or updates to remove this is going to take a while. There is an index you can add to the WSUS table that dramatically improves this so it happens at about 1 second per record. Microsoft confirmed this index is OK, however it is not officially supported (at time of writing)

USE [SUSDB]
GO
CREATE NONCLUSTERED INDEX [IX_tbRevisionSupersedesUpdate] ON [dbo].[tbRevisionSupersedesUpdate]([SupersededUpdateID])
GO
CREATE NONCLUSTERED INDEX [IX_tbLocalizedPropertyForRevision] ON [dbo].[tbLocalizedPropertyForRevision]([LocalizedPropertyID])
GO

Now to the cleanup script. Simply this script will cleanup obsolete records, provide progress feedback and also allow you to run it in small blocks. This allows you to run in short blocks without needing to stop the WSUS server and avoids generating huge transaction loads on the SQL server.

To “tweak” the script, modify this line with the number of updates you want to do in each block. Start with 50, see how it runs in your environment and increase as needed. Ideally don’t run batches that take more than 5-10 minutes to prevent those SQL transaction logs growing.

IF @curitem < 101

If you do want to run a larger batch that may take hours, you should of course stop the WSUS services to do so. Also, don’t run this script if a WSUS Sync is in progress or scheduled to start.

USE SUSDB
DECLARE @var1 INT, @curitem INT, @totaltodelete INT
DECLARE @msg nvarchar(200)
CREATE TABLE #results (Col1 INT) INSERT INTO #results(Col1)
EXEC spGetObsoleteUpdatesToCleanup
SET @totaltodelete = (SELECT COUNT(*) FROM #results)
SELECT @curitem=1
DECLARE WC Cursor FOR SELECT Col1 FROM #results
OPEN WC
FETCH NEXT FROM WC INTO @var1 WHILE (@@FETCH_STATUS > -1)
BEGIN SET @msg = cast(@curitem as varchar(5)) + '/' + cast(@totaltodelete as varchar(5)) + ': Deleting ' + CONVERT(varchar(10), @var1) + ' ' + cast(getdate() as varchar(30))
RAISERROR(@msg,0,1) WITH NOWAIT
EXEC spDeleteUpdate @localUpdateID=@var1
SET @curitem = @curitem +1
IF @curitem < 101
 FETCH NEXT FROM WC INTO @var1
END
CLOSE WC
DEALLOCATE WC
DROP TABLE #results
deleteobsolete

If for any reason the script is interrupted, you will find SQL still has the transaction table open and won’t let you run again (There is already an object named ‘#results’ in the table). To resolve this highlight and execute the last line to drop the table.

If this still doesn’t help, close the SQL Studio Manager session and you should be prompted with a warning about uncommitted transactions. Select Yes to commit then reopen and start the query again.

If for any reason the query is not properly closed there may be locks held on the SQL database that will prevent the normal WSUS service functioning resulting in failure of service.

Source :
https://kickthatcomputer.wordpress.com/2017/08/15/wsus-delete-obsolete-updates/

Cleaning out old WSUS update files

How This Article Came To Be

The contents of this article are the results of a long path of investigation, trial and error, and (bloody-minded) determination to find a way to clean up our corporate WSUS (Windows Server Update Services) installation. What I’ve documented below is partly based on work done by others (which I’ll provide attribution for as they are definitely due the credit), and other parts are based on my own personal investigations.

There have been several updates to this post since I first wrote it in late October 2018, based on findings of other readers using it for newer versions of WSUS. Thank you to Vladimir, Ulrich, and James for your helpful feedback!

Note that this article assumes you have some familiarity with SQL Server and its management studio (SSMS), as well as with general server management, like starting and stopping services.

The Background

As many other companies do, the one I work for employs WSUS to manage the Windows updates which are delivered to our various servers and workstations. I set this up back in mid-2015 to mitigate the fact that 50+ servers and workstations were hammering our 10Mbps corporate internet connection once a month to grab the updates directly from Microsoft. Given that a large part of our business relies on connecting to customer installations remotely, having little to no bandwidth available during a business day is not desirable. It took a few days to set up WSUS, and a few evenings for it to pull down all of the latest updates. With network policies in place to make workstations instead grab updates from the internal server, all was good. At least for the first while…

A year or so in I noticed that updates didn’t seem to be happening on a regular schedule anymore. I took a deeper look at the WSUS machine I’d set up and found that the 500GB drive the updates were stored on was full to the brim. I hastily cloned it over to a 1TB drive (providing about 800GB of total space on the update partition), expanded the partition to use the extra space, and synced down the latest updates. All was good. Until I had to do it again in less than a year, this time increasing the drive to a 2TB unit. I thought that would hold us for a while.

Fast forward a couple of years. That 2TB drive now had about 10GB free, and the database housing the WSUS data had grown to nearly 40GB. I researched things and shifted the database to the OS partition through a detach-move-attach cycle. I had to first install a copy of SSMS (SQL Server Management Studio) on the server to be able to interact with the Windows Internal Database instance. In the end, it was a simple enough process, and that solution is well documented on the internet. That database move freed up enough disk space to stop the low disk space warnings, but only just barely. The database was still 40GB and the update files were still consuming almost all of the partition’s 1.6TB of disk space.

So, How Did Things Get This Bad?

So, in between other tasks, I started researching whether or not the system could be cleaned up. It became very clear early on in my searches that this was not an uncommon problem, and was caused by a general “set it and forget it” mentality around WSUS management. Like so many other systems, maintenance of the system can be automated, but by default is not. And so the system runs, accumulating more data about available updates in the database, and more update files on the file system, eating up disk space while the performance of the database degrades.

In a perfect world, dutiful administrators run the cleanup tasks in the WSUS console every few weeks or so. These tasks clear out old, superseded updates from the database and their associated update files. However, if this kind of maintenance hasn’t been done in a few years, the WSUS console winds up timing out when it is instructed to do this, as the queries take too long to run. In addition, the indexing in the database becomes horribly inefficient, further slowing things down. One of the early indicators of this problem is the frequent display of an error when bringing up the WSUS console:WSUS displaying the “Reset Server Node” error message.

There Must Be A Way To Clean Up This Mess

Thankfully, there are many people out there who have worked out various parts of the solution, and I’ve found a few reliable ways to do some other cleanup. The general process follows this list of tasks:

  1. Install SSMS on the WSUS server if it isn’t already there. You’ll need this for running various scripts to clean up the WSUS database.
  2. Stop a few services on the WSUS server so that the following steps don’t prevent various maintenance steps from working.
  3. Take a backup of the WSUS database in case something goes horribly wrong during the cleanup.
  4. Run a script to rebuild/optimize the indexes in the WSUS database, which will make the other steps run faster.
  5. Run a WSUS stored procedure to determine how many obsolete updates are recorded in the database.
  6. Run a script to remove a batch of those updates from the database.
  7. Repeat steps 4 through 6 until there are no more updates to be removed. This may take several days depending on the volume of updates to be removed, though it speeds up as the number of updates in the database is reduced.
  8. Shrink the database files to reclaim space, and then rebuild/optimize the indexes.
  9. Using a copy of the WSUS database and a list of update files on the WSUS server, determine what files can safely be deleted, and then delete them.

1. Installing SSMS

This is probably the easiest part of the whole process. If WSUS is deployed on a full SQL Server instance instead of a Windows Internal Database, then the server may already have SSMS installed. Otherwise, it’s a matter of picking the right version. For my own purposes, I was working with Windows Server 2008 R2 and the WSUS version that came with it. I installed it with the Windows Internal Database, as the server’s sole purpose was to support WSUS. As such, I needed to install SSMS for SQL Server 2008 R2. It’s easy enough to find online. What you may need will vary by your own installation, so I leave it up to you to find on your own.

Connecting to the WSUS database through the Windows Internal Database is a bit different than doing so with a standard SQL Server instance. As well, you generally can’t access the instance from anywhere else but the WSUS server, hence needing to install SSMS on the WSUS server. The connection string I use in the SSMS connection prompt for the WSUS server is:

\\.\pipe\MSSQL$MICROSOFT##SSEE\sql\query

The connection is done using the named pipes protocol, pointing to the local machine, and employs Windows Authentication to get to the database. You need to be a local admin or a WSUS admin to do this. However, if you’re connecting to a true SQL Server instance, you can point at the machine’s instance in a more standard way. Either way, once you’re connected, you can explore the database objects and run queries in the normal manner.

2. Stopping Services

If your WSUS server is anything like mine, you’ll find that it is frequently running at the limits of its available memory, which slows down the queries. In order to free up memory, a few services can be temporarily stopped on the WSUS server. In my case, it dropped from consuming nearly 6GB of memory down to 1GB. Note that stopping these services will prevent WSUS from picking up new updates and block workstations from querying it for new updates, so you likely want to do this outside of normal business hours if you’re in a corporate environment.

The services are:

  • IIS Admin Service
  • World Wide Web Publishing Service
  • Update Services

They may be named slightly differently on newer operating systems.

In addition, you can restart the database instance service, which for the Windows Internal Database is named:

  • Windows Internal Database (MICROSOFT##SSEE)

For a standard SQL Server instance, it is often named something like:

  • SQL Server ([instance name])

where [instance name] reflects what you named the instance, or is the default instance name, which is based on what version of SQL Server is installed.

3. Backup the WSUS Database

Since there is a real potential that the cleanup process could damage the WSUS database, I highly recommend taking a backup of it. If you have the disk space, you can simply stop the SQL Server or Windows Internal Database service, copy the WSUS database files to somewhere else, and then restart the service. Otherwise, you should be able to use the normal backup methods for SQL Server to take a full backup. If you’re not sure where the files are, look at the properties of the database when logged into SSMS.

4. Rebuild the WSUS Database Indexes

The following script was sourced from Microsoft. Run this within SSMS while connected to the WSUS database. It may take 15 minutes or more to run, depending on the size of the WSUS database.

/******************************************************************************
This sample T-SQL script performs basic maintenance tasks on SUSDB
1. Identifies indexes that are fragmented and defragments them. For certain
   tables, a fill-factor is set in order to improve insert performance.
   Based on MSDN sample at http://msdn2.microsoft.com/en-us/library/ms188917.aspx
   and tailored for SUSDB requirements
2. Updates potentially out-of-date table statistics.
******************************************************************************/

USE SUSDB;
GO
SET NOCOUNT ON;

-- Rebuild or reorganize indexes based on their fragmentation levels
DECLARE @work_to_do TABLE (
	 objectid int
	,indexid int
	,pagedensity float
	,fragmentation float
	,numrows int
)

DECLARE @objectid int;
DECLARE @indexid int;
DECLARE @schemaname nvarchar(130); 
DECLARE @objectname nvarchar(130); 
DECLARE @indexname nvarchar(130); 
DECLARE @numrows int
DECLARE @density float;
DECLARE @fragmentation float;
DECLARE @command nvarchar(4000); 
DECLARE @fillfactorset bit
DECLARE @numpages int

-- Select indexes that need to be defragmented based on the following
-- * Page density is low
-- * External fragmentation is high in relation to index size
PRINT 'Estimating fragmentation: Begin. ' + convert(nvarchar, getdate(), 121) 

INSERT @work_to_do
SELECT
	 f.object_id
	,index_id
	,avg_page_space_used_in_percent
	,avg_fragmentation_in_percent
	,record_count
FROM 
	sys.dm_db_index_physical_stats (DB_ID(), NULL, NULL , NULL, 'SAMPLED') AS f
WHERE
	(f.avg_page_space_used_in_percent < 85.0 and f.avg_page_space_used_in_percent/100.0 * page_count < page_count - 1)
	or (f.page_count > 50 and f.avg_fragmentation_in_percent > 15.0)
	or (f.page_count > 10 and f.avg_fragmentation_in_percent > 80.0)

PRINT 'Number of indexes to rebuild: ' + cast(@@ROWCOUNT as nvarchar(20))

PRINT 'Estimating fragmentation: End. ' + convert(nvarchar, getdate(), 121)

SELECT @numpages = sum(ps.used_page_count)
FROM
	@work_to_do AS fi
	INNER JOIN sys.indexes AS i ON fi.objectid = i.object_id and fi.indexid = i.index_id
	INNER JOIN sys.dm_db_partition_stats AS ps on i.object_id = ps.object_id and i.index_id = ps.index_id

-- Declare the cursor for the list of indexes to be processed.
DECLARE curIndexes CURSOR FOR SELECT * FROM @work_to_do

-- Open the cursor.
OPEN curIndexes

-- Loop through the indexes
WHILE (1=1)
BEGIN
	FETCH NEXT FROM curIndexes
	INTO @objectid, @indexid, @density, @fragmentation, @numrows;
	IF @@FETCH_STATUS < 0 BREAK;

	SELECT 
		 @objectname = QUOTENAME(o.name)
		,@schemaname = QUOTENAME(s.name)
	FROM 
		sys.objects AS o
		INNER JOIN sys.schemas as s ON s.schema_id = o.schema_id
	WHERE 
		o.object_id = @objectid;

	SELECT 
		 @indexname = QUOTENAME(name)
		,@fillfactorset = CASE fill_factor WHEN 0 THEN 0 ELSE 1 END
	FROM 
		sys.indexes
	WHERE
		object_id = @objectid AND index_id = @indexid;

	IF ((@density BETWEEN 75.0 AND 85.0) AND @fillfactorset = 1) OR (@fragmentation < 30.0)
		SET @command = N'ALTER INDEX ' + @indexname + N' ON ' + @schemaname + N'.' + @objectname + N' REORGANIZE';
	ELSE IF @numrows >= 5000 AND @fillfactorset = 0
		SET @command = N'ALTER INDEX ' + @indexname + N' ON ' + @schemaname + N'.' + @objectname + N' REBUILD WITH (FILLFACTOR = 90)';
	ELSE
		SET @command = N'ALTER INDEX ' + @indexname + N' ON ' + @schemaname + N'.' + @objectname + N' REBUILD';
	PRINT convert(nvarchar, getdate(), 121) + N' Executing: ' + @command;
	EXEC (@command);
	PRINT convert(nvarchar, getdate(), 121) + N' Done.';
END

-- Close and deallocate the cursor.
CLOSE curIndexes;
DEALLOCATE curIndexes;


IF EXISTS (SELECT * FROM @work_to_do)
BEGIN
	PRINT 'Estimated number of pages in fragmented indexes: ' + cast(@numpages as nvarchar(20))

	SELECT
		@numpages = @numpages - sum(ps.used_page_count)
	FROM
		@work_to_do AS fi
		INNER JOIN sys.indexes AS i ON fi.objectid = i.object_id and fi.indexid = i.index_id
		INNER JOIN sys.dm_db_partition_stats AS ps on i.object_id = ps.object_id and i.index_id = ps.index_id

	PRINT 'Estimated number of pages freed: ' + cast(@numpages as nvarchar(20))
END
GO


--Update all statistics
PRINT 'Updating all statistics.' + convert(nvarchar, getdate(), 121) 
go

EXEC sp_updatestats
go

PRINT 'Done updating statistics.' + convert(nvarchar, getdate(), 121) 
GO

5. Determine How Many Obsolete Updates Exist

Once the indexes are rebuilt, you need to find out how many updates need to be cleaned up. When I started, the following stored procedure call identified over 28,000 of them. Open a new query window in SSMS, copy/paste the following, and run it. It may take several minutes to run.

USE SUSDB
GO

EXEC spGetObsoleteUpdatesToCleanup

This stored procedure returns a listing of the updates that are marked as obsolete, which are ones that have been superseded by other, newer updates. Because those older updates are obsolete, they will never be deployed to servers and workstations, and as such are no longer needed.

6. Remove a Batch of Obsolete Updates

If you have a lot of obsolete updates to delete, you’ll want to do so in manageable chunks so that you can periodically have the WSUS server obtaining and providing new updates to computers like it should. The following script, which I sourced and reformatted from here, lets you do just that. You can adjust the size of a batch by changing the number assigned to the @batchSize variable near the start of the script. When run, the script deletes obsolete updates one at a time until either it runs out of updates or it reaches the batch size.

In my circumstances, when I first started using the script, it took slightly more than 60 seconds per update, meaning a batch of 2,000 updates would take about 36 hours to go through. The speed is dependent on the hardware resources it has available, so it may be faster or slower for you. I recommend running the script for a small batch of maybe 20 to start with, average the amount of time it takes for each delete to complete, and then based on that calculate how many updates you could delete in the time span you have available at night and on weekends. For example, at 65 seconds per update, during the 10 or so hours an office is likely closed overnight, you could process slightly more than 500 updates. As the time to delete individual updates decreases, you can increase the number of updates you process in that time span. You can easily determine this by looking at the output of the script, shown the Messages tab, where it lists the exact time down to the millisecond of when each delete started.

As of this writing, with my WSUS database cleaned up, updates delete within about 8 seconds each.

Here’s the script:

USE SUSDB

DECLARE
     @updateID       INT
    ,@currentItem    INT
    ,@itemsToDelete  INT
    ,@batchSize      INT

DECLARE @msg NVARCHAR(200)

SELECT
     @currentItem    = 1
    ,@batchSize      = 2000

CREATE TABLE #obsoleteUpdates (localUpdateID INT)

INSERT INTO #obsoleteUpdates (localUpdateID)
EXEC spGetObsoleteUpdatesToCleanup

SET @itemsToDelete = (SELECT COUNT(1) FROM #obsoleteUpdates)

DECLARE ObsoleteUpdates CURSOR
FOR
    SELECT localUpdateID
    FROM #obsoleteUpdates

OPEN ObsoleteUpdates

FETCH NEXT
FROM ObsoleteUpdates
INTO @updateID

WHILE (@@FETCH_STATUS > - 1)
BEGIN
    SET @msg = cast(@currentItem AS VARCHAR(5)) + '/' + cast(@itemsToDelete AS VARCHAR(5)) + ': Deleting ' + CONVERT(VARCHAR(10), @updateID) + ' @ ' + replace(convert(VARCHAR(50), getdate(), 126), 'T', ' - ')

    RAISERROR (@msg, 0, 1) WITH NOWAIT

    EXEC spDeleteUpdate @localUpdateID = @updateID

    SET @currentItem = @currentItem + 1

    IF @currentItem < (@batchSize + 1)
        FETCH NEXT
        FROM ObsoleteUpdates
        INTO @updateID
END

CLOSE ObsoleteUpdates
DEALLOCATE ObsoleteUpdates

DROP TABLE #obsoleteUpdates

7. Keep At It!

It may take a week or so of evenings and weekends to clear out all of the obsolete updates using the steps above, but it will eventually finish. This is the first half of the battle, though. The scripts above clean up only the WSUS database, and do nothing to remove the already downloaded Windows Update files stored on the server.

8. Shrink the WSUS Database Files

This isn’t absolutely necessary, but if your WSUS database has grown to a huge size, you can shrink it down. There are a multitude of articles out there (like this one) that describe how to do this, so I won’t provide steps here. As a point of common sense, back up the WSUS database first. That said, once you shrink it, make sure you go back and run the script from step 4 above to rebuild all the indexes, as the shrink process makes them inefficient again.

9. Get Rid of the Obsolete Update Files

This was, frankly, the hardest part to figure out. A lot of the discussion I saw online about this part of the issue generally came to the conclusion of “reset WSUS and start again.” This essentially requires you to record the configuration of your WSUS installation, issue a command that wipes the databases and the file store, re-enter all of the configuration, and then have the server download the latest updates. In some ways, this approach is quicker than the cleanup steps described above.

However, in my mind, this seemed a bit extreme, as WSUS already knows what files need to be pushed out to workstations when they ask for an update. So, theoretically, it should be possible to query WSUS about what files are needed to support the updates it knows about, compare that to the files stored on the file system, and delete any files which aren’t referenced by any updates.

I sleuthed around for a few days, off and on, and could not find any articles that described a process like this. I did figure out how to determine what a particular update file is called and where they are located on the file system, but I wasn’t finding anything to link an update to the files. The WSUS database refers to files in many tables through a binary field named FileDigest. The textual representation of its hexadecimal value matches the name of the actual file in the file system, which I verified by locating several update files on the file system and comparing their details to what was recorded in the WSUS database.

Then I found this article in which a comment by ClaudioG64 described how to query for the files needed for a particular update. This way, you could manually grab them from the WSUS server, copy them to another server that couldn’t talk to WSUS, and apply them. The critical piece was the WSUS stored procedure he referenced, which is named spGetInstallableItems.

I looked at the output from it after calling it for one of the updates on my WSUS server. I then looked at the code in the stored procedure and unwound the queries to work backwards to a point where I could get a FileDigest value. After that, I just needed a list of the files on the file system to compare to, and an outer join would tell me what files matched to the updates in WSUS and what files had no corresponding update in WSUS. Generating the list was a cinch using Powershell, where I could query for particular values and export it to a .CSV file for later import.

In Powershell 2 or earlier, as is found on Windows Server 2008 R2 and earlier (unless you’ve upgraded it), use the following snippet:

Get-ChildItem .\* -Recurse | Select-Object FullName, BaseName, DirectoryName, Length | Export-Csv C:\temp\WsusContent.csv -NoTypeInformation

In Powershell 3 or later, as is found on Windows Server 2012 and later, use the following snippet:

Get-ChildItem .\ -Recurse -File -Include * | Select-Object FullName, BaseName, DirectoryName, Length | Export-Csv C:\temp\WsusContent.csv -NoTypeInformation

The different snippets above are necessary to deal with some functional and syntactical differences arising as Powershell evolved over the years. The first snippet only returns files, leaving out folders, but only works properly in Powershell 2 or earlier. In Powershell 3 and later, the syntax changed, and the first snippet, while it works, returns both files and folders, which causes problems in what needs to happen later on in this process. The second snippet uses appropriate syntax to return only files, but its syntax does not work in Powershell 2.

Open an elevated Powershell command prompt, switching into the folder that contains the WSUS files, and then run the above command (which is entered as a single line). It dumps the list of files out to a CSV file, creating C:\temp\WsusContent.csv, though you can specify a different file location that works for you. The file name I chose, which will be the name the import tool used later defaults to, doesn’t conflict with any table names in the WSUS database, and reflects the name of the folder the files are kept in. The WSUS files are usually located off the root of a drive (C: or D: in most cases) in the following folder:

WSUS\WsusContent

When the above Powershell command was run for my problematic WSUS server, it produced a file with just over 476,000 rows in it. Each row provides:

  • the full path and name of the update file
  • the name of the update file with no path information or file extension
  • the path of the directory the update is located in
  • the size of the file in bytes

This structure allowed me enough information to work with it to verify a few things while building and testing my queries. But first, the data needs to be brought into the WSUS database. Unfortunately, I was unable to create tables in the Windows Internal Database on the WSUS server itself, so I wound up pulling a copy of the WSUS database files down to my workstation and attaching them to my local SQL Server 2016 Developer Edition instance. If you’re using a full SQL Server installation for WSUS, you may have rights to create tables. I created a table named WsusContent to import the data into, using the following SQL script:

USE [SUSDB]
GO

SET ANSI_NULLS ON
GO

SET QUOTED_IDENTIFIER ON
GO

CREATE TABLE [dbo].[WsusContent]
(
     [FullName]         [varchar](250)    NOT NULL
    ,[BaseName]         [varchar](250)    NOT NULL
    ,[DirectoryName]    [varchar](250)    NOT NULL
    ,[Length]           [int]             NOT NULL
    ,[FileDigest]       [binary](20)      NULL
) 
ON [PRIMARY]

GO

CREATE NONCLUSTERED INDEX [IX_WsusContent_FileDigest] ON [dbo].[WsusContent]
(
    [FileDigest] ASC
)
WITH
(
     PAD_INDEX = OFF
    ,STATISTICS_NORECOMPUTE = OFF
    ,SORT_IN_TEMPDB = OFF
    ,DROP_EXISTING = OFF
    ,ONLINE = OFF
    ,ALLOW_ROW_LOCKS = ON
    ,ALLOW_PAGE_LOCKS = ON
) 
ON [PRIMARY]

GO

It also sets up an index on the FileDigest column, which starts out empty but will be filled in after the main data import. This index will be useful later on in the process. From there, it was a simple matter to tell SSMS to import the contents of the WsusContent.csv file into the new table. In the import wizard, you need to tell it the following things:

  • the source data is coming from a flat file, which is WsusContent.csv
  • the column names are in the first data row of the source data file
  • set the text qualifier to a double quote
  • adjust the size of the first three columns (FullName, BaseName, and DirectoryName) to be 250 characters
  • adjust the size of the last column (Length) to be a 4-byte signed integer
  • the data is being imported through a SQL Server native client connection
  • it should automatically pick the WsusContent table, at least if the source data file has the same name as the table created by the script above

The import itself should complete fairly quickly, and you should be able to query the new table through SSMS to confirm it has data. Once the data is imported, run the following SQL script to populate the FileDigest column:

UPDATE
    dbo.WsusContent
SET
    FileDigest = convert(BINARY (20), '0x' + BaseName, 1)

This command converts the base file names (the file’s name without the extension) into binary values. This binary value can then be matched to FileDigest values recorded elsewhere in the WSUS database, which is done in a query a little further down in this article.

Note that it is possible you can encounter an error with this UPDATE, especially if working with newer versions of WSUS. One reader, James, reported encountering a file named “anonymousCheckFile.txt” in the WSUSContent folder, which doesn’t exist in the folders for WSUS 2008 R2. The error is caused by the above query not being able to convert “anonymousCheckFile” to a binary value, as it isn’t a hexadecimal value. Simply delete this row out of the dbo.WsusContent table (or the CSV file before doing the import), and the command should work.

After some tinkering and testing, I came up with the following SQL query to determine what update files on the file system have no corresponding update information in the WSUS database. I carefully checked it in my testing to ensure that the number of files on the file system matched the total number of files needed for the WSUS updates plus the total number of files on the file system that had no matching WSUS update entry. I didn’t want to be removing files that were needed for updates.

The query below is structured to create commands that can be saved into a “batch” file and run from an elevated command prompt. Here’s the query:

SELECT
    'del "' + y.FullName + '"'
FROM
    WsusContent y
LEFT OUTER JOIN
    (
        SELECT DISTINCT
             wc.FullName
            ,wc.FileDigest
        FROM
            WsusContent wc
        JOIN
            tbFile f ON f.FileDigest = wc.FileDigest
        JOIN
            tbFileForRevision ffr ON ffr.FileDigest = f.FileDigest
        JOIN
            tbRevision r ON r.RevisionID = ffr.RevisionID
        JOIN
            tbProperty p ON p.RevisionID = r.RevisionID
    ) x ON y.FileDigest = x.FileDigest
WHERE
    x.FileDigest IS NULL

The results of this query can be exported to a text file. For my WSUS system, the resulting file had somewhere over 440,000 lines in it. You may need to do some cleanup on it because of the way SSMS exports the data for particular file formats.

If you export the results as a tab-delimited file, the file requires no modifications, so you can skip past the steps below.

If you export the results as a comma-delimited file, the file needs the following modifications. This is because it encloses each of the lines in double quotes, and converts the double quotes around the file names to a pair of double quotes. The lines start out looking like this:

"del ""D:\wsus\WsusContent\01\9AC0F6B420813C870A63F8F252D0739A71D41A01.exe"""

They all need to be fixed up so that they look like this instead:

del "D:\wsus\WsusContent\01\9AC0F6B420813C870A63F8F252D0739A71D41A01.exe"

Thankfully, this is quick and easy to do with the search and replace features of a good text editor like Notepad++. You can do the following search/replace for the entire file, in the following order:

  1. search for “”” (three double quotes) and replace with  (a single double quote); this handles the double quotes at the end of each line
  2. search for “del “ (there is a space before the final double quote) and replace with del[space]; this handles the start of the line; also note that the [space] indicates a single space should be entered

Finally, save the updated text file.

Note: Because of the way this blog tries to format posts in a “smart” way, I don’t recommend copying and pasting the search/replace text from above, as the double quotes above are likely formatted as “smart” quotes instead of as a normal ASCII double quote (character 34).

The export file can now be renamed to have a BAT extension turning it into a batch command file. Copy the batch file over to the drive on the WSUS server that holds the WsusContent folder.

All that’s left to do is open an elevated command prompt on the WSUS server and run the batch file. When I did so, it took a couple of hours to run. Once it was done, the drive’s free space had increased from about 40GB to just over 1TB, leaving about 600GB of updates on it. After that, I defragmented the drive for good measure.

I hope this article helps some other WSUS admins who are struggling to clean up their servers. Of course, I appreciate any feedback on this process.

Source :
https://managingdevelopers.wordpress.com/2018/10/26/cleaning-out-old-wsus-update-files/

10 Best Firewalls for Small & Medium Business Networks in 2023

BY AMINU ABDULLAHI MAY 16, 2023

Small and medium-sized businesses (SMBs) are increasingly becoming targets for cyber attacks. According to Verizon, about 61 percent of SMBs reported at least one cyber attack in 2021. Worse, Joe Galvin, chief research officer at Vistage, reported that about 60 percent of small businesses fold within six months of a cyber attack.

To protect your network from potential threats, you need a reliable and effective firewall solution. This tool will act as the first line of defense against unauthorized access and can help prevent malicious attacks from infiltrating a business’s network.

We reviewed the top SMB firewall solutions to help you determine the best one for your business.

Top SMB firewall software comparison

 Best forIPSContent filteringStarting price
Perimeter 81Best overallYesYes$8 per user per month, billed annually
pfSenseOpen sourceYesYes$0.01 per hour 
Comodo Free FirewallWindows PCsYesYesFree
ManageEngine Firewall AnalyzerLog, policy, and firewall configuration managementYesYes$395 per device
Fortinet FortiGateHybrid workforcesYesYesApprox. $335
SonicWall TZ400 Security FirewallAdvanced threat protectionYesYesApprox. $1,000–$1,500
Cisco Meraki MX68Small branches with up to 50 usersYesYesApprox $640
Sophos XGS SeriesRemote workersYesYesApprox. $520
Protectli Vault – 4 PortBuilding your own OPNsense or pfSense router and firewallYesYes$269 for FW4B – 4x 1G Port Intel J3160
OPNSenseFlexibilityYesYesFree, or $170.46/yr for business ed.

Jump to:

Perimeter81 icon

Perimeter 81

Best overall

Founded in 2018, Perimeter 81 is a cloud and network security company that provides organizations with a secure and unified platform for accessing and managing their applications and data.

It provides many security solutions, including firewall as a service (FWaaS), secure web gateway (SWG), zero trust network access (ZTNA), malware protection, software-defined perimeter, VPN-alternative and secure access service edge (SASE) capabilities, to ensure that data is secure and accessible to authorized personnel. It also provides centralized management and user access monitoring, enabling organizations to monitor and control user activity across the network.

Perimeter 81 provides granular access control policies that enable organizations to define and enforce access rules for their network resources based on the user’s identity, device type, and other contextual factors—making it easy for employees to access the company’s resources without compromising security.

Pricing

Pricing plansMinimum usersCost per month, plus gateway costCost per year, plus gateway costCloud firewallAgentless application accessDevice posture check
Essential10$10 per user, plus $50 per month per gateway$8 per user, plus $40 per month per gatewayNo2 applicationsNo
Premium10$12 per user, plus $50 per month per gateway$15 per user, plus $40 per month per gateway10 policies10 applications3 profiles
Premium Plus20$16 per user, plus $50 per month per gateway$20 per user, plus $40 per month per gateway100 policies100 applications20 profiles
Enterprise50Custom quotesCustom quotesUnlimitedUnlimitedUnlimited

Features

  • Identity-based access for devices and users.
  • Network segmentation.
  • OS and application-level security and mutual TLS encryption.
  • Enable traffic encryption enforcement, 2FA, Single Sign-On, DNS filtering, and authentication.

Pros

  • Provides visibility into the company network.
  • Allows employee access from on-premise.
  • Automatic Wi-Fi security.
  • 30-day money-back guarantee.

Cons

  • Low and mid-tiered plans lack phone support.
  • Limited support for Essential, Premium, and Premium Plus.
pfSense icon

pfSense

Best open-source-driven firewall

pfSense is an open-source firewall/router network security solution based on FreeBSD. Featuring firewall, router, VPN, and DHCP servers, pfSense is a highly customizable tool that can be used in various network environments, from small home networks to large enterprise networks.

The tool supports multiple WAN connections, failover and load balancing, and traffic shaping, which can help optimize network performance. pfSense can be used on computers, network appliances, and embedded systems to provide a wide range of networking services.

Pricing

pfSense pricing varies based on your chosen medium—cloud, software, or hardware appliances.

For pfSense cloud:

  • pfSense on AWS: Pricing starts from $0.01 per hour to $0.40 per hour.
  • pfSense on Azure: Pricing starts from $0.08 per hour to $0.24 per hour.

For pfSense software:

  • pfSense CE: Open source version available to download for free.
  • pfSense+ Home or Lab: Available at no cost for evaluation purposes only.
  • pfSense+ W/TAC LITE: Currently available at no charge, but vendor may increase rate to $129 per year in the future. 
  • pfSense+ W/TAC PRO: $399 per year.
  • pfSense+ W/TAC ENT: $799 per year.

For pfSense appliances:

pfSense+ appliancesDevice costBest forFirewall speed (IPERF3 TRAFFIC)Firewall speed
(IMIX TRAFFIC)
Netgate 1100$189Home607 Mbps(10k ACLs)191 Mbps(10k ACLs)
Netgate 2100$349Home
Home Pro
Branch/Small Business
964 Mbps(10k ACLs)249 Mbps(10k ACLs)
Netgate 4100$599Home Pro
Branch/Small Business
Medium Business
4.09 Gbps(10k ACLs)1.40 Gbps(10k ACLs)
Netgate 6100$799Home Pro
Branch/Small Business
Medium Business
9.93 Gbps(10k ACLs)2.73 Gbps(10k ACLs)
Netgate 8200$1,395Branch/Small Business
Medium Business
Large Business
18.55 Gbps5.1 Gbps
Netgate 1537$2,199Medium Business
Large Business
Data Center
18.62 Gbps(10k ACLs)10.24 Gbps(10k ACLs)
Netgate 1541$2,899Medium Business
Large Business
Data Center
18.64 Gbps(10k ACLs)12.30 Gbps(10k ACLs)

Features

  • Stateful packet inspection (SPI).
  • IP/DNS-based filtering.
  • Captive portal guest network.
  • Time-based rules.
  • NAT mapping (inbound/outbound).

Pros

  • Anti-spoofing capability.
  • Connection limits option.
  • Community support.

Cons

  • The tool’s open-source version support is limited to community or forum. It lacks remote login support, private login support, a private support portal, email, telephone, and tickets.
  • Complex initial setup for inexperienced users.
Comodo icon

Comodo Free Firewall

Best for Windows PCs

Comodo Firewall is a free firewall software designed to protect computers from unauthorized access and malicious software by monitoring all incoming and outgoing network traffic. 

The firewall features packet filtering, intrusion detection and prevention, and application control. It also includes a “sandbox” feature that allows users to run potentially risky applications in a protected environment without risking damage to the underlying system. 

The software works seamlessly with other Comodo products, such as Comodo Antivirus and Comodo Internet Security.

Pricing

Comodo is free to download and use. The vendor recommends adding its paid antivirus product (Comodo Internet Security Pro) to its firewall for added security. The antivirus costs $29.99 per year for one PC or $39.99 per year for three PCs. 

Features

  • Auto sandbox technology.
  • Cloud-based behavior analysis. 
  • Cloud-based allowlisting. 
  • Supports all Windows OS versions since Windows XP (Note: Windows 11 support forthcoming).
  • Website filtering.
  • Virtual desktop.

Pros

  • Monitors in/out connections.
  • Learn user behavior to deliver personalized protection.
  • Real-time malware protection.

Cons

  • Lacks modern user interface.
  • Pop-up notifications—some users may find the frequent alerts generated by the software annoying and intrusive.
ManageEngine icon

ManageEngine Firewall Analyzer

Best for log, policy, and firewall configuration management

ManageEngine Firewall Analyzer is a web-based log analytics and configuration management software for firewall devices. 

It provides real-time visibility into network activity and helps organizations identify network threats, malicious traffic, and policy violations. It supports various firewalls, including Cisco ASA, Palo Alto, Juniper SRX, Check Point, SonicWall, and Fortinet. 

Firewall Analyzer helps monitor network security, analyze the security posture of the network, and ensure compliance with security policies. It also provides reports, dashboards, and automated alerting to ensure the network remains secure.

Pricing

The amount you will pay for this tool depends on the edition you choose and the number of devices in your organization. 

You can download the enterprise edition’s 30-day free trial to test-run it and learn more about its capabilities. It’s available in two versions: Windows OS or Linux. You can also download it for mobile devices, including iPhone devices and Android phones or tablets.

  • Standard Edition: Starts at $395 per device, up to 60 devices.
  • Professional Edition: Starts at $595 per device, up to 60 devices.
  • Enterprise Edition: Starts at $8,395 for 20 devices, up to 1,200 devices.

Feature

  • Firewall rules report and firewall device audit report.
  • Regulatory compliance with standards such as ISO, PCI-DSS, NERC-CIP, SANS, and NIST.
  • Network behavioral anomaly alert.
  • Security reports for viruses, attacks, spam, denied hosts, and event summaries.
  • Historical configuration change tracking.
  • Bandwidth report for live bandwidth, traffic analyzer, URL monitor, and employee internet usage.
  • Compatible with over 70 firewall versions.

Pros

  • Excellent technical support.
  • Users praise its reporting capability.
  • In-depth auditing with aggregated database entries capability.
  • VPN and security events analysis.

Cons

  • Complex initial setup.
  • Users reported that the tool is occasionally slow.
Fortinet icon

Fortinet FortiGate

Best for hybrid workforces

Fortinet FortiGate is a network security platform that offers a broad range of security and networking services for enterprises of all sizes. It provides advanced threat protection, secure connectivity, and secure access control. It also provides advanced firewall protection, application control, and web filtering. 

Business owners can use Fortinet’s super-handy small business product selector to determine the best tool for their use cases. 

Small and mid-sized businesses may find the following FortiGate’s model suitable for their needs:

 IPSNGFWThreat ProtectionInterfacesSeries
FortiGate 80F1.4 Gbps1 Gbps900 MbpsMultiple GE RJ45 | Variants with PoE, DSL,3G4G, WiFi and/or storageFG-80F, FG-80F-PO, FG-80F-Bypass, FG-81F, FG-81F-PO, FG-80F-DSL, FWF-81F-2R-POE, FWF-81, F-2R-3G4G-POE, FWF-80F/81F-2R, and FWF-80F/81F-2R-3G4G-DSL
FortiGate 70F 1.4 Gbps1 Gbps800 MbpsMultiple GE RJ45 | Variants with internalstorageFG-70F and FG-71F
FortiGate 60F 1.4 Gbps1 Gbps700 MbpsMultiple GE RJ45 | Variants with internalstorage | WiFi variantsFG-60F, FG-61F, FWF-60F, and FWF-61F
FortiGate 40F 1 Gbps800 Mbps 600 MbpsMultiple GE RJ45 | WiFi variantsFG-40F, FG-40F-3G4G, FWF-40F, FWF-40F-3G4G

Fortinet FortiGate is compatible with several operating systems and can easily be integrated into existing networks. 

Pricing

Unfortunately, Fortinet doesn’t publish their prices. Reseller prices start around $335 for the FortiGate 40F with no support. Contact Fortinet’s sales team for quotes.

Features

  • Offers AI-powered security services, including web, content, and device security, plus advanced tools for SOC/NOC.
  • Continuous risk assessment. 
  • Threat protection capability.

Pros

  • Top-rated firewall by NSS Labs.
  • Intrusion prevention.

Cons

  • According to user reviews, the CLI is somewhat complex.
  • Complex initial setup.
SonicWall icon

SonicWall TZ400 Security Firewall

Best for advanced threat protection

The SonicWall TZ400 is a mid-range, enterprise-grade security firewall designed to protect small to midsize businesses. It supports up to 150,000 maximum connections, 6,000 new connections per second, and 7×1-Gbe. 

The TZ400 features 1.3 Gbps firewall inspection throughput, 1.2 Gbps application inspection throughput, 900 Mbps IPS throughput, 900 Mbps VPN throughput, and 600 Mbps threat prevention throughput. 

Pricing

This product’s pricing is not available on the Sonicwall website. However, resellers such as CDW, Staples, and Office Depot typically sell it in the $1,000–$1,500 range. You can request a quote for your particular use case directly from Sonicwall.

Features

  • Deep memory inspection.
  • Single-pane-of-glass management and reporting.
  • SSL/TLS decryption and inspection.
  • SD-WAN and zero-touch deployment capabilities.

Pros

  • Optional PoE and Wi-Fi options.
  • DDoS attack protection (UDP/ICMP/SYN flood).
  • Fast performance with gigabit and multi-gigabit Ethernet interfaces.
  • Protects against intrusion, malware, and ransomware.
  • High-performance IPS, VPN, and threat prevention throughput.
  • Efficient ​​firewall inspection and application inspection throughput.

Cons

  • Support can be improved.
  • It can be difficult to configure for inexperienced users.
Cisco icon

Cisco Meraki MX68

Best for small branches with up to 50 users

The Cisco Meraki MX68 is a security appliance designed for SMBs. It’s part of the Cisco Meraki MX series of cloud-managed security appliances that provide network security, content filtering, intrusion prevention, and application visibility and control.

The MX68 is equipped with advanced security features such as a stateful firewall, VPN, and intrusion prevention system (IPS) to protect your network from cyber attacks. The MX68 has a variety of ports and interfaces, including LAN and WAN ports and a USB port for 3G/4G failover. It also supports multiple WAN uplinks, providing redundancy and failover options to ensure your network remains online and available.

Pricing

The Cisco Meraki MX68 pricing isn’t listed on the company’s website, but resellers typically list it starting around $640. You can request a demo, free trial, or quotes by contacting the Cisco sales team.

Features

  • Centralized management via web-based dashboard or API.
  • Intrusion detection and prevention (IDS/IPS).
  • Next-generation layer 7 firewalls and content filtering.
  • SSL decryption/inspection, data loss prevention (DLP), and cloud access security broker (CASB).
  • Instant wired failover with added 3G/4G failover via a USB modem.

Pros

  • Remote browser isolation, granular app control, and SaaS tenant restrictions.
  • Support for native IPsec or Cisco AnyConnect remote client VPN.
  • Provides unified management for security, SD-WAN, Wi-Fi, switching, mobile device management (MDM), and internet of things (IoT)

Cons

  • The license cost is somewhat high.
  • Support can be improved.
Sophos icon

Sophos XGS Series

Best for remote workers

Sophos XGS Series Desktop is a range of network security appliances designed to provide comprehensive protection for SMBs. These appliances combine several security technologies, including firewall, intrusion prevention, VPN, web filtering, email filtering, and application control, to provide a robust and integrated security solution.

Here’s a comparison table of the Sophos XGS series firewalls:

 FirewallTLS inspectionIPSIPSEC VPNNGFWFirewall IMIXThreat protectionLatency (64 byte UDP)
XGS Desktop Models3,850 Mbps375 Mbps1,200 Mbps3,000 Mbps700 Mbps3,000 Mbps280 Mbps6 µs
XGS 107 / 107w7,000 Mbps420 Mbps1,500 Mbps4,000 Mbps1,050 Mbps3,750 Mbps370 Mbps6 µs
XGS 116 / 116w7,700 Mbps650 Mbps2,500 Mbps4,800 Mbps2,000 Mbps4,500 Mbps720 Mbps8 µs
126/126w10,500 Mbps800 Mbps3,250 Mbps5,500 Mbps2,500 Mbps5,250 Mbps900 Mbps8 µs
136/136w11,500 Mbps950 Mbps4,000 Mbps6,350 Mbps3,000 Mbps6,500 Mbps1,000 Mbps8 µs

The Sophos XGS Series Desktop appliances are available in several models with varying performance capabilities, ranging from entry-level models suitable for small offices to high-performance models suitable for large enterprises. They are designed to be easy to deploy and manage, with a user-friendly web interface and centralized management capabilities.

Pricing

Sophos doesn’t advertise the pricing for their XGS Series Desktop appliances online, but they typically retail starting at about $520 from resellers. 

Potential customers are encouraged to request a free trial and pricing information by filling out a form on the “Get Pricing” page of their website.

Features

  • Centralized management and reporting.
  • Wireless, SD-WAN, application aware routing, and traffic shaping capability.
  • SD-WAN orchestration.
  • Advanced web and zero-day threat protection.

Pros

  • Zero-touch deployment.
  • Lateral movement protection.
  • Users find the tool scalable.

Cons

  • Performance limitations.
  • Support can be improved.
Protectli icon

Protectli Vault – 4 Port

Best for building your own OPNsense or pfSense router and firewall

The Protectli Vault is a small form-factor network appliance designed to act as a firewall, router, or other network gateway. The 4-Port version has four gigabit Intel Ethernet NIC ports, making it ideal for SMB or home networks.

The device is powered by a low-power Intel processor and can run a variety of open-source firewall and router operating systems, such as pfSense, OPNsense, or Untangle. It comes with 8GB DDR3 RAM and up to 32GB DDR4 RAM. 

The Protectli Vault is designed to be fanless, silent, and compact, making it ideal for use in the home or office environments where noise and space may be an issue. It’s also designed to be energy-efficient, consuming only a few watts of power, which can save businesses considerable amounts of money on energy costs over time.

Pricing

The amount you will pay for this tool depends on the model you select and your desired configuration. The rates below are starting prices; your actual rate may vary based on your configuration. Note that all these items ship free to U.S. addresses.

  • VP2410 – 4x 1G Port Intel J4125: Starts at $329.
  • VP2420 – 4x 2.5G Port Intel J6412: Starts at $379.
  • FW4B – 4x 1G Port Intel J3160: Starts at $269.
  • FW4C – 4x 2.5G Port Intel J3710: Starts at $289.

Features

  • Solid-state and fanless tool.
  • Provides 2.5 GB ports unit.
  • AES-NI, VPN, and coreboot options.

Pros

  • A 30-day money-back guarantee.
  • Transparent pricing.
  • Coreboot support.
  • CPU supports AES-NI.

Cons

  • Steep learning curve.
OPNSense icon

OPNSense

Best for flexibility 

OPNsense is a free and open-source firewall and routing platform based on the FreeBSD OS. It was forked from the popular pfSense and m0n0wall project in 2014 and was officially released in January 2015.

OPNsense provides a modular design that allows users to easily add or remove functionality based on their needs. 

OPNsense is popular among IT professionals and network administrators who need a flexible and customizable firewall and routing platform that they can tailor to their specific needs. It’s also a good choice for small businesses and home users who want to improve their networks’ security without spending a lot of money on commercial solutions.

Pricing

OPNSense is a free, open source tool. It is available in two editions: Community edition and business edition. You can download the community version at no cost. For the business version, a one-year subscription costs $170.46 per year.

Features

  • High availability and hardware failover.
  • Intrusion detection and prevention.
  • Captive portal.
  • VPN (site-to-site and road warrior, IPsec, OpenVPN, and legacy PPTP support).
  • Built-in reporting and monitoring tools, including RRD Graphs.

Pros

  • Free, open source.
  • Traffic shaper.
  • Support for plugins.
  • Multi-language support, including English, Czech, Chinese, French, German, Italian, Japanese, Portuguese, Russian, and Spanish.

Cons

  • Reporting capability can be improved.
  • The interface can be improved.

Key features of SMB firewalls

Firewalls designed for SMBs share many of the same characteristics as their enterprise-grade cousins—such as firewall rule and policy configuration, content filtering, reporting and analytics—while placing additional emphasis on affordability and ease of use.

Firewall rules and policies

Administrators should be able to set up firewall rules and policies that control traffic flow and block or permit traffic based on various criteria, such as source/destination IP addresses, ports, and protocols. 

These rules and policies can be used to control the types of applications, services, and data that are allowed to traverse the network, as well as create restrictions on access. 

Firewall rules and policies are essential to the security of a network, as they provide the first line of defense against malicious attacks.

Content filtering

Content filtering is the process of blocking or restricting certain types of content from entering or leaving a network. It can be used to block websites, applications, or data that may contain malicious or unwanted content, such as malware, viruses, or pornographic material. 

Content filtering is typically implemented using a combination of hardware and software solutions. Hardware solutions, such as routers and switches, can be configured to block certain types of traffic or data or to restrict access to certain websites or applications. Software solutions, such as firewall rules and policies, can also be used to block or restrict certain types of content.

Reporting and analytics 

Reporting and analytics are essential for any business network, as they provide important insights into the health and security of the network. Firewall reporting and analytics features allow network administrators to identify trends, detect potential threats, and analyze the performance of the network over time.

Reporting and analytics can also be used to identify any areas of the network that may be vulnerable to attack, as well as identify any areas where the network may not be performing optimally.

Affordability

For SMBs, affordability is a key factor when it comes to purchasing a firewall. SMB firewalls are typically more affordable than enterprise firewalls and can be purchased for as little as a few hundred dollars, so it is important to consider your budget when selecting a firewall.

Some SMB firewalls offer additional features for a fee, so consider what features are necessary for your network and the ones you can do without, as this will help you decide on the most cost-effective firewall solution. At the same time, be careful not to cut corners—your business’s data is too important to be insufficiently protected.

Ease of use and support

For SMBs, finding a firewall solution that is easy to use and has good support is essential. Firewalls should be easy to configure and manage so the network administrator can quickly and easily make changes as needed.

Additionally, good support should be available for any issues or questions that arise. This support should include an online knowledge base and access to technical support staff that can assist with any questions or problems, ideally 24/7.

How to choose the best SMB firewall software for your business

When shopping for the best SMB firewall software for your business, look for software that offers the features you need, easy installation and management, scalability to grow with your business, minimal impact on network performance, and an affordable price.

It’s also important to choose a vendor with a good reputation in the industry, backed up by positive reviews and customer feedback.

Frequently asked questions (FAQs)

What is an SMB firewall?

An SMB firewall is a type of network security device that is designed specifically for small and medium-sized businesses. It’s used to protect networks from unauthorized access, malicious attacks, and other security threats.

What features should I look for in an SMB firewall?

Above all you need a solution with a strong security profile. Look for specific security measures such as:

  • Intrusion prevention
  • Content filtering
  • Malware protection
  • Application control
  • Traffic shaper 

Other factors to consider include ease of management, scalability, and cost.

Do small businesses need a firewall?

Yes, small businesses need a firewall. It provides an essential layer of network security that helps protect against unauthorized access, malware, and other security threats. Without a firewall, small businesses are vulnerable to attacks that could compromise sensitive data, cause network downtime, and damage their reputation.

How much does a firewall cost for SMBs?

The cost of an SMB firewall can vary widely depending on the features, capabilities, and brand of the firewall. Generally, SMB firewalls can range in price from a few hundred to several thousand dollars.

How many firewalls do you need for a small business?

The number of firewalls needed for a small business will depend on the size and complexity of the network. In many cases, a single firewall may be sufficient to protect the entire network. However, in larger networks, it may be necessary to deploy multiple firewalls to provide adequate protection.

Factors such as network segmentation, geographic location, and compliance requirements may also influence the number of firewalls needed. It’s best to consult with a network security expert to determine the appropriate number of firewalls for your small business.

Methodology

We analyzed dozens of SMB firewall software and narrowed down our list to the top ten. We gathered primary data—including pricing details, features, support, and more—from each tool provider’s website, as well as third-party reviews. We selected each software based on five key data points: security, ease of use, affordability, quality of service, and user satisfaction.

Bottom line: Choosing an SMB firewall

The solutions we evaluated are some of the best SMB firewalls currently available on the market. They are designed to provide SMBs with advanced security features, easy management, and scalability at affordable rates.

If your business is growing fast and you need an enterprise-grade network firewall solution, we also reviewed the best firewall software for enterprise networks.

Read our complete guide to designing and configuring a firewall policy for your organization, complete with a free, downloadable template.

Source :
https://www.enterprisenetworkingplanet.com/guides/best-firewalls-for-small-medium-business/