Cybersecurity researchers have disclosed an unpatched security vulnerability that could pose a serious risk to IoT products.
The issue, which was originally reported in September 2021, affects the Domain Name System (DNS) implementation of two popular C libraries called uClibc and uClibc-ng that are used for developing embedded Linux systems.
uClibc is known to be used by major vendors such as Linksys, Netgear, and Axis, as well as Linux distributions like Embedded Gentoo, potentially exposing millions of IoT devices to security threats.
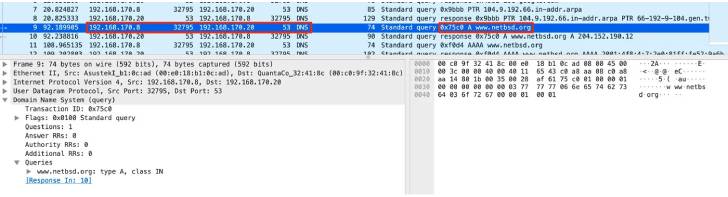
“The flaw is caused by the predictability of transaction IDs included in the DNS requests generated by the library, which may allow attackers to perform DNS poisoning attacks against the target device,” Giannis Tsaraias and Andrea Palanca of Nozomi Networks said in a Monday write-up.
DNS poisoning, also referred to as DNS spoofing, is the technique of corrupting a DNS resolver cache — which provides clients with the IP address associated with a domain name — with the goal of redirecting users to malicious websites.
The vulnerability in uClibc and uClibc-ng is the result of having a predictable transaction ID assigned to each DNS lookup and their static use of source port 53, effectively defeating source port randomization protections.
Successful exploitation of the bug could allow an adversary to carry out Man-in-the-Middle (MitM) attacks and corrupt the DNS cache, effectively rerouting internet traffic to a server under their control.
Nozomi Networks cautioned that the vulnerability could be trivially exploited in a reliable manner should the operating system be configured to use a fixed or predictable source port.
“The attacker could then steal and/or manipulate information transmitted by users, and perform other attacks against those devices to completely compromise them,” the researchers said.
Cybersecurity researchers have detailed as many as five severe security flaws in the implementation of TLS protocol in several models of Aruba and Avaya network switches that could be abused to gain remote access to enterprise networks and steal valuable information.
The findings follow the March disclosure of TLStorm, a set of three critical flaws in APC Smart-UPS devices that could permit an attacker to take over control and, worse, physically damage the appliances.
IoT security firm Armis, which uncovered the shortcomings, noted that the design flaws can be traced back to a common source: a misuse of NanoSSL, a standards-based SSL developer suite from Mocana, a DigiCert subsidiary.
The new set of flaws, dubbed TLStorm 2.0, renders Aruba and Avaya network switches vulnerable to remote code execution vulnerabilities, enabling an adversary to commandeer the devices, move laterally across the network, and exfiltrate sensitive data.
Affected devices include Avaya ERS3500 Series, ERS3600 Series, ERS4900 Series, and ERS5900 Series as well as Aruba 5400R Series, 3810 Series, 2920 Series, 2930F Series, 2930M Series, 2530 Series, and 2540 Series.https://player.vimeo.com/video/704230226?h=6c3f78c718&byline=0&portrait=0
Armis chalked up the flaws to an “edge case,” a failure to adhere to guidelines pertaining to the NanoSSL library that could result in remote code execution. The list of bugs is as follows –
CVE-2022-23676 (CVSS score: 9.1) – Two memory corruption vulnerabilities in the RADIUS client implementation of Aruba switches
CVE-2022-23677 (CVSS score: 9.0) – NanoSSL misuse on multiple interfaces in Aruba switches
HTTP POST request handling heap overflow vulnerability in a discontinued Avaya product line (no CVE)
Even more concerningly, the vulnerabilities found in Avaya switches are zero-click, meaning they can be activated via unauthenticated network packets without any user interaction.
“These research findings are significant as they highlight that the network infrastructure itself is at risk and exploitable by attackers, meaning that network segmentation alone is no longer sufficient as a security measure,” Barak Hadad, head of research in engineering at Armis, said.
Organizations deploying impacted Avaya and Aruba devices are highly recommended to apply the patches to mitigate any potential exploit attempts.
Latest tools, tactics, and procedures being used by the Hive, Conti, and AvosLocker ransomware operations.
Targeted ransomware attacks continue to be one of the most critical cyber risks facing organizations of all sizes. The tactics used by ransomware attackers are continually evolving, but by identifying the most frequently employed tools, tactics, and procedures (TTPs) organizations can gain a deeper understanding into how ransomware groups infiltrate networks and use this knowledge to identify and prioritize areas of weakness.
Symantec, a division of Broadcom Software, tracks various ransomware threats; however, the following three ransomware families are being observed in the majority of recent attacks:
Hive
Conti
Avoslocker
Similar to many other ransomware families, Hive, Conti, and Avoslocker follow the ransomware-as-a-service (RaaS) business model. In the RaaS model the ransomware operators hire affiliates who are responsible for launching the ransomware attacks on their behalf. In most cases affiliates stick to a playbook that contains detailed attack steps laid out by the ransomware operators.
Once initial access to a victim network has been gained, Hive, Conti, and Avoslocker use a plethora of TTPs to help the operators achieve the following:
Gain persistence on the network
Escalate privileges
Tamper with and evade security software
Laterally move across the network
Initial Access
Affiliates for the Hive, Conti, and Avoslocker ransomware operators use a variety of techniques to gain an initial foothold on victim networks. Some of these techniques include:
Spear phishing leading to the deployment of malware, including but not limited to:
IcedID
Emotet
QakBot
TrickBot
Taking advantage of weak RDP credentials
Exploiting vulnerabilities such as:
Microsoft Exchange vulnerabilities – CVE-2021-34473, CVE-2021-34523, CVE-2021-31207, CVE-2021-26855
FortiGate firewall vulnerabilities – CVE-2018-13379 and CVE-2018-13374
Apache Log4j vulnerabily – CVE-2021-44228
In most cases, the spear-phishing emails contain Microsoft Word document attachments embedded with macros that lead to the installation of one of the previously mentioned malware threats. In some instances, attackers use this malware to install Cobalt Strike, which is then used to pivot to other systems on the network. These malware threats are then used to distribute ransomware onto compromised computers.
Persistence
After gaining initial access, Symantec has observed affiliates for all three ransomware families using third-party software such as AnyDesk and ConnectWise Control (previously known as ScreenConnect) to maintain access to victim networks. They also enable default Remote Desktop access in the firewall:
netsh advfirewall firewall set rule group=”Remote Desktop” new enable=yes
Actors are also known to create additional users on compromised systems to maintain access. In some instances we have seen threat actors add registry entries that allow them to automatically log in when a machine is restarted:
During the discovery phase the ransomware actors try to sweep the victim’s network to identify potential targets. Symantec has observed the aforementioned ransomware actors using tools such as the following:
ADRecon – Gathers Active Directory information and generates a report
Netscan – Discovers devices on the network
Credential Access
Mimikatz is a go-to tool for most ransomware groups and Hive, Conti, and Avoslocker are no exception. We have observed them using the PowerShell version of Mimikatz as well as the PE version of the tool. There are also instances where the threat actors directly load the PowerShell version of Mimikatz from GitHub repositories:
In addition to using Mimikatz, the threat actors have also taken advantage of the native rundll32 and comsvcs.dll combination to dump the LSASS memory:
rundll32.exe C:\Windows\System32\comsvcs.dll, MiniDump <process id> lsass.dmp full
Adversaries also dump the SECURITY, SYSTEM, and SAM hives and later extract credentials from the dump. In rare occasions they have also been observed using taskmgr.exe to dump the LSASS memory and later using the dump to extract valuable credentials.
Lateral Movement
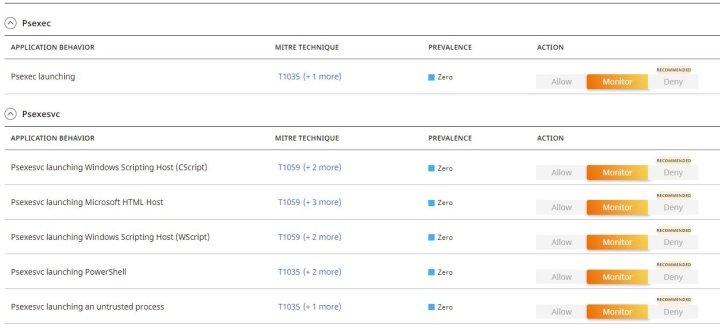
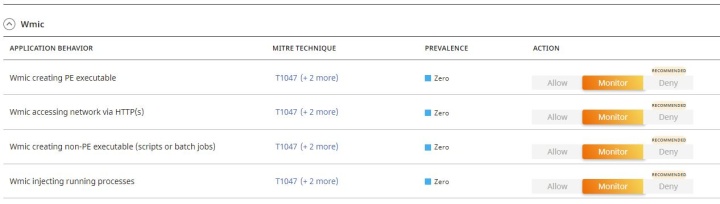
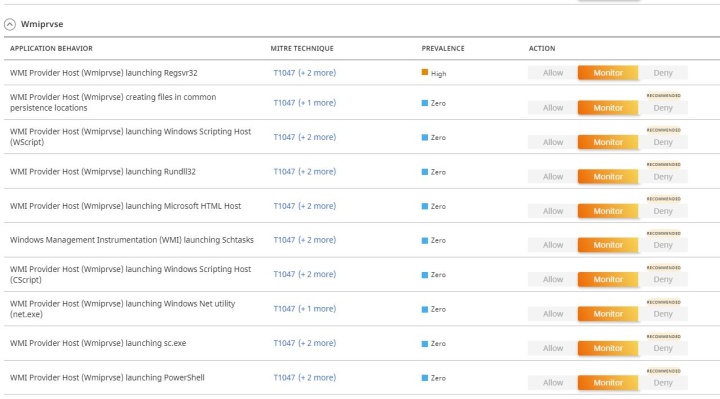
Attackers employ tools like PsExec, WMI, and BITSAdmin to laterally spread and execute the ransomware on victim networks. We have also observed the attackers using several other techniques to laterally move across networks.
As with a number of other ransomware families, Hive, Conti, and Avoslocker also tamper with various security products that interfere with their goal. We have observed them meddling with security services using the net, taskkill, and sccommands to disable or terminate them. In some cases they also use tools like PC Hunterto end processes. They have also been seen tampering with various registry entries related to security products, since changes to the registry entries can make those products inoperative.
Both Hive and AvosLocker have been observed attempting to disable Windows Defender using the following reg.exe commands.
Adversaries tend to disable or tamper with operating system settings in order to make it difficult for administrators to recover data. Deleting shadow copies is a common tactic threat actors perform before starting the encryption process. They perform this task by using tools like Vssadmin or WMIC and running one of the following commands:
vssadmin.exe delete shadows /all /quiet
wmic.exe shadowcopy delete
We have also seen BCDEditbeing used to disable automatic system recovery and to ignore failures on boot:
Attackers commonly exfiltrate critical data from a victim’s environment before encrypting it. They then use the stolen data in an attempt to extort a ransom from victims. We have observed threat actors using the following cloud services to exfiltrate data:
https://anonfiles.com
https://mega.nz
https://send.exploit.in
https://ufile.io
https://www.sendspace.com
We have also seen attackers use the following tools for data exfiltration:
Filezilla
Rclone
Conclusion
The TTPs outlined in this blog are a snapshot of the current ransomware threat landscape. The TTPs used by these threat actors are constantly evolving, with groups continually tweaking their methods in a bid to outmaneuver their targets’ security defenses. As such, organizations need to be vigilant and employ a multi-layered security approach.
Symantec Protection
Symantec Endpoint Protection (SEP) protects against ransomware attacks using multiple static and dynamic technologies.
AV Protection
Ransom.Hive
Ransom.Conti
Ransom.AvosLocker
Backdoor.Cobalt
Hacktool.Mimikatz
Trojan.IcedID*
Trojan.Emotet*
W32.Qakbot*
Trojan.Trickybot*
Behavioral Protection
SONAR.RansomHive!g2
SONAR.RansomHive!g3
SONAR.RansomHive!g4
SONAR.RansomAvos!g2
SONAR.RansomConti!g1
SONAR.RansomConti!g3
SONAR.RansomConti!g4
SONAR.Ransomware!g30
SONAR.RansomGregor!g1
SONAR.SuspLaunch!gen4
SONAR.SuspLaunch!g18
SONAR.Ransom!gen59
SONAR.Ransomware!g26
SONAR.Cryptlck!g171
Intrusion Prevention System (IPS) detections
IPS blocks initial access, persistence, and lateral movement. SEP’s Audit Signatures are intended to raise awareness of potentially unwanted traffic on the network. By default, Audit Signatures do not block. Administrators reviewing the logs of IPS events in their network can note these Audit events and decide whether or not to configure the corresponding Audit Signatures to block the traffic.
The following is a list of Audit Signatures that can be enabled to block, through policies, activity related to the use of software or tools such as AnyDesk, ScreenConnect, and PsExec.
Symantec recommends that you have intrusion prevention enabled on all your devices including servers.
Adaptive Protection
Symantec Adaptive Protection can help protect against lateral movement and ransomware execution techniques used by an attacker. If you are not using tools like PsExec, WMIC, and BITSAdmin in your environment then you should “Deny” these applications and actions using Symantec Adaptive Protection policies.
Recommendations
Customers are advised to enable their Intrusion Prevention System (IPS) on desktops and servers for best protection. Click here for instructions on enabling the IPS Server Performance Tuning feature. This feature should be enabled on servers to allow additional tuning for the IPS module and definitions in high-throughput scenarios.
Customers are also advised to enable Proactive Threat Protection, also known as SONAR, which is Symantec’s behavior-based protection.
Customers should also keep Symantec Endpoint Protection (SEP) up-to-date with the latest version and definition set.
Symantec has multi-layer protection technologies for all the threat types. To provide the best protection, all SEP features should be enabled for Windows desktops and servers.
You’ve been asked for a Vulnerability Assessment Report for your organisation and for some of you reading this article, your first thought is likely to be “What is that?”
Worry not. This article will answer that very question as well as why you need a Vulnerability Assessment Report and where you can get one from.
As it’s likely the request for such a report came from an important source such as the Board, a partner, a client or an auditor, there isn’t a moment to waste. So let’s drive straight in.
What is a Vulnerability Assessment Report and why do you need one?
A Vulnerability Assessment Report is simply a document that illustrates how you are managing your organisation’s vulnerabilities. It’s important because, with tens of thousands of new technology flaws being discovered every year, you need to be able to prove that your organisation does its best to avoid attack if you want to be trusted by partners and customers.
A best security practice recommended by governments across the world, a vulnerability assessment is an automated review process that provides insights into your current security state. The vulnerability assessment report is the outcome of this review. Used as a roadmap to a better state of security preparedness, it lays out the unique risks your organisation is up against due to the technology you use, and reveals how best to overcome them with minimal disruption to your core business strategy and operations.
The help it provides is clear but why do you need one? As mentioned above, it’s likely you were asked for a Vulnerability Assessment Report by the Board, a partner, a client or an auditor as each of these groups needs reassurance that you’re on top of any weaknesses in your infrastructure. Here’s why:
— Customers need to trust you
Weaknesses in your IT systems could affect your customers’ operations. With supply chain attacks on the rise, a vulnerability in a single company could leave the whole range of organizations paralysed, as demonstrated by the infamous SolarWinds hack last year.
It doesn’t matter how small your business is; if your customers will be entrusting you with any of their data, they may wish for a Vulnerability Assessment Report first to confirm that your IT security practices are tiptop.
— The Board wants a better understanding of the business’ risk
Cyber security is a growing concern across many businesses, so chances are your board members want to take a better grip of their risk, before the lack of insights into vulnerabilities is turned into a much more serious business problem. With ransomware attacks regularly making headlines, having proper vulnerability management in place and presenting an “all clear” report, can give your business heads that needed peace of mind.
— Your auditors are checking for compliance
Many of the regulatory or compliance frameworks related to security and privacy, like SOC2, HIPAA, GDPR, ISO 27001, and PCI DSS, advise or outright require regular compliance scans and reporting, so if the request for a vulnerability assessment report was made by your auditor, it is likely to be for compliance purposes.
— Your CFO is renewing your cyber insurance
It could be the case that your insurance provider is seeking a vulnerability assessment report as part of the underwriting process. If you don’t want to run the risk of being denied your insurance payment or wouldn’t like to see your premiums rise, then you could benefit from supplying these reports regularly.
How often do you need to produce a vulnerability assessment report?
Regularly. Think of it like vulnerability scanning: For maximum efficacy, you need to conduct regular, if not constant, comprehensive evaluations of your entire technology stack, otherwise you could miss something that could bring your business to a costly halt.
Cybercriminals do not stop searching until they find something they can take advantage of. You need to scan your systems continuously and have up to date reporting to reflect your vigilance as and when it’s needed.
Modern vulnerability scanning solutions, like Intruder, will give you a cyber hygiene score which enables you to track the progress of your vulnerability management efforts over time, proving that your security issues are being continuously resolved in good time.
A vulnerability assessment report from Intruder, to provide evidence to your customers or regulators that a vulnerability scanning process is in place.
What should be included in a vulnerability assessment report?
Unfortunately, there isn’t a one size fits all report. While the contents are generally the number of vulnerabilities detected in your systems at a point in time, your different stakeholders will require varying levels of detail. Even for compliance purposes, vulnerability assessment reporting requirements can differ.
As a good rule of thumb, we recommend building an Executive Report containing graph views and composite cyber hygiene scores for the Board and C-Suite that clue them in on where they stand at any given moment. And for your IT team, their report needs greater detail such as how to apply the correct solutions to existing problems and sidestep subsequent mistakes.
Where can you get a Vulnerability Assessment Report from?
Ensuring your Vulnerability Assessment Reports contain all the elements and information your stakeholders require can take a lot of work and expertise; which can distract your security teams from other activities that will keep your organisation secure. That is why it’s recommended to choose an external provider to produce your reports.
Before you start comparing individual vendors, make sure you have a solid understanding of your technical environment and of the specific outcomes that the vulnerability assessment should present. This is because vulnerability assessment tools are not built the same; they check for different types of weaknesses, so you need to choose the solution that best suits your requirements. Consider the features and checks you’ll require, as well as the industry standards you need to follow and your budget.
Two key elements to consider relate to reporting: firstly, how flexible the assessment provider will be with how much detail is presented (particularly if you need to present data to different audiences); and secondly, how clearly the results are communicated. Scanning results can be overwhelming but the right vendor will demystify complex security data to grant you a clear, jargon-free understanding of the risks you face.
At Intruder, reports are designed to be well-understood, whilst also maintaining all the technical detail required by IT managers and DevOps teams. Whether you’re a massive enterprise or a fledgling startup, you can generate rapid reports, create compliance paper trails, stay secure, and communicate with employees and potential investors. Intruder offers a free trial of its software, which you can activate here. Get vulnerability assessment reporting in place now.
Buying a hard disk used to be quite easy. Now we have stuff like CMR vs SMR drives, manufacturers not being completely clear in their product showcase pages, and so on.
TLDR: To keep things short, you should strive to buy a CMR drive because SMR drives, while they work just fine, are usually slower in every typical individual test carried by a lot of people out there. SMR drives are slower as their method of writing data aims for storage density, and one of the drawbacks of this goal is speed.
And before we continue, yes, even if manufacturers have developed firwmare that optimize the read and write performance for SMR drives, they are still not that great as a CMR drive.
Tip: some great benchmarks for hard disk drives are: Crystal Disk Mark, ATTO Disk Benchmark, HD Tune, and even PCMark has some storage benchmarks.
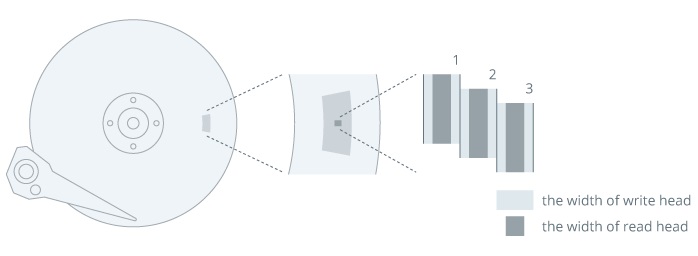
CMR or PMR drives – how they work
CMR comes from Conventional Magnetic Recording. It is also known as PMR that comes from Perpendicular Magnetic Recording.
The way CMR works is by aligning the poles of the magnetic elements, which represent bits of data perpendicularly to the surface of the disk. The magnetic tracks are written side-by-side without overlapping.
a great image explanation from Synology for CMR / PMR drives
And because the write head is usually quite large in comparison to the read head, HDD manufacturers aim to shrinking the size of the write head – or do it as much as possible.
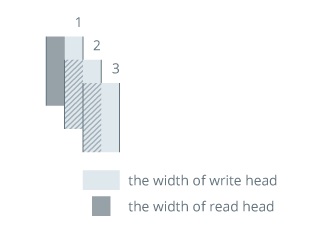
SMR – how do these drives work?
Shingled Magnetic Recording, or SMR, is an extension to PMR. It basically offers improved density. And this happens because rather than writing each magnetic track without overlapping, SMR overlaps each new track with part of the previous track. One way to think about it is by comparing it to the shingles on a roof.
a great image explanation from Synology for SMR drives
By overalapping the tracks, write heads become a lot thinner, and we get a bigger areal density.
CMR vs SMR drives – why does it actually matter?
In short, because you want the best performance for your dollar.
But to get a little bit more technical, regardless of whether an HDD uses CMR or SMR when some new data is written on the drive, the tracks are fully readable without performance impact.
So we have a pretty good read speed, right? No matter what we choose? Right? Kind of. Not really. Well, it depends on how you use the drive.
But! On an SMR drive, when any data is edited or overwritten, the write head will not overwrite data on the existing magnetic track. It will write the new data on an empty area of the disk. While the original track with the old data will temporarily sit put. Then, when the SMR HDD becomes idle, it will enter a ‘reorganization mode’, where the old bits of data on the original track are being erased and made available for future use.
This reorganization procedure must occur and makes idle time essential on an SMR drive. If you hit the respective SMR drive hard with write and read operations, it won’t get to do this in a fast way, and the drive will have to write new data and reorganize stuff at the same time. This causes an impact on the overall read and write performance of the drive.
How can I tell if the HDD I want to buy is SMR or CMR?
Some manufacturers make it easy, some not so much. But basically, searching with something like ‘product code SMR or CMR’ on Google will lead you to a good result most of the time.
Now, Western Digital, on their homepage in the shop section, actually lists CMR or SMR for their drives in the ‘Full Specifications’ area, at the Recording Technology specification. Neat!
For Seagate, however, you have to go to the product page, and download the PDF datasheet. Oh well, I guess it works.
Here’s a breakdown of what is what usually, at least for the common models. Please, search online or on the manufacturer’s website in case the below data becomes outdated.It was last looked up in 29.01.2022, on the manufacturers’ websites, just so you know.
But if you get an amazing price, and you know that hard drive will not get a lot of writes, edits, and deletions… well, it might make sense since the actual heavy usage of erasing,editing and writing data is causing the ‘slowness’. Like if you were to just fill it up with movies and that’s it. Those movies will not get edited, deleted or anything – they will just be read when you watch them. I guess – thinking about selfhosting something like Plex or Nextcloud… or a DIY NAS. I’d still opt for a CMR drive – what kind of discount are we talking about, to be fair? 10% is not worth it in my opinion.
Closing thoughts
Basically, aim for a CMR drive. And if you are new to the whole computer parts upgrade or stuff… don’t stress if you are buying a NAS drive for your desktop PC. It does not matter, it will work the same – maybe even last longer!
Hard disk buying is now as tedious as buying another component, I guess – one more thing to look for besides the usual specifications. I do hope that testing, developing, and working with diverse methods and technologies of storing data will eventually lead to manufacturers developing more performant and higher density hard disks. Just imagine a 100 TB HDD! That would be insane.
I hope this article helped you figure out what you need – an SMR or a CMR drive and why it matters.
Learn how to Defer Parsing of JavaScript to improve pagespeed score. And how you can fix ‘Eliminate render-blocking of JavaScript’ warning in Google PageSpeed Insights by deferring non-critical JavaScript(s). The newer version of Google PageSpeed Insight refers to this issue as ‘Eliminate render-blocking resources’; these render-blocking resources may include JavaScripts and CSS.
In this article, I will cover what is defer parsing of JavaScript, how to defer parsing of JavaScript properly, why you should defer parsing JavaScript, how to find render-blocking JavaScript(s) which are to be deferred, how to defer multiple JavaScripts in one go, how you can defer parsing of JavaScript in WordPress with or without plugin and how does deferred loading of JavaScript help to speed up your website?
How to Defer Parsing of JavaScript
In a nutshell, we’ll eliminate render-blocking JavaScript(s) not by actually removing (deleting) them from the website code but by defer loading them. So that they stop blocking the loading (rendering) of meaningful content (the first paint) of the website.
These terms (the above terminology) might be overwhelming for you at first, especially if you’re not a tech guy.
But, don’t worry about that!
I am going to explain everything step by step in simple words. So that you can proceed at your pace and implement the methods to fix ‘Eliminate render-blocking resources’ on your website/blog.
A web page is made of up several components which include HTML, CSS/Stylesheets, JavaScript, and graphical (images & icons) components etc. These components are stacked one over another in the code structure of the web page.
When a user types your website URL in the web browser’s address bar and hit enter. The browser first establishes the connection with the server on which your website is hosted.
Once the connection is established, the browser starts rendering the components of the webpage to display the web page.
The browser renders the components serially from the top towards the bottom of the webpage. That means what comes first rendered first and so on.
When the browser encounters JavaScript on a web page, it downloads the JavaScript, executes it, and then proceeds to render the next component. So during this time browser stop rendering the rest of the web page.
Every time the browser encounters JavaScript, it stops rendering the rest of the webpage until it renders and executes the encountered JavaScript.
That’s how JavaScript blocks the critical rendering path.
To avoid this situation, Google Engineers recommend deferring non-critical JavaScript.
The question still remains the same, What is Defer Parsing of JavaScript?
Defer Parsing of JavaScript can be defined as the process of using defer or async attribute with JavaScript to avoid render blocking of the first paint of a web page. These attributes tell the web browser to parse and execute the JavaScript in parallel (asynchronously) or after (defer) the parsing of HTML of a web page. Thus, the visitors need not wait longer to see the meaningful content of the web page.
Difference between defer or async
Now you know that there are two attributes – defer or async; that can be used to defer javascript loading.
Before we talk about the difference between defer and async, let’s see how does <script> tag works.
Legend
legend async vs defer attribute
<script>
script tag
When we use <script> tag to add script in our code, the HTML is keep parsing till the script file is reached, then onwards parsing will be paused until the script file is downloaded and executed.
Suitability: Not recommended in most cases.
<script defer>
script defer attribute
When defer attribute is appended with script tag, the script file is downloaded alongside the HTML parsing but the downloaded script executes only after the completion of HTML parsing.
Suitability: For non-critical script files.
<script async>
script async attribute
When async attributed is used with script tag, the script file downloads during HTML parsing, then HTML parsing pauses just to execute the downloaded-script file.
Suitability: For critical script files that cannot be inline.
Defer loading of JS & PageSpeed Insights recommendation
Let’s try to put this in a perspective with Google PageSpeed Insights warning and recommendation.
When you test, a website using Google Pagespeed Insights Tool, you get some warnings and recommendations to fix those warnings/errors.
Google PSI – Render blocking resources – JavaScripts to be deferred
The PageSpeed Insights (PSI) text for render-blocking resourcessays,
Eliminate render-blocking resources.
Resources are blocking the first paint of your page. Consider delivering critical JS/CSS inline and deferring all non-critical JS/styles.
This warning triggers for two different elements i.e. JavaScript (JS) and CSS when any of them block the critical rendering path 1 during the website loading. Here in this article, we are discussing the JavaScript part.
(In the previous version of PageSpeed Insights Tool, the same warning (for the JavaScript) used to be called ‘Eliminate render-blocking of JavaScript’.)
In simple words, this warning triggers when there are some JavaScript(s) loading on your website which blocks the loading of the content that matters most to your visitors.
This means your visitors have to wait longer to see the meaningful content of your website because JavaScript(s) are blocking the rendering of content.
Clearly, Pagespeed Insights or other site speed testing tools (GTMetrix, etc.) show this warning/error, if your site loads some JavaScript(s) that block the loading of meaningful content (the first paint) of your site.
And this needs to be fixed.
Critical vs Non-critical JavaScript: Explained
As Google PageSpeed Insights (PSI) recommendation says you should deliver critical JSinline and defer all non-critical JS.
What does this mean?
Let’s break that down by terminology.
Critical JavaScripts: JavaScripts that are necessary to load during optimized critical rendering.
Non-critical JavaScripts: Those JS that can wait to load until the first meaningful content (the first paint) of the webpage has loaded.
Inline Delivery: Inline delivery refers to loading a resource (in this case JS) within the HTML code instead of calling/importing that separately.
Curious? Why does JavaScript block the critical rendering path in the first place?
We’ll discuss that in the next section with other reasons why you should Defer JavaScript Parsing.
First of all, JavaScript(s) is one of the major culprits to make your website slow.
Wondering, why is that?
Because when the web browser comes across a script, it executes the script firstbefore continuing to load HTML that includes the content users are looking for.
For a browser, executingJavaScript is a heavier task (depending on the size of the script) and takes more time as compared to rendering the meaningful content (the first paint) of the webpage.
Hence JavaScript affects the critical rendering path and slows down pagespeed of your website.
Why not defer this heavier task of JS execution so that the critical rendering path remains uninterrupted, right?
Pagespeed: is now a Ranking Factor
Site speed has already become a ranking signal.
About a decade ago Google announced 2 in an official blog post on Google Webmaster Central Blog that site speed has become a ranking signal.
In another blog post published on the Official Webmaster Central Blog in 2018, they revealed 3 that Google started using page speed as a ranking factor in mobile search ranking.
Since Google had declared pagespeed a factor in search result rankings for desktop and mobile. Therefore, site speed optimization has become a significant aspect of technical SEO.
For the same reason, Google PageSpeed Insights Tool recommends deferred parsing of JavaScript as one of the solutions 4 to remove render-blocking JavaScript in above-the-fold content.
User Experience: decides Your Site’s Success
How does JavaScript affect user experience (UX)?
We have already discussed that JavaScript(s) slow down the pagespeed by blocking the rendering of first paint (the meaningful content). That led to more loading time and a longer wait for users to see the content; bad user experience, right.
Speed matters a lot, the truth is users do not like slow-loading websites. In fact, studies show that the users leave a slow loading site early and move on.
On the contrary, you want your website audience to engage with your site and eventually turn into a customer, subscriber, or ad-viewer. In order to make that happen, you need to improve your pagespeed by deferring non-critical JavaScript(s).
Reasons to Defer Loading of JavaScript: Summing it up
As I mentioned above, however, the parser (browser) starts downloading and executing the script over parsing the rest of HTML, whenever it encounters the script.
But the fact is, most of the JavaScript(s) come into use when the complete web page is loaded. For example, in some animation, effect, or functionality, etc.
Therefore, it is a good idea to load JavaScript(s) only after the content has loaded.
This way deferred loading of JavaScript does not affect the critical render path and consequently helps to speed up your website. And hence, a better user experience for your readers.
And by making your site load faster, you also improve your search ranking on desktop as well as mobile.
Do you know, good web hosting is a must for better pagespeed? If you are already using good web hosting? Awesome, let’s skip to defer parsing of JavaScript. Not sure? whether your hosting is as good as your website deserves, don’t worry. We recommend Cloudways and Kinsta Hosting for better sitespeed. Read our Kinsta Review.
Now, since you have an understanding of what is defer parsing of JavaScript and why you should defer loading of JavaScript(s).
It is a good time to figure outwhich JavaScript(s) (on your website) are the culprits and need to be deferred.
If you already know which JavaScript(s) on your website are blocking the critical rendering path, you may skip the following section and jump to the implementation part. Otherwise, keep on reading…
How to Find Render-blocking JavaScript(s)
JavaScript(s) which block the rendering of meaningful content are called ‘Render Blocking JavaScript(s)’ and need to be deferred.
You can find render-blocking JavaScript(s) by analyzing your website using site speed testing tools.
There are several pagespeed testing tools available to analyze a website for site speed and loading time. I am sharing with you the most reliable and trusted tools for pagespeed testing.
Test your site using these tools and note the results of these tools so that you can compare the results before and after implementing defer parsing of JavaScript(s).
1. PageSpeed Insights by Google
PageSpeed Insights by Google
Google PageSpeed Insights (PSI) is an exclusive pagespeed testing tool by Google. Test your website using Google PSI Tool to find out render-blocking JavaScript(s). PageSpeed Insights Tool results give information about warnings and their solutions/fixes.
2. GTmetrix
GTmetrix – Speed and Performance Test Tool
This one (GTmetrix) is another good free tool to test site speed. You can test your site with GTmetrix to know which JavaScripts need to be deferred.
3. Pingdom Tools
Pingdom Tools for Website Speed Test
Solarwinds’ Pingdom Tools are also very popular when it comes to site speed testing tools. You can test your site using Pingdom Tools to check the number of JS requests on your site and how much they contribute to the total number of requests.
Now you know which JavaScript(s) are making your site slow and need to be deferred. So, let’s see how to fix this issue by deferring non-critical JavaScript(JS).
Test Results: Before Defer Parsing of JavaScript
I have tested a website beforeimplementing defer parsing of JavaScript. Consider these a baseline and compare these results after deferred loading of JavaScripts.
Pagespeed Insights Result before Defer Parsing of JSGTmetrix Result before Defer Parsing of JS
How to Defer Parsing of JavaScript [Step by step]
You need to use the following code to defer parsing JavaScript. Insert this code in HTML file just before the </body> tag. Read the instructions given below to use this script.
< script type="text/javascript">
function parseJSAtOnload() {
var element = document.createElement("script");
element.src = "script_to_be_deferred.js";
document.body.appendChild(element);
}
if (window.addEventListener)
window.addEventListener("load", parseJSAtOnload, false);
else if (window.attachEvent)
window.attachEvent("onload", parseJSAtOnload);
else window.onload = parseJSAtOnload;
</script >
Instructions for Defer Parsing JavaScript using the script
Don’t forget to take a complete backup before making any changes in the code. If something went wrong, you can use that backup to go back.
Copy the code and paste it in HTML file just before the </body> tag (near the bottom of HTML file).
Replace script_to_be_deferred.js with the link of the JavaScript which is to be deferred. You can copy the link of JavaScript(s) (which Google PageSpeed tool suggests to defer) from Google PageSpeed Insights tool results for your website.
Save changes. And you are done.
Finally, test your website again to see the effect.
Code to Defer Multiple JavaScripts in One-go
If you want to defer multiple scripts in one go. You can use the same script with little modification. In the following code replace defer1.js, defer3.js, and defer3.js, etc. with the link of scripts that you want to defer.
 < script type="text/javascript">
function parseJSAtOnload() {
var links = ["defer1.js", "defer2.js", "defer3.js"],
headElement = document.getElementsByTagName("head")[0],
linkElement, i;
for (i = 0; i < links.length; i++) {
linkElement = document.createElement("script");
linkElement.src = links[i];
headElement.appendChild(linkElement);
}
}
if (window.addEventListener)
window.addEventListener("load", parseJSAtOnload, false);
else if (window.attachEvent)
window.attachEvent("onload", parseJSAtOnload);
else window.onload = parseJSAtOnload;
</script >
How to Defer Parsing of JavaScript in WordPress
You can defer parsing of JavaScript in WordPress by following methods:
Using WordPress Plugins (with a plugin) – suitable for all plugin lovers.
Adding a Code Snippet to function.php file – suitable for those who are used to playing with code and editing files in WordPress. – without plugin method #1
Using the Script mentioned above – suitable for geeks who don’t want to use a plugin. – without plugin method #2
1. Defer Parsing of JavaScript using WordPress Plugin
There are several WordPress plugins available to defer parsing of JavaScript in WordPress, I am listing the best plugins that stand out in the crowd because of their performance and reliability.
Obviously, the process of installing and activating any of the following plugins remains the same.
If you’re not sure about the process of installing a WordPress plugin, you can refer this beginner’s guide to learn different methods of installing a plugin in WordPress.
#1.1 Async JavaScript Plugin
If you want a standalone plugin to defer parsing of JavaScript, Async JavaScript should be your pick.
This tiny plugin offers all necessary settings to tweak deferred loading of JS in WordPress.
HOW TO USE ASYNC JAVASCRIPT PLUGIN: SETTINGS & USAGE GUIDE
Steps to defer parsing of javascript in WordPress using a plugin:
Navigate to WordPress Dashboard > Plugins > Add New.
Search Async JavaScript Plugin in the plugin repository.
Go over WP Dashboard > Performance (W3 Total Cache Settings) > Minify.
Scroll down to JS minify settings. You will see settings like shown in the image below.
Check/select options as shown in the image below. Click Save all settings and you are done.
Test your site using pagespeed test to see the results.
Defer JavaScript – W3 Total Cache
#1.4 Defer Loading of JavaScript in LiteSpeed Cache Plugin
LiteSpeed Cache is an amazing optimization plugin for LiteSpeed server hosting. But the general features of this plugin can be utilized on any server like LiteSpeed, Apache, NGINX, etc.
Steps to defer parsing of javascript in LiteSpeed Cache plugin:
Go to Dashboard > Settings > Autoptimize > JS, CSS & HTML.
Under JavaScript Options enable Optimize JavaScript Code and,
Then enable Do not aggregate but defer option and save changes.
Now Empty Cache and test your site using speed test tool to see the result.
Defer Javascript Loading – Autoptimize
#1.8 WP Fastest Cache to Defer Parsing of JavaScript
You can eliminate render-blocking JavaScript resources using WP Fastest Cache plugin. But this feature is available with the premium version only.
2. Defer JavaScript Parsing in WordPress via functions.php file
Yes, you can defer parsing of JavaScript in WordPress by adding a code snippet to function.php file.
This is one of the methods that you can use to Defer Parsing of JavaScript in WordPress without using a plugin.
As I have mentioned above this method is suitable for people who are comfortable with code editing in WordPress.
You might be thinking, but why?
First of all, functions.php is an important theme file. That means you might end up breaking your site easily if anything went wrong with the editing of functions.php file.
Also, there are different versions of the code snippet on the web to fix defer parsing of JavaScript in WordPress via functions file. Unfortunately, not all the code snippets work fine.
So you should be careful while using a code snippet to defer loading of JavaScript.
How to Edit functions.php File Safely
I always recommend using a child theme in WordPress in order to avoid code editing mess.
Because while editing the code, even if you miss a single comma (,) semicolon (;) or any other symbol/syntax, your website will break completely or partially. And you have to make extra efforts to recover the site.
For any reason, if you don’t want to implement a child theme now, you can use this plugin to add code to functions.php file of your theme without editing the original file.
Step by step process to Defer Parsing JavaScript in WordPress via functions.php
Take a complete backup before making any changes to the code.
I assume that you’re using a child theme. If you’re not, first create and activate a child theme to any trouble because of theme file editing.
Go to your WordPress Dashboard > Appearance > Theme Editor
Select/open functions.php file (of child theme) from theme files.
Paste the code snippet given below at the end of functions.php file.
You can specify JS files to exclude from defer in the array (‘jquery.js’).
Finally, click Update File to save changes. That’s all.
The code snippet is to be pasted in functions.php file.
// Defer Parsing of JavaScript in WordPress via functions.php file
// Learn more at https://technumero.com/defer-parsing-of-javascript/

function defer_parsing_js($url) {
//Add the files to exclude from defer. Add jquery.js by default
    $exclude_files = array('jquery.js');
//Bypass JS defer for logged in users
    if (!is_user_logged_in()) {
        if (false === strpos($url, '.js')) {
            return $url;
        }

        foreach ($exclude_files as $file) {
            if (strpos($url, $file)) {
                return $url;
            }
        }
    } else {
        return $url;
    }
    return "$url' defer='defer";

}
add_filter('clean_url', 'defer_parsing_js', 11, 1);
The above code snippet is using defer attribute to defer parsing of JavaScripts. You can replace the defer attribute with async attribute to parse JavaScript asynchronously. You can read more about async attribute and other methods to fix render-blocking JavaScript.
3. Defer Parsing of JavaScript without WordPress Plugin – Script Method
The script method explained above can be used in WordPress to defer loading of javascript. In WordPress, the above-mentioned code can be placed in HTML file just before the </body> tag using hook content option.
Most of the popular WordPress themes come with hook content provision. If you are not using the hook content option or it is not available in your theme. Then, either you can use a WordPress plugin to add the script to WordPress footer before </body> tag or you can place the script in the footer file just before the </body> tag manually.
Steps to defer load javascript in WordPress without using a plugin:
Copy the code and paste that before the </body> tag (using a plugin or built-in theme hook) .
Now replace script_to_be_deferred.js with the JavaScript to be deferred.
Save changes and you’re done.
Clear the cache, if there is any.
Test your website again to see the result.
Test Results: After Defer Parsing of JavaScript
The following are the test results after defer loading of JavaScript.
PageSpeed Insights Result after fixing Defer Parsing of JavaScriptGTmetrix result after implementing Defer Parsing of JavaScript
Wrapping it up
Other than defer parsing of JavaScript, you can also use async attribute or inline JavaScript to remove render-blocking JavaScript. I have covered async attribute or inline JavaScript in another blog post, read that article here. In that article, I have also mentioned a few useful WordPress plugins to defer parsing JavaScript.
Although WordPress plugins are available to defer parsing of JavaScript. The above-explained script method is considered more appropriate by several experts and webmasters. But the people who use WordPress know that using a WordPress plugin is like bliss.
I hope this guide will help you to defer parsing of JavaScript. Let me know, which technique you use to defer parsing of JavaScript. If you are facing any problem implementing the above methods or have a question. Let me know via the comment section. I will be happy to answer.
Looking for the best way to extend your firewall protection to the cloud? Independent testing recently found that SonicWall NSv series is more than up to the challenge.
More than 90% of enterprises use the cloud in some way, with 69% of those considered hybrid cloud users (utilizing both private and public clouds). Along with widespread remote work adoption, this shift is driving the need for scaled-out, distributed infrastructure.
Within this new cloud landscape, security has become more complex as the number of perimeters and integrations grow, and cybercriminals increasingly focus on security gaps and vulnerabilities in cloud implementations. It’s often easier for threat actors to exploit these vulnerabilities than it is to breach hardened components of the cloud deployment.
A next-generation firewall deployed in the cloud can protect critical data stored in the cloud. But it’s important to make sure this firewall provides the same level of security and performance as an on-premises firewall.
Recently, Tolly Group used Keysight Technologies’ brand-new native cloud testing solution — CyPerf — to measure the performance of SonicWall NSv 470 virtual firewall in Amazon Web Services (AWS). AWS is the major public cloud vendor, with a projected 49% market share in enterprise cloud adoption for 2022. AWS recommends a shared responsibility model, meaning AWS is responsible for the security of the cloud, and the customer is responsible for security in the cloud.
What is SonicWall NSv virtual firewall?
SonicWall’s NSv Series virtual firewalls provide all the security advantages of a physical firewall, plus all the operational and economic benefits of the cloud — including system scalability and agility, speed of system provisioning, simple management and cost reduction. NSv delivers full-featured security tools including VPN, IPS, application control and URL filtering. These capabilities shield all critical components of the private/public cloud environments from resource misuse attacks, cross-virtual-machine attacks, side-channel attacks, and common network-based exploits and threats.
What is Keysight Technologies CyPerf?
Keysight CyPerf is the industry’s first cloud-native software solution that recreates every aspect of a realistic workload across a variety of physical and cloud environments. CyPerf deployed across a variety of heterogeneous cloud environments realistically models dynamic application traffic, user behavior and threat vectors at scale. It validates hybrid cloud networks, security devices and services for more confident rollouts.
Putting SonicWall NSv to the Test
Keysight Technologies and Tolly Group engineers tested a SonicWall NSv 470 virtual firewall running SonicOSX version 7. The AWS instance for the NSv 470 under test was AWS C5.2xlarge. The engineers deployed CyPerf agents on AWS C5.n2xlarge instances to be certain that the agents would have sufficient resources to stress the firewall under test. Each of two agent instances was provisioned with 8 vCPUs, 21GB memory and 25GbE network interfaces.
Test methodology and results
The engineers used three different traffic profiles to collect results — unencrypted HTTP traffic, encrypted (HTTPS/TLS) traffic, and Tolly’s productivity traffic mix, which includes five applications: JIRA, Office 365, Skype, AWS S3 and Salesforce. Engineers used CyPerf application mix tests to create the Tolly productivity mix and generate stateful, simulated application traffic.
The tests were run against three different security profiles:
1) Firewall: Basic firewall functions with no policy set
2) IPS: Firewall with the intrusion prevention system feature enabled
3) Threat Prevention: Firewall with IPS, antivirus, anti-spyware and application control features enabled
The results observed in the AWS public cloud environment are similar to the results observed in virtual environment.
Test
Unencrypted HTTP Traffic
Encrypted HTTPS/TLS Traffic
Firewall Throughput
7.70 Gbps
3.10 Gbps
IPS Throughput
7.60 Gbps
3.05 Gbps
Threat Prevention
7.40 Gbps
3.04 Gbps
Table 1: Test measurements for NSv 470 in AWS Cloud
Note: The table above highlights just a few of the test results. For complete results and test parameters, please download the report.
Conclusion
Most enterprises are moving their datacenters away from traditional on-premises deployments and to the cloud. It is imperative that security teams provide the same level of security for cloud server instances as they have been doing for on-premises physical servers. A next-generation firewall with advanced security services like IPS and application control is the first step to securing cloud instances against cyber threats.
In addition to security features, it also important to choose a firewall that provides the right level of performance needed for a given cloud workload. SonicWall NSv series offers a variety of models with performance levels suited to any size of cloud deployment, with all the necessary security features enabled. To learn more about how SonicWall NSv Series excels in AWS environments, click here.
Our lastest ShieldPRO 14.1 security plugin for WordPress brings a huge WordPress REST API integration along with some much-needed tweaks and enhancements.
Read on to discover everything we’ve included in your newest and favourite WordPress Securty Plugin.
Consider the work that’s involved with managing just 1 WordPress site and all its plugins, themes, updates, backups and, of course, security.
Now multiply that by the number of WordPress sites you run.
It’s a huge amount of work.
This is why we built iControlWP many years back and why we also integrated Shield Security into it to allow WordPress admins to manage their WordPress sites at scale, and also their WordPress security.
But not everyone wants to use iControlWP and that’s totally cool! But we still want to open up management of Shield to folk that need to scale their WordPress security.
This is where our new WordPress REST API integration comes in. It leverages the very thorough platform that the WordPress Core provides, letting us build a REST API that is powerful, secure and easy to maintain.
Many clients won’t have a need for our REST API directly, but you may use tools and services that could take advantage of if you asked them to.
This involved a major revamp of the UI and the tables that display the logs.
As you can imagine, these tables and data set can grow very large, particularly for busy websites.
Since we were loading a large dataset all at once, browsing these log tables became tedious and slow. For high traffic sites, it would unusable in some cases resulting in loading errors!
So we went back to our core implementation (again) and made the entire thing dynamic. Instead of loading all the records, we only load precisely what we need. This makes the initial loading near-instant.
The pagination will be a bit slower than what you’re used to – but this is because we’re loading just the log records you need, when you need them.
We’ve also adjusted the traffic log database table structure to help us speed all this along and provide more useful information right where you need it.
This is a major reworking and we hope you’ll love it!
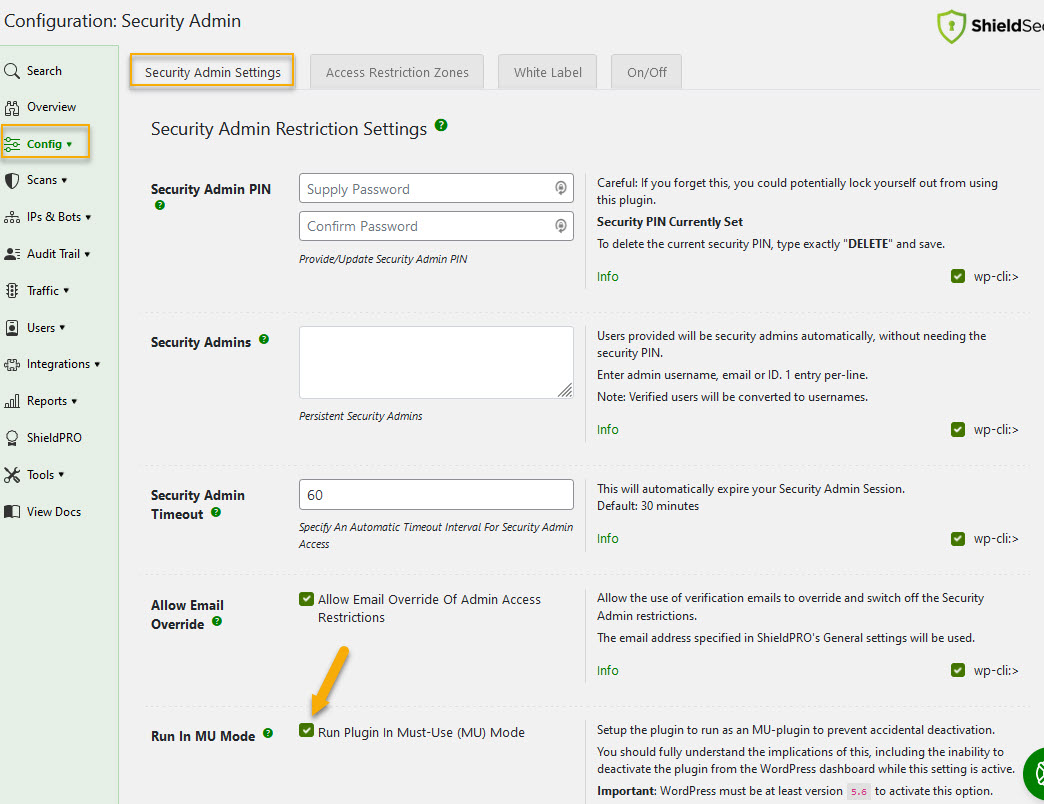
#3 Run Shield As A “Must-Use” (MU) Plugin
If you’ve never heard of a must-use WordPress plugin, don’t worry, you’re not alone.
They’re installed in a different directory (/wp-content/mu-plugins/) instead of the default (/wp-content/plugins/).
So why would you want to switch Shield to be an MU plugin?
In much the same way as Shield offers the Security Admin module to protect against tampering, you could set Shield to be an MU plugin to prevent the plugin from being disabled accidentally, maliciously.
It’ll also ensure Shield executes before other plugins. While this won’t offer an advantage currently, we’ll soon adjust some Shield’s code to block malicious requests much earlier in the WordPress load.
What actually happens when you enable MU Mode?
The core of the Shield plugin will remain in the normal installation directory- /wp-content/plugins/.
Shield will then create a new file in the MU directory that loads the normal Shield plugin. When this happens you’ll see 2x Shield plugins installed on your site as shown below:
How can you disable Shield after enabling MU Mode?
Once MU mode is enabled, you can’t disable the normal Shield plugin from the WordPress dashboard. This is normal WordPress behviour.
However, you can simple revert the option within Shield’s settings to disable MU Mode, and then return the plugins screen and disable Shield like any other plugin.
The setting for MU Mode is found within the Security Admin module and doesn’t require a Security Admin PIN to be set.
Shield’s MU Mode plugin option
#4 Better Detection Of Incorrect Application Passwords
Until now Shield wasn’t correctly spotting when these application password login attempts were failing. We’ve added some new events and logging and we’ll even increase the offense counter for an IP address when the event is triggered.
We spotted these new events being triggered almost immediately after we put them live for testing.
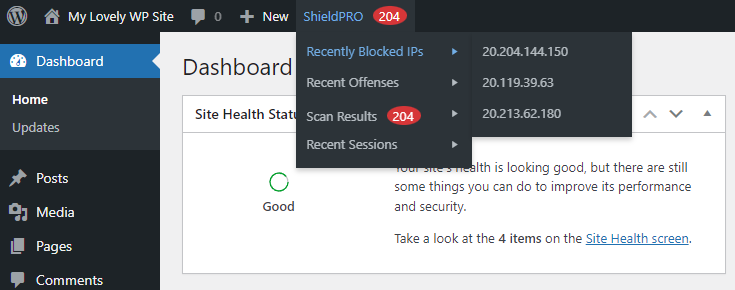
#5 More Quick Access Data In Admin Bar
Some time ago we add a top menu to the WordPress admin bar to help indicate when Shield found some scan items that warrant further investigation.
The original WP Admin Bar addition by Shield Security
After prompting for some extra information by a client, we’ve made some new helpful additions to the menu (see image below).
Shield’s Additional WP Admin Bar Items
Each of these additions provide helpful links to the item in question, for example:
Recently Blocked IPs and Offenses link to the IP Analyse Tool for the specific IP in-question.
Recent Sessions links to the Shield Sessions table and the individual session item in the menu links to the profile of the given user.
On March 10, 2022 the Wordfence Threat Intelligence team initiated the responsible disclosure process for a vulnerability we discovered in “SiteGround Security”, a WordPress plugin that is installed on over 400,000 sites. This flaw makes it possible for attackers to gain administrative user access on vulnerable sites when two-factor authentication (2FA) is enabled but not yet configured for an administrator.
Wordfence Premium, Wordfence Care, and Wordfence Response received a set of firewall rules on March 10, 2022 to provide protection against any attackers trying to exploit this vulnerability. Wordfence Free users will receive this same protection 30 days later on April 9, 2022
After sending the full disclosure details to the SiteGround security team on March 10, 2022 a patch was released the next day on March 11, 2022. While the plugin was partially patched immediately, it wasn’t optimally patched until April 7, 2022.
Sites hosted on the SiteGround platform have automatically been updated to the patched version while those hosted elsewhere will require a manual update, if auto-updates are not enabled for the plugin. We strongly recommend ensuring that your site has been updated to the latest patched version of “SiteGround Security”, which is version 1.2.6 at the time of this publication.
SiteGround Security is a plugin designed to enhance the security of WordPress installations via several features like login security including 2FA, general WordPress hardening, activity monitoring, and more. It’s also worth noting that it comes pre-installed on all SiteGround hosted WordPress sites. Unfortunately, the 2FA functionality of the plugin was insecurely implemented making it possible for unauthenticated attackers to gain access to privileged accounts.
When two-factor authentication is enabled, it requires all administrative and editor users to set-up two factor authentication. This requirement is triggered when the site’s administrative and editor users log into the site for the first time after 2FA has been enabled at which time they are prompted to configure 2FA for their account. This means that there will be a period of time between 2FA being enabled on a site and each user configuring it for the account.
During this interim period, attackers could hijack the 2FA set-up process. The plugin had a flaw that made it so that attackers could completely bypass the first step of authentication, which requires a username and password, and access the 2FA set-up page for users that had not configured 2FA yet.
It was as simple as supplying the user ID they would like to compromise via the sg-user-id parameter, along with a few other parameters to indicate that they would like to trigger the initial 2FA configuration process.
The following validate_2fa_login() function shows the process by which a user-supplied ID is validated. If the results from the check_authentication_code() function and the sg_security_2fa_configured user meta retuned false, which indicated that 2FA hasn’t yet been configured for that user, then the plugin would load the 2fa-initial-setup-form.php template which displays the QR code and 2FA secret needed to configure the authenticator app for the user supplied ID.
</pre><pre>publicfunctionvalidate_2fa_login( $user) {// Bail if there is no valid user authentication.if( ! isset( $_POST['sg-user-id'] ) ) { // phpcs:ignorereturn;}$result= $this->check_authentication_code( wp_unslash( $_POST['sgc2facode'] ), wp_unslash( $_POST['sg-user-id'] ) ); // phpcs:ignore// Check the result of the authtication.if( false === $result) {if( 0 == get_user_meta( $_POST['sg-user-id'], 'sg_security_2fa_configured', true ) ) { // phpcs:ignore// Arguments for initial 2fa setup.$args= array('template'=> '2fa-initial-setup-form.php','qr'=> get_user_meta( $_POST['sg-user-id'], 'sg_security_2fa_qr', true ), // phpcs:ignore'secret'=> get_user_meta( $_POST['sg-user-id'], 'sg_security_2fa_secret', true ), // phpcs:ignore'error'=> esc_html__( 'Invalid verification code!', 'sg-security'),'action'=> esc_url( add_query_arg( 'action', 'sgs2fa', wp_login_url() ) ),);} else{// Arguments for 2fa login.$args= array('template'=> '2fa-login.php','error'=> esc_html__( 'Invalid verification code!', 'sg-security'),'action'=> esc_url( add_query_arg( 'action', 'sgs2fa', wp_login_url() ) ),);}$this->load_form( wp_unslash( $_POST['sg-user-id'] ), $args); // phpcs:ignore}// Set the auth cookie.wp_set_auth_cookie( wp_unslash( $_POST['sg-user-id'] ), intval( wp_unslash( $_POST['rememberme'] ) ) ); // phpcs:ignore</pre><pre>
The authentication QR code and secret key displayed that would be displayed to potentially unauthorized users.
The returned QR code and secret key are the only things needed to connect the user account with an authentication mechanism, such as Google Authenticator. Attackers were able to use this to connect their authentication app with the account and successfully use a code to pass the “second factor of authentication.” This function would then set the user authentication cookies via the wp_set_auth_cookie() function using the user supplied ID from the sg-user-id parameter which effectively logs the attacker in as that user. Due to the default configuration of the plugin, this account would most likely be a privileged user like an administrator or editor. It’s also worth noting that the function returns the back-up codes which could be used via the weakness outlined in the next section.
To sum it up, there was no validation on the validate_2fa_login() function that the identity a user was claiming was in fact legitimate. As such attackers could bypass the first authentication mechanism, a username/password pair, which is meant to prove identity and successfully log in, due to a weakness in the second authentication mechanism, the 2FA process. When successful, an attacker could completely infect a site by exploiting this vulnerability.
In addition to the above outlined vulnerability, the method in which 2FA back-up code authentication was handled made it possible for attackers to log in if they were able to brute force a back-up code for a user or compromise it via other means such as SQL Injection.
Diving deeper, the plugin registered the validate_2fabc_login() function which validated the supplied backup code through the validate_backup_login() function using the user supplied user ID from the sg-user-id parameter along with the back-up code supplied via the sgc2fabackupcode parameter. If the back-up code was found in the array of stored back-up codes for that user, then the function would use the wp_set_auth_cookie() function to set the authentication cookies for the supplied user ID. If that user ID belonged to an administrator, the attacker would effectively be logged in as an administrator.
</pre><pre>publicfunctionvalidate_2fabc_login() {$result= $this->validate_backup_login( wp_unslash( $_POST['sgc2fabackupcode'] ), wp_unslash( $_POST['sg-user-id'] ) ); // phpcs:ignore// Check the result of the authtication.if( false === $result) {$this->load_form(wp_unslash( $_POST['sg-user-id'] ), // phpcs:ignorearray('template'=> '2fa-login-backup-code.php','action'=> esc_url( add_query_arg( 'action', 'sgs2fabc', wp_login_url() ) ),'error'=> esc_html__( 'Invalid backup code!', 'sg-security'),));}// Set the auth cookie.wp_set_auth_cookie( wp_unslash( $_POST['sg-user-id'] ), intval( wp_unslash( $_POST['rememberme'] ) ) ); // phpcs:ignore
Similarly to the previous vulnerability, the issue here is that there was no true identity validation for the authentication, which indicates an authorization weakness. The function performed no checks to verify that a user had previously authenticated prior to entering the 2FA back-up code, and as such they did not need to legitimately log in prior to being logged in while using a back-up code. This meant that there were no checks to validate that a user was authorized to use a back-up code to perform the second factor of authentication that would log them in.
Though the risk in this case is lower, the backup codes were 8 digits long and entirely numeric, so an attacker could potentially brute force one of the 8 back-up codes and automatically be logged in without knowing a username and password combination for an administrative user.
While this might not be practical to attempt on most servers, a patient adversary attacking a well-provisioned server capable of processing a large number of requests at once would have a high chance of eventually gaining access unless the brute force attempts were stopped by another mechanism, such as the Wordfence plugin’s built-in brute force protection or rate limiting rules.
Further, this vulnerability could be used in conjunction with another vulnerability, such as SQL injection, where an attacker would be able to compromise the 2FA back-up codes that are stored in the database and then subsequently use them to log in without needing to crack the password of an administrative user which would likely be significantly stronger. In both cases, the impact would be significant as an attacker could gain administrative access to the compromised WordPress site which could be used for complete site infection.
An Important Security Reminder: Audit Your WordPress Site’s User Accounts
This vulnerability serves as an important reminder to audit your WordPress site’s user accounts. This means identifying any old and unused user accounts that have been inactive for an extended period of time and/or are likely to never be used again and removing them or completely stripping the user’s capabilities. This vulnerability could easily be exploited on sites where the site owner enabled 2FA, which is required for all administrative and editor users, and had old inactive administrative/editor user accounts on the site that an attacker could target. Considering accounts that are no longer active are unlikely to log in after the 2FA setting has been enabled, the 2FA for those accounts would not be configured leaving the site ripe for exploitation by any attackers exploiting the vulnerability.
A situation involving a similar security issue involving insecure 2FA was reported by the CISA in conjunction with the FBI a few weeks ago, around the same time we discovered this vulnerability. In the Cybersecurity Advisory (CSA) by the CISA, it was disclosed that a threat actor was able to successfully brute force a dormant user’s account credentials, and due to a default 2FA setting that would allow dormant users to re-enroll a new device for 2FA during the next active log in, the threat actor was able to connect the 2FA secret to their own account and retrieve the code needed to pass the second factor of authentication. Once the threat actor gained initial access to the system they were able to escalate their privileges by exploiting the “PrintNightmare” vulnerability, which you can read more about here, and steal sensitive information from across the organization’s network. This goes to show that attackers are definitely looking for flaws like the one disclosed today to exploit and any site can be a target. As such, it’s important to actively maintain and validate the security of your site through regularly performed professional or self-conducted security audits and penetration tests, which is a service Wordfence provides. Security is an active and continuous process.
Timeline
March 10, 2022 – Conclusion of the plugin analysis that led to the discovery of two Authentication Bypass Vulnerabilities in the “SiteGround Security” WordPress plugin. We deploy firewall rules to protect Wordfence Premium, Wordfence Care, and Wordfence Response users. We send the full disclosure details to SiteGround in accordance with their responsible disclosure policy. March 11, 2022 – The CTO of SiteGround responds indicating that a patch has been released. We review the patch and inform them that it is insufficient. They release an additional patch. March 11, 2022 – A patched version of the plugin is released as version 1.2.3. We suggest further security enhancements to the functionality. March 16, 2022 – An update is made that reduces the security of the 2FA functionality, we follow-up again to suggest better security enhancements to the functionality. The CTO assures us that they are working on it. April 6, 2022 – A fully and optimally patched version of the plugin is released as version 1.2.6. April 9, 2022 – Wordfence Free users receive the firewall rules.
Conclusion
In today’s post, we detailed a flaw in the “SiteGround Security” plugin that made it possible for unauthenticated attackers to gain access to administrative user accounts in instances where 2-Factor Authentication was enabled, though not yet fully set up, and in cases where an attacker could successfully brute force a back-up code. This could easily be used by an attacker to completely compromise a site. This flaw has been fully patched in version 1.2.6.
We strongly recommend ensuring that your site has been updated to the latest patched version of “SiteGround Security”, which is version 1.2.6 at the time of this publication.
Wordfence Premium, Wordfence Care, and Wordfence Response received a set of firewall rules on March 10, 2022 to provide protection against attempts by attackers to exploit this vulnerability. Wordfence Free users will receive this same protection 30 days later on April 9, 2022
If you believe your site has been compromised as a result of this vulnerability or any other vulnerability, we offer Incident Response services via Wordfence Care. If you need your site cleaned immediately, Wordfence Response offers the same service with 24/7/365 availability and a 1-hour response time. Both Wordfence Care and Wordfence Response include hands-on security support that provide you with ongoing assistance from our incident response team, should you need it.
Special thanks to the team at SiteGround, for responding swiftly and working quickly to get a patch out to protect their customers and working to further secure the 2FA component.


 Hosting | Unlimited SSD Hosting powered by LiteSpeed Servers + CDN")


