In part one, we discussed what numerical control machines do and their basic concepts. These concepts are important to understand the machines better, offering a wider view of their operations. We also laid out how we evaluated the chosen vendors for our research.
For this blog, we will continue discussing our evaluated vendors and highlighting findings that we discovered during our research.
Haas
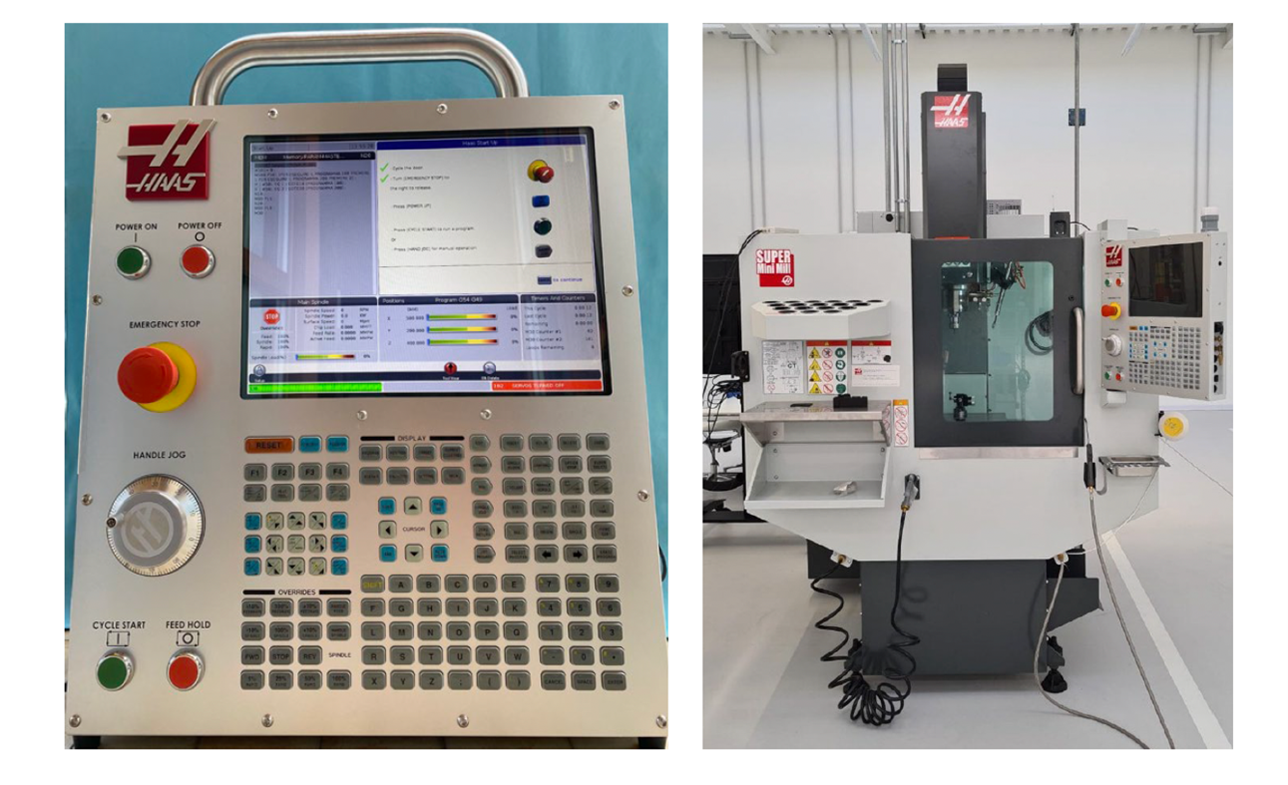
Figure 1. The Haas simulator we used for preliminary testing (left) and the Haas CNC machine (Super Mini Mill 2) by Celada we used for verification (right)
Haas was the first vendor we focused on because of the fast availability of its controller. We began our analysis by conducting port scanning on the controller simulator and identifying the protocols exposed by the controller. After that, we evaluated the options with which an attacker could abuse the protocols to perform attacks aimed at the security of the machine and verified these attacks in practice on a real-world machine installation.
Okuma
Figure 2. The Okuma simulator we used for the development of the malicious application and during the initial testing
Okuma stands out in the market of CNC controllers for one interesting feature: the modularity of its controller. While the vendor offers in the device’s simplest form a tiny controller, it also provides a mechanism, called THINC API, to highly customize the functionalities of the controller. With this technology, any developer can implement a program that, once installed, runs in the context of the controller, in the form of an extension. This approach is very similar to how a mobile application, once installed, can extend a smartphone’s functionalities.
Heidenhain
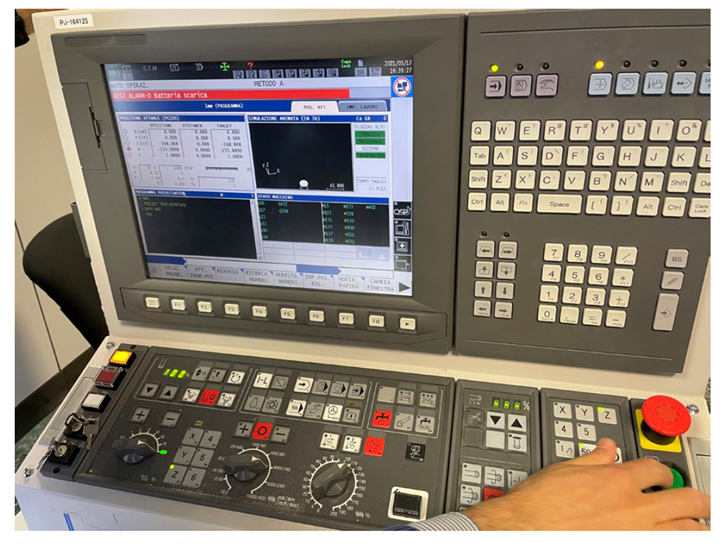
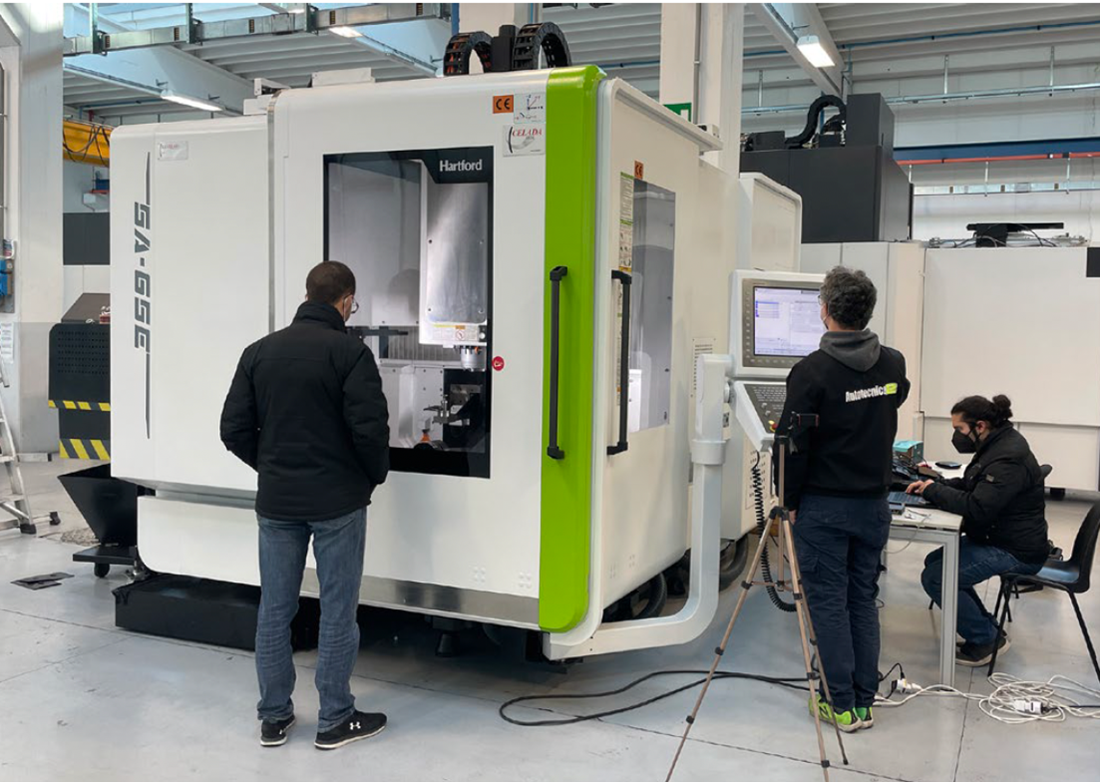
Figure 3. The Hartford 5A-65E machine, running on a Heidenhain TNC 640 controller, that we used in our experiments at Celada
In the spirit of the Industry 4.0 paradigm, Heidenhain offers the Heidenhain DNC interface to integrate machines on modern, digital shop floors. Among the many scenarios, Heidenhain DNC enables the automatic exchange of data with machine and production data acquisition (MDA/PDA) systems, higher level enterprise resource planning (ERP) and manufacturing execution systems (MESs), inventory management systems, computer-aided design and manufacturing (CAD/CAM) systems, production activity control systems, simulation tools, and tool management systems
In our evaluation, we had access to the library provided by Heidenhain to the integrators to develop interfaces for the controller. The manufacturer provides this library, called RemoTools SDK,35 to selected partners only.
Fanuc
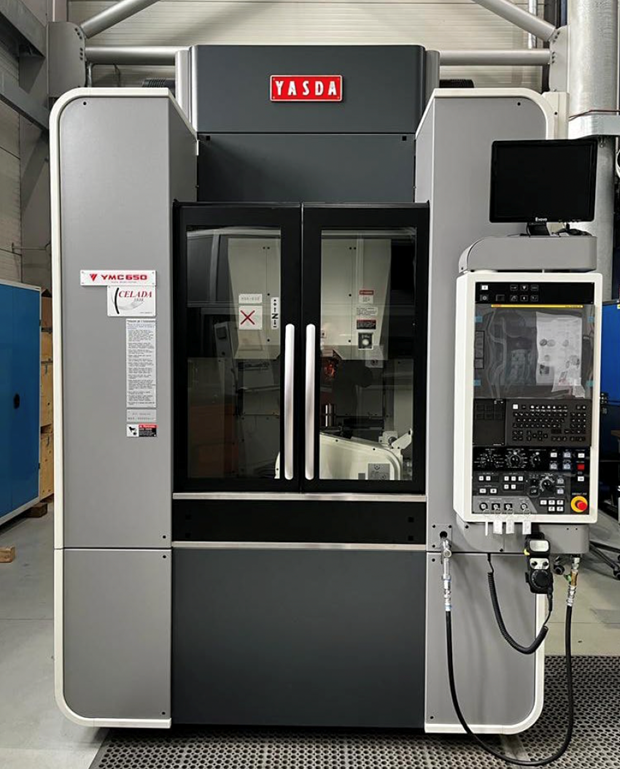
Figure 4. The Yasuda YMC 430 + RT10 machine, running on a Fanuc controller, that we used in our experiments at the Polytechnic University of Milan
Like Heidenhain, Fanuc offers an interface, called FOCAS,36 for the integration of CNC machines in smart network environments. Even though this technology offers a restricted set of remote-call possibilities compared with the other vendors’ (that is, a limited number of management features), our experiments showed that a miscreant could potentially conduct attacks like damage, DoS, and hijacking.
What we found
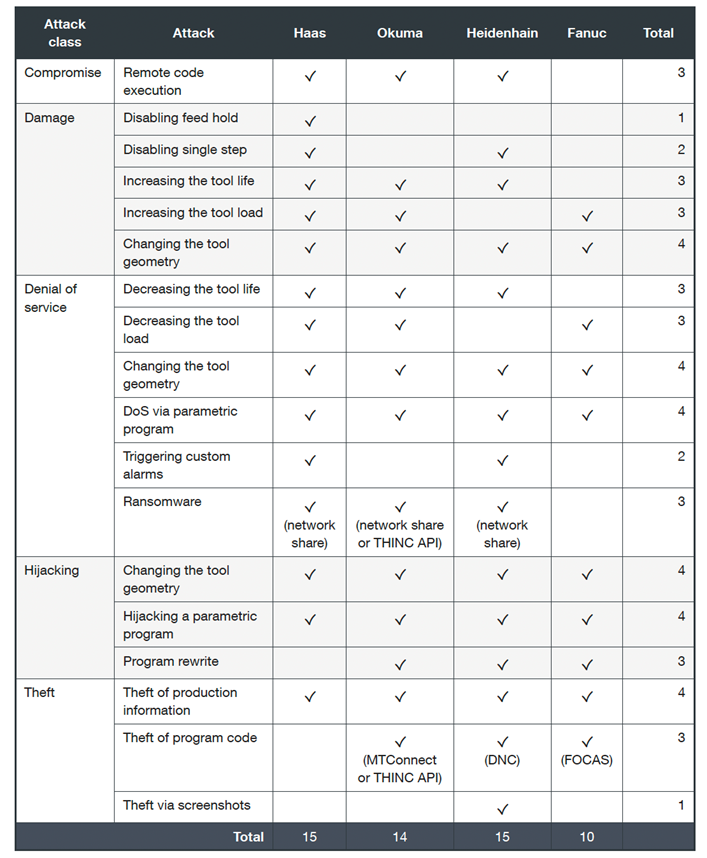
As our evaluation identified 18 different attacks (or variations), we grouped them into five classes: compromise, damage, and denial of service (DoS):
Table 1. A summary of the attacks we identified in our research
Controller manufacturers like Haas, Okuma, and Heidenhain have been found to have a similar number of issues, around 15. Fanuc had 10 confirmed attacks. Unfortunately, our research shows that this domain lacks awareness concerning security and privacy. This creates serious and compelling problems.
The need for automation-facing features like remote configuration of tool geometry or parametric programming with values determined by networked resources is becoming more common in manufacturing.
With these findings, we determined countermeasures that enterprises can do to mitigate such risks, which we’ll discuss in our final installation. In the last part, we’ll also discuss our responsible disclosure process.
Computer numerical controls (CNCs) are machines used to produce products in a factory setting. They have been in use for many years, and in the last decade, their use has become more widespread due to increased connectivity. This increased connectivity has made them more software-dependent and therefore more vulnerable to attacks. This vulnerability is due to the heterogeneity of technologies used in factories and the lack of awareness among users of how to best secure these systems.
This three-part blog series explores the risks associated with CNC machines. We performed a security evaluation on four representative vendors and analyzed technological developments that satisfy the Industry 4 .0 paradigm while conducting practical attacks against real-world installations.
For our research, we picked vendors that are:
Are geographically distributed (that is, with headquarters and subsidiaries spread across the world) and resell on a global scale.
Have been on the market for decades.
Have a large, estimated size, for example, with a total annual revenue of at least a billion US dollars.
Use technologies widely adopted in the domain and present in different manufacturing sectors.
Understanding numerical control machines
A machine tool is a device that uses cutting tools to remove material from a workpiece. This process, called machining, results in the desired geometry of the workpiece. Machining is a subtractive process, meaning that the material is removed from the original geometry to create the desired shape.
Numerical control (NC) is a technology that allows machines to be controlled by computers. This technology has revolutionized machine tools, making them more accurate and allowing for greater flexibility in their use. NC machine tools are now widely used in production systems and can be used on other types of machines, such as lasers and bending machines.
Basic concepts
To facilitate the understanding of what we discovered in our research, we introduce some basic concepts related to the use of machine tools:
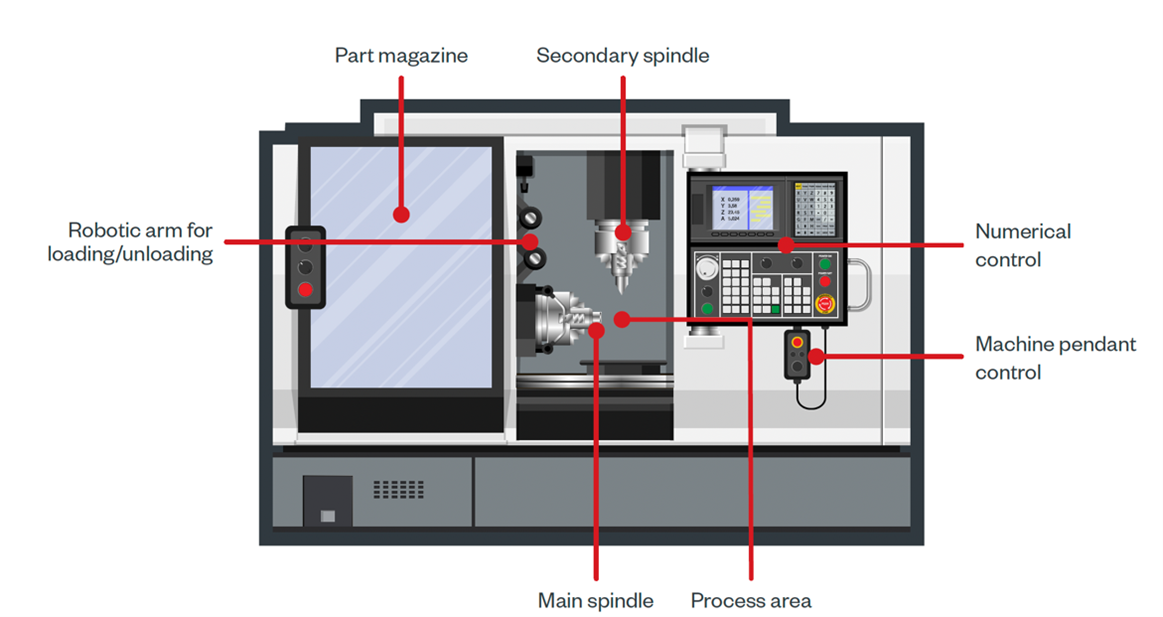
Figure 1. Parts of a CNC machine
Numerical control. The NC is the most critical element of the machine, as it controls the entire process. This system includes visual programming functions to speed up the setup of production cycles. Additionally, the NC is always equipped with a human-machine interface (HMI) to facilitate operator interaction with control.
Programming. Initially developed in the 1950s, G-code (aka RS-274) is the predominant programming language in the world of machine tools. It is presented as a series of instructions initialized by a letter address, which follow one another on successive lines separated by paragraph breaks; each of these lines is called a “block.” Each letter address specifies the type of movement or function called by the user in that part of the program.
Parametric programming. Parametric programming is a way to make programs that are adjustable to different values. This is done by using variables that the user can input, and then the program will change based on those values. This is used in machine tools to help with things like feedback and closed-loop controls between production systems.
Single step. This allows for running the work program one line of code at a time. In this way, the operator can check the correspondence of executed code to the best possible working conditions and determine if intervention by modification is necessary.
Feed hold. The “feed hold” function is mainly used to check the correct execution of complex features by inspecting the work area before proceeding with further steps in the process. In fact, chips coming from the removal of the material being processed could be deposited in work areas or on measuring probes, potentially invalidating the measurements, or inducing defects downstream of the machining if they are not removed.
Tools. The machining process is a manufacturing technique that uses an element called a tool to remove excess material from a raw piece. The tool cutting is made possible by the relative speed between the manufacturing part and the cutting tool edge, also known as the cutting speed or surface speed. In addition to this parameter, the feed rate (speed of tool moving along workpiece) also affects chip removal process. Many types of tools are available depending on the type of processing needed.
Evaluating vendors
For all vendors that we included in our research scope, we conducted an equal evaluation of their machines:
The “Industry 4.0–ready” technologies are interfaces and related protocols used by machines in smart environments to transmit information outwards, towards centralized systems like production data for better management or cost reduction; they also enable remote management such that an operator can change the executed program without needing local access.
We identified potential vulnerabilities in the exposed services using automated scanners like Nessus. These included known or misconfigurations that could pose as dangerous, which we ignored to focus on domain-specific abuse cases for CNC interfaces instead.
We then went deep into the CNC-specific technologies previously identified, by analyzing the risks of abuses and conducting practical attacks on the controllers. For this, we developed attack tools that exploited the weaknesses we identified in the domain-specific interfaces with the aid of proprietary APIs we got access to.
We collected evidence of our concerns and collaborated with vendors to suggest mitigations. All evidence came from tests we conducted on real-world installations, but we also used simulators for preliminary testing or when the machines were not immediately available.
Now that we have established a better understanding of numerical control machines and their basic concepts, we will further explore the vendors we chose for this research in part two of the series. There, we’ll discuss how we evaluated vendors and what we discovered during our research.
When the headlines focus on breaches of large enterprises like the Optus breach, it’s easy for smaller businesses to think they’re not a target for hackers. Surely, they’re not worth the time or effort?
Unfortunately, when it comes to cyber security, size doesn’t matter.
Assuming you’re not a target leads to lax security practices in many SMBs who lack the knowledge or expertise to put simple security steps in place. Few small businesses prioritise cybersecurity, and hackers know it. According to Verizon, the number of smaller businesses being hit has climbed steadily in the last few years – 46% of cyber breaches in 2021 impacted businesses with fewer than 1,000 employees.
Securing any business doesn’t need to be complex or come with a hefty price tag. Here are seven simple tips to help the smaller business secure their systems, people and data.
Every organisation has anti-virus on their systems and devices, right? Unfortunately, business systems such as web servers get overlooked all too often. It’s important for SMBs to consider all entry points into their network and have anti-virus deployed on every server, as well as on employees’ personal devices.
Hackers will find weak entry points to install malware, and anti-virus software can serve as a good last-resort backstop, but it’s not a silver bullet. Through continuous monitoring and penetration testing you can identify weaknesses and vulnerabilities before hackers do, because it’s easier to stop a burglar at the front door than once they’re in your home.
Your perimeter is exposed to remote attacks because it’s available 24/7. Hackers constantly scan the internet looking for weaknesses, so you should scan your own perimeter too. The longer a vulnerability goes unfixed, the more likely an attack is to occur. With tools like Autosploit and Shodan readily available, it’s easier than ever for attackers to discover internet facing weaknesses and exploit them.
Even organisations that cannot afford a full-time, in-house security specialist can use online services like Intruder to run vulnerability scans to uncover weaknesses.
Intruder is a powerful vulnerability scanner that provides a continuous security review of your systems. With over 11,000 security checks, Intruder makes enterprise-grade scanning easy and accessible to SMBs.
Intruder will promptly identify high-impact flaws, changes in the attack surface, and rapidly scan your infrastructure for emerging threats.
Your attack surface is made up of all the systems and services exposed to the internet. The larger the attack surface, the bigger the risk. This means exposed services like Microsoft Exchange for email, or content management systems like WordPress can be vulnerable to brute-forcing or credential-stuffing, and new vulnerabilities are discovered almost daily in such software systems. By removing public access to sensitive systems and interfaces which don’t need to be accessible to the public, and ensuring 2FA is enabled where they do, you can limit your exposure and greatly reduce risk.
A simple first step in reducing your attack surface is by using a secure virtual private network (VPN). By using a VPN, you can avoid exposing sensitive systems directly to the internet whilst maintaining their availability to employees working remotely. When it comes to risk, prevention is better than cure – don’t expose anything to the internet unless it’s absolutely necessary!
New vulnerabilities are discovered daily in all kinds of software, from web browsers to business applications. Just one unpatched weakness could lead to full compromise of a system and a breach of customer data; as TalkTalk discovered when 150,000 of its private data records were stolen.
According to a Cyber Security Breaches Survey, businesses that hold electronic personal data of their customers are more likely than average to have had breaches. Patch management is an essential component of good cyber hygiene, and there are tools and services to help you check your software for any missing security patches.
Ransomware is on the increase. In 2021, 37% of businesses and organisations were hit by ransomware according to research by Sophos. Ransomware encrypts any data it can access, rendering it unusable, and can’t be reversed without a key to decrypt the data.
Data loss is a key risk to any business either through malicious intent or a technical mishap such as hard disk failure, so backing up data is always recommended. If you back up your data, you can counter attackers by recovering your data without needing to pay the ransom, as systems affected by ransomware can be wiped and restored from an unaffected backup without the attacker’s key.
Cyber attackers often rely on human error, so it’s vital that staff are trained in cyber hygiene so they recognise risks and respond appropriately. The Cyber Security Breaches Survey 2022 revealed that the most common types of breaches were staff receiving fraudulent emails or phishing attacks (73%), followed by people impersonating the organisation in emails or online (27%), viruses, spyware and malware (12%), and ransomware (4%).
Increasing awareness of the benefits of using complex passwords and training staff to spot common attacks such as phishing emails and malicious links, will ensure your people are a strength rather than a vulnerability.
Cyber security measures should always be appropriate to the organisation. For example, a small business which handles banking transactions or has access to sensitive information such as healthcare data should employ far more stringent security processes and practices than a pet shop.
That’s not to say a pet shop doesn’t have a duty to protect customer data, but it’s less likely to be a target. Hackers are motivated by money, so the bigger the prize the more time and effort will be invested to achieve their gains. By identifying your threats and vulnerabilities with a tool like Intruder, you can take appropriate steps to mitigate and prioritize which risks need to be addressed and in which order.
Attacks on large companies dominate the news, which feeds the perception that SMBs are safe, when the opposite is true. Attacks are increasingly automated, so SMBs are just as vulnerable targets as larger enterprises, more so if they don’t have adequate security processes in place. And hackers will always follow the path of least resistance. Fortunately, that’s the part Intruder made easy…
Intruder is a cyber security company that helps organisations reduce their attack surface by providing continuous vulnerability scanning and penetration testing services. Intruder’s powerful scanner is designed to promptly identify high-impact flaws, changes in the attack surface, and rapidly scan the infrastructure for emerging threats. Running thousands of checks, which include identifying misconfigurations, missing patches, and web layer issues, Intruder makes enterprise-grade vulnerability scanning easy and accessible to everyone. Intruder’s high-quality reports are perfect to pass on to prospective customers or comply with security regulations, such as ISO 27001 and SOC 2.
Intruder offers a 14-day free trial of its vulnerability assessment platform. Visit their website today to take it for a spin!
Found this article interesting? Follow us on Twitter and LinkedIn to read more exclusive content we post.
Wordfence 7.8.0 is out! A huge thanks to our quality assurance team, our team of developers and our ops team for planning, implementing and releasing Wordfence 7.8.0. This release has several fixes to make Wordfence even more robust, and includes a fundamental change in the way our signup works.
Since our launch in 2012, the signup flow for Wordfence has not required you to leave your own WordPress installation and come to our website. We briefly required this, but removed it 10 days after launch.
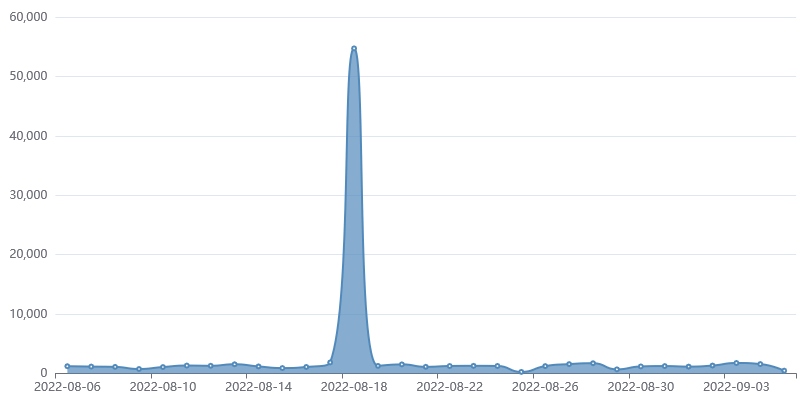
Wordfence has grown to a community of over 4 million active websites and a very large number of paying customers. Wordfence is now downloaded over 30,000 times every day. Today we spend a huge amount of money on providing the services that our free and paid community needs to stay secure. Privacy laws have also changed profoundly since 2012.
Scaling up our operations has required us to get better at capacity planning, which means knowing how many installations we’re getting, how many are bots or spam, who is communicating with our servers during a scan, and whether it is a real website running Wordfence, a nulled plugin or someone simply using our resources to power something unrelated to Wordfence.
Privacy laws have also added the need for us to be able to communicate with our free customers to alert them to privacy policy and terms of use changes.
This has required us to adjust our signup flow to match other popular plugins out there, like Akismet. Many customers may find this is a clearer signup workflow because we no longer need to shoehorn a complex user experience into a set of modals on a site where we don’t control presentation.
This change will not disrupt any of our existing free or paid customers. If you have a free API key that Wordfence automatically fetched when you installed it, that key will remain valid and your site will continue uninterrupted. If you have a paid Wordfence API key, your key will continue to work without disruption. We are not requiring any existing customers to visit our site to install a new key.
The only users this affects are new free Wordfence installations. The installation process is quite simple. You install Wordfence and are directed to our site. You can choose a paid or free option. If you choose the paid option, you’ll go through our checkout process as usual. If you choose free, we’ll email you your key. The email includes a button that you can click to automatically take you back to your site where your key will be automatically installed. The email also includes your Wordfence key in case you need to manually install it.
A side benefit of this new process is that our free customers will now have a record of their API key in their email inbox for future reference.
We’re including the full changelog for Wordfence 7.8.0 below. You’ll notice that we’ve mentioned that additional WooCommerce support is on its way, so keep an eye out for that.
Thanks for choosing Wordfence!
Mark Maunder – Wordfence Founder & CEO.
Wordfence 7.8.0 Changelog
Change: Updated Wordfence registration workflow
For new installations of Wordfence, registering for a new license key now occurs on wordfence.com instead of within the plugin interface. Allows us to provide a more complete signup experience for our free and paid customers. Also allows us to do better capacity planning.
Improvement: Added feedback when login form is submitted with 2FA
When logging in with two-factor authentication, the “Log In” button is now disabled during processing, so that it is clear the button was clicked. Sometimes on slower sites, it was hard to tell whether the login was going through, leading users to click more than once.
Fix: Restored click support on login button when using 2FA with WooCommerce
Clicking the “Log In” button after entering a 2FA code on a WooCommerce site was no longer working, while pressing “Enter” still worked. Both methods now work as expected. Additional support for WooCommerce is coming in the near future.
Fix: Corrected display issue with reCAPTCHA score history graph
The reCAPTCHA score history graph was sometimes displayed larger than intended when switching tabs. It now has a set size, so that it does not become unusually large.
Fix: Prevented errors on PHP caused by corrupted login timestamps
One Wordfence user reported an error on PHP 8, and upon investigation, we found that a timestamp for some user records contained invalid data instead of the expected timestamp. We don’t expect this to occur on other sites, but in case another plugin had modified the value, we now check the value before formatting it as a timestamp.
Fix: Prevented deprecation notices on PHP 8.2 related to dynamic properties
Future versions of PHP will no longer allow use of variables on an object unless they are previously declared. This is still allowed even in PHP 8.2, but PHP 8.2 can log a warning about the upcoming change, so Wordfence has been updated to declare a few variables where necessary, before using them.
If you haven’t patched CVE-2022-22954 yet, now would be an excellent time to do so.
Hackers have been exploiting a now-patched vulnerability in VMware Workspace ONE Access in campaigns to install various ransomware and cryptocurrency miners, a researcher at security firm Fortinet said on Thursday.
FURTHER READING
2 vulnerabilities with 9.8 severity ratings are under exploit. A 3rd loomsCVE-2022-22954 is a remote code execution vulnerability in VMware Workspace ONE Access that carries a severity rating of 9.8 out of a possible 10. VMware disclosed and patched the vulnerability on April 6. Within 48 hours, hackers reverse-engineered the update and developed a working exploit that they then used to compromise servers that had yet to install the fix. VMware Workspace ONE access helps administrators configure a suite of apps employees need in their work environments.
In August, researchers at Fortiguard Labs saw a sudden spike in exploit attempts and a major shift in tactics. Whereas before the hackers installed payloads that harvested passwords and collected other data, the new surge brought something else—specifically, ransomware known as RAR1ransom, a cryptocurrency miner known as GuardMiner, and Mirai, software that corrals Linux devices into a massive botnet for use in distributed denial-of-service attacks.
“Although the critical vulnerability CVE-2022-22954 is already patched in April, there are still multiple malware campaigns trying to exploit it,” Fortiguard Labs researcher Cara Lin wrote. Attackers, she added, were using it to inject a payload and achieve remote code execution on servers running the product.
The Mirai sample Lin saw getting installed was downloaded from http[:]//107[.]189[.]8[.]21/pedalcheta/cutie[.]x86_64 and relied on a command and control server at “cnc[.]goodpackets[.]cc. Besides delivering junk traffic used in DDoSes, the sample also attempted to infect other devices by guessing the administrative password they used. After decoding strings in the code, Lin found the following list of credentials the malware used:
hikvision
1234
win1dows
S2fGqNFs
root
tsgoingon
newsheen
12345
default
solokey
neworange88888888
guest
bin
user
neworang
system
059AnkJ
telnetadmin
tlJwpbo6
iwkb
141388
123456
20150602
00000000
adaptec
20080826
vstarcam2015
v2mprt
Administrator
1001chin
vhd1206
support
NULL
xc3511
QwestM0dem
7ujMko0admin
bbsd-client
vizxv
fidel123
dvr2580222
par0t
hg2x0
samsung
t0talc0ntr0l4!
cablecom
hunt5759
epicrouter
zlxx
pointofsale
nflection
admin@mimifi
xmhdipc
icatch99
password
daemon
netopia
3com
DOCSIS_APP
hagpolm1
klv123
OxhlwSG8
In what appears to be a separate campaign, attackers also exploited CVE-2022-22954 to download a payload from 67[.]205[.]145[.]142. The payload included seven files:
phpupdate.exe: Xmrig Monero mining software
config.json: Configuration file for mining pools
networkmanager.exe: Executable used to scan and spread infection
phpguard.exe: Executable used for guardian Xmrig miner to keep running
init.ps1: Script file itself to sustain persistence via creating scheduled task
clean.bat: Script file to remove other cryptominers on the compromised host
encrypt.exe: RAR1 ransomware
In the event RAR1ransom has never been installed before, the payload would first run the encrypt.exe executable file. The file drops the legitimate WinRAR data compression executable in a temporary Windows folder. The ransomware then uses WinRAR to compress user data into password-protected files.
The payload would then start the GuardMiner attack. GuardMiner is a cross-platform mining Trojan for the Monero currency. It has been active since 2020.
The attacks underscore the importance of installing security updates in a timely manner. Anyone who has yet to install VMware’s April 6 patch should do so at once.
[German]Since Monday, October 17, 2022, many Metro stores worldwide have been struggling with severe IT problems. I had already suspected a cyber attack on the Metro Group in a post and I had reports from Austria, from France as well as comments from German Metro customers as well as employees. However, a cyber attack remained unconfirmed so far. Now Metro AG has confirmed such an attack to heise – and on its website.
Advertising
Metro Group with IT problems
I had already reported about the IT problems at Metro Group in the blog post Cyber attack on Metro AG or just a IT break down? Austria, France, German (and more countries?) affected. Since Monday, October 17, 2022, Metro wholesales stores have been struggling with massive IT problems. No invoices or daily passes could be issued and online orders had also disappeared, Metro customers reported. A blog reader had provided me with the following photo of a Metro notice board.
Notification about IT disruption at a Metro wholesale store
The suspicion of a cyber attack has not been confirmed by company spokespersons till today (October 21, 2022). But I have had reports from German blog readers, reporting IT issues since days and some people told me, it’s a cyber attack as a root cause.
Not only Austria and France are affected, but Metro AG worldwide. In Germany, too, the same problem has existed since last Monday. No more stock or prices can be updated or checked in the store. The checkout system is still working but also sluggishly, resulting in long lines. If you want to reserve something digitally, that doesn’t work either.
One reader noted that from what he observed, the IT problems have been going on since Friday afternoon (October 14, 2022). A reader informed me on Facebook that their email systems had delivered a 442 connection Failed-Error when communicating with the Metro mail system last Monday. By the afternoon of October 19, 2022, communication with the Metro Group email system was working again – so something is happening.
Advertising
Metro confirms cyber attack
First a speaker from Metro AG confired to German IT magazine heise a cyber attack on it’s IT systems. After searching the Metro AG site today, I finally found the following statement. It says (translated in English):
Metro cyber attack confirmation (addenum: here is an English version)
T-Security Incident at METRO
METRO/MAKRO is currently experiencing a partial IT infrastructure outage for several technical services. METRO’s IT team, together with external experts, immediately launched a thorough investigation to determine the cause of the service disruption. The latest results of the analysis confirm a cyber attack on METRO systems as the cause of the IT infrastructure outage. METRO AG has informed all relevant authorities about the incident and will of course cooperate with them in every possible way.
During the operation of METRO stores and the regular availability of services, disruptions and delays may occur. The teams in the stores have quickly set up offline systems to process payments. Online orders via the web app and online store are being processed, but there may be individual delays here as well.
We will continue to analyze and monitor the situation intensively and provide updates if necessary. METRO sincerely apologizes for any inconvenience this incident may cause to customers and business partners.
So they confirmed just a cyber attack, but stay tight lipped about the details. No information, whether it’s a ransomware infection nor about a possible attack vector.
Metro AG is a listed group of wholesale companies (for purchases in the gastronomy sector). Headquartered in Düsseldorf, the group employs more than 95,000 people in 681 stores worldwide, most of them in Germany. In Germany, the company mainly operates the Metro wholesale stores. Sales are 24.8 billion euros (2020).
Over 45,000 VMware ESXi servers inventoried by Lansweeper just reached end-of-life (EOL), with VMware no longer providing software and security updates unless companies purchase an extended support contract.
Lansweeper develops asset management and discovery software that allows customers to track what hardware and software they are running on their network.
As of October 15, 2022, VMware ESXi 6.5 and VMware ESXi 6.7 reached end-of-life and will only receive technical support but no security updates, putting the software at risk of vulnerabilities.
The company analyzed data from 6,000 customers and found 79,000 installed VMware ESXi servers.
Of those servers, 36.5% (28,835) run version 6.7.0, released in April 2018, and 21.3% (16,830) are on version 6.5.0, released in November 2016. In total, there are 45,654 VMware ESXi servers reaching End of Life as of today
The findings of Lansweeper are alarming because apart from the 57% that enter a period of elevated risk, there are also another 15.8% installations that run even older versions, ranging from 3.5.0 to 5.5.0, which reached EOL quite some time ago.
In summary, right now, only about one out of four ESXi servers (26.4%) inventoried by Lansweeper are still supported and will continue to receive regular security updates until April 02, 2025.
However, in reality, the number of VMware servers reaching EOL today, is likely far greater, as this report is based only on Lansweeper’s customers.
VMWare versions detected on net scans(Lansweeper)
The technical guidance for ESXi 6.5 and 6.7 will carry on until November 15, 2023, but this concerns implementation issues, not including security risk mitigation.
The only way to ensure you can continue to use older versions securely is to apply for the two-year extended support, which needs to be purchased separately. However, this does not include updates for third-party software packages.
For more details about EOL dates on all VMware software products, check out this webpage.
What does this mean?
When a software product reaches the end-of-life date, it stops receiving regular security updates. This means that admins should have already planned ahead and upgraded all deployments to a newer release.
While it’s not unlikely that VMware will still offer some critical security patches for these older versions, it’s not guaranteed and certainly won’t release patches for all new vulnerabilities that are discovered.
Once an unsupported ESXi server has carried on for long enough without patches, it will have accumulated so many security vulnerabilities that attackers would have multiple ways to breach it.
Due to ESXi hosting virtual machines, attacking the server can potentially cause severe and wide-scale disruption to business operations, which is why ransomware gangs are so focused on targeting it.
More recently, Mandiant discovered that hackers found a new method to establish persistence on VMware ESXi hypervisors that lets them control the server and hosted VMs without being detected.
All that said, ESXi already enjoys ample attention from threat actors, so running outdated and vulnerable versions of the software would no doubt be a terrible idea.
Port Trunking, also known as LACP (Link Aggregation Control Protocol), allows you to combine multiple LAN interfaces for increased bandwidth and load balancing for multiple clients. It also provides failover capabilities to maintain network connectivity if a network port fails.
802.3ad (Dynamic Link Aggregation) is the No.5 mode according to the IEEE 802.3ad specification. It uses a complex algorithm to aggregate adapters by speed and duplex settings to provide load balancing and fault tolerance but requires a switch that supports IEEE 802.3ad with LACP mode properly configured.
Note: Your switch must support 802.3ad. Note: A NAS with multiple LAN ports is required.
Follow these steps to set up your NAS.
Log into the NAS as an administrator. Go to “Main Menu” > “Network & Virtual Switch” > “Interfaces”. Click “Port Trunking”.
Click “Add” from the pop-up window.
Select the network interfaces to use and select 802.3ad for the Port Trunking Mode.
Click the settings button beside 802.3ad.
Select a HASH policy for 802.3ad: The default setting is “layer 2 (MAC)“. This is compatible with every switch but only offers load balancing by MAC address. We recommend using “Layer 2+3 (MAC+IP)” for greater performance but you will need to check that your switch supports it.
Click “Apply” to finish.
Test Results:
The test results of before and after Port Trunking is as follows.
A Gigabit Ethernet Network
One user downloading a large video file from the NAS:
One user uploading a large video file to the NAS:
Two users downloading a large video file from the NAS at the same time: The throughput of the NAS reaches 108~110 MB/s (downloading):
Two users upload a large video file to the NAS at the same time: The throughput of NAS reaches 102~104 MB/s (uploading):
Aggregating two Gigabit Ethernet Networks on the NAS
One user downloads a large video file from the NAS:
One user uploads a large video file to the NAS:
Two users download a large video file from the NAS at the same time: The throughput of NAS reaches 210~223 MB/s (downloading):
Two users upload a large video file to the NAS at the same time: The throughput of NAS reaches 200~210 MB/s (uploading):
As displayed by the test results, Port Trunking can increase bandwidth on a QNAP NAS . But please note the following:
Port Trunking cannot break the speed limit of a single Ethernet device, but it offers a sufficient amount of bandwidth for multiple users connecting at the same time. For example, if two 1Gb NICs are used for Port Trunking, the aggregated network bandwidth will be increased to 2Gb, but the network speed will remain 1Gb.
Available system resources and the maximum read/write speeds of the storage devices on the NAS will greatly influence the overall bandwidth.
Last modified date: 2022-10-05 Applicable Products QTS QuTS hero SED Usage Can I use different types of SEDs to create a SED secure storage pool? Yes, you can use different types of SEDs in the same SED secure storage pool.
Can I use SEDs in a normal storage pool? Yes, normal storage pools can contain SEDs. However, the SEDs would function as regular disks without self-encryption.
When creating a normal storage pool, make sure the option Create SED secure storage pool is deselected.
If I use SEDs in a normal storage pool, will the pool be locked after the NAS restarts? No, the system does not lock normal storage pools when the NAS restarts. SEDs in a normal storage pool function as regular disks without self-encryption.
Only SED secure storage pools are locked after the NAS restarts (unless the setting Auto unlock on startup is enabled).
SED Status Why is my SED’s disk status “Unlocked” even though I never activated its self-encrypting function? In QTS versions earlier than 5.0.1 and QuTS hero versions earlier than h5.0.1, only SEDs of the type TCG Opal are supported.
Starting from QTS 5.0.1 and QuTS hero h5.0.1, TCG Enterprise SEDs are also supported.
If you used any TCG Enterprise SEDs to create a normal storage pool when your NAS was running QTS versions earlier than 5.0.1 or QuTS hero versions earlier than h5.0.1, and then later upgraded your operating system to QTS 5.0.1 (or later) or QuTS hero h5.0.1 (or later), the NAS will now indicate their disk status as “Unlocked”. This does not affect the status or performance of the storage pool, and the SEDs will continue to function as regular disks.
If a TCG Enterprise SED has never been used in a storage pool, and the disk status has changed to “Unlocked” after you upgraded the NAS operating system to QTS 5.0.1 (or later) or QuTS hero h5.0.1 (or later), you can use the SED Erase function to reset the disk to factory default, and then activate self-encryption on the disk by setting an encryption password.
Resetting to Factory Default What can I do if I cannot find the PSID on my SED? SEDs usually have a PSID (physical secure ID) labeled on the disk. If you cannot find the PSID on the disk, please contact the disk manufacturer for assistance.
Why doesn’t the PSID work when I try to reset my SED? If you are unable to reset your SED to factory default using its PSID (physical secure ID), please contact the disk manufacturer for technical assistance.
If the disk manufacturer is unable to help you reset the SED, you can still use the SED as a regular disk.
A self-encrypting drive (SED) is a drive with encryption hardware built into the drive controller. SEDs automatically encrypt all data as it is written to the drive and decrypt all data as it is read from the drive. Data stored on SEDs are always fully encrypted by a data encryption key, which is stored on the drive’s hardware and cannot be accessed by the host operating system or unauthorized users. The encryption key can also be encrypted by a user-specified encryption password that allows the SED to be locked and unlocked.
Because encryption and decryption are handled by the drive, accessing data on SEDs does not require any extra CPU resources from the host device. Data on SEDs also become inaccessible if the SEDs are physically stolen or lost. For these reasons, SEDs are widely preferred for storing sensitive information.
You can use SEDs to create SED secure storage pools in QTS and QuTS hero, and SED secure static volumes in QTS. You can also use SEDs to create regular storage pools or volumes, but the self-encrypting function on the SEDs would remain deactivated.
Why Use SEDs?
Data storage security is an extremely important matter for many enterprises and organizations, especially when they store personal data such as credit card information and identity card numbers, or industry secrets such as product blueprints and intellectual property.
If a data leak occurs, the enterprise or organization can face serious consequences. Apart from sensitive information being exposed, a data leak can also result in customer and client damages, revenue loss, and legal penalties.
Because SEDs use hardware-based full disk encryption, both the encryption and decryption processes occur in the disk hardware. This separation from the host operating system makes hardware encryption more secure than software encryption. Moreover, unlike software encryption, hardware encryption does not require extra CPU resources. If a SED is physically stolen or lost, it becomes practically impossible to obtain intelligible information from the SED.
For these reasons, SEDs are often a specified data security requirement in bidding processes for government agencies, health care institutions, and financial and banking services.
SED Types
QNAP categorizes SED types according to the industry-standard specifications defined by the Trusted Computing Group (TCG). Supported SED types are listed in the following table.
To check the SED type of an installed SED, go to Storage & Snapshots > Storage > Disks/VJBOD and click a SED.
SED Type
Supported
TCG Opal
Yes
TCG Enterprise
Yes, in QTS 5.0.1 (or later) and QuTS hero h5.0.1 (or later)
SED Storage Creation
You can use SEDs to create SED secure storage pools in QTS and QuTS hero, and SED secure static volumes in QTS. For details, see the corresponding QNAP operating system user guide.
Action
Details
Create a SED secure storage pool in QTS
The latest version of the QTS User Guide is available at https://www.qnap.com/go/doc/qts/.You can find the relevant topic by searching “self-encrypting drives”.
Create a SED secure static volume in QTS
Create a SED secure storage pool in QuTS hero
The latest version of the QuTS hero User Guide is available at https://www.qnap.com/go/doc/quts-hero/.You can find the relevant topic by searching “self-encrypting drives”.
SED Management
SED Storage Pool and Static Volume Actions
To perform the following actions, go to Storage & Snapshots > Storage > Storage/Snapshots, select a SED pool or volume, click Manage, then select Actions > SED Settings.
Action
Description
Change SED Pool PasswordChange SED Volume Password
Change the encryption password.Warning:Remember this password. If you forget the password, the pool or volume will become inaccessible and all data will be unrecoverable.You can also enable Auto unlock on startup.This setting enables the system to automatically unlock and mount the SED pool or volume whenever the NAS starts, without requiring the user to enter the encryption passwordWarning:Enabling this setting can result in unauthorized data access if unauthorized personnel are able to physically access the NAS.Tip:In some earlier versions of QTS and QuTS hero, this setting is known as Save encryption key.
Lock
Lock the pool or volume. All volumes/shared folders, LUNs, snapshots, and data in the pool or volume will be inaccessible until it is unlocked.
Unlock
Unlock a locked SED pool or volume. All volumes/shared folders, LUNs, snapshots, and data in the pool or volume will become accessible.
Disable SED Security
Remove the encryption password and disable the ability to lock and unlock the pool or volume.
Enable SED Security
Add an encryption password and enable the ability to lock and unlock the pool or volume.
Removing a Locked SED Storage Pool or Static Volume
Go to Storage & Snapshots > Storage > Storage/Snapshots.
Select a locked SED storage pool or static volume.Note:Static volumes are only available in QTS.
Click Manage, and then click Remove.The Removal Wizard window opens.
Select a removal option.OptionDescriptionUnlock and remove pool, data, and saved keyThis option unlocks the SED disks in the storage pool or static volume, and then deletes all data. The storage pool or static volume is removed from the system.You must enter the encryption password.Remove pool without unlocking itThis option removes the storage pool or static volume without unlocking the disks. The SED disks cannot be used again until you perform one of the following actions:
Unlock the disks. Go to Disks/VJBOD, click Recover, and then select Attach and Recover Storage Pool.
Erase the disks using SED erase.
Click Apply.
The system removes the locked SED storage pool or static volume.
Migrating a SED Secure Storage Pool to a New NAS
The following requirements apply when migrating a storage pool to a new NAS.
The two NAS devices must both be running QTS, or both be running QuTS hero. Migration between QTS and QuTS hero is not possible.
The version of QTS or QuTS hero running on the new NAS must be the same or newer than the version running on the original NAS.
On the original NAS, go to Storage & Snapshots > Storage > Storage/Snapshots.
Select a SED secure storage pool.
Click Manage.The Storage Pool Management window opens.
Click Action, and then select Safely Detach Pool.A confirmation message appears.
Click Yes.The storage pool status changes to Safely Detaching…. After the system has finished detaching the pool, it disappears from Storage & Snapshots.
Remove the drives containing the storage pool from the NAS.
Install the drives in the new NAS.
On the new NAS, go to Storage & Snapshots > Storage > Disks/VJBOD .
Click Recover, and then select Attach and Recover Storage Pool.A confirmation message appears.
Enter the encryption password.You must enter this password if you are using self-encrypted drives (SEDs) with encryption activated.
Click Attach.The system scans the disks and detects the storage pool.
Click Apply.
The storage pool appears in Storage & Snapshots on the new NAS.
Erasing a Disk Using SED Erase
SED Erase erases all of the data on a locked or unlocked SED disk and removes the encryption password.
Go to Storage & Snapshots > Storage > Disks/VJBOD.
Select a SED disk.
Click Actions, and then select SED Erase.The SED Erase window opens.
Enter the disk’s Physical Security ID (PSID).Tip:The PSID can usually be found on the disk label.If you cannot find the PSID, contact the disk manufacturer.
Click Apply.
The system erases all data on the SED.
SED Status
To view the status of a SED, go to Storage & Snapshots > Storage > Disks/VJBOD and click an installed SED.
SED Status
Description
Uninitialized
The SED is uninitialized. Drive encryption is deactivated.
Unlocked
The SED is initialized and unlocked. Drive encryption is activated. Data on the SED is encrypted and accessible.
Locked
The SED is initialized and locked. Drive encryption is activated. Data on the SED is encrypted and inaccessible.
Blocked
The SED is blocked for security reasons. The drive cannot be initialized.Note:To unblock the SED, reinsert the disk or erase the disk using SED Erase. For details, see Erasing a Disk Using SED Erase.
Glossary
Gloss
Definition
Auto unlock on startup
Setting that allows the system to automatically unlock a SED secure storage pool or SED secure static volume after the NAS restarts
Encryption key
A unique, randomized cryptographic string physically stored within the hardware in self-encrypting drives (SEDs) for encrypting data written to the drive and decrypting data as it is read from the drive
Encryption password
A user-defined password for locking and unlocking a SED secure storage pool or static volume
PSID (Physical Secure ID)
A unique key usually labeled on a self-encrypting drive (SED) for resetting the drive to factory default
SED Erase
Storage & Snapshots function for erasing all data on a self-encrypting drive (SED) and removing the encryption password


.png)


 A confirmation message appears.
 If you cannot find the PSID, contact the disk manufacturer.