About this article
In this article, we are going to start by describing what the Windows Firewall feature is and what it is used for. This information will then allow you to enable and manage the Windows Firewall on your Windows PC or laptop. We will cover all the different versions of the Windows operating system that are currently supported by the Secure Remote Worker Validation Tool.
Lets first describe what a firewall actually is.
What is a firewall?
A firewall can be either a physical hardware device, software-based application that you install on your PC, or in the case of the Windows Firewall, an integrated feature of the operating system that is designed to protect your PC against the attack of malicious files. The firewall checks information and data sent across the internet or other networks to your PC. If the firewall detects that the information may contain malicious files then it will block them from reaching your PC, therefore protecting your PC from that threat. Equally, it can prevent you PC sending malicious content to other PCs.
Windows Firewall is an integrated firewall solution that is part of the Windows operating system. In this article, we are going to configure the Windows Firewall to work with Secure Remote Worker. In the following sections, we are going to discuss the process for each of the different version of the Windows operating, starting with Windows 10.
Important configuration note:
You should only have one software firewall solution installed at any one time. If you install additional security software on your PC that also has its own software-based firewall solution, then you will need to disable this if you are to use the Windows Firewall solution.
Enabling the firewall on Windows 10 devices
In this section, we are going to describe the process for enabling the Windows Firewall feature on Windows 10. Follow the steps below to work through the process of enabling the firewall:
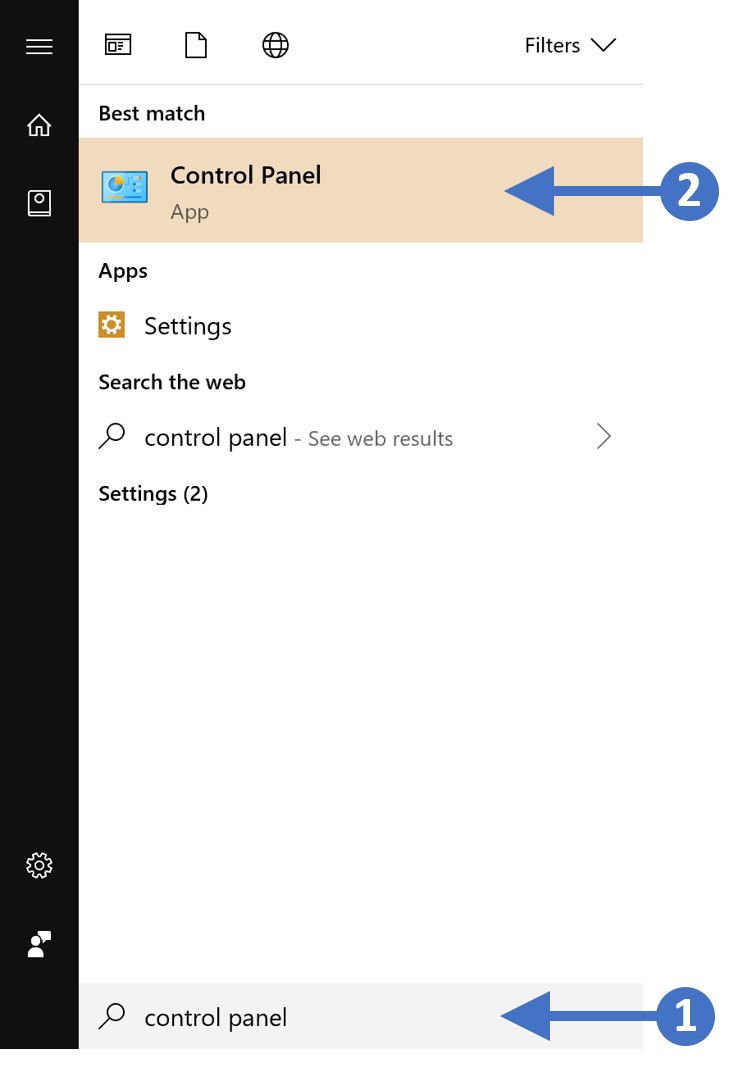
- Press the Windows key on your keyboard and then start to type in “control panel” in the search box highlighted (1). You will then see the Control Panel App appear at the top of the list as the best match, highlighted (2). Click on the Control Panel App to launch it as shown in the following screenshot:
Click to Zoom
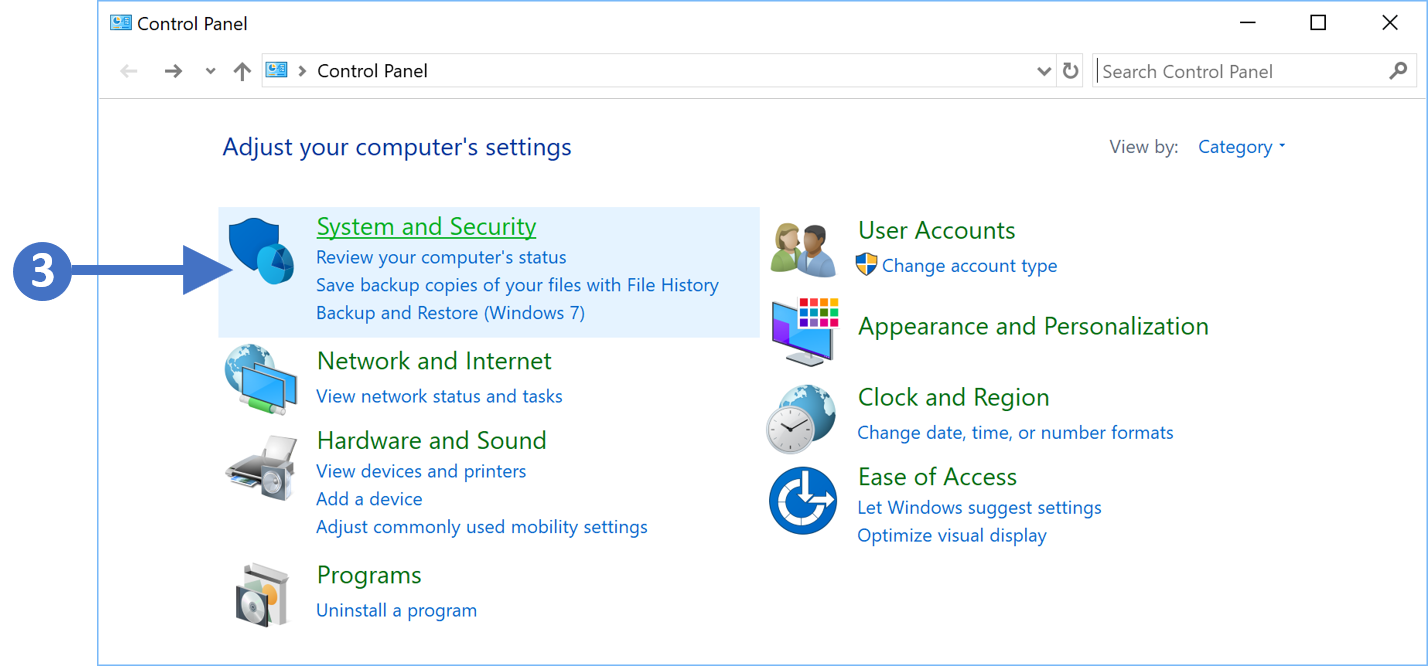
2. You will now see the Control Panel as shown in the following screenshot:
Click to Zoom
3. Now click on System and Security as highlighted (3) in the screenshot above.
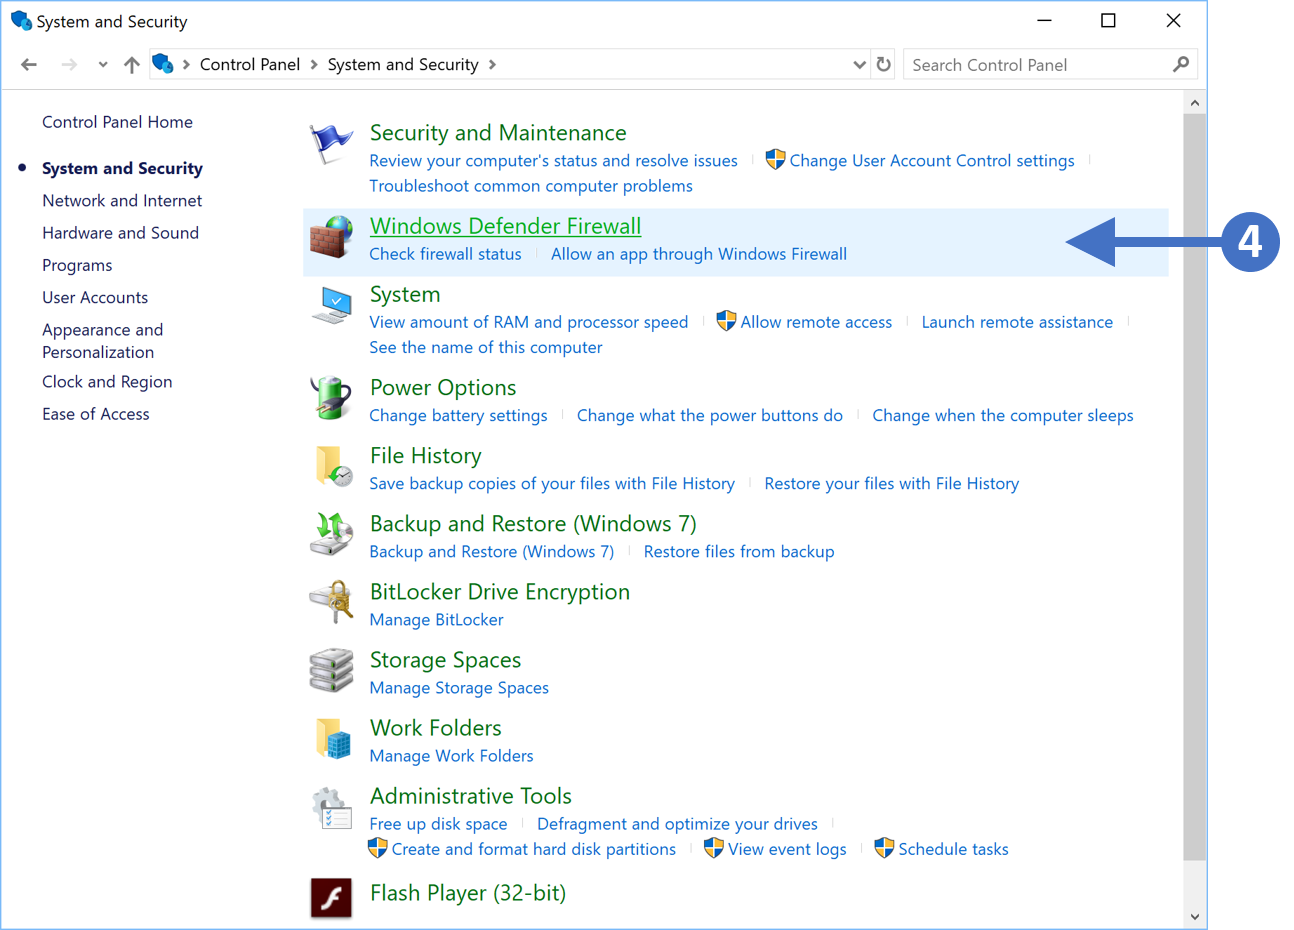
4. You will now see the System and Security configuration options as shown in the following screenshot:
Click to Zoom
5. Click on Windows Defender Firewall as highlighted (4) in the above screenshot.
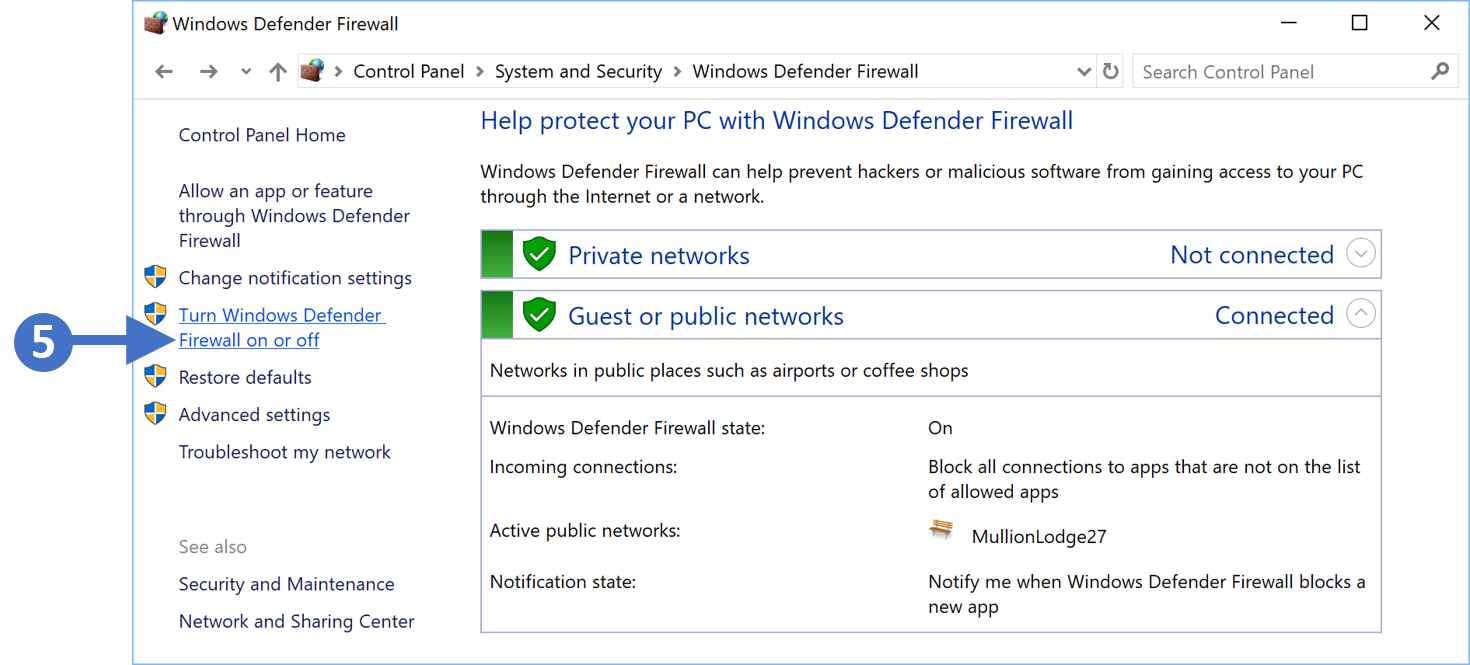
6. You will now see the Windows Defender Firewall configuration screen as shown in the following screenshot:
Click to Zoom
7. Click on Turn Windows Defender Firewall on or off as highlighted (5) in the above screenshot.
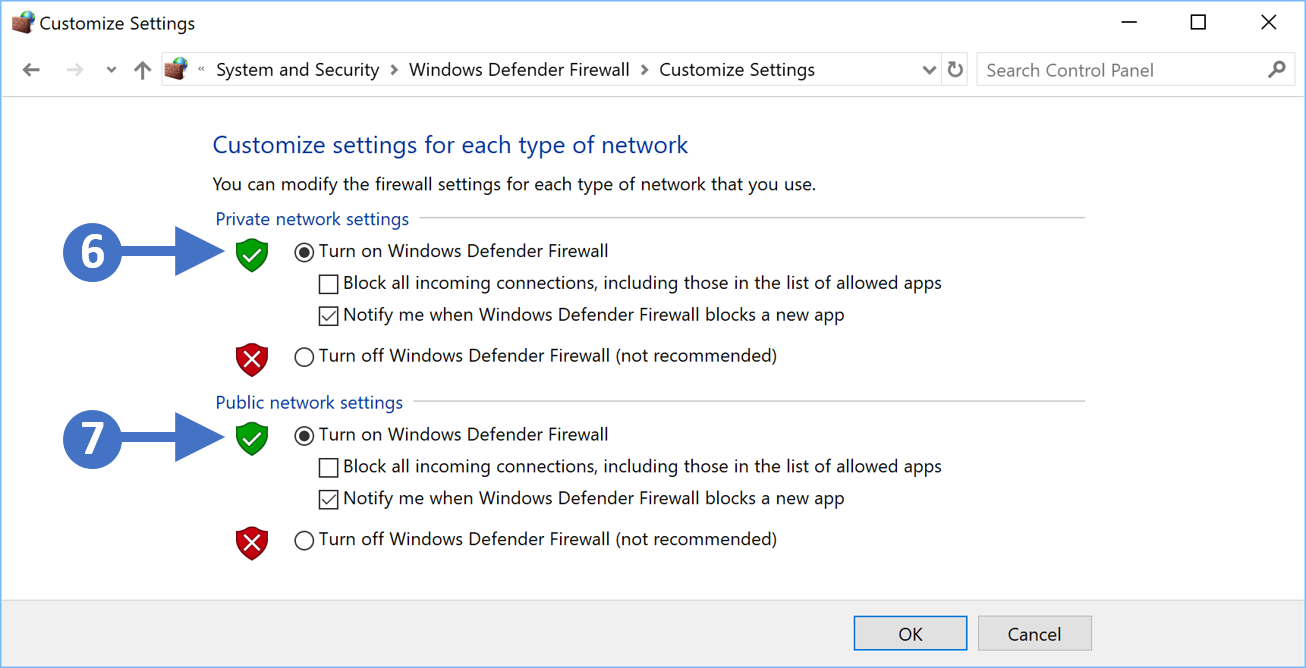
8. You will now see the Customize settings for each type of network as shown in the following screenshot:
Click to Zoom
9. First, enable the firewall for private networks. To do this click the radio button for Turn on Windows Defender Firewall under the Private network settings section as highlighted (6) in the previous screenshot.
10. Next, enable the firewall for public networks. To do this click the radio button for Turn on Windows Defender Firewall under the Public network settings section as highlighted (7) in the previous screenshot.
11. The other thing to configure is to make sure that you check the box for Notify me when Windows Defender Firewall blocks a new app for both network settings, so Public and Private. This means that you will be notified when something potentially malicious is blocked.
12. Finally, once configured, click the OK button to close the configuration window, and then click the red X button in the top right-hand corner to close the control panel.
You have now successfully enabled the Windows Firewall for Windows 10 operating systems.
Enabling the firewall on Windows 8.1 devices
In this section, we are going to describe the process for enabling the Windows Firewall feature on Windows 10. Follow the steps below to work through the process of enabling the firewall:
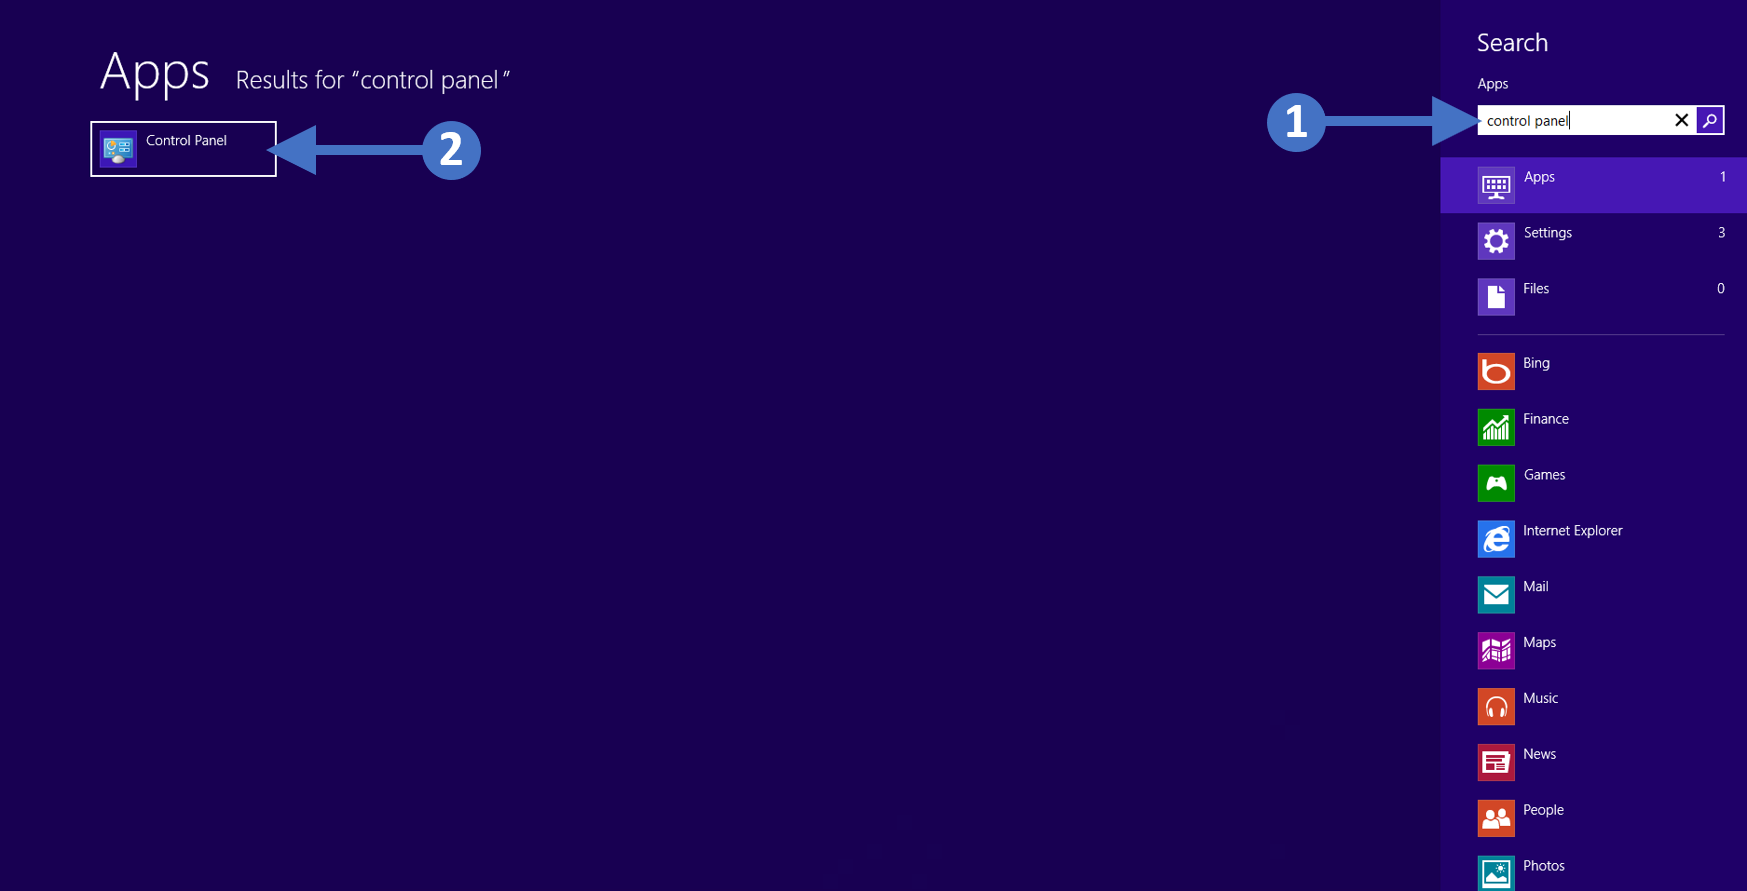
1. Press the Windows key on your keyboard and then start to type in “control panel” in the search box highlighted (1). You will then see the Control Panel icon appear at the top left of the screen in the Results section, highlighted (2). Double click on the Control Panel icon to launch it as shown in the following screenshot:
Click to Zoom
2. You will now see the Control Panel as shown in the following screenshot:
Click to Zoom
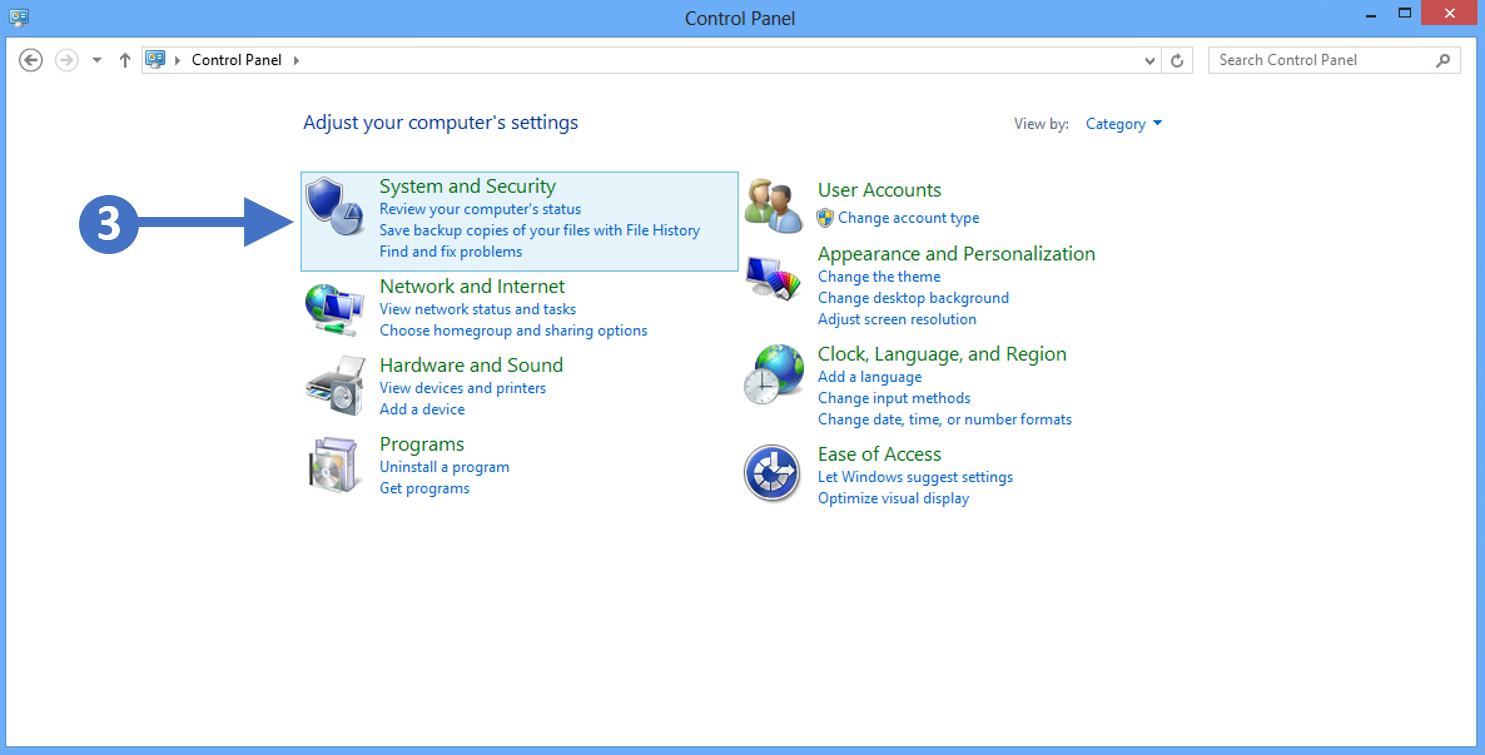
3. Now click on System and Security as highlighted (3) in the screenshot above.
4. You will now see the System and Security configuration options as shown in the following screenshot:
Click to Zoom
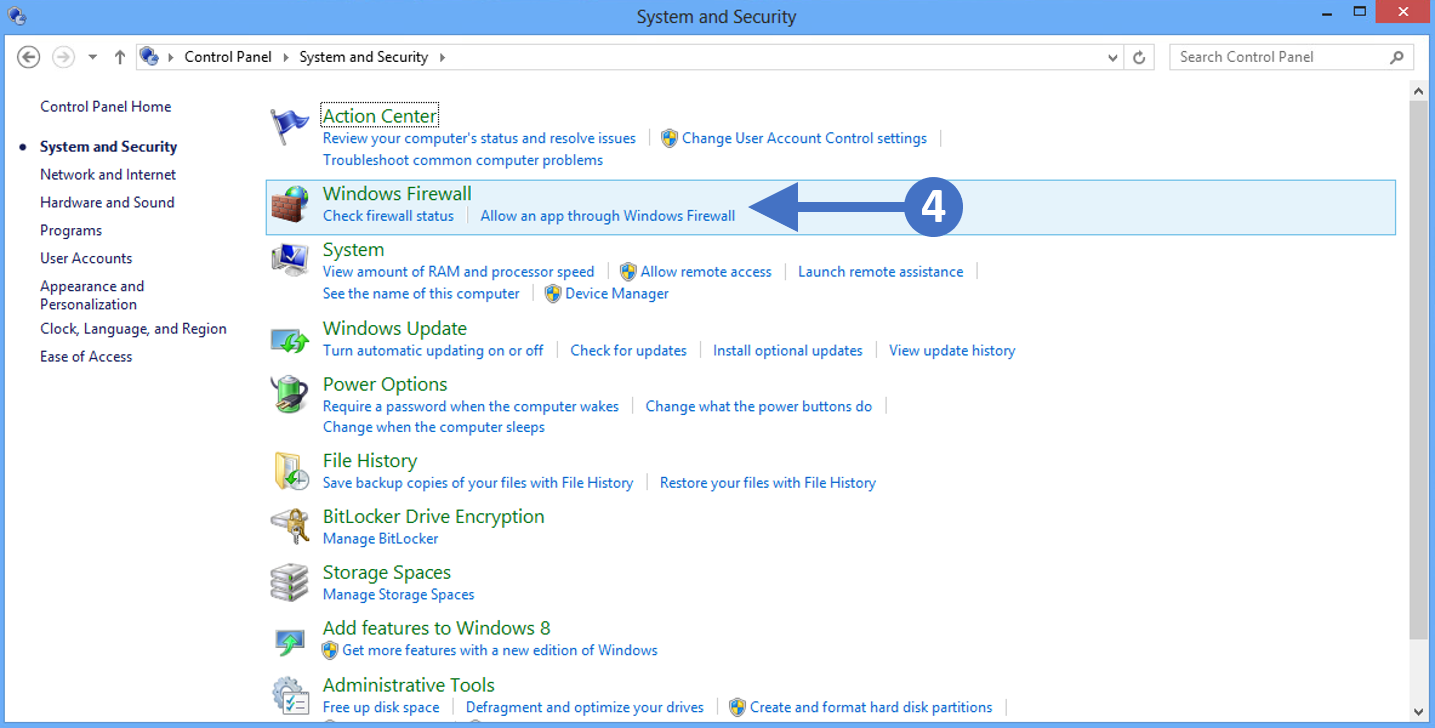
5. Click on Windows Firewall as highlighted (4) in the above screenshot.
6. You will now see the Windows Firewall configuration screen as shown in the following screenshot:
Click to Zoom
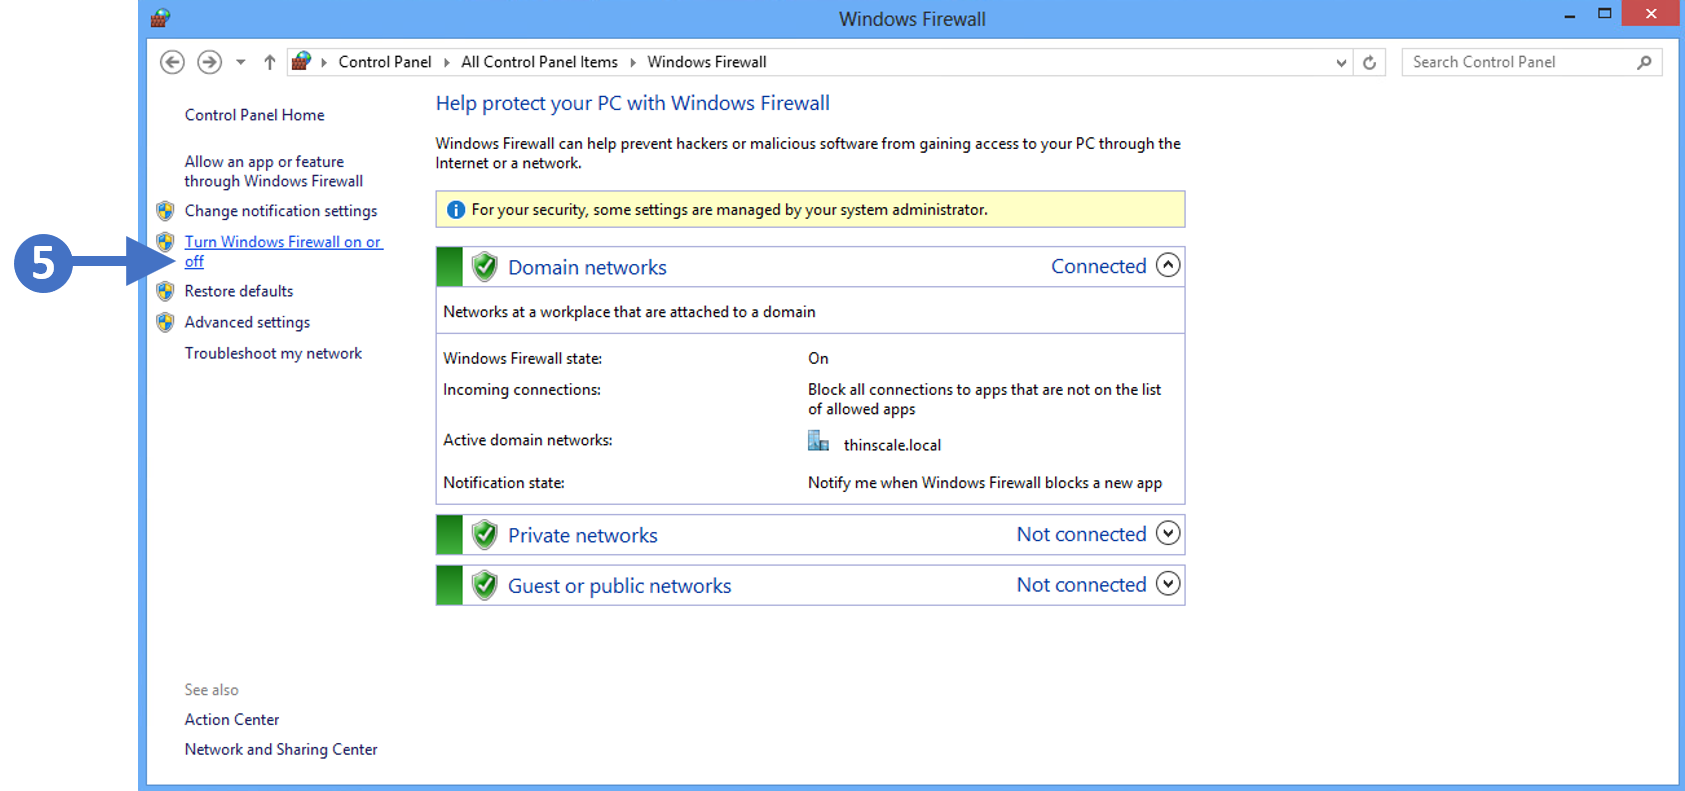
7. Click on Turn Windows Firewall on or off as highlighted (5) in the above screenshot.
8. You will now see the Customize settings for each type of network as shown in the following screenshot:

Click to Zoom
9. First, enable the firewall for domain networks. To do this click the radio button for Turn on Windows Defender Firewall under the Domain network settings section as highlighted (6) in the previous screenshot.
10. Next, enable the firewall for private networks. To do this click the radio button for Turn on Windows Defender Firewall under the Private network settings section as highlighted (7) in the previous screenshot.
11. The final one to enable is the firewall for public networks. To do this click the radio button for Turn on Windows Defender Firewall under the Public network settings section as highlighted (8) in the previous screenshot.
12. The other thing to configure is to make sure that you check the box for Notify me when Windows Firewall blocks a new app for domain settings, public settings, and private settings. This means that you will be notified when something potentially malicious is blocked.
13. Finally, once configured, click the OK button to close the configuration window, and then click the red X button in the top right-hand corner to close the control panel.
You have now successfully enabled the Windows Firewall for Windows 8.x operating systems.
Enabling the firewall on Windows 7 devices
In this section, we are going to describe the process for enabling the Windows Firewall feature on Windows 7. Follow the steps below to work through the process of enabling the firewall:
1. Press the Windows key on your keyboard and then start to type in “control panel” in the search box highlighted (1). You will then see the Control Panel icon appear at the top of the screen under Programs(1), highlighted (2). Double click on the Control Panel icon to launch it as shown in the following screenshot:

Click to Zoom
2. You will now see the Control Panel as shown in the following screenshot:
Click to Zoom
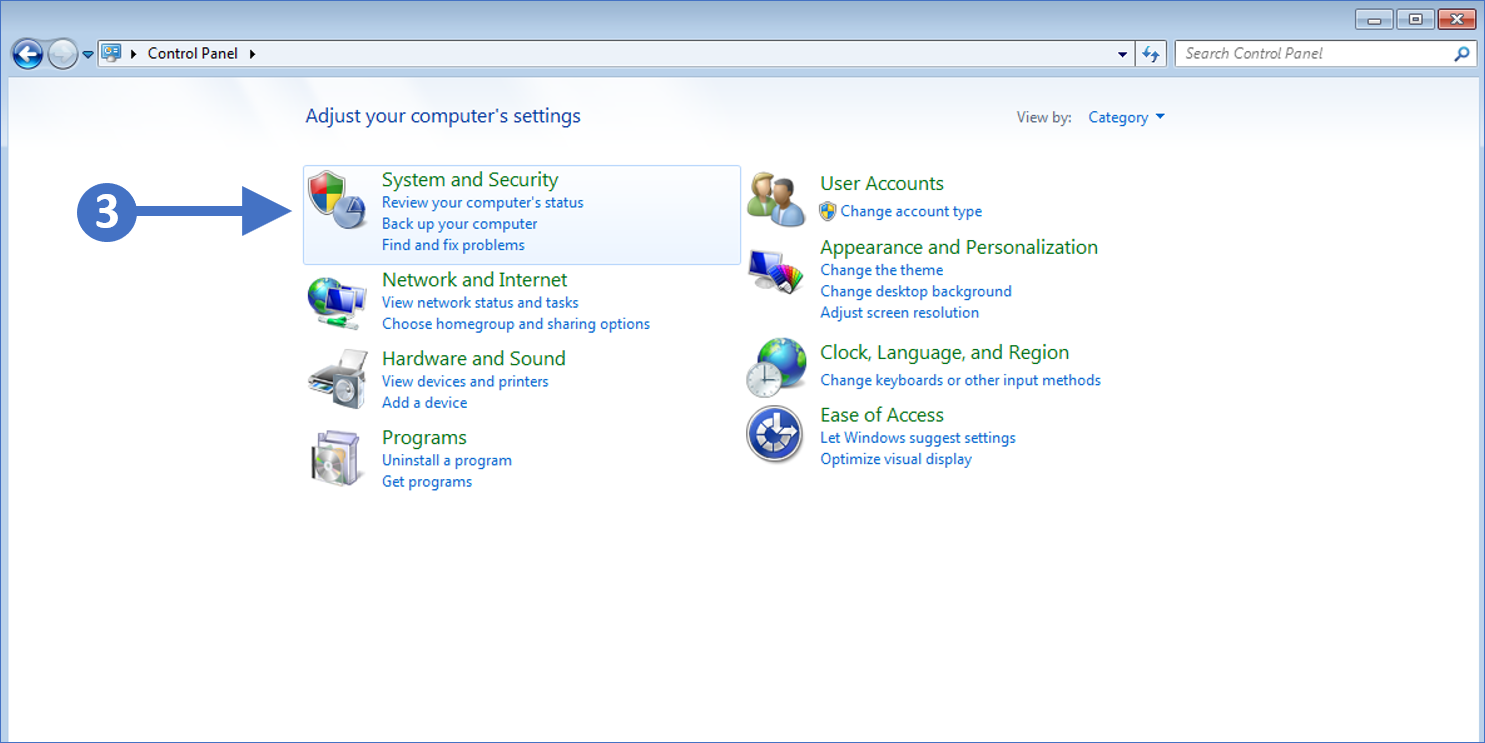
3. Now click on System and Security as highlighted (3) in the screenshot above.
4. You will now see the System and Security configuration options as shown in the following screenshot:
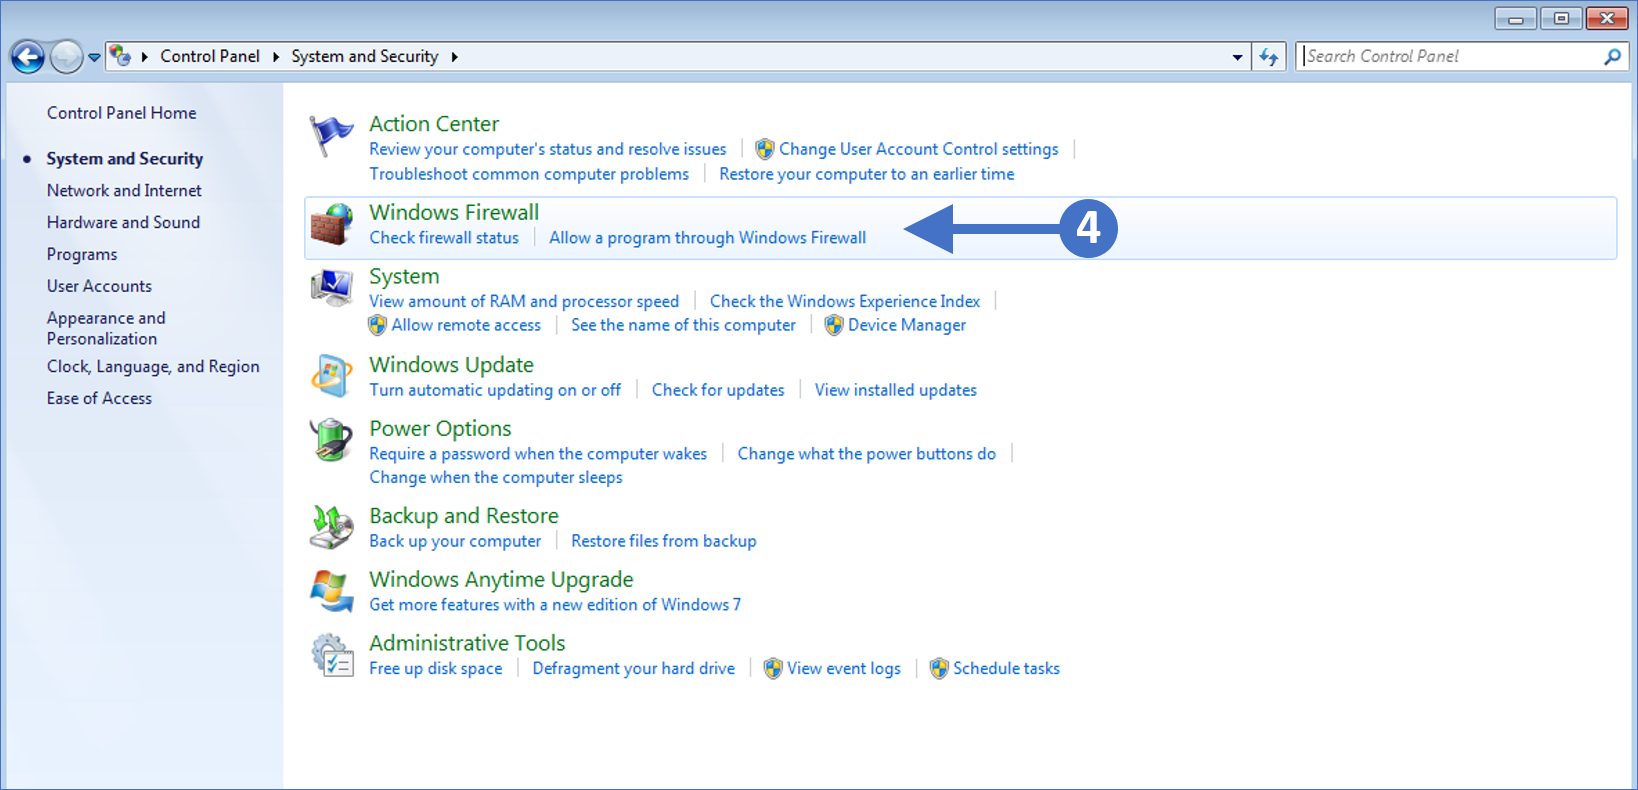
Click to Zoom
5. Click on Windows Firewall as highlighted (4) in the above screenshot.
6. You will now see the Windows Firewall configuration screen as shown in the following screenshot:
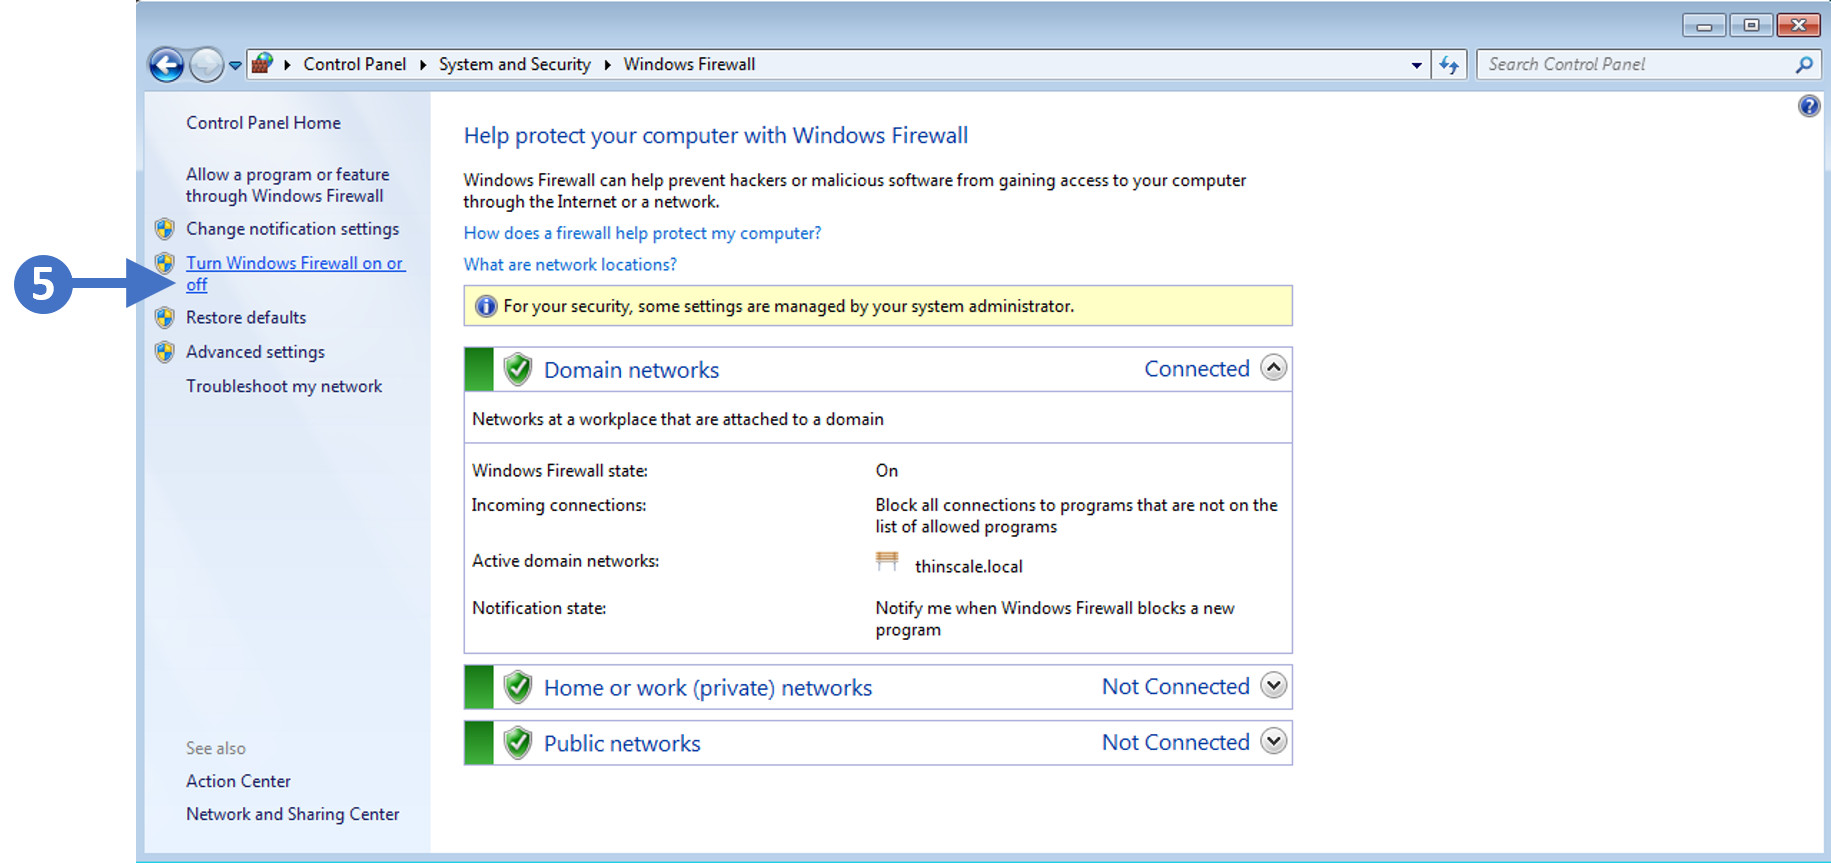
Click to Zoom
7. Click on Turn Windows Firewall on or off as highlighted (5) in the above screenshot.
8. You will now see the Customize settings for each type of network as shown in the following screenshot:

Click to Zoom
9. First, enable the firewall for domain networks. To do this click the radio button for Turn on Windows Defender Firewall under the Domain network location settings section as highlighted (6) in the previous screenshot.
10. Next, enable the firewall for private networks. To do this click the radio button for Turn on Windows Defender Firewall under the Home or work (private) network location settings section as highlighted (7) in the previous screenshot.
11. The final one to enable is the firewall for public networks. To do this click the radio button for Turn on Windows Defender Firewall under the Public network location settings section as highlighted (8) in the previous screenshot.
12. The other thing to configure is to make sure that you check the box for Notify me when Windows Firewall blocks a new program for domain settings, public settings, and private settings. This means that you will be notified when something potentially malicious is blocked.
13. Finally, once configured, click the OK button to close the configuration window, and then click the red X button in the top right-hand corner to close the control panel.
You have now successfully enabled the Windows Firewall for Windows 7 operating systems.
Source :
https://kb.thinscale.com/secure-remote-worker-validation-tool/enabling-managing-windows-firewall-settings