The HIPAA Compliance Audit in 12 Easy Steps + Checklist

27.07.2023

What is a HIPAA Audit?

A HIPAA audit is a thorough evaluation conducted to assess a healthcare organization’s compliance with the Health Insurance Portability and Accountability Act (HIPAA) regulations. 

The main goal of the audit is to ensure that entities handling protected health information (PHI), such as hospitals, clinics, and health insurers, are adhering to the strict privacy and security standards set forth by HIPAA. 

The audit examines various aspects, including privacy practices, data security measures, employee training, and risk management procedures. 

By conducting HIPAA audits regularly, organizations can identify potential vulnerabilities, address compliance gaps, and safeguard sensitive patient data, fostering trust and confidentiality within the healthcare industry.

What Will Be Audited?

In a HIPAA audit, numerous aspects of an organization’s operations will be examined to assess compliance with HIPAA. The audit will typically review policies and practices related to the HIPAA Privacy, Security, and Breach Notification Rules, as well as physical, technical, and administrative safeguards protecting personal health information (PHI) and electronic health information (ePHI). 

Who Is Eligible for a HIPAA Audit?

HIPAA audits target covered entities and business associates that handle PHI and ePHI. Covered entities include healthcare providers, health plans, and healthcare clearinghouses, while business associates are organizations or individuals that perform functions involving PHI on behalf of covered entities. 

How Does The Selection Process Work?

The selection process for HIPAA audits involves multiple triggers. The OCR usually initiates audits in response to complaints or breach reports filed against a covered entity or business associate. Complaints can be raised by patients or employees concerning privacy violations or mishandling of PHI.

Additionally, breaches of PHI that meet certain criteria will lead to an audit. The OCR may also conduct follow-up audits for organizations with a history of prior non-compliance. Random audits are rare and typically reserved for larger, established entities due to the OCR’s limited resources.

When do HIPAA Audits Occur?

The timing of an audit can vary depending on the triggering event. The OCR usually provides advance notice to the organization being audited, informing them of the audit’s purpose, scope, and expected duration. Audits can take several weeks to several months to complete, depending on factors like the organization’s size and complexity.

What is my Risk of Being Audited?

The risk of being audited for HIPAA compliance varies depending on several factors. Organizations that have previously violated HIPAA, experienced breaches of PHI, or received complaints are at a higher risk of being audited.

To mitigate the risk of an audit, organizations should proactively invest time and effort into maintaining a comprehensive HIPAA compliance program, including regular self-audits and staff training to ensure adherence to HIPAA regulations and safeguard PHI.

How to Be Ready for an Audit in 12 Easy Steps

Whether you’re preparing for a financial, compliance, or HIPAA audit, this step-by-step approach will equip you with the knowledge and strategies needed to ensure a smooth and successful audit process.

Step 1: Assign a Privacy and Security Officer

The Privacy Officer plays a significant role in workforce training and education, ensuring that all staff members are well-versed in HIPAA compliance. They are responsible for monitoring privacy practices, developing security measures, and scheduling regular policy reviews.

In larger organizations, the role may be divided, with an Information Security Officer overseeing the company’s security program. The Privacy and Security Officer(s) are pivotal in creating and implementing a comprehensive compliance program that aligns with HIPAA regulations and ensures the protection of PHI and ePHI.

Step 2: Perform a Risk Analysis

A risk analysis involves identifying potential vulnerabilities and threats to your organization’s processes, systems, and data. By carefully assessing these risks, you can develop effective mitigation strategies and implement necessary safeguards to protect your organization from potential audit findings and ensure compliance with relevant regulations.

Step 3: Provide Employee Training

Educating your workforce on compliance policies, data security best practices, and the importance of safeguarding sensitive information is crucial.

By conducting regular training sessions and keeping comprehensive records of completed training, you can demonstrate your commitment to maintaining a well-informed and vigilant workforce, which significantly enhances your organization’s preparedness for an audit.

Step 4: Document All Locations Where PHI Is Stored

Document all physical and electronic storage sites, such as servers, databases, file cabinets, and even portable devices like laptops and smartphones.

By maintaining a comprehensive inventory of these locations and the PHI they contain, you demonstrate an organized approach to data management and enable auditors to verify that proper security measures are in place to protect PHI at all times.

Step 5: Review and Document HIPAA Policies and Procedures

Establish clear and well-defined procedures for responding to various requests related to privacy protection, access, correction, and transfers of Protected Health Information (PHI).

  • Procedures for Responding to Requests for Privacy Protection – Your procedures should outline the steps to verify the identity of the requester, assess the validity of the request, and implement the necessary restrictions in accordance with HIPAA guidelines.
  • Procedures for Responding to Requests for Access, Correction, and Transfers – Your procedures should define the process for handling these requests, including the timeframe within which the requests must be fulfilled and any associated fees, if applicable.
  • Procedures for Maintaining an Accounting of Disclosures – Your organization should have well-documented procedures for recording and tracking such disclosures, ensuring accuracy, and being able to provide an accounting of disclosures to patients upon request.

Step 6: Report all Breaches

In the event of a breach of PHI, covered entities must act swiftly and responsibly to notify the affected individuals, the Department of Health and Human Services, and potentially the media, depending on the scale and severity of the breach.

Your breach reporting procedures should be well-defined, outlining the steps to be taken immediately after a breach is discovered. This includes conducting a thorough assessment of the incident to determine the extent of the breach and the types of information involved.

Once the assessment is complete, affected individuals should be promptly notified, providing them with essential details about the breach, potential risks, and steps they can take to protect themselves.

Additionally, covered entities must report the breach to the HHS through the OCR’s online breach reporting portal. The report should include specific information about the breach, such as the number of affected individuals, the types of PHI involved, and the steps taken to mitigate the risks and prevent future incidents.

The HHS may investigate the breach further, and the incident may become a subject of review during a HIPAA audit.

Step 7: Perform Regular Audits

Internal assessments enable covered entities to proactively identify potential vulnerabilities, gaps, and areas of non-compliance within their operations. By conducting periodic audits, organizations can monitor their adherence to HIPAA policies and procedures, assess the effectiveness of their privacy and security measures, and make necessary adjustments to enhance data protection.

Regular audits also serve as valuable learning opportunities, fostering a culture of compliance and strengthening an organization’s ability to respond confidently to official HIPAA audits.

Step 8: Keep HIPAA Audit Logs

As mandated by the Security Rule, covered entities must implement hardware, software, and/or procedural mechanisms that continuously record and monitor activity within information systems containing or using ePHI.

These audit logs serve as an essential tool for tracking user access, detecting potential security breaches, and investigating any unauthorized or suspicious activities. 

Step 9: Institute Role-Based Access Controls (RBAC)

RBAC ensures that individuals within an organization have access only to the data necessary for their specific job functions. By assigning roles and permissions based on job responsibilities, organizations can minimize the risk of unauthorized access to ePHI.

RBAC enhances overall data protection, streamlines data management, and helps meet HIPAA compliance requirements, making it an essential safeguard in the healthcare industry.

Step 10: Have a Risk-Management / Emergency Action Plan In Place

Your plan should include a thorough risk assessment, identification of vulnerabilities, and strategies for prevention and response. By proactively addressing risks and defining proper procedures in case of data breaches, natural disasters, or other emergencies, healthcare organizations can ensure the continuity of critical services, protect patient information, and maintain HIPAA compliance.

Step 11: Review All Business Associate Agreements (BAAs)

BAAs outline the responsibilities and obligations of business associates regarding HIPAA compliance. Ensuring that BAAs accurately reflect current HIPAA requirements and cover all aspects of data protection is critical to maintaining a secure ecosystem for patient information.

Regular reviews and updates help enforce accountability and compliance among business associates, ultimately safeguarding the confidentiality and integrity of ePHI.

Step 12: Upgrade Your Network Security

Implementing advanced firewalls, intrusion detection systems, and data encryption protocols enhances the protection of sensitive health information from unauthorized access and data breaches.

Network segmentation, multi-factor authentication, and regular security assessments also play a vital role in bolstering the overall security posture. A robust network security infrastructure not only safeguards patient data but also ensures a HIPAA-compliant environment that instills trust among patients and stakeholders in the healthcare industry.

Perimeter81: Simplifying HIPAA Compliance with Secure Access Solutions

Perimeter81 is a leading provider of secure access service edge (SASE) solutions.  The company’s platform plays a crucial role in assisting organizations with the HIPAA compliance audit process. One of the key challenges in achieving HIPAA compliance is ensuring that all data transmissions, including those containing ePHI, are secure, regardless of the user’s location or device. 

Perimeter 81’s Zero Trust Network as a Service (NaaS) model ensures that data is always encrypted and authenticated, providing a secure tunnel for remote employees and preventing unauthorized access to sensitive information.

With Perimeter 81’s solution, healthcare organizations can enforce role-based access controls and granular user permissions. This feature enables organizations to define access policies based on the principle of least privilege, ensuring that employees, contractors, and business associates can only access the data required for their specific roles.

The platform’s centralized management console allows IT administrators to monitor and control user access, streamlining the audit process by providing detailed logs of user activities and access attempts. This audit logging capability is essential for demonstrating compliance during a HIPAA audit, as it ensures that every interaction with ePHI is tracked, recorded, and auditable, reducing the risk of potential HIPAA violations.

Furthermore, Perimeter 81’s solution offers advanced threat prevention and detection mechanisms, including intrusion prevention and detection systems (IPS/IDS) and behavior-based analytics. These features help healthcare organizations identify and mitigate security threats before they escalate into major incidents or breaches, contributing to the overall security posture and reducing the likelihood of data breaches that could trigger a HIPAA audit. 

By leveraging Perimeter 81’s SASE platform, healthcare organizations can enhance their security measures, simplify compliance management, and confidently navigate the complexities of the HIPAA compliance audit process.

How Much Do HIPAA Audits Cost?

The cost of a HIPAA audit can vary depending on several factors. If a healthcare organization is selected for an official audit conducted by the Office for Civil Rights (OCR), there are no direct costs incurred by the audited organization.

However, there are indirect costs associated with preparing for the audit, such as hiring consultants, allocating staff time, and implementing any necessary improvements to achieve compliance. Additionally, organizations can choose to perform voluntary self-audits using external or internal auditors, which may involve fees ranging from a few thousand to tens of thousands of dollars, depending on the scope and duration of the audit.

How Long Does it Take to Complete a HIPAA Audit?

The duration of a HIPAA audit can vary based on several factors. Typically, the length of an audit depends on the scope of the investigation, the size and complexity of the organization being audited, and the presence of external entities that may complicate and extend the investigation. 

On average, a HIPAA audit can take anywhere from several weeks to several months to complete. The OCR usually provides advance notice before conducting an audit, informing the audited organization of the purpose, scope, and expected duration of the audit.

In cases of follow-up audits or if significant issues are identified, the audit process may take longer to ensure that the organization has implemented the necessary corrective actions.

What Happens When You Get Audited?

When a HIPAA compliance audit is initiated, the Office for Civil Rights (OCR) typically begins by sending questionnaires to selected organizations to assess their compliance. Based on the responses received, the OCR decides whether to proceed with a thorough investigation of the organization’s adherence to HIPAA rules, specifically focusing on the confidentiality, integrity, and availability of PHI. 

The audit report will outline the organization’s efforts and may identify any gaps or weaknesses in their system. After the audit, the OCR provides draft findings, and within 60 days, the organization must develop and revise policies and procedures, which must be approved by the HHS.

Implementing the updated policies within 30 days is crucial, as failure to verify or comply with the rules can lead to significant financial penalties. Consistent review and updates of HIPAA policies, staff training on security measures, and prompt issue resolution are key to maintaining compliance during a HIPAA audit.

Check out our HIPAA Compliance Checklist here.

FAQs

Does HIPAA require audits?

HIPAA itself does not explicitly require audits. However, the Department of Health and Human Services (HHS) Office for Civil Rights (OCR) conducts periodic audits to assess covered entities and business associates’ compliance with HIPAA regulations. These audits help ensure the protection of sensitive health information and identify potential vulnerabilities that may need to be addressed.

How often does HIPAA audit?

The frequency of HIPAA audits conducted by the OCR varies. In the past, the OCR has conducted both random and targeted audits. Random audits are less common and are typically conducted on a smaller scale due to resource limitations.

Targeted audits are usually triggered by complaints or breach reports and may focus on specific areas of non-compliance. The OCR uses its discretion to determine the scope and frequency of audits based on factors such as risk assessment, complaints, and breach incidents.

Does HIPAA require a third-party audit?

HIPAA does not explicitly mandate third-party audits. Covered entities and business associates can conduct internal self-assessments to evaluate their compliance with HIPAA regulations. However, some organizations may choose to undergo third-party audits as part of a proactive approach to ensure independent validation of their compliance efforts and to gain valuable insights from experts in the field.

Who conducts the HIPAA audit?

The HIPAA audits are primarily conducted by the Department of Health and Human Services (HHS) Office for Civil Rights (OCR). The OCR is responsible for enforcing HIPAA regulations and ensuring that covered entities and business associates adhere to the Privacy, Security, and Breach Notification Rules.

In some cases, the OCR may engage third-party auditors to assist with conducting audits, but the oversight and enforcement remain under the purview of the OCR.

How do you prove HIPAA compliance?

Proving HIPAA compliance involves demonstrating that your organization has implemented policies, procedures, and safeguards to protect sensitive health information effectively. This includes having comprehensive documentation of risk assessments, security measures, workforce training, incident response plans, and business associate agreements.

Regular self-audits, risk analyses, and ongoing monitoring are crucial in providing visible demonstrable evidence of compliance. In the event of a HIPAA audit, organizations should be prepared to present these records and demonstrate their commitment to protecting the privacy and security of personal health information.

Source :
https://www.perimeter81.com/blog/compliance/hipaa-compliance-audit
What is Firewall Design?

27.07.2023

firewall is a network security device designed to monitor and control network traffic flow based on predetermined security rules. It acts as a barrier, selectively allowing or blocking incoming and outgoing network connections to protect the internal network from external threats. Essentially, a firewall ensures that only authorized and secure connections are made by filtering network traffic based on defined criteria.

Firewalls operate using a combination of rule-based filtering and packet inspection techniques. When network traffic passes through a firewall, it undergoes scrutiny based on various parameters, including source and destination IP addresses, ports, protocols, and the state of connections.

The Importance of Firewall Design for Network Security

So how does firewall design impact your network security? Here are the top reasons.

Protecting Against Unauthorized Access

One of the primary functions of firewall design is to prevent unauthorized access to an organization’s network resources. Firewalls act as gatekeepers, examining incoming and outgoing network traffic and enforcing access control policies based on predefined rules.

Identifying and configuring firewalls carefully will help organizations prevent unauthorized access by ensuring that only legitimate connections are allowed.

Mitigating Cyber Threats

Firewalls employ packet filtering, deep packet inspection, and stateful inspection to analyze network traffic and identify potential threats. They can detect and block suspicious or malicious traffic. Organizations can reduce the risk of successful attacks and protect their networks and sensitive information.

Preventing Data Breaches

Data breaches can severely affect organizations, resulting in financial losses, reputational damage, and legal liabilities. Firewall design prevents data breaches by monitoring and controlling network traffic. Also, firewall design principles advocate for network segmentation, which helps contain potential breaches and limit the impact on critical assets.

Enforcing Security Policies

Firewall design allows organizations to enforce and manage their security policies effectively. Organizations can align firewall configurations with security objectives and compliance requirements by defining rules and access controls.

Firewall policies can be customized based on traffic, user roles, and data sensitivity. Regular review and updates of firewall policies can ensure the effectiveness of their security measures.

Compliance with Regulations

Compliance with industry regulations and data protection laws is crucial for organizations across various sectors. Firewall design plays a significant role in achieving compliance by implementing security controls and access restrictions mandated by regulatory frameworks.

Organizations can demonstrate their commitment to protecting sensitive data by enforcing policies in line with GDPR, HIPAA, or PCI DSS regulations.

Characteristics of a Firewall

1. Physical Barrier

A firewall is a physical barrier between an internal network and the external world. It inspects incoming and outgoing network traffic, allowing or blocking connections based on predetermined security rules. By serving as a protective boundary, a firewall helps safeguard the internal network from unauthorized access and potential threats.

2. Multi-Purpose

A firewall is a versatile security tool that performs various functions beyond basic network traffic filtering. It can support additional security features, such as intrusion detection/prevention systems, VPN connectivity, antivirus scanning, content filtering, and more. This multi-purpose nature enables firewalls to provide comprehensive security measures tailored to an organization’s needs.

3. Security Platform

Firewalls serve as a security platform by integrating different security mechanisms into a unified system. They combine packet filtering, stateful inspection, application-level gateways, and other security technologies to protect against cyber threats. By functioning as a consolidated security platform, firewalls offer a layered defense strategy against potential attacks.

4. Flexible Security Policies

Firewalls offer flexible security policy implementation, allowing organizations to define and enforce customized rules and access controls. These policies can be based on various factors, including source/destination IP addresses, ports, protocols, user identities, and time of day.

With the ability to tailor security policies to specific requirements, organizations can effectively manage network traffic and adapt to evolving security needs.

5. Access Handler

A firewall acts as an access handler by controlling and managing network access permissions. It determines what connections are allowed or denied using predefined rules and policies. By regulating access to network resources, a firewall ensures that only authorized users and devices can establish connections, reducing the risk of unauthorized access and potential data breaches.

Firewall Design Principles

It is important to remember certain principles when designing a firewall to ensure its effectiveness in safeguarding network security. These principles serve as guidelines for architects and administrators, helping them design robust firewall architectures that protect against unauthorized access and potential threats.

  • Defense-in-Depth Approach: A fundamental principle in firewall design is adopting a defense-in-depth strategy. Rather than relying solely on a single firewall, organizations should deploy multiple firewalls, intrusion detection/prevention systems, and other security measures to create a layered defense architecture. 
  • Least Privilege Principle: The principle of least privilege is crucial in firewall design to minimize the potential attack surface. It advocates granting the minimum level of privileges and access necessary for users and systems to perform their required functions. This minimizes exposure to potential threats and reduces the risk of unauthorized access or malicious activities.
  • Rule Set Optimization: Firewall rule set optimization is another important design principle. As firewalls employ rule-based filtering mechanisms, regularly reviewing and optimizing the rule sets is essential. This involves removing unnecessary or redundant rules, consolidating overlapping rules, and organizing rules logically and efficiently. 
  • Secure Default Configurations: Firewall design should prioritize secure default configurations to ensure a strong foundation for network security. Default settings often allow all traffic, leaving the network vulnerable to attacks. Secure defaults are a starting point for designing effective firewall policies and help prevent misconfigurations that may lead to security gaps.
  • Regular Monitoring and Updates: Monitoring and updating firewalls are critical principles in firewall design. Regular monitoring allows organizations to promptly detect and respond to security incidents, identify unauthorized access attempts, and analyze network traffic patterns. 

7 Steps to Designing the Perfect Firewall For Your Business

Designing an effective firewall for your business requires careful planning and consideration of specific requirements. This section presents a step-by-step approach to creating the perfect firewall. 

1. Identify Requirements

The first step in designing a firewall is to identify the specific requirements of your business. This involves understanding the network topology, the types of applications and services in use, the security objectives, and any regulatory or compliance requirements.

2. Outline Policies

The next step is to outline the firewall policies based on the requirements. You can decide which traffic is allowed or denied for each source and destination address, port, protocol, and role using rules and access controls.

3. Set Restrictions

Setting restrictions involves configuring the firewall to enforce the outlined policies. This may include blocking certain types of traffic, implementing intrusion prevention mechanisms, enabling VPN connectivity, or configuring content filtering rules.

4. Identify the Deployment Location

This involves determining whether the firewall will be placed at the network perimeter, between internal segments, or within a demilitarized zone (DMZ), depending on the network architecture and security requirements.

5. Identify Firewall Enforcement Points

Identifying firewall enforcement points involves determining where the firewall will be implemented within the network topology. This includes considering factors such as the location of critical assets, the flow of network traffic, and the points where the firewall can effectively inspect and control the traffic.

6. Identify Permitted Communications

As part of the design process, it is important to identify the permitted communications the firewall will allow. This includes identifying the necessary communication channels for business-critical applications, remote access requirements, and any specific exceptions to the firewall policies.

7. Launch

Lastly, launch the firewall and ensure all configurations are correct. This includes testing the firewall’s functionality, monitoring its performance, and conducting regular audits to ensure compliance with security policies and industry best practices.

Safeguarding Networks with Strong Firewall Design – Protect Your Business Today

Take charge of your network security today and safeguard your business from cyber threats. Don’t wait for a security breach to occur—proactively design and deploy a powerful firewall that acts as a shield, protecting your network and ensuring the continuity of your operations.

Take the first step towards a secure network—consult with experts, assess your requirements, and design a robust firewall solution that suits your business needs. Protect your valuable assets, preserve customer trust, and stay one step ahead of potential threats with a well-designed firewall architecture. Safeguard your network and fortify your business with Perimeter 81’s Firewall as a Service.

FAQs

What are 3 common firewall designs?

– Packet Filtering Firewalls: They inspect packets based on rules, operating at Layer 3 of the OSI model.
– Stateful Inspection Firewalls: These track network connections and analyze entire network packets.
– Next-Generation Firewalls (NGFW): NGFWs combine traditional firewall features with intrusion prevention, application awareness, and deep packet inspection.

What are the four basic types of firewall rules?

1. Allow: This rule permits specific traffic to pass through the firewall based on defined criteria, such as source/destination IP addresses, ports, and protocols.
2. Deny: This rule blocks specific traffic from passing through the firewall based on defined criteria. Denied traffic is typically dropped or rejected.
3. NAT (Network Address Translation): NAT rules modify network packets’ source or destination IP addresses.
4. Session Control: These rules define how the firewall handles and manages sessions.

What are the 4 common architectural implementations of firewalls?

1. Network-based Firewalls: Positioned at the network’s edge, they offer centralized security, filtering and monitoring all inbound and outbound traffic.
2. Host-based Firewalls: These are installed directly on devices like servers or workstations, providing tailored protection and control over device-specific traffic.
3. Virtual Firewalls: They ensure security within virtualized environments. Apart from protecting virtual machines, they control and isolate network traffic between VMs.
4. Cloud-based Firewalls: Positioned within cloud environments, they ensure robust security for cloud-based applications and infrastructure, balancing scalability and centralized control.

Source :
https://www.perimeter81.com/blog/network/firewall-design

What is a Cloud Firewall?

27.07.2023

In the past when fires were fought, people used traditional means like fire extinguishers and water hoses.

Translating this to the virtual world of computing — a cloud firewall is akin to the digital ‘fire extinguisher’ and ‘hose.’ It is a tool designed to stopslow, or prevent unauthorized access to or from a private network.

It inspects incoming and outgoing traffic, based on predetermined security rules. They can be a standalone system or incorporated into other network components.

In technical words, it acts as a barrier between on-premises networks and external networks.

Cloud firewalls are often deployed in a ‘perimeter’ security model — where they act as the first line of defense against cyber threats. This includes protection against DDoS attacks, SQL injections, and cross-site scripting.

The Benefits of Using a Cloud Firewall

In this section, we’ll discuss the benefits of using a cloud firewall over traditional ones.

Scalability

Traditional firewalls can’t keep pace as your network grows — their hardware limitations bound them.

On the other hand, a cloud firewall can easily adapt and expand in line with your business needs. Because it’s cloud-based, scaling does not require any additional hardware investment or complex configurations.

Be it on-site installation, maintenance, or upgrading, cloud firewalls wipe out all those physical processes, saving you time and resources.

Availability

Unlike traditional firewalls that rely on singular hardware systems and can fail, cloud firewalls are designed for high availability. Their decentralization means that even if one part fails, the rest continue to operate, ensuring constant protection.

Being cloud-based, they can also balance the load during peak traffic times to prevent slowdowns or outages.

For instance — during an attack like DDoS when the traffic dramatically increases, a cloud firewall can distribute the traffic across multiple servers. This ensures that your systems remain accessible and functional.

Extensibility

Cloud-based firewalls are not just scalable and highly available — they are also highly extensible.

This means that you can easily integrate them with other security features or services — such as Intrusion Detection Systems (IDS), Intrusion Prevention Systems (IPS), and Secure Web Gateways (SWG) — to create a solid security system.

Release updates and patches can be applied automatically, ensuring that the security is always up-to-date.

Identity Protection

When it comes to identity protection, cloud firewalls reign supreme.

They can identify and control application access on a per-user basis. This means that if unauthorized access is attempted, it can be immediately identified and blocked, providing extra security to your sensitive information.

Along with that, they can also provide an audit trail so that attempted breaches can be traced back to their origins. This info is beneficial for investigating cyber crimes and strengthening your cybersecurity strategy in the long run.
Performance Management

Sometimes, it’s not just about blocking harmful traffic, but also about prioritizing useful traffic.

Cloud firewalls enable performance management by prioritizing network traffic and providing quality of service (QoS) capabilities.

This can be handy during peak usage times or when certain services require higher bandwidth.

For instance, a cloud firewall can prioritize the traffic for certain high-demand resources, ensuring uninterrupted access and excellent performance. As a result, end users experience less lag and appreciate better service.

Moreover, the firewall can be programmed to give a higher priority to certain types of workloads or specific applications, like Voice over Internet Protocol (VoIP) or video streaming services.

Secure Access Parity

Remote work is another area where cloud firewalls shine.

Cloud firewalls enable a consistent security policy across all locations and users, no matter where they’re accessing from. This ensures that remote workers are just as protected as on-site ones.

Also, you get comprehensive visibility and control over all network traffic, and thanks to their cloud nature — updates can be pushed globally.

Migration Security

Migration — in particular to the cloud — can be a risky process in terms of security. The necessity to move data from one place to another can expose it to potential threats. Cloud firewalls eliminate these concerns.

Due to their inherent design, they provide end-to-end security during data migration. The data is protected at the source, during transit, and at the destination. This ensures a secure and seamless cloud migration process.

It’s like having a secure convoy for your data as it travels.

Types of Cloud Firewalls

There are four major types of cloud firewalls which can be broadly categorized as — SaaS Firewalls/Firewall as a service (FWaaS), Next-generation Firewall (NGFW), Public Cloud Firewall, and Web Application Firewall (WAF).

SaaS Firewalls/Firewall as a Service (FWaaS)

SaaS Firewalls, or Firewall as a Service, operate directly in the cloud. Offering security as a service — they are a scalable, flexible, and cost-effective solution.

  • Flexibility: Being cloud-based, these firewalls can rapidly adapt to changes in network traffic and configuration.
  • Scalability: FWaaS can comfortably scale up or down based on the needs without harming performance.
  • Cost-effective: As a subscription-based service, FWaaS can be adjusted to fit any budget and eliminates the need for expensive hardware and software maintenance.
  • Integrated approach: FWaaS offers a comprehensive, integrated approach to security, so you have complete visibility and control over network traffic and user activity.
  • Ease of deployment: Require less administrative effort and minimize human error.

Next-Generation Firewall (NGFW)

Next-Generation Firewalls represent the evolution in firewall technology, designed to go beyond traditional firewall functions.

  • Deep packet inspection: NGFWs are capable of examining the payload of a packet, crucial for detecting advanced threats within seemingly legitimate traffic.
  • Application awareness: NGFWs offer application-level control, significantly enhancing the granularity of security policies.
  • Threat detection: Their advanced threat detection capabilities protect organizations from a broad range of attacks, including zero-day vulnerabilities.
  • Integrated IPS: They feature an integrated Intrusion Prevention System that can identify and block potential security breaches, adding a layer of protection.
  • User identification: Unlike traditional firewalls, NGFWs can identify users and devices, not just IP addresses. This helps in creating more targeted, effective security policies.

Public Cloud Firewall

Public cloud firewalls are built within public cloud infrastructures like AWS, Google Cloud, and Azure to provide a layer of security control.

  • Seamless integration: These firewalls integrate seamlessly with other cloud services, infrastructure, and applications.
  • Autoscaling: Being cloud-native, they can scale dynamically with the workload, managing a substantial increase in network traffic without compromising performance.
  • Cloud-specific rulesets: These firewalls enable cloud-specific packet filtering, applying rules to cloud-native as well as hybrid and multi-cloud environments.
  • Compatibility: Public Cloud Firewalls are compatible with the automatic deployment mechanisms of their respective cloud platforms. This compatibility reduces the overhead of manual configurations.
  • Resilience: With a distributed, highly available architecture, they provide resilience — ensuring that the firewall is operational even if individual components fail.

Web Application Firewall (WAF)

A Web Application Firewall specifically protects web applications by filtering, monitoring, and blocking HTTP traffic that could exploit vulnerabilities in these applications.

  • Web app protection: WAFs stop attacks targeting web applications, including SQL injection, cross-site scripting (XSS), and others.
  • Custom policies: Customizable Policies in WAFs allow for tailored protection suited to the individual needs of every web application.
  • Inspection: They offer a thorough inspection of HTTP/S traffic, ensuring no harmful requests reach the web applications.
  • Bot control: WAFs can discern harmful bots from legitimate traffic, granting access only to authorized users and services.
  • API security: Security for APIs against attacks such as DDoS, improving overall protection.

Using Cloud Firewall vs Other Network Security Approaches

How do cloud firewalls compare to other network security approaches? See how they compare to virtual firewall appliances, IP-based network security policies, and security groups.

Virtual Firewall Appliances

Despite brands like Cisco, Juniper, and Fortinet making a strong push for them, virtual firewall appliances don’t fit in a work environment that is heavily cloud-based.

  • Not scalable: Virtual appliances have limitations in scaling. When traffic increases, they struggle to keep pace, affecting performance.
  • Operational inefficiency: They require manual configurations and adjustments, which can lead to operational inefficiencies and potential mistakes.
  • Limited visibility: They usually provide limited visibility into network traffic and, in some cases, can’t even offer granular control at the application level.
  • Architectural complexity: These appliances often introduce architectural complexity, as they need to intercept and secure network traffic at different points.
  • High cost: Acquiring, maintaining, and upgrading a virtual firewall appliance can be expensive, especially when compared to subscription-based cloud firewalls.
  • Limited extensibility: Be it AWS transit gateways, Gateway Load Balancers, or VPC/VNet peering — virtual appliances usually struggle to integrate with these advanced cloud-native services.

IP-Based Network Security Policy

IP-based network security policies have traditionally been used in many organizations. However, they also have shortcomings when compared to cloud firewalls.

  • Dynamic IP difficulties: These policies are primarily based on static IP addresses, triggering issues when dealing with dynamic IPs — such as those used in today’s highly scalable, distributed infrastructures.
  • Granularity problems: IP-based policies offer less granular control over access to applications and data, compared to cloud firewalls.
  • Security loopholes: Because they rely heavily on IP addresses for identification, they can be vulnerable to IP spoofing, creating potential security loopholes.
  • Inefficient management: IP-based policies can be tedious to manage, especially when dealing with larger, more complex network infrastructures.
  • Limited scalability: Like virtual appliances, IP-based policies struggle when it comes to handling a significant increase in network traffic.
  • Dependency on IP reputation: These policies depend on the reputation of IP addresses, which can be unreliable and manipulated. Also, legitimate IP addresses can be compromised, creating a potential avenue for attacks.

Security Groups

Lastly, security groups, while being a crucial part of network security in a cloud-based environment, fall short compared to cloud firewalls on several fronts.

  • Scope limitation: Security groups usually have a limited scope — often only applicable within a single instance or VPC. This might not be adequate for enterprises with large-scale or diverse cloud deployments.
  • Manual administration: This can lead to potential errors and security risks, more so in large and complex environments.
  • Lack of visibility: Security groups don’t provide comprehensive visibility into network traffic or robust logging and audit capabilities — both of which are fundamental for troubleshooting and regulatory compliance.
  • Limited flexibility: Security groups lack the flexibility to adapt quickly to changes in network configuration or traffic patterns. This can hinder performance and affect user experience.
  • Dependencies: Security groups are dependent on the underlying cloud service. This means that they can be impacted by any disruptions or changes to that service. So, the level of independence and control tends to be on the lower end.

It’s evident, compared to the other network security approaches, cloud firewalls provide superior flexibility, scalability, visibility, and control.

How does a Cloud-Based Firewall Fit into a SASE Framework?

SASE is a concept introduced by Gartner that stands for Secure Access Service Edge. It combines network security and wide area networking (WAN) capabilities in a single cloud-based service.

Cloud-based firewalls fit wonderfully into this framework as they provide network security enforcement. Below’s how.

  • Unified security and networking: By integrating with other SASE components, cloud-based firewalls facilitate unified security and networking. They ensure that security controls and networking capabilities are not siloed but work together seamlessly.
  • Location-agnostic: Being cloud-based, these firewalls offer location-agnostic security. This is important in a SASE framework which is designed to support securely connected, geographically-dispersed endpoints.
  • Dynamic scaling: The dynamism of cloud-based firewalls aligns with the scalable nature of SASE. So, the security scales with network requirements.
  • Policy enforcement: They provide efficient enforcement of security policies across a distributed network, aiding in consistent security compliance.
  • Visibility and control: In a SASE framework, cloud-based firewalls offer enriched visibility and control over network traffic and user activity. This aids in improved threat detection and response times.
  • Data protection: They provide encryption and decryption, protecting sensitive data transmitted across the network. This capability is pivotal for data protection in a SASE architecture.
  • Fast deployment: Enjoy operational simplicity as they can be seamlessly deployed across multiple locations.
  • Easier management: Management becomes easier as there is a single point of control allowing for unified threat management.
  • Lower costs: Reduced capital expenditure as the need for on-premise hardware decreases significantly.
  • Highly available: These firewalls offer high availability and resilience, adhering to the SASE principle of continual access and service regardless of location. Thus, enhancing the overall security posture in an ever-increasing remote work landscape.

Secure your network with firewall-as-a-service today!

Organizations across the globe are transitioning to a cloud-first strategy. Perimeter 81 can assist you in this journey. Our Firewall-as-a-Service model provides security, scalability, and simplicity that is unmatched in the industry. Learn more here!

FAQs

What is the disadvantage of cloud firewall?

Reliance on the availability of the FaaS provider is a potential disadvantage of cloud firewalls.

Why do you need a cloud firewall?

Just like you need a security gate to prevent unauthorized entry into your house, a cloud firewall acts as a barrier to block malicious traffic from entering your network. It provides real-time protection and security monitoring — making it crucial in today’s world where cyber threats are rampant.

What is the main reason to operate a public cloud firewall?

Application visibility and control is the primary reason to operate a public cloud firewall. And unlike traditional firewalls, cloud firewalls allow for extensive network traffic logging and reporting, providing a thorough overview of your application’s security status.

What is cloud vs hardware firewall?

A cloud firewall, also known as a Firewall-as-a-Service (FaaS), is a firewall hosted in the cloud, providing scalability, cost efficiency, and real-time updates. Hardware firewalls, on the other hand, are physical devices installed in the infrastructure of a network. While cloud firewall is software-based, traditional ones can be both software and hardware-based.

Is a cloud-based firewall more secure?

Cloud-based firewall comes with the same level of security as a traditional or on-premises firewall but with advanced access policy, encryption, connection management, and filtering between servers.

What is the difference between a next-generation firewall and a cloud firewall?

While next-generation firewalls (NGFWs) offer advanced security capabilities such as intrusion prevention systems (IPS), deep packet inspection, and application awareness— they can be limiting when it comes to scalability and flexibility, especially in a dynamic, cloud-based environment. That’s where cloud firewalls excel.

Source :
https://www.perimeter81.com/blog/network/cloud-based-firewall

HIPAA LAW: What Does It Protect?

27.07.2023

What is HIPPA?

HIPAA stands for the Health Insurance Portability and Accountability Act, a federal law enacted in 1996 in the United States. HIPAA’s primary aim is to safeguard the privacy, security, and confidentiality of individuals’ protected health information (PHI) by establishing a set of standards and regulations for healthcare providers, health plans, and other entities that maintain PHI. 

HIPAA Privacy Rule, Explained

The HIPAA Privacy Rule grants patients’ rights over their PHI, including the right to access, request amendments, and control the sharing of their health information. It also imposes obligations on covered entities to implement safeguards to protect PHI, train their workforce on privacy practices, and obtain individual consent for certain uses and disclosures. 

The Privacy Rule plays a vital role in keeping the confidentiality and security of personal health information, ensuring patients have control over their own data while allowing appropriate access for healthcare purposes.

HIPAA Security Rule, Explained

The HIPAA Security Rule is an essential part of the Health Insurance Portability and Accountability Act (HIPAA). The Security Rule sets forth administrative, physical, and technical safeguards that covered entities must implement to protect the confidentiality, integrity, and availability of ePHI. 

These safeguards include measures such as risk assessments, workforce training, access controls, encryption, and contingency planning to prevent unauthorized access, use, or disclosure of ePHI. Compliance with the HIPAA Security Rule is crucial for ensuring the secure handling of electronic health information, reducing the risk of data breaches, and maintaining the trust and confidentiality of sensitive patient data.

HIPAA Covered Entities

HIPAA defines specific entities that are subject to its regulations, known as covered entities. 

Covered entities include:

Healthcare Providers

Healthcare providers, such as doctors, hospitals, clinics, psychologists, and pharmacies, are considered covered entities under HIPAA. They play a vital role in the delivery of healthcare services and are responsible for maintaining the privacy and security of patients’ protected health information (PHI).

Healthcare providers must follow HIPAA regulations when electronically transmitting and overseeing PHI, implementing safeguards to protect patient data, and ensuring appropriate access and disclosures.

Health Plans

Health plans, including health insurance companies, HMOs, employer-sponsored health plans, Medicare, Medicaid, and government health programs, fall under the category of covered entities. These entities are responsible for managing health insurance coverage and must comply with HIPAA to protect the privacy of individuals’ health information.

Health plans have obligations to implement privacy policies, provide individuals with notice of their privacy practices, and set up safeguards to secure PHI against unauthorized access or disclosures.

Healthcare Clearinghouses 

Healthcare clearinghouses are entities that process nonstandard health information into standardized formats. They function as intermediaries between healthcare providers and health plans, facilitating the electronic exchange of health information.

Covered healthcare clearinghouses must adhere to HIPAA’s regulations, implementing security measures and safeguards to protect the confidentiality, integrity, and availability of electronic protected health information (ePHI). They play a critical role in ensuring the secure transmission and conversion of health data, contributing to the interoperability and efficiency of electronic healthcare transactions.

Business Associates

Business associates are external entities or individuals that provide services or perform functions involving PHI, such as third-party administrators, billing companies, IT providers, and certain consultants. 

Covered entities must have written agreements in place with their business associates, outlining the responsibilities and obligations regarding the protection of PHI. These agreements should address issues such as the permissible uses and disclosures of PHI, safeguards for data security, breach notification requirements, and compliance with HIPAA’s Privacy Rule.

Who is Not Required to Follow HIPAA Regulations? 

Entities not required to follow HIPAA laws include:

Life Insurers

Since life insurers primarily deal with underwriting life insurance policies, they do not manage or maintain protected health information (PHI) as defined by HIPAA.

Employers

Employers, in their role as employers, are not covered by HIPAA regulations because they manage employee health information for employment-related purposes only, rather than for healthcare operations.

Workers’ Compensation Carriers

Workers’ compensation carriers are exempt from HIPAA because the health information they handle is typically related to work-related injuries or illnesses, which falls outside the scope of HIPAA’s regulations.

Most Schools and School Districts

Schools and school districts, except for those that run healthcare facilities or have specific health programs, are generally not subject to HIPAA as they primarily handle educational records and student information.

Many State Agencies

State agencies, such as child protective service agencies, often deal with sensitive information related to child welfare or social services, which are typically regulated under state-specific privacy laws rather than HIPAA.

Most Law Enforcement Agencies

Law enforcement agencies, while involved in protecting public safety, are generally exempt from HIPAA as they primarily focus on law enforcement activities rather than the provision of healthcare services.

Many Municipal Offices

Municipal offices that do not function as healthcare providers or healthcare clearinghouses are not subject to HIPAA regulations. They primarily manage administrative and governmental functions rather than healthcare-related activities.

What Information is Protected Under HIPAA? 

HIPAA protects a broad range of health information, primarily focusing on individually identifiable health information known as Protected Health Information (PHI). 

Under HIPAA, PHI is subject to strict privacy and security safeguards, and covered entities must obtain individual consent or authorization before using or disclosing PHI, except in certain permitted circumstances. HIPAA also allows the use and disclosure of de-identified health information, which is health information that does not identify an individual and has undergone a process to remove specific identifiers.

De-identified health information is not subject to HIPAA’s privacy and security requirements because it does not contain identifiable information that could be used to link it back to an individual. However, covered entities must follow specific guidelines and methods outlined by HIPAA to ensure that information is properly de-identified and cannot be re-identified.

Overall, HIPAA provides protection and safeguards for a wide range of health information, with a specific focus on safeguarding individually identifiable health information (PHI) and allowing for the use and disclosure of de-identified health information under certain circumstances.

When Can PHI Be Disclosed? 

Under HIPAA, Protected Health Information (PHI) can be disclosed in a variety of situations, including:

General Principle for Uses and Disclosure

PHI can be disclosed for treatment, payment, and healthcare operations without explicit authorization, following the general principle that PHI should be used or disclosed based on the minimum necessary information needed to accomplish the intended purpose.

Permitted Uses and Disclosures

PHI can be shared without individual authorization for activities such as public health activities, healthcare oversight, research (with privacy safeguards), law enforcement purposes, and when required by law, including reporting certain diseases and vital events.

Authorized Uses and Disclosures

PHI can be disclosed based on the individual’s written authorization, allowing specific uses and disclosures beyond what is permitted without authorization, such as sharing PHI for marketing purposes or with third-party organizations.

PHI Uses and Disclosures Limited to the Minimum Necessary

Covered entities are required to make reasonable efforts to limit PHI uses and disclosures to the minimum necessary to accomplish the intended purpose. This means sharing only the information necessary for the specific situation, whether it is for treatment, payment, healthcare operations, or other permitted purposes.

Notice and Individual Rights

Covered entities must provide individuals with a Notice of Privacy Practices, explaining how their PHI may be used and disclosing their rights regarding their health information. Individuals have rights such as accessing their PHI, requesting amendments, and requesting restrictions on certain uses or disclosures. 

Privacy Practices Notice

Covered entities must respect these rights and enable individuals to exercise them. 

Notice distribution

Covered entities must make efforts to distribute the Notice of Privacy Practices to individuals, including posting it prominently in their facilities and providing a copy to individuals upon request. They should also make reasonable attempts to obtain written acknowledgment of receipt.

Acknowledgment of Notice Receipt

Covered entities should document individuals’ acknowledgment of receiving the Notice of Privacy Practices. This acknowledgment can be obtained through various means, such as a signed form or electronic confirmation, ensuring that individuals have been made aware of their rights and the entity’s privacy practices.

Access

Individuals have the right to access their PHI and obtain copies of their health records upon request, with certain exceptions and reasonable fees.

Amendment

Individuals can request amendments or corrections to their PHI if they believe it is incomplete, inaccurate, or requires updating.

Disclosure Accounting

Covered entities must provide individuals with an accounting of certain disclosures of their PHI, upon request, excluding disclosures for treatment, payment, healthcare operations, and other exceptions.

Restriction Request

Individuals have the right to request restrictions on the use or disclosure of their PHI, although covered entities are not required to agree to all requested restrictions.

Confidential Communications Requirement

Covered entities must accommodate reasonable requests from individuals to receive communications of their PHI through alternative means or at alternative locations to protect privacy.

Administrative Requirements

Covered entities must establish and implement privacy policies and procedures to ensure compliance with HIPAA’s Privacy Rule, including designating a Privacy Officer responsible for overseeing privacy practices.

Privacy Personnel

Covered entities should have designated privacy personnel responsible for developing and implementing privacy policies, handling privacy inquiries, and ensuring compliance.

Workforce Training and Management

Covered entities must provide training to their workforce members regarding privacy policies, procedures, and the protection of PHI. They should also have mechanisms in place to manage workforce members’ compliance with privacy practices.

Mitigation

Covered entities must take reasonable steps to mitigate any harmful effects resulting from the use or disclosure of PHI in violation of the Privacy Rule.

Data Safeguards

Covered entities are required to implement reasonable safeguards to protect PHI from unauthorized access, disclosure, or use.

Complaints

Covered entities must have a process in place for individuals to file complaints regarding privacy practices, and they must not retaliate against individuals who exercise their privacy rights.

Retaliation and Waiver

Covered entities cannot retaliate against individuals for exercising their privacy rights, and individuals cannot be required to waive their rights as a condition for receiving treatment or benefits.

Documentation and Record Retention

Covered entities must retain documentation related to their privacy practices and policies for at least six years.

Fully Insured Group Health Plan Exception

The Privacy Rule does not apply directly to fully insured group health plans, although the plans must follow other federal and state laws governing the privacy of health information.

These various requirements and provisions ensure that covered entities adhere to privacy practices, protect individuals’ rights, and keep the security and confidentiality of PHI.

How is PHI Protected?

PHI is protected through various measures to safeguard its confidentiality, integrity, and security:

  1. Safeguards – Safeguards can include physical, technical, and administrative measures such as secure storage, encryption, access controls, and firewalls.
  2. Minimum Necessary – This means that only the information needed for a particular task or situation should be accessed or shared.
  3. Access and Authorization Controls – Covered entities must have procedures in place to control and limit who can view and access PHI. This includes implementing access controls, user authentication, and authorization processes to ensure that only authorized individuals can access and handle PHI.
  4. Employee Training – Training ensures that employees understand their responsibilities, know how to handle PHI securely, and are aware of potential risks and safeguards.
  5. Business Associates – Business associates, who handle PHI on behalf of covered entities, are also obligated to implement safeguards to protect PHI and comply with HIPAA regulations. This ensures that third-party entities involved in healthcare operations support the same level of privacy and security standards when handling PHI.

Get HIPAA Compliant With Our Checklist

By implementing the above-mentioned HIPAA safeguards, limiting the use and disclosure of PHI, and supplying employee training, covered entities and their business associates can work together to protect the privacy and security of individuals’ health information, and prevent improper use or disclosure. Want more tips to stay compliant? Check out our HIPAA Compliance Checklist.

Source :
https://www.perimeter81.com/blog/compliance/hipaa-law

Enable Remote Desktop (Windows 10, 11, Windows Server)

Last Updated: June 22, 2023 by Robert Allen

In this guide, you will learn how to enable Remote Desktop on Windows 10, 11, and Windows Server. I’ll also show you on to enable RDP using PowerShell and group policy.

Tip: Use a remote desktop connection manager to manage multiple remote desktop connections. You can organize your desktops and servers into groups for easy access.

Table of contents

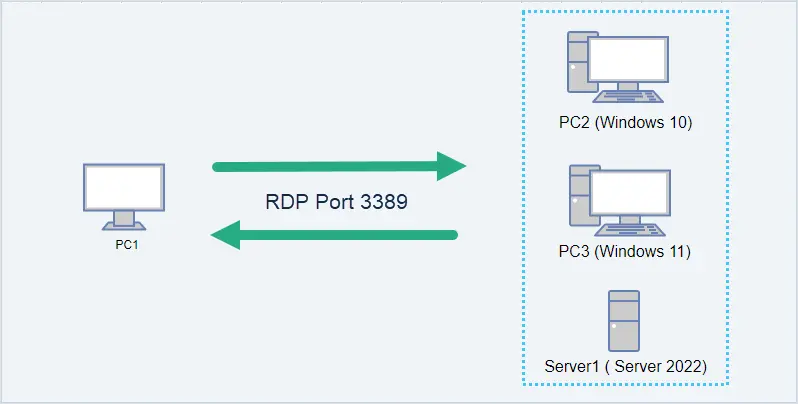
In the diagram below, my admin workstation is PC1. I’m going to enable RDP on PC2, PC3, and Server1 so that I can remotely connect to them. RDP uses port TCP 3389. You can change the RDP listening port by modifying the registry.

Enable Remote Desktop on Windows 10

In this example, I’m going to enable remote desktop on PC2 that is running windows 10.

Step 1. Enable Remote Desktop

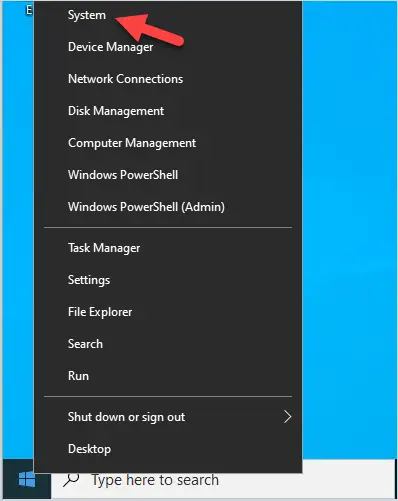
Right click the start menu and select system.

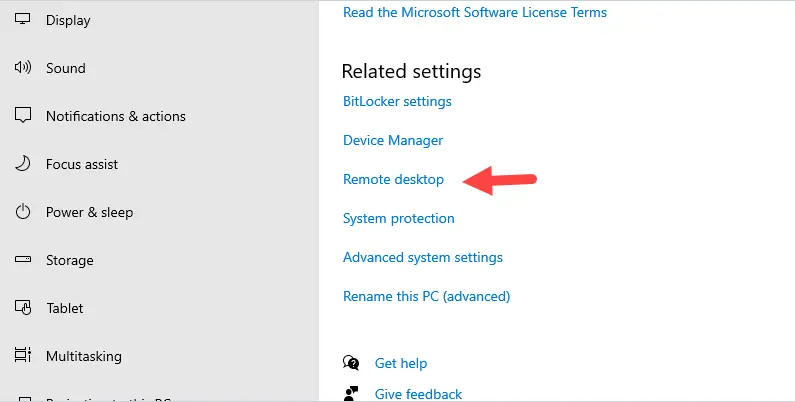
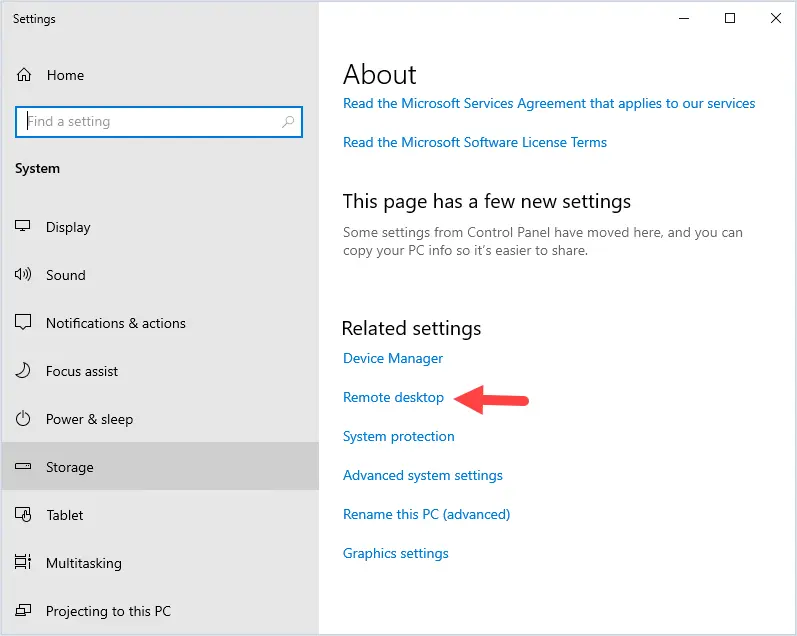
Under related settings click on Remote desktop.

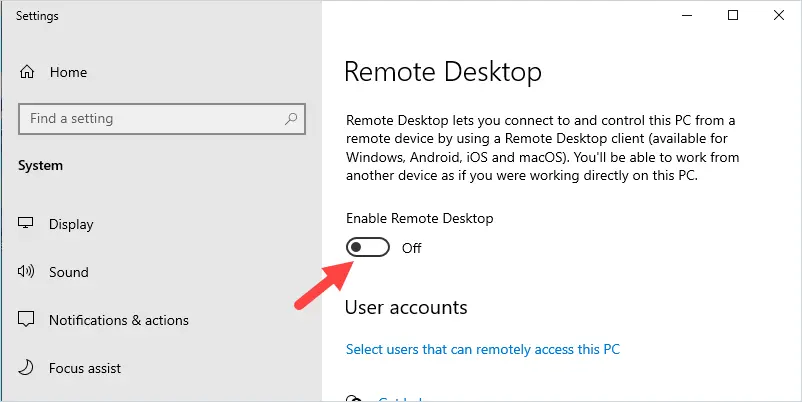
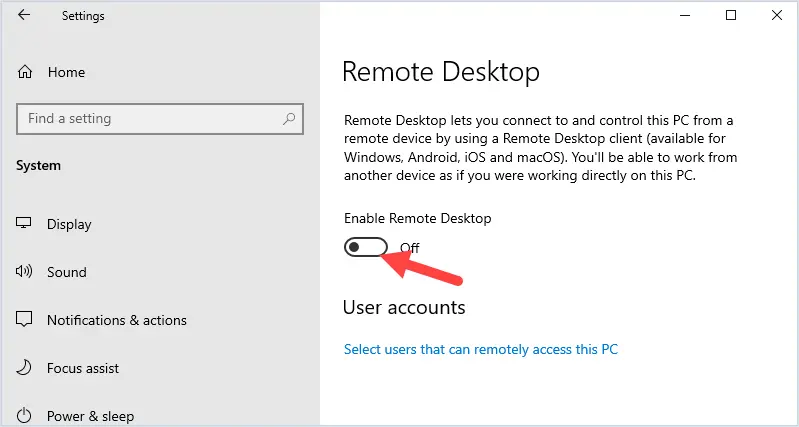
Click the slider button to enable remote desktop.

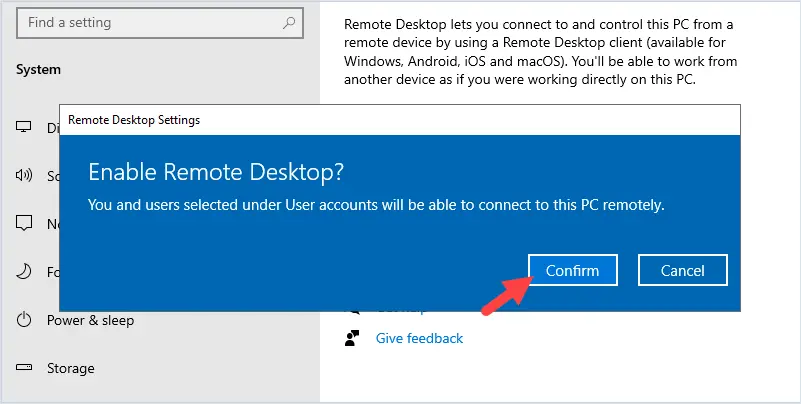
You will get a popup to confirm that you want to enable Remote desktop. Click confirm.

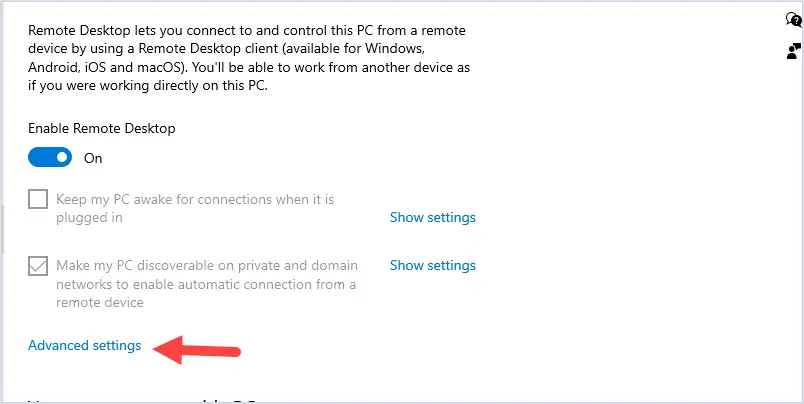
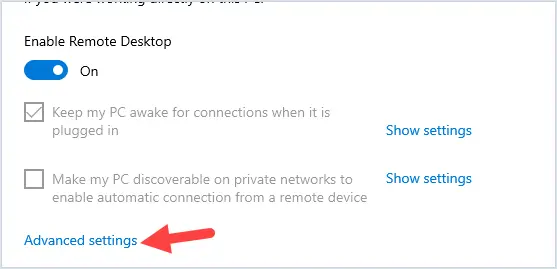
Next, Click on Advanced Settings.

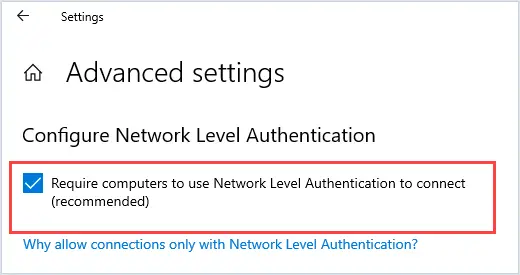
Make sure “Require computers to use Network Level Authentication to connect” is selected.

This setting will force the user to authenticate before it will start a remote desktop session. This setting will enable a layer of security and prevent unauthorized remote connections.

Step 2. Select Users Accounts

The next step is to ensure only specific accounts can use RDP.

By default, only members of the local administrators group will be allowed to connect using remote desktop.

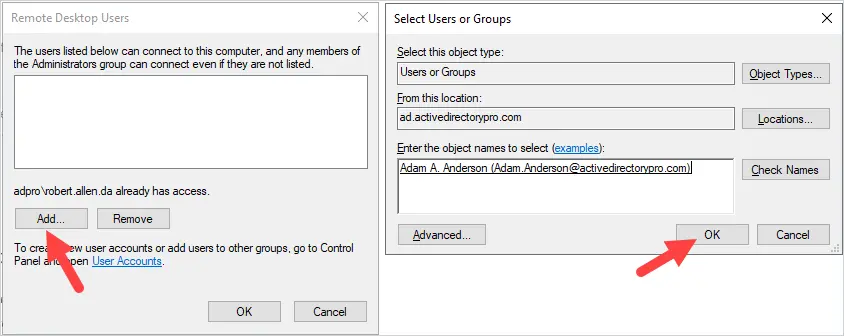
To add or remove user accounts click on “select users that can remotely access this PC”.

To add a user click the Add button and search for the username.

In this example, I’m going to add a user Adam A. Anderson.

Tip. I recommend creating a domain group to allow RDP access. This will make it easier to manage and audit RDP access.
That was the last step, remote desktop is now enabled.

Let’s test the connection.

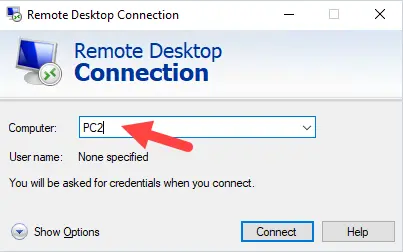
From PC1 I open Remote Desktop Connection and enter PC2.

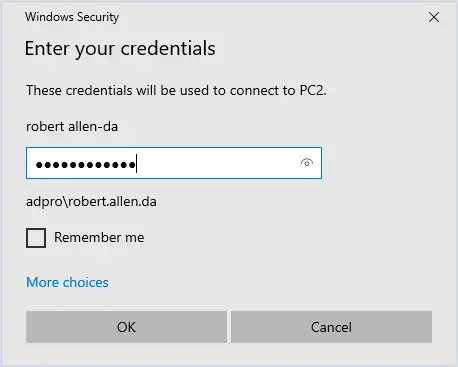
I am prompted to enter credentials.

Success!

I now have a remote desktop connection to PC2.

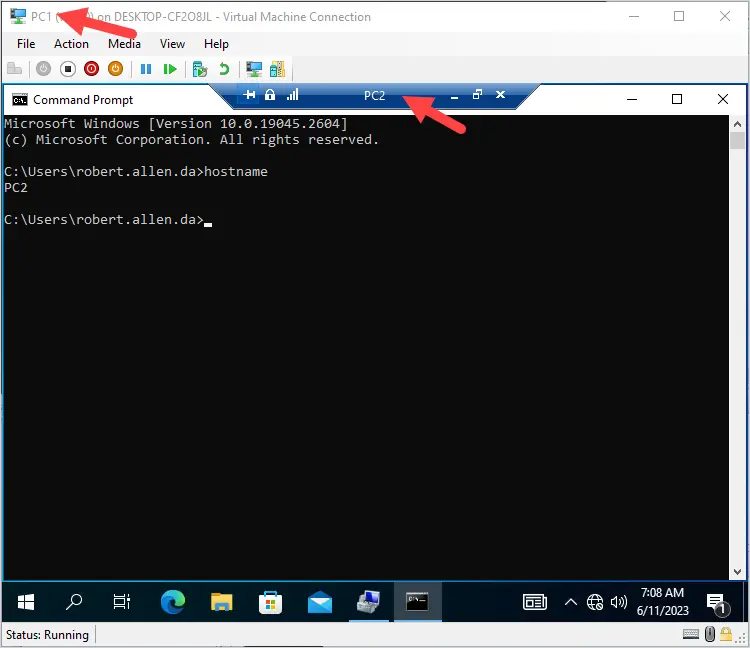
In the screenshot below you can see I’m connected via console to PC1 and I have a remote desktop connection open to PC2.

Damware Mini Remote Control

Multiple monitor support. Reboot and wake sleeping computers remotely.

Remote access to Windows, Linux, and Mac OS X operating systems. In session chat, remote screenshot, file transfer, and more.

Download 14 Day Free Trial

Enable Remote Desktop on Windows 11

In this example, I’ll enable remote desktop on my Windows 11 computer (PC3).

Step 1. Enable Remote Desktop

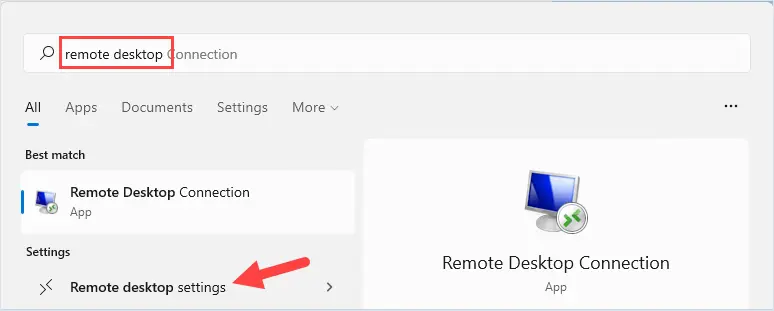
Click on search.

Enter “remote desktop” and click on “Remote desktop settings”

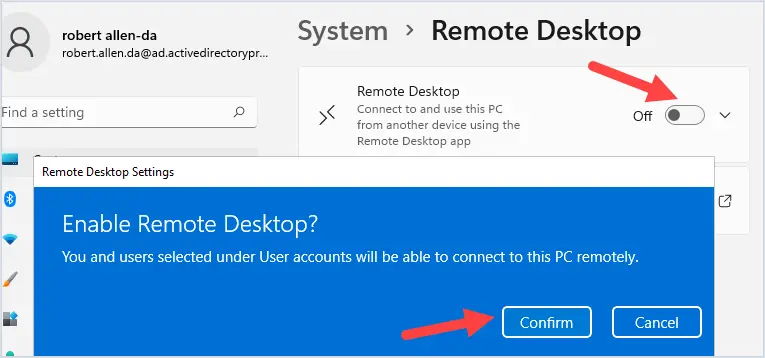
Click the slider to enable remote desktop. You will get a popup to confirm.

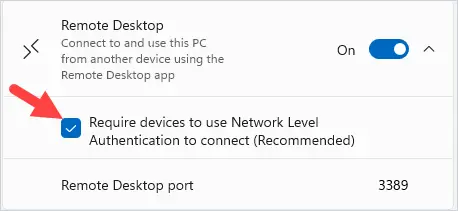
Click the down arrow and verify “Require devices to use Network Level Authentication to connect” is enabled.

Remote Desktop is now enabled. In the next step, you will select which users are allowed to use remote desktop.

Step 2. Remote Desktop Users

By default, only members of the local administrators group can use remote desktop. To add additional users follow these steps.

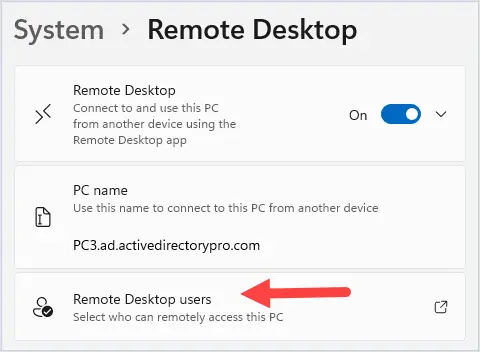
Click on “Remote Desktop users”

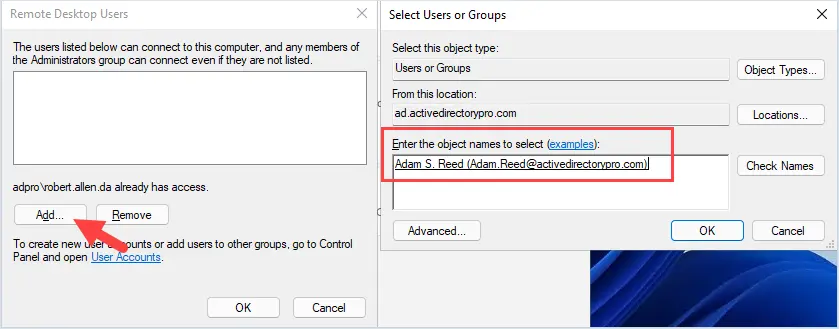
Click on add and search or enter a user to add. In this example, I’ll add the user adam.reed.

Now I’ll test if remote desktop is working.

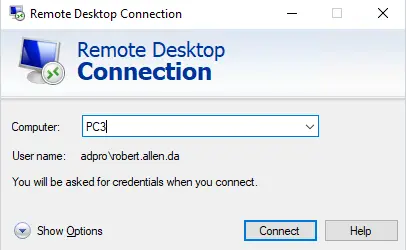
From my workstation PC1 I’ll create a remote desktop connection to PC3 (windows 11).

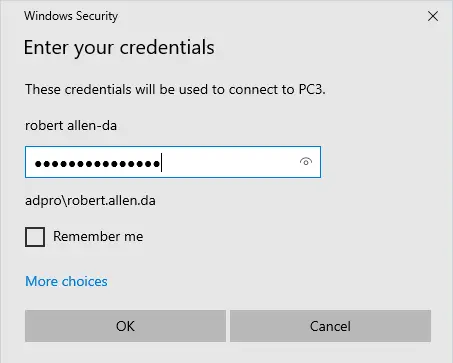
Enter the password to connect.

The connection is good!

You can see in the screenshot below I’m on the console of PC1 and I have a remote desktop connection to PC3 that is running Windows 11.

Enable Remote Desktop on Windows Server

In this example, I’ll enable remote desktop on Windows Server 2022.

Step 1. Enable Remote Desktop.

Right click the start menu and select System.

On the settings screen under related settings click on “Remote desktop”.

Click the slider button to enable remote desktop.

You will get a popup to confirm that you want to enable Remote desktop. Click confirm.

Click on Advanced settings.

Make sure “Require computers to use Network level Authentication to connect” is enabled.

Remote desktop is now enabled, the next step is to select users that can remotely access the PC.

Step 2. Select User accounts

By default, only members of the local administrators group will be allowed to connect using remote desktop.

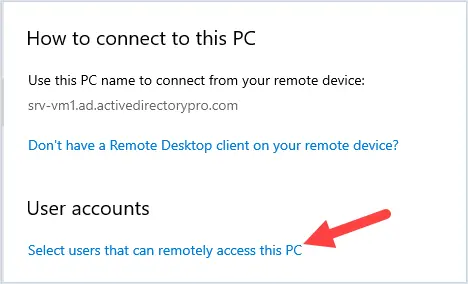
To add additional users click on click on “select users that can remotely access this pc”.

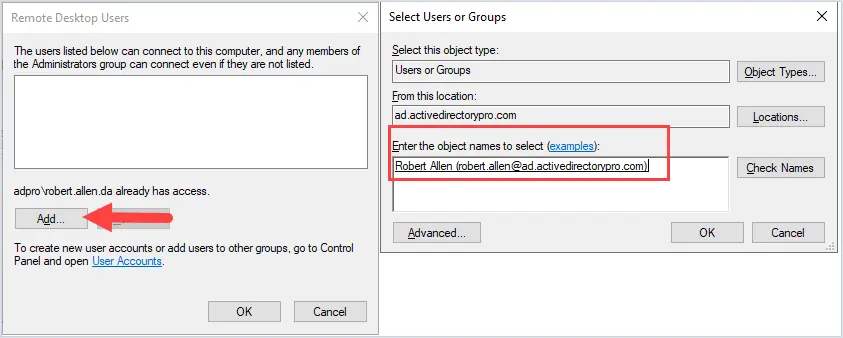
Next, click add then enter or search for users to add. In this example, I’ll add the user robert.allen. Click ok.

Now I’ll test if remote desktop is working on my Windows 2022 server.

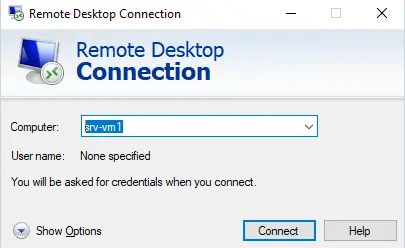
From my workstation (pc2) I open the remote desktop connection client and enter srv-vm1and click connect. Enter my username and password and click ok.

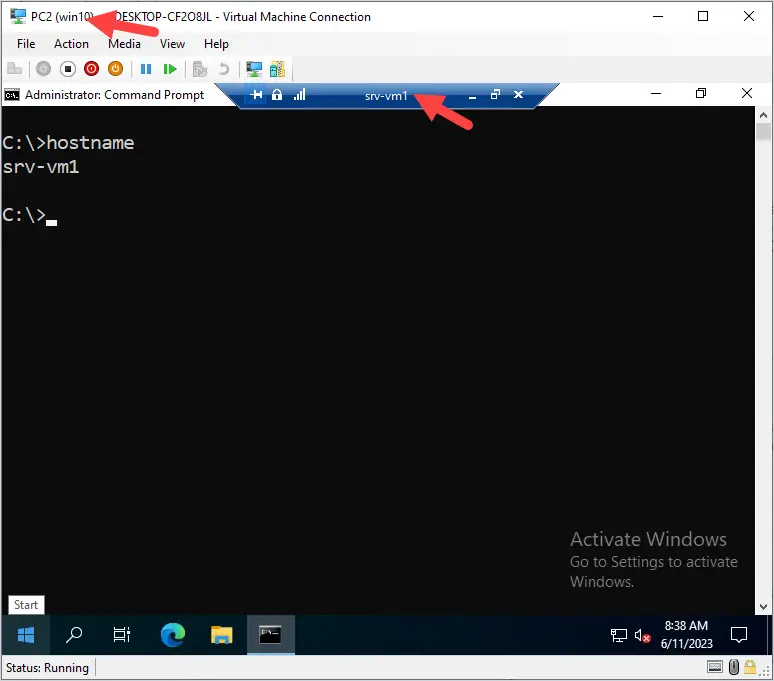
Awesome, it works!
I’ve established a remote session to my Windows 2022 server from my Windows 10 computer.

PowerShell Enable Remote Desktop

To enable Remote Desktop using PowerShell use the command below. This will enable RDP on the local computer.

Set-ItemProperty -Path 'HKLM:\System\CurrentControlSet\Control\Terminal Server' -name "fDenyTSConnections" -value 0

You can use the below PowerShell command to check if remote desktop is enabled.


if ((Get-ItemProperty "hklm:\System\CurrentControlSet\Control\Terminal Server").fDenyTSConnections -eq 0) { write-host "RDP is Enabled" } else { write-host "RDP is NOT enabled" }
To enable remote desktop remotely you can use the invoke-command. This requires PS remoting to be enabled, check out my article on remote powershell for more details.

In this example, I’ll enable remote desktop on the remote computer PC2.

invoke-command -ComputerName pc2 -scriptblock {Set-ItemProperty -Path 'HKLM:\System\CurrentControlSet\Control\Terminal Server' -name "fDenyTSConnections" -value 0} 

Group Policy Configuration to allow RDP

If you need to enable and manage the remote desktop settings on multiple computers then you should use Group Policy or intune.

Follow the steps below to create a new GPO.

Step 1. Create a new GPO

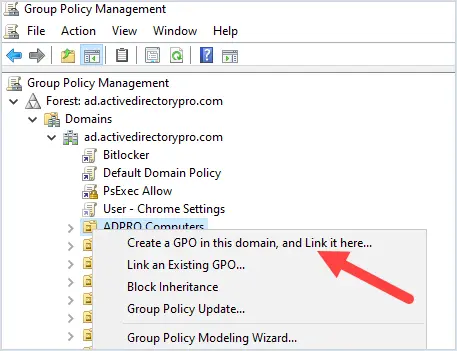
Open the group policy management console and right click the OU or root domain to create a new GPO.

In this example, I’m going to create a new GPO on my ADPPRO Computers OU, this OU has all my client computers.

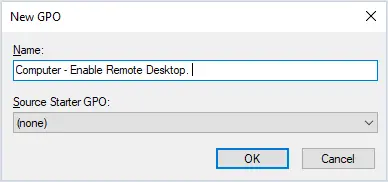
Give the GPO a name.

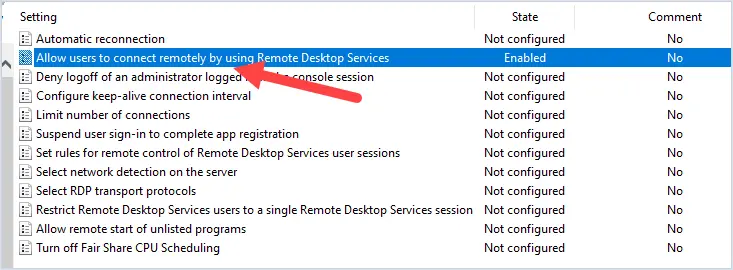
Edit the GPO and browse to the following policy setting.

Computer Configuration -> Policies -> Administrative Templates -> Windows Components -> Remote Desktop Services -> Remote Desktop Session Host -> Connections;

Enable the policy setting -> Allow users to connect remotely by using Remote Desktop Services

That is the only policy setting that needs to be enabled to allow remote desktop

Step 2. Update Computer GPO

The GPO policies will auto refresh on remote computers every 90 minutes.

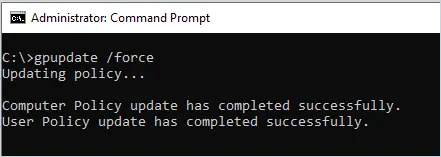
To manually update GPO on a computer run the gpupdate command.

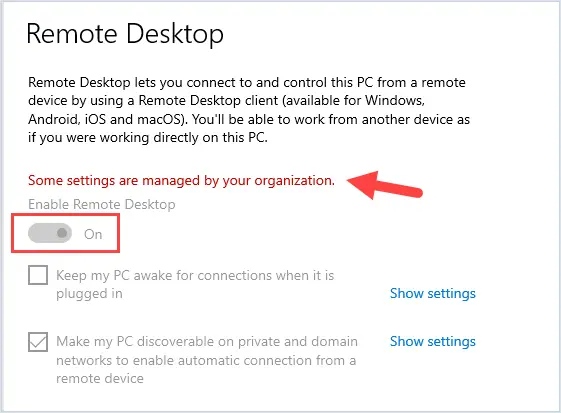
When remote desktop is managed with group policy the settings will be greyed out. This will allow you to have consistent settings across all your computers. It will also prevent users or the helpdesk from modifying the settings.

That’s a wrap.

I just showed you several ways to enable remote desktop on Windows computers. If you are using Active Directory with domain joined computers then enabling RDP via group policy is the best option.

Related Articles

Recommended: Active Directory Permissions Reporting Tool

The ARM Permissions Reporting Tool helps you monitor, analyze, and report on the permissions assigned to users, groups, computers, and organizational units in your Active Directory

You can easily identify who has what permissions, where they came from, and when they were granted or revoked. You can also generate compliance-ready reports for various standards and regulations, such as HIPAA, PCI DSS, SOX, and GDPR

Get instant visibility into user and group permissions.

Download Free Trial

Source :
https://activedirectorypro.com/enable-remote-desktop-windows/

10 NTFS Permissions Management Best Practices

Last Updated: July 27, 2023 by Robert Allen

ntfs permissions management best practices

This is a list of 10 best NTFS permissions management tips, techniques, and best practices.

These are strategies I have used to implement and manage NTFS security permissions on Windows file shares in medium and large organizations.

NTFS permissions management is critical to ensuring your data is secure from threats and prevents unauthorized access. NTFS permissions need to be properly configured when enabling shared folders on your network.

Let’s get started.

1. Audit & Review NTFS Permissions

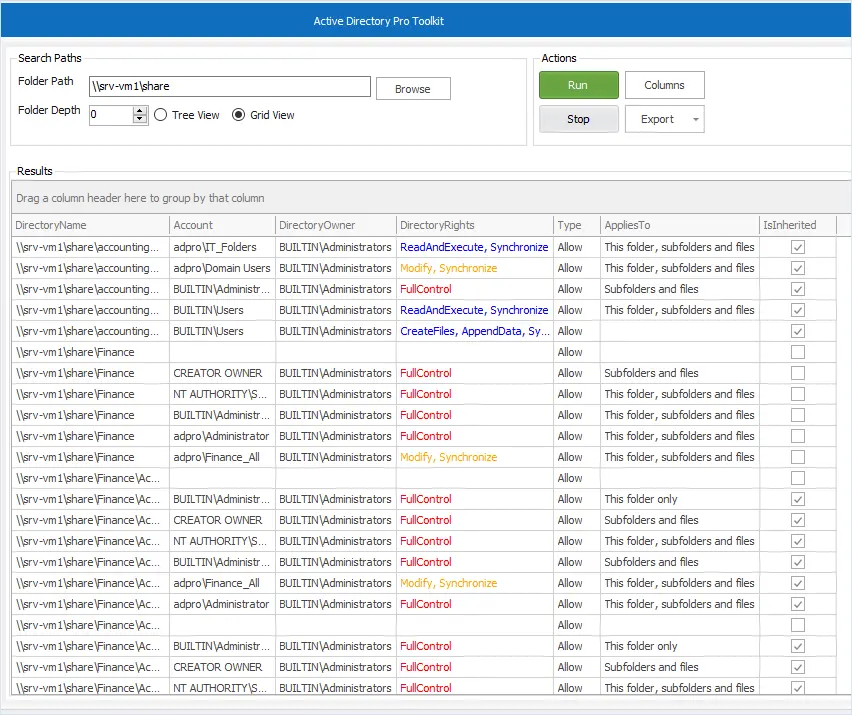
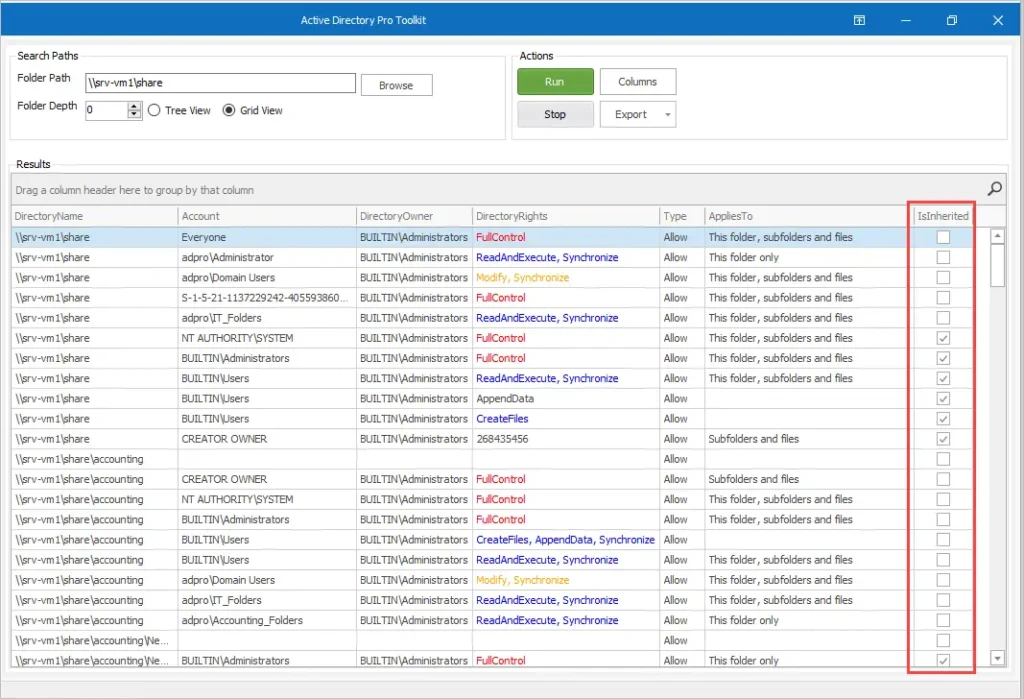
Whether you have an existing file server or are setting up a new one it is important to review your NTFS permissions, this at times can even be a requirement of an audit. To simplify this task I recommend using an NTFS Permissions Report Tool that can scan all folders and show you who has access to what. With a reporting tool, you can list all folder permissions, verify users have the correct permissions, check inheritance, find insecure permissions, verify directory rights, and export the report to CSV, Excel, or PDF.

AD Pro NTFS Permissions Reporter

2. Secure NTFS Permissions with Security Groups

It is a best practice to create security groups to set NTFS permissions rather than using individual user accounts. Security groups have the following advantages:

  • Easier to manage permissions for a group of users
  • Easily remove user’s permissions
  • Easily grant users access to a file or folder
  • Makes it easier to identify who has access to what
  • Simplifies auditing and compliance reports

Let me walk through an example of how using security groups simplifies NTFS permissions management.

Say you have 100 employees that need access to the accounting folder, 80 need read/write permissions, and the other 20 need read-only access.

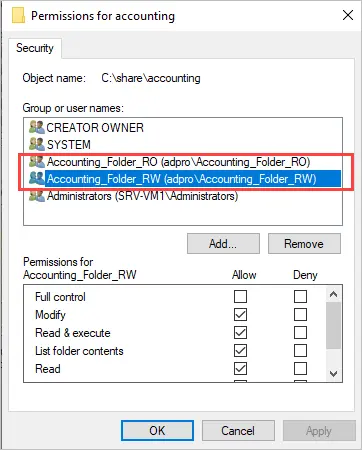
To set these permissions you only need to create two security groups, and then configure the permissions for these two groups. Example below.

Example of using security groups to manage NTFS permissions.

Now as new employees are hired, all you need to do is add the user to one of these groups to give them access. To remove access you would just remove them from the group.

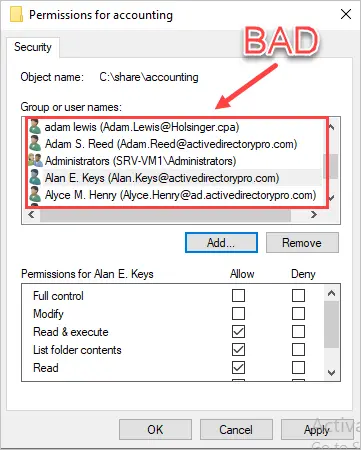
If you did not use security groups for the NTFS permissions you would have to add all 100 users to the ACL, this would be very time consuming and difficult to manage. Example below.

Example of setting individual accounts on NTFS ACL permissions. This is a bad design.

Always use security groups to manage the ACL on NTFS permissions.

3. Standardized Naming Convention & Documentation

This is my favorite NTFS Permissions management tip.

You can easily provide groups of users with unwanted access if you do not use descriptive security group names.

For example, the accounting department just purchased a SaaS based accounting program. It can sync with Active Directory for single sign-on and permissions. The administrator created an Accounting_1 and Accounting_2 group to manage access to the software. Accounting_1 is full access and Accounting_2 is limited. Both groups are generic and have no description or documentation.

The accounting department also needs a shared folder setup so they can share and collaborate on some files. The administrator thinks, oh I’ve already got accounting groups configured, and therefore proceeds to use Accounting_1. Users are added to Accounting_1 to provide access to the NTFS share, but unfortunately this now grants users full access to the SaaS accounting program.

Bad Security Group Names

The groups below are examples of bad security group names because there is no description and are generic, telling the administrator nothing. You would have to scan the entire network to know where these groups are being used.

Good Security Group Names

In the examples below you can look at the group name and instantly know what it is used for and there is information in the description box.

Do not create generic security group names, instead be descriptive in their use and use the description field.

4. Do Not Use the Everyone Group (For Anything)

I might get some hate mail for this but seriously what is the justification for using the everyone group? There is no good reason to use it.

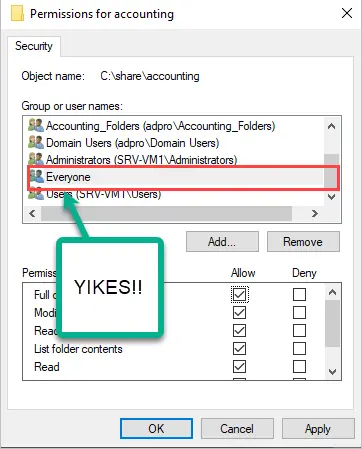
You should not set the everyone group on the ACL

What is the Everyone group?

All interactive, network, dial-up, and authenticated users are members of the Everyone group. This special identity group gives wide access to system resources. When a user logs on to the network, the user is automatically added to the Everyone group. Membership is controlled by the operating system.https://learn.microsoft.com/en-us/windows-server/identity/ad-ds/manage/understand-special-identities-groups

The Everyone group also includes the Guest account. This is just bad news for security so I highly recommend never using the Everyone group for anything.

Unfortunately, there are some poorly designed programs and tech support that do not understand this. Has a vendor tech support ever told you, “you need to add the everyone group and give them it permissions”? This is horrible advice and if followed you have significantly weakened security in your network.

Some admins will argue that it is not an issue to use everyone on shared permissions and then lock it down using NTFS permissions. This would still allow hackers to scan and detect shared folders in the network so why allow it? Instead, use the least principle model and only allow those that need access to it.

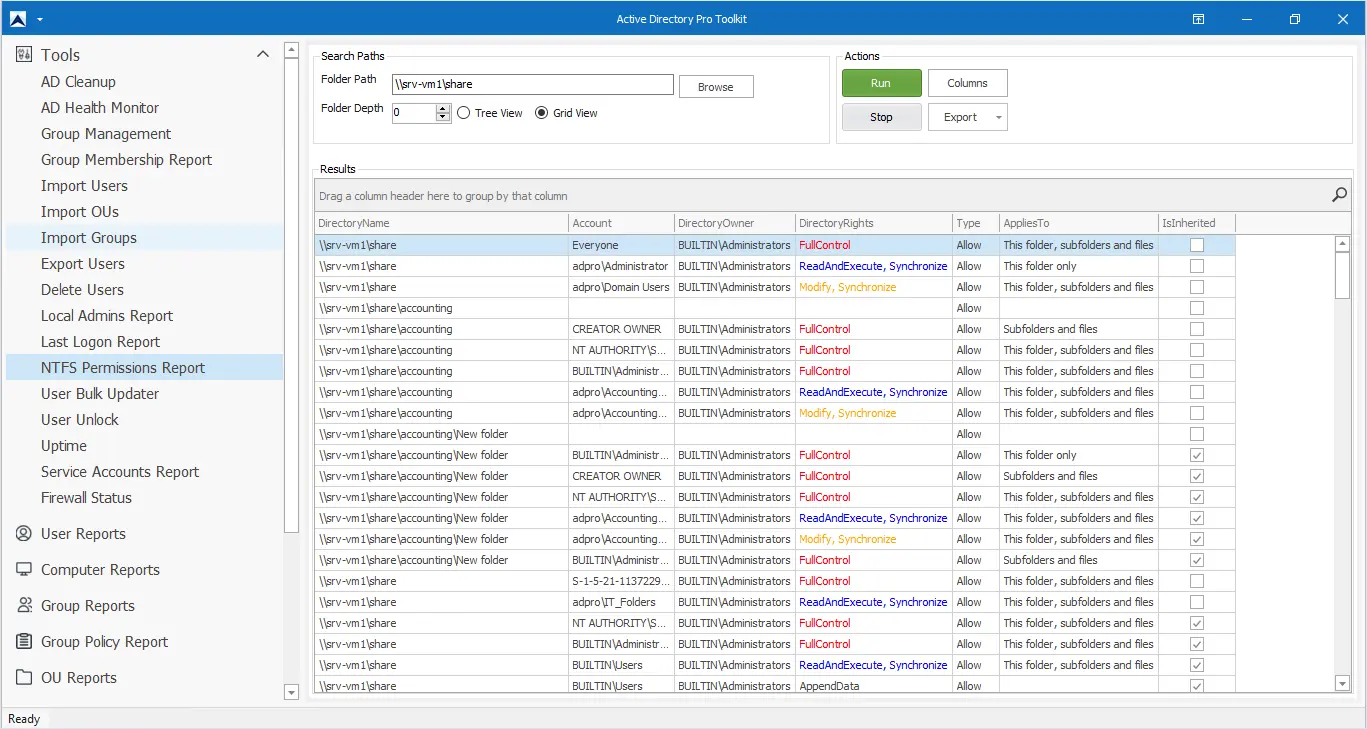
You can quickly find where the Everyone account is in use by using a reporting tool and filter for the account.

In the example below, I scanned my file server and found 4 folders that are using the Everyone account and have full control, and this is not good.

Easily search for the everyone group using the AD Pro Toolkit

5. Use the Principle of Least Privilege

The principle of least privilege means a user should only have access to the data, resources, and applications needed to complete a required task.

Preventing unnecessary permissions prevents mishandling of company data and helps to mitigate security threats.

Just because a user is part of a department doesn’t mean they need full access to all department folders and files. Consider using read-only and read/write groups to set granular permissions on files and folders.

6. Avoid setting Full Access Permissions

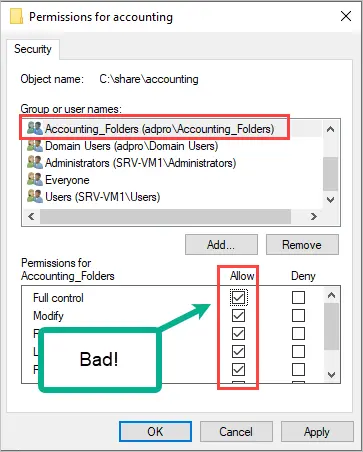
Only the administrator account or other IT staff should have full control of files and folders. I can’t think of a good reason a regular user needs full control. By giving regular users full control they are granted the ability to change settings and permissions, which is a bad idea.

Do not give regular users full access

7. Limit the Depth of Setting NTFS Permissions

Try and limit settings NTFS permissions to no more than two or three levels deep. There will always be exceptions to this rule, but if you set no rules for this these permissions, things will get out of control. Your users will request for every file or folder to have special permissions which will cause problems.

Here is an example.

The accounting department has a folder that has a level 1 folder and two subfolders (level 2 and level 3). It is no problem to set explicit permissions on level 1 and level 2 but I would not go any level deeper (level 3) as this becomes difficult to manage, and the same goes for files.

I would also try to limit setting explicit permissions to folders only. Users will call and will want to set specific permissions on individual files, this will become a pain to manage so try to avoid this.

8. Avoid Breaking Inheritance

By default, the permissions set at the root folder will be inherited by all subfolders. If you break inheritance it can make it difficult to read and manage NTFS permissions.

Let’s look at an example.

In the above screenshot, accounting, sales, and purchasing are what I consider the root folder. These folders have NTFS permissions set and all the subfolders will inherit their permissions.

For example, I set permissions on the accounting folder, and therefore all its subfolders inherit its permissions. If I broke the inheritance I would have to set the NTFS permissions on the folder.

There will be times when you need to break inheritance such as limiting access to a specific folder but this should be kept to a minimum.

You can easily check for folder inheritance with the AD Pro Toolkit.

Audit Folder Inheritance with the AD Pro Toolkit

9. Use Access Based Enumeration (ABE)

Access Based Enumeration allows you to hide files and folders from users who do not have permission. Limiting visibility to files and folders makes it easier for your users to browse and access resources.

If ABE is not enabled users will still see folders they do not have access to but will be denied if they try to open them. This can cause some confusion and so it is best to just hide them.

To enable ABE follow these steps.

1. Open Server Manager

2. Click on File and Storage Services (left sidebar menu)

3. Click on Shares

4. Right click the share and select properties.

5. Click on Settings

6. Check “Enable Access based enumeration.

Enable access based enumeration

10. Prevent Users from Creating Folders in the Root

It can be frustrating when you take the time to organize your folders and get it all cleaned up just to then find a bunch of new folders in the root directory.

What usually then happens is someone will create a folder and use it to share files with other users bypassing the security you have put in place. To fix this you need to set read and execute permissions at the root folder only, do not set this permission on subfolders. You will then need to add the group again and set the permissions for the subfolders. Be careful configuring this as you can easily mess up permissions.

Bonus #1. File Screening Management

File screen management can increase security and help control data on your Windows file shares. File screen management can be used for the following:

  • Block certain files types such as exe, bat files, videos files.
  • Quote Management – Limit disk space usage to users and groups.
  • Storage Reports – Generate store reports and see who is using the most space and what file types.

Bonus #2. Use Volume Shadow Copy Service (VSS)

VSS is a built-in Windows technology that allows you to take point-in-time snapshots of an entire disk. This allows you to create a backup of your file shares or any other data that resides on the disk. VSS works great as a quick solution to recover deleted files and folders from your file servers. VSS should not be used as your only backup solution.

I hope you enjoyed this article. If you have questions or comments please post them below.

Source :
https://activedirectorypro.com/ntfs-permissions-management-best-practices/

Shared Storage and Monitoring for VMware vSphere Cluster as a base building block with Software Defined Storage from StarWind

By Vladan SEGET | Last Updated: July 31, 2023

Shared storage is a critical component of a VMware vSphere cluster. In a vSphere cluster, multiple hosts are grouped together to provide a pool of computing resources that can be used to run virtual machines. These hosts are connected to shared storage, which provides a centralized location for storing virtual machine files, such as virtual disks and configuration files. This shared storage is accessible to all hosts in the cluster, allowing virtual machines to be migrated between hosts without the need to copy files between them.

Shared storage is a base building block without which most (if not all) cluster services will not work. Shared storage is a requirement for vSphere HA, DRS, FT or other cluster services.

What are the benefits of shared storage?

There are several benefits to using shared storage in a vSphere cluster. One of the most significant benefits is the ability to migrate virtual machines between hosts using vMotion. vMotion allows virtual machines to be moved between hosts without any downtime, allowing administrators to perform maintenance tasks or balance the load on the hosts without impacting the availability of virtual machines. This is possible because the virtual machine files are stored on shared storage, which is accessible to all hosts in the cluster.

Another benefit of shared storage is the ability to use advanced features such as High Availability (HA) and Distributed Resource Scheduler (DRS). HA provides automatic failover of virtual machines in the event of a host failure, while DRS provides load balancing of virtual machines across hosts in the cluster. Both of these features rely on shared storage to function properly.
There are several types of shared storage that can be used in a vSphere cluster, including Fibre Channel, iSCSI, and NFS. Each of these storage types has its own advantages and disadvantages, and the choice of storage type will depend on factors such as performance requirements, budget, and existing infrastructure.

In addition to choosing the right type of shared storage, it is also important to properly configure and manage the storage environment. This includes tasks such as setting up storage arrays, configuring storage networking, and monitoring storage performance. VMware provides a number of tools and best practices to help administrators manage shared storage in a vSphere cluster, including the vSphere Storage APIs, vSphere Storage DRS, and the vSphere Web Client.

StarWind SAN and NAS has another advantage over a hardware based storage array. This is cost. In addition, storage array, despite that you can have multiple PSUs or multiple CPUs or controller cards or NICs, you can only have a single motherboard, which is a still single point of failureStarWind SAN and NAS, that is a software based, is configured to run on at least 2-nodes where each node participate with its internal disks and RAM, to the storage pool created by StarWind. As a result, when you have a 1 host failure, the other host still has your VM file as the storage is simply mirrored. If you have vSphere HA, the restart of VMs on the remaining host is done automatically. Without vSphere HA you simply start those VMs manually from your remaining host.

What is StarWind SAN and NAS?

StarWind SAN and NAS is a software that turns your server or a group of servers into a powerful and easy-to-use storage appliance. It eliminates the need for expensive and complex storage hardware and provides a cost-effective and scalable storage solution for your virtualized environment.

Benefits of StarWind SAN and NAS for VMware vSphere

High Availability – StarWind SAN and NAS provides high availability by creating a redundant storage pool that can withstand hardware failures. It uses synchronous replication to keep the data in sync between the nodes, ensuring that there is no data loss in case of a failure.

Scalability – StarWind SAN and NAS is highly scalable and can be easily expanded by adding more nodes to the storage pool. This allows you to scale your storage capacity as your business grows, without having to invest in expensive hardware.

Cost-Effective – StarWind SAN and NAS is a cost-effective storage solution that eliminates the need for expensive hardware. It uses commodity hardware and turns it into a powerful storage appliance, reducing the overall cost of ownership.

Easy to Use – StarWind SAN and NAS is easy to use and can be set up in minutes. It comes with a user-friendly web-based interface that allows you to manage your storage pool and monitor its performance.

Performance – StarWind SAN and NAS provides high-performance storage that can meet the demands of your virtualized environment. It uses advanced caching algorithms to optimize the performance of your storage pool, ensuring that your virtual machines run smoothly.

Integration with VMware vSphere – StarWind SAN and NAS integrates seamlessly with VMware vSphere, providing a powerful and scalable storage solution for your virtualized environment. It supports all the features of VMware vSphere, including vMotion, High Availability, and Distributed Resource Scheduler.

StarWind Virtual SAN – StarWind Virtual SAN is a software that eliminates the need for physical shared storage by simply “mirroring” internal hard disks and flash between hypervisor servers. It creates a VM-centric and high-performing storage pool for a VMware cluster. This allows you to create a highly available and scalable storage solution for your virtualized environment.

Quote:

StarWind SAN & NAS supports hardware and software-based storage redundancy configurations. The solution allows turning your server with internal storage into a redundant storage array presented as NAS or SAN, exposing standard protocols such as iSCSI, SMB, and NFS. It features Web-based UI, Text-based UI, vCenter Plugin, and Command-line interface for your cluster-wide operations.

A while back, we have created a short video from the deployment process for vSphere. However, please note that this product is evolving and today, it might look a bit different. Check the latest StarWind SAN and NAS version here.

https://www.youtube.com/embed/4Wzzk-d_BOM
How about vCenter server appliance on 2-hosts config?

Note: in 2-node config, your vCenter server appliance (VCSA) should be stored on shared storage. If you running your VCSA from local storage on one of your ESXi hosts, you risking the downtime of your VCSA in case this particular host fails. This does not mean, however, that vSphere HA or other cluster services will fail. Not at all, as VCSA is used only to configure vSphere HA, not responsible in triggering the actual HA event! It mean you can perfectly “lose” your VCSA and still have your VMs restarted on the remaining host automatically.

Performance Improvements of vSphere cluster

StarWind SAN and NAS can improve the performance of VMware vSphere in several ways. One of the main ways is through the use of StarWind Virtual SAN for vSphere, which creates a VM-centric and high-performing storage pool for a VMware cluster. This allows for faster data access and improved performance for virtual machines. StarWind SAN and NAS also uses advanced caching algorithms to optimize the performance of the storage pool. This ensures that frequently accessed data is stored in cache, reducing the time it takes to access the data and improving overall performance.

In addition, StarWind SAN and NAS provides high availability and redundancy, which can improve performance by reducing downtime and ensuring that data is always available. This is achieved through synchronous replicationwhich keeps the data in sync between the nodes, ensuring that there is no data loss in case of a failure. It supports all the features of VMware vSphere, including vMotion, High Availability, and Distributed Resource Scheduler, which can further improve performance by allowing for workload balancing and resource optimization.

Final Words

In conclusion, shared storage is a critical component of a VMware vSphere cluster. It provides a centralized location for storing virtual machine files, allowing virtual machines to be migrated between hosts without downtime and enabling advanced features such as HA and DRS. Properly configuring and managing shared storage is essential for ensuring the availability and performance of virtual machines in a vSphere cluster.

StarWind SAN and NAS is a powerful and cost-effective storage solution that can be used with VMware vSphere. It provides high availability, scalability, and performance, making it an ideal storage solution for virtualized environments. Its seamless integration with VMware vSphere and support for all its features make it a must-have for any virtualized environment.

More posts about StarWind on ESX Virtualization:

More posts from ESX Virtualization:

PHD Virtual Backup 6.0

By Vladan SEGET | Last Updated: June 28, 2023

PHD Virtual Backup 6.0 – Backup, Restore, Replication and Instant recovery. PHD Virtual has released their new version of backup software for VMware vSphere environments. PHD Virtual backup 6.0 comes up with several completely new features. Those features that are specific to virtualized environments. In this review I’ll focus more on those new features instead on the installation process, which is fairly simple. This review contains images, which can be clicked and enlarged (most of them) to see all the details from the UI.

Now first something that I was not aware of. Even if I work as a consultant, I must say I focus most of the time on the technical side of a solution which I’m implementing and I leave the commercial (licensing) part to vendors or resellers.  But with this review I would like to point out that PHD Virtual Backup 6.0 is licensed on a per-host basis. Not CPU Socket like some vendors do, but also not per site like other vendors do. As a result, their price is a fraction of the cost of competitive alternatives.

Introduction of PHD Virtual Backup and Recovery 6.0

The PHD Virtual Backup 6.0 comes up with quite a few new features that I will try to cover in my review. One of them is the Instant Recovery, which enables to run VM directly from a backup location and initiate storage vMotion from within VMware vSphere to move the VM back to your SAN.

But PHD Virtual goes even further by developing a proprietary function to initiate the move of the VM by using PHD Motion. What is it? It’s an alternative for SMB users which does not have VMware Enterprise and Enterprise Plus License, which includes storage vMotion.

PHD Motion does not require VMware’s storage vMotion in order to work. It leverages multiple streams, intelligent data restore, direct storage recovery to copy a running state of a VM back to the SAN, while the VM still runs in the sandbox at the storage location. Therefore, it is much faster at moving the data back to production than storage vMotion.

The delta changes to the VM are maintained in another, separate temporary location.  So the final switch back to SAN happens fairly quickly since only the deltas of changes between the VM which runs from the backup and the VM which is located back on SAN, are quickly copied. So small planned downtime (about the time for a VM reboot) is necessary.

Installation of the Software

PHD Virtual Backup 6.0

The installation will take like 5 minutes, just to deploy the OVF into vCenter and configure the network interface, storage …. and that’s it. Pretty cool!

One of those differences from previous version of PHD Virtual backup is the Instant Recovery Configuration TAB, since this feature has just been introduced in the PHD Virtual Backup 6.0.

The Instant recovery feature is available for Virtual Full backups only. The full/incremental backup types are not currently supported for instant recovery, so if you select the full/incremental option, you might see that the Instant Recovery option isn’t available. Use Virtual Full option when configuring your backup jobs to take benefit of Instant recovery.

PHD Virtual Backup and Replication 6.0 If you choose the full/incremental backup type, the Instant VM recovery isn't currently supported

PHD Virtual backup 6.0 – Replication of VMs.

Replication – This feature requires at least one PHD VBA installed and configured with access to both environments – but if you will be using replication in larger environments, you may need additional PHD VBAs. For instance, one PHD VBA deployed at the primary site would be configured to run regular backups of your VMs while a second PHD VBA could be deployed to the DR site configured to replicate VMs from the primary site to the secondary location.

The replication of VMs is functionality that is very useful for DR plans. You can also configure the replication within the same site as well, and choose a different datastore ( and ESXi host) as a destination. This is my case, because I wanted to test this function, since my lab don’t have two different locations.

The replication job works the way that only the first replica is full copy. PHD VM replication takes data from existing backups and replicates those to a cold standby VM. After the VM is initially created during the first pass, PHD uses its own logic to transfer only the changes from the previous run.

You can see the first and second job, when finishes on the image below. The latter one took only 51 s.

PHD Virtual Backup 6.0 - Replication Jobs

Testing Failover – After the replica VM is created, you have the option to test each replica to validate your standby environment or to failover to your replicated VMs. There is a Start Test button in order to proceed.

PHD Virtual 6.0 - testing failover button

What’s happening during the test. At first, another snapshot is created of the Replica VM. This is only to have the ability to get back to the state before the test. See the image below.

PHD Virtual Backup 6.0 - Testing the Replication with the Failover Test Button

This second snapshot is deleted the moment when you’re done with the testing of that failover VM, you tested that the application is working etc…. The VM is powered off and it is rolled back to the state it was in prior to testing mode.

So when you click the Stop Test button (it changed text), the replica Status is changed back to STANDBY, once again click Refresh button to refresh the UI.

If you lose your primary site, you can go to the PHD console at the DR site and failover the VMs which has been replicated there.  You can recover your production environment there by starting the VMs that has been replicated.  And now, when you run your production (or at least the most critical VMs) from DR site, and because you don’t have a failover site anymore, you should consider start backing up those VMs in failover mode….. it will be helpful when failing back to the main primary site, when damages there gets repaired.

Why one would have to start doing backups as soon as the VMs are in failover state ? …. Here is a quick quote from the manual:

When ending Failover, any changes made to the replica VM will be lost the next time replication runs. To avoid losing changes, be sure to fail back the replica VM (backup and restore) to a primary site prior to ending Failover mode.

I can only highly recommend to read the manual where you’ll find all the step-by-steps and all those details. In this review I can’t focus to provide all those step-by-step procedures. The manual is a PDF file very good quality, with many screenshots and walk through guides. In addition, there are some nice FAQ which were certainly created as a result of feedback from customer’s sites. One of them is for example a FAQ for increasing backup storage and the step-by-step follows. Nice.

You can see the possibility to end the failover test with the Stop Test button.

PHD Virtual Backup 6.0 - end falover test.

Seeding – If you have some huge amount of data to replicate for the DR site you can seed the VMs data before configuring the replication process. The seeding process is process when you pre-populate the VMs to the DR site first. This can be done through removable USB drives, or small NAS device. When the seeding is complete, you can start creating the replication jobs to move only the subsequent changes.

In fact the seeding process is fairly simple. Here is the outline. First create full backup of VMs > copy those backups to NAS or USB for transport >  Go to the DR site and deploy PHD VBA and add the data that you have with you as a replication datastore > create and run replication job to replicate all the VMs from the NAS (USB) to your DR site > Remove the replication datastore and the NAS and create the replication job where you specify the the primary site datastore as a source. Only the small, incremental changes will be replicated and sent over the WAN.

PHD Virtual Backup 6.0 – File level Recovery

File level recovery is a feature that is used at most in virtual environments, when it comes to console manipulations. I think, since more frequently you (or your users) are in need for file restore, than VM crashes or corruption, so the full VM needs to be restored.

I’ve covered the the FLR process in the 5.1 version by creating an iSCSI target and then mounting the volume as an additional disk in computer management, but the option was greatly simplified in PHD Virtual Backup 6.0. In fact when you run the assistant, you have the now a choice between the creation of iSCSI target and create windows share. I took the option Create Windows share.

All the backup/recovery/replication tasks are done through assistants. The task is composed with just few steps:

First selecting the recovery point , then create a windows share (or iSCSI target) > and mount this share to finally be able to copy-paste the files that needs to be restored from withing that particular VM.

The process is fast and direct. It takes few clicks to get the files back to the user’s VM. You can see the part of the process on the images at left and bellow.

PHD Virtual Backup and Replication 6.0 - file level restore final shot - you can than easily copy paste the files you need

PHD Virtual Backup 6.0 – Instant VM Recovery and PHD Motion – as said in the beginning of my review, the PHD virtual backup 6.0 has the ability to run VMs directly from backup location.

The Instant VM Recovery works out of the box without further necessity to setup the temporarily storage location, but if needed, the location for temporary changes can be changed from the defaults. But there is usually no need to do so.

You can do it in Configuration > Instant VM Recovery.

There is a choice between the attached virtual disk and VBA’s backup storage.

PHD Virtual Backup 6.0 - configuration of temporary storage location for Instant VM recovery

Then we can have a look and see how the Instant VM recovery option works. Let’s start by selecting the recovery point that we would want to use for that. An XP VM which I backed up earlier will do. Right Click the point in time from which one you want to recover (usually the latest), and choose recover.

PHD Virtual Backup 6.0 - Instant VM Recovery

At the next screen there is many options. I checked the Power On VM after recovery and Recover using original storage and network settings from backup. Like this the VM is up and running with network connectivity as soon as possible. I did also checked the option to Automatically start PHD Motion Seeding, which will start copying the VM back to my SAN.

When the copy finishes I’ll receive a confirmation e-mail…..  Note that you have a possibility to schedule this task as well.

PHD Virtual Backup 6.0 - Instant VM recovery and PHD Motion

On the next screen you can see the final screen before you hit the submit button. You can make changes there if you want.

PHD Virtual Backup 6.0 - Instant VM recovery and PHD Motion

The VM is registered in my vCenter and started from the backup location. 1 min later my VM was up. The VM was running from temporary storage created by PHD Virtual backup 6.0. The temporary storage that I configured before, when setting up the software.

You can see on the image below which tasks are performed by PHD Virtual backup 6.0 in the background.

PHD Virtual Backup 6.0 - Instant VM Recovery with PHD Motion

So, we have the Instant VM Recovery tested and our VM is up and running. Now there are two options, depending if you have storage vMotion licensed or not.

With VMware Storage vMotion – If that’s the case, you can initiate storage vMotion from the temporary datastore created by PHD Virtual back to your datastore located on your SAN.

When the migration completes, open the PHD Console and click Instant VM Recovery. In the Current tab, select the VM that
you migrated and click End Instant Recovery to remove the VM from the list.

Using PHD Motion – If you don’t have storage vMotion, you can use PHD Motion. How it works… Let’s see. You remember that during the assistant launching the Instant VM recovery, we selected an option to start PHD Motion seeding.

This option will start to copy the whole VM back to the datastore on the SAN (in my case it’s the Freenas datastore). I checked that option to start Automatically PHD Motion seeding when setting up the job, remember?

You can see it in the properties of the VM being run in the Instant VM recovery mode. On the image below you can see the temporary datastore (PHDIR-423…….) and the final destination’s datastore of the VM (the Freenas datastore).

PHD Virtual Backup 6.0 - Instant VM Recovery and PHD Motion

This process will take some time. So when you go back to the PHD Virtual console, you choose the Instant VM Recovery Menu option > Current Tab, you’ll see that Complete PHD Motion is grayed out. That’s because of the above mentioned copy hasn’t finished. Well it really does not matter, since you (or your users) can still work and use the VM.

PHD Virtual Backup 6.0 - Instant VM Recovery and PHD Motion

And you can see on the image below that when the seeding process has finished, the button Complete PHD Motion became activ. (In fact, the software drops you an e-mail that the seeding process has finished copying

PHD Virtual Backup 6.0 - PHD Motion

And then, after few minutes the VM dissapears from this tab. The process has finished the copy of the deltas and the VM can be powered back on. It’s definitely a time saver, and when no storage vMotion licenses (in SMBs) are available, this solution can cut the the downtime quite impressively. The History tab shows you the details.

PHD Virtual Backup 6.0 - Instant VM recovery with PHD Motion

PHD Virtual Backup 6.0 – The E-mail Reporting Capabilities.

PHD Virtual Backup 6.0 has got the possibility to report on backup/replication jobs success (failure). The configuration of it it’s made mores simpler now than in previous release, since there is a big Test button there in order to send test e-mail. I haven’t had any issues after entering the information for my e-mail server, but in case you’re using different ports or you’re behind a firewall, this option is certainly very useful.

PHD Virtual Backup 6.0 - E-mail Reporting Capabilities

In v6, PHD made the email reports WAY more attractive.  They have a great job summary at the job and lots of great information in a nicely formatted chart that shows details for each VM and each virtual disk.  They even color code errors and warnings.  Very cool.

PHD Virtual Backup 6.0 - E-mail reports

PHD Exporter

PHD Virtual Backup .60 has also few tools bundled within the software suite which can be useful. PHD Exporter is one of them. This application can help when you need to archive VMs with data. Usually you would want to install this software on physical windows server which has got a tape library attached. It’s great because you can schedule existing backups to be exported as compressed OVF files. So if you ever had to recover from an archive, you wouldn’t even need PHD to do the recovery.

The tool basically connects itself to the location where the backups are stored and through an internal processing does extract those backup files to be stored temporary in a location that you configure when you setting up – it’s called staging location. Usually it’s a local storage. Then the files are sent to tape for archiving purposes.

Through the console you configure exporting jobs where the VM backups are exported to staging location.

PHD Exporter - Tool to export backups to Tape for archiving purposes

PHD Virtual Backup 6.0 is Application Aware Backup Solution

PHD virtual Backup 6.0 can make a transactionally-consistent backups of MS Exchange with the possibility to truncate the logs. Log truncation is supported for Microsoft Exchange running on Windows 2003 Server 64 bit SP2 and later and Windows Server 2008 R2 SP1 and later.

When an application aware backup is started, PHD Guest Tools initiates the quiesce process and an application-consistent VSS snapshot is created on the VM. The backup process continues and writes the data to the backup store while this snapshot exists on disk. When the backup process completes, post-backup processing options are executed and the VSS snapshot is removed from the guest virtual machine.

PHD Virtual Backup 6.0 provides small agent called PHD Guest Tools, which is installed inside of the VM.  This application performs the necessary application aware functions, including Exchange log truncation. Additionally, you can add your own scripts to perform tasks for other applications. Scripts can be added before and after a snapshot, and after a backup completes. So it looks like they’ve got all the bases covered for when you might want to execute something on your own. I’ve tested with an Exchange 2010 VM and it worked great!

I was nicely surprised with the deduplication performance at the destination datastore. Here is a screenshot from the dashboard where you can see that the Dedupe ration is 33:1 and saved space 1.4 TB.

PHD Virtual Backup 6.0 - The dashboard

During the few days that I had the chance and time to play with the solution in my lab I did not have to look often in the manual, but if you do plan using the replication feature with several remote sites, I highly recommend to read the manual which is as I already told you, good quality.

PHD Virtual Backup 6.0 provides many features that are useful and provide real value for VMware admins. Replication and Instant Recovery are features which becomes a necessity providing short RTO.

PHD Virtual Backup 6.0  is an agent-less backup solution (except VMs which needs Application aware backups) which don’t use physical hardware, but runs as a virtual appliance with 1CPU and 1Gigs of RAM.  This backup software solution can certainly have its place in today’s virtualized infrastructures running VMware vSphere.

Please note that this review was sponsored by PHD Virtual.

Source :
https://www.vladan.fr/phd-virtual-backup-6-0/

Delegate Control in Active Directory (Step-by-Step Guide)

Last Updated: July 20, 2023 by Robert Allen

How to delegate control in active directory

Do you need to give the helpdesk staff permissions to reset passwords and unlock user accounts?

Do you want to allow specific users to modify group membership?

No problem.

In this guide, you will learn how to use the delegation control wizard in Active Directory to grant users very specific permissions.

It is important to know how to correctly use the delegation of control in Active Directory to avoid giving users more rights than they need. Whatever you do, do not add users into highly privileged groups like Domain Admins.

Table of Contents:

Delegation of Control Best Practices

Here are my recommendations and tips for delegating permissions in Active Directory.

Good OU Design

Delegating permissions in Active Directory is done by using organizational units (OU), so it is critical to have a good OU design. The OU design will be different for every organization, but a simple design is to put all similar resources into their own OU.

  • Computer OU – All computers go here
  • Users OU – All user accounts go here
  • Servers OU – All server accounts go here
  • Groups – All groups go here.

You can then create sub-OUs to further organize your resources.

users ou

In the above screenshot, I have the “ADPRO Users” OU for all my user accounts. I then created sub-OUs for each department to further organize the user accounts. With this design, I can easily delegate control to all resources or resources in a specific sub-OU. For example, HR hired their own IT support person and they want to reset passwords for all HR users. I can delegate the password reset permissions to just the HR OU.

You can structure the sub-OUs any way that you like. For example, you could make them based on geographic locations, or by user type such as regular, privileged, and so on.

With a good OU design, it makes delegating permissions easy and helps to avoid delegating more permissions than needed.

To read more on OU design see the Microsoft guide Designing OU structures that work.

Don’t use Built-in Security Groups

When delegating control it is best to create new security groups rather than using built-in AD groups. For example, don’t use “Account Operators” or Backup Operators” when delegating permissions. These built-in AD groups have special permissions that can give users more rights than needed.

Delegate Control to Groups, NOT USERS

Do not delegate control to a user account. This will become a security nightmare as it will be very difficult to audit and manage. Assigning permissions to groups makes it easy to add and remove permissions.

Use Descriptive Group Names

Have you come across a group in Active Directory and have no idea what it is for? This happens a lot and drives me bonkers. Creating a descriptive name will make it easy for you and other admins to identify its use.

For example, if the helpdesk wants to reset user passwords I would create a group like this:

Helpdesk_password_reset

If a group of users needs to modify a specific AD attribute such as the telephone field I would create a group like this:

IT_modify_telephone

active directory group names

You can see that in the screenshot above, the group name and description make it easy for anyone to identify what the group is used for.

Tip: I also put details into the group description. I can then use PowerShell to search for all of the groups that have “delegate control” in the description.

get-adgroup -Properties * -filter {Description -like 'Delegate*'} | select name, description

Audit AD Delegated Controls Yearly

You should review the Active Directory ACL permissions each year. AD permissions can easily get out of control and the only true way to know who has what rights is to audit the ACL permissions.

See the last section in this guide for details on auditing Active Directory Permissions.

Don’t Over Delegate Control (Use lease Privilege)

Only delegate control to what is needed.

If another department wants to reset their own passwords don’t grant them this permission to all user objects, but instead to just their group or department.

If the helpdesk needs the rights to delete computer accounts, don’t grant this permission to all computer objects, but instead to just the ones the helpdesk manages (hint… not the servers).

Over delegating control can easily be avoided by having a good OU design.

Now let’s check out some examples on how to delegate permissions.

Delegate Password Reset and Unlock Permissions

In this example, I’ll use the delegation control wizard to give helpdesk users permissions to reset passwords and unlock user accounts. I’ll also demonstrate how to limit this to a specific group of users (department).

Step 1: Create a New Active Directory Group

I’m going to create a new group and name it “Helpdesk_password_reset”. Use whatever naming convention makes sense to you, I just recommend it to be descriptive. I also recommend using the description field to provide exact details on what the group is used for. With a descriptive name and the description filled out, there should be no confusion about what this group is used for, this will help you and other System Admins.

helpdesk password reset group

Next, I’ll add the helpdesk staff to this group. When the delegation is complete you can easily add or remove rights by changing the membership of this group.

Step 2: Use Delegation of Control Wizard

This is where good OU design is important. I want to grant this group permission to change the password for all users in the domain, and since I have all users in the “ADPro Users” OU this can easily be done. The delegated rights will apply to the root and all sub-OUs.

Right-click on the OU and select “Delegate Control”.

delegate control on ou

Click “Next”

Select the group you want to delegate control to.

delegate control select group

Click “Next”

Select “Create a custom task to delegate”

select custom task to delegate

Select “Only the following objects in the folder” then select “User objects”

select user objects

Click “Next”

Select “General” and “Property-specific”

Then enable the following permissions:

  • Change password
  • Reset password
  • Read lockoutTime
  • Write lockoutTime
delegate control unlock user accounts

Click “Next”

Click “Finish”

Now any member of the “Helpdesk_password_reset” group can change/reset passwords and unlock user accounts for all users in the “ADPRO Users” OU.

What if you had a department that wanted to reset/unlock their own accounts? For example, the HR department wants to reset/unlock their own accounts without having to call IT support.

Here are the steps: (The steps are basically the same as above you just run the delegation control on a specific OU)

  1. Create a new group for the HR users (example, HR_password_reset).
  2. Use the delegation control wizard on the HR OU.
  3. Select the HR group (example, HR_password_reset).
  4. Set permissions (change password, reset password, read lockoutTime, write lockoutTime). See the above screenshots for more details.
delegate control to department

If you delegated control to the entire domain or an OU with all users then you gave HR staff more permissions than they need. They could reset/unlock users for the entire domain, you want to avoid this.

Delegate Permissions to Modify Telephone Number

In this example, I want to give a group of users permission to only modify the Telephone number in Active Directory. You will see in the delegation of control wizard you can grant permissions to other user fields (address, zip, state, and so on).

Step 1: Create a group.

I created a group called “IT_Modify_Telephone”.

Step 2: Run delegation Control Wizard.

Run the delegation control wizard on the target OU.

Select the group.

Select “create a custom task to delegate”

Select “Only the following objects in the folder” then select “User Object”

Select “Property-specific”

Enable “Read Telephone Number” and “Write Telephone Number”

delegate control telephone number

Click “Next” then “Finish” to complete.

Now any member of the group can modify the “Telephone Number” field in Active Directory. All other fields are read-only.

active directory user screenshot

Delegate Permissions to Modify Group Membership

In this example, I will give a group of users permission to modify group membership (add/remove users to groups).

This one is easier than previous examples as Microsoft has a common task for it.

Step 1: Create AD Group

Step 2: Run Delegation Control Wizard

If you have all groups in a specific OU then run the delegation wizard on the OU. For example, all of my groups are in an OU called “ADPRO Groups”.

delegate control to groups ou

Select the group you want to delegate control to.

Click “Next”

Select “Modify the group membership of a group”

modify group membership task

Click “Next” and click “Finish”.

Delegate Control to Delete Computer Accounts

Helpdesk or other IT staff will often need rights to delete computer accounts in Active Directory. Here is how to delegate those rights.

Step 1: Create AD Group

For example “IT_delete_computers”.

Step 2: Run delegation control wizard on OU.

Make sure you run the wizard on the OU that contains the computer objects.

Select the group to delegate control

Click “Next”

Select “Create a custom task to delegate”

Select “This folder, existing objects in this folder, and creation of new objects in this folder”.

Click “Next”

Select “creation/deletion of specific child objects”

Then select “Delete Computer objects”

delete computer objects task

Now members of the selected group can delete computer objects.

How to Audit Active Directory (ACL) Permissions

Over time Active Directory permissions can easily spiral out of control. It is recommended to audit your AD permissions at least once a year. How else are you going to know if someone gave unnecessary rights to a user or group?

Maybe someone used the delegation of control wizard and accidentally gave helpdesk the rights to delete servers. The only way to determine this, is to check the ACL permissions in Active Directory.

You can view the ACL on an OU by right-clicking the OU selecting properties and the Security tab. But this would take too long if you had a lot of OUs.

The best option I have found is the AD ACL Scanner PowerShell tool. This tool lets you choose what to scan and creates an easy-to-read report on Active Directory permissions.

In this example, I’m going to scan my ADPRO Users OU, and scan each Sub-OU.

active directory acl scanner

When the tool is done scanning you will get a report like below.

acl scanner report

In the report, I can see the AD groups that I delegated control to and what permissions they have. Very easy to use and saves a ton of time.

Summary

In this guide, I walked you through several examples of delegating control in Active Directory. The delegation of Control Wizard can be confusing as it’s not always clear where to find specific permissions. It’s best to use groups for delegating control and set very specific permissions. Lastly, I showed you how to audit Active Directory ACL permissions using the AD ACL scanner tool. Don’t forget to audit the ACL permissions at least once a year.

Recommended: Active Directory Permissions Reporting Tool

The ARM Permissions Reporting Tool helps you monitor, analyze, and report on the permissions assigned to users, groups, computers, and organizational units in your Active Directory

You can easily identify who has what permissions, where they came from, and when they were granted or revoked. You can also generate compliance-ready reports for various standards and regulations, such as HIPAA, PCI DSS, SOX, and GDPR

Try the Permissions Reporting Tool today and take control of your permissions management

Download Free Trial

Source :
https://activedirectorypro.com/delegate-control-in-active-directory/

8 Essential Tips for Data Protection and Cybersecurity in Small Businesses

Michelle Quill — June 6, 2023

Small businesses are often targeted by cybercriminals due to their lack of resources and security measures. Protecting your business from cyber threats is crucial to avoid data breaches and financial losses.

Why is cyber security so important for small businesses?

Small businesses are particularly in danger of cyberattacks, which can result in financial loss, data breaches, and damage to IT equipment. To protect your business, it’s important to implement strong cybersecurity measures.

Here are some tips to help you get started:

One important aspect of data protection and cybersecurity for small businesses is controlling access to customer lists. It’s important to limit access to this sensitive information to only those employees who need it to perform their job duties. Additionally, implementing strong password policies and regularly updating software and security measures can help prevent unauthorized access and protect against cyber attacks. Regular employee training on cybersecurity best practices can also help ensure that everyone in the organization is aware of potential threats and knows how to respond in the event of a breach.

When it comes to protecting customer credit card information in small businesses, there are a few key tips to keep in mind. First and foremost, it’s important to use secure payment processing systems that encrypt sensitive data. Additionally, it’s crucial to regularly update software and security measures to stay ahead of potential threats. Employee training and education on cybersecurity best practices can also go a long way in preventing data breaches. Finally, having a plan in place for responding to a breach can help minimize the damage and protect both your business and your customers.

Small businesses are often exposed to cyber attacks, making data protection and cybersecurity crucial. One area of particular concern is your company’s banking details. To protect this sensitive information, consider implementing strong passwords, two-factor authentication, and regular monitoring of your accounts. Additionally, educate your employees on safe online practices and limit access to financial information to only those who need it. Regularly backing up your data and investing in cybersecurity software can also help prevent data breaches.

Small businesses are often at high risk of cyber attacks due to their limited resources and lack of expertise in cybersecurity. To protect sensitive data, it is important to implement strong passwords, regularly update software and antivirus programs, and limit access to confidential information.

It is also important to have a plan in place in case of a security breach, including steps to contain the breach and notify affected parties. By taking these steps, small businesses can better protect themselves from cyber threats and ensure the safety of their data.

Tips for protecting your small business from cyber threats and data breaches are crucial in today’s digital age. One of the most important steps is to educate your employees on cybersecurity best practices, such as using strong passwords and avoiding suspicious emails or links.

It’s also important to regularly update your software and systems to ensure they are secure and protected against the latest threats. Additionally, implementing multi-factor authentication and encrypting sensitive data can add an extra layer of protection. Finally, having a plan in place for responding to a cyber-attack or data breach can help minimize the damage and get your business back on track as quickly as possible.

Small businesses are attackable to cyber-attacks and data breaches, which can have devastating consequences. To protect your business, it’s important to implement strong cybersecurity measures. This includes using strong passwords, regularly updating software and systems, and training employees on how to identify and avoid phishing scams.

It’s also important to have a data backup plan in place and to regularly test your security measures to ensure they are effective. By taking these steps, you can help protect your business from cyber threats and safeguard your valuable data.

To protect against cyber threats, it’s important to implement strong data protection and cybersecurity measures. This can include regularly updating software and passwords, using firewalls and antivirus software, and providing employee training on safe online practices. Additionally, it’s important to have a plan in place for responding to a cyber attack, including backing up data and having a designated point person for handling the situation.

In today’s digital age, small businesses must prioritize data protection and cybersecurity to safeguard their operations and reputation. With the rise of remote work and cloud-based technology, businesses are more vulnerable to cyber attacks than ever before. To mitigate these risks, it’s crucial to implement strong security measures for online meetings, advertising, transactions, and communication with customers and suppliers. By prioritizing cybersecurity, small businesses can protect their data and prevent unauthorized access or breaches.

Here are 8 essential tips for data protection and cybersecurity in small businesses.

8 Essential Tips for Data Protection and Cybersecurity in Small Businesses

1. Train Your Employees on Cybersecurity Best Practices

Your employees are the first line of defense against cyber threats. It’s important to train them on cybersecurity best practices to ensure they understand the risks and how to prevent them. This includes creating strong passwords, avoiding suspicious emails and links, and regularly updating software and security systems. Consider providing regular training sessions and resources to keep your employees informed and prepared.

2. Use Strong Passwords and Two-Factor Authentication

One of the most basic yet effective ways to protect your business from cyber threats is to use strong passwords and two-factor authentication. Encourage your employees to use complex passwords that include a mix of letters, numbers, and symbols, and to avoid using the same password for multiple accounts. Two-factor authentication adds an extra layer of security by requiring a second form of verification, such as a code sent to a mobile device, before granting access to an account. This can help prevent unauthorized access even if a password is compromised.

3. Keep Your Software and Systems Up to Date

One of the easiest ways for cybercriminals to gain access to your business’s data is through outdated software and systems. Hackers are constantly looking for vulnerabilities in software and operating systems, and if they find one, they can exploit it to gain access to your data. To prevent this, make sure all software and systems are kept up-to-date with the latest security patches and updates. This includes not only your computers and servers but also any mobile devices and other connected devices used in your business. Set up automatic updates whenever possible to ensure that you don’t miss any critical security updates.

4. Use Antivirus and Anti-Malware Software

Antivirus and anti-malware software are essential tools for protecting your small business from cyber threats. These programs can detect and remove malicious software, such as viruses, spyware, and ransomware before they can cause damage to your systems or steal your data. Make sure to install reputable antivirus and anti-malware software on all devices used in your business, including computers, servers, and mobile devices. Keep the software up-to-date and run regular scans to ensure that your systems are free from malware.

5. Backup Your Data Regularly

One of the most important steps you can take to protect your small business from data loss is to back up your data regularly. This means creating copies of your important files and storing them in a secure location, such as an external hard drive or cloud storage service. In the event of a cyber-attack or other disaster, having a backup of your data can help you quickly recover and minimize the impact on your business. Make sure to test your backups regularly to ensure that they are working properly and that you can restore your data if needed.

6. Carry out a risk assessment

Small businesses are especially in peril of cyber attacks, making it crucial to prioritize data protection and cybersecurity. One important step is to assess potential risks that could compromise your company’s networks, systems, and information. By identifying and analyzing possible threats, you can develop a plan to address security gaps and protect your business from harm.

For Small businesses making data protection and cybersecurity is a crucial part. To start, conduct a thorough risk assessment to identify where and how your data is stored, who has access to it, and potential threats. If you use cloud storage, consult with your provider to assess risks. Determine the potential impact of breaches and establish risk levels for different events. By taking these steps, you can better protect your business from cyber threats

7. Limit access to sensitive data

One effective strategy is to limit access to critical data to only those who need it. This reduces the risk of a data breach and makes it harder for malicious insiders to gain unauthorized access. To ensure accountability and clarity, create a plan that outlines who has access to what information and what their roles and responsibilities are. By taking these steps, you can help safeguard your business against cyber threats.

8. Use a firewall

For Small businesses, it’s important to protect the system from cyber attacks by making data protection and reducing cybersecurity risk. One effective measure is implementing a firewall, which not only protects hardware but also software. By blocking or deterring viruses from entering the network, a firewall provides an added layer of security. It’s important to note that a firewall differs from an antivirus, which targets software affected by a virus that has already infiltrated the system.

Small businesses can take steps to protect their data and ensure cybersecurity. One important step is to install a firewall and keep it updated with the latest software or firmware. Regularly checking for updates can help prevent potential security breaches.

Conclusion

Small businesses are particularly vulnerable to cyber attacks, so it’s important to take steps to protect your data. One key tip is to be cautious when granting access to your systems, especially to partners or suppliers. Before granting access, make sure they have similar cybersecurity practices in place. Don’t hesitate to ask for proof or to conduct a security audit to ensure your data is safe.

Source :
https://onlinecomputertips.com/support-categories/networking/tips-for-cybersecurity-in-small-businesses/