Three Reasons Endpoint Security Can’t Stop With Just Patching

Last updated: June 14, 2023
James Saturnio
Security Unified Endpoint Management

With remote work now commonplace, having a good cyber hygiene program is crucial for organizations who want to survive in today’s threat landscape. This includes promoting a culture of individual cybersecurity awareness and deploying the right security tools, which are both critical to the program’s success. 

Some of these tools include endpoint patching, endpoint detection and response (EDR) solutions and antivirus software. But considering recent cybersecurity reports, they’re no longer enough to reduce your organization’s external attack surface.

Here are three solid reasons, and real-world situations, that happened to organizations that didn’t take this threat seriously.

  1. AI generated polymorphic exploits can bypass leading security tools
  2. Patching failures and patching fatigue are stifling security teams
  3. Endpoint patching only works for known devices and apps
  4. How can organizations reduce their external attack surface?

1. AI generated polymorphic exploits can bypass leading security tools

Recently, AI-generated polymorphic malware has been developed to bypass EDR and antivirus, leaving security teams with blind spots into threats and vulnerabilities.

Real-world example: ChatGPT Polymorphic Malware Evades “Leading” EDR and Antivirus Solutions

In one report, researchers created polymorphic malware by abusing ChatGPT prompts that evaded detection by antivirus software. In a similar report, researchers created a polymorphic keylogging malware that bypassed an industry-leading automated EDR solution.

These exploits achieved this by mutating its code slightly with every iteration and encrypting its malicious code without a command-and-control (C2) communications channel. 

This mutation is not detectable by traditional signature-based and low-level heuristics detection engines. This means that security time gaps are created for a patch to be developed and released, for the patch to be tested for effectiveness, for the security team to prioritize vulnerabilities and for the IT (Information Technology) team to rollout the patches onto affected systems.

In all, this could mean several weeks or months where an organization will need to rely on other security tools to help them protect critical assets until the patching process is completed successfully.
 

2. Patching failures and patching fatigue are stifling security teams

Unfortunately, updates breaking systems because patches haven’t been rigorously tested occur frequently. Also, some updates don’t completely fix all weaknesses, leaving systems vulnerable to more attacks and requiring additional patches to completely fix. 

Real-world example: Suffolk County’s ransomware attack

The Suffolk County government in New York recently released their findings from the forensic investigation of the data breach and ransomware attack, where the Log4j vulnerability was the threat actor’s entry point to breach their systems. The attack started back in December 2021, which was the same time Apache released security patches for these vulnerabilities. 

Even with updates available, patching never took place, resulting in 400 gigabytes of data being stolen including thousands of social security numbers and an initial ransom demand of $2.5 million.

The ransom was never paid but the loss of personal data and employee productivity and subsequent investigation outweighed the cost of updated cyber hygiene appliances and tools and a final ransom demand of $500,000. The county is still trying to recover and restore all their systems today, having already spent $5.5 million. 

Real world example: An errant Windows server update caused me to work 24-hours straight

From personal experience, I once worked 24 hours straight because one Patch Tuesday, a Microsoft Windows server update was automatically downloaded, installed which promptly broke authentication services between the IoT (Internet of Things) clients and the AAA (authentication, authorization and accounting) servers grinding production to a screeching halt.

Our company’s internal customer reference network that was implemented by our largest customers deployed Microsoft servers for Active Directory Certificate Services (ADCS) and Network Policy Servers (NPS) used for 802.1x EAP-TLS authentication for our IoT network devices managed over the air.

This happened a decade ago, but similar recurrences have also occurred over the next several years, including this update from July 2017, where NPS authentication broke for wireless clients and was repeated in May of last year.

At that time, an immediate fix for the errant patch wasn’t available, so I spent the next 22 hours rebuilding the Microsoft servers for the company’s enterprise public key infrastructure (PKI) and AAA services to restore normal operations. The saving grace was we took the original root certificate authority offline, and the server wasn’t affected by the bad update. 

However, we ended up having to revoke all the identity certificates issued by the subordinate certificate authorities to thousands of devices including routers, switches, firewalls and access points and re-enroll them back into the AAA service with new identity certificates.

Learning from this experience, we disabled automatic updates for all Windows servers and took more frequent backups of critical services and data.
 

3. Endpoint patching only works for known devices and apps 

With the pandemic came the shift to Everywhere Work, where employees worked from home, often connecting their personal devices to their organization’s network. This left security teams with a blind spot to shadow IT. With shadow IT, assets go unmanaged, are potentially out-of-date and cause insecure personal devices and leaky applications. 

The resurgence of bring your own device (BYOD) policies and the lack of company-sanctioned secure remote access quickly expanded the organization’s external attack surface, exposing other attack vectors for threat actors to exploit. 

Real-world example: LastPass’ recent breach 

LastPass is a very popular password manager that stores your passwords in an online vault. It has more than 25 million users and 100,000 businesses. Last year, LastPass experienced a massive data breach involving two security incidents.   

The second incident leveraged data stolen during the first breach to target four DevOps engineers, specifically, their home computers. One senior software developer used their personal Windows desktop to access the corporate development sandbox. The desktop also had an unpatched version of Plex Media Server (CVE-2020-5741) installed.

Plex provided a patch for this vulnerability three years ago. Threat actors used this vulnerability to deliver malware, perform privilege escalation (PE), then a remote code execution (RCE) to access LastPass cloud-based storage and steal DevOps secrets and multi-factor (MFA) and Federation databases.

“Unfortunately, the LastPass employee never upgraded their software to activate the patch,” Plex said in a statement. “For reference, the version that addressed this exploit was roughly 75 versions ago.”

If patching isn’t enough, how can organizations reduce their external attack surface?

Cyber hygiene

Employees are the weakest link to an organization’s cyber hygiene program. Inevitably, they’ll forget to update their personal devices, re-use the same weak password to different internet websites, install leaky applications, and click or tap on phishing links contained within an email, attachment, or text message. 

Combat this by promoting a company culture of cybersecurity awareness and practice vigilance that includes: 

· Ensuring the latest software updates are installed on their personal and corporate devices. 

· Recognizing social engineering attack techniques including the several types of phishing attacks.

· Using multi-factor authentication whenever possible. 

· Installing and automatically updating the databases on antivirus software for desktops and mobile threat defense for mobile devices. 

Continuing education is key to promoting great cyber hygiene within your organization, especially for anti-phishing campaigns.  

Cyber hygiene tool recomendations 

In cybersecurity, the saying goes, “You can’t protect what you can’t see!” Having a complete discovery and accurate inventory of all network-connected hardware, software and data, including shadow IT assets, is the important first step to assessing an organization’s vulnerability risk profile. The asset data should feed into an enterprise endpoint patch management system

Also, consider implementing a risk-based vulnerability management approach to prioritize the overwhelming number of vulnerabilities to only those that pose the greatest risk to your organization. Often included with risk-based vulnerability management solutions is a threat intelligence feed into the patch management system

Threat intelligence is information about known or potential threats to an organization. These threats can come from a variety of sources, like security researchers, government agencies, infrastructure vulnerability and application security scanners, internal and external penetration testing results and even threat actors themselves. 

This information, including specific patch failures and reliability reported from various crowdsourced feeds, can help organizations remove internal patch testing requirements and reduce the time gap to patch deployments to critical assets.

unified endpoint management (UEM) platform is necessary to remotely manage and provide endpoint security to mobile devices including shadow IT and BYOD assets.

The solution can enforce patching to the latest mobile operating system (OS) and applications, provision email and secure remote access profiles including identity credentials and multi-factor authentication (MFA) methods like biometrics, smart cards, security keys, certificate-based or token-based authentication.

The UEM solution should also integrate an AI machine learning-based mobile threat defense (MTD) solution for mobile devices, while desktops require next-generation antivirus (NGAV) with robust heuristics to detect and remediate device, network, and app threats with real-time anti-phishing protection.

And finally, to level the playing field against AI-generated malware, cyber hygiene tools will have to evolve quickly by leveraging AI guidance to keep up with the more sophisticated polymorphic attacks that are on the horizon.

Adding the solutions described above will help deter cyberattacks by putting impediments in front of threat actors to frustrate them and seek out easier targets to victimize. 

About James Saturnio

James Saturnio is the Technical Product Marketing Director for the Technical Marketing Engineering team at Ivanti. He immerses himself in all facets of cybersecurity with over 25 years’ hands-on industry experience. He is an always curious practitioner of the zero trust security framework. Prior to Ivanti, he was with MobileIron for almost 7 years as a Senior Solutions Architect and prior to that, he was at Cisco Systems for 19 years. While at Cisco, he started out as a Technical Assistance Center (TAC) Engineer and then a Technical Leader for the Security Technology and Internet of Things (IoT) business units. He is a former Service Provider and Security Cisco Certified Internetworking Expert (CCIE) and was the main architect for the IoT security architecture that is still used today by Cisco’s lighthouse IoT customers.
Source :
https://www.ivanti.com/blog/three-reasons-endpoint-security-can-t-stop-with-just-patching-or-antivirus

The 8 Best Practices for Reducing Your Organization’s Attack Surface

Last updated: June 20, 2023
Robert Waters
Security Unified Endpoint Management DEX

Increases in attack surface size lead to increased cybersecurity risk. Thus, logically, decreases in attack surface size lead to decreased cybersecurity risk.

While some attack surface management solutions offer remediation capabilities that aid in this effort, remediation is reactive. As with all things related to security and risk management, being proactive is preferred.

The good news is that ASM solutions aren’t the only weapons security teams have in the attack surface fight. There are many steps an organization can take to lessen the exposure of its IT environment and preempt cyberattacks.

How do I reduce my organization’s attack surface?

Unfortunately for everyone but malicious actors, there’s no eliminating your entire attack surface, but the following best practice security controls detailed in this post will help you significantly shrink it:

  1. Reduce complexity 
  2. Adopt a zero trust strategy for logical and physical access control
  3. Evolve to risk-based vulnerability management
  4. Implement network segmentation and microsegmentation
  5. Strengthen software and asset configurations
  6. Enforce policy compliance
  7. Train all employees on cybersecurity policies and best practices
  8. Improve digital employee experience (DEX)

As noted in our attack surface glossary entry, different attack vectors can technically fall under multiple types of attack surfaces — digital, physical and/or human. Similarly, many of the best practices in this post can help you reduce multiple types of attack surfaces.

For that reason, we have included a checklist along with each best practice that signifies which type(s) of attack surface a particular best practice primarily addresses.

#1: Reduce complexity

.

Digital attack surface Physical attack surface Human attack surface 
XX

.

Reduce your cybersecurity attack surface by reducing complexity. Seems obvious, right? And it is. However, many companies have long failed at this seemingly simple step. Not because it’s not obvious, but because it hasn’t always been easy to do.

Research from Randori and ESG reveals seven in 10 organizations were compromised by an unknown, unmanaged or poorly managed internet-facing asset over the past year. Cyber asset attack surface management (CAASM) solutions enable such organizations to identify all their assets — including those that are unauthorized and unmanaged — so they can be secured, managed or even removed from the enterprise network.

Any unused or unnecessary assets, from endpoint devices to network infrastructure, should also be removed from the network and properly discarded.

The code that makes up your software applications is another area where complexity contributes to the size of your attack surface. Work with your development team to identify where opportunities exist to minimize the amount of executed code exposed to malicious actors, which will thereby also reduce your attack surface.

#2: Adopt a zero trust strategy for logical and physical access control

.

Digital attack surface Physical attack surface Human attack surface 
XX

.

The National Institute of Standards and Technology (NIST) defines zero trust as follows:

“A collection of concepts and ideas designed to minimize uncertainty in enforcing accurate, least privilege per-request access decisions in information systems and services in the face of a network viewed as compromised.”

In other words, for every access request, “never trust, always verify.”

Learn how Ivanti can help you adopt the NIST CSF in The NIST Cybersecurity Framework (CSF): Mapping Ivanti’s Solutions to CSF Controls

Taking a zero trust approach to logical access control reduces your organization’s attack surface — and likelihood of data breaches — by continuously verifying posture and compliance and providing least-privileged access.

And while zero trust isn’t a product but a strategy, there are products that can help you implement a zero trust strategy. Chief among those products are those included in the secure access service edge (SASE) framework:

And though it’s not typically viewed in this manner, a zero trust strategy can extend beyond logical access control to physical access control. When it comes to allowing anyone into secure areas of your facilities, remember to never trust, always verify. Mechanisms like access cards and biometrics can be used for this purpose.

#3: Evolve to risk-based vulnerability management

.

Digital attack surface Physical attack surface Human attack surface 
X

.

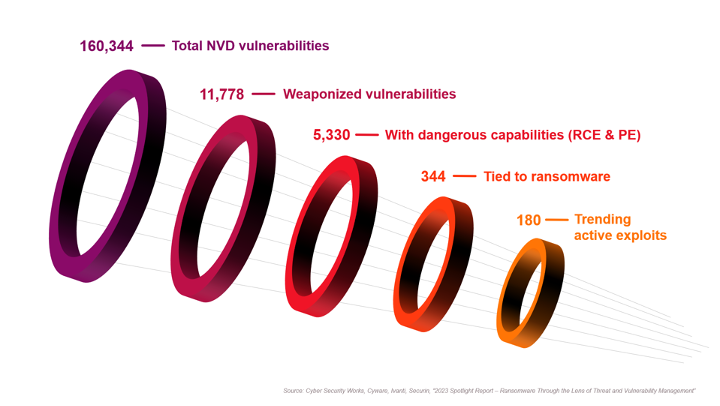
First, the bad news: the US National Vulnerability Database (US NVD) contains over 160,000 scored vulnerabilities and dozens more are added every day. Now, the good news: a vast majority of vulnerabilities have never been exploited, which means they can’t be used to perpetrate a cyberattack, which means they aren’t part of your attack surface.

In fact, a ransomware research report from Securin, Cyber Security Works (CSW), Ivanti and Cyware showed only 180 of those 160,000+ vulnerabilities were trending active exploits.

Comparison of total NVD vulnerabilities vs. those that endanger an organization

Total NVD graph.
Only approximately 0.1% of all vulnerabilities in the US NVD are trending active exploits that pose an immediate risk to an organization

legacy approach to vulnerability management reliant on stale and static risk scores from the Common Vulnerability Scoring System (CVSS) won’t accurately classify exploited vulnerabilities. And while the Cybersecurity & Infrastructure Security Agency Known Exploited Vulnerabilities (CISA KEV) Catalog is a step in the right direction, it’s incomplete and doesn’t account for the criticality of assets in an organization’s environment.

A true risk-based approach is needed. Risk-based vulnerability management (RBVM) — as its name suggests — is a cybersecurity strategy that prioritizes vulnerabilities for remediation based on the risk they pose to the organization.

Read The Ultimate Guide to Risk-Based Patch Management and discover how to evolve your remediation strategy to a risk-based approach.

RBVM tools ingest data from vulnerability scannerspenetration teststhreat intelligence tools and other security sources and use it to measure risk and prioritize remediation activities.

With the intelligence from their RBVM tool in hand, organizations can then go about reducing their attack surface by remediating the vulnerabilities that pose them the most risk. Most commonly, that involves patching exploited vulnerabilities on the infrastructure side and fixing vulnerable code in the application stack.

#4: Implement network segmentation and microsegmentation

.

Digital attack surface Physical attack surface Human attack surface 
X

.

Once again, borrowing from the NIST glossary, network segmentation is defined as follows:

Splitting a network into sub-networks, for example, by creating separate areas on the network which are protected by firewalls configured to reject unnecessary traffic. Network segmentation minimizes the harm of malware and other threats by isolating it to a limited part of the network.

From this definition, you can see how segmenting can reduce your attack surface by blocking attackers from certain parts of your network. While traditional network segmentation stops those attackers from moving north-south at the network level, microsegmentation stops them from moving east-west at the workload level.

More specifically, microsegmentation goes beyond network segmentation and enforces policies on a more granular basis — for example, by application or device instead of by network.

For example, it can be used to implement restrictions so an IoT device can only communicate with its application server and no other IoT devices, or to prevent someone in one department from accessing any other department’s systems.

#5: Strengthen software and asset configurations

.

Digital attack surface Physical attack surface Human attack surface 
X

.

Operating systems, applications and enterprise assets — such as servers and end user, network and IoT devices — typically come unconfigured or with default configurations that favor ease of deployment and use over security. According to CIS Critical Security Controls (CIS Controls) v8, the following can all be exploitable if left in their default state:

  • Basic controls
  • Open services and ports
  • Default accounts or passwords
  • Pre-configured Domain Name System (DNS) settings
  • Older (vulnerable) protocols
  • Pre-installation of unnecessary software

Clearly, such configurations increase the size of an attack surface. To remedy the situation, Control 4: Secure Configuration of Enterprise Assets and Software of CIS Controls v8 recommends developing and applying strong initial configurations, then continually managing and maintaining those configurations to avoid degrading security of software and assets.

Here are some free resources and tools your team can leverage to help with this effort:

#6: Enforce policy compliance

.

Digital attack surface Physical attack surface Human attack surface 
XX

.

It’s no secret that endpoints are a major contributor to the size of most attack surfaces — especially in the age of Everywhere Work when more employees are working in hybrid and remote roles than ever before. Seven in 10 government employees now work virtually at least part of the time.

It’s hard enough getting employees to follow IT and security policies when they’re inside the office, let alone when 70% of them are spread all over the globe.

Unified endpoint management (UEM) tools ensure universal policy compliance by automatically enforcing policies. This fact should come as no surprise to IT and security professionals, many of whom consider UEM a commodity at this point. In fact, Gartner predicts that 90% of its clients will manage most of their estate with cloud-based UEM tools by just 2025.

Nonetheless, UEM is the best option for enforcing IT and security policy compliance, so I’d be remiss to omit it from this list.

Read The Ultimate Guide to Unified Endpoint Management and learn about the key business benefits and endpoint security use cases for modern UEM solutions.

Additionally, beyond compliance, modern UEM tools offer several other capabilities that can help you identify, manage and reduce your attack surface:

  • Have complete visibility into IT assets by discovering all devices on your network — a key ASM capability for organizations without a CAASM solution.
  • Provision devices with the appropriate software and access permissions, then automatically update that software as needed — no user interactions required.
  • Manage all types of devices across the entire lifecycle, from onboarding to retirement, to ensure they’reproperly discarded once no longer in use.
  • Automatically enforce device configurations (refer to #5: Strengthen software and asset configurations to learn more about the importance of this capability).
  • Support zero trust access and contextual authentication, vulnerability, policy, configuration and data management by integrating with identity, security and remote-access tools. For example, UEM and mobile threat defense (MTD) tools can integrate to enable you to enact risk-based policies to protect mobile devices from compromising the corporate network and its assets.

#7: Train all employees on cybersecurity policies and best practices

.

Digital attack surface Physical attack surface Human attack surface 
X

.

Seventy-four percent of breaches analyzed for the 2023 Verizon Data Breaches Investigation Report (DBIR) involved a human element.

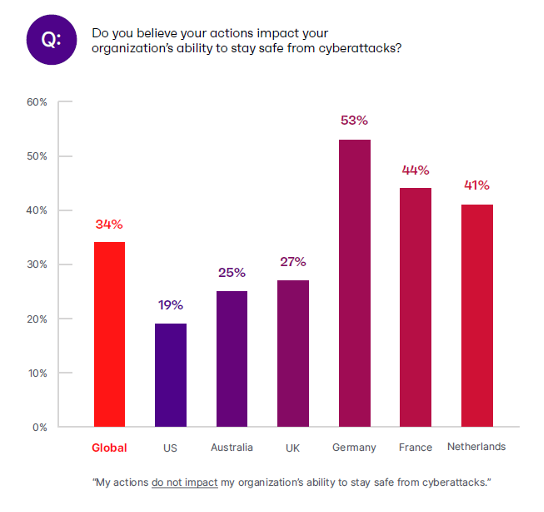
Thus, it should come as no surprise when you review the data from Ivanti’s 2023 Government Cybersecurity Status Report and see the percentages of employees around the world that don’t believe their actions have any impact on their organization’s ability to avert cyberattacks:

Do employees think their own actions matter?

Many employees don’t believe their actions impact their organization’s ability to stay safe from cyberattacks.

In the immortal words of Alexander Pope: “To err is human…” In cybersecurity terms: until AI officially takes over, humans will remain a significant part of your attack surface. And until then, human attack surfaces must be managed and reduced wherever possible.

Thus far, the best way to do that’s proven to be cybersecurity training, both on general best practices and company-specific policies — and definitely don’t forget to include a social engineering module.

Many cybersecurity practitioners agree. When the question “In your experience, what security measure has been the most successful in preventing cyberattacks and data breaches?” was posed in Reddit’s r/cybersecurity subreddit, many of the top comments referenced the need for user education:

Reddit / u/Forbesington
Reddit / u/slybythenighttothecape
Reddit / u/_DudeWhat
Reddit / u/onneseen

To once again borrow from CIS Controls v8, Control 14: Security Awareness and Skills Training encourages organizations to do the following: “Establish and maintain a security awareness program to influence behavior among the workforce to be security conscious and properly skilled to reduce cybersecurity risks to the enterprise.”

CIS — the Center for Internet Security — also recommends leveraging the following resources to help build a security awareness program:

Security and IT staff — not just those in non-technical roles — should also be receiving cybersecurity training relevant to their roles. In fact, according to the IT and security decision-makers surveyed by Randori and ESG for their 2022 report on The State of Attack Surface Management, providing security and IT staff with more ASM training would be the third most-effective way to improve ASM.

Ensuring partners, vendors and other third-party contractors take security training as well can also help contain your human attack surface.

#8: Improve digital employee experience (DEX)

.

Digital attack surface Physical attack surface Human attack surface 
XX

.

No matter how much cybersecurity training you provide employees, the more complex and convoluted security measures become, the more likely they are to bypass them. Sixty-nine percent of end users report struggling to navigate overly convoluted and complex security measures. Such dissatisfied users are prone to distribute data over unsecured channels, prevent the installation of security updates and deploy shadow IT.

That seems to leave IT leaders with an impossible choice: improve digital employee experience (DEX) at the cost of security or prioritize security over experience? The truth is, security and DEX are equally important to an organization’s success and resilience. In fact, according to research from Enterprise Management Associates (EMA), reducing security friction leads to far fewer breach events.

So what do you do? Ivanti’s 2022 Digital Employee Experience Report indicates IT leaders — with support from the C-suite — need to put their efforts toward providing a secure-by-design digital employee experience. While that once may have seemed like an impossible task, it’s now easier than ever thanks to an emerging market for DEX tools that help you measure and continuously improve employees’ technology experience.

Read the 2022 Digital Employee Experience Report to learn more about the role DEX plays in cybersecurity.

One area in which organizations can easily improve both security and employee experience is authentication. Annoying and inefficient to remember, enter and reset, passwords have long been the bane of end users.

On top of that, they’re extremely unsecure. Roughly half of the 4,291 data breaches not involving internal malicious activity analyzed for the 2023 Verizon DBIR were enabled through credentials — about four times the amount enabled by phishing — making them by far the most popular path into an organization’s IT estate.

Passwordless authentication software solves this problem. If you’d like to improve end user experience and reduce your attack surface in one fell swoop, deploy a passwordless authentication solution that uses FIDO2 authentication protocols. Both you and your users will rejoice when you can say goodbye to passwords written on Post-it Notes forever.

For more guidance on how to balance security with DEX, refer to the following resources:

Additional guidance from free resources

Ivanti’s suggested best practices for reducing your attack surface combine learnings from our firsthand experience plus secondhand knowledge gleaned from authoritative resources.

And while these best practices will indeed greatly diminish the size of your attack surface, there’s no shortage of other steps an organization could take to combat the ever-expanding size and complexity of modern attack surfaces.

Check out the following free resources — some of which were referenced above — for additional guidance on shrinking your attack surface:

Next steps

So, you’ve implemented all the best practices above and you’re wondering what’s next. As with all things cybersecurity, there’s no time for standing still. Attack surfaces require constant monitoring.

You never know when the next unmanaged BYOD device will connect to your network, the next vulnerability in your CRM software will be exploited or the next employee will forget their iPhone at the bar after a team happy hour.

On top of tracking existing attack vectors, you also need to stay informed about emerging ones. For example, the recent explosion of AI models is driving substantial attack surface growth, and it’s safe to say more technologies that open the door to your IT environment are on the horizon. Stay vigilant.

About Robert Waters

Robert Waters is the Lead Product Marketing Manager for endpoint security at Ivanti. His 15 years of marketing experience in the technology industry include an early stint at a Fortune 1000 telecommunications company and a decade at a network monitoring and managed services firm.

Robert joined Ivanti in November of 2022 and now oversees all things risk-based vulnerability management and patch management.

Source :
https://www.ivanti.com/blog/the-8-best-practices-for-reducing-your-organization-s-attack-surface

How Cloud Migration Helps Improve Employee Experience

Last updated: June 26, 2023
DEX ITSM and ITAM

The old saying goes, “practice what you preach.” When Ivanti started its “Customer Zero” initiative, Bob Grazioli, Chief Information Officer, saw it as a perfect opportunity to test the products and services consumed by customers.  
For example, during Ivanti’s move to the cloud, Grazioli and the team experienced the same issues that customers would’ve experienced in their migration process. This first-hand experience allowed them to make improvements along the way. Listen to Grazioli go into detail about other crucial findings in the Customer Zero initiative and how expanding ITSM helps elevate the employee experience. 

Key learnings from Ivanti’s “Customer Zero” program  

https://youtube.com/watch?v=unBhdg2rwkg%3Fenablejsapi%3D1%26origin%3Dhttps%253A%252F%252Fwww.ivanti.com

“That’s great to call out our Customer Zero program because we’re really proud of it, actually. We are the first customer in Ivanti. We take every one of our tools that are obviously applicable to IT or SaaS and we implement them first, before the customer,  to provide the feedback to our product managers, our engineering team and make sure that that feedback either makes it into the product or eliminates any potential problems that our customers might experience if something obviously wasn’t discovered during our testing.   

But having said that, we have learned an awful lot about actually moving from on-prem to SaaS. If you look at what we’ve done with Customer Zero, our focus now has been to take a look at the Ivanti on-prem products and move ourself to the cloud. Obviously, I manage SaaS, so I’m very biased towards being in the cloud and that is our focus right now. So, we’ve taken patch, we’ve moved that from on-prem to cloud.  

We now have taken our ITSM converged product with workflow management, with all of low-code, no code, we moved that into IT for ITSM. We have our own CMDB that we’re running against Discovery. Going out to our data centers, we have close to what, 40 different geos globally that we manage — thousands and thousands of assets across all of those data centers. Those are all being discovered placed in our own CMBD and managed.   

We’re now deploying GRC for our compliance. We were like a lot of, you know, companies struggle through our SOC 2, SOC 2 type 2, where artifacts are put into certain repositories. We managed those assets. Now we have GRC, where all those artifacts get managed to ITSM. They’re linked to the proper controls. It makes the audit process so much simpler, so much easier for us to get through every year for compliance.    

We’re learning that through the efficiency of moving to cloud from on-prem to SaaS, we’re learning those efficiencies do save us time, have a great ROI in terms of the OpeEx – CapEx equation, if most of you CIOs that go through that, there is a big advantage on the Capex-Opex side.”

Using ITSM to support a broader organization  

https://youtube.com/watch?v=unBhdg2rwkg%3Fstart%3D152%26enablejsapi%3D1%26origin%3Dhttps%253A%252F%252Fwww.ivanti.com

“And then, just having all of our data in the cloud in ITSM, as I said earlier, becoming a single source of truth for PatchDiscovery, RiskSense [now known as Risk-Based Vulnerability Mangement] vulnerabilities. And obviously, the main focus, all the tickets that are created on the customer facing side, giving us insight into the customer, into what they’re using or what they’re not using. So really, adoption, big part of obviously what you need in SaaS to manage, the real true user experience.   

It really has been eye opening, moving all of our products from on-prem to SaaS, leveraging those SaaS products in our own cloud, gaining that experience, pushing it back to product managers, pushing it back to engineering to produce a better quality product and a better service for all of our customers as they migrate to the cloud.   

So, we kind of blunt any particular problems that our customers would have experienced when they move from on-prem to cloud. Customer Zero – it’s definitely eliminating a lot of issues that customers would have had if they move on-prem to SaaS. And we’re providing valuable telemetry to help improve our product and improve the quality and service to our customers.” 

Important takeaways from Ivanti’s Customer Zero initiative 

https://youtube.com/watch?v=IzbJvG6Izs0%3Fenablejsapi%3D1%26origin%3Dhttps%253A%252F%252Fwww.ivanti.com

“Well, so we’ve improved our catalog for service requests and so on. That is the evolution of what ITSM should do. But DEX is the key. Having all of those tickets in ITSM that show customer issues or customer successes or what they’re using in our product, etc.

That is the game changer because now, as I said earlier, having DEX out there, looking at all those tickets, analyzing the tickets and then proactively either anticipating a problem with their device or potentially the way a customer is adopting certain technologies that we pushed out into the environment.  

Those tickets are gold for that level of telemetry that allows us to gain the insights we need to provide the customer with a better experience. I think ticket management is really, it’s tough — you don’t want a lot of tickets, obviously, because sometimes that’s not a good thing. But what these tickets represent in terms of knowledge of the customer, it really is instrumental in us making things better, making the service better and having the customer have a better experience.” 

How to use DEX to drive cultural change  

https://youtube.com/watch?v=x71aP3P4OCs%3Fenablejsapi%3D1%26origin%3Dhttps%253A%252F%252Fwww.ivanti.com

“I mean, we use the word culture, but let’s face it, the generation of customers that are out there today growing up with technology and having the ability to control a lot of that technology right at their fingertips, that’s really what you’re trying to accommodate.  

You don’t want someone to come into your company as an employee and have them not have that same experience. Not have them engaged with technology the same way they can engage at home or anywhere else out in the market. That’s what we’re trying to get to and be for that customer.   

And we’re doing that because today, with the proactive nature that we’re creating within our products. Proactive nature, that’s DEX.  

That’s having all that intelligence to engage the customer with empathy and with a proactive approach to giving them a solution to whatever issue they have. It’s empathy to what they’re going through and then proactively providing them with a fast, reliable solution to whatever experience they’re calling in on. 

I think that’s our goal and I think ITSM is evolving to that because again, of the amount of information it’s able to collect and use with all of the AI and ML that we’re applying to it, to really create that more proactive experience with a very intelligent, very tech savvy customer that we have both in and outside our company.   

And that’s happening. That’s the culture, if you will, that I see, that I’m engaged with, and we want to make sure our products can satisfy. ”

Broadening ITSM to support other areas brings with it new levels of proactive troubleshooting and empathy, helping you drive a better digital employee experience.

.

If you’d like to learn more, dive into our ITSM + toolkit and listen to this on-demand webinar on Expanding your ITSM: key learnings for building connected enterprise workflows.  

Source :
https://www.ivanti.com/blog/how-cloud-migration-helps-improve-employee-experience

Configure DoH on your browser

There are several browsers compatible with DNS over HTTPS (DoH). This protocol lets you encrypt your connection to 1.1.1.1 in order to protect your DNS queries from privacy intrusions and tampering.

Some browsers might already have this setting enabled.

​​Mozilla Firefox

  1. Select the menu button > Settings.
  2. In the General menu, scroll down to access Network Settings.
  3. Select Settings.
  4. Select Enable DNS over HTTPS. By default, it resolves to Cloudflare DNS.

​​Google Chrome

  1. Select the three-dot menu in your browser > Settings.
  2. Select Privacy and security > Security.
  3. Scroll down and enable Use secure DNS.
  4. Select the With option, and from the drop-down menu choose Cloudflare (1.1.1.1).

​​Microsoft Edge

  1. Select the three-dot menu in your browser > Settings.
  2. Select Privacy, Search, and Services, and scroll down to Security.
  3. Enable Use secure DNS.
  4. Select Choose a service provider.
  5. Select the Enter custom provider drop-down menu and choose Cloudflare (1.1.1.1).

​​Brave

  1. Select the menu button in your browser > Settings.
  2. Select Security and Privacy > Security.
  3. Enable Use secure DNS.
  4. Select With Custom and choose Cloudflare (1.1.1.1) as a service provider from the drop-down menu.

​​Check if browser is configured correctly

Visit 1.1.1.1 help pageOpen external link and check if Using DNS over HTTPS (DoH) show Yes.

Source :
https://developers.cloudflare.com/1.1.1.1/encryption/dns-over-https/encrypted-dns-browsers/

Change the owner of computer objects in Active Directory

Wolfgang Sommergut Thu, Jun 15 2023

When a user joins a computer to an AD domain, they automatically become the owner of the corresponding AD object. This is why standard users should not have the domain join permission. If they still own computer objects, it is recommended for security reasons to replace them with a service account.

As a best practice, Microsoft recommends revoking the domain join permission from regular users. Instead, it is advised to delegate this task to service accounts whose permissions are tailored to this purpose. By doing so, a known attack vector is eliminated.

Easily deploy and centrally manage your phone system in your Windows network

Download 3CX now for free!Ad

If the domain join is delegated to specific accounts after end users have already added numerous computers to the domain, it is recommended that the owner of these computer objects be changed.

This also applies if a domain admin has been used for this purpose until now.

Active Directory Users and Computers

To view the permissions and the owner of a computer object in AD Users and Computers (ADUC), open the properties of the computer object, switch to the Security tab, and click Advanced.

Edit the owner of a computer object in Active Directory with AD Users and Computers

If necessary, you can enter a new owner by clicking the Change link in that section.

In ADUC, you can only edit the permissions of individual objects. If you select multiple objects, the Properties dialog will not display the Security tab.

Display owner with PowerShell

For bulk operations, it is therefore recommended to use PowerShell. If you first want to get an overview of multiple objects’ ownership, there are several options available.

One approach is to generate a list of computer names and owners by expanding the nTSecurityDescriptor attribute using Select-Object:

Get-ADComputer –Filter * -properties ntSecurityDescriptor -PipelineVariable p |

select -ExpandProperty ntSecurityDescriptor |

select @{n=”Computer”;e={ $p.name }}, @{n=”Owner”;e={ $_.owner }}

Display all domain computers and their owners with PowerShell

Alternatively, you can use Get-ACL to retrieve the owner for each computer individually. When outputting the results using Format-List, you can use Trimstart() to remove the leading “CN=” from PSChildName:

Get-ADComputer –Filter * |

foreach{Get-Acl -Path “AD:$($_.DistinguishedName)“} |

Format-List @{n=”Name”;e={$_.PSChildName.Trimstart(“CN=”)}}, @{n=”Owner”;e={$_.owner}}

This variant has the advantage of generating the necessary ACL objects, which are required if you want to change the owner. The following script accomplishes this task:

$user = new-object system.security.principal.ntaccount(“contoso\djoin”)

Get-ADComputer –filter ‘name -like “win11*”‘ |

foreach{

$acl = Get-Acl -Path “AD:$($_.DistinguishedName)

$acl.SetOwner($user)

Set-Acl -Path “AD:$($_.DistinguishedName)$acl

}

In this example, all computers whose names begin with “Win11” are assigned contoso\djoin as the new owner.

Assign a new owner to computer objects with Set Acl

It is worth mentioning that to use the SetOwner method, you need to provide a system.security.principal.ntaccount object. However, Get-ADuser returns objects of the type Microsoft.ActiveDirectory.Management.ADUser. If you want to retrieve the principal using this cmdlet, then you need to call it as follows:

$user = New-Object System.Security.Principal.SecurityIdentifier (Get-ADUser -Identity “myuser”)

Summary

For security reasons, it is not recommended to let users join PCs to an AD domain. However, if you have allowed this in the past, it is advisable to assign new owners to the computer objects.

Source :
https://4sysops.com/archives/change-the-owner-of-computer-objects-in-active-directory/

Qnap QuTS hero h5.1.0 | Release Notes

QuTS hero h5.1.0
2023-05-29

QuTS hero h5.1.0 brings many important new features to further enhance security, improve performance, and boost productivity for your QNAP NAS. You can now log in with more secure verification methods, delegate administrative tasks to general users, and centrally manage NAS devices via AMIZ Cloud. You can also benefit from smarter disk migration, smoother file browsing and search in File Station, more powerful SMB signing and file sharing, more convenient storage pool expansion, and much more. See What’s New to learn about main features and Other Changes to learn about other features, enhancements, and changes.

We also include fixes for reported issues and provide information about known issues. For details, see Fixed and Known Issues. You should also see Important Notes before updating QuTS hero.

What’s New

Storage pool expansion by adding disks to an existing RAID group

Users can now expand a storage pool by adding disks to expand an existing RAID group within the pool. When expanding the RAID group, users can also migrate the RAID group to a different RAID type.

To use this function, go to Storage & Snapshots > Storage > Storage/Snapshots, select a storage pool, click Manage > Storage Pool > Action > Expand Pool to open the Expand Storage Pool Wizard, and then select Add new disk(s) to an existing RAID group.

Support for SMB multichannel

Users can now allow SMB 3.x clients to establish multiple network connections simultaneously to an SMB file share. Multichannel can increase the network performance by aggregating network bandwidth over multiple NICs and mitigating network disruption by increasing network fault tolerance.

To enable SMB multichannel, go to Control Panel > Network & File Services > Win/Mac/NFS/WebDAV > Microsoft Networking, and then select Enable SMB Multichannel.

SMB multichannel is only supported on the following clients using SMB 3.0 or later:

  • Windows 8.1 and later
  • Windows Server 2012 and later
  • macOS Big Sur 11.3.1 and later

AES-128-GMAC algorithm support for SMB signing

QuTS hero h5.1.0 now supports the Advanced Encryption Standard (AES) Galois Message Authentication Code (GMAC) cipher suite for SMB signing. SMB signing can use this algorithm to encode and decode using 128-bit keys and can automatically negotiate this method when connecting to a client device that also supports the same algorithm standard.

To enable SMB signing, go to Control Panel > Network & File Services > Win/Mac/NFS/WebDAV > Microsoft Networking > Advanced Settings, and then configure the SMB signing settings. Make sure that you select the highest SMB version as SMB 3.

Delegated Administration for better organization flexibility and productivity

In modern organizations, IT administrators are often overwhelmed by a sheer number of tasks and responsibilities. QuTS hero h5.1.0 now supports Delegated Administration, which allows administrators to delegate various roles to general users, so that they can perform routine tasks, control their data, manage system resources, and monitor device status even when IT administrators are not available. You can choose from a wide range of roles, including System Management, Application Management, Backup Management, Shared Folder Management, and many more. To ensure system security, we recommend only granting permissions that are essential for performing required tasks.

This feature not only helps reduce the workloads of administrators but also greatly enhances productivity and flexibility for your organization. You can also easily view the roles currently assigned to each user and change their roles anytime according to your needs. To configure these settings, go to Control Panel > Privilege > Delegated Administration. To learn more about Delegated Administration, check QuTS hero h5.1.0 User Guide.

2-step verification and passwordless login for enhanced account security

QuTS hero now supports passwordless login, which replaces your password with a more secure verification method. Instead of entering a password, you can scan a QR code or approve a login request with your mobile device to verify your identify. QuTS hero now also supports more verification methods for 2-step verification. In addition to a security code (TOTP), you can also choose to scan a QR code, approve a login request, or enter an online verification code to add an extra layer of security to protect your NAS account.

To configure these settings, go to the NAS desktop, click your username on the taskbar, and then select Login and Security. You can download and install QNAP Authenticator from App Store or Google Play and pair this mobile app with your NAS to secure your NAS account. Note that you cannot use 2-step verification and passwordless login at the same time.

Centralized NAS management with AMIZ Cloud

You can now add the NAS to an organization when setting up the myQNAPcloud service for your NAS. This allows organization administrators to remotely access, manage, and monitor various system resources on the NAS via AMIZ Cloud, a central cloud management platform designed for QNAP devices.

To manage the NAS via AMIZ Cloud, you must enable AMIZ Cloud Agent in myQNAPcloud. This utility communicates with AMIZ Cloud and collects the data of various resources on your device for analytics purposes without any identifiable person information.

Automatic disk replacement with Predictive Migration before potential failure

Predictive Migration is a major improvement over the original Predictive S.M.A.R.T. Migration feature in Storage & Snapshots. This upgrade now allows users to specify multiple trigger events that prompt the system to automatically replace a disk before it fails.

Besides S.M.A.R.T. warnings, users can also specify trigger events from other monitoring systems such as Western Digital Device Analytics (WDDA), IronWolf Health Management (IHM), DA Drive Analyzer, and SSD estimated remaining life. When a specified trigger event occurs—for example, a disk ‘s Galois WDDA status changes to “Warning” or the SSD estimated remaining life reaches 3%—the system automatically replaces the disk and migrates all its data to a spare disk. This process protects your data better and is safer than manually initiating a full RAID rebuild after the disk fails.

To configure Predictive Migration, go to Storage & Snapshots > Global Settings > Disk Health.

Lists of recent files in File Station for easier file browsing

With the new Recent Files feature in File Station, you can now easily locate files that were recently uploaded, opened, or deleted. These three folders are conveniently grouped together under the Recent File folder at the upper left portion of File Station.

File content search in File Station with Qsirch integration

The original search function in File Station could only search for file names of a specific file type. With the integration of Qsirch into File Station, you can now search for file content using keywords, and also search for multiple file types using these keywords at the same time. To use this feature, you need to install Qsirch, an app that can index the files on your device and greatly facilitate your file search.

Other Changes

Control Panel

  • Users can now configure an individual folder to inherit permissions from its parent folder or to remove the inherited permissions anytime. Users can also make a folder extend its permissions to all its subfolders and files. To configure permission inheritance on a folder, go to Control Panel > Privilege > Shared Folders, and then click the Edit Shared Folder Permissions icon under Action.
  • Added additional specification information for memory slots in Control Panel > System Status > Hardware Information.
  • Changed the behavior and the description of certain permission settings as we do not recommend using the default administrator account “admin”.
  • Optimized the process of restoring the LDAP database.
  • The “Network Recycle Bin” feature has been renamed to “Recycle Bin” in Network & File Services.
  • The automatic firmware update settings have been streamlined with the following changes: – The selectable options for automatic firmware updates have been greatly simplified. Users now select one of three firmware types to automatically update their system with: quality updates, critical updates, or latest updates. – “Security updates” are now “critical updates”. Critical updates include security fixes as well as critical system issue fixes. – “Quality updates” now include security fixes and critical issue fixes in addition to bug fixes.- “Feature updates” are now “latest updates” and include quality and critical updates in addition to new features, enhancements, and bug fixes. – Update notifications no longer need to be enabled separately for each firmware type. Notifications are now either enabled or disabled for all firmware types.
  • The time interval for observing successive failed login attempts can now be configured to be between 0 and 600 minutes. Moreover, a time interval of 0 minutes means that failed login attempts are never reset.
  • You can now include more information from account profiles when importing and exporting user accounts.
  • You can now select the direction to append the custom header for the reverse proxy rule.
  • Users can now edit and enable or disable existing power schedules in Control Panel > System > Power > Power Schedule. Previously, users could only add or remove power schedules.
  • The “Network Recycle Bin” feature has been renamed to “Recycle Bin” in Network & File Services.

Desktop & Login

  • You can now log out of your account on all devices, browsers, and applications at once. To use this feature, go to the desktop, click your username on the taskbar, and then go to Login and Security > Password.
  • Added an icon on the top-right corner of the desktop to indicate whether the device has enabled myQNAPcloud and been associated with a QNAP ID or whether the device has joined AMIZ Cloud.
  • Users can now save their QuTS Hero login credentials in their web browser. To enhance the security of your QuTS Hero user account, we recommend enabling 2-step verification.

App Center

  • Users can now configure a schedule for automatic installations of app updates.

File Station

  • Added prompt banners to remind users to turn on related browsing functions for multimedia files.
  • Enhanced the Background Tasks display UI.
  • Improved File Station performance and enhanced file browsing experience.

Help Center

  • Redesigned the user interface of Help Center for a better user experience.

Initialization

  • You can now purchase licenses during QuTScloud installation.

iSCSI & Fibre Channel

  • Added a new settings page for managing default iSCSI CHAP authentication settings, which you can use for multiple iSCSI targets. You can find these settings in iSCSI & Fibre Channel > Global Settings > Default iSCSI CHAP. When creating or editing a target, you can choose to use the default CHAP settings or configure unique settings for the target.
  • Added the client umask feature to assign default permissions for existing and new files and folders.
  • When creating an iSCSI target, you can now select the network interfaces that an iSCSI target will use for data transmission. Previously, users could only do so after the target was created.

Network & Virtual Switch

  • Network & Virtual Switch can now record event logs when the system identifies conflicting IP addresses between the local device and another device on the same network.
  • Users can now configure the MAC address when creating or modifying a virtual switch.
  • When selecting the system default gateway automatically, you can now configure the checking target by specifying the domain name or IP address.

NFS

  • NFS service now supports both NFSv4 and NFSv4.1 protocols.
  • Users can now set the rcpbind to assign fixed ports to RPC services. Make sure that you configure the firewall rules accordingly to allow connections only on the fixed ports.

PHP System Module

  • Updated the built-in PHP version to 8.2.0.

Resource Monitor

  • Resource Monitor now displays the space used by files created from Qsync file versioning.

SAMBA

  • Updated Samba to version 4.15.
  • You can now aggregate up to 50 shared folders on a Windows network.

Storage & Snapshots

  • Added support for disk failure prediction from ULINK’s DA Drive Analyzer. Registered users of DA Drive Analyzer can now also monitor disk failure prediction statuses in Storage & Snapshots > Storage > Disks/VJBOD > Disks.
  • Added support for Seagate dual-actuator disks. These disks appear with a “Seagate DA” tag in Storage & Snapshots > Storage > Disks/VJBOD > Disks.
  • Added support for Western Digital Device Analytics (WDDA) for Western Digital (WD) disks. To view WDDA information, go to Storage & Snapshots > Storage > Disks/VJBOD > Disks, select a WD disk, and click Health > View Details.
  • Improved the “Enable Read Acceleration” feature so that it not only improves the read performance of new files added to a shared folder (starting in QuTS hero h5.0.1), but also improves the read performance of existing files (starting in QuTS hero h5.1.0). This feature can be enabled for shared folders after upgrading from QuTS hero h5.0.0 or earlier to QuTS hero h5.0.1 or later.
  • Increased the maximum number of disks in RAID-TP from 16 to 24.
  • Redesigned the presentation of disk information into tabular format for enhanced user experience, now viewable in Storage & Snapshots > Storage > Disks/VJBOD > Disks.
  • Renamed the function “Replace & Detach” to “Replace” and added the option for users to choose whether to designate the replaced disk as a spare disk or to detach it from the system.
  • You can now select up to 24 disks for a single RAID-TP group.
  • Encrypted LUNs are now supported in VJBOD, SnapSync, Snapshot Replica, and snapshot import/export operations.
  • Improved the user interface on various snapshot-related screens.
  • Users can now change the destination IP address in Snapshot Replica jobs.
  • Added a new window that automatically appears when you insert new disks and helps you decide what to do with them. You can also access this window any time by going to Storage & Snapshots > Storage > Disks/VJBOD > Disks > More > Manage Free Disks.
  • After rebuilding a RAID group with a spare disk, the failed disk’s slot becomes reserved for a spare disk. To free up this slot for other purposes, go to Storage & Snapshots > Storage > Disks/VJBOD > Disks, select the disk slot, and click Action > Free Up Spare Disk Slot.
  • Users can now enable and disable QNAP SSD Antiwear Leveling (QSAL) on an existing SSD storage pool any time. Richer information is also available for QSAL-enabled pools, including replacement priority recommendation and charts showing the remaining capacity and life of the SSDs in the pool. To configure QSAL or view QSAL information, go to Storage & Snapshots > Storage > Storage/Snapshots, click an SSD storage pool, and then click Manage > QSAL.

System

  • You now need to enter a verification code when resetting your password if you forgot your password. This extra step helps enhance your account security.

Important Note

  • In QuTS Hero h5.0.1 or earlier, users can no longer create new VJBOD disks from a remote NAS if the remote NAS is running QuTS Hero h5.1.0 or later. If there are existing VJBOD disks connections to the remote NAS before it is updated to QuTS Hero h5.1.0 or later, these VJBOD disks are unaffected and remain operational after the update. In QuTS Hero h5.1.0 or later, users can still create VJBOD disks from a remote NAS running QuTS Hero h5.0.1 or earlier.
  • Removed support for CO Video.


Source :
https://www.qnap.com/en/release-notes/quts_hero/overview/h5.1.0

How To Stop Windows From Updating Graphics Drivers

Updated on January 12, 2023

Marlo Strydom

You may have noticed that Windows 10 is very eager to keep your system software up to date. The OS will automatically download and install new drivers for your graphics card, sound card, modem, or other hardware components.

Table Of Contents

While this can be convenient, it also risks breaking previous driver configurations and introducing bugs to your system through the updated driver. 

Here’s how to stop windows from updating graphics drivers:

  1. Click on the Start menu.
  2. Double click on Advanced System Settings.
  3. On the System Properties window, select the Hardware tab.
  4. Select Device Installation Settings.
  5. Save to apply the setting.

In this article, I’ll take you through the quickest way to stop Windows from updating graphics drivers on your computer.

0 of 34 secondsVolume 0%

00:01

00:16

00:34

1. Click on the Start Menu

An open Start Menu in Windows.

The Start menu provides easy access to commonly used programs and system settings. You can click on the Start button from the taskbar or press the Windows key on your keyboard.

The Windows Start Menu (as shown above) should pop up whichever approach you take, allowing you to proceed to the next step.

2. Double click on Advanced System Settings 

Type in advanced system and open advanced system settings.

In the search bar, you can find it in the Windows menu, type in Advanced System, and select Advanced System Settings from the options that appear.

Windows 10 comes with a range of system settings that you can access to control how the operating system and its apps behave. 

3. On the System Properties Window, select the Hardware tab

The Hardware tab in the Advanced System Properties windows is selected.

Windows provides a variety of built-in system properties, which are attributes that describe specific features of the system.

You can view and change these properties on the System Properties window. Specifically, you’ll want to access the Hardware tab, which you can do by selecting it in the menu that pops up.

4. Select Device Installation Settings

Click on the Device Installation Button.

Windows 10 users can now set their device installation settings to receive important updates.

No is selected to stop Windows from updating graphics drivers.

Here, the system will ask you whether you want to automatically download the manufacturer’s apps and custom icons available for your device.

Select No (your device might not work as expected).

5. Save to apply the setting

Hit the Save Changes button to save the settings.

Lastly, click Save to apply the new settings.

Using the Device Installation Settings is one of the easiest ways to prevent your Windows device from automatically updating drivers.

If that doesn’t work, there’s no need to worry. There are a few other alternative solutions you can try.

How to stop Windows from updating graphics drivers in alternative ways

Windows Update automatically downloads and installs software updates that are released from time to time.

These updates introduce new features, fix problems with existing apps, or improve the operating system’s performance.

If you have an OEM computer or a pre-installed version of Windows on your computer, you might not have much control over what updates get installed on your system.

Sometimes these updates can cause stability issues and lead to blue screen crashes.

If this happens to you after installing graphics driver updates, here are some alternative ways to stop Windows from updating graphics drivers in the future:

Stop Automatic Updates through the Local Group Policy Editor

Windows Local Group Policy Editor (LGPE) is a snap-in that can be used to manage local group policy objects on Windows operating systems.

In Windows, the traditional system controller isn’t always enough for managing user settings and other configurations.

Administrators can use the Local Group Policy Editor to: 

  • Manage the operating system and user behavior.
  • Set restrictions on user applications.
  • Control what software the computer can install.
  • Restrict their access to certain programs and folders, and much more. 

In this section, we’ll focus on how to use it to stop Windows from automatically updating graphics drivers.

Exclude driver updates for Windows updates in Group Policy Editor.
  1. Click the Start button on your keyboard.
  2. Copy gpedit.msc and paste it into the search box at the bottom left corner.
  3. Open the Local Group Policy Editor.
  4. Click Computer Configuration.
  5. Navigate to Administrative TemplatesWindows Components.
  6. Scroll down to Windows Update.
  7. Navigate to Do not include drivers with Windows Update and double click.
  8. You should see three options: Not ConfiguredEnabled, and Disabled.
  9. Select Enabled and click on Apply.
  10. Click OK.

Windows will still receive other updates but will exclude drivers from being installed on your computer. In that case, you may have to download and install drivers manually.

Stop graphics drivers update with Windows Registry

The Windows Registry is a central location for storing configuration information and user settings for Windows and its applications.

The registry stores information about user preferences, operating system settings, and application configurations to help your computer run smoothly and efficiently.

The Windows registry is organized into different categories known as keys. Each key stores specific information in the form of values, which are either numbers or text strings.

Create a new folder under the Windows folder in Windows Registry.

Here’s how to use the registry to stop automatic driver updates:

  1. Click the Start button on your keyboard.
  2. Type Regedit on the search box and open the Registry Editor app.
  3. Allow the application to make changes to your computer.
  4. Navigate to HKEY_LOCAL_MACHINE, go to SOFTWARE and scroll down to Policies.
  5. Select Microsoft and right-click Windows.
  6. Select New > Key.
  7. Rename your newly created key, preferably as Windows Updates.
  8. Right-click your newly created key, and go to New > DWORD (32-bit) Value.
  9. Right-click the DWORD and rename it as ExcludeWUDriversInQualityUpdate.
  10. Right-click the new DWORD and select Modify. Set the value data from 0 to 1 and click OK.
Windows key and value added to the Registry to stop Windows updating graphics card driver.

Using the Microsoft Show or Hide Updates Troubleshooter

The Microsoft Show or Hide Updates Troubleshooter is a lightweight, portable tool that can be used to identify and hide problematic updates on your computer.

Unfortunately, if you’re using Windows 10, you’re bound to run into some issues.

You might find yourself in a situation where an update messes up something essential to your workflow.

Perhaps an upcoming update has broken some functionality or compatibility with other programs.

In that case, try the Show or Hide Updates Troubleshooter to block automatic updates for a problematic driver:

  1. Download the Microsoft Show or Hide Updates Troubleshooter.
  2. Run the troubleshooter to select the drivers that will install automatically.
  3. Click Next and wait as the system detects problems.
  4. Select Hide Updates.
  5. Choose your graphics drivers from the list.

Hidden drivers will be temporarily blocked from automatic updates. If this tool does not work, you may always roll back to the previous version of the driver.

In that case, you may have to uninstall the driver, reinstall the previous one, and download it from the vendor’s website.

Troubleshooting graphics drivers on Windows

We don’t normally think of graphics cards as independent units, but if you’re an avid gamer or a professional video editor, you know how important they are in your work.

Graphics drivers are programs that tell your computer how to efficiently operate its graphical user interface (GUI). 

If you recently updated graphics drivers and are experiencing issues with your Windows 10 computer, you may want to revert back to the previous version of the graphics driver.

Updating graphics drivers may differ depending on your system’s manufacturer and graphics card type.

Here are some things to check if you’re having trouble with your graphics driver:

  • Low-performance computer: A slow computer is one of the most common graphics driver issues. While many computers experience some slowdown over time, poor graphics drivers can worsen this issue. Playing games, editing videos, or performing other tasks requiring high graphics levels with problematic graphics drivers is virtually impossible.
  • Display issues: Display issues can be caused by several culprits, including a faulty computer or a faulty graphics driver. While a faulty computer is less likely, a faulty graphics driver is much more common. You can tell that your graphics drivers are not working properly by checking for distorted images, colors that look washed out, or black and white screen issues.
  • Video card issues: A video card is responsible for converting your computer’s instructions into images that appear on your monitor. If your video card is misconfigured or damaged, it can cause various issues, including distorted images, poor color quality, or even a blank or black screen. 
  • Failed driver updates and installs: A failed driver update is one of the most common graphics driver issues. Fortunately, this problem is easy to spot and usually has an easy fix. Download and reinstall your graphics driver.

A graphics driver issue can cause various subsequent problems, including low performance, display issues, and video card issues.

To troubleshoot these issues, start by ensuring that your computer’s display is set up properly. Then, if your computer has display issues, check your computer’s graphics settings.

Check for Windows Updates

Performing Windows updates check and updating Windows.

When looking for potential issues with your Windows 10 computer, don’t forget to check whether any Windows updates are interfering with your graphics drivers.

When your computer installs a Windows update, it may modify the driver file associated with your graphics card, which can cause your computer to malfunction. 

To check for pending Windows updates:

  1. Open the Windows 10 Start Menu
  2. Go to Settings > Update & Security > Windows Update.
  3. Select Check for updates.

Windows users are always at risk of a virus, trojan horse, or other malicious software. Windows updates are the solution to all these issues.

It’s up to you to keep your computer secure. Check for updates regularly and install them as soon as possible to avoid problems that can slow down or crash your computer.

Reinstall the current version of the graphics driver

Uninstalling the device driver in the Device Manager in Windows.

If you’ve recently installed new graphics drivers and are having issues, it might be best to uninstall them and reinstall the older version.

To remove the current graphics driver:

  1. Open the Start Menu and search for Device Manager. You can also open the Control Panel and search for Device Manager
  2. Once there, select Display adapters and right-click the installed graphics driver
  3. Select Properties.
  4. Navigate to the Driver tab.
  5. Select Uninstall Device and reboot your computer.

Once you’ve uninstalled the driver, go back to the manufacturer’s website and download it. Next, check out this video on how to install the driver manually:

YouTube video

Roll back to an earlier version of the graphics driver

If you’ve tried installing a different graphics driver and the issues persist, you can roll back to an earlier version of the driver. 

  1. Open the Device Manager and scroll down to Graphics adapters.
  2. Right-click your installed graphics driver (under Display Adapters) and select Properties
  3. Navigate to the Driver tab.
  4. Select Roll Back Driver and follow the on-screen instructions to return to an earlier version of the graphics driver.

If none of the above solutions work, it may be best to completely uninstall your current graphics driver, restart your computer, and then manually reinstall the latest version of the driver.

Check your Device Manager

If your computer is running slowly and you suspect that the graphics driver may be to blame, one thing to check is the Device Manager.

In the Device Manager, you can see a list of all the hardware installed on your computer. 

If there is a yellow ! or red X next to a device, it means the computer is having some issues with it.

If there is an exclamation mark next to your graphics card, it means there’s a problem with the device driver, which can slow down your computer.

Check for hardware compatibility issue(s) and update(s)

If you recently installed a new driver accompanied by a new device and are experiencing issues when using it, you could be experiencing a hardware compatibility issue.

To check for compatibility issues, you can browse through the supported devices list for the program or device you’re using. 

As for updating the device driver, you should do this to ensure it is compatible with your computer and operating system.

If you’re using a brand-new device, it may not yet have a working third-party graphics driver installed on your computer. Check the manufacturer’s website to see if a compatible version has been released.

Ensure your computer is using the latest software

Last but not least, ensure that your computer has the latest updates. If your computer runs slow or has issues, it could result from the old software.

While some updates are crucial and address important computer security issues, others may create more problems than they solve. 

Windows will automatically prompt you to install new updates when available. However, you might need to check for updates yourself in some instances. 

Installing the latest updates for your computer’s operating system, browser, and other programs keeps your computer safe from cyber criminals who try to exploit outdated software.

Updating software regularly also helps prevent crashes, reduce blue screen errors and increase system performance.

Final thoughts

If you’ve had enough of Windows automatically updating your graphics drivers, the good news is there are several simple solutions to this issue.

By reading through the previous sections, you’ll be able to obtain a much higher control level over your device.

Source :
https://computerinfobits.com/how-to-stop-windows-from-updating-graphics-drivers/

PSWindowsupdate: Automated Windows Updates with PowerShell

brandon.lee 02 June 2023

The process to install Windows Updates can be a pain. Managing WSUS servers can be a headache too. However, with PowerShell, a special module, and some automation, we can schedule and automate the installation process of Windows Updates. Let’s look at PSWindowsupdate automated Windows Updates with PowerShell and see how it can come to the rescue for keeping your Windows environment up-to-date.

Table of contents

What is PSWindowsUpdate?

PSWindowsUpdate is a PowerShell third-party module found in the PowerShell gallery repository available for download designed to help administrators manage Windows updates and install updates flexibly and precisely.

Unlike the standard Windows Update Service Manager (WSUS) interface, the PSWindowsUpdate module provides commands for downloading, installing, and managing updates in an automated way. However, it can work in conjunction with WSUS or pull updates directly from Microsoft.

Admins can control every aspect of Windows updates with this module – from viewing available updates and initiating installations to setting update schedules. It includes advanced features like installing specific updates, managing hidden updates, or even automating the entire update process using the Windows Task Scheduler.

Why is Installing Windows Updates Important?

Before diving into the PSWindowsupdate module, why is installing Windows updates important? Installing Windows updates is essential to maintaining a secure and stable system. These updates often contain security patches that protect your systems from vulnerabilities and threats. By regularly installing these updates, you’re ensuring your system’s defenses are up-to-date.

Updates also introduce new features, improve system stability, and fix existing system and software bugs. This can lead to better performance, fewer errors, and a smoother overall user experience. As such, regular updates can go a long way in minimizing downtime and reducing the need for troubleshooting.

If you are a system administrator, it may seem like a headache to patch systems constantly. However, you will thank yourself later for having a fully patched system when the next ransomware variant takes advantage of known patched vulnerabilities. Also, if you are looking at introducing any new integration or software into the environment, it is always best practice to be on the latest version of Windows, patches installed, etc.

Installing the PSWindowsUpdate Module

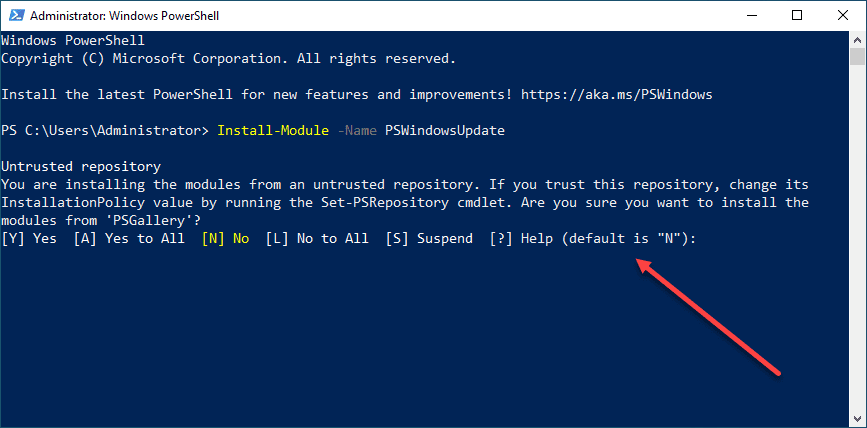
The installation process for the PSWindowsUpdate module starts with the command line in your PowerShell console. You need to install the module from the PowerShell gallery by typing:

Install-Module -Name PSWindowsUpdate

This command will download and install the module on your local system. However, it’s critical to note that you may need administrator privileges to install modules. Open the PowerShell prompt as an admin and run the command.

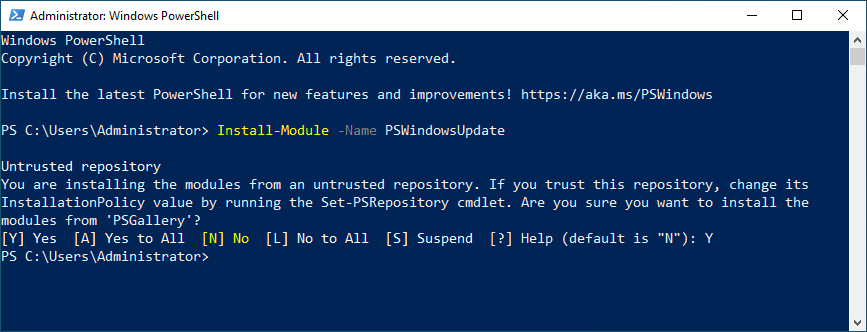
You will be prompted to trust the untrusted repository, which is normal.

Installing the PSWindowsupdate PowerShell module

Type “Y” to trust the PSGallery repository.

Accept the untrusted repository to install the module

Importing the PSWindowsUpdate Module

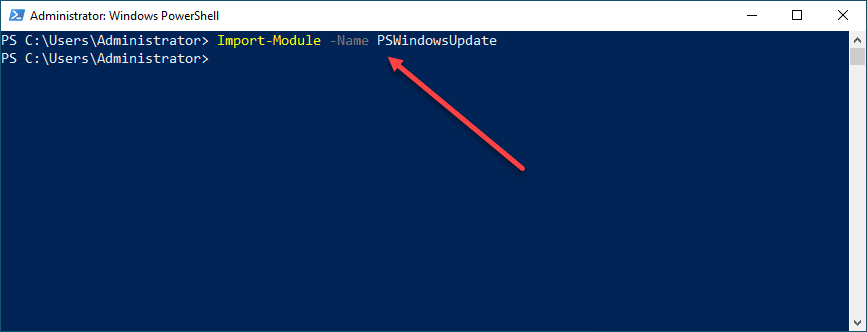
Once installed, you need to import the module PSWindowsUpdate to begin using it. Use the following command:

Import-Module -Name PSWindowsUpdate

It loads the module into your active PowerShell session, making the related cmdlets available for use.

Importing the module in PowerShell

Checking for Available Updates

Upon successful import of the PSWindowsUpdate module, you can quickly check for available updates using the command:

Get-WindowsUpdate

This command will query your machine’s Windows Update Client settings and connect to the Microsoft Update servers to fetch the list of all available updates. You can see critical updates, security updates, and all other types of updates that your system can download and install.

Using the Get WindowsUpdate to see available updates

Downloading Windows Updates

The PSWindowsUpdate module offers the command:

Download-WindowsUpdate

Use this to download Windows updates. Depending on your settings, this command initiates the download process for all approved updates from the Windows Server Update Service (WSUS) or Microsoft Update.

Download Windows Update with PowerShell

Installing Windows Updates

With the updates downloaded, you can install them using the ‘Install-WindowsUpdate‘ command. This command installs all downloaded updates, following which your system might need to reboot.

Install-WindowsUpdate
Running the Install WindowsUpdate command

Managing Windows Update History

The PSWindowsUpdate module provides an opportunity to access your system’s update history. You can use the ‘Get-WUHistory‘ command to get a detailed log of all installed updates.

Get-WUHistory

This command returns a detailed list, including the KB number, update title, and the status of the installed updates.

Get the reboot status of your Windows Server

Customizing Update Installation with an XML File

Advanced users might appreciate the ability to customize update installations using XML files. These files can specify category names to include or exclude from the update process. You can also use them to specify whether to include or exclude updates marked for automatic installation.

Scheduling Updates with Task Scheduler

In many environments, you may want to run the PSWindowsupdate command in an automated way. One way you can do this is by leveraging the power of the Windows Task Scheduler in conjunction with the PSWindowsUpdate module.

Using this combination, you can automate the download and install process at specific intervals, ensuring your system stays updated without manual intervention. We will take a look below at a script you can schedule with the Task Manager to run on a regular interval.

Installing Specific Updates

You can install specific updates using their unique KB number with the Install-WindowsUpdate command. For example, suppose you only want to install the update with the KB number KB4012606, you can do so with the following command:

Install-WindowsUpdate -KBArticleID KB4012606 -AcceptAll -AutoReboot

This command will only install the specified update and perform an automatic reboot if necessary.

Installing Only Security Updates

If you wish only to install security updates, you can do so with the following command:

Get-WindowsUpdate -Category 'SecurityUpdates' | Install-WindowsUpdate

This command first fetches only the security updates and then pipes them into the Install-WindowsUpdate command, installing only the security updates.

Hiding Specific Updates

There may be times when you want to hide a problematic update. If you want to hide Windows updates, maybe because it’s causing issues on your system, you can do so with the Hide-WindowsUpdate command. Suppose you want to hide the update with the KB number KB4012606, you can do so with the following command:

Hide-WindowsUpdate -KBArticleID KB4012606

This command will hide the specified update, preventing it from appearing in future searches for updates.

Checking if a Reboot is Required

You may want to see if there is a pending reboot required. If you want to check if a reboot is required after installing updates, you can do so with the Get-WURebootStatus command like so:

Get-WURebootStatus

This command will check and let you know if any installed updates require a reboot.

In the example, replace the placeholder KB numbers in the commands with the actual KB number of the update you’re interested in. Also, always ensure to run these commands in a safe and controlled environment, particularly when executing them on production systems or remote computers.

Get Windows Update history using PSWindowsupdate

Automate Windows Updates using PSWindowsUpdate

Automation is one of the powerful features of PowerShell and by extension, the PSWindowsUpdate module. In this section, we’ll cover an example of how to write a script for automating Windows updates using PSWindowsUpdate.

# Import the PSWindowsUpdate module
Import-Module PSWindowsUpdate

# Get all available updates
$updates = Get-WindowsUpdate -MicrosoftUpdate

# Filter out optional updates
$importantUpdates = $updates | Where-Object {$_.IsDownloaded -eq $true -and $_.IsMandatory -eq $true}

# Install important updates
$importantUpdates | Install-WindowsUpdate -AcceptAll -AutoReboot

In this script, we first import the PSWindowsUpdate module. We then fetch all available updates using Get-WindowsUpdate. Using Where-Object, we filter out only the important (mandatory and already downloaded) updates, ignoring the optional ones. Lastly, we install these important updates using Install-WindowsUpdate, automatically accepting EULAs and rebooting if necessary.

You can automate the execution of this script using Task Scheduler. Here’s a basic example of how you can do this:

  1. Open Task Scheduler and create a new task.
  2. In the Triggers tab, set the schedule for the task according to your needs (for example, daily at 3 AM).
  3. In the Actions tab, select ‘Start a program’ and input powershell.exe as the program.
  4. In the ‘Add arguments’ field, input -ExecutionPolicy Bypass -File “c:your script file path.ps1” where <your script file path> is the path to your PowerShell script.
  5. Finish the wizard and the task will be scheduled.

Remember to replace the path to the script with the actual path of your script file. The system will automatically execute the update script at the specified time.

This script and scheduling are basic examples. You may need to modify the script and task parameters according to your specific requirements, such as filtering updates based on criteria or sending a report by email after installation.

Also, be sure to test these scripts in a safe and controlled environment before deploying them in production, especially when executing them on remote computers.

PSWindowsupdate Frequently Asked Questions

Can I use the PSWindowsUpdate module to manage updates on remote computers?

Using the PSWindowsUpdate module, you can manage updates both locally and on remote computers. You must ensure you have all the necessary permissions as you would normally to administer and manage a remote machine.

Can I automate the update process using the PSWindowsUpdate module?

One of the strong suits of the PSWindowsUpdate module is the ability you have to automate the process of applying Windows Updates. You can easily create a simple PowerShell script to download and install Windows Updates. It can also apply various logic such as hiding updates, downloading only certain types of updates, etc. Using Task Scheduler, it is easy to have a way to trigger the automation of PSWindowsUpdate.

How do I view hidden updates using PSWindowsUpdate?

You can use the Get-WUHiddenUpdate command to view all hidden updates on your system. If you wish to unhide an update, use the UnHide-WindowsUpdate command with the appropriate KB number.

How can I install specific categories of updates using the PSWindowsUpdate module?

You can filter updates based on a particular category using PSWindowsUpdate. It is common to see administrators only install the “security updates” available for an operating system. You can easily accomplish this with the following command:

Get-WindowsUpdate -Category 'SecurityUpdates' | Install-WindowsUpdate.

Wrapping up

The PSWindowsUpdate module is a great way for system administrators to manage single or multiple Windows servers using a fully automated solution built on top of PowerShell. It provides many capabilities that give you full control over the Windows Update service. You can use it to review available updates, download approved updates, or manage the update history. The PSWindowsupdate PowerShell module can help streamline your system’s update process, including all Windows PCs and Servers across the board.

Fixing WSUS – When the Best Defense is a Good Offense

By Johan Arwidmark / April 12, 2018

This week started pretty harsh, a ton of customers reaching out to our team having WSUS issues. Everything from the “traditional” CPU and Memory spikes, to severe network traffic over port 8530 to the WSUS/SUP server. Basically Clients downloading massive amount of info, some customers reporting up to 700 MB per endpoint.

Note #1: One ongoing issue right now seem to be that the Windows version next updates contains a ton of metadata, causing a massive headache for WSUS admins. See below for scripts to help cleanup the mess, and to perform needed maintenance tasks. Also, if you are missing some info here, let me know. I’m @jarwidmark on Twitter.

WARNING: Whatever solution you pick for the maintenance of your WSUS/SUP server, ensure that you do not sync your WSUS/SUP during the maintenance process!

WSUS Housekeeping

Until Microsoft replaces WSUS with something better, you have to do some housekeeping for WSUS to behave. Your mileage is going to vary, but you simply have to keep the WSUS database in shape, as well as declining unused updates. Here are a few resources that can help when WSUS goes bad.

Update:
The network traffic from WSUS can also be heavily loaded due an out-dated Microsoft Compatibility Appraiser version on the machines. See this KB:

Unexpected high network bandwidth consumption when clients scan for updates from local WSUS server
http://support.microsoft.com/en-us/help/4163525/high-bandwidth-use-when-clients-scan-for-updates-from-local-wsus-serve

I have also published a PowerShell script you can run, either via remote PowerShell, or via the “Run Script” feature in ConfigMgr:

Checking the Microsoft Compatibility Appraiser version to prevent unwanted network traffic
https://deploymentresearch.com/666/Checking-the-Microsoft-Compatibility-Appraiser-version-to-prevent-unwanted-network-traffic

Step 1 – Buy you some time

When all 8 CPU’s on your site site server are constantly at 95-100 percent, there is little room for any admin work, nor cleanup. So make sure to throttle CPU on the WsusPool application pool, to give you some working room.

image
WsusPool application pool.

Here is a good write-up of the preceding steps.

ConfigMgr Software Update Point: Out-of-Control App Pool
http://www.windowsmanagementexperts.com/configmgr-software-update-point-out-of-control-app-pool/configmgr-software-update-point-out-of-control-app-pool.htm

Step 2 – More application pool settings, and the WSUS web.config file

Next step is to configure everything else in the application pool, together with the web.config file. I was lazy so I “borrowed” some settings from Sherry’s post below, and added them to a PowerShell script: http://github.com/DeploymentResearch/DRFiles/blob/master/Scripts/Invoke-WSUSConfiguration.ps1

The script came from a series of ConfigMgr Configuration Items posted by Sherry Kissinger 

WSUS Administration, WSUSPool, web.config, settings enforcement via Configuration Items
http://www.mnscug.org/blogs/sherry-kissinger/512-wsus-administration-wsuspool-web-config-settings-enforcement-via-configuration-items    

Step 3 – Decline weird stuff

Use any or all of the listed solutions to get rid of junk in your WSUS database:

Tip: Before starting to run decline scripts, PowerShell / SQL etc., make sure your SUSDB is not heavily fragmented. Use the Maintenance Solution from Ola Hallengren to optimize the SUSDB indexes: http://ola.hallengren.com/

Optional Speed Tip: If you don’t mind going totally unsupported, you can create additional indexes in the WSUS database that speeds up the cleanup dramatically. More info here: http://kickthatcomputer.wordpress.com/2017/08/15/wsus-delete-obsolete-updates, a great post by Scott Williams (@ip1). Again, not supported by Microsoft so don’t blame me if something happens 🙂 Fun fact: In my environment that change made the deletions go 30 times faster!!!
Here is a copy of the “code”: http://github.com/DeploymentResearch/DRFiles/blob/master/Scripts/Create-WSUS-Index.sql

Decline weird stuff #1 – Fully Automate Software Update Maintenance in Configuration Manager

As the title implies, a script that automates software updates, including cleanup, optimization and more. Written by Bryan Dam (@bdam555).
https://damgoodadmin.com/2017/11/05/fully-automate-software-update-maintenance-in-cm/

Update April 17, 2018: Bryan recently updated the script to support standalone WSUS too, below you find a sample syntax for that:

.\Invoke-DGASoftwareUpdateMaintenance.ps1 -UpdateListOutputFile .\UpdateListOutputFile.csv -StandaloneWSUS WSUS01 -RunCleanUpWizard -DeclineSuperseded -DeclineByTitle @('*Itanium*','*ia64*','*Beta*') -DeclineByPlugins -Force

Decline weird stuff #2 – SQL Cleanup scripts

Some shiny SQL scripts from paul salwey @psalwey

Especially checkout the WSUSSQLMaintenance_4_DeclineUpdates_XML_Lengthover5000.sql one. I had not seen that before.

http://drive.google.com/drive/folders/11dNPRZgqlultZql7rVHZZm3Dom8eKlVJ

Tip on usage:

  1. Reindex
  2. Obsolete script
  3. Superseded script
  4. XML script
  5. Reindex again
  6. Reboot server

Tip #1:  If you have a lot of obsolete updates (Script 2.), consider using an alternate version below that runs in batches, and also shows total number of updates. The script is from Scott Williams (see Resource #6 further down this post). I just added a comment on where to change the batch numbers.

http://github.com/DeploymentResearch/DRFiles/blob/master/Scripts/WSUSSQLMaintenance_2_RemoveObsoleteUpdates_BatchVersion.sql

Tip #2: If you just want to quickly see how many obsolete updates you have, use this script:

http://github.com/DeploymentResearch/DRFiles/blob/master/Scripts/Get-WSUSObsoleteUpdatesNumber.sql

Tip #3: Benjamin Reynolds (@SqlBenjamin), with Microsoft, has put together a combination of creating indexes for speed with a more optimized version of cleaning up obsolete updates, and Steve Thompson (@Steve_TSQL), has it all explained and published here: http://stevethompsonmvp.wordpress.com/2018/05/01/enhancing-wsus-database-cleanup-performance-sql-script/

Decline weird stuff #3 – Decline Updates Script by Jeff Carreon

In the same post as the SQL script to view updates with large metadata (In the “Additional Resources” section” further down this post), you find a great decline update scripts by Jeff Carreon (@jeffctangsoo10). It’s in the same post as the SQL script, but kind of hidden if you don’t look carefully. Here is a direct link:

https://www.tcsmug.org/images/carryon/Run-DeclineUpdate-CleanupV5.zip

By default the script run in “What-If” mode ($TrialRun set to $True). Here is a syntax to run it in declining mode, without sending an email report:  

.\Run-DeclineUpdate-CleanupV3.ps1 -Servers CM01 -TrialRun:$false -EmailReport:$false

Decline weird stuff #4 – WSUS Automated Maintenance (Formerly Adamj Clean-WSUS

I have not personally tested this one, but the community seems to like it quite a bit. Cleanup and DB script from Adam Marshall (@Adamj_1)

http://community.spiceworks.com/scripts/show/2998-wsus-automated-maintenance-formerly-adamj-clean-wsus

Additional Resources

Here follows some additional resources that I found useful:

Resource #1 – Script to view updates with large metadata

Here is another contribution from Sherry’s team. This SQL script was put together by Jeff Carreon, after working with Microsoft support on a WSUS performance issue. Very shiny.

The script is used to identify and measure the metadata that the clients are downloading, it tells you what articles (fancy word for update metadata) the are deployable and the size of each article.

What’s SUP???

http://mnscug.org/blogs/jeff-carreon/513-what-s-sup

Resource #2 – The complete guide to Microsoft WSUS and Configuration Manager SUP maintenance

Info from Microsoft. The title is a bit misleading, since it’s not actually a complete guide. But there is still lots of good info.

http://blogs.technet.microsoft.com/configurationmgr/2016/01/26/the-complete-guide-to-microsoft-wsus-and-configuration-manager-sup-maintenance/

Resource #3 – Clients cannot report Scan Results back to WSUS

During the day, Matthew Krause (@MatthewT_Krause) also provided info on an issue he was having: Quite many clients, 75 percent out of 6500,were not reporting back the scan results to WSUS. Basically the server got overloaded with IIS 500 errors as the clients kept trying to report scan results, fail, and then try again. In the WindowsUpdate.log on the client they found that clients would get the error message stating invalid parameter but the sub message was Message:parameters.InstalledNonLeafUpdateIDs (see below).

6G6vXV6c

WindowsUpdate.log on a client failing to report back scan results.

So if you are running into the non-leaf error message, one solution that proved to be working was changing the maxInstalledPrerequisites value in the WSUS Web.config file, and then do an IIS Reset. Doing this change made 90% of clients report scan results back within one day for this environment.

Change WSUS Web.config from:

<add key=”maxInstalledPrerequisites” value=”400″/>

to:

<add key=”maxInstalledPrerequisites” value=”800″/>

Resource #4 – Optimizing WSUS with Configuration Manager, via Adaptiva

Good WSUS overview article with a few technical tricks in it. Written by Matt Tinney (@mnt2556) from Windows Management Experts.

https://insights.adaptiva.com/2018/wsus-configuration-manager/

Resource #5 – Unleash WSUS performance, via Pawel Jarosz

Here is another reading I found useful.

Simon says – unleash WSUS performance

http://paweljarosz.wordpress.com/2018/03/23/simon-says-unleash-wsus-performance

Resource #6 – WSUS Delete Obsolete Updates, via Scott Williams

Yet another useful resources. Written by Scott Williams (@ip1).

WSUS Delete Obsolete Updates
http://kickthatcomputer.wordpress.com/2017/08/15/wsus-delete-obsolete-updates

That all for now,

Happy Deployment / Johan

Source :
https://www.deploymentresearch.com/fixing-wsus-when-the-best-defense-is-a-good-offense/

WSUS Delete Obsolete Updates

Posted: August 15, 2017
in Configuration Manager, Information, SQL, Windows Update
Tags: delete obsolete updates, deleteobsoleteupdates, index, wsus

NOTE: Usual warnings apply. Do a backup before making any changes. If you are unsure about anything in the post then ask or look for more information or help before attempting it.

Over time WSUS will accumulate update metadata that can create performance issues for clients. In large environments this can be quite an issue.

There is a script Microsoft often provides during Premier Support calls to cleanup this update metadata, however there are a few issues:

  • The query can take a *really* long time to run if there are a lot of updates to cleanup. In some cases it can take *days*
  • You need to stop all the WSUS services while it runs
  • If it fails for whatever reason, it will have to start all over because it doesn’t commit the changes until it completes successfully
  • While it runs, the TEMPDB and Transaction logs will grow quite significantly until the data is committed
  • It gives no useful information on progress

There is a TechNet article (This is essential reading and has LOTS of important stuff) and a Forum Post where an improved version was written that gave progress of the cleanup, however it didn’t address the temp/transaction growth issues or the time issues. To this end I have applied my very rudimentary SQL scripting skills.

To find out just how many updates are waiting to be cleaned up, run this stored procedure:

EXEC spGetObsoleteUpdatesToCleanup

Firstly, when the script runs on a default WSUS install it can take over a minute to process *each* record. If there are thousands or tens of thousands or updates to remove this is going to take a while. There is an index you can add to the WSUS table that dramatically improves this so it happens at about 1 second per record. Microsoft confirmed this index is OK, however it is not officially supported (at time of writing)

USE [SUSDB]
GO
CREATE NONCLUSTERED INDEX [IX_tbRevisionSupersedesUpdate] ON [dbo].[tbRevisionSupersedesUpdate]([SupersededUpdateID])
GO
CREATE NONCLUSTERED INDEX [IX_tbLocalizedPropertyForRevision] ON [dbo].[tbLocalizedPropertyForRevision]([LocalizedPropertyID])
GO

Now to the cleanup script. Simply this script will cleanup obsolete records, provide progress feedback and also allow you to run it in small blocks. This allows you to run in short blocks without needing to stop the WSUS server and avoids generating huge transaction loads on the SQL server.

To “tweak” the script, modify this line with the number of updates you want to do in each block. Start with 50, see how it runs in your environment and increase as needed. Ideally don’t run batches that take more than 5-10 minutes to prevent those SQL transaction logs growing.

IF @curitem < 101

If you do want to run a larger batch that may take hours, you should of course stop the WSUS services to do so. Also, don’t run this script if a WSUS Sync is in progress or scheduled to start.

USE SUSDB
DECLARE @var1 INT, @curitem INT, @totaltodelete INT
DECLARE @msg nvarchar(200)
CREATE TABLE #results (Col1 INT) INSERT INTO #results(Col1)
EXEC spGetObsoleteUpdatesToCleanup
SET @totaltodelete = (SELECT COUNT(*) FROM #results)
SELECT @curitem=1
DECLARE WC Cursor FOR SELECT Col1 FROM #results
OPEN WC
FETCH NEXT FROM WC INTO @var1 WHILE (@@FETCH_STATUS > -1)
BEGIN SET @msg = cast(@curitem as varchar(5)) + '/' + cast(@totaltodelete as varchar(5)) + ': Deleting ' + CONVERT(varchar(10), @var1) + ' ' + cast(getdate() as varchar(30))
RAISERROR(@msg,0,1) WITH NOWAIT
EXEC spDeleteUpdate @localUpdateID=@var1
SET @curitem = @curitem +1
IF @curitem < 101
 FETCH NEXT FROM WC INTO @var1
END
CLOSE WC
DEALLOCATE WC
DROP TABLE #results
deleteobsolete

If for any reason the script is interrupted, you will find SQL still has the transaction table open and won’t let you run again (There is already an object named ‘#results’ in the table). To resolve this highlight and execute the last line to drop the table.

If this still doesn’t help, close the SQL Studio Manager session and you should be prompted with a warning about uncommitted transactions. Select Yes to commit then reopen and start the query again.

If for any reason the query is not properly closed there may be locks held on the SQL database that will prevent the normal WSUS service functioning resulting in failure of service.

Source :
https://kickthatcomputer.wordpress.com/2017/08/15/wsus-delete-obsolete-updates/