But reliable recognition isn’t just about the big things — done well, even the smallest details of your WordPress website can help it stand out from the crowd and attract customer notice. This is the role of the favorite icon or “favicon” that’s used in web browser tabs, bookmarks, and on mobile devices as the app image for your site.
Not sure how favicons work or how to get them up and running on your site? We’ve got you covered with our functional guide to favicons — what they are, why they matter, and how to enable them in WordPress.
The official WordPress support page defines a favicon as “an icon associated with a particular website or web page.” This description doesn’t do the term justice — in fact, favicons are everywhere and are intrinsically associated with your brand.
Let’s take a closer look at how favicons look and why they matter below.
WordPress Favicon Size
The typical size of a WordPress favicon is 512 x 512 pixels. These icons are stored as .ico files in the root directory of your WordPress server.
But what does a favicon look like in real life? For a quick example, take a look at the browser tab of this webpage if you’re on a desktop or the area just under the address bar on your mobile device. Notice anything? That orange symbol with lines and circles is HubSpot’s favicon — and it shows up anytime you’re on our site.
In most cases, favicons are the same as brand logos scaled down to fit web and mobile browsers. Where this isn’t possible — such as cases where your logo is too complex or detailed — site owners typically opt for similar color schemes and thematic elements to ensure brand consistency.
Once you start seeing favicons you can’t unsee them; from webpages to tabs to bookmarks and mobile applications, the icon you choose for your favicon is inextricably linked to your site and your brand — so make sure you choose wisely.
Why Favicons Matter
Favicons are the visual currency of your brand. They’re everywhere — from browsers to bookmarks to mobile apps — and become an integral part of your site’s overall branding strategy.
As result, effective favicon design and deployment offers three broad benefits:
Improved Brand Recognition
Think of your favicon like your calling card — the icon needs to be simple, recognizable and consistent. The more places your favicon appears, the better, since this makes it easy for users to connect your WordPress site with your icon image.
Consistency is also key as users open multiple browser tabs and the available space for text descriptions naturally shrinks. Open enough tabs and all that’s left is — you guessed it — room for the favicon.
Increased Consumer Confidence
While visitors may not be able to define what a favicon is or how it works, these icons are inherently familiar. So familiar, in fact, that sites without favicons often stand out from the crowd for all the wrong reasons.
Much like relevant social media content and secure site connections, favicons are critical to boosting consumer confidence in the products or services you offer on your site.
Integrated Mobile Consistency
The impact of mobile devices can’t be ignored, with smartphones and tablets now outpacing desktops as the primary means of consumer online interaction. Favicons make it possible to ensure your brand easily translates to mobile — when users create website bookmarks on mobile home screens, your favicon stands in for the link.
Favicon Creation Guidelines
Not sure how to get started creating your site’s favicon? Let’s break down some best-practice guidelines.
1. Get the size right.
As noted above, favicons are typically 512 x 512 pixels in size. While it’s possible to use a larger WordPress favicon size, the platform will often ask you to crop the image down.
2. Keep it simple.
While it’s possible to add background colors and other customization to your favicon, keeping it simple is often the best choice. Here, simplicity includes opting for transparency over background colors and keeping the number of foreground colors in your favicon to one or two at most.
Ideally, your favicon will look almost identical to your brand’s logo — if that’s not possible, try to pull elements from your logo such as shapes or color schemes that help tie in your new favicon.
3. Choose wisely.
Site owners can update their favicon at any time, but it’s a good idea to keep the number of changes to a minimum. Here’s why: If users see a different favicon every time they log on to your website, they won’t have an opportunity to associate a specific image with your brand.
Bottom line? Better to go without a favicon until you find one that works for your site and that you don’t plan on changing.
How to Enable WordPress Favicons
To get your favicon up and running on your WordPress site, you’ve got three options:
Use the Site Icon feature
Install a favicon plugin
Upload the new favicon yourself
Let’s break down each method in more detail.
1. Use the site icon feature.
As of WordPress version 4.3, the content management system (CMS) includes a Site Icon function that enables favicons. Simply prepare your image file — which can be a .jpeg, .ico, .gif or .png file — and head to the Administration page of your WordPress Site.
Next, click on “Appearance” and then “Customize”, then click “Site Identity.” Now, click “Select Image” under the Site Icon subheading and upload the file you’ve prepared. You should see a screen like this:
If you like the favicon you’ve created, no further action is required. If not, you can easily remove the file or upload a new image.
2. Install a favicon plugin.
You can also use a plugin — such as Favicon by RealFaviconGenerator — to create and deploy your favicon. This must-have WordPress plugin not only lets you customize your favicon but also ensures that multiple versions are created to satisfy the requirements of different operating systems and device versions.
As long as the image you upload to the plugin is at least 70 x 70 pixels, the RealFaviconGenerator will take care of the rest.
3. Upload the new favicon yourself.
If you’d rather do the legwork yourself, you can create and upload your own favicon to your WordPress site.
First, create an image that’s at least 16 x 16 pixels and is saved as a .ico file. Then, use an FTP client to upload this file to the main folder of your current WordPress theme — typically the same place as your wp-admin and wp-content folders.
While this should display your favicon in most web browsers, some older browser versions will require you to edit WordPress header HTML code. The result? DIY favicons aren’t recommended unless you’re familiar with more technical WordPress functions.
Final Favicon Thoughts
Whie favicons form only a small part of your WordPress website build, they’re critical for website recognition. Consistent and clear favicons make it easy for visitors to remember your site and carry this mental connection across desktop, tablet, and mobile devices.
When API (Application Programming Interfaces) calls are made to the NVP/SOAP servers, PayPal strongly recommends that you use Domain Name Service (DNS) results with the default Time To Live (TTL) values, to determine the IP addresses of our servers.
PayPal does not recommend adding IPs to an allow list. If you must allow list the IP addresses for any of these domains, use the following ranges:
173.0.80.0/20
64.4.240.0/21
64.4.248.0/22
66.211.168.0/22
91.243.72.0/23
The above IPs are applicable to the following Live and Sandbox Endpoints:
Attackers used a newly discovered malware to backdoor Microsoft Exchange servers belonging to government and military organizations from Europe, the Middle East, Asia, and Africa.
The malware, dubbed SessionManager by security researchers at Kaspersky, who first spotted it in early 2022, is a malicious native-code module for Microsoft’s Internet Information Services (IIS) web server software.
It has been used in the wild without being detected since at least March 2021, right after the start of last year’s massive wave of ProxyLogon attacks.
“The SessionManager backdoor enables threat actors to keep persistent, update-resistant and rather stealth access to the IT infrastructure of a targeted organization,” Kaspersky revealed on Thursday.
“Once dropped into the victim’s system, cybercriminals behind the backdoor can gain access to company emails, update further malicious access by installing other types of malware or clandestinely manage compromised servers, which can be leveraged as malicious infrastructure.”
SessionManager’s capabilities include, among other features:
dropping and managing arbitrary files on compromised servers
remote command execution on backdoored devices
connecting to endpoints within the victim’s local network and manipulating the network traffic
In late April 2022, while still investigating the attacks, Kaspersky found that most of the malware samples identified earlier were still deployed on 34 servers of 24 organizations (still running as late as June 2022).
Additionally, months after the initial discovery, they were still not flagged as malicious by “a popular online file scanning service.”
After deployment, the malicious IIS module allows its operators to harvest credentials from system memory, collect information from the victims’ network and infected devices, and deliver additional payloads (such as a PowerSploit-based Mimikatz reflective loader, Mimikatz SSP, ProcDump, and a legitimate Avast memory dump tool).
SessionManager targets (Kaspersky)
“The exploitation of exchange server vulnerabilities has been a favorite of cybercriminals looking to get into targeted infrastructure since Q1 2021. The recently discovered SessionManager was poorly detected for a year and is still deployed in the wild,” added Pierre Delcher, a Senior Security Researcher at Kaspersky’s GReAT.
“In the case of Exchange servers, we cannot stress it enough: the past year’s vulnerabilities have made them perfect targets, whatever the malicious intent, so they should be carefully audited and monitored for hidden implants, if they were not already.”
Kaspersky uncovered the SessionManager malware while continuing to hunt for IIS backdoors similar to Owowa, another malicious IIS module deployed by attackers on Microsoft Exchange Outlook Web Access servers since late 2020 to steal Exchange credentials.
Gelsemium APT group links
Based on similar victimology and the use of the OwlProxy malware variant, Kaspersky’s security experts believe the SessionManager IIS backdoor was leveraged in these attacks by the Gelsemium threat actor as part of a worldwide espionage operation.
This hacking group has been active since at least 2014, when some of its malicious tools were spotted by G DATA’s SecurityLabs while investigating the “Operation TooHash” cyber-espionage campaign. In 2016, new Gelsemium indicators of compromise surfaced in a Verint Systems presentation during the HITCON conference.
Two years later, in 2018, VenusTech unveiled malware samples linked to the Operation TooHash and an unknown APT group, later tagged by Slovak internet security firm ESET as early Gelsemium malware versions.
ESET also revealed last year that its researchers linked Gelsemium to Operation NightScout, a supply-chain attack targeting the update system of the NoxPlayer Android emulator for Windows and macOS (with over 150 million users) to infect gamers’ systems between September 2020 and January 2021.
Otherwise, the Gelsemium APT group is mainly known for targeting governments, electronics manufacturers, and universities from East Asia and the Middle East and mostly flying under the radar.
Do you want to send email to WordPress users from your admin dashboard?
It’s actually quite simple to use WordPress for sending emails to your registered users. This can be useful if you have a membership site and want to send email announcements or other updates to your site members.
In this article, we’ll show walk you through the steps for sending emails to WordPress users without needing any code.
When Should You Send Email to WordPress Users?
WordPress automatically sends transactional emails to your customers like order receipts and password reset links. But you can also send mass emails to your entire list of users from WordPress. While this isn’t a recommended practice, it’s a good option to have in case you don’t have a proper email list maintained in an email marketing service.
If your website allows users to register, learning how to email users right from your WordPress dashboard is always an important skill. You may want to send emails about new product updates, changes to your website, or other important announcements.
How to Send Email to All WordPress Registered Users
To send emails to your WordPress users, just follow the steps below. First, we’ll set up WP Mail SMTP to take care of your WordPress email delivery from the backend. Then, we’ll set up another plugin that lets you select your WordPress email recipients, compose an email, and send it.
First, you’ll need WP Mail SMTP on your site to deliver your emails reliably to intended recipients.
By default, WordPress uses PHP Mail for emails which is commonly responsible for poor email delivery and spam blocks by mailing servers.
A much more dependable method for sending emails takes advantage of SMTP. In SMTP, your emails are properly authenticated, so their legitimacy is easy to verify. As a result, your WordPress emails are able to avoid spam filters and reach recipients without fail.
To install WP Mail SMTP on your site, first select a plan that’s appropriate for your needs.
You’ll be able to log into your WP Mail SMTP account area once you’ve purchased a plan and created your account. From your account area, click on the Downloads tab.
Now, press the Download Mail SMTP button to start the ZIP file download.
While the download is in progress, it’s a good idea to use this moment to copy your WP Mail SMTP license key. You’ll need this later on.
When the file has finished downloading, open your WordPress dashboard. Then, go to Plugins » Add New.
Here, you can upload the plugin file that you just downloaded. Click on the Choose File button and locate your WP Mail SMTP zip file in your download folder.
After selecting the file, click on Install Now. It will only take a few seconds for WordPress to install this plugin.
Press the blue Activate Plugin to activate WP Mail SMTP on your site.
Great job! Now we just have to configure a mailer with WP Mail SMTP to finish the setup.
2. Integrate WP Mail SMTP With a Mailer
WP Mail SMTP needs an API connection with a mailer service in order to deliver your WordPress emails properly.
The WP Mail SMTP setup wizard allows you to set up a connection between your WordPress site and a mailer service very easily.
After you activate the plugin, the setup wizard should launch automatically. But if for any reason it didn’t start, you can launch it manually.
From your WordPress dashboard, go to WP Mail SMTP» Settings. Underneath the Mail section, find and click the Launch Setup Wizard button.
The wizard will ask you to select an SMTP mailer service from a wide range of options.
If you need a reliable and reasonably priced mailer, we recommend SendLayer. However, you’re free to choose from other available options.
When you’ve selected a mailer, click Save and Continue. You’ll need to fill out a few fields to configure the mailer connection.
If you need help setting up a particular mailer, click one of the links below for detailed instructions.
In the final step of the setup, WP Mail SMTP will ask you to check the features that you want to enable. If you have the paid version, you can enable extra features like email logs (which we highly recommend for the purposes of this topic).
If you check the Pro features, the setup wizard will then require you to add your license key (which we copied in an earlier step). Insert your license key and then press Verify License Key.
The wizard will now send a test email to make sure your configuration is properly set up. If all is good, move to the next step.
3. Get the Send Users Email Plugin
Now that you have WP Mail SMTP configured, you can rest assured that your emails originating from any plugin on your site will always deliver successfully.
But by default, there’s no way in WordPress to write an email and send it to your WordPress users at will.
To be able to send emails to any recipient of your choice in WordPress, you’ll need to install a plugin called Send Users Email.
When the plugin is installed and activated on your site, you can start sending emails to your WordPress users easily.
4. Send Email to Registered Users
Open your WordPress admin area and then click Email to Users » Email Roles.
You should now see a page with options to send emails to people selected by their assigned WordPress roles. If you want to send the email to all of your WordPress subscribers, checkmark the box against Subscriber.
You can also select other types of users as your recipients such as administrators and authors. The email subject field lets you write a subject line for your email. There’s also a rich text field for composing the body of your email message.
After selecting recipients and writing the email, press the Send Message button,
Your email will now start sending to all WordPress users that you selected by role above.
But what if you only want to email individual users rather than mass emailing your entire list?
The Send Users Email includes a feature that lets you individually select each registered WordPress user you wish to send your email to.
To access this feature, go to Email to Users » Email Users. Here, you’ll see a list of all registered WordPress users on your site. You can simply select the users that you want to send emails to from this list.
As before, you can use the email subject field and email message fields to customize your subject line and email content.
Press the blue Send Message button to send your email to individually selected WordPress users.
Congratulations! You now have the necessary tools to send emails to WordPress users entire individually or to your entire subscriber list.
5. Track Your WordPress Emails (Optional)
Generally, WordPress isn’t the best way to send emails and run email marketing campaigns. This is because of the inherent limitations of the platform when it comes to email functionalities.
WordPress is primarily a content management system, so its email capabilities are only basic. For the best results and much easier management, you should consider using a dedicated email marketing service (Sendinblue, Constant Contact, and MailerLite to name a few).
However, if you are going to send some of your emails from WordPress, then it’s wise to log and track your emails.
One of the many benefits of WP Mail SMTP Pro is that it includes email tracking features. With this feature, WP Mail SMTP can track how many times your emails were opened and clicked by your subscribers.
To enable this feature, navigate to WP Mail SMTP » Settings.
On the top of the Settings page, click on the Email Log tab.
Here, make sure that the Email Log option is enabled.
Now scroll down to view additional email tracking settings. You can enable open and click tracking to collect open and click rate data for every WordPress email you send to users.
With email tracking enabled, you will be able to see engagement metrics for each email right within your WordPress dashboard.
This information is extremely helpful as it allows you to experiment with different subject lines to produce higher engagement levels.
And that’s all! You now know how to send email to WordPress users (by role and individually) and also track the performance of your emails from your admin area!
Ready to fix your emails? Get started today with the best WordPress SMTP plugin. WP Mail SMTP Elite includes full White Glove Setup and offers a 14-day money-back guarantee.
At Wordfence our business is to secure over 4 million WordPress websites and keep them secure. My background is in network operations, and then I transitioned into software development because my ops role was at a scale where I found myself writing a lot of code. This led me to founding startups, and ultimately into starting the cybersecurity business that is Wordfence. But I’ve maintained that ops perspective, and when I think about securing a network, I tend to think of ports.
You can find a rather exhaustive list of TCP and UDP ports on Wikipedia, but for the sake of this discussion let’s focus on a few of the most popular ports:
20 and 21 – FTP
22 – SSH
23 – (Just kidding. You better not be running Telnet)
25 – Email via SMTP
53 – DNS
80 – Unencrypted Web
110 – POP3 (for older email clients)
443 – Web encrypted via TLS
445 – Active Directory or SMB sharing
993 – IMAP (for email clients)
3306 – MySQL
6378 – Redis
11211 – Memcached
If you run your eye down this list, you’ll notice something interesting. The options available to you for services to run on most of these ports are quite limited. Some of them are specific to a single application, like Redis. Others, like SMTP, provide a limited number of applications, either proprietary or open-source. In both cases, you can change the configuration of the application, but it’s rare to write a custom application on one of those ports. Except port 443.
In the case of port 443 and port 80, you have a limited range of web servers listening on those ports, but users are writing a huge range of bespoke applications on port 443, and have a massive selection of applications that they can host on that port. Everything from WordPress to Drupal to Joomla, and more. There are huge lists of Content Management Systems.
Not only do you have a wide range of off-the-shelf web applications that you can run on port 443 or (if you’re silly) port 80, but you also have a range of languages they might be coded in, or in which you can code your own web application. Keep in mind that the web server, in this case, is much like an SSH or IMAP server in that it is listening on the port and handling connections, but the difference is that it is handing off execution to these languages, their various development frameworks, and ultimately the application that a developer has written to handle the incoming request.
With SSH, SMTP, FTP, IMAP, MySQL, Redis and most other services, the process listening on the port is the process that handles the request. With web ports, the process listening on the port delegates the incoming connection to another application, usually written in another language, running at the application layer, that is part of the extremely large and diverse ecosystem of web applications.
This concept in itself – that the applications listening on the web ports are extremely diverse and either home-made or selected from a large and diverse ecosystem – presents unique security challenges. In the case of, say, Redis, you might worry about running a secure version of Redis and making sure it is not misconfigured. In the case of a web server, you may have 50 application instances written in two languages from five different vendors all on the same port, which all need to be correctly configured, have their patch levels maintained, and be written using secure coding practices.
As if that doesn’t make the web ports challenging enough, they are also, for the most part, public. Putting aside internal websites for the moment, perhaps the majority of websites derive their value from making services available to users on the Internet by being public-facing. If you consider the list of ports I have above, or in the Wikipedia article I linked to, many of those ports are only open on internal networks or have access to them controlled if they are external. Web ports for public websites, by their very nature, must be publicly accessible for them to be useful. There are certain public services like SMTP or DNS, but as I mentioned above, the server that is listening on the port is the server handling the request in these cases.
A further challenge when securing websites is that often the monetary and data assets available to an attacker when compromising a website are greater than the assets they may gain compromising a corporate network. You see this with high volume e-commerce websites where a small business is processing a large number of web-based e-commerce transactions below $100. If the attacker compromises their corporate network via leaked AWS credentials, they may gain access to the company bank account and company intellectual property, encrypt the company’s data using ransomware, or perhaps even obtain customer PII. But by compromising the e-commerce website, they can gain access to credit card numbers in-flight, which are far more tradeable, and where the sum of available credit among all cards is greater than all the assets of the small business, including the amount of ransom that business might be able to pay.
Let’s not discount breaches like the 2017 Equifax breach that compromised 163 million American, British and Canadian citizen’s records. That was extremely valuable to the attackers. But targets like this are rare, and the Web presents a target-rich environment. Which is the third point I’d like to make in this post. While an organization may run a handful of services on other ports, many companies – with hosting providers in particular – run a large number of web applications. And an individual or company is far more likely to have a service running on a web port than any other port. Many of us have websites, but how many of us run our own DNS, SMTP, Redis, or another service listening on a port other than 80 or 443? Most of us who run websites also run MySQL on port 3306, but that port should not be publicly accessible if configured correctly.
That port 443 security is different has become clear to us at Wordfence over the years as we have tracked and cataloged a huge number of malware variants, web vulnerabilities, and a wide range of tactics, techniques, and procedures (TTP) that attackers targeting web applications use. Most of these have no relationship with the web server listening on port 443, and nearly all of them have a close relationship with the web application that the web server hands off control to once communication is established.
My hope with this post has been to catalyze a different way of thinking about port 443 and that other insecure port (80) we all hopefully don’t use. Port 443 is not just another service. It is, in fact, the gateway to a whole new universe of programming languages, dev frameworks, and web applications.
In the majority of cases, the gateway to that new universe is publicly accessible.
Once an attacker passes through that gateway, a useful way to think about the web applications hosted on the server is that each application is its own service that needs to have its patch level maintained, needs to be configured correctly, and should be removed if it is not in use to reduce the available attack surface.
If you are a web developer you may already think this way, and if anything, you may be guilty of neglecting services on ports other than port 80 or 443. If you are an operations engineer, or an analyst working in a SOC protecting an enterprise network, you may be guilty of thinking about port 443 as just another port you need to secure.
Think of port 443 as a gateway to a new universe that has no access control, with HTTPS providing easy standardized access, and with a wide range of diverse services running on the other side, that provide an attacker with a target and asset-rich environment.
—
Footnote: We will be exhibiting at Black Hat in Las Vegas this year at booth 2514 between the main entrance and Innovation City. Our entire team of over 30 people will be there. We’ll have awesome swag, as always. Come and say hi! Our team will also be attending DEF CON immediately after Black Hat.
Written by Mark Maunder – Founder and CEO of Wordfence.
I’m pretty much always thinking about the prospect of starting an eCommerce business. I like my job, but I do not enjoy labor, and the siren songs of any number of passive income streams call to me daily. Tragically, however, I am not cut out for entrepreneurship. I spent a few years freelancing full-time in my early 20s, and I nearly bankrupted myself—I just never did any work.
If you’re thinking about diving into eCommerce entrepreneurship, you should have a clear and thorough understanding of exactly what it takes to be successful as an online seller. So before you start loading up on craft resin or earring hooks, read on to find out exactly what it takes to start an eCommerce business.
Pros and cons of running an eCommerce store
You don’t have to search very far to see what it is that draws people to the idea of starting their own eCommerce business. No micromanaging supervisors to answer to or fat cat executives living off of the fruits of your labor, and without any physical assets or locations, you can go wherever you want and still run your operation.
In short, many people are drawn to eCommerce selling because they think it’s their key to freedom. To those people, I say: au contraire. In many ways, eCommerce sellers are more limited than regular employees.
Sure, I may have to answer to my manager, but if I mess something up, there’s no chance of her requesting a refund on my last paycheck or claiming the work I emailed her got irretrievably lost. I may not make my own hours, but since my salary is fixed, I can take days off knowing that there’s no chance of it impacting how much money I make. You need to decide for yourself whether the benefits of launching an eCommerce business outweigh the risks of flying without the safety net of job security to fall back on.
How to tell if eCommerce is right for you
In the same way that some kids are terrible at homework but are great test-takers, there are some personalities that do thrive under the pressure of relying on their business’s success for their survival. When it comes to employment vs. entrepreneurship, there is no objectively better, more flexible, more independent choice—there’s just what works better for you.
Here’s a quick self-screener you can use to determine if you’re cut out for online selling:
Do you like what you do? This is something you’re going to be spending hours on, day in and day out—and you’re going to have to work really hard to get your business off the ground. Unlike traditional small business owners, you won’t have a staff, coworkers, or a physical workplace; it’s just going to be you, likely in your home, making the thing you sell. If you’re not truly passionate about your product, you’ll be miserable within a few weeks, tops.
Are you self-disciplined? It’s not easy being your own boss, especially in an industry as isolating as eCommerce. Many other small businesses don’t have this problem—I taught piano lessons for a period of time and didn’t have a boss then, but knowing that my students were relying on me to be prepared for their lessons still kept me accountable. It’s a lot easier to stay motivated when you’re interacting with customers or a small staff.
Do you have a lot of commitments? Anyone who has ever tried to work remotely from their parents’ house can tell you that, for whatever reason, people simply do not perceive solo work on a computer as “real work,” so if you want to run a successful online store, you need strong boundaries and a close relationship with the word “no.”
Can you take on the financial risk?Starting a store on the side while you stay in a day job is one thing, but if you’re making a complete leap to entrepreneurship, you need to be able to get by for a few months or even a year without much income. If you have lots of debt or a family to feed, this might not be the career for you.
Provided you’ve given it some thought and you’re ready to make the leap—or if you’re starting your business part-time until it takes off—you’re ready to get started on launching your business.
Choose an eCommerce business model
When I think of small eCommerce businesses, I think primarily of some of my favorite niche Etsy shops selling things like taxidermied squid jewelry and D&D dice with real mushrooms inside. (I am a very fun person to know at Christmas.)
But eCommerce selling includes far more than traditional consumer retail. Depending on your needs, you may find that one of these alternatives suits you best:
Dropshipping: Dropshipping is a type of eCommerce business where you sell products without carrying any inventory. When a customer places an order on your site, you simply contact the supplier (or have the order sent automatically) and have them ship the product directly to the customer. Dropshipping is a popular eCommerce business model because you don’t need to spend a lot of money up front.
Print on demand: Print on demand is similar to dropshipping, but instead of shipping products from a supplier, you have your products printed and shipped by a print-on-demand service. This type of eCommerce business is often used for selling custom-printed products like t-shirts, mugs, and stationery.
Retail arbitrage:Retail arbitrage is the process of buying products from brick-and-mortar stores and selling them online at a higher price. This type of eCommerce business can be profitable, but it requires a bit more work than dropshipping or print on demand. You also need to identify a product niche that allows you to do this profitably, where you can be confident that customers won’t just go to the original source to make their purchase at a lower price.
Wholesaling: Wholesaling is a type of eCommerce business where you sell products in bulk to retailers. The benefit of wholesaling is that you can get discounts on the products you purchase, which allows you to sell them at a higher price and still make a profit. But this requires a large initial investment since you’ll need to stock inventory in bulk quantities.
Subscriptions: Subscription eCommerce businesses sell products or services on a recurring basis, most commonly in the form of a monthly box of curated products (or, in my dog’s case, a monthly delivery of different home-style baked treats). But there are other types of subscription businesses, such as online courses and members-only clubs.
What business model you choose will also rely heavily on the product market you want to target, since not all models will work with all types of products. Naturally, dropshipping won’t work to sell hand-knitted sweaters, while very few people are likely to buy a subscription for artisan coffee tables. The other thing that will help you decide what products to sell is your chosen target market.
A broad target market is the kiss of death for a budding eCommerce entrepreneur. There are over 9.1 million eCommerce retailers in the world, 2.5 million of which are located in the United States. Do you want to compete with between 2.5 and 9.1 million businesses? I didn’t think so.
When you choose a product market, you’re isolating a part of this larger market of retailers that you want to compete within. The more specific your product market is, the fewer competitors you have; the fewer competitors you have, the more likely you are to succeed. In eCommerce, the most successful sellers home in on extremely small, highly specific product markets—also called micro-markets or niches.
How to find your eCommerce niche
A product niche is a very small sliver of a product market that is both large enough to contain a robust customer audience but small enough that it doesn’t contain many competitors. The best way to identify your niche is to start with a product market and whittle it down from there.
To choose a product market to start with target products that:
You’re capable of creating (at high quality)
You enjoy creating (even at scale)
Have a small market/minimal competition
People want or need
Are profitable
Let’s break down each of these characteristics in detail.
Pick something you’re good at
It’s perhaps the most obvious of the five characteristics listed, but it still bears mentioning: when starting an eCommerce business, choose something that you can do or make well. If you choose something extremely unique and specific that no one else is doing, you may be fooled into believing the lack of competition will make up for poor quality. But the moment you gain some popularity, if someone else can create your product better than you can, your business will be dead in the water.
Pick something you like
Choose something you enjoy making, looking at, and thinking about. More importantly, choose something you won’t hate after the tenth, fiftieth, hundredth, or thousandth time you’ve sold it. Selling can be tedious work, especially if you make your products yourself. Don’t build your business around a product market only to find that you can’t stand working in it.
Pick a small market with limited competition
eCommerce sellers can’t use the same logic and strategy that regular companies do to choose their target markets. You’re one person, with one person’s resources and power—if you try to enter a market where you’re competing with full-sized companies and brands, you’ll be out-marketed and out-maneuvered every time.
Be specific: instead of lawn services, target the market for environmentally sustainable lawn care in one finite geographical location. Instead of publishing eBooks on finance, publish eBooks on investing for American women ages 18-24. Keep narrowing it down until you’ve found your product niche (more on that later).
Pick something people want or need
This is just common sense: you need to sell something that people will actually buy. Even the biggest brands still mess this up every once in a while (looking at you, Colgate-brand frozen dinners and the Bristol-Myers Squibb nightmare that was the “Touch of Yogurt” shampoo). Don’t wait until after you’ve launched your product to try to match it to a potential customer market. Do your research, and narrow down your target customer’s pains and gains, or the problems they need to solve and the enjoyable things they want to enhance. Make sure there’s a large enough demographic of people who are in the market for what you can provide.
Pick something profitable
There’s no surefire way to guarantee that a product or business will be profitable, but with some thorough research, you can certainly strengthen your odds. Ideally, you want to choose a product market with a strong balance between a large potential customer base and a small number of competitors. You’re also more likely to succeed if your product is truly unique in some way—if you offer a feature or element that no other competitor offers. Keep narrowing down your market until you’ve found your unique niche.
Narrowing down your product niche
Once you’ve identified a promising product market, you can start adding details to whittle your target market down to a target niche.
For example, let’s say that you make clothes in your free time, and you’re interested in figuring out how to turn that into an eCommerce business opportunity. In the broadest sense, you want to target the clothing industry, but since this is an extremely saturated market—meaning that it contains many, many competitors—it’s not one where you’re likely to succeed as an individual eCommerce seller.
You need to find a more unique product category within the larger framework of the clothing industry. One good choice might be pet clothes, since there are far fewer designers and retailers in the pet fashion industry than the human one. But “pet clothes” is still a pretty broad category, so you might narrow it further to pet clothes that are specifically for dogs.
When solo eCommerce selling was still a burgeoning market, handmade dog clothes may have been a narrow enough niche to pursue since there were so few non-corporate sellers and even fewer online marketplaces where sellers could compete. But today, you’ll want to get even more specific—perhaps by focusing on dog clothes for specific occasions, like weddings and engagements.
That’s as far as I’m taking this example, but if I were actually launching this business, I’d probably drill down even further just to really make sure that I had my unique micro-market cornered. I might narrow it down by size, theme, or even specific clothing items until I hit on my ultimate niche: floral-themed wedding bow ties for small and medium dogs. (Though there’s truly no limit to how far you drill down your niche—until, perhaps, you reach CelebriDucks levels of specificity.)
Your niche isn’t a permanent designation—if your product does well in your corner of the market, you’ll have more capital to invest in better marketing, audience targeting tools, and maybe even an employee or two. The more your company grows, the more resources and power you have to capture a larger market share.
Set up your store
You’ve found your market, honed your niche, picked your product, and you’re ready to start generating inventory and selling it to your customers. It’s time to choose a platform and set up your eCommerce store.
Choose an eCommerce platform
Talk about a crowded market—there are a ton of different platforms you can use to create a store online. You also don’t necessarily need your own online storefront; you can sell on marketplaces, crowdfunding sites, or a number of other eCommerce alternatives. If you do go with an eCommerce platform, here are a few different guides and comparisons that can help you find the right site for your business:
The platforms above fall into one of two categories, each with different setup requirements.
A standard website builder (like Wix, Weebly, Squarespace, or WordPress) will allow you to create an entire website, only part of which needs to be dedicated to your actual store’s functions. If eCommerce selling is only part of your business plan—for example, if you’re a professional photographer who sells prints and posters as a side hustle—you would want your site to be dedicated to your store as well as pages housing biographical information, your professional portfolio, booking information, recordings of photography classes or talks you’ve given, online course signups, and anything else that pertains to your career.
If your primary goal is eCommerce selling, you’re better off opting for a purpose-built eCommerce platform like Shopify or WooCommerce. Both platforms are capable of many of the same features as a general website builder, like adding about pages, forms, image displays, and blogs. These platforms also grant you access to more advanced features and integrations designed specifically for eCommerce sites, which can help supercharge your selling and help your store gain momentum early on.
Ready to build your store? Check out these step-by-step guides to building your store in the platform you want:
With your eCommerce shop all set up, it’s time to throw everything you’ve got into making sure that it succeeds. You can’t wait for your customers to come to you—you need to go out and find, reach, and convert your target audience.
Target inbound sales leads
Inbound sales strategies are designed to draw people to you, instead of the other way around—think search optimization (SEO), paid search, social media, email marketing campaigns, and content marketing.
Explore potential sales strategies in more detail with these guides:
As a small business owner, your plate is going to be full most of the time (frankly, it will often be full-on, Thanksgiving-style overflowing). If you want to keep up with it all, you need to learn to be efficient about using what you already have and drawing multiple marketing materials out of one asset.
For example:
Get into the habit of snapping and recording your day-to-day processes and behind-the-scenes moments, so you always have material for social and website visuals.
If you’re researching a topic, if it’s related to your business, consider adding an extra step to turn your research into a marketing email or SEO post.
Whenever you design a new marketing asset—an email layout, an Instagram Story, a blog structure—aim to turn it into a template that you can use again, instead of starting from scratch on your next asset.
Marketing as a small business owner is a “work smarter, not harder” game. Get as much mileage as you possibly can out of everything you create, and you’ll free up time and attention that would be better spent on business strategy and growing your company.
Automate as much as possible
There are lots of opportunities to automate parts of the eCommerce process. Invest time in setting up automations at the outset, and you’ll save far more time and energy avoiding unnecessary busywork once your store gets off the ground.
In fact, most of the risks specific to eCommerce entrepreneurship come down to the fact that it’s an overwhelming amount of work for one person to handle, so automating as much of your workload as possible can materially increase the likelihood of your business’s success.
Here are a few guides on the kinds of automation that work best for eCommerce and how to set them up:
In the Cascade Mountains of Southern Oregon, there sits a volcano with no peak. But what takes the place of a billowing summit isn’t a barren crater — it’s an electric blue lake, surrounded by pine trees and the jagged remains of the volcano’s collapsed mouth, which crumbled during an eruption almost 8,000 years ago.
This place is called Crater Lake. It’s considered one of the most beautiful national parks in the United States. It’s also where Justin Champion, a Content Professor at HubSpot Academy, spent his work day last Thursday.https://www.instagram.com/p/BkTxa6cHCjr/embed/captioned/?cr=1&v=8&wp=648&rd=https%3A%2F%2Fblog.hubspot.com&rp=%2Fmarketing%2Fdigital-nomad#%7B%22ci%22%3A0%2C%22os%22%3A1813.1999999999534%2C%22ls%22%3A1638.5%2C%22le%22%3A1770.9000000001397%7D
A striking landscape, like Crater Lake, is a normal office view for Justin and his wife, Ariele. After working in the National Park, they headed north to Portland and spent a day in Mt. Hood. Then, they drove through Redwood National Park. And next week, they plan to work in Yosemite National Park.
Justin and his wife have been living, working, and traveling across America in a Ford F-250 with an Airstream trailer hitched to its back for the past two years. And their alternative lifestyle has helped them prioritize life experiences and close connections over material possessions. They’re modern day nomads. Or what most people call digital nomads.
What is a Digital Nomad?
Digital nomads are remote workers who usually travel to different locations. They often work in coffee shops, co-working spaces, or public libraries, relying on devices with wireless internet capabilities like smart phones and mobile hotspots to do their work wherever they want.
With 34% of remote employees working 4-5 days a week out of the office, the digital nomad lifestyle could be an exciting possibility if you’ve caught the travel bug and want to break free from the shackles of 9-5 life. Below, we’ll cover the benefits, job opportunities, and realities of this alternative lifestyle.
Let’s find out if it’s the right fit for you.
Living the Dream? 5 Benefits of Being a Digital Nomad
1. You’ll be more productive.
There’s no time to waste when you travel to gorgeous places almost every day. Exploring your new surroundings will motivate you to get your work done as soon as possible. Adventure can be one of the best types of motivation.
2. You’ll have more breakthrough ideas.
Creativity happens when you mash seemingly unrelated concepts together to form a new idea. Neuroscientists call this synaptic play, and the more incongruent the concepts are, the more synapses occur in your brain. Working in a different place everyday gives you a lot of diverse experiences that you call pull from to make these creative connections. And when your brain is chock full of these diverse inputs, your ideas are much more inventive.
3. You’ll become more adaptable.
Constantly traveling to new places pushes you out of your comfort zone. And to adapt to new environments everyday, you need to be willing to engage with different people and cultures. This makes you more open to new experiences in the future.
Traveling also improves your brain’s reaction to change. When you travel, the stress of navigating a foreign place sprouts dendrites in your brain. These dangling extensions increase your brain’s capacity and attentiveness during new and challenging situations in the future.
In a nutshell, traveling strengthens your desire and ability to learn new skills.
4. You’ll have more time to do the things you love.
Even though work can be great, we still work to live, not the other way around. Finishing work faster gives you more time in your schedule to explore your surroundings, do the things you’re passionate about, and spend more time with loved ones.
5. You’ll make lifelong friendships.
Adventure and memorable experiences forge close connections between people. When you embark on your journey, you’ll meet other digital nomads and become friends with them. And if you travel with a friend or significant other, your relationship will be closer than ever before.
Common Jobs for Digital Nomads
Today, most companies embrace remote work. 43% of American employees spent time working remote last year, and this number will only increase. But being a digital nomad and working a few days at home are two different animals. If you want to keep your day job while traveling, you need to prove to your manager that you can handle full-time remote work before you can do work on the road. Justin Champion decided to work remotely for six months before he even asked to travel.
If you’re looking for job, sift through sites that only list remote jobs, like We Work Remotely or Remote.co, and ask prospective employers if the role lends itself to your nomadic lifestyle.
Freelancing is also a common role for digital nomads. Before you embark on your journey, though, you must be realistic with yourself. How will you be able to make a living? Answer the following questions to help you figure this out:
What am I good at?
What do I like to do?
Is there a need for my skill?
Can I do this job online?
Once you know how you’ll be able to make money, you can enter the gig economy by marketing and selling your services on your own, or finding work on a freelance service marketplace like Upwork or Fiverr.
Whether you chose to work for a company or yourself, becoming a digital nomad doesn’t mean pigeonholing yourself in a specific role. Your job just has to be fully digital. Listed below are some common roles that lend themselves well to a fully remote lifestyle:
Accounting
Customer Service
Design
Editing
Healthcare
IT
Marketing
Project Management
Quality Analyst (QA)
Recruiting & HR
Sales
Software Development
Teacher/Tutor
Transcription
Virtual Assistant
Writing
As you can see, there’s a lot of different industries and roles for digital nomads. Remote work is becoming commonplace, which is exciting and beneficial for the workforce. But that doesn’t mean anyone and everyone should be a digital nomad. It’s still a tough challenge. You need to be organized and disciplined, or you won’t be able to enjoy your travels — which is the point of the lifestyle, right? So how do you set yourself up for success?
How Do You Become a Digital Nomad? 5 Things to Consider Before You Get Started
1. Get rid of unnecessary expenses.
Paying for things that don’t greatly impact your life is never ideal. That’s why you need to get rid of all the expenses that you won’t need living as a digital nomad. Things like gym memberships, subscriptions, and debt are all expenses that’ll bog you down on the road. And if you’re a freelancer, they’ll be even more of a burden because you might experience some periods of inconsistent income. Getting rid of these expenses and paying off debt will allow you to fully focus on your work and travels.
2. Make sure you have income you can rely on for months in advance.
Whatever lifestyle you pursue, it’s always smart to have safety net. You never know when an emergency will arise. This rings especially true when you’re a digital nomad because you’re mostly own your own. You can’t find solace in a warm, comfortable home or family, and if you’re freelancer, you don’t have the luxury of a consistent paycheck. To widen your safety net, you should sell any unnecessary belongings, move the essentials into a storage unit, sell or rent your house, and save as much money as possible.
3. Get travel health insurance.
Traveling can give you some of the best experiences in your life, but it not always a blissful, perpetual highlight reel. It’s still real life. You’ll get sick, have emergencies and accidents, and need regular checkups. You also need immunizations to enter certain parts of the world. Your health should be your number one priority during your travels, so make sure you buy a solid health insurance plan that’s valid in all the places you visit.
4. Set yourself up for financial success.
Ample funds are the key to successful travel. American credit cards will usually charge you a fee if you use it abroad, so ask your bank for an international credit card. You should also sign up for credit monitoring services that’ll alert you if anyone tries to steal your identity.
5. If you travel internationally, unlock your phone.
Most countries have different cell phone carriers, so if you want to bounce from country to country, you need to call your current carrier and ask them to unlock your phone. You’ll be able to use your phone in any country because you can put a different sim card in your phone from each international carrier you use.
Once you square these things away, it’s time to start your new life on the road. But actually living life as a digital nomad is an entirely different ballgame than preparing to be one.
7 Tips for Living as a Digital Nomad
1. Make a budget.
As a digital nomad, your budget should be your bible. And if you follow it, you can live quite comfortably. To create a successful budget, calculate your living expenditures, the cost of traveling to each destination, staying there, the activities you’ll do there, the costs of working, and how it all affects your savings if you can’t earn a salary for a while.
2. Plan for the worst-scenario.
When you live abroad, It’s crucial to have multiple backup plans in case of any emergencies. Nothing really ever works out the way it’s supposed to. Things happen. What if your truck breaks down? Or what if you get stuck in a foreign country with no backup plan? What’s your plan B and C? You need to set these processes in place to handle the inevitable bumps in the road.
3. Join a digital nomad community.
Digital Nomad communities like Couchsurfing and Nomadlist will help you learn the nuances of the digital nomad lifestyle, and reduce its steep learning curve. Fellow nomads will be happy to answer any pressing questions about your new lifestyle and any areas you plan to visit. They’ll also teach you how to work effectively on the road. And arguably the most beneficial perk of these communities is that you can connect with other traveling professionals, which can lead to new business opportunities, partnerships, and friendships.
4. Make sure you have cell reception or wifi.
If your employer lets you work remotely, show them and your team some respect by being available as much as possible online. Not having wifi or cell phone reception should never be an excuse for missing a meeting or failing to get an assignment done. The same goes for client work, if you’re a freelancer.
To make sure you’ll always have internet connection, consider investing in a cell phone booster and a mobile hotspot mifi device. Cell phone boosters can detect the smallest shred of cell phone reception and send the signal to your vehicle. Mobile hotspot mifi devices strengthen your mobile hotspot service, so you don’t have to rely on a spotty, public wifi connection.
5. Make sure you can communicate with locals.
Knowing the language of the country you’re going to or knowing that they speak your language is crucial for successful travel. Assuming that there has to be someone who will understand English is a dangerous move. But if you must go to a place where you don’t know the native language or they don’t speak yours, use Google Translate or another translation app to navigate your new environment.
6. Research your destinations.
If you’re not living in an RV, find affordable housing on AirBnB or Couchsurf before you arrive to your destination. And make sure your lodging is near a hospital, emergency room or clinic in case of an emergency. You should also research the area to find safe neighborhood to stay in.
7. Draw cash from ATMs.
Airports are notorious for charging ridiculously high currency exchange fees. If you need cash, draw it from an ATM. Your bank will charge you a fee, but it’ll be much lower than the one at the currency exchange desk.
Before you set off …
If an adventurous lifestyle sounds appealing to you, then being a digital nomad can be one of the most rewarding yet challenging ways to live. But if you arm yourself with organization, discipline, and a thirst for learning, you could enjoy an exciting and fulfilling life on the road. Just ask Justin and Ariele Champion. They’re living the alternative American Dream. And they’ve never looked back.
Working from home is awesome, right up until the cat throws up on your computer. And your neighbor, who you can only assume is building a time machine, starts firing up all sorts of power tools and noisy machinery across the street.
COVID-19 has caused remote work to become a necessity instead of a luxury for many professionals. But which environment allows us to be more productive: the home office or the office office?
In the office office, your colleagues often pose the greatest threat to keeping you from getting some real, heads-down work done. They drop by your desk, engage you in conversation, and invite you to lunch — or so I hear. The social benefits are nice to have, but they can become a challenge if you’re easily distracted.
However, at the home office, while family members can be a distraction, I find that it’s easy for you to become your own worst enemy. Because without coworkers around, you’re free to drop those pesky inhibitions. At the home office, no one’s watching. You don’t necessarily feel that same peer pressure or communal obligation to get stuff done. (Also, you don’t have to wear pants.)
Below, I’ve compiled many great work-at-home tips and tricks from some of my awesome coworkers.
How to Work From Home
Communicate expectation with anyone who will be home with you.
Take clear breaks.
Interact with other humans.
Prepare meals the night before.
Pick a definitive finish time.
Eat and sleep.
Talk to your employer.
Join a remote-friendly company.
Start a career as a freelancer.
Start a home business.
1. Communicate expectations with anyone who will be home with you.
Of course, you might be working from home but still have “company.” Make sure any roommates, family members, and dogs (well, maybe not dogs) respect your space during work hours. Just because you’re working from home doesn’t mean you’re home.
If you share space with another work-from-home adult, you may have to lay ground rules about meeting times, shared desks and chairs, and quiet times.
CEO Sam Mallikarjunan tells how he manages to get work done even when people are around.
“If anyone else is going to be at home when you’re working, they just have to be clear that when you’re in your ‘office’ (in my case, my signal to the family is having headphones on), you’re working — even if it looks like and feels like you’re hanging out at home.”
He continues, “It’s easy to get distracted by the many things that have to be done around the house during the day.”
2. Take clear breaks.
It can be so easy to get distracted as a telecommuter that you avoid breaks altogether. Don’t let the guilt of working in the building you sleep in prevent you from taking five minutes to relax.
However rather than just opening YouTube and watching some comfort clips, use your breaks to get away from your desk. Go for a walk, enjoy fresh air, or spend time with others who might also be in the house.
Take Ginny Mineo‘s advice. “Breaks, like making and eating lunch, can recharge you to do better work. Don’t assume you need to be working 100% of the time while you’re home to be more productive.”
3. Interact with other humans.
When your office starts working from home, you’ll likely miss the casual social interactions with colleagues you’re used to throughout the day. When working from home, you don’t have the small talk and other activities that make each day at the office unique.
So what can you do? Communicate.
Fight boredom and loneliness by frequent communication with other employees. Reach out to them through video chat via apps like Zoom and Slack, a hosted phone system, or however else your company communicates.
Remember: You’re working from home, not the moon. Interacting with other people during the day is allowed, even if they’re not your colleagues. It’s a good idea to see another face during the day when most of your workday is solitary. So, use your breaks to interact with others.
“Go outside and find a human to interact with — ordering your coffee, running an errand, whatever. It keeps you sane.”
When you’re in your own home, it can be tempting to spend time preparing a nice breakfast and lunch for yourself, chopping and cooking included. Don’t use precious minutes making your food the day of work — cook it the night before.
Preparing food ahead of time ensures you can use your meal times to eat and that you aren’t performing non-work tasks that spend energy better used at your desk.
Digital marketing strategist, Lindsay Kolowich, adds, “Cooking at home is time you wouldn’t have spent meal prepping if you’d been in the office that day, and I find the minutes can add up in the end. To mitigate that, I try to cook and prep my meals the night before, just like I would for a day at the office.“
5. Pick a definitive finishing time.
You might be under the impression that working from home establishes more work-life balance, but be careful with that assumption.
Working from home can also feel like being at a casino — you can get so caught up in your activity, in a relaxing environment, that you lose complete track of time.
“If you work from home full-time (or regularly), it’s really easy to let your work life bleed into your personal life,” says Tyler Littwin.
He continues, “Maintaining a boundary is important for both halves of the equation.”
In lieu of coworkers, whose packing up and leaving the office reminds you to do the same, set an alarm at the end of the day to indicate your normal workday is coming to an end. You don’t have to stop at exactly that time, but knowing the workday is technically over can help you start the process of saving your work and calling it quits for the evening.
6. Eat and sleep.
What is the biggest perk to working from home? One of the biggest benefits for some people (me), is complete access to the kitchen.
As soon as I take a break, I automatically drift towards the kitchen for some snacks.
An unhealthy diet can affect productivity and drain energy. When I switched to a healthier diet, it made me function better and get the most from my routine.
So eat well when working from home.
It’s also vital that you keep to a proper sleep schedule. Save binge-watching your favorite shows for the weekend. With the right food to keep energy levels high and sound sleep to refresh your body and mind, you can make a success of working from home.
7. Talk to your employer.
If you like your current job and don’t want to change it, the obvious step is to find a way to pivot the position.
One of the tips for doing this is folding the possibility of going remote into your next promotion cycle. Talk to your boss often about your intention to pivot.
And, if you’re not sure your employer will agree to working completely remotely, talk about the option of working remotely one or two days a week. When you use the work from home tips we’ve provided above, and your boss sees how productive you are, they could allow you more days to work from home.
8. Join a remote-friendly company.
If your work can be done remotely, but your current boss or organization doesn’t allow you to work from home, you might need to get a new job.
When looking for a work-from-home job, you can use the same methods you used in finding your regular office job. This includes channels like job sites, local job ads, and social media platforms.
Check out these firms to see whether you meet the requirements to start working remotely for them.
9. Start a career as a freelancer.
If your current job isn’t remote work-friendly, you can go remote by starting your own business as a freelancer or a consultant.
Depending on the nature of your current job, you may start your own freelance business while still being employed.
The benefit of starting your freelance business while still employed is that it reduces the financial strain experienced by any new business.
10. Start a home business.
Starting a home business is one way to enjoy remote work.
Unlike other fields, certifications and education are not usually prerequisites. Instead, researching, having a smart business plan, and choosing the right business is more essential to the success of your business.
You can find more work-from-home tips in the books listed in this best remote work books article.
Working From Home Tips
Get started early.
Pretend like you are going into the office.
Structure your day like you would in the office.
Choose a dedicated workspace
Don’t stay at home.
Make it harder to use social media.
Commit to doing more.
Work when you’re at your most productive.
Save calls for the afternoon.
Focus on one distraction.
Plan out what you’ll be workign on ahead of time.
Use technology to stay connected.
Match your music to the task at hand.
Use laundry as a work timer.
1. Get started early.
When working in an office, your morning commute can help you wake up and feel ready to work by the time you get to your desk. At home, however, the transition from your pillow to your computer can be much more jarring.
Believe it or not, one way to work from home productively is to dive into your to-do list as soon as you wake up. Simply getting a project started first thing in the morning can be the key to making progress on it gradually throughout the day. Otherwise, you’ll prolong breakfast and let the morning sluggishness wear away your motivation.
Lindsay Kolowich says, “When I work from home, I wake up, put on a pot of coffee, and start working immediately — much earlier than normal working hours. I only start making breakfast once I’ve hit a wall or need a break. I’m a morning person and find I can get a ton done in the early morning hours, so this works really well for me.”
2. Pretend like you are going into the office.
The mental association you make between work and an office can make you more productive, and there’s no reason that feeling should be lost when working remotely.
I know that you love working in your pajamas (I do, too), but the mere act of changing clothes to something more serious will give you a signal to get work done throughout the day.
When you dress up, you give your brain a reason for dressing up, and it can keep you pumped throughout your work hours.
So when working from home, do all the things you’d do to prepare for an office role: Set your alarm, make (or get) coffee, and wear nice clothes.
Internet browsers like Google Chrome even allow you to set up multiple accounts with different toolbars on the top — for example, a toolbar for home and a separate toolbar for work.
Take to heart the words of HubSpot graphic designer, Anna Faber-Hammond, who says, “Get fully ready for the day and pretend you’re actually going to work. Otherwise, you might find yourself back in bed.”
3. Structure your day like you would in the office.
When working from home, you’re your own personal manager and can choose your working hours.
However, without things like an in-person meeting schedule to break up your day, you can easily lose focus or burn out.
To stay on schedule, segment what you’ll do and when for the day. If you have an online calendar, create personal events and reminders that tell you when to shift gears and start on new tasks. Google Calendar makes this easy.
Structuring your day as you would in the office also saves you from work creep. With this structure in place, working from home will not cause your work to invade your personal life.
“Are mornings for writing while you’re in the office? Use the same schedule at home. This structure will help keep you focused and productive.” – Ginny Mineo
4. Choose a dedicated workspace.
Just because you’re not working at an office doesn’t mean you can’t, well, have an office. Rather than cooping yourself up in your room or on the couch in the living room — spaces associated with leisure time — dedicate a specific room or surface in your home to working remotely.
No matter the space or location, have an area of the home to work and stay committed to throughout the day. And, after choosing your dedicated workspace, make the most of it by making it quiet.
CEO, Sam Mallikarjunan says, “Have a place you go specifically to work. It could be a certain table, chair, local coffee shop — some place that’s consistently your ‘workspace.’ It helps you get into the right frame of mind.”
5. Don’t stay at home.
Is your home office just not getting it done for you? Take your work-from-home life a step further and get out of the house. Coffee shops, libraries, public lounges, and similar Wi-Fi-enabled spaces can help you simulate the energy of an office so you can stay productive even when you don’t sit in an official workplace.
Content marketer, Corey Wainwright, comments, “I get out of my home to work and go to an establishment with actual tables, chairs, and people. It helps simulate the work environment and removes the distractions I typically have at home, like the urge to finally clean my room, do laundry, or watch TV. “
6. Make it harder to use social media.
Social media is designed to make it easy for us to open and browse quickly. As remote workers, though, this convenience can be the detriment of our productivity.
To counteract your social networks’ ease of use during work hours, remove them from your browser shortcuts and log out of every account on your phone or computer.
You might even consider working primarily in a private (or, if you’re using Chrome, an “Incognito”) browser window. This ensures you stay signed out of all your accounts, and each web search doesn’t autocomplete the word you’re typing. It’s a guarantee that you won’t be tempted into taking too many social breaks during the day.
Also, many have found it helpful to shut off social media notifications during the hours they work from home.
Alec Biedrzycki, product marketer at AirTable, says, “I remove all social networks from my toolbar bookmarks… you can get sucked in without knowing it, so eliminating the gateway to those networks keeps me on track.”
7. Commit to doing more.
Projects always take longer than you initially think they will. For that reason, you’ll frequently get done less than you set out to do.
So, just as you’re encouraged to overestimate how much work hours you’ll spend doing one thing, you should also overestimate how many things you’ll do during the day.
Even if you come up short of your goal, you’ll still come out of that day with a solid list of tasks filed under ‘complete.’
“On days I’m working from home, I tend to slightly overcommit on what I’ll deliver that day. So even if I get the urge to go do something else, I know I’ve already committed a certain amount of work to my team.”- Corey Wainwright
8. Work when you’re at your most productive.
Nobody sprints through their work from morning to evening — your motivation will naturally ebb and flow throughout the day. However, when you’re working from home, it’s all the more important to know when those ebbs and flows will take place and plan your schedule around it.
To capitalize on your most productive periods, save your more challenging tasks for when you know you’ll be in the right headspace for them. Use slower points of the day to knock out the easier logistical tasks on your plate.
Verily Magazine calls these tasks “small acts of success,” and they can help build your momentum for the heavier projects that are waiting for you later on.
Product designer, Brittany Leaning, says about her routine, “For me, the most productive times of the day are usually early in the morning or late at night. I recognize this and try to plan my day accordingly. Also, music that pumps me up doesn’t hurt.”
The responsibility is on you to know when you are most productive and build your work schedule around the periods of maximum productivity.
9. Save calls for the afternoon.
Sometimes, I’m so tired in the morning, that I don’t even want to hear my voice — let alone talk to others with it.
You shouldn’t have to give yourself too much time to become productive in the morning, but you can give yourself some extra time before working directly with others.
If you’re struggling to develop a reasonable work schedule for yourself as a telecommuter, start with the solitary tasks in the morning.
Save your phone calls, meetings, Google hangouts meetings, video call, and other collaborative work for when you’ve officially “woken up.”
Senior Marketing Director, James Gilbert, advises that you “Take advantage of morning hours to crank through meaty projects without distractions, and save any calls or virtual meetings for the afternoon.”
10. Focus on one distraction.
There’s an expression out there that says, “if you want something done, ask a busy person.”
The bizarre but true rule of productivity is that the busier you are, the more you’ll do.
It’s like Newton’s law of inertia: If you’re in motion, you’ll stay in motion. If you’re at rest, you’ll stay at rest. And busy people are in fast-enough motion that they have the momentum to complete anything that comes across their desk.
Unfortunately, it’s hard to find things to help you reach that level of busyness when you’re at home — your motivation can just swing so easily. HubSpot’s principal marketing manager, Pam Vaughan, suggests focusing on something that maintains your rhythm (in her case, it’s her daughter).
She says, “When I work from home, my 20-month-old daughter is home with me, too. It seems counterintuitive, but because I have to manage taking care of her and keeping her happy and entertained while still getting my work done, the pressure helps to keep me focused. When she’s napping or entertaining herself, I go into super-productive work mode.
The ‘distraction’ of my daughter (I mean that in the most loving way possible) means I can’t possibly succumb to some of the other common distractions of home.”
11. Plan out what you’ll be working on ahead of time.
Spending time figuring out what you’ll do today can take away from actually doing those things. And, you’ll have planned your task list so recently that you can be tempted to change your schedule on the fly.
It’s important to let your agenda change if you need it to, but it’s equally important to commit to a schedule that outlines every assignment before you begin.
Try solidifying your schedule the day before, making it feel more official when you wake up the next day to get started on it.
“Plan out your week in advance to optimize for the environments you’ll be in.”- Niti Shah
12. Use technology to stay connected.
Working from home might make you feel cut off from the larger operation happening in your company.
Instant messaging and videoconferencing tools like Slack and Zoom can make it easy to check in with other remote employees and remind you how your work contributes to the big picture.
It’s also vital to invest in the right technology. For instance, a bad-performance router can take the steam right off your enthusiasm to work, so it’s better to invest in a high-performance router.
CMO and former HubSpot employee, Meghan Keaney Anderson, remarks, “At HubSpot, we use Slack to keep conversations going remotely, Trello to keep us organized around priorities, and Google Hangouts plus Webex to make remote meetings more productive. Getting the right stack of support tools to fit your work style makes a big difference.”
13. Match your music to the task at hand.
During the week, music is the soundtrack to your career (cheesy, but admit it, it’s true). And at work, the best playlists are diverse playlists — you can listen to music that matches the energy of the project you’re working on to boost your productivity.
Video game soundtracks are excellent at doing this. In the video game, the lyric-free music is designed to help you focus; it only makes sense that it would help you focus on your work.
Want some other genres to spice up your routine and make you feel focused? Take them from startup marketer, Ginny Mineo, who offers her work music preferences below.
“When I’m powering through my inbox, I need some intense and catchy rap/R&B (like Nicki Minaj or Miley Cyrus) blasting through my headphones, but when I’m writing, Tom Petty is the trick. Finding what music motivates and focuses me for different tasks (and then sticking to those playlists for those tasks) has completely changed my WFH productivity.”
14. Use laundry as a work timer.
You might have heard that listening to just two or three songs in the shower can help you save water. And it’s true; hearing a few of your favorite songs start and end, one after another, can remind you how long you’ve been in the bathroom and shorten your wash time.
Why bring this up? Because the same general principle can help you stay on task when working from home. But instead of three songs off your music playlist, run your laundry instead.
Doing your laundry is a built-in timer for your home. So, use the time to start and finish something from your to-do list before changing the load.
Committing to one assignment during the wash cycle and another during the dry process can train you to work smarter on tasks that you might technically have all day to tinker with. And when you know there’s a timer, it makes it hard for distractions to derail your work.
People ops manager, Emma Brudner, notes, “I also usually do laundry when I work from home, and I set mini-deadlines for myself corresponding to when I have to go downstairs to switch loads. If I’m working on an article, I tell myself I’ll get to a certain point before the wash cycle ends. Then I set another goal for the dryer.”
Staying Productive While Working From Home
While you might miss the office, working full time from home can be good for you.
For one, you don’t have to worry about commuting every day and you can better care for your loved ones by being around more often.
The work from home tips that we have provided can help you make the most of your new routine. Try out a few and you might find that you’re just as productive working from home as you are in the office.
Are you worried about hackers attacking your website?
Cross-site scripting, also called XSS, is one of the most common attacks on WordPress sites. Hackers find vulnerabilities on your site and use them to steal information and misuse your website.
What’s worse is that if you don’t fix it immediately, these hacks could lead to more severe damage – the kind that’s really hard to recover from.
If your website is already under attack, we’ll show you how to fix it right away in simple beginner-friendly language. We’ll keep cybersecurity jargon to the bare minimum in this tutorial. We’ll also show you how to prevent future attacks.
First, let’s quickly understand what happens in an XSS attack so that you’ll be better equipped to handle it.
What is an XSS Attack in WordPress?
XSS stands for Cross Site Scripting which is a kind of injection attack where hackers inject malicious scripts into a website.
These scripts are disguised as good code on a trusted website. Next, when a user lands on this website, their browser executes all the code, including the malicious script, because it thinks it’s all trusted instructions.
In simpler terms, imagine you’re a spy and you’ve just received an official email from the government about a top-secret mission. It contains all the instructions you need to follow down to the T.
What you don’t know is that someone intercepted that email and added a few more instructions of their own. The government has no clue about it and you don’t bother to double check because you trust the source.
Some of it doesn’t make sense but you’re trained to obey every order to achieve your mission.
In this scenario, the government is your website, and the spy is the user’s browser. The browser follows the instructions from your website and can’t differentiate between the good and bad scripts.
These scripts are usually in Javascript, one of the most popular and widely-used programming languages. Although, these attacks can take place using any client-side language.
Now there are many ways to carry out an XSS attack. One way is to send a link to unsuspecting users to get them to click on it. Once they click on it, the attack can possibly do one or more of the following:
Redirect users to a malicious site
Capture the user’s keystrokes
Run web browser-based exploits
Steal cookie information of the user logged into an account
If the hacker is able to steal cookie information, they can completely compromise the user’s account. For instance, if you’re logged into your website’s wp-admin panel, the hacker can steal your credentials and log into your site.
What you need to do to prevent these attacks is to make sure all user data is validated and sanitized properly before it enters your website. That way, no user input can be malicious Javascript code. Added to that, you need to make sure there are no XSS vulnerabilities on your site that can allow a hacker to attack.
We’ve barely scratched the surface of XSS attacks but we hope you have a decent understanding of how a WordPress XSS attack works. Now if you suspect your site is hacked, follow our easy step-by-step tutorial below.
How to Find and Fix an XSS Attack in WordPress
To find any kind of malware or hacks on your site, you’ll need to run a deep scan on your entire website including its files and database.
We’ll be using Sucuri to scan and clean up your hacked site. Sucuri gives you a robust security setup including a firewall, malware scanner, and malware cleaner.
Sucuri offers a free website malware scanner that you can install inside your WordPress site by navigating to Plugins » Add New tab.
We recommend using the premium server-side scanner. This will turn your website inside out to find any trace of malware.
Added to that, here are a few of its highlights:
Monitors spam and malicious scripts
Checks for hidden backdoors created by hackers
Detects changes made to DNS (domain name system) and SSL
Checks for blacklists with search engines and other authorities
Sucuri comes with a price tag of $199.99 per year. If that’s out of your budget, you can try other security plugins. See our list: 9 Best WordPress Security Plugins Compared.
While selecting a security plugin, make sure it gives you all the cyber security features you need to find and fix malware infections and protect your website.
Step 1: Scanning Your Website
To get started, you’ll need to sign up for a plan with Sucuri. Then, log in to the Sucuri dashboard where you can add your site.
Here, you’ll need to connect your website by entering your FTP credentials. If you don’t know your FTP credentials, you can get them from your web host.
When your site is connected, Sucuri will automatically run a thorough scan of your website. Once done, it will show you a detailed report under the ‘My Sites’ tab.
Now you can click on the ‘Details’ button next to the warning message. This will open up the Monitoring page where you can view the details of the hack or infection.
Step 2: Requesting a Malware Cleanup
On the Monitoring page, you can see what kind of malware has infected your site. Sucuri adds a rating to indicate the risk level. So if it’s a critical or high risk, you know that you need to fix it right away. Added to that, it will also show you if your site has been blacklisted by any search engines.
Now that you know your site is infected, you need to clean it up and Sucuri makes this really easy for you. To get started with the process, click on the ‘Clean Up My Site’ button.
On the next page, click on New Malware Removal Request button and a form will appear where you can enter your site’s details.
Simply fill out the form and submit it. Once done, Sucuri’s security experts will clean up your site for you. In case you don’t know any of the details you need for the form, you can ask your web host for them.
Now you may be wondering how long would it take to get your site cleaned.
Sucuri gives first preference to users on the Business plan. They assure a turnaround time of 6 hours. For other plans, it depends on how complex your site’s infection is and the volume of requests they have in queue.
Immediately after an attack, we strongly recommend logging all users out of your site and changing your login credentials to be on the safe side.
How to Prevent XSS Attacks on Your WordPress Site
It’s always best to protect your website and prevent these kinds of malware attacks on your site. It’s much easier and cheaper than trying to fix a hacked website. Here are our top recommended steps to prevent XSS attacks on your site.
1. Enable a Web Application Firewall (WAF)
Sucuri has one of the best firewalls for WordPress sites. It not only blocks XSS attacks but all sorts of other malware attacks like DDoS, Brute Force, Phishing, and SQL injections.
The firewall will sit in front of your website and scan every user coming through. It will identify and block bad bots before they reach your site.
To enable the Sucuri firewall, navigate to the Firewall tab on your Sucuri dashboard.
Select your site, and you’ll see setup instructions that you can follow. Sucuri gives you 2 options to set up the firewall:
1. Automatic Integration: Simply enter your hosting credentials using cPanel or Plesk. This method requires you to give Sucuri access to your website’s server to automatically set up the firewall on your site.
2. Manual Integration: You can set up the firewall on your own without granting internal access to Sucuri. To get started, click on the internal domain link and make sure that it loads.
Next, you can configure your DNS to point your web traffic at the Sucuri firewall. For this, you’ll need to access the DNS records in your hosting account. Here, you can change the ‘A’ record of your site and enter the IP addresses that Sucuri provides.
If you’re stressed that this is all too complicated, you can ask your web host for help and they will guide you through the process. Added to that, you can also raise a support ticket with Sucuri and their support team will help you change the DNS records.
To open a ticket, you’ll find a link inside the manual instructions on the same page.
Once you’re done setting up the firewall, it usually takes a few hours for the changes to reflect. You can expect a maximum wait time of 48 hours.
When you enable the firewall, it will automatically add security headers to your site to protect it from XSS attacks.
If there’s an attempted XSS attack Sucuri will block it and report it to you in the Reports tab.
Now what we love about the Sucuri firewall is that it’s so easy for anyone to use, including beginners. You don’t have to be a cyber security expert or know any coding.
You can enable all sorts of protection features with just a click in the Settings » Security tab.
So for instance, you can enable DDoS protection and geoblocking to make it harder for hackers to attack your site.
To enable a security feature here, all you have to do is check the box and save your settings. When you need to disable it, you simply have to uncheck the box.
Aside from this, the Sucuri plugin will:
Regularly scan and monitor for spam and malicious code
Alert you of any cross-site scripting vulnerability
Block bad bots and hackers
Check for blacklists with search engines and other authorities
Monitor website uptime
Detect changes made to DNS (domain name system) and SSL
Send you instant security alerts via email, SMS, Slack, and RSS
So your site will be protected at all times.
2. Use Secure Forms
On a vulnerable website, forms are one of the most common targets for hackers. If your form is unsecured, this means anyone can simply enter malicious code in your form fields.
Our recommendation for securing your website’s forms is WPForms. It is the #1 WordPress form builder that has built-in security so your forms are protected right from the start.
By default, the forms have anti-spam protection turned on. Plus, you can even add CAPTCHA to your forms to block spam bots.
You can enable an invisible captcha or the type where a user will have to solve a little puzzle or tick a box to prove they’re human.
3. Set User Role Permissions
When you have multiple people working on your website, it isn’t wise to give everyone admin access. It’s better to assign them roles based on what permissions they need.
WordPress lets you create roles for:
Super Admin
Administrator
Editor
Author
Contributor
Subscriber
Now if a hacker gets control over a user’s account, they’ll be limited in what they can do on your site.
4. Auto-logout Inactive Users
Hackers can gain access to user accounts by hijacking their browser sessions and stealing cookies.
You can minimize this risk by logging out inactive WordPress users.
Many security plugins have an idle session logout feature or you can use the Inactive Logout plugin.
5. Update Your Website Regularly
WordPress plugins, themes, and even your WordPress installation get updates regularly. You’ll see them inside your WordPress dashboard when they’re available:
Many website owners ignore updates for a long time but this can expose your website to hackers. Updates usually carry bug fixes, new features, and improvements to the software. They can also have security patches. You can see if an update carries a security patch by viewing the details of the update.
This means a vulnerability was found in the software that hackers can use to attack your site. When developers find security problems, they patch them up and release a new version of the software.
All you have to do is update the software on your site.
So if you see it’s a security patch, update it immediately to avoid any risk of being hacked.
One of the main reasons site owners ignore updates is that they can sometimes break your site or cause incompatibility issues. We recommend that you test the update on a staging site and then run it on your live site.
With that, you’ve learned how to fix and prevent XSS attacks on your WordPress site.
Before we wrap up, we’ll give you one more security tip. Always take regular backups of your website.
Even with the strongest security measures on your site, there are many things that can go wrong. For instance, a user can make a simple human error that crashes your website.
1. Is WordPress vulnerable to cross-site scripting attacks?
The WordPress core software is developed and maintained by some of the best experts in the world. Their software is pretty rock solid but keep in mind that no software is free from vulnerabilities.
The reason WordPress websites are attacked often is that the platform is so popular. And most users install tons of third-party themes and plugins. Vulnerabilities can develop in any of these elements and hackers can exploit them to hack your site.
2. Are there different kinds of cross site scripting attacks?
Yes. There are 3 main types of XSS attacks:
Stored XSS (also know as persistent XSS): Attackers stores their payload on a compromised server, causing the website to deliver malicious code to other visitors.
Reflected XSS: The payload is stored in the data sent from the browser to the server.
DOM XSS: Here, the server itself isn’t the one vulnerable to XSS, but rather the JavaScript on the page is.
Self cross-site scripting: Attackers can exploit a vulnerability that needs really specific context and manual changes. The victim here can only be yourself.
Blind cross-site scripting: In these attacks, the vulnerability commonly lies on a page that only authorized users can access. The attacker can’t see the result of an attack.
3. How do I make sure there are no other security issues on my site?
Make sure you always have a security plugin installed on your website. This is a must for all kinds of websites including WooCommerce, blogs, and small business sites. We recommend Sucuri, but you can also check out Wordfence, MalCare, and SiteLock. See more of our top recommendations here: 9 Best WordPress Security Plugins Compared.
That’s all we have for you today. We hope this post has given you everything you need to secure your website.
For more on website security, see our resources on:
Often we’re asked about what are the best WordPress SEO plugins and tools that we recommend.
That’s because search engines are a major source of traffic for most websites on the internet. Optimizing your website for search engines can help you rank higher in search results and significantly grow your business.
In this article, we will share the best WordPress SEO plugins and tools that you should use. Some of these tools offer similar functionalities, so we will also highlight which ones are the best for specific use-cases.
Things You Must Know About WordPress SEO Plugins & Tools
When reading SEO WordPress tips or searching for “best free WordPress SEO plugins”, you will come across articles that feature several dozen tools.
This can be quite overwhelming for beginners and non-techy users.
The truth is that you don’t need dozens of top SEO tools to get higher search engine result rankings.
While most blog posts (including ours) will share the top most popular SEO plugins, it is extremely important for you to understand the use-cases of each tool.
For example, you never want to use more than one WordPress SEO plugin on your website. We will mention All in One SEO (formerly All in One SEO Pack), Yoast SEO, SEOPress, and Rank Math. You need to pick only one to avoid plugin conflict.
We’ll mention SEMRush, Ahrefs, and few other powerful tools, but you don’t need them all when you’re first starting out since they have a similar feature set. We will share what tools we use in our business, and which features are the best among each tool.
With that said, let’s take a look at our expert pick of the best WordPress SEO plugins and tools.
All in One SEO for WordPress (AIOSEO) is the best WordPress SEO plugin on the market. Used by over 3+ million users, it is the most comprehensive SEO toolkit that helps you improve search rankings without learning any complicated SEO jargon.
The free version of AIOSEO has all the essential features, but the pro version gives you everything you need to outrank your competitors.
It comes with the easiest setup wizard that automatically helps you choose the best SEO settings for your business. AIOSEO shows you TruSEO on-page analysis with an actionable checklist to optimize your posts and pages.
The on-page SEO checklist includes a smart meta tag generator where you can use dynamic values (current year, month, day, custom fields, author info, and much more) in your SEO title and meta descriptions. This means you don’t need to update a post just to change SEO titles.
AIOSEO also comes with Rich snippet schema markup, smart XML sitemaps (with advanced controls), SEO health check, and other useful features to grow your search engine visibility.
There is a built-in social media integration to add Open Graph metadata as well. This means you can choose which image or thumbnail you want to show when your pages are shared on social media websites like Facebook, Twitter, Pinterest, etc.
AIOSEO also comes with built-in WooCommerce SEO tools for eCommerce sites. This includes features like dynamic optimizations, individual product page optimizations, product image SEO, and other handy features to bring more organic traffic to your online store.
For more SEO savvy users, it includes full control of RSS feeds, Robots.txt editor, local SEO, breadcrumbs, Google News sitemaps, video SEO, advanced redirect manager, 404 tracking, IndexNow integration, and more.
For business owners, it comes with SEO user roles, so you can manage access to important SEO features without handing over control of your website.
Update: Recently AIOSEO added a Link Assistant which is a game-changer for internal linking. It helps identify link opportunities, gives you linking suggestions in real-time, and you can bulk-add internal links with just a few clicks.
Overall, All in One SEO (AIOSEO) is the most beginner-friendly and comprehensive WordPress SEO plugin on the market. It’s easy to configure and eliminates the need to install multiple plugins to do things on your WordPress site. It works perfectly for all types of businesses, eCommerce, blogs, news, and other websites.
SEMRush is the best overall SEO tool on the market. Used by professional SEO experts, marketers, bloggers, large and small businesses, it provides a comprehensive set of tools to grow your traffic.
You can use it to find organic keywords and search terms that you can easily rank for. It also allows you to do competitive research and see which keywords your competitors rank for, and how you can beat them.
SEMRush SEO Writing Assistant tool helps you improve your website content to beat the top 10 results for your focus keyword. It integrates with WordPress, and this will help you write more SEO-friendly content.
You can also generate SEO templates and get easy search engine optimization suggestions for your content along with advanced SEO recommendations.
SEMRush seamlessly integrates with All in One SEO (AIOSEO) to help you find additional keyphrases for your focus keyphrase. You can see related keyphrases and their search volume right from WordPress. Then, you can add them to your content with the click of a button.
Google Search Console is a free tool offered by Google to help website owners and webmasters monitor and maintain their site’s presence in Google search results.
It alerts you when Google is unable to crawl and index pages on your website. You also get helpful tips on how to fix those crawl errors.
Most importantly, it shows which keywords your website is ranking for, anchor texts, average position, impressions, and more. You can use this data to find keywords where you can easily rank higher by simply optimizing your content. You can also use this keyword data to come up with new blog post ideas.
Tip: You can use MonsterInsights to track your keyword rankings inside WordPress admin area using Google Seach Console data. We will cover this tool later in the article below.
Yoast SEO is a popular WordPress SEO plugin that allows you to optimize your WordPress website for search engines.
It lets you easily add SEO titles and descriptions to all posts and pages on your website. You can also use it to add Open Graph metadata and social media images to your articles.
Yoast SEO automatically generates an XML sitemap for all your website content which makes it easier for search engines to crawl your website. It also helps you easily import your SEO data if you have been using another SEO plugin.
Other features include readability analysis, Google and social previews, and faster load times for a better user experience.
Google Keyword Planner tool helps you generate your own keyword ideas from Google itself.
No one on the planet has more insights into what people are searching for than the search giant Google. This free tool is offered to Google’s advertisers for free and anyone can use it. Its main purpose is to show advertisers the keywords they can bid on for their advertising campaigns.
It also helps advertisers choose the right keywords by showing them an estimate of search volume, number of results, and difficulty level.
As a content marketer or blogger, you can use this data to find keywords with high search volume, high advertiser interest, and more importantly keywords where you can easily outrank all other sites.
Ahrefs is an all-in-one SEO analysis tool for marketers, bloggers, and businesses. It is a popular alternative to SEMRush and offers a lot of similar tools and features.
It allows you to do keyword research, competition analysis, backlink research, SEO audit, monitor keyword rankings, and more.
It also offers a detailed content analysis tool that helps you improve content while targeting specific keywords.
While there’s a huge feature overlap, what Ahrefs does really well is backlink analysis. We can use it to see which sites are linking to multiple competitors, but not us. This helps us get more backlinks and build more partnerships.
They also help us identify which content multiple of our competitors are ranking for that we aren’t, so we can create content on those subjects to get more exposure.
Last but not least, Ahrefs helps us better identify duplicate content and keyword cannibalization which helps us merge and upgrade the right content to boost our rankings.
For the reasons above, we pay for both SEMRush and Ahrefs because they’re both good for specific use-cases.
SEOPress is another simple yet powerful WordPress SEO plugin. It includes all the features you would expect from an SEO plugin like meta title, description, open graph support, image and content XML sitemaps, redirects, and more.
It comes with a straightforward setup for beginners and advanced controls for more experienced users. It is comparable to other top WordPress SEO plugins on the market in terms of features and options.
The paid version of the plugin is cheaper than some other premium WordPress SEO plugins on the market.
Note: SEOPress is a WordPress SEO plugin. Remember, you only need one WordPress SEO plugin on your site.
Rank Math is another user-friendly WordPress SEO plugin that allows you to optimize your website for search engines and social media. It comes with a setup wizard and allows you to import data from other SEO plugins during the setup.
You can use it to easily add meta title, description, and Open Graph metadata to your blog posts. The plugin also allows you to generate an XML sitemap, connect Google Search Console, and control access to plugin features based on user roles.
Note: Rank Math is an AIOSEO alternative. Remember, you only need one WordPress SEO plugin on your site.
Schema Pro allows you to add rich snippets to your website which makes it stand out in search results.
Rich Snippets allow you to make your website stand out in search results by showing star ratings below a review, prices below a product, image or video next to the description, and so on.
Top WordPress SEO plugins, like All in One SEO (AIOSEO) already add structured rich snippets data to your website. However, if you need more schema types or want to extend the functionality of your existing WordPress SEO plugin then Schema Pro is the way to go.
Schema Pro also allows you to use it alongside your existing WordPress SEO plugin by mapping the plugin data to Schema Pro fields.
KeywordTool.io is one of the best free keyword research tools available right now. It allows you to simply generate keyword ideas by typing in a keyword. These keyword suggestions are gathered from Google’s autosuggest feature. It also shows you keyword suggestions from Bing, YouTube, Amazon, and more.
These keyword suggestions are a treasure of information. You can also get search volume, cost per click, and other data for each keyword by upgrading to their paid plan.
Redirection helps you set up SEO friendly redirects in WordPress. It is a handy broken link checker that helps you easily fix 404 errors in WordPress by setting up redirects.
Broken links can affect your site’s SEO and create a bad experience for your users. If you have been running a blog for some time, then you should check your site from time to time for broken links and fix them.
There are multiple ways to easily find broken links in WordPress. Once you find a broken link, you may need to fix it by pointing users to the correct link or removing the incorrect link.
SEOQuake is a useful SEO tool for website owners. It is available as a browser add-on for Google Chrome, Mozilla Firefox, Opera, and Safari web browsers.
It provides SEO related information for any website. This data includes page health, age, last updated, Alexa rank, and many other parameters. It is one of the most downloaded browser addons by SEO professionals.
Apart from that, the SEOQuake toolbar can show you all the same data search results when you type in a keyword. This information can be extremely useful if you are gauging competition for different keywords. You can even download search results in CSV format and prepare your own excel sheets of search data.
These tools give you the additional advantage when optimizing your website for SEO. They do not advertise themselves as SEO tools but they are essential for every website and play a significant role in your website’s search performance.
Site speed is a major factor in search rankings. That’s why you need to monitor your website speed & performance to make sure it’s not affecting your SEO.
The easiest way to boost your website speed is by enabling caching. WP Rocket is the best WordPress caching plugin on the market, which allows you to set up caching without diving into any technical stuff.
Many beginners rely on their best guess to make their marketing decisions. You don’t need to do that when you can easily get the insights you need to improve your website’s SEO strategy.
It tells you where your users are coming from, your top content, what users do on your website, and more. It also allows you to track your eCommerce SEO by seeing which products are popular and where you are losing customers.
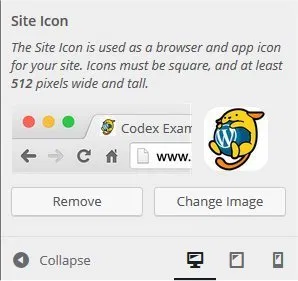


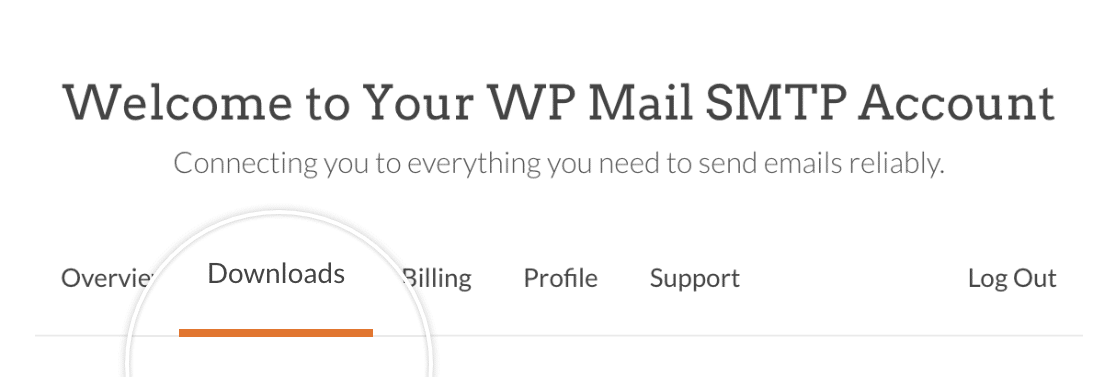


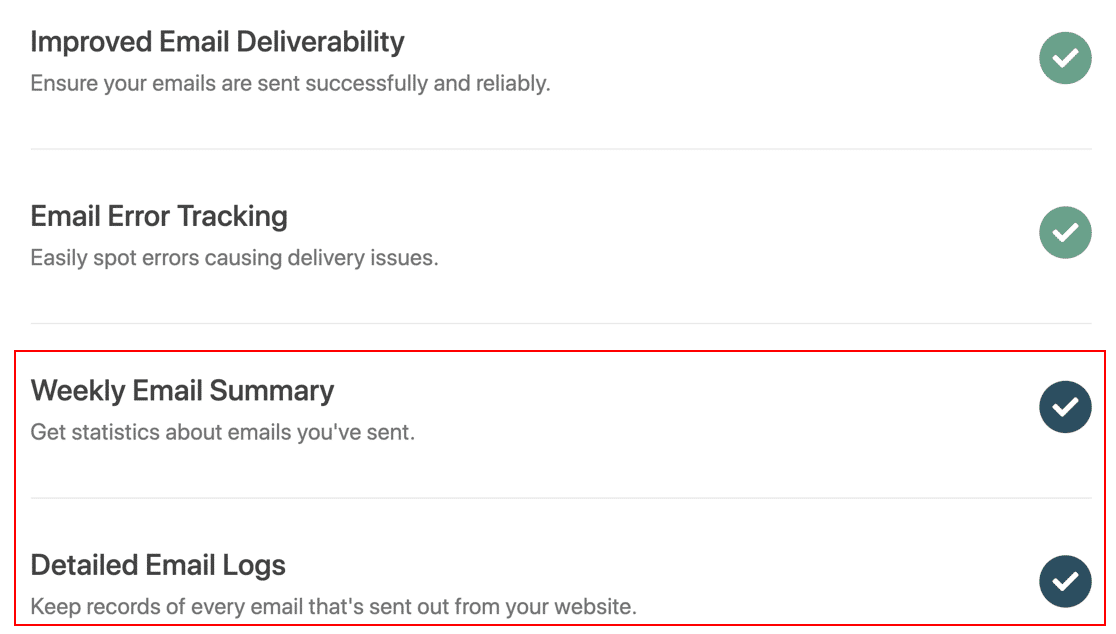


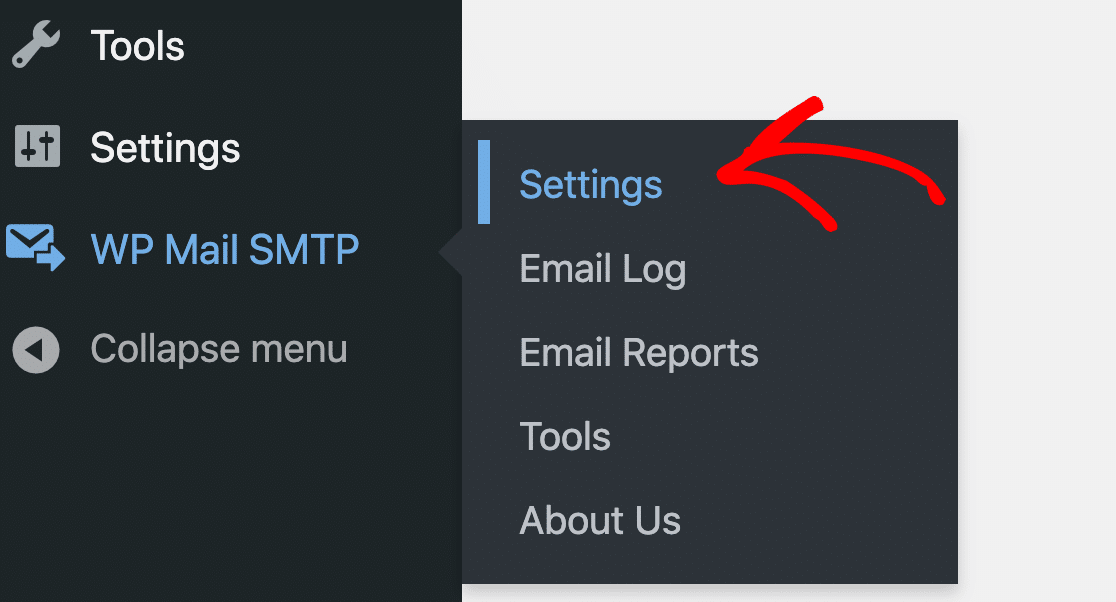


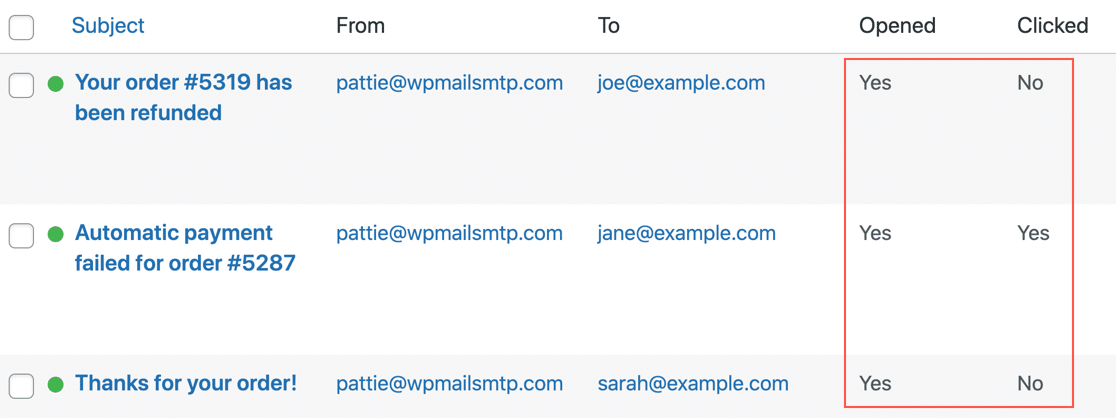

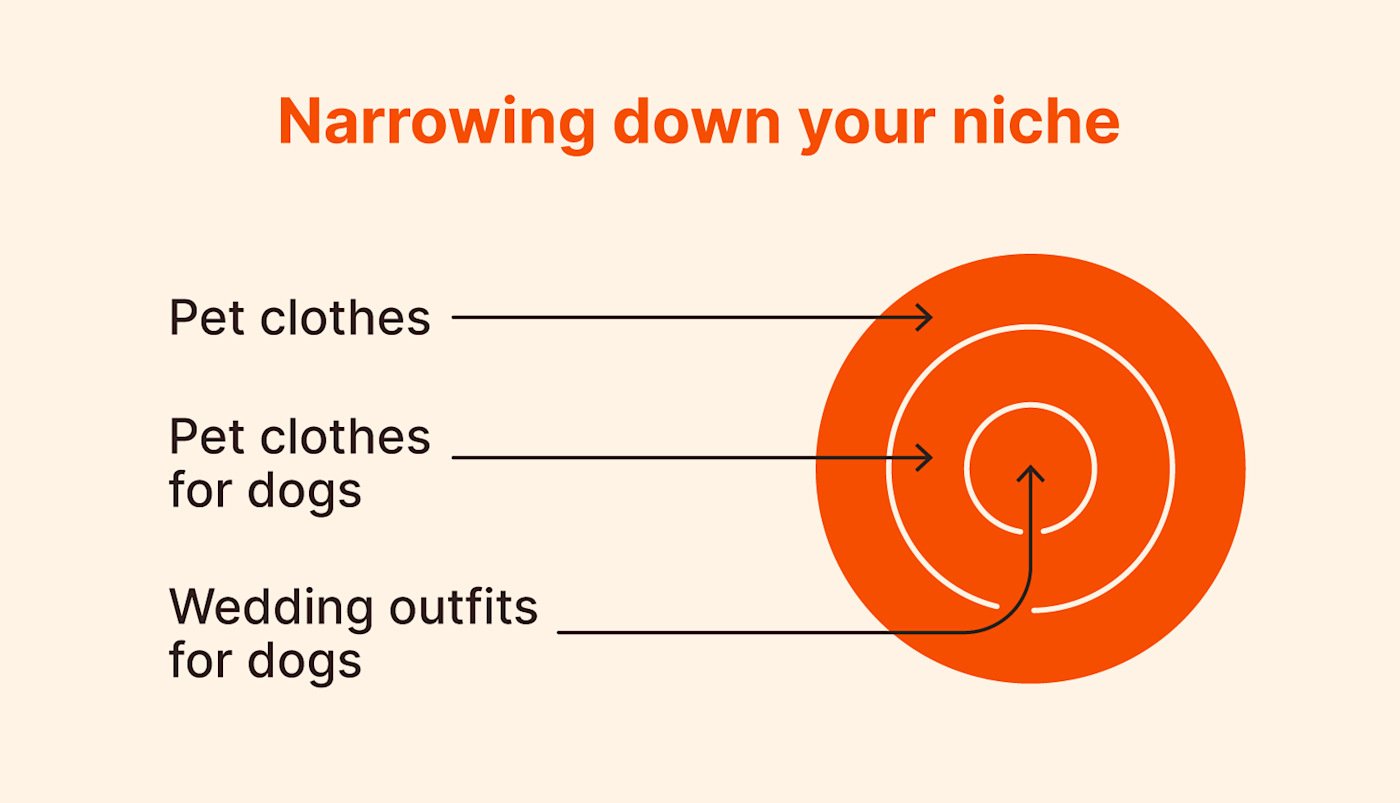


")
 dynamic meta title and description")
 social media profiles")


