Tech giant Microsoft on Tuesday shipped fixes to quash 64 new security flaws across its software lineup, including one zero-day flaw that has been actively exploited in real-world attacks.
Of the 64 bugs, five are rated Critical, 57 are rated Important, one is rated Moderate, and one is rated Low in severity. The patches are in addition to 16 vulnerabilities that Microsoft addressed in its Chromium-based Edge browser earlier this month.
“In terms of CVEs released, this Patch Tuesday may appear on the lighter side in comparison to other months,” Bharat Jogi, director of vulnerability and threat research at Qualys, said in a statement shared with The Hacker News.
“However, this month hit a sizable milestone for the calendar year, with MSFT having fixed the 1000th CVE of 2022 – likely on track to surpass 2021 which patched 1,200 CVEs in total.”
The actively exploited vulnerability in question is CVE-2022-37969 (CVSS score: 7.8), a privilege escalation flaw affecting the Windows Common Log File System (CLFS) Driver, which could be leveraged by an adversary to gain SYSTEM privileges on an already compromised asset.
“An attacker must already have access and the ability to run code on the target system. This technique does not allow for remote code execution in cases where the attacker does not already have that ability on the target system,” Microsoft said in an advisory.
The tech giant credited four different sets of researchers from CrowdStrike, DBAPPSecurity, Mandiant, and Zscaler for reporting the flaw, which may be an indication of widespread exploitation in the wild, Greg Wiseman, product manager at Rapid7, said in a statement.
CVE-2022-37969 is also the second actively exploited zero-day flaw in the CLFS component after CVE-2022-24521 (CVSS score: 7.8), the latter of which was resolved by Microsoft as part of its April 2022 Patch Tuesday updates.
It’s not immediately clear if CVE-2022-37969 is a patch bypass for CVE-2022-24521. Other critical flaws of note are as follows –
“An unauthenticated attacker could send a specially crafted IP packet to a target machine that is running Windows and has IPSec enabled, which could enable a remote code execution exploitation,” Microsoft said about CVE-2022-34721 and CVE-2022-34722.
Also resolved by Microsoft are 15 remote code execution flaws in Microsoft ODBC Driver, Microsoft OLE DB Provider for SQL Server, and Microsoft SharePoint Server and five privilege escalation bugs spanning Windows Kerberos and Windows Kernel.
The September release is further notable for patching yet another elevation of privilege vulnerability in the Print Spooler module (CVE-2022-38005, CVSS score: 7.8) that could be abused to obtain SYSTEM-level permissions.
Lastly, included in the raft of security updates is a fix released by chipmaker Arm for a speculative execution vulnerability called Branch History Injection or Spectre-BHB (CVE-2022-23960) that came to light earlier this March.
“This class of vulnerabilities poses a large headache to the organizations attempting mitigation, as they often require updates to the operating systems, firmware and in some cases, a recompilation of applications and hardening,” Jogi said. “If an attacker successfully exploits this type of vulnerability, they could gain access to sensitive information.”
Software Patches from Other Vendors
Aside from Microsoft, security updates have also been released by other vendors since the start of the month to rectify dozens of vulnerabilities, including —
Companies are increasingly using Cloud services to support their business processes. But which types of Cloud services are there, and what is the difference? Which kind of Cloud service is most suitable for you? Do you want to be unburdened or completely in control? Do you opt for maximum cost savings, or do you want the entire arsenal of possibilities and top performance? Can you still see the forest for the trees? In this article and in the next, I describe several different Cloud services, what the differences and features are and what exactly you need to pay attention to.
Let’s start with the definition of Cloud computing. This is the provision of services using the internet (Cloud). Think of storage, software, servers, databases etc. Depending on the type of service and the service that is offered (think of license management or data storage), you can divide these services into categories. Examples are IaaS (Infrastructure as a Service), PaaS (Platform as a Service), SaaS (Software as a Service), etc. These services are provided by a cloud provider. Whether this is Microsoft (Azure), Amazon (AWS), or another vendor (Google, Alibaba, Oracle, etc.), each vendor offers Cloud services that fall under one of the categories of Cloud services that we are about to discuss.
One feature of Cloud computing is that you pay according to the usage and the service you purchase. For example, for SaaS, you pay for the software’s license and support. This also means that if you buy a SaaS service (e.g., Office 365) and don’t use it, you will still be charged. At the same time, if you purchase storage with IaaS, for example, you only pay for the amount of storage you use, possibly supplemented with additional services such as backup, etc.
Sometimes Cloud services complement each other; think, for example, of DaaS (Database as a Service), where a database is offered via the Cloud. Often you need an application server and other infrastructure to read data from this database. These usually run in a Landing Zone, purchased from an IaaS service. But some services can also be standalone, for example, SaaS (Office 365).
Each Cloud service has specific characteristics. Sometimes it requires little or no (technical) knowledge, but it can also be challenging to manage and use the services according to best practices. This often depends on the degree to which you want to see yourself in control. If you want an application from the Cloud where you are completely relieved of all worries, this requires little technical knowledge from the user or the administrator. But if you want maximum control, then IaaS gives you an enormous range of possibilities. In this article, you can read what you need to consider.
It is advisable to think beforehand about what your requirements and wishes are precisely and whether this fits in with the service you want to purchase. If you wish to use an application in the Cloud but use many custom settings, this is often not possible. If you don’t want to be responsible for updating and backing up an application and use little or no customization, a SaaS can be very interesting. Also, look at how a service fits into your business process. Does it offer possibilities for automation, reporting, or disaster recovery? Are there possibilities to temporarily allocate extra resources in case of peak demand (horizontal or vertical scaling up), and what guarantees does the supplier offer with this service? Think of RPO / RTO and accessibility of the service desk in case of a calamity.
Let’s get started quickly!
IaaS (Infrastructure as a Service)
One of the best-known Cloud services is undoubtedly IaaS. For many companies, this is often their first introduction to a Cloud service. You rent the infrastructure from a cloud provider. For example, the network infrastructure, virtual servers (including operations system), and storage. A feature of IaaS is that you have complete control – Both on the management side and how you can deploy resources (requests). This can be done in various automated ways (Powershell, IaC, DevOps pipelines, etc.) and via the classic management interface that all providers offer. Things that are often not possible with a PaaS service are possible with an IaaS service. You have complete control. In principle, you can set up a complete server environment (all services are available for this), but you do have the benefits of the Cloud, such as scalability and pay per use or per resource.
IaaS therefore, most resembles an on-premise implementation. You often see this used in combination with the use of virtual servers. Critical here is a good investigation into the possible limitations, for example, I/O, so that the performance can be different in practice than in a traditional local environment. You are responsible for arranging security and backup. The advantage is that you have an influence on the choice of technology used. You can customize the setup according to your needs and wishes. You can standardize the configuration to your organization. Deployment can be complex, and you are forced to make your own choices, so some expertise is needed.
PaaS (Platform as a Service)
PaaS stands for Platform as a service and goes further than IaaS. You get a platform where you can do the configuration yourself. When you use a PaaS service, the vendor takes care of the sub-layer (IaaS) and the operating system and middleware. So you sacrifice something in terms of control and capabilities. PaaS services are ideal for developers, web and application builders. After all, you can quickly make an environment available. Using it means you no longer have to worry about the infrastructure, operating system, and middleware. This is taken care of by the supplier based on best practices. This also offers security advantages, as you do not have to think about patching and upgrading these things that are now done by the vendor.
Another advantage is that you can entirely focus on what you want to do and not on managing the environment. You can also easily purchase additional services and quickly scale them up or down. When you are finished, you can remove and stop the resources, so you have no more costs.
However, do take into account the use of existing software. Not all existing software is suitable to function in a PaaS environment; for example, in a PaaS environment, you do not have full access (after all, the vendor is responsible). Also, not all CPU power and memory are allocated to the Cloud application. This is because it is often hosted on a shared platform, so other applications (and databases) may use the same resources. As for the database, you have the same advantages and disadvantages as with DBaaS.
SaaS (Software as a Service)
This is probably a service you’ve been using for a while. In short, you take applications through the Cloud on a subscription basis. The provider is responsible for managing the infrastructure, patches, and updates. A SaaS solution is ready for use immediately, and you directly benefit from the added value, such as fast scaling up and down and paying per use. Examples are Office365, Sharepoint online, SalesForce, Exact Online, Dropbox, etc.
Unlike IaaS and PaaS, where there is still a lot of freedom, and you have to set everything up yourself, with SaaS however, it is immediately clear what you are buying and what you will get. With this service, you are relieved of most of your worries. The vendor is responsible for all updates, patches, development, and more. You cannot make any updates or changes to the software with this service.
Many companies use one or more SaaS services often even within companies, there is a distinction. For example, each department within a company has its specific applications and associated SaaS services. With this service, you only pay for what you need, including the licenses. These licenses can easily be scaled up or down.
It is interesting for many companies to work with SAAS solutions. It is particularly interesting for start-ups, small companies and freelancers because you only purchase what you use, you don’t have unnecessarily high start-up costs, and you don’t have to worry about the maintenance of the software.
But SAAS can also be a perfect solution for larger companies. For example, if you hire extra staff for specific periods, you can quickly get these people working with the software they need. You buy several additional licenses, and you can stop this when the temporary staff leaves.
How can Vembu help you?
BDRSuite, is a comprehensive Backup & DR solution designed to protect your business-critical data across Virtual (VMware, Hyper-V), Physical Servers (Windows, Linux), SaaS (Microsoft 365, Google Workspace), AWS EC2 Instances, Endpoints (Windows, Mac) and Applications & Databases (MS Active Directory, MS Exchange, MS Outlook, SharePoint, MS SQL, MySQL).
A new attack technique called ‘GIFShell’ allows threat actors to abuse Microsoft Teams for novel phishing attacks and covertly executing commands to steal data using … GIFs.
The new attack scenario, shared exclusively with BleepingComputer, illustrates how attackers can string together numerous Microsoft Teams vulnerabilities and flaws to abuse legitimate Microsoft infrastructure to deliver malicious files, commands, and perform exfiltrating data via GIFs.
As the data exfiltration is done through Microsoft’s own servers, the traffic will be harder to detect by security software that sees it as legitimate Microsoft Team’s traffic.
Overall, the attack technique utilizes a variety of Microsoft Teams flaws and vulnerabilities:
Bypassing Microsoft Teams security controls allows external users to send attachments to Microsoft Teams users.
Modify sent attachments to have users download files from an external URL rather than the generated SharePoint link.
Spoof Microsoft teams attachments to appear as harmless files but download a malicious executable or document.
Insecure URI schemes to allow SMB NTLM hash theft or NTLM Relay attacks.
Microsoft supports sending HTML base64 encoded GIFs, but does not scan the byte content of those GIFs. This allows malicious commands to be delivered within a normal-looking GIF.
Microsoft stores Teams messages in a parsable log file, located locally on the victim’s machine, and accessible by a low-privileged user.
Microsoft servers retrieve GIFs from remote servers, allowing data exfiltration via GIF filenames.
GIFShell – a reverse shell via GIFs
The new attack chain was discovered by cybersecurity consultant and pentester Bobby Rauch, who found numerous vulnerabilities, or flaws, in Microsoft Teams that can be chained together for command execution, data exfiltration, security control bypasses, and phishing attacks.
The main component of this attack is called ‘GIFShell,’ which allows an attacker to create a reverse shell that delivers malicious commands via base64 encoded GIFs in Teams, and exfiltrates the output through GIFs retrieved by Microsoft’s own infrastructure.
To create this reverse shell, the attacker must first convince a user to install a malicious stager that executes commands, and uploads command output via a GIF url to a Microsoft Teams web hook. However, as we know, phishing attacks work well in infecting devices, Rauch came up with a novel phishing attack in Microsoft Teams to aid in this, which we describe in the next section.
GIFShell works by tricking a user into loading a malware executable called the “stager” on their device that will continuously scan the Microsoft Teams logs located at $HOME\AppData\Roaming\Microsoft\Teams\IndexedDB\https_teams.microsoft.com_0.indexeddb.leveldb\*.log.
Microsoft Teams log folder Source: BleepingComputer
All received messages are saved to these logs and are readable by all Windows user groups, meaning any malware on the device can access them.
Once the stager is in place, a threat actor would create their own Microsoft Teams tenant and contact other Microsoft Teams users outside of their organization. Attackers can easily achieve this as Microsoft allows external communication by default in Microsoft Teams.
To initiate the attack, the threat actor can use Rauch’s GIFShell Python script to send a message to a Microsoft Teams user that contains a specially crafted GIF. This legitimate GIF image has been modified to include commands to execute on a target’s machine.
When the target receives the message, the message and the GIF will be stored in Microsoft Team’s logs, which the malicious stager monitors.
When the stager detects a message with a GIF, it will extract the base64 encoded commands and execute them on the device. The GIFShell PoC will then take the output of the executed command and convert it to base64 text.
This base64 text is used as the filename for a remote GIF embedded in a Microsoft Teams Survey Card that the stager submits to the attacker’s public Microsoft Teams webhook.
As Microsoft Teams renders flash cards for the user, Microsoft’s servers will connect back to the attacker’s server URL to retrieve the GIF, which is named using the base64 encoded output of the executed command.
The GIFShell server running on the attacker’s server will receive this request and automatically decode the filename allowing the attackers to see the output of the command run on the victim’s device, as shown below.
For example, a retrieved GIF file named ‘dGhlIHVzZXIgaXM6IA0KYm9iYnlyYXVjaDYyNzRcYm9iYnlyYXVJa0K.gif’ would decode to the output from the ‘whoami’ command executed on the infected device:
the user is:
bobbyrauch6274\bobbyrauIkBáë
The threat actors can continue using the GIFShell server to send more GIFs, with further embedded commands to execute, and continue to receive the output when Microsoft attempts to retrieve the GIFs.
As these requests are made by the Microsoft website, urlp.asm.skype.com, used for regular Microsoft Teams communication, the traffic will be seen as legitimate and not detected by security software.
This allows the GIFShell attack to covertly exfiltrate data by mixing the output of their commands with legitimate Microsoft Teams network communication.
Even worse, as Microsoft Teams runs as a background process, it does not even need to be opened by the user to receive the attacker’s commands to execute.
The Microsoft Teams logs folder have also been found accessed by other programs, including business monitoring software, such as Veriato, and potentially malware.
Microsoft acknowledged the research but said it would not be fixed as no security boundaries were bypassed.
“For this case, 72412, while this is great research and the engineering team will endeavor to improve these areas over time, these all are post exploitation and rely on a target already being compromised,” Microsoft told Rauch in an email shared with BleepingComputer.
“No security boundary appears to be bypassed. The product team will review the issue for potential future design changes, but this would not be tracked by the security team.”
Abusing Microsoft teams for phishing attacks
As we previously said, the GIFShell attack requires the installation of an executable that executes commands received within the GIFs.
To aid in this, Rauch discovered Microsoft Teams flaws that allowed him to send malicious files to Teams users but spoof them to look as harmless images in phishing attacks.
“This research demonstrates how it is possible to send highly convincing phishing attachments to victims through Microsoft Teams, without any way for a user to pre-screen whether the linked attachment is malicious or not,” explains Rauch in his writeup on the phishing method.
As we previously said in our discussion about GIFShell, Microsoft Teams allows Microsoft Teams users to message users in other Tenants by default.
However, to prevent attackers from using Microsoft Teams in malware phishing attacks, Microsoft does not allow external users to send attachments to members of another tenant.
While playing with attachments in Microsoft Teams, Rauch discovered that when someone sends a file to another user in the same tenant, Microsoft generates a Sharepoint link that is embedded in a JSON POST request to the Teams endpoint.
This JSON message, though, can then be modified to include any download link an attacker wants, even external links. Even worse, when the JSON is sent to a user via Teams’ conversation endpoint, it can also be used to send attachments as an external user, bypassing Microsoft Teams’ security restrictions.
For example, the JSON below has been modified to show a file name of Christmas_Party_Photo.jpeg but actually delivers a remote Christmas_Party_Photo.jpeg………….exe executable.
Microsoft Teams JSON to spoof an attachment Source: Bobby Rauch
When the attachment is rendered in Teams, it is displayed as Christmas_Party_Photo.jpeg, and when highlighting it, it will continue to show that name, as shown below.
Spoofing a JPEG file Source: Bobby Rauch
However, when the user clicks on the link, the attachment will download the executable from the attacker’s server.
In addition to using this Microsoft Teams spoofing phishing attack to send malicious files to external users, attackers can also modify the JSON to use Windows URIs, such as ms-excel:, to automatically launch an application to retrieve a document.
Rauch says this would allow attackers to trick users into connecting to a remote network share, letting threat actors steal NTLM hashes, or local attackers perform an NTLM relay attack to elevate privileges.
“These allowed, potentially unsafe URI schemes, combined with the lack of permissions enforcement and attachment spoofing vulnerabilities, can allow for a One Click RCE via NTLM relay in Microsoft Teams,” Rauch explains in his report on the spoofing attack.
Microsoft not immediately fixing bugs
Rauch told BleepingComputer that he disclosed the flaws to Microsoft in May and June of 2022, and despite Microsoft saying they were valid issues, they decided not to fix them immediately.
When BleepingComputer contacted Microsoft about why the bugs were not fixed, we were not surprised by their response regarding the GIFShell attack technique, as it requires the device to already be compromised with malware.
“This type of phishing is important to be aware of and as always, we recommend that users practice good computing habits online, including exercising caution when clicking on links to web pages, opening unknown files, or accepting file transfers.
We’ve assessed the techniques reported by this researcher and have determined that the two mentioned do not meet the bar for an urgent security fix. We’re constantly looking at new ways to better resist phishing to help ensure customer security and may take action in a future release to help mitigate this technique.” – a Microsoft spokesperson.
However, we were surprised that Microsoft did not consider the ability of external attackers to bypass security controls and send attachments to another tenant as not something that should be immediately fixed.
Furthermore, not immediately fixing the ability to modify JSON attachment cards so that Microsoft Teams recipients could be tricked to download files from remote URLs was also surprising.
However, Microsoft has left the door open to resolving these issues, telling BleepingComputer that they may be serviced in future versions.
“Some lower severity vulnerabilities that don’t pose an immediate risk to customers are not prioritized for an immediate security update, but will be considered for the next version or release of Windows,” explained Microsoft in a statement to BleepingComputer.
One month from today, we’re going to start to turn off basic auth for specific protocols in Exchange Online for customers who use them.
Since our first announcement nearly three years ago, we’ve seen millions of users move away from basic auth, and we’ve disabled it in millions of tenants to proactively protect them.
We’re not done yet though, and unfortunately usage isn’t yet at zero. Despite that, we will start to turn off basic auth for several protocols for tenants not previously disabled.
Starting October 1st, we will start to randomly select tenants and disable basic authentication access for MAPI, RPC, Offline Address Book (OAB), Exchange Web Services (EWS), POP, IMAP, Exchange ActiveSync (EAS), and Remote PowerShell. We will post a message to the Message Center 7 days prior, and we will post Service Health Dashboard notifications to each tenant on the day of the change.
We will not be disabling or changing any settings for SMTP AUTH.
If you have removed your dependency on basic auth, this will not affect your tenant or users. If you have not (or are not sure), check the Message Center for the latest data contained in the monthly usage reports we have been sending monthly since October 2021. The data for August 2022 will be sent within the first few days of September.
What If You Are Not Ready for This Change?
We recognize that unfortunately there are still many tenants unprepared for this change. Despite multiple blog posts, Message Center posts, interruptions of service, and coverage via tweets, videos, conference presentations and more, some customers are still unaware this change is coming. There are also many customers aware of the deadline who simply haven’t done the necessary work to avoid an outage.
Our goal with this effort has only ever been to protect your data and accounts from the increasing number of attacks we see that are leveraging basic auth.
However, we understand that email is a mission-critical service for many of our customers and turning off basic auth for many of them could potentially be very impactful.
One-Time Re-Enablement
Today we are announcing an update to our plan to offer customers who are unaware or are not ready for this change.
When we turn off basic auth after October 1st, all customers will be able to use the self-service diagnostic to re-enable basic auth for any protocols they need, once per protocol. Details on this process are below.
Once this diagnostic is run, basic auth will be re-enabled for those protocol(s). Selected protocol(s) will stay enabled for basic auth use until end of December 2022. During the first week of calendar year 2023, those protocols will be disabled for basic auth use permanently, and there will be no possibility of using basic auth after that.
Avoiding Disruption
If you already know you need more time and wish to avoid the disruption of having basic auth disabled you can run the diagnostics during the month of September, and when October comes, we will not disable basic for protocol(s) you specify. We will disable basic for any non-opted-out protocols, but you will be able to re-enable them (until the end of the year) by following the steps below if you later decide you need those too.
In other words – if you do not want basic for a specific protocol or protocols disabled in October, you can use the same self-service diagnostic in the month of September. Details on this process below.
Diagnostic Options
Thousands of customers have already used the self-service diagnostic we discussed in earlier blog posts (here and here) to re-enable basic auth for a protocol that had been turned off, or to tell us not to include them in our proactive protection expansion program. We’re using this same diagnostic again, but the workflow is changing a little.
Today, we have archived all prior re-enable and opt-out requests. If you have previously opted out or re-enabled basic for some protocol, you’ll need to follow the steps below during the month of September to indicate you want us to leave something enabled for basic auth after Oct 1.
To invoke the self-service diagnostic, you can go directly to the basic auth self-help diagnostic by simply clicking on this button (it’ll bring up the diagnostic in the Microsoft 365 admin center if you’re a tenant Global Admin):
Or you can open the Microsoft 365 admin center and click the green Help & support button in the lower right-hand corner of the screen.
When you click the button, you enter our self-help system. Here you can enter the phrase “Diag: Enable Basic Auth in EXO”
Customers with tenants in the Government Community Cloud (GCC) are unable to use the self-service diagnostic covered here. Those tenants may opt out by following the process contained in the Message Center post sent to their tenant today. If GCC customers need to re-enable a protocol following the Oct 1st deadline they will need to open a support ticket.
Opting Out
During the month of September 2022, the diagnostic will offer only the option to opt-out. By submitting your opt-out request during September, you are telling us that you do not want us to disable basic for a protocol or protocols during October. Please understand we will be disabling basic auth for all tenants permanently in January 2023, regardless of their opt-out status.
The diagnostic will show a version of the dialog below, and you can re-run it for multiple protocols. It might look a bit different if some protocols have already been disabled. Note too that protocols are not removed from the list as you opt-out but rest assured (unless you receive an error) we will receive the request.
Re-Enabling Basic for protocols
Starting October 1, the diagnostic will only allow you to re-enable basic auth for a protocol that it was disabled for.
If you did not opt-out during September, and we disabled basic for a protocol you later realize you need, you can use this to re-enable it.
Within an hour (usually much sooner) after you run the diagnostics and ask us to re-enable basic for a protocol, basic auth will start to work again.
At this point, we have to remind you that by re-enabling basic for a protocol, you are leaving your users and data vulnerable to security risks, and that we have customers suffering from basic auth-based attacks every single day (but you know that already).
Starting January 1, 2023, the self-serve diagnostic will no longer be available, and basic auth will soon thereafter be disabled for all protocols.
Summary of timelines and actions
Please see the following flow chart to help illustrate the changes and actions that you might need to take:
Blocking Basic Authentication Yourself
If you re-enable basic for a protocol because you need some extra time and then afterward no longer need basic auth you can block it yourself instead of waiting for us to do it in January 2023. The quickest and most effective way to do this is to use Authentication Policies which block basic auth connections at the first point of contact to Exchange Online.
Just go into the Microsoft 365 admin center, navigate to Settings, Org Settings, Modern Authentication and uncheck the boxes to block basic for all protocols you no longer need (these checkboxes will do nothing once we block basic for a protocol permanently, and we’ll remove them some time after January 2023).
Reporting Web Service Endpoint
For those of you using the Reporting Web Service REST endpoint to get access to Message Tracking Logs and more, we’re also announcing today that this service will continue to have basic auth enabled until Dec 31st for all customers, no opt-out or re-enablement is required. And, we’re pleased to be able to provide the long-awaited guidance for this too right here.
EOP/SCC PowerShell
Basic authentication will remain enabled until Dec 31st, 2022. Customers need to migrate to certificate based authentication. Follow the Instructions here: App-only authentication
One Other Basic Authentication Related Update
We’re adding a new capability to Microsoft 365 to help our customers avoid the risks posed by basic authentication. This new feature changes the default behavior of Office applications to block sign-in prompts using basic authentication. With this change, if users try to open Office files on servers that only use basic authentication, they won’t see any basic authentication sign-in prompts. Instead, they’ll see a message that the file has been blocked because it uses a sign-in method that may be insecure.
Office Team is looking for customers to opt-in to their Private Preview Program for this feature. Please send them an email if you are interested in signing up: basicauthdeprmailer@microsoft.com.
Summary
This effort has taken three years from initial communication until now, and even that has not been enough time to ensure that all customers know about this change and take all necessary steps. IT and change can be hard, and the pandemic changed priorities for many of us, but everyone wants the same thing: better security for their users and data.
Our customers are important to us, and we do not want to see them breached, or disrupted. It’s a fine balance but we hope this final option will allow the remaining customers using Basic auth to finally get rid of it.
The end of 2022 will see us collectively reach that goal, to Improve Security – Together.
In this article, we are going to talk about this and see what you can do to resolve the Error 740 Printer install error with some simple solutions. Some users are unable to add a Printer to their computer. When they try to do the same, they see the following error message.
That didn’t work We can’t install this printer right now. Try again later or contact your network administrator for help. Error: #740
Can’t install this printer right now #740?
Error message, Can’t install this printer right now, comes with error code: 740. The issue, sometimes, can be nothing more than a glitch. Windows is notorious for having glitches, and this can be one of them. However, as reports from other victims and from our own probing of this error code, we found the Printer wizard is unable to get installed on your system. The most common reason for this peculiar behavior is lack of administrative privilege, which is a bit weird as more often than not, the issue has been reported on an administrator system. We have mentioned all the solutions you need to resolve the issue later in this guide.
We can’t install this printer right now, Error 740
You can fix Error #740, We can’t install this printer right now on Windows 11/10 by following these suggestions:
Remove the Printer and restart your computer
Run Printer Wizard as an administrator
Disable UAC or User Account Control
Run Printer Troubleshooter
Create a new Administrator Account
Let us talk about them in detail.
1] Remove the Printer and restart your computer
Maybe the issue is nothing more than a glitch. This glitch can be resolved by just restarting the process. So, first up, try removing your printer, turn off your device and detach all the cables. Now, see if the issue is resolved. If the issue persists, try restarting your system. Make sure to not, click on the Restart button, instead, click on Shutdown and then reopen your system. Hopefully, this will do the job for you.
2] Run Printer Wizard as an administrator
If the issue was not a glitch, then this is the solution you need. After studying the error code for a while we stumbled upon a solution that worked for a lot of users. According to them, all you have to do to add the Printer is manually install the wizard with administrative privileges. So, open Command Prompt as an administrator and run the following command.
rundll32 printui.dll,PrintUIEntry /il
This should do the job for you.
3] Disable UAC or User Account Control
UAC or User Account Control helps in preventing malware from attacking and damaging your computer. Even though it is a good thing to have, sometimes, it can the reason for your issue, as in this case. You should try and disable UAC temporarily and see if it helps. Follow the given steps to do the same.
Open Run by Win + R.
Type useraccountcontrolsettings and click Ok.
Select Never and press OK.
Finally, retry adding your Printer. Hopefully, it will be added without any hassle.
4] Run Printer Troubleshooter
Next up, we are going to give put some load on your Operating System to resolve the issue. The Printer Troubleshooter is a utility that not only looks for the problem but also resolves it. We are going to deploy it and see if it helps.
Windows 11
Open Settings from the Start Menu.
Click System > Troubleshoot > Other troubleshooters.
Look for the Printer troubleshooter, and click on the Run button.
Windows 10
Open Settings.
Go to Update & Security > Additional troubleshooter.
Click Printer > Run the troubleshooter.
Let the troubleshooter do its job and then see if the issue persists. Hopefully, the troubleshooter will resolve the issue for you.
5] Create a new Administrator Account
Maybe there is an issue with your account. The issue can sometimes be a glitch, and sometimes, a misconfiguration. What you have to do is create a new account and retry adding your Printer. Follow the prescribed steps to do the same.
Launch Settings.
Go to Accounts and then to Family and other users.
Click on Add account from the Other users section.
Click on I don’t have this person’s sign-in information.
Select Add a user without a Microsoft account.
Enter the username you want and Security questions.
Finally, a user account will be created.
Now, click on Change account type.
Select Administrator > Ok.
Now, log out from your current account and log in to the newly created one.
There are two Error 740s that users are facing. One of them is, We can’t install this printer right now. Try again later or contact your network administrator for help, we have mentioned all the required solutions for this error in this post, but if you are looking for solutions for The requested operation requires elevation, then check our post.
Securing a Microsoft 365 tenant must start with identity.
Protecting identities is a fundamental part of Zero Trust and it’s the first “target” that most attackers look for. We used to say that attackers hack their way in, now we say they log in, using bought, found or stolen/phished credentials. This article will show you why MFA is so important and how to implement advanced security features in Azure AD such as PIM, Password protection, Conditional Access policies (also a strong part of Zero Trust), auditing and more.
Below is the first chapter from our free Microsoft 365 Security Checklist eBook. The Microsoft 365 Security Checklist shows you all the security settings and configurations you need to know for each M365 license to properly secure your environment. Download the full eBook and checklist spreadsheet.
Multi-Factor Authentication
It should be no surprise that we start with identity, it’s the new security perimeter or the new firewall and having a strong identity equals strong security. The first step to take here is implementing Multi Factor Authentication (MFA). It’s free for all Office / Microsoft tenants. If you want to use Conditional Access (CA) to enforce it (rather than just enabling users “in bulk”), you need Azure AD Premium P1+ licensing. A username and a simple password are no longer adequate (it never was, we just never had a simple, affordable, easy to use alternative) to protect your business.
Hand-in-hand with MFA you need user training. If your business is relying on users doing the right thing when they get the prompt on their phone – they MUST also know that if they get a prompt when they’re NOT logging in anywhere, they must click Block / No / Reject.
To enable MFA on a per-user basis, go to aad.portal.azure.com, login as an administrator, click Azure Active Directory – Security – MFA and click on the blue link “Additional cloud-based MFA settings”.
Additional MFA settings
There are two parts (tabs) on this page, “service settings” where you should disable app passwords (a workaround for legacy clients that don’t support MFA, shouldn’t be necessary in 2022), add trusted public IP addresses (so that users aren’t prompted when they’re in the corporate office – we and Microsoft recommend not using this setting), disabling Call and Text message to phone and remember MFA on trusted devices setting (1-365 days), Microsoft recommends either using CA policies to manage Sign-In frequency or setting this to 90 days. Phone call / text message MFA are not strong authentication methods and should not be used unless there’s no other choice.
On the user’s tab you can enable MFA for individual users or click bulk update and upload a CSV file with user accounts.
If you have AAD Premium P1, it’s better to use a CA policy to enforce MFA, it’s more flexible and the MFA settings page will eventually be retired.
Enforcing MFA with a Conditional Access Policy
A few words of caution, enabling MFA for all your administrators is a given today. Seriously, if you aren’t requiring every privileged account to use MFA (or 2FA / passwordless, see below), stop reading and go and do that right now. Yes, it’s an extra step and yes, you’ll get push back but there’s just no excuse – it’s simply unprofessional and you don’t belong in IT if you’re not using it. For what it is worth, I’ve been using Azure MFA for over seven years and require it for administrators at my clients – no exceptions.
Enabling MFA for all users is also incredibly important but takes some planning. You may have some users who refuse to run the Microsoft Authenticator app on their personal phone – ask for it to be put in their hiring contract. You need to train them as to why MFA is being deployed, what to do, both for authentic logins and malicious ones. Furthermore, you need to have a smooth process for enrolling new users and offboarding people who are leaving.
You should also strongly consider creating separate (cloud only) accounts for administrators. They don’t require a license and it separates the day-to-day work of a person who only performs administrative actions in your tenant occasionally (or use PIM, Chapter 10).
MFA protects you against 99.9% of identity-based attacks but it’s not un-phishable. Stronger alternatives include biometrics such as Windows Hello for Business (WHFB) and 2FA hardware keys which bring you closer to the ultimate in identity security: passwordless.
Legacy Authentication
However, it’s not enough to enable MFA for all administrators and users, the bad guys can still get in with no MFA prompt in sight. The reason is that Office 365 still supports legacy protocols that don’t support modern authentication / MFA. You need to disable these; you can’t just turn them off, you need to check if there are legitimate applications / workflows / scripts that use any of them. Go to aad.portal.azure.com, login as a Global Administrator, click Azure Active Directory – Monitoring – Sign-in logs. Change the time to last one month, and click Add filters, then click Client app and then None Selected, in the drop-down pick all 13 checkboxes under Legacy Authentication Clients and click Apply.
Filtering Azure AD Sign-in logs for legacy authentication
This will show you all the logins over the last month that used any of the legacy protocols. If you get a lot of results, add a filter for Status and add Success to filter out password stuffing attacks that failed. Make sure you check the four different tabs for interactive / non-interactive, service principals and managed identity sign-ins.
You’ll now need to investigate the logins. In my experience there will be some users who are using Android / Apple mail on smartphones; point them to the free Outlook app instead (Apple mail can be configured to use modern authentication). There’s also likely to be line-of-business (LOB) applications and printers / scanners that send emails via Office 365, so you’ll need updates for these. Alternatively, you can use another email service for these such as smtp2go.
Once you have eliminated all legitimate legacy authentication protocol usage you can disable it in two ways, it’s best to use both. Start by creating a Conditional Access policy based on the new template to block it, also go to admin.microsoft.com, Settings – Org settings – Services – Modern authentication and turn off basic authentication protocols.
Disable legacy authentication protocols in the M365 Admin Center
Break Glass accounts
Create at least one, preferably two break glass accounts, also known as emergency access accounts. These accounts are exempted from MFA, all CA policies and PIM (see below) and have very long (40 characters+), complex passwords. They’re only used if AAD MFA is down, for example, to gain access to your tenant to temporarily disable MFA or a similar setting, depending on the outage.
A second part to this is that you want to be notified if these accounts are ever used. One way to do this is to send your Azure AD sign-in logs to Azure Monitor (also known as Log Analytics), with instructions here. Another option is to use Microsoft Sentinel (which is built on top of Log Analytics) and create an Analytics rule.
Microsoft Sentinel alert rule when a Break Glass account is used
Security Defaults
If yours is a very small business, with few requirements for flexibility, the easiest way to set up Azure AD with MFA for everyone, plus several other security features enabled, is to turn on Security Defaults. Note that you can’t have break-glass accounts or other service accounts with Security Defaults as there’s no way to configure exceptions. Go to Properties for your Azure AD tenant and scroll to the bottom, and click on Manage Security defaults, here you can enable and disable it.
Privileged Identity Management
It’s worth investing in Azure Active Directory (AAD) Premium P2 for your administrator’s accounts and enabling Privileged Identity Management (PIM). This means their accounts are ordinary user accounts who are eligible to elevate their privileges to whatever administrator type they are assigned (see Chapter 10).
If you’re not using PIM, create dedicated admin accounts in AAD only. Don’t sync these accounts from on-premises but enforce MFA and strong passwords. Since they won’t be used for day-to-day work, they won’t require an M365 license.
Password Protection
After MFA, your second most important step is banning bad passwords. You’re probably aware that we’ve trained users to come up with bad passwords over the last few decades with “standard” policies (at least 8 characters, uppercase, lowercase, special character and numbers) which results in P@ssw0rd1 and when they’re forced to change it every 30 days, P@ssw0rd2. Both NIST in the US and GHCQ in the UK now recommends allowing (but not enforcing) the use of upper / lowercase etc., but not mandating frequent password changes and instead of checking the password at the time of creation against a list of known, common bad passwords and blocking those. In Microsoft’s world that’s called Password protection which is enabled for cloud accounts by default. There’s a global list of about 2000 passwords (and their variants) that Microsoft maintains, based on passwords they find in dumps, and you should add (up to 1000) company-specific words (brands, locations, C-suite people’s names, local sports teams, etc.) for your organization.
You find Password protection in the AAD portal – Security – Authentication Methods.
Password protection settings
Remember, you don’t have to add common passwords to the list, they’re already managed by Microsoft, just add company / region specific words that your staff are likely to use.
If you’re syncing accounts from Active Directory on-premises to AAD, you should also extend Password protection to your DCs. It involves the installation of an agent on each DC, a proxy agent, and a reboot of each DC.
Continuous Access Evaluation
This feature has been in preview for quite some time but is now in general availability. Before Continuous Access Evaluation (CAE), when you disabled a user’s account, or they changed location (from the office to a public Wi-Fi for example) it could be up to one hour before their state was re-evaluated and new policies applied, or they were blocked from accessing services. With CAE, this time is much shorter, in most cases in the order of a few minutes. It’s turned on by default for all tenants (unless you were part of the preview and intentionally disabled it). Another benefit of CAE is that tokens are now valid for 28 hours, letting people keep working during a shorter Azure AD outage. You can disable CAE in a CA policy, but it’s not recommended.
Conditional Access policies
We’ve mentioned Conditional Access (CA) policies several times already as it’s a crucial component of strong identity security and Zero Trust. Unlike other recommendations, there isn’t a one size fit all set of CA policies we can give you, however (at a minimum) you should have policies for:
Require MFA for admins (see MFA above)
Require MFA for users (see MFA above)
Require MFA for Azure management
Block legacy authentication (see MFA above)
Require compliant or Hybrid AAD joined device for admins
Require compliant or Hybrid AAD joined device for users
Block access to M365 from outside your country
Require MFA for risky sign-ins (if you have AAD Premium P2)
Require password change for high-risk users (if you have AAD Premium P2)
This is all going to be a lot easier going forward with the new policy templates for identity and devices. Go to Azure AD – Security – Conditional Access – New policy – Create a new policy from templates. Another step to take is to create a system for managing the lifecycle of policies and there’s an API for backing up and updating policies, that you can access in several ways, including PowerShell. There’s even a tutorial to set up a backup system using a Logic App.
Conditional Access policy templates for identity
A common question is if there’s a priority when policies are evaluated and there isn’t, they’re all processed together for a particular sign-in, from a specific device and location to an individual application. If there are multiple policies with different controls (MFA + compliant device), all controls must be fulfilled for access. And if there are conflicting policies with different access (block vs grant), block access will win.
To get you started, here are the step-by-step instructions for a policy blocking access to M365 from outside your country, appropriate for most small and medium businesses that only operate in one or a few countries. Keep in mind that travelling staff may be caught out by this so make sure you align with business objectives and be aware that this won’t stop every attack as a VPN or TOR exit node can make it appear as if the attacker is in your country, but it’s one extra step they must take. Remember, you don’t have to run faster than the Fancy Bear, just faster than other companies around you.
Start by going to Azure AD – Security – Conditional Access – Named locations and click +Countries location and call the location Blocked countries. Leave Determine location by IP address, a new feature is using GPS location from the Microsoft Authenticator app which will be more accurate once all your users are using Azure AD MFA (and therefore can be located via GPS). Click the box next to Name to select all countries, then find the one(s) that you need to allow login from and click Create.
Creating a Named Location for a Conditional Access Policy
Go to Azure AD – Security – Conditional Access – New policy – Create new policy and name your policy with a name that clearly defines what the policy does and adheres to your naming standard. Click on All Users… and Include All users and Exclude your Break Glass accounts.
Click on No cloud apps… and select All cloud apps. Select 0 conditions… and click Not configured under Locations. Pick Selected locations under Include and select your newly created location. Finally, under Access controls – Grant, click 0 controls selected and then Block access.
CA policies can be either in Report-only mode where you can look at reports of what they would have blocked and control they would have enforced, or they can be turned on / off. Report-only can be handy to make sure you don’t get fired for accidentally locking everyone out but turn this policy on as soon as possible.
Conditional Access policy to block logins from outside Australia
A common question is, how can I control how often users are prompted for MFA or signing in again? While it might be counterintuitive, the default in Azure AD is a rolling windows of 90 days. Remember, if you change a user’s password, block non-compliant devices, or disable an account (plus any number of other CA policies you have in place that might affect the security posture of the session), it’ll automatically require new authentications. Don’t prompt the users for authentication when nothing has changed because if you do it too frequently, they’re more likely to approve a malicious login.
Branding Log-on Pages
While in the Azure AD portal, click on Company branding and add a company-specific Sign-in page background image (1920x1080px) and a Banner logo (280x60px). Note that these files have to be small (300 KB and 10 KB respectively) so you may have to do some fancy compression. This isn’t just a way to make users feel at home when they see a login page, in most cases when attackers send phishing emails to harvest credentials, they’ll send users to a fake login page that looks like the generic Office 365 one, not your custom one which is another clue that should alert your users to the danger. Also – Windows Autopilot doesn’t work unless you have customized AAD branding.
Edit Azure AD Company Branding images
Self Service Password Reset
The benefit of Self Service Password Reset (SSPR) is to lower the load on your help desk to manage password resets for users. Once enabled, users must register various ways of being identified when they’re resetting their password, mobile app notification/code, email (non-Office 365), mobile/office phone call, security questions (not available to administrators, plus you can create custom questions). If you are synchronizing user accounts from AD to Azure AD, take care in setting up SSPR as the passwords must be written back to AD from the cloud once changed.
Configuring Self Service Password Reset in Azure AD
Unified Auditing
Not restricted to security but nevertheless, a fundamental building block is auditing across Microsoft 365. Go to the Microsoft 365 Defender portal and find Audit in the left-hand menu (it’s almost at the end). If for some reason unified auditing isn’t enabled in your tenant a yellow banner will give you a button to turn it on (it’s on by default for new tenants). Once enabled, click the Audit retention policies tab, and create a policy for your tenant. You want to ensure that you have logs to investigate if there’s a breach and you want them kept for as long as possible.
With Business Premium you get a maximum of 90 days of retention and Microsoft 365 E5 gives you one year, but you want to make sure to create a policy to set this, rather than rely on the default policy (which you can’t see). Give the policy a name, a description and add all the record types, one by one. This policy will now apply to all users (including new ones that are created) for all activities. Only use the Users option when you want to have a specific policy for a particular user. Give the policy a priority, 1 is the highest and 10,000 is the lowest.
Create an audit retention policy for maximum retention
Integrating applications into Azure AD
One of the most powerful but often overlooked features (at least in SMBs) is the ability to use Azure AD to publish applications to your users. Users can go to myapps.microsoft.com (or office.com) and see tiles for all applications they have access to. But there’s more to that story. Say, for example, you have a shared, corporate Twitter account that a few executives and marketing staff should have access to. Instead of sharing a password amongst them all and having to remember to reset it if someone leaves the organization, you can create a security group in AAD, add the relevant users, link Twitter to the group and they’ll automatically have access – without knowing the password to the account. There are a lot more actions you can take here to simplify access and secure management of applications, here’s more information.
Azure AD Connect
If you’re synchronizing accounts from Active Directory to Azure Active Directory (AAD), check the configuration of AAD Connect and make sure you’re not replicating an entire domain or forest to AAD. There’s no reason that service accounts etc. should be exposed in both directories, start the AAD Connect wizard on the server where it’s installed and double-check that only relevant OUs are synchronized. One other thing to note here is the fact that any machine running Azure AD Connect should be treated with the same care (in terms of security) as a domain controller. This is because AAD Connect requires the same level of access as AD itself and has the ability to read password hashes. Making sure security best practices for access, patching, etc. are followed to the letter for the system running AAD connect is critically important.
The M365 Identity Checklist
Work through the Identity checklist.
Enable MFA for administrators
Enable MFA for users
Create cloud-only administrator accounts for privileged users / occasional administrators
Disable app passwords
(Configure trusted IPs)
Disable text message MFA
Disable phone call MFA
Remember MFA trusted devices 90 days
Train staff in using MFA correctly
Use Windows Hello where possible
Use FIDO2 / 2FA keys where possible
Investigate legacy authentication protocol usage in AAD Sign-in logs
Block legacy authentication with CA Policy
Block legacy authentication in M365 Admin Center
Create two Break glass accounts and exempt from MFA, CA Policies etc.
Configure alerting if a Break glass account is used
Enable Security Defaults in AAD (consider the limitations)
Enable PIM (AAD Premium P2) for all admin users
Add organization-specific words to Password protection
Deploy Password protection in AD on-premises
CA Policy Require MFA for admins
CA Policy Require MFA for users
CA Policy Require MFA for Azure management
CA Policy Block legacy authentication
CA Policy Require compliant or Hybrid AAD joined device for admins
CA Policy Require compliant or Hybrid AAD joined device for users
CA Policy Block access to M365 from outside your country
Require MFA for risky sign-ins [Only for E5)
Require password change for high-risk users [Only for E5)
Create custom branding logos and text in Azure AD
Enable and configure Self Service Password Reset, including password writeback
Go Further than Identity to Protect your M365 Tenant
There you have it, all the most important steps to take to make sure your users’ identities are kept secure, and therefore your tenant and its data also safeguarded. Keen to learn and do more?
The Microsoft 365 Security Checklist has another nine chapters of security recommendations each with its own checklist for:
This article addresses some common questions about WSUS maintenance for Configuration Manager environments.
Original product version: Windows Servers, Windows Server Update Services, Configuration Manager Original KB number: 4490644
Introduction
Questions are often along the lines of How should I properly run this maintenance in a Configuration Manager environment, or How often should I run this maintenance. It’s not uncommon for conscientious Configuration Manager administrators to be unaware that WSUS maintenance should be run at all. Most of us just set up WSUS servers because it’s a prerequisite for a software update point (SUP). Once the SUP is set up, we close the WSUS console and pretend it doesn’t exist. Unfortunately, it can be problematic for Configuration Manager clients, and the overall performance of the WSUS/SUP server.
With the understanding that this maintenance needs to be done, you’re wondering what maintenance you need to do and how often you need to be doing it. The answer is that you should perform monthly maintenance. Maintenance is easy and doesn’t take long for WSUS servers that have been well maintained from the start. However, if it has been some time since WSUS maintenance was done, the cleanup may be more difficult or time consuming the first time. It will be much easier or faster in subsequent months.
Maintain WSUS while supporting Configuration Manager current branch version 1906 and later versions
If you are using Configuration Manager current branch version 1906 or later versions, we recommend that you enable the WSUS Maintenance options in the software update point configuration at the top-level site to automate the cleanup procedures after each synchronization. It would effectively handle all cleanup operations described in this article, except backup and reindexing of WSUS database. You should still automate backup of WSUS database along with reindexing of the WSUS database on a schedule.
For more information about software update maintenance in Configuration Manager, see Software updates maintenance.
Before you start the maintenance process, read all of the information and instructions in this article.
When using WSUS along with downstream servers, WSUS servers are added from the top down, but should be removed from the bottom up. When syncing or adding updates, they go to the upstream WSUS server first, then replicate down to the downstream servers. When performing a cleanup and removing items from WSUS servers, you should start at the bottom of the hierarchy.
WSUS maintenance can be performed simultaneously on multiple servers in the same tier. When doing so, ensure that one tier is done before moving onto the next one. The cleanup and reindex steps described below should be run on all WSUS servers, regardless of whether they are a replica WSUS server or not. For more information about determining if a WSUS server is a replica, see Decline superseded updates.
Ensure that SUPs don’t sync during the maintenance process, as it may cause a loss of some work already done. Check the SUP sync schedule and temporarily set it to manual during this process.
If you have multiple SUPs of the primary site or central administration sit (CAS) which don’t share the SUSDB, consider the WSUS server that syncs with the first SUP on the site as residing in a tier below the site. For example, my CAS site has two SUPs:
The one named New syncs with Microsoft Update, it would be my top tier (Tier1).
The server named 2012 syncs with New, and it would be considered in the second tier. It can be cleaned up at the same time I would do all my other Tier2 servers, such as my primary site’s single SUP.
Perform WSUS maintenance
The basic steps necessary for proper WSUS maintenance include:
Back up the WSUS database (SUSDB) by using the desired method. For more information, see Create a Full Database Backup.
Create custom indexes
This process is optional but recommended, it greatly improves performance during subsequent cleanup operations.
If you are using Configuration Manager current branch version 1906 or a later version, we recommend that you use Configuration Manager to create the indexes. To create the indexes, configure the Add non-clustered indexes to the WSUS database option in the software update point configuration for the top-most site.
If you use an older version of Configuration Manager or standalone WSUS servers, follow these steps to create custom indexes in the SUSDB database. For each SUSDB, it’s a one-time process.
Make sure that you have a backup of the SUSDB database.
Use SQL Management Studio to connect to the SUSDB database, in the same manner as described in the Reindex the WSUS database section.
Run the following script against SUSDB, to create two custom indexes:SQLCopy-- Create custom index in tbLocalizedPropertyForRevision USE [SUSDB] CREATE NONCLUSTERED INDEX [nclLocalizedPropertyID] ON [dbo].[tbLocalizedPropertyForRevision] ( [LocalizedPropertyID] ASC )WITH (PAD_INDEX = OFF, STATISTICS_NORECOMPUTE = OFF, SORT_IN_TEMPDB = OFF, DROP_EXISTING = OFF, ONLINE = OFF, ALLOW_ROW_LOCKS = ON, ALLOW_PAGE_LOCKS = ON) ON [PRIMARY] -- Create custom index in tbRevisionSupersedesUpdate CREATE NONCLUSTERED INDEX [nclSupercededUpdateID] ON [dbo].[tbRevisionSupersedesUpdate] ( [SupersededUpdateID] ASC )WITH (PAD_INDEX = OFF, STATISTICS_NORECOMPUTE = OFF, SORT_IN_TEMPDB = OFF, DROP_EXISTING = OFF, ONLINE = OFF, ALLOW_ROW_LOCKS = ON, ALLOW_PAGE_LOCKS = ON) ON [PRIMARY] If custom indexes have been previously created, running the script again results in an error similar to the following one:Msg 1913, Level 16, State 1, Line 4 The operation failed because an index or statistics with name ‘nclLocalizedPropertyID’ already exists on table ‘dbo.tbLocalizedPropertyForRevision’.
The steps to connect to SUSDB and perform the reindex differ, depending on whether SUSDB is running in SQL Server or Windows Internal Database (WID). To determine where SUSDB is running, check value of the SQLServerName registry entry on the WSUS server located at the HKEY_LOCAL_MACHINE\Software\Microsoft\Update Services\Server\Setup subkey.
If the value contains just the server name or server\instance, SUSDB is running on a SQL Server. If the value includes the string ##SSEE or ##WID in it, SUSDB is running in WID, as shown:
If SUSDB was installed on WID
If SUSDB was installed on WID, SQL Server Management Studio Express must be installed locally to run the reindex script. Here’s an easy way to determine which version of SQL Server Management Studio Express to install:
For Windows Server 2012 or later versions:
Go to C:\Windows\WID\Log and find the error log that contains the version number.
Go to C:\Windows\SYSMSI\SSEE\MSSQL.2005\MSSQL\LOG and open up the last error log with Notepad. At the top, there will be a version number (for example 9.00.4035.00 x64). Look up the version number in How to determine the version, edition and update level of SQL Server and its components. This version number tells you what Service Pack level it’s running. Include the SP level when searching the Microsoft Download Center for SQL Server Management Studio Express.
After installing SQL Server Management Studio Express, launch it, and enter the server name to connect to:
If the OS is Windows Server 2012 or later versions, use \\.\pipe\MICROSOFT##WID\tsql\query.
If the OS is older than Windows Server 2012, enter \\.\pipe\MSSQL$MICROSOFT##SSEE\sql\query.
For WID, if errors similar to the following occur when attempting to connect to SUSDB using SQL Server Management Studio (SSMS), try launching SSMS using the Run as administrator option.
If SUSDB was installed on SQL Server
If SUSDB was installed on full SQL Server, launch SQL Server Management Studio and enter the name of the server (and instance if needed) when prompted.
Tip
Alternatively, a utility called sqlcmd can be used to run the reindex script. For more information, see Reindex the WSUS Database.
Running the script
To run the script in either SQL Server Management Studio or SQL Server Management Studio Express, select New Query, paste the script in the window, and then select Execute. When it’s finished, a Query executed successfully message will be displayed in the status bar. And the Results pane will contain messages related to what indexes were rebuilt.
Decline superseded updates
Decline superseded updates in the WSUS server to help clients scan more efficiently. Before declining updates, ensure that the superseding updates are deployed, and that superseded ones are no longer needed. Configuration Manager includes a separate cleanup, which allows it to expire superseded updates based on specified criteria. For more information, see the following articles:
The following SQL query can be run against the SUSDB database, to quickly determine the number of superseded updates. If the number of superseded updates is higher than 1500, it can cause various software update related issues on both the server and client sides.
SQLCopy
-- Find the number of superseded updates
Select COUNT(UpdateID) from vwMinimalUpdate where IsSuperseded=1 and Declined=0
If you are using Configuration Manager current branch version 1906 or a later version, we recommend that you automatically decline the superseded updates by enabling the Decline expired updates in WSUS according to supersedence rules option in the software update point configuration for the top-most site.
When you use this option, you can see how many updates were declined by reviewing the WsyncMgr.log file after the synchronization process finishes. If you use this option, you don’t need to use the script described later in this section (either by manually running it or by setting up as task to run it on a schedule).
If you are using standalone WSUS servers or an older version of configuration Manager, you can manually decline superseded updates by using the WSUS console. Or you can run this PowerShell script. Then, copy and save the script as a Decline-SupersededUpdatesWithExclusionPeriod.ps1 script file.
Note
This script is provided as is. It should be fully tested in a lab before you use it in production. Microsoft makes no guarantees regarding the use of this script in any way. Always run the script with the -SkipDecline parameter first, to get a summary of how many superseded updates will be declined.
If Configuration Manager is set to Immediately expire superseded updates (see below), the PowerShell script can be used to decline all superseded updates. It should be done on all autonomous WSUS servers in the Configuration Manager/WSUS hierarchy.
You don’t need to run the PowerShell script on WSUS servers that are set as replicas, such as secondary site SUPs. To determine whether a WSUS server is a replica, check the Update Source settings.
If updates are not configured to be immediately expired in Configuration Manager, the PowerShell script must be run with an exclusion period that matches the Configuration Manager setting for number of days to expire superseded updates. In this case, it would be 60 days since SUP component properties are configured to wait two months before expiring superseded updates:
The following command lines illustrate the various ways that the PowerShell script can be run (if the script is being run on the WSUS server, LOCALHOST can be used in place of the actual SERVERNAME):
Running the script with a -SkipDecline and -ExclusionPeriod 60 to gather information about updates on the WSUS server, and how many updates could be declined:
Running the script with -ExclusionPeriod 60, to decline superseded updates older than 60 days:
The output and progress indicators are displayed while the script is running. Note the SupersededUpdates.csv file, which will contain a list of all updates that are declined by the script:
After superseded updates have been declined, for best performance, SUSDB should be reindexed again. For related information, see Reindex the WSUS database.
Run the WSUS Server Cleanup Wizard
WSUS Server Cleanup Wizard provides options to clean up the following items:
Unused updates and update revisions (also known as Obsolete updates)
Computers not contacting the server
Unneeded update files
Expired updates
Superseded updates
In a Configuration Manager environment, Computers not contacting the server and Unneeded update files options are not relevant because Configuration Manager manages software update content and devices, unless either the Create all WSUS reporting events or Create only WSUS status reporting events options are selected under Software Update Sync Settings. If you have one of these options configured, you should consider automating the WSUS Server Cleanup to perform cleanup of these two options.
If you are using Configuration Manager current branch version 1906 or a later version, enabling the Decline expired updates in WSUS according to supersedence rules option handles declining of Expired updates and Superseded updates based on the supersedence rules that are specified in Configuration Manager. Enabling the Remove obsolete updates from the WSUS database option in Configuration Manager current branch version 1906 handles the cleanup of Unused updates and update revisions (Obsolete updates). It’s recommended to enable these options in the software update point configuration on the top-level site to allow Configuration Manager to clean up the WSUS database.
If you’ve never cleaned up obsolete updates from WSUS database before, this task may time out. You can review WsyncMgr.log for more information, and manually run the SQL script that is specified in HELP! My WSUS has been running for years without ever having maintenance done and the cleanup wizard keeps timing out once, which would allow subsequent attempts from Configuration Manager to run successfully. For more information about WSUS cleanup and maintenance in Configuration Manager, see the docs.
For standalone WSUS servers, or if you are using an older version of Configuration Manager, it is recommended that you run the WSUS Cleanup wizard periodically. If the WSUS Server Cleanup Wizard has never been run and the WSUS has been in production for a while, the cleanup may time out. In that case, reindex with step 2 and step 3 first, then run the cleanup with only the Unused updates and update revisions option checked.
If you have never run WSUS Cleanup wizard, running the cleanup with Unused updates and update revisions may require a few passes. If it times out, run it again until it completes, and then run each of the other options one at a time. Lastly make a full pass with all options checked. If timeouts continue to occur, see the SQL Server alternative in HELP! My WSUS has been running for years without ever having maintenance done and the cleanup wizard keeps timing out. It may take multiple hours or days for the Server Cleanup Wizard or SQL alternative to run through completion.
The WSUS Server Cleanup Wizard runs from the WSUS console. It is located under Options, as shown here:
After it reports the number of items it has removed, the cleanup finishes. If you do not see this information returned on your WSUS server, it is safe to assume that the cleanup timed out. In that case, you will need to start it again or use the SQL alternative.
After superseded updates have been declined, for best performance, SUSDB should be reindexed again. See the Reindex the WSUS database section for related information.
Troubleshooting
HELP! My WSUS has been running for years without ever having maintenance done and the cleanup wizard keeps timing out
There are two different options here:
Reinstall WSUS with a fresh database. There are a number of caveats related to this, including length of initial sync, and full client scans against SUSDB, versus differential scans.
Ensure you have a backup of the SUSDB database, then run a reindex. When that completes, run the following script in SQL Server Management Studio or SQL Server Management Studio Express. After it finishes, follow all of the above instructions for running maintenance. This last step is necessary because the spDeleteUpdate stored procedure only removes unused updates and update revisions.
DECLARE @var1 INT
DECLARE @msg nvarchar(100)

CREATE TABLE #results (Col1 INT)
INSERT INTO #results(Col1) EXEC spGetObsoleteUpdatesToCleanup

DECLARE WC Cursor
FOR
SELECT Col1 FROM #results

OPEN WC
FETCH NEXT FROM WC
INTO @var1
WHILE (@@FETCH_STATUS > -1)
BEGIN SET @msg = 'Deleting' + CONVERT(varchar(10), @var1)
RAISERROR(@msg,0,1) WITH NOWAIT EXEC spDeleteUpdate @localUpdateID=@var1
FETCH NEXT FROM WC INTO @var1 END

CLOSE WC
DEALLOCATE WC

DROP TABLE #results
Running the Decline-SupersededUpdatesWithExclusionPeriod.ps1 script times out when connecting to the WSUS server, or a 401 error occurs while running
If errors occur when you attempt to use the PowerShell script to decline superseded updates, an alternative SQL script can be run against SUDB.
If Configuration Manager is used along with WSUS, check Software Update Point Component Properties > Supersedence Rules to see how quickly superseded updates expire, such as immediately or after X months. Make a note of this setting.
Use SQL Server Management Studio to connect to SUSDB.
Run the following query. The number 90 in the line that includes DECLARE @thresholdDays INT = 90 should correspond with the Supersedence Rules from step 1 of this procedure, and the correct number of days that aligns with the number of months that is configured in Supersedence Rules. If this is set to expire immediately, the value in the SQL query for @thresholdDays should be set to zero.SQLCopy-- Decline superseded updates in SUSDB; alternative to Decline-SupersededUpdatesWithExclusionPeriod.ps1 DECLARE @thresholdDays INT = 90 -- Specify the number of days between today and the release date for which the superseded updates must not be declined (i.e., updates older than 90 days). This should match configuration of supersedence rules in SUP component properties, if ConfigMgr is being used with WSUS. DECLARE @testRun BIT = 0 -- Set this to 1 to test without declining anything. -- There shouldn't be any need to modify anything after this line. DECLARE @uid UNIQUEIDENTIFIER DECLARE @title NVARCHAR(500) DECLARE @date DATETIME DECLARE @userName NVARCHAR(100) = SYSTEM_USER DECLARE @count INT = 0 DECLARE DU CURSOR FOR SELECT MU.UpdateID, U.DefaultTitle, U.CreationDate FROM vwMinimalUpdate MU JOIN PUBLIC_VIEWS.vUpdate U ON MU.UpdateID = U.UpdateId WHERE MU.IsSuperseded = 1 AND MU.Declined = 0 AND MU.IsLatestRevision = 1 AND MU.CreationDate < DATEADD(dd,-@thresholdDays,GETDATE()) ORDER BY MU.CreationDate PRINT 'Declining superseded updates older than ' + CONVERT(NVARCHAR(5), @thresholdDays) + ' days.' + CHAR(10) OPEN DU FETCH NEXT FROM DU INTO @uid, @title, @date WHILE (@@FETCH_STATUS > - 1) BEGIN SET @count = @count + 1 PRINT 'Declining update ' + CONVERT(NVARCHAR(50), @uid) + ' (Creation Date ' + CONVERT(NVARCHAR(50), @date) + ') - ' + @title + ' ...' IF @testRun = 0 EXEC spDeclineUpdate @updateID = @uid, @adminName = @userName, @failIfReplica = 1 FETCH NEXT FROM DU INTO @uid, @title, @date END CLOSE DU DEALLOCATE DU PRINT CHAR(10) + 'Attempted to decline ' + CONVERT(NVARCHAR(10), @count) + ' updates.'
To check progress, monitor the Messages tab in the Results pane.
What if I find out I needed one of the updates that I declined?
If you decide you need one of these declined updates in Configuration Manager, you can get it back in WSUS by right-clicking the update, and selecting Approve. Change the approval to Not Approved, and then resync the SUP to bring the update back in.
If the update is no longer in WSUS, it can be imported from the Microsoft Update Catalog, if it hasn’t been expired or removed from the catalog.
Automating WSUS maintenance
Note
If you are using Configuration Manager version1906 or a later version, automate the cleanup procedures by enabling the WSUS Maintenance options in the software update point configuration of the top-level site. These options handle all cleanup operations that are performed by the WSUS Server Cleanup Wizard. However, you should still automatically back up and reindex the WSUS database on a schedule.
WSUS maintenance tasks can be automated, assuming that a few requirements are met first.
If you have never run WSUS cleanup, you need to do the first two cleanups manually. Your second manual cleanup should be run 30 days from your first since it takes 30 days for some updates and update revisions to age out. There are specific reasons for why you don’t want to automate until after your second cleanup. Your first cleanup will probably run longer than normal. So you can’t judge how long this maintenance will normally take. The second cleanup is a much better indicator of what is normal for your machines. This is important because you need to figure out about how long each step takes as a baseline (I also like to add about 30-minutes wiggle room) so that you can determine the timing for your schedule.
If you have downstream WSUS servers, you will need to perform maintenance on them first, and then do the upstream servers.
To schedule the reindex of the SUSDB, you will need a full version of SQL Server. Windows Internal Database (WID) doesn’t have the capability of scheduling a maintenance task though SQL Server Management Studio Express. That said, in cases where WID is used you can use the Task Scheduler with SQLCMD mentioned earlier. If you go this route, it’s important that you don’t sync your WSUS servers/SUPs during this maintenance period! If you do, it’s possible your downstream servers will just end up resyncing all of the updates you just attempted to clean out. I schedule this overnight before my AM sync, so I have time to check on it before my sync runs.
Setting up the WSUS Cleanup task in Task Scheduler
Note
As mentioned previously, if you are using Configuration Manager current branch version 1906 or a later version, automate the cleanup procedures by enabling the WSUS Maintenance options in the software update point configuration of the top-level site. For standalone WSUS servers or older versions of Configuration Manager, you can continue to use the following steps.
The Weekend Scripter blog post mentioned in the previous section contains basic directions and troubleshooting for this step. However, I’ll walk you through the process in the following steps.
Open Task Scheduler and select Create a Task. On the General tab, set the name of the task, the user that you want to run the PowerShell script as (most people use a service account). Select Run whether a user is logged on or not, and then add a description if you wish.
Under the Actions tab, add a new action and specify the program/script you want to run. In this case, we need to use PowerShell and point it to the PS1 file we want it to run. You can use the WSUS Cleanup script. This script performs cleanup options that Configuration Manager current branch version 1906 doesn’t do. You can uncomment them if you are using standalone WSUS or an older version of Configuration Manager. If you would like a log, you can modify the last line of the script as follows:PowerShellCopy[reflection.assembly]::LoadWithPartialName("Microsoft.UpdateServices.Administration") | out-null $wsus = [Microsoft.UpdateServices.Administration.AdminProxy]::GetUpdateServer(); $cleanupScope = new-object Microsoft.UpdateServices.Administration.CleanupScope; # $cleanupScope.DeclineSupersededUpdates = $true # Performed by CM1906 # $cleanupScope.DeclineExpiredUpdates = $true # Performed by CM1906 # $cleanupScope.CleanupObsoleteUpdates = $true # Performed by CM1906 $cleanupScope.CompressUpdates = $true $cleanupScope.CleanupObsoleteComputers = $true $cleanupScope.CleanupUnneededContentFiles = $true $cleanupManager = $wsus.GetCleanupManager(); $cleanupManager.PerformCleanup($cleanupScope) | Out-File C:\WSUS\WsusClean.txt; You’ll get an FYI/warning in Task Scheduler when you save. You can ignore this warning.
On the Triggers tab, set your schedule for once a month or on any schedule you want. Again, you must ensure that you don’t sync your WSUS during the entire cleanup and reindex time.
Set any other conditions or settings you would like to tweak as well. When you save the task, you may be prompted for credentials of the Run As user.
You can also use these steps to configure the Decline-SupersededUpdatesWithExclusionPeriod.ps1 script to run every three months. I usually set this script to run before the other cleanup steps, but only after I have run it manually and ensured it completed successfully. I run at 12:00 AM on the first Sunday every three months.
Setting up the SUSDB reindex for WID using SQLCMD and Task Scheduler
Schedule this task to start about 30 minutes after you expect your cleanup to finish running. My cleanup is running at 1:00 AM every first Sunday. It takes about 30 minutes to run and I am going to give it another 30 minutes before starting my reindex. It means I would schedule this task for every first Sunday at 2:00 AM, as shown here:
Select the action to Start a program. In the Program/script box, type the following command. The file specified after the -i parameter is the path to the SQL script you saved in step 1. The file specified after the -o parameter is where you would like the log to be placed. Here’s an example:"C:\Program Files\Microsoft SQL Server\110\Tools\Binn\SQLCMD.exe" -S \\.\pipe\Microsoft##WID\tsql\query -i C:\WSUS\SUSDBMaint.sql -o c:\WSUS\reindexout.txt
You’ll get a warning, similar to the one you got when creating the cleanup task. Select Yes to accept the arguments, and then select Finish to apply:
You can test the script by forcing it to run and reviewing the log for errors. If you run into issues, the log will tell you why. Usually if it fails, the account running the task doesn’t have appropriate permissions or the WID service isn’t started.
Setting up a basic Scheduled Maintenance Task in SQL for non-WID SUSDBs
Note
You must be a sysadmin in SQL Server to create or manage maintenance plans.
Open SQL Server Management Studio and connect to your WSUS instance. Expand Management, right-click Maintenance Plans, and then select New Maintenance Plan. Give your plan a name.
Select subplan1 and then ensure your Toolbox is in context:
Drag and drop the task Execute T-SQL Statement Task:
Right-click it and select Edit. Copy and paste the WSUS reindex script, and then select OK:
Schedule this task to run about 30 minutes after you expect your cleanup to finish running. My cleanup is running at 1:00 AM every first Sunday. It takes about 30 minutes to run, and I am going to give it another 30 minutes before starting reindex. It means I would schedule this task to run every first Sunday at 2:00 AM.
While creating the maintenance plan, consider adding a backup of the SUSDB into the plan as well. I usually back up first, then reindex. It may add more time to the schedule.
Putting it all together
When running it in a hierarchy, the WSUS cleanup run should be done from the bottom of the hierarchy up. However, when using the script to decline superseded updates, the run should be done from the top down. Declining superseded updates is really a type of addition to an update rather than a removal. You’re actually adding a type of approval in this case.
Since a sync can’t be done during the actual cleanup, it’s suggested to schedule/complete all tasks overnight. Then check on their completion via the logging the following morning, before the next scheduled sync. If something failed, maintenance can be rescheduled for the next night, once the underlying issue is identified and resolved.
These tasks may run faster or slower depending on the environment, and timing of the schedule should reflect that. Hopefully they are faster since my lab environment tends to be a bit slower than a normal production environment. I am a bit aggressive on the timing of the decline scripts. If Tier2 overlaps Tier3 by a few minutes, it will not cause a problem because my sync isn’t scheduled to run.
Not syncing keeps the declines from accidentally flowing into my Tier3 replica WSUS servers from Tier2. I did give myself extra time between the Tier3 decline and the Tier3 cleanup since I definitely want to make sure the decline script finishes before running my cleanup.
It brings up a common question: Since I’m not syncing, why shouldn’t I run all of the cleanups and reindexes at the same time?
The answer is that you probably could, but I wouldn’t. If my coworker across the globe needs to run a sync, with this schedule I would minimize the risk of orphaned updates in WSUS. And I can schedule it to rerun to completion the next night.
Time
Tier
Tasks
12:00 AM
Tier1-Decline
12:15 AM
Tier2-Decline
12:30 AM
Tier3-Decline
1:00 AM
Tier3 WSUS Cleanup
2:00 AM
Tier3 Reindex
Tier2 WSUS Cleanup
3:00 AM
Tier1-Cleanup
Tier2 Reindex
4:00 AM
Tier1 Reindex
Note
If you’re using Configuration Manager current branch version 1906 or a later version to perform WSUS Maintenance, Configuration Manager performs the cleanup after synchronization using the top-down approach. In this scenario, you can schedule the WSUS database backup and reindexing jobs to run before the configured sync schedule without worrying about any of the other steps, because Configuration Manager will handle everything else.
For more information about SUP maintenance in Configuration Manager, see the following articles:
A new large-scale phishing campaign targeting Coinbase, MetaMask, Kraken, and Gemini users is abusing Google Sites and Microsoft Azure Web App to create fraudulent sites.
These phishing pages are promoted through comments posted to legitimate sites by a network of bots controlled by the threat actors. Posting links to phishing pages on various legitimate sites aims to increase traffic and boost the malicious site’s search engine rankings.
Furthermore, because the phishing sites are hosted in Microsoft and Google services, they aren’t flagged by automated moderator systems, allowing promotional messages to stay in the comment section for longer.
Comment containing multiple links to phishing pages(Netskope)
The new campaign was spotted by analysts at Netskope, who noted that this tactic has allowed some of the fraudulent sites to appear as the first result in Google Search.
Even worse, as shown below, Google has also included the phishing pages as featured snippets, giving them the highest exposure possible in the search results.
The first result for the given search term(Netskope)
Abusing legitimate services
Google Sites is a free web page creation tool, part of Google’s online service suite, allowing users to create websites and host them on Google Cloud or other providers.
Similarly, Microsoft’s Azure Web Apps is a platform helping users create, deploy, and manage web applications and websites.
Both services are trusted by internet security tools, offer competitive pricing and high availability, so they are a good option for creating phishing pages.
The crooks in the campaign seen by Netskope created sites that mimicked Metamask, Coinbase, Gemini, and Kraken, targeting people’s wallets and their assets.
The sites are just landing pages, and their visitors are redirected to the actual phishing sites when they click on the “login” buttons.
Landing page for Kraken phishing(Netskope)
Targeting wallets and services
The phishing campaign is currently attempting to steal MetaMask wallets and credentials for crypto exchanges, such as CoinBase, Kraken, and Gemini.
The MetaMask phishing site attempts to steal the user’s password and wallet’s secret recovery phrase (seed phrase). This information allows the threat actor to import the wallet on their own devices and drain the contents.
MetaMask phishing site asking the seed phrase(Netskope)
For the crypto exchange phishing pages, the threat actors attempt to steal their login credentials.
In all four cases, users who enter their credentials are redirected to a fake 2FA (two-factor authentication) page that requests the victim to provide their phone number.
After entering the code, the websites generate a fake error alleging unauthorized activity and authentication problems, prompting the victim to click on an “Ask Expert” button.
Bogus error message served to victims(Netskope)
This takes the victims to an online chat page where a scammer pretending to be a customer support agent promises to solve the problem by directing the victim to install the TeamViewer remote access tool.
The remote access is likely to allow the threat actors to retrieve the multi-factor authentication codes required to log in to the exchanges with the stolen credentials.
Don’t get phished
When attempting to log in to a crypto exchange, always make sure you are on the platform’s official website and not on a clone.
Users of locally installed cryptocurrency wallets, such as MetaMask, Phantom, and TrustWallet, should never share their recovery phrase on any website, regardless of the reason.
It is also important to remember that Google Ads can be abused, and Google Search SEO can be manipulated, so the ranking of the results shouldn’t be seen as a guarantee of safety.
Finally, protect your cryptocurrency exchange accounts with MFA and keep most of your crypto investments on cold wallets that are much more challenging to hack.
What initially started like a minor Microsoft Teams outage has also taken down multiple Microsoft 365 services with Teams integration, including Exchange Online, Windows 365, and Office Online.
“We’ve received reports of users being unable to access Microsoft Teams or leverage any features,” the company revealed on its official Microsoft 365 Status Twitter account more than 8 hours ago.
Two hours later, Redmond said the issue causing the connection problems was a recent deployment that featured a broken connection to an internal storage service.
However, Teams was not the only product impacted by the outage since users also began reporting failures to connect to various Microsoft 365 services.
Microsoft confirmed the issues saying that the subsequent Microsoft 365 outage only affected services that came with Teams integration.
“We’ve identified downstream impact to multiple Microsoft 365 services with Teams integration, such as Microsoft Word, Office Online and SharePoint Online,” Microsoft explained.
As the company further detailed on its Microsoft 365 Service health status page, affected customers experienced issues with one or more of the following services:
Microsoft Teams (Access, chat, and meetings)
Exchange Online (Delays sending mail)
Microsoft 365 Admin center (Inability to access)
Microsoft Word within multiple services (Inability to load)
Microsoft Forms (Inability to use via Teams)
Microsoft Graph API (Any service relying on this API may be affected)
Office Online (Microsoft Word access issues)
SharePoint Online (Microsoft Word access issues)
Project Online (Inability to access)
PowerPlatform and PowerAutomate (Inability to create an environment with a database)
Autopatches within Microsoft Managed Desktop
Yammer (Impact to Yammer experiments)
Windows 365 (Unable to provision Cloud PCs)
After redirecting traffic to a healthy service to mitigate the impact, Redmond said its telemetry indicates that Microsoft Teams functionality started to recover.
“Service availability has mostly recovered with only a few service features still requiring attention,” Microsoft added on the service health status page and on Twitter two hours ago, at 4 AM EST.
“We’ll continue to monitor the service as new regions enter business hours to ensure the service health does not fluctuate while the remaining actions are completed.”
New survey reveals lack of staff, skills, and resources driving smaller teams to outsource security.
As business begins its return to normalcy (however “normal” may look), CISOs at small and medium-size enterprises (500 – 10,000 employees) were asked to share their cybersecurity challenges and priorities, and their responses were compared the results with those of a similar survey from 2021.
Here are the 5 key things we learned from 200 responses:
1 — Remote Work Has Accelerated the Use of EDR Technologies
In 2021, 52% of CISOs surveyed were relying on endpoint detection and response (EDR) tools. This year that number has leapt to 85%. In contrast, last year 45% were using network detection and response (NDR) tools, while this year just 6% employ NDR. Compared to 2021, double the number of CISOs and their organizations are seeing the value of extended detection and response (XDR) tools, which combine EDR with integrated network signals. This is likely due to the increase in remote work, which is more difficult to secure than when employees work within the company’s network environment.
2 — 90% of CISOs Use an MDR Solution
There is a massive skills gap in the cybersecurity industry, and CISOs are under increasing pressure to recruit internally. Especially in small security teams where additional headcount is not the answer, CISOs are turning to outsourced services to fill the void. In 2021, 47% of CISOs surveyed relied on a Managed Security Services Provider (MSSP), while 53% were using a managed detection and response (MDR) service. This year, just 21% are using an MSSP, and 90% are using MDR.
3 — Overlapping Threat Protection Tools are the #1 Pain Point for Small Teams
The majority (87%) of companies with small security teams struggle to manage and operate their threat protection products. Among these companies, 44% struggle with overlapping capabilities, while 42% struggle to visualize the full picture of an attack when it occurs. These challenges are intrinsically connected, as teams find it difficult to get a single, comprehensive view with multiple tools.
4 — Small Security Teams Are Ignoring More Alerts
Small security teams are giving less attention to their security alerts. Last year 14% of CISOs said they look only at critical alerts, while this year that number jumped to 21%. In addition, organizations are increasingly letting automation take the wheel. Last year, 16% said they ignore automatically remediated alerts, and this year that’s true for 34% of small security teams.
5 — 96% of CISOs Are Planning to Consolidate Security Platforms
Almost all CISOs surveyed have consolidation of security tools on their to-do lists, compared to 61% in 2021. Not only does consolidation reduce the number of alerts – making it easier to prioritize and view all threats – respondents believe it will stop them from missing threats (57%), reduce the need for specific expertise (56%), and make it easier to correlate findings and visualize the risk landscape (46%). XDR technologies have emerged as the preferred method of consolidation, with 63% of CISOs calling it their top choice.


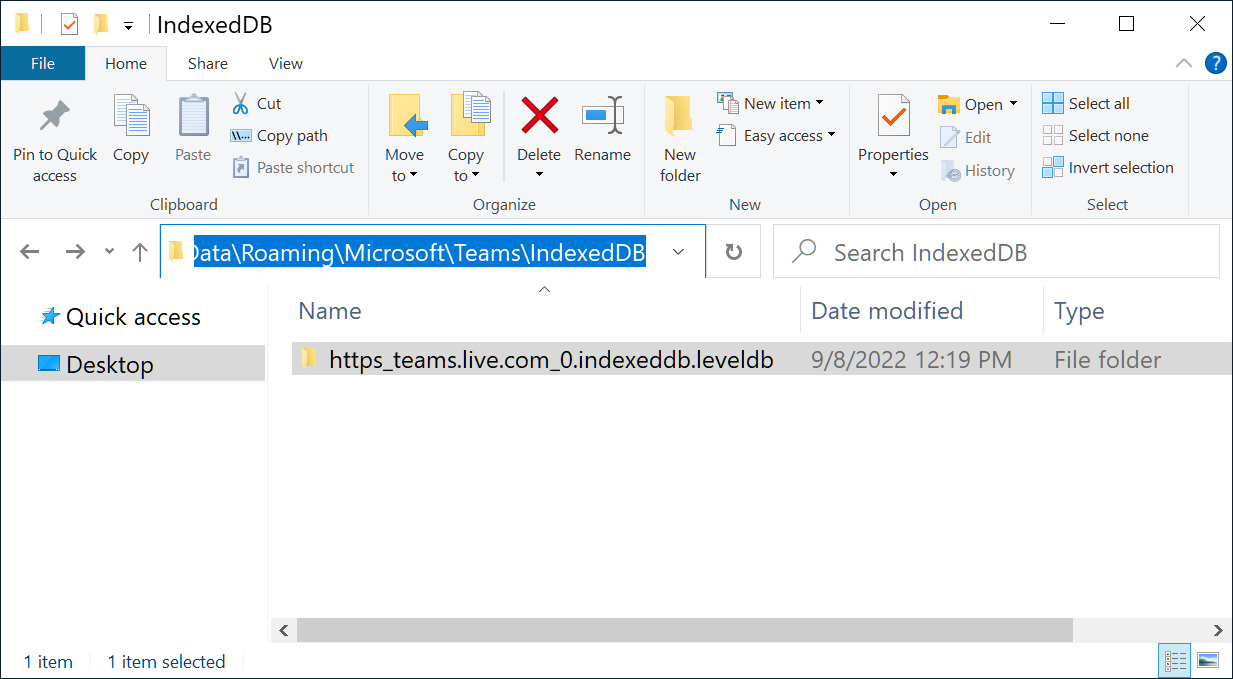
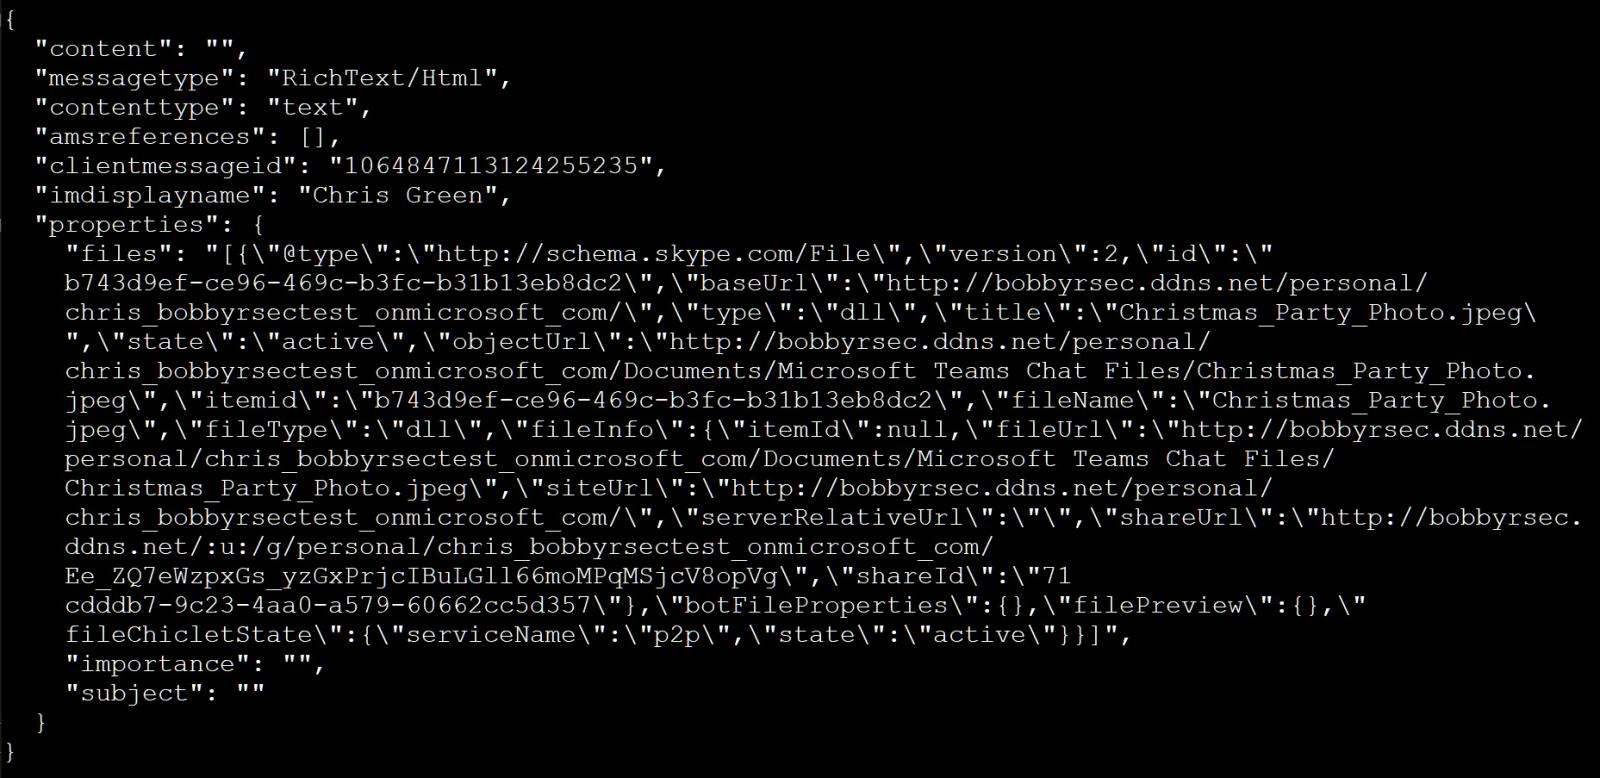
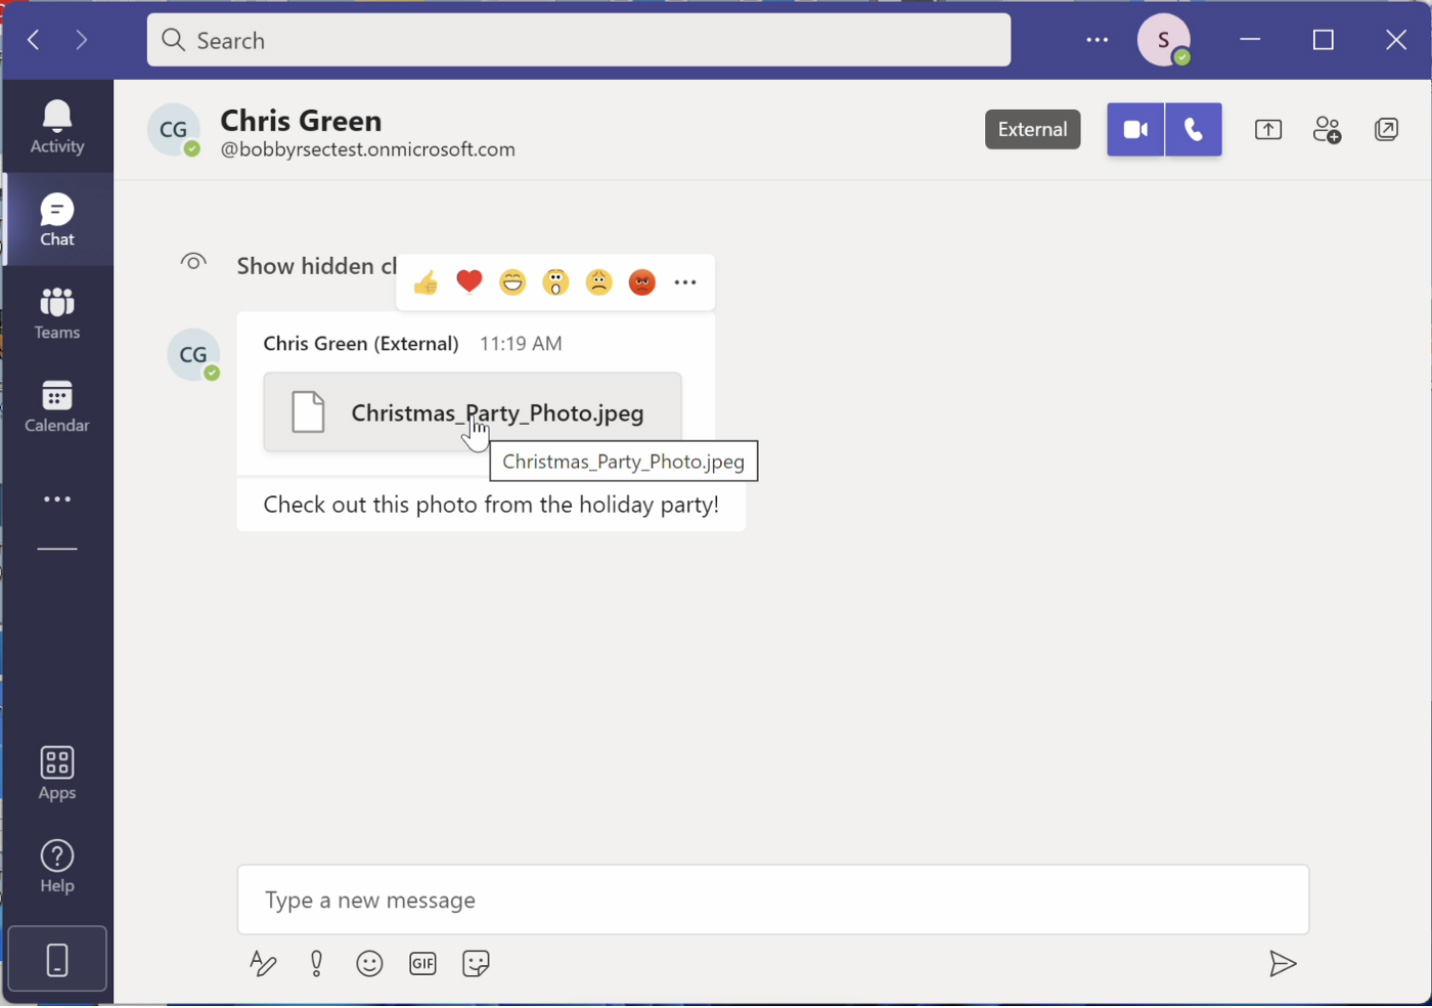


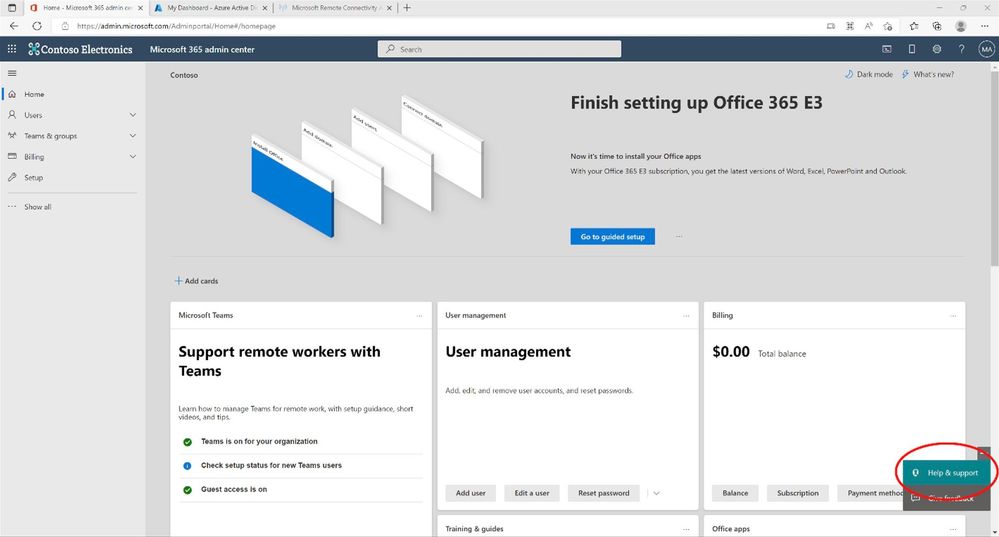


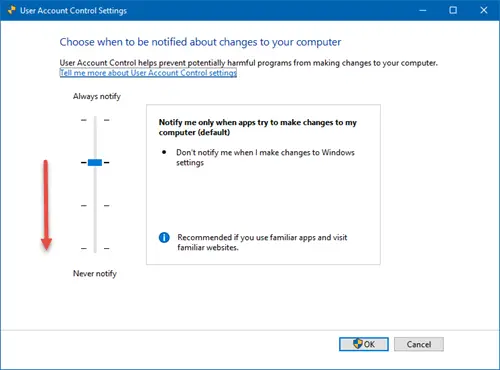


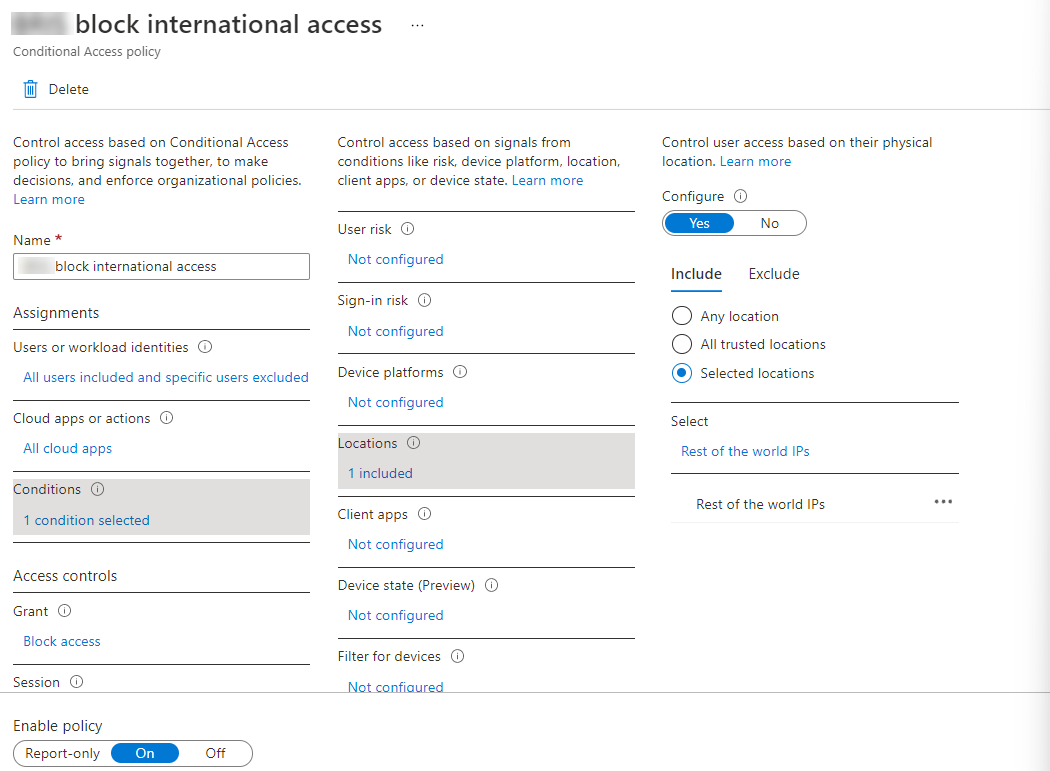
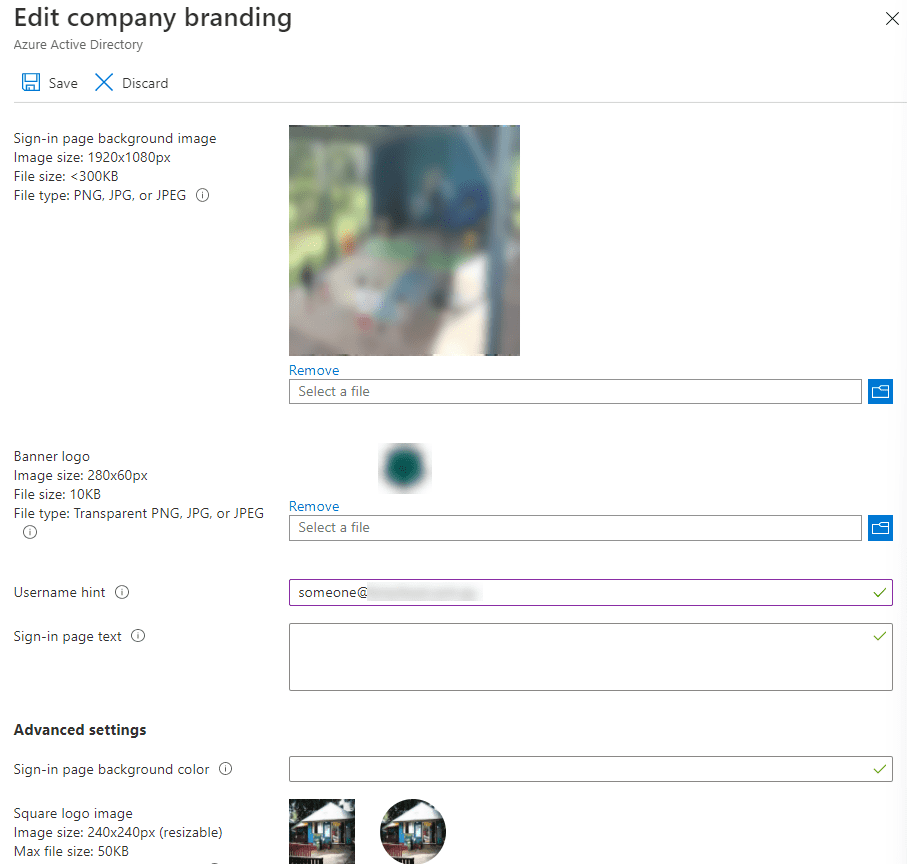


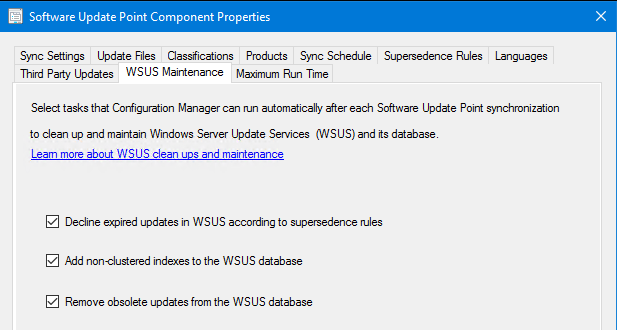
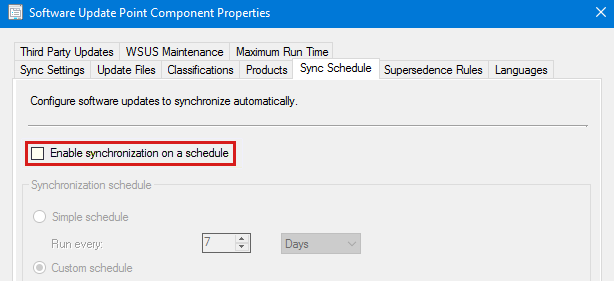
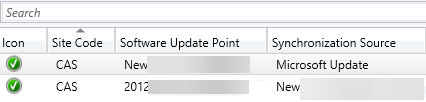
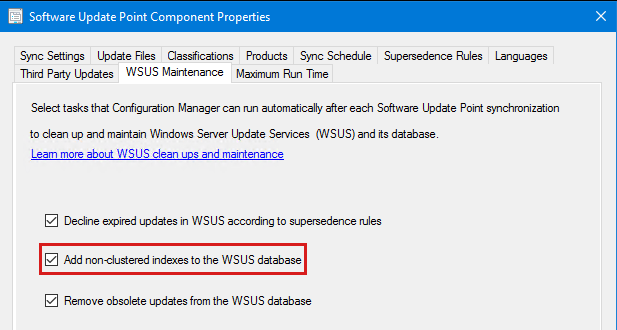


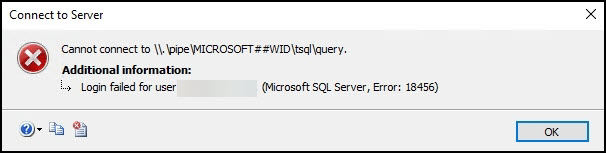
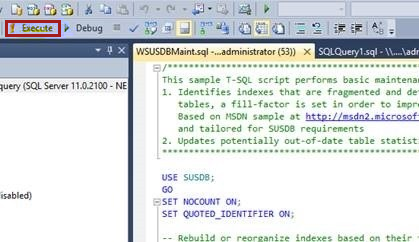
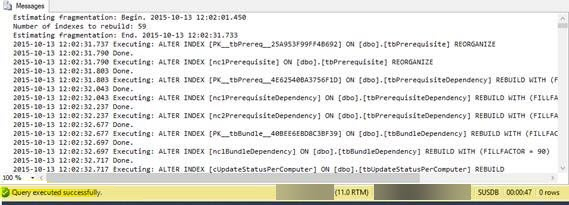
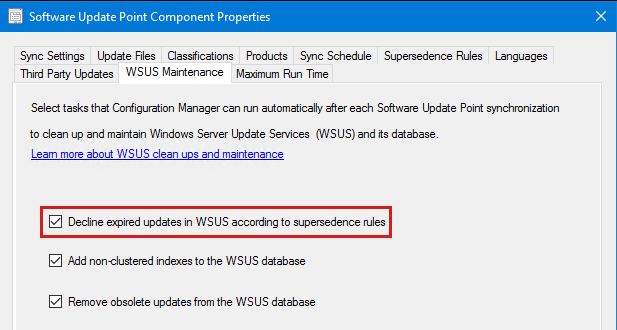
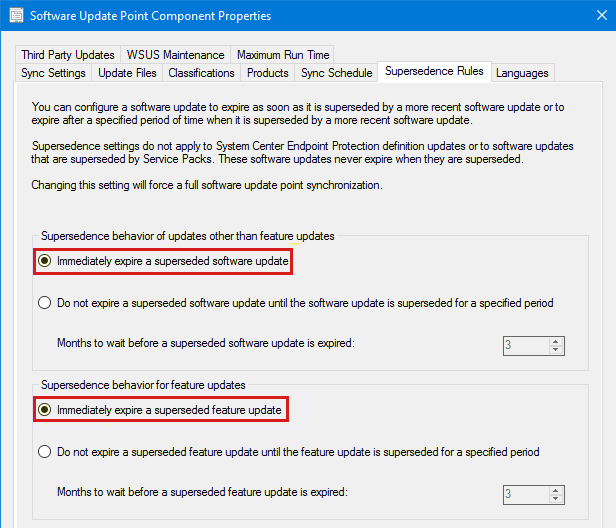
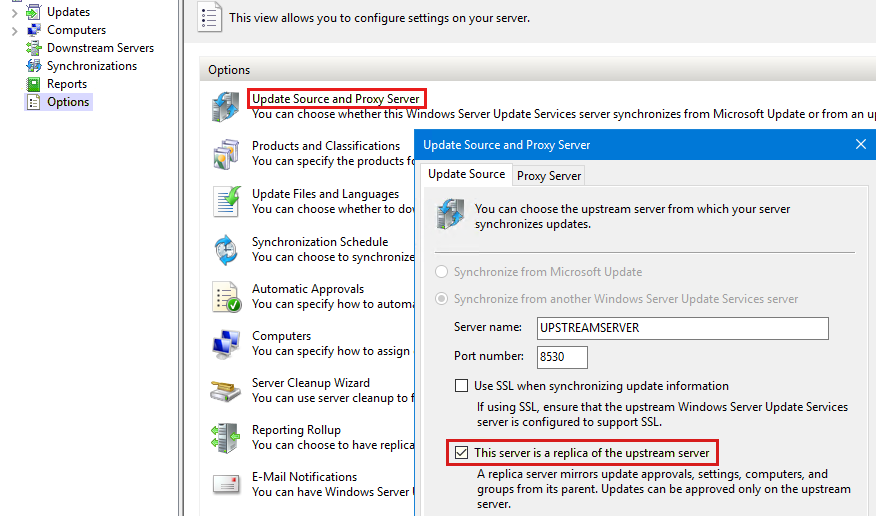
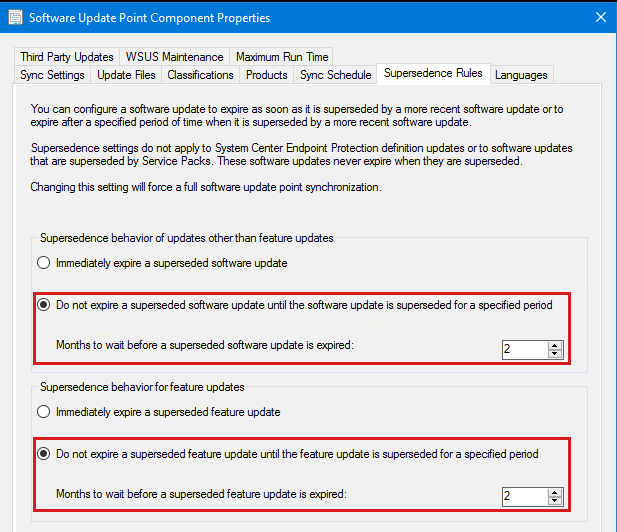
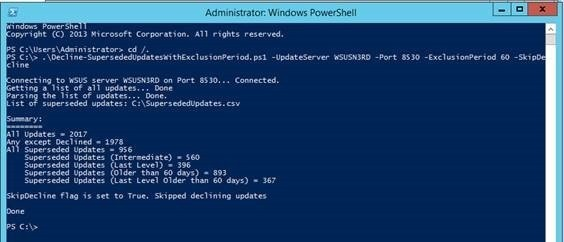
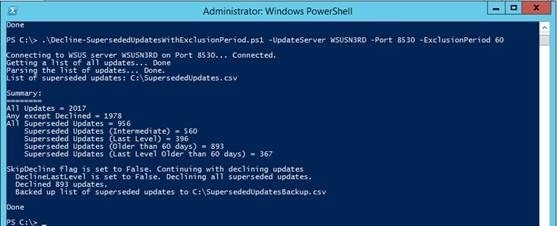
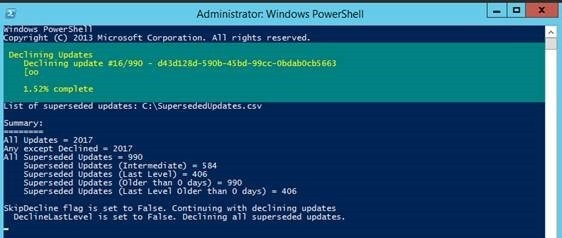

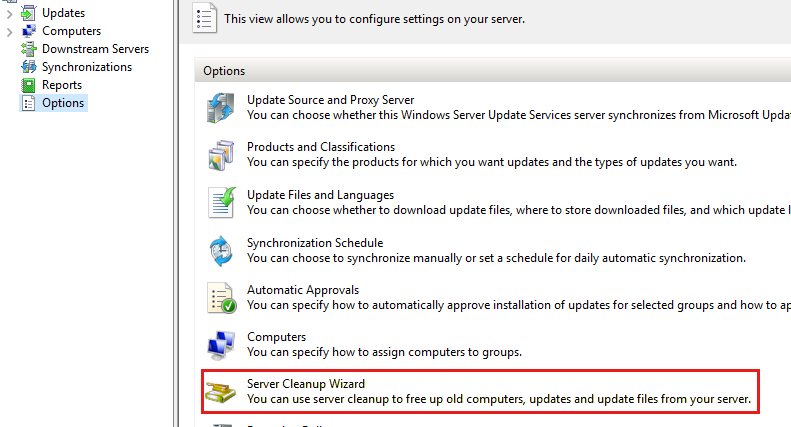
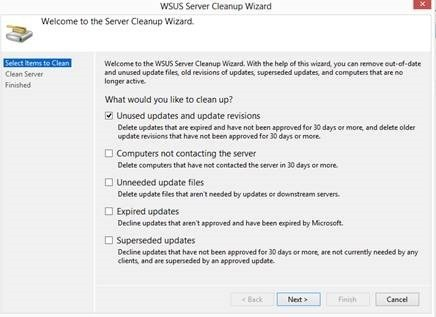
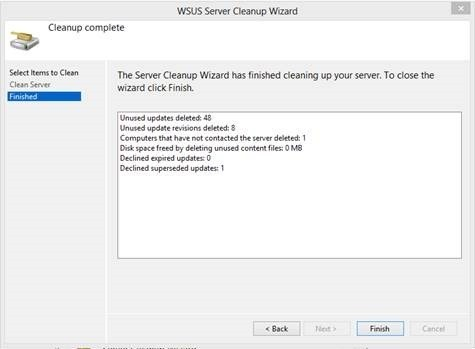
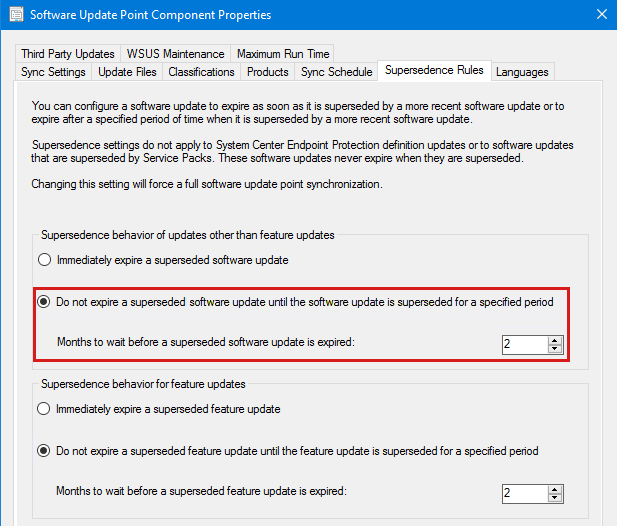


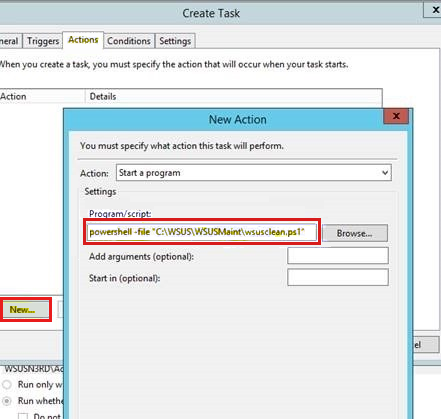


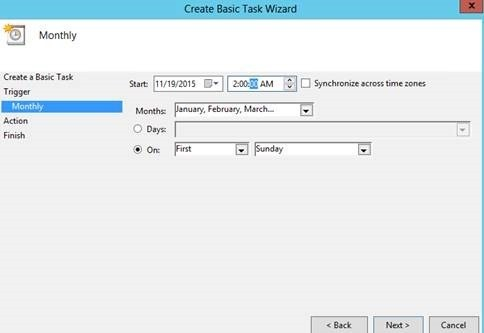


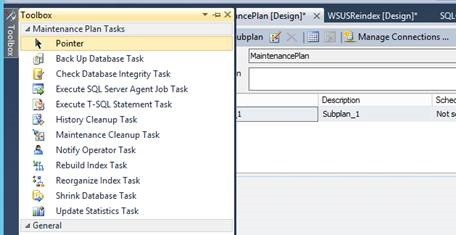

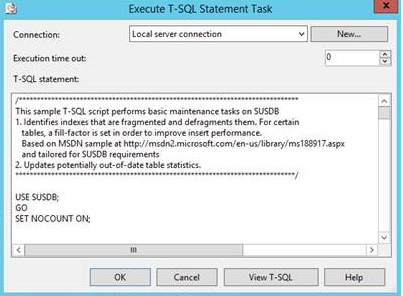
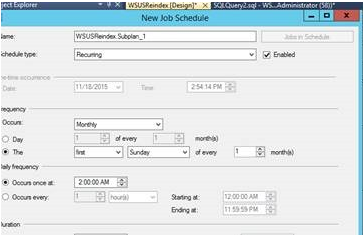
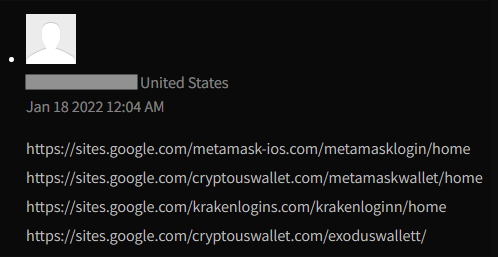
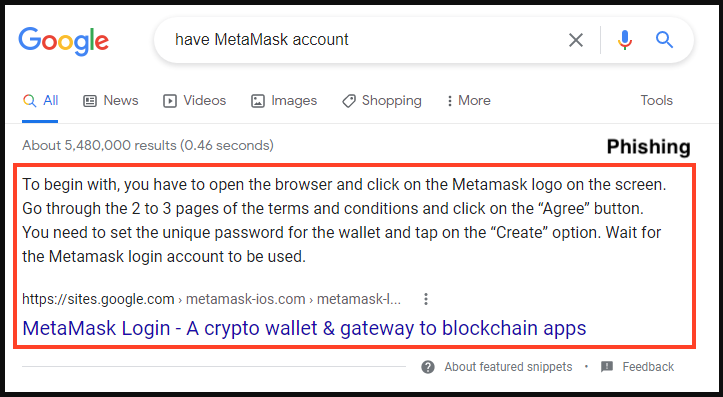

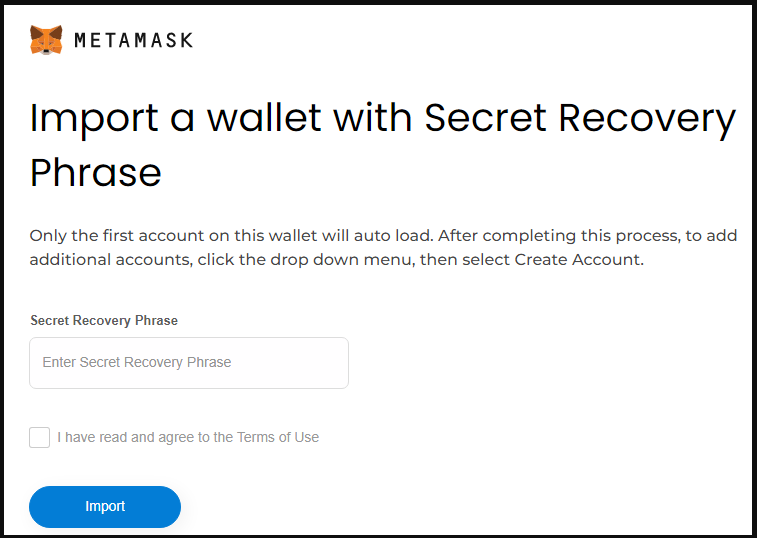
.png)