Securing a Microsoft 365 tenant must start with identity.
Protecting identities is a fundamental part of Zero Trust and it’s the first “target” that most attackers look for. We used to say that attackers hack their way in, now we say they log in, using bought, found or stolen/phished credentials. This article will show you why MFA is so important and how to implement advanced security features in Azure AD such as PIM, Password protection, Conditional Access policies (also a strong part of Zero Trust), auditing and more.
Below is the first chapter from our free Microsoft 365 Security Checklist eBook. The Microsoft 365 Security Checklist shows you all the security settings and configurations you need to know for each M365 license to properly secure your environment. Download the full eBook and checklist spreadsheet.
Multi-Factor Authentication
It should be no surprise that we start with identity, it’s the new security perimeter or the new firewall and having a strong identity equals strong security. The first step to take here is implementing Multi Factor Authentication (MFA). It’s free for all Office / Microsoft tenants. If you want to use Conditional Access (CA) to enforce it (rather than just enabling users “in bulk”), you need Azure AD Premium P1+ licensing. A username and a simple password are no longer adequate (it never was, we just never had a simple, affordable, easy to use alternative) to protect your business.
Hand-in-hand with MFA you need user training. If your business is relying on users doing the right thing when they get the prompt on their phone – they MUST also know that if they get a prompt when they’re NOT logging in anywhere, they must click Block / No / Reject.
To enable MFA on a per-user basis, go to aad.portal.azure.com, login as an administrator, click Azure Active Directory – Security – MFA and click on the blue link “Additional cloud-based MFA settings”.

Additional MFA settings
There are two parts (tabs) on this page, “service settings” where you should disable app passwords (a workaround for legacy clients that don’t support MFA, shouldn’t be necessary in 2022), add trusted public IP addresses (so that users aren’t prompted when they’re in the corporate office – we and Microsoft recommend not using this setting), disabling Call and Text message to phone and remember MFA on trusted devices setting (1-365 days), Microsoft recommends either using CA policies to manage Sign-In frequency or setting this to 90 days. Phone call / text message MFA are not strong authentication methods and should not be used unless there’s no other choice.
On the user’s tab you can enable MFA for individual users or click bulk update and upload a CSV file with user accounts.
If you have AAD Premium P1, it’s better to use a CA policy to enforce MFA, it’s more flexible and the MFA settings page will eventually be retired.

Enforcing MFA with a Conditional Access Policy
A few words of caution, enabling MFA for all your administrators is a given today. Seriously, if you aren’t requiring every privileged account to use MFA (or 2FA / passwordless, see below), stop reading and go and do that right now. Yes, it’s an extra step and yes, you’ll get push back but there’s just no excuse – it’s simply unprofessional and you don’t belong in IT if you’re not using it. For what it is worth, I’ve been using Azure MFA for over seven years and require it for administrators at my clients – no exceptions.
Enabling MFA for all users is also incredibly important but takes some planning. You may have some users who refuse to run the Microsoft Authenticator app on their personal phone – ask for it to be put in their hiring contract. You need to train them as to why MFA is being deployed, what to do, both for authentic logins and malicious ones. Furthermore, you need to have a smooth process for enrolling new users and offboarding people who are leaving.
You should also strongly consider creating separate (cloud only) accounts for administrators. They don’t require a license and it separates the day-to-day work of a person who only performs administrative actions in your tenant occasionally (or use PIM, Chapter 10).
MFA protects you against 99.9% of identity-based attacks but it’s not un-phishable. Stronger alternatives include biometrics such as Windows Hello for Business (WHFB) and 2FA hardware keys which bring you closer to the ultimate in identity security: passwordless.
Legacy Authentication
However, it’s not enough to enable MFA for all administrators and users, the bad guys can still get in with no MFA prompt in sight. The reason is that Office 365 still supports legacy protocols that don’t support modern authentication / MFA. You need to disable these; you can’t just turn them off, you need to check if there are legitimate applications / workflows / scripts that use any of them. Go to aad.portal.azure.com, login as a Global Administrator, click Azure Active Directory – Monitoring – Sign-in logs. Change the time to last one month, and click Add filters, then click Client app and then None Selected, in the drop-down pick all 13 checkboxes under Legacy Authentication Clients and click Apply.

Filtering Azure AD Sign-in logs for legacy authentication
This will show you all the logins over the last month that used any of the legacy protocols. If you get a lot of results, add a filter for Status and add Success to filter out password stuffing attacks that failed. Make sure you check the four different tabs for interactive / non-interactive, service principals and managed identity sign-ins.
You’ll now need to investigate the logins. In my experience there will be some users who are using Android / Apple mail on smartphones; point them to the free Outlook app instead (Apple mail can be configured to use modern authentication). There’s also likely to be line-of-business (LOB) applications and printers / scanners that send emails via Office 365, so you’ll need updates for these. Alternatively, you can use another email service for these such as smtp2go.
Once you have eliminated all legitimate legacy authentication protocol usage you can disable it in two ways, it’s best to use both. Start by creating a Conditional Access policy based on the new template to block it, also go to admin.microsoft.com, Settings – Org settings – Services – Modern authentication and turn off basic authentication protocols.

Disable legacy authentication protocols in the M365 Admin Center
Break Glass accounts
Create at least one, preferably two break glass accounts, also known as emergency access accounts. These accounts are exempted from MFA, all CA policies and PIM (see below) and have very long (40 characters+), complex passwords. They’re only used if AAD MFA is down, for example, to gain access to your tenant to temporarily disable MFA or a similar setting, depending on the outage.
A second part to this is that you want to be notified if these accounts are ever used. One way to do this is to send your Azure AD sign-in logs to Azure Monitor (also known as Log Analytics), with instructions here. Another option is to use Microsoft Sentinel (which is built on top of Log Analytics) and create an Analytics rule.

Microsoft Sentinel alert rule when a Break Glass account is used
Security Defaults
If yours is a very small business, with few requirements for flexibility, the easiest way to set up Azure AD with MFA for everyone, plus several other security features enabled, is to turn on Security Defaults. Note that you can’t have break-glass accounts or other service accounts with Security Defaults as there’s no way to configure exceptions. Go to Properties for your Azure AD tenant and scroll to the bottom, and click on Manage Security defaults, here you can enable and disable it.
Privileged Identity Management
It’s worth investing in Azure Active Directory (AAD) Premium P2 for your administrator’s accounts and enabling Privileged Identity Management (PIM). This means their accounts are ordinary user accounts who are eligible to elevate their privileges to whatever administrator type they are assigned (see Chapter 10).
If you’re not using PIM, create dedicated admin accounts in AAD only. Don’t sync these accounts from on-premises but enforce MFA and strong passwords. Since they won’t be used for day-to-day work, they won’t require an M365 license.
Password Protection
After MFA, your second most important step is banning bad passwords. You’re probably aware that we’ve trained users to come up with bad passwords over the last few decades with “standard” policies (at least 8 characters, uppercase, lowercase, special character and numbers) which results in P@ssw0rd1 and when they’re forced to change it every 30 days, P@ssw0rd2. Both NIST in the US and GHCQ in the UK now recommends allowing (but not enforcing) the use of upper / lowercase etc., but not mandating frequent password changes and instead of checking the password at the time of creation against a list of known, common bad passwords and blocking those. In Microsoft’s world that’s called Password protection which is enabled for cloud accounts by default. There’s a global list of about 2000 passwords (and their variants) that Microsoft maintains, based on passwords they find in dumps, and you should add (up to 1000) company-specific words (brands, locations, C-suite people’s names, local sports teams, etc.) for your organization.
You find Password protection in the AAD portal – Security – Authentication Methods.

Password protection settings
Remember, you don’t have to add common passwords to the list, they’re already managed by Microsoft, just add company / region specific words that your staff are likely to use.
If you’re syncing accounts from Active Directory on-premises to AAD, you should also extend Password protection to your DCs. It involves the installation of an agent on each DC, a proxy agent, and a reboot of each DC.
Continuous Access Evaluation
This feature has been in preview for quite some time but is now in general availability. Before Continuous Access Evaluation (CAE), when you disabled a user’s account, or they changed location (from the office to a public Wi-Fi for example) it could be up to one hour before their state was re-evaluated and new policies applied, or they were blocked from accessing services. With CAE, this time is much shorter, in most cases in the order of a few minutes. It’s turned on by default for all tenants (unless you were part of the preview and intentionally disabled it). Another benefit of CAE is that tokens are now valid for 28 hours, letting people keep working during a shorter Azure AD outage. You can disable CAE in a CA policy, but it’s not recommended.
Conditional Access policies
We’ve mentioned Conditional Access (CA) policies several times already as it’s a crucial component of strong identity security and Zero Trust. Unlike other recommendations, there isn’t a one size fit all set of CA policies we can give you, however (at a minimum) you should have policies for:
- Require MFA for admins (see MFA above)
- Require MFA for users (see MFA above)
- Require MFA for Azure management
- Block legacy authentication (see MFA above)
- Require compliant or Hybrid AAD joined device for admins
- Require compliant or Hybrid AAD joined device for users
- Block access to M365 from outside your country
- Require MFA for risky sign-ins (if you have AAD Premium P2)
- Require password change for high-risk users (if you have AAD Premium P2)
This is all going to be a lot easier going forward with the new policy templates for identity and devices. Go to Azure AD – Security – Conditional Access – New policy – Create a new policy from templates. Another step to take is to create a system for managing the lifecycle of policies and there’s an API for backing up and updating policies, that you can access in several ways, including PowerShell. There’s even a tutorial to set up a backup system using a Logic App.

Conditional Access policy templates for identity
A common question is if there’s a priority when policies are evaluated and there isn’t, they’re all processed together for a particular sign-in, from a specific device and location to an individual application. If there are multiple policies with different controls (MFA + compliant device), all controls must be fulfilled for access. And if there are conflicting policies with different access (block vs grant), block access will win.
To get you started, here are the step-by-step instructions for a policy blocking access to M365 from outside your country, appropriate for most small and medium businesses that only operate in one or a few countries. Keep in mind that travelling staff may be caught out by this so make sure you align with business objectives and be aware that this won’t stop every attack as a VPN or TOR exit node can make it appear as if the attacker is in your country, but it’s one extra step they must take. Remember, you don’t have to run faster than the Fancy Bear, just faster than other companies around you.
Start by going to Azure AD – Security – Conditional Access – Named locations and click +Countries location and call the location Blocked countries. Leave Determine location by IP address, a new feature is using GPS location from the Microsoft Authenticator app which will be more accurate once all your users are using Azure AD MFA (and therefore can be located via GPS). Click the box next to Name to select all countries, then find the one(s) that you need to allow login from and click Create.

Creating a Named Location for a Conditional Access Policy
Go to Azure AD – Security – Conditional Access – New policy – Create new policy and name your policy with a name that clearly defines what the policy does and adheres to your naming standard. Click on All Users… and Include All users and Exclude your Break Glass accounts.
Click on No cloud apps… and select All cloud apps. Select 0 conditions… and click Not configured under Locations. Pick Selected locations under Include and select your newly created location. Finally, under Access controls – Grant, click 0 controls selected and then Block access.
CA policies can be either in Report-only mode where you can look at reports of what they would have blocked and control they would have enforced, or they can be turned on / off. Report-only can be handy to make sure you don’t get fired for accidentally locking everyone out but turn this policy on as soon as possible.
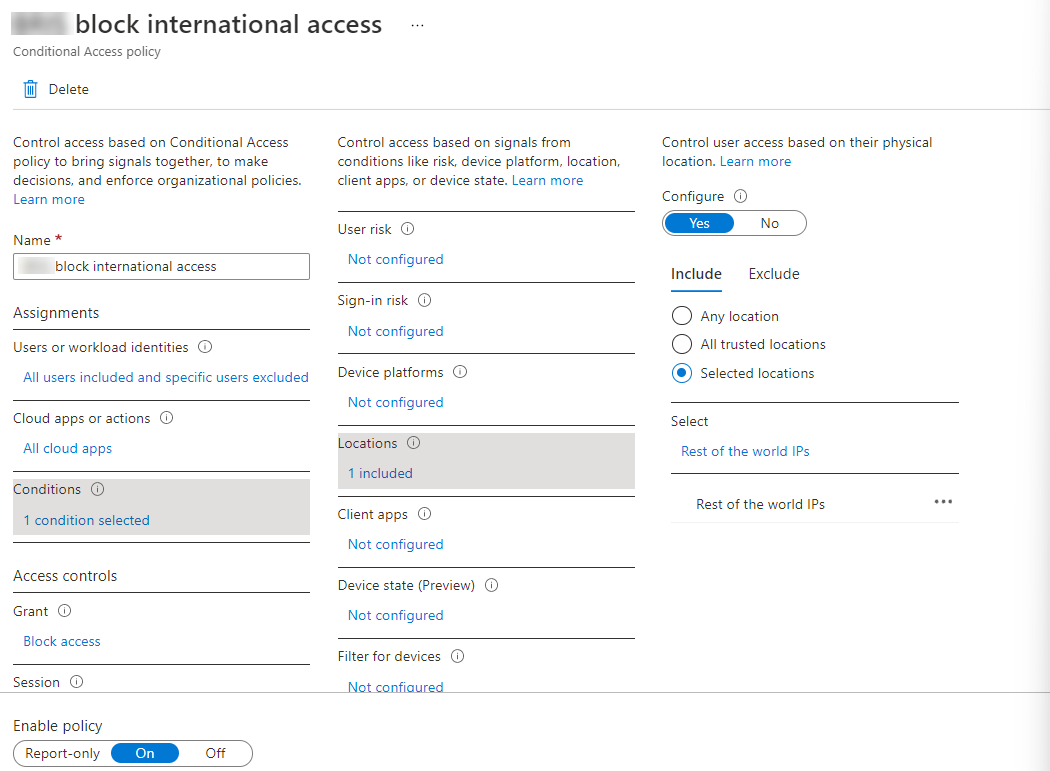
Conditional Access policy to block logins from outside Australia
A common question is, how can I control how often users are prompted for MFA or signing in again? While it might be counterintuitive, the default in Azure AD is a rolling windows of 90 days. Remember, if you change a user’s password, block non-compliant devices, or disable an account (plus any number of other CA policies you have in place that might affect the security posture of the session), it’ll automatically require new authentications. Don’t prompt the users for authentication when nothing has changed because if you do it too frequently, they’re more likely to approve a malicious login.
Branding Log-on Pages
While in the Azure AD portal, click on Company branding and add a company-specific Sign-in page background image (1920x1080px) and a Banner logo (280x60px). Note that these files have to be small (300 KB and 10 KB respectively) so you may have to do some fancy compression. This isn’t just a way to make users feel at home when they see a login page, in most cases when attackers send phishing emails to harvest credentials, they’ll send users to a fake login page that looks like the generic Office 365 one, not your custom one which is another clue that should alert your users to the danger. Also – Windows Autopilot doesn’t work unless you have customized AAD branding.
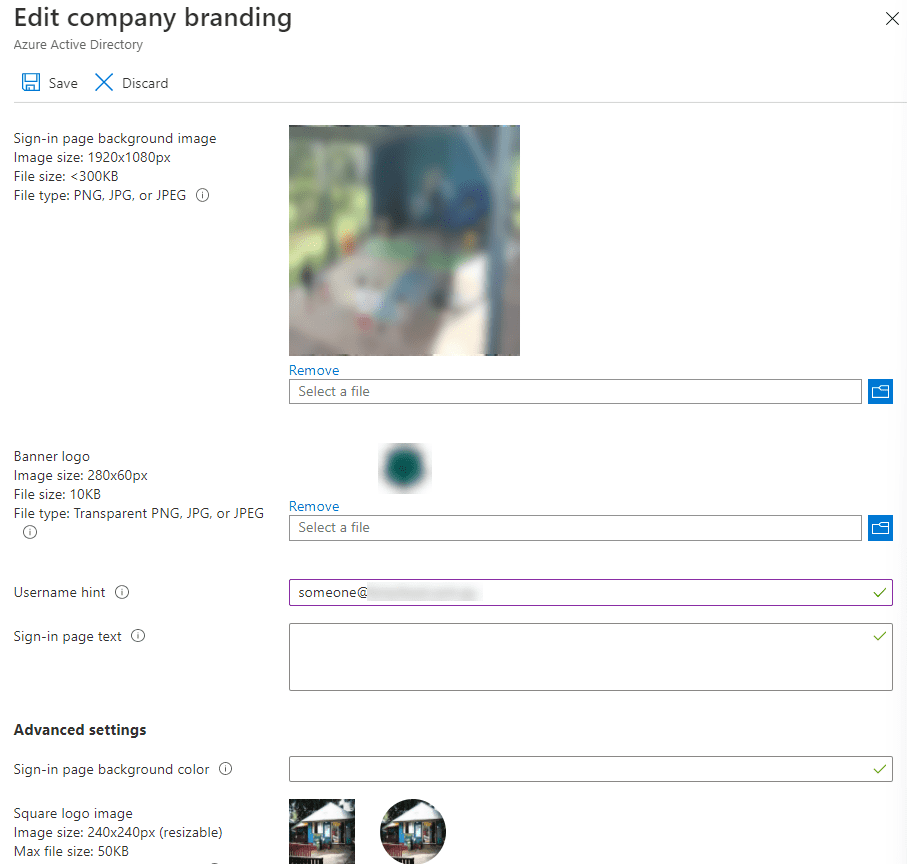
Edit Azure AD Company Branding images
Self Service Password Reset
The benefit of Self Service Password Reset (SSPR) is to lower the load on your help desk to manage password resets for users. Once enabled, users must register various ways of being identified when they’re resetting their password, mobile app notification/code, email (non-Office 365), mobile/office phone call, security questions (not available to administrators, plus you can create custom questions). If you are synchronizing user accounts from AD to Azure AD, take care in setting up SSPR as the passwords must be written back to AD from the cloud once changed.

Configuring Self Service Password Reset in Azure AD
Unified Auditing
Not restricted to security but nevertheless, a fundamental building block is auditing across Microsoft 365. Go to the Microsoft 365 Defender portal and find Audit in the left-hand menu (it’s almost at the end). If for some reason unified auditing isn’t enabled in your tenant a yellow banner will give you a button to turn it on (it’s on by default for new tenants). Once enabled, click the Audit retention policies tab, and create a policy for your tenant. You want to ensure that you have logs to investigate if there’s a breach and you want them kept for as long as possible.
With Business Premium you get a maximum of 90 days of retention and Microsoft 365 E5 gives you one year, but you want to make sure to create a policy to set this, rather than rely on the default policy (which you can’t see). Give the policy a name, a description and add all the record types, one by one. This policy will now apply to all users (including new ones that are created) for all activities. Only use the Users option when you want to have a specific policy for a particular user. Give the policy a priority, 1 is the highest and 10,000 is the lowest.

Create an audit retention policy for maximum retention
Integrating applications into Azure AD
One of the most powerful but often overlooked features (at least in SMBs) is the ability to use Azure AD to publish applications to your users. Users can go to myapps.microsoft.com (or office.com) and see tiles for all applications they have access to. But there’s more to that story. Say, for example, you have a shared, corporate Twitter account that a few executives and marketing staff should have access to. Instead of sharing a password amongst them all and having to remember to reset it if someone leaves the organization, you can create a security group in AAD, add the relevant users, link Twitter to the group and they’ll automatically have access – without knowing the password to the account. There are a lot more actions you can take here to simplify access and secure management of applications, here’s more information.
Azure AD Connect
If you’re synchronizing accounts from Active Directory to Azure Active Directory (AAD), check the configuration of AAD Connect and make sure you’re not replicating an entire domain or forest to AAD. There’s no reason that service accounts etc. should be exposed in both directories, start the AAD Connect wizard on the server where it’s installed and double-check that only relevant OUs are synchronized. One other thing to note here is the fact that any machine running Azure AD Connect should be treated with the same care (in terms of security) as a domain controller. This is because AAD Connect requires the same level of access as AD itself and has the ability to read password hashes. Making sure security best practices for access, patching, etc. are followed to the letter for the system running AAD connect is critically important.
The M365 Identity Checklist
| Work through the Identity checklist. |
| Enable MFA for administrators |
| Enable MFA for users |
| Create cloud-only administrator accounts for privileged users / occasional administrators |
| Disable app passwords |
| (Configure trusted IPs) |
| Disable text message MFA |
| Disable phone call MFA |
| Remember MFA trusted devices 90 days |
| Train staff in using MFA correctly |
| Use Windows Hello where possible |
| Use FIDO2 / 2FA keys where possible |
| Investigate legacy authentication protocol usage in AAD Sign-in logs |
| Block legacy authentication with CA Policy |
| Block legacy authentication in M365 Admin Center |
| Create two Break glass accounts and exempt from MFA, CA Policies etc. |
| Configure alerting if a Break glass account is used |
| Enable Security Defaults in AAD (consider the limitations) |
| Enable PIM (AAD Premium P2) for all admin users |
| Add organization-specific words to Password protection |
| Deploy Password protection in AD on-premises |
| CA Policy Require MFA for admins |
| CA Policy Require MFA for users |
| CA Policy Require MFA for Azure management |
| CA Policy Block legacy authentication |
| CA Policy Require compliant or Hybrid AAD joined device for admins |
| CA Policy Require compliant or Hybrid AAD joined device for users |
| CA Policy Block access to M365 from outside your country |
| Require MFA for risky sign-ins [Only for E5) |
| Require password change for high-risk users [Only for E5) |
| Create custom branding logos and text in Azure AD |
| Enable and configure Self Service Password Reset, including password writeback |
| Check that Unified Auditing is enabled |
| Define audit retention policies (90 or 365 days) |
| Integrate applications into Azure AD |
Download the Excel template to use with your team >
Go Further than Identity to Protect your M365 Tenant
There you have it, all the most important steps to take to make sure your users’ identities are kept secure, and therefore your tenant and its data also safeguarded. Keen to learn and do more?

The Microsoft 365 Security Checklist has another nine chapters of security recommendations each with its own checklist for:
- Teams
- SharePoint
- Applications
- Endpoint Manager
- Information Protection
- Secure Score
- Business Premium
- Microsoft 365 Enterprise E5
Download the full Microsoft 365 Security Checklist eBook and checklist template >
Source :
https://www.altaro.com/microsoft-365/identity-checklist-m365-tenant/