Macros from the internet will be blocked by default in Office

VBA macros are a common way for malicious actors to gain access to deploy malware and ransomware. Therefore, to help improve security in Office, we’re changing the default behavior of Office applications to block macros in files from the internet.

With this change, when users open a file that came from the internet, such as an email attachment, and that file contains macros, the following message will be displayed:

Security risk banner about blocked macros with a Learn More button

The Learn More button goes to an article for end users and information workers that contains information about the security risk of bad actors using macros, safe practices to prevent phishing and malware, and instructions on how to enable these macros (if absolutely needed).

In some cases, users will also see the message if the file is from a location within your intranet that’s not identified as being trusted. For example, if users are accessing files on a network share by using the share’s IP address. For more information, see Files centrally located on a network share or trusted website.

 Important

Even before this change we’re introducing, organizations could use the Block macros from running in Office files from the Internet policy to prevent users from inadvertently opening files from the internet that contain macros. We recommend enabling this policy as part of the security baseline for Microsoft 365 Apps for enterprise. If you do configure the policy, your organization won’t be affected by this default change.

For more information, see Use policies to manage how Office handles macros.

Prepare for this change

To prepare for this change, we recommend that you work with the business units in your organization that use macros in Office files that are opened from locations such as intranet network shares or intranet websites. You’ll want to identify those macros and determine what steps to take to keep using those macros. You’ll also want to work with independent software vendors (ISVs) that provide macros in Office files from those locations. For example, to see if they can digitally sign their code and you can treat them as a trusted publisher.

Also, review the following information:

Preparation actionMore information
Understand which versions and which update channels have this change (as we roll out this change)Versions of Office affected by this change
See a flow chart of the process Office takes to determine whether to run macros in a fileHow Office determines whether to run macros in files from the internet
Identify files with VBA macros that might be blocked using the Readiness ToolkitUse the Readiness Toolkit to identify files with VBA macros that might be blocked
Learn about policies that you can use to control VBA macro executionUse policies to manage how Office handles macros

Steps to take to allow VBA macros to run in files that you trust

How you allow VBA macros to run in files that you trust depends on where those files are located or the type of file.

The following table list different common scenarios and possible approaches to take to unblock VBA macros and allow them to run. You don’t have to do all possible approaches for a given scenario. In the cases where we have listed multiple approaches, pick the one that best suits your organization.

ScenarioPossible approaches to take
Individual files• Select the Unblock checkbox on the General tab of the Properties dialog for the file
• Use the Unblock-File cmdlet in PowerShell

For more information, see Remove Mark of the Web from a file.
Files centrally located on a network share or trusted websiteUnblock the file using an approach listed under “Individual files.”

If there isn’t an Unblock checkbox and you want to trust all files in that network location:
• Designate the location as a Trusted site
• Add the location to the Local intranet zone

For more information, see Files centrally located on a network share or trusted website.
Files stored on OneDrive or SharePoint, including a site used by a Teams channel• Have users directly open the file by using the Open in Desktop App option
• If users download the file locally before opening it, remove Mark of the Web from the local copy of the file (see the approaches under “Individual files”)
• Designate the location as a Trusted site

For more information, see Files on OneDrive or SharePoint.
Macro-enabled template files for Word, PowerPoint, and ExcelIf the template file is stored on the user’s device:
• Remove Mark of the Web from the template file (see the approaches under “Individual files”)
• Save the template file to a Trusted Location

If the template file is stored on a network location:
• Use a digital signature and trust the publisher
• Trust the template file (see the approaches under “Files centrally located on a network share or trusted website”)

For more information, see Macro-enabled template files for Word, PowerPoint, and Excel.
Macro-enabled add-in files for PowerPoint• Remove Mark of the Web from the Add-in file
• Use a digital signature and trust the publisher
• Save the Add-in file to a Trusted Location

For more information, see Macro-enabled add-in files for PowerPoint and Excel.
Macro-enabled add-in files for Excel• Remove Mark of the Web from the Add-in file
• Save the Add-in file to a Trusted Location

For more information, see Macro-enabled add-in files for PowerPoint and Excel.
Macros that are signed by a trusted publisher• [recommended] Deploy the public code-signing certificate for the trusted publisher to your users and prevent your users from adding trusted publishers themselves.
• Remove Mark of the Web from the file, and have the user add the publisher of the macro as a trusted publisher.

For more information, see Macros that are signed by a trusted publisher
.
Groups of files saved to folders on the user’s deviceDesignate the folder a Trusted Location

For more information, see Trusted Locations.

Versions of Office affected by this change

This change only affects Office on devices running Windows and only affects the following applications: Access, Excel, PowerPoint, Visio, and Word.

The change began rolling out in Version 2203, starting with Current Channel (Preview) in early April 2022. Later, the change will be available in the other update channels, such as Monthly Enterprise Channel and Semi-Annual Enterprise Channel.

The following table shows the forecasted schedule of when this change will be available in each update channel. Information in italics is subject to change.

Update channelVersionDate
Current Channel (Preview)Version 2203Started rolling out on April 12, 2022
Current ChannelVersion 2206Started rolling out on July 27, 2022
Monthly Enterprise ChannelVersion 2208October 11, 2022
Semi-Annual Enterprise Channel (Preview)Version 2208October 11, 2022
Semi-Annual Enterprise ChannelVersion 2208January 10, 2023

 Note

As we roll out this change to Current Channel over the next few weeks, not all customers will see the change right away.

The change doesn’t affect Office on a Mac, Office on Android or iOS devices, or Office on the web.

How Office determines whether to run macros in files from the internet

The following flowchart graphic shows how Office determines whether to run macros in a file from the internet.

Flowchart that shows how Office determines whether to run macros in files from the internet

The following steps explain the information in the flowchart graphic, except for Excel Add-in files. For more information about those files, see Macro-enabled add-in files for PowerPoint and Excel. Also, if a file is located on a network share that isn’t in the Local intranet zone or isn’t a trusted site, macros will be blocked in that file.

  1. A user opens an Office file containing macros obtained from the internet. For example, an email attachment. The file has Mark of the Web (MOTW).

 Note

  • Mark of the Web is added by Windows to files from an untrusted location, such as the internet or Restricted Zone. For example, browser downloads or email attachments. For more information, see Mark of the Web and zones.
  • Mark of the Web only applies to files saved on an NTFS file system, not files saved to FAT32 formatted devices.
  1. If the file is from a Trusted Location, the file is opened with the macros enabled. If the file isn’t from a Trusted Location, the evaluation continues.
  2. If the macros are digitally signed and the matching Trusted Publisher certificate is installed on the device, the file is opened with the macros enabled. If not, then the evaluation continues.
  3. Policies are checked to see if macros are allowed or blocked. If the policies are set to Not Configured, the evaluation continues to Step 6.
  4. (a) If macros are blocked by policy, the macros are blocked.
    (b) If the macros are enabled by policy, the macros are enabled.
  5. If the user had previously opened the file, before this change in default behavior, and had selected Enable content from the Trust Bar, then the macros are enabled because the file is considered trusted.

 Note

  • For more information, see New security hardening policies for Trusted Documents.
  • For perpetual versions of Office, such as Office LTSC 2021 or Office 2019, this step occurs after Step 3 and before Step 4, and isn’t affected by the change coming to Current Channel.
  1. This step is where the change to the default behavior of Office takes effect. With this change, macros in files from the internet are blocked and users will see the Security Risk banner when they open the file.

 Note

Previously, before this change in default behavior, the app would check to see if the VBA Macro Notification Settings policy was enabled and how it was configured.

If the policy was set to Disabled or Not Configured, then the app would check the settings under File > Options > Trust Center > Trust Center Settings… > Macro Settings. The default is set to “Disable all macros with notification,” which allows users to enable content in the Trust Bar.

Guidance on allowing VBA macros to run in files you trust

Remove Mark of the Web from a file

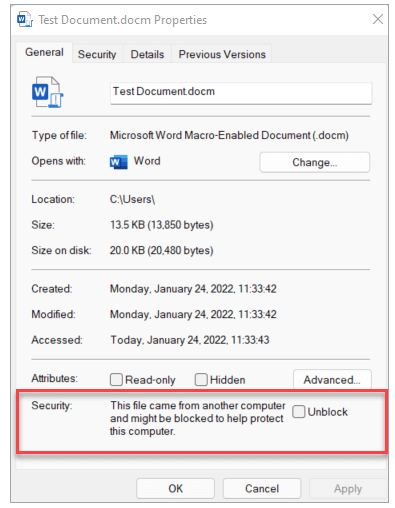
For an individual file, such as a file downloaded from an internet location or an email attachment the user has saved to their local device, the simplest way to unblock macros is to remove Mark of the Web. To remove, right-click on the file, choose Properties, and then select the Unblock checkbox on the General tab.

File properties dialog showing the choice to unblock

 Note

  • In some cases, usually for files on a network share, users might not see the Unblock checkbox for a file where macros are being blocked. For those cases, see Files centrally located on a network share or trusted website.
  • Even if the Unblock checkbox is available for a file on a network share, selecting the checkbox won’t have any effect if the share is considered to be in the Internet zone. For more information, see Mark of the Web and zones.

You can also use the Unblock-File cmdlet in PowerShell to remove the ZoneId value from the file. Removing the ZoneId value will allow VBA macros to run by default. Using the cmdlet does the same thing as selecting the Unblock checkbox on the General tab of the Properties dialog for the file. For more information about the ZoneId value, see Mark of the Web and zones.

Files centrally located on a network share or trusted website

If you have your users access files from a trusted website or an internal file server, you can do either of the following steps so that macros from those locations won’t be blocked.

  • Designate the location as a Trusted site
  • If the network location is on the intranet, add the location to the Local intranet zone

 Note

  • If you add something as a trusted site, you’re also giving the entire site elevated permissions for scenarios not related to Office.
  • For the Local intranet zone approach, we recommend you save the files to a location that’s already considered part of the Local intranet zone, instead of adding new locations to that zone.
  • In general, we recommend that you use trusted sites, because they have some additional security compared to the Local intranet zone.

For example, if users are accessing a network share by using its IP address, macros in those files will be blocked unless the file share is in the Trusted sites or the Local intranet zone.

 Tip

  • To see a list of trusted sites or what’s in the Local intranet zone, go to Control Panel > Internet Options > Change security settings on a Windows device.
  • To check if an individual file is from a trusted site or local intranet location, see Mark of the Web and zones.

For example, you could add a file server or network share as a trusted site, by adding its FQDN or IP address to the list of trusted sites.

Trusted sites dialog

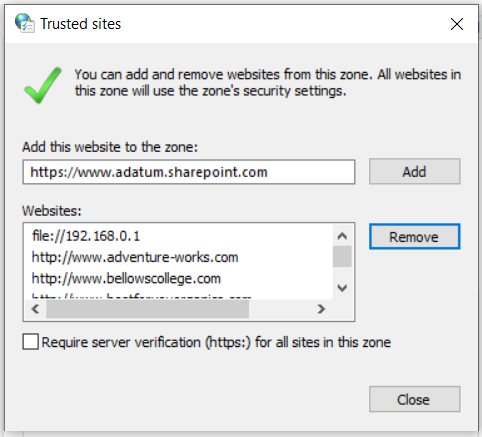
If you want to add URLs that begin with http:// or network shares, clear the Require server verification (https:) for all sites in this zone checkbox.

 Important

Because macros aren’t blocked in files from these locations, you should manage these locations carefully. Be sure you control who is allowed to save files to these locations.

You can use Group Policy and the “Site to Zone Assignment List” policy to add locations as trusted sites or to the Local intranet zone for Windows devices in your organization. This policy is found under Windows Components\Internet Explorer\Internet Control Panel\Security Page in the Group Policy Management Console. It’s available under both Computer Configuration\Policies\Administrative Templates and User Configuration\Policies\Administrative Templates.

Files on OneDrive or SharePoint

  • If a user downloads a file on OneDrive or SharePoint by using a web browser, the configuration of the Windows internet security zone (Control Panel > Internet Options > Security) will determine whether the browser sets Mark of the Web. For example, Microsoft Edge sets Mark of the Web on a file if it’s determined to be from the Internet zone.
  • If a user selects Open in Desktop App in a file opened from the OneDrive website or from a SharePoint site (including a site used by a Teams channel), then the file won’t have Mark of the Web.
  • If a user has the OneDrive sync client running and the sync client downloads a file, then the file won’t have Mark of the Web.
  • Files that are in Windows known folders (Desktop, Documents, Pictures, Screenshots, and Camera Roll), and are synced to OneDrive, don’t have Mark of the Web.
  • If you have a group of users, such as the Finance department, that need to use files from OneDrive or SharePoint without macros being blocked, here are some possible options:
    • Have them open the file by using the Open in Desktop App option
    • Have them download the file to a Trusted Location.
    • Set the Windows internet security zone assignment for OneDrive or SharePoint domains to Trusted Sites. Admins can use the “Site to Zone Assignment List” policy and configure the policy to place https://{your-domain-name}.sharepoint.com (for SharePoint) or https://{your-domain-name}-my.sharepoint.com (for OneDrive) into the Trusted Sites zone.
      • This policy is found under Windows Components\Internet Explorer\Internet Control Panel\Security Page in the Group Policy Management Console. It’s available under both Computer Configuration\Policies\Administrative Templates and User Configuration\Policies\Administrative Templates.
      • SharePoint permissions and OneDrive sharing aren’t changed by adding these locations to Trusted Sites. Maintaining access control is important. Anyone with permissions to add files to SharePoint could add files with active content, such as macros. Users who download files from domains in the Trusted Sites zone will bypass the default to block macros.

Macro-enabled template files for Word, PowerPoint, and Excel

Macro-enabled template files for Word, PowerPoint, and Excel that are downloaded from the internet will have Mark of the Web. For example, template files with the following extensions:

  • .dot
  • .dotm
  • .pot
  • .potm
  • .xlt
  • .xltm

When the user opens the macro-enabled template file, the user will be blocked from running the macros in the template file. If the user trusts the source of the template file, they can remove Mark of the Web from the template file, and then reopen the template file in the Office app.

If you have a group of users that need to use macro-enabled templates without macros being blocked, you can take either of the following actions:

  • Use a digital signature and trust the publisher.
  • If you’re not using digital signatures, you can save the template file to a Trusted Location and have users get the template file from that location.

Macro-enabled add-in files for PowerPoint and Excel

Macro-enabled Add-in files for PowerPoint and Excel that are downloaded from the internet will have Mark of the Web. For example, Add-in files with the following extensions:

  • .ppa
  • .ppam
  • .xla
  • .xlam

When the user tries to install the macro-enabled Add-in, by using File > Options > Add-ins or by using the Developer ribbon, the Add-in will be loaded in a disabled state and the user will be blocked from using the Add-in. If the user trusts the source of the Add-in file, they can remove Mark of the Web from the Add-in file, and then reopen PowerPoint or Excel to use the Add-in.

If you have a group of users that need to use macro-enabled Add-in files without macros being blocked, you can take the following actions.

For PowerPoint Add-in files:

  • Remove Mark of the Web from the .ppa or .ppam file.
  • Use a digital signature and trust the publisher.
  • Save the Add-in file to a Trusted Location for users to retrieve.

For Excel Add-in files:

  • Remove Mark of the Web from the .xla or .xlam file.
  • Save the Add-in file to a Trusted Location for users to retrieve.

 Note

Using a digital signature and trusting the publisher doesn’t work for Excel Add-in files that have Mark of the Web. This behavior isn’t new for Excel Add-in files that have Mark of the Web. It’s worked this way since 2016, as a result of a previous security hardening effort (related to Microsoft Security Bulletin MS16-088).

Macros that are signed by a trusted publisher

If the macro is signed and you’ve validated the certificate and trust the source, you can make that source a trusted publisher. We recommend, if possible, that you manage trusted publishers for your users. For more information, see Trusted publishers for Office files.

If you have just a few users, you can have them remove Mark of the Web from the file and then add the source of the macro as a trusted publisher on their devices.

 Warning

  • All macros validly signed with the same certificate are recognized as coming from a trusted publisher and are run.
  • Adding a trusted publisher could affect scenarios beyond those related to Office, because a trusted publisher is a Windows-wide setting, not just an Office-specific setting.

Trusted Locations

Saving files from the internet to a Trusted Location on a user’s device ignores the check for Mark of the Web and opens with VBA macros enabled. For example, a line of business application could send reports with macros on a recurring basis. If files with macros are saved to a Trusted Location, users won’t need to go to the Properties for the file, and select Unblock to allow the macros to run.

Because macros aren’t blocked in files saved to a Trusted Location, you should manage Trusted Locations carefully and use them sparingly. Network locations can also be set as a Trusted Location, but it’s not recommended. For more information, see Trusted Locations for Office files.

Additional information about Mark of the Web

Mark of the Web and Trusted Documents

When a file is downloaded to a device running Windows, Mark of the Web is added to the file, identifying its source as being from the internet. Currently, when a user opens a file with Mark of the Web, a SECURITY WARNING banner appears, with an Enable content button. If the user selects Enable content, the file is considered a Trusted Document, and macros are allowed to run. The macros will continue to run even after the change of default behavior to block macros in files from the internet is implemented, because the file is still considered a Trusted Document.

After the change of default behavior to block macros in files from the internet, users will see a different banner the first time they open a file with macros from the internet. This SECURITY RISK banner doesn’t have the option to Enable content. But users will be able to go to the Properties dialog for the file, and select Unblock, which will remove Mark of the Web from the file and allow the macros to run, as long as no policy or Trust Center setting is blocking.

Mark of the Web and zones

By default, Mark of the Web is added to files only from the Internet or Restricted sites zones.

 Tip

To see these zones on a Windows device, go to Control Panel > Internet Options > Change security settings.

You can view the ZoneId value for a file by running the following command at a command prompt, and replacing {name of file} with your file name.

ConsoleCopy

notepad {name of file}:Zone.Identifier

When you run this command, Notepad will open and display the ZoneId under the [ZoneTransfer] section.

Here’s a list of ZoneId values and what zone they map to.

  • 0 = My Computer
  • 1 = Local intranet
  • 2 = Trusted sites
  • 3 = Internet
  • 4 = Restricted sites

For example, if the ZoneId is 2, VBA macros in that file won’t be blocked by default. But if the ZoneId is 3, macros in that file will be blocked by default.

You can use the Unblock-File cmdlet in PowerShell to remove the ZoneId value from the file. Removing the ZoneId value will allow VBA macros to run by default. Using the cmdlet does the same thing as selecting the Unblock checkbox on the General tab of the Properties dialog for the file.

Use the Readiness Toolkit to identify files with VBA macros that might be blocked

To identify files that have VBA macros that might be blocked from running, you can use the Readiness Toolkit for Office add-ins and VBA, which is a free download from Microsoft.

The Readiness Toolkit includes a standalone executable that can be run from a command line or from within a script. You can run the Readiness Toolkit on a user’s device to look at files on the user’s device. Or you can run it from your device to look at files on a network share.

When you run the standalone executable version of the Readiness Toolkit, a JSON file is created with the information collected. You’ll want to save the JSON files in a central location, such as a network share. Then you’ll run the Readiness Report Creator, which is a UI wizard version of the Readiness Toolkit. This wizard will consolidate the information in the separate JSON files into a single report in the form of an Excel file.

To identify files that might be impacted by using the Readiness Toolkit, follow these basic steps:

  1. Download the most current version of the Readiness Toolkit from the Microsoft Download Center. Make sure you’re using at least Version 1.2.22161, which was released on June 14, 2022.
  2. Install the Readiness Toolkit.
  3. From a command prompt, go to the folder where you installed the Readiness Toolkit and run the ReadinessReportCreator.exe command with the blockinternetscan option.For example, if you want to scan files in the c:\officefiles folder (and all its subfolders) on a device and save the JSON file with the results to the Finance share on Server01, you can run the following command.

ConsoleCopy

ReadinessReportCreator.exe -blockinternetscan -p c:\officefiles\ -r -output \\server01\finance -silent
  1. After you’ve done all your scans, run the Readiness Report Creator.
  2. On the Create a readiness report page, select Previous readiness results saved together in a local folder or network share, and then specify the location where you saved all the files for the scans.
  3. On the Report settings page, select Excel report, and then specify a location to save the report.
  4. When you open the report in Excel, go to the VBA Results worksheet.
  5. In the Guideline column, look for Blocked VBA file from Internet.

For more detailed information about using the Readiness Toolkit, see Use the Readiness Toolkit to assess application compatibility for Microsoft 365 Apps.

Use policies to manage how Office handles macros

You can use policies to manage how Office handles macros. We recommend that you use the Block macros from running in Office files from the Internet policy. But if that policy isn’t appropriate for your organization, the other option is the VBA Macro Notification Settings policy.

For more information on how to deploy these policies, see Tools available to manage policies.

 Important

You can only use policies if you’re using Microsoft 365 Apps for enterprise. Policies aren’t available for Microsoft 365 Apps for business.

Block macros from running in Office files from the Internet

This policy prevents users from inadvertently opening files containing macros from the internet. When a file is downloaded to a device running Windows, or opened from a network share location, Mark of the Web is added to the file identifying it was sourced from the internet.

We recommend enabling this policy as part of the security baseline for Microsoft 365 Apps for enterprise. You should enable this policy for most users and only make exceptions for certain users as needed.

There’s a separate policy for each of the five applications. The following table shows where each policy can be found in the Group Policy Management Console under User Configuration\Policies\Administrative Templates:

ApplicationPolicy location
AccessMicrosoft Access 2016\Application Settings\Security\Trust Center
ExcelMicrosoft Excel 2016\Excel Options\Security\Trust Center
PowerPointMicrosoft PowerPoint 2016\PowerPoint Options\Security\Trust Center
VisioMicrosoft Visio 2016\Visio Options\Security\Trust Center
WordMicrosoft Word 2016\Word Options\Security\Trust Center

Which state you choose for the policy determines the level of protection you’re providing. The following table shows the current level of protection you get with each state, before the change in default behavior is implemented.

IconProtection levelPolicy stateDescription
Green circle with white check markProtected [recommended]EnabledUsers will be blocked from running macros in files obtained from the internet.

Part of the Microsoft recommended security baseline.
Red circle with white XNot protectedDisabledWill respect the settings configured under File > Options > Trust Center > Trust Center Settings… > Macro Settings.
Red circle with white XNot protectedNot ConfiguredWill respect the settings configured under File > Options > Trust Center > Trust Center Settings… > Macro Settings.

 Note

  • If you set this policy to Disabled, users will see, by default, a security warning when they open a file with a macro. That warning will let users know that macros have been disabled, but will allow them to run the macros by choosing the Enable content button.
  • This warning is the same warning users have been shown previously, prior to this recent change we’re implementing to block macros.
  • We don’t recommend setting this policy to Disabled permanently. But in some cases, it might be practical to do so temporarily as you test out how the new macro blocking behavior affects your organization and as you develop a solution for allowing safe usage of macros.

After we implement the change to the default behavior, the level of protection changes when the policy is set to Not Configured.

IconProtection levelPolicy stateDescription
Green circle with white check markProtectedNot ConfiguredUsers will be blocked from running macros in files obtained from the internet.

Users will see the Security Risk banner with a Learn More button

VBA Macro Notification Settings

If you don’t use the “Block macros from running in Office files from the Internet” policy, you can use the “VBA Macro Notification Settings” policy to manage how macros are handled by Office.

This policy prevents users from being lured into enabling malicious macros. By default, Office is configured to block files that contain VBA macros and display a Trust Bar with a warning that macros are present and have been disabled. Users can inspect and edit the files if appropriate, but can’t use any disabled functionality until they select Enable Content on the Trust Bar. If the user selects Enable Content, then the file is added as a Trusted Document and macros are allowed to run.

There’s a separate policy for each of the five applications. The following table shows where each policy can be found in the Group Policy Management Console under User Configuration\Policies\Administrative Templates:

ApplicationPolicy location
AccessMicrosoft Access 2016\Application Settings\Security\Trust Center
Excel [1]Microsoft Excel 2016\Excel Options\Security\Trust Center
PowerPointMicrosoft PowerPoint 2016\PowerPoint Options\Security\Trust Center
VisioMicrosoft Visio 2016\Visio Options\Security\Trust Center
WordMicrosoft Word 2016\Word Options\Security\Trust Center

 Note

  • [1] For Excel, the policy is named Macro Notification Settings.
  • The “VBA Macro Notification Settings” policy is also available for Project and Publisher.

Which state you choose for the policy determines the level of protection you’re providing. The following table shows the level of protection you get with each state.

IconProtection levelPolicy statePolicy value
Green circle with white check markProtected [recommended]EnabledDisable all except digitally signed macros (and select “Require macros to be signed by a trusted publisher”)
Green circle with white check markProtectedEnabledDisable all without notification
Orange circle with white check markPartially protectedEnabledDisable all with notification
Orange circle with white check markPartially protectedDisabled(Same behavior as “Disable all with notification”)
Red circle with white XNot protectedEnabledEnable all macros (not recommended)

 Important

Securing macros is important. For users that don’t need macros, turn off all macros by choosing “Disable all without notification.”

Our security baseline recommendation is that you should do the following:

  • Enable the “VBA Macro Notification Settings” policy.
  • For users that need macros, choose “Disable all except digitally signed macros” and then select “Require macros to be signed by a trusted publisher.” The certificate needs to be installed as a Trusted Publisher on users’ devices.

If you don’t configure the policy, users can configure macro protection settings under File > Options > Trust Center > Trust Center Settings… > Macro Settings.

The following table shows the choices users can make under Macro Settings and the level of protection each setting provides.

IconProtection levelSetting chosen
Green circle with white check markProtectedDisable all macros except digitally signed macros
Green circle with white check markProtectedDisable all macros without notification
Orange circle with white check markPartially protectedDisable all macros with notification (default)
Red circle with white XNot protectedEnable all macros (not recommended; potentially dangerous code can run)

 Note

In the policy setting values and the product UI for Excel, the word “all” is replaced by “VBA.” For example, “Disable VBA macros without notification.”

Tools available to manage policies

There are several tools available to you to configure and deploy policy settings to users in your organization.

Cloud Policy

You can use Cloud Policy to configure and deploy policy settings to devices in your organization, even if the device isn’t domain joined. Cloud Policy is a web-based tool and is found in the Microsoft 365 Apps admin center.

In Cloud Policy, you create a policy configuration, assign it to a group, and then select policies to be included in the policy configuration. To select a policy to include, you can search by the name of the policy. Cloud Policy also shows which policies are part of the Microsoft recommended security baseline. The policies available in Cloud Policy are the same User Configuration policies that are available in the Group Policy Management Console.

For more information, see Overview of Cloud Policy service for Microsoft 365.

Microsoft Endpoint Manager admin center

In the Microsoft Endpoint Manager admin center, you can use either the Settings catalog (preview) or Administrative Templates to configure and deploy policy settings to your users for devices running Windows 10 or later.

To get started, go to Devices > Configuration profiles > Create profile. For Platform, choose Windows 10 and later and then choose the profile type.

For more information, see the following articles:

Group Policy Management Console

If you have Windows Server and Active Directory Domain Services (AD DS) deployed in your organization, you can configure policies by using Group Policy. To use Group Policy, download the most current Administrative Template files (ADMX/ADML) for Office, which include the policy settings for Microsoft 365 Apps for enterprise. After you copy the Administrative Template files to AD DS, you can use the Group Policy Management Console to create Group Policy Objects (GPOs) that include policy settings for your users, and for domain joined devices.

UniFi Talk – Use UniFi Talk devices

This article describes how to use your UniFi Talk devices once they’re set up and configured in the Talk application. For more information on how to set up and configure your devices, please refer to these articles on adopting devices and using the Talk application.

For optimal performance, make sure you’re using the latest firmware for your devices and the latest UniFi Talk application version.

Configure voicemail

To configure voicemail on the Touch and Touch Max phone:

  1. From the Keypad, dial *86 or long-press 1 to access voicemail configuration.
  2. Follow the audio prompts to complete voicemail configuration.

Note: Visual voicemail configuration is coming soon.

To configure voicemail on the Flex phone:

  1. Press the MESSAGE button to access voicemail configuration.
  2. Follow the audio prompts to complete voicemail configuration.

Forward an incoming call

To forward an incoming call on the Touch and Touch Max phone:

  1. From the incoming call screen, press the blue Forward button to view your contact list.
  2. Select a contact to forward the incoming call.

Start a parallel call

To start a parallel call (i.e., start a new call while one or more calls are already ongoing) on the Touch and Touch Max phone:

  1. From the active call screen, press the Add / Transfer button.
  2. There are two options for starting a parallel call:
    1. From the Contacts tab of the Add / Transfer screen, select a contact from your contact list.
    2. From the Keypad tab of the Add / Transfer screen, dial a number and press the green button at the bottom of the screen.
  3. Press the Call button to start a parallel call. The current active call will be placed on hold.
  4. When two or more calls are active in parallel, swipe left or right to navigate between active calls.

Transfer an active call

To transfer an active call on the Touch or Touch Max  phone:

  1. From the active call screen, press the Add / Transfer button.
  2. There are two options for transferring an active call:
    1. From the Contacts tab of the Add / Transfer screen, select a contact from your contact list.
    2. From the Keypad tab of the Add / Transfer screen, dial a number and press the green button at the bottom of the screen.
  3. You will have the option to press Transfer or Warm Transfer.
    1. If you press the Transfer button, this will utilize a cold (blind) transfer. The active call will immediately be transferred and will ring the destination phone once you press the Transfer button.
    2. If you select the Warm Transfer option, the original caller is placed on hold while the transfer destination is dialed. The transfer destination has to pick up, at which point you have to again press the blue transfer button to complete the transfer.

To transfer an active call on the Flex phone:

  1. While the call is active, press the TRANSFER button.
  2. From here, you can either transfer to a specific number or a contact.
    1. To transfer to a specific number, enter the number you’d like to transfer the call to and press the DIAL soft key.
    2. To transfer to a contact, press the CONTACT soft key to load your contact list. Navigate the contact list using the up/down keys and dial the desired contact by pressing the DIAL soft key or the OK button.
  3. You’re now calling the transfer destination. Once the transfer destination answers the call, press the TRANSFER button again to connect the original caller with the transfer destination.

Note: The Flex phone utilizes a warm (attended) transfer. The original caller will be placed on hold while a second call is established with the transfer destination. Once the second call is connected, the transfer can be completed to connect the original caller with the transfer destination.

Start a conference call

To start a conference call on the Touch and Touch Max phone:

  1. From the active call screen, press the Add / Transfer button.
  2. There are two options for adding additional parties to a conference call:
    1. From the Contacts tab of the Add / Transfer screen, select a contact and press the Add to Call button.
    2. From the Keypad tab of the Add / Transfer screen, dial the additional party’s number, press the green button at the bottom of the screen, and select the Add to Call option.

To start a three-way conference call on the Flex phone:

  1. While the call is active, press the CONF soft key.
  2. From here, you can either start a call with a specific number or a contact.
    1. To call a specific number, enter the number you’d like to transfer the call to and press the DIAL soft key.
    2. To call a contact, press the CONTACT soft key to load your contact list. Navigate the contact list using the up/down keys and dial the desired contact by pressing the DIAL soft key or the OK button.
  3. You’re now calling the third party. Once the third party answers the call, press the CONF soft key again to start a conference call.

Manage your status

To manage your status on the Touch and Touch Max phone:

  1. Press the App Selector button, located below the phone’s touchscreen to the left of the Ubiquiti logo.
  2. Select Settings and click on My Status.
  3. From here, you can select between three status settings:
    1. Create a DND Allow List to allow specific numbers to ring your device when your status is set to Do Not Disturb.
    2. Specify a redirect number using the Change Redirect Number button on the My Status page.
    1. Available: Incoming calls will ring your device.
    2. Do Not Disturb (DND): Incoming calls will be sent to voicemail.
    3. Redirect: Incoming calls will be forwarded to the specified redirect number.

To manage your status on the Flex phone:

  1. Do Not Disturb (DND): Incoming calls will be sent to voicemail.
    1. Press the DND soft key to place your device in Do Not Disturb mode. Incoming calls will go to voicemail. When DND is enabled you will see the word DND with a symbol in the top-left corner of the screen.
    2. Press the DND soft key again to disable Do Not Disturb mode.
  2. Redirect: Incoming calls will be forwarded to the specified redirect number.
    1. Press the MENU soft key, then select 2. SETTINGS.
    2. Use the up/down keys to navigate the settings menu and select 5. CALL FORWARD.
    3. Press the YES soft key to set a redirect status.

On the CALL FORWARD NUMBER screen, press the EDIT soft key, enter your redirect number with the keypad, and press the CONFIRM soft key.

Troubleshooting

My Talk device is showing a Connection Error screen

This error means that your Talk device cannot communicate with the Talk application.

To troubleshoot a Connection Error state:

  1. Ensure that the Talk application is running. To check on Talk’s status, open unifi.ui.com, select your UniFi OS Console, go to Settings > Updates, and locate the Talk application tile. If Talk is stopped, click on the three dots menu in the Talk application tile and select Start.
  2. Restart the Talk application. See this section for instructions on how to restart Talk.
  3. Restart your UniFi OS Console by going to its Settings > Advanced and clicking Restart Console under the Console Controls header.
    If you’re still encountering this issue after the troubleshooting steps above, please contact Ubiquiti Support.

    Source :
    https://help.ui.com/hc/en-us/articles/4409791920791-UniFi-Talk-Use-UniFi-Talk-devices

UniFi Talk – Use the UniFi Talk application

This article outlines key setup and configuration processes that can be completed in the UniFi Talk application.

Create users

To create new users in the UniFi Talk application:

  1. Open the Users tab and click the Add User button in the top-right corner of the screen.
  2. Type the user’s first name, last name, and extension in the respective text fields. If you do not assign an extension, the UniFi Talk application will do so automatically.
  3. Select the user’s phone number from the drop-down menu and click Save. If no phone number is selected, the user will only be able to make internal calls unless they are added to a group with a number assigned.

Assign phones to users

A user must be assigned to each phone managed by the UniFi Talk application. You can assign a phone to a user on the Devices page or in the user’s profile panel.

To assign a phone to a user on the Devices page:

  1. Click the Devices icon in the left navigation bar.
  2. Hover your cursor over the phone you’d like to assign to the user, then click the Assign link when it appears.
  3. Select the user from the pop-up window’s drop-down field, then click Assign.

To assign a phone to a user via their profile panel:

  1. Click the Users icon in the left navigation bar.
  2. Click the user that you’d like to assign a phone to.
  3. Click the Manage tab, then scroll down and click the Manage drop-down option.
  4. Select the phone that you’d like to assign to the user from the Reassign Device drop-down field.
  5. Click Save at the bottom of the panel.

Assign numbers to users

If you wish to purchase additional numbers in the UniFi Talk application before you start assigning, see UniFi Talk – Manage UniFi Talk subscriptions.

To assign a number to a user:

  1. Click the Users icon in the left navigation bar.
  2. Click the user that you’d like to assign a number to.
  3. Click the Manage tab, then scroll down and click the Manage drop-down option.
  4. Select the number that you’d like to assign to the user from the Change Number drop-down field.
  5. Click Save at the bottom of the panel.

Note: Users without a number assigned will not be able to make or receive external calls, but will still have an active extension that can make and receive unlimited internal calls.

Add a third-party SIP provider

Session Initiation Protocol (SIP) providers facilitate real-time video and voice communication (e.g., Twilio, Voxbone, 3CX, etc.). If you currently subscribe to a third-party SIP provider, you don’t have to purchase a UniFi Talk subscription to use your existing service in the UniFi Talk application.

To add a third-party SIP provider to your UniFi Talk application:

  1. Create and configure a new trunk in your SIP provider’s settings console: 
    1. Create a credential list and assign username and password credentials to the trunk itself. 
    2. Add an ACL IP and a new entry for your router’s public IP address (e.g., 1.2.3.4/32).
    3. Add an origination uri in the same format as your router’s public IP address (e.g., sip:1.2.3.4:6767).
    4. Ensure that the Direct Inward Dialing (DID) number(s) you want to use with UniFi Talk are assigned to the newly created trunk.
  2. Add your SIP provider’s information to the UniFi Talk application:
    1. Go to Settings > System Settings.
    2. Click the Add Third-Party SIP Provider button at the bottom of the screen.
    3. Enter your provider’s name.
    4. Enter your SIP provider’s required fields:
      1. Locate your SIP provider’s custom fields by referencing either the Providers ITSPs directory or your provider’s user documentation.
      2. Click the Add Field button in the UniFi Talk Settings menu.
      3. Type or paste the copied field into the Add Fields window and click the icon. Repeat this process for multiple entries.
      4. Click Done once all fields have been added.
    5. Type the DID number(s) from your SIP provider in the Input Numbers field(s) in either E.164 format (e.g., +10123456789) or the format supported by your provider.
    6. Add your SIP provider’s media and signaling servers:
      1. Click the Add IP Address Range button.
      2. Type the address information in the corresponding fields and click Add.
    7. Enable the Static Signaling Port toggle located in the Network tab of the UniFi Talk Settings menu.
  3. Assign the new DID number(s) and phone(s) to users registered in your UniFi Talk application:
    1. Open the Users page of your UniFi Talk application.
    2. Click the desired user then click the Manage tab at the top of their profile panel.
    3. Select the phone that you’d like to assign the user from the Reassign Device drop-down menu.
    4. Select the DID number that you’d like to assign the user from the Change Number drop-down menu.
    5. Repeat this process as needed for additional users.

      Note: If you’re using a third-party SIP provider, said provider will be responsible for maintaining E911 compliance. Please contact your provider for more guidance on how to ensure that all requirements are met.
  4. Add or adjust port forwarding rule(s) for the UniFi OS Console hosting the UniFi Talk application:
    1. Open the UniFi Network Settings menu and click the Firewall & Security tab.
    2. Locate the Port Forwarding section and click the Create New Forwarding Rule button.
    3. Add all required information to apply the port forwarding rule(s) to your UniFi OS Console.

If you have another router upstream from your UniFi OS Console, forward incoming traffic to Port 6767 of your UniFi OS Console.

Set up a Smart Attendant

The Smart Attendant helps you create and execute custom call routing to ensure that all your calls are directed to the right extension or preferred language speaker.

To set up a Smart Attendant:

  1. Open the Smart Attendant tab in the UniFi Talk application. If you already have one or more Smart Attendants, click the Add New button. Otherwise, proceed with setup.
  2. Name your Smart Attendant and click Next.
  3. Select the number(s) you want the Smart Attendant to answer from the drop-down field.
    1. If you select None, your Smart Attendant will not be active until you assign it a number.
    2. You can also select multiple numbers for your Smart Attendant to answer.
  4. From this screen, you can also configure the Ringback and Hold Music that your Smart Attendant will use.
    1. Ringback: The audio that callers hear when dialing a Talk user or group via your Smart Attendant.
    2. Hold Music: The audio that callers hear when a Talk user places them on hold after being dialed via your Smart Attendant.
  5. Select if your Smart Attendant will behave differently based on business hours. When enabled, you can define custom call handling for business hours and non-business hours.
    1. If you select Yes, configure your business hours schedule. You can add multiple business hour segments within a single day.
  6. Select if you wish to have extension dialing enabled. When enabled, callers can dial an extension to connect with a user or group without going through Smart Attendant menus.
    1. If you select Yes, select an extension dialing method:
      1. All Users and Groups: All users and groups in your Talk application can be dialed by their extension.
      2. Custom List: Only the Talk users and groups added to the custom list can be dialed by their extension.
      3. Smart Attendant Ring Menus: Only the Talk users and groups added to the Smart Attendant with a Ring Phone(s) menu can be dialed by their extension.
  7. Configure your Smart Attendant’s greeting message:
    1. Select the voice your Smart Attendant will use for generated audio.
    2. Select the greeting type. You can generate audio from text or use custom audio by recording or uploading a file.
    3. Following the instructions to configure your greeting based on the type selected.
  8. Create your call routing tree:
    1. Enter the prompt message and select the user(s) and/or group(s) that each key press will direct to.
    2. If you don’t need a call routing tree or wish to configure this later, click No then Finish.

To add a new menu or user:

  1. Hover your cursor over the menu that you’d like to add a new block to and click the icon when it appears.
  2. Choose between the two different types of blocks:
    • Keypress Prompt (e.g., Press 1 for Sales)
    • Ring Phone(s) (Dial a specific user or group)
    • Play Audio (Play an audio message)
    • Voicemail (Leave voicemail for a specific user)
    • Keypress to Return (Return to the previous menu)
    • Schedule (Configure call handling based on a schedule)

To delete a menu or user, hover your cursor over it and click the icon when it appears.

Manage voicemails and call recordings

The UniFi Talk application collects voicemail by default. To listen to voicemails, click the Voicemail button on your Talk phone.

To automate call recordings:

  1. Enable the Automatic Call Recording toggle from Settings > Call Settings.
  2. Review the disclaimer text in the pop-up advisory window carefully, and click I Understand if you consent.

To disable voicemail:

  1. Open the Settings menu and click the Call Settings  tab.
  2. Open the Voicemail drop-down.
  3. Disable the voicemail toggle.

View call logs

To view your call logs:

  1. Open the Call Log tab to view a listing of every call made with a device managed by the UniFi Talk application.
  2. View the details of a specific call:
    1. Click the desired call’s entry or hover your cursor over its listing and click the View link when it appears.
    2. Review basic call information (e.g., caller, recipient, call experience score, length, date, and time) from the General section of the call log’s pop-up panel.
    3. Click the Recording tab at the top of the call log’s panel to listen to its recording.
    4. For voicemail messages, click the Voicemail tab at the top of the call log’s panel to listen to its recording.
  3. To delete a call log, hover your cursor over the log’s entry and click Delete, then click the Delete button in the confirmation pop-up window.

Set up groups

The UniFi Talk application allows you to create groups that allow multiple phones to share the same number and ring. Groups can utilize all UniFi Talk application features, including the Smart Attendant.

To create a new group:

  1. Click the Groups icon in the left navigation bar and click the Create New Group link in the top-right corner of the following page.
  2. Enter a group name, assign a number to the group (optional), and add an internal extension (optional).
  3. Select either Simultaneous or Sequential call handling.
    1. Simultaneous: When the group is called, all phones assigned to group members will ring. The first phone to answer will receive the call and the other phones will stop ringing.
    2. Sequential: When the group is called, phones assigned to group members will ring in the order you define.
  4. Manage the group’s members. You can add Talk users and global contacts to a group.
  5. Configure the Ringback for the group. This is the audio that callers hear when calling the group.
  6. Click Create.

Note: Groups without a number assigned will not be able to make or receive external calls, but will still have an active extension that can make and receive unlimited internal calls.

To assign a specific outgoing number to a user who is a member of several groups:

  1. Open the Users page, select the user, and click the Manage tab.
  2. Select the desired outgoing number from the drop-down field.

Troubleshooting

I can’t receive incoming calls

We recommend enabling the static signaling port feature if your UniFi Talk deployment can’t receive incoming calls. The instructions below describe how to implement this fix.

  1. In the Talk application, enable the toggle for static signaling port within Settings > System Settings > Create Static Signaling Port.
  2. Create a port forwarding rule that forwards port 6767 to your UniFi OS Console running the Talk application. If your routing tasks are being handled by UniFi, go to the Network application to create this rule within Settings > Advanced Features > Advanced Gateway Settings > Port Forwarding.
    Need help creating this port forwarding rule?
  3. Try making a call to one of your UniFi Talk phones from an external number to test if incoming calling is working.
  4. If the steps above did not work, try creating a firewall rule that allows Internet traffic destined for port 6767 of your UniFi OS Console running the Talk application. If your firewall rules are managed by UniFi, go to the Network application to create this rule within Settings > Traffic & Security > Global Threat Management > Firewall.Need help creating this rule?

I can’t make outgoing calls

For outgoing call failures, we recommend disabling the SIP ALG setting found in the router upstream from the UniFi OS Console running the Talk application (e.g., the router modem installed by your ISP). The SIP ALG setting is sometimes enabled by default on these devices and interferes with telephony.

I could previously make and/or receive calls, and now I can’t

In some cases, events like a network outage can result in degraded Talk application performance. This can be resolved by restarting the Talk application.

To restart the Talk application:

  1. From unifi.ui.com, select your UniFi OS Console, go to Settings > Updates, and locate the Talk application tile.
  2. Click on the three dots menu in the Talk application tile and select Stop.
    stop-application.png
  3. After the Talk application has stopped, click on the Start Talk button.

If you’re still having trouble making and/or receiving calls, please contact UniFi Technical Support.

Recovering Talk subscriptions and phone numbers

If you need to factory reset, replace, or migrate to a new UniFi OS Console, or reset the Talk application, you can recover your Talk subscriptions and phone numbers during the UniFi Talk setup process. This option is available when you’re logged in using the same Ubiquiti account that manages your Talk subscriptions.

To recover or migrate your Talk subscriptions:

  1. Log in to your Ubiquiti account at unifi.ui.com and select the UniFi OS Console you’d like to recover or migrate your Talk subscriptions to.
  2. Launch the UniFi Talk Setup Wizard.
    1. If you have multiple UniFi Talk deployments associated with your Ubiquiti account, you’ll see a list of previous deployments to select from. Hover over the information tooltip to view the phone numbers associated with each deployment.
    2. Select the deployment with the phone numbers that you want to recover or migrate.
      previous-install-detected.png
  3. Click the Next button to continue setup.
  4. On the Setup Device(s) page, you’ll now have the option to assign your recovered or migrated phone numbers to users and devices. These are available for selection from the Number / Area Code dropdown menu. Make your selections and click Next.
    setup-device.png
  5. Complete the UniFi Talk setup process to finish recovering or migrating your Talk subscriptions and phone numbers.

Notes: A Talk subscription can only be active on a single UniFi OS Console. If you use this option during the UniFi Talk setup process while a subscription is still active on another UniFi OS Console, your subscription(s) will be transferred and will no longer be accessible from that device.

If you’re still having trouble making and/or receiving calls, please contact UniFi Technical Support.

Source :
https://help.ui.com/hc/en-us/articles/1500000304422-UniFi-Talk-Use-the-UniFi-Talk-application

UniFi Protect – Configure location-based activity notifications

You can configure UniFi Protect location-based activity notifications so you are only notified when the user(s) are off-site. This article outlines the steps needed to set this up for your account.

In this article, you will learn how to:

Set the location of your UniFi OS Console

To set the location of your UniFi OS Console:

  1. Make sure that your UniFi OS Console has remote access enabled.
  2. In the UniFi OS settings, go to Console Settings > Time Zone / Location > Edit Location on Map
  3. Search for the Address or drag your UOS Console to the correct location.
  4. Adjust the Geofencing Radius slider to define your console’s on-site radius (i.e, “geofence”).
  5. Click Apply Changes when you’ve set the desired geofence.

If you experience unexpected status changes while on site, increase the geofence’s radius.

Configure your primary mobile device

Your primary mobile device will be the one used to determine whether you are on or off-site (i.e., within the geofence).

To configure your primary mobile device:

  1. Make sure cellular data is enabled on your mobile device.
  2. Make sure that the UniFi Protect mobile app has proper location permissions:
    1. For iOS devices, set the Protect mobile app’s Location Setting permission to AlwaysPrecise Location should also be enabled.
    2. For Android devices, make sure that Protect mobile app’s location access is set to Allow all the time.
  3. Open the Protect mobile app, tap the Settings icon on the bottom-left corner of the screen followed by Primary Device; then, select the desired mobile device from the list. 
  4. To activate your UniFi OS Console’s geofence, use the Protect mobile app to go to Settings UniFi OS Console > Network and enable the Geofencing toggle.

Configure location-based activity notifications

After you’ve configured the locations of your UniFi OS Console and primary mobile device, you can create activity notifications using your UniFi Protect web application or mobile app.

To create activity notifications using the UniFi Protect mobile app:

  1. Go to Settings > Notifications to create a new activity notification or edit an existing one.
  2. Select from OffDefault, or Custom.
    1. If you choose Custom, click the Activity tab to customize the notification for each camera.

To create or edit activity notifications using the Protect web application:

  1. Log in and go to Settings > Notifications > Activity.
  2. Adjust When to Send > Location Based to receive notifications when you are off site (When I’m Away) or when all users are off site (When Everyone is Away).
  3. Go back and customize the notifications for your cameras.

Troubleshooting inaccurate location tracking

The Protect mobile app uses GPS and communication with the UniFi OS Console to provide an accurate location.

If you are experiencing location inaccuracies, follow the device-specific steps below to improve the mobile app’s location tracking:

For iOS / iPadOS devices:

  1. Disable Low Power mode, as it may prevent the app from sending location status updates.
  2. Enable Background App Refresh and Cellular Data for the UniFi Protect mobile app.
  3. Disable VPN or Mobile Hotspot if they interfere with location accuracy.

For Android devices:

  1. Select High Accuracy mode for mobile phone location tracking, if available.
  2. Disable data saving settings.
  3. Disable battery optimization for the UniFi Protect mobile app by tapping Settings > Battery > Battery Optimization > Don’t Optimize.
  4. Disable power saving mode to ensure it isn’t auto-enabled once your phone battery is low.
  5. If your mobile has a Deep Sleep feature, disable it for the UniFi Protect mobile app to make sure you don’t receive location status updates after opening it.

    Source :
    https://help.ui.com/hc/en-us/articles/360037982314-UniFi-Protect-Configure-location-based-activity-notifications

UniFi Protect – Manage motion detection and privacy zones

This article describes how to set camera zones and configure motion detection behavior on your UniFi Protect system.

Camera zones overview

There are three different types of camera zone settings you can use:

  • Motion Zones, which tell the camera to recognize motion in specific zones and trigger certain actions, e.g. record footage and create Motion Detections for you to review later
  • Privacy Zones, which let you block out certain areas on the video recordings
  • Smart Detection (AI and G4 camera series), which let you create Events for certain types of motion, e.g. when the camera detects a person

Set up motion zones

Motion zones are specific zones where the camera will detect and record motion.

To trigger and record motion events and also trigger motion alerts, the camera recording settings must be set to Always or Detections.

For more information on recording settings, see UniFi Protect – View camera streams and manage recordings.

To set up a motion zone on the web application:

  1. Go to the Devices section and select the desired camera.
  2. On the right side panel, select Zones > Expand Motion Zones > Add Motion Zone.
  3. Create the Motion Zone by clicking on the four corners of its perimeter. You can further adjust the corners by dragging them with your cursor.
  4. Adjust the zone’s detection sensitivity based on your camera’s surroundings using the slider node below the feed window.”
unifi-protect-manage-motion-detection-privacy-zones-1.png

To set up a motion zone on the mobile app:

  1. Select the desired camera on the home screen.
  2. Tap on the Settings icon in the upper-right corner of your screen, then select Motion Zones > Add Motion Zone.
  3. Create the Motion Zone by clicking on the four corners of its perimeter. You can further adjust the corners by dragging them with your cursor.
  4. Adjust the zone’s detection sensitivity based on your camera’s surroundings using the slider node below the feed window.

Please note that adjusting the recording setting to Never disables motion detection recording and alerts.

When setting up zones, you can adjust the zone sensitivity. Setting a higher value will make your camera more sensitive, making it more likely to detect and log more subtle motions (e.g., small object movements).

If you’re getting an increased amount of motion events due to minor movements such as moving branches, decrease zone sensitivity to prevent excessive minor motion event logging.

unifi-protect-mobile-motion-zone-frame.png

Set up Smart Detection zones

Smart Detection Zones create events when specific motions are detected (e.g., a person’s movement).

Currently Smart Detection zones only supports person detection, meaning that you will only be notified when this specific motion event occurs.

The Smart Detection feature is only available for G4 and AI series cameras, except for G4 Instant.

To set up Smart Detection zones:

  1. Go to Devices > Properties panel > Recordings and enable Person detection.
  2. Go to the Zones section, click Add new zone, and name it.
  3. Create the Smart Detection Zone by clicking on the four corners of its perimeter. You can further adjust the corners by dragging them with your cursor.
  4. Adjust the zone’s detection sensitivity based on your camera’s surroundings using the slider node below the feed window.
unifi-protect-manage-motion-detection-privacy-zones-2.png

Set up privacy zones

You can set privacy zones for each of your cameras, which block live playback and recordings of content within the specified area. Instead, you will see a blacked-out image.

To set up a privacy zone on the web application:

  1. Go to the Devices section and select the desired camera.
  2. On the right side panel, select Zones > Expand Privacy Zones > Add Privacy Zone.
  3. Create the Privacy Zone by clicking on the four corners of its perimeter. You can further adjust the corners by dragging them with your cursor.
unifi-protect-manage-motion-detection-privacy-zones-3.png
unifi-protect-manage-motion-detection-privacy-zones-4.png

To set up a privacy zone on the mobile app:

  1. Select the desired camera on the home screen.
  2. Tap on the Settings icon in the upper-right corner of your screen, then select Privacy Zones > Add Privacy Zone.
  3. Create the Privacy Zone by clicking on the four corners of its perimeter. You can further adjust the corners by dragging them with your cursor.
unifi-protect-privacy-zone-mobile-app-frame.png

Source :
https://help.ui.com/hc/en-us/articles/360056987954-UniFi-Protect-Manage-motion-detection-and-privacy-zones

UniFi Protect – Manage Live Footage and Recordings

The UniFi Protect mobile and web applications allow you to view live and recorded footage as well as adjust the image and video playback quality. 

Live View

By default, the video bitrate of your cameras is automatically reduced during prolonged periods of low motion frequency in order to reduce storage utilization. You may choose a specific resolution by changing the Viewer Quality to Low or High on the Protect web application by hovering over the Live View, or on the mobile app within the Live View’s specific settings.

Note: If your bandwidth is limited, you may experience unstable playback while viewing a high quality live feed.

Recordings and Detections

Your recording’s duration and quality will depend on the camera’s Recording Mode. The When to Record setting can be set to AlwaysNever or Detections. Image quality and frame rate can be adjusted using the Recording Quality setting.

Note that:

  • A higher frame rate will give you smoother video playback while a lower frame rate will ensure better picture quality.
  • Recording with higher image quality will require more storage space than lower quality ones.

You can download the Detection clips from the mobile app by tapping the Share icon > Export clip, or from the web application by selecting the detection and clicking the Download icon.

Adjust the Camera Picture Settings

Most image quality issues can be resolved by adjusting the camera picture settings, which are specific to each camera and found within Devices > select a camera > Settings.

The camera’s image is dull, dark, or distorted

To correct imagery that appears dark, dull, or distorted:

  1. Open the camera’s settings and select Adjust Camera Picture.
  2. Adjust the BrightnessContrast, and Hue settings for the camera.

Note: There is no definite way of setting this for all cameras in any environment. Try adjusting these settings to achieve the desired image quality outcome.

The camera recording quality is low

To improve a camera’s recording quality, open its Recording Mode settings and increase the Frame Rate and Image Quality settings as described above.

The camera’s image is harshly lit

Harsh lighting creates a strong contrast that can make it difficult to see smaller, finer details in your live feeds and recordings. To resolve this, try enabling the HDR feature (or WDR depending on the camera model) in the Camera Picture settings.

The camera is out of focus (G3 Pro, G4 Pro, G4 PTZ cameras only)

If your G3 Pro, G4 Pro, or G4 PTZ cameras appear to be out of focus:

  • Make sure there are no objects between the camera and its focal point that may affect its ability to auto-focus.
  • Try manually setting the focal point with the Focus Camera Picture setting.

The camera isn’t switching to Night (IR) Mode

If your cameras are not switching to Night (IR) mode, or are rapidly alternating between Night and Day Mode, verify that:

  • Each camera’s infrared setting is set to Auto.
  • There are no external light sources, such as ambient lights in front of a camera, affecting integrated light sensors.
  • There are no obstructions near the front of the camera. Obstructions can cause the camera’s infrared light to reflect back at its sensor, causing it to switch back and forth between Night and Day Modes.

Night (IR) Mode imagery is blurry

If your Night (IR) Mode imagery is blurry:

  • Carefully clean your camera’s lens or dome using a soft cloth and isopropyl alcohol. The alcohol’s concentration should not exceed 70%; otherwise, you risk damaging its surface. Be sure to remove all residue to prevent unwanted reflections.
  • Ensure that no obstructions near the camera’s lens are causing IR reflections.
  • (For Dome cameras) Make sure that the dome cover is tightly secured to the lens housing. The rubber gasket should be firmly fastened to the dome’s surface and the dome should be in the locked position.

    Source :
    https://help.ui.com/hc/en-us/articles/360058867233-UniFi-Protect-Manage-Live-Footage-and-Recordings

UniFi Protect – Optimizing G4 Dome’s Night Mode

The G4 Dome camera is equipped with infrared LEDs to give it night vision. However, some factors may cause these LEDs to produce glares on the camera’s feed. The most common causes of glaring and poor resolution are:

https://www.youtube-nocookie.com/embed/gKNf23tWOFE

Reflections from nearby objects

Per its installation guide, the G4 Dome should be installed at least 60 centimeters (cm), or 24 inches, away from neighboring walls and the ceiling. If nearby objects or fixtures, such as a wall corner or overhang, are closer than that, they may reflect infrared light into the camera and create a glare.

Ceiling-mounting near a wall corner

Below, you can see how mounting the G4 Dome to the ceiling with objects in the foreground can result in poor image quality.

1_G4_Dome_ceiling_mounting_near_a_wall_corner_1.png
1_G4_Dome_ceiling_mounting_near_a_wall_corner_2.jpg

Ceiling-mounting near overhangs

The camera below is too close to the pillar so it appears in the camera’s field of view (FoV).

2_G4_Dome_ceiling_mounting_near_overhangs_1.png
2_G4_Dome_ceiling_mounting_near_overhangs_2.jpg

Wall-mounting too close to the ceiling

The camera below doesn’t have at least 60 cm of separation from the ceiling and its image quality is diminished as a result.

3_G4_Dome_wall_mounting_too_close_to_the_ceiling_1.png
3_G4_Dome_wall_mounting_too_close_to_the_ceiling_2.jpg

Residue on the bubble cover or lens

While installing the G4 Dome, its lens and bubble cover may collect dust, oil stains, and fingerprints. This can also occur if you wipe the lens or bubble cover incorrectly. 

If there is residue on the G4 Dome’s lens or bubble cover, clean them with either lens wipes, a lens cloth with a lens cleaning solution, or a soft cleaning cloth and rubbing alcohol. Continue to do this periodically to prevent distorted image quality due to dirty lens and cover surfaces.

Oil stains or fingerprints on the bubble cover or lens

When oil stains stick to the bubble cover or lens, the infrared lights become diffused by the foggy surface.

The image below shows the camera’s bubble cover marked with fingerprints.

4_G4_Dome_fingerprints_on_lens_1.png

The image below shows a lens with oil stains.

4_G4_Dome_residue_on_bubble_cover_or_lens_2.png

Below, you can see how image quality with a clean bubble cover is markedly better than that of an oil-stained equivalent.

4_G4_Dome_residue_on_bubble_cover_or_lens_3.jpg
4_G4_Dome_residue_on_bubble_cover_or_lens_4.jpg

Moisture droplets on the bubble cover

When moisture droplets stick to the bubble cover, the camera’s infrared lights become scattered by the trapped moisture, like in the example directly below.

To avoid reduced image quality due to moisture droplets, wipe the bubble cover’s exterior with a lens cloth.

5_G4_Dome_moisture_droplets_on_the_bubble_cover_1.png
5_G4_Dome_moisture_droplets_on_the_bubble_cover_2.jpg

Bubble cover not properly locked in place

The G4 Dome’s removable bubble cover has a locking mechanism to ensure an airtight seal. When the bubble cover is not attached properly, the camera’s infrared lights can be reflected back into its lens. 

To mount the bubble cover correctly:

  1. Align the small indentations on the cover and camera.
  2. Rotate the cover clockwise to securely fasten its rubber lining. The sealing strips should not be visible.

The example images below show the G4 Dome when its bubble cover is properly attached (left), and when it’s not (right).

6_G4_Dome_correct_vs_incorrect_bubble_cover_attachment_2_correct.png

Here, you can see the G4 Dome’s image quality when its bubble cover is properly attached.

6_G4_Dome_bubble_cover_not_securely_attached_3.jpg

Here, you can see how its image quality is greatly reduced by an incorrectly attached cover.

6_G4_Dome_bubble_cover_not_securely_attached_4.jpg

The rubber seal surrounding the lens is damaged

When the rubber seal surrounding the lens is damaged, infrared light can leak in and distort the camera feed.

The images below show a normal seal (left) and a damaged one (right).

7_G4_Dome_rubber_seal_surrounding_the_lens_normal_vs_damaged.png


Source :
https://help.ui.com/hc/en-us/articles/1500008633161-UniFi-Protect-Optimizing-G4-Dome-s-Night-Mode

Edge Chromium/ Chrome URL Whitelist and Blacklist

In case you do not wish to utilize the “Secure Browser”, instead, you want to use the “Edge Chromium” browser, then the “Secure Browser” URL management will not apply to Chrome or Edge browsers setup as Local Applications. 

In this case, please follow the following steps:

  • In the profile go to Computer Settings | Additional Registry Values
  • Add the link you want to “Allow” or “Deny”

To “Block” all URL’s within “Edge Chromium” use the following registry key:

HKEY_CURRENT_USER\Software\Policies\Microsoft\Edge\URLBlocklist

Value Name: 1

Value Type: REG_SZ

Value Data: *

To “Allow” URL use the following registry key:

HKEY_CURRENT_USER\Software\Policies\Microsoft\Edge\URLAllowlist

Value Name: 1

Value Type: REG_SZ

Value Data: teams.microsoft.com (used as an example)

Multiple links can be allowed by adding another registry key:

Click to Zoom

To “Block” all URL’s within “Chrome” use the following registry key:

HKEY_CURRENT_USER\SOFTWARE\Policies\Google\Chrome\URLBlocklist

Value Name: 1

Value Type: REG_SZ

Value Data: *

To “Block” file access within “Chrome” use the following registry key:

HKEY_CURRENT_USER\SOFTWARE\Policies\Google\Chrome\URLBlocklist

Value Name: `

Value Type: REG_SZ

Value Data: file://*

To “Block” facebook.com within “Chrome” use the following registry key:

HKEY_CURRENT_USER\SOFTWARE\Policies\Google\Chrome\URLBlocklist

Value Name: `

Value Type: REG_SZ

Value Data: facebook.com

To “Allow” URL use the following registry key:

HKEY_CURRENT_USER\SOFTWARE\Policies\Google\Chrome\URLAllowlist

Value Name: 1

Value Type: REG_SZ

Value Data: https://thinscale.com (used as an example)

Source :
https://kb.thinscale.com/thinkiosk-knowledge-base/edge-url-management

What are webhooks?

A simple guide to connecting web apps with webhooks

By Matthew Guay · September 20, 2022

what-are-webhooks primary img

You might have seen webhooks mentioned in your apps’ settings and wondered if they’re something you should use. The answer, in a nutshell, is probably yes.

Webhooks are one way that apps can send automated messages or information to other apps. It’s how PayPal tells your accounting app when your clients pay you, how Twilio routes phone calls to your number, and how WooCommerce can notify you about new orders in Slack.

They’re a simple way your online accounts can “speak” to each other and get notified automatically when something new happens. In many cases, you’ll need to know how to use webhooks if you want to automatically push data from one app to another.

Let’s break it down, learn how to speak webhook, and get your favorite apps to talk to each other.

Here’s what we’ll cover:

What are webhooks?

Example SMS message with a sender, receiver, and message

There are two ways your apps can communicate with each other to share information: polling and webhooks. As one of our customer champion’s friends has explained it: polling is like knocking on your friend’s door and asking if they have any sugar (aka information), but you have to go and ask for it every time you want it. Webhooks are like someone tossing a bag of sugar at your house whenever they buy some. You don’t have to ask—they just automatically punt it over every time it’s available.

Automate your way forward with Zapier

Sign up

Webhooks are automated messages sent from apps when something happens. They have a message—or payload—and are sent to a unique URL—essentially the app’s phone number or address. Webhooks are almost always faster than polling, and require less work on your end.

They’re much like SMS notifications. Say your bank sends you an SMS when you make a new purchase. You already told the bank your phone number, so they knew where to send the message. They type out “You just spent $10 at NewStore” and send it to your phone number +1-234-567-8900. Something happened at your bank, and you got a message about it. All is well.

Webhooks work the same way.

Example webhook data

Take another look at our example message about a new order. Bob opened your store’s website, added $10 of paper to his shopping cart, and checked out. Boom, something happened, and the app needs to tell you. Time for the webhook.

Wait: who’s the app gonna call? Just like you need to tell the bank your phone number before they can text you, for webhooks, you need to tell the originating app—your eCommerce store, in this case—the webhook URL of the receiving app, the app where you want the data to be sent.

Say you want to make an invoice for this new order. The app that creates this invoice is on the receiving end—it’s the app that needs the order data.

Automate workflows that drive success

Learn from expert Zapier users, receive personalized support, and find ways to scale your impact at our free user conference.

Register for ZapConnect

You’d first open your invoice app, make an invoice template, and copy its webhook URL—something like yourapp.com/data/12345. Then open your eCommerce store app, and add that URL to its webhook settings. That URL is your invoice app’s phone number, essentially. If another app pings that URL (or if you enter the URL in your browser’s address bar), the app will notice that someone is trying to send it data.

Ok. Back to the order. Your eCommerce store got the order and knows it needs to send the details to yourapp.com/data/12345. It then writes the order in a serialization format. The simplest of those formats is called “form-encoded”, and means your customer’s order would look something like this:

Customer=bob&value=10.00&item=paper

Now your eCommerce store needs to send the message. The simplest way to send data to a webhooks URL is with an HTTP GET request. Literally, that means to add the data to the URL and ping the URL (or enter it in your browser’s address bar). The same way you can open Zapier’s about page by typing /about after zapier.com, your apps can send messages to each other by tagging extra text with a question mark on the end of a website address. Here’s the full GET request for our order:

https://yourapp.com/data/12345?Customer=bob&value=10.00&item=paper

Deep inside your invoice app, something dings and says “You’ve got mail!” and the app gets to work, making a new invoice for Bob’s $10 paper order. That’s webhooks in action.

Remember when you had to check your email to see if you had new messages—and how freeing push email (“You’ve got mail!”) was? That’s what webhooks are for your apps. They don’t have to check for new info anymore. Instead, when something happens, they can push the data to each other and not waste their time checking and waiting.

→ Ready to start using webhooks? Jump ahead to skip the geeky details—or keep reading to learn more about the terms you’ll often see used with webhooks.


That’s the simple version. Technically, webhooks are “user-defined callbacks made with HTTP” according to Jeff Lindsay, one of the first people to conceptualize webhooks. Webhooks are data and executable commands sent from one app to another over HTTP instead of through the command line in your computer, formatted in XML, JSON, or form-encoded serialization. They’re called webhooks since they’re software hooks—or functions that run when something happens—that work over the web. And they’re typically secured through obscurity—each user of an application gets a unique, random URL to send webhook data to—though they can optionally be secured with a key or signature.

Webhooks typically are used to connect two different applications. When an event happens on the trigger application, it serializes data about that event and sends it to a webhook URL from the action application—the one you want to do something based on the data from the first application. The action application can then send a callback message, often with an HTTP status code like 302 to let the trigger application know if the data was received successfully or 404 if not.

Webhooks are similar to APIs—but simpler. An API is a full language for an app with functions or calls to add, edit, and retrieve data. The difference is, with an API, you have to do the work yourself. If you build an application that connects to another with an API, your application will need to have ways to ask the other app for new data when it needs it. Webhooks, on the other hand, are for one specific part of an app, and they’re automated. You might have a webhook just for new contacts—and whenever a new contact is added, the application will push the data to the other application’s webhooks URL automatically. It’s a simple, one-to-one connection that runs automatically.

How to use webhooks

Video Thumbnail

You know the lingo, understand how apps can message each other with webhooks, and can even figure out what the serialized data means. You speak webhook.

It’s time to use it. The best way to make sure you understand how webhooks work is to test it out, try making your own webhooks, and see if they work. Or, you can jump ahead and just drop your webhook URL into an app to share data—after all, you don’t have to know how to make webhooks to use them.

Here are the resources you need:

Test webhooks with RequestBin and Postman

The quickest way to learn is to experiment—and it’s best to experiment with something you can’t break. With webhooks, there are two great tools for that: RequestBin (owned by Pipedream) and Postman.

How data appears in Requestbin

How data appears in Requestbin

RequestBin lets you create a webhooks URL and send data to it to see how it’s recognized. Go to RequestBin, click Create a RequestBin, then copy the URL it gives you.You’ll need to have a Pipedream account (created with Google or GitHub) before you can view and use a URL.

Now, serialize some data in form encoded style—or copy our example form copy above. Open a new tab, paste your RequestBin URL in the URL bar, add a ? to the end, then paste your serialized data. You’ll end up with something like this:

https://requestbin.com/19uynve1?customer=bob&value=10.00&item=paper

Press enter in your browser’s address bar, and you’ll get a simple message back: success:true. Refresh your RequestBin tab, and you’ll see the data listed at the bottom as in the screenshot above.

Click REST under INTEGRATIONS to see the data.

Click REST under INTEGRATIONS to see the data.

You can then try sending POST requests in Terminal or from your own app’s code, if you’d like, using RequestBin’s sample code. That’s a bit more complex—but gives you a way to play with JSON or XML encoding, too.

The setup in Postman

The setup in Postman

Or, use another app for that. The app Postman lets you make custom HTTP requests for an easy way to send customized data to a webhooks URL. Enter the URL, then choose the HTTP request method you want to use (GET, POST, PUT, etc), and add the body data. That’ll let you send far more detailed requests to your webhook URL without having to use more code.

Add webhooks to your apps

Testing webhooks and serializing data by hand is tricky—as is copying and pasting data from your apps. Let’s skip both, and just get our apps talking to each other.

We’re using WordPress-powered form tool Gravity Forms and document template-builder app WebMerge as the examples here—but the same general idea works in most other apps that support webhooks. Here’s essentially what you need to do:

Gravity Forms Webhook data

Open your form’s Webhook settings in Gravity Forms

First, enable webhooks in your app if they’re not already and open the webhooks settings (in Gravity Forms, for instance, you need to install an add-on; in Active Campaign or WooCommerce, you’ll find webhooks under the app’s default settings). Your app might have one set of webhook settings for the entire app—or, often, it’ll have a specific webhook for each form, document, or other items the app maintains.

We want the data to come from Gravity Forms, so we’ll open the Webhooks settings under the form we want to use. That gives us a URL field (this lets us tell Gravity Forms where we want to send the data) and options to specify the webhook HTTP request method (how to send the data).

WebMerge webhook

Each WebMerge document template has a unique webhook URL.

Now let’s get that URL from the app that will receive the data—WebMerge, in this case. In WebMerge, each document has its own “merge URL”—and it wants the data in form encoded serialization, as you can tell from the ampersands in the example data. Copy the merge URL—or whatever URL your app offers, as it may have a different name.

Tip: You’ll often find webhook URLs and related settings under the “integration”, “webhook”, or “workflow” settings, depending on your app.

Add webhooks URL to Gravity Forms

Add the webhooks URL to your trigger app so it can share data when something happens

Finally, go back to your trigger app—Gravity Forms in our case—and paste the webhook URL in Gravity Forms’ URL field. You may also be able to set the correct request method and the specific field values to ensure only the data you want is sent, and is shared with the same variable names as the receiving app uses. Save the settings, and you’re good to go.

The next time someone fills out our form that Bob ordered 10.00 of paper, Gravity Forms will send the data to WebMerge’s URL as https://www.webmerge.me/merge/149933/gxszxg?Name=Bob&Item=Paper&Value=10.00 and WebMerge will turn that into a complete invoice.


PayPal IPN

PayPal IPN is very similar to webhooks—and you can add a webhook URL to PayPal to get payment notifications

Once you start using webhooks, you’ll notice them (or similar links) everywhere, in places you never thought they’d show up. PayPal, for instance, uses Instant Payment Notifications or IPNs to send notifications whenever you receive a payment. Have an app that you’d like to do something whenever you get a PayPal payment? Add its webhooks URL to PayPal’s IPN settings and that app will get a message the next time you get money.

Or take TwimletsTwilio‘s simple apps to forward calls, record voicemail messages, start a conference call, and more. To, say, forward a call, you’ll add a familiar, webhook-style Twimlet address like http://twimlets.com/forward?PhoneNumber=415-555-1212 to your Twilio phone number settings. Want to build your own phone-powered app, or notify another app when a new call comes in? Put your webhook URL in Twilio’s settings instead.

They might go by different names, but once you notice places where apps offer to send notifications to a unique link, you’ll often have found somewhere else webhooks can work. Now that you know how to use webhooks, you can use them to make software do whatever you want.

Use webhooks in any app with Zapier

Many apps on Zapier use webhooks behind the scenes already. You may not realize it, since Zapier apps generally handle all the actual setup for you. If you come across an app that offers webhooks as an option, you can use a webhooks step in a Zap to set that up yourself using what you’ve learned about webhooks. Note: Webhooks by Zapier is a built-in tool only available to Zapier users on a paid plan or during their trial period.

Copy Webhooks URL from Zapier

Say you have an app that can send data to a webhooks URL. To connect it to other apps, you’ll make a new Zap—what we call Zapier’s automated app workflows—and choose Webhooks by Zapier as the trigger app. Select Catch Hook, which can receive a GET, POST, or PUT request from another app. Zapier will give you a unique webhooks URL—copy that, then add it to your app’s webhooks URL field in its settings.

GET requests ask the server for data. POST requests send data to a computer. PUSH requests ask the server for specific data, typically to update it.

Test webhooks in Zapier

Zapier will parse each serialized item from your webhook data

Then have your app test the URL, or perhaps just add a new item (a new form entry, contact, or whatever thing your app makes) to have your app send the data to the webhook. Test the webhook step in Zapier, and you’ll see data from the webhook listed in Zapier.

Use webhooks in action app in Zapier

You can add each data item from your webhook to another app in Zapier

Now you can use that data in another app. Select the action app—the app you want to send data to. You’ll see form fields to add data to that app. Click in the field where you want to add webhooks data and select it from the dropdown. Test your Zap and it’s now ready to use. Now the next time your trigger app sends data to the webhook, Zapier will automatically add it to the action app you selected.


Zapier webhook action

Zapier can send any data you want to a webhooks URL

The reverse works as well. Want to send data from one app to another via webhooks? Zapier can turn the data from the trigger app into a serialized list and send it to any webhooks URL you want.

First, select the trigger app you want to send data from, and set it up in Zapier as normal. Then select Webhooks as the action app, and choose how you want to send the data (POST is typically the best option for most webhook integrations).

Finally, paste the webhooks URL from the app you want to receive the data into the URL field in Zapier’s webhook settings. You can choose how to serialize the data (form or JSON are typically best). Zapier will then automatically send all of the data from your trigger app to the webhook—or you can set the specific data variables from the Data fields below.

Zapier send data to webhook URL

You can specify how Zapier serializes your data and choose the specific data it sends to your webhook

You’re now ready to use your Zap. Now whenever something new happens in your trigger app, Zapier will copy the data and send it to your other app’s webhooks URL.


Webhooks are one of the best ways to connect apps that wouldn’t otherwise work with Zapier. Have a Mac or iPhone app that doesn’t connect with Zapier? Using Alfred or Siri Shortcuts—plus a Zapier Webhooks URL—you can connect them to your Zapier workflows. Here’s how:

Or, automate any other app that uses webhooks with Zapier’s webhook integrations or use one of these popular Zap templates to get started quickly:

Add info to a Google Sheet from new Webhook POST requests

Try it

  • Google Sheets logo
  • Webhooks by Zapier logo

Google Sheets, Webhooks by Zapier

Google Sheets + Webhooks by ZapierMore details

Send webhooks with new items in RSS feeds

Try it

  • RSS by Zapier logo
  • Webhooks by Zapier logo

RSS by Zapier, Webhooks by Zapier

RSS by Zapier + Webhooks by ZapierMore details

POST new Facebook Lead Ads to a webhook

Try it

  • Facebook Lead Ads logo
  • Webhooks by Zapier logo

Facebook Lead Ads, Webhooks by Zapier

Facebook Lead Ads + Webhooks by ZapierMore details

Send emails with new caught webhooks

Try it

  • Email by Zapier logo
  • Webhooks by Zapier logo

Email by Zapier, Webhooks by Zapier

Email by Zapier + Webhooks by ZapierMore details

POST new user tweets to a webhook

Try it

  • Twitter logo
  • Webhooks by Zapier logo

Twitter, Webhooks by Zapier

Twitter + Webhooks by ZapierMore details


Time to start using webhooks

Ok, you’ve got this. Armed with your newfound knowledge about webhooks and their confusing terminology, you’re ready to start using them in your work. Poke around your favorite web apps’ advanced settings and see if any of them support webhooks. Think through how you could use them—then give it a shot.

And bookmark this article. Next time you read something about a GET request needing to make an HTTP callback, or see a URL with ?name=bob&value=10 and such at the end, you’ll know what it actually means.

Further Reading: Want to learn more about webhooks? Read up on our Webhooks documentation page for all the details.

Source :
https://zapier.com/blog/what-are-webhooks/

Customer Guidance for Reported Zero-day Vulnerabilities in Microsoft Exchange Server

September 30, 2022 updates:

  • Added link to Microsoft Security blog in Summary.
  • Microsoft created a script for the URL Rewrite mitigation steps and modified step 6 in the Mitigations section.
  • Microsoft released the Exchange Server Emergency Mitigation Service (EMS) mitigation for this issue. More information is in the Mitigations section. 
  • Antimalware Scan Interface (AMSI) guidance, and auditing AV exclusions to optimize detection, and blocking of the Exchange vulnerability exploitation in the Detections section.
  • Microsoft Sentinel hunting queries in the Detections section.

Summary

Microsoft is investigating two reported zero-day vulnerabilities affecting Microsoft Exchange Server 2013, Exchange Server 2016, and Exchange Server 2019. The first one, identified as CVE-2022-41040, is a Server-Side Request Forgery (SSRF) vulnerability, and the second one, identified as CVE-2022-41082, allows Remote Code Execution (RCE) when PowerShell is accessible to the attacker.  

Currently, Microsoft is aware of limited targeted attacks using these two vulnerabilities.  In these attacks, CVE-2022-41040 can enable an authenticated attacker to remotely trigger CVE-2022-41082. It should be noted that authenticated access to the vulnerable Exchange Server is necessary to successfully exploit either vulnerability.

We are working on an accelerated timeline to release a fix. Until then, we’re providing mitigations and the detections guidance below to help customers protect themselves from these attacks. 

Microsoft Exchange Online has detections and mitigations to protect customers. As always, Microsoft is monitoring these detections for malicious activity and we’ll respond accordingly if necessary to protect customers.

Microsoft Security Threat Intelligence teams have provided further analysis of observed activity along with mitigation and detection guidance in a new Microsoft Security blog.

We will also continue to provide updates here to help keep customers informed. 

Mitigations

Exchange Online customers do not need to take any action.

The current Exchange Server mitigation is to add a blocking rule in “IIS Manager -> Default Web Site -> URL Rewrite -> Actions” to block the known attack patterns. Exchange Server customers should review and choose only one of the following three mitigation options.

Option 1: For customers who have the Exchange Server Emergency Mitigation Service (EMS) enabled, Microsoft released the URL Rewrite mitigation for Exchange Server 2016 and Exchange Server 2019. The mitigation will be enabled automatically. Please see this blog post for more information on this service and how to check active mitigations.

Option 2: Microsoft created the following script for the URL Rewrite mitigation steps. https://aka.ms/EOMTv2 

Option 3: Customers can follow the below instructions, which are currently being discussed publicly and are successful in breaking current attack chains. 1. Open IIS Manager. 
2. Select Default Web Site.
3. In the Feature View, click URL Rewrite.

4. In the Actions pane on the right-hand side, click Add Rule(s)…  

5. Select Request Blocking and click OK. 

6. Add the string “.*autodiscover\.json.*\@.*Powershell.*” (excluding quotes).
7. Select Regular Expression under Using.
8. Select Abort Request under How to block and then click OK.

9. Expand the rule and select the rule with the pattern .*autodiscover\.json.*\@.*Powershell.* and click Edit under Conditions

10. Change the Condition input from {URL} to {REQUEST_URI}

NOTE: If you need to change any rule it is best to delete and recreate it.

Impact: There is no known effect on Exchange functionality if URL Rewrite is installed as recommended. 

Detections

Microsoft Sentinel 

Based on what we’re seeing in the wild, looking for the techniques listed below will help defenders. Our post on Web Shell Threat Hunting with Microsoft Sentinel also provides guidance on looking for web shells in general.  

The Exchange SSRF Autodiscover ProxyShell detection, which was created in response to ProxyShell, can be used for queries as there are similarities in function with this threat. Also, the new Exchange Server Suspicious File Downloads and Exchange Worker Process Making Remote Call queries specifically look for suspicious downloads or activity in IIS logs. In addition to those, we have a few more that might be helpful when looking for post-exploitation activity:

Microsoft Defender for Endpoint 
Microsoft Defender for Endpoint detects post-exploitation activity. The following alerts can be related to this threat:  

  • Possible web shell installation 
  • Possible IIS web shell
  • Suspicious Exchange Process Execution 
  • Possible exploitation of Exchange Server vulnerabilities 
  • Suspicious processes indicative of a web shell 
  • Possible IIS compromise 

Customers with Microsoft Defender Antivirus enabled can also detect the web shell malware used in exploitation of this vulnerability in-the-wild as of this writing with the following alerts:

  • ‘Chopper’ malware was detected on an IIS Web server 
  • ‘Chopper’ high-severity malware was detected 

Microsoft Defender Antivirus 
Microsoft Exchange AMSI integration and Antivirus Exclusions

Exchange supports the integration with the Antimalware Scan Interface (AMSI) since the June 2021 Quarterly Updates for Exchange. It is highly recommended to ensure these updates are installed and AMSI is working using the guidance provided by the Exchange Team, as this integration provides the best ability for Defender Antivirus to detect and block exploitation of vulnerabilities on Exchange.

Many organizations exclude Exchange directories from antivirus scans for performance reasons. It’s highly recommended to audit AV exclusions on the Exchange systems and assess if they can be removed without impacting performance and still ensure the highest level of protection. Exclusions can be managed via Group Policy, PowerShell, or systems management tools like System Center Configuration Manager.

To audit AV exclusions on an Exchange Server running Defender Antivirus, launch the Get-MpPreference command from an elevated PowerShell prompt.

If exclusions cannot be removed for Exchange processes and folders, running Quick Scan in Defender Antivirus scans Exchange directories and files regardless of exclusions.

Microsoft Defender Antivirus (EPP) provides detections and protections for components and behaviors related to this threat under the following signatures: 

Exit mobile version