Shadow IT refers to the practice of users deploying unauthorized technology resources in order to circumvent their IT department. Users may resort to using shadow IT practices when they feel that existing IT policies are too restrictive or get in the way of them being able to do their jobs effectively.
An old school phenomenon
Shadow IT is not new. There have been countless examples of widespread shadow IT use over the years. In the early 2000s, for example, many organizations were reluctant to adopt Wi-Fi for fear that it could undermine their security efforts. However, users wanted the convenience of wireless device usage and often deployed wireless access points without the IT department’s knowledge or consent.
The same thing happened when the iPad first became popular. IT departments largely prohibited iPads from being used with business data because of the inability to apply group policy settings and other security controls to the devices. Even so, users often ignored IT and used iPads anyway.
Of course, IT pros eventually figured out how to secure iPads and Wi-Fi and eventually embraced the technology. However, shadow IT use does not always come with a happy ending. Users who engage in shadow IT use can unknowingly do irreparable harm to an organization.
Even so, the problem of shadow IT use continues to this day. If anything, shadow IT use has increased over the last several years. In 2021 for example, Gartner found that between 30% and 40% of all IT spending (in a large enterprise) goes toward funding shadow IT.
Shadow IT is on the rise in 2022
Remote work post-pandemic
One reason for the rise in shadow IT use is remote work. When users are working from home, it is easier for them to escape the notice if the IT department than it might be if they were to try using unauthorized technology from within the corporate office. A study by Core found that remote work stemming from COVID requirements increased shadow IT use by 59%.
Tech is getting simpler for end-users
Another reason for the increase in shadow IT is the fact that it is easier than ever for a user to circumvent the IT department. Suppose for a moment that a user wants to deploy a particular workload, but the IT department denies the request.
A determined user can simply use their corporate credit card to set up a cloud account. Because this account exists as an independent tenant, IT will have no visibility into the account and may not even know that it exists. This allows the user to run their unauthorized workload with total impunity.
In fact, a 2020 study found that 80% of workers admitted to using unauthorized SaaS applications. This same study also found that the average company’s shadow IT cloud could be 10X larger than the company’s sanctioned cloud usage.
Know your own network
Given the ease with which a user can deploy shadow IT resources, it is unrealistic for IT to assume that shadow IT isn’t happening or that they will be able to detect shadow IT use. As such, the best strategy may be to educate users about the risks posed by shadow IT. A user who has a limited IT background may inadvertently introduce security risks by engaging in shadow IT. According to a Forbes Insights report 60% of companies do not include shadow IT in their threat assessments.
Similarly, shadow IT use can expose an organization to regulatory penalties. In fact, it is often compliance auditors – not the IT department – who end up being the ones to discover shadow IT use.
Of course, educating users alone is not sufficient to stopping shadow IT use. There will always be users who choose to ignore the warnings. Likewise, giving in to user’s demands for using particular technologies might not always be in the organization’s best interests either. After all, there is no shortage of poorly written or outdated applications that could pose a significant threat to your organization. Never mind applications that are known for spying on users.
The zero-trust solution to Shadow IT
One of the best options for dealing with shadow IT threats may be to adopt zero trust. Zero-trust is a philosophy in which nothing in your organization is automatically assumed to be trustworthy. User and device identities must be proven each time that they are used to access a resource.
There are many different aspects to a zero-trust architecture, and each organization implements zero-trust differently. Some organizations for instance, use conditional access policies to control access to resources. That way, an organization isn’t just granting a user unrestricted access to a resource, but rather is considering how the user is trying to access the resource. This may involve setting up restrictions around the user’s geographic location, device type, time of day, or other factors.
Zero-trust at the helpdesk
One of the most important things that an organization can do with regard to implementing zero trust is to better secure its helpdesk. Most organizations’ help desks are vulnerable to social engineering attacks.
When a user calls and requests a password reset, the helpdesk technician assumes that the user is who they claim to be, when in reality, the caller could actually be a hacker who is trying to use a password reset request as a way of gaining access to the network. Granting password reset requests without verifying user identities goes against everything that zero trust stands for.
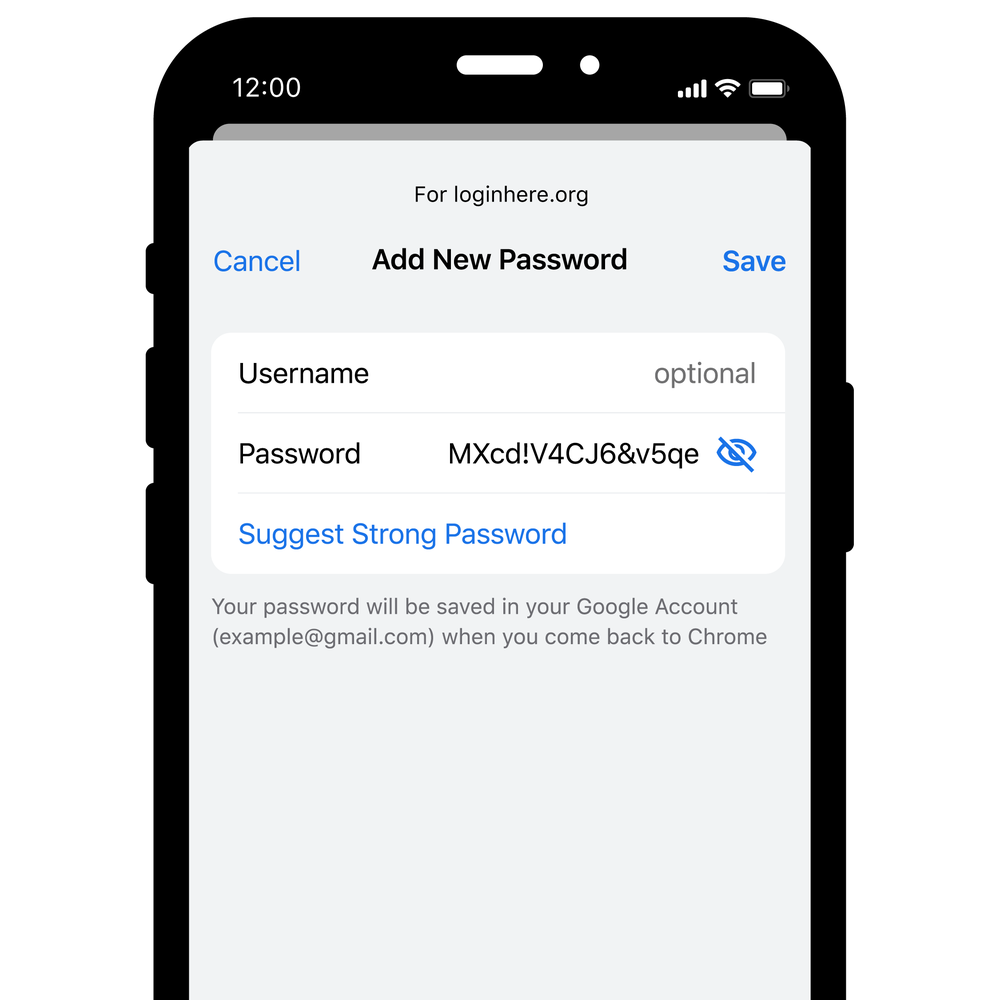
Strong, unique passwords are key to helping keep your personal information secure online. That’s why Google Password Manager can help you create, remember and autofill passwords on your computer or phone: on the web in Chrome, and in your favorite Android and iOS apps.
Today we’ve started rolling out a number of updates that help make the experience easier to use, with even stronger protections built in.
A consistent look and feel, across web and apps
We’re always grateful for feedback, and many of you have shared that managing passwords between Chrome and Android has been confusing at times: “It’s the same info in both places, so why does it look so different?” With this release, we’re rolling out a simplified and unified management experience that’s the same in Chrome and Android settings. If you have multiple passwords for the same sites or apps, we’ll automatically group them. And for your convenience, you can create a shortcut on your Android home screen to access your passwords with a single tap.
You can now add a shortcut to Google Password Manager to your Android homescreen.
More powerful password protections
Google Password Manager can create unique, strong passwords for you across platforms, and helps ensure your passwords aren’t compromised as you browse the web. We’re constantly working to expand these capabilities, which is why we’re giving you the ability to generate passwords for your iOS apps when you set Chrome as your autofill provider.
You can now create strong passwords on your computer or mobile, on any operating system.
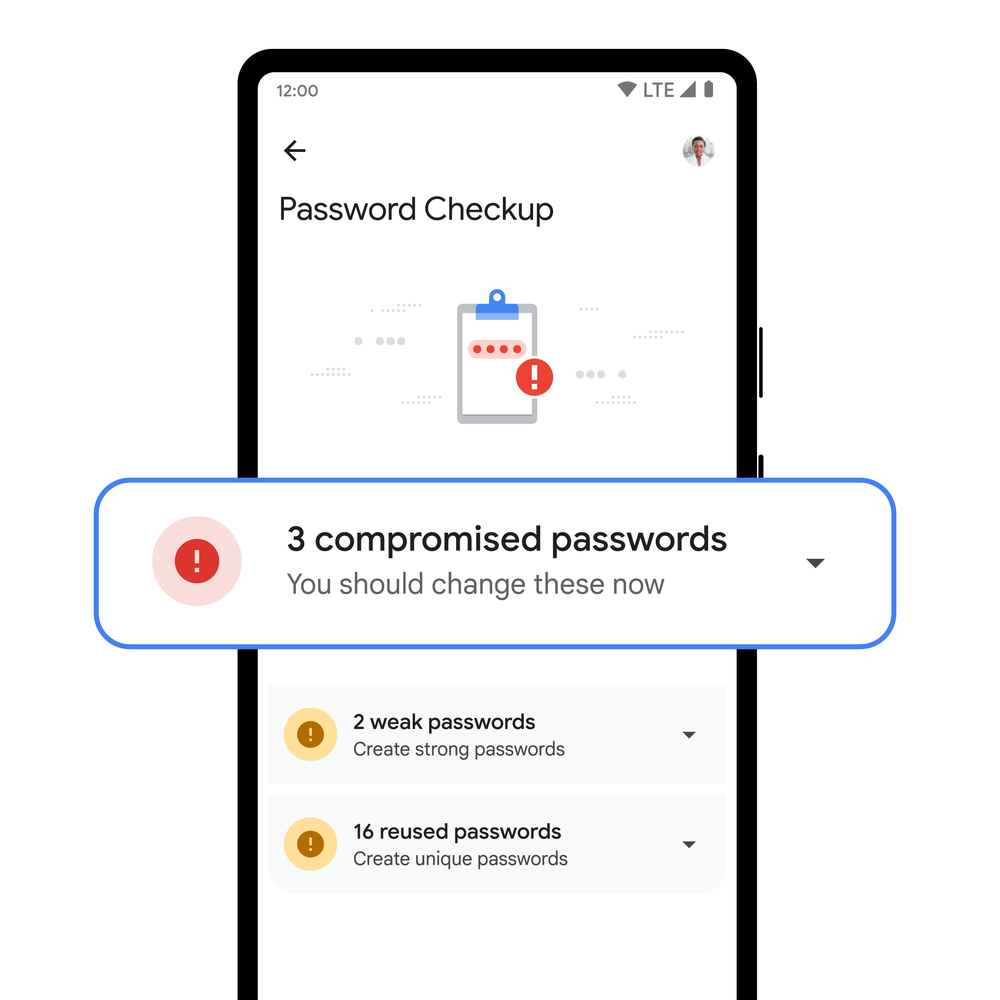
Chrome can automatically check your passwords when you enter them into a site, but you can have an added layer of confidence by checking them in bulk with Password Checkup. We’ll now flag not only compromised credentials, but also weak and re-used passwords on Android. If Google warns you about a password, you can now fix them without hassle with our automated password change feature on Android.
For your peace of mind, Password Checkup on Android can flag compromised, weak and reused passwords.
To help protect even more people, we’re expanding our compromised password warnings to all Chrome users on Android, Chrome OS, iOS, Windows, MacOS and Linux.
Simplified access and password management
Google built its password manager to stay out of your way — letting you save passwords when you log in, filling them when you need them and ensuring they aren’t compromised. However, you might want to add your passwords to the app directly, too. That’s why, due to popular demand, we’re adding this functionality to Google Password Manager on all platforms.
Adding your passwords directly is now possible on all platforms.
In 2020, we announced Touch-to-Fill to help you fill your passwords in a convenient and recognizable way. We’re now bringing Touch-to-Login to Chrome on Android to make logging in even quicker by allowing you to securely log in to sites directly from the overlay at the bottom of your screen.
Touch-to-Login signs you in directly from a recognizable overlay.
Many of these features were developed at the Google Safety Engineering Center (GSEC), a hub of privacy and security experts based in Munich, so Guten Tag from the team! Of course, our efforts to create a safer web are a truly global effort – from our early work on 2-step verification, to our future investments in technologies like passkeys – and these updates that we are rolling out over the next months are an important part of that work.
Google this week announced that new warnings added in the Google Workspace Alert Center will keep administrators notified of critical and sensitive configuration changes.
Previously known as G Suite, Google Workspace provides secure collaboration and productivity tools for enterprises of all sizes. Accessible from anywhere in Google Workspace, the Alert Center delivers real-time security alerts and insights, to help admins mitigate threats such as phishing and malware.
With the new alerts in place, admins will also receive notifications whenever select changes are made to their Google Workspace configurations.
Specifically, warnings will be displayed when the primary admin is changed, when the password for a super admin account has been reset, and when changes are made to SSO profiles – when a third-party SSO profile has been added, updated, or deleted for the organization.
“These additional intelligent alerts will closely monitor several sensitive actions, making it easier for admins to stay on top of high-risk changes to their environment and potentially malicious actions being taken by bad actors,” Google explains.
An email notification containing key details on the event will be delivered to admins and super admins for each alert. The security investigation tool will allow admins to further investigate the reported incident.
The alerts and their associated email notifications are enabled by default and cannot be turned off.
The new capability is rolling out to all Google Workspace customers, including legacy G Suite Basic and Business customers, and is expected to become visible for everyone in the next couple of weeks.
Earlier this year, Google boosted malware and phishing protections in Workspace with updated comment notifications that now also include the commenter’s email address, so that users can better assess the legitimacy of the message.
Cybersecurity firm Checkmarx has published details on a high-severity vulnerability in the Amazon Photos Android application that could have allowed malicious apps to steal an Amazon access token.
With more than 50 million downloads, Amazon Photos offers cloud storage, allowing users to store photos and videos at their original quality, as well as to print and share photos, and to display them on multiple Amazon devices.
In November 2021, Checkmarx researchers identified an issue in the application that could have leaked the Amazon access token to malicious applications on the user’s device, potentially exposing the user’s personal information. The bug was addressed in December 2021.
The leaked Amazon access token is used for user authentication across Amazon APIs, including some that contain personal information such as names, addresses, and emails. Through the Amazon Drive API, for example, the attacker could access the user’s files, Checkmarx says.
The issue, the researchers explain, resided in a misconfigured component that was “exported in the app’s manifest file, thus allowing external applications to access it.”
The issue resulted in the access token being sent in the header of a HTTP request, but the most important aspect was the fact that an attacker could control the server receiving this request.
“The activity is declared with an intent-filter used by the application to decide the destination of the request containing the access token. Knowing this, a malicious application installed on the victim’s phone could send an intent that effectively launches the vulnerable activity and triggers the request to be sent to a server controlled by the attacker,” Checkmarx notes.
The leaked token could provide the attacker with access to all of the user information available through the Amazon API. Using the Amazon Drive API, the attacker could access users’ files and read, re-write, or delete their contents.
The researchers also explain that the access token could have allowed anyone to modify files and erase their history, to prevent recovery, or could have completely deleted files and folders from the user’s Amazon Drive account.
“With all these options available for an attacker, a ransomware scenario was easy to come up with as a likely attack vector. A malicious actor would simply need to read, encrypt, and re-write the customer’s files while erasing their history,” the researchers say.
The vulnerability might have had a wider impact, given that the potentially affected APIs that the researchers identified represent only a small subset of the entire Amazon ecosystem, Checkmarx also notes.
A lesser-known ransomware strain called AstraLocker has recently released its second major version, and according to threat analysts, its operators engage in rapid attacks that drop its payload directly from email attachments.
This approach is quite unusual as all the intermediate steps that typically characterize email attacks are there to help evade detection and minimize the chances of raising red flags on email security products.
According to ReversingLabs, which has been following AstraLocker operations, the adversaries don’t seem to care about reconnaissance, evaluation of valuable files, and lateral network movement.
Instead, they are performing “smash-n-grab” attacks to his immediately hit with maximum force aiming for a quick payout.
From document to encryption
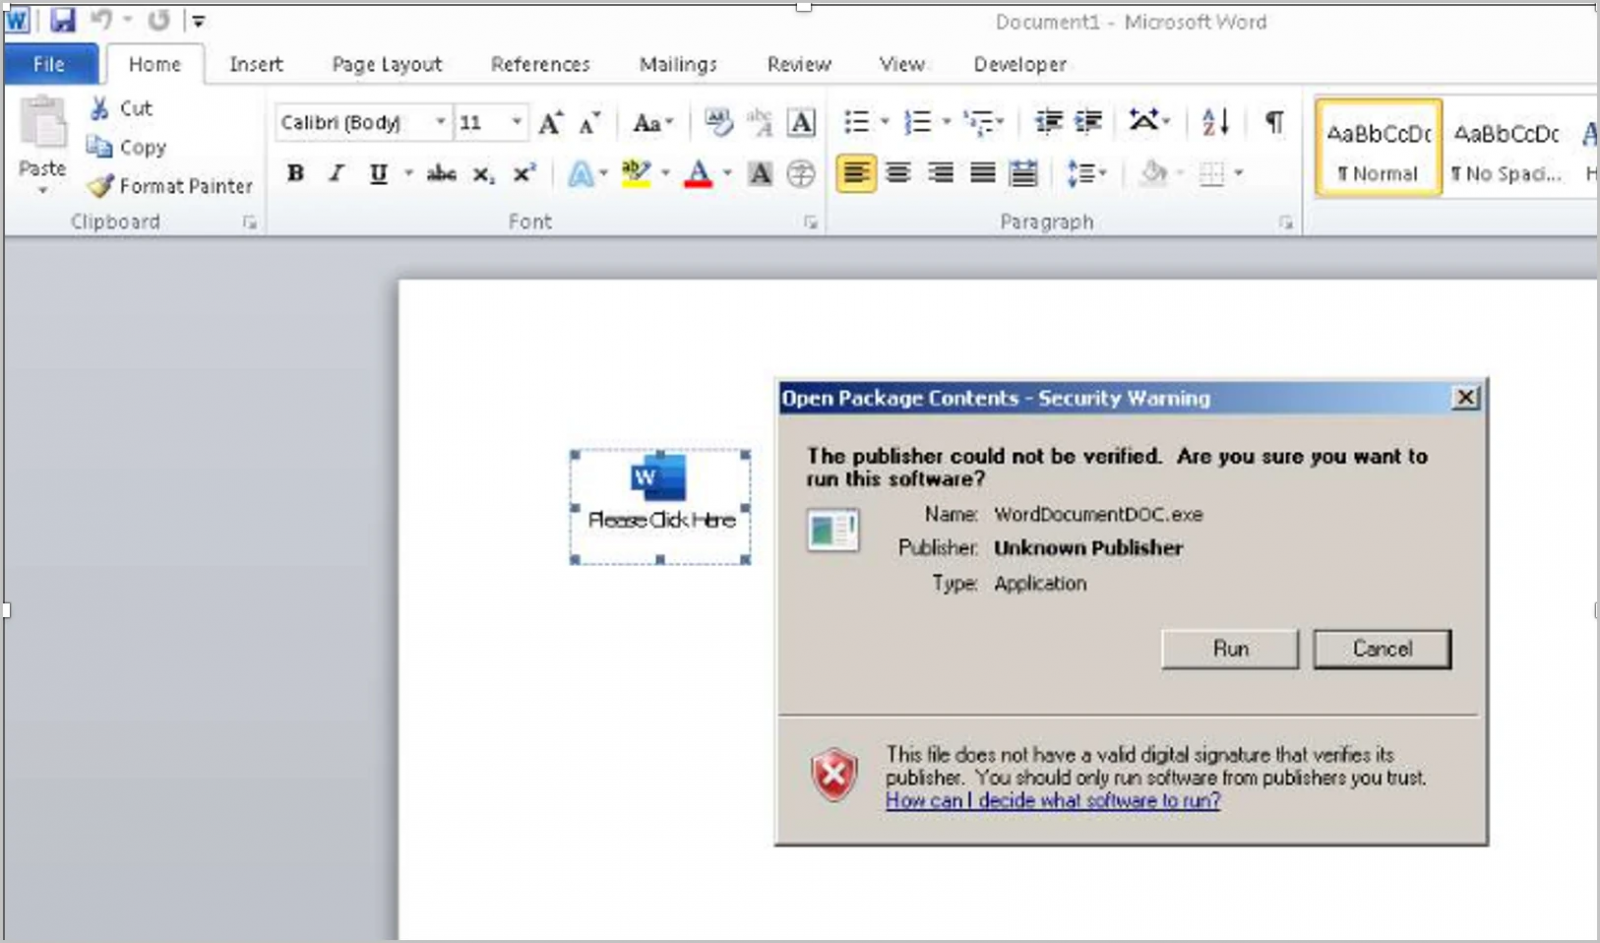
The lure used by the operators of AstraLocker 2.0 is a Microsoft Word document that hides an OLE object with the ransomware payload. The embedded executable uses the filename “WordDocumentDOC.exe”.
To execute the payload, the user needs to click “Run” on the warning dialog that appears upon opening the document, further reducing the chances of success for the threat actors.
Unknown publisher warning(ReversingLabs)
This bulk approach is in line with Astra’s overall “smash-n-grab” tactic, choosing OLE objects instead of VBA macros that are more common in malware distribution.
Another peculiar choice is the use of SafeEngine Shielder v2.4.0.0 to pack the executable, which is such an old and outdated packer that reverse engineering is almost impossible.
After an anti-analysis check to ensure that the ransomware isn’t running in a virtual machine and that no debuggers are loaded in other active processes, the malware prepares the system for encryption using the Curve25519 algorithm.
The preparation includes killing processes that could jeopardize the encryption, deleting volume shadow copies that could make restoration easier for the victim, and stopping a list of backup and AV services. The Recycle Bin is simply emptied instead of encrypting its contents.
AstraLocker 2.0 ransom note(ReversingLabs)
AstraLocker background
According to the code analysis of ReversingLabs, AstraLocker is based on the leaked source code of Babuk, a buggy yet still dangerous ransomware strain that exited the space in September 2021.
Additionally, one of the Monero wallet addresses listed in the ransom note is linked to the operators of Chaos ransomware.
This could mean that the same operators are behind both malware or that the same hackers are affiliates on both ransomware projects, which is not uncommon.
Judging from the tactics that underpin the latest campaign, this doesn’t seem to be the work of a sophisticated actor but rather one who is determined to deliver as many destructive attacks as possible.
Attackers used a newly discovered malware to backdoor Microsoft Exchange servers belonging to government and military organizations from Europe, the Middle East, Asia, and Africa.
The malware, dubbed SessionManager by security researchers at Kaspersky, who first spotted it in early 2022, is a malicious native-code module for Microsoft’s Internet Information Services (IIS) web server software.
It has been used in the wild without being detected since at least March 2021, right after the start of last year’s massive wave of ProxyLogon attacks.
“The SessionManager backdoor enables threat actors to keep persistent, update-resistant and rather stealth access to the IT infrastructure of a targeted organization,” Kaspersky revealed on Thursday.
“Once dropped into the victim’s system, cybercriminals behind the backdoor can gain access to company emails, update further malicious access by installing other types of malware or clandestinely manage compromised servers, which can be leveraged as malicious infrastructure.”
SessionManager’s capabilities include, among other features:
dropping and managing arbitrary files on compromised servers
remote command execution on backdoored devices
connecting to endpoints within the victim’s local network and manipulating the network traffic
In late April 2022, while still investigating the attacks, Kaspersky found that most of the malware samples identified earlier were still deployed on 34 servers of 24 organizations (still running as late as June 2022).
Additionally, months after the initial discovery, they were still not flagged as malicious by “a popular online file scanning service.”
After deployment, the malicious IIS module allows its operators to harvest credentials from system memory, collect information from the victims’ network and infected devices, and deliver additional payloads (such as a PowerSploit-based Mimikatz reflective loader, Mimikatz SSP, ProcDump, and a legitimate Avast memory dump tool).
SessionManager targets (Kaspersky)
“The exploitation of exchange server vulnerabilities has been a favorite of cybercriminals looking to get into targeted infrastructure since Q1 2021. The recently discovered SessionManager was poorly detected for a year and is still deployed in the wild,” added Pierre Delcher, a Senior Security Researcher at Kaspersky’s GReAT.
“In the case of Exchange servers, we cannot stress it enough: the past year’s vulnerabilities have made them perfect targets, whatever the malicious intent, so they should be carefully audited and monitored for hidden implants, if they were not already.”
Kaspersky uncovered the SessionManager malware while continuing to hunt for IIS backdoors similar to Owowa, another malicious IIS module deployed by attackers on Microsoft Exchange Outlook Web Access servers since late 2020 to steal Exchange credentials.
Gelsemium APT group links
Based on similar victimology and the use of the OwlProxy malware variant, Kaspersky’s security experts believe the SessionManager IIS backdoor was leveraged in these attacks by the Gelsemium threat actor as part of a worldwide espionage operation.
This hacking group has been active since at least 2014, when some of its malicious tools were spotted by G DATA’s SecurityLabs while investigating the “Operation TooHash” cyber-espionage campaign. In 2016, new Gelsemium indicators of compromise surfaced in a Verint Systems presentation during the HITCON conference.
Two years later, in 2018, VenusTech unveiled malware samples linked to the Operation TooHash and an unknown APT group, later tagged by Slovak internet security firm ESET as early Gelsemium malware versions.
ESET also revealed last year that its researchers linked Gelsemium to Operation NightScout, a supply-chain attack targeting the update system of the NoxPlayer Android emulator for Windows and macOS (with over 150 million users) to infect gamers’ systems between September 2020 and January 2021.
Otherwise, the Gelsemium APT group is mainly known for targeting governments, electronics manufacturers, and universities from East Asia and the Middle East and mostly flying under the radar.
At Wordfence our business is to secure over 4 million WordPress websites and keep them secure. My background is in network operations, and then I transitioned into software development because my ops role was at a scale where I found myself writing a lot of code. This led me to founding startups, and ultimately into starting the cybersecurity business that is Wordfence. But I’ve maintained that ops perspective, and when I think about securing a network, I tend to think of ports.
You can find a rather exhaustive list of TCP and UDP ports on Wikipedia, but for the sake of this discussion let’s focus on a few of the most popular ports:
20 and 21 – FTP
22 – SSH
23 – (Just kidding. You better not be running Telnet)
25 – Email via SMTP
53 – DNS
80 – Unencrypted Web
110 – POP3 (for older email clients)
443 – Web encrypted via TLS
445 – Active Directory or SMB sharing
993 – IMAP (for email clients)
3306 – MySQL
6378 – Redis
11211 – Memcached
If you run your eye down this list, you’ll notice something interesting. The options available to you for services to run on most of these ports are quite limited. Some of them are specific to a single application, like Redis. Others, like SMTP, provide a limited number of applications, either proprietary or open-source. In both cases, you can change the configuration of the application, but it’s rare to write a custom application on one of those ports. Except port 443.
In the case of port 443 and port 80, you have a limited range of web servers listening on those ports, but users are writing a huge range of bespoke applications on port 443, and have a massive selection of applications that they can host on that port. Everything from WordPress to Drupal to Joomla, and more. There are huge lists of Content Management Systems.
Not only do you have a wide range of off-the-shelf web applications that you can run on port 443 or (if you’re silly) port 80, but you also have a range of languages they might be coded in, or in which you can code your own web application. Keep in mind that the web server, in this case, is much like an SSH or IMAP server in that it is listening on the port and handling connections, but the difference is that it is handing off execution to these languages, their various development frameworks, and ultimately the application that a developer has written to handle the incoming request.
With SSH, SMTP, FTP, IMAP, MySQL, Redis and most other services, the process listening on the port is the process that handles the request. With web ports, the process listening on the port delegates the incoming connection to another application, usually written in another language, running at the application layer, that is part of the extremely large and diverse ecosystem of web applications.
This concept in itself – that the applications listening on the web ports are extremely diverse and either home-made or selected from a large and diverse ecosystem – presents unique security challenges. In the case of, say, Redis, you might worry about running a secure version of Redis and making sure it is not misconfigured. In the case of a web server, you may have 50 application instances written in two languages from five different vendors all on the same port, which all need to be correctly configured, have their patch levels maintained, and be written using secure coding practices.
As if that doesn’t make the web ports challenging enough, they are also, for the most part, public. Putting aside internal websites for the moment, perhaps the majority of websites derive their value from making services available to users on the Internet by being public-facing. If you consider the list of ports I have above, or in the Wikipedia article I linked to, many of those ports are only open on internal networks or have access to them controlled if they are external. Web ports for public websites, by their very nature, must be publicly accessible for them to be useful. There are certain public services like SMTP or DNS, but as I mentioned above, the server that is listening on the port is the server handling the request in these cases.
A further challenge when securing websites is that often the monetary and data assets available to an attacker when compromising a website are greater than the assets they may gain compromising a corporate network. You see this with high volume e-commerce websites where a small business is processing a large number of web-based e-commerce transactions below $100. If the attacker compromises their corporate network via leaked AWS credentials, they may gain access to the company bank account and company intellectual property, encrypt the company’s data using ransomware, or perhaps even obtain customer PII. But by compromising the e-commerce website, they can gain access to credit card numbers in-flight, which are far more tradeable, and where the sum of available credit among all cards is greater than all the assets of the small business, including the amount of ransom that business might be able to pay.
Let’s not discount breaches like the 2017 Equifax breach that compromised 163 million American, British and Canadian citizen’s records. That was extremely valuable to the attackers. But targets like this are rare, and the Web presents a target-rich environment. Which is the third point I’d like to make in this post. While an organization may run a handful of services on other ports, many companies – with hosting providers in particular – run a large number of web applications. And an individual or company is far more likely to have a service running on a web port than any other port. Many of us have websites, but how many of us run our own DNS, SMTP, Redis, or another service listening on a port other than 80 or 443? Most of us who run websites also run MySQL on port 3306, but that port should not be publicly accessible if configured correctly.
That port 443 security is different has become clear to us at Wordfence over the years as we have tracked and cataloged a huge number of malware variants, web vulnerabilities, and a wide range of tactics, techniques, and procedures (TTP) that attackers targeting web applications use. Most of these have no relationship with the web server listening on port 443, and nearly all of them have a close relationship with the web application that the web server hands off control to once communication is established.
My hope with this post has been to catalyze a different way of thinking about port 443 and that other insecure port (80) we all hopefully don’t use. Port 443 is not just another service. It is, in fact, the gateway to a whole new universe of programming languages, dev frameworks, and web applications.
In the majority of cases, the gateway to that new universe is publicly accessible.
Once an attacker passes through that gateway, a useful way to think about the web applications hosted on the server is that each application is its own service that needs to have its patch level maintained, needs to be configured correctly, and should be removed if it is not in use to reduce the available attack surface.
If you are a web developer you may already think this way, and if anything, you may be guilty of neglecting services on ports other than port 80 or 443. If you are an operations engineer, or an analyst working in a SOC protecting an enterprise network, you may be guilty of thinking about port 443 as just another port you need to secure.
Think of port 443 as a gateway to a new universe that has no access control, with HTTPS providing easy standardized access, and with a wide range of diverse services running on the other side, that provide an attacker with a target and asset-rich environment.
—
Footnote: We will be exhibiting at Black Hat in Las Vegas this year at booth 2514 between the main entrance and Innovation City. Our entire team of over 30 people will be there. We’ll have awesome swag, as always. Come and say hi! Our team will also be attending DEF CON immediately after Black Hat.
Written by Mark Maunder – Founder and CEO of Wordfence.
If you’re like me, you often find yourself feeling like there’s not enough time in the day—and by often, I mean pretty much every day. When there’s no time to waste and you have to nail down your priorities, adding structure and consistency becomes a necessity. That’s where time blocking apps are an excellent way to manage your schedule: they force you to plan out every minute of your day.
Connect your time-tracking app to your other tools
Some time blocking apps work better for people who are more visual, while others are better for those who need more organization. Some apps are geared towards solopreneurs and freelancers, while others are designed for folks who work as part of a corporate team. That’s why I spent several weeks testing dozens of time blocking apps—to figure out which ones were the best for which people.
Whatever your reason for time blocking, one of the time blocking calendars here should speak to you and your needs.
Time blocking is a time management technique where you schedule how you’ll spend your time during every minute of every day. Each task you need to complete gets time scheduled on your calendar, so you can make sure you have the bandwidth for every to-do list item.
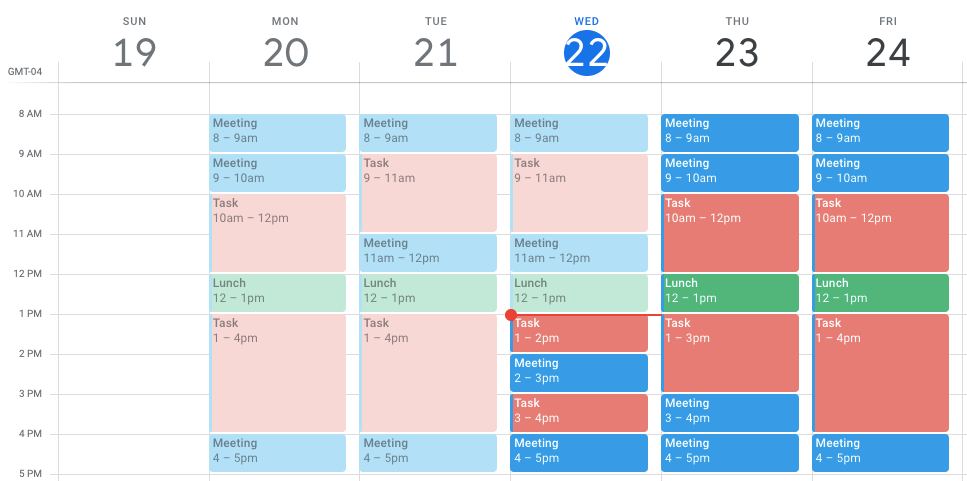
Most people’s work calendars look like this:
Your meetings are there, and the rest of your time is just assumed to be open. A time blocked calendar, meanwhile, fills in all of those gaps:
Time blocking as a time management technique was popularized by Cal Newport, author of Deep Work. Newport says he dedicates 10-20 minutes every evening to time blocking his schedule for the next day, but when you choose to block your time and create your schedule depends on what works best for you. You might create your schedule every day when you get to work, at the end of every work day for the next day, or at the beginning of each week for the rest of the week.
Additionally, you can approach the time blocking method in a couple of different ways. You might schedule time blocks for specific tasks around your meetings and other commitments, or you might choose to schedule time specifically for meetings and other commitments.
For example, instead of accepting meeting invites for whenever people send them, you may block off Monday, Wednesday, and Friday for working on tasks and leave Tuesday and Thursday open for people to schedule meetings. Then, you can break those big sections for Monday, Wednesday, and Friday down into specific tasks—daily or weekly, based on your priorities.
Scheduling time for tasks forces you to think about how long each task is going to take you to complete, which, over time, can help you form more realistic estimates.
What makes a great time blocking app?
How we evaluate and test apps
All of our best apps roundups are written by humans who’ve spent much of their careers using, testing, and writing about software. We spend dozens of hours researching and testing apps, using each app as it’s intended to be used and evaluating it against the criteria we set for the category. We’re never paid for placement in our articles from any app or for links to any site—we value the trust readers put in us to offer authentic evaluations of the categories and apps we review. For more details on our process, read the full rundown of how we select apps to feature on the Zapier blog.
You could just use your calendar app to time block your schedule, or even a sheet of paper, but dedicated time blocking tools make the process a lot easier. Here are the criteria I used to determine the best time blocking software:
Integration with your current calendar. Being able to sync a calendar with a time blocking planner saves time and helps keep schedules error-free, so this is a must-have.
Ease of use. Some apps are just downright hard to figure out, so it was essential that my picks had a simple, intuitive interface that was easy to navigate.
Calendar and tasks in one place. No one wants to deal with having their projects and to-dos scattered in too many places. The purpose of a time-blocking app should be to simplify, which means being able to find and review your tasks in a central place.
Customization. While the ability to customize features like colors, themes, lists, alerts, and notifications is of varying importance, I chose apps that I felt provided enough flexibility to fit most people’s day-to-day needs.
Integration with other tools. Integrating your time block planner with your calendar is just the standard, but integration with other apps and tools is a wonderful cherry on top.
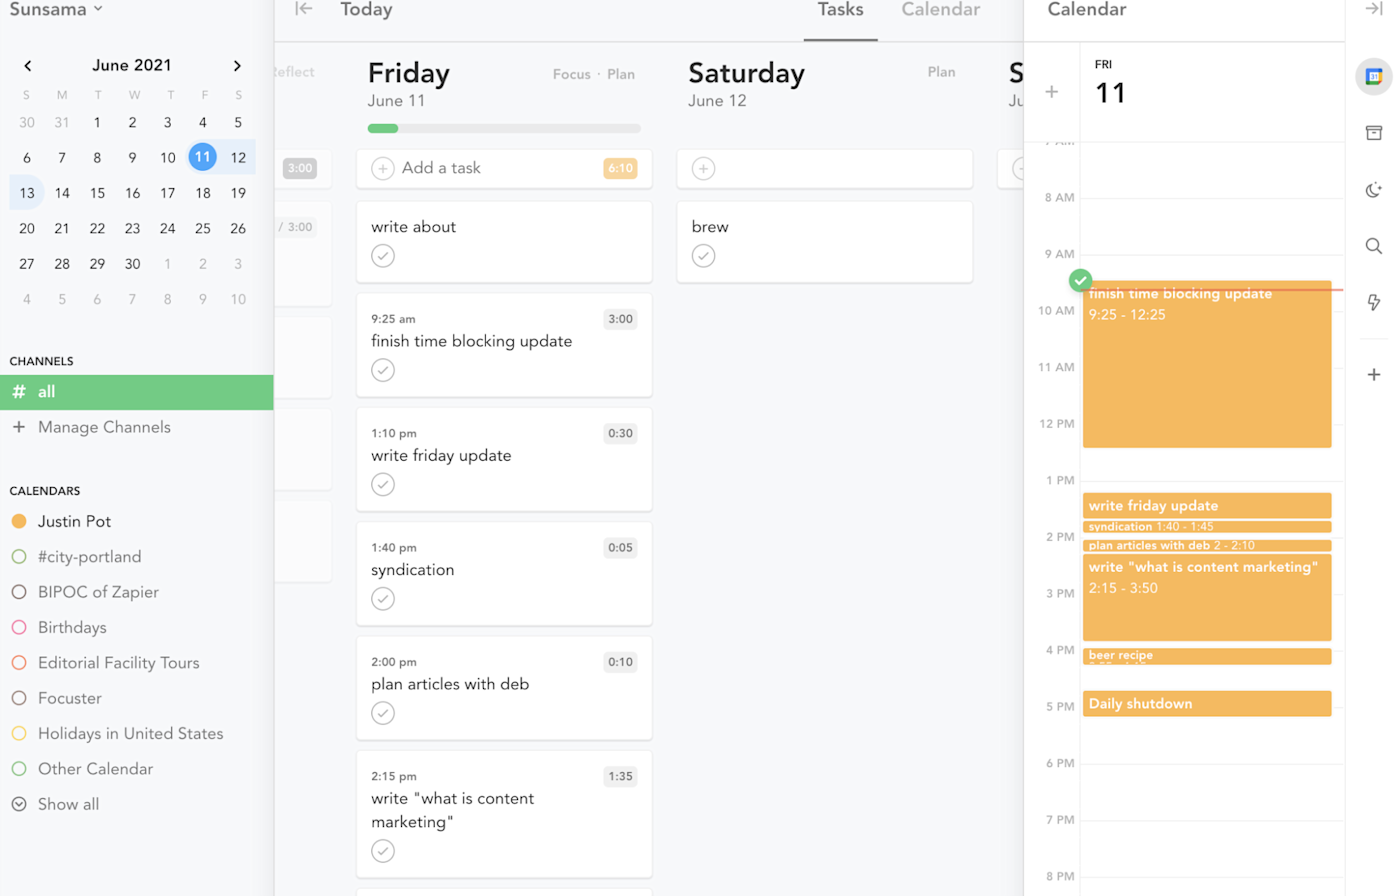
Sunsama is by far the best-designed app on this list. The app wastes no space, and after setting it up, you’ll immediately understand how to use it. There’s a task list, sorted by date, and there’s a sidebar with a calendar. You can flip this around if you want, but either way, it’s quick to drag tasks over to your calendar, making it convenient to jot down all your duties for the day and then focus on planning them all out accordingly.
Another neat feature is the ability to properly categorize all your tasks. Most time blocking apps have some kind of tagging aspect, but Sunsama takes it a little further with what they call contexts and channels. Contexts are essentially overarching categories, like Work or Personal. Within those categories, you can create sub-categorizations, like Focus Time, Creative Time, or Family Time to further drill down the organization of tasks.
Where Sunsuma really stands out is how it helps you plan out your day. Sign on in the morning, and you’ll be asked which tasks you have to work on, how long you think they are, and when you want to do them all. It really makes the process of blocking your day painless, and there’s even support for sending a summary of your plan for the day over to Slack in a single click. When nearing the end of your day, Sunsama will prompt you to jot down what you finished that day and what you didn’t get to, which I found a nice way to regroup before logging off.
The app is full of little touches like this, and the result is that time blocking your daily to-do list feels easier here than in any app we tested. And integrations with Trello, Gmail, GitHub, and Jira mean you can drag tasks over from a variety of apps. Google and Outlook calendars are both supported. The main downside: there’s no free plan.
Sunsama pricing: Starts at $20/month. No free version, though there is a 14-day free trial.
If you’re looking for a Sunsama alternative, try Timepage. It’s not a traditional time blocking app, but the sleek interface and added features, like weather reports and RSVP reminders, make it a worthy option.
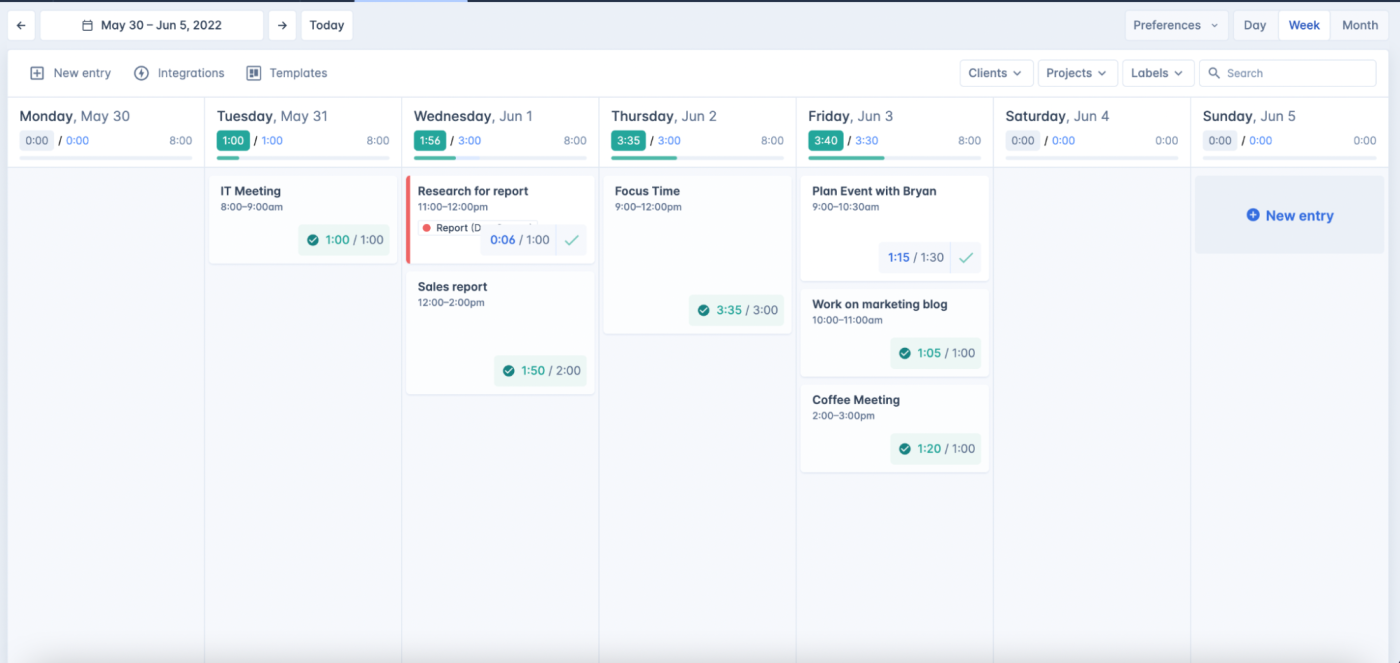
HourStack is well-suited for teamwork, with the ability to add multiple users and manage an entire team’s workflow. But it also works well as a task tracker app for individual professionals who just want to keep track of their work, monitor how much time is spent on each task, and block time out to focus.
You start by blocking time for the day/week. Then, when you’re ready to start on each task, click the task, and select Start to initiate a timer. When you’re finished working on the task, you can complete it if it’s finished, or if you run out of time, you can roll the task over to work on it again later. In the Reports section, you’ll see detailed metrics for the time estimated and spent on each task. And as bonus, you can integrate HourStack with Google Sheets to export all your insights, which is very useful when you need to present or share your time spent with people who don’t use HourStack. I also personally loved how visual the platform was—you can see all your tasks and events for the week as cards on your dashboard (Sunsama actually does this similarly, too).
HourStack will pull events from Google Calendar and Outlook 365, but it doesn’t add those events directly onto your HourStack calendar. Instead, you’ll see them in a sidebar on the right side of the screen and can drag and drop them onto your HourStack calendar.
The main downside to HourStack is that it doesn’t have a place to keep a to-do list. Instead, you’re mostly using your calendar to capture your to-dos. But it does have native integrations with apps like Trello, Todoist, and Asana, so you can see your to-dos from another app within HourStack to plan and schedule in one place. There are also integrations with HubSpot, GitHub, and Google Sheets—plus basically every other app, thanks to HourStack’s Zapier integrations, which let you do things like automatically adding new calendar events to your HourStack calendar and vice versa.
Add new Google Calendar events to your HourStack week
HourStack Pricing: 14-day free trial. Personal plan starts at $9/month.
Timely is an HourStack alternative that also allows you to track billable projects within a team. One of the biggest differences is the lack of an actual timer—instead, it uses a Memory app to track time automatically, which is nice, especially if you’re working on other projects in the background.
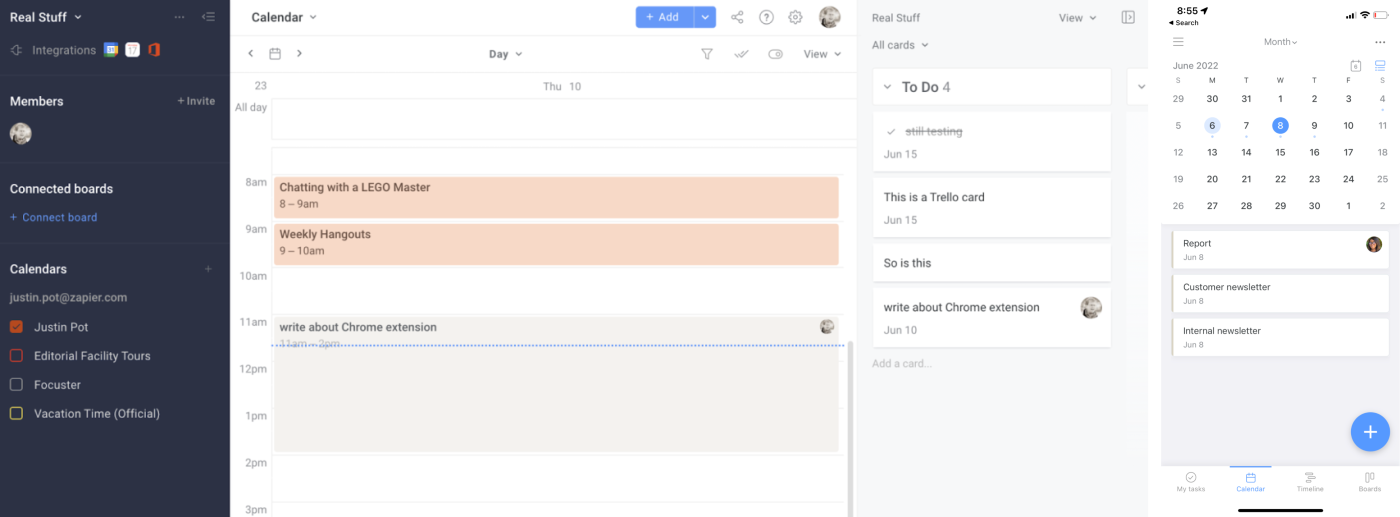
If you use Trello or Jira as your to-do list or project management tool, Planyway lets you block time on your calendar using those tasks.
You can easily create and place all your tasks into your pre-created Trello lists (or create new lists within Planyway), and then just drag and drop them onto the Planyway calendar. Connect your existing calendar, and you’ll see those same tasks or events with the rest of your schedule. The app did take a bit of time to think about integrating with my Google Calendar, but after a few refreshes, it wound up working just fine.
Planyway also gives you the option to connect it to your Google, Outlook, or Apple calendar, so you can see your calendar appointments in context. On its Free and Basic plans, Planyway supports one-way syncing: you can see your Planyway cards in your calendar using an iCal URL, but you can’t see your calendar events in Planyway. Two-way syncing that keeps both calendars in sync is available on the Pro plan.
Planyway Pricing: The Free plan includes one-way calendar syncing; from $3.99/month for the Pro plan that includes two-way calendar syncing and recurring tasks.
TickTick Premium lets you compile your tasks in a to-do list and then block time for those tasks on your calendar. But TickTick offers a feature that the others don’t: a Pomodoro timer. So if you want to combine time blocking with the Pomodoro Technique—or if you’re looking for the best task management app with built-in time blocking—TickTick Premium may be the best option for you.
Adding tasks to your calendar in TickTick isn’t as simple as it is in some of the other apps. Instead of dragging and dropping tasks onto your calendar, you have to take a few steps. While adding a task, you can use natural language processing to add a due date—for example, you could type “walk the dog tomorrow.” Do that, and your task will have a due date. If you forget, that’s ok: you can edit a task and select a due date. It will then show up on your calendar as an all-day event—you can drag it to whatever time you want.
TickTick can also pull events from your existing calendar and display them on your TickTick calendar; or you can set it up to push TickTick events to your main calendar. You can’t manage calendar appointments in TickTick, though—the appointments from your calendar are basically only there for reference. But it’s enough to plan your day.
Another neat feature to take advantage of is the Eisenhower Matrix. The name may sound a little intimidating, but it’s actually very simple. You can use the matrix to organize your tasks according to Urgent & Important, Urgent & Unimportant, Not Urgent & Important, and Not Urgent & Unimportant. This system essentially provides a way to properly prioritize and tag your tasks with a simple drag and drop. As someone who can get overwhelmed with the number of tasks on my plate, being able to see a visual representation of my tasks prioritized was a huge help.
You can integrate TickTick with thousands of apps using Zapier’s TickTick integrations. This is great for adding tasks to your calendar or pulling in tasks from other apps like Gmail or Slack.
Create TickTick tasks from new saved Slack messages
TickTick Pricing: The free TickTick product doesn’t include a calendar view; from $2.79/month for TickTick Premium that includes the calendar view and RSS feeds to and from third-party calendars.
Best free time blocking app for Apple users (and hyper-scheduling)
Sorted^3 is the self-proclaimed app for hyper-schedulers—and as someone who self-identifies that way, I’d absolutely agree.
Sorted^3 has an excellent onboarding flow. When you sign up, you’ll be immediately directed to a tutorial showing you how to use app shortcuts and other unique features, like Magic Select (more on that in a bit). While the amount of information may seem overwhelming at first, it does a superb job of guiding you through all the features that are available to you as you start using them.
On the hyper-categorization front, there’s a tab for lists that has sections for errands, notes, links, and groceries, so you can put any tasks or information that you want to store for later—but you can also schedule out any tasks from the lists as well.
Back to Magic Select. This feature lets you quickly highlight multiple items in your schedule. This means you can delete, recategorize, retag, or reschedule multiple tasks without too much effort. Surprisingly, out of all the other apps I tested, none had this feature.
You’ll also get an auto-scheduling feature. You can add all your tasks to the schedule section, assign a certain period of time for each one, and then let Sorted^3 do the heavy lifting of blocking out time for all your tasks. You can even add an automatic buffer period between tasks, and you’re able to move things around after they’ve been scheduled.
Sorted^3 also has some nice Apple-specific features. For example, you can sync to iCloud and can take advantage of Siri to plan out tasks.
Sorted^3 pricing: Free; PRO version is $14.99
SkedPal also has great auto-scheduling capabilities, and it’s worth a look if you like the idea of Sorted^3 but don’t use Apple devices. SkedPal’s time map feature allows you to throw a task into a category, like Focus Time or Weekends, and then automatically schedules it within that task category.
Do you need a time block app?
You might decide that you don’t need a dedicated app for time blocking, and that’s fine. Here are some other ideas:
We included TickTick in the list above, but some of the other best to-do list apps also have basic time blocking features, including Any.do and Todoist.
Honestly, any of the best calendar apps could work for calendar blocking. Just add your tasks as calendar appointments.
Serene is a distraction blocking app that also works great for planning your day. It’s not exactly a time blocking app, but might be better for some people.
Also worth noting: if you already have a great to-do list app and a great calendar app, you could just connect the two using Zapier.
Google Calendar + Jira Software ServerMore details
But if you want everything in one app, one of the tools in this list should do the trick. Each app offers a free plan or free trial, so you can try them all and pick the one that works best for you.
Yes, you need to turn shortcuts on. If you try these Gmail shortcuts without turning them on first, you’ll be slamming that C key into the void. So if you think your Gmail keyboard shortcuts aren’t working, try this first.
To turn on Gmail shortcuts:
Click the Settings gear in the top-right corner, then See all settings.
Scroll down to the Keyboard shortcuts section, and choose the Keyboard shortcuts on option.
Scroll to the bottom, and click Save Changes.
Congrats! You can use all of Gmail’s shortcuts now—here are the ones you should start using right away.
1. Browse through your emails
Prefer using keyboard navigation over mouse? Flip through the email threads in your inbox using K to go to the previous email and J to go to the next email.
Press Enter / return to open the selected thread. Then:
Press U to go back to your inbox.
Press ]or[ to archive the message and go to the previous or next message.
Press # to delete the message.
Press Shift+Uto mark the message as unread.
2. Jump between categories
Gmail also has “jumping” shortcuts that instantly take you to your desired inbox category. Use the following combos to visit different categories:
Main inbox: G + I
Starred conversations: G+S
Snoozed conversations: G+B
Sent messages: G+T
Drafts: G + D
All mail: G + A
If you like to use Google Tasks and Gmail together, you can even go to the Tasks window by pressing G + K.
3. Compose new emails
Here’s a universal and easy-to-remember one: composing a new message. Press C, and the trusty New Message window will pop up.
4. Add CC and BCC
When you open a compose window, it keeps the CC and BCC options nestled for you to click and add fields for them. Add those fields instantly using the Gmail shortcut Ctrl / command + Shift + C(CC) or Ctrl / command + Shift + B (BCC).
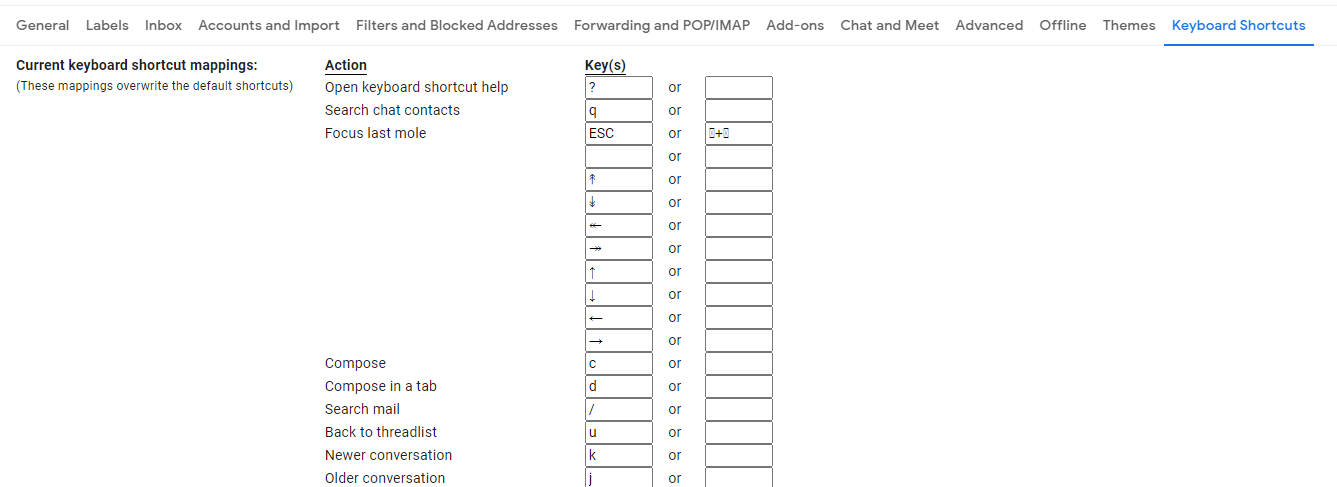
How to create a Gmail shortcut
You can change your Gmail shortcut keys to better suit your workflow. Here’s how to customize Gmail shortcuts:
Go back into the main settings menu you used to turn on shortcuts, then click the Advanced tab.
Find Custom Keyboard Shortcuts and choose Enable. Gmail will send you back to your inbox.
When you visit the main settings menu again, you’ll see a new tab titled Keyboard Shortcuts.
Click that tab, and you’ll get a menu where you can customize your shortcuts as much as you’d like.
Do more with Gmail
Want to go even further? Here’s a list of every Gmail shortcut, courtesy of Google itself. And here are a few more guides to make you a Gmail power user:
Are you trying to fix issues with WordPress search not working on your website?
While WordPress comes with basic search feature, it has some common errors and limitations that can keep your visitors from finding what they’re looking for.
In this post, we’ll show you how to fix problems with WordPress search not working.
Why Do WordPress Search Errors Happen?
Most websites have a search feature that helps visitors find interesting content on your WordPress blog or products that they may want to buy on your online store.
However, WordPress’ built-in search feature is very basic.
By default, it doesn’t search all types of content such as comments, reviews, or custom post types. This may stop the visitor from finding what they’re looking for.
The built-in search also focuses on matching search words with the post or page content without paying attention to things such as tags, categories, or custom fields. This is important information that can help your visitors get more accurate search results.
Lastly, there’s no easy way to customize the built-in search. For example, if you wanted to prioritize a post’s titles over its excerpt, or exclude certain pages from WordPress search, you would need to edit the code.
With that in mind, let’s look at how you can easily fix common problems with WordPress search not working. Simply use the quick links below to jump straight to the issue you’re having with WordPress search.
While WordPress has built-in search feature, not all themes may come with a search bar design. If your theme doesn’t come with a search bar, then there are a few ways that you can create one.
You can add a Search block to any widget-ready area of your WordPress website such as the header or footer. This is a quick and easy way to show a search bar across every page of your WordPress site.
To add a Search block, simply go to Appearance » Widgets. You can then find the area where you want to add a search bar, and click on its arrow icon to expand.
Then, just click on the + icon.
In the popup that appears, type in ‘search’ and then select the Search block.
Once you’ve done that, you can customize the Search block using the row of icons that appears above the block. This includes changing the size of the search button and adding some text.
When you’re happy with how your Search block looks, go ahead and click on the ‘Update’ button. You can now visit your website to see the search bar live.
Another option is adding the Search block to a specific page or post. For example, you might just want to show a search bar on your homepage or landing page.
To do this, just open the page or post where you want to show your search bar. You can then click on the + icon and add a Search block following the same process described above.
WordPress’ ready-made Search block is an easy way to add basic search to your site. However, if you want complete control over how your search bar looks and acts, then you’ll need a page builder plugin.
SeedProd is the best drag and drop page builder for WordPress and comes with over 80 professionally-designed blocks including a Search Form block. This allows you to instantly add a search bar to any area of your WordPress website.
All you need to do is open SeedProd’s editor and then drag and drop the Search Form block into place on your website’s layout.
Once you’ve done that, you can customize it using all the settings in the left-hand menu.
Once you’ve added a search bar, you can use the SeedProd theme builder to design a completely custom search results page that perfectly matches your brand. For more information, please see our guide on how to easily create a custom WordPress theme.
How to Fix WordPress Search Showing 404 Error
When a visitor performs a search, your site may show a 404 error such as ‘This page could not be found!’
You can often fix 404 errors by regenerating your permalinks. This rebuilds and repairs the WordPress permalink structure without changing anything on your site.
This may sound complex, but WordPress does all of the hard work for you.
To regenerate your permalinks, simply go to Settings » Permalinks.
Then, scroll to the bottom of the page and click on the ‘Save Changes’ button.
That’s it. WordPress will now regenerate your permalink structure. To make sure it worked, head over to your site and try performing a search.
How to Fix WordPress Search Showing Irrelevant Results
Every time a visitor performs a search, you’ll want to show relevant search results. This helps visitors find interesting content, which will keep them on your site for longer and increase your sales and conversions.
However, the built-in WordPress search doesn’t always show the most accurate results. This is because it looks for the search term in your post’s title and content only.
With that in mind, we recommend installing an advanced search plugin.
SearchWP is the best custom search plugin for WordPress, used by over 30,000 websites. SearchWP can search every part of your site including custom fields, WooCommerce products, categories and tags, PDF files, and more.
You can use SearchWP to adjust your website’s search algorithm and make sure your most important content appears at the top of the visitor’s search results.
The first thing you need to do is install and activate the SearchWP plugin. For more details, see our step by step guide on how to install a WordPress plugin.
Upon activation, click on the new ‘SearchWP’ button in your website’s toolbar. You can then go ahead and click on ‘Activate License.’
Once you’ve done that, click on the ‘License’ tab.
You can now either paste or type your license into the ‘License’ box. You’ll find this key in the email you got when you purchased SearchWP.
After that, go ahead and click on the ‘Activate’ button.
SearchWP integrates with WordPress search automatically, so right away your site will start showing more accurate results. However, to get the best results you’ll want to customize SearchWP’s search engine settings.
Here it helps to think about the way that search engines such as Google rank their content.
These search engines use algorithms to find high-quality content that closely matches the search term. It then ranks this content to make sure the best matches appear at the top of the search results page.
With SearchWP you can build your own algorithms and set your own rules, just like Google. This can improve the visitor experience, boost your conversions, and help you make money online with WordPress.
To configure SearchWP’s settings, click on the ‘Engines’ tab.
On this screen, you’ll see sections for the different types of WordPress content such as pages and posts.
For each section, SearchWP shows the attributes it looks at when performing a search. In the following image, we can see that SearchWP searches the page’s title, content, slug, and the page’s excerpt.
There is also an ‘Applicable Attribute Relevance’ scale for each attribute. This is the weight that SearchWP gives to each attribute when ranking its search results.
In the following image, we can see that a post’s title has more weight than its URL slug.
You can make an attribute more or less relevant using its slider.
There are no settings that are guaranteed to provide accurate results for every website. With that in mind, you may want to try different relevancy settings to see what gives you the most accurate search results.
You can also add different types of content to be included in your search results. For example, you can add PDF searching and indexing in WordPress if you have PDF files you want your visitors to be able to search for.
If you have any custom taxonomies or fields, then you can also tell SearchWP to look at this content when searching your site.
To add or remove attributes, click on the ‘Add/Remove Attributes’ button.
This opens a popup. To get SearchWP to ignore an attribute, simply uncheck its box.
If you want to add an attribute, then click to check its box.
Want to include a custom field or taxonomy in your searches?
Simply type in the name of that field or taxonomy, and then select it when it appears.
Once you’re happy with your attributes, click on the ‘Done’ button.
You can now change the relevancy for your new attributes following the same process described above.
Once you’re connected to your site, you can use FTP to open the wp-content/themes/ folder.
Inside the ‘themes’ folder, find the theme you’re currently using on your WordPress website. You can then open this folder and find the search.php file.
Next simply click on the search.php file and select ‘View/Edit.’
This will open search.php in your computer’s default text editor.
Now, check this template for any queries that contain query_posts, new WP_Query, or get_posts. This usually means that your theme is performing a redundant search.
If search.php has any of these queries, then we recommend switching to an alternative WordPress theme. To help you out, we’ve created a list of the most popular and best WordPress themes.
Another option is to hire a WordPress developer who can write a new template that doesn’t perform a redundant search.
How to Fix WooCommerce Product Search Not Showing Accurate Results
Fast search helps visitors find what they’re looking for in less time. This will improve the user experience and can increase your pageviews and conversion rate.
Unfortunately, the built-in WordPress search isn’t particularly fast. As you add more content, you may notice that your site takes longer and longer to return the search results.
The good news is that there are ways to speed up your site’s search. If you’re using an advanced search plugin like SearchWP, then you’re already off to a great start.
SearchWP is designed to deliver search results, fast. It’s also fully customizable, so you can ignore some of your site’s content when performing a search. For example, you may tell SearchWP to ignore your media metadata. This can speed up your search by reducing the amount of content it has to look through.
You can also improve the search experience by adding live Ajax search to your WordPress site. This is a dropdown that guesses what visitors are searching for as they type, which can make your searches feel instant.


.png)