How it works: The novel HTTP/2 ‘Rapid Reset’ DDoS attack

October 10, 2023

Juho Snellman
Staff Software Engineer

Daniele Iamartino
Staff Site Reliability Engineer

A number of Google services and Cloud customers have been targeted with a novel HTTP/2-based DDoS attack which peaked in August. These attacks were significantly larger than any previously-reported Layer 7 attacks, with the largest attack surpassing 398 million requests per second.

The attacks were largely stopped at the edge of our network by Google’s global load balancing infrastructure and did not lead to any outages. While the impact was minimal, Google’s DDoS Response Team reviewed the attacks and added additional protections to further mitigate similar attacks. In addition to Google’s internal response, we helped lead a coordinated disclosure process with industry partners to address the new HTTP/2 vector across the ecosystem.

Hear monthly from our Cloud CISO in your inbox

Get security updates, musings, and more from Google Cloud CISO Phil Venables direct to your inbox every month.

Subscribe today

https://storage.googleapis.com/gweb-cloudblog-publish/images/gcat_small_1.max-300x168.jpg

Below, we explain the predominant methodology for Layer 7 attacks over the last few years, what changed in these new attacks to make them so much larger, and the mitigation strategies we believe are effective against this attack type. This article is written from the perspective of a reverse proxy architecture, where the HTTP request is terminated by a reverse proxy that forwards requests to other services. The same concepts apply to HTTP servers that are integrated into the application server, but with slightly different considerations which potentially lead to different mitigation strategies.

A primer on HTTP/2 for DDoS

Since late 2021, the majority of Layer 7 DDoS attacks we’ve observed across Google first-party services and Google Cloud projects protected by Cloud Armor have been based on HTTP/2, both by number of attacks and by peak request rates.

A primary design goal of HTTP/2 was efficiency, and unfortunately the features that make HTTP/2 more efficient for legitimate clients can also be used to make DDoS attacks more efficient.

Stream multiplexing

HTTP/2 uses “streams”, bidirectional abstractions used to transmit various messages, or “frames”, between the endpoints. “Stream multiplexing” is the core HTTP/2 feature which allows higher utilization of each TCP connection. Streams are multiplexed in a way that can be tracked by both sides of the connection while only using one Layer 4 connection. Stream multiplexing enables clients to have multiple in-flight requests without managing multiple individual connections.

One of the main constraints when mounting a Layer 7 DoS attack is the number of concurrent transport connections. Each connection carries a cost, including operating system memory for socket records and buffers, CPU time for the TLS handshake, as well as each connection needing a unique four-tuple, the IP address and port pair for each side of the connection, constraining the number of concurrent connections between two IP addresses.

In HTTP/1.1, each request is processed serially. The server will read a request, process it, write a response, and only then read and process the next request. In practice, this means that the rate of requests that can be sent over a single connection is one request per round trip, where a round trip includes the network latency, proxy processing time and backend request processing time. While HTTP/1.1 pipelining is available in some clients and servers to increase a connection’s throughput, it is not prevalent amongst legitimate clients.

With HTTP/2, the client can open multiple concurrent streams on a single TCP connection, each stream corresponding to one HTTP request. The maximum number of concurrent open streams is, in theory, controllable by the server, but in practice clients may open 100 streams per request and the servers process these requests in parallel. It’s important to note that server limits can not be unilaterally adjusted.

For example, the client can open 100 streams and send a request on each of them in a single round trip; the proxy will read and process each stream serially, but the requests to the backend servers can again be parallelized. The client can then open new streams as it receives responses to the previous ones. This gives an effective throughput for a single connection of 100 requests per round trip, with similar round trip timing constants to HTTP/1.1 requests. This will typically lead to almost 100 times higher utilization of each connection.

The HTTP/2 Rapid Reset attack

The HTTP/2 protocol allows clients to indicate to the server that a previous stream should be canceled by sending a RST_STREAM frame. The protocol does not require the client and server to coordinate the cancellation in any way, the client may do it unilaterally. The client may also assume that the cancellation will take effect immediately when the server receives the RST_STREAM frame, before any other data from that TCP connection is processed.

This attack is called Rapid Reset because it relies on the ability for an endpoint to send a RST_STREAM frame immediately after sending a request frame, which makes the other endpoint start working and then rapidly resets the request. The request is canceled, but leaves the HTTP/2 connection open.

https://storage.googleapis.com/gweb-cloudblog-publish/images/2023_worlds_largest_rapid_reset_diagram.max-1616x909.png

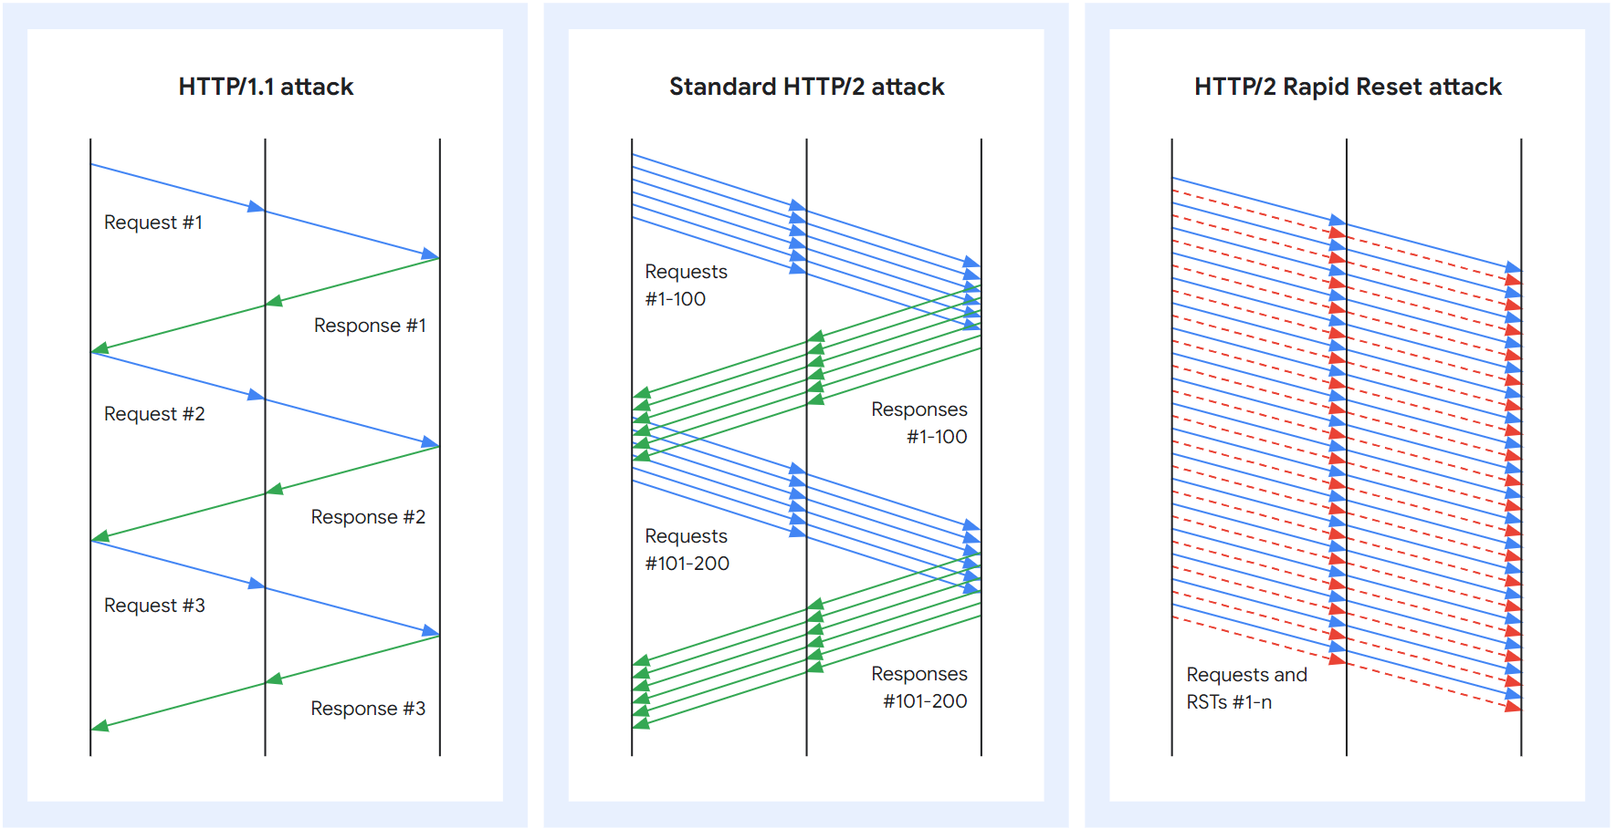
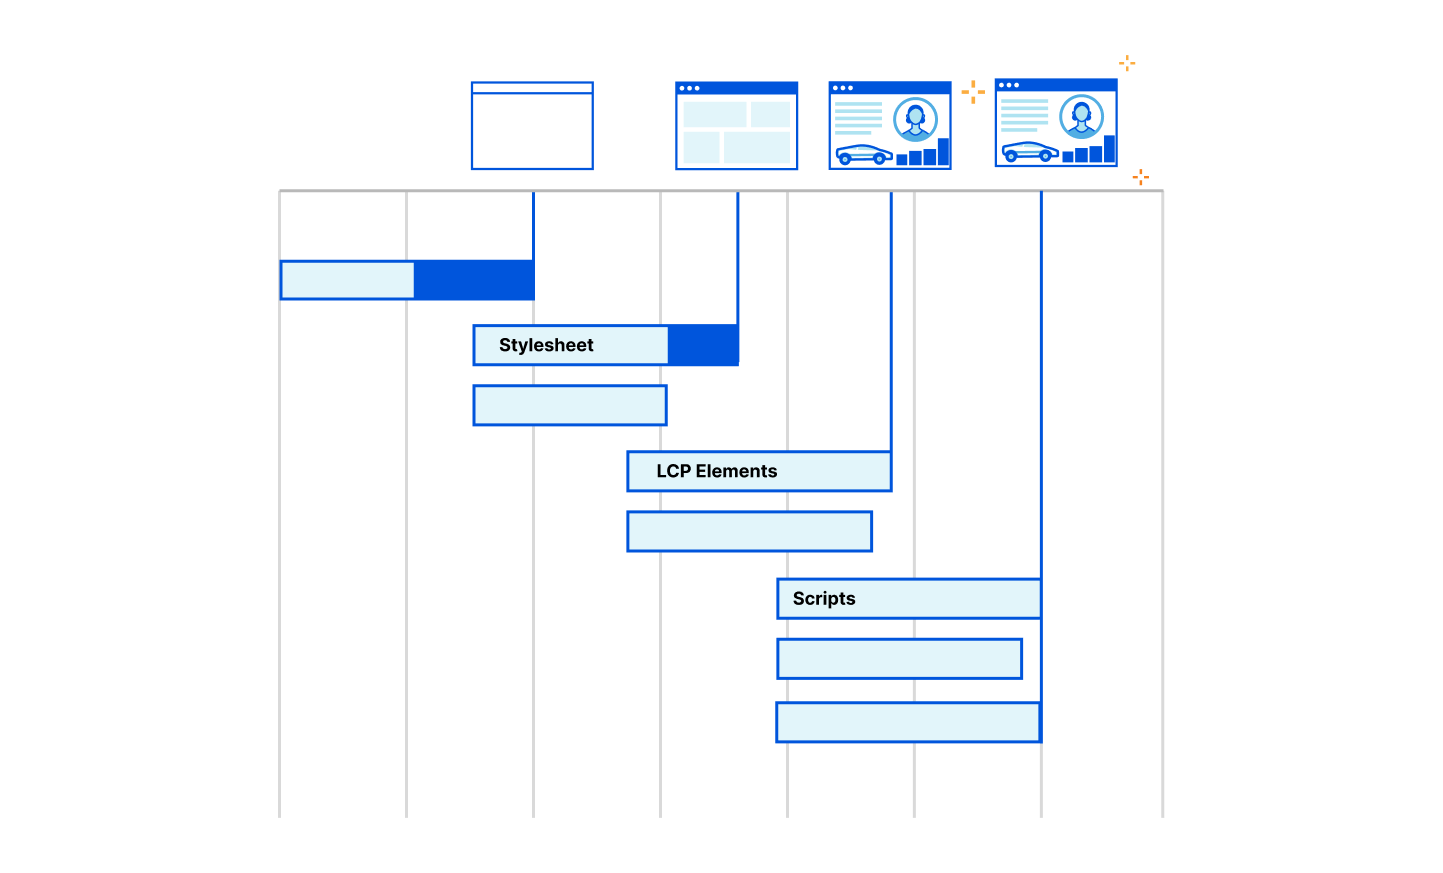
HTTP/1.1 and HTTP/2 request and response pattern

The HTTP/2 Rapid Reset attack built on this capability is simple: The client opens a large number of streams at once as in the standard HTTP/2 attack, but rather than waiting for a response to each request stream from the server or proxy, the client cancels each request immediately.

The ability to reset streams immediately allows each connection to have an indefinite number of requests in flight. By explicitly canceling the requests, the attacker never exceeds the limit on the number of concurrent open streams. The number of in-flight requests is no longer dependent on the round-trip time (RTT), but only on the available network bandwidth.

In a typical HTTP/2 server implementation, the server will still have to do significant amounts of work for canceled requests, such as allocating new stream data structures, parsing the query and doing header decompression, and mapping the URL to a resource. For reverse proxy implementations, the request may be proxied to the backend server before the RST_STREAM frame is processed. The client on the other hand paid almost no costs for sending the requests. This creates an exploitable cost asymmetry between the server and the client.

Another advantage the attacker gains is that the explicit cancellation of requests immediately after creation means that a reverse proxy server won’t send a response to any of the requests. Canceling the requests before a response is written reduces downlink (server/proxy to attacker) bandwidth.

HTTP/2 Rapid Reset attack variants

In the weeks after the initial DDoS attacks, we have seen some Rapid Reset attack variants. These variants are generally not as efficient as the initial version was, but might still be more efficient than standard HTTP/2 DDoS attacks.

The first variant does not immediately cancel the streams, but instead opens a batch of streams at once, waits for some time, and then cancels those streams and then immediately opens another large batch of new streams. This attack may bypass mitigations that are based on just the rate of inbound RST_STREAM frames (such as allow at most 100 RST_STREAMs per second on a connection before closing it).

These attacks lose the main advantage of the canceling attacks by not maximizing connection utilization, but still have some implementation efficiencies over standard HTTP/2 DDoS attacks. But this variant does mean that any mitigation based on rate-limiting stream cancellations should set fairly strict limits to be effective.

The second variant does away with canceling streams entirely, and instead optimistically tries to open more concurrent streams than the server advertised. The benefit of this approach over the standard HTTP/2 DDoS attack is that the client can keep the request pipeline full at all times, and eliminate client-proxy RTT as a bottleneck. It can also eliminate the proxy-server RTT as a bottleneck if the request is to a resource that the HTTP/2 server responds to immediately.

RFC 9113, the current HTTP/2 RFC, suggests that an attempt to open too many streams should invalidate only the streams that exceeded the limit, not the entire connection. We believe that most HTTP/2 servers will not process those streams, and is what enables the non-cancelling attack variant by almost immediately accepting and processing a new stream after responding to a previous stream.

A multifaceted approach to mitigations

We don’t expect that simply blocking individual requests is a viable mitigation against this class of attacks — instead the entire TCP connection needs to be closed when abuse is detected. HTTP/2 provides built-in support for closing connections, using the GOAWAY frame type. The RFC defines a process for gracefully closing a connection that involves first sending an informational GOAWAY that does not set a limit on opening new streams, and one round trip later sending another that forbids opening additional streams.

However, this graceful GOAWAY process is usually not implemented in a way which is robust against malicious clients. This form of mitigation leaves the connection vulnerable to Rapid Reset attacks for too long, and should not be used for building mitigations as it does not stop the inbound requests. Instead, the GOAWAY should be set up to limit stream creation immediately.

This leaves the question of deciding which connections are abusive. The client canceling requests is not inherently abusive, the feature exists in the HTTP/2 protocol to help better manage request processing. Typical situations are when a browser no longer needs a resource it had requested due to the user navigating away from the page, or applications using a long polling approach with a client-side timeout.

Mitigations for this attack vector can take multiple forms, but mostly center around tracking connection statistics and using various signals and business logic to determine how useful each connection is. For example, if a connection has more than 100 requests with more than 50% of the given requests canceled, it could be a candidate for a mitigation response. The magnitude and type of response depends on the risk to each platform, but responses can range from forceful GOAWAY frames as discussed before to closing the TCP connection immediately.

To mitigate against the non-cancelling variant of this attack, we recommend that HTTP/2 servers should close connections that exceed the concurrent stream limit. This can be either immediately or after some small number of repeat offenses.

Applicability to other protocols

We do not believe these attack methods translate directly to HTTP/3 (QUIC) due to protocol differences, and Google does not currently see HTTP/3 used as a DDoS attack vector at scale. Despite that, our recommendation is for HTTP/3 server implementations to proactively implement mechanisms to limit the amount of work done by a single transport connection, similar to the HTTP/2 mitigations discussed above.

Industry coordination

Early in our DDoS Response Team’s investigation and in coordination with industry partners, it was apparent that this new attack type could have a broad impact on any entity offering the HTTP/2 protocol for their services. Google helped lead a coordinated vulnerability disclosure process taking advantage of a pre-existing coordinated vulnerability disclosure group, which has been used for a number of other efforts in the past.

During the disclosure process, the team focused on notifying large-scale implementers of HTTP/2 including infrastructure companies and server software providers. The goal of these prior notifications was to develop and prepare mitigations for a coordinated release. In the past, this approach has enabled widespread protections to be enabled for service providers or available via software updates for many packages and solutions.

During the coordinated disclosure process, we reserved CVE-2023-44487 to track fixes to the various HTTP/2 implementations.

Next steps

The novel attacks discussed in this post can have significant impact on services of any scale. All providers who have HTTP/2 services should assess their exposure to this issue. Software patches and updates for common web servers and programming languages may be available to apply now or in the near future. We recommend applying those fixes as soon as possible.

For our customers, we recommend patching software and enabling the Application Load Balancer and Google Cloud Armor, which has been protecting Google and existing Google Cloud Application Load Balancing users.

Source :
https://cloud.google.com/blog/products/identity-security/how-it-works-the-novel-http2-rapid-reset-ddos-attack

The PQXDH Key Agreement Protocol

Revision 1, 2023-05-24 [PDF]

Ehren Kret, Rolfe Schmidt

Table of Contents

1. Introduction

This document describes the “PQXDH” (or “Post-Quantum Extended Diffie-Hellman”) key agreement protocol. PQXDH establishes a shared secret key between two parties who mutually authenticate each other based on public keys. PQXDH provides post-quantum forward secrecy and a form of cryptographic deniability but still relies on the hardness of the discrete log problem for mutual authentication in this revision of the protocol.

PQXDH is designed for asynchronous settings where one user (“Bob”) is offline but has published some information to a server. Another user (“Alice”) wants to use that information to send encrypted data to Bob, and also establish a shared secret key for future communication.

2. Preliminaries

2.1. PQXDH parameters

An application using PQXDH must decide on several parameters:

NameDefinition
curveA Montgomery curve for which XEdDSA [1] is specified, at present this is one of curve25519 or curve448
hashA 256 or 512-bit hash function (e.g. SHA-256 or SHA-512)
infoAn ASCII string identifying the application with a minimum length of 8 bytes
pqkemA post-quantum key encapsulation mechanism (e.g. Crystals-Kyber-1024 [2])
EncodeECA function that encodes a curve public key into a byte sequence
DecodeECA function that decodes a byte sequence into a curve public key and is the inverse of EncodeEC
EncodeKEMA function that encodes a pqkem public key into a byte sequence
DecodeKEMA function that decodes a byte sequence into a pqkem public key and is the inverse of EncodeKEM

For example, an application could choose curve as curve25519, hash as SHA-512, info as “MyProtocol”, and pqkem as CRYSTALS-KYBER-1024.

The recommended implementation of EncodeEC consists of a single-byte constant representation of curve followed by little-endian encoding of the u-coordinate as specified in [3]. The single-byte representation of curve is defined by the implementer. Similarly the recommended implementation of DecodeEC reads the first byte to determine the parameter curve. If the first byte does not represent a recognized curve, the function fails. Otherwise it applies the little-endian decoding of the u-coordinate for curve as specified in [3].

The recommended implementation of EncodeKEM consists of a single-byte constant representation of pqkem followed by the encoding of PQKPK specified by pqkem. The single-byte representation of pqkem is defined by the implementer. Similarly the recommended implementation of DecodeKEM reads the first byte to determine the parameter pqkem. If the first byte does not represent a recognized key encapsulation mechanism, the function fails. Otherwise it applies the decoding specified by the selected key encapsulation mechanism.

2.2. Cryptographic notation

Throughout this document, all public keys have a corresponding private key, but to simplify descriptions we will identify key pairs by the public key and assume that the corresponding private key can be accessed by the key owner.

This document will use the following notation:

  • The concatenation of byte sequences X and Y is X || Y.
  • DH(PK1, PK2) represents a byte sequence which is the shared secret output from an Elliptic Curve Diffie-Hellman function involving the key pairs represented by public keys PK1 and PK2. The Elliptic Curve Diffie-Hellman function will be either the X25519 or X448 function from [3], depending on the curve parameter.
  • Sig(PK, M, Z) represents the byte sequence that is a curve XEdDSA signature on the byte sequence M which was created by signing M with PK’s corresponding private key and using 64 bytes of randomness Z. This signature verifies with public key PK. The signing and verification functions for XEdDSA are specified in [1].
  • KDF(KM) represents 32 bytes of output from the HKDF algorithm [4] using hash with inputs:
    • HKDF input key material = F || KM, where KM is an input byte sequence containing secret key material, and F is a byte sequence containing 32 0xFF bytes if curve is curve25519, and 57 0xFF bytes if curve is curve448. As in in XEdDSA [1]F ensures that the first bits of the HKDF input key material are never a valid encoding of a scalar or elliptic curve point.
    • HKDF salt = A zero-filled byte sequence with length equal to the hash output length, in bytes.
    • HKDF info = The concatenation of string representations of the 4 PQXDH parameters infocurvehash, and pqkem into a single string separated with ‘_’ such as “MyProtocol_CURVE25519_SHA-512_CRYSTALS-KYBER-1024”. The string representations of the PQXDH parameters are defined by the implementer.
  • (CT, SS) = PQKEM-ENC(PK) represents a tuple of the byte sequence that is the KEM ciphertext, CT, output by the algorithm pqkem together with the shared secret byte sequence SS encapsulated by the ciphertext using the public key PK.
  • PQKEM-DEC(PK, CT) represents the shared secret byte sequence SS decapsulated from a pqkem ciphertext using the private key counterpart of the public key PK used to encapsulate the ciphertext CT.

2.3. Roles

The PQXDH protocol involves three parties: AliceBob, and a server.

  • Alice wants to send Bob some initial data using encryption, and also establish a shared secret key which may be used for bidirectional communication.
  • Bob wants to allow parties like Alice to establish a shared key with him and send encrypted data. However, Bob might be offline when Alice attempts to do this. To enable this, Bob has a relationship with some server.
  • The server can store messages from Alice to Bob which Bob can later retrieve. The server also lets Bob publish some data which the server will provide to parties like Alice. The amount of trust placed in the server is discussed in Section 4.9.

In some systems the server role might be divided between multiple entities, but for simplicity we assume a single server that provides the above functions for Alice and Bob.

2.4. Elliptic Curve Keys

PQXDH uses the following elliptic curve public keys:

NameDefinition
IKAAlice’s identity key
IKBBob’s identity key
EKAAlice’s ephemeral key
SPKBBob’s signed prekey
(OPKB1OPKB2, …)Bob’s set of one-time prekeys

The elliptic curve public keys used within a PQXDH protocol run must either all be in curve25519 form, or they must all be in curve448 form, depending on the curve parameter [3].

Each party has a long-term identity elliptic curve public key (IKA for Alice, IKB for Bob).

Bob also has a signed prekey SPKB, which he changes periodically and signs each time with IKB, and a set of one-time prekeys (OPKB1OPKB2, …), which are each used in a single PQXDH protocol run. (“Prekeys” are so named because they are essentially protocol messages which Bob publishes to the server prior to Alice beginning the protocol run.) These keys will be uploaded to the server as described in Section 3.2.

During each protocol run, Alice generates a new ephemeral key pair with public key EKA.

2.5. Post-Quantum Key Encapsulation Keys

PQXDH uses the following post-quantum key encapsulation public keys:

NameDefinition
PQSPKBBob’s signed last-resort pqkem prekey
(PQOPKB1PQOPKB2, …)Bob’s set of signed one-time pqkem prekeys

The pqkem public keys used within a PQXDH protocol run must all use the same pqkem parameter.

Bob has a signed last-resort post-quantum prekey PQSPKB, which he changes periodically and signs each time with IKB, and a set of signed one-time prekeys (PQOPKB1PQOPKB2, …) which are also signed with IKB and each used in a single PQXDH protocol run. These keys will be uploaded to the server as described in Section 3.2. The name “last-resort” refers to the fact that the last-resort prekey is only used when one-time pqkem prekeys are not available. This can happen when the number of prekey bundles downloaded for Bob exceeds the number of one-time pqkem prekeys Bob has uploaded (see Section 3 for details about the role of the server).

3. The PQXDH protocol

3.1. Overview

PQXDH has three phases:

  1. Bob publishes his elliptic curve identity key, elliptic curve prekeys, and pqkem prekeys to a server.
  2. Alice fetches a “prekey bundle” from the server, and uses it to send an initial message to Bob.
  3. Bob receives and processes Alice’s initial message.

The following sections explain these phases.

3.2. Publishing keys

Bob generates a sequence of 64-byte random values ZSPK, ZPQSPK, Z1, Z2, … and publishes a set of keys to the server containing:

  • Bob’s curve identity key IKB
  • Bob’s signed curve prekey SPKB
  • Bob’s signature on the curve prekey Sig(IKB, EncodeEC(SPKB), ZSPK)
  • Bob’s signed last-resort pqkem prekey PQSPKB
  • Bob’s signature on the pqkem prekey Sig(IKB, EncodeKEM(PQSPKB), ZPQSPK)
  • A set of Bob’s one-time curve prekeys (OPKB1, OPKB2, OPKB3, …)
  • A set of Bob’s signed one-time pqkem prekeys (PQOPKB1, PQOPKB2, PQOPKB3, …)
  • The set of Bob’s signatures on the signed one-time pqkem prekeys (Sig(IKB, EncodeKEM(PQOPKB1), Z1), Sig(IKB, EncodeKEM(PQOPKB2), Z2), Sig(IKB, EncodeKEM(PQOPKB3), Z3), …)

Bob only needs to upload his identity key to the server once. However, Bob may upload new one-time prekeys at other times (e.g. when the server informs Bob that the server’s store of one-time prekeys is getting low).

For both the signed curve prekey and the signed last-resort pqkem prekey, Bob will upload a new prekey along with its signature using IKB at some interval (e.g. once a week or once a month). The new signed prekey and its signatures will replace the previous values.

After uploading a new pair of signed curve and signed last-resort pqkem prekeys, Bob may keep the private key corresponding to the previous pair around for some period of time to handle messages using it that may have been delayed in transit. Eventually, Bob should delete this private key for forward secrecy (one-time prekey private keys will be deleted as Bob receives messages using them; see Section 3.4).

3.3. Sending the initial message

To perform a PQXDH key agreement with Bob, Alice contacts the server and fetches a “prekey bundle” containing the following values:

  • Bob’s curve identity key IKB
  • Bob’s signed curve prekey SPKB
  • Bob’s signature on the curve prekey Sig(IKB, EncodeEC(SPKB), ZSPK)
  • One of either Bob’s signed one-time pqkem prekey PQOPKBn or Bob’s last-resort signed pqkem prekey PQSPKB if no signed one-time pqkem prekey remains. Call this key PQPKB.
  • Bob’s signature on the pqkem prekey Sig(IKB, EncodeKEM(PQPKB), ZPQPK)
  • (Optionally) Bob’s one-time curve prekey OPKBn

The server should provide one of Bob’s curve one-time prekeys if one exists and then delete it. If all of Bob’s curve one-time prekeys on the server have been deleted, the bundle will not contain a one-time curve prekey element.

The server should prefer to provide one of Bob’s pqkem one-time signed prekeys PQOPKBn if one exists and then delete it. If all of Bob’s pqkem one-time signed prekeys on the server have been deleted, the bundle will instead contain Bob’s pqkem last-resort signed prekey PQSPKB.

Alice verifies the signatures on the prekeys. If any signature check fails, Alice aborts the protocol. Otherwise, if all signature checks pass, Alice then generates an ephemeral curve key pair with public key EKA. Alice additionally generates a pqkem encapsulated shared secret:

    (CT, SS) = PQKEM-ENC(PQPKB)
               shared secret SS
               ciphertext CT

If the bundle does not contain a curve one-time prekey, she calculates:

    DH1 = DH(IKA, SPKB)
    DH2 = DH(EKA, IKB)
    DH3 = DH(EKA, SPKB)
    SK = KDF(DH1 || DH2 || DH3 || SS)

If the bundle does contain a curve one-time prekey, the calculation is modified to include an additional DH:

    DH4 = DH(EKA, OPKB)
    SK = KDF(DH1 || DH2 || DH3 || DH4 || SS)

After calculating SK, Alice deletes her ephemeral private key, the DH outputs, the shared secret SS, and the ciphertext CT.

Alice then calculates an “associated data” byte sequence AD that contains identity information for both parties:

    AD = EncodeEC(IKA) || EncodeEC(IKB)

Alice may optionally append additional information to AD, such as Alice and Bob’s usernames, certificates, or other identifying information.

Alice then sends Bob an initial message containing:

  • Alice’s identity key IKA
  • Alice’s ephemeral key EKA
  • The pqkem ciphertext CT encapsulating SS for PQPKB
  • Identifiers stating which of Bob’s prekeys Alice used
  • An initial ciphertext encrypted with some AEAD encryption scheme [5] using AD as associated data and using an encryption key which is either SK or the output from some cryptographic PRF keyed by SK.

The initial ciphertext is typically the first message in some post-PQXDH communication protocol. In other words, this ciphertext typically has two roles, serving as the first message within some post-PQXDH protocol, and as part of Alice’s PQXDH initial message.

The initial message must be encoded in an unambiguous format to avoid confusion of the message items by the recipient.

After sending this, Alice may continue using SK or keys derived from SK within the post-PQXDH protocol for communication with Bob, subject to the security considerations discussed in Section 4.

3.4. Receiving the initial message

Upon receiving Alice’s initial message, Bob retrieves Alice’s identity key and ephemeral key from the message. Bob also loads his identity private key and the private key(s) corresponding to the signed prekeys and one-time prekeys Alice used.

Using these keys, Bob calculates PQKEM-DEC(PQPKB, CT) as the shared secret SS and repeats the DH and KDF calculations from the previous section to derive SK, and then deletes the DH values and SS values.

Bob then constructs the AD byte sequence using IKA and IKB as described in the previous section. Finally, Bob attempts to decrypt the initial ciphertext using SK and AD. If the initial ciphertext fails to decrypt, then Bob aborts the protocol and deletes SK.

If the initial ciphertext decrypts successfully, the protocol is complete for Bob. For forward secrecy, Bob deletes the ciphertext and any one-time prekey private key that was used. Bob may then continue using SK or keys derived from SK within the post-PQXDH protocol for communication with Alice subject to the security considerations discussed in Section 4.

4. Security considerations

The security of the composition of X3DH [6] with the Double Ratchet [7] was formally studied in [8] and proven secure under the Gap Diffie-Hellman assumption (GDH)[9]. PQXDH composed with the Double Ratchet retains this security against an adversary without access to a quantum computer, but strengthens the security of the initial handshake to require the solution of both GDH and Module-LWE [10]. The remainder of this section discusses an incomplete list of further security considerations.

4.1. Authentication

Before or after a PQXDH key agreement, the parties may compare their identity public keys IKA and IKB through some authenticated channel. For example, they may compare public key fingerprints manually, or by scanning a QR code. Methods for doing this are outside the scope of this document.

Authentication in PQXDH is not quantum-secure. In the presence of an active quantum adversary, the parties receive no cryptographic guarantees as to who they are communicating with. Post-quantum secure deniable mutual authentication is an open research problem which we hope to address with a future revision of this protocol.

If authentication is not performed, the parties receive no cryptographic guarantee as to who they are communicating with.

4.2. Protocol replay

If Alice’s initial message doesn’t use a one-time prekey, it may be replayed to Bob and he will accept it. This could cause Bob to think Alice had sent him the same message (or messages) repeatedly.

To mitigate this, a post-PQXDH protocol may wish to quickly negotiate a new encryption key for Alice based on fresh random input from Bob. This is the typical behavior of Diffie-Hellman-based ratcheting protocols [7].

Bob could attempt other mitigations, such as maintaining a blacklist of observed messages, or replacing old signed prekeys more rapidly. Analyzing these mitigations is beyond the scope of this document.

4.3. Replay and key reuse

Another consequence of the replays discussed in the previous section is that a successfully replayed initial message would cause Bob to derive the same SK in different protocol runs.

For this reason, any post-PQXDH protocol that uses SK to derive encryption keys MUST take measures to prevent catastrophic key reuse. For example, Bob could use a DH-based ratcheting protocol to combine SK with a freshly generated DH output to get a randomized encryption key [7].

4.4. Deniability

Informally, cryptographic deniability means that a protocol neither gives its participants a publishable cryptographic proof of the contents of their communication nor proof of the fact that they communicated. PQXDH, like X3DH, aims to provide both Alice and Bob deniablilty that they communicated with each other in a context where a “judge” who may have access to one or more party’s secret keys is presented with a transcript allegedly created by communication between Alice and Bob.

We focus on offline deniability because if either party is collaborating with a third party during protocol execution, they will be able to provide proof of their communication to such a third party. This limitation on “online” deniability appears to be intrinsic to the asynchronous setting [11].

PQXDH has some forms of cryptographic deniability. Motivated by the goals of X3DH, Brendel et al. [12] introduce a notion of 1-out-of-2 deniability for semi-honest parties and a “big brother” judge with access to all parties’ secret keys. Since either Alice or Bob can create a fake transcript using only their own secret keys, PQXDH has this deniability property. Vatandas, et al. [13] prove that X3DH is deniable in a different sense subject to certain “Knowledge of Diffie-Hellman Assumptions”. PQXDH is deniable in this sense for Alice, subject to the same assumptions, and we conjecture that it is deniable for Bob subject to an additional Plaintext Awareness (PA) assumption for pqkem. We note that Kyber uses a variant of the Fujisaki-Okamoto transform with implicit rejection [14] and is therefore not PA as is. However, in PQXDH, an AEAD ciphertext encrypted with the session key is always sent along with the Kyber ciphertext. This should offer the same guarantees as PA. We encourage the community to investigate the precise deniability properties of PQXDH.

These assertions all pertain to deniability in the classical setting. As discussed in [15] we expect that for future revisions of this protocol (that provide post-quantum mutual authentication) assertions about deniability against semi-honest quantum advsersaries will hold. Deniability in the face of malicious quantum adversaries requires further research.

4.5. Signatures

It might be tempting to omit the prekey signature after observing that mutual authentication and forward secrecy are achieved by the DH calculations. However, this would allow a “weak forward secrecy” attack: A malicious server could provide Alice a prekey bundle with forged prekeys, and later compromise Bob’s IKB to calculate SK.

Alternatively, it might be tempting to replace the DH-based mutual authentication (i.e. DH1 and DH2) with signatures from the identity keys. However, this reduces deniability, increases the size of initial messages, and increases the damage done if ephemeral or prekey private keys are compromised, or if the signature scheme is broken.

4.6. Key compromise

Compromise of a party’s private keys has a disastrous effect on security, though the use of ephemeral keys and prekeys provides some mitigation.

Compromise of a party’s identity private key allows impersonation of that party to others. Compromise of a party’s prekey private keys may affect the security of older or newer SK values, depending on many considerations.

A full analysis of all possible compromise scenarios is outside the scope of this document, however a partial analysis of some plausible scenarios is below:

  • If either an elliptic curve one-time prekey (OPKB) or a post-quantum key encapsulation one-time prekey (PQOPKB) are used for a protocol run and deleted as specified, then a compromise of Bob’s identity key and prekey private keys at some future time will not compromise the older SK.
  • If one-time prekeys were not used for a protocol run, then a compromise of the private keys for IKBSPKB, and PQSPKB from that protocol run would compromise the SK that was calculated earlier. Frequent replacement of signed prekeys mitigates this, as does using a post-PQXDH ratcheting protocol which rapidly replaces SK with new keys to provide fresh forward secrecy [7].
  • Compromise of prekey private keys may enable attacks that extend into the future, such as passive calculation of SK values, and impersonation of arbitrary other parties to the compromised party (“key-compromise impersonation”). These attacks are possible until the compromised party replaces his compromised prekeys on the server (in the case of passive attack); or deletes his compromised signed prekey’s private key (in the case of key-compromise impersonation).

4.7. Passive quantum adversaries

PQXDH is designed to prevent “harvest now, decrypt later” attacks by adversaries with access to a quantum computer capable of computing discrete logarithms in curve.

  • If an attacker has recorded the public information and the message from Alice to Bob, even access to a quantum computer will not compromise SK.
  • If a post-quantum key encapsulation one-time prekey (PQOPKB) is used for a protocol run and deleted as specified then compromise after deletion and access to a quantum computer at some future time will not compromise the older SK.
  • If post-quantum one-time prekeys were not used for a protocol run, then access to a quantum computer and a compromise of the private key for PQSPKB from that protocol run would compromise the SK that was calculated earlier. Frequent replacement of signed prekeys mitigates this, as does using a post-PQXDH ratcheting protocol which rapidly replaces SK with new keys to provide fresh forward secrecy [7].

4.8. Active quantum adversaries

PQXDH is not designed to provide protection against active quantum attackers. An active attacker with access to a quantum computer capable of computing discrete logarithms in curve can compute DH(PK1, PK2) and Sig(PK, M, Z) for all elliptic curve keys PK1PK2, and PK. This allows an attacker to impersonate Alice by using the quantum computer to compute the secret key corresponding to PKA then continuing with the protocol. A malicious server with access to such a quantum computer could impersonate Bob by generating new key pairs PQSPK’B and PQOPK’B, computing the secret key corresponding to PKB, then using PKB to sign the newly generated post-quantum KEM keys and delivering these attacker-generated keys in place of Bob’s post-quantum KEM key when Alice requests a prekey bundle.

It is tempting to consider adding a post-quantum identity key that Bob could use to sign the post-quantum prekeys. This would prevent the malicious server attack described above and provide Alice a cryptographic guarantee that she is communicating with Bob, but it does not provide mutual authentication. Bob does not have any cryptographic guarantee about who he is communicating with. The post-quantum KEM and signature schemes being standardized by NIST [16] do not provide a mechanism for post-quantum deniable mutual authentication, although this can be achieved through the use of a post-quantum ring signature or designated verifier signature [12][15]. We urge the community to work toward standardization of these or other mechanisms that will allow deniable mutual authentication.

4.9. Server trust

A malicious server could cause communication between Alice and Bob to fail (e.g. by refusing to deliver messages).

If Alice and Bob authenticate each other as in Section 4.1, then the only additional attack available to the server is to refuse to hand out one-time prekeys, causing forward secrecy for SK to depend on the signed prekey’s lifetime (as analyzed in Section 4.6).

This reduction in initial forward secrecy could also happen if one party maliciously drains another party’s one-time prekeys, so the server should attempt to prevent this (e.g. with rate limits on fetching prekey bundles).

4.10. Identity binding

Authentication as in Section 4.1 does not necessarily prevent an “identity misbinding” or “unknown key share” attack.

This results when an attacker (“Charlie”) falsely presents Bob’s identity key fingerprint to Alice as his (Charlie’s) own, and then either forwards Alice’s initial message to Bob, or falsely presents Bob’s contact information as his own. The effect of this is that Alice thinks she is sending an initial message to Charlie when she is actually sending it to Bob.

To make this more difficult the parties can include more identifying information into AD, or hash more identifying information into the fingerprint, such as usernames, phone numbers, real names, or other identifying information. Charlie would be forced to lie about these additional values, which might be difficult.

However, there is no way to reliably prevent Charlie from lying about additional values, and including more identity information into the protocol often brings trade-offs in terms of privacy, flexibility, and user interface. A detailed analysis of these trade-offs is beyond the scope of this document.

4.11. Risks of weak randomness sources

In addition to concerns about the generation of the keys themselves, the security of the PQKEM shared secret relies on the random source available to Alice’s machine at the time of running the PQKEM-ENC operation. This leads to a situation similar to what we face with a Diffie-Hellman exchange. For both Diffie-Hellman and Kyber, if Alice has weak entropy then the resulting shared secret will have low entropy when conditioned on Bob’s public key. Thus both the classical and post-quantum security of SK depend on the strength of Alice’s random source.

Kyber hashes Bob’s public key with Alice’s random bits to generate the shared secret, making Bob’s key contributory, as it is with a Diffie-Hellman key exchange. This does not reduce the dependence on Alice’s entropy source, as described above, but it does limit Alice’s ability to control the post-quantum shared secret. Not all KEMs make Bob’s key contributory and this is a property to consider when selecting pqkem.

5. IPR

This document is hereby placed in the public domain.

6. Acknowledgements

The PQXDH protocol was developed by Ehren Kret and Rolfe Schmidt as an extension of the X3DH protocol [6] by Moxie Marlinspike and Trevor Perrin. Thanks to Trevor Perrin for discussions on the design of this protocol.

Thanks to Bas Westerbaan, Chris Peikert, Daniel Collins, Deirdre Connolly, John Schanck, Jon Millican, Jordan Rose, Karthik Bhargavan, Loïs Huguenin-Dumittan, Peter Schwabe, Rune Fiedler, Shuichi Katsumata, Sofía Celi, and Yo’av Rieck for helpful discussions and editorial feedback.

Thanks to the Kyber team [17] for their work on the Kyber key encapsulation mechanism.

7. References

[1]

T. Perrin, “The XEdDSA and VXEdDSA Signature Schemes,” 2016. https://signal.org/docs/specifications/xeddsa/

[2]

“Module-lattice-based key-encapsulation mechanism standard.” https://nvlpubs.nist.gov/nistpubs/FIPS/NIST.FIPS.203.ipd.pdf

[3]

A. Langley, M. Hamburg, and S. Turner, “Elliptic Curves for Security.” Internet Engineering Task Force; RFC 7748 (Informational); IETF, Jan-2016. http://www.ietf.org/rfc/rfc7748.txt

[4]

H. Krawczyk and P. Eronen, “HMAC-based Extract-and-Expand Key Derivation Function (HKDF).” Internet Engineering Task Force; RFC 5869 (Informational); IETF, May-2010. http://www.ietf.org/rfc/rfc5869.txt

[5]

P. Rogaway, “Authenticated-encryption with Associated-data,” in Proceedings of the 9th ACM Conference on Computer and Communications Security, 2002. http://web.cs.ucdavis.edu/~rogaway/papers/ad.pdf

[6]

M. Marlinspike and T. Perrin, “The X3DH Key Agreement Protocol,” 2016. https://signal.org/docs/specifications/x3dh/

[7]

T. Perrin and M. Marlinspike, “The Double Ratchet Algorithm,” 2016. https://signal.org/docs/specifications/doubleratchet/

[8]

K. Cohn-Gordon, C. Cremers, B. Dowling, L. Garratt, and D. Stebila, “A formal security analysis of the signal messaging protocol,” J. Cryptol., vol. 33, no. 4, 2020. https://doi.org/10.1007/s00145-020-09360-1

[9]

T. Okamoto and D. Pointcheval, “The gap-problems: A new class of problems for the security of cryptographic schemes,” in Proceedings of the 4th international workshop on practice and theory in public key cryptography: Public key cryptography, 2001.

[10]

A. Langlois and D. Stehlé, “Worst-case to average-case reductions for module lattices,” Des. Codes Cryptography, vol. 75, no. 3, Jun. 2015. https://doi.org/10.1007/s10623-014-9938-4

[11]

N. Unger and I. Goldberg, “Deniable Key Exchanges for Secure Messaging,” in Proceedings of the 22nd ACM SIGSAC Conference on Computer and Communications Security, 2015. https://cypherpunks.ca/~iang/pubs/dake-ccs15.pdf

[12]

J. Brendel, R. Fiedler, F. Günther, C. Janson, and D. Stebila, “Post-quantum asynchronous deniable key exchange and the signal handshake,” in Public-key cryptography – PKC 2022 – 25th IACR international conference on practice and theory of public-key cryptography, virtual event, march 8-11, 2022, proceedings, part II, 2022, vol. 13178. https://doi.org/10.1007/978-3-030-97131-1_1

[13]

N. Vatandas, R. Gennaro, B. Ithurburn, and H. Krawczyk, “On the cryptographic deniability of the signal protocol,” in Applied cryptography and network security – 18th international conference, ACNS 2020, rome, italy, october 19-22, 2020, proceedings, part II, 2020, vol. 12147. https://doi.org/10.1007/978-3-030-57878-7_10

[14]

D. Hofheinz, K. Hövelmanns, and E. Kiltz, “A modular analysis of the fujisaki-okamoto transformation,” in Theory of cryptography – 15th international conference, TCC 2017, baltimore, MD, USA, november 12-15, 2017, proceedings, part I, 2017, vol. 10677. https://doi.org/10.1007/978-3-319-70500-2_12

[15]

K. Hashimoto, S. Katsumata, K. Kwiatkowski, and T. Prest, “An efficient and generic construction for signal’s handshake (X3DH): Post-quantum, state leakage secure, and deniable,” J. Cryptol., vol. 35, no. 3, 2022. https://doi.org/10.1007/s00145-022-09427-1

[16]

NIST, “Post-quantum cryptography.” https://csrc.nist.gov/Projects/post-quantum-cryptography

[17]

“Kyber key encapsulation mechanism.” https://pq-crystals.org/kyber/

Source :
https://signal.org/docs/specifications/pqxdh/

18 Tips to Improve the Remote Network Security of Your Business

30.07.2023

Post-COVID-19, with the rise of remote work, business network security has become paramount. The rapid shift to remote work unveiled numerous network vulnerabilities, risking data breaches, financial losses, and reputational harm. 

No longer is a simple firewall enough; today’s remote security includes technologies from VPNs to cloud measures and the zero-trust model. Besides these tools, it’s crucial to recognize risks, such as shared passwords, outdated software, and insecure personal devices. 

Here are some of the best tips to enhance your business’s remote security, guaranteeing safe and streamlined operations.

What is Business Remote Network Security? 

Business remote network security encompasses measures safeguarding a company’s digital assets accessed from remote locations. Securing these connections has become paramount with the growth of remote work and evolving digital landscapes.

Who is Responsible for Remote Network Security?

The responsibility for ensuring that your remote network stays secure primarily rests with SecOps. They can combat cybersecurity risks via strong access controls, monitor remote access, update rules, and test remote access operations.

Cybersecurity teams now lead and manage secure remote access policies, processes, and technologies, though traditionally, it’s a network team’s role.

SecOps has gained prominence amid increasing cyber threats and a remote workforce. Their roles include:

  • Sharing passwords
  • Usage of software that breaches an organization’s security standards
  • Personal devices without encryption 
  • Negligible or absent patching practices

Key attributes of a proficient SecOps team include:

  1. Diverse expertise: SecOps teams boast a mix of professionals.
  2. Advanced tools: They use cutting-edge tools for real-time monitoring and quick threat detection and response.
  3. Cloud security managementSecure and manage cloud resources.
  4. Automation and AI integration: Use automation and AI to address modern threats quickly.
  5. Adherence to best practices: SecOps teams follow best practices, staying proactive against emerging threats.

How Does Remote Network Security Work? 

Remote network security allows users to access resources anywhere without risking data or network integrity. 

  1. The basics of remote access: Users must install the remote software on the target devices. Once active, users log in, choose the target device, and its screen gets mirrored.
  2. Securing endpoints: Secure all endpoints (PCs, smartphones) on networks with updated antivirus and adherence to security guidelines. Equip employees with tools and knowledge for protection.
  3. Minimizing attack surfaces: Remote access, while convenient, introduces vulnerabilities. Ransomware, for example, frequently targets remote desktop protocols (RDP). It’s essential to configure firewalls to respond only to known IP addresses.
  4. Implementing multi-factor authentication (MFA): MFA enhances security with multiple identifiers like passwords and tokens, granting access to verified users only.
  5. Using VPNs: VPNs secure connections on public Wi-Fi but update software to prevent vulnerabilities.
  6. Monitoring and logging: For remote work, update SIEM and firewall to handle home logins. Record and monitor all remote sessions in real-time, triggering alerts for suspicious activity.
  7. User education: Informed users significantly bolster cyber defenses. Employees require training to spot threats.
  8. Policy updates and role-based access control (RBAC): Updating policies across all devices is vital. Also, it’s important to grant access based on roles.

Why is Remote Network Security Important?

Robust remote network security is essential as businesses embrace remote work’s benefits, like flexibility and cost savings, while facing significant cybersecurity challenges. 

Protecting data and operations in remote work is vital for business continuity and reputation. Companies must prioritize safeguarding digital assets and networks from threats and breaches.

  1. Unprecedented growth in remote work: Over the last 5 years, remote work has grown by 44%, challenging traditional corporate network security perimeters as operations expand online.
  2. Vulnerability to data breaches: Remote work surge led to more data breaches. Proxyrack found healthcare breaches costing $9.23 million and the finance sector averaging $5.27 million.
  3. Targeted attacks: The U.S. faces 7,221,177 incidents per million people, the highest globally. The average breach cost for U.S. companies is $9,050,000.
  4. More than just financial loss: Data breaches inflict enduring financial and reputational harm, eroding customer trust. To preserve brand integrity and loyalty, companies must prioritize cybersecurity.
  5. The human element: Remote employees are vulnerable to cyberattacks due to personal devices and unsecured networks. Mistakes like phishing or weak passwords risk breaches.
  6. The need for proactive defense: Businesses need a proactive approach to tackle remote data breaches: train employees, use secure clouds, and update technology and systems.

Advantages of Remote Network Security

Securing your remote networks offers significant advantages to businesses, particularly in an era marked by escalating cyber crimes and the rise of remote work. Let’s explore the four main benefits of implementing robust security measures.

Secure Your Network Everywhere, on Any Device

Remote network security protects data and systems, blocking unauthorized access from the company or personal devices.

Improved Endpoint Protection

Vulnerable endpoints, such as laptops and smartphones, attract cybercriminals. Maintaining the security of your networks ensures all endpoints remain protected. We use VPNs, multi-factor authentication, and security tools to reinforce endpoint safety.

Secure Web Access for All Employees

Employees frequently access online company resources. This security encrypts online interactions, granting access only to authorized users.

Raise Awareness of Security Issues

Empowering employees with remote security fosters cyber awareness. Training, updates, and drills cultivate a vigilant defense against threats.

18 Tips to Improve Your Remote Network Security

The digital shift has propelled many businesses towards a remote work model. With this evolution comes a heightened need to prioritize the security of your remote networks. 

Here are 18 strategies to bolster your defenses:

Protect Endpoints for All Remote Users

Secure all devices connecting to the network to reduce breach risks.

Reduce Attack Surface in Remote Work

Frequently update and patch software. Also, practice access limitation.

Use Multi-Factor Authentication

Strengthen security by mandating multiple identification forms before granting access.

Use Password Managers

Urge employees to adopt password managers.

Implement Single Sign-on Technology

Streamline login: utilize a single set of credentials for multiple applications.

Use VPNs

By encrypting internet traffic, Virtual Private Networks ensure confidential data transmission.

Adjust Logs and Security Information Tracking

Consistently revise and refresh logs to pinpoint and address anomalous or unauthorized actions.

Educate Your Employees and Contractors

Equip everyone with knowledge on contemporary cybersecurity threats and best practices to foster an informed, watchful team.

Create Clear Remote Work Policies

Craft clear-cut rules guiding employees’ interaction with company resources during remote work.

Build Intrusion Prevention and Detection Systems

Set up systems to check the network for malevolent activities. This ensures you’re using preventive measures against detected threats.

Use Firewalls

Position firewalls as protective barriers, scrutinizing incoming and outgoing traffic to safeguard against potential risks.

Encrypt and Back-up Data

Prioritize encryption of sensitive data and consistently back up crucial information to avert data loss.

Use Secure Software

Opt for reputable software that aligns with the organizational security benchmarks.

Implement an Identity Access and Management (Iam) Framework

With IAM, manage user identities and their access rights, ensuring that only vetted individuals can tap into particular resources.

Build Service-Level Agreements With Third-Party Vendors

Hold third-party associates to the same security standards as your company.

Ensure Mobile Security

Prioritize mobile device security as usage rises, safeguarding organizational data access.

Implement Direct Application Access Processes

Let users directly access applications without jeopardizing the security of the primary network.

Secure Specific Remote Work Devices

Ensuring the security of devices designated for remote work goes beyond the hardware; it’s about integrating sound policies, technologies, and procedures. 

Here’s a concise breakdown:

  • Criteria: Establish straightforward criteria for determining which employees are eligible for remote access.
  • Technologies & features: Opt for secure technologies offering valuable features like encryption.
  • IT resource access: Deploy specific IT assets.
  • Network resources: Guarantees a secure connection.
  • IT personnel: Assign dedicated staff.
  • Emergency protocols: Have a quick response strategy for emergencies like security breaches.
  • Integration: Integrate remote access security with other data protection measures.

Technologies Used for Business Remote Network Security

In the evolving landscape of remote work, businesses leverage advanced technologies to fortify their network security. These technologies protect sensitive data and ensure seamless operations across distributed teams. 

Here’s a closer look at some of the pivotal technologies in use:

Endpoint Security

Endpoint security safeguards all user devices in a network, which is crucial for remote work and personal device use. It defends against cyber threats, ensuring data integrity.

Virtual Private Networks (VPN)

Business VPNs safeguard data between user devices and the company’s network, which is vital for remote workers accessing company resources securely.

Zero Trust Network Access (ZTNA)

ZTNA: “Never trust, always verify” principle replaces perimeters. Every user and device is verified for network access. It’s not a VPN alternative, the two work hand in hand to secure your assets.

Network Access Control

The technology assesses and enforces network access policies based on device health, update status, and more for compliance.

Single Sign-on

SSO simplifies login across apps, enhances convenience, saves time, and reduces password-related breaches.

Secure Access Service Edge (SASE)

SASE: Cloud-based service combining network and security functions for modern businesses.

The Future of Business Security in a Remote World

The digital age demands remote network security for businesses. Global events shift to remote work and expose traditional vulnerabilities. This article provides insights and actionable tips on securing your networks to bolster your business operations. 

With evolving technology come evolving threats. To keep your business secure and efficient, stay informed, proactive, and adaptable to emerging challenges. By adopting these tools and strategies, you’ll confidently navigate the future of remote work securely.

Looking for a secure and seamless digital future for your business? Click here to book a consultation and enjoy strengthened security, tailor-made remote work solutions, and a robust digital infrastructure.

Source :
https://www.perimeter81.com/blog/network/business-remote-network-security

Cloud VPN vs. Traditional VPN: Which One’s Best for Your Business?

16.08.2023

Are you struggling to decide between a cloud VPN vs. traditional VPN for your business? 

You’re not alone. Many companies grapple with this decision, still determining which option best meets their needs.

The pain of making the wrong choice is real. Opt for a solution that doesn’t align with your business needs, and you could face slow connection speeds, increased security risks, or even inflated costs. Worse, you might be locked into a solution that doesn’t scale with your business, leading to even more headaches.

The world of VPNs can be complex and confusing, with each type boasting its features, benefits, and drawbacks. It’s easy to feel overwhelmed, unsure of which path to take.

In this article, we’ll demystify the differences between cloud VPN vs. traditional VPN, providing you with the information you need to make an informed decision. We’ll explore how each type works, its advantages, and its key differences. 

What is a Cloud VPN? 

Cloud VPN is a service that provides secure and private internet access to users. Cloud VPNs are hosted in the cloud, meaning they can be accessed from anywhere worldwide, making them an ideal choice for businesses with a remote workforce or multiple office locations.

Cloud VPNs are more scalable, flexible, and efficient than their traditional counterparts. They can quickly adapt to the needs of businesses, whether it’s accommodating growth, supporting mobile devices, or providing global accessibility. 

This adaptability makes Cloud VPNs popular for companies looking to secure their data without sacrificing convenience or performance.

How Do Cloud VPNs Work?

Cloud VPNs create a secure pathway, an encrypted tunnel, between the user’s device and the internet. This tunnel acts as a safe conduit for data to travel, ensuring that all information passing through it’s protected from external threats such as hackers or malware.

When users connect to a Cloud VPN, their device communicates with the VPN server in the cloud. The server then encrypts the user’s data before it’s sent over the internet. This encryption makes the data unreadable to anyone who might intercept it, ensuring its security.

A Cloud VPN also masks the user’s IP address, replacing it with the IP address of the VPN server. This provides an additional layer of privacy, preventing third parties from tracking the user’s online activities or determining their physical location.

Types of Cloud VPNs

Businesses come in all shapes and sizes, and so do their networking needs. That’s why Cloud VPNs are versatile, offering different types to suit various requirements. Here are the two main types of Cloud VPNs:

Remote Access VPNs 

Designed for the modern workforce, these VPNs allow individual users to securely access a private network from anywhere. Ideal for remote workers or teams spread across multiple locations, they ensure secure access to company resources.

Site-to-Site Connection VPNs

Site-to-site connection VPNs connect entire networks, providing a secure bridge for data to travel between different office locations or between a business and its partners or clients. Ideal for companies with multiple office locations.

The Main Benefits of Cloud VPNs 

Cloud VPNs offer several advantages over traditional VPNs. These include:

Direct Cloud Access

Cloud VPNs provide direct access to cloud services, reducing latency and improving performance.

Global Accessibility

They are hosted in the cloud and can be accessed from anywhere worldwide.

Flexibility 

They can be easily scaled up or down based on the needs of the business.

Scalability 

They can support many users without the need for significant hardware investment.

Mobile Support

They are designed to work well with mobile devices, supporting the modern mobile workforce.

Cost Efficiency 

They eliminate the need for expensive hardware and maintenance costs associated with traditional VPNs.

What is a Traditional VPN (remote VPN)?

A traditional VPN, also known as a remote VPN, is a technology that creates a secure connection over a less secure network between the user’s computer and a private network. 

Remote workers widely use this technology to access company resources they wouldn’t otherwise be able to reach. It’s also used by individuals who want to ensure their online activity is private and secure.

How Do Remote VPNs Work?

A cloud VPN vs. traditional VPN comparison reveals how remote VPNs function. These systems create a secure tunnel between the user’s device and the VPN server. The data traveling through this tunnel is encrypted, offering a safe method for transmitting information between the remote user and the company network.

The VPN server, acting as a go-between, conceals your IP address and gives the impression that your traffic originates from its IP address. This covers your online activities from your ISP and creates the illusion that you’re located where the VPN server is. This can be particularly useful for accessing content that is region-restricted.

In a hosted VPN service, the server is maintained by a third-party provider, reducing the burden on your IT resources.

Advantages of Traditional VPNs

Traditional VPNs offer several benefits, including:

  • Security: Traditional VPNs use advanced encryption protocols to secure your data, protecting your information from hackers and other cyber threats.
  • Privacy: By masking your IP address, a VPN ensures that your online activities remain private.
  • Remote access: VPNs allow remote workers to securely access their company’s network from anywhere in the world.
  • Bypassing geo-restrictions: VPNs can make it appear as though you’re browsing from a different location, allowing you to access content that may be region-locked.
  • Cost-effective: Many VPN services are available at a relatively low cost, and the security benefits they provide can save businesses money in the long run by preventing data breaches.

Cloud VPN vs. Traditional VPN: the Main Differences

Regarding cloud VPN vs. traditional VPN, it’s essential to understand that both have strengths and weaknesses. However, the transition from traditional VPN to cloud VPN has really underscored how good the cloud is at addressing the limitations of traditional VPN technologies.

Cloud VPNs eliminate network choke points by allowing users to connect directly to the required network, whether cloud-based or on-premises. This direct connection reduces bandwidth consumption and latency, enhancing user experience. 

Also, cloud VPNs centralize remote access security, simplifying setting up and maintaining security policies across all cloud platforms.

Unlike traditional VPNs, which have hard limits on bandwidth and user numbers, cloud VPNs can scale to meet changing business requirements. Still, as we delve deeper into the differences, you’ll see that the choice between cloud and traditional VPNs depends on your business’s needs.

Features 

Cloud VPNs are known for their scalability, cost-efficiency, and enhanced security features. They’re implemented as cloud-based services, making them more flexible and globally accessible. On the other hand, traditional VPNs are network appliances that provide secure, remote access to company networks but may lack the flexibility and scalability of their cloud counterparts.

Performance

Performance is a key differentiator. Cloud VPNs, running in data centers, offer high-speed connections not limited by network speed, unlike hardware VPNs. They also eliminate backhaul, allowing users to connect directly to cloud-based networks, improving network performance and reducing latency.

Support

In terms of support, Cloud VPNs have an edge. They can quickly adopt new security features and vulnerability patches, making them more secure than on-premise VPNs. Traditional VPNs, however, may require more time and resources to implement such updates.

Pricing 

Pricing is a significant factor in cloud VPN vs. traditional VPN. Cloud VPNs are generally more affordable, with usage-based VPN-as-a-Service (VPNaaS) fees being more cost-effective than the expenses associated with deploying, maintaining, and upgrading VPN hardware.

So, Which Should You Choose: A Cloud Vpn or a Traditional Vpn?

Choosing between a cloud VPN vs. a traditional VPN for your business largely depends on your specific needs and circumstances. However, it’s crucial to consider the evolution of technology and the increasing demand for robust, flexible, and secure networking solutions.

Cloud VPNs offer a more flexible and scalable solution than traditional VPNs. On the other hand, traditional VPNs have been a staple in the security landscape for decades.

However, as businesses adapt to an increasingly digital landscape, the demand for secure, remote access to resources is rising. This has led to the emergence of alternatives to both cloud VPN and traditional VPN. 

Two such alternatives are:

  • Zero Trust Network Access (ZTNA)This modern approach to network access enhances security by verifying every connection attempt and limiting access privileges to only what users need to perform their tasks. This reduces the risk of data breaches and ensures a secure network environment.
  • Software-Defined Perimeter (SDP): Offering a flexible, scalable, and secure solution, the SDP model creates a dynamic, individualized perimeter for each user. This adaptability ensures robust security without compromising user experience, making it an attractive business option.

We offer a comprehensive solution that implements the Zero Trust model, providing businesses with a secure, flexible, and scalable alternative to both Cloud VPN and Traditional VPN. This solution combines the strengths of both ZTNA and SDP, ensuring that your business is equipped with the most robust and adaptable network security measures available today.

Ready to secure your business’s digital infrastructure and enhance your network’s performance? Want to benefit from a solution that aligns with your specific needs? Book a demo today!

Source :
https://www.perimeter81.com/blog/network/cloud-vpn-vs-traditional-vpn

8 Essential Tips for Data Protection and Cybersecurity in Small Businesses

Michelle Quill — June 6, 2023

Small businesses are often targeted by cybercriminals due to their lack of resources and security measures. Protecting your business from cyber threats is crucial to avoid data breaches and financial losses.

Why is cyber security so important for small businesses?

Small businesses are particularly in danger of cyberattacks, which can result in financial loss, data breaches, and damage to IT equipment. To protect your business, it’s important to implement strong cybersecurity measures.

Here are some tips to help you get started:

One important aspect of data protection and cybersecurity for small businesses is controlling access to customer lists. It’s important to limit access to this sensitive information to only those employees who need it to perform their job duties. Additionally, implementing strong password policies and regularly updating software and security measures can help prevent unauthorized access and protect against cyber attacks. Regular employee training on cybersecurity best practices can also help ensure that everyone in the organization is aware of potential threats and knows how to respond in the event of a breach.

When it comes to protecting customer credit card information in small businesses, there are a few key tips to keep in mind. First and foremost, it’s important to use secure payment processing systems that encrypt sensitive data. Additionally, it’s crucial to regularly update software and security measures to stay ahead of potential threats. Employee training and education on cybersecurity best practices can also go a long way in preventing data breaches. Finally, having a plan in place for responding to a breach can help minimize the damage and protect both your business and your customers.

Small businesses are often exposed to cyber attacks, making data protection and cybersecurity crucial. One area of particular concern is your company’s banking details. To protect this sensitive information, consider implementing strong passwords, two-factor authentication, and regular monitoring of your accounts. Additionally, educate your employees on safe online practices and limit access to financial information to only those who need it. Regularly backing up your data and investing in cybersecurity software can also help prevent data breaches.

Small businesses are often at high risk of cyber attacks due to their limited resources and lack of expertise in cybersecurity. To protect sensitive data, it is important to implement strong passwords, regularly update software and antivirus programs, and limit access to confidential information.

It is also important to have a plan in place in case of a security breach, including steps to contain the breach and notify affected parties. By taking these steps, small businesses can better protect themselves from cyber threats and ensure the safety of their data.

Tips for protecting your small business from cyber threats and data breaches are crucial in today’s digital age. One of the most important steps is to educate your employees on cybersecurity best practices, such as using strong passwords and avoiding suspicious emails or links.

It’s also important to regularly update your software and systems to ensure they are secure and protected against the latest threats. Additionally, implementing multi-factor authentication and encrypting sensitive data can add an extra layer of protection. Finally, having a plan in place for responding to a cyber-attack or data breach can help minimize the damage and get your business back on track as quickly as possible.

Small businesses are attackable to cyber-attacks and data breaches, which can have devastating consequences. To protect your business, it’s important to implement strong cybersecurity measures. This includes using strong passwords, regularly updating software and systems, and training employees on how to identify and avoid phishing scams.

It’s also important to have a data backup plan in place and to regularly test your security measures to ensure they are effective. By taking these steps, you can help protect your business from cyber threats and safeguard your valuable data.

To protect against cyber threats, it’s important to implement strong data protection and cybersecurity measures. This can include regularly updating software and passwords, using firewalls and antivirus software, and providing employee training on safe online practices. Additionally, it’s important to have a plan in place for responding to a cyber attack, including backing up data and having a designated point person for handling the situation.

In today’s digital age, small businesses must prioritize data protection and cybersecurity to safeguard their operations and reputation. With the rise of remote work and cloud-based technology, businesses are more vulnerable to cyber attacks than ever before. To mitigate these risks, it’s crucial to implement strong security measures for online meetings, advertising, transactions, and communication with customers and suppliers. By prioritizing cybersecurity, small businesses can protect their data and prevent unauthorized access or breaches.

Here are 8 essential tips for data protection and cybersecurity in small businesses.

8 Essential Tips for Data Protection and Cybersecurity in Small Businesses

1. Train Your Employees on Cybersecurity Best Practices

Your employees are the first line of defense against cyber threats. It’s important to train them on cybersecurity best practices to ensure they understand the risks and how to prevent them. This includes creating strong passwords, avoiding suspicious emails and links, and regularly updating software and security systems. Consider providing regular training sessions and resources to keep your employees informed and prepared.

2. Use Strong Passwords and Two-Factor Authentication

One of the most basic yet effective ways to protect your business from cyber threats is to use strong passwords and two-factor authentication. Encourage your employees to use complex passwords that include a mix of letters, numbers, and symbols, and to avoid using the same password for multiple accounts. Two-factor authentication adds an extra layer of security by requiring a second form of verification, such as a code sent to a mobile device, before granting access to an account. This can help prevent unauthorized access even if a password is compromised.

3. Keep Your Software and Systems Up to Date

One of the easiest ways for cybercriminals to gain access to your business’s data is through outdated software and systems. Hackers are constantly looking for vulnerabilities in software and operating systems, and if they find one, they can exploit it to gain access to your data. To prevent this, make sure all software and systems are kept up-to-date with the latest security patches and updates. This includes not only your computers and servers but also any mobile devices and other connected devices used in your business. Set up automatic updates whenever possible to ensure that you don’t miss any critical security updates.

4. Use Antivirus and Anti-Malware Software

Antivirus and anti-malware software are essential tools for protecting your small business from cyber threats. These programs can detect and remove malicious software, such as viruses, spyware, and ransomware before they can cause damage to your systems or steal your data. Make sure to install reputable antivirus and anti-malware software on all devices used in your business, including computers, servers, and mobile devices. Keep the software up-to-date and run regular scans to ensure that your systems are free from malware.

5. Backup Your Data Regularly

One of the most important steps you can take to protect your small business from data loss is to back up your data regularly. This means creating copies of your important files and storing them in a secure location, such as an external hard drive or cloud storage service. In the event of a cyber-attack or other disaster, having a backup of your data can help you quickly recover and minimize the impact on your business. Make sure to test your backups regularly to ensure that they are working properly and that you can restore your data if needed.

6. Carry out a risk assessment

Small businesses are especially in peril of cyber attacks, making it crucial to prioritize data protection and cybersecurity. One important step is to assess potential risks that could compromise your company’s networks, systems, and information. By identifying and analyzing possible threats, you can develop a plan to address security gaps and protect your business from harm.

For Small businesses making data protection and cybersecurity is a crucial part. To start, conduct a thorough risk assessment to identify where and how your data is stored, who has access to it, and potential threats. If you use cloud storage, consult with your provider to assess risks. Determine the potential impact of breaches and establish risk levels for different events. By taking these steps, you can better protect your business from cyber threats

7. Limit access to sensitive data

One effective strategy is to limit access to critical data to only those who need it. This reduces the risk of a data breach and makes it harder for malicious insiders to gain unauthorized access. To ensure accountability and clarity, create a plan that outlines who has access to what information and what their roles and responsibilities are. By taking these steps, you can help safeguard your business against cyber threats.

8. Use a firewall

For Small businesses, it’s important to protect the system from cyber attacks by making data protection and reducing cybersecurity risk. One effective measure is implementing a firewall, which not only protects hardware but also software. By blocking or deterring viruses from entering the network, a firewall provides an added layer of security. It’s important to note that a firewall differs from an antivirus, which targets software affected by a virus that has already infiltrated the system.

Small businesses can take steps to protect their data and ensure cybersecurity. One important step is to install a firewall and keep it updated with the latest software or firmware. Regularly checking for updates can help prevent potential security breaches.

Conclusion

Small businesses are particularly vulnerable to cyber attacks, so it’s important to take steps to protect your data. One key tip is to be cautious when granting access to your systems, especially to partners or suppliers. Before granting access, make sure they have similar cybersecurity practices in place. Don’t hesitate to ask for proof or to conduct a security audit to ensure your data is safe.

Source :
https://onlinecomputertips.com/support-categories/networking/tips-for-cybersecurity-in-small-businesses/

Tailing Big Head Ransomware’s Variants, Tactics, and Impact

By: Ieriz Nicolle Gonzalez, Katherine Casona, Sarah Pearl Camiling
July 07, 2023

We analyze the technical details of a new ransomware family named Big Head. In this entry, we discuss the Big Head ransomware’s similarities and distinct markers that add more technical details to initial reports on the ransomware.

Reports of a new ransomware family and its variant named Big Head emerged in May, with at least two variants of this family being documented. Upon closer examination, we discovered that both strains shared a common contact email in their ransom notes, leading us to suspect that the two different variants originated from the same malware developer. Looking into these variants further, we  uncovered a significant number of versions of this malware. In this entry, we go deeper into the routines of these variants, their similarities and differences, and the potential impact of these infections when abused for attacks.

Analysis

In this section, we go expound on the three samples of Big Head we found, as well as their distinct functions and routines. While we continue to investigate and track this threat, we also highly suspect that all three samples of the Big Head ransomware are distributed via malvertisement as fake Windows updates and fake Word installers.

First sample

fig1-big-head-ransomware-variants-tactics-impact-worldwind-stealer-neshta
Figure 1. The infection routine of the first Big Head ransomware sample

The first sample of Big Head ransomware (SHA256: 6d27c1b457a34ce9edfb4060d9e04eb44d021a7b03223ee72ca569c8c4215438, detected by Trend Micro as Ransom.MSIL.EGOGEN.THEBBBC) featured a .NET compiled binary file. This binary checks the mutex name 8bikfjjD4JpkkAqrz using CreateMutex and terminates itself if the mutex name is found.

fig2-big-head-ransomware-variants-tactics-impact-worldwind-stealer-neshta
Figure 2. Calling CreateMutex function
fig3-big-head-ransomware-variants-tactics-impact-worldwind-stealer-neshta
Figure 3. MTX value “8bikfjjD4JpkkAqrz”

The sample also has a list of configurations containing details related to the installation process. It specifies various actions such as creating a registry key, checking the existence of a file and overwriting it if necessary, setting system file attributes, and creating an autorun registry entry. These configuration settings are separated by the pipe symbol “|” and are accompanied by corresponding strings that define the specific behavior associated with each action.

fig4-big-head-ransomware-variants-tactics-impact-worldwind-stealer-neshta
Figure 4. List of configurations

The format that the malware adheres to in terms of its behavior upon installation is as follows:

[String ExeName] [bool StartProcess] [bool CheckFileExists] [bool SetSystemAttribute] [String FilePath] [bool SetRegistryKey] [None]

Additionally, we noted the presence of three resources that contained data resembling executable files with the “*.exe” extension:

  • 1.exe drops a copy of itself for propagation. This is a piece of ransomware that checks for the extension “.r3d” before encrypting and appending the “.poop” extension.
  • Archive.exe drops a file named teleratserver.exe, a Telegram bot responsible for establishing communication with the threat actor’s chatbot ID.
  • Xarch.exe drops a file named BXIuSsB.exe, a piece of ransomware that encrypts files and encodes file names to Base64. It also displays a fake Windows update to deceive the victim into thinking that the malicious activity is a legitimate process.

These binaries are encrypted, rendering their contents inaccessible without the appropriate decryption mechanism.

fig5-big-head-ransomware-variants-tactics-impact-worldwind-stealer-neshta
Figure 5. Three resources found in the main sample
fig6-big-head-ransomware-variants-tactics-impact-worldwind-stealer-neshta
Figure 6. The encrypted content of one of the files located within the resource section (“1.exe”)

To extract the three binaries from the resources, the malware employs AES decryption with the electronic codebook (ECB) mode. This decryption process requires an initialization vector (IV) for proper decryption.

It is also noteworthy that the decryption key used is derived from the MD5 hash of the mutex 8bikfjjD4JpkkAqrz. This mutex is a hard-coded string value wherein its MD5 hash is used to decrypt the three binaries 1.exe, archive.exe, and Xarch.exe. It is important to note that the MTX value and the encrypted resources are different per sample.

We manually decrypted the content within each binary by exclusively utilizing the MD5 hash of the mutant name. Once this step was completed, we proceeded with the AES decryption to decrypt the encrypted resource file. 

fig7-big-head-ransomware-variants-tactics-impact-worldwind-stealer-neshta
Figure 7. Code for decrypting the three binaries (top) and the decrypted binary file that came from the parent file (bottom)

The following table shows the details of the binaries dropped by the decrypted malware using the MTX value 8bikfjjD4JpkkAqrz. These three binaries exhibit similarities with the parent sample in terms of code structure and binary extraction:

File nameBytesDropped file
1.exe2334881.exe
archive.exe12843536teleratserver.exe
Xarch.exe65552BXIuSsB.exe
fig8-big-head-ransomware-variants-tactics-impact-worldwind-stealer-neshta
Figure 8. 1.exe (left), teleratserver.exe (middle), and BXIuSsB.exe (right)

Binaries

This section details the binaries dropped, as identified from the previous table, and the first binary, 1.exe, was dropped by the parent sample.

            1.      Binary: 1.exe
                    Bytes: 222224
                    MTX value that was used to decrypt this file: 2AESRvXK5jbtN9Rvh

Initially, the file will hide the console window by using WinAPI ShowWindow with SW_HIDE (0). The malware will create an autorun registry key, which allows it to execute automatically upon system startup. Additionally, it will make a copy of itself, which it will save as discord.exe in the <%localappdata%> folder in the local machine.

fig9-big-head-ransomware-variants-tactics-impact-worldwind-stealer-neshta
Figure 9. ShowWindow API code hides the window of the current process (top) and the creation of the registry key and drops a copy of itself as “discord.exe” (bottom)

The Big Head ransomware checks for the victim’s ID in %appdata%\ID. If the ID exists, the ransomware verifies the ID and reads the content. Otherwise, it creates a randomly generated 40-character string and writes it to the file %appdata%\ID as a type of infection marker to identify its victims.

fig10-big-head-ransomware-variants-tactics-impact-worldwind-stealer-neshta
Figure 10. Randomly generating the 40-character string ID (top) and file named ID saved in the “<%appdata%>” folder (bottom)

The observed behavior indicates that files with the extension “.r3d” are specifically targeted for encryption using AES, with the key derived from the SHA256 hash of “123” in cipher block chaining (CBC) mode. As a result, the encrypted files end up having the “.poop” extension appended to them.

fig11-big-head-ransomware-variants-tactics-impact-worldwind-stealer-neshta
Figure 11. The malware checks for the extension that contains “.r3d” before encrypting and appending the ”.poop” extension (top) and the file encryption process when the file extension “.r3d” exists (bottom).

In this file, we also observed how the ransomware deletes its shadow copies. The command used to delete shadow copies and backups, which is also used to disable the recovery option is as follows:

/c vssadmin delete shadows /all /quiet & wmic shadowcopy delete & bcdedit /set {default} bootstatuspolicy ignoreallfailures & bcdedit /set {default} recoveryenabled no & wbadmin delete catalog -quiet

It drops the ransom note on the desktop, subdirectories, and the %appdata% folder. The Big Head ransomware also changes the wallpaper of the victim’s machine. 

fig12-big-head-ransomware-variants-tactics-impact-worldwind-stealer-neshta
Figure 12. Ransom note of the “1.exe” binary
fig13-big-head-ransomware-variants-tactics-impact-worldwind-stealer-neshta
Figure 13. The wallpaper that appears on the victim’s machine

Lastly, it will execute the command to open a browser and access the malware developer’s Telegram account at hxxps[:]//t[.]me/[REDACTED]_69. Our analysis showed no particular action or communication being exchanged with this account in addition to the redirection.

        2.     Binary: teleratserver.exe
                Bytes: 12832480
                MTX value that was used to decrypt this file: OJ4nwj2KO3bCeJoJ1

Teleratserver is a 64-bit Python-compiled binary that acts as a communication channel between the threat actor and the victim via Telegram. It accepts the commands “start”, “help”, “screenshot”, and “message”.

fig14-big-head-ransomware-variants-tactics-impact-worldwind-stealer-neshta
Figure 14. Decompiled Python script from the binary

    3.      Binary: BXIuSsB.exe
             Bytes: 54288
             MTX value that was used to decrypt this file: gdmJp5RKIvzZTepRJ

The malware displays a fake Windows Update UI to deceive the victim into thinking that the malicious activity is a legitimate software update process, with the percentage of progress in increments of 100 seconds.

fig15-big-head-ransomware-variants-tactics-impact-worldwind-stealer-neshta
Figure 15. The code responsible for fake update (left) and the fake update shown to the user (right)

The malware terminates itself if the user’s system language matches the  Russian, Belarusian, Ukrainian, Kazakh, Kyrgyz, Armenian, Georgian, Tatar, and Uzbek country codes. The malware also disables the Task Manager to prevent users from terminating or investigating its process.

fig16-big-head-ransomware-variants-tactics-impact-worldwind-stealer-neshta
Figure 16. The “KillCtrlAltDelete” command responsible for disabling the Task Manager

The malware drops a copy of itself in the hidden folder <%temp%\Adobe> that it created, then creates an entry in the RunOnce registry key, ensuring that it will only run once at the next system startup.

fig17-big-head-ransomware-variants-tactics-impact-worldwind-stealer-neshta
Figure 17. Creation of AutoRun registry

The malware also randomly generates a 32-character key that will later be used to encrypt files. This key will then be encrypted using RSA-2048 with a hard-coded public key.

The ransomware then drops the ransom note that includes the encrypted key.

fig18-big-head-ransomware-variants-tactics-impact-worldwind-stealer-neshta
Figure 18. The ransom note

The malware avoids the directories that contain the following substrings:

  • WINDOWS or Windows
  • RECYCLER or Recycler
  • Program Files
  • Program Files (x86)
  • Recycle.Bin or RECYCLE.BIN
  • TEMP or Temp
  • APPDATA or AppData
  • ProgramData
  • Microsoft
  • Burn

By excluding these directories from its malicious activities, the malware reduces the likelihood of being detected by security solutions installed in the system and increases its chances of remaining undetected and operational for a longer duration. The following are the extensions that the Big Head ransomware encrypts:

“.mdf”, “.db”, “.mdb”, “.sql”, “.pdb”, “.pdb”, “.pdb”, “.dsk”, “.fp3”, “.fdb”, “.accdb”, “.dbf”, “.crd”, “.db3”, “.dbk”, “.nsf”, “.gdb”, “.abs”, “.sdb”, “.sdb”, “.sdb”, “.sqlitedb”, “.edb”, “.sdf”, “.sqlite”, “.dbs”, “.cdb”, “.cdb”, “.cdb”, “.bib”, “.dbc”, “.usr”, “.dbt”, “.rsd”, “.myd”, “.pdm”, “.ndf”, “.ask”, “.udb”, “.ns2”, “.kdb”, “.ddl”, “.sqlite3”, “.odb”, “.ib”, “.db2”, “.rdb”, “.wdb”, “.tcx”, “.emd”, “.sbf”, “.accdr”, “.dta”, “.rpd”, “.btr”, “.vdb”, “.daf”, “.dbv”, “.fcd”, “.accde”, “.mrg”, “.nv2”, “.pan”, “.dnc”, “.dxl”, “.tdt”, “.accdc”, “.eco”, “.fmp”, “.vpd”, “.his”, “.fid”

The malware also terminates the following processes:

“taskmgr”, “sqlagent”, “winword”, “sqlbrowser”, “sqlservr”, “sqlwriter”, “oracle”, “ocssd”, “dbsnmp”, “synctime”, “mydesktopqos”, “agntsvc.exeisqlplussvc”, “xfssvccon”, “mydesktopservice”, “ocautoupds”, “agntsvc.exeagntsvc”, “agntsvc.exeencsvc”, “firefoxconfig”, “tbirdconfig”, “ocomm”, “mysqld”, “sql”, “mysqld-nt”, “mysqld-opt”, “dbeng50”, “sqbcoreservice”

The malware renames the encrypted files using Base64. We observed the malware using the LockFile function which encrypts files by renaming them and adding a marker. This marker serves as an indicator to determine whether a file has been encrypted. Through further examination, we saw the function checking for the marker inside the encrypted file. When decrypted, the marker can be matched at the end of the encrypted file.

fig19-big-head-ransomware-variants-tactics-impact-worldwind-stealer-neshta
Figure 19. The LockFile function
fig20-big-head-ransomware-variants-tactics-impact-worldwind-stealer-neshta
Figure 20. Checking for the marker “###” (top) and finding the marker at the end of the encrypted file (bottom)

The malware targets the following languages and region or local settings of the current user’s operating system as listed in the following:

“ar-SA”, “ar-AE”, “nl-BE”, “nl-NL”, “en-GB”, “en-US”, “en-CA”, “en-AU”, “en-NZ”, “fr-BE”, “fr-CH”, “fr-FR”, “fr-CA”, “fr-LU”, “de-AT”, “de-DE”, “de-CH”, “it-CH”, “it-IT”, “ko-KR”, “pt-PT”, “es-ES”, “sv-FI”, “sv-SE”, “bg-BG”, “ca-ES”, “cs-CZ”, “da-DK”, “el-GR”, “en-IE”, “et-EE”, “eu-ES”, “fi-FI”, “hu-HU”, “ja-JP”, “lt-LT”, “nn-NO”, “pl-PL”, “ro-RO”, “se-FI”, “se-NO”, “se-SE”, “sk-SK”, “sl-SI”, “sv-FI”, “sv-SE”, “tr-TR”

The ransomware checks for strings like VBOX, Virtual, or VMware in the disk enumeration registry to determine whether the system is operating within a virtual environment. It also scans for processes that contain the following substring: VBox, prl_(parallel’s desktop), srvc.exe, vmtoolsd.

fig21-big-head-ransomware-variants-tactics-impact-worldwind-stealer-neshta
Figure 21. Checking for virtual machine identifiers (top) and processes (bottom)

The malware identifies specific process names associated with virtualization software to determine if the system is running in a virtualized environment, allowing it to adjust its actions accordingly for better success or evasion. It can also proceed to delete recovery backup available by using the following command line:

vssadmin delete shadows /all /quiet & bcdedit.exe /set {default} recoveryenabled no & bcdedit.exe /set {default} bootstatuspolicy ignoreallfailures

After deleting the backup, regardless of the number available, it will proceed to delete itself using the SelfDelete() function. This function initiates the execution of the batch file, which will delete the malware executable and the batch file itself.

fig22-big-head-ransomware-variants-tactics-impact-worldwind-stealer-neshta
Figure 22. SelfDelete function

Second sample

The second sample of the Big Head ransomware we observed (SHA256: 2a36d1be9330a77f0bc0f7fdc0e903ddd99fcee0b9c93cb69d2f0773f0afd254, detected by Trend as Ransom.MSIL.EGOGEN.THEABBC) exhibits both ransomware and stealer behaviors.

fig23-big-head-ransomware-variants-tactics-impact-worldwind-stealer-neshta
Figure 23. The infection routine of the second sample of the Big Head ransomware

The main file drops and executes the following files:

  • %TEMP%\runyes.Crypter.bat
  • %AppData%\Roaming\azz1.exe
  • %AppData%\Roaming\Microsoft\Windows\Start Menu\Programs\Startup\Server.exe

The ransomware activities are carried out by runyes.Crypter.bat and azz1.exe, while Server.exe is responsible for collecting information for stealing.

The file runyes.Crypter.bat drops a copy of itself and Cipher.psm1 and then executes the following command to begin encryption:

cmd  /c powershell -executionpolicy bypass -win hidden -noexit -file cry.ps1

The malware employs the AES algorithm to encrypt files and adds the suffix “.poop69news@[REDACTED]” to the encrypted files. It specifically targets files with the following extensions:

*.aif ,*.cda ,*.mid ,*.midi ,*.mp3 ,*.mpa ,*.ogg ,*.wav ,*.wma ,*.wpl ,*.7z ,*.arj ,*.deb ,*.pkg ,*.rar ,*.rpm ,*.tar ,*.gz ,*.z ,*.zip ,*.bin ,*.dmg ,*.iso ,*.toas ,*.vcd ,*.csv  ,*.dat ,*.db ,*.dbf ,*.log ,*.mdb ,*.sav ,*.sql ,*.tar ,*.xml ,*.email ,*.eml ,*.emlx ,*.msg ,*.oft ,*.ost ,*.pst ,*.vcf ,*.apk ,*.bat ,*.bin ,*.cgi ,*.pl ,*.com ,*.exe ,*.gadget ,*.jar ,*.msi ,*.py ,*.wsf ,*.fnt ,*.fon ,*.otf ,*.ttf ,*.ai ,*.bmp ,*.gif ,*.ico ,*.jpeg ,*.jpg ,*.png ,*.ps ,*.psd ,*.svg ,*.tif ,*.tiff ,*.asp ,*.aspx ,*.cer ,*.cfm ,*.cgi ,*.pl ,*.css ,*.htm ,*.html ,*.js ,*.jsp ,*.part ,*.php ,*.py ,*.rss ,*.xhtml ,*.key ,*.odp ,*.pps ,*.ppt ,*.pptx ,*.c ,*.class ,*.cpp ,*.cs ,*.h ,*.java ,*.pl ,*.sh ,*.swift ,*.vb ,*.ods ,*.xls ,*.xlsm ,*.xlsx ,*.bak ,*.cab ,*.cfg ,*.cpl ,*.cur ,*.dll ,*.dmp ,*.drv ,*.icns ,*.icoini ,*.lnk ,*.msi ,*.sys ,*.tmp ,*.3g2 ,*.3gp ,*.avi ,*.flv ,*.h264 ,*.m4v ,*.mkv ,*.mov ,*.mp4 ,*.mpg ,*.mpeg ,*.rm ,*.swf ,*.vob ,*.wmv ,*.doc ,*.docx ,*.odt ,*.pdf ,*.rtf ,*.tex ,*.txt ,*.wpd ,*.ps1 ,*.cmd ,*.vbs ,*.vmxf ,*.vmx ,*.vmsd ,*.vmdk ,*.nvram ,*.vbox

The file azz1.exe, which is also involved in other ransomware activities, establishes a registry entry at <HKCU\Software\Microsoft\Windows\CurrentVersion\Run>. This entry ensures the persistence of a copy of itself. It also drops a file containing the victim’s ID and a ransom note:

fig24-big-head-ransomware-variants-tactics-impact-worldwind-stealer-neshta
Figure 24. The ransom note for the second sample of the Big Head ransomware

Like the first sample, the second sample also changes the victim’s desktop wallpaper. Afterward, it will open the URL hxxps[:]//github[.]com/[REDACTED]_69 using the system’s default web browser. As of this writing, the URL is no longer available.

Other variants of this ransomware used the dropper azz1.exe as well, although the specific file might differ in each binary. Meanwhile, Server.exe, which we have identified as the WorldWind stealer, collects the following data:

  • Browsing history of all available browsers
  • List of directories
  • Replica of drivers
  • List of running processes
  • Product key
  • Networks
  • Screenshot of the screen after running the file

Third sample

The third sample (SHA256: 25294727f7fa59c49ef0181c2c8929474ae38a47b350f7417513f1bacf8939ff, detected by Trend as Ransom.MSIL.EGOGEN.YXDEL) includes a file infector we identified as Neshta in its chain.

fig25-big-head-ransomware-variants-tactics-impact-worldwind-stealer-neshta
Figure 25. The infection routine of the third sample of the Big Head ransomware

Neshta is a virus designed to infect and insert its malicious code into executable files. This malware also has a characteristic behavior of dropping a file called directx.sys, which contains the full path name of the infected file that was last executed. This behavior is not commonly observed in most types of malware, as they typically do not store such specific information in their dropped files.

Incorporating Neshta into the ransomware deployment can also serve as a camouflage technique for the final Big Head ransomware payload. This technique can make the piece of malware appear as a different type of threat, such as a virus, which can divert the prioritization of security solutions that primarily focus on detecting ransomware.

Notably, the ransom note and wallpaper associated with this binary are different from the ones previously mentioned.

fig26-big-head-ransomware-variants-tactics-impact-worldwind-stealer-neshta
Figure 26. Wallpaper (top) and ransom note (bottom) used in the victim’s machine post infection

The Big Head ransomware exhibits unique behaviors during the encryption process, such as displaying the Windows update screen as it encrypts files to deceive users and effectively locking them out of their machines, renaming the encrypted files using Base64 encoding to provide an extra layer of obfuscation, and as a whole making it more challenging for users to identify the original file names and types of encrypted files. We also noted the following significant distinctions among the three versions of the Big Head ransomware:

  • The first sample incorporates a backdoor in its infection chain.
  • The second sample employs a trojan spy and/or info stealer.
  • The third sample utilizes a file infector. 

Threat actor

The ransom note clearly indicates that the malware developer utilizes both email and Telegram for communication with their victims. Upon further investigation with the given Telegram username, we were directed to a YouTube account.

The account on the platform is relatively new, having joined on April 19, 2023, With a total of 12 published videos as of this writing. This YouTube channel showcases demonstrations of the piece of malware the cybercriminals have. We also noted that in a pinned comment on each of their videos, they explicitly state their username on Telegram. 

fig27-big-head-ransomware-variants-tactics-impact-worldwind-stealer-neshta
Figure 27. A new YouTube account with a number of videos featuring pieces of malware (top) and a Telegram username pinned in the comments section for all videos (bottom)

While we suspect that this actor engages in transactions on Telegram, it is worth noting that the YouTube name “aplikasi premium cuma cuma” is a phrase in Bahasa that translates to “premium application for free.” While it is possible, we can only speculate on any connection between the ransomware and the countries that use the said language.

Insights

Aside from the specific email address to tie all the samples of the Big Head ransomware together, the ransom notes from the samples have the same bitcoin wallet and drops the same files. Looking at the samples altogether, we can see that all the routines have the same structure in the infection process that it follows once the ransomware infects a system.

The malware developers mention in the comment section of their YouTube videos that they have a “new” Telegram account, indicative of an old one previously used. We also checked their Bitcoin wallet history and found transactions made in 2022. While we’re unaware of what those transactions are, the history implies that these cybercriminals are not new at this type of threats and attacks, although they might not be sophisticated actors as a whole.

The discovery of the Big Head ransomware as a developing piece of malware prior to the occurrence of any actual attacks or infections can be seen as a huge advantage for security researchers and analysts. Analysis and reporting of the variants provide an opportunity to analyze the codes, behaviors, and potential vulnerabilities. This information can then be used to develop countermeasures, patch vulnerabilities, and enhance security systems to mitigate future risks.

Moreover, advertising on YouTube without any evidence of “successful penetrations or infections” might seem premature promotional activities from a non-technical perspective. From a technical point of view, these malware developers left recognizable strings, used predictable encryption methods, or implementing weak or easily detectable evasion techniques, among other “mistakes.”

However, security teams should remain prepared given the malware’s diverse functionalities, encompassing stealers, infectors, and ransomware samples. This multifaceted nature gives the malware the potential to cause significant harm once fully operational, making it more challenging to defend systems against, as each attack vector requires separate attention.

Indicators of Compromise (IOCs)

You can download the IOCs here

Tailing Big Head Ransomware’s Variants, Tactics, and Impact

Indicators of Compromise (IOCs)

Filename				SHA256									Detection			Description
Read Me First!.txt			Ransom note
1.exe 					6d27c1b457a34ce9edfb4060d9e04eb44d021a7b03223ee72ca569c8c4215438	Ransom.MSIL.EGOGEN.THEBBBC 	First sample
1.exe 					226bec8acd653ea9f4b7ea4eaa75703696863841853f488b0b7d892a6be3832a	Ransom.MSIL.EGOGEN.YXDFE	
123yes.exe 				ff900b9224fde97889d37b81855a976cddf64be50af280e04ce53c587d978840	Ransom.MSIL.EGOGEN.YXDEO	
archive.exe 				cf9410565f8a06af92d65e118bd2dbaeb146d7e51de2c35ba84b47cfa8e4f53b	Ransom.MSIL.EGOGEN.YXDFZ	
azz1.exe, discord.exe 			1c8bc3890f3f202e459fb87acec4602955697eef3b08c93c15ebb0facb019845	Ransom.MSIL.EGOGEN.YXDEW	
BXIuSsB.exe 				64246b9455d76a094376b04a2584d16771cd6164db72287492078719a0c749ab	Ransom.MSIL.EGOGEN.YXDEL	
ConsoleApp2.exe 			0dbfd3479cfaf0856eb8a75f0ad4fccb5fd6bd17164bcfa6a5a386ed7378958d	Ransom.MSIL.EGOGEN.YXDEW	
cry.ps1 				6698f8ffb7ba04c2496634ff69b0a3de9537716cfc8f76d1cfea419dbd880c94	Ransom.PS1.EGOGEN.YXDFV	
Cipher.psm1, 													Ransom.PS1.EGOGEN.YXDFZ	
discord.exe 				b8e456861a5fb452bcf08d7b37277972a4a06b0a928d57c5ec30afa101d77ead	Ransom.MSIL.EGOGEN.YXDEL	
discord.exe 				6b3bf710cf4a0806b2c5eaa26d2d91ca57575248ff0298f6dee7180456f37d2e	Ransom.MSIL.EGOGEN.YXDEL	
docx.Crypter.bat, runyes.Crypter.bat 	6b771983142c7fa72ce209df8423460189c14ec635d6235bf60386317357428a	Ransom.BAT.EGOGEN.YXDFZ 	
event-stream.exe 			627b920845683bd7303d33946ff52fb2ea595208452285457aa5ccd9c01c3b0a	HackTool.Win32.EventStream.A	
l.bat 					40d11a20bd5ca039a15a0de0b1cb83814fa9b1d102585db114bba4c5895a8a44	Ransom.BAT.EGOGEN.YXDFZ	
Locker.ps1 				159fbb0d04c1a77d434ce3810d1e2c659fda0a5703c9d06f89ee8dc556783614	Ransom.PS1.EGOGEN.YXDEL	
locker.ps1 				9aa38796e0ce4866cff8763b026272eb568fa79d8a147f7d61824752ad6d8f09	Ransom.PS1.EGOGEN.YXDFZ	
program.exe 				39caec2f2e9fda6e6a7ce8f22e29e1c77c8f1b4bde80c91f6f78cc819f031756	Ransom.MSIL.EGOGEN.YXDEP	
Prynts.exe 				1ada91cb860cd3318adbb4b6fd097d31ad39c2718b16c136c16407762251c5db	TrojanSpy.MSIL.STORMKITTY.D	
r.pyw 					be6416218e2b1a879e33e0517bcacaefccab6ad2f511de07eebd88821027f92d	Ransom.Python.EGOGEN.YXDFZ 	
Server.exe 				9a7889147fa53311ba7ec8166c785f7a935c35eba4a877c1313a8d2e80e3230d	TrojanSpy.MSIL.WORLDWIND.A	Dropped WorldWind Stealer
Server.exe  				f6a2ec226c84762458d53f5536f0a19e34b2a9b03d574ae78e89098af20bcaa3	PE_NESHTA.A	
sfchost.exe, 12.exe 			1942aac761bc2e21cf303e987ef2a7740a33c388af28ba57787f10b1804ea38e	Ransom.MSIL.EGOGEN.YXDEL	
slam.exe 				f354148b5f0eab5af22e8152438468ae8976db84c65415d3f4a469b35e31710f	Ransom.MSIL.EGOGEN.YXDE4	
ssissa.Crypter.bat  			037f9434e83919506544aa04fecd7f56446a7cc65ee03ac0a11570cf4f607853	Ransom.BAT.EGOGEN.YXDFZ	
svchost.com 				980bac6c9afe8efc9c6fe459a5f77213b0d8524eb00de82437288eb96138b9a2	PE_NESHTA.A-O	
teleratserver.exe 			603fcc53fd7848cd300dad85bef9a6b80acaa7984aa9cb9217cdd012ff1ce5f0	Backdoor.WIn64.TELERAT.A	
Xarch.exe     				bcf8464d042171d7ecaada848b5403b6a810a91f7fd8f298b611e94fa7250463	Ransom.MSIL.EGOGEN.YXDEV	
XarchiveOutput.exe			64aac04ffb290a23ab9f537b1143a4556e6893d9ff7685a11c2c0931d978a931	Ransom.MSIL.EGOGEN.YXDEV	
Xatput.exe 				f59c45b71eb62326d74e83a87f821603bf277465863bfc9c1dcb38a97b0b359d	Ransom.MSIL.EGOGEN.YXDEV	
Xserver.exe 				2a36d1be9330a77f0bc0f7fdc0e903ddd99fcee0b9c93cb69d2f0773f0afd254	Ransom.MSIL.EGOGEN.THEABBC	Second sample
Xsput.exe 				66bb57338bec9110839dc9a83f85b05362ab53686ff7b864d302a217cafb7531	Ransom.MSIL.EGOGEN.YXDEV	
Xsuut.exe 				806f64fda529d92c16fac02e9ddaf468a8cc6cbc710dc0f3be55aec01ed65235	Ransom.MSIL.EGOGEN.YXDEV	
Xxut.exe 				9c1c527a826d16419009a1b7797ed20990b9a04344da9c32deea00378a6eeee2	Ransom.MSIL.EGOGEN.YXDEO 	
iXZAF					40e5050b894cb70c93260645bf9804f50580050eb131e24f30cb91eec9ad1a6e	Ransom.MSIL.EGOGEN.THFBIBC	
XBtput.exe 				25294727f7fa59c49ef0181c2c8929474ae38a47b350f7417513f1bacf8939ff	Ransom.MSIL.EGOGEN.YXDEL	Third sample
XBtput2.exe 				dcfa0fca8c1dd710b4f40784d286c39e5d07b87700bdc87a48659c0426ec6cb6	Ransom.MSIL.EGOGEN.YXDEO	

Source :
https://www.trendmicro.com/it_it/research/23/g/tailing-big-head-ransomware-variants-tactics-and-impact.html

Part 2: Rethinking cache purge with a new architecture

21/06/2023

In Part 1: Rethinking Cache Purge, Fast and Scalable Global Cache Invalidation, we outlined the importance of cache invalidation and the difficulties of purging caches, how our existing purge system was designed and performed, and we gave a high level overview of what we wanted our new Cache Purge system to look like.

It’s been a while since we published the first blog post and it’s time for an update on what we’ve been working on. In this post we’ll be talking about some of the architecture improvements we’ve made so far and what we’re working on now.

Cache Purge end to end

We touched on the high level design of what we called the “coreless” purge system in part 1, but let’s dive deeper into what that design encompasses by following a purge request from end to end:

Step 1: Request received locally

An API request to Cloudflare is routed to the nearest Cloudflare data center and passed to an API Gateway worker. This worker looks at the request URL to see which service it should be sent to and forwards the request to the appropriate upstream backend. Most endpoints of the Cloudflare API are currently handled by centralized services, so the API Gateway worker is often just proxying requests to the nearest “core” data center which have their own gateway services to handle authentication, authorization, and further routing. But for endpoints which aren’t handled centrally the API Gateway worker must handle authentication and route authorization, and then proxy to an appropriate upstream. For cache purge requests that upstream is a Purge Ingest worker in the same data center.

Step 2: Purges tested locally

The Purge Ingest worker evaluates the purge request to make sure it is processible. It scans the URLs in the body of the request to see if they’re valid, then attempts to purge the URLs from the local data center’s cache. This concept of local purging was a new step introduced with the coreless purge system allowing us to capitalize on existing logic already used in every data center.

By leveraging the same ownership checks our data centers use to serve a zone’s normal traffic on the URLs being purged, we can determine if those URLs are even cacheable by the zone. Currently more than 50% of the URLs we’re asked to purge can’t be cached by the requesting zones, either because they don’t own the URLs (e.g. a customer asking us to purge https://cloudflare.com) or because the zone’s settings for the URL prevent caching (e.g. the zone has a “bypass” cache rule that matches the URL). All such purges are superfluous and shouldn’t be processed further, so we filter them out and avoid broadcasting them to other data centers freeing up resources to process more legitimate purges.

On top of that, generating the cache key for a file isn’t free; we need to load zone configuration options that might affect the cache key, apply various transformations, et cetera. The cache key for a given file is the same in every data center though, so when we purge the file locally we now return the generated cache key to the Purge Ingest worker and broadcast that key to other data centers instead of making each data center generate it themselves.

Step 3: Purges queued for broadcasting

purge request to small colo, ingest worker sends to queue worker in T1

Once the local purge is done the Purge Ingest worker forwards the purge request with the cache key obtained from the local cache to a Purge Queue worker. The queue worker is a Durable Object worker using its persistent state to hold a queue of purges it receives and pointers to how far along in the queue each data center in our network is in processing purges.

The queue is important because it allows us to automatically recover from a number of scenarios such as connectivity issues or data centers coming back online after maintenance. Having a record of all purges since an issue arose lets us replay those purges to a data center and “catch up”.

But Durable Objects are globally unique, so having one manage all global purges would have just moved our centrality problem from a core data center to wherever that Durable Object was provisioned. Instead we have dozens of Durable Objects in each region, and the Purge Ingest worker looks at the load balancing pool of Durable Objects for its region and picks one (often in the same data center) to forward the request to. The Durable Object will write the purge request to its queue and immediately loop through all the data center pointers and attempt to push any outstanding purges to each.

While benchmarking our performance we found our particular workload exhibited a “goldilocks zone” of throughput to a given Durable Object. On script startup we have to load all sorts of data like network topology and data center health–then refresh it continuously in the background–and as long as the Durable Object sees steady traffic it stays active and we amortize those startup costs. But if you ask a single Durable Object to do too much at once like send or receive too many requests, the single-threaded runtime won’t keep up. Regional purge traffic fluctuates a lot depending on local time of day, so there wasn’t a static quantity of Durable Objects per region that would let us stay within the goldilocks zone of enough requests to each to keep them active but not too many to keep them efficient. So we built load monitoring into our Durable Objects, and a Regional Autoscaler worker to aggregate that data and adjust load balancing pools when we start approaching the upper or lower edges of our efficiency goldilocks zone.

Step 4: Purges broadcast globally

multiple regions, durable object sends purges to fanouts in other regions, fanout sends to small colos in their region

Once a purge request is queued by a Purge Queue worker it needs to be broadcast to the rest of Cloudflare’s data centers to be carried out by their caches. The Durable Objects will broadcast purges directly to all data centers in their region, but when broadcasting to other regions they pick a Purge Fanout worker per region to take care of their region’s distribution. The fanout workers manage queues of their own as well as pointers for all of their region’s data centers, and in fact they share a lot of the same logic as the Purge Queue workers in order to do so. One key difference is fanout workers aren’t Durable Objects; they’re normal worker scripts, and their queues are purely in memory as opposed to being backed by Durable Object state. This means not all queue worker Durable Objects are talking to the same fanout worker in each region. Fanout workers can be dropped and spun up again quickly by any metal in the data center because they aren’t canonical sources of state. They maintain queues and pointers for their region but all of that info is also sent back downstream to the Durable Objects who persist that data themselves, reliably.

But what does the fanout worker get us? Cloudflare has hundreds of data centers all over the world, and as we mentioned above we benefit from keeping the number of incoming and outgoing requests for a Durable Object fairly low. Sending purges to a fanout worker per region means each Durable Object only has to make a fraction of the requests it would if it were broadcasting to every data center directly, which means it can process purges faster.

On top of that, occasionally a request will fail to get where it was going and require retransmission. When this happens between data centers in the same region it’s largely unnoticeable, but when a Durable Object in Canada has to retry a request to a data center in rural South Africa the cost of traversing that whole distance again is steep. The data centers elected to host fanout workers have the most reliable connections in their regions to the rest of our network. This minimizes the chance of inter-regional retries and limits the latency imposed by retries to regional timescales.

The introduction of the Purge Fanout worker was a massive improvement to our distribution system, reducing our end-to-end purge latency by 50% on its own and increasing our throughput threefold.

Current status of coreless purge

We are proud to say our new purge system has been in production serving purge by URL requests since July 2022, and the results in terms of latency improvements are dramatic. In addition, flexible purge requests (purge by tag/prefix/host and purge everything) share and benefit from the new coreless purge system’s entrypoint workers before heading to a core data center for fulfillment.

The reason flexible purge isn’t also fully coreless yet is because it’s a more complex task than “purge this object”; flexible purge requests can end up purging multiple objects–or even entire zones–from cache. They do this through an entirely different process that isn’t coreless compatible, so to make flexible purge fully coreless we would have needed to come up with an entirely new multi-purge mechanism on top of redesigning distribution. We chose instead to start with just purge by URL so we could focus purely on the most impactful improvements, revamping distribution, without reworking the logic a data center uses to actually remove an object from cache.

This is not to say that the flexible purges haven’t benefited from the coreless purge project. Our cache purge API lets users bundle single file and flexible purges in one request, so the API Gateway worker and Purge Ingest worker handle authorization, authentication and payload validation for flexible purges too. Those flexible purges get forwarded directly to our services in core data centers pre-authorized and validated which reduces load on those core data center auth services. As an added benefit, because authorization and validity checks all happen at the edge for all purge types users get much faster feedback when their requests are malformed.

Next steps

While coreless cache purge has come a long way since the part 1 blog post, we’re not done. We continue to work on reducing end-to-end latency even more for purge by URL because we can do better. Alongside improvements to our new distribution system, we’ve also been working on the redesign of flexible purge to make it fully coreless, and we’re really excited to share the results we’re seeing soon. Flexible cache purge is an incredibly popular API and we’re giving its refresh the care and attention it deserves.

We protect entire corporate networks, help customers build Internet-scale applications efficiently, accelerate any website or Internet applicationward off DDoS attacks, keep hackers at bay, and can help you on your journey to Zero Trust.

Visit 1.1.1.1 from any device to get started with our free app that makes your Internet faster and safer.

To learn more about our mission to help build a better Internet, start here. If you’re looking for a new career direction, check out our open positions.

Source :
https://blog.cloudflare.com/rethinking-cache-purge-architecture/

Part 1: Rethinking Cache Purge, Fast and Scalable Global Cache Invalidation

14/05/2022

There is a famous quote attributed to a Netscape engineer: “There are only two difficult problems in computer science: cache invalidation and naming things.” While naming things does oddly take up an inordinate amount of time, cache invalidation shouldn’t.

In the past we’ve written about Cloudflare’s incredibly fast response times, whether content is cached on our global network or not. If content is cached, it can be served from a Cloudflare cache server, which are distributed across the globe and are generally a lot closer in physical proximity to the visitor. This saves the visitor’s request from needing to go all the way back to an origin server for a response. But what happens when a webmaster updates something on their origin and would like these caches to be updated as well? This is where cache “purging” (also known as “invalidation”) comes in.

Customers thinking about setting up a CDN and caching infrastructure consider questions like:

  • How do different caching invalidation/purge mechanisms compare?
  • How many times a day/hour/minute do I expect to purge content?
  • How quickly can the cache be purged when needed?

This blog will discuss why invalidating cached assets is hard, what Cloudflare has done to make it easy (because we care about your experience as a developer), and the engineering work we’re putting in this year to make the performance and scalability of our purge services the best in the industry.

What makes purging difficult also makes it useful

(i) Scale
The first thing that complicates cache invalidation is doing it at scale. With data centers in over 270 cities around the globe, our most popular users’ assets can be replicated at every corner of our network. This also means that a purge request needs to be distributed to all data centers where that content is cached. When a data center receives a purge request, it needs to locate the cached content to ensure that subsequent visitor requests for that content are not served stale/outdated data. Requests for the purged content should be forwarded to the origin for a fresh copy, which is then re-cached on its way back to the user.

This process repeats for every data center in Cloudflare’s fleet. And due to Cloudflare’s massive network, maintaining this consistency when certain data centers may be unreachable or go offline, is what makes purging at scale difficult.

Making sure that every data center gets the purge command and remains up-to-date with its content logs is only part of the problem. Getting the purge request to data centers quickly so that content is updated uniformly is the next reason why cache invalidation is hard.  

(ii) Speed
When purging an asset, race conditions abound. Requests for an asset can happen at any time, and may not follow a pattern of predictability. Content can also change unpredictably. Therefore, when content changes and a purge request is sent, it must be distributed across the globe quickly. If purging an individual asset, say an image, takes too long, some visitors will be served the new version, while others are served outdated content. This data inconsistency degrades user experience, and can lead to confusion as to which version is the “right” version. Websites can sometimes even break in their entirety due to this purge latency (e.g. by upgrading versions of a non-backwards compatible JavaScript library).

Purging at speed is also difficult when combined with Cloudflare’s massive global footprint. For example, if a purge request is traveling at the speed of light between Tokyo and Cape Town (both cities where Cloudflare has data centers), just the transit alone (no authorization of the purge request or execution) would take over 180ms on average based on submarine cable placement. Purging a smaller network footprint may reduce these speed concerns while making purge times appear faster, but does so at the expense of worse performance for customers who want to make sure that their cached content is fast for everyone.

(iii) Scope
The final thing that makes purge difficult is making sure that only the unneeded web assets are invalidated. Maintaining a cache is important for egress cost savings and response speed. Webmasters’ origins could be knocked over by a thundering herd of requests, if they choose to purge all content needlessly. It’s a delicate balance of purging just enough: too much can result in both monetary and downtime costs, and too little will result in visitors receiving outdated content.

At Cloudflare, what to invalidate in a data center is often dictated by the type of purge. Purge everything, as you could probably guess, purges all cached content associated with a website. Purge by prefix purges content based on a URL prefix. Purge by hostname can invalidate content based on a hostname. Purge by URL or single file purge focuses on purging specified URLs. Finally, Purge by tag purges assets that are marked with Cache-Tag headers. These markers offer webmasters flexibility in grouping assets together. When a purge request for a tag comes into a data center, all assets marked with that tag will be invalidated.

With that overview in mind, the remainder of this blog will focus on putting each element of invalidation together to benchmark the performance of Cloudflare’s purge pipeline and provide context for what performance means in the real-world. We’ll be reviewing how fast Cloudflare can invalidate cached content across the world. This will provide a baseline analysis for how quick our purge systems are presently, which we will use to show how much we will improve by the time we launch our new purge system later this year.

How does purge work currently?

In general, purge takes the following route through Cloudflare’s data centers.

  • A purge request is initiated via the API or UI. This request specifies how our data centers should identify the assets to be purged. This can be accomplished via cache-tag header(s), URL(s), entire hostnames, and much more.
  • The request is received by any Cloudflare data center and is identified to be a purge request. It is then routed to a Cloudflare core data center (a set of a few data centers responsible for network management activities).
  • When a core data center receives it, the request is processed by a number of internal services that (for example) make sure the request is being sent from an account with the appropriate authorization to purge the asset. Following this, the request gets fanned out globally to all Cloudflare data centers using our distribution service.
  • When received by a data center, the purge request is processed and all assets with the matching identification criteria are either located and removed, or marked as stale. These stale assets are not served in response to requests and are instead re-pulled from the origin.
  • After being pulled from the origin, the response is written to cache again, replacing the purged version.

Now let’s look at this process in practice. Below we describe Cloudflare’s purge benchmarking that uses real-world performance data from our purge pipeline.

Benchmarking purge performance design

In order to understand how performant Cloudflare’s purge system is, we measured the time it took from sending the purge request to the moment that the purge is complete and the asset is no longer served from cache.  

In general, the process of measuring purge speeds involves: (i) ensuring that a particular piece of content is cached, (ii) sending the command to invalidate the cache, (iii) simultaneously checking our internal system logs for how the purge request is routed through our infrastructure, and (iv) measuring when the asset is removed from cache (first miss).

This process measures how quickly cache is invalidated from the perspective of an average user.

  • Clock starts
    As noted above, in this experiment we’re using sampled RUM data from our purge systems. The goal of this experiment is to benchmark current data for how long it can take to purge an asset on Cloudflare across different regions. Once the asset was cached in a region on Cloudflare, we identify when a purge request is received for that asset. At that same instant, the clock started for this experiment. We include in this time any retrys that we needed to make (due to data centers missing the initial purge request) to ensure that the purge was done consistently across our network. The clock continues as the request transits our purge pipeline  (data center > core > fanout > purge from all data centers).  
  • Clock stops
    What caused the clock to stop was the purged asset being removed from cache, meaning that the data center is no longer serving the asset from cache to visitor’s requests. Our internal logging measures the precise moment that the cache content has been removed or expired and from that data we were able to determine the following benchmarks for our purge types in various regions.  

Results

We’ve divided our benchmarks in two ways: by purge type and by region.

We singled out Purge by URL because it identifies a single target asset to be purged. While that asset can be stored in multiple locations, the amount of data to be purged is strictly defined.

We’ve combined all other types of purge (everything, tag, prefix, hostname) together because the amount of data to be removed is highly variable. Purging a whole website or by assets identified with cache tags could mean we need to find and remove a multitude of content from many different data centers in our network.

Secondly, we have segmented our benchmark measurements by regions and specifically we confined the benchmarks to specific data center servers in the region because we were concerned about clock skews between different data centers. This is the reason why we limited the test to the same cache servers so that even if there was skew, they’d all be skewed in the same way.  

We took the latency from the representative data centers in each of the following regions and the global latency. Data centers were not evenly distributed in each region, but in total represent about 90 different cities around the world:  

  • Africa
  • Asia Pacific Region (APAC)
  • Eastern Europe (EEUR)
  • Eastern North America (ENAM)
  • Oceania
  • South America (SA)
  • Western Europe (WEUR)
  • Western North America (WNAM)

The global latency numbers represent the purge data from all Cloudflare data centers in over 270 cities globally. In the results below, global latency numbers may be larger than the regional numbers because it represents all of our data centers instead of only a regional portion so outliers and retries might have an outsized effect.

Below are the results for how quickly our current purge pipeline was able to invalidate content by purge type and region. All times are represented in seconds and divided into P50, P75, and P99 quantiles. Meaning for “P50” that 50% of the purges were at the indicated latency or faster.  

Purge By URL

P50P75P99
AFRICA0.95s1.94s6.42s
APAC0.91s1.87s6.34s
EEUR0.84s1.66s6.30s
ENAM0.85s1.71s6.27s
OCEANIA0.95s1.96s6.40s
SA0.91s1.86s6.33s
WEUR0.84s1.68s6.30s
WNAM0.87s1.74s6.25s
GLOBAL1.31s1.80s6.35s

Purge Everything, by Tag, by Prefix, by Hostname

P50P75P99
AFRICA1.42s1.93s4.24s
APAC1.30s2.00s5.11s
EEUR1.24s1.77s4.07s
ENAM1.08s1.62s3.92s
OCEANIA1.16s1.70s4.01s
SA1.25s1.79s4.106s
WEUR1.19s1.73s4.04s
WNAM0.9995s1.53s3.83s
GLOBAL1.57s2.32s5.97s

A general note about these benchmarks — the data represented here was taken from over 48 hours (two days) of RUM purge latency data in May 2022. If you are interested in how quickly your content can be invalidated on Cloudflare, we suggest you test our platform with your website.

Those numbers are good and much faster than most of our competitors. Even in the worst case, we see the time from when you tell us to purge an item to when it is removed globally is less than seven seconds. In most cases, it’s less than a second. That’s great for most applications, but we want to be even faster. Our goal is to get cache purge to as close as theoretically possible to the speed of light limit for a network our size, which is 200ms.

Intriguingly, LEO satellite networks may be able to provide even lower global latency than fiber optics because of the straightness of the paths between satellites that use laser links. We’ve done calculations of latency between LEO satellites that suggest that there are situations in which going to space will be the fastest path between two points on Earth. We’ll let you know if we end up using laser-space-purge.

Just as we have with network performance, we are going to relentlessly measure our cache performance as well as the cache performance of our competitors. We won’t be satisfied until we verifiably are the fastest everywhere. To do that, we’ve built a new cache purge architecture which we’re confident will make us the fastest cache purge in the industry.

Our new architecture

Through the end of 2022, we will continue this blog series incrementally showing how we will become the fastest, most-scalable purge system in the industry. We will continue to update you with how our purge system is developing  and benchmark our data along the way.

Getting there will involve rearchitecting and optimizing our purge service, which hasn’t received a systematic redesign in over a decade. We’re excited to do our development in the open, and bring you along on our journey.

So what do we plan on updating?

Introducing Coreless Purge

The first version of our cache purge system was designed on top of a set of central core services including authorization, authentication, request distribution, and filtering among other features that made it a high-reliability service. These core components had ultimately become a bottleneck in terms of scale and performance as our network continues to expand globally. While most of our purge dependencies have been containerized, the message queue used was still running on bare metals, which led to increased operational overhead when our system needed to scale.

Last summer, we built a proof of concept for a completely decentralized cache invalidation system using in-house tech – Cloudflare Workers and Durable Objects. Using Durable Objects as a queuing mechanism gives us the flexibility to scale horizontally by adding more Durable Objects as needed and can reduce time to purge with quick regional fanouts of purge requests.

In the new purge system we’re ripping out the reliance on core data centers and moving all that functionality to every data center, we’re calling it coreless purge.

Here’s a general overview of how coreless purge will work:

  • A purge request will be initiated via the API or UI. This request will specify how we should identify the assets to be purged.
  • The request will be routed to the nearest Cloudflare data center where it is identified to be a purge request and be passed to a Worker that will perform several of the key functions that currently occur in the core (like authorization, filtering, etc).
  • From there, the Worker will pass the purge request to a Durable Object in the data center. The Durable Object will queue all the requests and broadcast them to every data center when they are ready to be processed.
  • When the Durable Object broadcasts the purge request to every data center, another Worker will pass the request to the service in the data center that will invalidate the content in cache (executes the purge).

We believe this re-architecture of our system built by stringing together multiple services from the Workers platform will help improve both the speed and scalability of the purge requests we will be able to handle.

Conclusion

We’re going to spend a lot of time building and optimizing purge because, if there’s one thing we learned here today, it’s that cache invalidation is a difficult problem but those are exactly the types of problems that get us out of bed in the morning.

If you want to help us optimize our purge pipeline, we’re hiring.

We protect entire corporate networks, help customers build Internet-scale applications efficiently, accelerate any website or Internet applicationward off DDoS attacks, keep hackers at bay, and can help you on your journey to Zero Trust.

Visit 1.1.1.1 from any device to get started with our free app that makes your Internet faster and safer.

To learn more about our mission to help build a better Internet, start here. If you’re looking for a new career direction, check out our open positions.

Source :
https://blog.cloudflare.com/part1-coreless-purge/

All the way up to 11: Serve Brotli from origin and Introducing Compression Rules

23/06/2023

Throughout Speed Week, we have talked about the importance of optimizing performance. Compression plays a crucial role by reducing file sizes transmitted over the Internet. Smaller file sizes lead to faster downloads, quicker website loading, and an improved user experience.

Take household cleaning products as a real world example. It is estimated “a typical bottle of cleaner is 90% water and less than 10% actual valuable ingredients”. Removing 90% of a typical 500ml bottle of household cleaner reduces the weight from 600g to 60g. This reduction means only a 60g parcel, with instructions to rehydrate on receipt, needs to be sent. Extrapolated into the gallons, this weight reduction soon becomes a huge shipping saving for businesses. Not to mention the environmental impact.

This is how compression works. The sender compresses the file to its smallest possible size, and then sends the smaller file with instructions on how to handle it when received. By reducing the size of the files sent, compression ensures the amount of bandwidth needed to send files over the Internet is a lot less. Where files are stored in expensive cloud providers like AWS, reducing the size of files sent can directly equate to significant cost savings on bandwidth.

Smaller file sizes are also particularly beneficial for end users with limited Internet connections, such as mobile devices on cellular networks or users in areas with slow network speeds.

Cloudflare has always supported compression in the form of Gzip. Gzip is a widely used compression algorithm that has been around since 1992 and provides file compression for all Cloudflare users. However, in 2013 Google introduced Brotli which supports higher compression levels and better performance overall. Switching from gzip to Brotli results in smaller file sizes and faster load times for web pages. We have supported Brotli since 2017 for the connection between Cloudflare and client browsers. Today we are announcing end-to-end Brotli support for web content: support for Brotli compression, at the highest possible levels, from the origin server to the client.

If your origin server supports Brotli, turn it on, crank up the compression level, and enjoy the performance boost.

Brotli compression to 11

Brotli has 12 levels of compression ranging from 0 to 11, with 0 providing the fastest compression speed but the lowest compression ratio, and 11 offering the highest compression ratio but requiring more computational resources and time. During our initial implementation of Brotli five years ago, we identified that compression level 4 offered the balance between bytes saved and compression time without compromising performance.

Since 2017, Cloudflare has been using a maximum compression of Brotli level 4 for all compressible assets based on the end user’s “accept-encoding” header. However, one issue was that Cloudflare only requested Gzip compression from the origin, even if the origin supported Brotli. Furthermore, Cloudflare would always decompress the content received from the origin before compressing and sending it to the end user, resulting in additional processing time. As a result, customers were unable to fully leverage the benefits offered by Brotli compression.

Old world

With Cloudflare now fully supporting Brotli end to end, customers will start seeing our updated accept-encoding header arriving at their origins. Once available customers can transfer, cache and serve heavily compressed Brotli files directly to us, all the way up to the maximum level of 11. This will help reduce latency and bandwidth consumption. If the end user device does not support Brotli compression, we will automatically decompress the file and serve it either in its decompressed format or as a Gzip-compressed file, depending on the Accept-Encoding header.

Full end-to-end Brotli compression support

End user cannot support Brotli compression

Customers can implement Brotli compression at their origin by referring to the appropriate online materials. For example, customers that are using NGINX, can implement Brotli by following this tutorial and setting compression at level 11 within the nginx.conf configuration file as follows:

brotli on;
brotli_comp_level 11;
brotli_static on;
brotli_types text/plain text/css application/javascript application/x-javascript text/xml 
application/xml application/xml+rss text/javascript image/x-icon 
image/vnd.microsoft.icon image/bmp image/svg+xml;

Cloudflare will then serve these assets to the client at the exact same compression level (11) for the matching file brotli_types. This means any SVG or BMP images will be sent to the client compressed at Brotli level 11.

Testing

We applied compression against a simple CSS file, measuring the impact of various compression algorithms and levels. Our goal was to identify potential improvements that users could experience by optimizing compression techniques. These results can be seen in the following table:

TestSize (bytes)% Reduction of original file (Higher % better)
Uncompressed response (no compression used)2,747
Cloudflare default Gzip compression (level 8)1,12159.21%
Cloudflare default Brotli compression (level 4)1,11059.58%
Compressed with max Gzip level (level 9)1,12159.21%
Compressed with max Brotli level (level 11)90966.94%

By compressing Brotli at level 11 users are able to reduce their file sizes by 19% compared to the best Gzip compression level. Additionally, the strongest Brotli compression level is around 18% smaller than the default level used by Cloudflare. This highlights a significant size reduction achieved by utilizing Brotli compression, particularly at its highest levels, which can lead to improved website performance, faster page load times and an overall reduction in egress fees.

To take advantage of higher end to end compression rates the following Cloudflare proxy features need to be disabled.

  • Email Obfuscation
  • Rocket Loader
  • Server Side Excludes (SSE)
  • Mirage
  • HTML Minification – JavaScript and CSS can be left enabled.
  • Automatic HTTPS Rewrites

This is due to Cloudflare needing to decompress and access the body to apply the requested settings. Alternatively a customer can disable these features for specific paths using Configuration Rules.

If any of these rewrite features are enabled, your origin can still send Brotli compression at higher levels. However, we will decompress, apply the Cloudflare feature(s) enabled, and recompress on the fly using Cloudflare’s default Brotli level 4 or Gzip level 8 depending on the user’s accept-encoding header.

For browsers that do not accept Brotli compression, we will continue to decompress and send Gzipped responses or uncompressed.

Implementation

The initial step towards implementing Brotli from the origin involved constructing a decompression module that could be integrated into Cloudflare software stack. It allows us to efficiently convert the compressed bits received from the origin into the original, uncompressed file. This step was crucial as numerous features such as Email Obfuscation and Cloudflare Workers Customers, rely on accessing the body of a response to apply customizations.

We integrated the decompressor into  the core reverse web proxy of Cloudflare. This integration ensured that all Cloudflare products and features could access Brotli decompression effortlessly. This also allowed our Cloudflare Workers team to incorporate Brotli Directly into Cloudflare Workers allowing our Workers customers to be able to interact with responses returned in Brotli or pass through to the end user unmodified.

Introducing Compression rules – Granular control of compression to end users

By default Cloudflare compresses certain content types based on the Content-Type header of the file. Today we are also announcing Compression Rules for our Enterprise Customers to allow you even more control on how and what Cloudflare will compress.

Today we are also announcing the introduction of Compression Rules for our Enterprise Customers. With Compression Rules, you gain enhanced control over Cloudflare’s compression capabilities, enabling you to customize how and which content Cloudflare compresses to optimize your website’s performance.

For example, by using Cloudflare’s Compression Rules for .ktx files, customers can optimize the delivery of textures in webGL applications, enhancing the overall user experience. Enabling compression minimizes the bandwidth usage and ensures that webGL applications load quickly and smoothly, even when dealing with large and detailed textures.

Alternatively customers can disable compression or specify a preference of how we compress. Another example could be an Infrastructure company only wanting to support Gzip for their IoT devices but allow Brotli compression for all other hostnames.

Compression rules use the filters that our other rules products are built on top of with the added fields of Media Type and Extension type. Allowing users to easily specify the content you wish to compress.

Deprecating the Brotli toggle

Brotli has been long supported by some web browsers since 2016 and Cloudflare offered Brotli Support in 2017. As with all new web technologies Brotli was unknown and we gave customers the ability to selectively enable or disable BrotlI via the API and our UI.

Now that Brotli has evolved and is supported by all browsers, we plan to enable Brotli on all zones by default in the coming months. Mirroring the Gzip behavior we currently support and removing the toggle from our dashboard. If browsers do not support Brotli, Cloudflare will continue to support their accepted encoding types such as Gzip or uncompressed and Enterprise customers will still be able to use Compression rules to granularly control how we compress data towards their users.

The future of web compression

We’ve seen great adoption and great performance for Brotli as the new compression technique for the web. Looking forward, we are closely following trends and new compression algorithms such as zstd as a possible next-generation compression algorithm.

At the same time, we’re looking to improve Brotli directly where we can. One development that we’re particularly focused on is shared dictionaries with Brotli. Whenever you compress an asset, you use a “dictionary” that helps the compression to be more efficient. A simple analogy of this is typing OMW into an iPhone message. The iPhone will automatically translate it into On My Way using its own internal dictionary.

OMW
OnMyWay

This internal dictionary has taken three characters and morphed this into nine characters (including spaces) The internal dictionary has saved six characters which equals performance benefits for users.

By default, the Brotli RFC defines a static dictionary that both clients and the origin servers use. The static dictionary was designed to be general purpose and apply to everyone. Optimizing the size of the dictionary as to not be too large whilst able to generate best compression results. However, what if an origin could generate a bespoke dictionary tailored to a specific website? For example a Cloudflare-specific dictionary would allow us to compress the words and phrases that appear repeatedly on our site such as the word “Cloudflare”. The bespoke dictionary would be designed to compress this as heavily as possible and the browser using the same dictionary would be able to translate this back.

new proposal by the Web Incubator CG aims to do just that, allowing you to specify your own dictionaries that browsers can use to allow websites to optimize compression further. We’re excited about contributing to this proposal and plan on publishing our research soon.

Try it now

Compression Rules are available now! With End to End Brotli being rolled out over the coming weeks. Allowing you to improve performance, reduce bandwidth and granularly control how Cloudflare handles compression to your end users.

Watch on Cloudflare TV

https://customer-rhnwzxvb3mg4wz3v.cloudflarestream.com/f1c71fdb05263b5ec3077e6e7acdb7e2/iframe?preload=true&poster=https%3A%2F%2Fcustomer-rhnwzxvb3mg4wz3v.cloudflarestream.com%2Ff1c71fdb05263b5ec3077e6e7acdb7e2%2Fthumbnails%2Fthumbnail.jpg%3Ftime%3D1s%26height%3D600

We protect entire corporate networks, help customers build Internet-scale applications efficiently, accelerate any website or Internet applicationward off DDoS attacks, keep hackers at bay, and can help you on your journey to Zero Trust.

Visit 1.1.1.1 from any device to get started with our free app that makes your Internet faster and safer.

To learn more about our mission to help build a better Internet, start here. If you’re looking for a new career direction, check out our open positions.

Source :
https://blog.cloudflare.com/this-is-brotli-from-origin/

Speeding up your (WordPress) website is a few clicks away

22/06/2023

Every day, website visitors spend far too much time waiting for websites to load in their browsers. This waiting is partially due to browsers not knowing which resources are critically important so they can prioritize them ahead of less-critical resources. In this blog we will outline how millions of websites across the Internet can improve their performance by specifying which critical content loads first with Cloudflare Workers and what Cloudflare will do to make this easier by default in the future.

Popular Content Management Systems (CMS) like WordPress have made attempts to influence website resource priority, for example through techniques like lazy loading images. When done correctly, the results are magical. Performance is optimized between the CMS and browser without needing to implement any changes or coding new prioritization strategies. However, we’ve seen that these default priorities have opportunities to improve greatly.

In this co-authored blog with Google’s Patrick Meenan we will explain where the opportunities exist to improve website performance, how to check if a specific site can improve performance, and provide a small JavaScript snippet which can be used with Cloudflare Workers to do this optimization for you.

What happens when a browser receives the response?

Before we dive into where the opportunities are to improve website performance, let’s take a step back to understand how browsers load website assets by default.

After the browser sends a HTTP request to a server, it receives a HTTP response containing information like status codes, headers, and the requested content. The browser carefully analyzes the response’s status code and response headers to ensure proper handling of the content.

Next, the browser processes the content itself. For HTML responses, the browser extracts important information from the <head> section of the HTML, such as the page title, stylesheets, and scripts. Once this information is parsed, the browser moves on to the response <body> which has the actual page content. During this stage, the browser begins to present the webpage to the visitor.

If the response includes additional 3rd party resources like CSS, JavaScript, or other content, the browser may need to fetch and integrate them into the webpage. Typically, browsers like Google Chrome delay loading images until after the resources in the HTML <head> have loaded. This is also known as “blocking” the render of the webpage. However, developers can override this blocking behavior using fetch priority or other methods to boost other content’s priority in the browser. By adjusting an important image’s fetch priority, it can be loaded earlier, which can lead to significant improvements in crucial performance metrics like LCP (Largest Contentful Paint).

Images are so central to web pages that they have become an essential element in measuring website performance from Core Web Vitals. LCP measures the time it takes for the largest visible element, often an image, to be fully rendered on the screen. Optimizing the loading of critical images (like LCP images) can greatly enhance performance, improving the overall user experience and page performance.

But here’s the challenge – a browser may not know which images are the most important for the visitor experience (like the LCP image) until rendering begins. If the developer can identify the LCP image or critical elements before it reaches the browser, its priority can be increased at the server to boost website performance instead of waiting for the browser to naturally discover the critical images.

In our Smart Hints blog, we describe how Cloudflare will soon be able to automatically prioritize content on behalf of website developers, but what happens if there’s a need to optimize the priority of the images right now? How do you know if a website is in a suboptimal state and what can you do to improve?

Using Cloudflare, developers should be able to improve image performance with heuristics that identify likely-important images before the browser parses them so these images can have increased priority and be loaded sooner.

Identifying Image Priority opportunities

Just increasing the fetch priority of all images won’t help if they are lazy-loaded or not critical/LCP images. Lazy-loading is a method that developers use to generally improve the initial load of a webpage if it includes numerous out-of-view elements. For example, on Instagram, when you continually scroll down the application to see more images, it would only make sense to load those images when the user arrives at them otherwise the performance of the page load would be needlessly delayed by the browser eagerly loading these out-of-view images. Instead the highest priority should be given to the LCP image in the viewport to improve performance.

So developers are left in a situation where they need to know which images are on users’ screens/viewports to increase their priority and which are off their screens to lazy-load them.

Recently, we’ve seen attempts to influence image priority on behalf of developers. For example, by default, in WordPress 5.5 all images with an IMG tag and aspect ratios were directed to be lazy-loaded. While there are plugins and other methods WordPress developers can use to boost the priority of LCP images, lazy-loading all images in a default manner and not knowing which are LCP images can cause artificial performance delays in website performance (they’re working on this though, and have partially resolved this for block themes).

So how do we identify the LCP image and other critical assets before they get to the browser?

To evaluate the opportunity to improve image performance, we turned to the HTTP Archive. Out of the approximately 22 million desktop pages tested in February 2023, 46% had an LCP element with an IMG tag. Meaning that for page load metrics, LCP had an image included about half the time. Though, among these desktop pages, 8.5 million had the image in the static HTML delivered with the page, indicating a total potential improvement opportunity of approximately 39% of the desktop pages within the dataset.

In the case of mobile pages, out of the ~28.5 million tested, 40% had an LCP element as an IMG tag. Among these mobile pages, 10.3 million had the image in the static HTML delivered with the page, suggesting a potential improvement opportunity in around 36% of the mobile pages within the dataset.

However, as previously discussed, prioritizing an image won’t be effective if the image is lazy-loaded because the directives are contradictory. In the dataset,  approximately 1.8 million LCP desktop images and 2.4 million LCP mobile images were lazy-loaded.

Therefore, across the Internet, the opportunity to improve image performance would be about ~30% of pages that have an LCP image in the original HTML markup that weren’t lazy-loaded, but with a more advanced Cloudflare Worker, the additional 9% of lazy-loaded LCP images can also be improved improved by removing the lazy-load attribute.

If you’d like to determine which element on your website serves as the LCP element so you can increase the priority or remove any lazy-loading, you can use browser developer tools, or speed tests like Webpagetest or Cloudflare Observatory.

39% of desktop images seems like a lot of opportunity to improve image performance. So the next question is how can Cloudflare determine the LCP image across our network and automatically prioritize them?

Image Index

We thought that how soon the LCP image showed up in the HTML would serve as a useful indicator. So we analyzed the HTTP Archive dataset to see where the cumulative percentage of LCP images are discovered based on their position in the HTML, including lazy-loaded images.

We found that approximately 25% of the pages had the LCP image as the first image in the HTML (around 10% of all pages). Another 25% had the LCP image as the second image. WordPress seemed to arrive at a similar conclusion and recently released a development to remove the default lazy-load attribute from the first image on block themes, but there are opportunities to go further.

Our analysis revealed that implementing a straightforward rule like “do not lazy-load the first four images,” either through the browser, a content management system (CMS), or a Cloudflare Worker could address approximately 75% of the issue of lazy-loading LCP images (example Worker below).

Ignoring small images

In trying to find other ways to identify likely LCP images we next turned to the size of the image. To increase the likelihood of getting the LCP image early in the HTML, we looked into ignoring “small” images as they are unlikely to be big enough to be a LCP element. We explored several sizes and 10,000 pixels (less than 100×100) was a pretty reliable threshold that didn’t skip many LCP images and avoided a good chunk of the non-LCP images.

By ignoring small images (<10,000px), we found that the first image became the LCP image in approximately 30-34% of cases. Adding the second image increased this percentage to 56-60% of pages.

Therefore, to improve image priority, a potential approach could involve assigning a higher priority to the first four “not-small” images.

Chrome 114 Image Prioritization Experiment

An experiment running in Chrome 114 does exactly what we described above. Within the browser there are a few different prioritization knobs to play with that aren’t web-exposed so we have the opportunity to assign a “medium” priority to images that we want to boost automatically (directly controlling priority with “fetch priority” lets you set high or low). This will let us move the images ahead of other images, async scripts and parser-blocking scripts late in the body but still keep the boosted image priority below any high-priority requests, particularly dynamically-injected blocking scripts.

We are experimenting with boosting the priority of varying numbers of images (2, 5 and 10) and with allowing one of those medium-priority images to load at a time during Chromes “tight” mode (when it is loading the render-blocking resources in the head) to increase the likelihood that the LCP image will be available when the first paint is done.

The data is still coming in and no “ship” decisions have been made yet but the early results are very promising, improving the LCP time across the entire web for all arms of the experiment (not by massive amounts but moving the metrics of the whole web is notoriously difficult).

How to use Cloudflare Workers to boost performance

Now that we’ve seen that there is a large opportunity across the Internet for helping prioritize images for performance and how to identify images on individual pages that are likely LCP images, the question becomes, what would the results be of implementing a network-wide rule that could boost image priority from this study?

We built a test worker and deployed it on some WordPress test sites with our friends at Rocket.net, a WordPress hosting platform focused on performance. This worker boosts the priority of the first four images while removing the lazy-load attribute, if present. When deployed we saw good performance results and the expected image prioritization.

export default {
  async fetch(request) {
    const response = await fetch(request);
 
    // Check if the response is HTML
    const contentType = response.headers.get('Content-Type');
    if (!contentType || !contentType.includes('text/html')) {
      return response;
    }
 
    const transformedResponse = transformResponse(response);
 
    // Return the transformed response with streaming enabled
    return transformedResponse;
  },
};
 
async function transformResponse(response) {
  // Create an HTMLRewriter instance and define the image transformation logic
  const rewriter = new HTMLRewriter()
    .on('img', new ImageElementHandler());
 
  const transformedBody = await rewriter.transform(response).text()
 
  const transformresponse = new Response(transformedBody, response)
 
  // Return the transformed response with streaming enabled
  return transformresponse
}
 
class ImageElementHandler {
  constructor() {
    this.imageCount = 0;
    this.processedImages = new Set();
  }
 
  element(element) {
    const imgSrc = element.getAttribute('src');
 
    // Check if the image is small based on Chrome's criteria
    if (imgSrc && this.imageCount < 4 && !this.processedImages.has(imgSrc) && !isImageSmall(element)) {
      element.removeAttribute('loading');
      element.setAttribute('fetchpriority', 'high');
      this.processedImages.add(imgSrc);
      this.imageCount++;
    }
  }
}
 
function isImageSmall(element) {
  // Check if the element has width and height attributes
  const width = element.getAttribute('width');
  const height = element.getAttribute('height');
 
  // If width or height is 0, or width * height < 10000, consider the image as small
  if ((width && parseInt(width, 10) === 0) || (height && parseInt(height, 10) === 0)) {
    return true;
  }
 
  if (width && height) {
    const area = parseInt(width, 10) * parseInt(height, 10);
    if (area < 10000) {
      return true;
    }
  }
 
  return false;
}

When testing the Worker, we saw that default image priority was boosted into “high” for the first four images and the fifth image remained “low.” This resulted in an LCP range of “good” from a speed test. While this initial test is not a dispositive indicator that the Worker will boost performance in every situation, the results are promising and we look forward to continuing to experiment with this idea.

While we’ve experimented with WordPress sites to illustrate the issues and potential performance benefits, this issue is present across the Internet.

Website owners can help us experiment with the Worker above to improve the priority of images on their websites or edit it to be more specific by targeting likely LCP elements. Cloudflare will continue experimenting using a very similar process to understand how to safely implement a network-wide rule to ensure that images are correctly prioritized across the Internet and performance is boosted without the need to configure a specific Worker.

Automatic Platform Optimization

Cloudflare’s Automatic Platform Optimization (APO) is a plugin for WordPress which allows Cloudflare to deliver your entire WordPress site from our network ensuring consistent, fast performance for visitors. By serving cached sites, APO can improve performance metrics. APO does not currently have a way to prioritize images over other assets to improve browser render metrics or dynamically rewrite HTML, techniques we’ve discussed in this post. Although this presents a potential opportunity for future development, it requires thorough testing to ensure safe and reliable support.

In the future we’ll look to include the techniques discussed today as part of APO, however in the meantime we recommend using Snippets (and Experiments) to test with the code example above to see the performance impact on your website.

Get in touch!

If you are interested in using the JavaScript above, we recommended testing with Workers or using Cloudflare Snippets. We’d love to hear from you on what your results were. Get in touch via social media and share your experiences.

We protect entire corporate networks, help customers build Internet-scale applications efficiently, accelerate any website or Internet applicationward off DDoS attacks, keep hackers at bay, and can help you on your journey to Zero Trust.

Visit 1.1.1.1 from any device to get started with our free app that makes your Internet faster and safer.

To learn more about our mission to help build a better Internet, start here. If you’re looking for a new career direction, check out our open positions.

Source :
https://blog.cloudflare.com/speeding-up-your-website-in-a-few-clicks/