Overview
Readers will learn how to properly recover a UniFi Access Point (UAP) using the TFTP method.
Table of Contents
Introduction
The method described in this article should help recover a “bricked” UniFi AP. This method will not void the device warranty, whereas opening the chassis for serial TTL will void your warranty. Most soft brick issues will be resolved via this procedure. If your issue continues unresolved, it might indicate a hardware issue that cannot be resolved via software. Feel free to contact support if you believe this to be the case.IMPORTANT:When Recovering UAP Gen1 Devices, The device itself will need approximately 5 minutes to finish recovering after the put command is entered.
TFTP for Windows
1. Prior to beginning the TFTP recovery, download the firmware for the device needed by visiting the UniFi Downloads section. Navigate to the UAP in question using the menu on the left, and find the latest firmware file. Confirm it is a .bin firmware file and not the UniFi Network application software file before downloading.
2. Once the correct firmware has been identified, download it and save it on your computer.
3. Unplug the ethernet cable from the UniFi AP.
4. Using a paperclip press and hold the UniFi AP’s reset button. Make sure you can feel it being depressed by the paperclip. Do not release the button until step 6.
5. While keeping the reset button pressed in, plug the ethernet cable back into the AP. Keep the reset button depressed until you see the device’s LED flashing in upgrade mode (read about LED patterns in this article). This may take up to 25 seconds. User Tip: The UAP will not respond to ping requests while in TFTP recovery mode, but will respond to ARP requests.
6. You may release the reset button. Now the device is in TFTP transfer mode.
7. Set a static IP on your Computer’s NIC. A static IP of 192.168.1.25, a subnet of 255.255.255.0 and gateway of 192.168.1.20 will work.
8. Plug the UniFi PoE injector’s LAN cable directly to your computer.
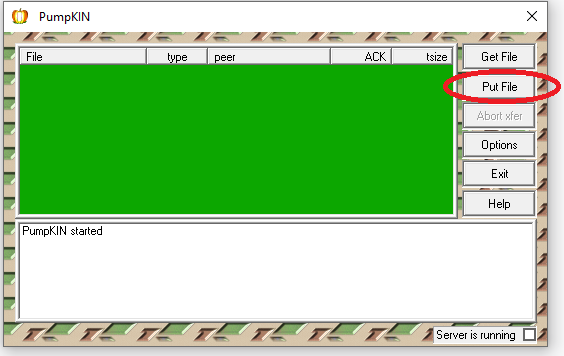
9. This example uses the Pumpkin TFTP software, which you can download here (clicking link will download the .exe file immediately) and disable the firewall or allow the Pumpkin connection. Click on “Put File”.
10. In “Local Files” browse for the firmware you downloaded and saved previously (in step 1).
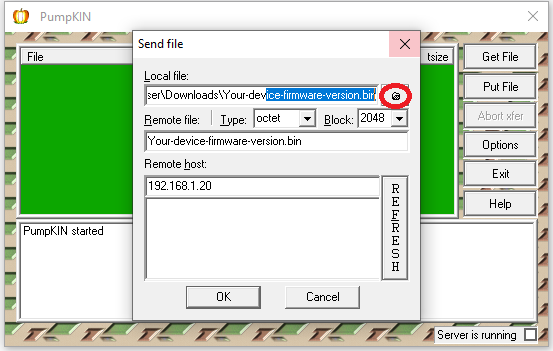
11. In the “Remote host” field enter the gateway you had predetermined (192.168.1.20), then click OK.
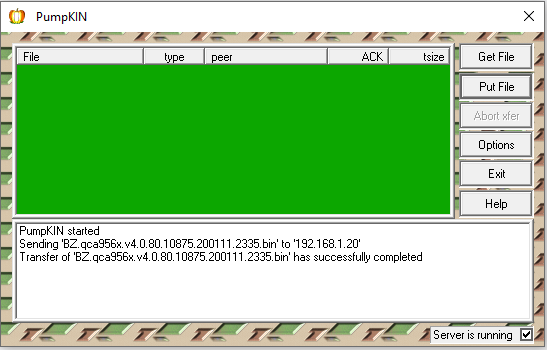
12. At this point, the file should begin transferring. The firmware will upgrade now and the device will automatically reboot once it has finished. Do not reboot it yourself.
TFTP for Linux & macOS
1. Prior to beginning the TFTP recovery, download the firmware for the device needed by visiting the UniFi Downloads section. Navigate to the UAP in question using the menu on the left, and find the latest firmware file. Confirm it is a .bin firmware file and not the UniFi Network application software file before downloading.
2. Once the correct firmware has been identified, download it and save it on your computer. You will need to know the exact path to your file, so for this example, we are moving the downloaded firmware file to /Users/username/.
3. Go to System Preferences > Network and set your computer’s network IP address to 192.168.1.25, subnet 255.255.255.0 and gateway 192.168.1.20. User Tip: Take note of what your IP address is before changing it. You will have to revert back to the original IP address on step 12.
4. On macOS Open Applications > Utilities > Terminal and type:
tftp
On Linux, open the command line application of choice and type the following (substituting the bolded path and firmware name for the name of the file you downloaded in step 2 and the path to where it is saved):
tftp -l ~/path/firmware_name.bin -p 192.168.1.20 69
5. A tftp> command prompt will appear. You are ready to reset the AP and connect it to your computer, while it’s in “upgrade mode”.
6. Unplug the ethernet cable from the UniFi AP.
7. Using a paperclip press and hold the UniFi AP’s reset button. Make sure you can feel it being depressed by the paperclip. Do not release the button until step 9.
8. While keeping the reset button pressed in, plug the ethernet cable back into the AP. Keep the reset button depressed until you see the device’s LED flashing in upgrade mode (read about LED patterns in this article). This may take up to 25 seconds. User Tip: The UAP will not respond to ping requests while in TFTP recovery mode, but will respond to ARP requests.
9. You may release the reset button. Now the device is in TFTP transfer mode.
10. On the TFTP command line in Terminal, paste these four lines and hit enter:
connect 192.168.1.20
binary
rexmt 1
timeout 60
Click to copy
11. Type the command put followed by the path to the firmware downloaded in step 2 and hit enter. Following the example mentioned in step 2, something similar to this would be typed into the Terminal window:
put /Users/Alex/BZ.qca956x.v3.9.27.8537.180317.1235.bin
IMPORTANT:Remember you must substitute the bolded path and firmware file name with your own path and file name.
Once it is successful, you will see something like this in the Terminal window (bolded words will be different for each user):
tftp> connect 192.168.1.20
tftp> binary
tftp> rexmt 1
tftp> timeout 60
tftp> put /path/firmware.bin
Sent x bytes in y seconds
The file should begin transferring at this point. The firmware will upgrade and the device will automatically reboot once it has finished. Do not reboot it yourself.
12. Re-connect the PoE injector’s LAN cable into your router. Restore the network IP back to what it was before.User Tip: If your device is having trouble getting adopted by the UniFi Network application after this process, try forgetting the device by going to the UniFiDevices section, clicking on the UAP in question and then within the properties panel that pops up, go to Config (gear icon) > Manage Device > Forget this device. Click on the “Forget” button and try the process again.
Source :
https://help.ui.com/hc/en-us/articles/204910124-UniFi-TFTP-Recovery-for-Bricked-Access-Points