How to install and configure Unifi controller on Raspberry Pi?
Written by Patrick Fromagetin How-To Tutorials
If you have already managed multiple Wi-Fi access points, you should know that this can be a nightmare …
But with good choices for hardware and a controller, this becomes easier.
It’s the main goal of the Unifi controller: manage most of the tasks on a wireless network to avoid issues.
It’s available on Raspberry Pi and I will show you how to install it.
How to install and configure Unifi controller on Raspberry Pi?
Start by adding the Ubiquiti server to the list of repositories for Raspberry Pi OS.
Then, the Unifi controller can be installed with apt and managed as a system service.
The installation is straightforward, you can install it like any Debian package.
But the access points configuration is not so easy and I saw no article explaining this.
As I’m using it at work, I can show you all the configuration steps with real access points and clients.
Before switching to Ubiquiti products, I remember having tested many brands to solve my issues, but none of them could not support over 10-20 users simultaneously (I even tested a fireproof model from D-Link, something like this one on Amazon ^^). So I definitely recommend trying Ubiquiti, this is cheap compared to other famous brands but works very well.
Let’s see how to do this!
Table of Contents
- Ubiquiti Networks products
- Unifi controller installation
- Unifi controller configuration
- Related questions
- Conclusion
Ubiquiti Networks products
Ubiquiti Networks introduction
Ubiquiti Networks is an American company, selling hardware for wireless technologies like access points, routers and cameras.
They started with wireless devices, and they are now diversifying upon a broader range of products.
The latest innovative product concerns the solar technology, they help you to manage solar farms.
Anyway, the product that interests us today is a software: Unifi controller.
The goal of this product is to manage access points and wireless devices from a unique web interface.
From the interface, you can see all the access points and broadcast a unique SSID.
The controller will handle the roaming between access points and load distribution.
Raspberry Pi Course
Sale: 10% off today. Take it to the next level.
I’m here to help you get started on Raspberry Pi, and learn all the skills you need in the correct order.YES, I WANT TO IMPROVE
Why do I need these products?
These products target mainly companies and large areas but you can have the same needs at home if you get some issues with your Wi-Fi connection (rooms with no network, roaming, stability, etc.).
If you need over one access point to cover all the house, it could be interesting to install these products at home.
For example, let’s say you install three access points and the controller somewhere.
You’ll have only one Wi-Fi SSID in all the area (outdoor included).
And you can move from one side to another without disconnection.
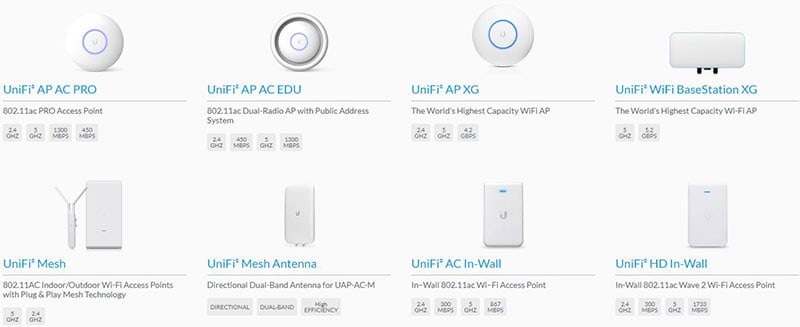
Ubiquiti products
Ubiquiti products are distributed by resellers, but are also available on several e-commerce websites:
To test these products, you don’t need many things.
Just buy one or more access points and build your professional wireless network.
Here is the link: Ubiquiti Unifi AP on Amazon.
You have several packages available: Only one, 2 AP (access point), 4 AP, etc.
Choose the one you prefer, but there is not a big saving by taking big packs, so you can try with one or two, and order the others after.
If you have a PoE Switch (this one for example on Amazon), you can plug them only to the network cable. An Ubiquiti switch is not mandatory, this one from Cisco is cheaper for example. It depends on what you want to do with it and how many AP you have.
Whatever your choice, a PoE switch will make the installation easier
If you want to start without it, there is a last option.
Ubiquiti provides an adapter with the AP (power cord + network = PoE Network), but you need a power outlet and two RJ45 cables instead of only one cable for everything.
Here is the link to the PoE injector on Amazon, make sure to check the AP power requirements are they are not all the same (a Pro AP needs PoE-48 for example).
Unifi controller installation
Now that you understand what are the Unifi products, we can move to the controller installation.
Installation on Raspberry Pi OS
As for any tutorial on this site, you firstly need to install Raspberry Pi OS on your Raspberry Pi.
Any version will do the job (I’m doing it with Raspberry Pi OS Lite).
If you don’t know how to do this, read my article on How to install Raspberry Pi OS on your Raspberry Pi.
Once installed, update it and reboot:sudo apt update
sudo apt upgrade
sudo reboot
And enable SSH access with:sudo service ssh start
This way you can follow this tutorial from your computer (if needed, check this post to learn more about this).
Set a static IP address
As our Raspberry Pi will be like a server on our network, we need to use:
- A wired connection
If you want a fast Wi-Fi network, you need to have your controller and your access point on a good connection.
So, I don’t recommend setting up the controller with a Wi-Fi connection (at home it’s probably ok). - A static IP address
The Raspberry Pi will become an important node on your network, so we need to fix its IP.
By default, the Raspberry Pi use the DHCP to get a random IP among those available.
For the static IP, you can either fix the IP in the DHCP server (your Internet router probably), or set a static IP in the Raspberry Pi configuration.
If you don’t know how to do this, I already explained it at the end of this article: Set a static IP address on your Raspberry Pi.

Master your Raspberry Pi in 30 days
Sale: 25% off today. Download the eBook.
Uncover the secrets of the Raspberry Pi in a 30 days challenge.GET IT NOW!
Unifi controller installation
Now we are ready to start the installation.
For these steps you have two choices:
- Download and install directly the official Debian package from the website.
- Add a new repository to manage the Unifi package with apt.
On the Ubiquiti downloads page you can find the Debian package to install the controller.
You can download it and install it on your Raspberry Pi.
But I don’t recommend it.
Because the Controller has many updates, about every month you have to download and install a new version manually.
There is a repository available and it’s easier to manage all updates with apt rather than doing everything manually.
- Connect with SSH to your Raspberry Pi.
- Add the repository in the apt configuration file:
echo 'deb https://www.ui.com/downloads/unifi/debian stable ubiquiti' | sudo tee /etc/apt/sources.list.d/100-ubnt-unifi.list - Add the key to the trusted keys:
sudo wget -O /etc/apt/trusted.gpg.d/unifi-repo.gpg https://dl.ui.com/unifi/unifi-repo.gpg
This allows us to use software from the previous repository - Run apt update to update the available packages list :
sudo apt update - And finally, install the Unifi package:
sudo apt install unifiAnswer yes and wait a few seconds for the installation process to finish.
This is the end of the installation procedure, but your controller may not work yet.
You can check the service status with:sudo service unifi status
If you get an error like this one on a fresh Raspberry Pi OS installation:
Starting Ubiquiti UniFi Controller: unifi
Cannot locate Java Home
Then you need to install Java to start the Unifi service.
Currently, the Unifier controller requires Java 8.
You may already have it from another application, but if you have this error, here is how to fix it:sudo apt install openjdk-8-jre
And finally start the Unifi service:sudo service unifi start
You can find more details about Java in this tutorial.
Check the status again if you want: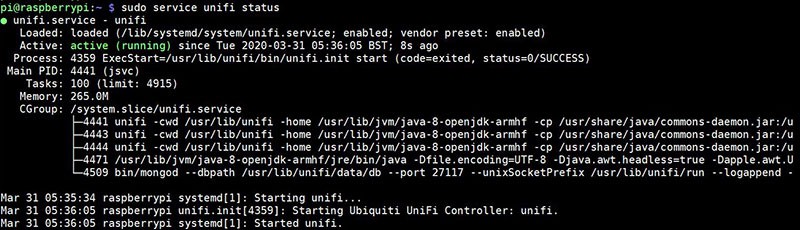
If everything is ok, you can move on to the next part to know how to use the software.You may also like:
- 25 awesome Raspberry Pi project ideas at home
- 15 best operating systems for Raspberry Pi (with pictures)
- My book: Master your Raspberry Pi in 30 days
Unifi controller configuration
First access
To access the web interface, go to https://<IP>:8443
For example, in my case it’s https://192.168.1.25:8443/
You’ll get a browser warning because we don’t have a secured certificate for the moment.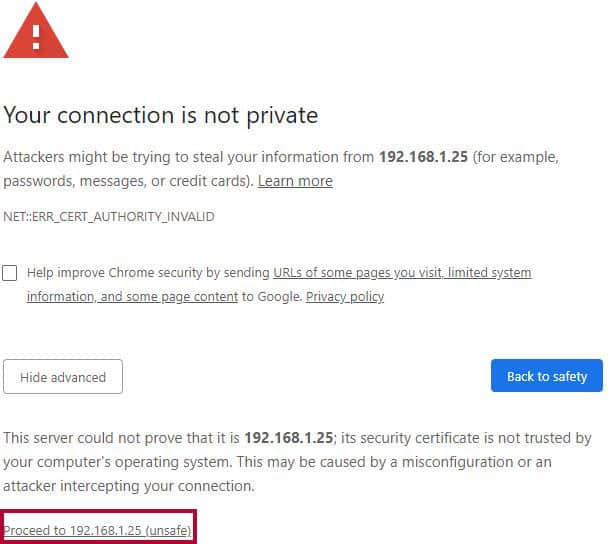
Accept the exception and move to the next page to configure everything you need to get started:
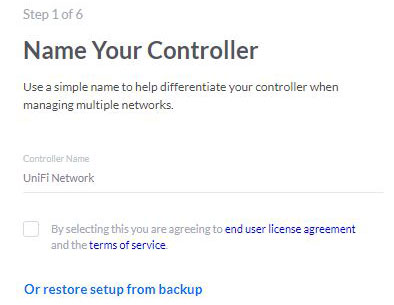
- Step1: Start by giving a name to his controller and click on “Next”
- Step 2: Choose if you want to enable the cloud interface (default) or not (advanced).
It depends on what you are trying to do.
If you are always on the same network (home or in a company), you don’t really need the cloud panel. But it can be useful for remote sites.- If you keep the default option, fill the form to create an Unifi account.
- On the advanced option, you have a form like this:
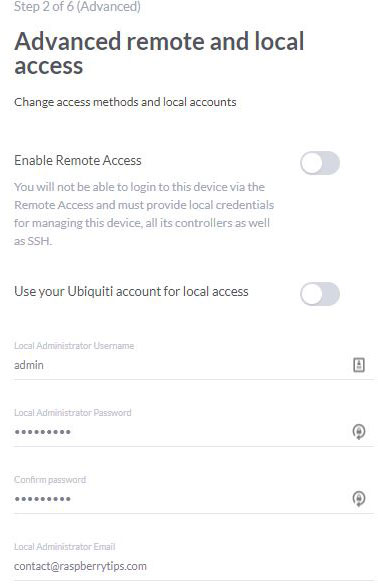
If you enable one option, you need to create a cloud account AND a local account.
I don’t need it for my test, so I disable everything.
- Step 3: Sign in or configure options.
This step is also different depending on your choice in the previous step
You may need to sign in your account, or just to configure two additional options (auto backup and auto-optimize).
Keep them enabled if asked. - Step 4: Configure your devices.
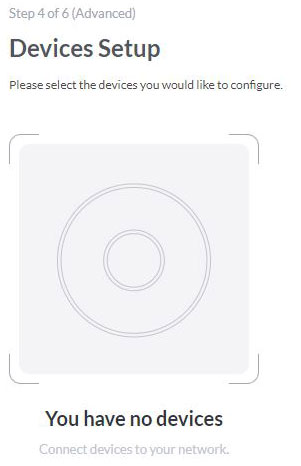
You can just skip this, it’s not required for now. You can add devices at anytime in the interface - Step5: You can finally configure your Wi-Fi settings now.
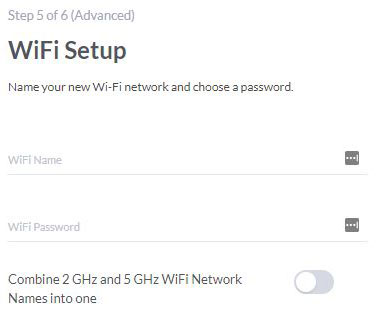
You can also change this in the interface, so just pick something to get started. - Step6: Finally, you also need to review your settings and you are ready to go.
Good job! You will now be redirected to the web panel.
We can finally see it and configure more things if needed.
Web interface overview
Once logged in the web interface, you’ll get many submenus to manage everything.
For the moment, it should be pretty empty, but in the left bar you can see:
- Dashboard: Here you can have a preview of your network performance (number of APs and clients).
Most of this dashboard needs the Unifi Security Gateway, so it’s not an important page. - Statistics: In this page you can monitor clients and traffic in the whole network.
For the moment, nothing here 🙂 - Map: In this one you can upload a map of your building, and place all APs on it.
This way you can know where they are and see the global Wi-Fi coverage (approximately). - Devices: This page shows you all the Unifi devices you have on your network.
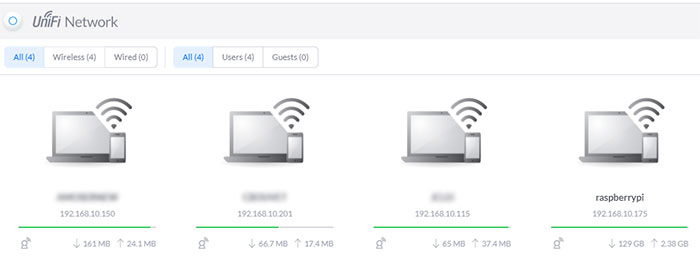
It’s the most important page, you will manage APs from here. - Clients: Same thing for the clients. You’ll see here all the connected clients with information about them (IP, AP, network usage, …):
- Insights: Here you can see miscellaneous information.
I’m using this mainly to see known clients (not connected now, but you can check the history, block or unblock them). - Events: This window shows you all the recent logs on your network
This can be clients connections, AP upgrades, roaming, … - Alerts: Same thing with errors and warnings.
- Settings: And this is the page where you’ll configure everything.
We’ll use it to create the wireless network. - Chat support: If you need help from Unifi, you can ask for help here.
Now that you have visited the whole interface, we can move forward to configure the access point.
Add the first access point
Physical preparation
There are two possibilities for the access point cabling.
With a PoE switch:
- Plug the access point to the POE Switch with an RJ45 cable.
- Basically, that’s it.
The status light should turn on and you can move to the next step.
Without PoE switch:
- You must have a POE adapter like this:
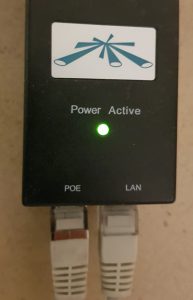 (it’s available on Amazon if you don’t have one with your access point: check it here).
 - Connect the LAN port to your switch or wall network socket.
- Connect the POE port to the access point.
- If the access point LED starts to blink, it’s ok.
Software configuration
Now that we powered on the access point, we can go back to the Unifi web interface for the next steps:
- Access the web interface: https://IP:8443.
- Click on “Devices” in the left menu.
- You should now see your access point in the list:
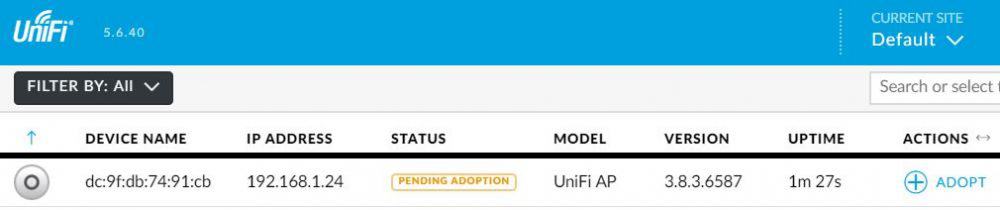 The controller is seeing it, but we need to tell that it’s an access point for this controller.
 - Click on “Adopt” at the end of the line.
The adoption process starts, after a few seconds, you should get the “Connected” status.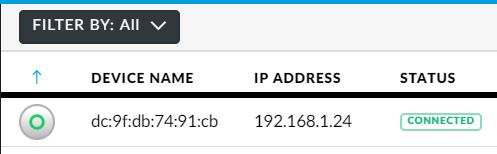
- If needed (probably), you can upgrade the AP firmware to the latest version by clicking “Upgrade”.
Your access point will take a few minutes to download and update the firmware.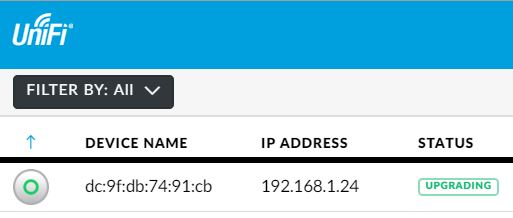
Anyway, the first access point is ready, and we can now create the wireless network (SSID).
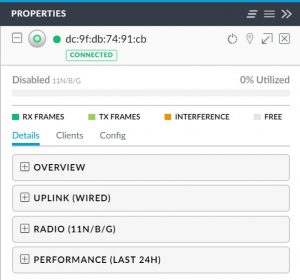
You can click on the line to see and change other settings for the access point (on the right).
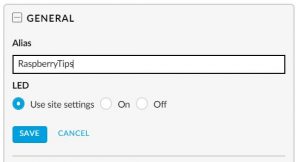

For example, you can set an alias for each access point to know which one is which.
In the properties window, click on the config tab and set an alias.
Change everything you want on the access point and move to the SSID creation.
Create your wireless network
Creating a wireless network is basically setting an SSID, a password and a security type.
You can do this in the “Settings” menu from the left bar:
- In settings, click on “Wireless Networks”.
- Then click on the “Create a new wireless network” button:

- In the new window, choose an SSID, a security type and a password:
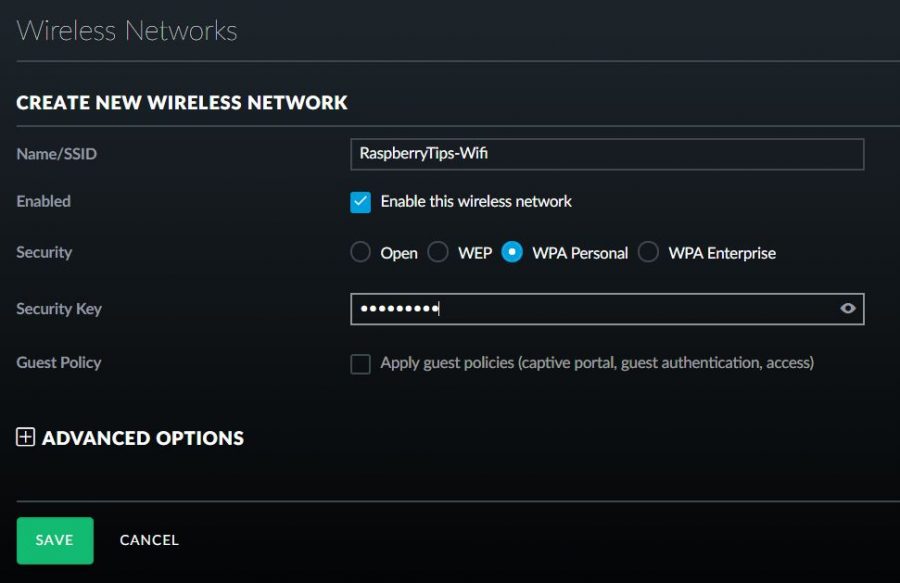 Choose WPA-Personal for security, WEP is not secure.
And prefer a long password (ideally a phrase from 15 to 30 characters). - Click “Save”.
The access points will restart with the new settings.
After a few seconds, the new wireless network is available for all your devices.
Connect to it and check that everything works fine.
By default, the Unifi controller will give you an IP address within your main network.
You have nothing else to do, but you can change it in Settings > LAN.
Then go back to the different menus to see information and statistics about your device.
Enjoy 🙂
Related questions
Do I need to keep the Raspberry Pi on? Not really. As soon as the Raspberry Pi stops, the controller is no longer available but the access point continue to work. You can still access the Wi-Fi network, but you lose controller’s features like roaming between APs.
Do the Unifi controller have advanced features you don’t talk about? Yes, a lot. I made a quick tutorial, but you can do a lot more: schedule downtimes, create guest access with VLAN or not, Radius with Active Directory, filter MAC address, block and unblock clients, etc …
How to reset an Unifi access point? If you lose access to an access point or have strange scenarios in the adoption process, you can reset it to factory defaults. To do this, use the reset button near the RJ45 socket. While the access point is on, let the button pressed for 10 seconds and then wait for the reset.
Conclusion
That’s it, you know how to install and configure an Unifi controller on your Raspberry Pi.
This controller is running perfectly on my Raspberry Pi (3B+ and 4).
I don’t know how many clients it would handle, but at home it’s more than enough.
If you have questions on this topic, leave a comment below and I’ll help you.
I’m using this software at work for five years now, so I may have the answer 😉
Source :
https://raspberrytips.com/unifi-controller-raspberry-pi/