Problem
It’s time to start planning! Microsoft will stop their browsers displaying the ‘lock’ icon for services that are secured with a certificate that uses SHA1. This is going to happen in February 2017 so now’s the time to start thinking about testing your PKI environment, and making sure all your applications support SHA2.
Note: This includes code that has been signed using SHA1 as well!
Solution
Below I’m just using an ‘offline root CA’ server, if you have multi tiered PKI deployments, then start at the root CA, fix that, then reissue your Sub CA certificates to your intermediate servers, fix them, then repeat the process for any issuing CA servers. Obviously if you only have a two tier PKI environment you will only need to do the root and Sub CA servers.
For your SubCA’s see PART TWO of this article.
Upgrade Your Microsoft PKI Environment to SHA2 (SHA256)
What about certificates that have already been issued?
We are NOT going to revoke any CA certificates that have already been issued so existing certificates will remain unaffected.
Here we can see my CA server is using SHA1
Note: If your server says the provider is Microsoft Strong Cryptographic Provider and not Microsoft Software Key Storage Provider then skip down a bit.

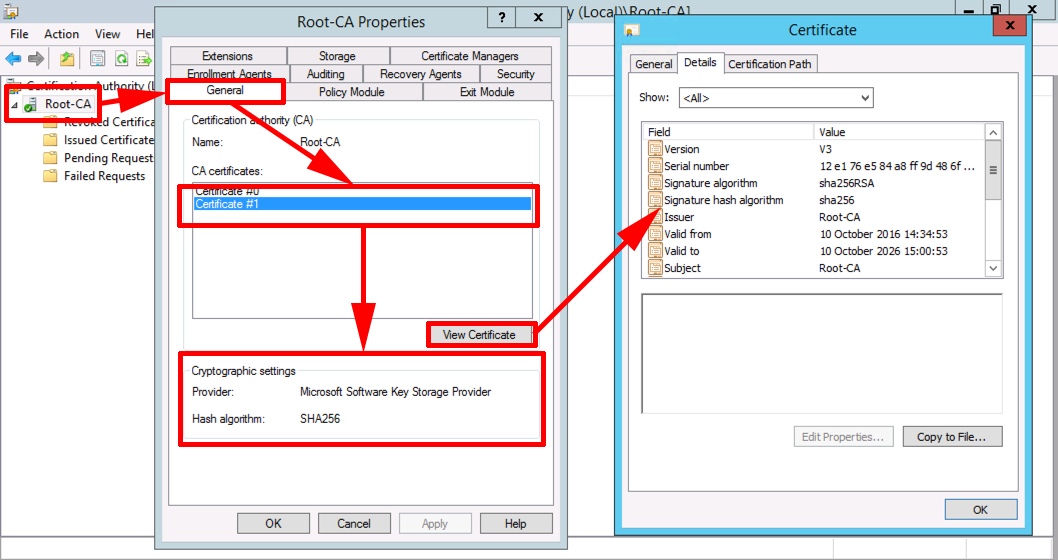
You may have multiple Certificates (that is not unusual).
Open a PowerShell Window (run as administrator), issue the following command;
certutil -setreg ca\csp\CNGHashAlgorithm SHA256
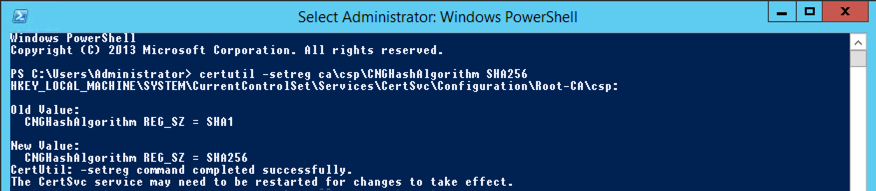
Restart Certificate Services.
net stop certsvc
net start certsvc

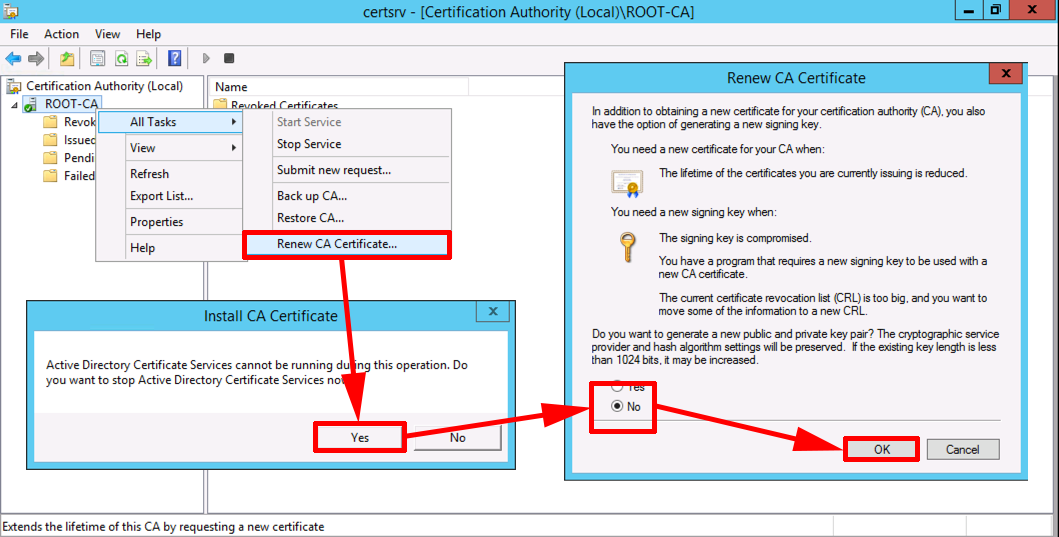
Now you need to generate a new CA certificate.

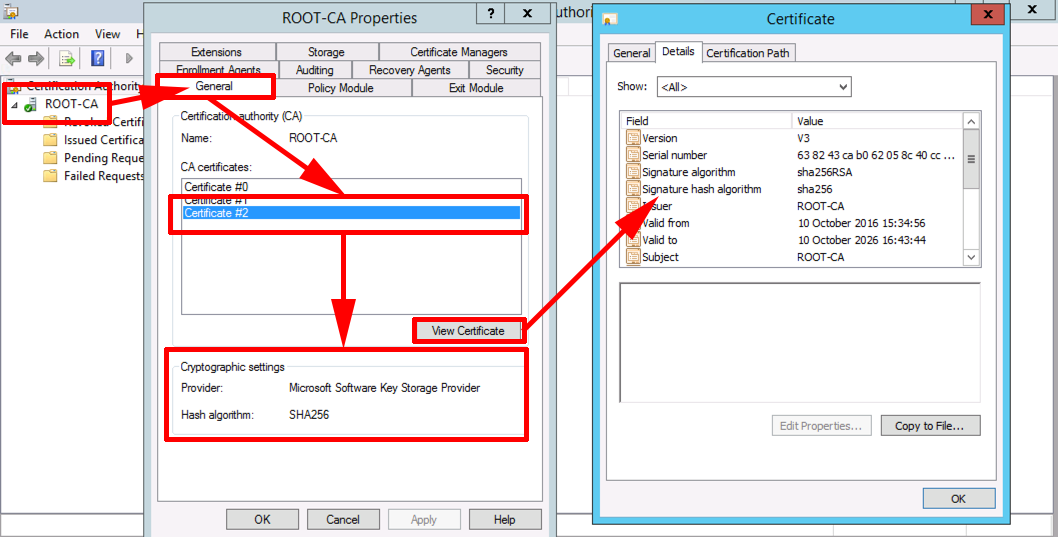
Now you can see your new cert is using SHA256.
Mine Won’t Change From SHA1?
That’s because your cryptographic provider does not support higher than SHA1, for example ‘The command to change to SHA256 was successful, but the new certificate still says SHA1. If you look the Provider is set to ‘Microsoft Strong Cryptography Provider‘.
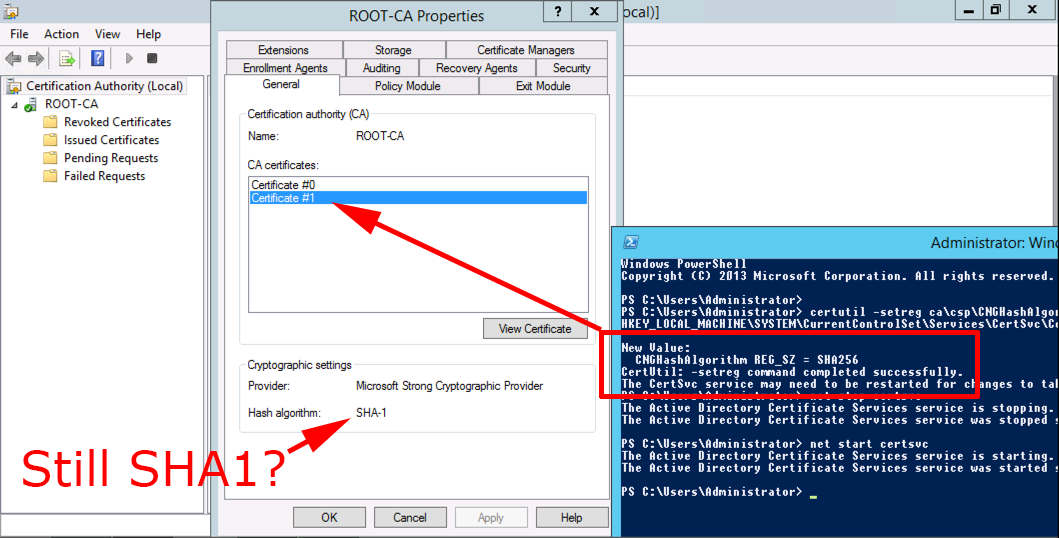
As you can see the strongest hash algorithm that supports is SHA1 that’s why it refuses to change.
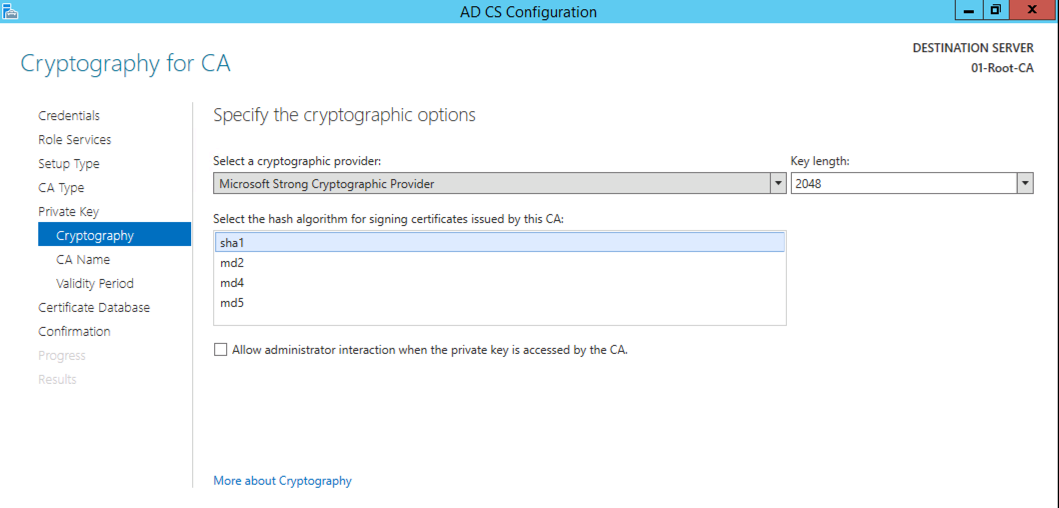
How Do I Change the CA Cryptographic Provider?
Make a backup of the CA Settings and the CA registry Settings.

Backup-CARoleService –path C:\CA-Backup -Password (Read-Host -Prompt "Enter Password" -AsSecureString)
TYPE IN A PASSWORD
reg export HKLM\SYSTEM\CurrentControlSet\services\CertSvc c:\Reg-Backup\CAregistry.reg
Note: You might want to create the Reg-Backup folder first and grant some rights to it.
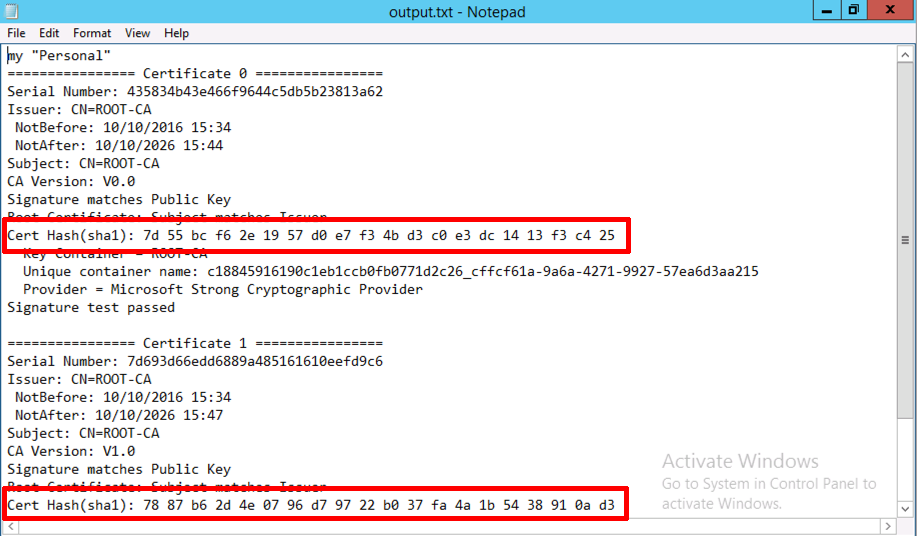
Now we need to delete the certificates this CA uses (don’t panic we’ve backed them up!) But first we need to find the certificate’s hashes to delete. Open an administrative command prompt, stop certificate services, and then issue the following command;
Note: ROOT-CA is the name of YOUR CA.
Stop-service certsvc

Certutil –store my ROOT-CA >output.txt
Open output.txt then take a note of the hashes for the certificate(s)
Then Open an Administrative PowerShell window and delete them;

cd cert:\localmachine\my
Del –deletekey <Certificate HASH>
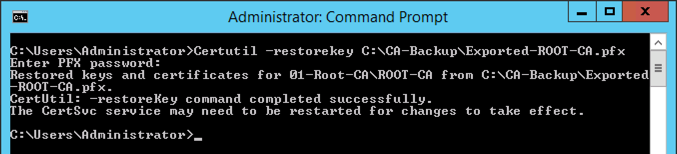
Now we need to import the p12 file we backed up earlier, then export that as a PFX file. Change ROOT-CA to the name of YOUR CA and the path to your backup folder and certificate as approriate.
Certutil –csp “Microsoft Software Key Storage Provider” –importpfx C:\CA-Backup\ROOT-CA.p12
Certutil –exportpfx my ROOT-CA C:\CA-Backup\Exported-ROOT-CA.pfx
ENTER AND CONFIRM A PASSWORD

Then restore the key from your PFX file.
Certutil –restorekey C:\CA-Backup\Exported-ROOT-CA.pfx
Now you need to import a couple of Registry files, in the examples below replace ROOT-CA with the name of your CA
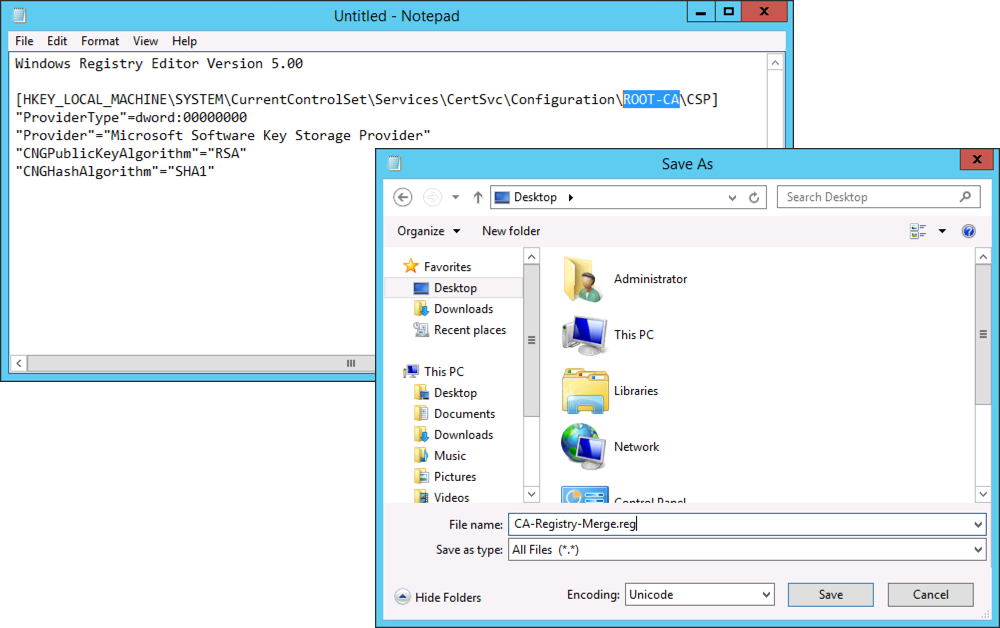
Save the file as CA-Registry-Merge.reg (set the save as file type to All Files)
Windows Registry Editor Version 5.00

[HKEY_LOCAL_MACHINE\SYSTEM\CurrentControlSet\Services\CertSvc\Configuration\ROOT-CA\CSP]
"ProviderType"=dword:00000000
"Provider"="Microsoft Software Key Storage Provider"
"CNGPublicKeyAlgorithm"="RSA"
"CNGHashAlgorithm"="SHA1"
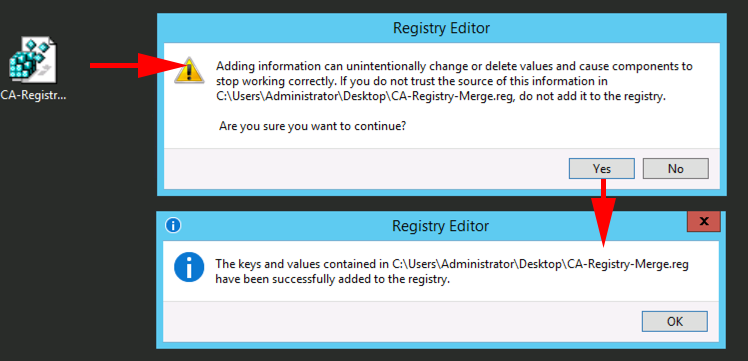
Merge the file into the registry.
Repeat the process with the following regisry file save this one as CA-Registry-Merge2.reg
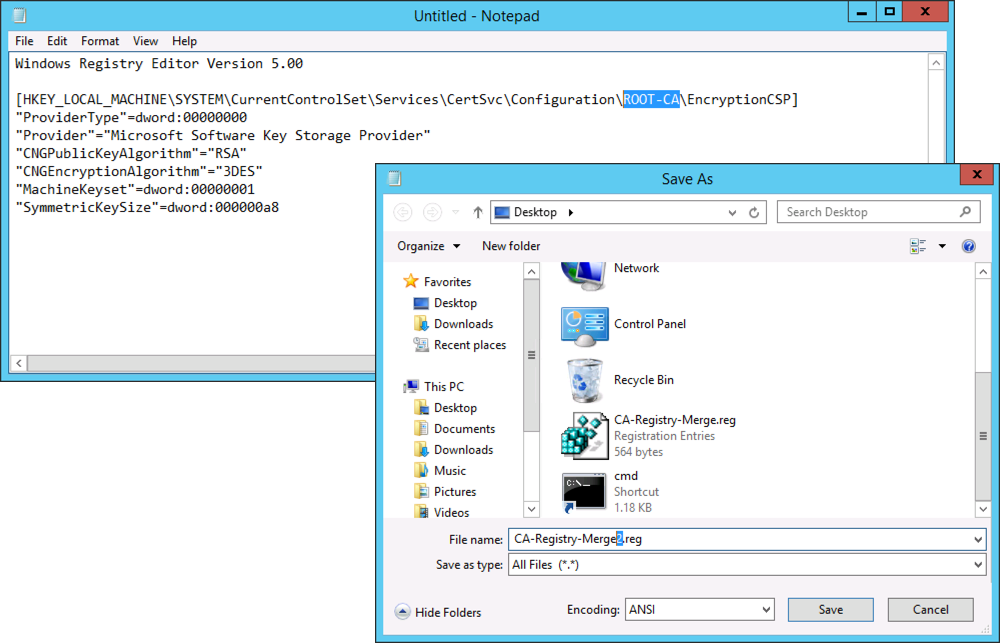
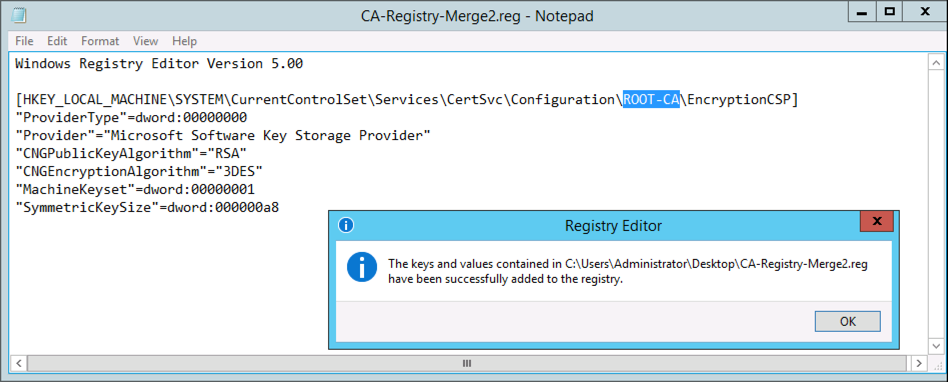
Windows Registry Editor Version 5.00

[HKEY_LOCAL_MACHINE\SYSTEM\CurrentControlSet\Services\CertSvc\Configuration\ROOT-CA\EncryptionCSP]
"ProviderType"=dword:00000000
"Provider"="Microsoft Software Key Storage Provider"
"CNGPublicKeyAlgorithm"="RSA"
"CNGEncryptionAlgorithm"="3DES"
"MachineKeyset"=dword:00000001
"SymmetricKeySize"=dword:000000a8
Now change the hashing algorithm to SHA256, open an administrative command prompt and issue the following two commands;
certutil -setreg ca\csp\CNGHashAlgorithm SHA256
net start certsvc
Renew the CA Cert.
You can now see the new cert is using SHA256.
Source :
https://www.petenetlive.com/KB/Article/0001243