Update 1/17/21: Microsoft has released OOB updates to fix the Windows Server bugs.
The latest Windows Server updates are causing severe issues for administrators, with domain controllers having spontaneous reboots, Hyper-V not starting, and inaccessible ReFS volumes until the updates are rolled back
Yesterday, Microsoft released the Windows Server 2012 R2 KB5009624 update, the Windows Server 2019 KB5009557 update, and the Windows Server 2022 KB5009555 update as part of the January 2022 Patch Tuesday.
After installing these updates, administrators have been battling multiple issues that are only resolved after removing the updates.
Windows domain controller boot loops
The most serious issue introduced by these updates is that Windows domain controllers enter a boot loop, with servers getting into an endless cycle of Windows starting and then rebooting after a few minutes.
As first reported by BornCity, this issue affects all supported Windows Server versions.
“Looks KB5009557 (2019) and KB5009555 (2022) are causing something to fail on domain controllers, which then keep rebooting every few minutes,” a user posted to Reddit.
A Windows Server administrator told BleepingComputer that they see the LSASS.exe process use all of the CPU on a server and then ultimately terminate.
As LSASS is a critical process required for Windows to operate correctly, the operating system will automatically restart when the process is terminated.
The following error will be logged to the event viewer when restarting due to a crashed LSASS process, as another user on Reddit shared.
“The process wininit.exe has initiated the restart of computer [computer_name] on behalf of user for the following reason: No title for this reason could be found Reason Code: 0x50006 Shutdown Type: restart Comment: The system process ‘C:\WINDOWS\system32\lsass.exe’ terminated unexpectedly with status code -1073741819. The system will now shut down and restart.”
Hyper-V no longer starts
In addition to the boot loops, BleepingComputer has been told by Windows administrators that after installing the patches, Hyper-V no longer starts on the server.
This bug primarily affects Windows Server 2012 R2 server, but other unverified reports say it affects newer versions of Windows Server.
As Hyper-V is not started, when attempting to launch a virtual machine, users will receive an error stating the following:
“Virtual machine xxx could not be started because the hypervisor is not running.”
Microsoft released security updates to fix four different Hyper-V vulnerabilities yesterday (CVE-2022-21901, CVE-2022-21900, CVE-2022-21905, and CVE-2022-21847), which are likely causing this issue.
ReFS file systems are no longer accessible
Finally, numerous admins are reporting that Windows Resilient File System (ReFS) volumes are no longer accessible or are seen as RAW (unformatted) after installing the updates.
The Resilient File System (ReFS) is a Microsoft proprietary file system that has been designed for high availability, data recovery, and high performance for very large storage volumes.
“Installed these updates tonight, in a two server Exchange 2016 CU22 DAG, running on Server 2012 R2. After a really long reboot, the server came back up with all the ReFS volumes as RAW,” explained a Microsoft Exchange administrator on Reddit.
“NTFS volumes attached were fine. I realize this is not exclusively an exchange question but it is impacting my ability to bring services for Exchange back online.”
Uninstalling the Windows Server updates made the ReFS volumes accessible again.
Yesterday, Microsoft fixed seven remote code execution vulnerabilities in ReFS, with one or more likely behind the inaccessible ReFS volumes.
These vulnerabilities are tracked as CVE-2022-21961, CVE-2022-21959, CVE-2022-21958, CVE-2022-21960, CVE-2022-21963, CVE-2022-21892, CVE-2022-21962, CVE-2022-21928.
How to fix?
Unfortunately, the only way to fix these issues is to uninstall the corresponding cumulative update for your Windows version.
Admins can do this by using one of the following commands:
Windows Server 2012 R2: wusa /uninstall /kb:KB5009624
Windows Server 2019: wusa /uninstall /kb:KB5009557
Windows Server 2022: wusa /uninstall /kb:KB5009555
As Microsoft bundles all security fixes into the single update, removing the cumulative update may fix the bugs, but will also remove all fixes for recently patched vulnerabilities.
Therefore, uninstalling these updates should only be done if absolutely necessary.
In this article, we’re going to look at Virtual Private Networks in Azure and how you can use them. As you may know, a Virtual Private Network or VPN is an encrypted tunnel over the Internet or other shared networks, for example, a telco provider network.
VPNs use different technologies to encrypt the traffic, the most common ones are IPSec and OpenVPN SSL.
VPNs can connect branches (“sites”), and/or clients devices to a corporate network. Branch and Site VPN connections are most called Site-to-Site or S2S VPNs and are generally permanently connected. User and Device VPN tunnels are called Point-to-Site or P2S VPNs and are normally initiated by the user or automatically by an application but are disconnected after they’re no longer in use.
In Azure, you can have and use both types of VPNs but depending on the solution of choice it can be a different setup.
Let us first explore the VPN Service and Device Options you have in Azure.
VPN Services and Devices
In Azure there are three different options to build VPNs:
Using Virtual Network Gateways
Using Azure Virtual WAN
Using Network Virtual Appliances
All of them are capable of both Point-to-Site and Site-to-Site connections but they have different infrastructures underneath each of them.
Virtual Network Gateway
Virtual Network Gateways are a classic approach, that many network architects are familiar with. You deploy one VPN Virtual Network Gateway Service within a Virtual Network. That service combines Point-to-Site and Site-to-Site Gateways and can be deployed in different sizes.
Here’s a list of different VPN Gateway SKUs:
VPN Gateway Generation
SKU
S2S/VNet-to-VNet Tunnels
P2S SSTP Connections
P2S IKEv2/OpenVPN Connections
Aggregate Throughput Benchmark
BGP
Zone-redundant
Generation1
Basic
Max. 10
Max. 128
Not Supported
100 Mbps
Not Supported
No
Generation1
VpnGw1
Max. 30*
Max. 128
Max. 250
650 Mbps
Supported
No
Generation1
VpnGw2
Max. 30*
Max. 128
Max. 500
1 Gbps
Supported
No
Generation1
VpnGw3
Max. 30*
Max. 128
Max. 1000
1.25 Gbps
Supported
No
Generation1
VpnGw1AZ
Max. 30*
Max. 128
Max. 250
650 Mbps
Supported
Yes
Generation1
VpnGw2AZ
Max. 30*
Max. 128
Max. 500
1 Gbps
Supported
Yes
Generation1
VpnGw3AZ
Max. 30*
Max. 128
Max. 1000
1.25 Gbps
Supported
Yes
Generation2
VpnGw2
Max. 30*
Max. 128
Max. 500
1.25 Gbps
Supported
No
Generation2
VpnGw3
Max. 30*
Max. 128
Max. 1000
2.5 Gbps
Supported
No
Generation2
VpnGw4
Max. 30*
Max. 128
Max. 5000
5 Gbps
Supported
No
Generation2
VpnGw5
Max. 30*
Max. 128
Max. 10000
10 Gbps
Supported
No
Generation2
VpnGw2AZ
Max. 30*
Max. 128
Max. 500
1.25 Gbps
Supported
Yes
Generation2
VpnGw3AZ
Max. 30*
Max. 128
Max. 1000
2.5 Gbps
Supported
Yes
Generation2
VpnGw4AZ
Max. 30*
Max. 128
Max. 5000
5 Gbps
Supported
Yes
Generation2
VpnGw5AZ
Max. 30*
Max. 128
Max. 10000
10 Gbps
Supported
Yes
As you can see, picking the right size depends on several factors, including the expected number of connected users/sites as well as your aggregate bandwidth internet connections.
Depending on the SKU, gateways are deployed with different sets of features. Normally Virtual Network Gateways are deployed in a pair, in an active/standby configuration without using Availability Zones in Azure. To use Availability Zones, you need to use a SKU with AZ at the end. If you want to switch from one SKU to another, that will require a 45-minute downtime. A switch from non-Availability Zone to Availability Zone will require a complete redeployment of the Virtual Network Gateway, which can take up to 2 hours.
Azure Virtual Network Gateway supports the following encryption standards for Site-to-Site tunnels.
If you want to use Point-to-Site it supports OpenVPN (SSL/TLS-based), Secure Sockets Tunneling Protocol (SSTP) or IKEv2 VPN, more information is available here:
Azure Virtual Network Gateways are a traditional and proven way to deploy VPN solutions Azure, but they are not as flexible as other solutions.
Virtual WAN
In comparison to Azure Virtual Network Gateways, Virtual WAN Gateways work differently. The first major difference is that Virtual WAN makes a distinction between Point-to-Site Gateways and Site-to-Site Gateways. While in Azure Virtual Network Gateways both Gateways are one service, in Virtual WAN you have different Gateways for each use case.
Another major difference is that Azure Virtual WAN Gateways are deployed in scale units. These units can be scaled up and down on-demand, without any service interruption.
Another great feature is, that Virtual WAN Network Gateways are always deployed as highly available as possible. These Gateways are deployed in Virtual Machine Scale Sets and are by default deployed in Availability Zones if the Azure Region supports them. If an Azure Region does not yet support Azure Availability Zones, the Virtual Network Gateways are deployed in Availability Sets and as soon as the region supports Availability Zones, the backend is updated automatically.
Azure Virtual WAN Site-to-Site Gateways supports the following IPSec encryption standards.
You can have up to 200 Scale units supporting 100,000 clients. The payment model for Virtual WAN Point-to-Site Clients is by connected users per minute. So, it’s completely paid as you go per connected user plus the amount of Gateway Scale Units.
With Virtual WAN, there is another very important point, routing between Site-to-Site VPN, Point-to-Site VPN and ExpressRoute Gateways is enabled by default without any additional efforts by the customer. You can get more details via the link below.
Network Virtual Appliances are Virtual Machines running in a classical Virtual Network or Azure Virtual WAN. Those Appliances are third party and are available via the Microsoft Azure Marketplace.
Those appliances are harder to integrate and make highly available. The configuration is completely the responsibility of the customer, but for certain scenarios, they can offer major benefits for customers. One major selling point is if your organization has already standardized on a particular vendor/appliance, using the same one in Azure will ensure consistency and lower the learning curve for your network engineers.
Those appliances are mostly supporting additional features like Quality of Service, special encryption protocols or VPN Client tunnel optimization. For example, Barracuda Networks uses its own VPN Tunnel and encryption protocol TINA between their appliances and devices.
Then there are appliance partners who offer great VPN clients with additional features like filtering, split tunnelling by service or traffic optimization. Examples are Palo Alto Global Protect or FortiGate FortiClient.
Those appliances are much harder to integrate into a classic hub and spoke environment, with Virtual WAN the process of deployment is more automated. If you use those NVAs, you also have additional license costs for the appliances, which must be paid to the OEM.
As already mentioned, feature sets of those Network Virtual Appliances are often much richer than with bare Azure Virtual Network Gateways and Virtual WAN Gateways.
How to Deploy a VPN
Let me guide you on how to deploy a VPN Tunnel with the different service offerings. As the nature of the three solutions is completely different, I will split them up into three separate parts.
Virtual Network Gateway
As there is already a lot of deployment documentation out there, I will not create a new one. Let me just point you to the right resources, so that you can start and deploy according to Microsoft best practices.
As an additional option, you can pick a Network Virtual Appliance, if the Appliance of your choice is available in Virtual WAN. I would encourage you to make use of the more PaaS like the approach of Azure Virtual WAN.
The deployment of VPN Connections with Network Virtual Appliances is pretty diverse and depends on the vendor itself. Before I can point you to some example documentation, start with the documentation on how to deploy NVAs.
This documentation describes how to deploy an NVA in Azure.
You should follow that guide to ensure that the NVA is deployed according to supported standards. As there are a lot of partners out there, please contact the vendor of your choice to get additional guidance.
Palo Alto
The first vendor with very good documentation on the deployment is Palo Alto. You can find their guides below.
Barracuda is not that common among enterprise customers in Europe but offers a great portfolio of features including their own tunnelling protocol. Please find their docs below.
Within the Troubleshooting part, I will only concentrate on the troubleshooting guides for Azure Services, as the troubleshooting on NVA is extremely specific to the vendor.
For Azure Virtual Network Gateways, there are two good troubleshooting guides available in Microsoft’s Documentation.
One focuses on connections to Azure Virtual Network Gateways dropping or being unable to connect.
When looking into Azure Virtual WAN is more difficult, as you may not have access to the Monitoring and Troubleshooting logs. So, if you have the need for deeper troubleshooting, it makes sense to engage with Microsoft Support. In any case, you should have good monitoring in place according to documentation.
Sometimes Customers can confuse Azure VPN with other services available. Most commonly customers confuse Virtual Network Peering and Azure ExpressRoute with VPN Solutions.
Virtual Network Peering
Azure Virtual Network Peering is “only” a peering connection via the Microsoft Global Network between two Virtual Networks in Azure. It uses Software Defined Network technologies to connect the two networks and there is no Virtual Gateway necessary to do so. Virtual Network Peering is only used for interconnecting Virtual Networks within Azure and there is no option to use Virtual Network Peering to connect to the world outside of Microsoft Azure.
To learn more about peering, please visit the documentation below.
Microsoft Azure ExpressRoute is like VPN a connection to networks outside of the Microsoft Global Network. Its build to connect Customer Networks with the Microsoft PaaS Network via Peering or the Customer Private IaaS infrastructure using peering and private gateways.
The difference between Azure ExpressRoute and VPN is the fact that ExpressRoute is not leveraging internet connections or shared networks. With ExpressRoute you get a private end to end connection from your on-premises location to the Microsoft Global Network.
Those connections are more expensive but can offer more bandwidth or better Service Level Agreements, depending on your location and network service provider. ExpressRoute is not always better than VPN, always check your use case and your needs.
To be honest, Network Providers like to sell ExpressRoute due to better margins than with premium Internet connections. If you are interested in more information about that topic, you can visit some other articles here on the DOJO.
As is often the case with Microsoft’s service offerings there are several ways to achieve the same goal, here’s a flowchart I use when talking to customers about this.
That chart should help, at least for the initial discussion and understanding, which solution is best for your situation.
Conclusion
The “right” solution depends on what you want to achieve with your architecture. Often, it’s a decision driven by costs and features. Please also take complexity and maybe newer security requirements and approaches into account.
For example, if you’re searching for RADIUS integration, and the only solution might be costly, maybe it’s better to reconsider the requirement and check if you can achieve the same security requirements with Azure Active Directory Authentication instead.
The previous entries in this section have gone through the most complex sections of Failover Cluster Manager as it applies to Hyper-V. Most of the tool’s remaining functions deal with the supporting infrastructure for a cluster and are much less involved with the virtual machines. If you’re building up and configuring a brand new cluster, these areas are where you’ll spend a lot of your initial time. For a functioning cluster, they still contain useful information but won’t be frequently accessed.
How to Manage Hyper-V Cluster Nodes in Failover Cluster Manager
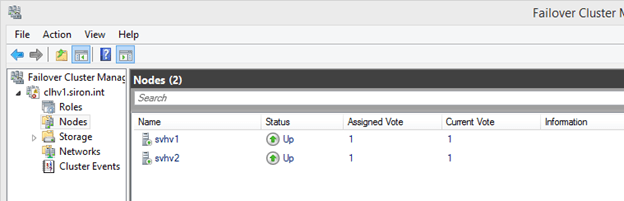
In the left pane underneath the cluster that you wish to work with, the second tree item is Nodes. This is where you’ll find the physical systems that perform the virtualization hosting for your cluster. If you have hosts that perform other roles for this cluster but are not cluster members, such as storage nodes, they should not appear here.
While it is technically possible for a single cluster to operate multiple roles, such as Hyper-V and Scale-Out File Server (SOFS), a single cluster cannot serve as both the storage platform and the virtualization platform for the same Hyper-V guests. Differing host types should be placed in separate clusters. The only secondary role supported in a Hyper-V cluster is the Hyper-V Replica Broker.
The typical node view should look something like the following. In this cluster, all nodes are present with a status of Up:
There are two context menus to work with in this section. As with all other aspects of Failover Cluster Manager, you can access an object’s context menu by either right-clicking it or by left-clicking it and looking in the panes at the far right.
For the Nodes tree object itself, there is only one unique item: Add Node. Clicking this will take you through the same screens that you saw in the first section of this application’s tour, except that the outcome will be the addition of a new node to an existing cluster rather than the creation of an all-new cluster. If you proceed through the wizard, you’ll be notified of the need to perform a cluster validation. Remember that you might need an up-to-date validation report if you contact Microsoft support.
The other items on the Roles tree node’s context menu are standard. You can customize the columns that appear in the center pane by selecting Customize, which is the only option in the View sub-tree. By default, you are shown the Assigned Vote and Current Vote columns, which give you the status of the cluster’s quorum. There is also an Information column that is usually empty, but will contain a preview of any error states. The last menu option allows you to Refresh the center pane to have Failover Cluster Manager re-check the status of the nodes. Finally, you can click Help to see Failover Cluster Manager’s MMC help window.
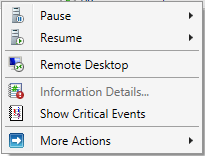
The context menu for a node is more complex, although not nearly to the same degree as what you saw for virtual machines in the Roles node.
Node Context Menu: Pause
Pausing a node makes it an ineligible target for role migrations. The node is still given a vote for quorum and remains in full communication with the other nodes. This is an ideal state if you wish to perform short-term manual maintenance operations on the node. This menu has two sub-menu items: Drain Roles and Do Not Drain Roles.
If you opt to perform a drain, the cluster will attempt to move all roles on that node to other nodes in the cluster based on its own balancing algorithms. Active guests with a priority of Medium or higher will be Live Migrated; all others will be Quick Migrated. Even if the drain operation is not fully successful, the node will be paused in order to prevent it from accepting any new roles.
Node Context Menu: Resume
The Resume option has the same options as the Pause menu in reverse: Fail Roles Back and Do Not Fail Roles Back. If you choose to perform failback, all roles that were migrated as part of the initial drain operation are retrieved after the node is resumed. Otherwise, they are left where they are.
Node Context Menu: Remote Desktop
This menu option starts the Remote Desktop Client, automatically targeted at the node.
Node Context Menu: Information Details
If any operation resulted in an error status, the Information column will show a short preview. Use this menu item to display the complete error message.
Node Context Menu: Show Critical Events
This menu item will spawn a minimalist event viewer window that shows critical events related to node and quorum management. Despite the implications in the context menu and the spawned window’s title bar text, the events are for all nodes.
Node Context Menu: More Actions
The More Actions menu gives you three sub-items. The first two are Stop Cluster Service and Start Cluster Service. In the current version of Failover Clustering, the outcome of stopping the cluster service in this fashion is very similar to the drain operation, with the exception that the cluster service (clussvc.exe) is gracefully halted. All of the node’s roles are drained and it cannot receive any incoming roles. The node will retain its quorum vote, although Dynamic Quorum may choose to rescind it.
The Start Cluster Service option will not restore drained roles. It will start the service, reattach the node to the cluster, and, if necessary, restore its quorum vote.
The final option on the More Actions menu is Evict. This should only be used when a node is being decommissioned or has failed entirely. In earlier versions of Failover Clustering, evicting a node was a fairly common troubleshooting step. It should no longer be necessary in current versions. Evicting a node does cause configuration information to be lost, so, even if rejoined, pre-existing validation reports may become invalidated.
How to Manipulate Storage for Hyper-V in Failover Cluster Manager
The storage node of Failover Cluster Manager allows you to work with cluster-controlled storage. Hyper-V does work perfectly well with virtual machines that are placed on file servers running SMB (storage message block) protocol version 3 or later. Version 3 debuted with Windows Server 2012. These storage locations are not controlled by the cluster and cannot be managed through Failover Cluster Manager. It can only work with standard cluster disks and Cluster Shared Volumes.
The Storage node has two sub-nodes of its own: Disks and Pools. Pools are used with Scale-Out File Servers (SOFS). It is technically possible to run Hyper-V roles and SOFS on the same cluster, but the virtual machines cannot be placed on space used by the same cluster’s SOFS. In addition to being unsupported, the system will error if you attempt to create such a “loopback” configuration.
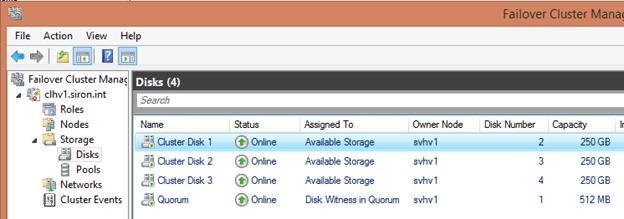
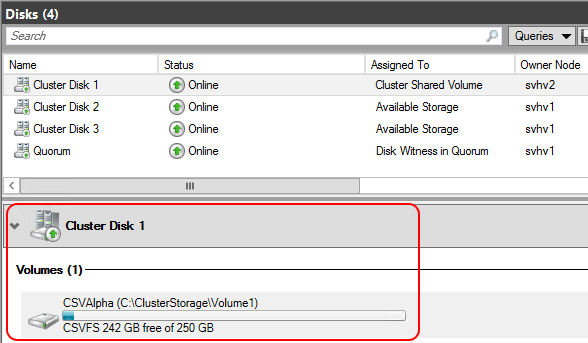
Disks
For a Hyper-V cluster, the Disks sub-node is typically of much greater use. The only situation in which it would not contain any information is if you are not using a disk witness for quorum and all guests are stored on SMB 3 storage. In order for this section to be of any use, you must have connected shared storage to every one of the nodes using common direct-attached storage through an external SCSI interface, an iSCSI link, or a fibre channel link.
Each shared storage location must be formatted with NTFS or ReFS. A disk to be used for quorum must be formatted with NTFS. The details of preparing storage are not part of this tour. Storage will be talked about in more detail in a later article, but you can find detailed guidance on how to connect storage to a Hyper-V system here. Making the connections on the nodes will not automatically make them available to the cluster. That can be done through this section of Failover Cluster Manager.
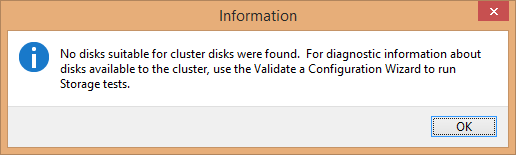
To begin, select the Disks node in the left pane and access its context menu. The very first item is Add Disk. If there is no unused storage connected to every node, you’ll receive a dialog indicating as much:
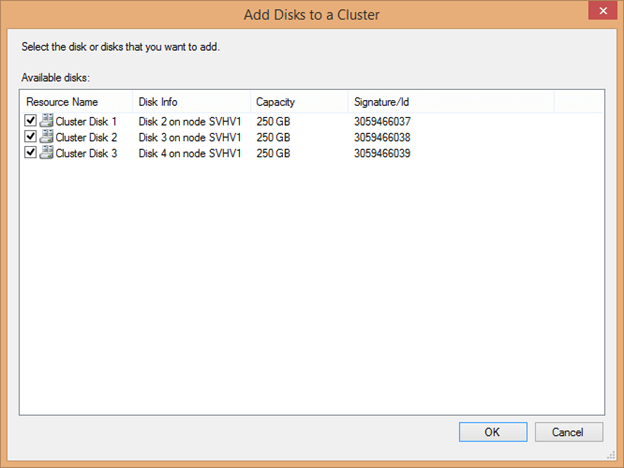
If one or more disks are available, you’ll see something like the following:
The cluster automatically determines the Resource Name by using the text “Cluster Disk” and incrementing a number. Disk Info helps you to identify what is being connected, as it does not read volume information such as labels. The signature can also be used to identify the disk; it’s retrievable by using Get-Disk. When adding several disks at once that are of equal size, be certain to match them when accessing this screen as it will not be so readily available after being attached to the cluster. Check the box(es) for the disk(s) you’d like to add and click OK. Each disk should then appear in the center pane:
The next item in the Disks sub-node’s context menu is Move Available Storage. Its sub-options are the same for virtual machine migrations: Best Possible Node and Select Node. These items operate only on standard cluster disks; quorum disks and Cluster Shared Volumes are unaffected. Every single cluster disk is moved if possible.
The remaining options in this node are the standard View, Refresh, and Help items which work as they do elsewhere in Failover Cluster Manager.
Disk Items Context Menu
The items in the center pane represent the disk-based storage assigned to the cluster. They have a dynamic context menu. Each item is presented below in alphabetical order.
Add to Cluster Shared Volumes: This option is only available for standard cluster disks. Once used, the disk is converted to a CSV. It no longer appears as a separate disk attached to a singular cluster node but becomes an entity underneath C:\ClusterStorage on all nodes. A folder named Volume# will be created to represent this disk. It can be renamed, but doing so after virtual machines are placed on it will cause those virtual machines to break. Any virtual machines that were on the cluster disk before it was converted will also be broken.
Bring Online: This returns an offline object to online status. All disk types are eligible.
Information Details: If the previous operation on this item in this console resulted in an error, this entry will become active. Clicking it will spawn a dialog with details about the error.
Move: The Move option is only available for Cluster Shared Volumes. It reassigns ownership to another node, either automatically with the sub-item Best Possible Node or by manual selection using Select Node.
More Actions: As with the menu it’s found in, this displays a dynamic menu with the following possible options:
Assign to another role: In a Hyper-V cluster, this menu item is not useful. You do have the ability to assign it directly to a virtual machine role, but that doesn’t grant any special abilities to the virtual machine that it doesn’t already have. Virtual machines can already use any cluster disk as a pass-through disk. Using this menu item could help visually reinforce that a particular virtual machine is using it as pass-through storage.
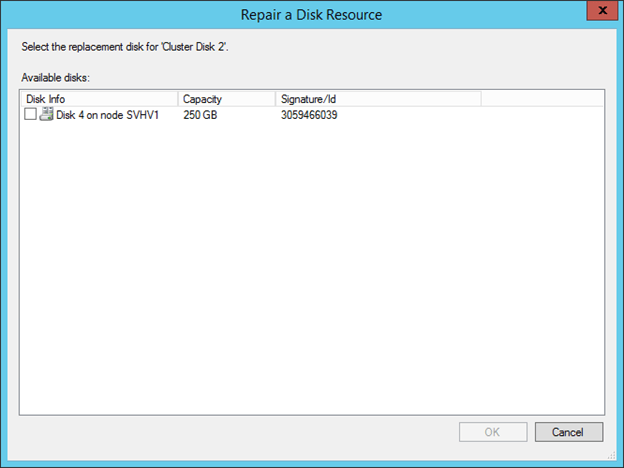
Repair: This item becomes active for a disk in an offline state. This menu item is to be used In the event that the disk is offline because it has permanently failed and you are replacing it. The replacement disk must be attached to storage but must not have been added as a cluster disk; if it was added, remove it. Upon clicking Repair, a dialog will appear with all available storage. Choose the item that will replace the failed disk. Upon selecting the replacement item, it will be added into the cluster with the name of the disk that was replaced. You will be prompted to bring it online to complete the repair.
Show Dependency Report: This item is of little use in a Hyper-V cluster as disk resources are not assigned directly to roles. For CSVs, it will display the underlying Cluster Disk resource.
Simulate Failure: Triggers the configured failure action for a standard cluster disk or the quorum disk.
Turn off Maintenance Mode: Restores a disk object that was previously placed in Maintenance Mode to normal operation.
Turn on Maintenance Mode: This mode removes protections against tools such as CHKDSK from running against the volume and disables the cluster’s automated health checks. When activated against a Cluster Shared Volume, you receive a warning that roles will be taken offline; this is not true for virtual machines. However, the volume’s representation under C:\ClusterStorage will disappear and virtual machines in that space cannot be Live Migrated until Maintenance Mode is ended.
Properties: A properties dialog will be displayed that will change depending upon the selected item. These will be explored after this list.
Remove: The selected standard cluster disk is removed from cluster disks. Virtual machines on it will instantly crash.
Remove from role: If a cluster disk is assigned to a role, a menu item will appear allowing you to return it to Available Storage.
Remove from Cluster Shared Volumes: The selected CSV is returned from CSV status to standard disk status. Any hosted virtual machines will instantly crash.
Show Critical Events: A minimal event viewer dialog is shown with any available critical events about the selected resource.
Take Offline: use this to take any disk resource offline. Any active virtual machines using this storage will instantly crash.
Properties Dialog for Cluster Shared Volumes
Of the three cluster disk types, the properties dialog for a CSV is the simplest:
The only modifiable control is the Name. This name is only used by Failover Cluster Manager and Failover Clustering. It does not change the way that virtual machines refer to their storage. You can change this at any time. The list box shows four sets of information. Volume is the logical path that the CSV is referred to on each node. This can be renamed using traditional file system commands and tools, but doing so after virtual machines are created on it will cause their links to break. Redirected Access indicates if the volume is in Redirected Access mode. Capacity shows the total space on the disk and Free Space displays how much of that space is unused.
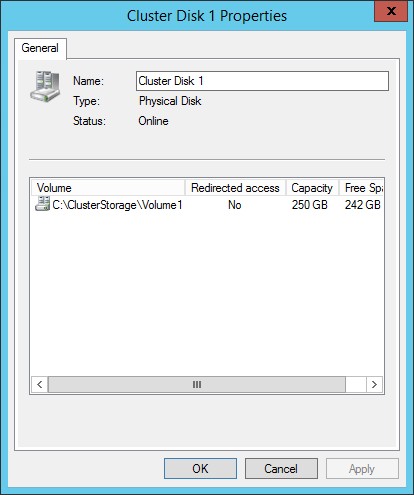
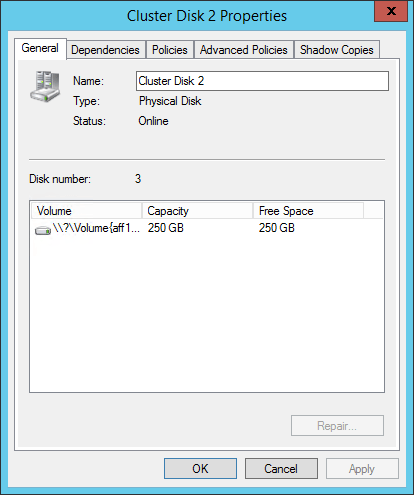
Properties Dialog for Standard Cluster Disks and Quorum Disks
The properties dialog is identical for the other two types. It contains a series of tabs. The first is the General tab and it looks very similar to the properties dialog for the CSV:
You can use this page to rename the cluster disk. As with a CSV, nothing is harmed by performing this operation. This dialog shows the cluster’s disk number, which can be referenced with the text-based tools and Disk Management. The center pane shows similar information to that of a CSV, although instead of a symbolic link path, the Volume is the drive letter, if one is assigned, or a raw volume identifier. Since cluster disks do not support Redirected Access mode, that column is not present.
The Dependencies tab will not show anything for the typical cluster disk in a Hyper-V environment since they are not commonly attached to roles. The Policies, and Advanced Polices tabs are identical in content and function to those for other cluster resources and were examined in the two preceding articles in this series.
The unique item on this dialog is the Shadow Copies tab. This setting is node independent and should be used instead of the traditional setting in Windows Explorer.
Details Pane
When a single cluster disk is selected in the center pane, that center pane will be divided into upper and lower sections. The lower section will show a quick summary of the item:
You can quickly see the space utilization for the volume and its drive letter or raw volume identifier (standard cluster disks and quorum disks) or its symbolic link (CSVs). In this pane, the item has a single-item context menu. A quorum or standard cluster disk will have the option to Change Drive Letter, which displays a very simple dialog allowing you to clear the drive letter or assign a new one from the available letters. A Cluster Shared Volume will give you the option to Turn On Redirected Access Mode if it is off or turn it on otherwise.
How to Manage Hyper-V-Related Cluster Networks in Failover Cluster Manager
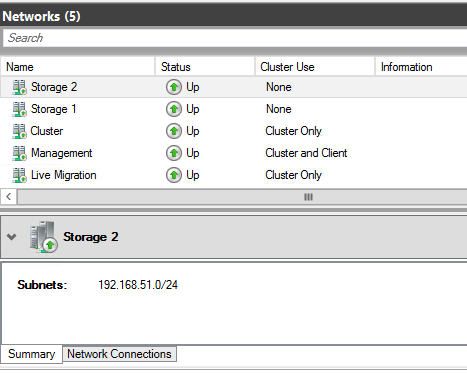
The next cluster tree item after Disks is Networks. This section gives access to the networking resources as managed by the cluster. Clicking this tree node will display all of the networks that the cluster is aware of in the center pane. By default, the cluster names them as Cluster Network 1, Cluster Network 2, etc.
The way that Failover Clustering identifies a network is by subnet. Every unique subnet discovered on each host will be displayed here. If a host has two or more adapters in the same subnet, only one of them will be displayed. If any host does not have an adapter in a subnet that can be found on other nodes, that network will be considered Partitioned. Configuring the subnets is a topic that’s tackled in the Networking article. As this is just a tour of the tool, it’s assumed that all of your subnets are already configured as desired.
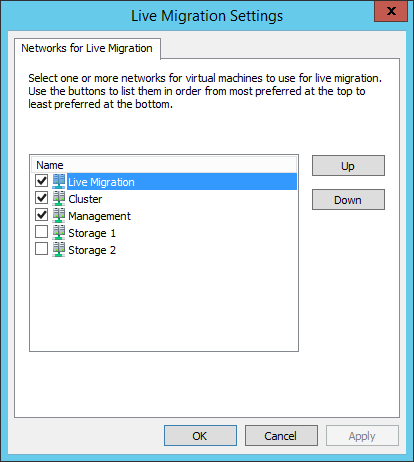
The tree node itself has only a single unique item: Live Migration Settings. The others are the standard View, Refresh, and Help items. Clicking the Live Migration Settings item will display a dialog box similar to the following:
This dialog allows you to prioritize how Live Migration will utilize available networks. It should be used judiciously to prevent Live Migrations from drowning out other types of communication. Live Migration traffic will only be allowed on networks that are checked (those networks must also be marked to allow cluster traffic, which will be demonstrated shortly). Items at the top of the dialog will be given preference when networks are selected. If the sending and receiving nodes are both set to use SMB for Live Migration and SMB multichannel is active, all selected networks will carry Live Migration traffic.
Networks List Entries and Context Menus
The center pane of the Networks section of Failover Cluster Manager looks like the following:
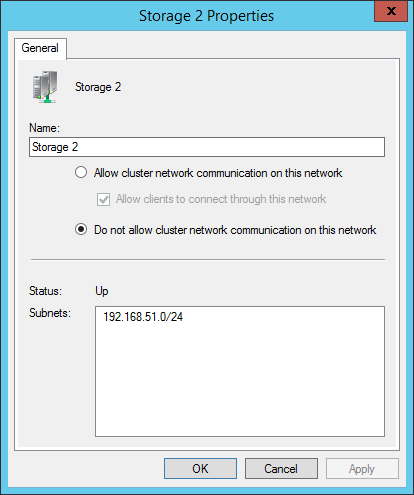
The upper portion shows the name, status, and allowed traffic for each network. The context menu for these items contains only three entries: Information Details, Show Critical Events, and Properties. As is common to previously discussed objects in Failover Cluster Manager, the Information Details link shows a pop-up dialog with details about any error message caused in this session and Show Critical Events displays any error events involving the selected item. Properties opens the properties dialog for the item:
The first changeable control is the name. A network can be safely renamed at any time. The most common use of this feature is to give a meaningful description to the network.
The second control group indicates how the network is to be used.
Allow cluster network communication on this network grants the ability for cluster communications, such as heartbeat, Redirected Access, and Live Migrations to utilize the selected network.
Allow clients to connect through this network is not as meaningful in a Hyper-V cluster as for other cluster types. The network that the cluster name object (CNO) appears on should be marked for client access. Clustered Hyper-V does not expose its virtual machine roles through this network the way that other clustered roles do, so this check box serves no other purpose.
Do not allow cluster network communication on this network prohibits the cluster from using the network at all. This will prevent Live Migration traffic even if the network’s box is checked for Live Migration as shown in the preceding sub-section.
The remainder of this dialog shows the status of the network and the subnets that have been detected on it.
Details Pane
The initial dialog for this section showed the Summary pane for the details section. It displays the name of the network and its detected subnets. There is also a Network Connections tab which shows the adapters in the subnet:
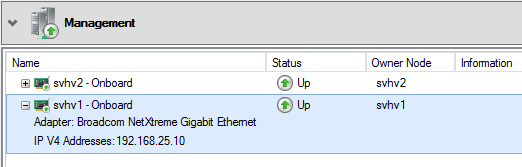
If a network is partitioned, this can help you determine which node(s) have lost connectivity or have failed adapters. It can also help you to verify that adapters have been assigned to the correct subnet. The displayed name (Onboard in the above image) is the same name that the host’s management operating system shows for the adapter. These items have a context menu with the options Information Details and Show Critical Events.
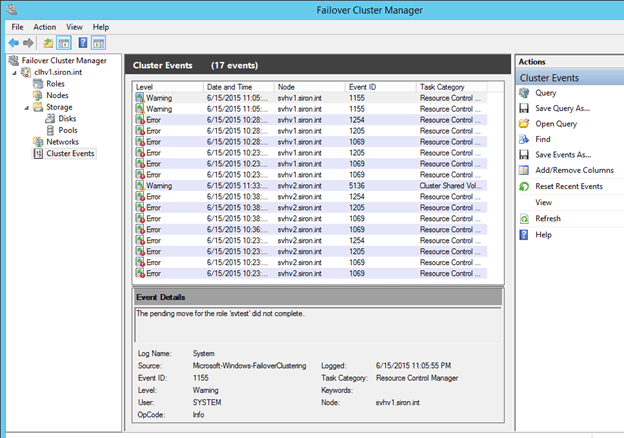
Cluster Events
The final cluster tree node is Cluster Events. This contains a display that is very similar to that of the standard Windows Event Viewer. It has been automatically filtered to contain a specific subset of the cluster-related events. Not all possible events are shown. The default view appears below:
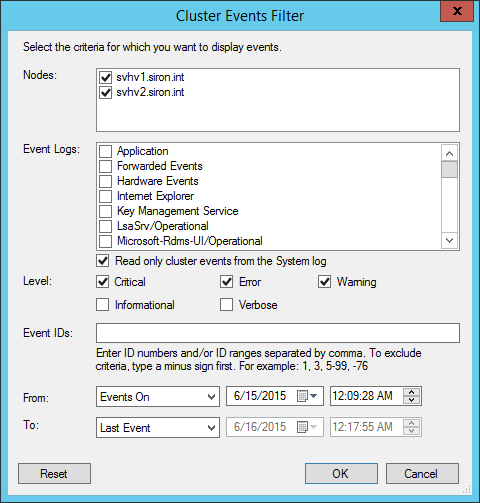
The Cluster Events node does have a context menu, displayed on the right in the above screenshot. It will not be discussed in detail here, as it is quite similar to that found in the traditional Event Viewer. One item to point out to those that are not familiar with that interface is Query. Clicking this will show the following dialog, which you can use to tailor what appears here:
Other items in the context menu can be used to further manipulate the query, if you so desire.
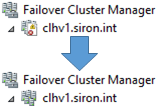
A second notable item in this list is Reset Recent Events. This clears the view, but it does not remove the events themselves. It also has the effect of resetting the icon that Failover Cluster uses for the cluster back to its default as shown below:
Wrapping up in the GUI
This concludes the tour of Failover Cluster Manager and the unit on the built-in graphical tools to manage Hyper-V and Failover Clustering. These sections have taken a very thorough look at these tools and their capabilities and will serve as a reference as you work through the rest of the material and in into the future.
Most Microsoft-based Hybrid Identity implementations use Active Directory Federation Services (AD FS) Servers, Web Application Proxies and Azure AD Connect installations. In this series, labeled Hardening Hybrid Identity, we’re looking at hardening these implementations, using recommended practices.
Note: This blogpost assumes all Web Application Proxies, AD FS servers and Azure AD Connect installations run Windows Server 2016.
Why harden
Hardening provides additional layers to defense in depth approaches. It changes the default behavior of products and services to make them more resilient to unauthorized changes and compromise.
REASONS WHY
Protocols, cipher suites and hashing algorithms are used to encrypt communications in every Hybrid Identity implementation. Typically, ciphers and algorithms to use are based on a negotiation between both ends of a communications channel. The purpose is to use the most secure protocols, cipher suites and hashing algorithms that both ends support. To use the strongest ciphers and algorithms it’s important to disable the ciphers and algorithms you no longer want to see used.
Microsoft recommends organizations to use strong protocols, cipher suites and hashing algorithms. For Azure Active Directory, they are changing the negotiation settings on their systems regularly, to avoid downgrades in encryption standards.
POSSIBLE NEGATIVE IMPACT (WHAT COULD GO WRONG?)
When the systems of an Hybrid Identity implementation are improperly hardened, there will be no communication between Azure Active Directory and the systems of the implementation, and/or between the systems of the Hybrid Identity implementation.
This may affect authentications directly when using Active Directory Federation Services (AD FS) or Pass-through Authentication as authentication method in the Hybrid Identity implementation. This may cause diminished functionality, when Password Hash Sync (PHS) is used as the authentication method. Also, this may cause certificates to expire, monitoring to halt and/or backups to fail. It may also mean admins will no longer be able to (remotely) manage the systems.
When using the Remote Desktop Protocol (RDP) to manage the Windows Server installations of the Hybrid Identity implementation, the default security layer in RDP is set to Negotiate which supports both SSL (TLS 1.0) and the RDP Security Layer. Open Remote Desktop Session Host Configuration in Administrative Tools and double-click RDP-Tcp under the Connections group. If it is set to SSL (TLS 1.0) and you are running Windows Server 2008, make sure that you have installed TLS 1.1 and 1.2 support.
To disable weak protocols, cipher suites and hashing algorithms on Web Application Proxies, AD FS Servers and Windows Servers running Azure AD Connect, make sure to meet the following requirements:
SYSTEM REQUIREMENTS
Make sure all systems in scope are installed with the latest cumulative Windows Updates. Also make sure you run the latest stable version of Azure AD Connect.
PRIVILEGE REQUIREMENTS
Make sure to sign in with an account that has privileges to create and/or change and link Group Policy objects to the Organizational Unit (OU) in which the systems in scope reside.
WHO TO COMMUNICATE TO
When intending to make changes to systems in the Hybrid Identity implementation, make sure to send a heads-up to these people and/or teams in your organization:
Load balancers and networking guys and gals
The Active Directory team
The people responsible for backups, restores and disaster recovery
The people going through the logs, using a SIEM and/or a TSCM solution
The monitoring team
One of the challenges you can easily avoid through communications is that multiple persons and/or teams make changes to the configuration. When it breaks, you don’t want to roll-back a bunch of changes, just the one that broke it. Make sure you have the proper freeze/unfreeze moments to achieve that.
Determining weak protocols, cipher suites and hashing algorithms
Encryption methods are comprised of:
A protocol, like PCT, SSL and TLS
A key exchange method, like ECDHE, DHE and RSA
A cipher suite, like AES, MD5, RC4 and 3DES
PROTOCOLS
For the purpose of this blogpost, I’ll stick to disabling the following protocols:
PCT v1.0
SSL v2
SSL v3
TLS v1.0
TLS v1.1
Note: PCT v1.0 is disabled by default on Windows Server Operating Systems. SSL v2 is disabled, by default, in Windows Server 2016, and later versions of Windows Server.
CIPHER SUITES AND HASHING ALGORITHMS
For the purpose of this blogpost, I’ll stick to disabling the following ciphers suites and hashing algorithms:
RC2
RC4
MD5
3DES
DES
NULL
All cipher suites marked as EXPORT
Note: NULL cipher suites provide no encryption.
Note: The above list is a snapshot of weak ciphers and algorithms dating July 2019. Please consult the SSL Labs Documentation for actual guidance on weak ciphers and algorithms to disable for your organization.
Protocols, cipher suites and hashing algorithms and the negotiation order to use
For the purpose of this blogpost, I’ll stick with the following protocols, cipher suites and hashing algorithms, in the following negotiation order:
TLS_ECDHE_ECDSA_WITH_AES_256_GCM_SHA384
TLS_ECDHE_ECDSA_WITH_AES_128_GCM_SHA256
TLS_ECDHE_RSA_WITH_AES_256_GCM_SHA384
TLS_ECDHE_RSA_WITH_AES_128_GCM_SHA256
TLS_DHE_RSA_WITH_AES_256_GCM_SHA384
TLS_DHE_RSA_WITH_AES_128_GCM_SHA256
TLS_ECDHE_ECDSA_WITH_AES_256_CBC_SHA384
TLS_ECDHE_ECDSA_WITH_AES_128_CBC_SHA256
TLS_ECDHE_RSA_WITH_AES_256_CBC_SHA384
TLS_ECDHE_RSA_WITH_AES_128_CBC_SHA256
TLS_ECDHE_ECDSA_WITH_AES_256_CBC_SHA
TLS_ECDHE_ECDSA_WITH_AES_128_CBC_SHA
TLS_ECDHE_RSA_WITH_AES_256_CBC_SHA
TLS_ECDHE_RSA_WITH_AES_128_CBC_SHA
This list provides a preference to cipher suites that offer Perfect Forwarding Secrecy (PFS) with the elliptic curve Diffie-Hellman key exchange (ECDHE_*).
How to disable weak protocols
As the systems in scope may or may not be of Active Directory Domain Services, may or may not run Server Core and may or may not allow downloading 3rd party tools, but in all cases you can disable weak protocols using Windows PowerShell with the following scripts:
Note: As SSL v2 is disabled and removed from Windows Server 2016, and up, and SSL v3 is disabled by default in Windows Server 2016, and up, these protocols do not need to be disabled on Windows Server 2016, and newer versions of Windows Server.
ENABLE TLS 1.2
To enable TLS 1.2, run the following Windows PowerShell script in an elevated PowerShell window on each of the Windows Server installations in scope of the Hybrid Identity implementation:
Note: The DisabledByDefault registry value doesn’t mean that the protocol is disabled by default. It means the protocol isn’t advertised as available by default during negotiations, but is available if specifically requested.
CONFIGURING .NET APPLICATIONS TO USE TLS 1.1 AND TLS 1.2
Now, we need to configure .Net applications to use either TLS 1.1 or TLS 1.2. This is important for built-in Windows functionality and 3rd party applications and services. Run the following Windows PowerShell script in the same elevated PowerShell window as the previous one:
To disable TLS 1.0 and TLS 1.1, run the following Windows PowerShell script in the same elevated PowerShell window as the previous Windows PowerShell script on each of the Windows Server installations in scope of the Hybrid Identity implementation:
Restart the server after these configuration changes.
How to disable weak ciphers and algorithms
The systems in scope may or may not be of Active Directory Domain Services, may or may not run Server Core and may or may not allow downloading 3rd party tools. In all cases you can disable weak cipher suites and hashing algorithms by disabling individual TLS cipher suites using Windows PowerShell.
Note: The below lines of PowerShell do not change the negotiation order of the cipher suites and hashing algorithms. It merely disables individual combinations of unwanted cipher suites and hashing algorithms. This also eliminates the need to keep up with the cipher suites in Windows Server between Windows Server version releases and even between updates. A win-win situation if you’d ask me!
Tip! To get an overview of the current negotiation order, use the following line of PowerShell:
Get-TlsCipherSuite | Format-Table Name
Use the following lines on Windows Server 2016 installations to remove weak cipher suites and hashing algorithms:
After hardening it’s time to test the hardening. Everyone should sign off (not literally, unless that’s procedure) on the correct working of the Windows Servers running Azure AD Connect. Does authentication to cloud applications still work? Does rolling over the certificate still work? Does monitoring still work? Can we still make back-ups? Can we still restore the backups we make?
Typically, hardening is rolled out to one Windows Server. When testing the hardening of the functionality behind the load balancer, make sure that the load balancer points you to the hardened system, not another one. In an environment with a Staging Mode Azure AD Connect installation, the hardening can be performed on this Windows Server installation and tested with the normal Staging Mode (imports only) synchronization cycles. When hardening is approved upon, the actively synchronizing Azure AD Connect installation can be switched, or hardened, too.
Get rid of old protocols, cipher suites and hashing algorithms in your Hybrid Identity implementation, so they cannot be used to negotiate the security of the connections down.
On December 9, 2021, a new critical 0-day vulnerability impacting multiple versions of the popular Apache Log4j 2 logging library was publicly disclosed that, if exploited, could result in Remote Code Execution (RCE) by logging a certain string on affected installations.
On December 14, 2021, information about a related vulnerability CVE-2021-45046 was released that recommended that users upgrade to at least version 2.16.0+ of Log4j 2.
Based on our analysis, the rules and protections listed below for CVE-2021-44228 are also effective against CVE-2021-45046.
On December 28th, yet another RCE (CVE-2021-44832) was discovered and disclosed. Although not as critical as the initial vulnerabilities (CVSS 6.6), it is still recommended that administrators do their due diligence to update to the latest version available (2.17.1).
Background
Log4j is an open-open source, Java-based logging utility that is widely deployed and used across a variety of enterprise applications, including many cloud services that utilize Apache web servers.
The vulnerability (assigned as CVE-2021-44228) is a Java Naming and Directory InterfaceTM (JNDI) injection vulnerability in the affected versions of Log4j listed above. It can be triggered when a system using an affected version of Log4j 2 includes untrusted data in the logged message – which if this data includes a crafted malicious payload, a JNDI lookup is made to a malicious server. Depending on the information sent back (response) a malicious Java object may be loaded, which could eventually lead to RCE. In addition, attackers who can control log messages or their parameters can execute arbitrary code loaded from LDAP servers when message lookup substitution is enabled.
The challenge with this vulnerability is widespread use of this particular logging utility in many enterprise and cloud applications. JDNI lookups support multiple protocols, but based on analysis so far, exploitability depends on the Java versions and configurations. From a practical standpoint, just because a server has implemented an affected version of Log4j 2, it does not automatically mean it is vulnerable depending on its configuration.
Trend Micro Research is continuing to analyze this vulnerability and its exploits and will update this article as more information becomes available. A comprehensive blog with more background information can be found here .DETAILS
Protection Against Exploitation
First and foremost, it is always highly recommended that users apply the vendor’s patches when they become available.
A new version of Log4j 2 has been released which reportedly resolves the issue: Version 2.17.1 is now availableand is the suggested update. Users with affected installations should consider updating this library at the earliest possible time.
Note: due to additional waves of new exploits, the previous manual mitigation steps published have proven not to be sufficient and have been removed.
Trend Micro Protection and Investigation
In addition to the vendor patch(s) that should be applied, Trend Micro has released some supplementary rules, filters and detection protection that may help provide additional protection and detection of malicious components associated with this attack servers that have not already been compromised or against further attempted attacks.
Trend Micro Log4j Vulnerability ScannerTrend Micro Research has created a quick web-based scanning tool that can help users and administrators identify server applications that may be affected but the Log4Shell vulnerability.The tool can be found at: https://log4j-tester.trendmicro.com/ and a demo video can be found at: https://youtu.be/7uix6nDoLBs.
Trend Micro Log4Shell Vulnerability Assessment ToolTrend Micro also has created a free assessment tool that can quickly identify endpoints and server applications that may have Log4j using the power of Trend Micro Vision One.This quick and easy self-serve security assessment tool leverages complimentary access to the Trend Micro Vision One threat defense platform, so you can identify endpoints and server applications that may be affected by Log4Shell. The assessment instantly provides a detailed view of your attack surface and shares next steps to mitigate risks.
Please note, if you are already a Trend Micro Vision One customer, you do not need to complete the form. Simply log into your console and you will be provided instructions to complete the assessment of your exposure.
Trend Micro Vision One™
Trend Micro Vision One customers benefit from XDR detection capabilities of the underlying products such as Apex One. In addition, depending on their data collection time range, Trend Micro Vision One customers may be able to sweep for IOCs retrospectively to identify if there was potential activity in this range to help in investigation.
Vision One Threat Intelligence Sweeping
Indicators for exploits associated with this vulnerability are now included in the Threat Intelligence Sweeping function of Trend Micro Vision One. Customers who have this enabled will now have the presence of the IOCs related to these threats added to their daily telemetry scans.
The first sweep, “Vulnerable version of log4j….” is slightly different than the others in that instead of specific IOCs, it is looking for specific instances of log4j libraries on systems which can help a customer narrow down or give additional insights on potentially vulnerable systems.
The results of the intelligence scans will populate in the WorkBench section of Vision One (as well as the sweep history of each unfolded threat intelligence report).
Please note that customers may also manually initiate a scan at any time by clicking the 3 dots at the right of a rule and selecting the “Start Sweeping” option.
Vision One Search Queries for Deep Security Deep Packet Inspection
Customers who have Trend Micro Cloud One – Workload Security or Deep Security may utilize the following search query to identify hosts and then additional queries can be made with a narrowed timeframe on those hosts as additional information is learned about exploits.
eventName:DEEP_PACKET_INSPECTION_EVENT AND (ruleId:1008610 OR ruleId:1011242 OR ruleId:1005177) AND ("${" AND ("lower:" OR "upper:" OR "sys:" OR "env:" OR "java:" OR "jndi:"))
Trend Micro Cloud One™ – Conformity
Trend Micro Cloud One – Conformity allows gives customers central visibility and real-time monitoring of their cloud infrastructure by enabling administrators to auto-check against nearly 1000 cloud service configuration best practices across 90+ services and avoid cloud service misconfigurations.
The following rules are available to all Trend Micro Cloud One – Conformity customers that may help provide more insight to customers looking to isolate affected machines (more information can be found here for rule configuration):
Lambda-001 : identifies all Lambdas that are running Java which may be vulnerable.
Unrestricted Security Group Egress (EC2-033) : identifies security groups that may be associated with, for example, an EC2 that may be compromised and then has the ability to communicated externally.
Preventative Rules, Filters & Detection
A demo video of how Trend Micro Cloud One can help with this vulnerability can be found at: https://youtu.be/CorEsXv3Trc.
Trend Micro Cloud One – Workload Security and Deep Security IPS Rules
Rule 1008610 – Block Object-Graph Navigation Language (OGNL) Expressions Initiation In Apache Struts HTTP Request
Rule 1008610 is a SMART rule that can be manually assigned to assist in protection/detection against suspicious activity that may be associated with this threat. This is not a comprehensive replacement for the vendor’s patch.
Please also note that rule 1008610 is shipped in DETECT, and must be manually changed to PREVENT if the administrator wishes to apply this. Also, please be aware that due to the nature of this rule, there may be False Positives in certain environments, so environment-specific testing is recommended.
Rule 1011249 – Apache Log4j Denial of Service Vulnerability (protects against CVE-2021-45105)
Trend Micro Cloud One – Workload Security and Deep Security Log Inspection
Rule 4643: POSSIBLE HTTP BODY OGNL EXPRESSION EXPLOIT – HTTP (REQUEST) – Variant 2
Trend Micro Cloud One – Network Security and TippingPoint Recommended Actions
Filter 40627 : HTTP: JNDI Injection in HTTP Header or URI
This was released in Digital Vaccine #9621 and has replaced CSW C1000001 that was previously released.
Trend Micro recommends customers enable this filter in a block and notify posture for optimal coverage. Starting with Digital Vaccines released on 12/21/2021, it will be enabled by default. Since it may not be enabled in your environment, Trend Micro strongly recommends you confirm the filter is enabled in your policy.
What other controls can be used to disrupt the attack?
This attack is successful when the exploit is used to initiate a transfer of a malicious attack payload. In addition to the filter above, these techniques can help disrupt that chain:
Geolocation filtering can be used to reduce possible attack vectors. Geolocation filtering can block inbound and outbound connections to any specified country, which may limit the ability for attackers to exploit the environment. In cases where a business only operates in certain regions of the globe, proactively blocking other countries may be advisable.
For TippingPoint IPS, TPS, and vTPS products Trend Micro also recommends enabling DNS and URL reputation as a proactive means of securing an environment from this vulnerability. Leveraging Trend Micro’s rapidly evolving threat intelligence, TippingPoint appliances can help disrupt the chain of attack destined to known malicious hosts.
Additionally, Reputation filtering can be leveraged to block Anonymous proxies that are commonly used in exploit attempts. Any inbound or outbound connections to/from an anonymous proxy or anonymizer service can be blocked by configuring a reputation filter with “Reputation DV Exploit Type” set to “Tor Exit” to a Block action.
For Cloud One – Network Security Anonymous proxies are also an independent, configurable “region” that can be selected as part of Geolocation filtering. This will block any inbound or outbound connection to/from an anonymous proxy or anonymizer service, which can be commonly used as part of exploit attempts.
Domain filtering can also be used to limit the attack vectors and disrupt the attack chain used to exploit this vulnerability. In this case, any outbound connection over TCP is dropped unless the domain being accessed is on a permit list. If the attacker’s domain, e.g. http://attacker.com, is not on the permit list, then it would be blocked by default, regardless of IPS filter policy.
Trend Micro Malware Detection Patterns (VSAPI, Predictive Learning, Behavioral Monitoring and WRS) for Endpoint, Servers, Mail & Gateway (e.g. Apex One, Worry-Free Business Security Services, Worry-Free Business Security Standard/Advanced, Deep Security w/Anti-malware, etc.)
Web Reputation (WRS): Trend Micro has added over 1700 URLs (and growing) to its WRS database to block that are linked to malicious reporting and communication vectors associated with observed exploits against this vulnerability.
Ransomware Detection – there have been observations about a major ransomware campaign (Khonsari) being utilized in attacks and Trend Micro detects components related to this as Ransom.MSIL.KHONSARI.YXBLN.
VSAPI (Pattern) Detections: the following detections have been released in the latest OPR for malicious code associated with exploits –
Trojan.Linux.MIRAI.SEMR
HS_MIRAI.SMF
HS_MIRAI.SME
Trojan.SH.CVE20207961.SM
Backdoor.Linux.MIRAI.SEMR
Trojan.SH.MIRAI.MKF
Coinminer.Linux.KINSING.D
Trojan.FRS.VSNTLB21
Trojan.SH.MALXMR.UWELI
Backdoor.SH.KIRABASH.YXBLL
Backdoor.Linux.MIRAI.SMMR1
Coinminer.SH.MALXMR.UWEKG
Coinminer.Linux.MALXMR.SMDSL64
Backdoor.Linux.GAFGYT.SMMR3
Coinminer.Win64.MALXMR.TIAOODGY
Rootkit.Linux.PROCHID.B
ELF_SETAG.SM
Backdoor.Linux.TSUNAMI.AMZ
Coinminer.PS1.MALXMR.PFAIQ
Trojan.SH.TSUNAMI.A
Trojan.PS1.METERPRETER.E
Coinminer.Linux.MALXRMR.PUWENN
Trend Micro Cloud One – Application Security
Trend Micro Cloud One – Application Security can monitor a running application and stop unexpected shell commands from executing. The product’s RCE configuration can be adjusted to help protect against certain exploits associated with this vulnerability using the following steps:
Log into Trend Micro Cloud One and navigate to Application Security.
Select “Group;s Policy” in the left-hand menu and find your application’s Group.
Enable “Remote Command Execution” if not already enabled.
Click the hamburger icon for “Configure Policy” and then click the ” < INSERT RULE > ” icon.
Input (?s).*in the “Enter a pattern to match” field and hit “Submit” and “Save Changes.”
Double-check that “Mitigate” is selected in your “Remote Command Execution” line item.
Trend Micro Cloud One – Open Source Security by Snyk
Trend Micro Cloud One – Open Source Security by Snyk can identify vulnerable versions of the log4j library across all organization source code repositories with very little integration effort. Once installed, it can also monitor progress on updating to non-vulnerable versions.
Trend Micro is continuing to actively research the potential exploits and behavior around this vulnerability and is actively looking for malicious code that may be associated with any exploit attempts against the vulnerability and will be adding additional detection and/or protection as they become available.
–
Impact on Trend Micro Products
Trend Micro is currently doing a product/service-wide assessment to see if any products or services may be affected by this vulnerability. Products will be added to the lists below as they are validated.
Products Confirmed Not Affected (Including SaaS Solutions that have been patched):
5G Mobile Network Security
Not Affected
ActiveUpdate
Not Affected
Apex Central (including as a Service)
Not Affected
Apex One (all versions including SaaS, Mac, and Edge Relay))
Following a year that the world will remember for a long time to come (and mostly not for good reasons), we wrap up 2021 with a plethora of events happening in the tech industry. In the meantime, we certainly hope that you are doing well and staying safe during this upcoming festive period. In this article, we’ll recap the most important VMware news stories of the year and have a look ahead at what 2022 has in store. Let’s get going!
Company Growth
A lot has been going on this year in the VMware space, not only in a technical aspect but also with major changes within the company’s structure and management.
Financially, the company keeps doing very well with projected revenue of over $12.8 billion, an increase of around 9% compared to last year with expected significant growth in the SaaS area.
One of the axes VMware is also working on to generate revenue is the partner incentives program based on the customer life cycle. The new incentives reward partners that deliver PoCs, customers’ assessments and “sell-through” partners working together.
Acquisitions
VMware acquired a dizzying number of companies over the course of the previous year (2020). However, mergers are time-consuming and are never straightforward when it comes to restructuring teams, merging products into existing portfolios… VMware has put a lot of resources into integrating previous years’ acquisitions into their existing portfolios such as Carbon Black, Salt or Datrium.
This might be the reason why they only acquired one company in 2021 with Mesh7. Let’s have a closer look at what it is.
Mesh7
VMware acquired Mesh7 at the end of the first quarter of 2021. Their technology helps customers improve application resiliency, reliability and reduce blind spots through the integration of deep Layer 7 insights with cloud, host, and reputation data. They offer a distributed API Security Mesh solution (API Firewall and API Gateway) which is focused on securing the application layer at its core in Kubernetes environments.
VMware acquired Mesh7 at the end of March 2021 to further secure Tanzu Service Mesh
VMware uses Envoy as an open-source Layer 7 proxy in Tanzu Service Mesh and Mesh7’s API gateway is being integrated into the solution to further secure the Kubernetes connectivity solution.
VMworld 2021
As usual, let’s quickly recap what happened during VMworld 2021 which was, once again, a virtual event. We will only skim over the surface of what was announced as a lot of other areas were covered such as Security, Networking, End-User services… For more information about the announcements made during this event, head over to our dedicated VMworld 2021 Round-up Article.
Strong focus on multi-cloud
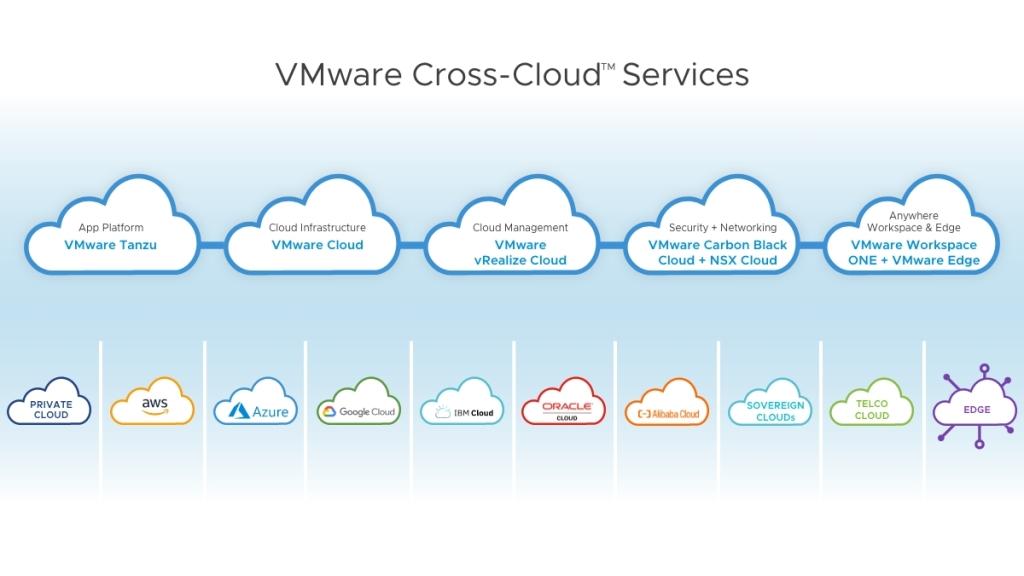
VMware followed the trend set in the previous year with a strong push towards multi-cloud and managed cloud services. VMware Cross-Cloud services will offer a bunch of multi-cloud services you can pick and choose from in a flexible manner to facilitate and accelerate customers’ adoption.
“VMware Cross-Cloud services aims at simplifying the shift to a multi-cloud SDDC”
VMware Sovereign Cloud tackles the issues around how sensitive data is dealt with through partnerships with Cloud providers. The goal is to offer those public entities and large organizations a data sovereignty seal of approval in a multi-cloud world.
VMware Tanzu, the company’s implementation of Kubernetes is being built upon ever since the portfolio was announced at VMworld 2019. The big reveal of this year’s event was Tanzu Community Edition, a free and open-source release of the solution aimed at learners and users.
Other Tanzu related announcements included VMware Cloud with Tanzu Services, managed Tanzu Kubernetes Grid (TKG), Tanzu Mission Control Essentials and a free tier with Tanzu mission control Starter.
“VMware Tanzu Community Edition is full-featured but free and open-source”
Lots of projects in development
VMware always has a bunch of projects with codenames in the works that later become actual products when they reached maturity. Remember how Tanzu used to be known as Project Pacific. In 2021, the company revealed no less than 9 major projects in various areas such as Edge computing, AI/ML, Security, multi-cloud, tiered memory for vSphere, Kubernetes…
Again, you can find the details about these projects in our VMworld 2021 roundup.
Edge Computing
The other area that was largely covered was Edge computing with the announcement of VMware Edge Compute Stack, a purpose-built and integrated stack offering HCI and SDN for small-scale VM and container workloads to effectively extend your SDDC to the Edge.
“VMware Edge compute Stack helps solve use cases for a wide variety of challenges”
While a lot of good things went their way, 2021 was an eventful year for VMware. Several big announcements were made that will change the face of the company and a few vSphere related crises the company’s TAMs had to navigate.
VMware and DellEMC Split
Probably the biggest announcement of the year was the split from DellEMC which was the majority stakeholder with 81% shares in the company. This separation comes 5 years after Dell acquired EMC in September of 2016 for a whopping $67 billion, EMC being VMware’s controlling stakeholder at the time. On November 1st 2021, VMware becomes a standalone company for the first time since EMC acquired it in 2004, albeit after paying $11.5 billion in dividends to the shareholders.
In a news article, VMware’s new CEO Raghu Raghuram (more on that later) officialized the split and kept emphasizing their multi-cloud strategy with the goal of becoming “the Switzerland of the cloud industry”:
“As a standalone company, we now have the flexibility to partner even more deeply with all cloud and on-premises infrastructure companies to create a better foundation that drives results for our customers. And the increased flexibility we will have to use equity to complete future acquisitions will help us remain competitive. “
VMware has a new CEO
A number of top officers over at VMware left the building and were replaced by new top profiles. Among those, we find the CEO of the company himself. Pat Gelsinger, who led VMware between 2012 and 2021 gave his notice in February to become Intel’s new CEO after spending 30 years as a top profile between 1979 and 2009 for the blue team, a very impressive resume if you ask me.
VMware replaced him with Raghu Raghuram, the previous COO who’d been climbing up the corporate ladder since 2003, clocking over 18 years of employment to reach the top of the pyramid.
Raghu Raghuram succeeds to Pat Gelsinger as VMware’s CEO
vSphere 7 Update 3 removed
On a more technical note, 2021 was a rather turbulent year for vSphere 7.0. The year started with many customers encountering purple screens on vSphere hypervisors installed on SD cards or USB sticks, which eventually led VMware to pull support for these boot devices. This wasn’t received particularly well among the customer base as many were taken by surprise and now have to plan for it, which will be a large piece of work and investment depending on the size of the environment.
Following this shaky start, customers started having problems with vSphere 7 Update 3 causing PSOD in some instances. In order to fix it, VMware released patches that ended up breaking vSphere HA for many customers using a certain type of Intel adapters. VMware eventually decided to stop the haemorrhage by removing vSphere 7 Update 3 from distribution altogether, just over a month after its release.
“vSphere 7 Update 3 was crippled with issues since its initial release”
Needless to say that customers were pretty unhappy with how this unfolded. Many blamed the 6 months release cycle and quality control being put to the side in favor of shiny new Cloud or Tanzu features. Let’s hope the scission from DellEMC will entice VMware to regain a certain level of quality control and that organizations won’t put the deployment of security patches on hold as a result.
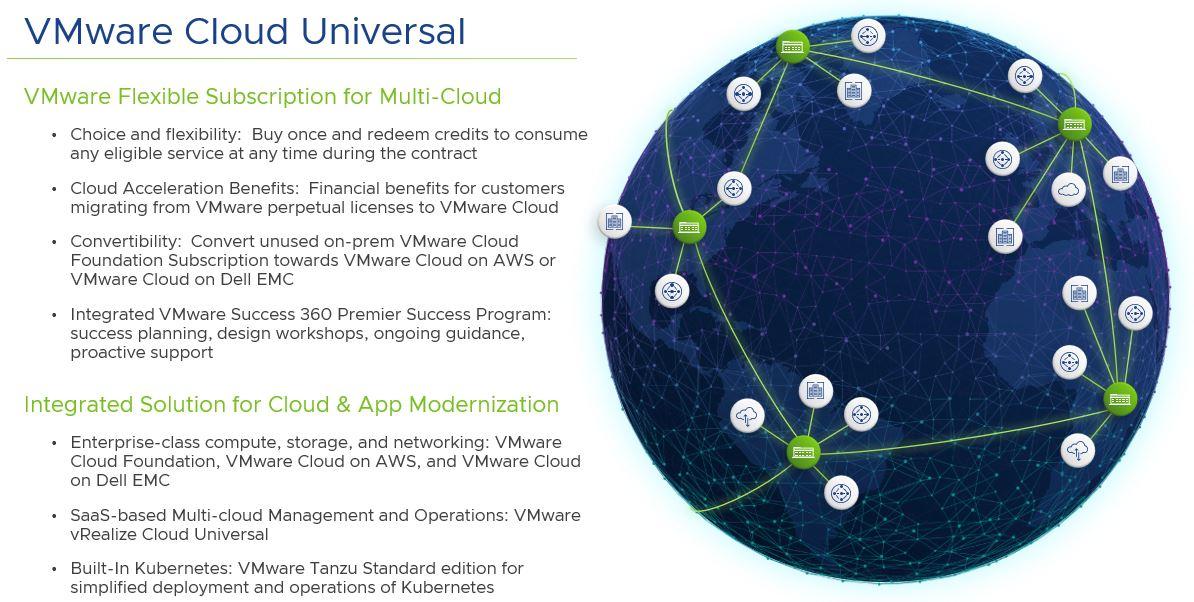
VMware Cloud Universal
As you can tell, VMware is very keen to push Cloud subscriptions to its customers and VMware Cloud Universal, which was released in April 2021, was another testimony of that. A subscription offering that offers access to multi-cloud resources, be it infrastructure, compute, storage, networking, modern apps…
The idea is to be able to flexibly deploy VMware Cloud Infrastructure across private and public clouds. VMware Cloud Universal includes VCF-Subscription (also released in 2021), VMware Cloud on AWS and VMware Cloud on DellEMC.
Now, I’ll admit that it is getting a bit tricky to make sense of the many cloud offerings proposed by VMware with VMC, VMC on AWS, VMware Cloud Universal, VMware Cross-Cloud services and then the subtleties in each one of them.
“VMware Cloud Universal allows customers to establish a flexible commercial agreement with VMware to commit once and consume dynamically”
Ransomware Attacks Targeting vSphere ESXi
In 2021, we, unfortunately, witnessed no curb in the infamous growing trend of vSphere Ransomware attacks. While most encrypting ransomware attacks were historically focused on Windows and Linux instances, vSphere is now being targeted as well. Bad actors will try to gain access to the virtual infrastructure and initiate encryption of the datastores to claim a ransom, hence impacting every single VMs in the environment.
Fortunately, most companies are now investing large amounts of resources to mitigate the risks and protect the customers, for instance, Altaro has been doing it for a long time now.
A Look Ahead to 2022
I wrapped up last year’s roundup with “Watch for 2021 as it is without a doubt that it will be a year packed with major events”. Well, I think it is safe to say that it turned out to be true. VMware’s split from DellEMC will give the company absolute autonomy over its market strategy and path to a multi-cloud world. 2022 will see a maturing of these core cloud technologies alongside VMware doubling down on its acquisition strategy of key technologies that will solidify its commitment to this direction.
While we are eager to find out what it brings in terms of novelties, we are equally looking forward to a return to a more sensible release cycle and the distribution of a stable version of the historic hypervisor (well that’s my main hope at least!) I’d love to hear your thoughts, so feel free to take your bet in the comment section as to what 2022 will bring!
This article describes some of the new features in Windows Server 2022. Windows Server 2022 is built on the strong foundation of Windows Server 2019 and brings many innovations on three key themes: security, Azure hybrid integration and management, and application platform. Also, Windows Server 2022 Datacenter: Azure Edition helps you use the benefits of cloud to keep your VMs up to date while minimizing downtime.
Security
The new security capabilities in Windows Server 2022 combine other security capabilities in Windows Server across multiple areas to provide defense-in-depth protection against advanced threats. Advanced multi-layer security in Windows Server 2022 provides the comprehensive protection that servers need today.
Secured-core server
Secured-core server provides protections that are useful against sophisticated attacks and can provide increased assurance when handling mission critical data in some of the most data sensitive industries. It is built on three key pillars: simplified security, advanced protection, and preventative defense.
Simplified security
When you buy hardware from an OEM for Secured-core server, you have assurance that the OEM has provided a set of hardware, firmware, and drivers that satisfy the Secured-core promise. Windows Server systems will have easy configuration experiences in the Windows Admin Center to enable the security features of Secured-core.
Advanced protection
Secured-core servers use hardware, firmware, and operating system capabilities to the fullest extent to provide protection against current and future threats. The protections enabled by a Secured-core server are targeted to create a secure platform for critical applications and data used on that server. The Secured-core functionality spans the following areas:
Hardware root-of-trustTrusted Platform Module 2.0 (TPM 2.0) come standard with servers capable of using Secured-core servers. TPM 2.0 provides a secure store for sensitive keys and data, such as measurements of the components loaded during boot. This hardware root-of-trust raises the protection provided by capabilities like BitLocker, which uses TPM 2.0 and facilitates creating attestation-based workflows that can be incorporated into zero-trust security strategies.
Firmware protectionThere is a clear rise in security vulnerabilities being reported in the firmware space given the high privileges that firmware runs with and the relative opacity of what happens in firmware to traditional anti-virus solutions. Recent reports show that malware and ransomware platforms are adding firmware capabilities raising the risk of firmware attacks that have already been seen targeting enterprise resources like Active Directory domain controllers. Using processor support for Dynamic Root of Trust of Measurement (DRTM) technology, along with DMA protection, Secured-core systems isolate the security critical hypervisor from attacks such as this.
Virtualization-based security (VBS)Secured-core servers support VBS and hypervisor-based code integrity (HVCI). VBS and HVCI protect against the entire class of vulnerabilities used in cryptocurrency mining attacks given the isolation VBS provides between the privileged parts of the operating system such as the kernel and the rest of the system. VBS also provides more capabilities that customers can enable, such as Credential Guard, which better protects domain credentials.
Preventative defense
Enabling Secured-core functionality helps proactively defend against and disrupt many of the paths attackers may use to exploit a system. This set of defenses also enables IT and SecOps teams better utilize their time across the many areas that need their attention.
Secure connectivity
Transport: HTTPS and TLS 1.3 enabled by default on Windows Server 2022
Secure connections are at the heart of today’s interconnected systems. Transport Layer Security (TLS) 1.3 is the latest version of the internet’s most deployed security protocol, which encrypts data to provide a secure communication channel between two endpoints. HTTPS and TLS 1.3 is now enabled by default on Windows Server 2022, protecting the data of clients connecting to the server. It eliminates obsolete cryptographic algorithms, enhances security over older versions, and aims to encrypt as much of the handshake as possible. Learn more about supported TLS versions and about supported cipher suites.
Secure DNS: Encrypted DNS name resolution requests with DNS-over-HTTPS
DNS Client in Windows Server 2022 now supports DNS-over-HTTPS (DoH) which encrypts DNS queries using the HTTPS protocol. This helps keep your traffic as private as possible by preventing eavesdropping and your DNS data being manipulated. Learn more about configuring the DNS client to use DoH.
Server Message Block (SMB): SMB AES-256 encryption for the most security conscious
Windows Server now supports AES-256-GCM and AES-256-CCM cryptographic suites for SMB encryption and signing. Windows will automatically negotiate this more advanced cipher method when connecting to another computer that also supports it, and it can also be mandated through Group Policy. Windows Server still supports AES-128 for down-level compatibility.
SMB: East-West SMB encryption controls for internal cluster communications
Windows Server failover clusters now support granular control of encrypting and signing intra-node storage communications for Cluster Shared Volumes (CSV) and the storage bus layer (SBL). This means that when using Storage Spaces Direct, you can decide to encrypt or sign east-west communications within the cluster itself for higher security.
SMB over QUIC
SMB over QUIC updates the SMB 3.1.1 protocol in Windows Server 2022 Datacenter: Azure Edition and supported Windows clients to use the QUIC protocol instead of TCP. By using SMB over QUIC along with TLS 1.3, users and applications can securely and reliably access data from edge file servers running in Azure. Mobile and telecommuter users no longer need a VPN to access their file servers over SMB when on Windows. More information can be found at the SMB over QUIC documentation.
Azure hybrid capabilities
You can increase your efficiency and agility with built-in hybrid capabilities in Windows Server 2022 that allow you to extend your data centers to Azure more easily than ever before.
Azure Arc enabled Windows Servers
Azure Arc enabled servers with Windows Server 2022 brings on-premises and multi-cloud Windows Servers to Azure with Azure Arc. This management experience is designed to be consistent with how you manage native Azure virtual machines. When a hybrid machine is connected to Azure, it becomes a connected machine and is treated as a resource in Azure. More information can be found at the Azure Arc enables servers documentation.
Windows Admin Center
Improvements to Windows Admin Center to manage Windows Server 2022 include capabilities to both report on the current state of the Secured-core features mentioned above, and where applicable, allow customers to enable the features. More information on these and many more improvements to Windows Admin Center can be found at the Windows Admin Center documentation.
Azure Automanage – Hotpatch
Hotpatch, part of Azure Automanage, is supported in Windows Server 2022 Datacenter: Azure Edition. Hotpatching is a new way to install updates on new Windows Server Azure Edition virtual machines (VMs) that doesn’t require a reboot after installation. More information can be found at the Azure Automanage documentation.
Application platform
There are several platform improvements for Windows Containers, including application compatibility and the Windows Container experience with Kubernetes. A major improvement includes reducing the Windows Container image size by up to 40%, which leads to a 30% faster startup time and better performance.
You can now also run applications that depend on Azure Active Directory with group Managed Services Accounts (gMSA) without domain joining the container host, and Windows Containers now support Microsoft Distributed Transaction Control (MSDTC) and Microsoft Message Queuing (MSMQ).
There are several other enhancements that simplify the Windows Container experience with Kubernetes. These enhancements include support for host-process containers for node configuration, IPv6, and consistent network policy implementation with Calico.
In addition to platform improvements, Windows Admin Center has been updated to make it easy to containerize .NET applications. Once the application is in a container, you can host it on Azure Container Registry to then deploy it to other Azure services, including Azure Kubernetes Service.
With support for Intel Ice Lake processors, Windows Server 2022 supports business-critical and large-scale applications, such as SQL Server, that require up to 48 TB of memory and 2,048 logical cores running on 64 physical sockets. Confidential computing with Intel Secured Guard Extension (SGX) on Intel Ice Lake improves application security by isolating applications from each other with protected memory.
Nested virtualization is a feature that allows you to run Hyper-V inside of a Hyper-V virtual machine (VM). Windows Server 2022 brings support for nested virtualization using AMD processors, giving more choices of hardware for your environments. More information can be found at the nested virtualization documentation.
Microsoft Edge browser
Microsoft Edge is included with Windows Server 2022, replacing Internet Explorer as the default browser. It is built on Chromium open source and backed by Microsoft security and innovation. It can be used with Server Core or Server with Desktop Experience installation options, and supports HTTP/3 which uses the QUIC protocol. More information can be found at the Microsoft Edge Enterprise documentation. Note that Microsoft Edge, unlike the rest of Windows Server, follows the Modern Lifecycle for its support lifecycle. For details, see Microsoft Edge lifecycle documentation.
Storage
Storage Migration Service
Enhancements to Storage Migration Service in Windows Server 2022 makes it easier to migrate storage to Windows Server or to Azure from more source locations. Here are the features that are available when running the Storage Migration Server orchestrator on Windows Server 2022:
Migrate local users and groups to the new server.
Migrate storage from failover clusters, migrate to failover clusters, and migrate between standalone servers and failover clusters.
Migrate storage from a Linux server that uses Samba.
More easily sync migrated shares into Azure by using Azure File Sync.
Migrate to new networks such as Azure.
Migrate NetApp CIFS servers from NetApp FAS arrays to Windows servers and clusters.
Adjustable storage repair speed
User adjustable storage repair speed is a new feature in Storage Spaces Direct that offers more control over the data resync process by allocating resources to either repair data copies (resiliency) or run active workloads (performance). This helps improve availability and allows you to service your clusters more flexibly and efficiently.
Storage bus cache with Storage Spaces on standalone servers
Storage bus cache is now available for standalone servers. It can significantly improve read and write performance, while maintaining storage efficiency and keeping the operational costs low. Similar to its implementation for Storage Spaces Direct, this feature binds together faster media (for example, NVMe or SSD) with slower media (for example, HDD) to create tiers. A portion of the faster media tier is reserved for the cache. To learn more, see Enable storage bus cache with Storage Spaces on standalone servers.
SMB compression
Enhancement to SMB in Windows Server 2022 and Windows 11 allows a user or application to compress files as they transfer over the network. Users no longer have to manually zip files in order to transfer much faster on slower or more congested networks. For details, see SMB Compression.
Ransomware operators such as Magniber and Vice Society are actively exploiting vulnerabilities in Windows Print Spooler to compromise victims and spread laterally across a victim’s network to deploy file-encrypting payloads on targeted systems.
“Multiple, distinct threat actors view this vulnerability as attractive to use during their attacks and may indicate that this vulnerability will continue to see more widespread adoption and incorporation by various adversaries moving forward,” Cisco Talos said in a report published Thursday, corroborating an independent analysis from CrowdStrike, which observed instances of Magniber ransomware infections targeting entities in South Korea.
While Magniber ransomware was first spotted in late 2017 singling out victims in South Korea through malvertising campaigns, Vice Society is a new entrant that emerged on the ransomware landscape in mid-2021, primarily targeting public school districts and other educational institutions. The attacks are said to have taken place since at least July 13.
Since June, a series of “PrintNightmare” issues affecting the Windows print spooler service has come to light that could enable remote code execution when the component performs privileged file operations –
CVE-2021-1675 – Windows Print Spooler Remote Code Execution Vulnerability (Patched on June 8)
CVE-2021-34527 – Windows Print Spooler Remote Code Execution Vulnerability (Patched on July 6-7)
CVE-2021-34481 – Windows Print Spooler Remote Code Execution Vulnerability (Patched on August 10)
CVE-2021-36936 – Windows Print Spooler Remote Code Execution Vulnerability (Patched on August 10)
CVE-2021-36947 – Windows Print Spooler Remote Code Execution Vulnerability (Patched on August 10)
CVE-2021-34483 – Windows Print Spooler Elevation of Privilege Vulnerability (Patched on August 10)
CVE-2021-36958 – Windows Print Spooler Remote Code Execution Vulnerability (Unpatched)
CrowdStrike noted it was able to successfully prevent attempts made by the Magniber ransomware gang at exploiting the PrintNightmare vulnerability.
Vice Society, on the other hand, leveraged a variety of techniques to conduct post-compromise discovery and reconnaissance prior to bypassing native Windows protections for credential theft and privilege escalation.
Specifically, the attacker is believed to have used a malicious library associated with the PrintNightmare flaw (CVE-2021-34527) to pivot to multiple systems across the environment and extract credentials from the victim.
“Adversaries are constantly refining their approach to the ransomware attack lifecycle as they strive to operate more effectively, efficiently, and evasively,” the researchers said. “The use of the vulnerability known as PrintNightmare shows that adversaries are paying close attention and will quickly incorporate new tools that they find useful for various purposes during their attacks.”
This guidance will help customers address threats taking advantage of the recently disclosed Microsoft Exchange Server on-premises vulnerabilities CVE-2021-26855, CVE-2021-26858, CVE-2021-26857, and CVE-2021-27065, which are being exploited. We strongly urge customers to immediately update systems. Failing to address these vulnerabilities can result in compromise of your on-premises Exchange Server and, potentially, other parts of your internal network.
Mitigating these vulnerabilities and investigating whether an adversary has compromised your environment should be done in parallel. Applying the March 2021 Exchange Server Security Updates is critical to prevent (re)infection, but it will not evict an adversary who has already compromised your server. Based on your investigation, remediation may be required. This guide will help you answer these questions:
Microsoft will continue to monitor these threats and provide updated tools and investigation guidance to help organizations defend against, identify, and remediate associated attacks. We will update this guidance with new details and recommendations as we continue to expand our knowledge of these threats and the threat actors behind them, so come back to this page for updates.
How does the attack work?
Microsoft released security updates for four different on premises Microsoft Exchange Server zero-day vulnerabilities (CVE-2021-26855, CVE-2021-26858, CVE-2021-26857, and CVE-2021-27065). These vulnerabilities can be used in combination to allow unauthenticated remote code execution on devices running Exchange Server. Microsoft has also observed subsequent web shell implantation, code execution, and data exfiltration activities during attacks. This threat may be exacerbated by the fact that numerous organizations publish Exchange Server deployments to the internet to support mobile and work-from-home scenarios.
In many of the observed attacks, one of the first steps attackers took following successful exploitation of CVE-2021-26855, which allows unauthenticated remote code execution, was to establish persistent access to the compromised environment via a web shell. A web shell is a piece of malicious code, often written in typical web development programming languages (e.g., ASP, PHP, JSP), that attackers implant on web servers to provide remote access and code execution to server functions. Web shells allow adversaries to execute commands and to steal data from a web server or use the server as launch pad for further attacks against the affected organization. Therefore, it is critical to not only immediately mitigate the vulnerabilities, but also remove any additional backdoors, such as web shells that attackers may have created.
Am I vulnerable to this threat?
If you are running Exchange Server 2010, 2013, 2016, or 2019 you must apply the March 2021 Security Update to protect yourself against these threats.
To determine if your Exchange Servers are vulnerable to this attack, the following methods can be used:
Using Microsoft Defender for Endpoint
Scanning your Exchange servers using Nmap
Microsoft Defender for Endpoint
Microsoft Defender for Endpoint customers can use the threat analytics article in Microsoft 365 security center to understand their risk. This requires your Exchange Servers to be onboarded to Microsoft Defender for Endpoint. See instructions for onboarding servers that are not currently monitored.
Scanning using Nmap script
For servers not onboarded to Microsoft Defender for Endpoint, use this Nmap script to scan a URL/IP to determine vulnerability: http-vuln-cve2021-26855.nse.
How do I mitigate the threat?
The best and only complete mitigation for these threats is to update to a supported version of Exchange Server and ensure it is fully updated. If it’s not possible to immediately move to the current Exchange Server Cumulative Update and apply security updates, additional strategies for mitigation are provided below. These lesser mitigation strategies are only a temporary measure while you install the latest Cumulative Update and Security Updates.
Immediate temporary mitigations
The following mitigation options can help protect your Exchange Server until the necessary Security Updates can be installed. These solutions should be considered temporary, but can help enhance safety while additional mitigation and investigation steps are being completed.
Run EOMT.ps1 (Recommended) – The Exchange On-premises Mitigation Tool (EOMT.ps1) mitigates CVE-2021-26855 and attempts to discover and remediate malicious files. When run, it will first check if the system is vulnerable to CVE-2021-26855 and, if so, installs a mitigation for it. It then automatically downloads and runs Microsoft Safety Scanner (MSERT). This is the preferred approach when your Exchange Server has internet access.
Run ExchangeMitigations.ps1– The ExchangeMitigations.ps1 script applies mitigations but doesn’t perform additional scanning. This is an option for Exchange Servers without internet access or for customers who do not want Microsoft Safety Scanner to attempt removing malicious activity it finds.
Applying the current Exchange Server Cumulative Update
The best, most complete mitigation is to get to a current Cumulative Update and apply all Security Updates. This is the recommended solution providing the strongest protection against compromise.
Apply security hotfixes to older Cumulative Updates
To assist organizations that may require additional time and planning to get to a supported Cumulative Update, security hotfixes have been made available. It’s important to note that applying these security hotfixes to older Cumulative Updates will mitigate against these specific Exchange vulnerabilities, but it will not address other potential security risks your Exchange Server may be vulnerable to. This approach is only recommended as a temporary solution while you move to a supported Cumulative Update.
To reduce the risk of exploitation of the vulnerabilities, the Exchange Server can be isolated from the public internet by blocking inbound connections over port 443.
Blocking port 443 from receiving inbound internet traffic provides temporary protection until Security Updates can be applied, but it reduces functionality as it could inhibit work-from-home or other non-VPN remote work scenarios and does not protect against adversaries who may already be present in your internal network.
The most comprehensive way to complete this is to use your perimeter firewalls that are currently routing inbound 443 traffic to block this traffic. You can use Windows Firewall to accomplish this, but you will have to remove all inbound 443 traffic rules prior to blocking the traffic.
Have I been compromised?
To determine if your Exchange Servers have been compromised due to these vulnerabilities, multiple options have been made available:
Microsoft Defender for Endpoint
Publicly available tools published by Microsoft
If Microsoft Defender for Endpoint is not running, skip directly to the publicly available tools section. If it is running, we recommend that you follow both methods.
Microsoft Defender for Endpoint
Check the threat analytics article in Microsoft 365 security center to determine if any indications of exploitation are observed. The Analyst report tab in the Microsoft 365 Security Center threat analytics article contains a continuously updated detailed description of the threat, actor, exploits, and TTPs. On the Overview page, the Impacted assets section lists all impacted devices. The Related incidents section shows any alerts for detected exploitation or post-exploitation activity.
If you have devices that are flagged as impacted (see Impacted assets section) and have active alerts and incidents, click the incidents to further understand the extent of the attack.
Microsoft Defender for Endpoint blocks multiple components of this threat and has additional detections for associated malicious behaviors. These are raised as alerts in the Microsoft Defender Security Center. Additionally, Microsoft Defender for Endpoint prevents some critical behaviors observed in attacks, such as attempts to exploit the CVE-2021-27065 post-authentication file-write vulnerability that can be combined with CVE-2021-26855 to elevate privileges.
Microsoft Defender for Endpoint also detects post-exploitation activity, including some techniques that attackers use to maintain persistence on the machine. Note that alerts marked “Blocked” indicate that the detected threat is also remediated. Alerts marked “Detected” require security analyst review and manual remediation.
You can use advanced hunting to search for unexpected files dropped or executing in Exchange folders, which could be web shells or other attacker artifacts. See more advanced hunting queries relevant to this threat in the Analyst report in Threat Analytics and in our GitHub queries repository.
Publicly available tools published by Microsoft
The following tools have been made available by Microsoft to aid customers in investigating whether their Microsoft Exchange Servers have been compromised. We recommend customers to run both tools as part of their investigation:
Exchange On-Premises Mitigation Tool
Download and run EOMT.ps1 as an administrator on your Exchange Server to automatically run the latest version of Microsoft Safety Scanner (MSERT). MSERT discovers and remediates web shells, which are backdoors that adversaries use to maintain persistence on your server.
After completing the scan, EOMT.ps1 reports any malicious files it discovers and removes. If malicious files are discovered and removed by the tool, follow the web shell remediation workflow. If no malicious files are found, it will report “No known threats detected.”
If this initial scan does not find evidence of malicious files, a full scan can be run via “.\EOMT.ps1 -RunFullScan”. This may take a few hours or days, depending on your environment and the number of files on the Exchange Server.
If the script is unable to download Microsoft Safety Scanner (MSERT), you can download and copy MSERT manually to your Exchange Server. Run this executable directly as an administrator. Follow the on-screen instructions to run a Quick or Full scan. A new version of MSERT should be downloaded each time it is run to ensure it contains the latest protections
Test-ProxyLogon.ps1
Run the Test-ProxyLogon.ps1 script as administrator to analyze Exchange and IIS logs and discover potential attacker activity.
IMPORTANT: We recommend re-downloading this tool at a minimum of once per day if your investigation efforts span multiple days, as we continue to make updates to improve its usage and output.
Step 1 – Review script output to determine risk:
If the script does not find attacker activity, it outputs the message Nothing suspicious detected
If attacker activity was found, the script reports the vulnerabilities for which it found evidence of use and collects logs that it stores in the specified output path in the Test-ProxyLogonLogs directory. Continue following these steps for remediation. Below is an example of the output:
Step 2 – Investigate CVE-2021-27065:
If CVE-2021-27065 is detected, then investigate the logs specified for lines containing Set-OabVirtualDirectory. This indicates that a file was written to the server.
Investigate web server directories for new or recently modified .aspx files or other file types that may contain unusual <script> blocks.
This indicates an adversary may have dropped a web shell file. Below is an example of such a <script> block.
Does the tool output for AnchorMailbox contain /ews/exchange.asmx?
This indicates an attacker may be exfiltrating your email.
If yes, inspect the Exchange web services (EWS) logs in \V15\Logging\EWS to verify if the adversary accessed a mailbox, and then proceed to the corresponding remediation workflow.
What remediation steps should I take?
The steps in Have I been compromised? section help establish the scope of possible exploitation: scanning, unauthorized email access, establishment of persistence via web shells, or post-exploitation activity.
Decide between restoring your Exchange Server or moving your mail services to the cloud. You can engage with FastTrack for data migration assistance for Office 365 customers with tenants of 500+ eligible licenses.
Follow applicable remediation workflows:
Was post-compromise activity related to credential harvesting or lateral movement detected by Microsoft Defender for Endpoint or during manual investigation?
Engage your incident response plan. Share the investigation details to your incident response team.
If you are engaging with CSS Security or Microsoft Detection and Response Team (DART), and you are a Microsoft Defender for Endpoint customer, see instructions for onboarding Windows Server to Microsoft Defender for Endpoint.
Were web shells detected?
Clean and restore your Exchange Server:
Preserve forensic evidence if your organization requires evidence preservation.
Disconnect the Exchange Server from the network, either physically or virtually via firewall rules.
Restart Exchange Server.
Stop W3WP services.
Remove any malicious ASPX files identified via the investigation steps above.
Delete all temporary ASP.NET files on the system using the following script:
Consider submitting suspected malicious files to Microsoft for analysis following this guidance: Submit files for analysis by Microsoft and include the string “ExchangeMarchCVE” in the Additional Information text box of the submission form.
Was mailbox access and exfiltration detected?
Disconnect Exchange Server from the network.
Apply Security Updates.
Run a full EOMT.ps1 scan via “.\EOMT.ps1 -RunFullScan”. Have I been compromised? for additional instructions for running EOMT.ps1.
Resume operation.
Was scan-only adversary behavior detected?
Disconnect Exchange Server from the network.
Apply Security Updates.
Resume operation.
How can I better protect myself and monitor for suspicious activity?
Additional protection and investigation capabilities are available if Microsoft Defender Antivirus and Microsoft Defender for Endpoint are running on the Exchange Server. If neither are yet installed, installing both now can provide additional protection moving forward and is strongly advised.
If you are an existing Microsoft Defender for Endpoint customer but have Exchange servers that are not onboarded, see instructions for onboarding Windows Server to Microsoft Defender for Endpoint.
Microsoft’s Detection and Response Team (DART) Microsoft 365 Defender Team CSS Security Incident Response
This blog and its contents are subject to the Microsoft Terms of Use. All code and scripts are subject to the applicable terms on Microsoft’s GitHub Repository (e.g., the MIT License).
We have been actively working with customers through our customer support teams, third-party hosters, and partner network to help them secure their environments and respond to associated threats from the recent Exchange Server on-premises attacks. Based on these engagements we realized that there was a need for a simple, easy to use, automated solution that would meet the needs of customers using both current and out-of-support versions of on-premises Exchange Server.
Microsoft has released a new, one-click mitigation tool, Microsoft Exchange On-Premises Mitigation Tool to help customers who do not have dedicated security or IT teams to apply these security updates. We have tested this tool across Exchange Server 2013, 2016, and 2019 deployments. This new tool is designed as an interim mitigation for customers who are unfamiliar with the patch/update process or who have not yet applied the on-premises Exchange security update.
By downloading and running this tool, which includes the latest Microsoft Safety Scanner, customers will automatically mitigate CVE-2021-26855 on any Exchange server on which it is deployed. This tool is not a replacement for the Exchange security update but is the fastest and easiest way to mitigate the highest risks to internet-connected, on-premises Exchange Servers prior to patching. We recommend that all customers who have not yet applied the on-premises Exchange security update:
Then, follow the more detailed guidance here to ensure that your on-premises Exchange is protected.
If you are already using Microsoft Safety Scanner, it is still live and we recommend keeping this running as it can be used to help with additional mitigations.
Once run, the Run EOMT.ps1 tool will perform three operations:
Mitigate against current known attacks using CVE-2021-26855 using a URL Rewrite configuration. Scan the Exchange Server using the Microsoft Safety Scanner. Attempt to reverse any changes made by identified threats.
Before running the tool, you should understand:
The Exchange On-premises Mitigation Tool is effective against the attacks we have seen so far, but is not guaranteed to mitigate all possible future attack techniques. This tool should only be used as a temporary mitigation until your Exchange servers can be fully updated as outlined in our previous guidance.
We recommend this script over the previous ExchangeMitigations.ps1 script as it tuned based on the latest threat intelligence. If you have already started with the other script, it is fine to switch to this one.
This is a recommended approach for Exchange deployments with Internet access and for those who want to attempt automated remediation.
Thus far, we have not observed any impact to Exchange Server functionality when these mitigation methods are deployed.
For more technical information, examples, and guidance please review the GitHub documentation.
Microsoft is committed to helping customers and will continue to offer guidance and updates that can be found at https://aka.ms/exchangevulns.
MICROSOFT MAKES NO WARRANTIES, EXPRESS, IMPLIED, OR STATUTORY, AS TO THE INFORMATION IN THIS GUIDANCE. The Exchange On-premises Mitigation Tool is available through the MIT License, as indicated in the GitHub Repository where it is offered.