Microsoft: New malware uses Windows bug to hide scheduled tasks

Microsoft has discovered a new malware used by the Chinese-backed Hafnium hacking group to maintain persistence on compromised Windows systems by creating and hiding scheduled tasks.

The Hafnium threat group has previously targeted US defense companies, think tanks, and researchers in cyberespionage attacks.

It is also one of the state-sponsored groups linked by Microsoft to last year’s global scale exploitation of the ProxyLogon zero-day flaws impacting all supported Microsoft Exchange versions.

Persistence via Windows registry value removal

“As Microsoft continues to track the high-priority state-sponsored threat actor HAFNIUM, new activity has been uncovered that leverages unpatched zero-day vulnerabilities as initial vectors,” the Microsoft Detection and Response Team (DART) said.

“Further investigation reveals forensic artifacts of the usage of Impacket tooling for lateral movement and execution and the discovery of a defense evasion malware called Tarrask that creates ‘hidden’ scheduled tasks, and subsequent actions to remove the task attributes, to conceal the scheduled tasks from traditional means of identification.”

This hacking tool, dubbed Tarrask, uses a previously unknown Windows bug to hide them from “schtasks /query” and Task Scheduler by deleting the associated Security Descriptor registry value.

The threat group used these “hidden” scheduled tasks to maintain access to the hacked devices even after reboots by re-establishing dropped connections to command-and-control (C2) infrastructure.

While the Hafnium operators could have removed all on-disk artifacts, including all registry keys and the XML file added to the system folder to delete all traces of their malicious activity, it would have removed persistence across restarts.

Deleting Security Descriptor to hide a scheduled task
Deleting Security Descriptor to hide a scheduled task (Microsoft)

How to defend against Tarrask attacks

The “hidden” tasks can only be found upon closer manual inspection of the Windows Registry if you look for scheduled tasks without an SD (security descriptor) Value within their Task Key.

Admins can also enable the Security.evtx and the Microsoft-Windows-TaskScheduler/Operational.evtx logs to check for key events linked to tasks “hidden” using Tarrask malware.

Microsoft also recommends enabling logging for ‘TaskOperational’ within the Microsoft-Windows-TaskScheduler/Operational Task Scheduler log and monitoring for outbound connections from critical Tier 0 and Tier 1 assets.

“The threat actors in this campaign used hidden scheduled tasks to maintain access to critical assets exposed to the internet by regularly re-establishing outbound communications with C&C infrastructure,” DART added.

“We recognize that scheduled tasks are an effective tool for adversaries to automate certain tasks while achieving persistence, which brings us to raising awareness about this oft-overlooked technique.”

Source :
https://www.bleepingcomputer.com/news/security/microsoft-new-malware-uses-windows-bug-to-hide-scheduled-tasks/

Microsoft: Windows Server now supports automatic .NET updates

Microsoft says Windows admins can now opt into automatic updates for .NET Framework and .NET Core via Microsoft Update (MU) on Windows Server systems.

The new option has started rolling out today, and once you opt-in, it will add .NET Core 3.1, .NET 5.0, and .NET 6.0 to the Automatic Updates channel as a third option on top of Windows Server Update Services (WSUS) and Microsoft Update Catalog.

“We’re excited to announce that starting April 2022, we will be making monthly updates for modern .NET (.NET Core) available for server operating systems via Microsoft Update (MU) on an opt-in basis,” explained Jamshed Damkewala, a .NET Principal Engineering Manager at Microsoft.

“If you do not want to have your servers updated automatically for you no action is required. There is no change for client operating systems which will continue to receive updates via Automatic Updates, WSUS, and MU Catalog as earlier.”

This new option has been added for customers asking for a way to install .NET updates without using a deployment tool, just as on Windows client platforms.

Making it an opt-in change will allow admins to choose their preferred method of keeping server operating systems up to date, depending on their deployment approach.

How to enable .NET automatic updates

You can opt-in for .NET automatic updates on Windows Server by setting registry keys listed in the table below (manually or with the help of Group Policy as detailed here).

.NET VersionRegistry KeyNameValue
ALL[HKEY_LOCAL_MACHINESOFTWAREMicrosoft.NET]“AllowAUOnServerOS”dword:00000001
.NET 6.0[HKEY_LOCAL_MACHINESOFTWAREMicrosoft.NET6.0]“AllowAUOnServerOS”dword:00000001
.NET 5.0[HKEY_LOCAL_MACHINESOFTWAREMicrosoft.NET5.0]“AllowAUOnServerOS”dword:00000001
.NET 3.1[HKEY_LOCAL_MACHINESOFTWAREMicrosoft.NET3.1]“AllowAUOnServerOS”dword:00000001

“We’re excited to start delivering updates for modern .NET to server operating systems via Microsoft Update on an opt-in basis and look forward to your feedback on this experience,” Damkewala added.

In December 2020, following customer requests, Microsoft first started delivering .NET and .NET Core updates on Windows via Microsoft Update (via WSUS and MU Catalog for server OS and Automatic Updates for client OS).

In early April 2022, the company reminded customers that multiple .NET Framework versions (i.e., 4.5.2, 4.6, and 4.6.1) signed using the insecure Secure Hash Algorithm 1 (SHA-1) will reach their end of life at the end of the month.

Redmond is also planning to roll out in July 2022 a new Windows Autopatch service that will automatically keep Windows and Office software up to date for Microsoft customers with a Windows 10/11 Enterprise E3 or above license.

Source :
https://www.bleepingcomputer.com/news/microsoft/microsoft-windows-server-now-supports-automatic-net-updates/

What’s New in System Center 2022?

Launched in “early preview” in November 2021 the next version of System Center is going to be released in the first quarter of 2022.

In this article, we’ll look at what’s new in each of the main components, Virtual Machine Manager, Operations Manager and Data Protection Manager and make some predictions around the finished product.

Virtual Machine Manager 2022

If you have a medium to large deployment of Hyper-V clusters, VMM is a must for management. Somewhat equivalent to vCenter in the VMware world this is the server product that lets you manage templates for VMs, including templates with multiple VMs (called a service) and other artefacts as well as automated deployments. VMM also manages your Software Defined Networking (SDN) stack and your backend storage (SANs and S2D). Notably, it also manages VMware virtualization hosts and clusters and can also integrate with Azure for light VM management.

SC Virtual Machine Manager 2022 Installation

SC Virtual Machine Manager 2022 Installation

There are a few new features in this version but the running theme throughout System Center 2022 (unless there’s a surprise reveal at GA) is that this is mostly about finishing little details and ensuring compatibility with current platforms. VMM 2022 runs on Windows Server 2022 and can manage Windows Server 2022 hosts.

On the networking side, the SDN stack gets support for dual-stack IPv4 and IPv6. You’ll need to be using the SDN v2 stack but that’s been where any new features have appeared since System Center 2016. In case you’re not familiar, up to System Center 2012R2 / Windows Server 2012R2 Microsoft built their own network virtualization stack and protocol but in 2016 they offered VXLan from VMware as an alternative. They also switched to an Azure inspired architecture where there’s a set of Network Controller VMs running on your cluster, managing all the virtualized networks. There are also Software Load Balancer VMs managing incoming network traffic, plus a Gateway providing connectivity from a virtualized network to the wider world. The dual-stack support covers all of these components, including site to site VPN (IPSec, GRE tunnel and L3 tunnels) so if your datacenter is adopting IPv6 – VMM is all ready to go. Note that you’ll need to provide both IPv4 and IPv6 address pools when setting this up.

VMM Logical Network with IPv4 and IPv6 subnets

VMM Logical Network with IPv4 and IPv6 subnets

The other big-ticket item is support for Azure Stack HCI (version 20H2 and 21H2) and Windows Server 2022. Note that VMM 2019 Update Release 3 (UR3) does provide support for Azure Stack HCI 20H2. If you missed our Windows Server 2022 webinar and haven’t heard of Azure Stack HCI realize that it’s got very little to do with Azure. This is a special version of Windows Server and Hyper-V that you cluster on top of Storage Spaces Direct (S2D) which you can then manage from Azure. The benefit of Azure Stack HCI is that all the latest features in Windows Server (and Hyper-V) are released for it (unlike “normal” Windows Server) and the downside is that you pay a subscription fee per core, per month, for it.

You can add existing Azure Stack HCI clusters, and you can also create new ones from within VMM. You can manage the entire VM lifecycle, set up VLAN based networks, deploy/manage the SDN controller and manage storage, creation of virtual disks and cluster shared volumes (CSVs) and application of storage QoS. There are new PowerShell cmdlets to handle Azure Stack HCI (Register-SCAzStackHCI).

Note that disaggregated Azure Stack HCI clusters (for Scale Out File Server, SOFS) aren’t supported, nor is Live Migration from an Azure Stack HCI cluster to a Windows Server cluster (although quick migration should work).

I installed the “early preview” on a Windows Server 2022 VM, and it works as advertised, with no visual differences from VMM 2019.

Operations Manager

Apart from VMM, I think SCOM is probably the strongest part of System Center. This venerable product keeps an eye on everything in your virtualized datacenter. Using Dell/HP/Lenovo servers? Just install the free management pack and you’ll get hardware monitoring, down to individual fans in your servers. The same goes for your networking and storage gear. Properly configured, SCOM provides visibility into your entire datacenter stack, from physical hardware to user-facing application code.

There are two new RBAC roles: Read-only Administrator which does what it says on the tin, including reporting. The Delegated Administrator profile doesn’t include report viewing but you can customize exactly what it should be able to do by adding one or more of:

  • Agent management
  • Account management
  • Connector Management
  • Global settings
  • Management pack authoring
  • Notification management
  • Operator permissions
  • Reporting permissions

If you have disabled NTLM in your organization, SCOM 2016/2019 reporting services are impacted, 2022 has a new authentication type (Windows Negotiate) that fixes this issue.

An interesting twist is the ability to choose the alert closure behavior, in 2019 you can’t close an alert when the underlying monitor is unhealthy, now you can choose to be able to close the alert and reset the monitor health, which will let you bulk close alerts. This brings back the behavior from earlier versions of SCOM. Alternatively, you can choose to stay with the 2019 behavior.

There are improvements to the upgrade process where registry key settings and custom install location of the Monitoring Agent is maintained when going from SCOM 2019 to 2022.

Alerts can now be sent to Teams channels, instead of Skype for Business.

SCOM can also monitor Azure Stack HCI deployments, using a new MP, which is actually a grouping of current Management Packs (BaseOS, Cluster, Hyper-V, SDN and Storage).

There are also some other minor fixes such as running the SCOM database on SQL Always On (no post configuration changes required), SHA256 encryption for certificates for the Linux agent, the FQDN source of alerts is now shown when tuning Management Packs and you can view the alert source for active alerts. Newer Linux distros such as Ubuntu20, Debian 10 and Oracle Linux 8 are also now supported for monitoring.

The dependency on the LocalSystem account on Management Servers has been removed and just like the other System Center components, SCOM 2022 runs on Windows Server 2022.

Data Protection Manager

Apart from running on Windows Server 2022, there are a few improvements in DPM. The main one (depending on your restore scenarios) is removing the requirement of file catalogue metadata for individual file and folder restores and instead uses an iSCSI based approach which improves backup times and restores.

If you’re using DPM to protect VMware vCenter you can now restore VMs in parallel, the default value is up to 8 VM simultaneously but you can up that limit with a simple registry change. Speaking of vCenter, VMware 7.0, 6.7 and 6.5 are supported and you can now separate the VDDK logs that relate to VMware operations from the rest of the DPM logs and store them in a user-defined file.

Another “big” improvement is the change of the maximum data storage for a DPM server from 120 TB to 300 TB. As before, it’s recommended to have tiered storage with a small amount of SSD cache and the rest hard-drive-based and use the ReFS file system.

Should you be Excited?

It seems that System Center Orchestrator will come in a 64-bit version although the bits weren’t part of the Early Preview, nor were System Center Service Manager 2022.

Overall, for me there’s nothing that we’ve covered in this article that’s a “must-have” to entice me to upgrade but if I’m upgrading to Windows Server 2022 anyway, or considering Azure Stack HCI, it’s a natural step.

I often express it like this – System Center is on life support. Microsoft isn’t looking to gain more market share against other datacenter management suites, they’re simply keeping System Center up to date and able to manage the latest OSs so that if you’re already a customer – you have a comfortable upgrade path. All System Center products also incorporate various levels of Azure/Microsoft 365 integration to tick the box of being “hybrid” and helping enterprises in their journey to the cloud.

Source :
https://www.altaro.com/hyper-v/system-center-2022/

Deep Dive on Microsoft 365 Defender

The best way to protect a business of any size today against cyber risks is with an integrated suite of tools. Microsoft 365 Defender is one such service that we’ll look at in this article.

For many years the conventional wisdom, especially in larger organizations, was to buy best of breed solutions for each area. So, you ended up with the “best” (defining the “best” solution is hard, and changes quite quickly) email hygiene solution, the best anti-malware solution, the best firewall etc. And because none of them natively integrated with each other, and manual integration is hard and time-consuming, you ended up with multiple consoles and multiple data silos where low fidelity signals were ignored, while they could actually have told you about a breach in progress if you’d been able to correlate those individual low severity signals between each of the systems. A way to solve this issue is via Security Orchestration and Automation Response (SOAR) solutions that act as a “glue” between each product. Another is to buy an already integrated suite of tools such as Microsoft 365 Defender. The promise is eXtended Detection and Response (XDR), which is an extension of Endpoint Detection and Response (EDR) to indicate that not only endpoints but all systems are included in the protection and response.

Microsoft 365 Defender Main Dashboard

Microsoft 365 Defender Main Dashboard

Name changes

In late 2020, Microsoft changed the names of nearly all of their security products so if you’re used to hearing about Advanced Threat Protection (ATP) or Microsoft Threat Protection (MTP), those have all been replaced. There’s now Microsoft 365 Defender which is the umbrella term for the Defenders in M365, as well as a unified console. There’s also Microsoft Defender for Identity (formerly Azure ATP), Microsoft Defender for Office 365 (formerly Office 365 Advanced Threat Protection), Defender for Endpoint (formerly Microsoft Windows Defender, then Microsoft Defender).

These products all tie into Microsoft 365 Defender (M365D) and are commonly abbreviated MDI, MDO and MDE. Microsoft’s Cloud App Security Broker (CASB) was renamed to Defender for Cloud Apps (MDCA?) at the Ignite conference in November 2021, it was previously known as Cloud App Security (MCAS). This makes a whole lot of sense as it’s part of the Defender family and can feed logs into the unified console.

Whilst not strictly a security product, and not bearing the Defender moniker, Azure Active Directory (AAD) and its security features also tie strongly into Microsoft 365 Defender.

There’s also Azure Defender for your IaaS and PaaS workloads in Azure, which also changed its name at Ignite in November 2021 to Microsoft Defender for Cloud. Also, separate from all of these security products but eminently capable of working with all of them is Azure Sentinel – a cloud-based Security Information and Event Management (SIEM).

Meet the Defenders

We have deep-dive articles on MDI, MDO and MDE here in the M365 Dojo but understanding what each of them does is crucial to understanding how Microsoft 365 Defender ties them all together.

MDI is a cloud-based service that monitors your on-premises Active Directory for specific indicators of compromised identities and attacker operations. Anytime an attacker gains a foothold in your organization, one of their first goals is to move laterally and elevate privileges, preferably reaching Domain Dominance. This last stage, where your entire on-premises identity infrastructure is completely under the criminal’s control, takes on average 48 hours. MDI relies on agents on your Domain Controllers (DCs) or if your security team can’t stomach that, a member server that receives forwarded event log data from each DC and catches network traffic using port mirroring. MDI will catch attacker activity during five phases: ReconnaissanceCompromised credentialsLateral movementDomain dominance and Exfiltration. Because MDI is laser-focused on AD (and AD Federation Services ADFS, after the Solarwinds attacks), it produces high fidelity alerts with very specific data to catch and contain miscreants on your network. Examples of attacks detected include Account enumeration reconnaissance, AS-REP Roasting, Identity theft (pass-the-hash), Skeleton Key attack and Data exfiltration over SMB and many, many others.

Threat and Vulnerability Management dashboard

MDO is all about providing advanced protection for your Office Online workloads. So, after incoming emails and attachments have been scanned by Exchange Online Protection (EOP) which includes three AV engines to provide a base level of protection if an attachment has never been seen before it’ll be opened in a VM and automatically inspected for malicious behaviour to catch zero-day attacks. MDO also looks at every URL in emails to see if they lead to compromised sites. It also provides time-of-click scanning as attackers will frequently compromise a benign website, send out their emails with links that won’t raise flags as they’re delivered (since the site isn’t displaying malicious indications at this point), then activate the malicious payload on the website. By checking the link atthe time of actually clicking on it, MDO provides stronger protection for your end-users. MDO comes in two flavours, plan 1 covers the above features, whereas plan 2 adds Threat Trackers (intelligence on current attacks in the wild), Threat Explorer (also known as Explorer, shows you recent threats in your tenant), Automated Investigation and Response (AIR) and Attack simulation training (to train your users to recognize dangerous phishing emails).

MDE on the other hand is a full-fledged EDR and anti-malware solution for your endpoints, including Windows, MacOS, Android, iOS and Linux. On Windows there’s no agent to deploy, it’s simply a matter of activating the bits already in the OS through onboarding, either with a script or Configuration Manager, Intune, or Group Policy at scale. Apart from local and cloud-based Machine Learning (ML) models to identify new threats, MDE also offers AIR and a complete Threat and Vulnerability Management (TVM) solution.

Threat and Vulnerability Management dashboard

TVM inventories all software installed on your endpoints (Windows 8.1, 10 (1709+), 11 and Windows Server 2008R2+, MacOS and Linux) and compares against known software vulnerabilities. Using signals such as the risk of the vulnerability being exploited, the number of devices in your organization where it’s installed and the usage of the application it’ll give you a prioritized list of programs to upgrade. As this is often a task for the endpoint/desktop team rather than the security team, there’s built-in functionality to create a task in Intune with links to the relevant upgrades etc.

Until recently there was only one version of MDE, but in August 2021 Microsoft announced a new version called Plan 1, while the full-featured version became Plan 2. Plan 1 is in preview and brings Next-generation protection (anti-malware/virus), Attack surface reduction, Manual response actions, Centralized management, Security reports and API access. Plan 2 adds Device discovery, TVM as above, AIR, Advanced hunting, full EDR and Microsoft Threat Experts (MTE). This last one is a managed SOC service by Microsoft which gives you two services, targeted attack notifications where analysts have identified an ongoing attack in your environment and access to experts on-demand to help your SOC if you need them.

At the Ignite 2021 conference, these two siblings (Plan 1 & Plan 2) were joined by a cousin, Microsoft Defender for Business which will (it’s “coming to preview soon”) protect your Windows, macOS, iOS, and Android endpoints for up to 300 users in a business. Unlike Plan 1, it comes with TVM, and AIR and full EDR so the only things that are missing are Linux support, MTE and advanced hunting. It’ll be available as part of Microsoft 365 Business Premium or as a standalone license at $3 per user per month. It’ll also integrate with Microsoft 365 Lighthouse.

A common misunderstanding is between MDE and the built-in security features that every Windows 10 user can take advantage of Microsoft Defender Security Center and Microsoft Defender Antivirus. These basic protection features are used by MDE, but it adds many advanced features on top as outlined above.

There are good alternatives to Microsoft’s services, if you’re looking for email hygiene, archiving / journaling, zero-day protection and email continuity even if Exchange Online is unavailable, plus optional backup, 365 Total Protection is excellent.

Microsoft 365 Defender

MDE used to have its own portal, separate from other security products (securitycenter.windows.com) and while it’s still there it comes with a banner strongly suggesting redirecting users to the main M365 Defender portal (security.microsoft.com). MDI’s previous portal is completely retired and its functionality was moved into the Defender for Cloud Apps portal quite some time ago and MDO is already housed in the M365 Defender portal. The work to integrate MDI into the main Microsoft 365 Defender portal is extensive and is likely to take some time. There’s more to the integration than just a single portal, although that’s a good start.

If you are using MCAS, you can integrate its telemetry into Microsoft 365 Defender.

First, there’s a unified alerts queue, so you’re not looking in one place for an email threat that might have snuck past your mail filtering, and in another place for endpoints where that same email attachment might have been opened, it’s all in the same place. The same goes for the unified user page, a user account is an object in MDI (AD) but also an entity in MDO (has a mailbox, OneDrive for Business storage etc.) and of course an object in MDE on whatever devices they’re logged in to.

The unified investigation page is my favourite, the ability to see details of automated actions (AIR) along with options to further investigate myself is very powerful, especially as it spans all the different Defenders. By popular demand, there’s also an email entity page that lets you investigate suspicious emails, including previewing them if they’re stored in an Exchange online mailbox.

Email entity page

Email entity page

There are two ways of controlling access to M365 Defender data using RBAC, either using built-in Azure AD roles or if you want to control access very granularly in a large environment, using Custom role access.

You don’t need to have all the different Defenders enabled to take advantage of M365 Defender, as soon as you enable one workload it works, as you add more services, more of the portal will light up.

Do you like to Hunt?

The coolest benefit of the integration however is the ability to do advanced hunting across all the data flowing into Microsoft 365 Defender. This is a sign of a mature security organization where it’s not all about dealing with alerts and incidents raised by the security systems but where there’s also time for an analyst to say, “I wonder if that attack against a company similar to us last week could have hit us too – let me grab the Indicators of Compromise (IOCs) and look through our logs”. All Microsoft security products rely on Kusto Query Language (KQL) with a similar syntax to SQL for searching through large amounts of security log data and the ability to look in one query over email data (MDO), identity data (MDI), endpoint processes and actions (MDE) as well as third party cloud service logs (MCAS) is incredibly powerful.

There’s a new Advanced Hunting UI, recently released, which offers tabs for each query you’re working with and feedback on the performance of each query run.

Here I’m looking to see if any suspicious PowerShell activity was launched within 30 minutes of a known malicious email being received in the last 7 days.

Advanced Hunting in Microsoft 365 Defender

Advanced Hunting in Microsoft 365 Defender

If you find events of interest during hunting, you can now use them to create an incident or add them as alerts to an existing incident. You can also bring in external data into hunting queries from lists of IP addresses, accounts etc.

Microsoft 365 Defender also offers a Secure Score across identities, devices and apps, giving you an overview of where you have strong controls in place and areas where you can improve your tenant’s overall security posture.

Microsoft 365 Defender Secure Score

Microsoft 365 Defender Secure Score

There’s also a unified view of Alerts and Incidents, actions taken by AIR and reports for endpoints, emails, identity, and overall security.

Alternative Solutions

While Microsoft 365 Defender is a comprehensive security solution it’s not the only game in town. There are many other providers that offer various solutions for email hygiene that integrate neatly with Exchange Online and provide features Microsoft doesn’t. There are also services for email continuity (when Exchange Online is down), encryption of sensitive data, long term archiving of emails for compliance, signature services, backup of Office 365 data and many other EDR and XDR solutions on the market. One reason for choosing a different provider is the perceived conflict of interest when Microsoft is both providing the collaboration platform and the security services on top. Another reason could be to pick a best of breed solution for a particular threat – just make sure the integration to the rest of the security stack you need is available.

Conclusion

The power of an integrated suite that looks for malicious activity across email, identity and endpoints cannot be underestimated. There are a few things to keep in mind, however: Microsoft 365 Defender is focused on Microsoft 365 (it’s in the name) but most organizations have many other platforms and services to secure and monitor which is where a SIEM like Azure Sentinel comes into play. It can ingest data from Microsoft 365 Defender and many other Microsoft services, along with 100+ third-party data sources for a true single view of your digital estate. There’s also bi-directional synchronization between them so if you close an incident in Microsoft 365 Defender, it closes in Azure Sentinel and vice versa. Log retention is only 30 days in Microsoft 365 Defender whereas Azure Sentinel gives you 90 days for free, with several different options for storing security log data for longer.

Secondly, most features in the Defender family require Microsoft 365 E5 licensing (or M365 E3 plus add-ons) which isn’t cheap, especially in medium to large organizations. There’s definitely a conversation to be had about the role of Microsoft providing the platforms and then charging extra on top for the advanced security features, rather than just ensuring that the platform itself has the required security in place. An alternative is a trusted third-party solution such as Hornet Security’s 365 Total Protection which is also considerably more cost-effective.

Source :
https://www.altaro.com/microsoft-365/deep-dive-m365-defender/

OneDrive for Business: Tips and Tricks for High-Performing Admins

This article focuses on administration and management exclusively for OneDrive for Business. We will cover advice and best practices from my extensive experience working with service ideal for system admins and those actively working with it on a daily basis.

What is Microsoft OneDrive?

Microsoft has two different, but similar services called OneDrive, both of which offer cloud file storage for users. A free version of OneDrive is available to everyone and is often called the “consumer” version. The business version is “OneDrive for Business” and requires a subscription to Microsoft 365 or Office 365. Both look a lot alike but are managed very differently. To add to the mix, Microsoft often refers to OneDrive for Business as simply “OneDrive” in their documentation and even in the UI.
Note: I may refer to OneDrive instead of OneDrive for Business from time to time in this article for the sake of brevity, but I always mean OneDrive for Business unless otherwise stated.

OneDrive for Business has company-wide administration in mind. A service administrator can control the deployment of the synchronization app, network performance, and many other settings. With OneDrive (consumer), there is no management framework. The individual using the service controls their settings.

Where Should Users Save Files?

OneDrive for Business makes it very easy to share files with others, but if you find yourself sharing lots of files, it is recommended to use Teams or SharePoint instead. Teams and SharePoint are simply better for collaboration. For example, with OneDrive, you can’t check-in and check-out a document. Also, in Teams, any document you upload to Teams is available to the entire Team by default, whereas documents you upload to OneDrive are private by default. Also, in Teams, a conversation about a document is shared in a Teams channel rather than via email. The general guidance is if you are working on a file without others involved use OneDrive for Business. If you need others involved, use a more collaborative service – Teams or SharePoint.

OneDrive for Business uses SharePoint Online as Service

As the service administrator, one of the most important concepts to master is that OneDrive for Business is a special purpose SharePoint document library created automatically for every user in your company. When a user is assigned an Office 365 or Microsoft 365 license, the services automatically create a personal OneDrive for Business document library.

The URL for OneDrive for Business is formatted as follows:

https://<company base name>-my.sharpoint.com/personal/<user-id>

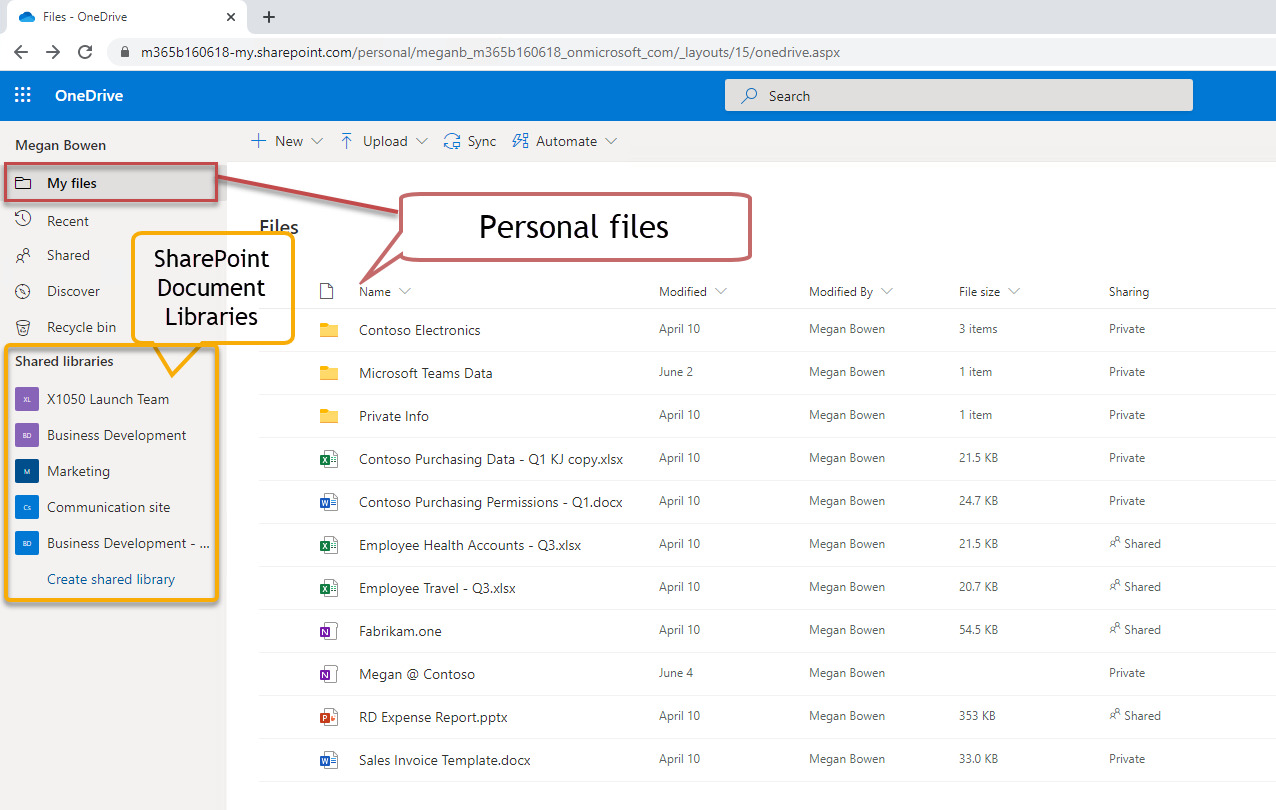
OneDrive For Business SharePoint Library

The landing page (shown above) for OneDrive for Business shows “My Files” which are your files. You can also navigate from here to any SharePoint asset, including SharePoint Document Libraries, files hosted for Teams, or other SharePoint content.

Now that you know OneDrive for Business is using SharePoint under the hood, the following guidance makes sense:

To manage the OneDrive sharing settings for your organization, use the Sharing page of the new SharePoint admin center, instead of the Sharing page in the OneDrive admin center. It lets you manage all the settings and latest features in one place.

In this way, settings related to file sharing on SharePoint are aligned with those for OneDrive for Business (and Teams, which also uses SharePoint as a file store). OneDrive picks up many features from SharePoint, such as the ability to do File RestoresRestore a previous version of file, and synchronize files to your desktop.

Easy Anonymous Access

One main reason OneDrive for Business is well-liked is that it’s so easy to share a document with anyone. You can send someone a URL to a document and relax. It just works, and you won’t hear the dreaded “I can’t open the document” (which is all too common and a huge productivity sink).

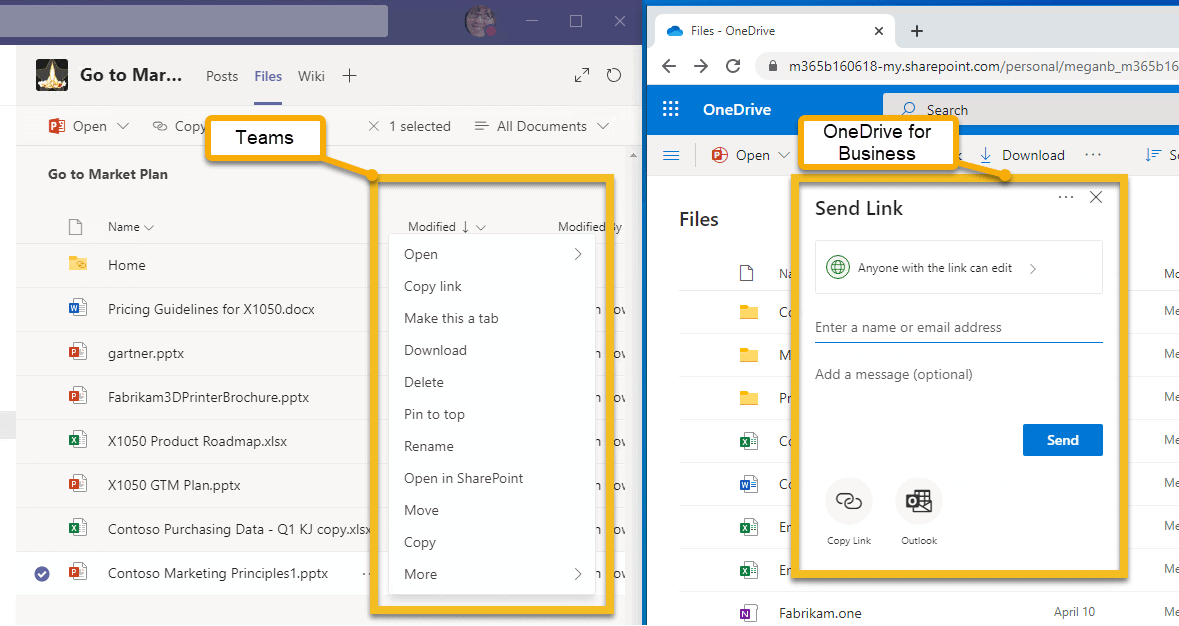
The screenshot below exemplifies my point. What’s being shown is the side-by-side sharing experience in Teams vs. OneDrive. Take note! There is no Share option in Teams. You can copy the link to the file, but you must know if the user you send it to has rights to view the document in the Teams library. In OneDrive for Business, however, there is a Share option that allows you to send a URL to anyone. This is called Anonymous Access and is one of the primary reasons users share from OneDrive rather than Teams.

OneDrive For Business, Microsoft Teams

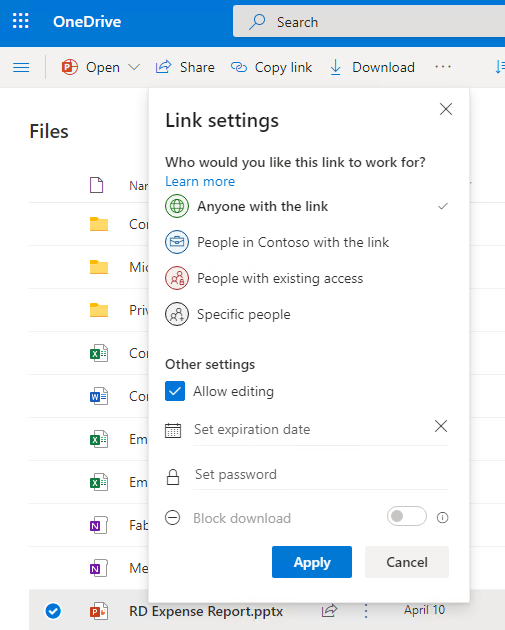
Also, in OneDrive, if you click on Anyone with the link can edit, you can further refine the Sharing options.

OneDrive For Business Sharing Options

As a side note, users frustrated by Teams’ lack of sharing controls can easily open a document or folder in SharePoint instead of Teams (as shown below). In SharePoint, you can share the file with anyone just like in OneDrive. There’s no need to copy a file in Teams to OneDrive to share anonymously. Just open it in SharePoint instead!

SharePoint Document Sharing

<>Controlling Default Permissions

Many businesses prefer to control who can open company documents. You can change the default settings in the OneDrive administration center, but let’s follow Microsoft’s advice to use SharePoint administration instead.

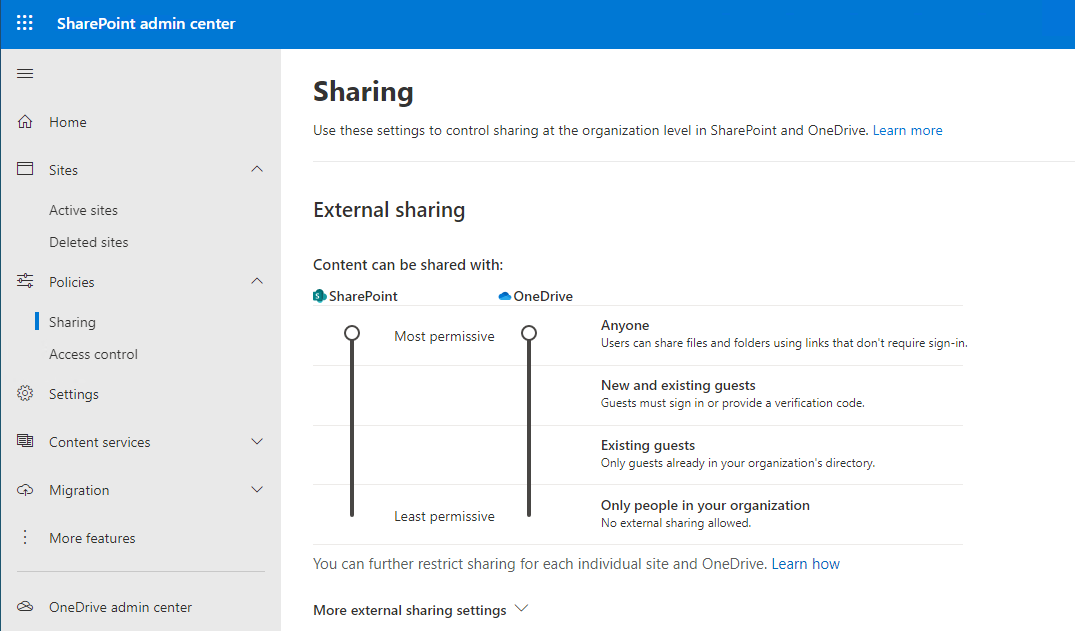
OneDrive SharePoint Admin Center

There are separate controls for External Sharing for SharePoint and OneDrive, ranging from Only people in your Organization to Anyone. However, what a static snapshot does not reveal is that the OneDrive settings cannot be more permissive than SharePoint. If you lower the permission on SharePoint, the permission also lowers on OneDrive. OneDrive can be more restrictive than SharePoint but never less restrictive. Since SharePoint hosts OneDrive files, this makes sense.

These settings are company-wide. Let users know before you make changes to global settings that cause changes in expected behavior. You WILL hear from them, and it generally won’t be a happy face emoji.

When guest users are needed, as they frequently are, consider securing the environment with the guidance provided by Microsoft in the documentation page titled Create a secure guest sharing environment.

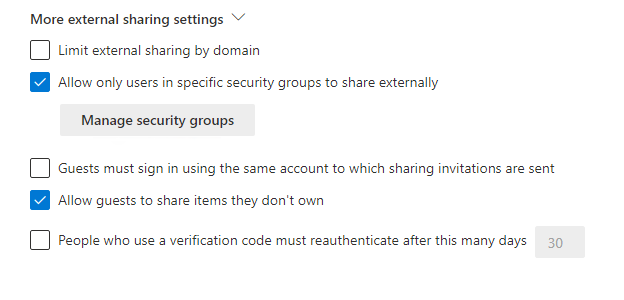
Savvy admins can control sharing using options available when you click on More external sharing settings on the same screen shown above:

OneDrive SharePoint External Sharing Settings

The option Limit external sharing by domain lets you allow or deny sharing to a particular domain. This can be a great way to go when you want to constrain sharing to a specific set of partners or external resources.

Allow only users in specific security groups to share externally lets you control who can share files with people outside your organization. A security group is an Azure AD object that is generally a collection of users and other groups. After populating the security group with users, you can assign permissions and policies to the group, such as granting the group access to a SharePoint site, a mailbox, or forcing members of the group to use 2-factor authentication.

Consider the following scenario. Marketing is involved with a lot of external sharing, so we want to enable sharing for members of Marketing but deny everyone else, AND we don’t want to have to make adjustments every time someone moves into or out of marketing.

To illustrate how this can be achieved with security groups, I created a security group in Azure AD named Marketing-Org and added four users. As employees come and go, members of marketing are added to and removed from this group. (If you haven’t created security groups in Azure AD, it’s straightforward.)

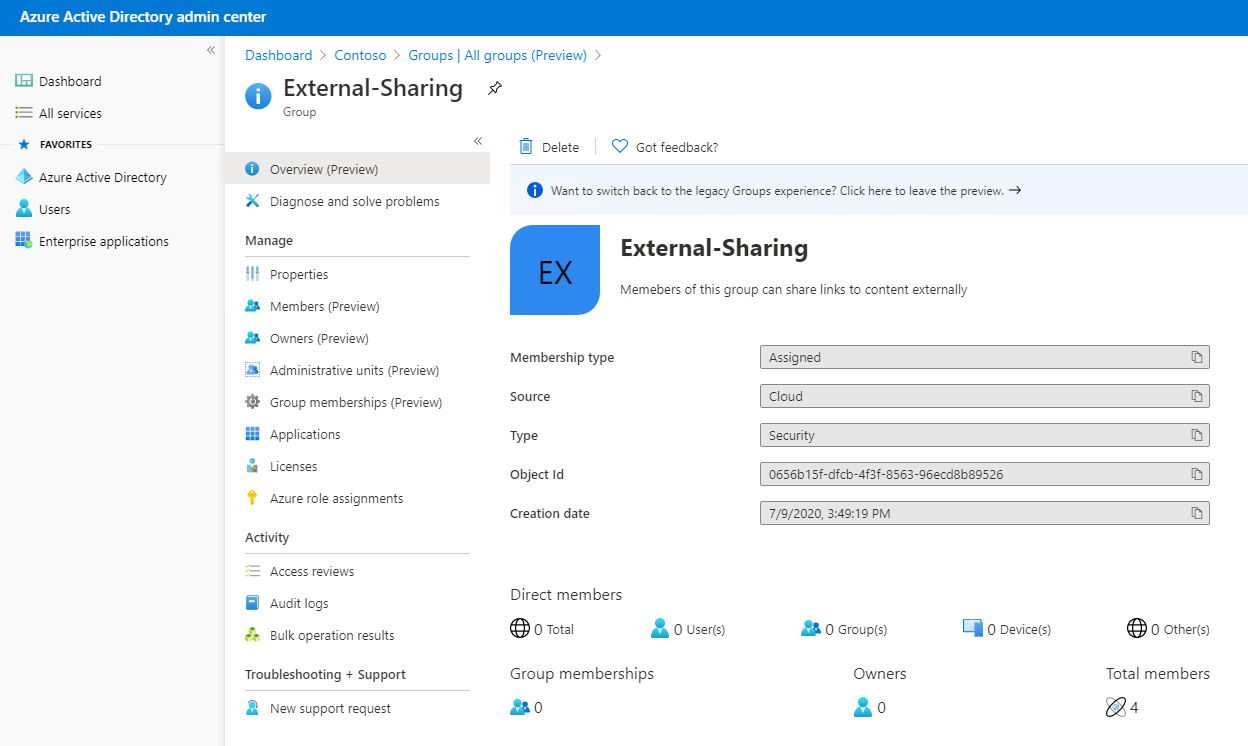
Next, (shown below) I created another security group called External-Sharing.

Azure AD External Sharing

Security groups can have other security groups as members! By adding Marketing-Org to External-Sharing, the users in Marketing-Org automatically inherit External-Org permissions and policies

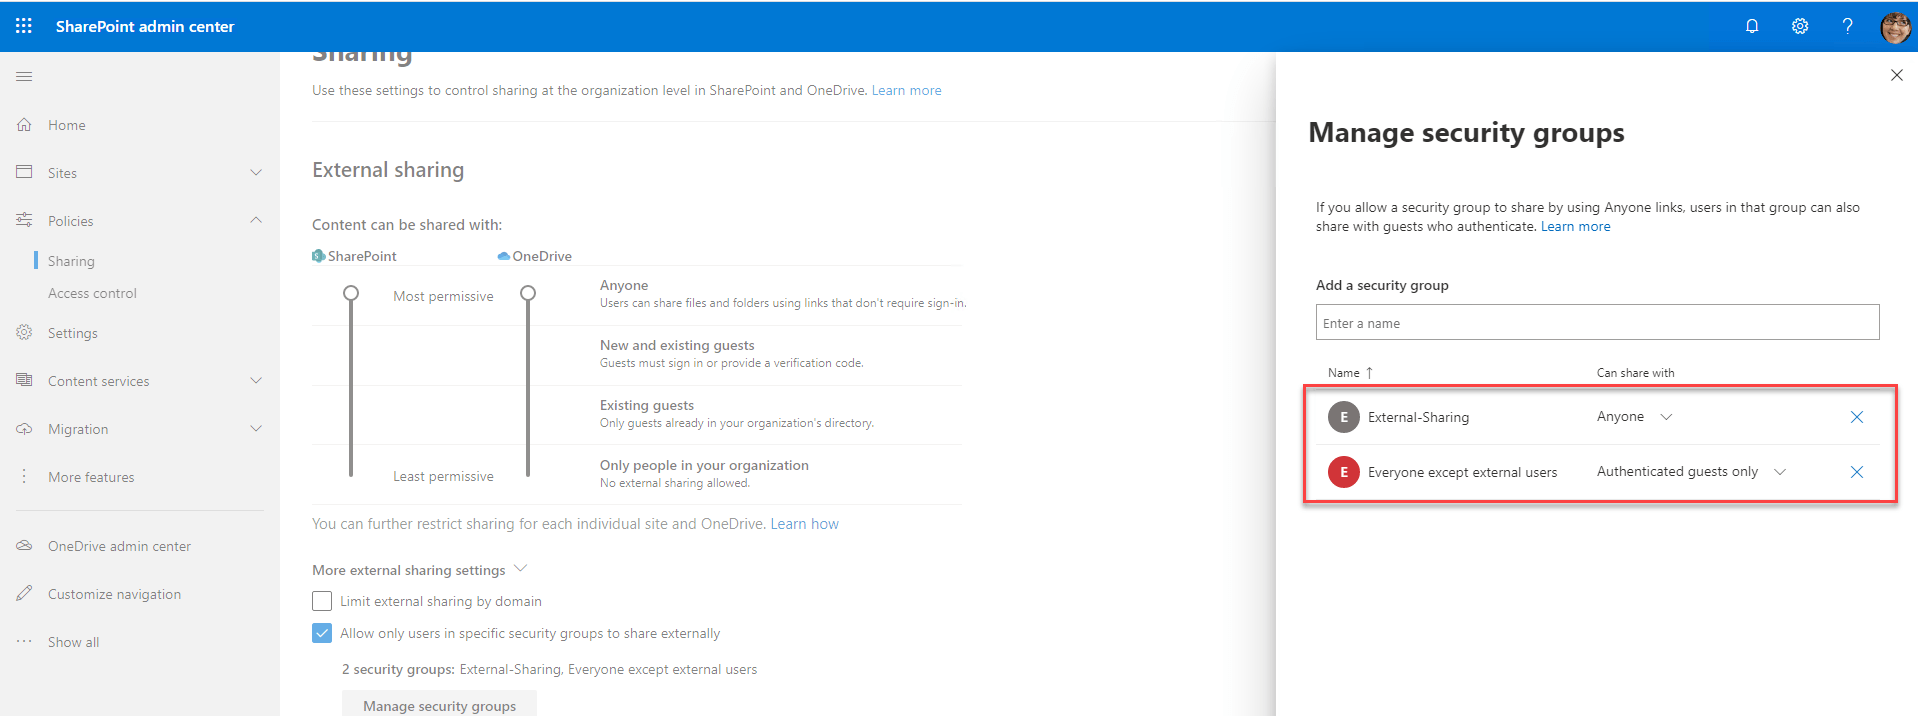
After that, I assigned the sharing permissions to the External-Org group. Returning to the SharePoint admin center Policies->Sharing->More external sharing settings-> Allow only users in specific security groups to share externally. Then, by clicking on Manage Security Groups (shown below)I added the External-Sharing group and set them so they can share with Anyone. To limit the ability of everyone else, I added the built-in security group Everyone except external users and set them to share with Authenticated guests only.

SharePoint Admin Center Manage Security Groups

In this way, everyone in the company can only share with authenticated guests, whereas only the members of External-Sharing can share with anyone.

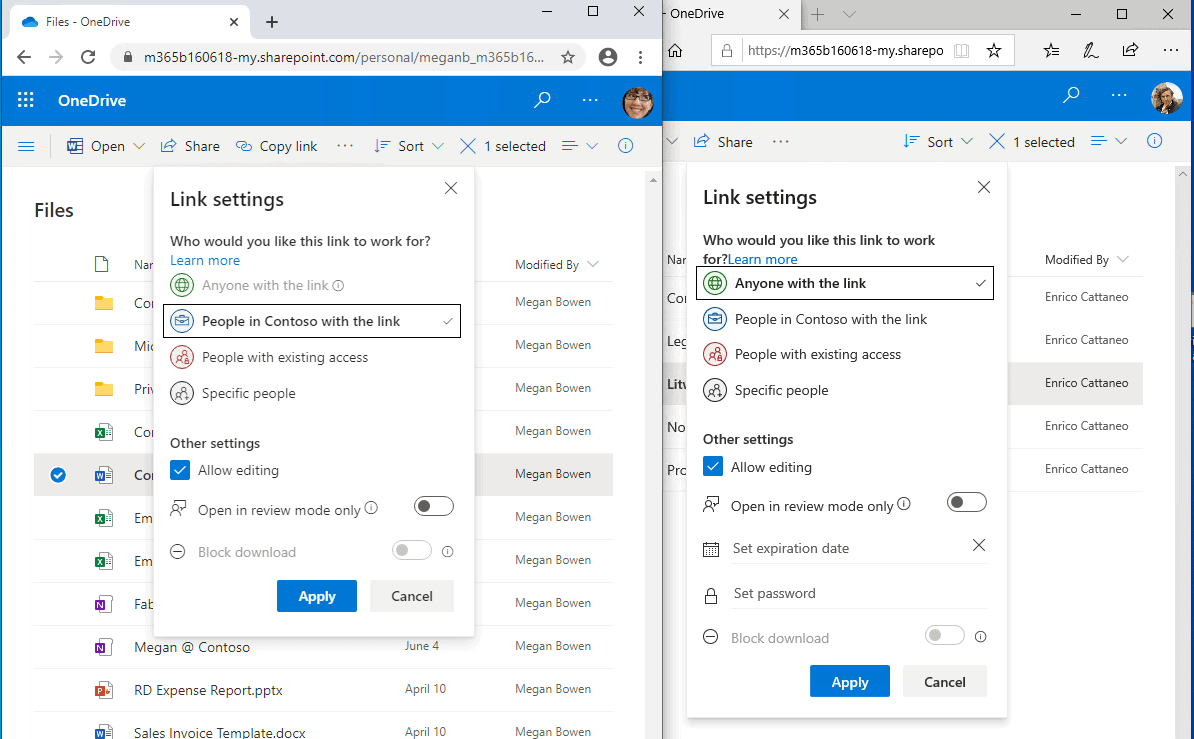
The screenshot below shows the result. The user on the left is not a member of the External-Sharing group (the Anyone option is grey and cannot be selected). However, the user on the right can.

OneDrive For Business External Sharing

Once configured, effective administrators can manage membership of the security groups using PowerShell with the Add-AzureADGroupMember and associated cmdlets.

Storage space per user

Most Microsoft 365 and Office 365 plans come with 1TB of storage per user for OneDrive. If there are more than 5 users on a plan, 1TB can be increased by administrators to 5TB. You can even go to 25TB on a user-by-user basis by filing a support ticket with Microsoft.

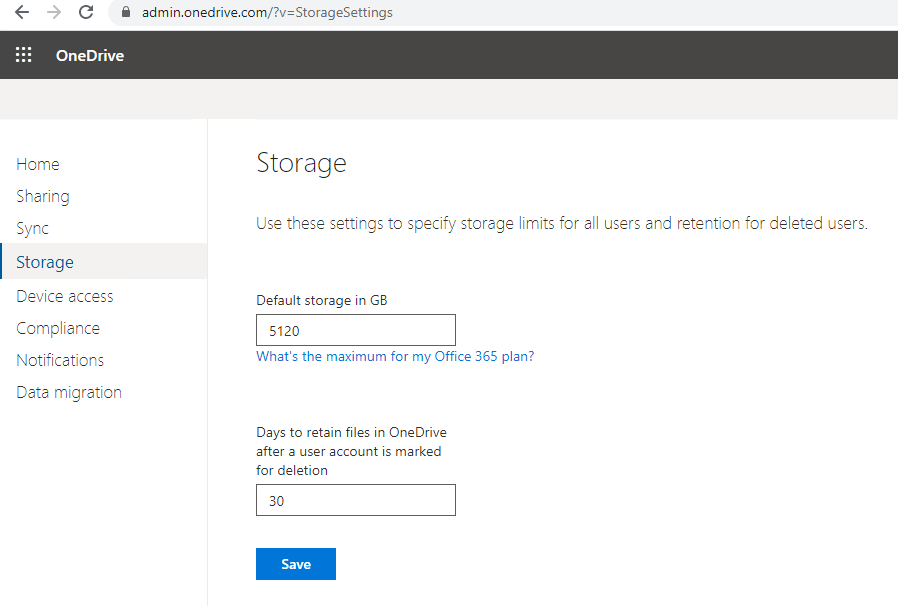
To increase the storage limit for all users, browse to the OneDrive administration console, and select Storage. Change the setting from 1024 to the new limit. Shown below is updating the limit to 5TB. There are no additional charges for the increase in capacity.

OneDrive For Business Storage Limit

A global or SharePoint admin can change storage quotas with PowerShell after you connect to SharePoint using the SharePoint Online Management Shell and run the following command:

Set-SPOSite -Identity <user’s OneDrive URL> -StorageQuota <quota>.

You have to construct the OneDrive URL from the company name and user name, as mentioned earlier. Then, find the user name from the list of active users in the Office or Microsoft 365 admin center.

For <Quota>, enter a number between 1024 (1MB is the minimum) and 5242880 (for 5 TB). Values are rounded up. 1TB is 1048576.

As of this writing, OneDrive allows files up to 100GB.

Request Files

In some scenarios, you may want to collect files from others, rather than send files to others. OneDrive for Business makes this easy with the Request Files feature. With this feature, users can send an email asking others to upload content to a specific folder.

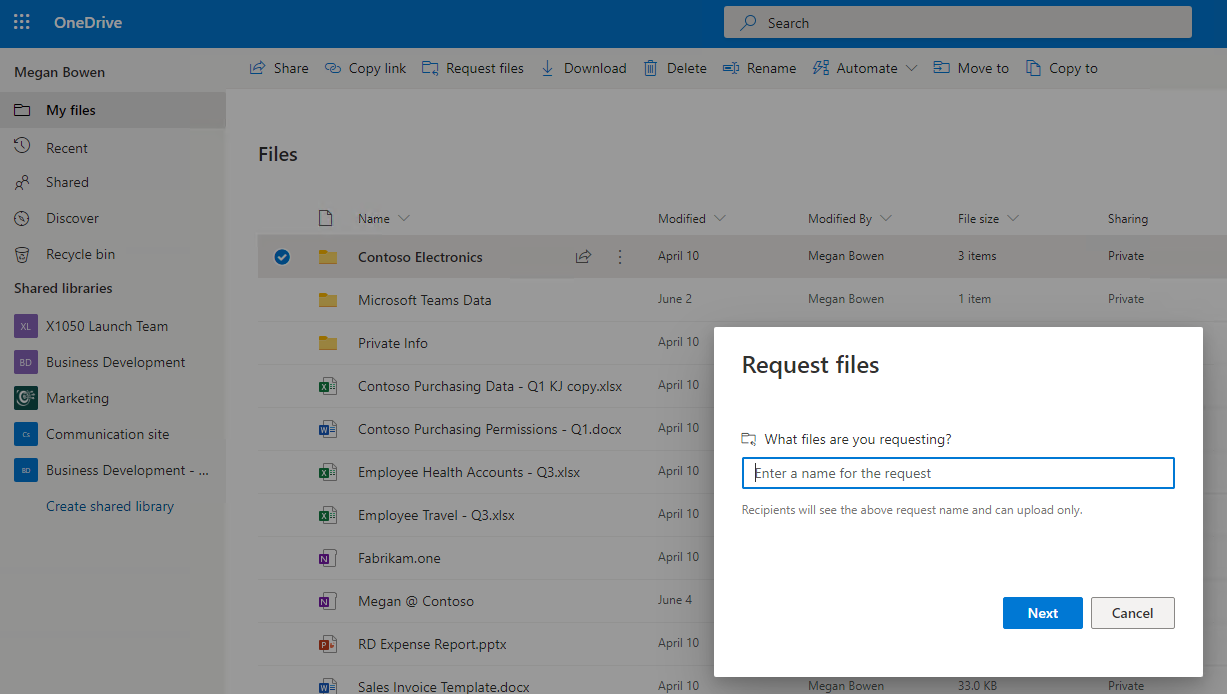
To set up a request files email, in the OneDrive UI, select a folder, click on the ellipses (…), and click Request files. You will see a window similar to the one shown below.

OneDrive For Business Request Files

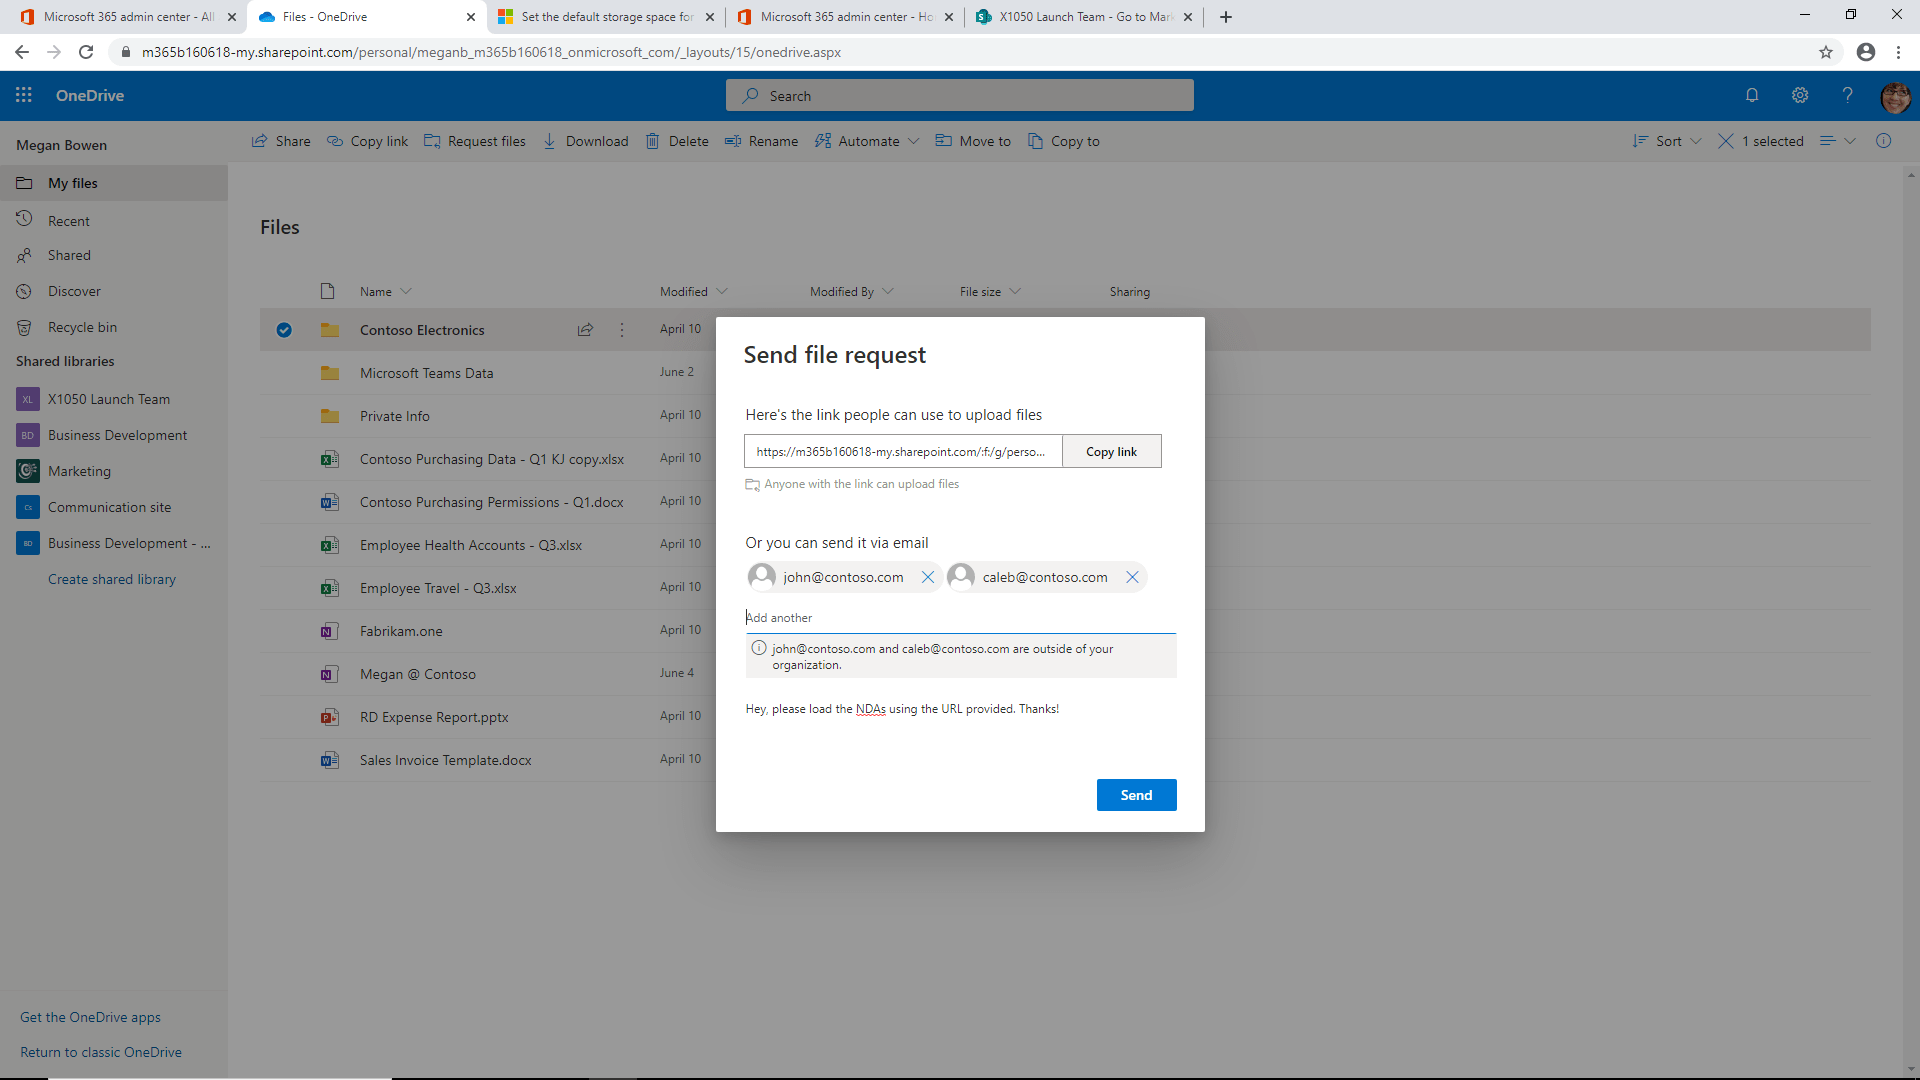
After clicking Next, you will see the Send file request window:

OneDrive For Business Send File Request

The email sent by this form provides a URL for uploading content to the OneDrive for Business folder. Request files is a great way to collect and concentrate needed files into a single location for processing. That said, you need to make sure to enable uploads for the folder locations in the request.

Of course, a savvy administrator is thinking, “Hmm, does this provide a way for these users to upload content forever to this location?”

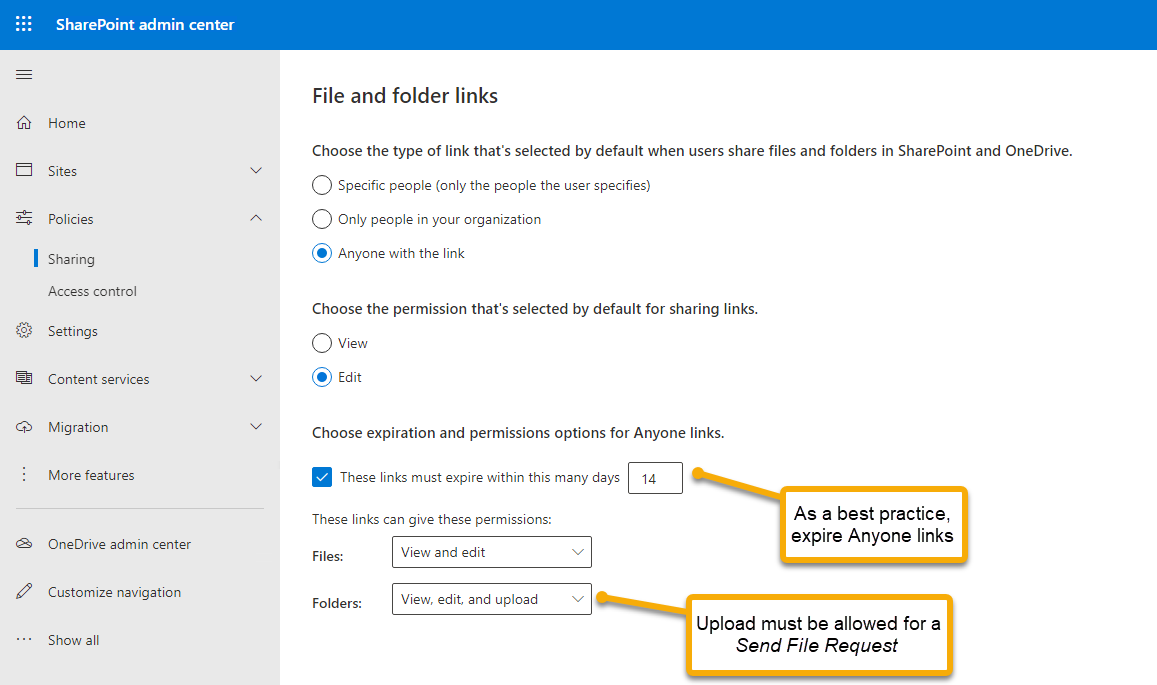
Shown below is the SharePoint admin center for Policies, Sharing.

SharePoint Admin Center Policies Sharing

With these settings, you can put some boundaries around the ability to upload files to location access given in the Request files invitation. These settings apply to anonymous links sent from OneDrive and SharePoint as well. As a best practice, if you permit users to send links to Anyone, which is enabled by default, you should expire those links. Otherwise, over a period of years, there can be hundreds or thousands of URLs that provide access to your content making access control distressingly challenging or impossible without disabling anonymous access altogether.

Folders must be set to View, edit, and upload as shown above to allow users to upload files in response to a file request.

Synchronization

One of the main features of OneDrive for Business is the ability to synchronize files from a user’s PC or laptop with OneDrive. With the synch service running, users can work on files locally, and the changes are sent to the cloud. Also, well-known folder locations such as Documents can be synchronized, ensuring essential documents are both local and in the cloud. You can easily sync Teams File Repositories as well as SharePoint Document Libraries.

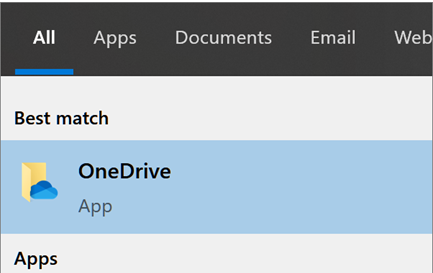
The synchronization service is part of Windows 10, so you do not generally need to download it individually. Users can install the service by clicking Start and typing OneDrive.

One Drive For Business App Windows 10
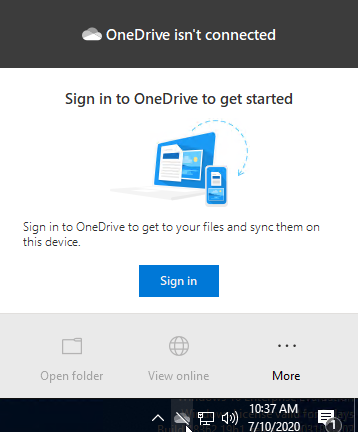
OneDrive For Business Sign In

Click on the OneDrive app to launch the setup. OneDrive is then accessible in the taskbar as the cloud icon (shown before logging in, below).

Alternatively, users can enable the client by logging into onedrive.microsoft.com and clicking Sync.

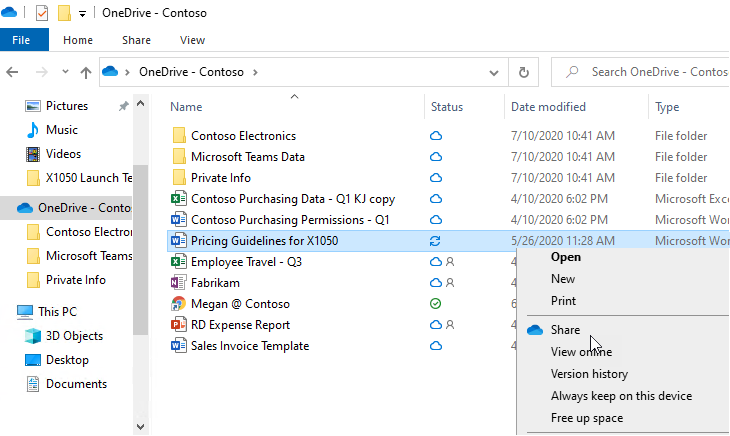
When installed, users can enjoy the integration of OneDrive with Windows File Explorer. A OneDrive location is visible in the File listing. The OneDrive file listing is unique as you can see if a file is in the cloud (cloud icon), local and in the cloud (checkmark), or synchronizing (arrows). Also, when you right-click on a file in the OneDrive folder, you can Share a file, View online, and check the version history.

OneDrive Windows File Explorer

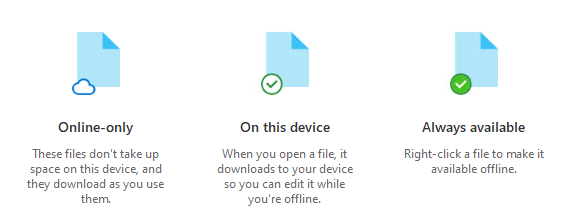
Pay particular attention to the following icons. Shown below is a screenshot from one that appears during the installation of the OneDrive client.

OneDrive Client Installation

TAKE NOTE – File on demand enabled by default!

Imagine this scenario. You are working on an important project with several others. A Teams site is used for collaboration. You’re headed out for an important meeting with your clients, and a colleague posts several important files to Teams. You’ve installed the sync client, and you’re headed off to the airport, so you think “no worries, I’ve got them synced to my laptop, and I can view them in flight.” Aloft, you open your laptop and see there is a cloud icon next to files. Clicking on a file, it’s not accessible. What happened?

What happened is the Files On-Demand is enabled by default.

Files On-Demand marks content that appears in the cloud as cloud-only. A file added to a Teams File Repository will not automatically sync locally. It’s not available offline until you open the file, or set the file or folder to Always keep on this device. Optionally, you could also disable Files On-Demand, which we’ll get to in a minute.

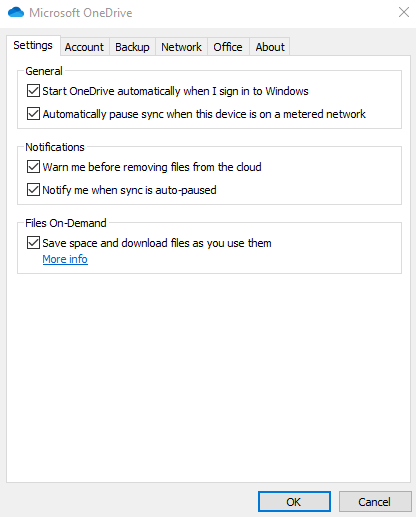
For an important file or folder, right-click in Windows Explorer and select Always keep on this device. Users can also disable Files On-Demand in the OneDrive client by opening the client and clicking More->Settings->Settings, then clear the checkbox that reads Files On-Demand.

Microsoft OneDrive Files On-Demand

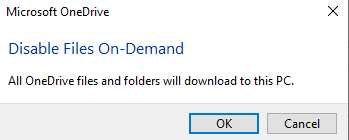
When you clear the checkbox, a pop-up message says that, indeed, the files will download to your PC instead of being cloud-only.

Microsoft OneDrive Disable Files On-Demand

Be advised that as the message above states, if your files in OneDrive for Business take up, say, 1TB, then that 1TB will be downloaded to your PC. Local storage needs to allow for this. Also, administrators need to consider the impact on bandwidth should you disable Files On-Demand for many users at the same time.

As an alternative, consider instructing users to mark files and folders they want to always be available offline “Always available on this device” using Windows File Explorer as previously discussed. Then you can keep Files On-Demand enabled to preserve bandwidth as only the designated files and folder will be permanently synched, while those you open, will be temporarily synched. All others will reside in the cloud.

Using Policy

For small businesses, administrators can manage OneDrive for Business effectively with the OneDrive for Business administration console. Larger organizations will be interested in using policy. The policy system for Microsoft and Office 365 is considered the most efficient way to manage many settings including those for OneDrive for Business. Policy-based administration provides administrators control, scale, repeatability, and flexibility.

Policy automation can be a complicated topic and breaks into different scenarios depending on your network architecture and configuration. For those with on-premise Active Directory environments, you manage policy via SCCM or Azure AD Domain Services.

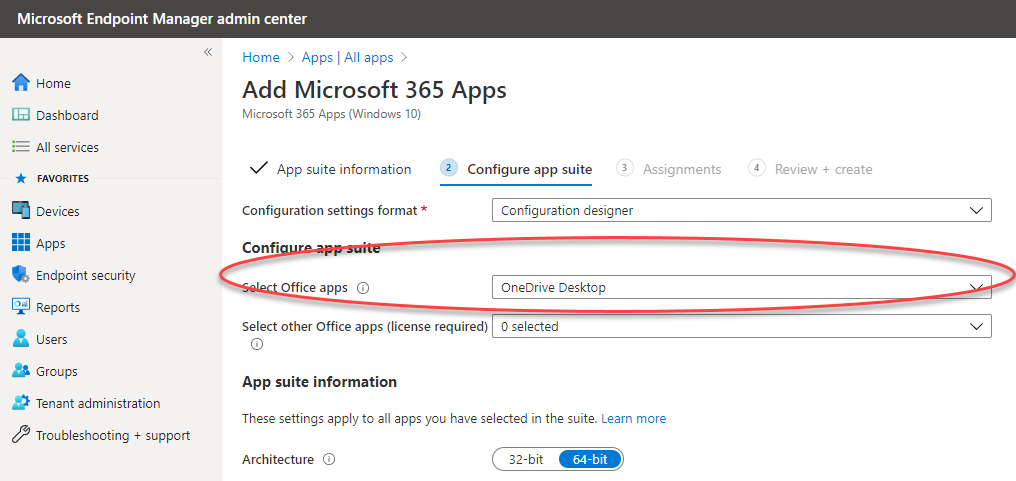
If your environment is cloud-only (meaning, you are not using domain controllers locally), using Microsoft’s InTune service lets you deploy the OneDrive sync service to desktops using the Microsoft Endpoint Manager admin center.

Microsoft Endpoint Manager admin center.

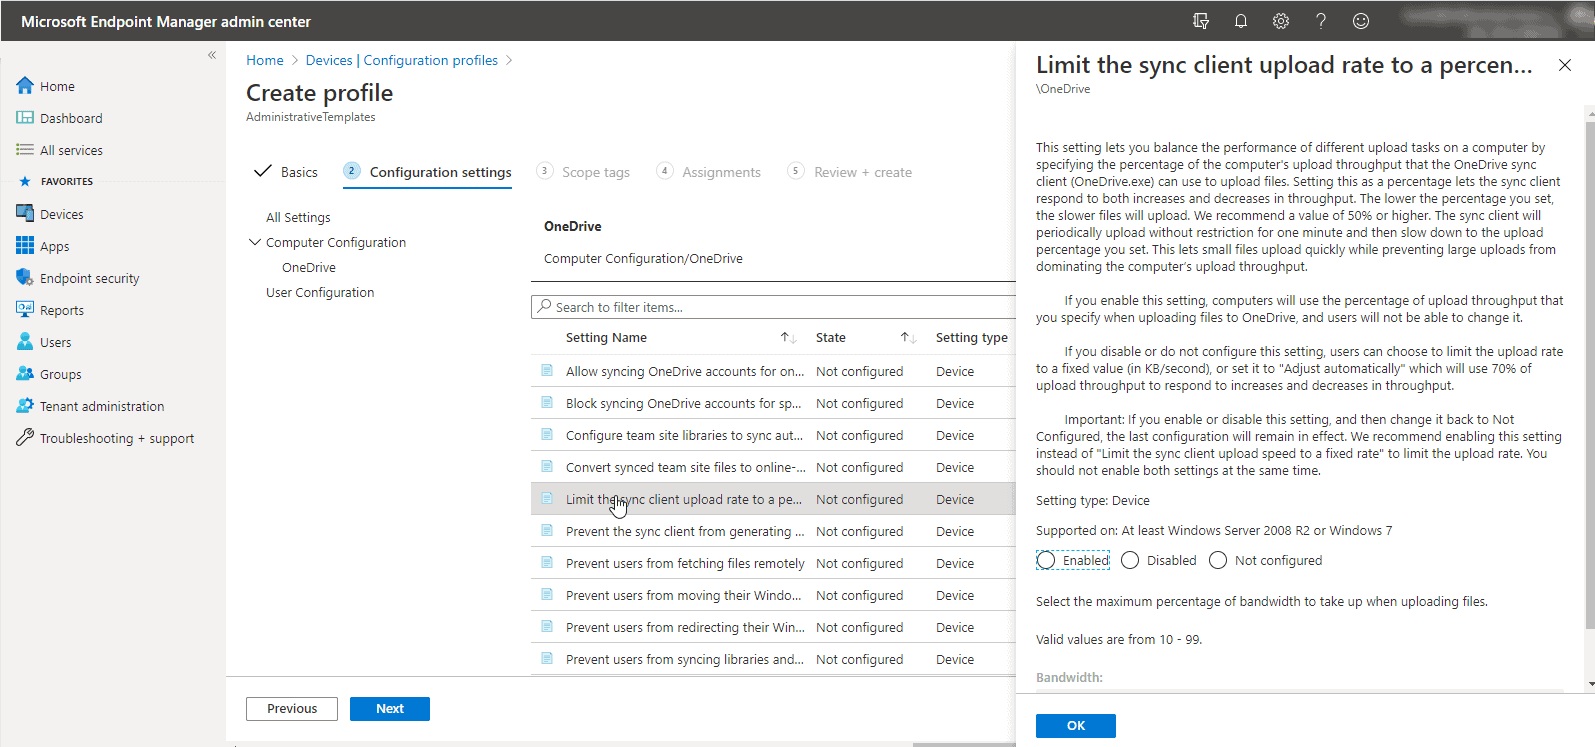
You can also create and apply profiles to users that control OneDrive behavior. Shown below is a policy profile limiting the client upload rate to a percentage of available bandwidth. This one of many possible settings to control OneDrive policies in Microsoft Endpoint Manager.

OneDrive policies in Microsoft Endpoint Manager

Previously, you saw how you can limit sharing with anonymous users to members of a specific security group. Similarly, you can apply different policy profiles to different security groups.

Microsoft EndPoint Manager Security Groups

In this way, you manage the behavior of OneDrive and many other aspects of your cloud service by membership in security groups. It’s easy to imagine uses for this practice with a group for New Hires, Legal-Review-Team, Alliance Partners, Vendors, or other typical roles with differing needs in a busy organization.

Network Impact

In regards to OneDrive, you want to be thoughtful about bandwidth consumption in your company, especially on the initial deployment of OneDrive for Business. More than one company has had issues with essential business services becoming sluggish when hundreds or even thousands of newly deployed OneDrive for Business sync clients start downloading content at the same time. Files On-Demand, as discussed earlier, helps significantly to reduce the initial bandwidth hit as files located in the cloud are not automatically downloaded to clients when enabled.

Known folder moves (discussed next) can also impact network performance by automatically uploading users’ local folders to the cloud when the client is deployed.

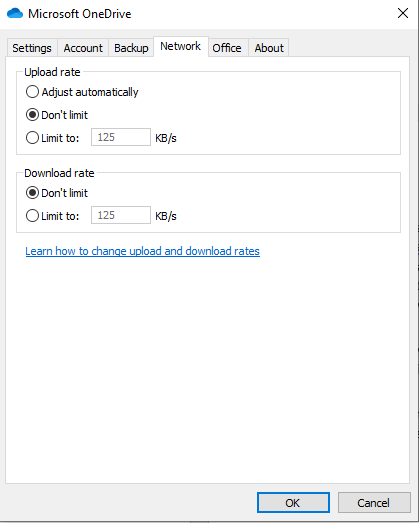
To help manage network impacts, the OneDrive sync client has bandwidth controls built-in. For a small business, you may want to adjust these settings on each users’ system. Right-click on the OneDrive for Business sync client, then click Settings->Network to see the settings.

Microsoft OneDrive Sync Client

In a larger business, you can use policy to push the desired settings, including the ability to mark OneDrive network traffic with QoS settings.

Known Folder Moves

Finally, a feature called Known Folder Moves is of keen interest to administrators as it can help reduce support desk calls and ease users’ transitions to new computers when replaced or upgraded.

As you probably know, specific folders in Windows, such as Documents, Desktop, and Pictures, and others are unique. These are “known folders” as they are in the same location in the file system on every Windows operating system.

OneDrive includes a feature where known folder locations are synced to OneDrive for Business. When a user needs a file in one of these locations and their PC is not available, they can access it from any device, including a mobile device that has an internet connection. Also, when a user moves to a new PC or laptop, all the previous documents, images, and important files are online and can easily be synched back to the new device.

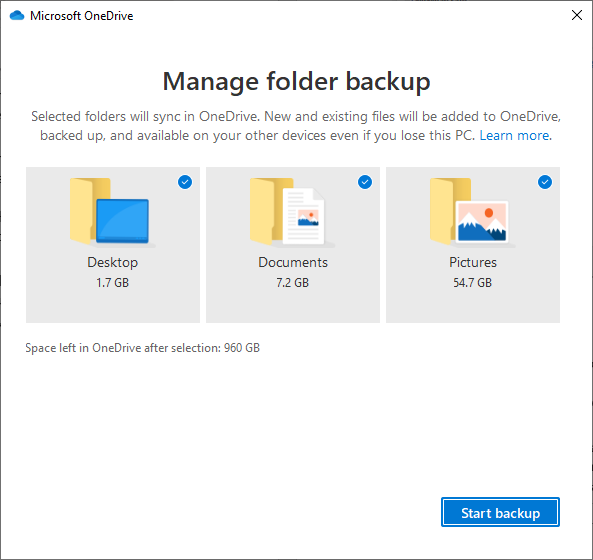
Known Folder Moves can be enabled in the sync client by clicking on Setting->Backup->Manage Backup.

Microsoft OneDrive Known Folder Moves

Of course, you can also use policy with the methods previously discussed. Should you decide to roll this out, be mindful of bandwidth impacts and network performance,all that content will be uploaded to the cloud.

Summary

OneDrive for Business is an exceptionally useful service. In this article, we’ve discussed many of the key considerations, benefits, best practices, and capabilities of OneDrive for Business so you can effectively manage the service for users. A capable administrator will understand the business use cases for sharing as well as the network impact of OneDrive for Business, and be familiar with how to administer the service including using policy to enforce the desired settings for your Business.

When set up, users will enjoy cloud access to essential files, including their Desktop, Document, Pictures, Team sites, and other files of importance, allowing them to share content quickly and work locally or collaboratively.

Of course, Microsoft is continuously updating OneDrive for Business, so as a last tip, bookmark the Microsoft official OneDrive blog to keep up-to-date.

Source :
https://www.altaro.com/microsoft-365/onedrive-business-tips-tricks/

Certificate Services – Migrate from SHA1 to SHA2 (SHA256)

Problem

It’s time to start planning! Microsoft will stop their browsers displaying the ‘lock’ icon for services that are secured with a certificate that uses SHA1. This is going to happen in February 2017 so now’s the time to start thinking about testing your PKI environment, and making sure all your applications support SHA2.

Note: This includes code that has been signed using SHA1 as well!

Solution

Below I’m just using an ‘offline root CA’ server, if you have multi tiered PKI deployments, then start at the root CA, fix that, then reissue your Sub CA certificates to your intermediate servers, fix them, then repeat the process for any issuing CA servers. Obviously if you only have a two tier PKI environment you will only need to do the root and Sub CA servers.

For your SubCA’s see PART TWO of this article.

Upgrade Your Microsoft PKI Environment to SHA2 (SHA256)

What about certificates that have already been issued? 

We are NOT going to revoke any CA certificates that have already been issued so existing certificates will remain unaffected.

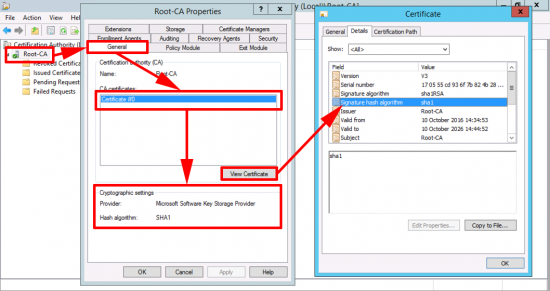
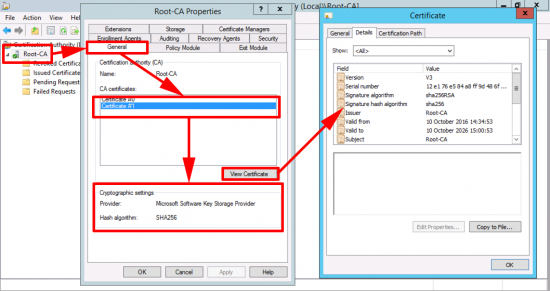
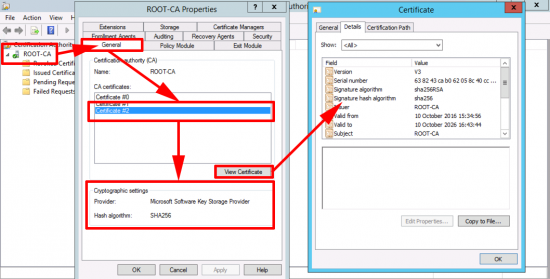
Here we can see my CA server is using SHA1

Note: If your server says the provider is Microsoft Strong Cryptographic Provider and not Microsoft Software Key Storage Provider then skip down a bit.

Offline Root CA Vanilla

You may have multiple Certificates (that is not unusual).

Open a PowerShell Window (run as administrator), issue the following command;

certutil -setreg ca\csp\CNGHashAlgorithm SHA256
Change to Sha256

Restart Certificate Services.

net stop certsvc
net start certsvc
Restart Certificte Services

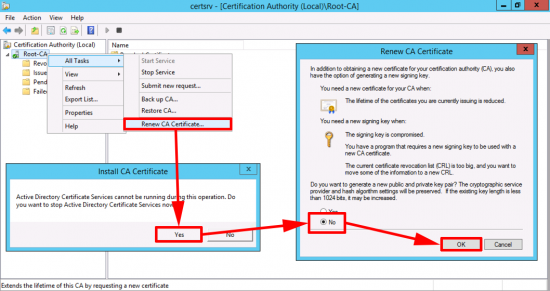
Now you need to generate a new CA certificate.

Renew CA Certificate

Now you can see your new cert is using SHA256.

Change CA to Sha256

Mine Won’t Change From SHA1?

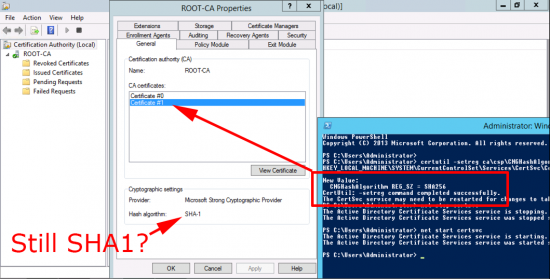
That’s because your cryptographic provider does not support higher than SHA1, for example ‘The command to change to SHA256 was successful, but the new certificate still says SHA1. If you look the Provider is set to ‘Microsoft Strong Cryptography Provider‘.

CA cannot upgrade from SHA1 to SHA2

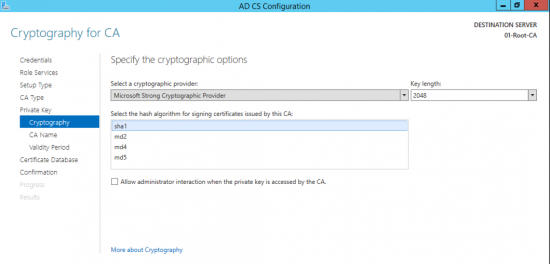
As you can see the strongest hash algorithm that supports is SHA1 that’s why it refuses to change.

Microsoft Strong Cryptographic Provider

How Do I Change the CA Cryptographic  Provider?

Make a backup of the CA Settings and the CA registry Settings.

Backup CA Server 2012 R2
Backup-CARoleService –path C:\CA-Backup -Password (Read-Host -Prompt "Enter Password" -AsSecureString) 
TYPE IN A PASSWORD
reg export HKLM\SYSTEM\CurrentControlSet\services\CertSvc c:\Reg-Backup\CAregistry.reg 

Note: You might want to create the Reg-Backup folder first and grant some rights to it.

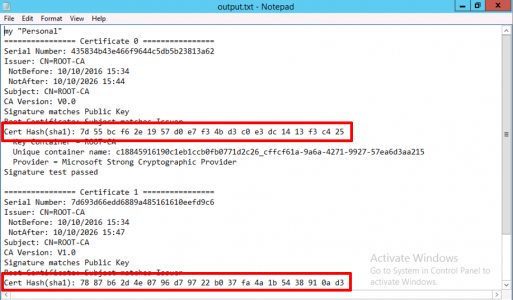
Now we need to delete the certificates this CA uses (don’t panic we’ve backed them up!) But first we need to find the certificate’s hashes to delete. Open an administrative command prompt, stop certificate services, and then issue the following command;

Note:  ROOT-CA is the name of YOUR CA.

Stop-service certsvc

Certutil –store my ROOT-CA >output.txt 

Open output.txt then take a note of the hashes for the certificate(s)

Output CA Cert Hash

Then Open an Administrative PowerShell window and delete them;

Delete Private Key
cd cert:\localmachine\my 
Del –deletekey <Certificate HASH>

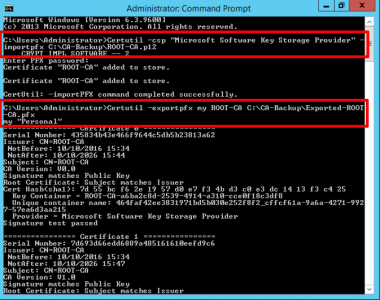
Now we need to import the p12 file we backed up earlier, then export that as a PFX file. Change ROOT-CA to the name of YOUR CA and the path to your backup folder and certificate as approriate.

Certutil –csp “Microsoft Software Key Storage Provider” –importpfx C:\CA-Backup\ROOT-CA.p12
Certutil –exportpfx my ROOT-CA C:\CA-Backup\Exported-ROOT-CA.pfx 
ENTER AND CONFIRM A PASSWORD
import cert and export as pfx

Then restore the key from your PFX file.

Certutil –restorekey C:\CA-Backup\Exported-ROOT-CA.pfx 
Restore CA Cert

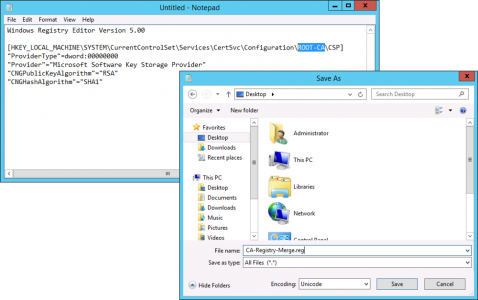
Now you need to import a couple of Registry files, in the examples below replace ROOT-CA with the name of your CA

Change CA SHA Settings

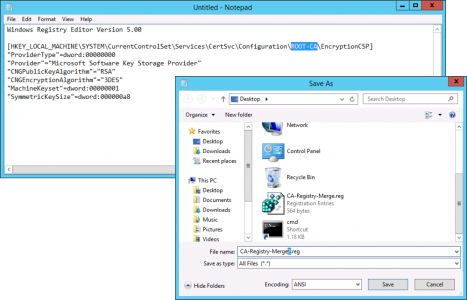
Save the file as CA-Registry-Merge.reg (set the save as file type to All Files)

Windows Registry Editor Version 5.00

[HKEY_LOCAL_MACHINE\SYSTEM\CurrentControlSet\Services\CertSvc\Configuration\ROOT-CA\CSP] 
"ProviderType"=dword:00000000 
"Provider"="Microsoft Software Key Storage Provider" 
"CNGPublicKeyAlgorithm"="RSA" 
"CNGHashAlgorithm"="SHA1" 

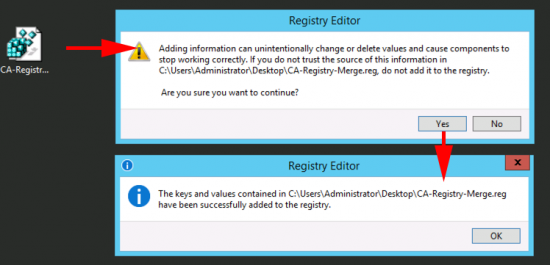
Merge the file into the registry.

013 - Merge Into Registry

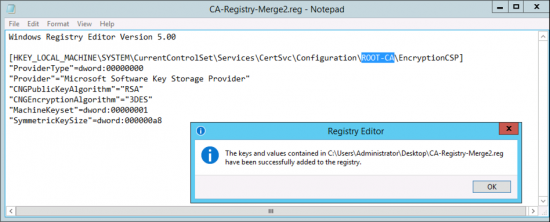
Repeat the process with the following regisry file save this one as CA-Registry-Merge2.reg

Change CA RSA Settings
Merge Into Registry RSA
Windows Registry Editor Version 5.00

[HKEY_LOCAL_MACHINE\SYSTEM\CurrentControlSet\Services\CertSvc\Configuration\ROOT-CA\EncryptionCSP] 
"ProviderType"=dword:00000000 
"Provider"="Microsoft Software Key Storage Provider" 
"CNGPublicKeyAlgorithm"="RSA" 
"CNGEncryptionAlgorithm"="3DES" 
"MachineKeyset"=dword:00000001 
"SymmetricKeySize"=dword:000000a8 

Now change the hashing algorithm to SHA256, open an administrative command prompt and issue the following two commands;

certutil -setreg ca\csp\CNGHashAlgorithm SHA256
net start certsvc

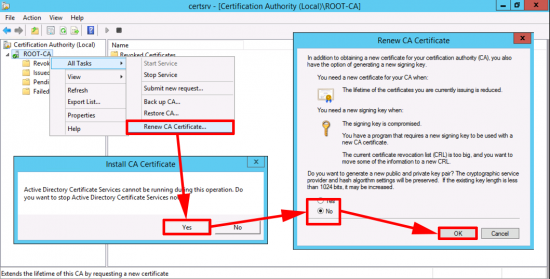
Renew the CA Cert.

Create New CA Cert

You can now see the new cert is using SHA256.

SHA 256 Certificate for CA

Source :
https://www.petenetlive.com/KB/Article/0001243

Microsoft rolling out new endpoint security solution for SMBs

Microsoft says its new endpoint security solution for small and medium-sized businesses (SMBs) known as Microsoft Defender for Business has hit general availability.

It has started rolling out to new and existing Microsoft 365 Business Premium customers worldwide starting today, March 1st.

Microsoft Defender for Business helps companies with up to 300 employees defend against cybersecurity threats, including malware, phishing, and ransomware in environments with Windows, macOS, iOS, and Android devices.

It comes with simplified client configuration via a wizard-driven setup, and it enables all recommended security policies out-of-the-box, making it easy to use even by organizations without dedicated security teams.

In November, Microsoft announced this new security solution at Microsoft Ignite 2021 in response to a 300% increase in ransomware attacks in the previous year, with more than 50% of them directly affecting SMBs, according to US Secretary of Homeland Security Alejandro Mayorkas.

Defender for Business began rolling out in preview worldwide in December when Microsoft also announced that it would be available as a standalone license directly from Microsoft and Microsoft Partner Cloud Solution Provider (CSP) channels at $3 per user per month.https://www.youtube.com/embed/umhUNzMqZto

Key features bundled with the Microsoft Defender for Business security suite include:

  • Simplified deployment and management for IT administrators who may not have the expertise to address today’s evolving threat landscape.
  • Next-generation antivirus protection and endpoint detection and response to detect and respond to sophisticated attacks with behavioral monitoring.
  • Automated investigation and remediation to help customers react quickly to threats.
  • Threat and vulnerability management proactively alerts users to weaknesses and misconfigurations in software.
  • Microsoft 365 Lighthouse integration with Microsoft Defender for Business for IT service providers to view security events across customers, with additional capabilities coming.

You can get Defender for Business as part of Microsoft 365 Business Premium and will not require onboarding or offboarding devices from Microsoft Defender for Endpoint P1 or P2.

“Defender for Business will be rolled out to existing Microsoft 365 Business Premium customers in the next few weeks. There is no action or additional transactions required and it will show up in the Microsoft 365 Defender portal under the section, Endpoints,” Microsoft said.

“Defender for Business will also be offered as a standalone solution and will be coming later this year. You can continue to preview the standalone solution by signing up at https://aka.ms/MDB-Preview.”

Source :
https://www.bleepingcomputer.com/news/microsoft/microsoft-rolling-out-new-endpoint-security-solution-for-smbs/
Deploying WPA2 WiFi profile (including Pre-Shared key) using Group Policy

Problem

Whilst there is a setting in Group Policy Preferences to deploy WiFi settings, this does not include the WiFi Pre-Shared Key (PSK).

The following method will allow you to also push out the Pre-Shared Key:

Solution

From a PC that already has the WiFi profile installed:

Open command prompt (as admin) and run the following command. Make a note of the name of the profile you want to export:

netsh wlan show profiles

Run the following command, replacing the profile name with the one you wish to export, and path to an existing folder where an XML file will be created

netsh wlan export profile name="MyWiFiSSID" folder=C:\WLAN key=clear

Note that the key=clear is vital for this to work.

Copy that XML file to a network share that is accessible from the computer accounts. Do bear in mind the WiFi key is visible in plain text within this file, so consideration must be taken as where/how to store it.

The following command is used to install the profile:

netsh wlan add profile filename="\\servername\share\Wi-Fi-MyWiFiSSID.xml" user=all

… however, this will reinstall and reconnect the WiFi each time.

From my experience, the best method is to create a Computer Startup script GPO that will only run once. This one does the trick:

IF EXIST C:\WiFi.txt GOTO END

netsh wlan add profile filename="\\servername\share\Wi-Fi-MyWiFiSSID.xml" user=all >> C:\WiFi.txt

Source :
https://goddamnpc.com/deploying-wpa2-wifi-profile-including-pre-shared-key-using-group-policy/
Hackers Backdoor Unpatched Microsoft SQL Database Servers with Cobalt Strike

Vulnerable internet-facing Microsoft SQL (MS SQL) Servers are being targeted by threat actors as part of a new campaign to deploy the Cobalt Strike adversary simulation tool on compromised hosts.

“Attacks that target MS SQL servers include attacks to the environment where its vulnerability has not been patched, brute forcing, and dictionary attack against poorly managed servers,” South Korean cybersecurity company AhnLab Security Emergency Response Center (ASEC) said in a report published Monday.

Cobalt Strike is a commercial, full-featured penetration testing framework that allows an attacker to deploy an agent named “Beacon” on the victim machine, granting the operator remote access to the system. Although billed as a red team threat simulation platform, cracked versions of the software have been actively used by a wide range of threat actors.

Intrusions observed by ASEC involve the unidentified actor scanning port 1433 to check for exposed MS SQL servers to perform brute force or dictionary attacks against the system administrator account, i.e., “sa” account, to attempt a log in.

Microsoft SQL Database Servers

That’s not to say that servers not left accessible over the internet aren’t vulnerable, what with the threat actor behind LemonDuck malware scanning the same port to laterally move across the network.

“Managing admin account credentials so that they’re vulnerable to brute forcing and dictionary attacks as above or failing to change the credentials periodically may make the MS-SQL server the main target of attackers,” the researchers said.

Upon successfully gaining a foothold, the next phase of the attack works by spawning a Windows command shell via the MS SQL “sqlservr.exe” process to download the next-stage payload that houses the encoded Cobalt Strike binary on to the system.

The attacks ultimately culminate with the malware decoding the Cobalt Strike executable, followed by injecting it into the legitimate Microsoft Build Engine (MSBuild) process, which has been previously abused by malicious actors to filelessly deliver remote access trojans and password-stealing malware on targeted Windows systems.

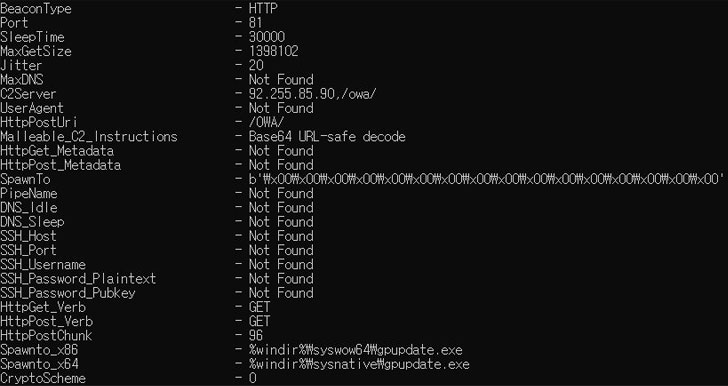
Furthermore, the Cobalt Strike that’s executed in MSBuild.exe comes with additional configurations to evade detection of security software. It achieves this by loading “wwanmm.dll,” a Windows library for WWan Media Manager, then writing and running the Beacon in the memory area of the DLL.

“As the beacon that receives the attacker’s command and performs the malicious behavior does not exist in a suspicious memory area and instead operates in the normal module wwanmm.dll, it can bypass memory-based detection,” the researchers noted.

Source :
https://thehackernews.com/2022/02/hackers-backdoor-unpatched-microsoft.html

CISA warns admins to patch maximum severity SAP vulnerability

The US Cybersecurity and Infrastructure Security Agency (CISA) has warned admins to patch a set of severe security flaws dubbed ICMAD (Internet Communication Manager Advanced Desync) and impacting SAP business apps using Internet Communication Manager (ICM).

CISA added that failing to patch these vulnerabilities exposes organizations with vulnerable servers to data theft, financial fraud risks, disruptions of mission-critical business processes, ransomware attacks, and a halt of all operations.

ICMAD bugs affect most SAP products

Yesterday, Onapsis Research Labs who found and reported CVE-2022-22536, one of the three ICMAD bugs and the one rated as a maximum severity issue, also cautioned SAP customers to patch them immediately (the other two are tracked as CVE-2022-22532, and CVE-2022-22533).

The SAP Product Security Response Team (PSRT) worked with Onapsis to create security patches to address these vulnerabilities and released them on February 8, during this month’s Patch Tuesday.

If successfully exploited, the ICMAD bugs allow attackers to target SAP users, business information, and processes, and steal credentials, trigger denials of service, execute code remotely and, ultimately, fully compromise any unpatched SAP applications.

“The ICM is one of the most important components of an SAP NetWeaver application server: It is present in most SAP products and is a critical part of the overall SAP technology stack, connecting SAP applications with the Internet,” Onapsis explained.

“Malicious actors can easily leverage the most critical vulnerability (CVSSv3 10.0) in unprotected systems; the exploit is simple, requires no previous authentication, no preconditions are necessary, and the payload can be sent through HTTP(S), the most widely used network service to access SAP applications.”

No SAP customers breached using ICMAD exploits so far

SAP’s Director of Security Response Vic Chung said they’re currently not aware of any customers’ networks breached using exploits targeting these vulnerabilities and “strongly” advised all impacted organizations to immediately apply patches “as soon as possible.”

SAP customers can use this open-source tool developed by Onapsis security researchers to help scan systems for ICMAD vulnerabilities.

The German business software developer also patched other maximum severity vulnerabilities associated with the Apache Log4j 2 component used in SAP Commerce, SAP Data Intelligence 3 (on-premise), SAP Dynamic Authorization Management, Internet of Things Edge Platform, SAP Customer Checkout.

All of them allow remote threat actors to execute code on systems running unpatched software following successful exploitation.

Source :
https://www.bleepingcomputer.com/news/security/cisa-warns-admins-to-patch-maximum-severity-sap-vulnerability/

Exit mobile version