If you start a program and receive an error stating that the program you are trying to run needs the Microsoft Visual C++ 2015 Runtime, you can use this tutorial to install the package so that your program works again.
When developers create a Windows program using Microsoft Visual Studio 2015, there are specific dynamic link libraries (DLLs) that their programs are linked to work correctly.
These DLLs are distributed through the Microsoft Visual C++ 2015 Runtime, and if the package is not installed, users will encounter errors stating that DLLs are missing or you need to install the runtime.
As an example, the video game Valorant released an update today that did not include the Microsoft Visual C++ 2015 Runtime, causing the game not to work after the update was installed.
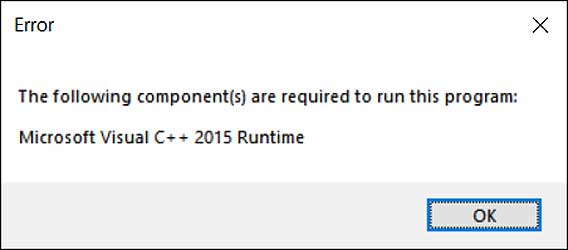
When users launch Valorant, they are instead greeted with the following error.
Missing Microsoft Visual C++ 2015 Runtime error
“The following component(s) are required to run this program: Microsoft Visual C++ 2015 Runtime”
The good news is that it is really easy to fix this problem by downloading and install the runtime from Microsoft’s website.
To install the Microsoft Visual C++ 2015 Runtime, please follow these steps:
You will be brought to a page where it asks you to select whether you want to download the 32-bit or 64-bit version of Windows. Select the version you need and click the Next button. If you are unsure what version you need, you can use this tutorial to determine what you need.
BleepingComputer suggests that you download and install both the x86 AND x64 versions of the runtime to not run into issues in the future.
The files will now be download to your computer. Once downloaded, double-click on the downloaded vc_redist.x64.exe file.
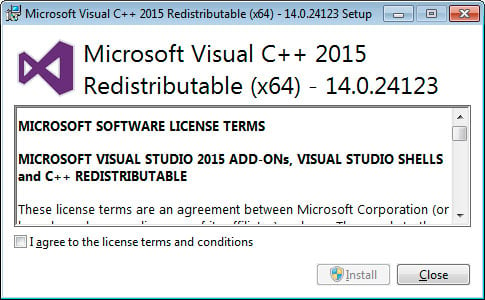
The Microsoft Visual C++-2015 Redistributable screen will be displayed and ask you to agree to the license terms and conditions. Put a checkmark in the “I agree” box and then click on the Install button.Microsoft Visual C++-2015 Redistributable
If Windows prompts you to allow the program to make changes or continue, click on the Yes or Allow button.
When done, the program will display a message stating that it was successfully installed.Redistributable Installed
Now perform the same steps to install the vc_redist.x86.exe runtime.
You can now close the installer.
If you already had the Visual C++ 2015 Runtime installed, you can run the above redistributables and perform a repair.
Perform a Repair
You can now try to run the program that previously gave the missing runtime error, and it should work again.
By default, the Windows 10 Start menu will open up in a size that accommodates all of the pinned items. For those who wish to use a larger Start screen, making the Start menu open in a full-screen mode is possible.
When the full-screen mode is enabled, the Start screen will overlay the entire desktop and provide a more generous amount of space to pin applications, and your live tiles will be larger.
If you wish to enable the Start full-screen mode, please follow these steps:
Click on the Start menu and then click on the Settings cog ( ) to open the Windows 10 Settings.
When the Settings open, click on Personalization and then Start.
In the Start settings, look for a setting named ‘Use Start full screen‘ and click on the toggle to enable the feature, as shown below.Enable Start full screen
You can now close the Start settings screen.
Now that you have enabled Start full screen mode, when you click on the Start button, the Start menu will be shown in full screen and overlay the entire desktop.
Start full screen
When using Start in full screen mode, you can close the Start menu at any time by pressing the Escape key on your keyboard or by clicking on another program or screen.
To disable Start full screen mode, just follow these steps again, but this time disable the ‘Use Start full screen’ setting.
One of the Windows 10 Start Menu features is a built-in Bing search when a local search fails to find anything. Whether it be due to privacy reasons, bugs, or just personal dislike, this article will explain how to disable Bing search in the Start Menu.
When you perform a search in the Windows 10 Start Menu, Windows will first look for local search results such as settings, files, or programs and display any that are found.
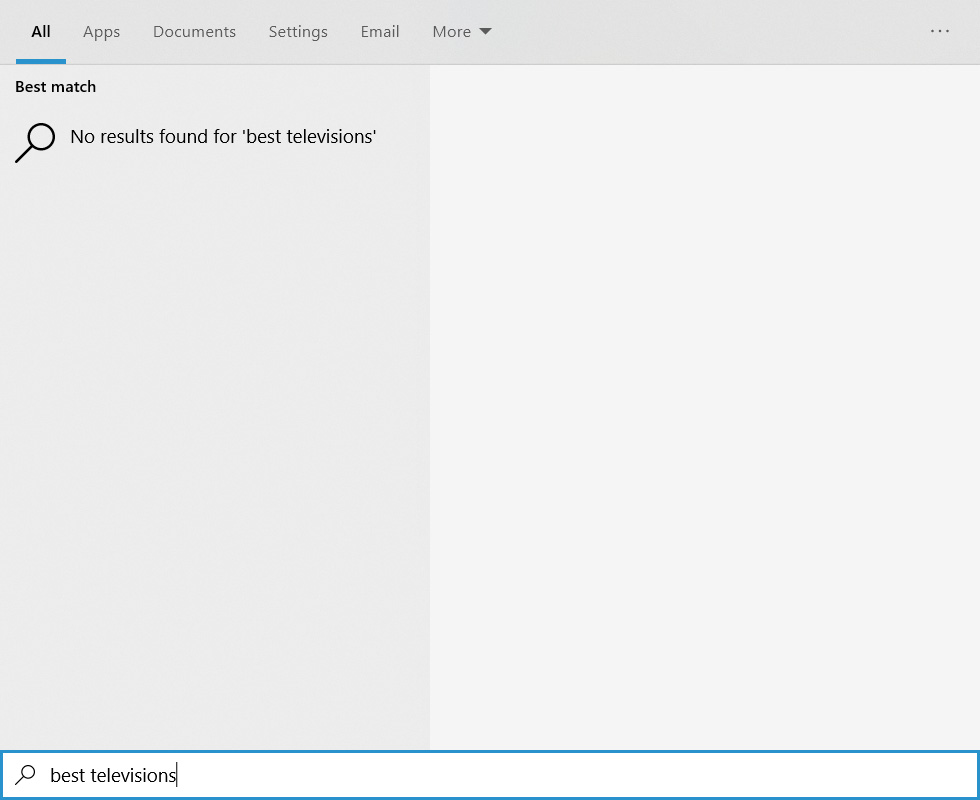
If there are no local results, Windows will then perform a Bing search for the search keyword and list the results in the Start Menu as shown below.
Blank search results in Start Menu
When logged into a Microsoft Account, these searches will be uploaded to Microsoft, who will then list them in your account’s Privacy Dashboard. This is a privacy concern for fear that Microsoft is using this data to track your browsing habits.
There have also been bugs in the Bing search component in the past that have caused the Windows 10 Start menu to appear completely blank. If you do not utilize the Bing search feature, disabling it could prevent those bugs in the future.
Below we have outlined two methods that can be used to disable Bing search in the Windows 10 Start Menu.
How to disable Bing search in the Windows 10 Start Menu
Unfortunately, for those who want to disable Bing search in the Start Menu, Microsoft does not provide an easy method.
Instead, Windows users need to modify the Registry so that it is using the following Registry values.
For those who feel comfortable modifying the Registry, we have instructions on setting the proper values using the Registry Editor.
For those who are not comfortable with Registry modifications, please see method two that contains an easy to use premade Registry file that makes the settings for you.
METHOD 1: DISABLE BING SEARCH RESULTS VIA THE GROUP POLICY EDITOR
Windows 10 Pro comes with the Group Policy editor, which you can use to disable Bing search in the Start Menu.
To disable Bing Search, follow these steps:
Search in the Start Menu for ‘gpedit.msc‘ and select it when the result appears.
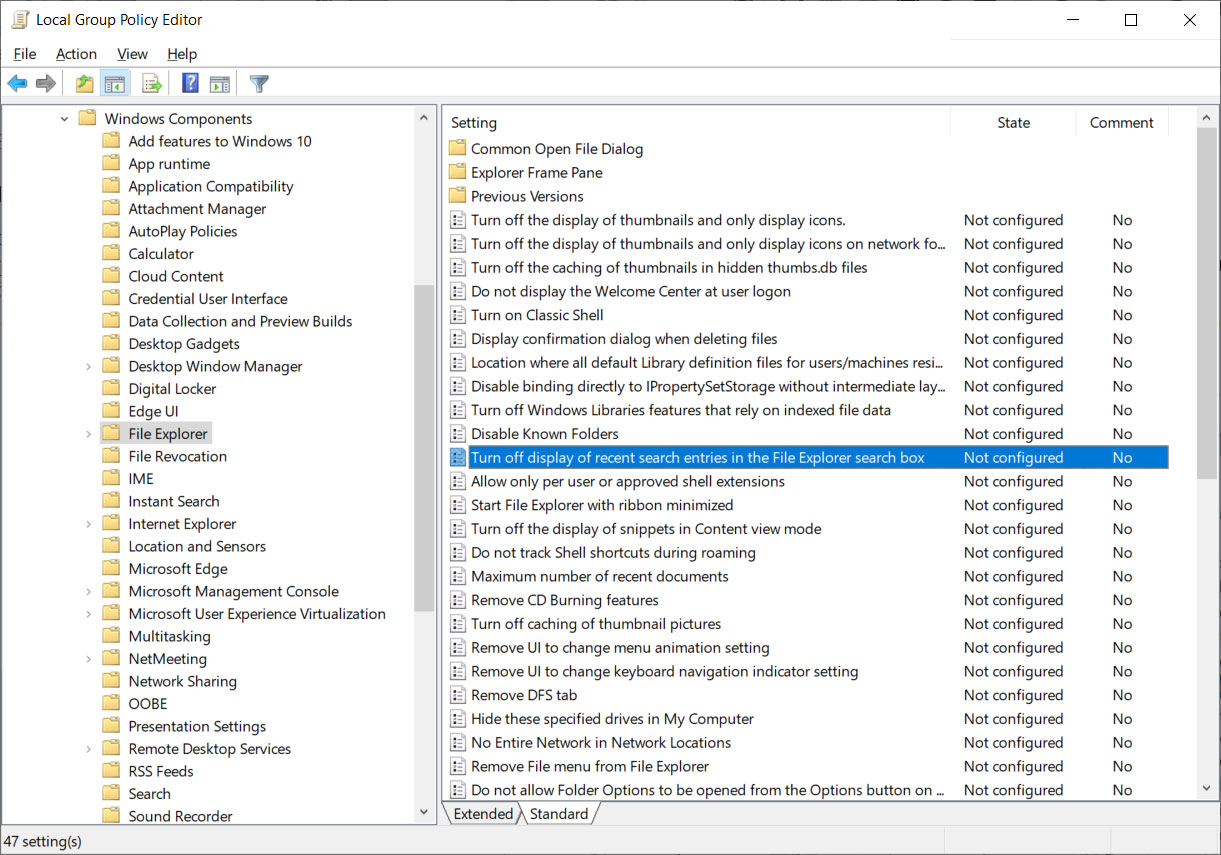
When the Group Policy Editor opens, navigate to the following path: User Configuration\Administrative Templates\Windows Components\File Explorer
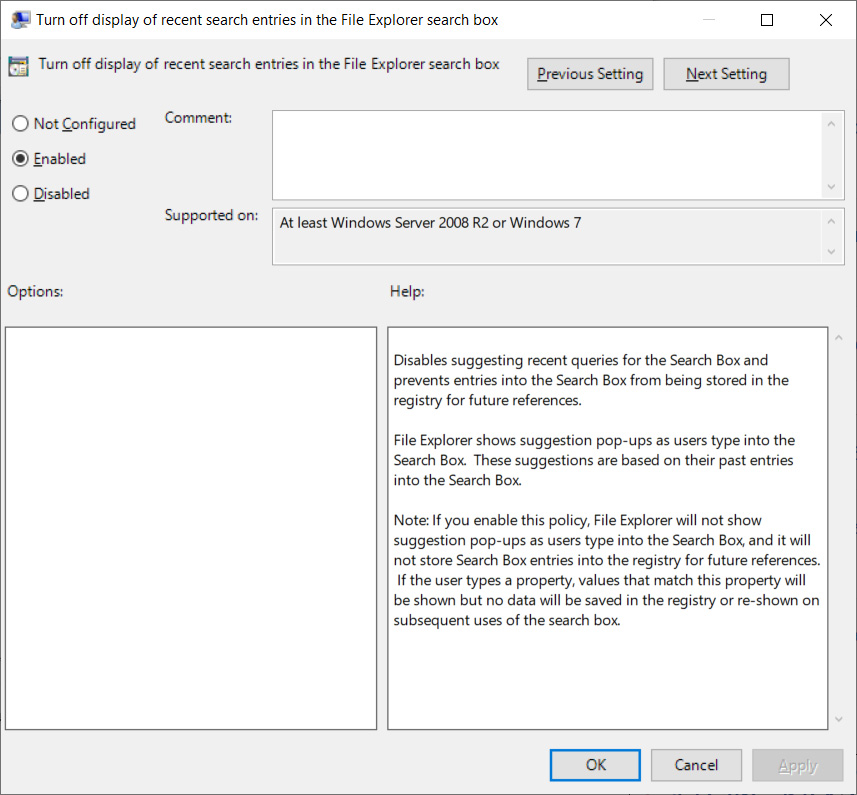
Under the File Explorer section, you will see a policy called ‘Turn off display of recent search entries in the File Explorer search box’ as shown below. Double-click on the policy to open it.
To disable Bing search, set this policy to ‘Enabled.’
When done, click on the Apply and then OK button to save the policy.
You can now close the Group Policy Editor and restart Windows Explorer or restart your computer.
Once restarted, Bing searches will no longer appear in the Start Menu.
METHOD 2: USE THE REGISTRY EDITOR TO DISABLE BING INTEGRATION
If you are using Windows 10 Home and are comfortable using the Windows Registry, you can disable Bing’s integration in Windows Search using the Registry editor.
First, open the Windows Registry Editor by pressing the Windows key + the R key at the same time. This will open the Run: dialog and then type regedit and press the OK button.Starting Registry Editor
Windows will display a UAC prompt asking if you wish to allow the Registry Editor to make changes to the system. Press the Yes button to continue.
Navigate to the HKEY_CURRENT_USER\SOFTWARE\Policies\Microsoft\Windows\Explorer key. If the key does not exist, create the necessary folders until you are in the Explorer key.
Right-click on Explorer and select New and then DWORD (32-bit) Value, as shown below.New DWORD value
You will be prompted to enter the name of the new value. Type DisableSearchBoxSuggestions and press Enter on the keyboard. A new value will be created that should automatically be set to 0. Now double-click on BingSearchEnabled and set the value to 1 and then press the OK button.
When done, you should have the BingSearchEnabled value created and set to 1.
Once restarted, Bing search will no longer work in the Windows 10 Start Menu.
Bing Search disabled
Enable Bing integration again
To enable Bing integration again, simply disable the group policy or edit the Registry and delete the DisableSearchBoxSuggestions value under the HKEY_CURRENT_USER\SOFTWARE\Policies\Microsoft\Windows\Explorer Registry key.
Once again, restart the Explorer process or the computer, and Bing integration will work again.
Update 10/5/20: Added updated instructions on how to disable Bing search.
Windows Safe Mode is a way of booting up your Windows operating system in order to run administrative and diagnostic tasks on your installation. When you boot into Safe Mode the operating system only loads the bare minimum of software that is required for the operating system to work. This mode of operating is designed to let you troubleshoot and run diagnostics on your computer. Windows Safe Mode loads a basic video drivers so your programs may look different than normal.
For Win98/ME, XP, Vista and Windows 7 there are two methods of booting into Safe Mode, while 95 and 2000 only have one. We will describe these methods below:
F8 – By pressing the F8 key right when Windows starts, usually right after you hear your computer beep when you reboot it, you will be brought to a menu where you can choose to boot into safe mode. If it does not work on the first try, reboot and try again as you have to be quick when you press it. I have found that during boot up right after the computer shows you all the equipment , memory, etc installed on your computer, if you start lightly tapping the F8 key you will usually be able to get to the desired menu.
System Configuration Utility – You can use the System Configuration Utility, or MSCONFIG, found in Windows 98, ME, XP, Windows Vista, and Windows 7 to make Windows boot into Safe Mode on the next reboot. We will go into specific details in the sections below. Please note, that you should not force your computer to boot into Safe Mode using the System Configuration Utility if you suspect you are infected with malware as the malware may corrupt keys required to boot into Safe Mode. You can read more about this here.
Windows 95
Windows 95 can only boot into Safe Mode using the F8 method as it does not have a System Configuration Utility.
Using the F8 Method:
Restart your computer.
When the machine first starts it will generally list some equipment that is installed in your machine, amount of memory, hard drives installed etc. When it is finished with that it will say “Starting Windows 95”. Immediately after seeing “Starting Windows 95” press the F8 key.
You will now be presented with a menu. Select the option for Safe Mode using the arrow keys.
Then press enter on your keyboard to boot into Safe Mode.
Do whatever tasks you require and when you are done reboot to boot back into normal mode.
Windows 98/ME
NOTE: Windows ME may look slightly different than what is shown in the images below. You should still have no problem following along.
Using the F8 Method:
Restart your computer.
When the machine first starts again it will generally list some equipment that is installed in your machine, amount of memory, hard drives installed etc. At this point you should gently tap the F8 key repeatedly until you are presented with a menu.
When you have the menu on the screen. Select the option for Safe Mode using the arrow keys.
Then press enter on your keyboard to boot into Safe Mode.
Do whatever tasks you require and when you are done reboot to boot back into normal mode.
Using the System Configuration Tool Method:
Step 1: Close all programs so that you have nothing open and are at the desktop.
Step 2: Click on the Start button then click on Run.
Step 3: In the Run field type msconfig as shown in the image below.
Figure 1. Starting Msconfig
Step 4: Press the OK button and the System Configuration Utility will start up. You will then see a screen similar to Figure 2 below.
Figure 2. SCU Startup Screen
Step 5: You should now press the Advanced button designated by the red box in the figure above and you will see a screen similar to figure 3 below.
Figure 3. Advanced Options
Step 6: Place a check mark in the checkbox labeled “Enable Startup Menu” designated by the red box in Figure 3 above. Then press the OK button and then the OK button again. Windows 98/ME will now prompt if you would like to reboot as shown in Figure 4 below.
Figure 4. Confirm Reboot
Step 7: Press the Yes button and your computer will restart into Safe Mode.
Step 8: When the computer boots up perform what diagnostic or troubleshooting tasks you require.
Step 9. When you are finished with these tasks, complete steps 1-7 again, but in Step 6 this time uncheck the checkbox labeled “Enable Startup Menu”.
Step 10: Reboot the computer back into normal mode.
Windows 2000
Windows 2000 can only boot into Safe Mode using the F8 method as it does not have a System Configuration Utility.
Using the F8 Method:
Restart your computer.
When the machine first starts again it will generally list some equipment that is installed in your machine, amount of memory, hard drives installed etc. When that is completed it will start loading Windows.
When you see the screen that has a black and white bar at the bottom stating “Starting Windows”, tap the F8 key repeatedly until you get to the Windows 2000 Advanced Options Menu
At this menu use the arrow keys to select the Safe Mode option, which is usually the first in the list.
Press the enter key.
Your computer will continue booting, but now will boot into Safe Mode.
Do whatever tasks you require and when you are done reboot to boot back into normal mode.
Windows XP
Using the F8 Method:
Restart your computer.
When the machine first starts again it will generally list some equipment that is installed in your machine, amount of memory, hard drives installed etc. At this point you should gently tap the F8 key repeatedly until you are presented with a Windows XP Advanced Options menu.
Select the option for Safe Mode using the arrow keys.
Then press enter on your keyboard to boot into Safe Mode.
Do whatever tasks you require and when you are done reboot to boot back into normal mode.
Using the System Configuration Tool Method:
Note: If you are having trouble entering Safe Mode via the F8 method, you should not use this method to force it to startup into safe mode. For reasons why, you should read this.
Step 1: Close all programs so that you have nothing open and are at the desktop.
Step 2: Click on the Start button then click on Run.
Step 3: In the Run field type msconfig as shown in the image below.
Figure 4. Starting Msconfig
Step 4: Press the OK button and the System Configuration Utility will start up. You will then see a screen similar to Figure 5 below.
Figure 5. Starting the System Configuration Utility
Step 5: Click on the tab labeled “BOOT.INI” which is designated by the red box in Figure 5 above. You will then be presented with a screen similar to Figure 6 below.
Figure 6. BOOT.INI Tab
Step 6: Put a check mark in the checkbox labeled “/SAFEBOOT” designated by the red box in Figure 6 above. Then press the OK button. After pressing the button you will be presented with a confirmation box as shown in Figure 7 below.
Figure 7. Confirm Reboot
Step 7: Press the Restart button and let the computer reboot. It will now boot up into Safe Mode.
Step 8: When the computer boots up do what diagnostic or troubleshooting tasks that you need to do.
Step 9. When are finished with your tasks, complete steps 1-7 again, but in Step 6 this time uncheck the checkbox labeled “/SAFEBOOT”. Then click on the General tab and set it for Normal startup.
Step 10: Reboot the computer back into normal mode.
Windows Vista
Using the F8 Method:
Restart your computer.
When the computer starts you will see your computer’s hardware being listed. When you see this information start to gently tap the F8 key repeatedly until you are presented with the Windows Vista Advanced Boot Options.
Select the Safe Mode option using the arrow keys.
Then press the enter key on your keyboard to boot into Vista Safe Mode.
When Windows starts you will be at a typical logon screen. Logon to your computer and Vista will enter Safe mode.
Do whatever tasks you require, and when you are done, reboot to go back into normal mode.
Using the System Configuration Tool Method:
Note: If you are having trouble entering Safe Mode via the F8 method, you should not use this method to force it to startup into safe mode. For reasons why, you should read this.
Close any running programs and open Windows so you are back at the desktop.
Click on the Start () button.
In the Start Menu Search Box () type msconfig and press enter on your keyboard.
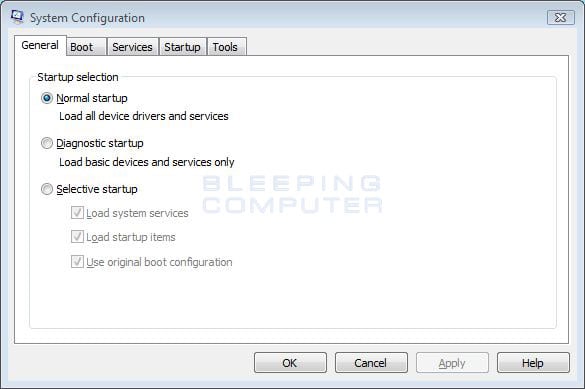
The System Configuration utility will open and you will see a screen similar to the one below.
Figure 8. Vista System Configuration Utility
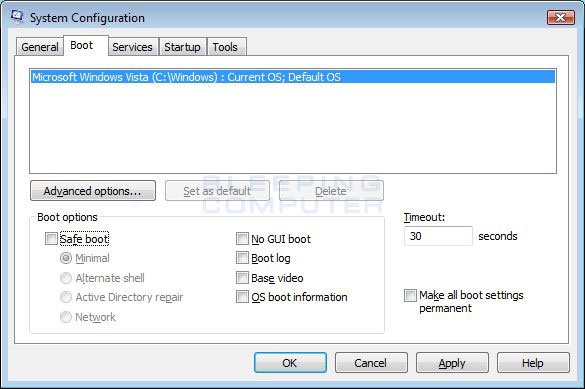
Click on the Boot tab.
You will now be at the Boot options screen as shown below.
Figure 9. Vista Boot tab in the System Configuration utility
Put a check mark in the checkbox labeled Safe boot
Press the Apply button and then press the OK button.
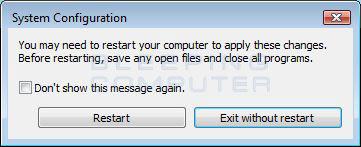
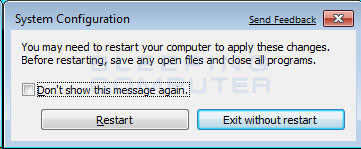
You will now be presented with a prompt stating that you need to reboot the computer to apply the change.
Figure 10. Restart Prompt
Click on the Restart button to reboot your computer.
Your computer will now restart directly into Safe Mode. When you get to the Vista logon screen, log on to the computer and perform any necessary tasks.
When done with your tasks, from within Safe Mode, start msconfig.
When the program is open, and you are on the General tab, select the option labeled Normal Startup.
Then press the Apply button and then the OK button.
When the programs prompts you to reboot, allow it to do so, and you will boot back into Windows Vista in normal mode.
Windows 7
Using the F8 Method:
Restart your computer.
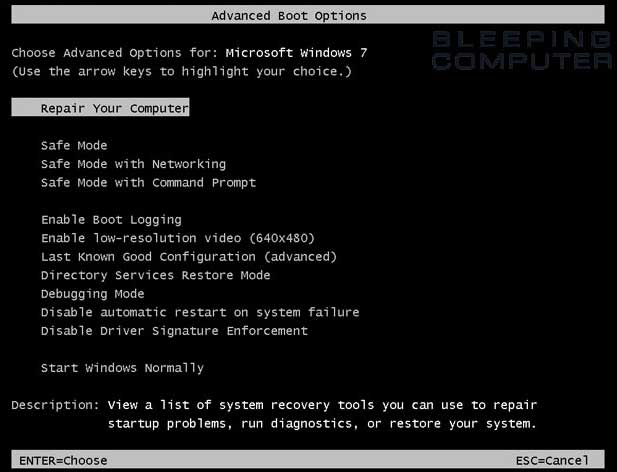
When the computer starts you will see your computer’s hardware being listed. When you see this information start to gently tap the F8 key on your keyboard repeatedly until you are presented with the Windows 7 Advanced Boot Options screen as shown in the image below.
Figure 11. Windows 7 Advanced Boot Options screen
Using the arrow keys, select the Safe Mode option you want.
Then press the enter key on your keyboard to boot into Windows 7 Safe Mode.
When Windows starts you will be at a typical logon screen. Logon to your computer and Windows 7 will enter Safe mode.
Do whatever tasks you require, and when you are done, reboot to go back into normal mode.
Using the System Configuration Tool Method:
Note: If you are having trouble entering Safe Mode via the F8 method, you should not use this method to force it to startup into safe mode. For reasons why, you should read this.
Close any running programs and open Windows so you are back at the desktop.
Click on the Start () button.
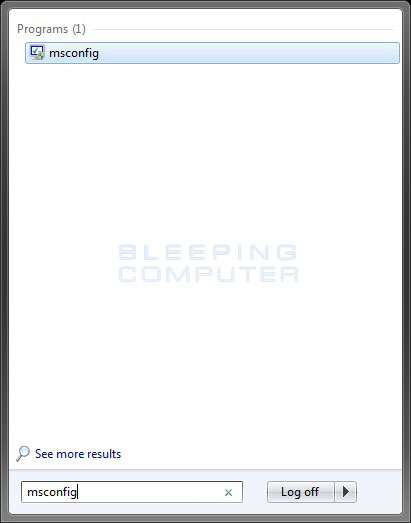
In the Start Menu Search Box type msconfig as shown in Figure 12 below.
Figure 12. Windows 7 Search box
Then press enter on your keyboard.
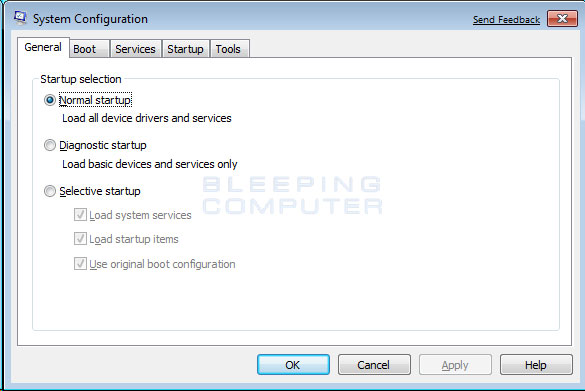
The System Configuration utility will open and you will see a screen similar to the one below.
Figure 13. Windows 7 System Configuration Utility
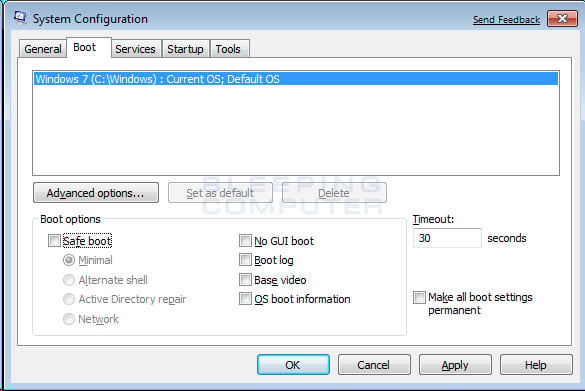
Click on the Boot tab.
You will now be at the Boot screen as shown below.
Figure 14. Windows 7 Boot tab in the System Configuration utility
Put a check mark in the checkbox labeled Safe boot
Press the Apply button and then press the OK button.
You will now be presented with a prompt stating that you need to reboot the computer to apply the change.
Figure 15. Restart Prompt
Click on the Restart button to reboot your computer.
Your computer will now restart directly into Safe Mode. When you get to the Windows 7 logon screen, log on to the computer and perform any necessary tasks.
When done with your tasks, from within Safe Mode, start msconfig.
When the program is open, and you are on the General tab, select the option labeled Normal Startup.
Then press the Apply button and then the OK button.
When the programs prompts you to reboot, allow it to do so, and you will boot back into Windows 7 in normal mode.
From the Windows Start screen, type Advanced startup and when the search results appear, click on the Settings category and then click on the Advanced startup options search option.
When the Settings screen opens, scroll down and click on the Restart now button under the Advanced Startup category and your computer will restart.
When the Advance startup menu appears, click on the Troubleshoot option.
Then click on the Advanced Options button.
Finally click on the Startup Settings option and then click on the Restart button. Your computer will now restart again.
When you get to the Startup Settings screen, press the number for the Safe Mode option you wish to use.
Do whatever tasks you require, and when you are done, reboot to go back into normal mode.
Using the System Configuration Tool Method:
Note: If you are having trouble entering Safe Mode via the Advanced Startup menu, you should not use this method to force it to startup into safe mode. For reasons why, you should read this.
Go to the Windows Start screen and type msconfig. When the msconfig search results appears, click on it.
The System Configuration utility will open and you will see a screen similar to the one below.
Click on the Boot tab.
You will now be at the Boot screen as shown below.
Put a check mark in the checkbox labeled Safe boot
Press the Apply button and then press the OK button.
You will now be presented with a prompt stating that you need to reboot the computer to apply the change.
Click on the Restart button to reboot your computer.
Your computer will now restart directly into Safe Mode. When you get to the Windows 8 logon screen, log on to the computer and perform any necessary tasks.
When done with your tasks, from within Safe Mode, go back to the Start screen by pressing the Tab key on your keyboard. Then start msconfig again by typing msconfig and then clicking on its search result.
When the program is open, and you are on the General tab, select the option labeled Normal Startup.
Then press the Apply button and then the OK button.
When the programs prompts you to reboot, allow it to do so, and you will boot back into Windows 8 in normal mode.
Press the Ctrl+Alt+Delete keys a the same time to enter the Windows security screen.
While holding down the Shift key, click on the Power button () and then click on Restart.
When Windows 10 restarts, you will be at the Choose an Option screen as shown below. At this screen, click on the Troubleshoot button to access the Troubleshoot options.
At the Troubleshoot screen, click on the Advanced Options button to open the advanced options screen.
At the Advanced Options screen, click on the Startup Settings option. This will open the Startup Settings screen.
At the Startup Settings screen, click on the Restart button. Windows will now restart.
After restarting you will be shown a Startup Settings screen. At this screen you should press the number 5 key on your keyboard to enter Safe Mode with Networking.
Your computer will now reboot. Once rebooted, you will be at a login prompt. Login to access Safe mode with Networking.
Problems that can occur by forcing Safe Mode using the System Configuration Utility
It is possible to make your computer continuously boot up into safe mode using the System Configuration utility as described above. The program does this by changing your boot.ini file, the settings file that configures your computer’s boot sequence, and adding the /safeboot argument to your operating systems startup line. An example of this can be seen below.
Original
[operating systems] multi(0)disk(0)rdisk(0)partition(2)\WINDOWS=”Microsoft Windows XP Professional” /FASTDETECT /NOEXECUTE=OPTIN
After using MsConfig.exe
[operating systems] multi(0)disk(0)rdisk(0)partition(2)\WINDOWS=”Microsoft Windows XP Professional” /FASTDETECT /NOEXECUTE=OPTIN /safeboot:minimal
When you are done using safe mode, you would then run the System Configuration utility again and uncheck the /Safeboot option, thus removing the /safeboot argument from the boot.ini file, and allowing your computer to boot up normally.
On a computer that is operating properly this is normally not a problem. Unfortunately, though, a new trick that some of the more recent malware are using is to delete certain Windows Registry keys so that your computer can not properly boot into safe mode. It is in these situations that using the System Configuration utility to boot into safe mode can cause the computer to become inoperable for many users.
This is because once you set the computer to boot into Safe Mode using /Safeboot, it will continuously attempt to start Safe Mode until the /safeboot argument is removed from the boot.ini. Since the malware is not allowing us to actually boot into safe mode, you have no way of getting to a point where you can run the System Configuration utility again to uncheck the /Safeboot option. Thus, you are stuck with a computer constantly attempting to get into safe mode and not being able to do so.
If a situation like this has happened to you it is possible to fix this problem by renaming your boot.ini file. The first step would be to use a boot disk to start your computer. If your computer does not have a floppy disk, then you can typically boot off the Windows CD that came with your computer in order to access the Windows Recovery Console. More information about the Windows Recovery Console can be found here. Once booted to a command prompt, you would simply rename your C:\Boot.ini file to another name like C:\Boot.ini.bak. The command to rename the file at the command prompt is:
ren C:\Boot.ini Boot.ini.bak
Once the file is renamed, you can then remove the boot disk and reboot your computer to get back to normal mode. When booting up after the rename, do not be surprised if you see an error stating that you do not have a valid Boot.ini file. When you get back to normal Windows mode, you can then rename C:\Boot.ini.bak to C:\Boot.ini and run Msconfig again to remove the /safeboot flag.
Conclusion
It is not uncommon when people are helping you troubleshoot your computer that they tell you to enter Safe Mode. With this tutorial you should now know how to enter Safe Mode when it is required.
If you have any questions please feel free to post them in our tech support forums.
Microsoft said it won’t be fixing or is pushing patches to a later date for three of the four security flaws uncovered in its Teams business communication platform earlier this March.
The disclosure comes from Berlin-based cybersecurity firm Positive Security, which found that the implementation of the link preview feature was susceptible to a number of issues that could “allow accessing internal Microsoft services, spoofing the link preview, and, for Android users, leaking their IP address, and DoS’ing their Teams app/channels.”
Of the four vulnerabilities, Microsoft is said to have addressed only one that results in IP address leakage from Android devices, with the tech giant noting that a fix for the denial-of-service (DoS) flaw will be considered in a future version of the product. The issues were responsibly disclosed to the company on March 10, 2021.
Chief among the flaws is a server-side request forgery (SSRF) vulnerability in the endpoint “/urlp/v1/url/info” that could be exploited to glean information from Microsoft’s local network. Also discovered is a spoofing bug wherein the preview link target can be altered to point to any malicious URL while keeping the main link, preview image and description intact, allowing attackers to hide malicious links and stage improved phishing attacks.
The DoS vulnerability, which affects the Android version of Teams, could cause the app to crash simply by sending a message with a specially crafted link preview containing an invalid target instead of a legitimate URL. The last of the issues concerns an IP address leak, which also affects the Android app. By intercepting messages that include a link preview to point the thumbnail URL to a non-Microsoft domain, Positive Security said it’s possible to gain access to a user’s IP address and user agent data.
“While the discovered vulnerabilities have a limited impact, it’s surprising both that such simple attack vectors have seemingly not been tested for before, and that Microsoft does not have the willingness or resources to protect their users from them,” Positive Security’s co-founder Fabian Bräunlein said.
Microsoft .NET Framework 4.7.2 is a highly compatible, in-place update to .NET Framework 4, 4.5, 4.5.1, 4.5.2, 4.6, 4.6.1, 4.6.2, 4.7, and 4.7.1.
The offline package can be used in situations in which the web installer cannot be used because of a lack of Internet connectivity. This package is larger than the web installer and does not include the language packs. We recommend that you use the web installer instead of the offline installer for optimal efficiency and bandwidth requirements.
When you install this package, the following packages or updates are installed per your operating system:
In Windows 7 Service Pack 1 (SP1) and Windows Server 2008 R2 SP1, .NET Framework 4.7.2 is listed as an installed product under the Programs and Features item in Control Panel.
In Windows Server 2012, Update for Microsoft Windows (KB4054542) is listed under the Installed Updates item in Control Panel.
In Windows 8.1 or Windows Server 2012 R2, Update for Microsoft Windows (KB4054566) is displayed under the Installed Updates item in Control Panel.
In Windows 10 Anniversary Update (version 1607), Windows 10 Creators Update (version 1703) and Windows Server 2016, Update for Microsoft Windows (KB4054590) is listed under the Installed Updates item in Control Panel.
In Windows 10 Fall Creators Update (version 1709), Update for Microsoft Windows (KB4073120) is listed under the Installed Updates item in Control Panel.
Microsoft .NET Framework 4.7.2 is available on Windows Update and on Windows Server Update Service (WSUS). It will be offered as a recommended update on Windows Update.
Note The package installer (NDP472-KB4054530-x86-x64-AllOS-ENU.exe) was updated on July 10, 2018. If you downloaded the installer before July 10, 2018, we recommend that you download the latest version (4.7.3081.0) of the installer to get the additional fixes included in the update.
Download information
The following files are available for download from the Microsoft Download Center:
For all Windows operating systems except Windows RT 8.1:
The following issues are fixed for .NET Framework 4.7.2.
SQL Server (SQL)
Fixes an issue in which the .NET Framework API SqlConnection.ConnectionString property is used to set a null or empty connection string. In this situation, a Null Reference Exception (NRE) occurs when you use the API together with .NET Framework 4.7.2. [611802, System.Data.dll, Bug]
Fixes an issue in which you connect to Azure SQL DB and MultipleActiveResultSets=true is used in the connection string together with System.Data.SqlClient.SqlConnection. In this situation, the async query operations cause a bad TDS protocol request stream to be sent from the client. This causes the Async Query APIs to fail. [620109, System.Data.dll , Bug]
Windows Presentation Framework (WPF)
Adds an AppContext switch that opts out of some work that was done during AppDomain or process shutdown. This issue can reduce (but not eliminate) the possibility of a crash in applications that make unwarranted assumptions about the timing of the finalizer thread. [593963, WindowsBase.dll, Bug]
Fixes a crash in WPF that occurs when you multiple characters are replaced by a single character (in a different language than the original text) by using IMEPad. [605996, PresentationFramework.dll, Bug]
Combo box grouped items now report children correctly through UIAutomation. [605922, PresentationFramework.dll, Bug]
More information
This version of .NET Framework runs side-by-side with .NET Framework 3.5 SP1 and earlier versions. However, it performs an in-place update for .NET Framework 4, 4.5, 4.5.1, 4.5.2, 4.6, 4.6.1, 4.6.2, 4.7, and 4.7.1.
Known issues
Applications that rely on .NET Framework to initialize a COM component and that run with restricted permissions may fail to start or run correctly, and return “access denied,” “class not registered,” or “internal failure occurred for unknown reasons” errors.
For more information about the various command-line options that are supported by this update, see the “Command-Line options” section in .NET Framework Deployment Guide for Developers.
Restart requirement
You may have to restart the computer after you install this update. We recommend that you exit all applications that are using .NET Framework before you install this update.
Supported operating systems
Microsoft .NET Framework 4.7.2 (Offline Installer) supports the following operating systems:
Windows Server 2016 (version 1709)
Windows 10 Anniversary Update (version 1607) (x86 and x64)
Windows 10 Creators Update (version 1703) (x86 and x64)
Windows 10 Fall Creators Update (version 1709) (x86 and x64)
When the CEO realizes they deleted a vital email thread three weeks ago, email recovery becomes suddenly becomes an urgent task. Sure, you can look in the Deleted Items folder in Outlook, but beyond that, how can you recover what has undergone “permanent” deletion? In this article, we review how you can save the day by bringing supposedly unrecoverable email back from the great beyond.
Deleted Email Recovery in Microsoft And Office 365
Email Recovery for Outlook in Exchange Online through Microsoft and Office can be as simple as dragging and dropping the wayward email from the Deleted Items folder to your Inbox. But what do you do when you can’t find the email you want to recover?
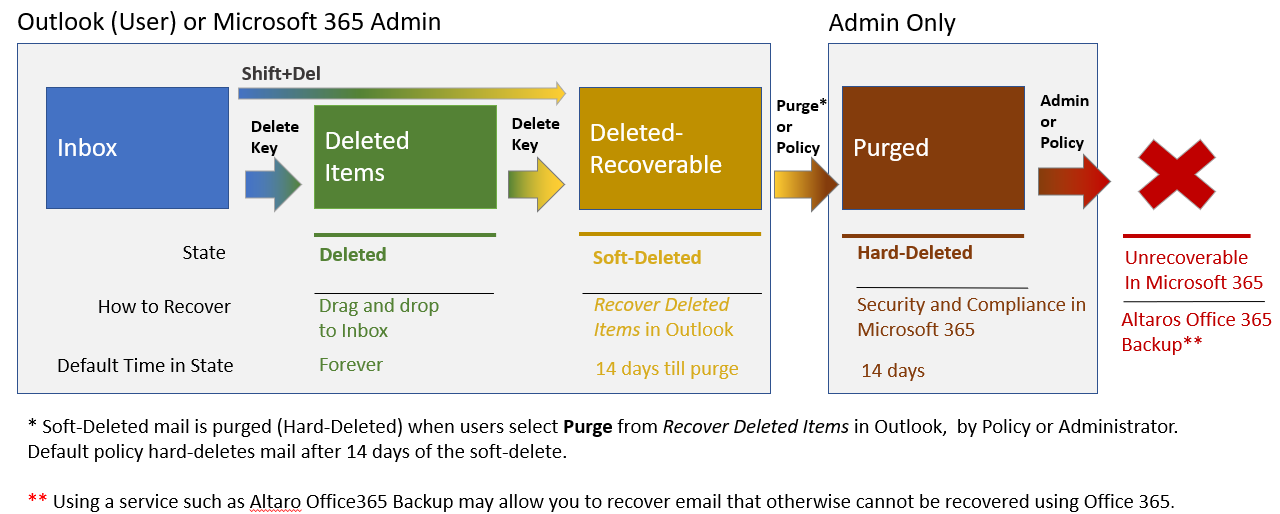
First, let’s look at how email recovery is structured in Microsoft 365. There are few more layers here than you might think! In Microsoft 365, deleted email can be in one of three states: Deleted, Soft-Deleted, or Hard-Deleted. The way you recover email and how long you have to do so depends on the email’s delete status and the applicable retention policy.
Let’s walk through the following graphic and talk about how email gets from one state to another, the default policies, how to recover deleted email in each state, and a few tips along the way.
Items vs. Email
Outlook is all about email yet also has tasks, contacts, calendar events, and other types of information. For example, you can delete calendar entries and may be called on to recover them, just like email. For this reason, the folder for deleted content is called “Deleted Items.” Also, when discussing deletions and recovery, it is common to refer to “items” rather than limiting the discussion to just email.
Policy
Various rules control the retention period for items in the different states of deletion. A policy is an automatically applied action that enforces a rule related to services. Microsoft 365 has hundreds of policies you can tweak to suit your requirements. See Overview of Retention policies for more information.
‘Deleted Items’ Email
When you press the Delete key on an email in Outlook, it’s moved to the Deleted Items folder. That email is now in the “Deleted” state, which simply means it moved to the Deleted Items folder. How long does Outlook retain deleted email? By default – forever! You can recover your deleted mail with just a drag and drop to your Inbox. Done!
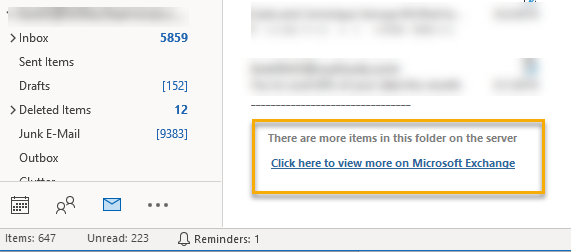
If you can’t locate the email in the Deleted Items folder, double-check that you have the Deleted Items folder selected, then scroll to the bottom of the email list. Look for the following message:
If you see the above message, your cache settings may be keeping only part of the content in Outlook and rest in the cloud. The cache helps to keep mailbox sizes lower on your hard drive, which in turn speeds up search and load times. Click on the link to download the missing messages.
But I Didn’t Delete It!
If you find content in the Deleted Items and are sure you did not delete it, you may be right! Administrators can set Microsoft 365 policy to delete old Inbox content automatically.
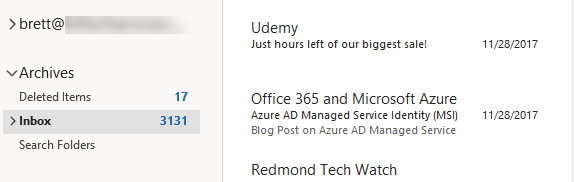
Mail can ‘disappear’ another way. Some companies enable a personal archive mailbox for users. When enabled, by default, any mail two years or older will “disappear” from your Inbox and the Deleted Items folder. However, there is no need to worry. While apparently missing, the email has simply moved to the Archives Inbox. A personal Archives Inbox shows up as a stand-alone mailbox in Outlook, as shown below.
As a result, it’s a good idea to search the Archives Inbox, if it is present when searching for older messages.
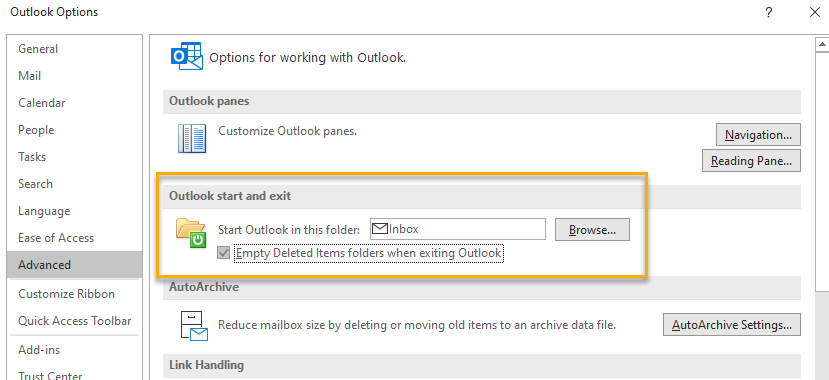
Another setting to check is one that deletes email when Outlook is closed. Access this setting in Outlook by clicking “File,” then “Options,” and finally “Advanced” to display this window:
If enabled, Outlook empties the Deleted Items when closed. The deleted email then moves to the ‘soft-delete’ state, which is covered next. Keep in mind that with this setting, all emails will be permanently deleted after 28 days
‘Soft-Deleted’ Email
The next stage in the process is Soft-Deleted. Soft-Deleted email is in the Deleted-Items folder but is still easily recovered. At a technical level, the mail is deleted locally from Outlook and placed in the Exchange Online folder named Deletions, which is a sub-folder of Recoverable Items. Any content in Recoverable Items folder in Exchange Online is, by definition, considered soft-deleted.
You have, by default, 14 days to recover soft-deleted mail. The service administrator can change the retention period to a maximum of 30 days. Be aware that this can consume some of the storage capacity assigned to each user account and you could get charged for overages.
How items become soft-deleted
There are three ways to soft-delete mail or other Outlook items.
Delete an item already in the Deleted Items folder. When you manually delete something that is already in the Deleted Items folder, the item is soft-deleted. Any process, manual or otherwise that deletes content from this folder results in a ‘soft-delete’
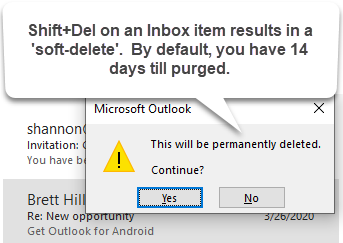
Pressing Shift + Delete on an email in your Outlook Inbox will bring up a dialog box asking if you wish to “permanently” delete the email. Clicking Yes will remove the email from the Deleted-Items folder but only perform a soft-delete. You can still recover the item if you do so within the 14 day retention period.
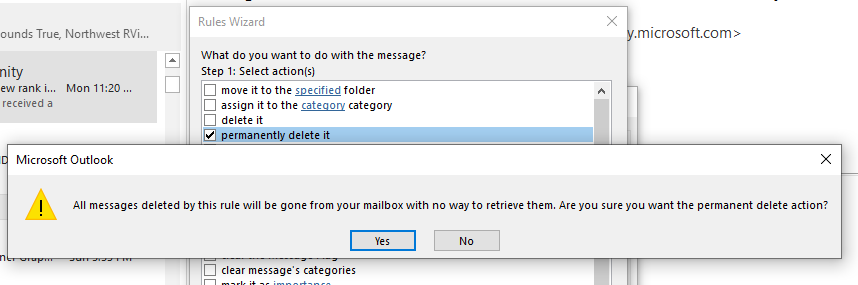
The final way items can be soft-deleted is by using Outlook policies or rules. By default, there are no policies that will automatically remove mail from the Deleted-Items folder in Outlook. However, users can create rules that ‘permanently’ (soft-delete) email. If you’re troubleshooting missing email, have the user check for such rules as shown below. You can click Rules on the Home menu and examine any created rules in the Rules Wizard shown below.
Note that the caution is a bit misleading as the rule’s action will soft-delete the email, which, as already stated, is not an immediate permanent deletion.
Recovering soft-deleted mail
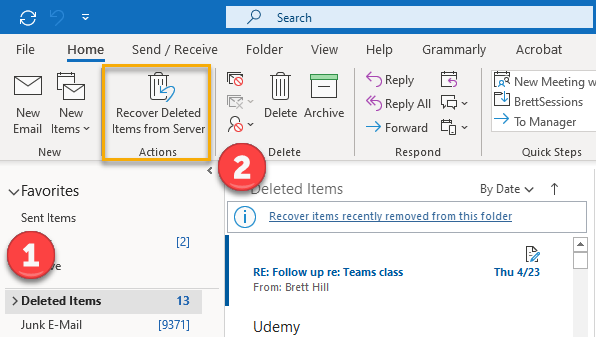
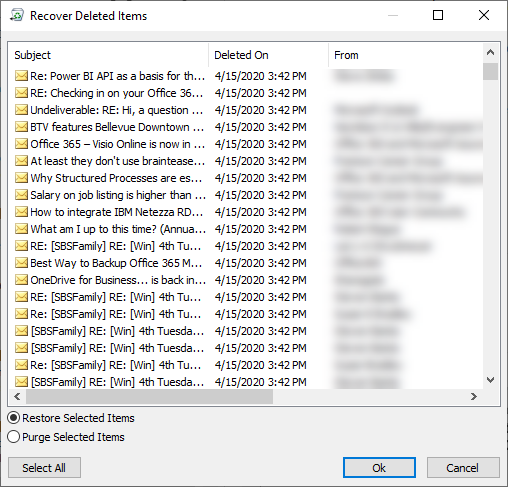
You can recover soft-deleted mail directly in Outlook. Be sure the Deleted Items folder is selected, then look for “Recover items recently removed from this folder“ at the top of the mail column, or the “Recover Deleted Items from Server” action on the Home menu bar.
Clicking on the recover items link opens the Recover Deleted Items window.
Click on the items you want to recover or Select All, and click OK.
NOTE: The recovered email returns to your Deleted Items folder. Be sure to move it into your Inbox.
If the email you’re looking for is not listed, it could have moved to the next stage: ‘Hard-Deleted.’
While users can recover soft-deleted email, Administrators can also recover soft-deleted email on their behalf using the ‘Hard-Deleted’ email recovery process described next (which works for both hard and soft deletions). Also, Microsoft has created two PowerShell commands very useful in this process for those who would rather script the tasks. You can use the Get-RecoverableItems and Restore-RecoverableItems cmdlets to search and restore soft-deleted email.
Hard-Deleted Email
The next stage for deletion is ‘Hard Delete.’ Technically, items are hard deleted when items moved from the Recoverable folder to the Purges folder in Exchange online. Administrators can still recover items in the folder with the recovery period set by policy which ranges from 14 (the default) to 30 (the maximum). You can extend the retention beyond 30 days by placing legal or litigation hold on the item or mailbox.
How items become Hard-Deleted
There are two ways content becomes hard-deleted.
By policy, soft-deleted email is moved to the hard-deleted stage when the retention period expires.
Users can hard-delete mail manually by selecting the Purge option in the Recover Deleted Items window shown above. (Again, choosing to ‘permanently delete’ mail with Shift + Del, results in a soft-delete, not a hard-delete.)
Recovering Hard-Deleted Mail
Once email enters the hard-delete stage, users can no longer recover the content. Only service administrators with the proper privileges can initiate recovery, and no administrators have those privileges by default, not even the global admin. The global admin does have the right to assign privileges so that they can give themselves (or others) the necessary rights. Privacy is a concern here since administrators with these privileges can search and export a user’s email.
Microsoft’s online documentation Recover deleted items in a user’s mailbox details the step-by-step instructions for recovering hard-deleted content. The process is a bit messy compared to other administrative tasks. As an overview, the administrator will:
Assign the required permissions
Search the Inbox for the missing email
Copy the results to a Discovery mailbox where you can view mail in the Purged folder (optional).
Export the results to a PST file.
Import the PST to Outlook on the user’s system and locate the missing email in the Purged folder
Last Chance Recovery
Once hard-deleted items are purged, they are no longer discoverable by any method by users or administrators. You should consider the recovery of such content as unlikely. That said, if the email you are looking for is not recoverable by any of the above methods, you can open a ticket with Microsoft 365 Support. In some circumstances, they may be able to find the email that has been purged but not yet overwritten. They may or may not be willing to look for the email, but it can’t hurt to ask, and it has happened.
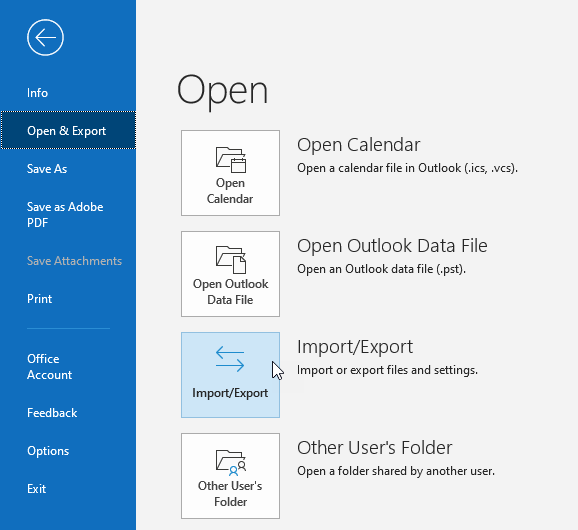
What about using Outlook to backup email?
Outlook does allow a user to export email to a PST file. To do this, click “File” in the Outlook main menu, then “Import & Export” as shown below.
You can specify what you want to export and even protect the file with a password.
While useful from time to time, a backup plan that depends on users manually exporting content to a local file doesn’t scale and isn’t reliable. Consequently, don’t rely on this as a possible backup and recovery solution.
Alternative Strategies
After reading this, you may be thinking, “isn’t there an easier way?” A service like Altaro Office 365 Backup allows you to recover from point-in-time snapshots of an inbox or other Microsoft 365 content. Having a service like this when you get that urgent call to recover a mail from a month ago can be a lifesaver.
Summary
Users can recover most deleted email without administrator intervention. Often, deleted email simply sits in the Deleted folder until manually cleared. When that occurs, email enters the ‘soft-deleted stage,’ and is easily restored by a user within 14-days. After this period, the item enters the ‘hard-deleted’ state. A service administrator can recover hard-deleted items within the recovery window. After the hard-deleted state, email should be considered uncoverable. Policies can be applied to extend the retention times of deleted mail in any state. While administrators can go far with the web-based administration tools, the entire recovery process can be scripted with PowerShell to customize and scale larger projects or provide granular discovery. It is always a great idea to use a backup solution designed for Microsoft 365, such as Altaro Office 365 Backup.
Microsoft has released emergency out-of-band (OOB) updates to address multiple issues caused by Windows Updates issued during the January 2022 Patch Tuesday.
“Microsoft is releasing Out-of-band (OOB) updates today, January 18, 2022, for some versions of Windows,” the company said.
“This update addresses issues related to VPN connectivity, Windows Server Domain Controllers restarting, Virtual Machines start failures, and ReFS-formatted removable media failing to mount.”
All OOB updates released today are available for download on the Microsoft Update Catalog, and some of them can also be installed directly through Windows Update as optional updates.
You will have to manually check for updates if you want to install the emergency fixes through Windows Update because they are optional updates and will not install automatically.
The following updates can only be downloaded and installed via the Microsoft Update Catalog:
According to admin reports, Windows domain controllers were being plagued by spontaneous reboots, Hyper-V was no longer starting on Windows servers, and Windows Resilient File System (ReFS) volumes were no longer accessible after deploying the January 2022 updates.
Windows 10 users and administrators also reported problems with L2TP VPN connections after installing the recent Windows 10 and Windows 11 cumulative updates and seeing “Can’t connect to VPN.” errors.
Those who cannot immediately install today’s out-of-band updates can remove the KB5009624, KB5009557, KB5009555, KB5009566, and KB5009543 updates causing these issues from an Elevated Command Prompt with the following commands:
Windows Server 2012 R2: wusa /uninstall /kb:5009624
Windows Server 2019: wusa /uninstall /kb:5009557
Windows Server 2022: wusa /uninstall /kb:5009555
Windows 10: wusa /uninstall /kb:5009543
Windows 11: wusa /uninstall /kb:5009566
However, since Microsoft also bundles all the security updates with these Windows cumulative updates, removing them will also remove all fixes for vulnerabilities patched during the January 2022 Patch Tuesday.
Windows admins and users need to consider the risks of unpatched vulnerabilities impacting their systems versus the disruption caused by the issues stemming from this month’s Windows updates.
Update 1/17/21: Microsoft has released OOB updates to fix the Windows Server bugs.
The latest Windows Server updates are causing severe issues for administrators, with domain controllers having spontaneous reboots, Hyper-V not starting, and inaccessible ReFS volumes until the updates are rolled back
Yesterday, Microsoft released the Windows Server 2012 R2 KB5009624 update, the Windows Server 2019 KB5009557 update, and the Windows Server 2022 KB5009555 update as part of the January 2022 Patch Tuesday.
After installing these updates, administrators have been battling multiple issues that are only resolved after removing the updates.
Windows domain controller boot loops
The most serious issue introduced by these updates is that Windows domain controllers enter a boot loop, with servers getting into an endless cycle of Windows starting and then rebooting after a few minutes.
As first reported by BornCity, this issue affects all supported Windows Server versions.
“Looks KB5009557 (2019) and KB5009555 (2022) are causing something to fail on domain controllers, which then keep rebooting every few minutes,” a user posted to Reddit.
A Windows Server administrator told BleepingComputer that they see the LSASS.exe process use all of the CPU on a server and then ultimately terminate.
As LSASS is a critical process required for Windows to operate correctly, the operating system will automatically restart when the process is terminated.
The following error will be logged to the event viewer when restarting due to a crashed LSASS process, as another user on Reddit shared.
“The process wininit.exe has initiated the restart of computer [computer_name] on behalf of user for the following reason: No title for this reason could be found Reason Code: 0x50006 Shutdown Type: restart Comment: The system process ‘C:\WINDOWS\system32\lsass.exe’ terminated unexpectedly with status code -1073741819. The system will now shut down and restart.”
Hyper-V no longer starts
In addition to the boot loops, BleepingComputer has been told by Windows administrators that after installing the patches, Hyper-V no longer starts on the server.
This bug primarily affects Windows Server 2012 R2 server, but other unverified reports say it affects newer versions of Windows Server.
As Hyper-V is not started, when attempting to launch a virtual machine, users will receive an error stating the following:
“Virtual machine xxx could not be started because the hypervisor is not running.”
Microsoft released security updates to fix four different Hyper-V vulnerabilities yesterday (CVE-2022-21901, CVE-2022-21900, CVE-2022-21905, and CVE-2022-21847), which are likely causing this issue.
ReFS file systems are no longer accessible
Finally, numerous admins are reporting that Windows Resilient File System (ReFS) volumes are no longer accessible or are seen as RAW (unformatted) after installing the updates.
The Resilient File System (ReFS) is a Microsoft proprietary file system that has been designed for high availability, data recovery, and high performance for very large storage volumes.
“Installed these updates tonight, in a two server Exchange 2016 CU22 DAG, running on Server 2012 R2. After a really long reboot, the server came back up with all the ReFS volumes as RAW,” explained a Microsoft Exchange administrator on Reddit.
“NTFS volumes attached were fine. I realize this is not exclusively an exchange question but it is impacting my ability to bring services for Exchange back online.”
Uninstalling the Windows Server updates made the ReFS volumes accessible again.
Yesterday, Microsoft fixed seven remote code execution vulnerabilities in ReFS, with one or more likely behind the inaccessible ReFS volumes.
These vulnerabilities are tracked as CVE-2022-21961, CVE-2022-21959, CVE-2022-21958, CVE-2022-21960, CVE-2022-21963, CVE-2022-21892, CVE-2022-21962, CVE-2022-21928.
How to fix?
Unfortunately, the only way to fix these issues is to uninstall the corresponding cumulative update for your Windows version.
Admins can do this by using one of the following commands:
Windows Server 2012 R2: wusa /uninstall /kb:KB5009624
Windows Server 2019: wusa /uninstall /kb:KB5009557
Windows Server 2022: wusa /uninstall /kb:KB5009555
As Microsoft bundles all security fixes into the single update, removing the cumulative update may fix the bugs, but will also remove all fixes for recently patched vulnerabilities.
Therefore, uninstalling these updates should only be done if absolutely necessary.
Outlook for Microsoft 365 Outlook for Microsoft 365 for Mac Microsoft 365 for home More…
Most email apps like Outlook are able to automatically configure email server settings. If you need server settings or help finding your server settings, click on one of the links below:
If you’re connecting to an Exchange mailbox and not using Microsoft 365 email, or if you aren’t sure if you’re using Microsoft 365 email, do the following to look up your settings:
In Outlook Web App, on the toolbar, select Settings > Mail > POP and IMAP.
The POP3, IMAP4, and SMTP server name and other settings you may need to enter are listed on the POP and IMAP settings page.
What server settings do I need from my email provider?
To help you get the info you need, we’ve put together a handy chart of the email server settings you should ask for. You will most likely have to set up your email as an IMAP or POP account as well. What are POP and IMAP? Check with your provider if you’re not sure which to use.
Note: When you use an IMAP or POP account, only your email will sync to your device. Any calendar or contacts associated with that account will be stored only on your local computer.
Follow these instructions to get your email settings:
Print out this page and keep it within reach.
Call your email provider and ask them about the settings in the chart below.
Write down the corresponding email server settings in the empty column.
Return to your email app and enter the information to complete your email setup.
Note: You may only need some of the settings on this list. Find out from your email provider what you will need to access your email on your mobile device.
General Email Settings
Setting
Description
Write Your Setting Here
Example
Email Address
The email address you want to set up.
yourname@contoso.com
Password
The password associated with your email account.
——–
Display Name
The name you want your email recipients to see.
Mike Rosoft
Description
Add a description of your email account.
Personal, work, etc.
Incoming Mail Server Settings
These settings are for sending email to your email provider’s mail server.
Setting
Description
Write Your Setting Here
Example
Host Name
Your incoming mail server name.
outlook.office365.com
Username
The email address you want to set up.
yourname@contoso.com
Port
The port number your incoming mail server uses.
Most use 143 or 993 for IMAP, or 110 or 995 for POP.
Server or Domain
This is your email provider.
yourprovider.com, gmail.com, etc.
SSL?
Is your email encrypted using SSL?(SSL is enabled by default in the Outlook mobile app)
SSL Enabled
Outgoing Mail Server Settings (SMTP)
These settings are for sending email to your email provider’s mail server.
Setting
Description
Write Your Setting Here
Example
SMTP Host Name
Outgoing mail server name. Most often smtp.yourprovider.com
smtp.office365.com
SMTP Username
The email address you want to set up.
yourname@contoso.com
SMTP Password
The password associated with your email account.
——–
SSL?
Is your email encrypted using SSL?(SSL is enabled by default in the Outlook mobile app)
If you have a work or school account that uses Microsoft 365 for business or Exchange-based accounts, talk to your Microsoft 365 admin or technical support.
 Microsoft Visual C++-2015 Redistributable
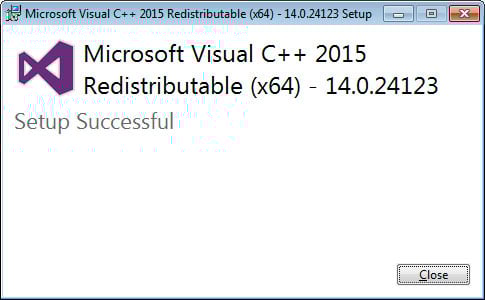 Redistributable Installed
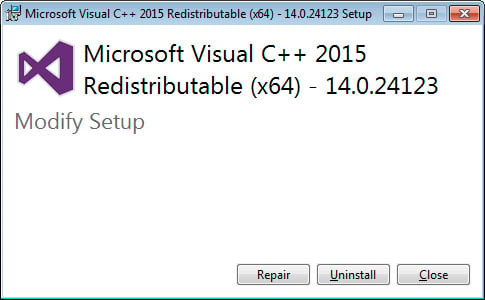
 Enable Start full screen
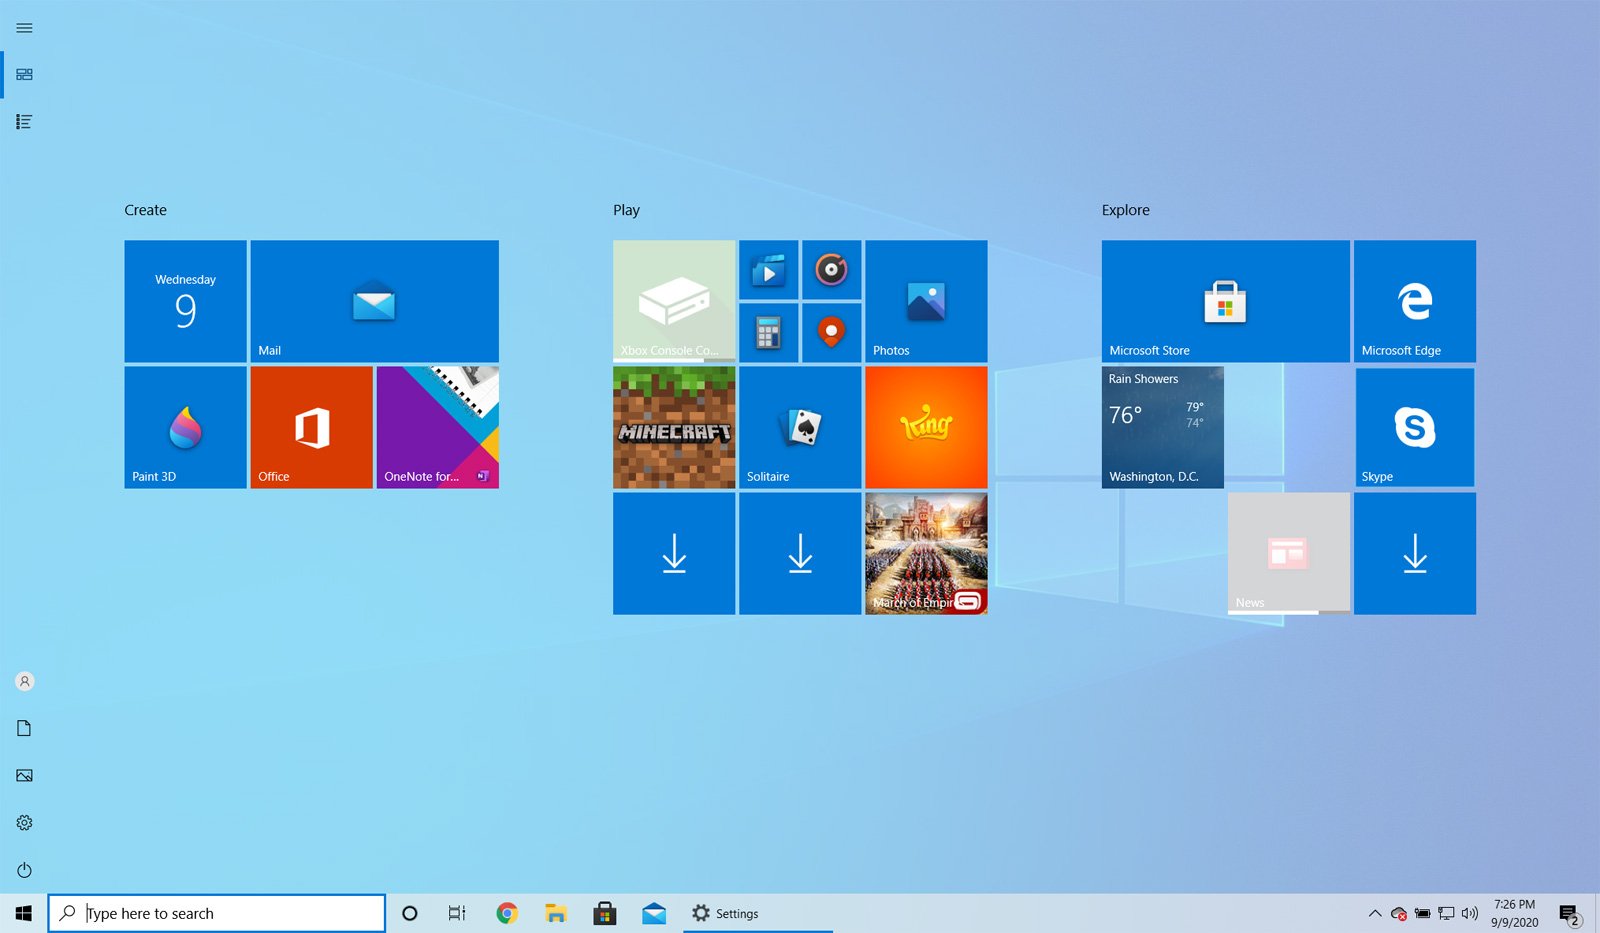

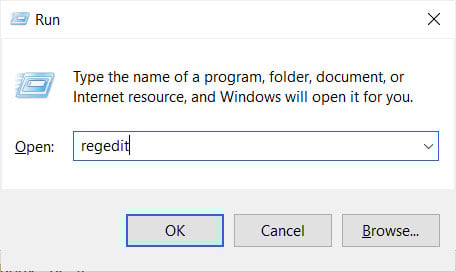 Starting Registry Editor
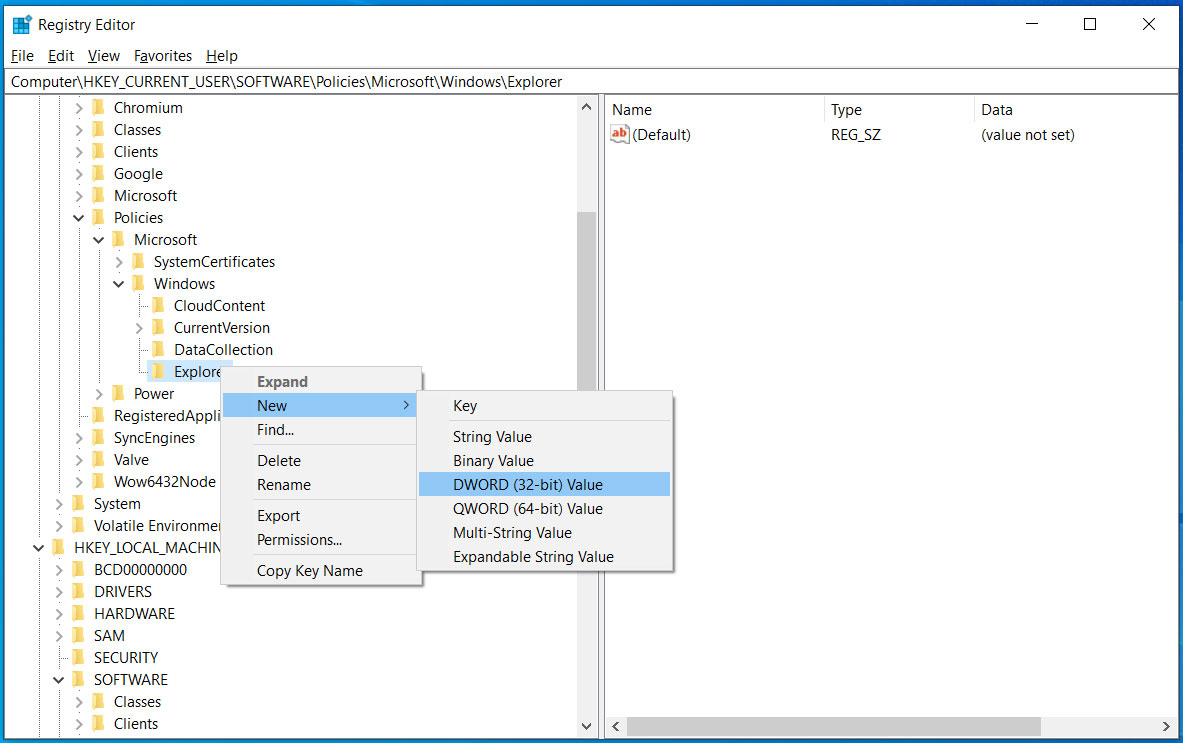 New DWORD value