UniFi – Console and Gateway Recovery Mode

The Recovery Mode User Interface (UI) is a special interface for UniFi OS Consoles (UDMP, UNVR, etc.) and gateways used to recover from various failure modes (indicated on the LCM screen of that device). From the Recovery Mode, you can perform the following actions:

  • Reset to Factory Defaults: Completely reset the device. Note this will also wipe out any stored backup files.
  • Reboot: Restart the device and re-load the existing configuration.
  • Power-off: Initiate a software shutdown on the device, after which you can safely remove the power cable.
  • Check Filesystems: Check the integrity of the file system. 
  • Firmware Update: Upload a previously downloaded firmware image (.bin) file in order to upgrade the firmware.

You should only resort to using recovery mode if you are prompted by the LCM screen found on your device. 

Performing a Device Recovery

  1. Download the most recent firmware for your device. You can find information on our latest releases here.
  2. Completely power-off the UniFi device and unplug it from its power source.
  3. Press and hold the reset button and then power on the device by connecting it to the power source once again.udm-pro-topology.pngudm-topology.png
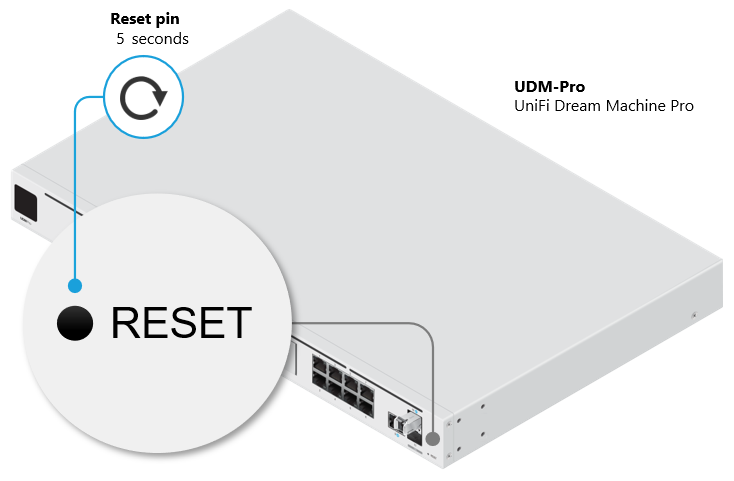
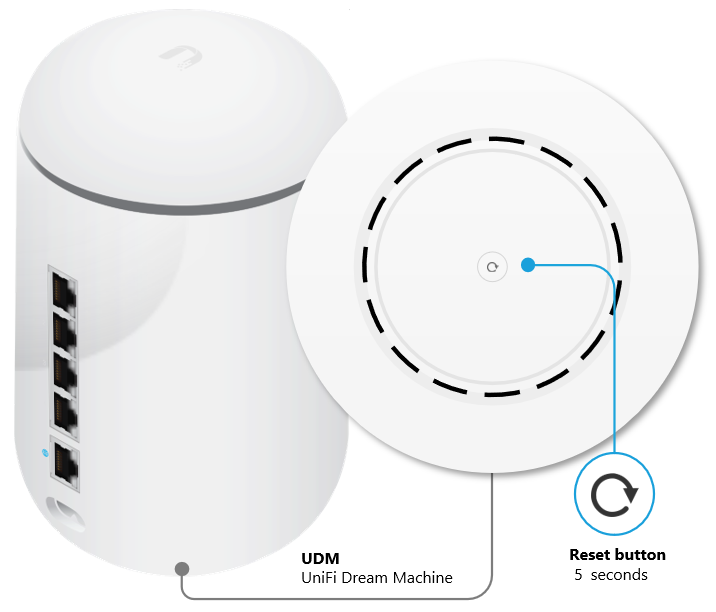
  4. Keep the reset button pressed for about 5 seconds. After some time the display (in supported models) will indicate that the gateway is in Recovery Mode.
  5. Connect an Ethernet cable from your computer to the first LAN port (port 1) on the UniFi gateway.

    Note: Port 1 is always the first one. Either the top port, or the top left corner one, depending on the layout of your device’s ports.
  6. Configure a static IP address on your computer in the 192.168.1.0/24 range (for example 192.168.1.11). Windows ClientmacOS clientNote: If a wireless adapter is enabled and connected to another network it could conflict with the connection to the UniFi device. Disable the wireless adapter if necessary. 
  7. Open a compatible web browser navigate to http://192.168.1.30 to access the Recovery Mode UI. 

    Note: The Recovery Mode UI is accessible via HTTP only and not HTTPS. It is possible that your browser will automatically try to redirect your session to HTTPS. Make sure to navigate to the http://192.168.1.30 address and use a different browser if necessary.
  8. Select Firmware Update > Choose and browse your computer for the previously download firmware (.bin) image file.
  9. Wait for the upgrade process to complete and reboot the device afterwards.

    Source :
    https://help.ui.com/hc/en-us/articles/360043360253-UniFi-Console-and-Gateway-Recovery-Mode

UniFi – Login with SSH (Advanced)

We do not recommend using SSH unless instructed by one of our Support Engineers as part of advanced troubleshooting. Inexperienced users risk making changes that may degrade network performance, or even worse, completely break your deployment. Proceed with caution.

Requirements

1. You are connected to the same local network as the device/console you plan to connect with via SSH. This may consist of using a laptop connected to the same WiFi network, or hardwired directly to the device.

2. SSH is enabled. UniFi Network devices and UniFi OS Consoles have independent SSH settings.

  • UniFi OS Consoles – Following setup, SSH is automatically disabled. It must be enabled in your UniFi OS System Settings.
  • UniFi Network Devices – Following setup, SSH is automatically enabled. The credentials consist of a random string of characters.

3. The device you are using has a command line interface (CLI) capable of establishing a Secure Shell (SSH) connection. Linux and macOS devices can use their native terminal. Windows OS requires PowerShell or PuTTY.

Establishing an SSH Connection

The format of the command used to establish an SSH connection is as follows:

ssh <username>@<ip-address>

The <username> for UniFi OS Consoles (UDM Pro / UNVR / Cloud Key) and UniFi Gateways (UXG Pro) is always ‘root’. For example, a Dream Machine Pro (gateway) with an IP address of 192.168.1.1 can be accessed as follows:

ssh root@192.168.1.1

Note: The UXG will use <username> = ‘root’, but the <password> will be the shared password set in your UniFi Network Application.

Default Credentials

Prior to setup/adoption, devices have a set of default credentials. 

UniFi – Advanced Updating Techniques

We recommend that most users enable automatic updates.  Doing so allows you to specify when your UniFi deployment automatically checks for and installs updates. 

UniFi OS Console and application update preferences can be configured in your UniFi OS Settings. Please note, though, that self-hosted UniFi Network applications do not offer automatic updating.

UniFi Network device update preferences are set in your Network application’s System Settings. Devices managed by other UniFi applications are automatically updated within their respective applications.

Manually Update UniFi Devices via Web Application

Updating via the Device Property Panel

Use Case: You want to try Early Access firmware releases for specific devices, or you want to return to an official release after trying an EA release.

1. Copy the firmware release link from community.ui.com/releases.

image1.png

2. Paste the link in the address bar found in the Settings tab of the device’s properties panel.

image2.png

Updating via Your Network Cache

Use Case: You prefer to download and store updates in your Network application so they can be used by other devices, as opposed to downloading multiple, device-specific files from the internet. This is an ideal solution for reducing bandwidth within high-volume networks that host a large number of similar UniFi devices. It is also suitable for the advanced users who disable internet access on their UniFi device’s management network.

Device updates can be cached in your Network application’s System Settings. Once an update is cached, you can open to your UniFi Devices page and click Update Available.

Note: The Cache link will appear when you hover your cursor over an update.image3.png

Updating via SSH

Note: SSH updating is not a typical or recommended method. It is only prescribed to work around specific scenarios, such as when:

  • Prior traditional update attempts have failed. A successful SSH update will help verify if initial failures resulted from incorrect network configuration. For more details, see Troubleshooting Device Updates.
  • Your UniFi Network device is not being discovered or cannot be adopted because it has been preloaded with outdated firmware.
  • Your UniFI OS Console cannot be set up because it has been preloaded with an outdated version of UniFi OS.

UAP/USW (Internet) 

  1. Copy the update link from community.ui.com/releases.
  2. SSH into your device.
  3. Run the following command:upgrade paste_download_link_here Exupgrade https://dl.ui.com/unifi/firmware/UAL6/5.60.1.12923/BZ.mt7621_5.60.1+12923.210416.1641.bin

UAP/USW (No Internet) 

  1. Download the desired firmware update from community.ui.com/releases.
  2. Use the following SCP command to copy the file into the /tmp folder of your device. This requires a compatible SCP application (e.g., Terminal on macOS and Linux, PuTTY/PowerShell on Windows).scp /folder_path/firmwarefile.bin <user>@<IP of device>:/tmp/fwupdate.binExscp /Users/alexpro/Desktop/BZ.mt7621_5.60.1+12923.210416.1641.bin Alex@192.168.1.219:/tmp/fwupdate.bin 
  3. Enter your SSH password when prompted.
  4. Run the following command:syswrapper.sh upgrade2 &

UDM/UDM Pro/UXG Pro (Internet)

  1. Copy the update link from community.ui.com/releases.
  2. SSH into your device.
  3. Run the following command:ubnt-upgrade paste_download_link_here Exubnt-upgrade https://fw-download.ubnt.com/data/udm/7675-udmpro-1.12.22-36b5213eaa2446aca8486f0b51e64cd3.bin

UDM/UDM Pro/UXG Pro (No Internet)

  1. Download the desired firmware update from community.ui.com/releases.
  2. Use the following SCP command to copy the file into the /mnt/data folder of your device. This requires a compatible SCP application (e.g., Terminal on macOS and Linux, PuTTY/PowerShell on Windows).scp /folder_path/firmwarefile.bin <user>@<IP of device>:/mnt/data/fwupdate.binExscp /Users/alexpro/Desktop/7675-udmpro-1.12.22-36b5213eaa2446aca8486f0b51e64cd3.bin Alex@192.168.1.219:/mnt/data/fwupdate.bin 
  3. Enter your SSH password when prompted.
  4. Run the following command:ubnt-upgrade /mnt/data/fwupdate.bin

UCK G2, UCK G2 Plus, UDM SE, UDR, UDW, UNVR, UNVR Pro (Internet)

  1. Copy the update link from community.ui.com/releases.
  2. SSH into your device.
  3. Run the following command:ubnt-systool fwupdate paste_download_link_here Exubnt-systool fwupdate https://fw-download.ubnt.com/data/unifi-dream/dd49-UDR-2.4.10-cd3afa000ebf4a4fb15374481539961c.bin

UCK G2, UCK G2 Plus, UDM SE, UDR, UDW, UNVR, UNVR Pro (No Internet)

  1. Download the desired firmware update from community.ui.com/releases.
  2. Use the following SCP command to copy the file into the /tmp folder of your device. This requires a compatible SCP application (e.g., Terminal on macOS and Linux, PuTTY/PowerShell on Windows).scp /folder_path/firmwarefile.bin <user>@<IP of device>:/tmp/fwupdate.binExscp /Users/alexpro/Desktop/dd49-UDR-2.4.10-cd3afa000ebf4a4fb15374481539961c.bin 
  3. Enter your SSH password when prompted.
  4. Run the following command:ubnt-systool fwupdate /tmp/fwupdate.bin

USG (Internet) 

  1. Copy the update link from community.ui.com/releases.
  2. SSH into your device.
  3. Run the following command:upgrade paste_download_link_here Exupgrade https://dl.ui.com/unifi/firmware/UGW3/4.4.56.5449062/UGW3.v4.4.56.5449062.tar

USG (No Internet) 

  1. Download the desired firmware update from community.ui.com/releases.
  2. Rename the file: upgrade.tar
  3. Use the following SCP command to copy the file into the /home/<user> folder of your USG. This requires a compatible SCP application (e.g., Terminal on macOS and Linux, PuTTY/PowerShell on Windows).scp /folder_path/upgrade.tar <user>@<IP of device>:/home/<user>/upgrade.tarExscp /Users/alexpro/Desktop/upgrade.tar Alex@192.168.1.1:/home/Alex/upgrade.tar
  4. Enter your SSH password when prompted.
  5. SSH into your device.
  6. Run the following command:sudo syswrapper.sh upgrade upgrade.tar

Manually Update the Network Application

  1. Download the desired application update from community.ui.com/releases.
  2. SSH into your device.
  3. Run the following command (UDM/UDM Pro Only):unifi-os shell
  4. Remove previously installed files:rm /tmp/unifi_sysvinit_all.deb &> /dev/null
  5. Store the new application version on your device using the download link:curl -o “/tmp/unifi_sysvinit_all.deb” <network application link.deb>Excurl -o “/tmp/unifi_sysvinit_all.deb” https://dl.ui.com/unifi/6.2.26-a79cb15f05/unifi_sysvinit_all.deb
  6. Once downloaded, install the new version:apt-get install -y /tmp/unifi_sysvinit_all.deb
  7. Following installation, remove the downloaded file:rm /tmp/unifi_sysvinit_all.deb

Updating Devices in a Broken State

In rare occurrences, a device may stop functioning. UniFi APs may be updated using our TFTP Recovery. This should only be used if your AP completely stops functioning as a last resort prior to submitting an RMA. UniFi OS Consoles and gateways my be updated using Recovery Mode. This should only be used if prompted on your device’s LCM screen.

Source :
https://help.ui.com/hc/en-us/articles/204910064-UniFi-Advanced-Updating-Techniques

UniFi – Getting Support Files and Logs

It may be necessary to provide support files to our team when troubleshooting issues. These contain detailed logs and information about what is happening with your UniFi system. Although sensitive information is generally removed, we do not recommend sharing these publicly.

There are two support files to be aware of:

  • UniFi OS Support File: This contains logs related to your UniFi OS Console, the installed applications, your adopted UniFi devices, and the client devices connected. 
    Navigating to unifi.ui.com (or signing in locally via IP address) > select your UniFi OS Console > Console Settings > Download Support File. Note that it will have a *.tgz extension.
  • UniFi Network Support File: This only contains information about your UniFi Network application, your adopted UniFi Network devices, and the connected clients. This should only be used if you are self-hosting the UniFi Network application on a Windows, macOS or Linux machine.
    Navigate to your UniFi Network Application > Settings > System > Download Network Support File. Note that it will have a *.supp extension.

Advanced

If the UOS Console or UniFi applications are inaccessible and you are not able to download the support file, you can download the logs by following these instructions. Please note, our support engineer will provide detailed information on which of the following will be required for troubleshooting.

1. SSH into the machine: ssh root@192.168.1.1

Note: If you need to change your SSH password, do so in the UniFi OS Settings, by navigating to unifi.ui.com (or signing in locally via IP address) > select your UniFi OS Console > Settings > System.

2. Create ZIP files for the logs. The commands’ format will be: tar -zcvf <file name> <folders path>.

  • UniFi OS logs: tar -zcvf unifi-core-logs.tar.gz /data/unifi-core/logs/
  • UniFi local portal (ULP) logs: tar -zcvf ulp-go-logs.tar.gz /data/ulp-go/log/
  • UniFi Network logs:
    • For UniFi Dream Machine consoles:tar -zcvf unifi-logs.tar.gz /data/unifi/logs/
    • For UniFi Cloud Key Gen2 consoles:tar -zcvf unifi-logs.tar.gz /usr/lib/unifi/logs
  • UniFi Protect logs:
    • Without external disks: tar -zcvf unifi-protect-logs.tar.gz /data/unifi-protect/logs/
    • With external disks: tar -zcvf unifi-protect-logs.tar.gz /srv/unifi-protect/logs/
  • UniFi Talk logs:
    • tar -zcvf unifi-talk-logs.tar.gz /var/log/unifi-talk/
    • tar -zcvf unifi-talk-base-logs.tar.gz /var/log/unifi-base/
    • tar -zcvf unifi-talk-freeswitch-logs.tar.gz /var/log/freeswitch/
  • UniFi Connect logs: tar -zcvf unifi-connect-logs.tar.gz /data/unifi-connect/log/
  • System logs:
    • ubnt-systool support /tmp/system
    • tar zcvf system.tar.gz /tmp/system

3. Open a new terminal window and run the SCP command to copy the logs from the UniFi OS Console and onto your computer (or system).

Note: The period (.) in the path variable means it will be copied onto the currently opened directory in the terminal. And the asterisk (*) stands for “all”. So the following command will copy everything with the extension tar.gz (i.e. all the logs you prepared in Step 2). 

scp root@192.168.1.1:/root/\*.gz .

4. Close both terminal windows to close the sessions.

If other logs are needed, our support agent will guide you and provide the necessary commands.

Source :
https://help.ui.com/hc/en-us/articles/360049956374-UniFi-Getting-Support-Files-and-Logs

UniFi Network – Updating Third-Party, non-Console UniFi Network Applications (Linux – Advanced)

This article provides the steps to update the UniFi Network application to the current stable release on a Debian or Ubuntu system via APT (Advanced Package Tool). If you run into issues following the process described in this article, please take a look at the scripts provided in this Community post that includes UniFi Network software installation on Ubuntu 18.04 and 16.04 and Debian 8/9.

Requirements

In order to update the UniFi Network application via APT, it is necessary to create source files or edit lines in an existing sources.list file with Linux text editors: vi or nano. The repo structure should be permanent, but if there are any changes they will be pointed out in the UniFi Network software version release posts, found in the Release section of the Community.

Before upgrading the UniFi Network application, make sure that you have backed up the UniFi Network Database. You will need to make sure that the user has sudo permissions. For more information about adding a user to sudo list, see this Debian article.

UniFi Network APT Steps

1. Install required packages before you begin with the following command:

sudo apt-get update && sudo apt-get install ca-certificates apt-transport-https

Click to copy

2. Use the following command to add a new source list:

echo 'deb https://www.ui.com/downloads/unifi/debian stable ubiquiti' | sudo tee /etc/apt/sources.list.d/100-ubnt-unifi.list

Click to copy

3. Add the GPG Keys. To add the GPG Keys use one of the two methods described below (Method A is recommended). When using the commands below, it is assumed you have sudo and wget installed, more information about sudo can be found here, and wget here.

User Tip: For Ubuntu 18.04, run the following commands before installing UniFi in step 4.

wget -qO - https://www.mongodb.org/static/pgp/server-3.4.asc | sudo apt-key add -
echo "deb https://repo.mongodb.org/apt/ubuntu xenial/mongodb-org/3.4 multiverse" | sudo tee /etc/apt/sources.list.d/mongodb-org-3.4.list
sudo apt-get update

Click to copy

See an example of what scripts the Community is using to install the UniFi Network application on Ubuntu 16.04 and 18.04 in this Community post.

(Method A) Install the following trusted key into /etc/apt/trusted.gpg.d

sudo wget -O /etc/apt/trusted.gpg.d/unifi-repo.gpg https://dl.ui.com/unifi/unifi-repo.gpg 

Click to copy

(Method B) Using apt-key.

sudo apt-key adv --keyserver keyserver.ubuntu.com --recv 06E85760C0A52C50 

Click to copy

4. Install and upgrade the UniFi Network application.

Note: On some Distributions, it’s possible an incompatible Java release can be installed during this step. We recommend running the following command before proceeding with this step, to restrict Ubuntu from automatically installing Java 11. If you wish to undo this later, replace “hold” with “unhold”.

sudo apt-mark hold openjdk-11-*

Install and upgrade the UniFi Network application with the following command:

sudo apt-get update && sudo apt-get install unifi -y

Click to copy

5.  This step may not be required, depending on the Linux distro you have. If your distro does not come with MongoDB, and it’s not available in their repo, then please see the MongoDB installation guide. You can find the latest installation guide for Ubuntu here, and Debian here. We recommend at least MongoDB 2.6.10. Some users have changed the backend to use MongoDB 3 successfully too.

6. The UniFi Network application should now be accessible at the computer’s configured local or public IP address, by typing that IP address in a browser’s navigation bar (Chrome is recommended). If it is not launching, use the following command: sudo service unifi start.

Other helpful commands are:

  • To stop the UniFi service: sudo service unifi stop
  • To restart the UniFi service: sudo service unifi restart
  • To see the status of UniFi service: sudo service unifi status

warning_25x25.png  We strongly recommend staying with the stable release, but for those users who wish to do otherwise, click here to expand and see possible suite names, as well as code names in the table within.

Log Files Location

Log files will be essential for any troubleshooting you might perform. Find them here:

  • /usr/lib/unifi/logs/server.log
  • /usr/lib/unifi/logs/mongod.log

If your application is running on a Unix/Linux based system, then you will require superuser (sudo) privileges to access these log files.

User Notes & Tips

These notes have been added thanks to user collaboration. Click to expand.

Source :
https://help.ui.com/hc/en-us/articles/220066768-UniFi-Network-Updating-Third-Party-non-Console-UniFi-Network-Applications-Linux-Advanced-

UniFi Network – Updating Third-Party, non-Console UniFi Network Applications

We recommend hosting your Network Application on a UniFi OS Console for the most seamless updating experience. In addition to providing the ability to toggle automatic Network Application updates, you can also initiate manual updates through the GUI.

Updating the Network Application

Updating your Network Application is very similar to the initial setup. You can download the latest version here

You will be required to close any running instances of the Network Application prior to the installation. Do not worry, your network will still continue to function as normal (devices will remain connected with internet access, and traffic will continue to be routed). 

After executing the file, the setup wizard will guide you through the process of updating your application. We always recommend downloading a backup file, found in your System Settings.

Note: macOS users may be required to move the downloaded file into the Applications folder, or right-click > open the file in order to begin the installation.

(Advanced) Updating via CLI on Linux-hosted Applications

It is also possible to use APT for managing updates on Debian and Ubuntu based installations. You may refer to this article for more details. This should only be attempted by users with appropriate knowledge of Linux.

Source :
https://help.ui.com/hc/en-us/articles/6330410381335-UniFi-Network-Updating-Third-Party-non-Console-UniFi-Network-Applications

UniFi Network – Self-Hosting your UniFi Network Without a Console (Advanced)

We strongly recommend that users opt for a UniFi OS Console instead of self-hosting the Network Application on third-party operating systems. 

Self-hosting the UniFi Network application on a home computer or 3rd party virtual machine (VM) requires extensive knowledge of computer engineering, networking, and security. Invalid host specifications or configurations may lead to system crashes, poor performance, and compromised network security.

A UniFi OS Console, on the other hand, takes all the guessing out of the picture as it is already optimized for running all of our UniFi Applications. It is also a significantly more secure solution for remote access, as this is hosted on your physical premises, as opposed to a third-party virtual machine in the cloud.

Note: Although a UI SSO account is required for remote access, it is possible to setup and use UniFi OS Consoles as local-only devices without the need for an SSO account.

For advanced users hoping for a scalable cloud-hosting approach, we also offer our own UniFi OS Cloud Console.

Configuration of third-party hosts is outside of Ubiquiti’s official support scope. If you still wish to self-host the UniFi Network Application, please be aware of the risks and proceed with caution.

Download and install the UniFi Network Application

The UniFi Network Application may be downloaded for Microsoft Windows, macOS, and Linux from this page. The Network application is provided as a simple installer for Microsoft Windows and macOS hosts.

For Linux, a .deb file is provided. This can be installed using the dpkg command on Debian or Ubuntu.

After installing the UniFi Network Application, you may launch it and follow the instructions to complete setup. You can access the configuration page by typing https://<IP_of_Network_Application_host>:8443 into the navigation bar of a browser while the application is running.

Frequently Asked Questions

What are the UniFi Network application system requirements?
At a bare-minimum, we recommend the following system requirements (make sure to read the Release Notes for more details about a particular version):

  • Operating system:
    • Linux: Ubuntu Desktop / Server 16.04; Debian 9 “Stretch”
    • Windows: Windows 10; Windows Server 2016
    • macOS: Mavericks 10.9, 10.10 Yosemite, 10.11 El Capitan, 10.12 Sierra, 10.13 High Sierra, 10.14 Mojave, 10.15 Catalina.
  • CPU: x86-64 Processor (Intel / AMD x64 Processors)
  • RAM: 2GB
  • Network: 100Mbps Wired Ethernet
  • HDD: Minimum 10GB free (20GB or more preferred)
  • Java: Java Runtime Environment (JRE) 8
  • Web Browser: Google Chrome
  • MongoDB: version 3.2 or later. Mongo is offered bundled: default is 2.4.14 (for macOS and Windows only).

Note: You will need to continually increase your system specs as you begin to adopt and manage more devices.

Does the UniFi Network application have to run at all times?
Although this is not required, we strongly recommend running the UniFi Network Application at all times. This enables you to configure your system at all times. It is also a requirement for proper statistics and reporting. 

I’m getting a Java-related error during setup, what do I do?
The UniFi Network application requires Java, so you’ll need to install Java 8 for your specific platform before re-running the installer.

The install is not finishing successfully, what could it be?
Make sure that all system requirements above are met and that all ports used by UniFi are opened. 

I’m getting a “Your connection is not private” security warning when accessing the UniFi Network Application in my browser, should I be concerned?
No, there is nothing to worry about. Simply proceed to the next page by clicking Advanced > Proceed.

Source :
https://help.ui.com/hc/en-us/articles/360012282453-UniFi-Network-Self-Hosting-your-UniFi-Network-Without-a-Console-Advanced-

UniFi Network – Understanding and Implementing Minimum RSSI

This article explains what Minimum RSSI is and how to configure it in the UniFi Network application. We only recommend using this if you are familiar with basic RF theory as misconfiguration may result in performance degradation of your network.

How Minimum RSSI works

Received Signal Strength Indication (RSSI) is a value indicating the perceived signal level of a wireless client from the AP’s perspective. The Minimum RSSI value is set individually on each AP and indicates the minimum signal level required for a client to remain connected. 

The main purpose of this is to assist with a client’s roaming between two nearby APs. It prevents a device getting “stuck” connected to the initial AP at a weaker signal strength as opposed to roaming to a new AP that may be more optimal. Once the signal drops below the Minimum RSSI value set, the initial AP will kick the client so that it can reconnect to the new AP.

Once an AP kicks a client (by sending a de-authentication packet), it is up to the client to find a better AP to connect to. It may connect back to the same AP, especially if it is the only one within range. Since the signal strength still does not meet the Minimum RSSI, it will again be booted. Improper tuning can thus result in network instability. For this reason, it is important to realize that there is no one size fits all and you should carefully test your configuration to avoid introducing connectivity problems.

How to determine and configure Minimum RSSI

Minimum RSSI is can be enabled within the UniFi Network Application by selecting an AP in UniFi Devices and then navigating to Settings in the side-panel of the selected device. Once enabled, this can be manually set for your 2G and 5G radios independently. 

You can view the Signal Strength for your current wireless clients by clicking on a device in the Client Devices tab. The signal is measured in units of dbm (decibels per milliwatt). You will notice that this is a negative number because the power is less than 1 mW:

  • dbm = 10 log P1/1mW
  • 0 dBm = 1 mW
  • -10 dBm = 0.1 mW
  • -20 dBm = 0.01 mW, and so forth

A value close to 0 indicates high signal quality, whereas a larger negative value indicates poor signal quality. Remember, you need to granularly select the appropriate value for each AP and avoid using a single value everywhere. 

Other Considerations

There are many factors that can affect the a client’s RSSI at the AP side including distance, building materials, objects, interference, etc. As much as we would love to give a recommendation, it really isn’t this simple. It’s safe to say -80dBm would be a starting point for standard home or office configurations, but there are too many environmental variables so you should have caution at all times.

The best method to determine appropriate Minimum RSSI values is to perform a site survey. This can be done by testing the signal strength of various wireless clients at different distances. Each device will have different antenna configurations and will thus perform differently in the same geographic location. You want to connect to an SSID, make it specific to that AP (an override on that SSID), and then roam to what you would consider the outer edge of the desired coverage area. Mark the client’s RSSI, and then take a couple more points. The more data you gather, the better idea you’ll get for the minimum RSSI value to use.

Source :
https://help.ui.com/hc/en-us/articles/221321728-UniFi-Network-Understanding-and-Implementing-Minimum-RSSI

UniFi – HDD Requirements and Compatibility

HDDs are not required for normal operation, however they expand the functionality by enabling things such as video recording from UniFi Protect, and call recordings and voicemails from UniFi Talk.

We strongly recommend using the UniFi 8TB HDD for UniFi OS Consoles with a 3.5” HDD bay (UDM Pro, UDM SE, UNVR, and UNVR-Pro). These are specialized, industrial-grade drives that can support continuous read and write operations required by a video surveillance system.

Cloud Keys (UCK-G2-PLUS) require a 2.5” HDD for which we strongly recommend continuing to use the drive shipped natively with your equipment. If it will be replaced, the Toshiba 2.5″ 5400RPM 1TB HDD (MQ01ABD100V) appears most stable according to internal testing.

Incorrect drives will result in premature failure which can degrade your entire network’s performance, as well as prevent remote management.

Third-party Drives

If you insist on using a third-party drive, it should meet the following criteria:

  • It fits inside the HDD tray
    • 3.5” for Dream Machines and Network Video Recorders
    • 2.5” for the UCK Gen2 Plus
  • It is a surveillance-grade drive designed for continuous load
    • These are generally 7200RPM, CMR Drives. SMR drives are not recommended and may lead to performance issues, loss of video footage, or even system crashes.
  • It offers at least 1 TB of storage.  No maximum HDD capacity has been established.

If you’re using multiple HDDs with your UniFi OS Console, they must all be the same size.  

The total usable storage capacity will be affected based on whether either the redundancy level is set to One Disk (RAID1 / RAID5) or Half of Disks (RAID10). 

Incompatible HDDs

Some hard drives require an additional 12V external power supply. These hard drives are not supported by the UCK Gen2 Plus or the UNVR.

The following is a list of 3.5” drives that are confirmed to be incompatible with our UniFi OS Consoles:

VendorSeriesModelCapacityNotes
SeagateSkyHawkST10000VX000410TBDoes not fit the drive tray.
SeagateUltrathinST500LT032500GBDoes not have bottom screws.
Western DigitalUltraSlimWD5000MPCK500GBDoes not have bottom screws and connectors do not fit the tray.
AnyAnySMR DrivesAnyDrives fit the tray but cause issues.

If you have questions about a particular hard drive or need help choosing a hard drive, please reach out to the Ubiquiti Community for insights and recommendations.

Source :
https://help.ui.com/hc/en-us/articles/360037340954-UniFi-HDD-Requirements-and-Compatibility

Integrating CrowdSec with Firewall appliances

In this article, we’ll show you how to integrate CrowdSec at the appliance level of a modern IT infrastructure thanks to Blocklist Mirror component.

The majority of modern IT infrastructures already includes some form of the security appliance. Our users requested some way to integrate CrowdSec at the appliance level, within their pre-existing ecosystem. In this article, we’ll show you how to make it happen, using the new crowdsec-blocklist-mirror component.  

Overview

Leveraging the firewall’s ability to pull IP blocklists from external HTTP URLs, we’ll deploy a crowdsec-blocklist-mirror in the network and configure the appliance to pull IP lists from it.

For this example we are going to use FortiGate, but the steps are similar for other vendors.

Deploying Blocklist Mirror

For this, you’ll need a machine that is accessible from the appliance. You can deploy the blocklist mirror in multiple ways, either by installing from a Linux package manager or deploying with docker. This machine should also be able to access the CrowdSec Local API. The Local API can either be installed on the same machine or can be deployed elsewhere.

For this tutorial we’ll assume that CrowdSec Local API is already installed and listening at port 8080. The OS being used here is ubuntu.

Install Blocklist Mirror

Make sure you have set up the CrowdSec repository. See this to learn how. Then run: 

sudo apt install crowdsec-blocklist-mirror

Or if you’re using a RPM-based Linux distribution, run 

‍sudo yum install crowdsec-blocklist-mirror

Configure Blocklist Mirror

After this, we will check and eventually modify the config file located at /etc/crowdsec/bouncers/crowdsec-blocklist-mirror.yaml

Make sure that the lapi_url parameter is correct. If your Local API is deployed on some other machine, please change the lapi_url to the appropriate address and set the lapi_key to a key generated by running the command sudo cscli bouncers add blocklistMirror on the LAPI machine.

By default the blocklist mirror server listens at 127.0.0.1:41412, let’s change this to 0.0.0.0:80 to make this simpler. We can do this by setting listen_uri parameter to 0.0.0.0:80

To load a new configuration use this command:

sudo systemctl restart crowdsec-blocklist-mirror

You can now see the blocklist being served at http://127.0.0.1/security/blocklist.

You can do things like setting authentication, multiple endpoints, TLS etc by tweaking the configuration. Learn more here.

Configure firewall appliance to pull blocklist

This tutorial assumes you are using a FortiGate firewall. Please note that for other vendors steps may vary.

Configuring external blocklist

Open the FortiGate dashboard and navigate to Security Fabric -> External Connectors  and click on Create New button.

Scroll down and select Threat Feed -> IP Address and create a connector

Make sure that the appliance can access the URL. This URL should be the one where the blocklist we deployed earlier is serving the IP-list. Finally, click OK.

After a while you can see that this threat feed will be filled. These are from blocklist mirror. 

Create a firewall policy referencing the blocklist

You can now create a firewall policy/policy which will deny access to your infrastructure if the incoming IP is present in blocklist. To do this you can navigate to Policy & Objects and click on the Create New button. 

Specify the fields as required, and you need to reference the blocklist by selecting it in the Source dropdown

All you have to do next is save the policy and enable it by clicking OK.

Great job!

To sum up

In this way we leveraged CrowdSec in a firewall appliance by using blocklist mirror bouncer. You can further configure the blocklist mirror with authentication, TLS and other security goodies. If you have a question or a suggestion feel free to reach out to us on Discord.

Source :
https://www.crowdsec.net/blog/integrating-crowdsec-with-firewall-appliances