Top 27 WordPress Security Vulnerabilities You Need To Know

Just the idea of WordPress Security Vulnerabilities can be daunting, and even a little scary, for some people.

We want to put an end to that.

In this article we’ll dispel some of the confusion and aim to reduce the anxiety that surrounds this topic. We’ll outline the big ticket items and provide clear, actionable advice on steps you can take to protect your WordPress sites.

Before we can talk about WordPress Security Vulnerabilities, let’s get clear on what exactly we mean.

What Is A WordPress Vulnerability?

When we think of vulnerabilities, the first thing to come to mind is usually publicly known software vulnerabilities. They often allow for some form of directed, specific attack against susceptible code.

This certainly is one type of vulnerability, as you’ll see below. But for the purposes of this article, we’re considering anything that makes your website susceptible to attack – anything that puts you at a disadvantage.

You can’t hope to fight hackers if you’re not aware of the weaknesses that your enemy will exploit.

This article will arm you with practical know-how to strengthen your weaker areas and give you the power and confidence to fight back.

Without further ado, let’s get into it.

#1 Outdated WordPress Core, Plugins, Themes

The single leading cause of WordPress site hacking is outdated WordPress software. This includes Plugins, Themes, and the WordPress Core itself.

The simple act of keeping all your plugins and themes up-to-date will keep you protected against the vast majority of vulnerabilities, either publicly known or “unknown”.

A known vulnerability is one that has been discovered, typically by a dedicated researcher, and published publicly – see #6 below.  But code vulnerabilities that aren’t publicly known are also important to be aware of.

Any good software developer is constantly improving their skills and their code. Over time, you can expect their code to improve, so keeping software updated ensures that you’re running only the best code on your sites.

How to protect against outdated WordPress software

We recommend making “WordPress Updates” a regular part of your weekly maintenance schedule. Block out some time every single week to get this critical work done.

The WordPress team regularly releases bug-fixing patches for the Core, and since WordPress 3.7+, these are installed automatically. It’s possible to disable that feature, but we strongly recommend that you never do.

# 2 Insecure WordPress Web Hosting

Your WordPress site is only as secure as the infrastructure that hosts it.

This is perhaps the most overlooked area of website security, and is, in our opinion, so critical that we place it in the top-3 in this list. #3 is closely related to this item, so make sure you check that out too.

If your web host doesn’t make server security a priority, then your server will get gradually more vulnerable over time. We see this all the time when customers write to our support team asking for help, only to discover that their web server is running on really, really old libraries.

This happens when the web host isn’t proactive in maintaining the server software that powers the websites of their customers.

Proactive maintenance by the web host has a cost, however. And if you’re paying bargain basement prices, then you can expect a corresponding level of service. That’s not to say that cheap web hosting is inherently insecure, and expensive web hosting isn’t. Not at all, but there is definitely a correlation between quality of web hosting and the price you pay.

How to protect against insecure WordPress web hosting

Cost of web hosting is only 1 indicator of quality. If your WordPress website is important to you or your business, then asking questions from the host about server security and ongoing maintenance should be part of your due diligence process.

You can take on recommendations from colleagues and friends, but never substitute their opinions with your own due diligence. Be prepared to invest in your hosting, as this will not only impact your security, but also your hosting reliability, uptime, and performance.

If you haven’t already done so, talk to your host today and ask them how they maintain the server that host your sites. Not in general terms, but ask them what their actual maintenance and update schedule is.

If you’re not happy with your answers and support, find a new host that will give you answers that you like. Never be afraid to switch service providers.

# 3 WordPress Web Hosting Site Contamination

This is related to the discussion above on web hosting quality. Generally speaking, the cheaper the web hosting, the more corners that will be cut in the service quality. This includes shared web server hosting configuration.

Here’s an over-simplified range of approaches in hosting websites:

  1. Host all sites within the same vhost*
  2. Host each site in separate vhosts, on the same, shared server
  3. Host each site on a separate VPS (Virtual Private Servers) on the same server
  4. Host each site on a separate dedicated server

*vhost is short for “virtual host”, that acts as a semi-independent container for hosting a website

As you move down the list, the cost increases, but the risk of contamination between websites increases. The 1st on the list is by-far the most dangerous, but is unfortunately the most common. This is where you might see something like:

  • /public_html/mywebsite1_com/
  • /public_html/mywebsite2_com/
  • /public_html/mywebsite3_com/
  • /public_html/mywebsite4_com/
  • /public_html/mywebsite5_com/

… when you look at the file system of the hosting account.

This is terrible for cross-site contamination as there is absolutely no isolation between individual websites. If any 1 of these sites becomes infected with malware, then you must assume the entire collection of sites is infected.

That’s a lot of cleanup work.

How to protect against web hosting site contamination

You’ll want to ensure that all your websites are, at the very least, hosted within their own vhost.

You could separate sites even further with separate VPSs, but you’ll pay more for it.

You’ll need to choose the type of hosting that best suits your expertise and budget.

If you can avoid it, please steer clear of hosting multiple sites within the same vhost, and if you are doing this already, look to gradually migrate these sites to their own independent vhosts as soon as possible.

For an idea, have a look at how we go about hosting many of our smaller WordPress sites.

# 4 Non-HTTPS Protection

Internet traffic sent via plain HTTP doesn’t encrypt the data transmitted between the website and the user’s browser, making it vulnerable to interception and tampering.

To avoid this, a technology known as Secure HTTP (HTTPS) is used.

Secure HTTPS is provided through the use of SSL/TLS certificates. It’s impossible to verify the identity of a website without certificates, and sensitive information such as login credentials, payment details, and personal information can be intercepted easily.

How to solve Non-HTTPS traffic

All WordPress websites should be using HTTPS by default. SSL Certificates are available for free with the LetsEncrypt service, and many web hosts provide this as-standard.

If your webhost doesn’t supply free LetsEncrypt Certificates, look to move hosts ASAP.

# 5 Insecure File Management (FTP) Vulnerability

Secure File Management is similar to the previous item on secure web/internet communications. If you’re transferring files to and from your web server using a tool like FTP, then this will typically require logging in with a username and password. If you’re not using a secure version of FTP, then you’re transmitting your username and password in plain text which can potentially be intercepted and used to compromise your server.

How to solve Insecure File Management

Practically all web hosts offer secure FTP (either FTPS or SFTP) as standard, but you should check with your hosting provider on whether that’s what you’re using and if not, how to switch.

Always use secure methods of file management. It’s just as easy to use than the insecure methods.

# 6 Known Plugin and Theme Vulnerabilities

Known vulnerabilities is what typically comes to mind when we discuss the topic of WordPress Vulnerabilities. When you’re told to upgrade because there’s a vulnerability, it basically means: a vulnerability has been discovered in the code of a plugin/theme that allows a hacker to perform a malicious attack.

By upgrading the plugin/theme, the vulnerable code has been fixed to prevent said attack.

Each vulnerability is different. Some are severe, some are trivial. Some are hard to exploit, others are easy to exploit.

The worst type of vulnerability are those that are severe, but easy to exploit.

Unfortunately, there is very little nuance in the way vulnerabilities are discussed publicly and so they’re all communicated as being catastrophic. This is not the case.

Of course, some vulnerabilities really are brutal, but many are not.

The point I’m trying to make is that you don’t need to stress about them. All you need to do is stay on top of vulnerability alerts and if your site is using a plugin or theme with a known vulnerability, then you need to update it as soon as possible.

The pseudo-standard practice for vulnerabilities reporting is this:

  1. Existence of vulnerability is reported to the developer
  2. Developer fixes the vulnerability and releases an update
  3. Users update their plugins/themes
  4. Some time passes, say 30 days
  5. Vulnerability details are released to the general public after enough time has passed to allow most people to upgrade the affected plugin/theme.

This brings us back to the first item on our list of vulnerabilities. If you’re performing regular maintenance on your WordPress sites, the likelihood that you’ll be susceptible to a vulnerability is slim-to-none, as you’ll have updated the affected plugin/theme, and you’re already protected.

The problem arises when you don’t regularly update your assets and you’re left with a known vulnerability on your site.

How to solve Known Vulnerabilities

Keeping on top of your WordPress updates is the best way to stay ahead of this type of vulnerability.

Alongside this, you could also use a WordPress security plugin, such as ShieldPRO, that will alert you when there’s a known vulnerability present on your website, and even automatically upgrade plugins when this is the case.

# 7 Untracked File Modifications

At the time of writing this article, WordPress 6.2 ships with over 3,800 PHP and Javascript source files. And that’s just the WordPress core. You’ll have many, many more files in your plugins and themes directories.

An Indicator of Compromise (IoC) that a WordPress site has been hacked is when a file is modified on your WordPress installation, or even added to the site, that shouldn’t be. If this ever happens, you want to know about it as quickly as possible.

The only way to do this reliably is to regularly scan all your files – at least once per day. This involves taking each file in-turn and checking whether its contents have changed from the original file, or whether it’s a file that doesn’t belong.

How to protect against untracked file modifications

Nearly all WordPress security plugins offer this scanning feature, at least for WordPress core files.

But you’ll want to also scan your plugins and themes, too. Not all WordPress security plugins offer this, so you’ll need to check whether this is supported. ShieldPRO supports scanning for all plugins and themes found on WordPress.org.

An additional complication exists for premium plugins and themes, however. Since premium plugins are only available for download from the developers’ sites, the source files for these plugins are not available for us to check against. The developers at ShieldPRO, however, have built a crowdsource-powered scanning system for premium plugins and themes so you can check these also. At the time of writing, this feature isn’t available anywhere else.

# 8 wp-config.php File Changes

If you download the source files for WordPress, you’ll discover there is no wp-config.php file. This file is often created by customising the wp-config-sample.php file with the necessary information. Since there is no universal content for the wp-config.php file, there is no way to scan this file for changes (as outlined in the previous item on this list).

In our experience, the wp-config.php file and the root index.php files are the files that are most often targeted when malware is inserted into a WordPress site, but it’s impossible to scan them using existing techniques.

You will need to constantly keep an eye on these files and be alert for changes.

How to protect against changes to wp-config.php files

One approach is to adjust the file system permissions on the file itself. This can be quite complicated so you may need technical assistance to achieve this. If you can restrict the permissions of the file so that it may only be edited by specific users, but readable by the web server, then you’ll have gone a long way in protecting it.

However, this poses another problem. Many WordPress plugins will try to make adjustments to these files automatically, so restricting access may cause you other problems.

The developers at ShieldPRO have custom-built the FileLocker system to address this issue.

It takes a snapshot of the contents of the files and alerts you as soon as they change. You’ll then have the ability to review the precise changes and then ‘accept’ or ‘reject’ them.

# 9 Malicious or Inexperienced WordPress Admins

With great power comes great responsibility.

A WordPress admin can do anything to a website. They can install plugins, remove plugins, adjust settings, add other users, add other admins. Anything at all.

But this is far from ideal when the administrator is inexperienced and likely to break things. It’s even worse if an adminaccount is compromised and someone gains unauthorized access to a site.

For this reason we always recommend adopting the Principle of Least Privilege (PoLP). This is where every user has their access privileges restricted as far as possible, but still allow them to complete their tasks.

This is why WordPress comes with built-in user roles such as Author and Editor, so that you can assign different permissions to users without giving them access to everything.

How to protect malicious or inexperienced administrators

As we’ve discussed, you should adopt PoLP and restrict privileges as far as possible.

Another approach that we’ve taken with Shield Security is to restrict a number of administrator privileges from the administrators themselves. We call this feature “Security Admin” and it allows us to lockout admin features from the everyday admin, such as:

  • Plugins management (install, activate, deactivate)
  • WordPress options control (site name, site URL, default user role, site admin email)
  • User admin control (creating, promoting, removing other admin users)
  • and more…

With the Security Admin feature we’re confident that should anyone gain admin access to the site, or already have it, they are prevented from performing many tasks that could compromise the site.

# 10 Existing Malware Infections

Think of malware as an umbrella term for any code that is malicious. Their purpose is wide-ranging, including:

  • stealing user data,
  • injecting spam content e.g. SEO Spam,
  • redirecting traffic to nefarious websites,
  • backdoors that allow unfettered access to the site and its data
  • or even taking over control of the website entirely

How to protect against WordPress Malware infections

Use a powerful malware scanner regularly on your WordPress sites to detect any unintended file changes and possible malware code. Examine all file changes and suspicious code as early as possible, and remove it.

# 11 WordPress Brute Force Login Attacks

WordPress brute force attacks attempt to gain unauthorized access to a website by trying to login using different username and password combinations.

These attacks are normally automated and there’s no way to stop them manually.

How to protect against brute force login attacks

You’ll need to use a WordPress security plugin, such as ShieldPRO, to detect these repeated login requests, and block the IP addresses of attackers automatically.

A powerful option is to use a service like CloudFlare to add rate limiting protection to your WordPress login page.

We also recommend using strong, unique (not shared with other services) passwords. You can use ShieldPRO to enforce minimum password strength requirements.

# 12 WordPress SQL Injection

WordPress SQL injection refers to attempts by an attacker to use carefully crafted database (MySQL) statements to read or update data residing in the WordPress database.

This is normally achieved through sending malicious data through forms on your site, such as search bars, user login forms, and contact forms.

If the SQL injection is successful, the attacker could potentially gain unauthorized access to the website’s database. They are free to steal sensitive information such as user data or login credentials, or if the injection is severe enough, make changes to the database to open up further site access.

How to protect against SQL injection attacks

The best protection against SQL injection attacks is defensive, well-written software. If the developer is doing all the right things, such as using prepared statements, validating and sanitizing user input, then malicious SQL statements are prevented from being executed.

This brings us back to item #1 on our list: keep all WordPress assets updated.

As further protection, you’ll want to use a firewall that detects SQL injection attacks and blocks the requests. ShieldPRO offers this as-standard.

# 13 Search Engine Optimization (SEO) Spam Attack

WordPress Search Engine Optimization (SEO) spam refers to manipulation of search engine results and rankings of a WordPress website.

SEO spam can take many forms, such as keyword stuffing, hidden text and links, cloaking, and content scraping.

This type of attack normally involves modification of files residing on the WordPress site, that will then cause the SPAM content to be output when the site is crawled by Google.

How to protect against SEO SPAM attacks

Ensuring your site is registered with Google Webmaster Tools and staying on top of any alerts is a first step in monitoring changes in your website’s search engine visibility.

As mentioned earlier, these sorts of attacks normally rely on modifying files on your WordPress site, so regular file scanning and review of scan results will help you detect file changes early and revert anything that appears malicious.

# 14 Cross-Site Scripting (XSS) Attack

WordPress Cross-Site Scripting (XSS) is where an attacker injects malicious scripts into a WordPress website’s web pages that is then automatically executed by other users. The attacker can use various methods to inject the malicious scripts, such as through user input fields, comments, or URLs.

This attack vector can potentially steal user data or have the user unintentionally perform other malicious actions on the website.

How to protect against XSS attacks

The prime responsibility for prevention of this attack lies with the software developer. They must properly sanitize and validate all user input to ensure they are as expected.

Security plugins may also be able to intercept the XSS payloads, but this is less common. The only thing that you, as the WordPress admin, can do is ensure that all WordPress assets (plugins & themes) are kept up-to-date, and that you’re using vetted plugins from reputable developers. (See the section on Nulled Plugins below)

# 15 Denial of Service Attacks (DoS)

WordPress Denial of Service (DoS) attacks attempt to overwhelm a WordPress server with a huge volume of traffic.

By exhausting the server resources, it renders the website inaccessible to legitimate users. This would be disastrous for, say, an e-commerce store.

How to protect against DoS attacks

DoS attacks can be simple to implement for an attacker, but they’re also relatively straightforward to prevent. Using traffic limiting, you can reduce the ability of an attacker to access your site and consume your resources.

Choosing web hosting that is sized correctly with enough resources to absorb some attacks, and even using a provider that implements DoS as part of their service offering will also help mitigate these attacks.

It should be noted that if the DoS attack is large enough, no WordPress plugin will be able to mitigate it. You’ll need the resources of a WAF service, such as CloudFlare, to ensure your web server is protected.

# 16 Distributed Denial of Service Attacks (DDoS)

A Distributed Denial of Service attack is the same as a Denial of Service (#15) attack, except that there are multiple origins for the requests that flood your server.

These attacks are more sophisticated, and more costly, for the attacker, so they’re definitely rarer. But they have exactly the same effect on your site as a normal DoS attack.

How to protect against DDoS attacks

Most web hosts are just not sophisticated enough to withstand a sustained DDoS attack and you’ll need the services of a dedicated WAF, such as CloudFlare.

# 17 Weak Passwords

WordPress Weak Passwords vulnerability is the use of weak passwords by WordPress users. Weak passwords can be easily cracked by attackers, allowing them to gain unauthorized access to the WordPress website and take any type of malicious action.

Related to Brute Force attacks, automated tools can be used to systematically guess or crack weak passwords with ease.

How to protect against Weak Password

To prevent WordPress Weak Passwords Vulnerability, website owners should ensure that all users, including administrators, use strong passwords. Strong passwords are complex and difficult to guess, typically consisting of a combination of uppercase and lowercase letters, numbers, and special characters. Passwords should also be unique and not used across multiple, separate services.

WordPress doesn’t currently enforce strong passwords, so a WordPress security plugin, such as ShieldPRO, will be needed to enforce this.

# 18 Pwned Passwords

Pwned passwords vulnerability is where a WordPress user re-uses a password they’ve used elsewhere, but that has been involved in a data breach.

If a password is publicly known to have been used for a given user, and the same user re-uses it on another service, then it opens up a strong possibility that the user account could be compromised.

How to protect against Pwned Passwords

The Pwned Passwords service provides a public API that can be used to check passwords. You’ll want to enforce some sort of password policy that restricts the user of Pwned Passwords on your WordPress sites. Shield Security offers this feature as-standard.

# 19 Account Takeover Vulnerability

The previous items on this list discussed the importance of good password hygiene. But until we can go through all our accounts and ensure there is no password reuse, no pwned passwords, and all our passwords are strong, we can prevent any sort of account theft by ensuring that the person logging-in to a user account is, in-fact that person.

This is where 2-factor authentication (2FA) comes into play.

It is designed to help verify and ensure that the person logging in, is who they say they are and is a critical part of all good WordPress website security.

2-Factor authentication involves verifying another piece of information (a factor) that only that user has access to, alongside their normal password. This could be in the form of an SMS text or an email containing a 1-time passcode. It could also use something like Google Authenticator to generate codes every 30 seconds.

How to protect against account takeover vulnerability

WordPress doesn’t offer 2FA option to the user login process, by default. You will need a WordPress security plugin that offers this functionality. Shield Security has offered 2FA by email, Google Authenticator and Yubikey for many years now.

# 20 Nulled Plugins and Themes Vulnerabilities

“Nulled” plugins and themes are pirated versions of premium WordPress plugins and themes that are distributed without the permission of the original authors.

They pose significant security risks as they often contain malicious code or backdoors that can be used by hackers to gain unauthorized access to the website.

They may also include hidden links or spammy advertisements that can harm the website’s reputation or adversely affect its search engine rankings. (see SEO SPAM)

How to prevent vulnerabilities through nulled plugins and themes

The simple solution to this is to purchase premium plugins and themes from the original software vendor. A lot of work goes into the development of premium plugins and themes and supporting the developer’s work goes a long way to ensuring the project remains viable for the lifetime of your own projects.

# 21 Inactive WordPress Users Vulnerability

Inactive WordPress users vulnerability refers to the security risk posed by user accounts that haven’t been active for an extended period of time. Inactive accounts can become a target for hackers, as they may be easier to compromise than active accounts. Older accounts are more likely to have Pwned Passwords, for example.

If a hacker can gain access to an inactive user account, particularly an admin account, it’s an open door to your website data. Users automatically bypass certain checks and they can easily post spam or exploit vulnerable code on the website.

How to prevent vulnerabilities from inactive WordPress users

To prevent any vulnerability posed by inactive WordPress users, it’s important to follow these best practices:

  • Regularly monitor your website’s user accounts and delete any that are inactive.
  • Implement strong password policies for all user accounts (see above).
  • Use a security plugin that can detect and alert you to any suspicious user activity.
  • Use a security plugin that can automatically disable access to inactive user accounts.

# 22 Default Admin User Account Vulnerability

The WordPress default admin user account vulnerability refers to the security risk posed by the default “admin” username that is automatically created in the installation of any WordPress site.

This default account name is widely-known and a common target by hackers, since knowing a valid admin username is half the information needed to gain admin access.

If the admin isn’t using strong passwords or 2-factor authentication, then the site is particularly vulnerable.

How to protect against the admin user account vulnerability

It should be understood that changing the primary admin username of a WordPress site is “security through obscurity”, and that using strong passwords is required regardless of the username.

To eliminate this risk, you’ll want to rename the admin username on a site. The simplest method to do this is to create a new administrator account and then delete the old account. Please ensure that you transfer all posts/pages to the new admin account during this process. Always test this on a staging site to ensure there are no unforeseen problems.

# 23 WordPress Admin PHP File Editing Vulnerability

WordPress comes with the ability to edit plugin and theme files directly on a site, from within the WordPress admin area. The editors are usually linked to within the Plugins and Appearance admin menus, but have recently been moved to the Tools menu, in some cases.

Having this access is far from ideal as it allows any administrator to quietly modify files. This also applies to anyone that gains unauthorised access to an admin account.

There is usually no good reason to have access to these editors

How To Restrict Access To The WordPress PHP File Editors

The easiest way to prevent this is to disallow file editing within WordPress.

The Shield Security plugin has an option to turn off file editing.This can be found under the WP Lockdown module and is easy to turn on and off.

# 24 WordPress Default Prefix for Database Tables 

WordPress’ default prefix for database tables represent a potential security risk. Similar to the previous item in the list, this is about reducing your surface area of attack by obscuring certain elements of your site.

If there are attempted attacks through SQL injection, then sometimes knowing the database table prefix can be helpful. If the attacker doesn’t know it, it may slow the attack or prevent it entirely.

The point is, obscuring the names of your database tables from would-be hackers won’t do any harm whatsoever, but may give you an edge over unsophisticated hacking attempts.

Hackers can exploit this vulnerability by using SQL injection attacks to gain unauthorized access to the website’s database. This can result in the theft of sensitive information or the compromise of the website’s security.

How To Change The WordPress Database Table Prefix

This is much more easily done at the time of WordPress installation – always choose a none-default (wp_) prefix.

Changing an existing prefix will require some MySQL database knowledge and we would recommend you employ the skills of a competent professional. And, as always, ensure you have a full and complete backup of your site.

It’s also important to note that, as mentioned above, you should be using a firewall or security plugin that can detect and block SQL injection attacks.

# 25 Directory Browsing Vulnerability

Web server directory browsing is where you can browse the contents of a web server from your web browser. This is far from ideal, as it supplies hackers information they may find useful to launch an attack.

From a hacker point of view, which would be better? Knowing which WordPress plugins are installed, or not knowing any of the WordPress plugins installed?

Clearly, more information is always better. And so we return to the principle of obscurity and reducing your surface area of attack by limiting access to information that hackers can use.

How To Prevent Directory Browsing Vulnerability

The easiest way to prevent this type of vulnerability is to directory browsing altogether.

This is done by adding a simple line to the site’s .htaccess file. Bear in mind that that this is only applicable to websites running the Apache web server (not nginx)

# 26 WordPress Security Keys/Salts

WordPress security keys are the means of encrypting and securing user cookies that control user login sessions. So they’re critical to good user security.

How To Improve User Security With Strong Keys/Salts

This is an easy one to implement for most admins. Here’s a quick how-to guide on updating your WordPress security keys.

# 27 Public Access To WordPress Debug Logs

Another security through obscurity item, the WordPress debug logs are normally stored in a very public location: /wp-content/debug.log

This is far from ideal as normally, without any specific configuration changes, this file is publicly accessible, and may expose some private site configuration issues through errors and logs data.

How To Eliminate Access to WordPress Debug Logs

If the file mentioned above is on your site, then you’ll want to move or delete it. You’ll then want to switch off debug mode on your site as you only need this active if you’re investigating a specific site issue.

Debug mode is typically toggled in your wp-config.php file so have a look in there for the lines:

define( 'WP_DEBUG', true );
define( 'WP_DEBUG_LOG', true );

You can either:

  • Remove the lines entirely,
  • Comment out the lines, or
  • Switch true to false for both of these.

Bonus Security Tip: WordPress Website Backup

WordPress backup is often cited as a WordPress Security function. Strictly speaking, it’s not. It forms part of your disaster recovery plan. You might not have a formal DR plan, but having a website backup may be your implicit plan.

If anything ever goes wrong with your WordPress site, whether this is security related or not, having a backup is critical to being able to recover your site.

If you haven’t put a regular backup plan in place for your site, this is probably the first thing you need to do. Some of the items in this list need to be done with the option of restoring a backup in case of disaster.

Final Thoughts On Your WordPress Security

With WordPress being so widely used, it’s the obvious target for hackers to focus their efforts. This means the aspects you have to consider can be almost overwhelming, in your quest to secure your WordPress sites.

The process is never-ending and you might even address all of the items on this list, and still get hacked. But you have to keep at it.

Each step you take to lockdown your site, puts a bit more distance between you and the hackers. You might not always stay ahead of them, and you won’t always have time to address issues immediately, but we can assure that the more steps you take, the more secure your site will be.

Source :
https://getshieldsecurity.com/blog/wordpress-security-vulnerabilities/

Friday Long Read: What To Do About AI

This is a Friday long-read, so grab a warm cup of something and kick back because we’re going to take our time on this. The world is about to profoundly change. I know you’re nervous – perhaps excited and optimistic, but if you’ve been paying attention and have been watching the trajectory of this thing, the rational reaction is to be nervous. In this post I’d like to unpack in practical and tangible terms what AI is, where it came from, and the state of play, and then I’ll show you a path that will give you a pretty good shot at surviving the coming revolution.

Who am I? I’m Mark Maunder and I founded Wordfence in 2011 and wrote the early versions of the product until 2015 when Matt Barry took over as lead developer and I morphed into a tech executive running Defiant Inc, which makes Wordfence. We have over 4 million customers using our free product and a large number of paying customers using our various paid WordPress security products. I’ve been a technologist since the early 90s and a kid hacker in my teens in the 80s and 90s. I started my career in mission-critical operations for companies like Coca-Cola, Credit Suisse (now UBS), and DeBeers and then went over to do dev for companies like the BBC and eToys which was one of the biggest dot-com busts. I created the first job meta-search called WorkZoo in the UK around 2001 which later competed with Indeed, launched after us, and which I sold in 2005 but which made Time Magazine and NYTimes. I subsequently launched a Geoblogging platform, inline comments via JS, an ad network, real-time analytics, a localized news website, and more. You could say I’ve been in the innovation game for a minute, and I’m in it for life. I’m based in the USA these days in case you’re curious – moved over here in 2003.

Examining Bubbles

My apologies for the long bio, but what I’d like to illustrate is that I’ve seen tech come and go. The hype cycles I’ve seen typically include:

  • Outlandish claims about how the tech will solve everything from slicing bread to world peace and everything in between.
  • Commercial vendors jumping on the emerging mega-trend to surf the wave with proprietary technologies of their own which they position as standards, or at the very least the default choice.
  • Nascent technologies implementing the tech, that are immature, unstable, rapidly changing, and may very well be abandoned in a few months or a few years.
  • The press contracting a bad case of rabies and foaming at the mouth about the tech, amplifying the most extreme aspects and use cases and creating a lot of noise, which makes it hard for implementors to sift for the truth and the fundamentals around the technology.
  •  The investment community pouring cash into the space with little focus. This creates an extremely adversarial environment for tech practitioners who are building fundamental value, who now have to compete with powerful VC-backed marketing machines.
  • As Warren Buffet says, the Innovators, the Imitators, and the Swarming Incompetents enter the space in that order. I’d add that they have a pyramid structure with each successive wave being at least an order of magnitude bigger than the last. Things get crowded for a while.
  • Then you have the typical bust cycle which cleans house and makes the tech uncool again, but also makes it interesting to the true believers. The VC’s go away and stop making noise that innovators have to compete against. The imitators and swarming incompetents drift off to imitate and mess up something else. The businesses not creating fundamental value fail. Some creating fundamental value fail too but the talent and tech are sometimes reincarnated into something else useful.

So who prospers, and what tech survives after a bust? Sometimes none of it, but helpful derivative technologies are created, like Java Applets in the 90s that inspired Flash which inspired standards-based rich content web browsers.

A technological phoenix rising from the ashes

Sometimes out of the ashes, an Amazon is born, as with the dot-com boom. And sometimes you have incredible innovation where the innovators never see large-scale commercial success, but others do, as with Igor Sysoyev who created Nginx which eliminated the need for a data center full of web servers to handle large-scale websites. Igor has a commercial thing, but the real winners were companies like Cloudflare who based their global infrastructure on Nginx, reverse proxying massive numbers of connections to origin servers with rules about what gets proxied. Hey, I benefited too. Nginx saved our behinds when Kerry and I were running Feedjit.com from 2007 to 2011 because it let us handle over 1 billion application requests per month on just 6 servers. Thanks Igor!

Blockchain technology is in a bust cycle and you can map the characteristics I defined above to blockchain. It looks eerily similar to the dot-com bust and you’ll see an Amazon emerge from the ashes about a decade from now. It might be Coinbase if they survive the over 80% dive in market cap that may continue, but who knows?

Derivative Versus Fundamental Technology Innovation

Seeing the forest for the trees

I’ve mentioned a few tech bubbles so far and it’s really the first step in pulling us out of the trees so that we can examine the various forests out there. Now let’s go a little more meta and talk about which forests matter. Some technology is derivative. Examples of derivative tech are new stuff that runs inside a browser, for example, Websockets.

Websockets are awesome because they let a browser keep a connection open and get push notifications without doing the old TCP three-way handshake to establish a new connection every time the browser wants to check if there’s data waiting on a chat server or whatever. We used to call this long-polling and I wrote a web server to do long polling which was a clumsy but necessary approach, so when Web Sockets came along we all breathed a sigh of relief and I happily retired my web server glad that no one would see my nasty source code which worked quite well mind you.

Another derivative technology – and you’re not going to like this – is blockchain. It’s a useful and novel implementation of hashing algorithms and a few other cryptographic tricks, but honestly, we should have disintermediated banking at least two decades ago and the fact that blockchain has still failed to do that is both disappointing and illustrative that it is just a set of derivative applications built on a tower of fundamentals that has a way to go before it matures. The hype cycle and speculative bubble around it was simply humans making human noise.

So that’s derivative tech. In addition to derivative tech, you have what I’d like to call fundamental tech. Electricity is fundamental. It’s cornerstone technology that transformed the world in our ability to use and transport energy which has enabled an industrial and technological revolution the likes of which the world has never seen. The microprocessor is also fundamental tech for similar reasons. You have algorithms that are fundamental tech like the RSA algorithm which allows us to establish a secure communication channel while a bad person is listening in the whole time – the kind of tech that could have changed the outcome of World War II.

The Internet is fundamental tech. It connected the world and gave us the ability to build applications on top like HTTP and the web which are derivative tech.

Oh I know you want to have a bar fight with me at this point and we’ll do that if you’re attending Wordcamp EU – a collegial and metaphorical barfight, that is – but hopefully, you’re picking up what I’m putting down here in a general sense: There is fundamental tech that profoundly enables and changes the world and which many other things are built on top of, and there is derivative tech that gets a lot of attention but isn’t quite as transformative in a historical sense if you’re thinking in terms of centuries. And there’s the big fat grey area in between.

Neural nets sitting at desks in a classroom learning math

AI is fundamental tech. For decades we have been programming by writing functions by hand. We’ve gotten quite good at structuring our code using metaphors like object-oriented programming to create logical structures that make sense in a human world, and help us organize large code bases. But fundamentally the way we define logic in a program hasn’t changed for a long time. Until now. For the first time in all of history, we can create functions in programming by training them, rather than writing them by hand. In other, slightly more technical words, we can infer a function from observations and then use it. Like babies and toddlers do. This is historic, it’s transformative and it is a fundamental breakthrough.

Funny thing is that until quite recently – around 2015 – AI had suffered many so-called “AI Winters” where there was significant interest in the field that catalyzed investment dollars, and then a setback usually caused by a reality check, that caused a winter in funding and interest. Does anyone remember the “expert systems” of the 80s? By the early 2000s AIs name had been dragged through the mud so many times that anyone doing serious research in the field used different words to describe their work, like “machine learning” or “informatics” or “knowledge systems”.

A few hardcore true believers like Yann Lecun, Yushua Bengio and Geoffrey Hinton powered through like Bilbo and Sam across The Dead Marshes and went on to win the Turing Award, which is basically the Nobel Prize of computer science and which I had the privilege of attending when Rivest, Adleman and Shamir won theirs for public key crypto. The Turing Award is a very big deal and well deserved considering how adversarial the AI environment was for a while.

So what changed? Well for one thing you’re reading this post because it’s about AI and you’re interested. And you’re interested because you recently used GPT-4, MidJourney, Dall-E or another model to create something. You’re seeing tangible results. And the reason you’re seeing results is that GPU hardware, algorithms, and an interest in the field have brought us to an inflection point where the technology is delivering results that are jaw-dropping enough to catalyze more funding, more research, and more jaw-dropping results. This cycle really picked up steam in 2015, and with the release of GPT-4 recently, has entered a phase of what I would describe as true and consistent exponential growth.

According to NVidia “LLM sizes have been increasing 10X every year for the last few years”. In two years that’s 100X. Three years from now that’s 1000X and so on. Extrapolate that out and be afraid. Or optimistic if your mind isn’t for rent and you are hopeful yet discontent. Rush lyrics aside, that pace should give you an idea of how quickly this thing is coming. And now that we’ve reached the point of inflection I mentioned, where the hardware and algorithms seem to have overcome the cycle of disappointment that AI has been stuck in for decades, I predict that you’ll see consistent and exponential growth in the field in capabilities for the foreseeable future, with a financial bubble and bust in there that won’t be of much consequence to the fundamental value of the technology.

“Thanks for the history lesson Maunder, but you brought us here with promises of telling us what to do about AI. So?”

What to do about AI

So far we’ve discussed what boom cycles look like and the kind of noise and bear traps you should be aware of. We’ve defined what AI is in fundamental terms – a function that you can train rather than hand code. And we’ve hopefully agreed that we’ve entered a period of consistent and exponential growth in the field. Now we’ll chat about how to survive and prosper in a world that looks a lot like when electricity was invented and commercialized, or the microprocessor, or the Internet.

Disruption

Goldman estimates that AI will add 7% to global GDP at a rate of about 1.5% growth per year. They also estimate that roughly two-thirds of US occupations are exposed to some degree of automation by AI. You can extrapolate this globally. That kind of global disruption is matched only by the industrial revolution or the entire recent tech revolution as a whole starting from 1980. From the same publication, “A recent study by economist David Autor cited in the report found that 60% of today’s workers are employed in occupations that didn’t exist in 1940.”. So on an optimistic note, this kind of disruption isn’t a new thing and we’ve been disrupting and adapting for some time now.

Perhaps you’re reading this because you are running a WordPress website, perhaps secured by my product, Wordfence. Which means you’re a creator of some kind. Perhaps you’re a writer, an artist, or perhaps you’re an entrepreneur creating a business out of thin air. [Yes my fellow entreps, you get to hang with the other cool creator kids too!!]. If you don’t plan on adapting at all, that makes you far more vulnerable to this coming wave than say a chef who runs a restaurant, or someone who manages real estate and rentals. And that really is the key: adaptation. So how can we adapt?

If you’re a creator, you need to become a user of AI. You’re probably already using GPT to write copy for your product catalogs on your e-commerce website, or using MidJourney (MJ) or Dall-E to create art for ad campaigns. If you’re a designer or artist, you may feel the kind of resentment this Blender artist does in the Blender subreddit.

“My Job is different now since Midjourney v5 came out last week. I am not an artist anymore, nor a 3D artist. Rn all I do is prompting, photoshopping and implementing good looking pictures. The reason I went to be a 3D artist in the first place is gone. I wanted to create form In 3D space, sculpt, create. With my own creativity. With my own hands.”

“It came over night for me. I had no choice. And my boss also had no choice. I am now able to create, rig and animate a character thats spit out from MJ in 2-3 days. Before, it took us several weeks in 3D. The difference is: I care, he does not. For my boss its just a huge time/money saver.”

While I sympathize with how hard change and disruption can be, it’s been a constant for the past couple of centuries in many fields. MidJourney has a long way to go before it can match a real-world artist, unless you’re just churning out images and letting the AI guide the design choices and are happy to work around the bugs. For MidJourney and other generative AIs to produce exactly what we want, they’re going to have to get better at understanding what exactly we want to create. And that’s where the skill comes in. You’re already seeing this with a document that someone has created listing famous photographers and examples of their look. This can be used in MJ prompts to say “in the style of” to get a specific look, but it is an incredibly rudimentary approach.

Midjourney trying to do hands

Another way to guide the MJ AI in particular is to blend photos it has generated. Again, super rudimentary, but it’s the start of having the ability to tightly specify exactly what you want and get that out of MJ. And if you need a reminder of how basic it still is, try to get MJ to generate hands. It still sucks, even at version 5.

So if you’re a creator, start getting good at using the tools now, understand their limitations, and evolve as the products evolve until you’re an expert at guiding the AI to create exactly what you want. This will help you guide your customers in explaining the limits of the current state of AI to them and where you add value, let you take immediate advantage of the use that the current tools have, and ramp up your productivity as the tools get better at taking instructions from you.

This applies to writers, artists, designers, filmmakers, photographers, screenwriters, and anyone with creative output. Get good at the tools. Get good at them now. Do it with an open mind. Know that changes aren’t permanent and that change is. (Again with sneaking in the Rush lyrics)

Adapting as a Dev

Coders! My people! We have a problem. Most of you have become users of AI. You’re users of GPT-4 via their API. You’re plugging into other generative AIs via an API. You aren’t rolling your own. And rolling your own is where all the fun is!!

A leaking Llama

Ever heard of transfer learning? You can grab a pre-trained model from Hugging Face, chop off the head – aka the final layer in the layers of neural nets, substitute it with random weights, and train the pre-trained model with your own data to take advantage of the sometimes millions of dollars that someone else already spent training their model. In fact Facebook’s LLAMA model which is one of the largest LLM’s in the world was leaked via Torrent recently.

The most important thing you need to do right now as a developer is to stop being a user of AI and become a dev of AI. GPT-4 is a shiny ball that the world will have forgotten about in a year, but it’s a very shiny and attractive ball right now that is fueling many a late-night dev chat. Remember that stat I gave you above? That LLM’s have been increasing in size at 10X per year. The current state of the art will be accessible to you on a desktop in a few years and you need to get ready for that world today.

I’m going to just go ahead and tell you what you need to do to get your AI stuff together, fast.

  • Ignore the math. Trust me on this. Most people including devs are not good at math and it intimidates the hell out of them. AI is just matrix multiplication and addition using GPU cores to parallelize the ops. Expressing this as code is easy. Expressing it as math will make you hide under your bed and cry. Ignore the math. If you can code, you’ll get it.
  • Learn Python. Everything in AI is Python. It’s a beautiful little language that you’ll come to appreciate very quickly if you’re already a dev. It’s like coming over to Aikido if you’re already a black belt. OK the MMA scene kinda messed up my metaphor proving that Aikido is actually worthless, but whatever.
  • Then go do the Practical Deep Learning for Coders course at fast.ai. It’s how we get our guys up to speed fast in the field and it’s brilliant. Jeremy Howard does a spectacular job of getting you up to speed fast in the field by immediately getting you productive and then unpacking the details in a fun non-mathy way.
  • As you progress in the course, definitely get up to speed using Jupyter Notebooks and I’d recommend Kaggle for this. They were bought by Google a few years ago and kind of compete with Google’s own notebook system called Colab, but I prefer Kaggle. You get GPU access by simply verifying your email address and it’s free which is kind of amazing. So you can use a rich text environment on Kaggle to write your code, see the output and run it on some fairly decent GPUs. Kaggle GPU’s perform at about 20% of the speed of my laptop RTX 4090 in case you’re curious about benchmarks.

The course teaches fundamentals, how to use pre-trained models, how to create Jupyter Notebooks or fork others, how to create Hugging Face Spaces, and how to share your models and their output with the world. It is the fastest way right now to transform yourself from an AI user into an AI dev and get drinks bought for you at parties by folks that have not yet made the leap.

Alright, this went long but that was the plan. We’ll talk more about AI. Go forth, be brave, learn, and create!

Mark Maunder – Founder & CEO – Wordfence and Defiant Inc.

Footnotes: All images on the page were created with MidJourney and if you’d like to see the prompt I used, simply view the image in a new tab and the image name is the prompt, all except for the heavy metal hands image which a colleague created. I’ll be in the comments in case there’s discussion.

Did you enjoy this post? Share it!

Source :
https://www.wordfence.com/blog/2023/04/friday-long-read-what-to-do-about-ai/

Update Now! Severe Vulnerability Impacting 600,000 Sites Patched in Limit Login Attempts

On January 26, 2023, the Wordfence team responsibly disclosed an unauthenticated stored Cross-Site Scripting vulnerability in Limit Login Attempts, a WordPress plugin installed on over 600,000 sites that provides site owners with the ability to block IP addresses that have made repeated failed login attempts.

The plugin is vulnerable in versions up to, and including, 1.7.1. A patch addressing this vulnerability was released on April 4, 2023 as version 1.7.2. We recommend all site owners update to version 1.7.2 as soon as possible.

All Wordfence PremiumWordfence Care, and Wordfence Response customers, along with those still using the free version of the plugin, are protected by the Wordfence firewall against any exploits targeting this vulnerability.

Description: Limit Login Attempts <= 1.7.1 – Unauthenticated Stored Cross-Site Scripting
Affected Plugin: Limit Login Attempts
Plugin Slug: limit-login-attempts
Affected Versions: <= 1.7.1
CVE ID: CVE-2023-1912
CVSS Score: 7.2 (High)
CVSS Vector: CVSS:3.1/AV:N/AC:L/PR:N/UI:N/S:C/C:L/I:L/A:N
Researcher/s: Marco Wotschka
Fully Patched Version: 1.7.2

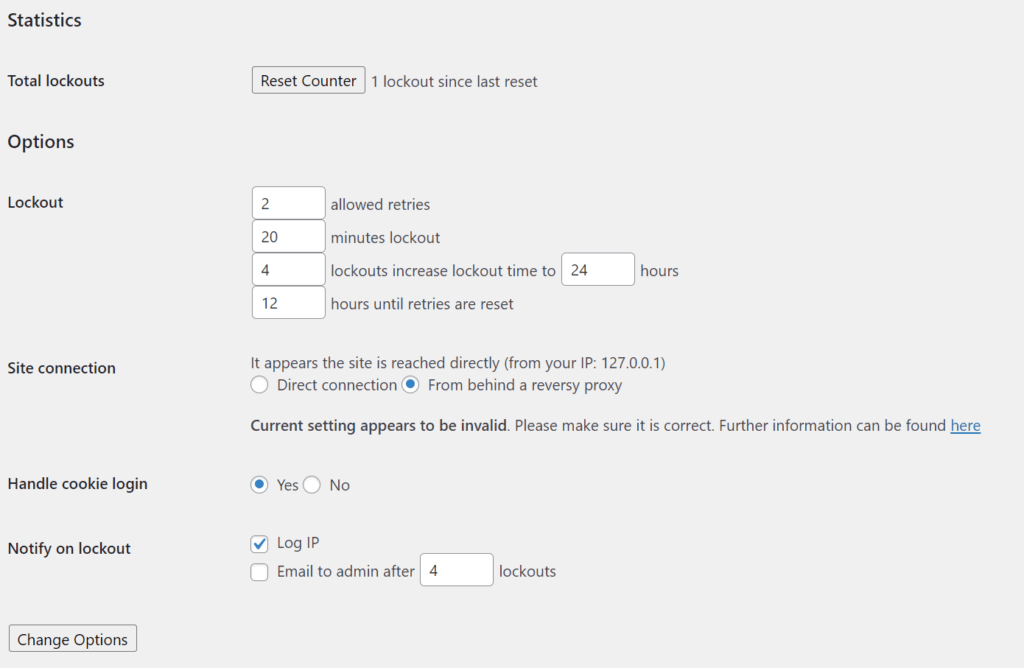
The Limit Login Attempts plugin offers some simple configuration options. These include a maximum number of login retries, lockout duration, lockout expiration times as well as some logging and notification options. The vulnerability, assigned CVE-2023-1912, requires a specific configuration: the site connection option must be set to “From behind a reversy [sic] proxy” and logging of IP addresses on lockout must be enabled. 

With the reverse proxy detection option enabled, the plugin uses the X-Forwarded-For header to determine the visitor’s IP address. While this HTTP header is spoofable, the plugin does offer its use as an alternative for those who are behind a load balancer or cache handler. It does not use this setting by default.

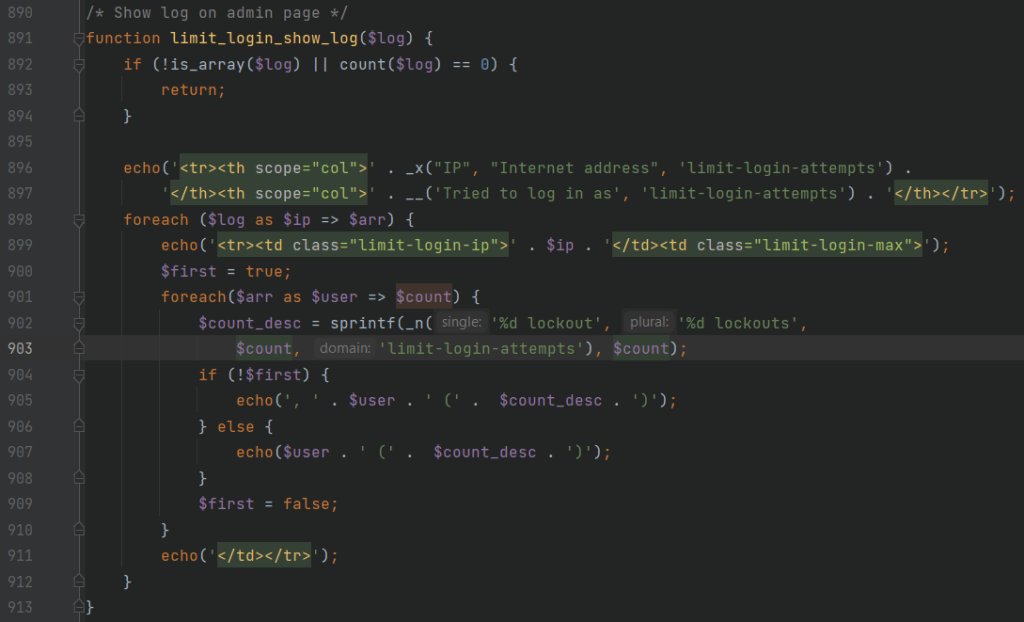
With the plugin’s logging feature enabled, login blocks are logged and displayed on the configuration page. The following code accomplishes this (slightly edited for legibility).

As can be seen, this function assembles a table of information but does not escape the values it uses. While sanitization is recommended as input is received, escaping output, even if it is already sanitized, is a far more effective tool in preventing Cross-Site Scripting. Unfortunately, this plugin was not utilizing either sanitization or escaping of the stored IP value that could be supplied via the X-Forwarded-For header.

To exploit this vulnerability, an attacker could send a login request with the following X-Forwarded-For header set:

X-Forwarded-For: <span onmouseover=alert(1)>23.23.23.23</span>

This header can be set via many methods, such as through a browser plugin or by intercepting the login request and adding it manually. Once the plugin’s blocking threshold is met, it will record the above code as the blocked IP and execute the malicious JavaScript code when an administrator visits the configuration page where the list of blocked IP addresses is displayed. This malicious code is executed under the authentication of an administrator and can be utilized to help facilitate a site takeover.

Cross-Site Scripting Vulnerabilities are the result of missing sanitization and unescaped display of user input. Most commonly, we see user input that is exploitable to Cross-Site Scripting collected via a form. In this vulnerability, the processed information is still provided by a user, but collected via a different and more unusual route which is why proper sanitization and escaping may have been missed.

Timeline

January 26, 2023 – We reached out directly to the WordPress Plugin Security Team as no contact information was readily available for the developer of the plugin.
March 24, 2023 – The WordPress Plugin Security Team team acknowledges receipt of our report.
April 4, 2023 – Version 1.7.2 addresses this issue.

Conclusion

In today’s post, we covered an unauthenticated Cross-Site Scripting vulnerability via the X-Forwarded-For header in the Limit Login Attempts plugin. This can be leveraged by unauthenticated attackers to facilitate a site takeover by injecting malicious JavaScript into the database of an affected site that may execute when a site administrator accesses the logging page.

Again, all Wordfence PremiumWordfence Care, and Wordfence Response customers, along with those still using the free version of the plugin, are protected by the Wordfence firewall for any exploits targeting this vulnerability.

Special Note: We independently discovered this vulnerability in January while reviewing a vulnerability in another plugin. We followed our responsible disclosure process and reported it to the WordPress Plugin Security Team, ensured it got patched, and published it to our vulnerability database once a patch was released. After adding the vulnerability to our database, we were made aware of another unnamed security researcher who also discovered this issue and publicly disclosed details about this vulnerability five years ago without ensuring the vulnerability got patched, which does not follow standard practice. Regardless, we would like to make mention of this so the other researcher who also found the vulnerability receives credit.

If you have any friends or colleagues who are using this plugin, please share this announcement with them and encourage them to update to the latest version of Limit Login Attempts as soon as possible.

If you are a security researcher, you can responsibly disclose your finds to us and obtain a CVE ID and get your name on the Wordfence Intelligence leaderboard.

Did you enjoy this post? Share it!

Source :
https://www.wordfence.com/blog/2023/04/update-now-severe-vulnerability-impacting-600000-sites-patched-in-limit-login-attempts/

CrowdStrike Falcon Platform Detects and Prevents Active Intrusion Campaign Targeting 3CXDesktopApp Customers

Note: Content from this post first appeared in r/CrowdStrike

We will continue to update on this dynamic situation as more details become available. CrowdStrike’s Intelligence team is in contact with 3CX.

On March 29, 2023, CrowdStrike observed unexpected malicious activity emanating from a legitimate, signed binary, 3CXDesktopApp — a softphone application from 3CX. The malicious activity includes beaconing to actor-controlled infrastructure, deployment of second-stage payloads, and, in a small number of cases, hands-on-keyboard activity. 

The CrowdStrike Falcon® platform has behavioral preventions and atomic indicator detections targeting the abuse of 3CXDesktopApp. In addition, CrowdStrike® Falcon OverWatch™ helps customers stay vigilant against hands-on-keyboard activity.

CrowdStrike customers can log into the customer support portal and follow the latest updates in Trending Threats & Vulnerabilities: Intrusion Campaign Targeting 3CX Customers

The 3CXDesktopApp is available for Windows, macOS, Linux and mobile. At this time, activity has been observed on both Windows and macOS.

CrowdStrike Intelligence has assessed there is suspected nation-state involvement by the threat actor LABYRINTH CHOLLIMA. CrowdStrike Intelligence customers received an alert this morning on this active intrusion. 

Get fast and easy protection with built-in threat intelligence — request a free trial of CrowdStrike Falcon® Pro today

CrowdStrike Falcon Detection and Protection

The CrowdStrike Falcon platform protects customers from this attack and has coverage utilizing behavior-based indicators of attack (IOAs) and indicators of compromise (IOCs) based detections targeting malicious behaviors associated with 3CX on both macOS and Windows. 

Customers should ensure that prevention policies are properly configured with Suspicious Processes enabled.

Figure 1. CrowdStrike’s indicator of attack (IOA) identifies and blocks the malicious behavior in macOS (click to enlarge)

Figure 2. CrowdStrike’s indicator of attack (IOA) identifies and blocks the malicious behavior in Windows (click to enlarge)

Hunting in the CrowdStrike Falcon Platform

Falcon Discover

CrowdStrike Falcon® Discover customers can use the following link: US-1 | US-2 | EU | Gov to look for the presence of 3CXDesktopApp in their environment.

Falcon Insight customers can assess if the 3CXDesktopApp is running in their environment with the following query:

Event Search — Application Search

event_simpleName IN (PeVersionInfo, ProcessRollup2) FileName IN ("3CXDesktopApp.exe", "3CX Desktop App")
| stats dc(aid) as endpointCount by event_platform, FileName, SHA256HashData

Falcon Long Term Repository — Application Search

#event_simpleName=/^(PeVersionInfo|ProcessRollup2)$/ AND (event_platform=Win ImageFileName=/\\3CXDesktopApp\.exe$/i) OR (event_platform=Mac ImageFileName=/\/3CX\sDesktop\sApp/i)
| ImageFileName = /.+(\\|\/)(?.+)$/i
| groupBy([event_platform, FileName, SHA256HashData], function=count(aid, distinct=true, as=endpointCount))

Atomic Indicators

The following domains have been observed beaconing, which should be considered an indication of malicious intent.

akamaicontainer[.]com
akamaitechcloudservices[.]com
azuredeploystore[.]com
azureonlinecloud[.]com
azureonlinestorage[.]com
dunamistrd[.]com
glcloudservice[.]com
journalide[.]org
msedgepackageinfo[.]com
msstorageazure[.]com
msstorageboxes[.]com
officeaddons[.]com
officestoragebox[.]com
pbxcloudeservices[.]com
pbxphonenetwork[.]com
pbxsources[.]com
qwepoi123098[.]com
sbmsa[.]wiki
sourceslabs[.]com
visualstudiofactory[.]com
zacharryblogs[.]com

CrowdStrike Falcon® Insight customers, regardless of retention period, can search for the presence of these domains in their environment spanning back one year using Indicator Graph: US-1 | US-2 | EU | Gov.

Event Search — Domain Search

event_simpleName=DnsRequest DomainName IN (akamaicontainer.com, akamaitechcloudservices.com, azuredeploystore.com, azureonlinecloud.com, azureonlinestorage.com, dunamistrd.com, glcloudservice.com, journalide.org, msedgepackageinfo.com, msstorageazure.com, msstorageboxes.com, officeaddons.com, officestoragebox.com, pbxcloudeservices.com, pbxphonenetwork.com, pbxsources.com, qwepoi123098.com, sbmsa.wiki, sourceslabs.com, visualstudiofactory.com, zacharryblogs.com)
| stats dc(aid) as endpointCount, earliest(ContextTimeStamp_decimal) as firstSeen, latest(ContextTimeStamp_decimal) as lastSeen by DomainName
| convert ctime(firstSeen) ctime(lastSeen)

Falcon LTR — Domain Search

#event_simpleName=DnsRequest
| in(DomainName, values=[akamaicontainer.com, akamaitechcloudservices.com, azuredeploystore.com, azureonlinecloud.com, azureonlinestorage.com, dunamistrd.com, glcloudservice.com, journalide.org, msedgepackageinfo.com, msstorageazure.com, msstorageboxes.com, officeaddons.com, officestoragebox.com, pbxcloudeservices.com, pbxphonenetwork.com, pbxsources.com, qwepoi123098.com, sbmsa.wiki, sourceslabs.com, visualstudiofactory.com, zacharryblogs.com])
| groupBy([DomainName], function=([count(aid, distinct=true, as=endpointCount), min(ContextTimeStamp, as=firstSeen), max(ContextTimeStamp, as=lastSeen)]))
| firstSeen := firstSeen * 1000 | formatTime(format="%F %T.%L", field=firstSeen, as="firstSeen")
| lastSeen := lastSeen * 1000 | formatTime(format="%F %T.%L", field=lastSeen, as="lastSeen")
| sort(endpointCount, order=desc)

File Details

SHA256Operating SystemInstaller SHA256FileName
dde03348075512796241389dfea5560c20a3d2a2eac95c894e7bbed5e85a0accWindowsaa124a4b4df12b34e74ee7f6c683b2ebec4ce9a8edcf9be345823b4fdcf5d8683cxdesktopapp-18.12.407.msi
fad482ded2e25ce9e1dd3d3ecc3227af714bdfbbde04347dbc1b21d6a3670405Windows59e1edf4d82fae4978e97512b0331b7eb21dd4b838b850ba46794d9c7a2c09833cxdesktopapp-18.12.416.msi
92005051ae314d61074ed94a52e76b1c3e21e7f0e8c1d1fdd497a006ce45fa61macOS5407cda7d3a75e7b1e030b1f33337a56f293578ffa8b3ae19c671051ed3142903CXDesktopApp-18.11.1213.dmg
b86c695822013483fa4e2dfdf712c5ee777d7b99cbad8c2fa2274b133481eadbmacOSe6bbc33815b9f20b0cf832d7401dd893fbc467c800728b5891336706da0dbcec3cxdesktopapp-latest.dmg

Recommendations 

The current recommendation for all CrowdStrike customers is:

  1. Locate the presence of 3CXDesktopApp software in your environment by using the queries outlined above.
  2. Ensure Falcon is deployed to applicable systems. 
  3. Ensure “Suspicious Processes” is enabled in applicable Prevention Policies.
  4. Hunt for historical presence of atomic indicators in third-party tooling (if available).

Additional Resources

Source :
https://www.crowdstrike.com/blog/crowdstrike-detects-and-prevents-active-intrusion-campaign-targeting-3cxdesktopapp-customers/

Is Once-Yearly Pen Testing Enough for Your Organization?

Any organization that handles sensitive data must be diligent in its security efforts, which include regular pen testing. Even a small data breach can result in significant damage to an organization’s reputation and bottom line.

There are two main reasons why regular pen testing is necessary for secure web application development:

  • Security: Web applications are constantly evolving, and new vulnerabilities are being discovered all the time. Pen testing helps identify vulnerabilities that could be exploited by hackers and allows you to fix them before they can do any damage.
  • Compliance: Depending on your industry and the type of data you handle, you may be required to comply with certain security standards (e.g., PCI DSS, NIST, HIPAA). Regular pen testing can help you verify that your web applications meet these standards and avoid penalties for non-compliance.

How Often Should You Pentest?#

Many organizations, big and small, have once a year pen testing cycle. But what’s the best frequency for pen testing? Is once a year enough, or do you need to be more frequent?

The answer depends on several factors, including the type of development cycle you have, the criticality of your web applications, and the industry you’re in.

You may need more frequent pen testing if:

You Have an Agile or Continuous Release Cycle#

Agile development cycles are characterized by short release cycles and rapid iterations. This can make it difficult to keep track of changes made to the codebase and makes it more likely that security vulnerabilities will be introduced.

If you’re only testing once a year, there’s a good chance that vulnerabilities will go undetected for long periods of time. This could leave your organization open to attack.

To mitigate this risk, pen testing cycles should align with the organization’s development cycle. For static web applications, testing every 4-6 months should be sufficient. But for web applications that are updated frequently, you may need to test more often, such as monthly or even weekly.

Your Web Applications Are Business-Critical#

Any system that is essential to your organization’s operations should be given extra attention when it comes to security. This is because a breach of these systems could have a devastating impact on your business. If your organization relies heavily on its web applications to do business, any downtime could result in significant financial losses.

For example, imagine that your organization’s e-commerce site went down for an hour due to a DDoS attack. Not only would you lose out on potential sales, but you would also have to deal with the cost of the attack and the negative publicity.

To avoid this scenario, it’s important to ensure that your web applications are always available and secure.

Non-critical web applications can usually get away with being tested once a year, but business-critical web applications should be tested more frequently to ensure they are not at risk of a major outage or data loss.

Your Web Applications Are Customer-Facing#

If all your web applications are internal, you may be able to get away with pen testing less frequently. However, if your web applications are accessible to the public, you must be extra diligent in your security efforts.

Web applications accessible to external traffic are more likely to be targeted by attackers. This is because there is a greater pool of attack vectors and more potential entry points for an attacker to exploit.

Customer-facing web applications also tend to have more users, which means that any security vulnerabilities will be exploited more quickly. For example, a cross-site scripting (XSS) vulnerability in an external web application with millions of users could be exploited within hours of being discovered.

To protect against these threats, it’s important to pen test customer-facing web applications more frequently than internal ones. Depending on the size and complexity of the application, you may need to pen test every month or even every week.

You Are in a High-Risk Industry#

Certain industries are more likely to be targeted by hackers due to the sensitive nature of their data. Healthcare organizations, for example, are often targeted because of the protected health information (PHI) they hold.

If your organization is in a high-risk industry, you should consider conducting pen testing more frequently to ensure that your systems are secure and meet regulatory compliance. This will help protect your data and reduce the chances of a costly security incident.

You Don’t Have Internal Security Operations or a Pen testing Team#

This might sound counterintuitive, but if you don’t have an internal security team, you may need to conduct pen testing more frequently.

Organizations that don’t have dedicated security staff are more likely to be vulnerable to attacks.

Without an internal security team, you will need to rely on external pen testers to assess your organization’s security posture.

Depending on the size and complexity of your organization, you may need to pen test every month or even every week.

You Are Focused on Mergers or Acquisitions#

During a merger or acquisition, there is often a lot of confusion and chaos. This can make it difficult to keep track of all the systems and data that need to be secured. As a result, it’s important to conduct pen testing more frequently during these times to ensure that all systems are secure.

M&A also means that you are adding new web applications to your organization’s infrastructure. These new applications may have unknown security vulnerabilities that could put your entire organization at risk.

In 2016, Marriott acquired Starwood without being aware that hackers had exploited a flaw in Starwood’s reservation system two years earlier. Over 500 million customer records were compromised. This placed Marriott in hot water with the British watchdog ICO, resulting in 18.4 million pounds in fines in the UK. According to Bloomberg, there is more trouble ahead, as the hotel giant could “face up to $1 billion in regulatory fines and litigation costs.”

To protect against these threats, it’s important to conduct pen testing before and after an acquisition. This will help you identify potential security issues so they can be fixed before the transition is complete.

The Importance of Continuous Pen Testing#

While periodic pen testing is important, it is no longer enough in today’s world. As businesses rely more on their web applications, continuous pen testing becomes increasingly important.

There are two main types of pen testing: time-boxed and continuous.

Traditional pen testing is done on a set schedule, such as once a year. This type of pen testing is no longer enough in today’s world, as businesses rely more on their web applications.

Continuous pen testing is the process of continuously scanning your systems for vulnerabilities. This allows you to identify and fix vulnerabilities before they can be exploited by attackers. Continuous pen testing allows you to find and fix security issues as they happen instead of waiting for a periodic assessment.

Continuous pen testing is especially important for organizations that have an agile development cycle. Since new code is deployed frequently, there is a greater chance for security vulnerabilities to be introduced.

Pen testing as a service models is where continuous pen testing shine. Outpost24’s PTaaS (Penetration-Testing-as-a-Service) platform enables businesses to conduct continuous pen testing with ease. The Outpost24 platform is always up-to-date with an organization’s latest security threats and vulnerabilities, so you can be confident that your web applications are secure.

  • Manual and automated pen testing: Outpost24’s PTaaS platform combines manual and automated pen testing to give you the best of both worlds. This means you can find and fix vulnerabilities faster while still getting the benefits of expert analysis.
  • Provides comprehensive coverage: Outpost24’s platform covers all OWASP Top 10 vulnerabilities and more. This means that you can be confident that your web applications are secure against the latest threats.
  • Is cost-effective: With Outpost24, you only pay for the services you need. This makes it more affordable to conduct continuous pen testing, even for small businesses.

The Bottom Line#

Regular pen testing is essential for secure web application development. Depending on your organization’s size, industry, and development cycle, you may need to revise your pen testing schedule.

Once-a-year pen testing cycle may be enough for some organizations, but for most, it is not. For business-critical, customer-facing, or high-traffic web applications, you should consider continuous pen testing.

Outpost24’s PTaaS platform makes it easy and cost-effective to conduct continuous pen testing. Contact us today to learn more about our platform and how we can help you secure your web applications.

Found this article interesting? Follow us on Twitter  and LinkedIn to read more exclusive content we post.

Source :
https://thehackernews.com/2023/01/is-once-yearly-pen-testing-enough-for.html

The best productivity apps in 2023

The premise of this article’s headline is nonsense, sure, but it isn’t clickbait—I promise. 

You’re almost certainly here because you searched for “best productivity apps.” I understand that impulse. You want to get more done in less time, which is about as universal a feeling as humans can have at work. The problem: productivity is deeply personal, and the words “productivity tools” mean a lot of different things to different people. What works for you may or may not work for me, which is why—after over a decade of writing about productivity software—I don’t really believe there are objectively “best” productivity apps. 

5 things you should automate today

Start automating

I do, however, think there are categories of tools that can help you become a better version of yourself. Some of them work better for more people than others, and not everyone needs an app from every category. Knowing what kinds of apps exist, and what you should look for in an app, is more important than knowing what the “best” app in that category is. 

Having said that, you’re here for software recommendations, not my personal reflections on the nature of productivity. So I’m going to go over the main kinds of productivity apps I think most humans who use electronic devices at work should know about. I’ll explain why I think each category is important, point to an app or two that I think will work well for most people, then offer links to other options if you want to learn more. 

Just remember: the specific app doesn’t matter. The best productivity app is the one that works best for you. The most important thing is having a system. Sound good? Let’s jump in. 

How we evaluate and test apps

All of our best apps roundups are written by humans who’ve spent much of their careers using, testing, and writing about software. We spend dozens of hours researching and testing apps, using each app as it’s intended to be used and evaluating it against the criteria we set for the category. We’re never paid for placement in our articles from any app or for links to any site—we value the trust readers put in us to offer authentic evaluations of the categories and apps we review. For more details on our process, read the full rundown of how we select apps to feature on the Zapier blog.


A to-do list like Todoist

We all have things we need to do—at work and in the rest of our lives. The worst place you could store those things, in my opinion, is in your mind. It’s just stressful: you’ll remember, at random moments, that there’s something you were supposed to be doing, and that memory will result in panic. Writing down everything you need to do allows you to make a plan, and (crucially) means you don’t have to panic. 

Not everyone benefits from a dedicated to-do list app—some of the most productive people I know prefer sticky notesemail inboxes, or even spreadsheets. I think that’s great, so long as you have some place to record the things you need to do. 

Todoist, our pick for the best to-do list app for balancing power and simplicity

I think that Todoist, shown above, is a great to-do list app for most people. It’s easy to use but also offers a lot of features. It can also be installed on basically any device you can imagine, meaning your to-do list is always available. It allows you to assign due dates to tasks, sort tasks by project, or even view a project using a Kanban board. You don’t have to worry about those features if you don’t want to, though, which is why I think it’s a great starting point for someone who needs a to-do list. 

If Todoist doesn’t work for you, though, check out our list of the best to-do list apps—it’s got a wide variety of recommendations. I, personally, use TickTick because I like how easy it is to add tasks, and I also can’t stop saying good things about Things for sheer simplicity on Apple devices. Find a tool you like—and that you remember to actually open. There’s nothing less useful than an app full of tasks you never look at. 

Once you’ve picked your to-do list app, make the most of it with automation, so you can easily add tasks that come in by email, team chat apps, project management tools, or notes. Read more about automating your to-do list.

A calendar like Google Calendar

There are only so many hours in the day, unfortunately, which means you have to budget them. A calendar is how you do that. You could use a paper wall calendar, sure, but a calendar app lets you invite other people to an event. Also, in a world where so many meetings are virtual, calendar apps give you a useful place to store the link to your Zoom call. 

Google Calendar, our pick for the best free calendar app

I think that Google Calendar, shown above, is the right calendar app for most people—particularly people who already use Gmail. Google Calendar is easy to load on any device, lets you see your calendar in several different views, and makes it easy to invite anyone else to any event or meeting you happen to plan. I could write multiple articles on Google Calendar features (and I have). This app does everything any other app can do, and more, all while being pretty easy to use.

If Google Calendar doesn’t work for you, though, check out our list of the best calendar apps for more options. Microsoft Outlook is a solid alternative, as is the Calendar app that comes with all Apple devices. 

I’d also consider looking into some kind of meeting scheduling app. These apps let anyone sign up for appointments with you, which is particularly useful if you have a meeting-heavy calendar. Calendly, shown below, is a solid option, with a lot of customizability and the ability to sync with Google Calendar. You can check out our list of the best meeting schedulers for a more complete rundown of Calendly and other options. 

Calendly, our pick for the best meeting scheduler app for simplified scheduling

Once you choose a calendar app, take it to the next level. With automation, you can do things like automatically turn calendar events into tasks on your to-do list or use forms to create calendar events. Here’s how you can bring context to your calendar by connecting other apps.

A note-taking app like OneNote

I’m constantly taking notes: before and during meetings; while researching an article; while brewing beer. And I think most people have some class of information they’ll need to reference later that doesn’t quite meet the threshold of a “document.” Who wants a sprawling series of folders with all of that information? 

This, to me, is what note-taking apps are for: quickly writing things down so you can read them later and (hopefully) follow up. They also work well as a personal journal, or a place to store files related to a particular project. 

Justin's beer brewing notes in OneNote

OneNote, above, is probably the note-taking app most people should try first. It’s free—so long as you don’t run out of OneDrive storage—and it gives you all kinds of ways to organize notes, from notebooks to sections to sub-headers. It also has powerful search, which includes the scanned contents of any images or PDFs you might drop in a note. 

But OneNote isn’t the only option. You should check out our list of the best note-taking apps for more choices. If you loved Evernote back in the day, you should check out Joplin, which is a completely free and open source replacement for that app. And I personally love Obsidian, which turns your notes into an entire database, complete with internal links and an extensive plugin collection. There are a lot of good choices out there—find something that lets you write things down and dig them up later.

See our favorite ways to use automation to improve how you put your notes to worktrack action items from meetings, and put an end to regular copy-paste actions.

A distraction blocker like Freedom

I’ve never tried to work in the middle of an amusement park, but I imagine it would be distracting. The internet is worse. Everything you could possibly imagine is available, all delivered by brilliant engineers who are doing everything they can to keep you looking at more and more and more of it. It’s understandable if you have trouble getting stuff done in that context, which is why apps that block distractions are so helpful. 

Freedom, our pick for the best focus app for blocking distractions on all your devices at once

Freedom is a great tool for the job. It runs on every platform and can block distractions—both websites and apps—on all of your devices. That means you can’t, for example, block Twitter on your computer only to pick up your phone and look at it there. With Freedom, you can set up multiple block lists, then start timers for any of them.

I personally love Serene, which combines distraction blocking with a sort of to-do list. You say what you want to do and how long it will take, then you start a distraction-free session to work on it. There’s also Cold Turkey Blocker, which can optionally prevent you from changing the time settings on your computer as a way of working around the block you set up. You’ve got more choices, though, particularly if you’re a Mac user. Check out our list of the best distraction blockers to learn more. 

Remember: the internet is distracting on purpose. There’s no shame in using a tool to build discipline. 

A habit tracker like Streaks or HabitNow

My dentist tells me I should brush my teeth twice a day, and I believe him, but I tended to only brush at night. I used a habit tracker to change that. 

These applications might sound similar to a to-do list, but they’re very different. You can’t add individual tasks to a habit tracker—only recurring ones. The idea is to set an intention to do something regularly, then keep track of how often you regularly do it. Eventually, you have a streak going, which psychologically motivates you to keep it up until the habit becomes second nature. Don’t laugh—it works. 

Streaks, our pick for the best habit tracker for iPhone

We recommend checking out Streaks, shown above, for iPhone and HabitNow, below, for Android. These apps both live on your phone, which is the place you’re most likely to look. They both let you create a list of habits you’d like to build, then remind you about that intention. They also both show you your progress in various ways. 

HabitNow, our pick for the best habit tracker for Android users

They’re not the only options, however; check out our list of the best habit tracker apps for more ideas. Also keep in mind that some to-do lists have habit-tracking capabilities built right in. I, personally, use TickTick‘s built-in habit tracker—I love it. And some people use a paper calendar for tracking a simple habit—just add an X every day you stick to your habit. 

An app to save things for later like Pocket

I’d love to read articles or watch YouTube videos all day. We all would. Sometimes, though, you have to do something else—even though your friend just sent you a really, really interesting article. That’s where read-it-later apps come in. They let you quickly save something you intend to read, so that you can come back to it when you have time.

Pocket, our pick for the best read it later app for turning articles into a podcast

I think that Pocket, above, is the app of choice in this class. It’s free to use, offers extensions for every major browser, and also has great mobile versions that sync your articles for offline reading. There’s even built-in support for highlighting, then reviewing your highlights later. 

Instapaper is a close second, and it even lets you send articles to your Kindle. These aren’t your only choices, though—check out our list of the best read-it-later apps for some more options. It’s also worth noting that some people use bookmarking apps or even note-taking apps for the same purpose, and that’s great—they both make it easy to save things for future reference. 

Automate the process of saving articles by connecting your read-it-later app to Zapier. Here are some ideas to get you started.

A screen recording tool like Loom

Whether it’s for a quick presentation or troubleshooting a problem, sometimes recording what’s on your screen and sharing it just makes life easier. Screen recording tools are perfect for this, allowing you to quickly record your screen, your voice, and even your face if you have a webcam. 

A screenshot of Loom, our pick for the best screen recording software for quickly recording and sharing on desktop

Loom is a great first tool to check out in this category. It’s easy to set up, works on all major platforms, and makes it really simple to share recordings. You can even add your face, via a webcam, to the recording. 

I personally use Zappy, which was originally an internal tool used by Zapier. It’s honestly the best screenshot tool I’ve ever used, and it’s free—if you use a Mac, it’s worth a try. Check out our list of the best screen recording tools for more options, and keep in mind you can actually record your screen without any software, if you don’t mind managing the file yourself. 

Want to share your screen in real-time? You need a screen sharing tool (Zoom works pretty well, surprisingly).

Other productivity tools worth checking out

This article could go on forever. There’s no end to great software out there, and I love writing about it. I think the above categories should save you all kinds of time—and take up plenty of your time to set up—but here are a few other suggestions if you’re feeling particularly motivated.

  • Password managers, like LastPass or 1Password, help you generate random passwords for all of your different services without the need for memorization. This is great for security, but it also makes logging in to stuff faster. Here’s a list of the best password managers.
  • Mobile scanning apps, like Microsoft Lens, let you scan documents using your phone while also digitizing any text using optical character recognition (OCR). Check out our list of the best mobile scanning OCR apps for more choices. 
  • Text expansion tools, like PhraseExpress, mean you’ll never need to look up and copy-paste the same message to multiple people ever again. Read more about text expansion software, or learn how it can make you better at dating
  • Dictation software, like Dragon by Nuance, lets you type by talking, which can save you all sorts of time. Here’s our list of the best dictation software.
  • Time tracking apps, like Toggl Track, are great for keeping track of how long projects take and making sure you’re not spending too much time on the wrong things. Take a look at our list of the best time tracking apps to find the right one for you.
  • Mind mapping software, like Coggle, helps you map the connections between different ideas while you’re brainstorming. Here are our picks for the best mind mapping software.
  • AI software, like OpenAI, could make all kinds of tasks easier in the future. It’s early, granted, but I already find it useful when I’m in the brainstorming phase of a project—I can ask the bot to generate ideas.

Once you have apps set up in some of these categories, you can take the whole productivity thing even further. Automation software like ours at Zapier connects all the other apps you use, with workflows you can build yourself—no code required. Like the tools above, Zapier won’t solve every problem you have, but it’s a great way to connect tools that otherwise don’t integrate well—which means you can use the best tools for you, as opposed to the tools that happen to play nice together. And it’s not limited to productivity—eventually, you’ll find yourself automating even your most business-critical workflows.

Plus, if you sign up for Zapier, we’ll be able to write more useful articles like this one. Here are five things you should automate today to get started.

This post was originally published in September 2018 by Matthew Guay. The most recent update was in December 2022.

Source :
https://zapier.com/blog/best-productivity-apps/

The 8 best to do list apps in 2023

There are too many to-do list apps. Trying them all would be a massive task, and I know because I did. 

Why are there so many apps for something easily done on sticky notes? Because managing tasks is an intensely personal thing. People will reject anything that doesn’t feel right. That’s a good instinct, but it makes it hard to find the right app. 

Make the most of your to-do list with Zapier

Automate your tasks

To that end, we’ve been hard at work researching the best to-do apps, trying to find the right ones for various use cases. Research for these pieces was exhaustive. We started by finding the best apps for every platform: AndroidWindowsmacOS, and iPhone/iPad. We then tried the top-rated apps in every respective app store, and spent way too much time migrating our personal to-do lists from one app to another.

And now I’m offering you what I feel is the cream of the crop. Whatever you’re looking for, one of these apps is going to be right for you. Click on any app to learn more about why I chose it, or keep reading for more context on to-do list apps.

The best to-do list apps

  • Todoist for balancing power and simplicity
  • TickTick for embedded calendars and timers
  • Microsoft To Do for Microsoft power users (and Wunderlist refugees)
  • Things for elegant design
  • OmniFocus for specific organizational systems
  • Habitica for making doing things fun
  • Google Tasks for Google power users
  • Any.do for people who forget to use to-do apps
  • Other options, including project management software, note-taking apps, and other tools that can do the job

What makes the best to-do list app?

How we evaluate and test apps

All of our best apps roundups are written by humans who’ve spent much of their careers using, testing, and writing about software. We spend dozens of hours researching and testing apps, using each app as it’s intended to be used and evaluating it against the criteria we set for the category. We’re never paid for placement in our articles from any app or for links to any site—we value the trust readers put in us to offer authentic evaluations of the categories and apps we review. For more details on our process, read the full rundown of how we select apps to feature on the Zapier blog.

I’ve written about technology in general, and productivity specifically, since 2009. In that time, I’ve personally tried basically every to-do list app that has come out, and I’m usually depending on at least one of them to function.

Of course, when it comes to managing a to-do list online, everyone has different criteria. I kept this in mind as I tested, and I noticed a few features that made certain apps stand out.

The best to-do list apps:

  • Make it fast to add and organize tasks. Ideally, a task is added and categorized in a couple taps or keystrokes.
  • Offer multiple ways to organize your tasks. Tags, lists, projects, and due dates are all helpful, and the best to-do apps offer at least a few categories like this.
  • Remind you about self-imposed deadlines. Notifications, widgets, emails—if you’re using an online to-do list, it should help you track what needs to happen when.
  • Offer clean user interfaces. The best to-do app fits into your workflow so you can get back to what you’re supposed to be doing.
  • Sync between every platform you use. Which platforms will depend on what you personally use, but I didn’t consider anything that doesn’t sync between desktop and mobile.

I tried to find the task list apps that balance these things in various ways. None of these options will be right for everyone, but hopefully one of them is right for you. Let’s dive in.


Make 2023 your most efficient year yet

Start the year off right with our five-email course that helps you streamline work across your whole business.

Register now

Best to-do list app for balancing power and simplicity

Todoist (Web, Windows, macOS, Android, iPhone, iPad)

Todoist, our pick for the best to-do list app for balancing power and simplicity

Todoist isn’t the most powerful to-do list website out there. It’s also not the simplest. That’s kind of the point: this app balances power with simplicity, and it does so while running on basically every platform that exists. That’s a strong selling point—which is probably why Todoist is one of the most popular to-do lists right now.

Adding tasks was quick on every platform in my tests, thanks in part to natural language processing (type “buy milk Monday” and the task “buy milk” will be added with the next Monday set as your due date). You can put new tasks in your Inbox and then move them to relevant projects; you can also set due dates. Paid users can create custom filters and labels, and there are also some basic collaboration features.

Todoist is flexible enough to adapt to most workflows but not so complicated as to overwhelm. And it adds new features regularly: you can view projects as a Kanban board, for example, and navigating the app by keyboard is much smoother after recent updates. Overall, this is a great first to-do list app to try out, especially if you don’t know where to start.

Todoist also integrates with Zapier, which means you can automatically create tasks in Todoist whenever something happens in one of your favorite apps. Here are some examples.

Add new Google Calendar events to Todoist as tasks

Try it

  • Google Calendar logo
  • Todoist logo

Google Calendar, Todoist

Google Calendar + TodoistMore details

Add new starred emails to Todoist as tasks [Business Gmail Accounts Only]

Try it

  • Gmail logo
  • Todoist logo

Gmail, Todoist

Gmail + TodoistMore details

Add new Trello cards to Todoist as tasks

Try it

  • Trello logo
  • Todoist logo

Trello, Todoist

Trello + TodoistMore details

Todoist price: Free version available; paid version from $4/month.

Check out more ideas for automating Todoist with Zapier.

Best to-do list app with embedded calendars and timers

TickTick (Web, Android, Windows, macOS, iPhone and iPad)

TickTick, our pick for the best to-do list app with embedded calendars and timers

TickTick is a fast-growing task list app that offers a wide array of features on just about every platform you can imagine. Adding tasks is quick thanks to natural language processing. There’s also a universal keyboard shortcut offered on the desktop versions and pinned notifications and widgets on mobile, which makes it quick to add a task before getting back to what you’re doing. Tasks can be organized using lists, tags, and due dates, and there’s also the ability to add subtasks to any task. 

TickTick offers all of this with apps that feel native—the macOS version is distinct from the Windows version, for example, in ways that make sense given the differences between those two systems. TickTick also offers a few features that are above and beyond what other apps offer.

First, there’s a built-in Pomodoro timer, allowing you to start a 25-minute work session for any of your tasks (complete with numerous white noise options, if you want). Second, there’s integration with various third-party calendars, allowing you to see your tasks and your appointments in one place, and even do some time blocking. There’s also a built-in habit-tracking tool, allowing you to review how many days you did or didn’t stick to your exercise and diet commitments. And an Eisenhower Matrix view allows you to prioritize your tasks based on what’s urgent and what’s important. It’s a great collection of features, unlike anything else on the market.

With TickTick’s Zapier integration, you can connect TickTick to the other tools in your tech stack to automatically create tasks whenever you get new leads, deals, or emails.

Create TickTick tasks for newly-labeled Gmail emails [Business Gmail Accounts Only]

Try it

  • Gmail logo
  • TickTick logo

Gmail, TickTick

Gmail + TickTickMore details

Generate TickTick tasks from new Facebook Leads

Try it

  • Facebook Lead Ads logo
  • TickTick logo

Facebook Lead Ads, TickTick

Facebook Lead Ads + TickTickMore details

Generate TickTick tasks from new HubSpot deals

Try it

  • HubSpot logo
  • TickTick logo

HubSpot, TickTick

HubSpot + TickTickMore details

TickTick price: Free version available; paid version from $2.40/month.

Check out other ways you can automate TickTick with Zapier.

Best to-do list app for Microsoft power users (and Wunderlist refugees)

Microsoft To Do (Web, Android, Windows, iPhone and iPad)

Microsoft To Do, our pick for the best to-do list app for Microsoft power users (and Wunderlist refugees)

In 2015, Microsoft bought Wunderlist and put that team to work on a new to-do list app. Microsoft To Do is the result of that, and you can find Wunderlist’s DNA throughout the project. The main interface is clean and friendly, adding tasks is quick, but there’s a lot of flexibility below the surface.

But the real standout feature here is the deep integration with Microsoft’s ecosystem. Any email flagged in Outlook, for example, shows up as a task. Outlook users can also sync their tasks from that app over to Microsoft To Do, meaning there’s finally a way to sync Outlook tasks to mobile. Windows users can add tasks using Cortana or by typing in the Start menu. For example, you can type “add rice to my shopping list,” and rice will be added to a list called “shopping.” If you’re a Windows user and an Outlook user, this is the app for you.

This is also the prettiest to-do list app on the market, in my opinion. You can set custom background images for every one of your lists, allowing you to tell at a glance which list you’re looking at. You’re going to be looking at your task list all day—it might as well look good. 

Microsoft To Do integrates with Zapier, which means you can make sure Microsoft To Do is talking to all the other apps you use, not just the Microsoft ones. Here are some examples to get started.

Create Workboard action items from new tasks in Microsoft To-Do

Try it

  • Microsoft To Do logo
  • Workboard logo

Microsoft To Do, Workboard

Microsoft To Do + WorkboardMore details

Send direct Slack messages with new Microsoft To-Do lists

Try it

  • Microsoft To Do logo
  • Slack logo

Microsoft To Do, Slack

Microsoft To Do + SlackMore details

Create Microsoft To-Do tasks from new Salesforce leads

Try it

  • Salesforce logo
  • Microsoft To Do logo

Salesforce, Microsoft To Do

Salesforce + Microsoft To DoMore details

Microsoft To Do price: Free

Learn how you can make Microsoft To Do a productivity powerhouse with Zapier.

The best to-do list app with elegant design

Things (macOS, iPhone, iPad)

Things, our pick for the best to-do list app with elegant design

To-do list apps tend to fall into two categories: the complex and the minimalist. Things is somehow both.

That’s about the highest praise I can give a to-do list app. This is an app with no shortage of features, and yet it always feels simple to use. Adding tasks is quick and so is organizing them, but there’s seemingly no end of variation in ways to organize them. Areas can contain tasks or projects; projects can contain tasks or headers that can also contain tasks; and tasks can contain subtasks if you want. It sounds confusing, but it isn’t, which really speaks to how well Things is designed.

Other apps offer these features, but Things does it in a way that never feels cluttered, meaning you can quickly be done with looking at your to-do list and get back to whatever it is you’re doing. Combine this blend of functionality and beauty with features like a system-wide tool for quickly adding tasks, integration with your calendar so you can see your appointments while planning your day, intuitive keyboard shortcuts, reminders with native notifications, and syncing to an iPhone and iPad app.

The only downside here is the complete lack of versions for Windows and Android, though this decision is probably part of what allows the team to focus on making such a clean product. If you’re an Apple user, you owe it to yourself to try out Things.

You can automatically add to-dos to Things from your other apps with Things’ integrations on Zapier. Here’s some inspiration.

Add saved Slack messages to Things as to-dos

Try it

  • Slack logo
  • Things logo

Slack, Things

Slack + ThingsMore details

Add new Trello cards to Things as to-dos

Try it

  • Trello logo
  • Things logo

Trello, Things

Trello + ThingsMore details

Create Things to-dos from starred emails in Gmail [Business Gmail Accounts Only]

Try it

  • Gmail logo
  • Things logo

Gmail, Things

Gmail + ThingsMore details

Things price: $49.99 for macOS (15-day free trial), $19.99 for iPad, $9.99 for iPhone.

Best to-do list app for users with a very specific organizational system

OmniFocus (Web, macOS, iPhone, iPad)

OmniFocus, our pick for the best to-do list app for users with a very specific organizational system

OmniFocus is nothing if not flexible. This Apple-exclusive application is built around the Getting Things Done (GTD) philosophy trademarked by David Allen, but an array of features means it can be used for just about any organizational system you can imagine. There are three different kinds of projects you can set up, for example, depending on whether you need to do tasks in a specific order or not. There are six main views by default, allowing you to organize your tasks by things like due date, projects, and tags. You can even add more views, assuming you have the Pro version.

You get the idea. OmniFocus is a power user’s dream, with more features than anyone can hope to incorporate into a workflow, which is kind of the point: if there’s a feature you want, OmniFocus has it, so you can organize your tasks basically any way you can imagine.

Syncing is offered only between Apple devices. There’s a web version that’s intended for occasional usage away from your Apple machines, but non-Apple users should probably look elsewhere.

You can connect OmniFocus to your other favorite apps with OmniFocus’s Zapier integration. Whenever something happens in another app that you want to keep track of in OmniFocus, Zapier will automatically send it there.

Create OmniFocus tasks from new saved Slack messages

Try it

  • Slack logo
  • OmniFocus logo

Slack, OmniFocus

Slack + OmniFocusMore details

Create OmniFocus tasks for new starred emails on Gmail

Try it

  • Gmail logo
  • OmniFocus logo

Gmail, OmniFocus

Gmail + OmniFocusMore details

Create OmniFocus tasks from new or moved Trello cards

Try it

  • Trello logo
  • OmniFocus logo

Trello, OmniFocus

Trello + OmniFocusMore details

OmniFocus price: From $99.99/year for the recurring plan, which includes all apps and the web version. Also available as a one-time purchase from $49.99 (14-day free trial).

Best to-do list app for making doing things fun

Habitica (Web, Android, iPhone and iPad)

Habitica, our pick for the best to-do list app for making doing things fun

Games are fantastic at motivating mundane activity—how else can you explain all that time you’ve spent on mindless fetch quests? Habitica, formerly known as HabitRPG, tries to use principles from game design to motivate you to get things done, and it’s remarkably effective. You can add tasks, daily activities, and habits to a list. You also have a character, who levels up when you get things done and takes damage when you put things off. You can also earn in-game currency for buying offline rewards, such as a snack, or in-game items like weapons or even silly hats.

This is even better when you join a few friends and start a party. You can all fight bosses together, but be careful: fail to finish some tasks on time and your friends will take damage. If that doesn’t motivate you, nothing will.

What’s the downside? Habitica isn’t a great to-do list for managing long-term projects, so you might need something else for that. But if motivation is your problem, Habitica is well worth a spin.

Habitica price: Free version available; paid version from $5/month.

Best to-do list app for Google power users

Google Tasks (Web, Android, iPhone and iPad)

Google Tasks, our pick for the best to-do list app for Google power users

If you live in Gmail and Google Calendar, Google Tasks is an obvious free to-do list app to try out. That’s because it lives right in the sidebar of those two apps, and offers more than a few integrations. Plus, there’s a dedicated mobile app.

The app itself is spartan. Adding tasks is quick, particularly if you spend a lot of time in Gmail anyway, but there’s not a lot of organizational offerings. There are due dates, lists, descriptions, subtasks, and the ability to “Star” tasks. There’s not much beyond that, which is ok. On the desktop, the integration with Gmail is a key selling point. You can drag an email to Google Tasks to turn it into a task, for example. You also can see your tasks on your Google Calendar, if you want.

The best to-do app is one that’s always handy. If you’re the kind of person who always has Gmail open on your computer, it’s hard for any app to be handier than Google Tasks. The mobile versions make those tasks accessible on the go.

You can automatically move information between Google Tasks and your other apps with Google Tasks’ integration on Zapier. Here are a few examples of workflows you can automate, so you can stop manually moving your tasks.

Create Trello cards from new Google Tasks tasks

Try it

  • Google Tasks logo
  • Trello logo

Google Tasks, Trello

Google Tasks + TrelloMore details

Add new Google Tasks to Todoist as tasks

Try it

  • Google Tasks logo
  • Todoist logo

Google Tasks, Todoist

Google Tasks + TodoistMore details

Add Google Tasks tasks for new Google Calendar events

Try it

  • Google Calendar logo
  • Google Tasks logo

Google Calendar, Google Tasks

Google Calendar + Google TasksMore details

Google Tasks price: Free

Take a look at how you can power up all of your Google apps using automation.

Best to-do list app for people who forget to use to-do apps

Any.do (Web, Android, iPhone and iPad)

Any.do, our pick for the best to-do list app for people who forget to use to-do apps

Any.do offers a really slick mobile app that makes it quick to add tasks, organize them into lists, and add due dates. But where it really shines is with its daily “Plan my Day” feature, which forces you to schedule when you’ll accomplish your various tasks, so that you remember to actually do things. Any.do also integrates nicely with Google and Outlook calendars, allowing you to see your appointments and your tasks in one place. This is exactly what you need if you’re the kind of person who adds things to a list and forgets about them.

The desktop version isn’t quite as slick as the mobile version—it feels cluttered and is more than a little confusing. Still, Any.do’s mobile version alone makes a compelling reason to give it a shot, especially if that’s where you do most of your task management.

Any.do integrates with Zapier, so you can automatically add tasks to Any.do whenever there’s a new calendar event, note, or task in your other apps.

Add Evernote reminders to Any.do as tasks

Try it

  • Evernote logo
  • Any.do logo

Evernote, Any.do

Evernote + Any.doMore details

Create tasks in Any.do for new saved messages in Slack

Try it

  • Slack logo
  • Any.do logo

Slack, Any.do

Slack + Any.doMore details

Add new incomplete Todoist tasks to Any.do

Try it

  • Todoist logo
  • Any.do logo

Todoist, Any.do

Todoist + Any.doMore details

Any.do price: Free version available; paid version from $2.99/month.

Other to-do list options

We focused on dedicated to-do list apps in this roundup, but plenty of other software can fulfill the same function. Here are a few ideas if none of the above quite fit what you’re looking for:

Finding the right task management system is hard because it’s so personal. To that end, let me know if there’s anything you think I missed.

Related reading:

This post was originally published in April 2018 by Andrew Kunesh. The most recent update was in November 2022.

Source :
https://zapier.com/blog/best-todo-list-apps/

How To Install Kimai Time Tracking App in Docker

In this guide, I’ll show you how to deploy the open source time tracking app Kimai in a Docker container. Kimai is free, browser-based (so it’ll work on mobile devices), and is extremely flexible for just about every use case.

It has a stopwatch feature where you can start/stop/pause a worklog timer. Then, it accumulates the total into daily, weekly, monthly or yearly reports, which can be exported or printed as invoices.

It supports single or multi users, so you can even track time for your entire department. All statistics are visible on a beautiful dashboard, which makes historical time-tracking a breeze.


Why use Kimai Time Tracker?

For my scenario, I am salaried at work. However, since I’m an IT Manager, I often find myself working after hours or on weekends to patch servers, reboot systems, or perform system and infrastructure upgrades. Normally, I use a pen and paper or a notetaking app to track overtime, although this is pretty inefficent. Sometimes I forget when I started or stopped, or if I’ve written down the time on a notepade at home, I can’t view that time at work.

And when it comes to managing a team of others who also perform after hours maintenance, it becomes even harder to track their total overtime hours.

Over the past few weeks, I stumbled across Kimai and really love all the features. Especially when I can spin it up in a docker or docker compose container!

If you don’t have Docker installed, follow this guide: https://smarthomepursuits.com/how-to-install-docker-ubuntu/

If you don’t have Docker-Compose installed, follow this guide: https://smarthomepursuits.com/how-to-install-portainer-with-docker-in-ubuntu-20-04/

In this tutorial, we will be installing Kimai for 1 user using standard Docker run commands. Other users can be added from the webui after initial setup.


Step 1: SSH into your Docker Host

Open Putty and SSH into your server that is running docker and docker compose.


Step 2: Create Kimai Database container

Enter the command below to create a new database to use with Kimai. You can copy and paste into Putty by right-clicking after copy, or CTRL+SHIFT+V into other ssh clients.

sudo docker run --rm --name kimai-mysql \
    -e MYSQL_DATABASE=kimai \
    -e MYSQL_USER=kimai \
    -e MYSQL_PASSWORD=kimai \
    -e MYSQL_ROOT_PASSWORD=kimai \
    -p 3399:3306 -d mysql

Step 3: Start Kimai

Next, start the Kimai container using the already created database. If you look at the Kimai github page, you’ll notice that this isn’t the same command as what shows there.

Here’s the original command (which I’m not using):

docker run --rm --name kimai-test -ti -p 8001:8001 -e DATABASE_URL=mysql://kimai:kimai@${HOSTNAME}:3399/kimai kimai/kimai2:apache

And here’s my command. I had to explicitly add TRUSTED_HOSTS, the ADMINMAIL and ADMINPASS, and change the ${HOSTNAME} to the IP address of your docker host. Otherwise, I wasn’t able to access Kimai from other computers on my local network.

  • Green = change port here if already in use
  • Red = Add the IP address of your docker host
  • Orange = Manually specifying the admin email and password. This is what you’ll use to log in with.
  • Blue = Change to docker host IP address
sudo docker run --rm --name kimai -ti -p 8001:8001 -e TRUSTED_HOSTS=192.168.68.141,localhost,127.0.0.1 -e ADMINMAIL=example@gmail.com -e ADMINPASS=8charpassword -e DATABASE_URL=mysql://kimai:kimai@192.168.68.141:3399/kimai kimai/kimai2:apache

Note that 8 characters is the minimum for the password.


Step 4: Log In via Web Browser

Next, Kimai should now be running!

To check, you can go to your http://dockerIP:8001 in a web browser (192.168.68.141:8001)

Then simply log in with the credentials you created.


Step 5: Basic Setup

This app is extremely powerful and customizeable, so I won’t be going over all the available options since everyone has different needs.

Like I mentioned earlier, I’m using Kimai for overtime tracking only, so the first step for me is to create a new “customer”.

Create a Customer

This is sort of unintuitive, but you need to create a customer before you can start tracking time to a project. I’m creating a generic “Employee” customer.

Click Customers on the left sidebar, then click the + button in the top right corner.

Create A Project

Click Projects on the left sidebar:

Then click the + button in the top right corner.

Add a name, choose the customer you just created, and then choose a date range.

Create An Activity

Click Activity on the left, then create an activity. I’m calling mine Overtime Worked and assigning it to the Project “Overtime 2021” I just created.


Step 6: Change “Timetracking Mode” to Time-clock

Click Settings. Under Timetracking mode, change it to Time-Clock. This will let you click the Play button to start/stop time worked vs having to manually enter start and stop times.


Step 7: Start Tracking Time!

To start tracking time, simply click the timer widget in the top right corner.

A screen will pop up asking you what project and activity you want to apply the time to.

The selfhosted stopwatch will start tracking time right after. You can then view the timesheets for yourself under the My Times section or for all users under the Timesheets or Reporting tabs.


Wrapping Up

Hopefully this guide helped you get Kimai installed and setup! If you have any questions, feel free to let me know in the comments below and I’ll do my best to help you out.


My Homelab Equipment

Here is some of the gear I use in my Homelab. I highly recommend each of them.

The full list of server components I use can be found on my Equipment List page.

Source :
https://smarthomepursuits.com/how-to-install-kimai-time-tracking-app-in-docker/

Port Forwarding configured using SonicOS API

Description

This article describes the steps involved in creating Polices using SonicOS APIs that will let you access internal devices or servers behind the SonicWall firewall.

Cause

SonicWall by default does not allow inbound traffic which not a part of a session that was initiated by an internal device on the network. This is done to protect the devices in the internal network from malicious access. If required certain parts of the network can be opened to external access, for example Webservers, Exchange servers and so on.

To open the network, we need to specify an access rule from the external network to the internal network and a NAT Policy so we direct traffic only to the intended device.

With APIs this can be achieved on scale for example you can create multiple Access Rules and NAT policies with one command and all the attributes can be specified into Json Objects.

Resolution

Manually opening Ports / enabling Port forwarding to allow traffic from the Internet to a Server behind the SonicWall using sonicos API involves the following steps:

Step1: Enabling the API Module.

Step2:Getting into Swagger.

Step3:Login to the SonicWall with API.

Step4:Create Address Objects and Service Objects with API.

Step5:Creating NAT Policy with API.

Step6: Creating Access Rules with API.

Step7:Committing all the configurational changes made with APIs.

Step8: Log out the SonicWall with API:

Scenario Overview

The following walk-through details allowing TCP 3389 From the Internet to a Terminal Server on the Local Network.Once the configuration is complete, Internet Users can RDP into the Terminal Server using the WAN IP address.Although the examples below show the LAN Zone and TCP 3389 they can apply to any Zone and any Port that is required.

Step 1: Enabling the API Module:               
 

  1.  Log into the SonicWall GUI.
  2.  Click Manage in the top navigation menu.
  3. Click Appliance | Base Settings
  4. Under Base Settings search for sonicos API
  5. Click Enable sonicos API  
  6. Click Enable RFC-2617 HTTP Basic Access authentication
Enabling API on the SonicOS

Step2: Getting into Swagger

  1. Click on the Mange Tab
  2. Scroll Down to find API
  3. Click on the Link https://sonicos-api.sonicwall.com
  4. Swagger will prepopulate your SonicWalls’s IP, MGMT Port, Firmware so it can give you a list of applicable APIs.

 NOTE: All the APIs required for configuring Port Forwarding will be listed in this Article.

API on the SonicOS

Step3:Login to the SonicWall with API:

  1.  curl -k -i -u “admin:password” -X POST https://192.168.168.168:443/api/sonicos/auth

      “admin:password” – Replace this with your SonicWalls username : password

      https://192.168.168.168:443/– Replace this with your SonicWalls Public or private IP address

Command Output should contain a string: “success”: true

Login with API

 NOTE: You are free to choose Swagger, Postman, Git bash or any application that allows API calls, if you are using a Linux based operating system you can execute cURL from the terminal.For this article I am using Git bash on Windows.

Step4:Create Address Objects and Service Objects with API:

  1.   curl -k -i -X POST “https://192.168.168.168:443/api/sonicos/address-objects/ipv4” -H “accept: application/Json” -H “Content-Type: application/Json” -d “{\”address_object\”:{\”ipv4\”:{\”name\”:\”Term Server Private\”,\”zone\”:\”LAN\”,\”host\”:{\”ip\”:\”192.168.168.10\”}}}}”  &&  curl -k -i -X POST “https://192.168.168.168:443/api/sonicos/address-objects/ipv4” -H “accept: application/Json” -H “Content-Type: application/Json” -d “{\”address_object\”:{\”ipv4\”:{\”name\”:\”Term Server Public\”,\”zone\”:\”WAN\”,\”host\”:{\”ip\”:\”1.1.1.1\”}}}}”

 OR 

curl -k -i -X POST “https://192.168.168.168:443/api/sonicos/address-objects/ipv4” -H “accept: application/Json” -H “Content-Type: application/Json” -d @add.Json

@add.Json is a file with the following information:

{
“address_objects”: [
{
“ipv4”: {
“name”: “Term Server Private”,
“zone”: “LAN”,
“host”: {
“ip”: “192.168.168.10”
}
}
},
{
“ipv4”: {
“name”: “Term Server Public”,
“zone”: “WAN”,
“host”: {
“ip”: “1.1.1.1”
}
}
}
]
}

Output of the First command where we have parsed the address object data on the command instead of creating a separate File:

Image

 Output of the second Command where we have used a file called @add instead of specifying data on the command:

Image

 TIP: If you are creating only one Address Object then the First command should be sufficient, if you are creating multiple address objects then the second command should be used.

 CAUTION: I have the add.Json file saved on to my desktop and hence I was able to call it into the command, if you have created the Json the file in a different location then make sure you are executing the command from that location.

2. Adding Service Object:

 curl -k -i -X POST “https://192.168.168.168:443/api/sonicos/service-objects” -H “accept: application/Json” -H “Content-Type: application/Json” -d @serviceobj.Json

https://192.168.168.168:443 – Replace that with the IP of the SonicWall

@serviceobj.Json is a file that contains the Attributes of the service object:

{

  “service_object”: {

    “name”: “Terminal Server 3389”,

    “TCP”: {

      “begin”: 3389,

      “end”: 3389

    }

  }

}

Output of the command:

Image

 3. Committing the changes made to the SonicWall: We need to do this to be able to use the Address Objects and service objects that we just created to make a NAT Policy and an Access Rule.

  curl -k -X POST “https://192.168.168.168:443/api/sonicos/config/pending” -H “accept: application/Json”

  https://192.168.168.168:443 – Replace that with the IP of the SonicWall

Output of the command: 

Image

Step5: Creating NAT Policy with API:

1.     curl -k -i -X POST “https://192.168.168.168:443/api/sonicos/nat-policies/ipv4” -H “accept: application/Json” -H “Content-Type: application/Json” -d @natpolicy.Json

         https://192.168.168.168:443 – Replace that with the IP of the SonicWall

         @natpolicy.Json is a file that contains the Attributes of the NAT Policy:

{

  “nat_policies”: [

    {

      “ipv4”: {

        “name”: “Inbound NAT 3389”,

        “enable”: true,

        “comment”: “”,

        “inbound”: “X1”,

        “outbound”: “any”,

        “source”: {

          “any”: true

        },

        “translated_source”: {

          “original”: true

        },

        “destination”: {

          “name”: “Term Server Public”

        },

        “translated_destination”: {

          “name”: “Term Server Private”

        },

        “service”: {

          “name”: “Terminal Server 3389”

        },

        “translated_service”: {

          “original”: true

        }

      }

    }

  ]

}

Output of the command:

Image

Step6: Creating Access Rules with API:

1.     curl -k -X POST “https://192.168.168.168:443/api/sonicos/access-rules/ipv4” -H “accept: application/Json” -H “Content-Type: application/Json” -d @accessrule.Json

https://192.168.168.168:443 – Replace that with the IP of the SonicWall

@accessrule.Json is a file that contains the Attributes of the access rule:

{

  “access_rules”: [

    {

      “ipv4”: {

        “name”: “Inbound 3389”,

        “enable”: true,

        “from”: “WAN”,

        “to”: “LAN”,

        “action”: “allow”,

        “source”: {

          “address”: {

            “any”: true

          },

          “port”: {

            “any”: true

          }

        },

        “service”: {

          “name”: “Terminal Server 3389”

        },

        “destination”: {

          “address”: {

            “name”: “Term Server Public”

          }

        }

        }

    }

  ]

}

Output of the command:

Image

Step7: Committing all the configurational changes made with APIs:

1.     We have already committed Address objects and Service Objects in Step 4, In this step we are committing the NAT Policy and the Access Rule to the SonicWalls configuration:

curl -k -X POST “https://192.168.168.168:443/api/sonicos/config/pending” -H “accept: application/Json”

https://192.168.168.168:443 – Replace that with the IP of the SonicWall

We have Only used the POST method in most of the API calls for this Article because we are only Adding things into the configuration, there are other methods Like GET,DELETE,PUT and etc. I recommend that you go through https://sonicos-api.sonicwall.com for more API commands.

Step8: Log out the SonicWall with API:

1.       It is recommended to log out from the SonicWall via API once the desired configuration is committed.

         curl -k -i -u “admin:password” -X DELETE https://192.168.168.168:443/api/sonicos/auth

         https://192.168.168.168:443 – Replace that with the IP of the SonicWall

         “admin:password” – is the actual username and password for the SonicWall.

Output of the command:

Image

 CAUTION: Caution: If you miss to perform the action in Step 7 and Execute the command in Step 8 you will lose all the configuration changes made in the current session.

Summary:We have successfully configured a Port Forwarding for a user in the Internet to access a Term Server that is behind a Firewall on port 3389 using sonicos API.

 NOTE: It is always recommended to use Client VPN for RDP connections this article here is just an example.

Related Articles

Categories

Source :
https://www.sonicwall.com/support/knowledge-base/port-forwarding-with-sonicos-api-using-postman-and-curl/190224162643523/

What FQDN’s and IP’s are used by SonicWall products to update their services?

Description

This article lists the Fully Qualified Domain Names (FQDNs) in use by SonicWall for its licensing and security services.

Resolution

SonicWall firewalls:

  • lm2.sonicwall.com – Registration information/licensing.
  • licensemanager.sonicwall.com – Registration information/licensing for older firewalls.
  • software.sonicwall.com – Softwares, firmwares, NetExtender, GVC.
  • responder.global.sonicwall.com – Probe target.
  • clientmanager.sonicwall.com – Client CF enforcement download.
  • policymanager.sonicwall.com – Global Security Client.
  • convert.global.sonicwall.com – Preference processor server.
  • geodnsd.global.sonicwall.com – Used for flow reporting and GeoIP.
  • webcfs00.global.sonicwall.com – Content filter server.
  • webcfs01.global.sonicwall.com – Content filter server.
  • webcfs02.global.sonicwall.com – Content filter server.
  • webcfs03.global.sonicwall.com – Content filter server.
  • webcfs04.global.sonicwall.com – Content filter server.
  • webcfs05.global.sonicwall.com – Content filter server.
  • webcfs06.global.sonicwall.com – Content filter server.
  • webcfs07.global.sonicwall.com – Content filter server.
  • webcfs08.global.sonicwall.com – Content filter server.
  • webcfs10.global.sonicwall.com – Content filter server.
  • webcfs11.global.sonicwall.com – Content filter server.
  • gcsd.global.sonicwall.com – Cloud antivirus and status.
  • sig2.sonicwall.com – Signature updates.
  • sigserver.global.sonicwall.com – Signature updates for older firewalls.
  • lmdashboard.global.sonicwall.com – License manager dashboard.
  • appreports.global.sonicwall.com – App reports server.
  • sonicsandbox.global.sonicwall.com – Default Capture ATP server (west coast) UDP 2259, and https (tcp 443).
  • sonicsandboxmia.global.sonicwall.com  – East coast capture ATP server UDP 2259, and https (tcp 443).
  • utmgbdata.global.sonicwall.com – Map info URL domain.
  • cfssupport.sonicwall.com – View rating of a website.
  • cloudtt.global.sonicwall.com – Zero Touch provisioning
  • eprs2.global.sonicwall.com (204.212.170.36, 204.212.170.11, 204.212.170.10) – Content Filter Client servers.
  • wsdl.mysonicwall.com  – Automatic preference backups and firmware downloads.
  • sonicsandbox.global.sonicwall.com
  • sonicsandboxmia.global.sonicwall.com
  • sonicsandboxams.global.sonicwall.com
  • sonicsandboxfra.global.sonicwall.com
  • sonicsandboxtko.global.sonicwall.com

    This information can also be found in the Tech Support Report (TSR). More information about the TSR can be found in the following article:
    How to Download Tech Support Files (TSR, EXP, Logs) From SonicWall UTM Firewalls

Capture Client software:

  • captureclient-36.sonicwall.com
  • captureclient.sonicwall.com
  • sonicwall.sentinelone.net (S1 agent)
  • software.sonicwall.com (software package updates)
  • sonicsandbox.global.sonicwall.com (Capture ATP- Applicable for Capture Client Advanced License)

SonicWall CSC:

  • For SanJose Colo

    FQDN: cloudgms.sonicwall.com
    Zero Touch FQDN: cloudtt.global.sonicwall.com
    IP: 4.16.47.168, 4.16.47.188

  • For AWS Colo

    FQDN: cscma.sonicwall.com
    Zero Touch FQDN: cscmatt.global.sonicwall.com
    IP: 34.211.138.110, 52.37.12.168, 52.89.82.203, 52.11.92.114

  • For AMS Colo

    FQDN: cloudgmsams.sonicwall.com
    Zero Touch FQDN: cloudttams.global.sonicwall.com
    IP: 213.244.188.168, 213.244.188.188

  • For AWS-FRA Colo

    FQDN: cscmafra.sonicwall.com
    Zero Touch FQDN: cscmafratt.global.sonicwall.com, cscmafratta.global.sonicwall.com
    IP: 18.197.234.66, 18.197.234.59

SonicWall NSM:

  • For Oregon AWS Colo

    FQDN: nsm-uswest.sonicwall.com (Use it in GMS settings under Administration Page)
    Zero Touch FQDN: nsm-uswest-zt.sonicwall.com (Use it in ZeroTouch Settings under Diag page)
    IP: 13.227.130.81, 13.227.130.63, 3.227.130.69, 13.227.130.12, 52.39.29.75, 44.233.105.101, 44.227.248.206

  • For AWS-FRA Colo

    FQDN: nsm-eucentral.sonicwall.com (Use it in GMS settings under Administration Page)
    Zero Touch FQDN: nsm-eucentral-zt.sonicwall.com (Use it in ZeroTouch Settings under Diag page)
    IP: 13.227.130.70, 13.227.130.69, 13.227.130.15, 13.227.130.92, 18.156.16.24, 18.157.240.148, 3.127.176.56

Related Articles

Categories

Source :
https://www.sonicwall.com/support/knowledge-base/what-fqdn-s-and-ip-s-are-used-by-sonicwall-products-to-update-their-services/170503941664663/