Windows Update Commands – USOClient, Powershell, WUAUCLT

The windows Update CLI commands are useful for troubleshooting Windows Update errors. And they are helpful when you need to automate the windows update tasks. In newer versions of windows, the WUAUCLT command has been deprecated and replaced with the usoclient. In this article we have included the options and syntax for using wuault, usoclient, and powershell to detect and install windows updates

WUAUCLT

The windows update command utility in windows is: WUAUCLT. This stands for Windows Update Automatic Update Client. This client has been deprecated in windows 10 and server 2016. Howeve,r it is still available through windows 7 and server 2012R2.

Below is a list of arguments you can pass to the WUAUCLT commands and a short explanation of what each argument does.
Search:

CommandDescription
/DetectNowDetect and download updates that are available (will vary by system settings)
/ReportNowTell the client to report its status back to the WSUS server
/RunHandlerComServer
/RunStoreAsComServer
/ShowSettingsDialogShow Windows Update settings dialog
/ShowWindowsUpdateShows the windows update dialog box or web page (depending on windows version)
/ResetAuthorizationwhen an update check occurs a cookie is stored that prevents a new update or check for 1 hour. So, you should use this to delete this cookie
/ResetEulasResets the accepted EULA’s
/ShowWUShows the windows update dialog on windows vista and above. Opens Windows update on XP
/SelfUpdateManagedScan for windows updates using WSUS
/SelfUpdateUnmanagedTriggers a windows update scan using the windows update website
/ShowOptionsOpen the windows update settings window
/ShowFeaturedOptInDialogShow Opt-In dialog for featured updates
/DemoUIShow the icons for windows update
/ShowFeaturedUpdatesOpen windows update dialog and shows the featured updates
/ShowWUAutoScan
/UpdateNowInstall updates now

Showing 1 to 17 of 17 entries

Examples

See below for some examples of running the wuauclt. All examples should be run from an elevated/administrative command prompt

If all you want to do is detect and install updates right now, you would run:

Wuauclt /dectectnow /updatenow

If it is refusing to install, you can run:

Wuauclt /resetauthorization

If you want to have the client report its status back to the WSUS server, you would run:

Wuauclt /reportnow

Powershell

Powershell will give you the most flexibility in installing windows updates. The other methods are fine for simply downloading and installing all updates. However, with the powershell cmdlets you can do things like get a list of updates, search for updates with a specific word in them, then only install those updates.

The first step is to download the powershell module here:
https://gallery.technet.microsoft.com/scriptcenter/2d191bcd-3308-4edd-9de2-88dff796b0bc

If you have Powershell verison 5, you can install the module from the gallery by running:

Install-module PSWindowsUpdate

Before you can run any commands, you need to import the windows update module:

Import-Module PSWindowsUpdate

You might need to install the Microsoft Update service. That can be done with this command:

Add-WUServiceManager -ServiceID 7971f918-a847-4430-9279-4a52d1efe18d

You can get a list of available cmdlets in the PSWindowsUpdate module with the following command:

Get-command -module PSWindowsUpdate

I have also included a list of commands below:

  • Add-WUOfflineSync
  • Add-WUServiceManager
  • Get-WUHistory
  • Get-WUInstall
  • Get-WUInstallerStatus
  • Get-WUList
  • Hide-WUUpdate
  • Invoke-WUInstall
  • Get-WURebootStatus
  • Get-WUServiceManager
  • Get-WUUninstall
  • Remove-WUOfflineSync
  • Remove-WUServiceManager
  • Update-WUModule

Examples

The most important cmdlet is Get-WUInstall . This will be apparent in the examples below

Download and install updates from Microsoft Update, then reboot:

Get-WUInstall –MicrosoftUpdate –AcceptAll –AutoReboot

**Note, I usually only reboot if required. For that reason, I don’t like to use the AutoReboot flag.

Check if a reboot is required

Get-wurebootstatus

List available updates on Microsoft Update

Get-WUInstall –MicrosoftUpdate –ListOnly

USOClient

The USO client is new to windows 10 and Server 2016. This replaces the wuauclt command in these Operating systems. I would recommend using powershell instead of this client when you are doing automation, since it will work on newer and older clients. However, this client is very simple to use. and is useful for one-off purposes. See the table below for all of the command arguments:
Show 102550100 entriesSearch:

startscanscan for updates
startdownloaddownload updates
startinstallinstall updates
RefreshsettingsRefresh settings if any changes were made
StartInteractiveScanOpen a dialog and start scanning for updates
RestartDeviceRestart computer to finish installing updates
ScanInstallWaitScan, Download, and install updates
ResumeUpdateResume installing updates on next boot

Showing 1 to 7 of 7 entries

PreviousNext

Examples

See below for some examples of how to use the USO client. All of these examples should be run in an administrative command prompt

Scan for updates

usoclient startscan

Download updates

Usoclient startdownload

Install updates

usoclient startinstall

Here are other related links

In case you would like to see some additional information, I hae included some links to good resources on these topics:

WSUS Server Cmdlets http://technet.microsoft.com/en-us/library/hh826166.aspx

http://blogs.technet.com/b/heyscriptingguy/archive/2012/01/16/introduction-to-wsus-and-powershell.aspx

Powershell Execution Policy:http://technet.microsoft.com/en-us/library/ee176961.aspx

Troubleshoot computers not in WSUS:
http://msmvps.com/blogs/athif/archive/2005/09/04/65174.aspx

Client Side Powershell Module:
http://gallery.technet.microsoft.com/scriptcenter/2d191bcd-3308-4edd-9de2-88dff796b0bc

Powershell FAQ
http://gallery.technet.microsoft.com/scriptcenter/2d191bcd-3308-4edd-9de2-88dff796b0bc/view/Discussions#content

Source :
https://www.idkrtm.com/windows-update-commands/
Guide: How to Install Active Directory in Windows Server 2019 Using PowerShell

In a previous article, I showed you how to install Active Directory (AD), the first domain controller (DC) in a new forest and domain, using Server Manager in Windows Server 2019. But if you’re not afraid of the command line, there’s a much quicker way to get Active Directory up and running in Windows Server. In this article, I’ll show you how to configure AD using PowerShell.

There are two steps to installing AD in Windows Server 2019. The first is to install the Active Directory Domain Services (AD DS) server role. The second step is to configure your server as a domain controller. An AD domain must have at least one DC. Your server will be the first DC in a new AD forest and domain.

To complete the instructions below, you will need to have an account with administrator privileges in Windows Server 2019. I will also assume that you are using Windows Server 2019 with the Desktop Experience role installed. If you are using Server Core, the instructions vary a little but are more or less the same.

Active Directory prerequisites

Before you install your first domain controller in the new AD domain, there are a couple of things you should do to prepare the server. While it’s not absolutely necessary, I recommend giving the computer a name that makes it easy to identify. For example, I usually call the first domain controller in a new domain DC1. Secondly, you’ll need to set a static IP address and configure the network adapter’s DNS server.

Let’s start by renaming the server.

  • Log in to Windows Server 2019 as an administrator.
  • Open the Start menu and click the Windows PowerShell
  • In the PowerShell window, run the command below and press ENTER. Replace ‘DC1’ with the name that you would like to use for your domain controller.
Rename-Computer -NewName DC1
  • Restart the server.

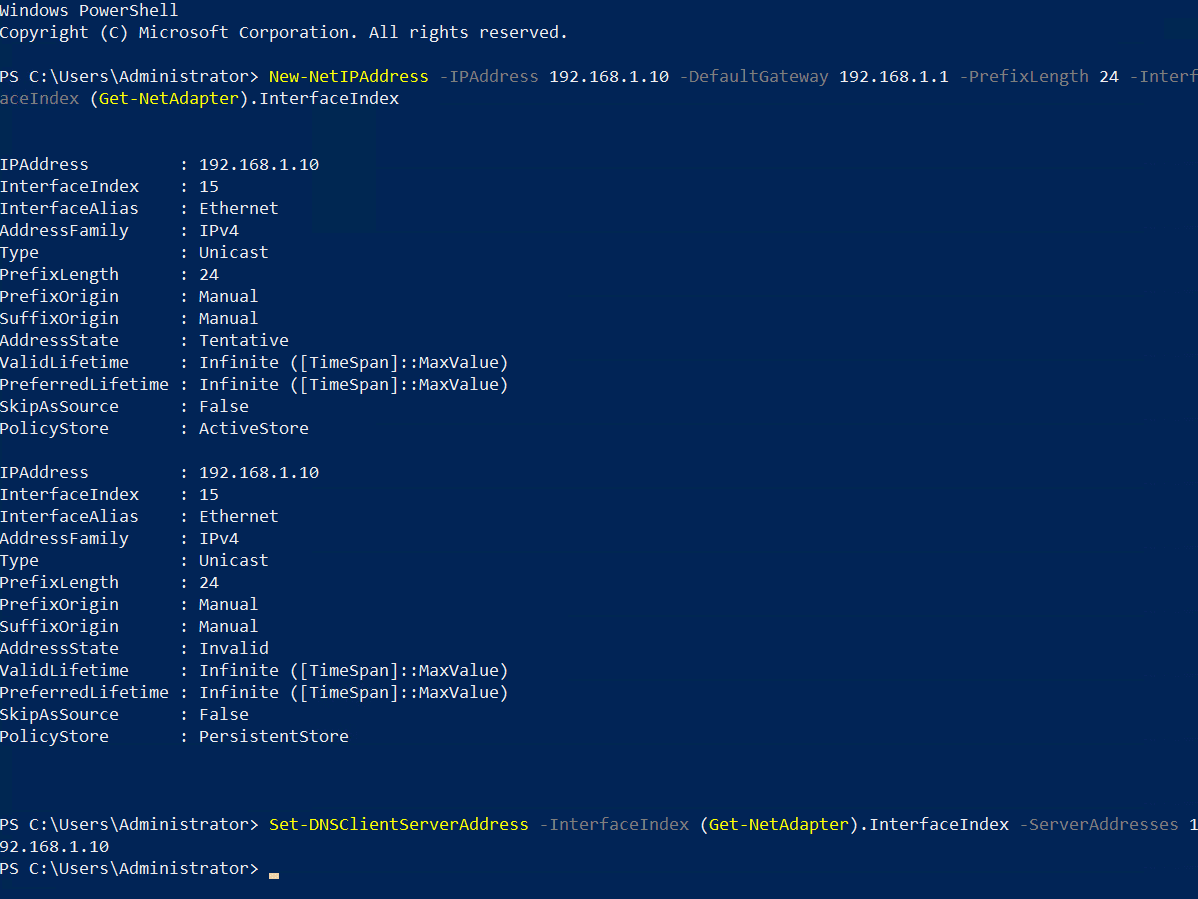
Once the server has rebooted, we can configure the network adapter. Your DC will need to communicate with other devices on the local network, so it’s important to speak to whoever oversees your network and get them to provide you with a static IP address that isn’t already in use. On my network, I will assign a static IP address of 192.168.1.10/24 and the default gateway is 192.168.1.1.

  • Log in to Windows Server 2019 as an administrator.
  • Open the Start menu and click the Windows PowerShell
  • In the PowerShell window, run the New-NetIPAddress command below and press ENTER. Replace the values for IPAddress, DefaultGateway, and PrefixLength to those provided by your network administrator.
New-NetIPAddress –IPAddress 192.168.1.10 -DefaultGateway 192.168.1.1 -PrefixLength 24 -InterfaceIndex (Get-NetAdapter).InterfaceIndex

The above command is designed to work on servers that have only one network adapter installed. If you have more than one adapter, you’ll need to enter the interface number instead of (Get-NetAdapter).InterfaceIndex. You can get the interface index number (ifIndex) for each adapter using Get-NetAdapter.

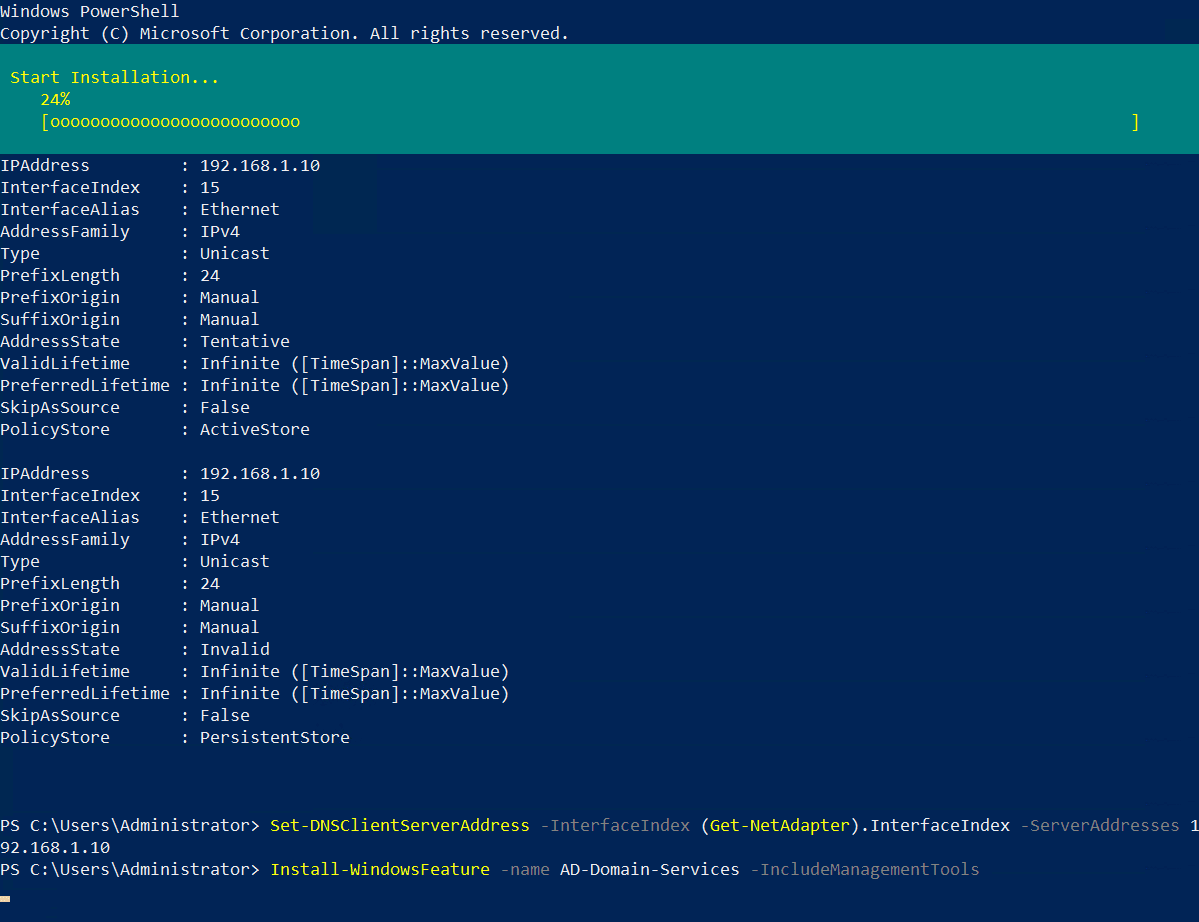
  • Now configure the adapter’s DNS settings. We’ll set the preferred DNS server to be our domain controller’s IP address because the domain controller will also perform the function of DNS server for the domain. So, replace 192.168.1.10 with the same IP address you configured for the adapter. Run Set-DNSClientServerAddress as shown, and press ENTER.
Set-DNSClientServerAddress –InterfaceIndex (Get-NetAdapter).InterfaceIndex –ServerAddresses 192.168.1.10

Again, the command is designed to work on servers that have only one network adapter installed. If you have more than one adapter, you’ll need to enter the interface number instead of (Get-NetAdapter).InterfaceIndex.

How to Install Active Directory in Windows Server 2019 Using PowerShell (Image Credit: Russell Smith)

Install the Active Directory Domain Services role

The next step is to install the AD DS server role. It’s easy to do using the Install-WindowsFeature cmdlet as shown below. If you are using Server Core, remove the -IncludeManagementTools parameter.

Install-WindowsFeature -name AD-Domain-Services -IncludeManagementTools
How to Install Active Directory in Windows Server 2019 Using PowerShell (Image Credit: Russell Smith)

Once the AD DS server role is installed, you’ll get a message in the PowerShell window. The Success column should read True.

How to Install Active Directory in Windows Server 2019 Using PowerShell (Image Credit: Russell Smith)

Configure the first domain controller in a new Active Directory forest

Before you continue, you should decide on a Fully Qualified Domain Name (FQDN) for your new domain. I’m going to use ad.contoso.com in this example. Where ‘ad’ is the name of my new domain and contoso.com is the top-level domain (TLD). You should make sure that you own the public TLD. In this example, I should own the contoso.com domain name. AD in the FQDN defines my internal DNS namespace for Active Directory.

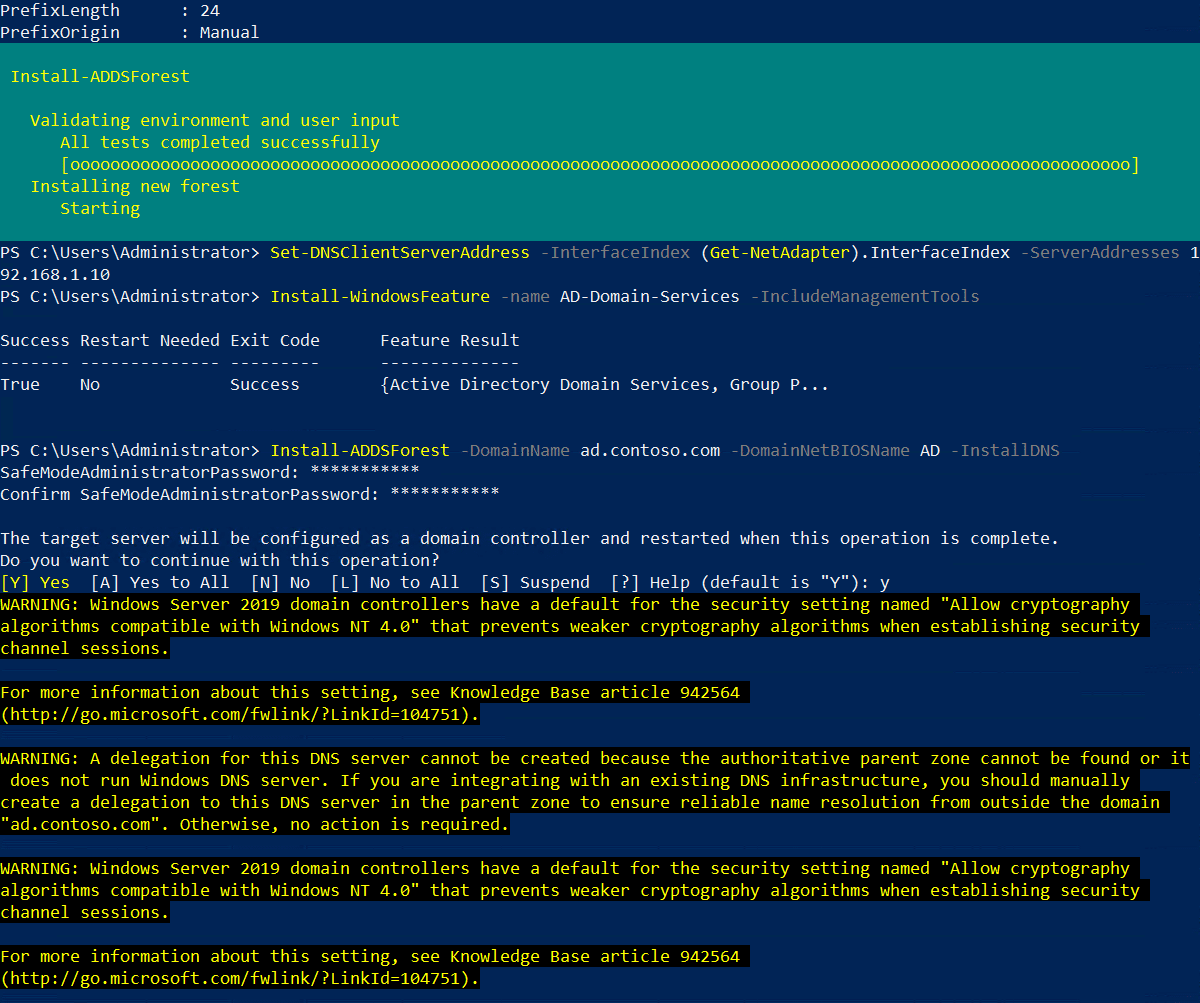
To configure Windows Server 2019 as a domain controller, run Install-ADDSForest as shown in the example below. Replace ad.contoso.com with your chosen FQDN. DomainNetBIOSName is usually set to the part of your FQDN that identifies your internal AD DNS namespace. So, the part that comes to the left of the first period. In this case, ‘ad’.

Install-ADDSForest -DomainName ad.contoso.com -DomainNetBIOSName AD -InstallDNS

You should note that Install-ADDSForest is only used when you are installing the first domain controller in a new AD forest. Install-ADDSDomain and Install-ADDSDomainController are used respectively to create a new domain in an existing forest and install a new DC in an existing AD domain.

DomainName and DomainNetBIOSName are the only two compulsory parameters for the Install-ADDSForest cmdlet. If you want to explore what other options you can configure, run the command line below:

Get-Help Install-ADDSForest

When you run the Install-ADDSForest cmdlet, you’ll be prompted to enter a password for Directory Services Restore Mode (DSRM). Or Safe Mode password as it’s sometimes referred to. Enter a password and confirm it when prompted.

You’ll then see a message:

The target server will be configured as a domain controller and restarted when this operation is complete.

Do you want to continue with this operation?

Type y in the PowerShell window and press ENTER to confirm that you want to configure the server as a domain controller.

How to Install Active Directory in Windows Server 2019 Using PowerShell (Image Credit: Russell Smith)

As AD is configured, you’ll see some yellow warnings appear in the PowerShell window. They are normal and you can safely ignore them. The server will automatically reboot. Once Windows Server has rebooted, you will need to log in with the domain administrator account. The domain administrator account is assigned the same password as the built-in administrator account.

On the sign-in page, type administrator in the User name field. Type the password for the administrator account, which is the same as the password for the previous built-in administrator account, and press ENTER.

How to Install Active Directory in Windows Server 2019 Using PowerShell (Image Credit: Russell Smith)

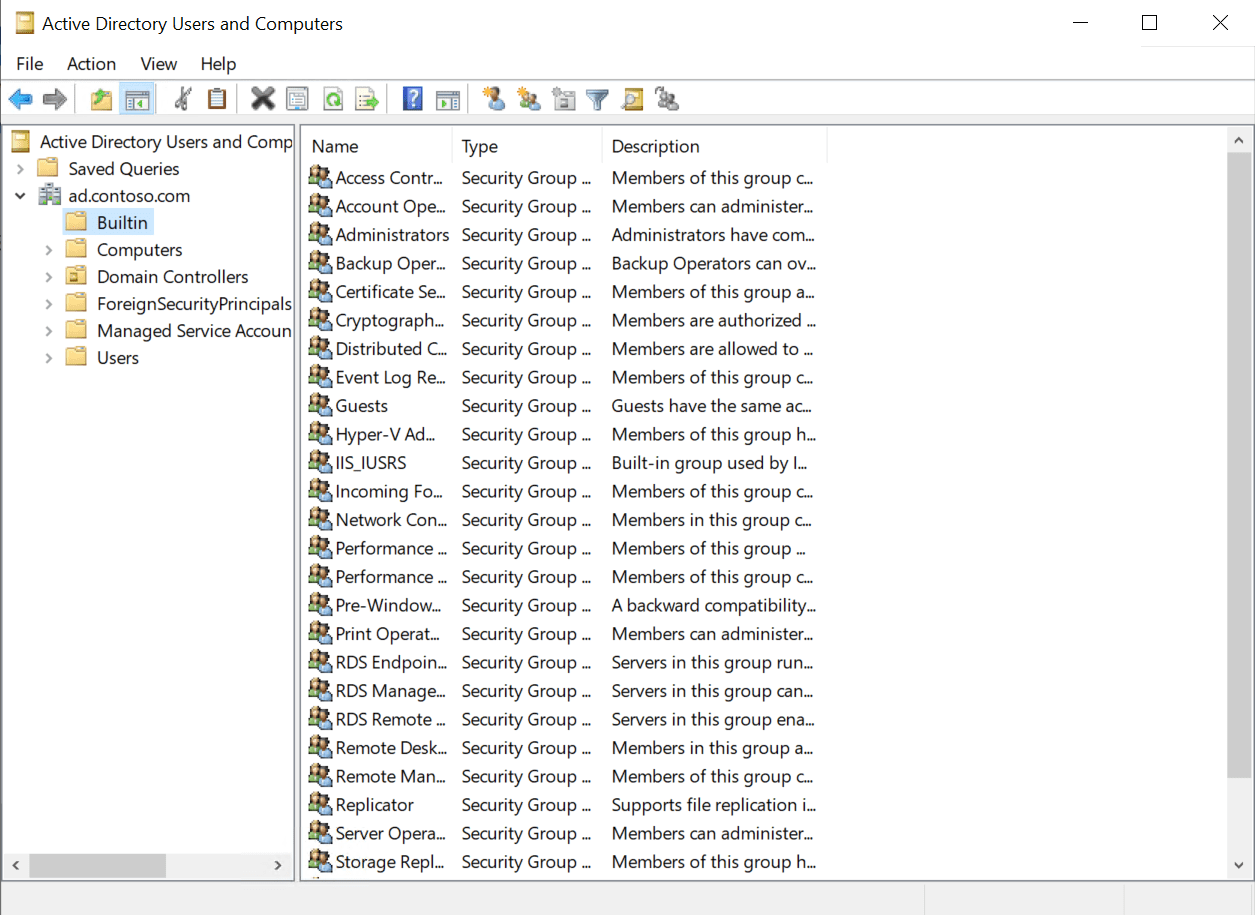
And that is it! You are now logged in to your AD domain’s first domain controller. You can access Server Manager from the Start menu. In Server Manager, click the Tools menu and then select Active Directory Users and Computers to start managing your domain.

Source :
https://petri.com/how-to-install-active-directory-in-windows-server-2019-using-powershell/

Active Directory: harden the security of your environment

In this tutorial dedicated to Active Directory and security, I will give you some tips to harden the level of security in order to be less vulnerable to attacks.

The different configuration points, which will be discussed, simply allow attacks to be made more difficult and longer internally, in no way will they guarantee that you are invulnerable.

What you need to know is that your first ally is time, the more “difficult” and longer it will be, the more likely you are that the attacker(s) will move on.

Before applying the settings, they should be tested in a restricted environment so as not to create more problems, especially on Active Directory environments that are several years old.

  1. Disable SMBv1 support
  2. Enable signing on the SMB protocol
  3. Disable LM and NTLMv1 authentication
  4. Disable LLMNR and NBT-NS
  5. Some additional tracks

Disable SMBv1 support

One of the first points is to disable support for the SMBv1 protocol on all computers (servers and client workstations).

Since Windows 10 and Windows Server 2019, SMBv1 support is disabled by default.

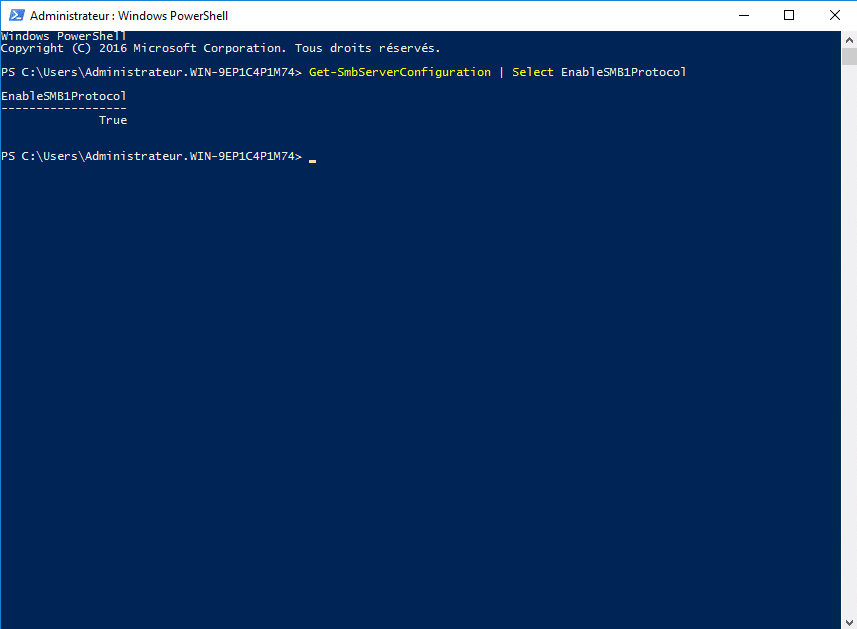
To find out if the SMBv1 protocol is enabled, use the following command:

Get-SmbServerConfiguration | Select EnableSMB1Protocol
SMBv1 Enable

Before disabling SMBv1, it is possible to check if it is still used on a server.

To do this, use the command below:

Get-SmbSession | Select-Object -Property ClientComputerName, ClientUserName, Dialect

This command returns the device IP address, username, and SMB version used to access the shares.

If you have “old” equipment (copiers, scanners …), it is possible that they do not support a higher version of SMB.

It is also possible to enable SMBv1 access auditing:

Set-SmbServerConfiguration -AuditSmb1Access $true

Once activated, you must search for events with ID 3000 in the log: Microsoft-Windows-SMBServer\Audit.

To disable the SMBv1 protocol, there are several solutions.

Disable the SMBv1 protocol, this solution is effective immediately and does not require a restart (Windows 8.1 / Server 2012R2 or newer):

Set-SmbServerConfiguration -EnableSMB1Protocol $false

To disable the SMBv1 protocol on later versions of Windows (7, Vista, Server 2008 and Server 2008R2), modify the registry:

Set-ItemProperty -Path "HKLM:\SYSTEM\CurrentControlSet\Services\LanmanServer\Parameters" SMB1 -Type DWORD -Value 0 -Force

To take an account a restart is necessary.

For Windows 8.1 / Server 2012R2, it is also possible to uninstall the SMBv1 protocol support, here a restart is necessary:

Disable-WindowsOptionalFeature -Online -FeatureName SMB1Protocol

I also wrote a tutorial on disabling SMBv1 protocol (Server/Client) by group policy: https://rdr-it.com/en/gpo-disabled-smbv1/

Enable signing on the SMB protocol

In order to “protect” against Man-in-the-middle (MITM) attacks, it is possible to activate the signature on SMB protocol exchanges.

SMB signing works with SMBv2 and SMBv3.

The configuration of the signature can be done:

  • at the client level
  • at the server level

From the moment one of the two negotiates the signature, the SMB flow will be signed.

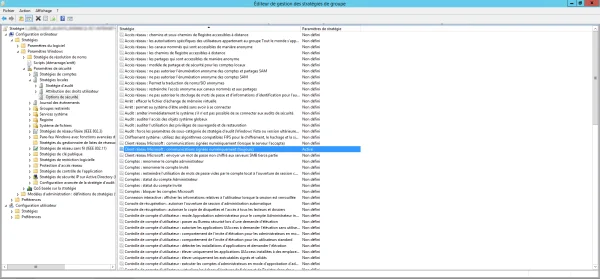
The configuration is done at the level of group policies: Computer configuration / Windows settings / Security settings / Security options. The two parameters to activate:

  • Microsoft network client: digitally sign communications (always)
  • Microsoft network server: digitally sign communications (always)

Again, I advise you to test on a few computers before applying this to your entire fleet, for my part, I had problems with RDS servers in terms of access to shares.

For more information I invite you to read this page : https://docs.microsoft.com/fr-fr/windows/security/threat-protection/security-policy-settings/microsoft-network-client-digitally-sign-communications-always.

Disable LM and NTLMv1 authentication

Still in the “old” protocols, it is necessary to disable the LM and NTLMv1 protocols which have password hashes that are very easy to brute force.

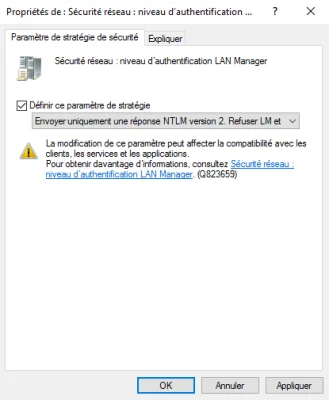
Once again, deactivation can be done by group policy at: Computer Configuration / Windows Settings / Security Settings / Security Options

You need to configure the parameter: Network Security: LAN Manager Authentication Level.

To do this, check Define this policy parameter and select: Send NTLM version 2 responses only\Refuse LM and NTLM

This setting is in an ideal world, if NTLMv1 should still be used, use this setting to disable LM: Only send NTLMv2 responses\Refuse LM

If you must use this parameter, NTLMv1 HASHes can still circulate on the network and are vulnerable to brute force attacks faster than NTLMv2.

It is possible to audit NTLM traffic by enabling settings to identify where NTMLv1 is being used

  • Network Security: Restrict NTLM: Audit Incoming NTLM Traffic
  • Network Security: Restrict NTLM: NTLM authentication in this domain

The NTLM configuration allows quite a bit of flexibility in terms of configuring it and adding exceptions.

Disable LLMNR and NBT-NS

LLMNR (Link-Local Multicast Name Resolution) and NBT-NS (Netbios Name Service) are two broadcast/multicast name resolution “protocols” that are enabled by default, they are used when dns name resolution fails.

If you use Wireshark type software to listen to the network, you will see that there is a lot of LLMNR and NBT-NS traffic.

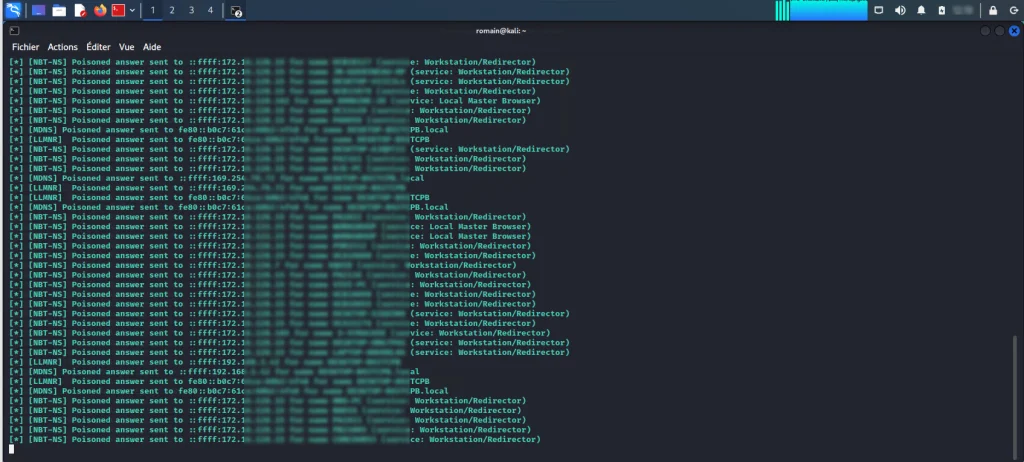
The main danger of LLMNR and NBT-NS is that it is easy to send a false response with another computer in order to retrieve an NTLM hash of the requesting client.

Below are screenshots of the responder which allows you to respond to LLMNR and NBT-NS requests

Listen

Now we will see how to deactivate LLMNR and NBT-NS

Disable LLMNR

Good news, LLMNR is disabled by group policy in configuring the DNS client of computers.

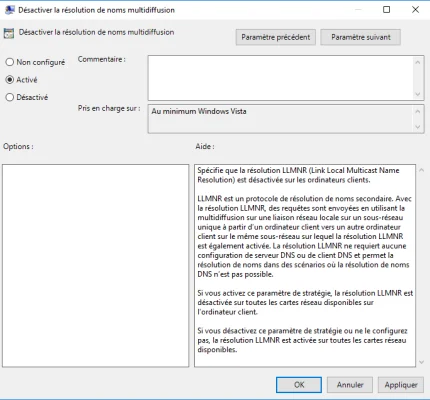
To disable LLMNR, you must enable the Disable multicast name resolution setting located at: Computer Configuration / Administrative Templates / Network / DNS Client.

After applying the GPO on the computers in the domain, they will no longer use LLMNR.

If you have non-domain computers, it will be necessary to do this on them.

Disable NBT-NS

Here it gets a little complicated because NBT-NS is configured at the NIC level and there is no applicable group policy. The good news is that for client computers (mainly workstations), it is possible to do this by an option on the DHCP server.

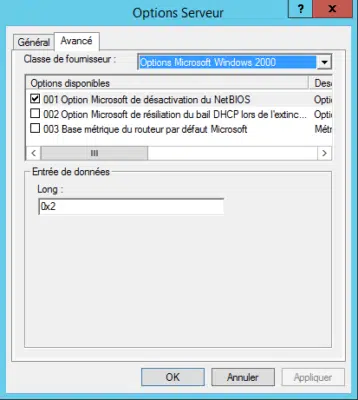
At the options level (extended or server), option 001 Microsoft Options for disabling NetBios must be configured in the Microsoft Windows 2000 Option vendor class. The value 0x2 must be entered to disable NBT-NS.

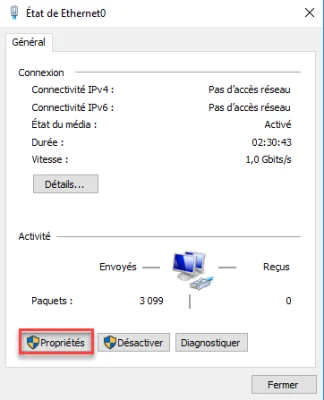
For computers that are not in automatic addressing, Netbios must be disabled on the network card(s).

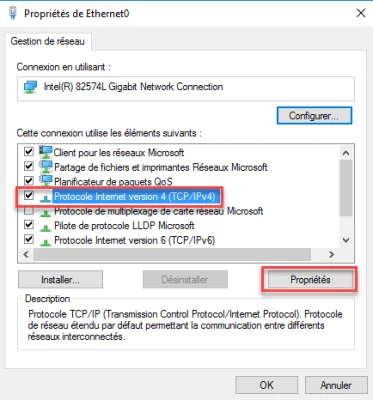
Open network card properties.

Select Internet Protocol Version 4 (TCP/IPv4) and click Properties.

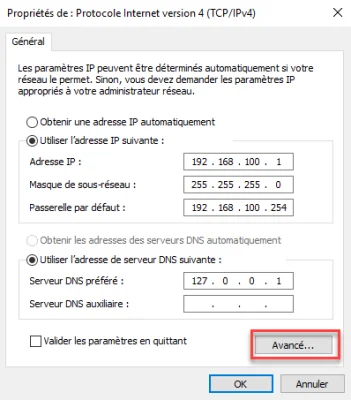
From the General tab, click on Advanced.

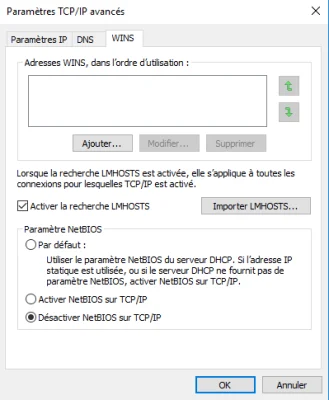
Go to the WINS tab, and select Disable NetBIOS over TCP/IP.

Close the different ones by validating the configuration.

It is possible to disable Netbios by GPO using a PowerShell script run at startup.

Here is the script:

 ps-disable-netbios.ps1 248 Bytes 

1234

# Get network cards
$regkey = "HKLM:SYSTEM\CurrentControlSet\services\NetBT\Parameters\Interfaces"
# Disable Netbios on each
Get-ChildItem $regkey |foreach { Set-ItemProperty -Path "$regkey\$($_.pschildname)" -Name NetbiosOptions -Value 2 -Verbose}

Some additional tracks

Here are some additional tips:

  • Deploy LAPS on computers and servers in order to have different local administrator passwords.
  • Sign your DNS zone (DNSSEC)
  • Regularly audit privileged accounts.

It is also important to follow some simple “hygiene” rules:

  • Limit privileged account usage (domain admins)
  • Do not use domain admin accounts on workstations
  • Update servers and computers regularly
  • Update applications (Web server, database, etc.)
  • Make sure you have up-to-date antivirus
  • Learn about security bulletins

Regarding the last point that I will address, it is passwords, for domain administrator accounts, privileged long passwords (20 to 30 characters) which will take much longer to be “brute-forced” than an 8-character password even with complexity.

Don’t forget to audit your Active Directory for free with Ping Castle.CategoriesActive DirectoryTagsActive DirectorySecurity

Source :
https://rdr-it.com/en/active-directory-harden-the-security-of-your-environment/

Active Directory: Add a Domain Controller to PowerShell

Table Of Contents

  1. Introduction
  2. Prerequisites
  3. Installing the ADDS role in PowerShell
  4. Domain Controller Promotion in PowerShell
  5. Complements

Introduction

In this tutorial, we will see how to add an Active Directory domain controller to an existing domain using PowerShell.

To do this through the GUI, I invite you to read this article: Add an AD DS Domain Controller to an Existing Domain. (fr)

Adding a domain controller to PowerShell is done in two command lines, which saves time….

Prerequisites

On the server that is going to be promoted domain controller, it is necessary:

  • A fixed IP address.
  • Configure an existing domain controller as a DNS server on the network adapter.
  • Make sure the ping of the domain name answers.

Dans le cas d’ajout où vous ajoutez un contrôleur de domaine sur une autre plage IP et que vous en novice, je vous conseille avant la lecture du l’article pour le faire en mode graphique et l’article suivant : Active Directory : configuration multi sites, sous réseau et réplication.

Installing the ADDS role in PowerShell

From a Powershell command prompt launched as administrator enter:

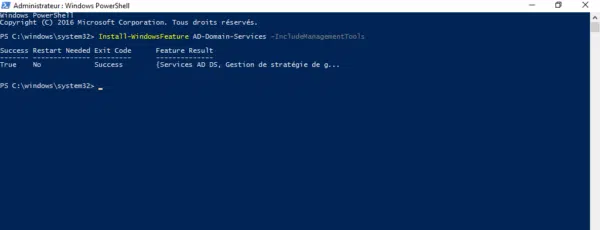
Install-WindowsFeature AD-Domain-Services -IncludeManagementTools
Install ADDS role in powershell

Wait during the installation ….

The AD DS role is installed:

Domain Controller Promotion in PowerShell

Always from a Powershell command prompt enter:

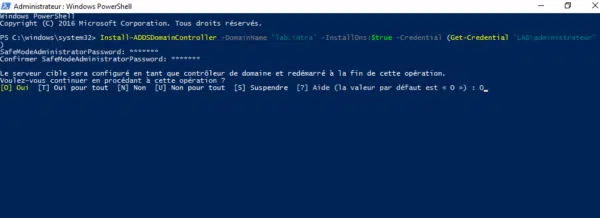
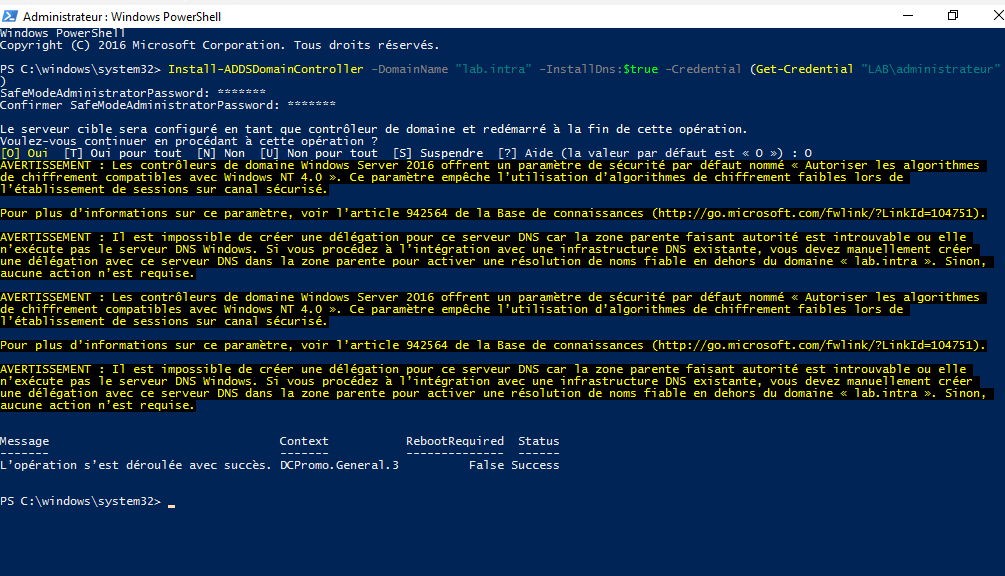
Install-ADDSDomainController -DomainName "domain.tld" -InstallDns:$true -Credential (Get-Credential "DOMAIN\administratreur")

Enter the password of the account passed as a parameter in the login window, then in the Powershell console enter the password of the directory recovery mode and confirm the promotion as a domain controller.

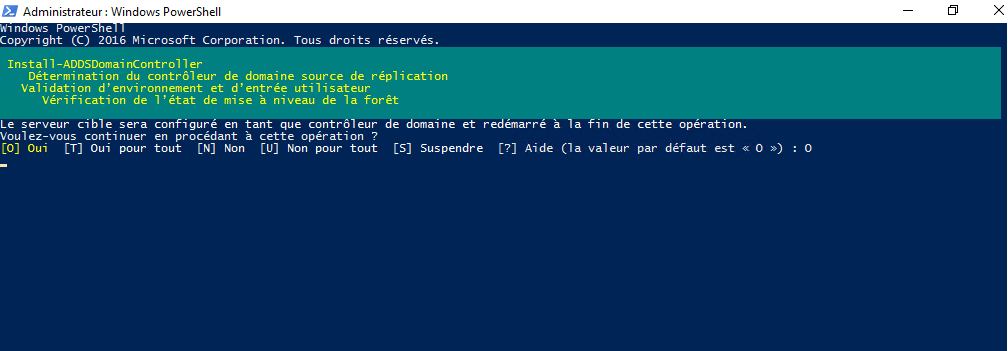
Wait during the promotion operation ….

After the operation completes, the following message appears and the server restarts.

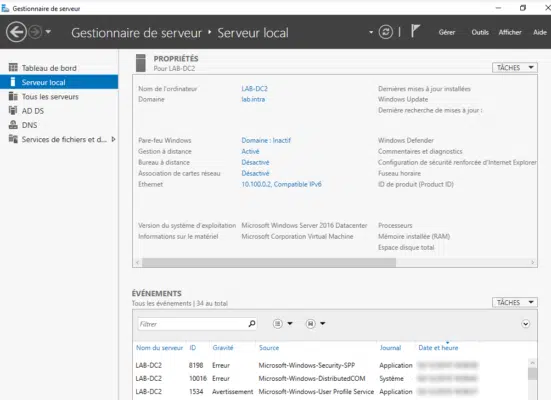
At reboot the server is domain control.

Complements

There are 3 different Powershell commands that allow promotion as a domain control. Each of the commands is to be used in a particular case:

CategoriesActive DirectoryTagsActive DirectoryDomain

Source :
https://rdr-it.com/en/active-directory-add-a-domain-controller-to-powershell/

Rename a computer in PowerShell

Rename-Computer command in PowerShell renames the local computer or remote computer name.

Rename-Computer cmdlet in PowerShell has a New-Name parameter to specify a new name for the target computer ( local or remote computer).

In this article, we will discuss how to rename a computer in PowerShell with examples.

Let’s understand Rename-Computer cmdlet in PowerShell to rename a local computer or remote computer with examples.

Table of Contents  hide 

1 Rename-Computer Syntax

2 Rename a Local Computer

3 Rename a Remote computer

4 PowerShell Rename a Computer on Domain

5 Conclusion

Rename-Computer Syntax

It renames a computer name to a specified new name.

Syntax:

Rename-Computer

[-ComputerName <String>]

[-PassThru]

[-DomainCredential <PSCredential>]

[-LocalCredential <PSCredential>]

[-NewName] <String>

[-Force]

[-Restart]

[-WsmanAuthentication <String>]

[-WhatIf]

[-Confirm]

[<CommonParameters>]

Parameters:

-ComputerName

Parameter renames the remote computer in PowerShell. The default is the local computer.

To rename a remote computer, specify the IP address, the domain name of the remote computer, or the NetBIOS name.

To specify the local computer name, use localhost, dot (.).

-NewName

It specifies a new name for a computer. This parameter is mandatory to rename a computer. The name may contain alphanumeric, hyphens (-).

-Restart

It specifies restart is required after the computer is renamed. Restart is required to reflect the changes.

-DomainCredential

It specifies a user account that has permission to connect to a remote computer in the domain and renames a computer joined in the domain with explicit credentials.

Use Domain\User or use the Get-Credential cmdlet to get user credentials.

-Force

The Force parameter forces the command to execute without user confirmation.

Let’s understand rename-computer cmdlet in PowerShell with examples.

Rename a Local Computer

To rename a local computer, use the rename-computer cmdlet in PowerShell as below

Rename-Computer -NewName “IN-CORP101” -Restart

In the above PowerShell, rename-computer renames a local computer name to IN-CORP101 specified by the NewName parameter. It will restart the local computer to reflect the change after the computer rename.

Rename a Remote computer

To rename a remote computer, use rename-computer cmdlet in PowerShell as below

Rename-Computer -ComputerName “IN-CORP01” -NewName “IN-CORP02” -Restart

In the above PowerShell script, rename-computer cmdlet renames a remote computer name. ComputerName parameter specify remote computer name and NewName parameter specify a new name for the computer.

After the computer is renamed, the remote computer will restart to reflect changes.

PowerShell Rename a Computer on Domain

To rename a computer on the domain, the user must have permission to connect to the domain. For explicit credentials, use Get-Credential cmdlet in PowerShell.

Let’s rename the computer on the domain using the rename-computer cmdlet in PowerShell.

Rename-Computer -ComputerName “EU-COPR10” -NewName “EU-CORP20” -DomainCredential ShellGeek\Admin -Force

In the above PowerShell script, Rename-Computer cmdlet renames a remote computer joined on a domain.

ComputerName specifies the remote computer name, NewName parameter specifies a new name for the computer.

DomainCredential parameter specify domain user ShellGeek\Admin who has permission to connect to the domain computer and rename a computer on the domain.

Conclusion

I hope the above article to rename a computer in PowerShell will help you to rename a local computer or remote computer.

Rename-Computer cmdlet in PowerShell doesn’t have a parameter that takes the input value and returns ComputerChangeInfo an object if you specify -PassThru a parameter else return does not return any value.

You can find more topics about PowerShell Active Directory commands and PowerShell basics on the ShellGeek home page.CategoriesPowerShell TipsTagsrename-computer

Using GetEnumerator in PowerShell to Read Data

How to Get Drivers Version Using PowerShell

Source :
https://shellgeek.com/rename-a-computer-in-powershell/

Get Domain name using PowerShell and CMD

In a large organization, its very quite common to have many domain and child domain names. While performing task automation for set of computers in domain, its best practice to get domain name of a computer.

In this article, I will explain how to get domain name using PowerShell script and command line (CMD)

Get-WmiObject class in PowerShell management library find the domain name for computer and wmic command-line utility to get domain name using command line (cmd)

Let’s understand how to get domain name in PowerShell and command line with below examples.

Table of Contents  hide 

1 PowerShell Get Domain name

2 Using Get-AdDomainController to get domain name

3 Get Domain Distinguished Name in PowerShell

4 Get FQDN (Fully Qualified Domain Name)

5 Get Domain Name using Command Line

6 Find Domain Name using SystemInfo in CMD

7 Conclusion

PowerShell Get Domain name

You can use Get-WmiObject class in PowerShell.Management gets WMI classes in the root namespace of computer and get domain name for a computer

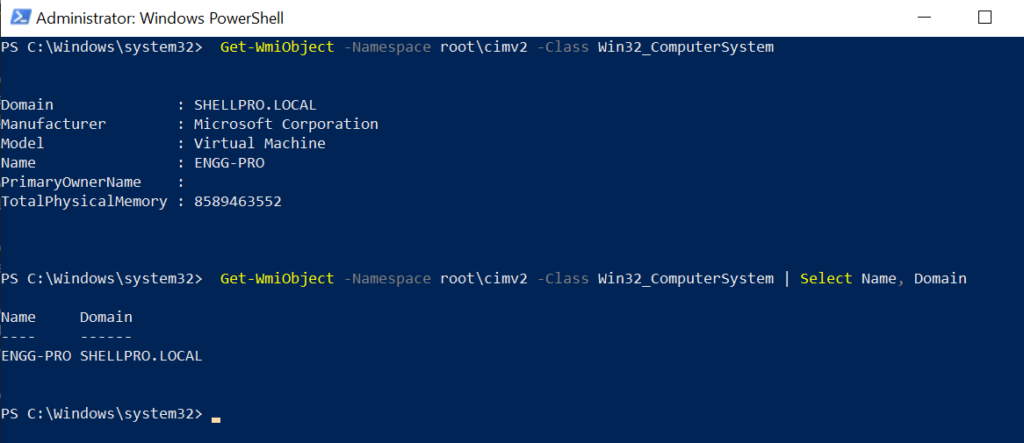
Get-WmiObject -Namespace root\cimv2 -Class Win32_ComputerSystem | Select Name, Domain

In the above PowerShell script, Get-WmiObject gets the WMI classes in the root\cimv2 namespace of computer and uses Win32_ComputerSystem to get computer system information.

Second command select Name and Domain name of a computer.

Output of above command to get domain name of a computer as below

PowerShell Get Domain Name

Using Get-AdDomainController to get domain name

PowerShell Get-AdDomainController cmdlet in Active Directory get one or more domain controllers based on search criteria.

You can get domain name of a computer in active directory using PowerShell Get-AdDomainController cmdlet as below

Get-ADDomainController -Identity “ENGG-PRO” | Select-Object Name, Domain

In the above PowerShell script, Get-AdDomainController command get domain controller specified by name of server object

Second command, select name and domain name, output as below

PS C:\Windows\system32> Get-ADDomainController -Identity "ENGG-PRO" | Select-Object Name, Domain

Name     Domain
----     ------
ENGG-PRO SHELLPRO.LOCAL


PS C:\Windows\system32>

Get Domain Distinguished Name in PowerShell

You can get domain distinguished name for current logged in user in active directory using PowerShell as below

Get-ADDomain -Current LoggedOnUser

PowerShell Get-ADDomain cmdlet find domain name in active directory for current logged on user.

Output of above command to get domain distinguished name as below

PS C:\Windows\system32> Get-ADDomain -Current LoggedOnUser


AllowedDNSSuffixes                 : {}
ChildDomains                       : {}
ComputersContainer                 : CN=Computers,DC=SHELLPRO,DC=LOCAL
DeletedObjectsContainer            : CN=Deleted Objects,DC=SHELLPRO,DC=LOCAL
DistinguishedName                  : DC=SHELLPRO,DC=LOCAL
DNSRoot                            : SHELLPRO.LOCAL

Get FQDN (Fully Qualified Domain Name)

In the PowerShell, there are environment variable which contains FQDN ( fully qualified domain name) of a computer.

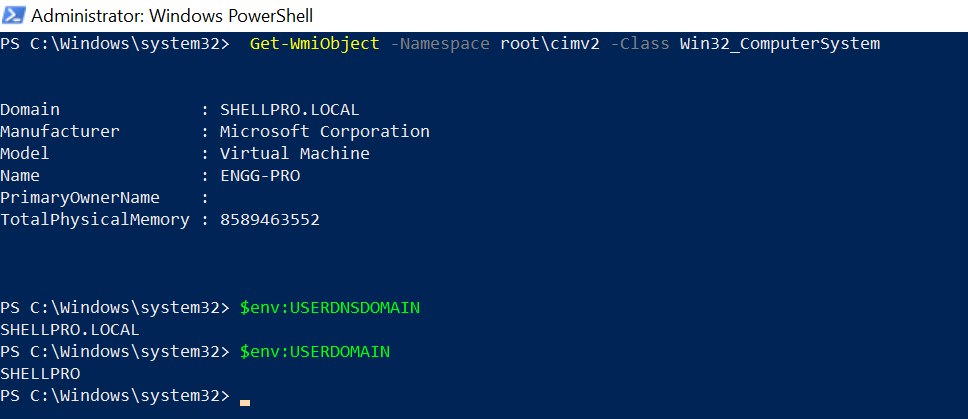
These variables are $env:USERDNSDomain and $env:$USERDomain

$env:USERDNSDomain variable contains FQDN ( fully qualified domain name) of domain or DNS name

$env:USERDomain variable contains NetBIOS domain name.

# Get Domain name using $env:USERDNSDoman

# Get FQDN – Fully Qualified Domain Name or DNS name

$env:USERDNSDOMAIN

#Get NetBios Domain name

$env:USERDOMAIN

Output of above environment variable to get domain name are as below

Find Domain Name using env:USERDNSDOMAIN

Get Domain Name using Command Line

You can use wmic command-line utility to get domain name using command line.

Run below command in cmd to retrieve domain name

wmic computersystem get domain

Output of above command to find domain name using cmd as below

C:\Windows\system32>wmic computersystem get domain
Domain
SHELLPRO.LOCAL

Find Domain Name using SystemInfo in CMD

You can get domain name using systeminfo which contains detailed information about computer system and operating system, run below command

systeminfo | findstr /B /C:”Domain”

Above SystemInfo command gets domain name of a computer joined to. Output of above command as below

C:\Windows\system32>systeminfo | findstr /B /C:"Domain"
Domain:                    SHELLPRO.LOCAL

Conclusion

In the above article, we have learned how to get domain of a computer using PowerShell and command line.

Use Get-WmiObject to get domain name of a computer using PowerShell. Using Get-AdDomainController get domain name in active directory.

wmic and SystemInfo command-line tool are useful to get domain name in cmd.

You can find more topics about PowerShell Active Directory commands and PowerShell basics on ShellGeek home page.CategoriesPowerShell TipsTagsGet domain nameGet-AdDomainController

Get-ComputerInfo – Get Computer Multiple Properties

Enable-AdAccount in Active Directory using PowerShell

Source :
https://shellgeek.com/get-domain-name-using-powershell-and-cmd/

What wireless cards and USB broadband modems are supported on Sonicwall firewalls and access points?

Description

The latest version of SonicOS firmware provides support for a wide variety of USB and Hotspot devices and wireless service providers as listed below.

Resolution

Broadband Devices

USA & Canada
Gen7  5G/4G/LTESonicOS 7.0
CARD REGIONOPERATORNAMEGENERATIONTYPESONICOS VERSIONSONICWAVE
USAAT&TNighthawk 5G Mobile Hotspot Pro MR 51005GHotspot7.0.1No
USAAT&TNightHawk LTE MR11004G/LTEHotspot7.0.0No
USAAT&TGlobal Modem USB8004G/LTEUSB7.0.1Yes
USAAT&TiPhone 11 Pro4G/LTEHotspot7.0.0No
USAAT&TiPhone 12 Pro4G/LTEHotspot7.0.1No
USAVerizonM21005GHotspot7.0.1Yes
USAVerizon M10005GHotspot7.0.0Yes
USAVerizonOrbic Speed4G/LTEHotspot7.0.0No
USAVerizonMiFi Global U620L4G/LTEUSB7.0.0Yes
USASprintNetstick4G/LTEUSB7.0.0No
USASprintFranklin U7724G/LTEUSB7.0.0No
USAT-MobileM20004G/LTEHotspot7.0.1No
USAT-MobileLink Zone24G/LTEHotspot7.0.0Yes
Gen6/Gen6.5  4G/LTESonicOS 6.x
CARD REGIONOPERATORNAMEGENERATIONTYPESONICOS VERSIONSONICWAVE
USAAT&TGlobal Modem USB8004G/LTEUSB6.5.4.5Yes
USAAT&TVelocity (ZTE MF861)4G/LTEUSB6.5.3.1Yes
USAAT&TBeam (Netgear AC340U)²4G/LTEUSB5.9.0.1Yes
USAAT&TMomentum (Sierra Wireless 313U)4G/LTEUSB5.9.0.0Yes
USAVerizonMiFi Global U620L4G/LTEUSB6.5.0.0Yes
USAVerizonNovatel 551L4G/LTEUSB6.2.4.2Yes
USAVerizonPantech UML2904G/LTEUSB5.9.0.0No
USASprintFranklin U7724G/LTEUSB6.5.3.1No
USASprintNetgear 341U4G/LTEUSB6.2.2.0Yes
CanadaRogersAirCard (Sierra Wireless 330U)4G/LTEUSB5.9.0.0No
Gen5  3GSonicOS 5.x
USAAT&TVelocity (Option GI0461)3GUSB5.8.1.1No
USAAT&TMercury (Sierra Wireless C885)3GUSB5.3.0.1No
USAVerizonPantech UMW1903GUSB5.9.0.0No
USAVerizonNovatel USB7603GUSB5.3.0.1No
USAVerizonNovatel 7273GUSB5.3.0.1No
USASprintNovatel U7603GUSB5.3.0.1No
USASprintNovatel 727U3GUSB5.3.0.1No
USASprintSierra Wireless 598U3GUSB5.8.1.1No
USAT-MobileRocket 3.0 (ZTE MF683)3GUSB5.9.0.0Yes
CanadaBellNovatel 7603GUSB5.3.1.0No
International
Gen7  5G/4G/LTESonicOS 7.0
CARD REGIONManufacturerNAMEGENERATIONTYPESONICOS VERSIONSONICWAVE
WorldwideHuaweiE6878-8705GHotspot7.0.0No
WorldwideHuaweiE8372H**4G/LTEUSB7.0.0No
WorldwideHuaweiE82014G/LTEUSB7.0.0No
WorldwideHuaweiE33724G/LTEUSB7.0.0No
WorldwideZTEMF833U4G/LTEUSB7.0.0Yes
WorldwideZTEMF825C4G/LTEUSB7.0.0Yes
WorldwideZTEMF79S4G/LTEUSB7.0.0Yes
Gen6/Gen6.5  4G/LTESonicOS 6.x
CARD REGIONManufacturerNAMEGENERATIONTYPESONICOS VERSIONSONICWAVE
WorldwideHuaweiE8372 (Telstra 4GX)4G/LTEUSB6.5.3.1Yes
WorldwideHuaweiE33724G/LTEUSB6.5.3.1Yes
WorldwideHuaweiE3372h (-608 variant) 64G/LTEUSB6.5.3.1Yes
WorldwideHuaweiE3372s (-608 variant) 64G/LTEUSB6.5.3.1Yes
WorldwideHuaweiE398 (Kyocera 5005)4G/LTEUSB5.9.0.2Yes
WorldwideHuaweiE3276s4G/LTEUSBNoYes
WorldwideD-LinkDWM-2214G/LTEUSB6.5.3.1Yes
WorldwideD-LinkDWM-222 A14G/LTEUSB6.5.3.1Yes
WorldwideZTEMF8254G/LTEUSB6.5.3.1Yes
WorldwideZTEMF832G4G/LTEUSBNoYes
WorldwideZTEMF79S4G/LTEUSBNoYes
Gen5  3GSonicOS 5.x
WorldwideHuaweiE353 73GUSB5.9.0.2Yes
WorldwideHuaweiK46053GUSB5.9.0.2Yes
WorldwideHuaweiEC169C3GUSB5.9.0.7No
WorldwideHuaweiE1803GUSB5.9.0.1No
WorldwideHuaweiE1823GUSB5.9.0.0No
WorldwideHuaweiK37153GUSB5.9.0.0No
WorldwideHuaweiE17503GUSB5.8.0.2No
WorldwideHuaweiE176G3GUSB5.3.0.1No
WorldwideHuaweiE2203GUSB5.3.0.1No
WorldwideHuaweiEC1223GUSB5.9.0.0No
LTE Cellular ExtenderSonicOS 6.x
WorldwideAccelerated6300-CX LTE router4G/LTESIM6.5.0.0No


¹ Cellular network operators around the world are announcing their plans to discontinue 3G services starting as early as December 2020.  Therefore LTE or 5G WWAN devices should be used for new deployments.  Existing deployments with 3G should be upgraded soon to LTE or 5G in preparation for the imminent discontinuation of 3G services.
² Refer to AT&T 340U article for more info
³ Multiple variations of the Huawei card: E8371h-153, E8372h-155, & E8372h-510
⁴ Huawei Modem 3372h and 3372s have been released by Huawei in multiple variants (i.e. -608, -153, -607, -517, -511) and with different protocols. At the moment, SonicOS does not support Huawei Proprietary protocol so all the variants using a non-standard or proprietary protocol are not supported or require the ISP to provide a PPP APN Type.
⁵ Huawei Modem E353 is not compatible with SOHO 250. Also note that it is not an LTE card
For customers outside of the 90-day warranty support period, an active SonicWall 8×5 or 24×7 Dynamic Support agreement allows you to keep your network security up-to-date by providing access to the latest firmware updates. You can manage all services including Dynamic Support and firmware downloads on any of your registered appliances at mysonicwall.com.

Related Articles

Categories

Source :
https://www.sonicwall.com/support/knowledge-base/what-wireless-cards-and-usb-broadband-modems-are-supported-on-firewalls-and-access-points/170505473051240/

Ubiquiti UniFi – Backups and Migration

Migration is the act of moving your UniFi devices from one host device to another. This is useful when:

  • You are replacing your UniFi OS Console with a new one of the same model.
  • You are upgrading your UniFi OS Console to a different model (e.g., a UDM to a UDM Pro).
  • You are offloading devices to a dedicated UniFi OS Console (e.g., moving cameras from a Cloud Key or UDM to a UNVR).
  • You are moving from a self-hosted Network application to a UniFi OS Console.

Note: This is not meant to be used as a staging file for setting up multiple applications on different hosts.

Types of Backups

UniFi OS Backups

UniFi OS backup files contain your entire system configuration, including your UniFi OS Console, user, application, and device settings. Assuming Remote Access is enabled, UniFi OS Cloud backups are created weekly by default. You can also generate additional Cloud backups or download localized backups at any time. 

UniFi OS backups are useful when:

  • Restoring a prior system configuration after making network changes.
  • Migrating all applications to a new UniFi OS Console that is the same model as the original.

Note: Backups do not include data stored on an HDD, such as recorded Protect camera footage.

Application Backups

Each UniFi application allows you to back up and export its configuration. Application backups contain settings and device configurations specific to the respective application.

Application backups are useful when:

  • You want to restore a prior application configuration without affecting your other applications.
  • You want to migrate a self-hosted Network application to a UniFi OS Console.
  • You want to migrate your devices between two different UniFi OS Console models.
  • You need to back up a self-hosted Network application.

Note: Backups do not include data stored on an HDD, such as recorded Protect camera footage.

UniFi OS Console Migration

UniFi OS backups also allow you to restore your system configuration should you ever need to replace your console with one of the same model.

To do so:

  1. First, ensure that you have already generated a Cloud backup, or downloaded a local backup. If not, please do so in your UniFi OS Settings.
  2. Replace your old UniFi OS Console with the new one. All other network connections should remain unchanged.
  3. Restore your system configuration on the new UniFi OS Console using the backup file. This can be done either during the initial setup or afterwards  in your UniFi OS settings.

Note: Currently, UniFi OS backups cannot be used to perform cross-console migrations, but this capability will be added in a future update.

If you are migrating between two different console models, you will need to restore each application’s configuration with their respective backups. Please note, though, that these file(s) will not include UniFi OS users or settings. 

See below for more information on using the configuration backups during migrations.

Migrating UniFi Network

Before migrating, we recommend reviewing your Device Authentication Credentials found in your Network application’s System Settings. These can be used to recover adopted device(s) if the migration is unsuccessful.

Standard Migration

This is used when all devices are on the same Layer 2 network (i.e., all devices are on the same network/VLAN as the management application’s host device). 

Note: If you are a home user managing devices in a single location and have not used the set-inform command or other advanced Layer 3 adoption methods, this is most likely the method for you.

  1. Download the desired backup file (*.unf) from your original Network application’s System Settings
  2. Ensure that your new Network application is up to date. Backups cannot be used to restore older application versions.
  3. Replace your old UniFi OS Console with the new one. All other network connections should remain unchanged.
  4. Restore the backup file in the Network application’s System Settings.
  5. Ensure that all devices appear as online in the new application. If they do not, you can try Layer 3 adoption, or factory-reset and readopt your device(s) to the new Network application.

    If a  device continues to appear as Managed by Other, click on it to open its properties panel, then use its Device Authentication Credentials (from the original Network application’s host device) to perform an Advanced Adoption.

Migrating Applications That Manage Layer 3 Devices

This method is for users that have performed Layer 3 device adoption (i.e., devices are on a different network/VLAN than the application’s host device). This may also be useful when migrating to a Network application host that is NOT also a gateway.

  1. Download the desired backup file (*.unf) from your original Network application’s System Settings
  2. Enable the Override Inform Host field on the original Network application’s host device, then enter the IP address of the new host device. This will tell your devices where they should establish a connection in order to be managed. Once entered, all devices in the old application should appear as Managed by Other.

    Note: When migrating to a Cloud Console, you can copy the Inform URL from the Cloud Console’s dashboard. Be aware that you will need to remove the initial http:// and the ending :8080/inform
  3. Ensure that your new Network application is up to date. Backups cannot be used to restore older application versions.
  4. Restore the backup file in the Network application’s System Settings.
  5. Ensure that all devices appear as online in the new application. If they do not, you can try Layer 3 adoption, or factory-reset and readopt your device(s) to the new application.

    If a device continues to appear as Managed by Other, click on it to open its properties panel, then use its Device Authentication Credentials (from the original Network application’s host) to perform an Advanced Adoption.

Exporting Individual Sites from a Multi-Site Host

Certain Network application hosts (e.g., Cloud Key, Cloud Console, self-hosted Network applications) can manage multiple sites. Site exportation allows you to migrate specific sites from one multi-site host to another. To do so:

  1. Click Export Site in your Network application’s System Settings to begin the guided walkthrough.
  2. Select the device(s) you wish to migrate to your new Network application.
  3. Enter the Inform URL of your new host. This will tell your devices where they should establish a connection in order to be managed. Once entered, all devices in the old application should appear as Managed by Other in the new one.

    Note: When migrating to a Cloud Console, you can copy the Inform URL from the Cloud Console’s dashboard. Be aware that you will need to remove the initial http:// and the ending :8080/inform.
  4. Go to your new Network application and select Import Site from the Site switcher located in the upper-left corner of your dashboard.

    Note: You may need to enable Multi-Site Management in your System Settings.
  5. Ensure that all devices appear as online in the new application. If they do not, you try Layer 3 adoption, or factory-reset and readopt your device(s) to the new application.

    If a device continues to appear as Managed by Other, click on it to open its properties panel, then use its Device Authentication Credentials (from the original Network application’s host) to perform an Advanced Adoption.

Migrating UniFi Protect

We recommend saving your footage with the Export Clips function before migrating. Although we provide HDD migration instructions, it is not an officially supported procedure due to nuances in the RAID array architecture. 

Standard Migration

  1. Download the desired backup file (*.zip) from the original Protect application’s settings. 
  2. Ensure that your new Protect application is up to date. Backups cannot be used to restore older application firmware.
  3. Replace your old UniFi OS Console with the new one. All other camera connections should remain unchanged.
  4. Restore the backup file in the Protect application’s settings.

HDD Migration

Full HDD migration is not officially supported; however, some users have been able to perform successful migrations by ensuring consistent ordering when ejecting and reinstalling drives  into their new console to preserve RAID arrays.

Note: This is only possible if both UniFi OS Consoles are the same model.

  1. Remove the HDDs from the old console. Record which bay each one was installed in, but do not install them in the new console yet.
  2. Turn on the new console and complete the initial setup wizard. Do not restore a Protect application or Cloud backup during initial setup!
  3. Upgrade the new console and its Protect application to a version that is either the same or newer than the original console.
  4. Shut down the new console, and then install the HDDs in the same bays as the original console.
  5. Turn on the new console again. The Protect application should start with its current configuration intact, and all exported footage should be accessible.

Source :
https://help.ui.com/hc/en-us/articles/360008976393-UniFi-Backups-and-Migration

SSA-482757: Missing Immutable Root of Trust in S7-1500 CPU devices

Siemens Security Advisory by Siemens ProductCERT

Publication Date:2023-01-10
Last Update:2023-01-10
Current Version:V1.0
CVSS v3.1 Base Score:4.6

SUMMARY

Affected models of the S7-1500 CPU product family do not contain an Immutable Root of Trust in Hardware. With this the integrity of the code executed on the device can not be validated during load-time. An attacker with physical access to the device could use this to replace the boot image of the device and execute arbitrary code.

As exploiting this vulnerability requires physical tampering with the product, Siemens recommends to assess the risk of physical access to the device in the target deployment and to implement measures to make sure that only trusted personnel have access to the physical hardware.

The vulnerability is related to the hardware of the product. Siemens has released new hardware versions for several CPU types of the S7-1500 product family in which this vulnerability is fixed and is working on new hardware versions for remaining PLC types to address this vulnerability completely. See the chapter “Additional Information” below for more details.AFFECTED PRODUCTS AND SOLUTION

Affected Product and VersionsRemediation
SIMATIC Drive Controller CPU 1504D TF (6ES7615-4DF10-0AB0)
All versions
Currently no fix is planned
See further recommendations from section Workarounds and Mitigations
SIMATIC Drive Controller CPU 1507D TF (6ES7615-7DF10-0AB0)
All versions
Currently no fix is planned
See further recommendations from section Workarounds and Mitigations
SIMATIC S7-1500 CPU 1510SP F-1 PN (6ES7510-1SJ00-0AB0)
All versions
Currently no fix is planned
See further recommendations from section Workarounds and Mitigations
SIMATIC S7-1500 CPU 1510SP F-1 PN (6ES7510-1SJ01-0AB0)
All versions
Currently no fix is planned
See further recommendations from section Workarounds and Mitigations
SIMATIC S7-1500 CPU 1510SP-1 PN (6ES7510-1DJ00-0AB0)
All versions
Currently no fix is planned
See further recommendations from section Workarounds and Mitigations
SIMATIC S7-1500 CPU 1510SP-1 PN (6ES7510-1DJ01-0AB0)
All versions
Currently no fix is planned
See further recommendations from section Workarounds and Mitigations
SIMATIC S7-1500 CPU 1511-1 PN (6ES7511-1AK00-0AB0)
All versions
Currently no fix is planned
See further recommendations from section Workarounds and Mitigations
SIMATIC S7-1500 CPU 1511-1 PN (6ES7511-1AK01-0AB0)
All versions
Currently no fix is planned
See further recommendations from section Workarounds and Mitigations
SIMATIC S7-1500 CPU 1511-1 PN (6ES7511-1AK02-0AB0)
All versions
Currently no fix is planned
See further recommendations from section Workarounds and Mitigations
SIMATIC S7-1500 CPU 1511C-1 PN (6ES7511-1CK00-0AB0)
All versions
Currently no fix is planned
See further recommendations from section Workarounds and Mitigations
SIMATIC S7-1500 CPU 1511C-1 PN (6ES7511-1CK01-0AB0)
All versions
Currently no fix is planned
See further recommendations from section Workarounds and Mitigations
SIMATIC S7-1500 CPU 1511F-1 PN (6ES7511-1FK00-0AB0)
All versions
Currently no fix is planned
See further recommendations from section Workarounds and Mitigations
SIMATIC S7-1500 CPU 1511F-1 PN (6ES7511-1FK01-0AB0)
All versions
Currently no fix is planned
See further recommendations from section Workarounds and Mitigations
SIMATIC S7-1500 CPU 1511F-1 PN (6ES7511-1FK02-0AB0)
All versions
Currently no fix is planned
See further recommendations from section Workarounds and Mitigations
SIMATIC S7-1500 CPU 1511T-1 PN (6ES7511-1TK01-0AB0)
All versions
Currently no fix is planned
See further recommendations from section Workarounds and Mitigations
SIMATIC S7-1500 CPU 1511TF-1 PN (6ES7511-1UK01-0AB0)
All versions
Currently no fix is planned
See further recommendations from section Workarounds and Mitigations
SIMATIC S7-1500 CPU 1512C-1 PN (6ES7512-1CK00-0AB0)
All versions
Currently no fix is planned
See further recommendations from section Workarounds and Mitigations
SIMATIC S7-1500 CPU 1512C-1 PN (6ES7512-1CK01-0AB0)
All versions
Currently no fix is planned
See further recommendations from section Workarounds and Mitigations
SIMATIC S7-1500 CPU 1512SP F-1 PN (6ES7512-1SK00-0AB0)
All versions
Currently no fix is planned
See further recommendations from section Workarounds and Mitigations
SIMATIC S7-1500 CPU 1512SP F-1 PN (6ES7512-1SK01-0AB0)
All versions
Currently no fix is planned
See further recommendations from section Workarounds and Mitigations
SIMATIC S7-1500 CPU 1512SP-1 PN (6ES7512-1DK00-0AB0)
All versions
Currently no fix is planned
See further recommendations from section Workarounds and Mitigations
SIMATIC S7-1500 CPU 1512SP-1 PN (6ES7512-1DK01-0AB0)
All versions
Currently no fix is planned
See further recommendations from section Workarounds and Mitigations
SIMATIC S7-1500 CPU 1513-1 PN (6ES7513-1AL00-0AB0)
All versions
Currently no fix is planned
See further recommendations from section Workarounds and Mitigations
SIMATIC S7-1500 CPU 1513-1 PN (6ES7513-1AL01-0AB0)
All versions
Currently no fix is planned
See further recommendations from section Workarounds and Mitigations
SIMATIC S7-1500 CPU 1513-1 PN (6ES7513-1AL02-0AB0)
All versions
Currently no fix is planned
See further recommendations from section Workarounds and Mitigations
SIMATIC S7-1500 CPU 1513F-1 PN (6ES7513-1FL00-0AB0)
All versions
Currently no fix is planned
See further recommendations from section Workarounds and Mitigations
SIMATIC S7-1500 CPU 1513F-1 PN (6ES7513-1FL01-0AB0)
All versions
Currently no fix is planned
See further recommendations from section Workarounds and Mitigations
SIMATIC S7-1500 CPU 1513F-1 PN (6ES7513-1FL02-0AB0)
All versions
Currently no fix is planned
See further recommendations from section Workarounds and Mitigations
SIMATIC S7-1500 CPU 1513R-1 PN (6ES7513-1RL00-0AB0)
All versions
Currently no fix is planned
See further recommendations from section Workarounds and Mitigations
SIMATIC S7-1500 CPU 1515-2 PN (6ES7515-2AM00-0AB0)
All versions
Currently no fix is planned
See further recommendations from section Workarounds and Mitigations
SIMATIC S7-1500 CPU 1515-2 PN (6ES7515-2AM01-0AB0)
All versions
Currently no fix is planned
See further recommendations from section Workarounds and Mitigations
SIMATIC S7-1500 CPU 1515-2 PN (6ES7515-2AM02-0AB0)
All versions
Currently no fix is planned
See further recommendations from section Workarounds and Mitigations
SIMATIC S7-1500 CPU 1515F-2 PN (6ES7515-2FM00-0AB0)
All versions
Currently no fix is planned
See further recommendations from section Workarounds and Mitigations
SIMATIC S7-1500 CPU 1515F-2 PN (6ES7515-2FM01-0AB0)
All versions
Currently no fix is planned
See further recommendations from section Workarounds and Mitigations
SIMATIC S7-1500 CPU 1515F-2 PN (6ES7515-2FM02-0AB0)
All versions
Currently no fix is planned
See further recommendations from section Workarounds and Mitigations
SIMATIC S7-1500 CPU 1515R-2 PN (6ES7515-2RM00-0AB0)
All versions
Currently no fix is planned
See further recommendations from section Workarounds and Mitigations
SIMATIC S7-1500 CPU 1515T-2 PN (6ES7515-2TM01-0AB0)
All versions
Currently no fix is planned
See further recommendations from section Workarounds and Mitigations
SIMATIC S7-1500 CPU 1515TF-2 PN (6ES7515-2UM01-0AB0)
All versions
Currently no fix is planned
See further recommendations from section Workarounds and Mitigations
SIMATIC S7-1500 CPU 1516-3 PN/DP (6ES7516-3AN00-0AB0)
All versions
Currently no fix is planned
See further recommendations from section Workarounds and Mitigations
SIMATIC S7-1500 CPU 1516-3 PN/DP (6ES7516-3AN01-0AB0)
All versions
Currently no fix is planned
See further recommendations from section Workarounds and Mitigations
SIMATIC S7-1500 CPU 1516-3 PN/DP (6ES7516-3AN02-0AB0)
All versions
Currently no fix is planned
See further recommendations from section Workarounds and Mitigations
SIMATIC S7-1500 CPU 1516F-3 PN/DP (6ES7516-3FN00-0AB0)
All versions
Currently no fix is planned
See further recommendations from section Workarounds and Mitigations
SIMATIC S7-1500 CPU 1516F-3 PN/DP (6ES7516-3FN01-0AB0)
All versions
Currently no fix is planned
See further recommendations from section Workarounds and Mitigations
SIMATIC S7-1500 CPU 1516F-3 PN/DP (6ES7516-3FN02-0AB0)
All versions
Currently no fix is planned
See further recommendations from section Workarounds and Mitigations
SIMATIC S7-1500 CPU 1516T-3 PN/DP (6ES7516-3TN00-0AB0)
All versions
Currently no fix is planned
See further recommendations from section Workarounds and Mitigations
SIMATIC S7-1500 CPU 1516TF-3 PN/DP (6ES7516-3UN00-0AB0)
All versions
Currently no fix is planned
See further recommendations from section Workarounds and Mitigations
SIMATIC S7-1500 CPU 1517-3 PN/DP (6ES7517-3AP00-0AB0)
All versions
Currently no fix is planned
See further recommendations from section Workarounds and Mitigations
SIMATIC S7-1500 CPU 1517F-3 PN/DP (6ES7517-3FP00-0AB0)
All versions
Currently no fix is planned
See further recommendations from section Workarounds and Mitigations
SIMATIC S7-1500 CPU 1517H-3 PN (6ES7517-3HP00-0AB0)
All versions
Currently no fix is planned
See further recommendations from section Workarounds and Mitigations
SIMATIC S7-1500 CPU 1517T-3 PN/DP (6ES7517-3TP00-0AB0)
All versions
Currently no fix is planned
See further recommendations from section Workarounds and Mitigations
SIMATIC S7-1500 CPU 1517TF-3 PN/DP (6ES7517-3UP00-0AB0)
All versions
Currently no fix is planned
See further recommendations from section Workarounds and Mitigations
SIMATIC S7-1500 CPU 1518-4 PN/DP (6ES7518-4AP00-0AB0)
All versions
Currently no fix is planned
See further recommendations from section Workarounds and Mitigations
SIMATIC S7-1500 CPU 1518-4 PN/DP MFP (6ES7518-4AX00-1AB0)
All versions
Currently no fix is planned
See further recommendations from section Workarounds and Mitigations
SIMATIC S7-1500 CPU 1518-4F PN/DP (6ES7518-4FP00-0AB0)
All versions
Currently no fix is planned
See further recommendations from section Workarounds and Mitigations
SIMATIC S7-1500 CPU 1518F-4 PN/DP MFP (6ES7518-4FX00-1AB0)
All versions
Currently no fix is planned
See further recommendations from section Workarounds and Mitigations
SIMATIC S7-1500 CPU 1518HF-4 PN (6ES7518-4JP00-0AB0)
All versions
Currently no fix is planned
See further recommendations from section Workarounds and Mitigations
SIMATIC S7-1500 CPU 1518T-4 PN/DP (6ES7518-4TP00-0AB0)
All versions
Currently no fix is planned
See further recommendations from section Workarounds and Mitigations
SIMATIC S7-1500 CPU 1518TF-4 PN/DP (6ES7518-4UP00-0AB0)
All versions
Currently no fix is planned
See further recommendations from section Workarounds and Mitigations
SIMATIC S7-1500 CPU S7-1518-4 PN/DP ODK (6ES7518-4AP00-3AB0)
All versions
Currently no fix is planned
See further recommendations from section Workarounds and Mitigations
SIMATIC S7-1500 CPU S7-1518F-4 PN/DP ODK (6ES7518-4FP00-3AB0)
All versions
Currently no fix is planned
See further recommendations from section Workarounds and Mitigations
SIMATIC S7-1500 ET 200pro: CPU 1513PRO F-2 PN (6ES7513-2GL00-0AB0)
All versions
Currently no fix is planned
See further recommendations from section Workarounds and Mitigations
SIMATIC S7-1500 ET 200pro: CPU 1513PRO-2 PN (6ES7513-2PL00-0AB0)
All versions
Currently no fix is planned
See further recommendations from section Workarounds and Mitigations
SIMATIC S7-1500 ET 200pro: CPU 1516PRO F-2 PN (6ES7516-2GN00-0AB0)
All versions
Currently no fix is planned
See further recommendations from section Workarounds and Mitigations
SIMATIC S7-1500 ET 200pro: CPU 1516PRO-2 PN (6ES7516-2PN00-0AB0)
All versions
Currently no fix is planned
See further recommendations from section Workarounds and Mitigations
SIPLUS ET 200SP CPU 1510SP F-1 PN (6AG1510-1SJ01-2AB0)
All versions
Currently no fix is planned
See further recommendations from section Workarounds and Mitigations
SIPLUS ET 200SP CPU 1510SP F-1 PN RAIL (6AG2510-1SJ01-1AB0)
All versions
Currently no fix is planned
See further recommendations from section Workarounds and Mitigations
SIPLUS ET 200SP CPU 1510SP-1 PN (6AG1510-1DJ01-2AB0)
All versions
Currently no fix is planned
See further recommendations from section Workarounds and Mitigations
SIPLUS ET 200SP CPU 1510SP-1 PN (6AG1510-1DJ01-7AB0)
All versions
Currently no fix is planned
See further recommendations from section Workarounds and Mitigations
SIPLUS ET 200SP CPU 1510SP-1 PN RAIL (6AG2510-1DJ01-1AB0)
All versions
Currently no fix is planned
See further recommendations from section Workarounds and Mitigations
SIPLUS ET 200SP CPU 1510SP-1 PN RAIL (6AG2510-1DJ01-4AB0)
All versions
Currently no fix is planned
See further recommendations from section Workarounds and Mitigations
SIPLUS ET 200SP CPU 1512SP F-1 PN (6AG1512-1SK00-2AB0)
All versions
Currently no fix is planned
See further recommendations from section Workarounds and Mitigations
SIPLUS ET 200SP CPU 1512SP F-1 PN (6AG1512-1SK01-2AB0)
All versions
Currently no fix is planned
See further recommendations from section Workarounds and Mitigations
SIPLUS ET 200SP CPU 1512SP F-1 PN (6AG1512-1SK01-7AB0)
All versions
Currently no fix is planned
See further recommendations from section Workarounds and Mitigations
SIPLUS ET 200SP CPU 1512SP F-1 PN RAIL (6AG2512-1SK01-1AB0)
All versions
Currently no fix is planned
See further recommendations from section Workarounds and Mitigations
SIPLUS ET 200SP CPU 1512SP F-1 PN RAIL (6AG2512-1SK01-4AB0)
All versions
Currently no fix is planned
See further recommendations from section Workarounds and Mitigations
SIPLUS ET 200SP CPU 1512SP-1 PN (6AG1512-1DK01-2AB0)
All versions
Currently no fix is planned
See further recommendations from section Workarounds and Mitigations
SIPLUS ET 200SP CPU 1512SP-1 PN (6AG1512-1DK01-7AB0)
All versions
Currently no fix is planned
See further recommendations from section Workarounds and Mitigations
SIPLUS ET 200SP CPU 1512SP-1 PN RAIL (6AG2512-1DK01-1AB0)
All versions
Currently no fix is planned
See further recommendations from section Workarounds and Mitigations
SIPLUS ET 200SP CPU 1512SP-1 PN RAIL (6AG2512-1DK01-4AB0)
All versions
Currently no fix is planned
See further recommendations from section Workarounds and Mitigations
SIPLUS S7-1500 CPU 1511-1 PN (6AG1511-1AK00-2AB0)
All versions
Currently no fix is planned
See further recommendations from section Workarounds and Mitigations
SIPLUS S7-1500 CPU 1511-1 PN (6AG1511-1AK01-2AB0)
All versions
Currently no fix is planned
See further recommendations from section Workarounds and Mitigations
SIPLUS S7-1500 CPU 1511-1 PN (6AG1511-1AK01-7AB0)
All versions
Currently no fix is planned
See further recommendations from section Workarounds and Mitigations
SIPLUS S7-1500 CPU 1511-1 PN (6AG1511-1AK02-2AB0)
All versions
Currently no fix is planned
See further recommendations from section Workarounds and Mitigations
SIPLUS S7-1500 CPU 1511-1 PN (6AG1511-1AK02-7AB0)
All versions
Currently no fix is planned
See further recommendations from section Workarounds and Mitigations
SIPLUS S7-1500 CPU 1511-1 PN T1 RAIL (6AG2511-1AK01-1AB0)
All versions
Currently no fix is planned
See further recommendations from section Workarounds and Mitigations
SIPLUS S7-1500 CPU 1511-1 PN T1 RAIL (6AG2511-1AK02-1AB0)
All versions
Currently no fix is planned
See further recommendations from section Workarounds and Mitigations
SIPLUS S7-1500 CPU 1511-1 PN TX RAIL (6AG2511-1AK01-4AB0)
All versions
Currently no fix is planned
See further recommendations from section Workarounds and Mitigations
SIPLUS S7-1500 CPU 1511-1 PN TX RAIL (6AG2511-1AK02-4AB0)
All versions
Currently no fix is planned
See further recommendations from section Workarounds and Mitigations
SIPLUS S7-1500 CPU 1511F-1 PN (6AG1511-1FK00-2AB0)
All versions
Currently no fix is planned
See further recommendations from section Workarounds and Mitigations
SIPLUS S7-1500 CPU 1511F-1 PN (6AG1511-1FK01-2AB0)
All versions
Currently no fix is planned
See further recommendations from section Workarounds and Mitigations
SIPLUS S7-1500 CPU 1511F-1 PN (6AG1511-1FK02-2AB0)
All versions
Currently no fix is planned
See further recommendations from section Workarounds and Mitigations
SIPLUS S7-1500 CPU 1513-1 PN (6AG1513-1AL00-2AB0)
All versions
Currently no fix is planned
See further recommendations from section Workarounds and Mitigations
SIPLUS S7-1500 CPU 1513-1 PN (6AG1513-1AL01-2AB0)
All versions
Currently no fix is planned
See further recommendations from section Workarounds and Mitigations
SIPLUS S7-1500 CPU 1513-1 PN (6AG1513-1AL01-7AB0)
All versions
Currently no fix is planned
See further recommendations from section Workarounds and Mitigations
SIPLUS S7-1500 CPU 1513-1 PN (6AG1513-1AL02-2AB0)
All versions
Currently no fix is planned
See further recommendations from section Workarounds and Mitigations
SIPLUS S7-1500 CPU 1513-1 PN (6AG1513-1AL02-7AB0)
All versions
Currently no fix is planned
See further recommendations from section Workarounds and Mitigations
SIPLUS S7-1500 CPU 1513F-1 PN (6AG1513-1FL00-2AB0)
All versions
Currently no fix is planned
See further recommendations from section Workarounds and Mitigations
SIPLUS S7-1500 CPU 1513F-1 PN (6AG1513-1FL01-2AB0)
All versions
Currently no fix is planned
See further recommendations from section Workarounds and Mitigations
SIPLUS S7-1500 CPU 1513F-1 PN (6AG1513-1FL02-2AB0)
All versions
Currently no fix is planned
See further recommendations from section Workarounds and Mitigations
SIPLUS S7-1500 CPU 1515F-2 PN (6AG1515-2FM01-2AB0)
All versions
Currently no fix is planned
See further recommendations from section Workarounds and Mitigations
SIPLUS S7-1500 CPU 1515F-2 PN (6AG1515-2FM02-2AB0)
All versions
Currently no fix is planned
See further recommendations from section Workarounds and Mitigations
SIPLUS S7-1500 CPU 1515F-2 PN RAIL (6AG2515-2FM02-4AB0)
All versions
Currently no fix is planned
See further recommendations from section Workarounds and Mitigations
SIPLUS S7-1500 CPU 1515F-2 PN T2 RAIL (6AG2515-2FM01-2AB0)
All versions
Currently no fix is planned
See further recommendations from section Workarounds and Mitigations
SIPLUS S7-1500 CPU 1515R-2 PN (6AG1515-2RM00-7AB0)
All versions
Currently no fix is planned
See further recommendations from section Workarounds and Mitigations
SIPLUS S7-1500 CPU 1515R-2 PN TX RAIL (6AG2515-2RM00-4AB0)
All versions
Currently no fix is planned
See further recommendations from section Workarounds and Mitigations
SIPLUS S7-1500 CPU 1516-3 PN/DP (6AG1516-3AN00-2AB0)
All versions
Currently no fix is planned
See further recommendations from section Workarounds and Mitigations
SIPLUS S7-1500 CPU 1516-3 PN/DP (6AG1516-3AN00-7AB0)
All versions
Currently no fix is planned
See further recommendations from section Workarounds and Mitigations
SIPLUS S7-1500 CPU 1516-3 PN/DP (6AG1516-3AN01-2AB0)
All versions
Currently no fix is planned
See further recommendations from section Workarounds and Mitigations
SIPLUS S7-1500 CPU 1516-3 PN/DP (6AG1516-3AN01-7AB0)
All versions
Currently no fix is planned
See further recommendations from section Workarounds and Mitigations
SIPLUS S7-1500 CPU 1516-3 PN/DP (6AG1516-3AN02-2AB0)
All versions
Currently no fix is planned
See further recommendations from section Workarounds and Mitigations
SIPLUS S7-1500 CPU 1516-3 PN/DP (6AG1516-3AN02-7AB0)
All versions
Currently no fix is planned
See further recommendations from section Workarounds and Mitigations
SIPLUS S7-1500 CPU 1516-3 PN/DP RAIL (6AG2516-3AN02-4AB0)
All versions
Currently no fix is planned
See further recommendations from section Workarounds and Mitigations
SIPLUS S7-1500 CPU 1516-3 PN/DP TX RAIL (6AG2516-3AN01-4AB0)
All versions
Currently no fix is planned
See further recommendations from section Workarounds and Mitigations
SIPLUS S7-1500 CPU 1516F-3 PN/DP (6AG1516-3FN00-2AB0)
All versions
Currently no fix is planned
See further recommendations from section Workarounds and Mitigations
SIPLUS S7-1500 CPU 1516F-3 PN/DP (6AG1516-3FN01-2AB0)
All versions
Currently no fix is planned
See further recommendations from section Workarounds and Mitigations
SIPLUS S7-1500 CPU 1516F-3 PN/DP (6AG1516-3FN02-2AB0)
All versions
Currently no fix is planned
See further recommendations from section Workarounds and Mitigations
SIPLUS S7-1500 CPU 1516F-3 PN/DP RAIL (6AG2516-3FN02-2AB0)
All versions
Currently no fix is planned
See further recommendations from section Workarounds and Mitigations
SIPLUS S7-1500 CPU 1516F-3 PN/DP RAIL (6AG2516-3FN02-4AB0)
All versions
Currently no fix is planned
See further recommendations from section Workarounds and Mitigations
SIPLUS S7-1500 CPU 1517H-3 PN (6AG1517-3HP00-4AB0)
All versions
Currently no fix is planned
See further recommendations from section Workarounds and Mitigations
SIPLUS S7-1500 CPU 1518-4 PN/DP (6AG1518-4AP00-4AB0)
All versions
Currently no fix is planned
See further recommendations from section Workarounds and Mitigations
SIPLUS S7-1500 CPU 1518-4 PN/DP MFP (6AG1518-4AX00-4AC0)
All versions
Currently no fix is planned
See further recommendations from section Workarounds and Mitigations
SIPLUS S7-1500 CPU 1518F-4 PN/DP (6AG1518-4FP00-4AB0)
All versions
Currently no fix is planned
See further recommendations from section Workarounds and Mitigations

WORKAROUNDS AND MITIGATIONS

Siemens has identified the following specific workarounds and mitigations that customers can apply to reduce the risk:

  • Restrict physical access to affected devices to trusted personnel to avoid hardware tampering (e.g., place the devices in locked control cabinets)

Please follow the General Security Recommendations.GENERAL SECURITY RECOMMENDATIONS

As a general security measure, Siemens strongly recommends to protect network access to devices with appropriate mechanisms. In order to operate the devices in a protected IT environment, Siemens recommends to configure the environment according to Siemens’ operational guidelines for Industrial Security (Download: https://www.siemens.com/cert/operational-guidelines-industrial-security), and to follow the recommendations in the product manuals. Additional information on Industrial Security by Siemens can be found at: https://www.siemens.com/industrialsecurityPRODUCT DESCRIPTION

SIMATIC Drive Controllers have been designed for the automation of production machines, combining the functionality of a SIMATIC S7-1500 CPU and a SINAMICS S120 drive control.

SIMATIC S7-1500 CPU products have been designed for discrete and continuous control in industrial environments such as manufacturing, food and beverages, and chemical industries worldwide.

The SIMATIC S7-1500 MFP CPUs provide functionality of standard S7-1500 CPUs with the possibility to run C/C++ Code within the CPU-Runtime for execution of own functions / algorithms implemented in C/C++ and an additional second independent runtime environment to execute C/C++ applications parallel to the STEP 7 program if required.

The SIMATIC S7-1500 ODK CPUs provide functionality of standard S7-1500 CPUs but additionally provide the possibility to run C/C++ Code within the CPU-Runtime for execution of own functions / algorithms implemented in C/C++. They have been designed for discrete and continuous control in industrial environments such as manufacturing, food and beverages, and chemical industries worldwide.

SIPLUS extreme products are designed for reliable operation under extreme conditions and are based on SIMATIC, LOGO!, SITOP, SINAMICS, SIMOTION, SCALANCE or other devices. SIPLUS devices use the same firmware as the product they are based on.VULNERABILITY CLASSIFICATION

The vulnerability classification has been performed by using the CVSS scoring system in version 3.1 (CVSS v3.1) (https://www.first.org/cvss/). The CVSS environmental score is specific to the customer’s environment and will impact the overall CVSS score. The environmental score should therefore be individually defined by the customer to accomplish final scoring.

An additional classification has been performed using the CWE classification, a community-developed list of common software security weaknesses. This serves as a common language and as a baseline for weakness identification, mitigation, and prevention efforts. A detailed list of CWE classes can be found at: https://cwe.mitre.org/.Vulnerability CVE-2022-38773Affected devices do not contain an Immutable Root of Trust in Hardware. With this the integrity of the code executed on the device can not be validated during load-time. An attacker with physical access to the device could use this to replace the boot image of the device and execute arbitrary code.

CVSS v3.1 Base Score4.6
CVSS VectorCVSS:3.1/AV:P/AC:L/PR:N/UI:N/S:U/C:N/I:H/A:N/E:P/RL:T/RC:C
CWECWE-1326: Missing Immutable Root of Trust in Hardware

ACKNOWLEDGMENTS

Siemens thanks the following party for its efforts:

  • Yuanzhe Wu and Ang Cui from Red Balloon Security for coordinated disclosure

ADDITIONAL INFORMATION

Siemens has released the following new hardware versions of the S7-1500 product family. They contain a new secure boot mechanism that resolves the vulnerability:

  • SIMATIC S7-1500 CPU 1511-1 PN (6ES7511-1AL03-0AB0)
  • SIMATIC S7-1500 CPU 1513-1 PN (6ES7513-1AM03-0AB0)
  • SIMATIC S7-1500 CPU 1511F-1 PN (6ES7511-1FL03-0AB0)
  • SIMATIC S7-1500 CPU 1513F-1 PN (6ES7513-1FM03-0AB0)
  • SIMATIC S7-1500 CPU 1513R-1 PN (6ES7513-1RM03-0AB0)
  • SIMATIC S7-1500 CPU 1515R-2 PN (6ES7515-2RN03-0AB0)

Siemens is working on new hardware versions for additional PLC types to address this vulnerability further.For further inquiries on security vulnerabilities in Siemens products and solutions, please contact the Siemens ProductCERT:

https://www.siemens.com/cert/advisoriesHISTORY DATA

V1.0 (2023-01-10):Publication Date

TERMS OF USE

Siemens Security Advisories are subject to the terms and conditions contained in Siemens’ underlying license terms or other applicable agreements previously agreed to with Siemens (hereinafter “License Terms”). To the extent applicable to information, software or documentation made available in or through a Siemens Security Advisory, the Terms of Use of Siemens’ Global Website (https://www.siemens.com/ terms_of_use, hereinafter “Terms of Use”), in particular Sections 8-10 of the Terms of Use, shall apply additionally. In case of conflicts, the License Terms shall prevail over the Terms of Use. SSA-482757© Siemens 2023

Source :
https://cert-portal.siemens.com/productcert/html/ssa-482757.html

How To Install Kimai Time Tracking App in Docker

In this guide, I’ll show you how to deploy the open source time tracking app Kimai in a Docker container. Kimai is free, browser-based (so it’ll work on mobile devices), and is extremely flexible for just about every use case.

It has a stopwatch feature where you can start/stop/pause a worklog timer. Then, it accumulates the total into daily, weekly, monthly or yearly reports, which can be exported or printed as invoices.

It supports single or multi users, so you can even track time for your entire department. All statistics are visible on a beautiful dashboard, which makes historical time-tracking a breeze.


Why use Kimai Time Tracker?

For my scenario, I am salaried at work. However, since I’m an IT Manager, I often find myself working after hours or on weekends to patch servers, reboot systems, or perform system and infrastructure upgrades. Normally, I use a pen and paper or a notetaking app to track overtime, although this is pretty inefficent. Sometimes I forget when I started or stopped, or if I’ve written down the time on a notepade at home, I can’t view that time at work.

And when it comes to managing a team of others who also perform after hours maintenance, it becomes even harder to track their total overtime hours.

Over the past few weeks, I stumbled across Kimai and really love all the features. Especially when I can spin it up in a docker or docker compose container!

If you don’t have Docker installed, follow this guide: https://smarthomepursuits.com/how-to-install-docker-ubuntu/

If you don’t have Docker-Compose installed, follow this guide: https://smarthomepursuits.com/how-to-install-portainer-with-docker-in-ubuntu-20-04/

In this tutorial, we will be installing Kimai for 1 user using standard Docker run commands. Other users can be added from the webui after initial setup.


Step 1: SSH into your Docker Host

Open Putty and SSH into your server that is running docker and docker compose.


Step 2: Create Kimai Database container

Enter the command below to create a new database to use with Kimai. You can copy and paste into Putty by right-clicking after copy, or CTRL+SHIFT+V into other ssh clients.

sudo docker run --rm --name kimai-mysql \
    -e MYSQL_DATABASE=kimai \
    -e MYSQL_USER=kimai \
    -e MYSQL_PASSWORD=kimai \
    -e MYSQL_ROOT_PASSWORD=kimai \
    -p 3399:3306 -d mysql

Step 3: Start Kimai

Next, start the Kimai container using the already created database. If you look at the Kimai github page, you’ll notice that this isn’t the same command as what shows there.

Here’s the original command (which I’m not using):

docker run --rm --name kimai-test -ti -p 8001:8001 -e DATABASE_URL=mysql://kimai:kimai@${HOSTNAME}:3399/kimai kimai/kimai2:apache

And here’s my command. I had to explicitly add TRUSTED_HOSTS, the ADMINMAIL and ADMINPASS, and change the ${HOSTNAME} to the IP address of your docker host. Otherwise, I wasn’t able to access Kimai from other computers on my local network.

  • Green = change port here if already in use
  • Red = Add the IP address of your docker host
  • Orange = Manually specifying the admin email and password. This is what you’ll use to log in with.
  • Blue = Change to docker host IP address
sudo docker run --rm --name kimai -ti -p 8001:8001 -e TRUSTED_HOSTS=192.168.68.141,localhost,127.0.0.1 -e ADMINMAIL=example@gmail.com -e ADMINPASS=8charpassword -e DATABASE_URL=mysql://kimai:kimai@192.168.68.141:3399/kimai kimai/kimai2:apache

Note that 8 characters is the minimum for the password.


Step 4: Log In via Web Browser

Next, Kimai should now be running!

To check, you can go to your http://dockerIP:8001 in a web browser (192.168.68.141:8001)

Then simply log in with the credentials you created.


Step 5: Basic Setup

This app is extremely powerful and customizeable, so I won’t be going over all the available options since everyone has different needs.

Like I mentioned earlier, I’m using Kimai for overtime tracking only, so the first step for me is to create a new “customer”.

Create a Customer

This is sort of unintuitive, but you need to create a customer before you can start tracking time to a project. I’m creating a generic “Employee” customer.

Click Customers on the left sidebar, then click the + button in the top right corner.

Create A Project

Click Projects on the left sidebar:

Then click the + button in the top right corner.

Add a name, choose the customer you just created, and then choose a date range.

Create An Activity

Click Activity on the left, then create an activity. I’m calling mine Overtime Worked and assigning it to the Project “Overtime 2021” I just created.


Step 6: Change “Timetracking Mode” to Time-clock

Click Settings. Under Timetracking mode, change it to Time-Clock. This will let you click the Play button to start/stop time worked vs having to manually enter start and stop times.


Step 7: Start Tracking Time!

To start tracking time, simply click the timer widget in the top right corner.

A screen will pop up asking you what project and activity you want to apply the time to.

The selfhosted stopwatch will start tracking time right after. You can then view the timesheets for yourself under the My Times section or for all users under the Timesheets or Reporting tabs.


Wrapping Up

Hopefully this guide helped you get Kimai installed and setup! If you have any questions, feel free to let me know in the comments below and I’ll do my best to help you out.


My Homelab Equipment

Here is some of the gear I use in my Homelab. I highly recommend each of them.

The full list of server components I use can be found on my Equipment List page.

Source :
https://smarthomepursuits.com/how-to-install-kimai-time-tracking-app-in-docker/