Transport Layer Security (TLS) – TLS protocol is used to provide privacy and data integrity between two communicating applications. SSL and TLS are both cryptographic protocols but because SSL protocols does not providers sufficient level of security compared to TLS, SSL 2.0 and SSL 3.0 have been deprecated. TLS 1.0 was released in 1999, TLS 1.1 was released in 2006, TLS 1.2 was released in 2008 and TLS 1.3 was released in 2018.
Most of the companies and Internet Browsers are now moving to TLS 1.2 which is having better security algorithms than TLS 1.0 and TLS 1.1. TLS is more secure than SSL. Mozilla Firefox, Google Chrome, Apple and Microsoft are all ending support for TLS 1.0/1.1 in 2020, so its better to plan ahead of time and test all the applications and create Policies to disable TLS 1.0 and TLS 1.1 on Windows devices.
If you are interested in learning more about these protocols, differences between these protocols and security improvements – you can check Protocols RFC’s (Request for Comments) at these links TLS1.0 RFC, TLS 1.1 RFC, TLS 1.2 RFC and TLS 1.3 RFC.
Similar other Blog posts:
- Disable TLS 1.0 And TLS 1.1 For Internet Explorer Using Intune
- How To Disable TLS 1.0 And TLS 1.1 Using Powershell On Windows 10
- Disable TLS 1.0 And TLS 1.1 On Windows 10 Machines Through GPO
- Disable TLS 1.0 And TLS 1.1 On Nginx Server
Create a GPO in Active Directory to disable TLS 1.0 and TLS 1.1
We will be creating a Group policy object in Active directory to disable TLS 1.0 and TLS 1.1. You will need to create given registry keys and registry entries to control TLS protocols. Please find below steps to disable TLS 1.0 and TLS 1.1 on windows servers.
How to create a GPO in Active Directory to disable TLS 1.0 and TLS 1.1
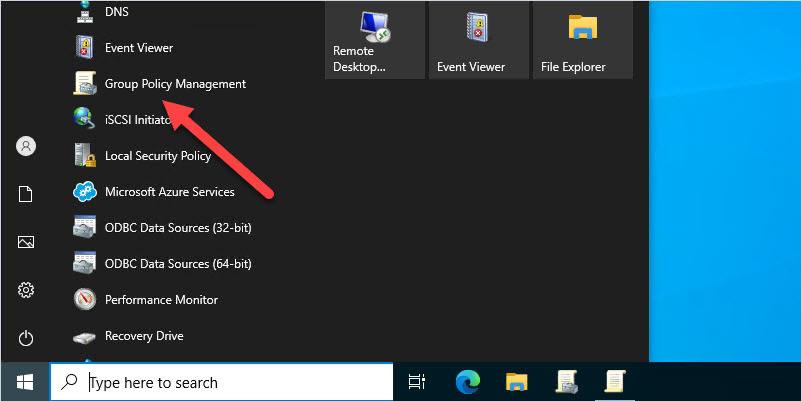
- Login on a domain controller as a domain administrator.
- Open Group policy management console (Go to Start -> Run and type
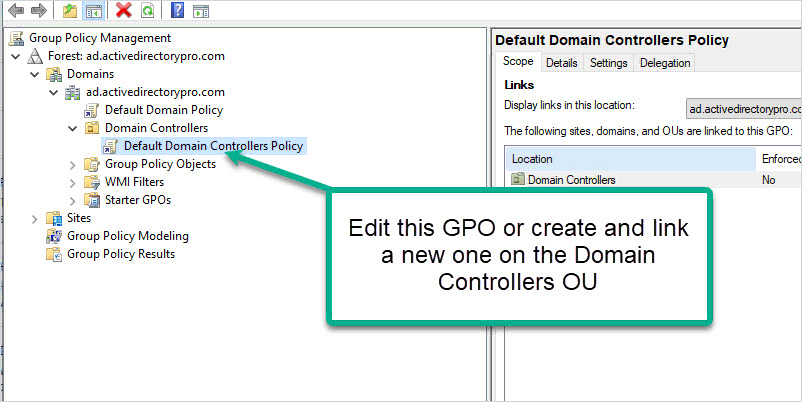
gpmc.mscand press Enter) - Expand Group Policy Objects Folder. Right-click on it and Select New.
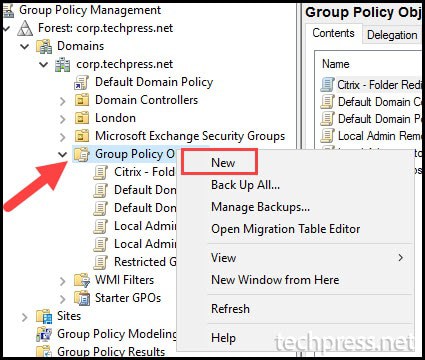
- Provide a Name of the GPO. For Example: Disable TLS 1.0 and TLS 1.1 Windows servers
- Right click on the Group policy “Disable TLS 1.0 and TLS 1.1 Windows Servers” and click on Edit.
- Go to Computer Configuration -> Preferences -> Windows settings -> Registry.
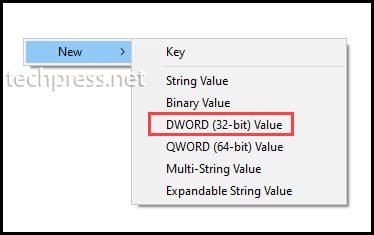
- Right click on Registry -> click on New -> click on Registry Item.
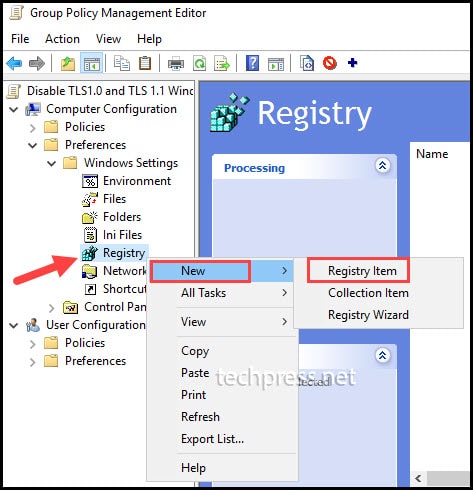
- In the next step, we will create registry keys and registry entries to Disable TLS 1.0 and TLS 1.1. Its recommended to disable SSL 2.0 and SSL 3.0 as well. Most of the newer Windows operating systems have TLS 1.2 enabled by default. However, If you want to control TLS 1.2 and TLS 1.3 then you can use the given registry keys for TLS 1.2 and TLS 1.3.
Registry Keys to disable TLS 1.0
[HKEY_LOCAL_MACHINE\SYSTEM\CurrentControlSet\Control\SecurityProviders\SCHANNEL\Protocols\TLS 1.0\Server] "Enabled"=dword:00000000
[HKEY_LOCAL_MACHINE\SYSTEM\CurrentControlSet\Control\SecurityProviders\SCHANNEL\Protocols\TLS 1.0\Server] "DisabledByDefault"=dword:00000001
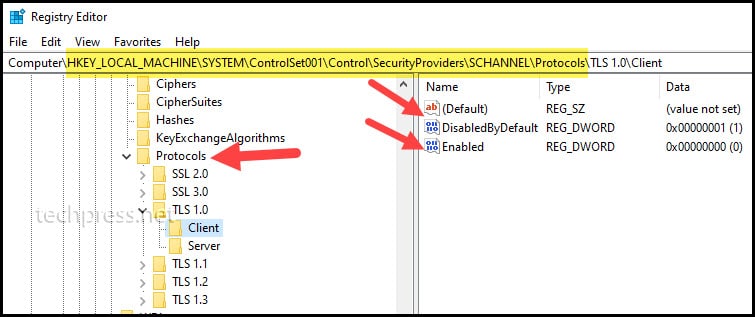
[HKEY_LOCAL_MACHINE\SYSTEM\CurrentControlSet\Control\SecurityProviders\SCHANNEL\Protocols\TLS 1.0\Client] "Enabled"=dword:00000000
[HKEY_LOCAL_MACHINE\SYSTEM\CurrentControlSet\Control\SecurityProviders\SCHANNEL\Protocols\TLS 1.0\Client] "DisabledByDefault"=dword:00000001Copy
Registry Keys to disable TLS 1.1
[HKEY_LOCAL_MACHINE\SYSTEM\CurrentControlSet\Control\SecurityProviders\SCHANNEL\Protocols\TLS 1.1\Server] "Enabled"=dword:00000001
[HKEY_LOCAL_MACHINE\SYSTEM\CurrentControlSet\Control\SecurityProviders\SCHANNEL\Protocols\TLS 1.1\Server] "DisabledByDefault"=dword:00000000
[HKEY_LOCAL_MACHINE\SYSTEM\CurrentControlSet\Control\SecurityProviders\SCHANNEL\Protocols\TLS 1.1\Client] "Enabled"=dword:00000001
[HKEY_LOCAL_MACHINE\SYSTEM\CurrentControlSet\Control\SecurityProviders\SCHANNEL\Protocols\TLS 1.1\Client] "DisabledByDefault"=dword:00000000
Copy
Registry Keys to disable SSL 2.0 [Recommended]
[HKEY_LOCAL_MACHINE\SYSTEM\CurrentControlSet\Control\SecurityProviders\SCHANNEL\Protocols\SSL 2.0\Server] "Enabled"=dword:00000000
[HKEY_LOCAL_MACHINE\SYSTEM\CurrentControlSet\Control\SecurityProviders\SCHANNEL\Protocols\SSL 2.0\Server] "DisabledByDefault"=dword:00000001
[HKEY_LOCAL_MACHINE\SYSTEM\CurrentControlSet\Control\SecurityProviders\SCHANNEL\Protocols\SSL 2.0\Client] "Enabled"=dword:00000000
[HKEY_LOCAL_MACHINE\SYSTEM\CurrentControlSet\Control\SecurityProviders\SCHANNEL\Protocols\SSL 2.0\Client] "DisabledByDefault"=dword:00000001
Copy
Registry Keys to disable SSL 3.0 [Recommended]
[HKEY_LOCAL_MACHINE\SYSTEM\CurrentControlSet\Control\SecurityProviders\SCHANNEL\Protocols\SSL 3.0\Server] "Enabled"=dword:00000000
[HKEY_LOCAL_MACHINE\SYSTEM\CurrentControlSet\Control\SecurityProviders\SCHANNEL\Protocols\SSL 3.0\Server] "DisabledByDefault"=dword:00000001
[HKEY_LOCAL_MACHINE\SYSTEM\CurrentControlSet\Control\SecurityProviders\SCHANNEL\Protocols\SSL 3.0\Client] "Enabled"=dword:00000000
[HKEY_LOCAL_MACHINE\SYSTEM\CurrentControlSet\Control\SecurityProviders\SCHANNEL\Protocols\SSL 3.0\Client] "DisabledByDefault"=dword:00000001
Copy
Registry Keys to Enable TLS 1.2 [Recommended]
[HKEY_LOCAL_MACHINE\SYSTEM\CurrentControlSet\Control\SecurityProviders\SCHANNEL\Protocols\TLS 1.2\Server] "Enabled"=dword:00000001
[HKEY_LOCAL_MACHINE\SYSTEM\CurrentControlSet\Control\SecurityProviders\SCHANNEL\Protocols\TLS 1.2\Server] "DisabledByDefault"=dword:00000000
[HKEY_LOCAL_MACHINE\SYSTEM\CurrentControlSet\Control\SecurityProviders\SCHANNEL\Protocols\TLS 1.2\Client] "Enabled"=dword:00000001
[HKEY_LOCAL_MACHINE\SYSTEM\CurrentControlSet\Control\SecurityProviders\SCHANNEL\Protocols\TLS 1.2\Client] "DisabledByDefault"=dword:00000000
Copy
Registry Keys to Enable TLS 1.3 [Optional]
[HKEY_LOCAL_MACHINE\SYSTEM\CurrentControlSet\Control\SecurityProviders\SCHANNEL\Protocols\TLS 1.3\Server] "Enabled"=dword:00000001
[HKEY_LOCAL_MACHINE\SYSTEM\CurrentControlSet\Control\SecurityProviders\SCHANNEL\Protocols\TLS 1.3\Server] "DisabledByDefault"=dword:00000000
[HKEY_LOCAL_MACHINE\SYSTEM\CurrentControlSet\Control\SecurityProviders\SCHANNEL\Protocols\TLS 1.3\Client] "Enabled"=dword:00000001
[HKEY_LOCAL_MACHINE\SYSTEM\CurrentControlSet\Control\SecurityProviders\SCHANNEL\Protocols\TLS 1.3\Client] "DisabledByDefault"=dword:00000000
Copy
After you click on Registry Item, A window will show where you can enter Information about the registry Item which you want to create. You need to provide below information about the registry Item:
- Action: Select Update from the drop-down. Selecting Update will create the registry keys and registry entries if its not found on end users devices.
- Hive: Select HKEY_LOCAL_MACHINE
- Key Path: You can either browse to the registry path or provide a registry key to create / update.
- Value Name: We will be creating two registry entries for each protocol. DisabledbyDefault and Enabled.
- Value type: Select REG_DWORD.
- Value type: Select 1 to Enable an 0 to disable.

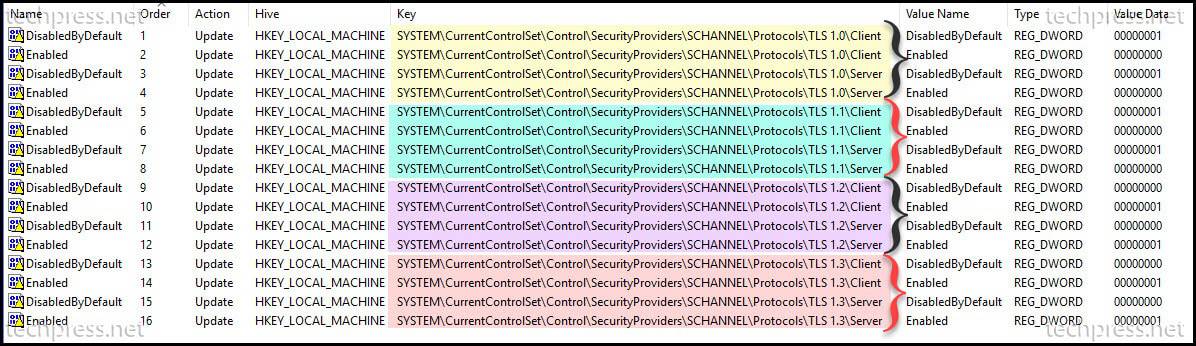
Go through the process of creating an entry for each registry Item. Below screenshot shows that we have Disabled TLS 1.0, TLS 1.1 protocols and Enabled TLS 1.2 and TLS 1.3.
- Once you create all the registry Items in the Group policy management console for Disable TLS 1.0 and TLS 1.1 Windows Servers GPO. You can link the GPO to the Organization Unit (OU) containing windows servers.
- Please note that as this group policy object contains settings in Computer configuration which will target the Devices. A restart of the computer will be required so that registry entries can be created.
Disable TLS 1.0 and TLS 1.1 using IIS Crypto Tool
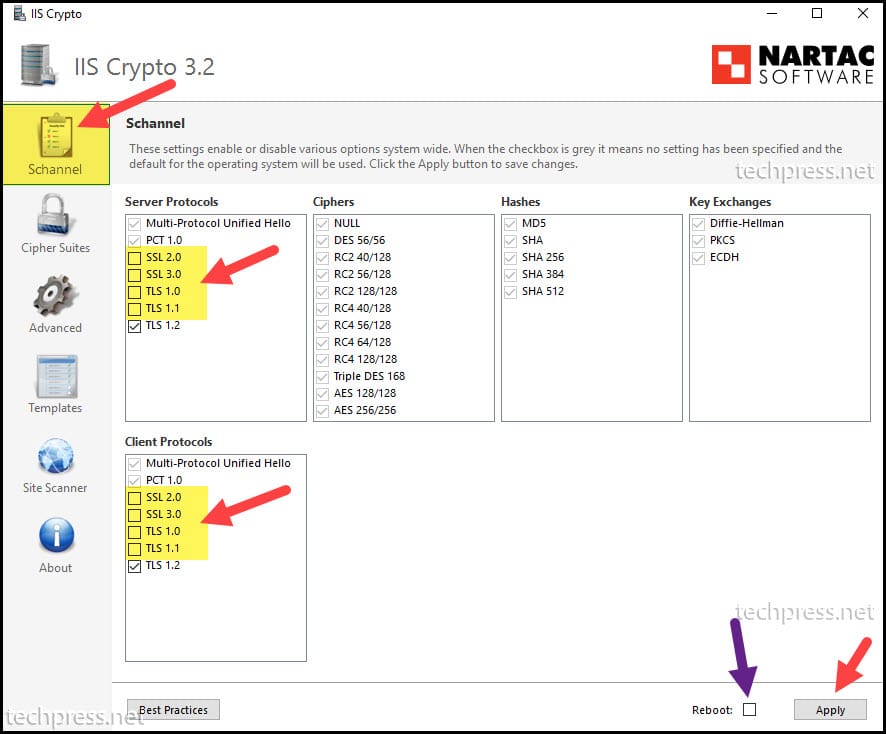
If your windows servers are not domain joined or you do not want to create group policy object in Active directory to disable deprecated SSL and TLS protocols. You can download and Install IIS Crypto tool on Windows server and manually select the checkboxes to Disable / Enable SSL / TLS protocols.
Please follow below steps to disable TLS 1.0 and TLS 1.1 using IIS Crypto Tool:
- Login on Windows Server using administrator credentials.
- Download IIS Crypto GUI tool.
- Launch IIS Crypto tool as an administrator.
- Uncheck SSL 2.0, SSL 3.0, TLS 1.0 and TLS 1.1 from Server Protocols.
- Uncheck SSL 2.0, SSL 3.0, TLS 1.0 and TLS 1.1 from Client Protocols.
- Reboot the server.
- Repeat Steps 1 to 6 on each server where you want to disable deprecated SSL and TLS protocols.
Conclusion
In this blog post, we have seen how to disable TLS 1.0 and TLS 1.1 on windows servers. Its highly recommended to disable SSL 2.0 and SSL 3.0 as well. Newer Windows server operting systems have TLS 1.2 and TLS 1.3 enabled but you can still control these protocols using the given registry keys.
If you have only couple of servers and you do not want to create the Active directory group policy or your windows servers are standalone servers and not domain joined. You can use IIS Crypto tool to disable deprecated SSL and TLS protocols.
Source :
https://techpress.net/how-to-disable-tls-1-0-and-tls-1-1-on-windows-servers/