There have been a lot of changes in ransomware over time. We want to help you protect your organization from this growing attack trend.
The Colonial Pipeline ransomware attack is just part of a new onslaught of ransomware attacks that malicious actors are ramping up against high value victims. Why are we seeing this?
These malicious actors are after extortion money, and as such they are looking to target organizations that are more likely to pay if they can disrupt their business operations. In the past we saw this with targeting of government and education victims. The more pain that these actors can cause an organization, the more likely they will receive an extortion payment.
Ransomware attacks have gone through many iterations and we’re now seeing phase 4 of these types of attacks. To give you context, here are the four phases of ransomware:
1st phase: Just ransomware, encrypt the files and then drop the ransom note … wait for the payment in bitcoin.
2nd phase: Double extortion. Phase 1 + data exfil and threaten for data release. Maze was the first document to do this and the other threat actor groups followed suit
3rd phase: Triple extortion. Phase 1 + Phase 2 and threaten for DDoS. Avaddon was the first documented to do this
4th phase: Quadruple extortion. Phase 1 + (possibly Phase 2 or Phase 3) + directly emailing affected victim’s customer base. Cl0p was first documented doing this, as written by Brian Krebs
The majority of the time now we’re seeing a double extortion model, but the main shift we’re now seeing is the targeting of critical business systems. In this latest case, it does not appear that OT systems were affected but the IT systems associated with the network were likely targeted.
That may change though as many organizations have an OT network that is critical to their operations and could become a target. In this blog post we highlighted how manufacturers are being targeted with modern ransomware and the associated impact.
Taking down the systems that run an organization’s day-to-day business operations can cause financial and reputation damage.
But there could also be unintended consequences of going after victims that are too high profile, and this latest might be one example of this. Bringing down a major piece of critical infrastructure for a nation, even if the motive is only financial gain, might incur major actions against the actors behind this attack. So in the future, malicious actors may need to assess the potential ramifications of their target victim and decide if it makes good business sense to commence with an attack.
We will continue to see ransomware used in the future, and as such organizations need to take the time to put in place an incident response plan focused on the new model of ransomware attacks. Some things to think about as you go about this:
Understand that you will be a target. Every business can likely be on the radar of malicious actors, but those in critical infrastructure need to assess the likelihood of becoming a victim now.
Dedicated attackers will find a way into your network. Access as a Service (usually where another group performs the initial access and sells it to another group) is used regularly now, and whether via a phished employee, a vulnerable system open to the internet, or using a supply chain attack, the criminals will likely find a way in.
The malicious use of legitimate tools are a preferred tactic used across the entire attack lifecycle. Check out our recent blog on this topic.
Your key administrator and application account credentials will be targeted.
Ransomware actors will look to exfiltrate data to be used in the double extortion model.
The ransomware component will be the last option in their malicious activities as it is the most visible part of the attack lifecycle and as such you will then know you’ve been compromised.
For those organizations who have OT networks some key things to think about:
Understand your risk if your OT network is taken offline
Build a security model that protects the devices within the OT network, especially those that cannot support a security agent
Network segmentation is critical
If your OT network needs to be taken offline due to the IT network being compromised, you need to identify how to overcome this limitation
This latest attack is another call to action for all organizations to harden their networks against attacks and improve their visibility that malicious actors are in your network. Trend Micro has a multi-layered cybersecurity platform that can help improve your detection and response against the latest ransomware attacks and improve your visibility. Check out our Trend Micro Vision One platform or give us a call to discuss how we can help.
As part of a recent decommission / security audit, we needed to remove an old WINS server. For desktop client this is fairly easy as they are all assigned through DHCP so it was just a case of removing WINS from the DHCP scope options.
For the hundreds of servers it is set manually, which to remove one by one would take a long time and be pretty boring for the person tasked with it. So I decided the simplest option would be to use PowerShell.
First I wanted to check if servers had WINS enabled so I could reduce the amount of server I would need to run the disable script against.
I am going to use Get-WmiObject and the Win32_NetworkAdapterConfiguration class as this is the simplest way I found to do this in PowerShell.
We will use a text file with a list of server names and a variable called $WINSServer that will be used to filter only network interfaces that have WINS set.
Below is the script to check for WINS and output to PowerShell windows I am just getting all adapters that have WINSPriamryServer value set to the IP in the $WINSServer variable and then selecting the objects to be outputted.
If you wanted to export to a csv or text file just add a | after the WINSPrimaryServer at the end of the script and do either Out-file or Export-csv and the path to export too.
Below is the link to the script location on Github it called Check-Wins.ps1
This guidance will help customers address threats taking advantage of the recently disclosed Microsoft Exchange Server on-premises vulnerabilities CVE-2021-26855, CVE-2021-26858, CVE-2021-26857, and CVE-2021-27065, which are being exploited. We strongly urge customers to immediately update systems. Failing to address these vulnerabilities can result in compromise of your on-premises Exchange Server and, potentially, other parts of your internal network.
Mitigating these vulnerabilities and investigating whether an adversary has compromised your environment should be done in parallel. Applying the March 2021 Exchange Server Security Updates is critical to prevent (re)infection, but it will not evict an adversary who has already compromised your server. Based on your investigation, remediation may be required. This guide will help you answer these questions:
Microsoft will continue to monitor these threats and provide updated tools and investigation guidance to help organizations defend against, identify, and remediate associated attacks. We will update this guidance with new details and recommendations as we continue to expand our knowledge of these threats and the threat actors behind them, so come back to this page for updates.
How does the attack work?
Microsoft released security updates for four different on premises Microsoft Exchange Server zero-day vulnerabilities (CVE-2021-26855, CVE-2021-26858, CVE-2021-26857, and CVE-2021-27065). These vulnerabilities can be used in combination to allow unauthenticated remote code execution on devices running Exchange Server. Microsoft has also observed subsequent web shell implantation, code execution, and data exfiltration activities during attacks. This threat may be exacerbated by the fact that numerous organizations publish Exchange Server deployments to the internet to support mobile and work-from-home scenarios.
In many of the observed attacks, one of the first steps attackers took following successful exploitation of CVE-2021-26855, which allows unauthenticated remote code execution, was to establish persistent access to the compromised environment via a web shell. A web shell is a piece of malicious code, often written in typical web development programming languages (e.g., ASP, PHP, JSP), that attackers implant on web servers to provide remote access and code execution to server functions. Web shells allow adversaries to execute commands and to steal data from a web server or use the server as launch pad for further attacks against the affected organization. Therefore, it is critical to not only immediately mitigate the vulnerabilities, but also remove any additional backdoors, such as web shells that attackers may have created.
Am I vulnerable to this threat?
If you are running Exchange Server 2010, 2013, 2016, or 2019 you must apply the March 2021 Security Update to protect yourself against these threats.
To determine if your Exchange Servers are vulnerable to this attack, the following methods can be used:
Using Microsoft Defender for Endpoint
Scanning your Exchange servers using Nmap
Microsoft Defender for Endpoint
Microsoft Defender for Endpoint customers can use the threat analytics article in Microsoft 365 security center to understand their risk. This requires your Exchange Servers to be onboarded to Microsoft Defender for Endpoint. See instructions for onboarding servers that are not currently monitored.
Scanning using Nmap script
For servers not onboarded to Microsoft Defender for Endpoint, use this Nmap script to scan a URL/IP to determine vulnerability: http-vuln-cve2021-26855.nse.
How do I mitigate the threat?
The best and only complete mitigation for these threats is to update to a supported version of Exchange Server and ensure it is fully updated. If it’s not possible to immediately move to the current Exchange Server Cumulative Update and apply security updates, additional strategies for mitigation are provided below. These lesser mitigation strategies are only a temporary measure while you install the latest Cumulative Update and Security Updates.
Immediate temporary mitigations
The following mitigation options can help protect your Exchange Server until the necessary Security Updates can be installed. These solutions should be considered temporary, but can help enhance safety while additional mitigation and investigation steps are being completed.
Run EOMT.ps1 (Recommended) – The Exchange On-premises Mitigation Tool (EOMT.ps1) mitigates CVE-2021-26855 and attempts to discover and remediate malicious files. When run, it will first check if the system is vulnerable to CVE-2021-26855 and, if so, installs a mitigation for it. It then automatically downloads and runs Microsoft Safety Scanner (MSERT). This is the preferred approach when your Exchange Server has internet access.
Run ExchangeMitigations.ps1– The ExchangeMitigations.ps1 script applies mitigations but doesn’t perform additional scanning. This is an option for Exchange Servers without internet access or for customers who do not want Microsoft Safety Scanner to attempt removing malicious activity it finds.
Applying the current Exchange Server Cumulative Update
The best, most complete mitigation is to get to a current Cumulative Update and apply all Security Updates. This is the recommended solution providing the strongest protection against compromise.
Apply security hotfixes to older Cumulative Updates
To assist organizations that may require additional time and planning to get to a supported Cumulative Update, security hotfixes have been made available. It’s important to note that applying these security hotfixes to older Cumulative Updates will mitigate against these specific Exchange vulnerabilities, but it will not address other potential security risks your Exchange Server may be vulnerable to. This approach is only recommended as a temporary solution while you move to a supported Cumulative Update.
To reduce the risk of exploitation of the vulnerabilities, the Exchange Server can be isolated from the public internet by blocking inbound connections over port 443.
Blocking port 443 from receiving inbound internet traffic provides temporary protection until Security Updates can be applied, but it reduces functionality as it could inhibit work-from-home or other non-VPN remote work scenarios and does not protect against adversaries who may already be present in your internal network.
The most comprehensive way to complete this is to use your perimeter firewalls that are currently routing inbound 443 traffic to block this traffic. You can use Windows Firewall to accomplish this, but you will have to remove all inbound 443 traffic rules prior to blocking the traffic.
Have I been compromised?
To determine if your Exchange Servers have been compromised due to these vulnerabilities, multiple options have been made available:
Microsoft Defender for Endpoint
Publicly available tools published by Microsoft
If Microsoft Defender for Endpoint is not running, skip directly to the publicly available tools section. If it is running, we recommend that you follow both methods.
Microsoft Defender for Endpoint
Check the threat analytics article in Microsoft 365 security center to determine if any indications of exploitation are observed. The Analyst report tab in the Microsoft 365 Security Center threat analytics article contains a continuously updated detailed description of the threat, actor, exploits, and TTPs. On the Overview page, the Impacted assets section lists all impacted devices. The Related incidents section shows any alerts for detected exploitation or post-exploitation activity.
If you have devices that are flagged as impacted (see Impacted assets section) and have active alerts and incidents, click the incidents to further understand the extent of the attack.
Microsoft Defender for Endpoint blocks multiple components of this threat and has additional detections for associated malicious behaviors. These are raised as alerts in the Microsoft Defender Security Center. Additionally, Microsoft Defender for Endpoint prevents some critical behaviors observed in attacks, such as attempts to exploit the CVE-2021-27065 post-authentication file-write vulnerability that can be combined with CVE-2021-26855 to elevate privileges.
Microsoft Defender for Endpoint also detects post-exploitation activity, including some techniques that attackers use to maintain persistence on the machine. Note that alerts marked “Blocked” indicate that the detected threat is also remediated. Alerts marked “Detected” require security analyst review and manual remediation.
You can use advanced hunting to search for unexpected files dropped or executing in Exchange folders, which could be web shells or other attacker artifacts. See more advanced hunting queries relevant to this threat in the Analyst report in Threat Analytics and in our GitHub queries repository.
Publicly available tools published by Microsoft
The following tools have been made available by Microsoft to aid customers in investigating whether their Microsoft Exchange Servers have been compromised. We recommend customers to run both tools as part of their investigation:
Exchange On-Premises Mitigation Tool
Download and run EOMT.ps1 as an administrator on your Exchange Server to automatically run the latest version of Microsoft Safety Scanner (MSERT). MSERT discovers and remediates web shells, which are backdoors that adversaries use to maintain persistence on your server.
After completing the scan, EOMT.ps1 reports any malicious files it discovers and removes. If malicious files are discovered and removed by the tool, follow the web shell remediation workflow. If no malicious files are found, it will report “No known threats detected.”
If this initial scan does not find evidence of malicious files, a full scan can be run via “.\EOMT.ps1 -RunFullScan”. This may take a few hours or days, depending on your environment and the number of files on the Exchange Server.
If the script is unable to download Microsoft Safety Scanner (MSERT), you can download and copy MSERT manually to your Exchange Server. Run this executable directly as an administrator. Follow the on-screen instructions to run a Quick or Full scan. A new version of MSERT should be downloaded each time it is run to ensure it contains the latest protections
Test-ProxyLogon.ps1
Run the Test-ProxyLogon.ps1 script as administrator to analyze Exchange and IIS logs and discover potential attacker activity.
IMPORTANT: We recommend re-downloading this tool at a minimum of once per day if your investigation efforts span multiple days, as we continue to make updates to improve its usage and output.
Step 1 – Review script output to determine risk:
If the script does not find attacker activity, it outputs the message Nothing suspicious detected
If attacker activity was found, the script reports the vulnerabilities for which it found evidence of use and collects logs that it stores in the specified output path in the Test-ProxyLogonLogs directory. Continue following these steps for remediation. Below is an example of the output:
Step 2 – Investigate CVE-2021-27065:
If CVE-2021-27065 is detected, then investigate the logs specified for lines containing Set-OabVirtualDirectory. This indicates that a file was written to the server.
Investigate web server directories for new or recently modified .aspx files or other file types that may contain unusual <script> blocks.
This indicates an adversary may have dropped a web shell file. Below is an example of such a <script> block.
Does the tool output for AnchorMailbox contain /ews/exchange.asmx?
This indicates an attacker may be exfiltrating your email.
If yes, inspect the Exchange web services (EWS) logs in \V15\Logging\EWS to verify if the adversary accessed a mailbox, and then proceed to the corresponding remediation workflow.
What remediation steps should I take?
The steps in Have I been compromised? section help establish the scope of possible exploitation: scanning, unauthorized email access, establishment of persistence via web shells, or post-exploitation activity.
Decide between restoring your Exchange Server or moving your mail services to the cloud. You can engage with FastTrack for data migration assistance for Office 365 customers with tenants of 500+ eligible licenses.
Follow applicable remediation workflows:
Was post-compromise activity related to credential harvesting or lateral movement detected by Microsoft Defender for Endpoint or during manual investigation?
Engage your incident response plan. Share the investigation details to your incident response team.
If you are engaging with CSS Security or Microsoft Detection and Response Team (DART), and you are a Microsoft Defender for Endpoint customer, see instructions for onboarding Windows Server to Microsoft Defender for Endpoint.
Were web shells detected?
Clean and restore your Exchange Server:
Preserve forensic evidence if your organization requires evidence preservation.
Disconnect the Exchange Server from the network, either physically or virtually via firewall rules.
Restart Exchange Server.
Stop W3WP services.
Remove any malicious ASPX files identified via the investigation steps above.
Delete all temporary ASP.NET files on the system using the following script:
Consider submitting suspected malicious files to Microsoft for analysis following this guidance: Submit files for analysis by Microsoft and include the string “ExchangeMarchCVE” in the Additional Information text box of the submission form.
Was mailbox access and exfiltration detected?
Disconnect Exchange Server from the network.
Apply Security Updates.
Run a full EOMT.ps1 scan via “.\EOMT.ps1 -RunFullScan”. Have I been compromised? for additional instructions for running EOMT.ps1.
Resume operation.
Was scan-only adversary behavior detected?
Disconnect Exchange Server from the network.
Apply Security Updates.
Resume operation.
How can I better protect myself and monitor for suspicious activity?
Additional protection and investigation capabilities are available if Microsoft Defender Antivirus and Microsoft Defender for Endpoint are running on the Exchange Server. If neither are yet installed, installing both now can provide additional protection moving forward and is strongly advised.
If you are an existing Microsoft Defender for Endpoint customer but have Exchange servers that are not onboarded, see instructions for onboarding Windows Server to Microsoft Defender for Endpoint.
Microsoft’s Detection and Response Team (DART) Microsoft 365 Defender Team CSS Security Incident Response
This blog and its contents are subject to the Microsoft Terms of Use. All code and scripts are subject to the applicable terms on Microsoft’s GitHub Repository (e.g., the MIT License).
We have been actively working with customers through our customer support teams, third-party hosters, and partner network to help them secure their environments and respond to associated threats from the recent Exchange Server on-premises attacks. Based on these engagements we realized that there was a need for a simple, easy to use, automated solution that would meet the needs of customers using both current and out-of-support versions of on-premises Exchange Server.
Microsoft has released a new, one-click mitigation tool, Microsoft Exchange On-Premises Mitigation Tool to help customers who do not have dedicated security or IT teams to apply these security updates. We have tested this tool across Exchange Server 2013, 2016, and 2019 deployments. This new tool is designed as an interim mitigation for customers who are unfamiliar with the patch/update process or who have not yet applied the on-premises Exchange security update.
By downloading and running this tool, which includes the latest Microsoft Safety Scanner, customers will automatically mitigate CVE-2021-26855 on any Exchange server on which it is deployed. This tool is not a replacement for the Exchange security update but is the fastest and easiest way to mitigate the highest risks to internet-connected, on-premises Exchange Servers prior to patching. We recommend that all customers who have not yet applied the on-premises Exchange security update:
Then, follow the more detailed guidance here to ensure that your on-premises Exchange is protected.
If you are already using Microsoft Safety Scanner, it is still live and we recommend keeping this running as it can be used to help with additional mitigations.
Once run, the Run EOMT.ps1 tool will perform three operations:
Mitigate against current known attacks using CVE-2021-26855 using a URL Rewrite configuration. Scan the Exchange Server using the Microsoft Safety Scanner. Attempt to reverse any changes made by identified threats.
Before running the tool, you should understand:
The Exchange On-premises Mitigation Tool is effective against the attacks we have seen so far, but is not guaranteed to mitigate all possible future attack techniques. This tool should only be used as a temporary mitigation until your Exchange servers can be fully updated as outlined in our previous guidance.
We recommend this script over the previous ExchangeMitigations.ps1 script as it tuned based on the latest threat intelligence. If you have already started with the other script, it is fine to switch to this one.
This is a recommended approach for Exchange deployments with Internet access and for those who want to attempt automated remediation.
Thus far, we have not observed any impact to Exchange Server functionality when these mitigation methods are deployed.
For more technical information, examples, and guidance please review the GitHub documentation.
Microsoft is committed to helping customers and will continue to offer guidance and updates that can be found at https://aka.ms/exchangevulns.
MICROSOFT MAKES NO WARRANTIES, EXPRESS, IMPLIED, OR STATUTORY, AS TO THE INFORMATION IN THIS GUIDANCE. The Exchange On-premises Mitigation Tool is available through the MIT License, as indicated in the GitHub Repository where it is offered.
If you have already managed multiple Wi-Fi access points, you should know that this can be a nightmare … But with good choices for hardware and a controller, this becomes easier. It’s the main goal of the Unifi controller: manage most of the tasks on a wireless network to avoid issues. It’s available on Raspberry Pi and I will show you how to install it.
How to install and configure Unifi controller on Raspberry Pi? Start by adding the Ubiquiti server to the list of repositories for Raspberry Pi OS. Then, the Unifi controller can be installed with apt and managed as a system service.
The installation is straightforward, you can install it like any Debian package. But the access points configuration is not so easy and I saw no article explaining this. As I’m using it at work, I can show you all the configuration steps with real access points and clients.
Before switching to Ubiquiti products, I remember having tested many brands to solve my issues, but none of them could not support over 10-20 users simultaneously (I even tested a fireproof model from D-Link, something like this one on Amazon ^^). So I definitely recommend trying Ubiquiti, this is cheap compared to other famous brands but works very well. Let’s see how to do this!
Ubiquiti Networks is an American company, selling hardware for wireless technologies like access points, routers and cameras. They started with wireless devices, and they are now diversifying upon a broader range of products. The latest innovative product concerns the solar technology, they help you to manage solar farms.
Anyway, the product that interests us today is a software: Unifi controller. The goal of this product is to manage access points and wireless devices from a unique web interface. From the interface, you can see all the access points and broadcast a unique SSID. The controller will handle the roaming between access points and load distribution.
Raspberry Pi Course Sale: 10% off today. Take it to the next level. I’m here to help you get started on Raspberry Pi, and learn all the skills you need in the correct order.YES, I WANT TO IMPROVE
Why do I need these products?
These products target mainly companies and large areas but you can have the same needs at home if you get some issues with your Wi-Fi connection (rooms with no network, roaming, stability, etc.). If you need over one access point to cover all the house, it could be interesting to install these products at home.
For example, let’s say you install three access points and the controller somewhere. You’ll have only one Wi-Fi SSID in all the area (outdoor included). And you can move from one side to another without disconnection.
Ubiquiti products
Ubiquiti products are distributed by resellers, but are also available on several e-commerce websites:
To test these products, you don’t need many things. Just buy one or more access points and build your professional wireless network. Here is the link: Ubiquiti Unifi AP on Amazon.
You have several packages available: Only one, 2 AP (access point), 4 AP, etc. Choose the one you prefer, but there is not a big saving by taking big packs, so you can try with one or two, and order the others after.
Whatever your choice, a PoE switch will make the installation easier If you want to start without it, there is a last option. Ubiquiti provides an adapter with the AP (power cord + network = PoE Network), but you need a power outlet and two RJ45 cables instead of only one cable for everything. Here is the link to the PoE injector on Amazon, make sure to check the AP power requirements are they are not all the same (a Pro AP needs PoE-48 for example).
Unifi controller installation
Now that you understand what are the Unifi products, we can move to the controller installation.
Installation on Raspberry Pi OS
As for any tutorial on this site, you firstly need to install Raspberry Pi OS on your Raspberry Pi. Any version will do the job (I’m doing it with Raspberry Pi OS Lite). If you don’t know how to do this, read my article on How to install Raspberry Pi OS on your Raspberry Pi.
Once installed, update it and reboot: sudo apt update sudo apt upgrade sudo reboot
And enable SSH access with: sudo service ssh start This way you can follow this tutorial from your computer (if needed, check this post to learn more about this).
Set a static IP address
As our Raspberry Pi will be like a server on our network, we need to use:
A wired connection If you want a fast Wi-Fi network, you need to have your controller and your access point on a good connection. So, I don’t recommend setting up the controller with a Wi-Fi connection (at home it’s probably ok).
A static IP address The Raspberry Pi will become an important node on your network, so we need to fix its IP. By default, the Raspberry Pi use the DHCP to get a random IP among those available.
For the static IP, you can either fix the IP in the DHCP server (your Internet router probably), or set a static IP in the Raspberry Pi configuration.
Master your Raspberry Pi in 30 days Sale: 25% off today. Download the eBook. Uncover the secrets of the Raspberry Pi in a 30 days challenge.GET IT NOW!
Unifi controller installation
Now we are ready to start the installation. For these steps you have two choices:
Download and install directly the official Debian package from the website.
Add a new repository to manage the Unifi package with apt.
On the Ubiquiti downloads page you can find the Debian package to install the controller. You can download it and install it on your Raspberry Pi. But I don’t recommend it.
Because the Controller has many updates, about every month you have to download and install a new versionmanually. There is a repository available and it’s easier to manage all updates with apt rather than doing everything manually.
Connect with SSH to your Raspberry Pi.
Add the repository in the apt configuration file: echo 'deb https://www.ui.com/downloads/unifi/debian stable ubiquiti' | sudo tee /etc/apt/sources.list.d/100-ubnt-unifi.list
Add the key to the trusted keys: sudo wget -O /etc/apt/trusted.gpg.d/unifi-repo.gpg https://dl.ui.com/unifi/unifi-repo.gpg This allows us to use software from the previous repository
Run apt update to update the available packages list : sudo apt update
And finally, install the Unifi package: sudo apt install unifi Answer yes and wait a few seconds for the installation process to finish.
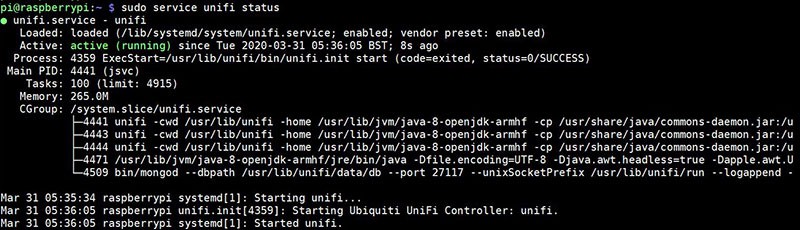
This is the end of the installation procedure, but your controller may not work yet. You can check the service status with: sudo service unifi status If you get an error like this one on a fresh Raspberry Pi OS installation:
Starting Ubiquiti UniFi Controller: unifi
Cannot locate Java Home
Then you need to install Java to start the Unifi service. Currently, the Unifier controller requires Java 8. You may already have it from another application, but if you have this error, here is how to fix it: sudo apt install openjdk-8-jre And finally start the Unifi service: sudo service unifi start You can find more details about Java in this tutorial.
Check the status again if you want: If everything is ok, you can move on to the next part to know how to use the software.You may also like:
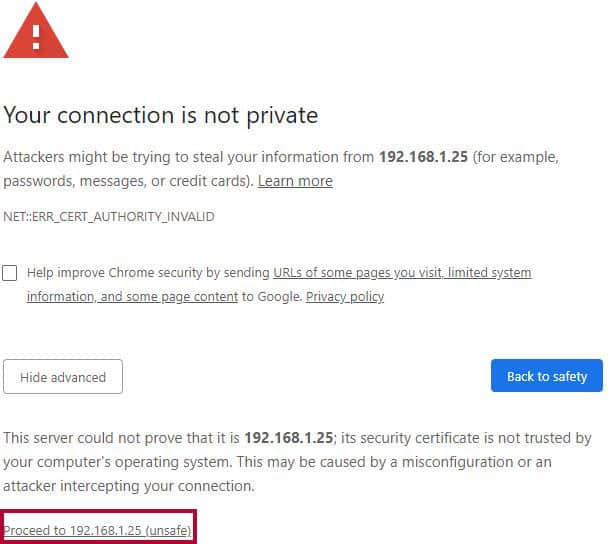
To access the web interface, go to https://<IP>:8443 For example, in my case it’s https://192.168.1.25:8443/ You’ll get a browser warning because we don’t have a secured certificate for the moment. Accept the exception and move to the next page to configure everything you need to get started:
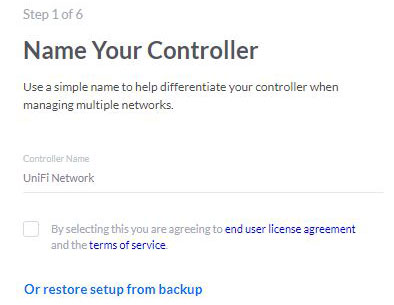
Step1: Start by giving a name to his controller and click on “Next”
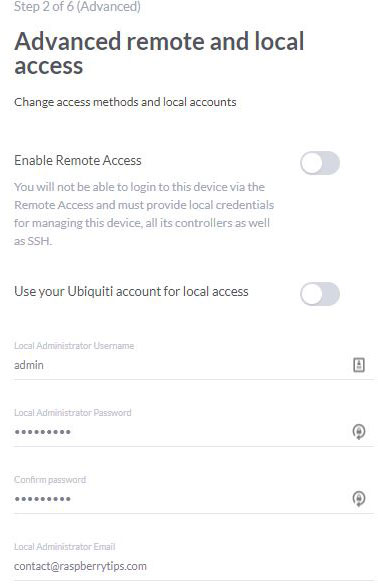
Step 2: Choose if you want to enable the cloud interface (default) or not (advanced). It depends on what you are trying to do. If you are always on the same network (home or in a company), you don’t really need the cloud panel. But it can be useful for remote sites.
If you keep the default option, fill the form to create an Unifi account.
On the advanced option, you have a form like this: If you enable one option, you need to create a cloud account AND a local account. I don’t need it for my test, so I disable everything.
Step 3: Sign in or configure options. This step is also different depending on your choice in the previous step You may need to sign in your account, or just to configure two additional options (auto backup and auto-optimize). Keep them enabled if asked.
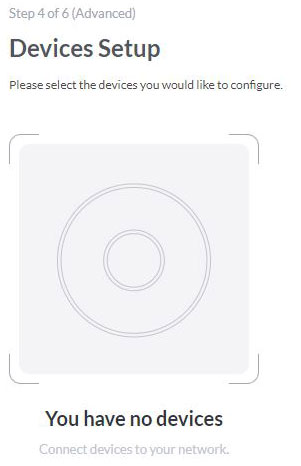
Step 4: Configure your devices. You can just skip this, it’s not required for now. You can add devices at anytime in the interface
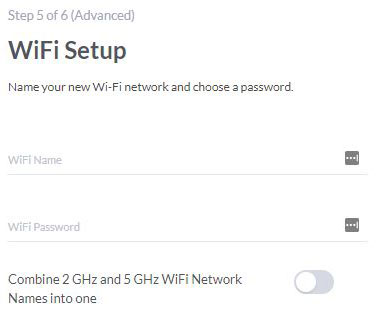
Step5: You can finally configure your Wi-Fi settings now. You can also change this in the interface, so just pick something to get started.
Step6: Finally, you also need to review your settings and you are ready to go.
Good job! You will now be redirected to the web panel. We can finally see it and configure more things if needed.
Web interface overview
Once logged in the web interface, you’ll get many submenus to manage everything. For the moment, it should be pretty empty, but in the left bar you can see:
Dashboard: Here you can have a preview of your network performance (number of APs and clients). Most of this dashboard needs the Unifi Security Gateway, so it’s not an important page.
Statistics: In this page you can monitor clients and traffic in the whole network. For the moment, nothing here 🙂
Map: In this one you can upload a map of your building, and place all APs on it. This way you can know where they are and see the global Wi-Fi coverage (approximately).
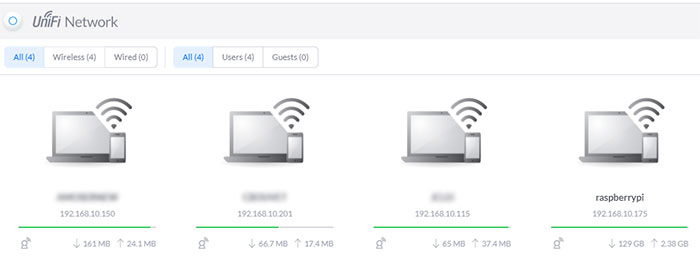
Devices: This page shows you all the Unifi devices you have on your network. It’s the most important page, you will manage APs from here.
Clients: Same thing for the clients. You’ll see here all the connected clients with information about them (IP, AP, network usage, …):
Insights: Here you can see miscellaneous information. I’m using this mainly to see known clients (not connected now, but you can check the history, block or unblock them).
Events: This window shows you all the recent logs on your network This can be clients connections, AP upgrades, roaming, …
Alerts: Same thing with errors and warnings.
Settings: And this is the page where you’ll configure everything. We’ll use it to create the wireless network.
Chat support: If you need help from Unifi, you can ask for help here.
Now that you have visited the whole interface, we can move forward to configure the access point.
Add the first access point
Physical preparation
There are two possibilities for the access point cabling.
With a PoE switch:
Plug the access point to the POE Switch with an RJ45 cable.
Basically, that’s it. The status light should turn on and you can move to the next step.
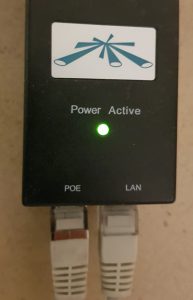
Without PoE switch:
You must have a POE adapter like this: (it’s available on Amazon if you don’t have one with your access point: check it here).
Connect the LAN port to your switch or wall network socket.
Connect the POE port to the access point.
If the access point LED starts to blink, it’s ok.
Software configuration
Now that we powered on the access point, we can go back to the Unifi web interface for the next steps:
Access the web interface: https://IP:8443.
Click on “Devices” in the left menu.
You should now see your access point in the list: The controller is seeing it, but we need to tell that it’s an access point for this controller.
Click on “Adopt” at the end of the line. The adoption process starts, after a few seconds, you should get the “Connected” status.
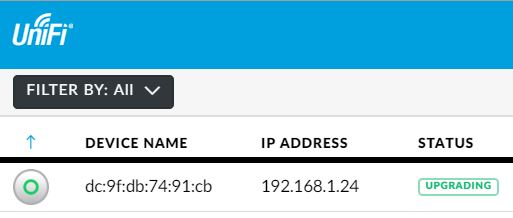
If needed (probably), you can upgrade the AP firmware to the latest version by clicking “Upgrade”. Your access point will take a few minutes to download and update the firmware.
Anyway, the first access point is ready, and we can now create the wireless network (SSID).
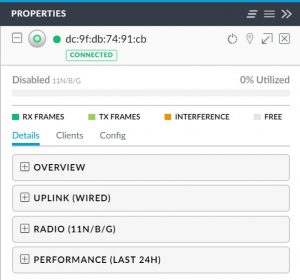
You can click on the line to see and change other settings for the access point (on the right).
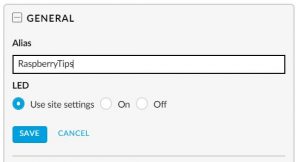
For example, you can set an alias for each access point to know which one is which. In the properties window, click on the config tab and set an alias.
Change everything you want on the access point and move to the SSID creation.
Create your wireless network
Creating a wireless network is basically setting an SSID, a password and a security type. You can do this in the “Settings” menu from the left bar:
In settings, click on “Wireless Networks”.
Then click on the “Create a new wireless network” button:
In the new window, choose an SSID, a security type and a password: Choose WPA-Personal for security, WEP is not secure. And prefer a long password (ideally a phrase from 15 to 30 characters).
Click “Save”.
The access points will restart with the new settings. After a few seconds, the new wireless network is available for all your devices.
Connect to it and check that everything works fine. By default, the Unifi controller will give you an IP address within your main network. You have nothing else to do, but you can change it in Settings > LAN.
Then go back to the different menus to see information and statistics about your device. Enjoy 🙂
Related questions
Do I need to keep the Raspberry Pi on? Not really. As soon as the Raspberry Pi stops, the controller is no longer available but the access point continue to work. You can still access the Wi-Fi network, but you lose controller’s features like roaming between APs.
Do the Unifi controller have advanced features you don’t talk about? Yes, a lot. I made a quick tutorial, but you can do a lot more: schedule downtimes, create guest access with VLAN or not, Radius with Active Directory, filter MAC address, block and unblock clients, etc …
How to reset an Unifi access point? If you lose access to an access point or have strange scenarios in the adoption process, you can reset it to factory defaults. To do this, use the reset button near the RJ45 socket. While the access point is on, let the button pressed for 10 seconds and then wait for the reset.
Conclusion
That’s it, you know how to install and configure an Unifi controller on your Raspberry Pi. This controller is running perfectly on my Raspberry Pi (3B+ and 4). I don’t know how many clients it would handle, but at home it’s more than enough.
If you have questions on this topic, leave a comment below and I’ll help you. I’m using this software at work for five years now, so I may have the answer 😉
One of the first malware samples tailored to run natively on Apple’s M1 chips has been discovered, suggesting a new development that indicates that bad actors have begun adapting malicious software to target the company’s latest generation of Macs powered by its own processors.
While the transition to Apple silicon has necessitated developers to build new versions of their apps to ensure better performance and compatibility, malware authors are now undertaking similar steps to build malware that are capable of executing natively on Apple’s new M1 systems, according to macOS Security researcher Patrick Wardle.
Wardle detailed a Safari adware extension called GoSearch22 that was originally written to run on Intel x86 chips but has since been ported to run on ARM-based M1 chips. The rogue extension, which is a variant of the Pirrit advertising malware, was first seen in the wild on November 23, 2020, according to a sample uploaded to VirusTotal on December 27.
“Today we confirmed that malicious adversaries are indeed crafting multi-architecture applications, so that their code will natively run on M1 systems,” said Wardle in a write-up published yesterday. “The malicious GoSearch22 application may be the first example of such natively M1 compatible code.”
While M1 Macs can run x86 software with the help of a dynamic binary translator called Rosetta, the benefits of native support mean not only efficiency improvements but also the increased likelihood of staying under the radar without attracting any unwanted attention.
First documented in 2016, Pirrit is a persistent Mac adware family notorious for pushing intrusive and deceptive advertisements to users that, when clicked, downloads and installs unwanted apps that come with information gathering features.
For its part, the heavily obfuscated GoSearch22 adware disguises itself as a legitimate Safari browser extension when in fact, it collects browsing data and serves a large number of ads such as banners and popups, including some that link to dubious websites to distribute additional malware.
Wardle said the extension was signed with an Apple Developer ID “hongsheng_yan” in November to further conceal its malicious content, but it has since been revoked, meaning the application will no longer run on macOS unless attackers re-sign it with another certificate.
Although the development highlights how malware continues to evolve in direct response to both hardware changes, Wardle warned that “(static) analysis tools or antivirus engines may struggle with arm64 binaries,” with detections from industry-leading security software dropping by 15% when compared to the Intel x86_64 version.
GoSearch22’s malware capabilities may not be entirely new or dangerous, but that’s beside the point. If anything, the emergence of new M1-compatible malware signals this is just a start, and more variants are likely to crop up in the future.
A full-time mass work from home (WFH) workforce was once considered an extreme risk scenario that few risk or security professionals even bothered to think about.
Unfortunately, within a single day, businesses worldwide had to face such a reality. Their 3-year long digital transformation strategy was forced to become a 3-week sprint during which offices were abandoned, and people started working from home.
Like in an eerie doomsday movie, servers were left on in the office, but nobody was sitting in the chairs.
While everyone hopes that the world returns to its previous state, it’s evident that work dynamics have changed forever. From now on, we can assume a hybrid work environment.
Even companies that will require their employees to arrive daily at their offices recognize that they have undergone a digital transformation, and work from home habits will remain.
The eBook “5 Security Lessons for Small Security Teams for a Post-COVID19 Era” (download here) helps companies prepare for these new work dynamics. The practical insights and provided recommendations make this a very helpful guide for small security teams that feel the brunt of security on a daily basis and now need to add one more item to their security strategy planning and execution.
This eBook details the following five security lessons derived from current business, IT, and threat landscape trends:
You can’t do it all. In particular, they suggest asking your security vendor for their customer success and offered services. Some vendors provide a range of free offerings, but many customers don’t realize this and forego the opportunity to extend their security team virtually.
Response speed is the name of the game. Everyone will tell you that automation is key. The guide takes it a step further and also suggests how to remove overheads from security stacks as well as how to reduce analyst work inefficiencies.
More corporate devices to be issued to employees. This point provides best practices for securely procuring and managing all of those new devices, also when the security team works remotely.
Supply chain attacks are on the rise. Your supplier’s security, unfortunately, becomes your security. The guide provides tips on how to receive more visibility into the threats that now reside in your environment, including how to address this challenge in a budget-constrained way.
Economies have changed. When ransomware is growing to insurmountable amounts, what are the ways – from training to technologies – to best protect your business.
At the end of the day, small security teams deal with many challenges. As all security teams go, they have the burden of tedious tasks and operational demands while needing to keep the business going.
But on top of that, they have a stricter budget and human resource limitations. In each practical step, this guide takes these constraints into consideration.
It’s no secret that sysadmins have plenty on their plates. Managing, troubleshooting, and updating software or hardware is a tedious task. Additionally, admins must grapple with complex webs of permissions and security. This can quickly become overwhelming without the right tools.
If you’re a sysadmin seeking to simplify your workflows, you’re in luck. We’ve gathered some excellent software picks to help tackle different duties more efficiently.
Thankfully, these free tools are also respectful of tight budgets—without sacrificing core functionality.
Best for Permissions Management: SolarWinds Permissions Analyzer for Active Directory
Whether you are part of an organization with many members or numerous resources, keeping track of permissions can be challenging. Changes in responsibilities, titles, or even employment statuses can influence one’s access to proprietary data. Each user has unique privileges.
SolarWinds Permissions Analyzer streamlines this process. Once the software has system access, you may inspect user permissions using the search bars. This lets you cross-reference specific users with key file groups—showing read access, write or modify access, delete or create capabilities, and even full control.
How does Permissions Analyzer (PA) check this?
The tool performs a user search
PA reads NTFS rights and calculates NTFS permissions
PA then reads membership information for any pertinent groups
PA searches for local group membership information
The program reads share rights, calculating share permissions
Finally, results are merged and finalized
This process is incredibly quick. Referring to the figure above, the way SolarWinds displays this information is its bread and butter. Permissions Analyzer organizes the output into a hierarchical table—including expandable categories based on inheritance. For instance, you can see if group membership impacts specific permissions statuses.
This information is shown in concert with NTFS, Shares, and Total permissions. The GUI allows for quick consumption using iconography and color (partially adopting the traffic light scheme). Therefore, PA excels where alternatives fall short: simplicity and usability.
Note that SolarWinds Permissions Analyzer is an investigative tool. It doesn’t allow you to edit permissions within the app; however, it provides rapid visibility into your permissions structure.
Best for Boosting Password Security: Specops Password Auditor
Active Directory password security is vitally important, yet many organizations routinely fail short. Teams can institute password policies—both broad and fine-grained. But, are these efforts adequate? Specops Password Auditor can answer that question and more for you.
Password Auditor does what its namesake implies by scanning all user accounts within your environment to detect leaked passwords. Specops maintains a dictionary of compromised passwords; should any user passwords match, Password Auditor highlights them within the tool.
The central dashboard displays the following in a unified view:
Breached passwords (and their corresponding users)
Identical passwords (and matching users)
Admin account names and stale variants
Accounts with expired passwords
Various password policies according to users, roles, and security
Password policy usage and compliance (pass, caution, fail)
This breakdown is easier to read at a glance than most others out there—including some paid options. It’s also a great supplement to Azure AD Password Protection. While that functionally applies password policies to domain controllers, Password Auditor determines if these policies are ultimately working properly.
Are dormant accounts causing issues? Perhaps password length and complexity aren’t up to snuff. Password Auditor can shed light on these issues.
Like SolarWinds Permissions Analyzer, Specops’ tool conducts a scan of your users and policies. This process is quick and easy to monitor. Password Auditor automatically compiles a report of its findings, which is available as a downloadable PDF. You may also export to CSV.
Worried about potential tampering? Specops Password Auditor is a read-only program.
Best for Network Visibility and Protocol Analysis: Wireshark
For lovers of the now-deprecated Microsoft Message Analyzer, Wireshark has emerged as a popular replacement. The multi-platform tool supports an expansive list of operating systems:
Windows 8+ and Windows Server 2012(R)+
macOS 10.12+
Over a dozen versions of UNIX, Linux, and BSD
Wireshark can inspect hundreds of network protocols, and even when that list is continually evolving. Accordingly, Wireshark can capture data whether you’re online or offline, allowing for uninterrupted inspection. Wireshark also supports over 20 capture file formats.
You may retrospectively parse logs using your preferred interface—whether that be the GUI or the TShark terminal utility. Files compressed using gzip can be uncompressed on the fly, which saves time.
Want to inspect the packets traveling throughout your network? Simply take advantage of the three-pane browser view, which keeps data well organized. Layouts also feature collapsible sections—letting you reveal additional details on demand or keep the interface uncluttered.
What else does Wireshark offer?
Numerous display filters
VoIP analysis
Real-time data reads over ethernet, IEEE, Bluetooth, USB, token ring, and more
Decryption for IPsec, Kerberos, SNMP, ISAKMP, SSL/TLS, WEP, WPA, and WPA2
Customizable coloring rules
Easy data export via XML, PostScript, CSV, or plain text
Wireshark remains open source to this day, and the developers maintain high-quality documentation on Wireshark’s website and GitHub pages.
Best for Proactive User-Password Management: Specops Password Notification Email
Even when your password policy is sound, it’s important to keep passwords from becoming stale. This can prevent hackers from gaining repeat access to a compromised account over the long term.
Unanticipated expiry can also separate users from vital resources. Accordingly, companies enforcing periodic password expiry should look no further than Specops Password Notification.
Password Notification’s premise is pretty simple: prevent a lockout, thwart unwanted access, and keep users connected from afar. Additionally, the goal is to lessen the burden on help desk technicians and universally prevent frustration. How exactly does the tool work?
The pwdLastSet attribute is compared to the maximum password age. This age is outlined in a given domain policy or fine-grained password policy
Users impacted by relevant GPOs are sent notification emails when their password nears expiry. This warning period, message, and subject are customizable
IT admins can communicate with all users—even those on remote networks or VPNs
Regular Windows users don’t receive these alerts when they’re off the network.
How else can you tailor emails in Password Notification? Email frequency is adjustable, as are recipients (including multiple contacts). You can also set priority levels that change dynamically as deadlines approach. Seamless time zone integrations are also available.
Manual methods might otherwise rely on scripting via PowerShell. Specops’ tool gives users rich functionality out of the box, without the need for heavy configuration.
Intel and Cybereason have partnered to build anti-ransomware defenses into the chipmaker’s newly announced 11th generation Core vPro business-class processors.
The hardware-based security enhancements are baked into Intel’s vPro platform via its Hardware Shield and Threat Detection Technology (TDT), enabling profiling and detection of ransomware and other threats that have an impact on the CPU performance.
“The joint solution represents the first instance where PC hardware plays a direct role in ransomware defenses to better protect enterprise endpoints from costly attacks,” Cybereason said.
Exclusive to vPro, Intel Hardware Shield provides protections against firmware-level attacks targeting the BIOS, thereby ensuring that the operating system (OS) runs on legitimate hardware as well as minimizing the risk of malicious code injection by locking down memory in the BIOS when the software is running to help prevent planted malware from compromising the OS.
Intel TDT, on the other hand, leverages a combination of CPU telemetry data and machine learning-based heuristics to identify anomalous attack behavior — including polymorphic malware, file-less scripts, crypto mining, and ransomware infections — in real-time.
“The Intel [CPU performance monitoring unit] sits beneath applications, the OS, and virtualization layers on the system and delivers a more accurate representation of active threats, system-wide,” Intel said. “As threats are detected in real-time, Intel TDT sends a high-fidelity signal that can trigger remediation workflows in the security vendor’s code.”
The development comes as ransomware attacks exploded in number last year, fueled in part by the COVID-19 pandemic, with average payout increasing from about $84,000 in 2019 to about $233,000 last year.
The ransomware infections have also led to a spike in “double extortion,” where cybercriminals steal sensitive data before deploying the ransomware and hold it hostage in hopes that the victims will pay up rather than risk having their information made public — thus completely undermining the practice of recovering from data backups and avoid paying ransoms.
What’s more, malware operators are increasingly extending their focus beyond the operating system of the device to lower layers to potentially deploy bootkits and take complete control of an infected system.
Last month, researchers detailed a new “TrickBoot” feature in TrickBot that can allow attackers to inject malicious code in the UEFI/BIOS firmware of a device to achieve persistence, avoid detection and carry out destructive or espionage-focused campaigns.
Viewed in that light, the collaboration between Intel and Cybereason is a step in the right direction, making it easier to detect and eradicate malware from the chip-level all the way to the endpoint.
“Cybereason’s multi-layered protection, in collaboration with Intel Threat Detection Technology, will enable full-stack visibility to swiftly detect and block ransomware attacks before the data can be encrypted or exfiltrated,” the companies said.
Hardware security keys—such as those from Google and Yubico—are considered the most secure means to protect accounts from phishing and takeover attacks.
But a new research published on Thursday demonstrates how an adversary in possession of such a two-factor authentication (2FA) device can clone it by exploiting an electromagnetic side-channel in the chip embedded in it.
The vulnerability (tracked as CVE-2021-3011) allows the bad actor to extract the encryption key or the ECDSA private key linked to a victim’s account from a FIDO Universal 2nd Factor (U2F) device like Google Titan Key or YubiKey, thus completely undermining the 2FA protections.
“The adversary can sign in to the victim’s application account without the U2F device, and without the victim noticing,” NinjaLab researchers Victor Lomne and Thomas Roche said in a 60-page analysis.
“In other words, the adversary created a clone of the U2F device for the victim’s application account. This clone will give access to the application account as long as the legitimate user does not revoke its second factor authentication credentials.”
The whole list of products impacted by the flaw includes all versions of Google Titan Security Key (all versions), Yubico Yubikey Neo, Feitian FIDO NFC USB-A / K9, Feitian MultiPass FIDO / K13, Feitian ePass FIDO USB-C / K21, and Feitian FIDO NFC USB-C / K40.
Besides the security keys, the attack can also be carried out on NXP JavaCard chips, including NXP J3D081_M59_DF, NXP J3A081, NXP J2E081_M64, NXP J3D145_M59, NXP J3D081_M59, NXP J3E145_M64, and NXP J3E081_M64_DF, and their respective variants.
The key-recovery attack, while doubtless severe, needs to meet a number of prerequisites in order to be successful.
An actor will have first to steal the target’s login and password of an account secured by the physical key, then stealthily gain access to Titan Security Key in question, not to mention acquire expensive equipment costing north of $12,000, and have enough expertise to build custom software to extract the key linked to the account.
“It is still safer to use your Google Titan Security Key or other impacted products as a FIDO U2F two-factor authentication token to sign in to applications rather than not using one,” the researchers said.
To clone the U2F key, the researchers set about the task by tearing the device down using a hot air gun to remove the plastic casing and expose the two microcontrollers soldered in it — a secure enclave (NXP A700X chip) that’s used to perform the cryptographic operations and a general-purpose chip that acts as a router between the USB/NFC interfaces and the authentication microcontroller.
Once this is achieved, the researchers say it’s possible to glean the ECDSA encryption key via a side-channel attack by observing the electromagnetic radiations coming off the NXP chip during ECDSA signatures, the core cryptographic operation of the FIDO U2F protocol that’s performed when a U2F key is registered for the first time to work with a new account.
A side-channel attack typically works based on information gained from the implementation of a computer system, rather than exploiting a weakness in the software. Often, such attacks leverage timing information, power consumption, electromagnetic leaks, and acoustic signals as a source of data leakage.
By acquiring 6,000 such side-channel traces of the U2F authentication request commands over a six-hour period, the researchers said they were able to recover the ECDSA private key linked to a FIDO U2F account created for the experiment using an unsupervised machine learning model.
Although the security of a hardware security key isn’t diminished by the above attack due to the limitations involved, a potential exploitation in the wild is not inconceivable.
“Nevertheless, this work shows that the Google Titan Security Key (or other impacted products) would not avoid [an] unnoticed security breach by attackers willing to put enough effort into it,” the researchers concluded. “Users that face such a threat should probably switch to other FIDO U2F hardware security keys, where no vulnerability has yet been discovered.”
 To remove the WINS IP and set NetBios option, we will use the set method in the WMI class.
 Once the script has run WINS should be removed and NetBios over Tcpip should be disabled this can be checked under the advanced properties on the NIC.


 (it’s available on Amazon if you don’t have one with your access point:
 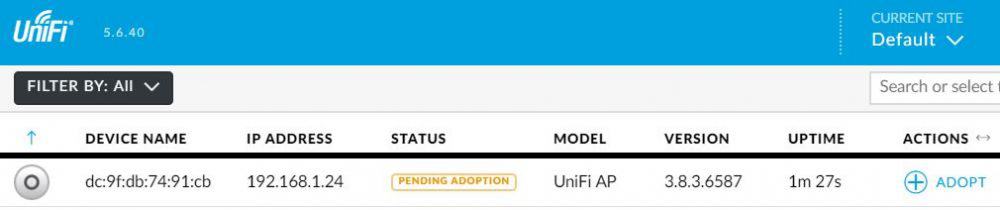 The controller is seeing it, but we need to tell that it’s an access point for this controller.
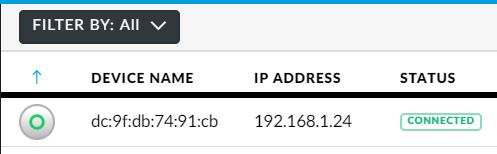


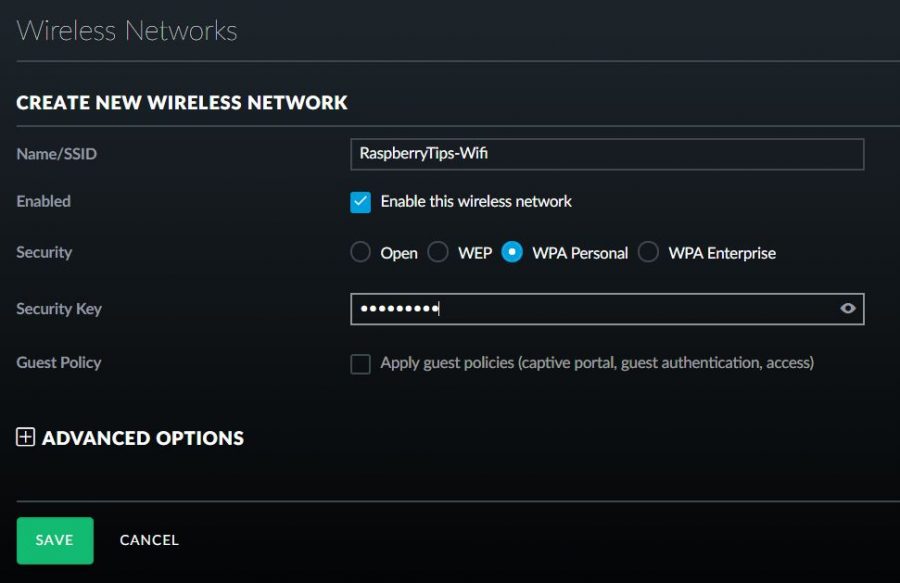 Choose WPA-Personal for security, WEP is not secure.