Businesses today have been forced to switch to remote working to ensure continued business continuity. After the pandemic began in early 2020, it caused a shift to a majority remote workforce, seemingly overnight. With the change to a distributed workforce, new requirements have emerged for businesses around availability, security, and flexibility.
Virtual Desktop Infrastructure (VDI) is a solution that allows connecting remote workers with virtual desktops and applications running in a corporate data center. VMware Horizon is a VDI solution offered by VMware that provides a robust feature set and capabilities for remote workers. So what is VMware Horizon, and how does it work?
What is VMware Horizon?
Today, the work from anywhere model is no longer optional for businesses. Providing accessibility, flexibility, and connectivity from anywhere for the distributed workforce allows remote employees to remain productive no matter where they are located.
As the pandemic escalated, businesses quickly found legacy on-premises desktop and app virtualization platforms that predated the widespread use of the cloud were not equipped for current challenges. It led to many companies struggling to provide the distributed workforce with fast and reliable access to apps they need for business productivity.
VMware Horizon is an end-to-end solution for managing and delivering virtualized or physical desktops and virtual application delivery to end-users. It allows creating and brokering connections to Windows & Linux virtual desktops, Remote Desktop Services (RDS) applications, and desktops. It can also deliver Linux-hosted applications.
VMware Horizon is a Virtual Desktop Infrastructure (VDI) solution, a core component of VMware’s digital workspace for businesses looking to deliver virtual desktops and applications to their workforce. It provides the tooling and capabilities that enable access from any device and is deeply integrated with other VMware solutions and services such as VMware NSX, VMware Workspace One, vSAN, and others.
VMware Horizon provides secure and robust connectivity for remote workers
Recent VMware Horizon versions have evolved to provide desktop resources on-premises, in the cloud, hybrid clouds, and multi-cloud environments.
VMware Horizon Editions
VMware Horizon is provided in three editions:
All three editions provide the components needed for end-to-end virtual desktop deployment.
What are the key capabilities / features of VMware Horizon?
- VMware Horizon is a flexible and agile hybrid cloud platform.
- It enables businesses to utilize existing datacenter based resources, including transforming on-premises desktop and app environments without redeploying.
- It provides the ability to leverage the cloud for additional capacity and use cases
- Choose if and when you transition workloads to optimize performance and lower the cost of on-premises environments.
- It lets you leverage cloud-native control plane services. As a result, it reduces costs, improves productivity, and shifts IT focus from manual tasks to automated processes.
- Manage and monitor your deployment from one central management GUI.
- It offers the ability to meet remote user needs keeping employees connected to desktops and apps from anywhere and any device with a single login. It doesn’t matter where the data resides, on-premises or in the cloud.
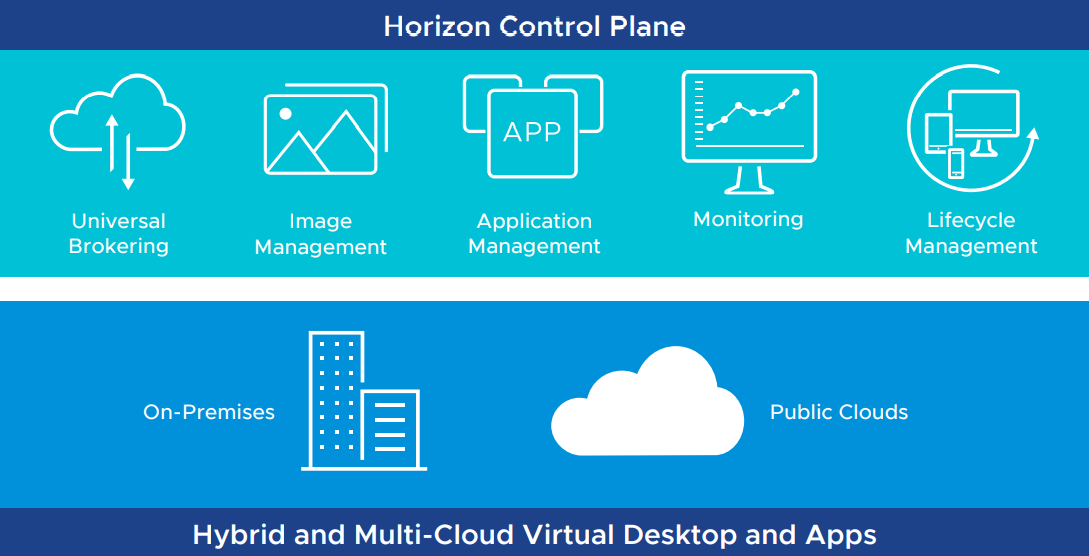
- The Horizon control plane delivers the ability to deploy, manage, and scale, virtual desktops, and apps across hybrid cloud environments.
- Horizon is a modern platform for securely delivering virtual desktops and apps across the hybrid cloud, keeping employees connected, productive and engaged, anytime and anywhere.
Deliver applications and desktops automatically and in real-time
One of the key benefits and use cases of VMware Horizon is to deliver applications and desktops automatically and in real-time. Today, many organizations are using VMware Horizon as the vehicle that allows remote workers to connect to virtual machine resources or physical workstations in the corporate network, without VPN, or exposing an RDP server to the outside world.
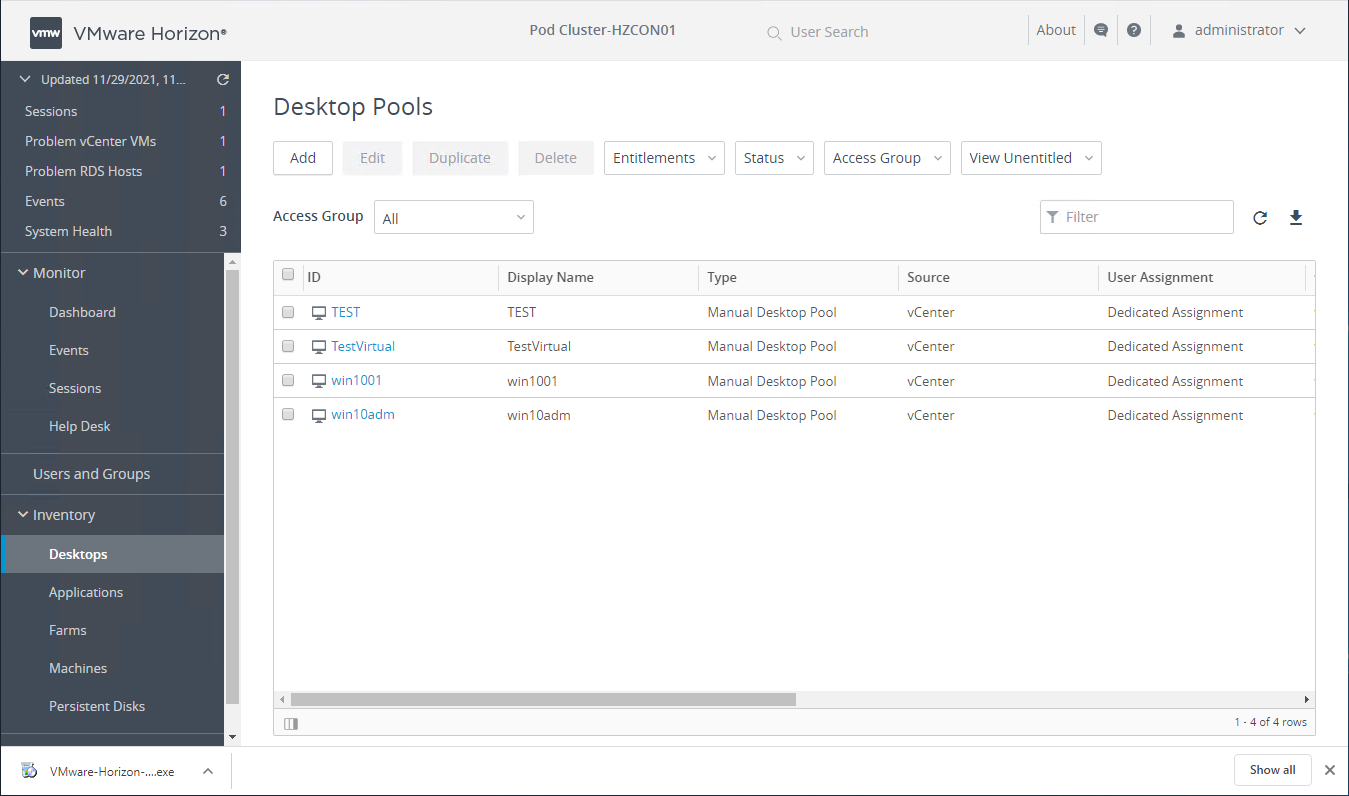
Administrators configure desktop pools consisting of a single desktop or multiple desktops that end-users can connect to and utilize. When there are multiple virtual machines or physical desktops in a single pool, users will be placed on an available desktop resource in the pool.
Desktop pools consist of:
- Automated desktop pools – An automated desktop pool uses a vCenter Server template or virtual machine snapshot to generate new machines. The machines can be created when the pool is created or generated on demand based on pool usage.
- Manual desktop pools – A manual desktop pool provides access to an existing set of machines. Any machine that can install the VMware Horizon agent is supported. These include both vCenter virtual machines and physical desktops.
- RDS Desktop pools – A Microsoft RDS desktop pool provides RDS sessions as machines to Horizon users. The Horizon Connection Server manages the RDS sessions in the same way as normal machines. Microsoft RDS hosts are supported on vCenter virtual machines and physical computers.
Viewing VMware Horizon Desktop Pools
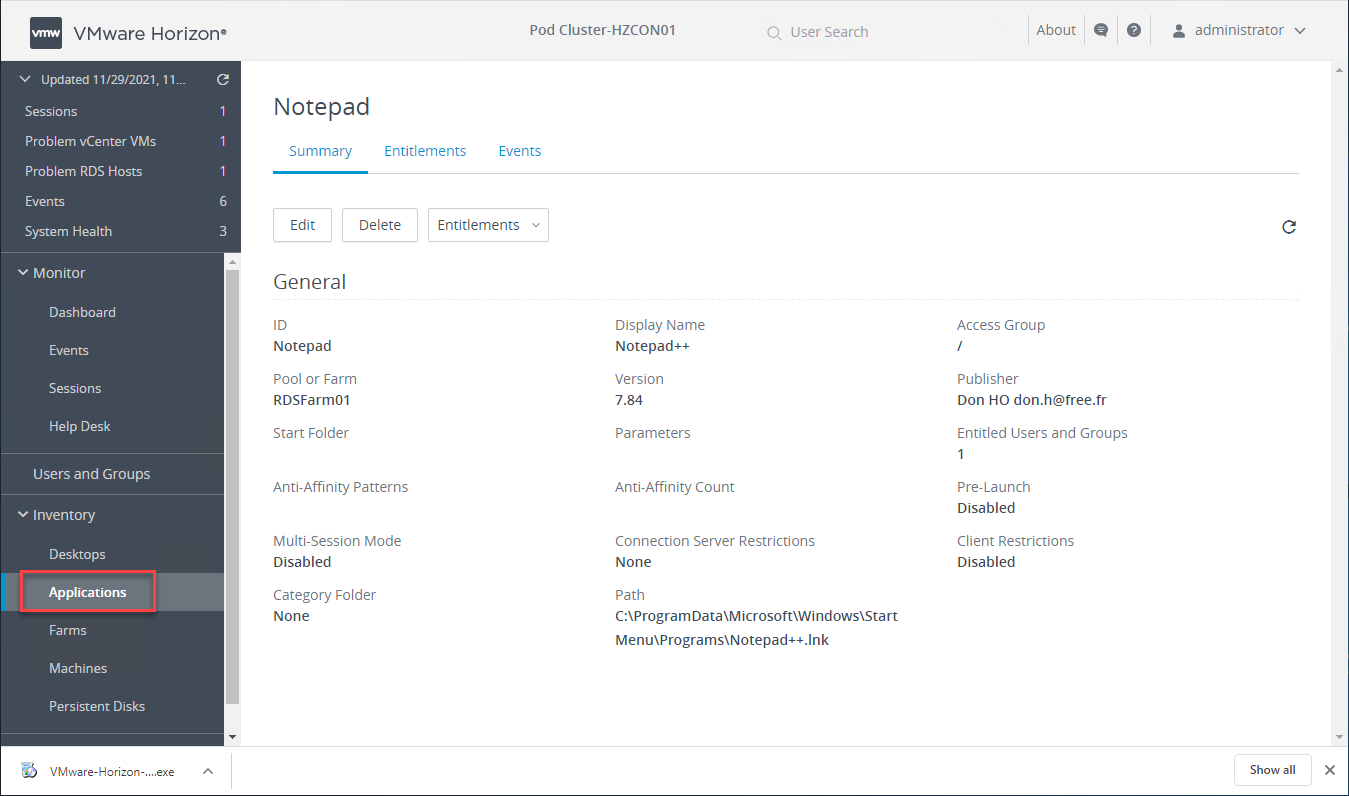
Application Pools provide remote workers with access to published applications, either from a desktop pool or RDS farm.
Viewing a published application in VMware Horizon
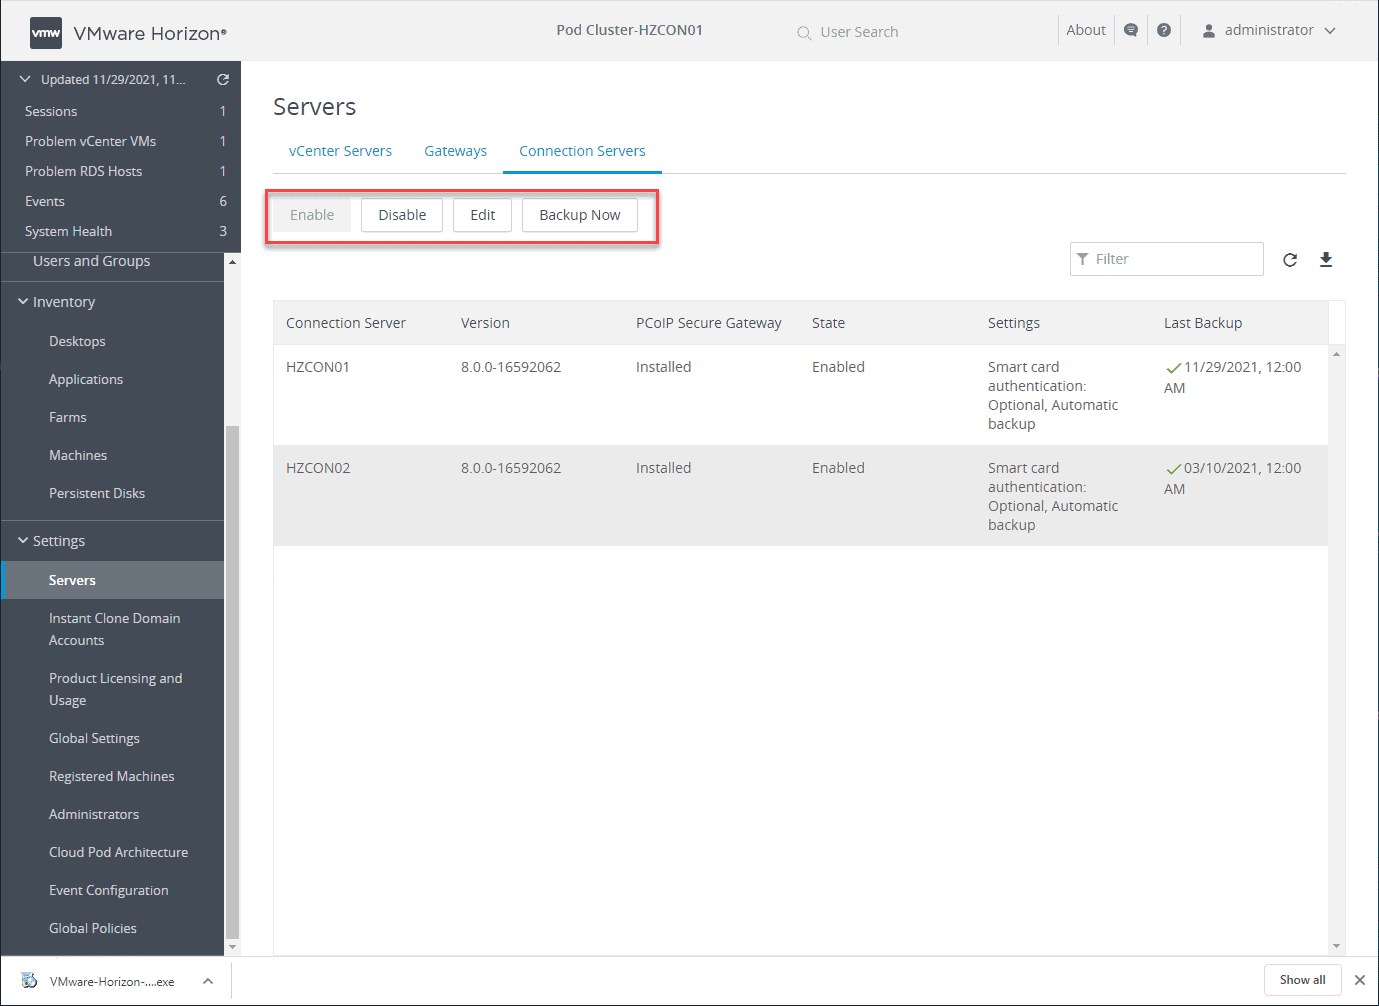
It also allows quickly performing maintenance tasks such as enabling or disabling specific Horizon Connection Servers and performing backup operations. You can also add vCenter Server environments and integrate your Unified Access Gateways to the environment.
Performing maintenance operations in the VMware Horizon Administration Console
Simplify management and maintenance tasks
One of the key areas that VMware Horizon provides quick time to value is the area of management and maintenance. The VMware Horizon Administration Console is an HTML 5 web console that is quick and intuitive. All of the tasks are very wizard-driven with natural workflows.
In the VMware Horizon Administration Console, administrators can easily see:
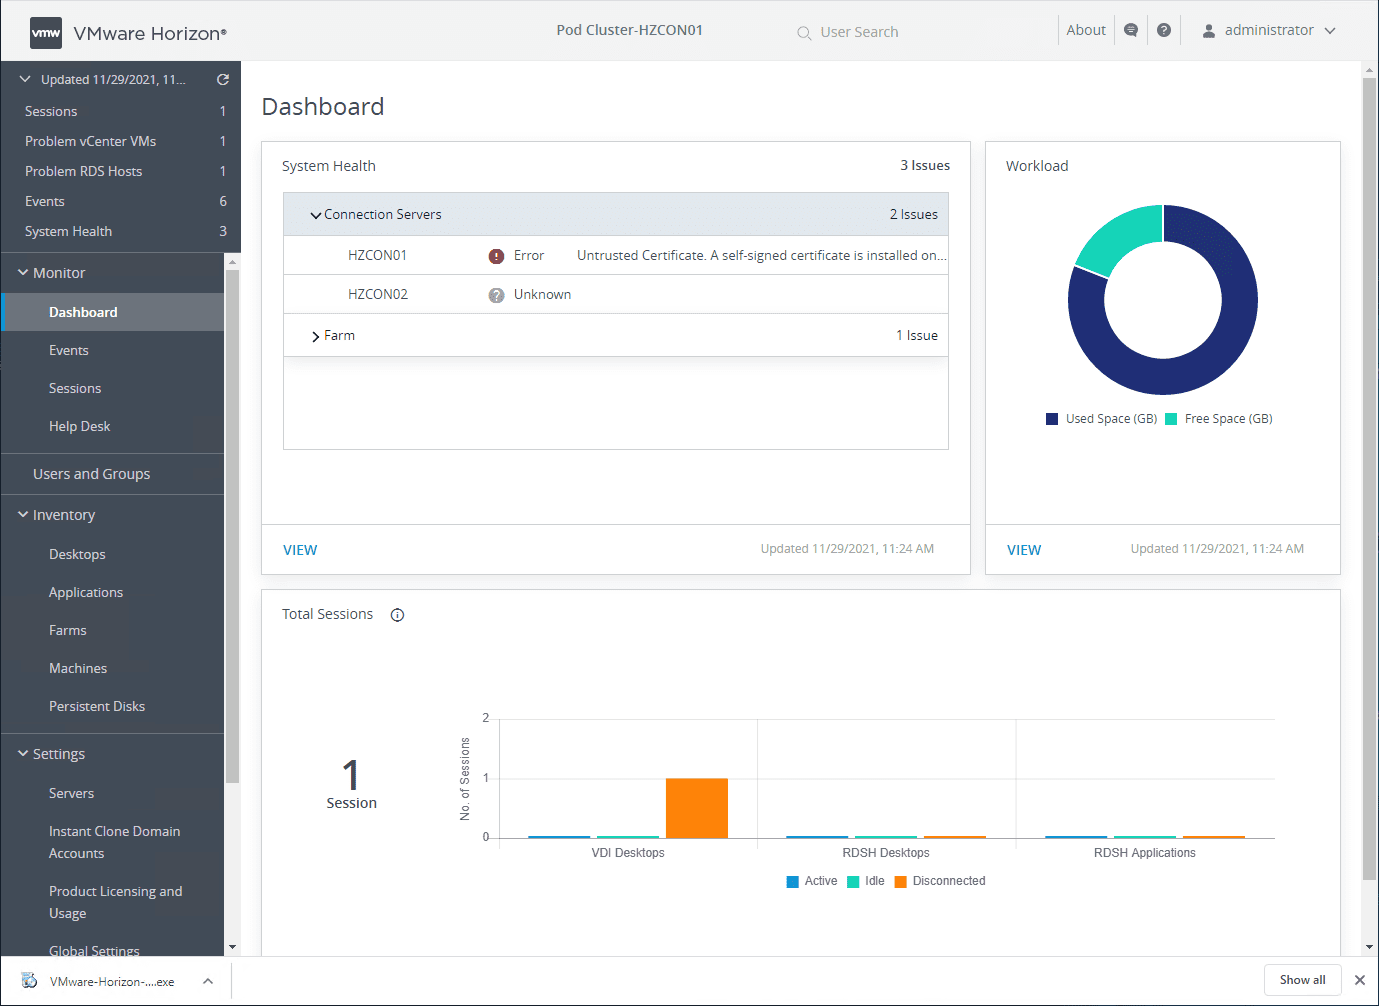
The VMware Horizon Monitoring dashboard quickly shows the overall system health, sessions, workload, VDI desktops, RDSH desktops, RDSH applications, and other information.
Viewing the VMware Horizon monitoring dashboard
Keep sensitive data safe and enforce endpoint compliance
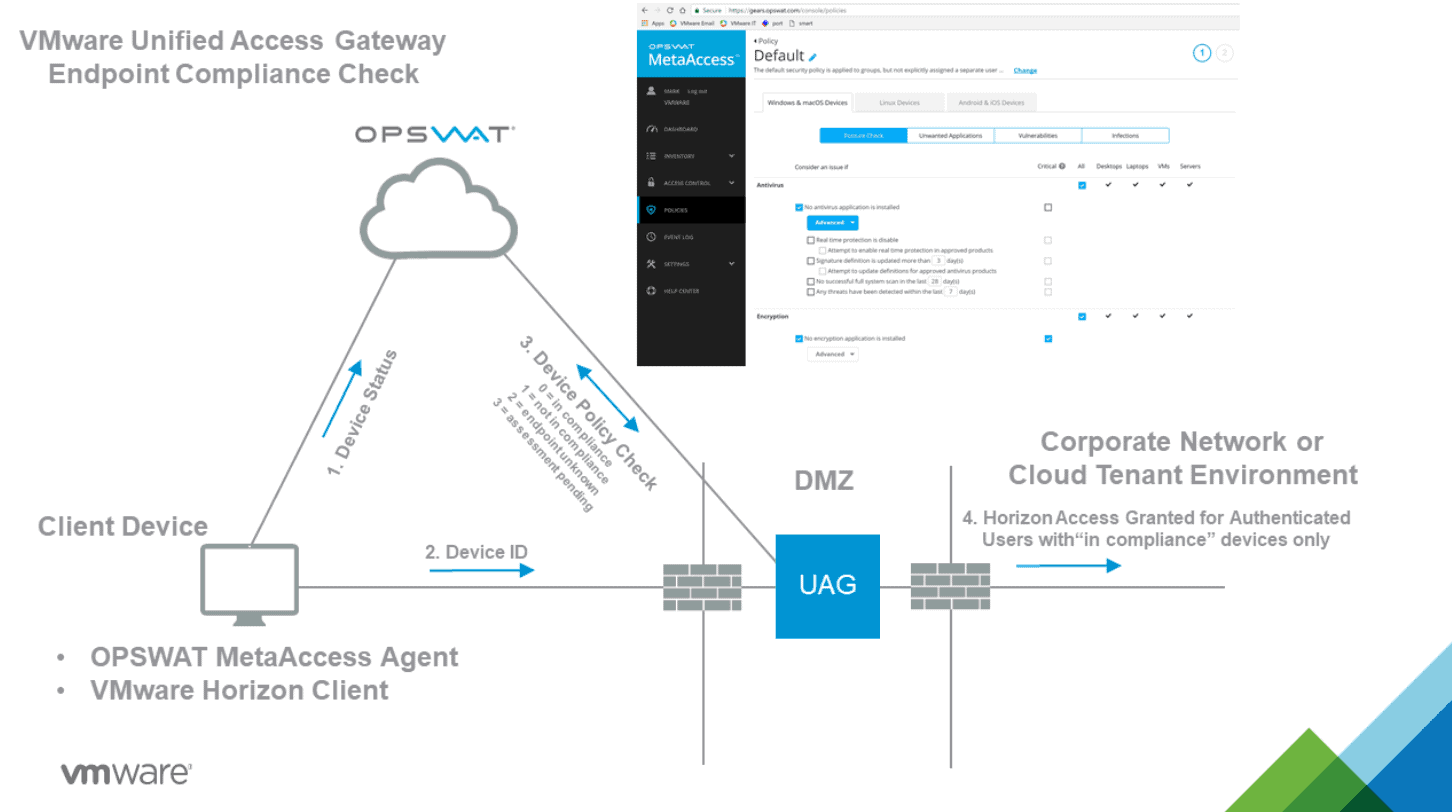
Several tools and VMware Horizon configurations help keep business-critical and sensitive data safe and enforce endpoint compliance. For example, the Endpoint Compliance Checks feature is part of the Unified Access Gateway (UAG) that provides a layer of security for clients accessing Horizon resources. The Endpoint Compliance Checks helps to verify end-user client compliance to predefined policies. These may include antivirus policy or encryption policy on endpoints.
Currently, a couple of endpoint compliance check providers offer the ability to check compliance of endpoints. These include:
- OPSWAT – The OPSWAT MetaAccess persistent agent or the OPSWAT MetaAccess on-demand agent on the Horizon Client communicates the compliance status to an OPSWAT instance. It can then enforce policies related to the health of the endpoint and the allowed access to Horizon resources
OPSWAT Endpoint Compliance Checks
- Workspace ONE Intelligence (Risk Analytics) – The Workspace ONE Intelligence platform has a risk analytics feature. It can assess both user and device risk by identifying behaviours that affect security and calculating a risk score for each device and user. Based on the risk score, policies can define whether or not clients can connect and access resources.
End-user components
There are only a couple of different components required for end-user clients for VMware Horizon. Actually, you can use either a browser to connect to the Horizon environment or the VMware Horizon Client. Most modern clients feature an HTML5-capable browser that allows connecting to VMware Horizon.
While you can connect to VMware Horizon-enabled endpoints using a web browser, the most robust connection experience is provided with the VMware Horizon Client. However, a question often comes up with the VMware Horizon Client – is it free?
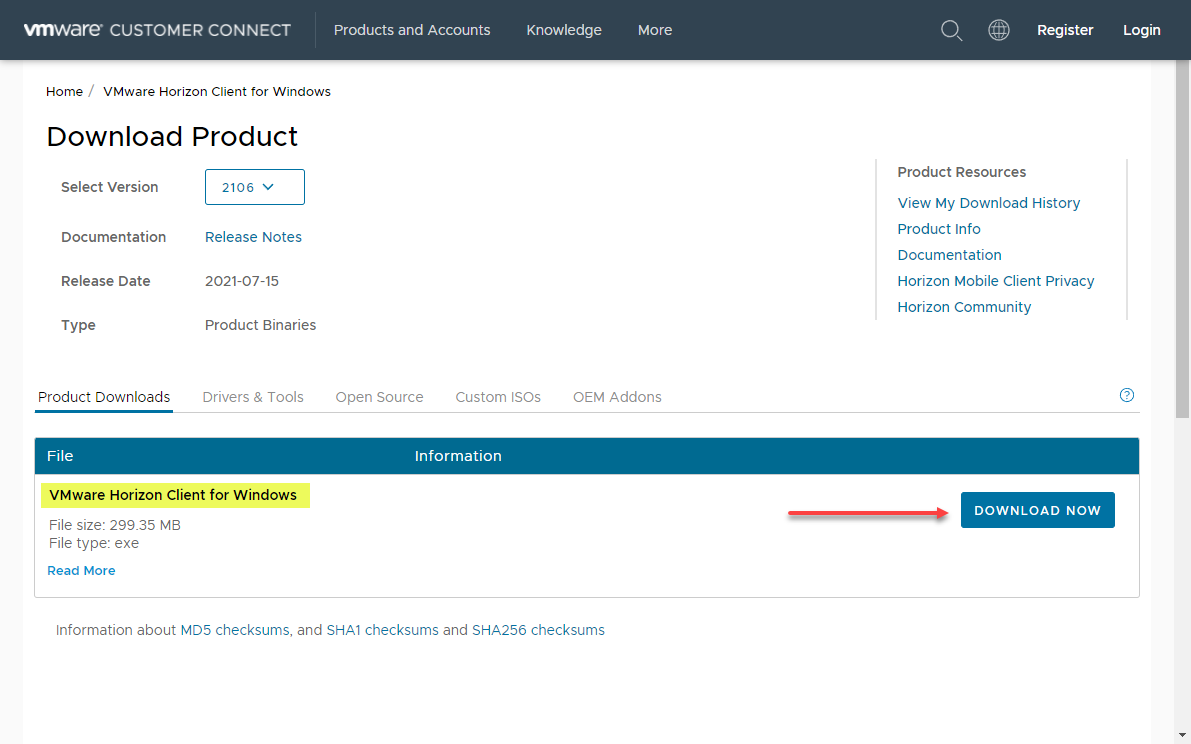
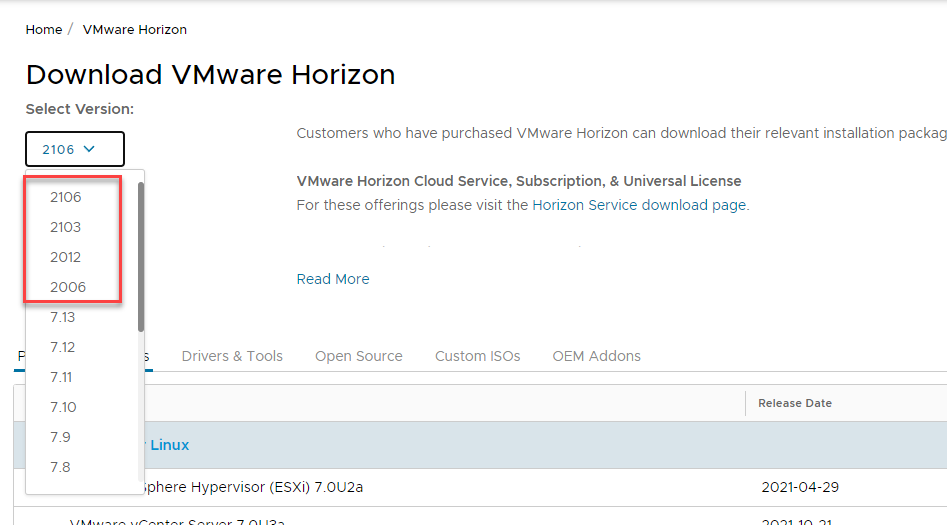
The VMware Horizon Client is indeed a free download from the VMware Customer Connect portal. Also, there is no need to provide an email address and sign up for an account. You can find the most recent download of the VMware Horizon Clients here:
Downloading the VMware Horizon Client
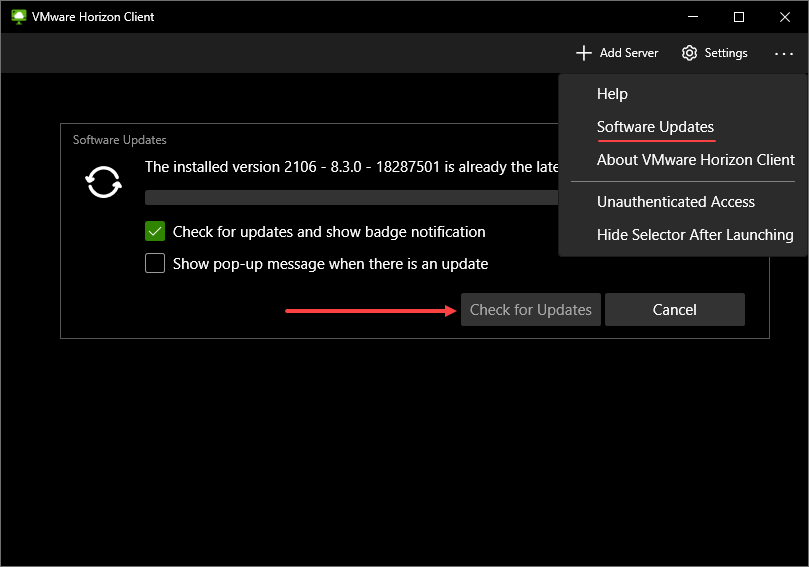
The availability and ease of downloading the VMware Horizon Client help to ensure remote workers can easily download, install, and connect to VMware Horizon resources. Another great feature built into the VMware Horizon Client is checking for and updating the client directly from the interface.
Checking for updates to VMware Horizon Client
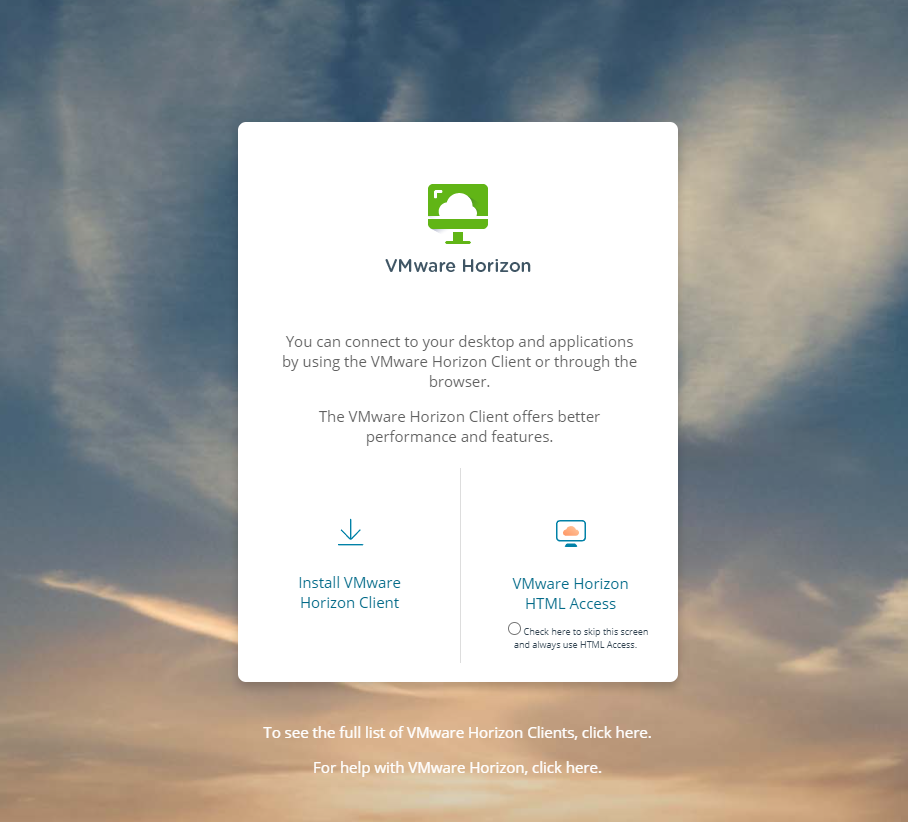
When remote workers browse to the public URL of the Unified Access Gateway, the UAG presents the Horizon Connection Server web page, allowing users to download the client or connect to their assigned resources using the VMware Horizon HTML access link.
Browsing to the VMware Horizon web access
VMware Workspace ONE UEM additional components
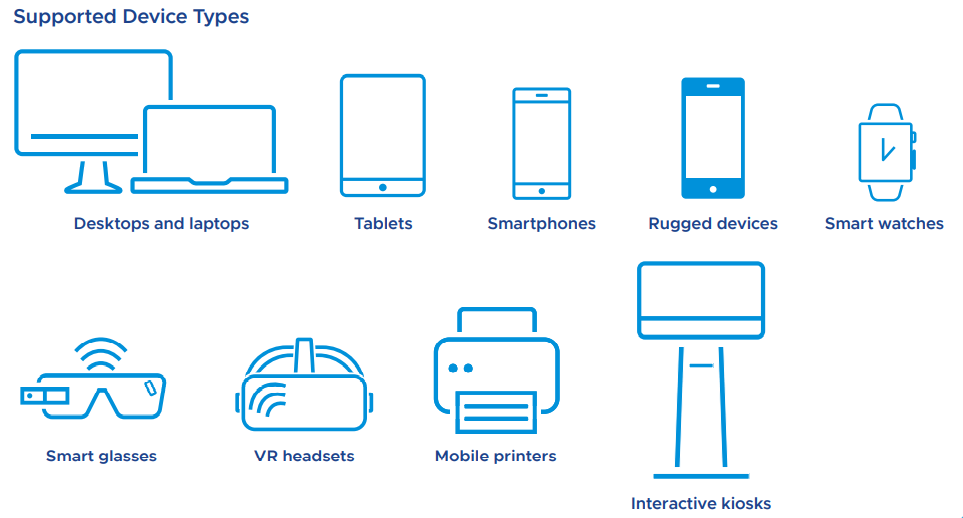
Organizations using cloud-based VMware Workspace ONE can simplify access to the cloud, mobile, and enterprise applications from various types of devices. Workspace ONE Unified Endpoint Management (UEM) is a single solution for modern, over-the-air management of desktops, mobile, rugged, wearables, and IoT.
It manages and secures devices and apps, taking advantage of native MDM capabilities in IOS and Android and the mobile-cloud management efficiencies found in modern versions of Windows, Mac, and Chrome OS.
Supported devices with Workspace ONE UEM
Managing clients with Workspace ONE UEM requires the Workspace ONE UEM agent is installed on the devices for management. It can be installed manually, scripted installations, or by using GPOs. Organizations can also make use of the Workspace ONE Intelligent Hub for an easily integrated digital workspace solution designed to improve employee engagement and productivity through a single app.
Read more about VMware Workspace ONE Intelligent Hub here:
VMware has departed a bit from the conventional naming convention associated with legacy versions of VMware Horizon previously. While the older versions of VMware Horizon were named according to a “major.minor” release name, VMware has adopted a release cadence style “YYMM” naming convention, denoting the year and month of the release, much like other software vendors have adopted in the last couple of years.
VMware Horizon 8 is denoted with a new naming convention in the YYMM format
If you see any of the VMware Horizon versions that start with at least a “20,” these are synonymous with VMware Horizon 8 across various documentation.
Is VMware Horizon a VPN?
There are many ways that enterprise organizations have traditionally delivered access to internal resources for remote employees. Virtual Private Network (VPN) has historically been a prevalent and familiar way for end-users to access business-critical resources that reside on the internal corporate network from the Internet.
While VPN is more secure than simply placing internal resources accessible directly from the Internet (not recommended), it also has its share of security issues. With VPN connections, a VPN client is loaded on the client workstation, laptop, or other devices, creating a secure, encrypted tunnel between the client and a VPN terminator, such as a firewall or other VPN device.
VPNs traditionally have been used for remote connectivity
While this secures and encrypts the communication between the client and the internal network, it essentially makes the end-user device part of the network. You can think of a VPN connection as simply a “long patch cable” between the corporate network switch and the client. There are ways to secure VPN connections and scope down the resources the external clients can see. However, it opens the door to potentially connecting a client with malware to the corporate network. It also creates the possibility of easy data exfiltration from the corporate network to the client.
VPN connections are also notoriously complex and cumbersome to manage and maintain. Admins must manage each VPN client individually in most cases. In addition, each VPN connection is its own tunnel to the corporate network, creating the need for tedious management of multiple tunnels.
VMware Horizon provides a solution that is not VPN-based and solves the challenges mentioned above with traditional VPN connections. Note the following:
- Remote users connect to virtual or physical desktops that are provisioned inside the corporate network. It means the end-user remote client is not directly connected to the corporate network
- While the Horizon Client is recommended for the most robust experience connecting to the VMware Horizon environment, end-users can also connect to provisioned resources over a simple web browser connection, with no client required.
- VPNs may not work with all types of devices. VMware Horizon connectivity, either via the Horizon Client or web browser connection, means almost any modern device with web connectivity can allow a user to connect to VMware Horizon resources
- Admins have a consolidated and centrally managed set of infrastructure as a connectivity point, either with the Unified Access Gateways (recommended for secure external connectivity) or the Horizon Connection Servers
- Combined with VMware NSX-T Data Center, administrators can easily secure the connectivity between VMware Horizon resources and which resources users can hit, making it an identity-driven solution
VMware Anywhere Workspace
VMware Horizon is a core component of the VMware Anywhere Workspace. What is the VMware Anywhere Workspace? It is a holistic solution that combines multiple components required for effective and efficient secure remote access, including:
- Digital workspace solution – Provided by VMware Horizon cloud services or on-premises resources
- Endpoint security – Organizations can seamlessly secure their remote worker interface with VMware NSX-T Data Center and VMware Carbon Black.
- Secure Access Service Edge (SASE) – Secure access service edge platform that converges industry-leading cloud networking and cloud security to deliver flexibility, agility, security, and scale for enterprise environments of all sizes.
Note how VMware Horizon fits into the various aspects of VMware Anywhere Workspace:
- It helps to manage multi-modal employee experience – With the VMware Anywhere Workspace, VMware Horizon can help deliver a familiar desktop and application experience across workspace locations and devices.
- Security and the distributed edge – VMware Horizon delivers access to desktops and applications to any endpoint.
- Anywhere Workspace Integrations – Workspace SEcurity brings Carbon Black together with Workspace ONE UEM and VMware Horizon
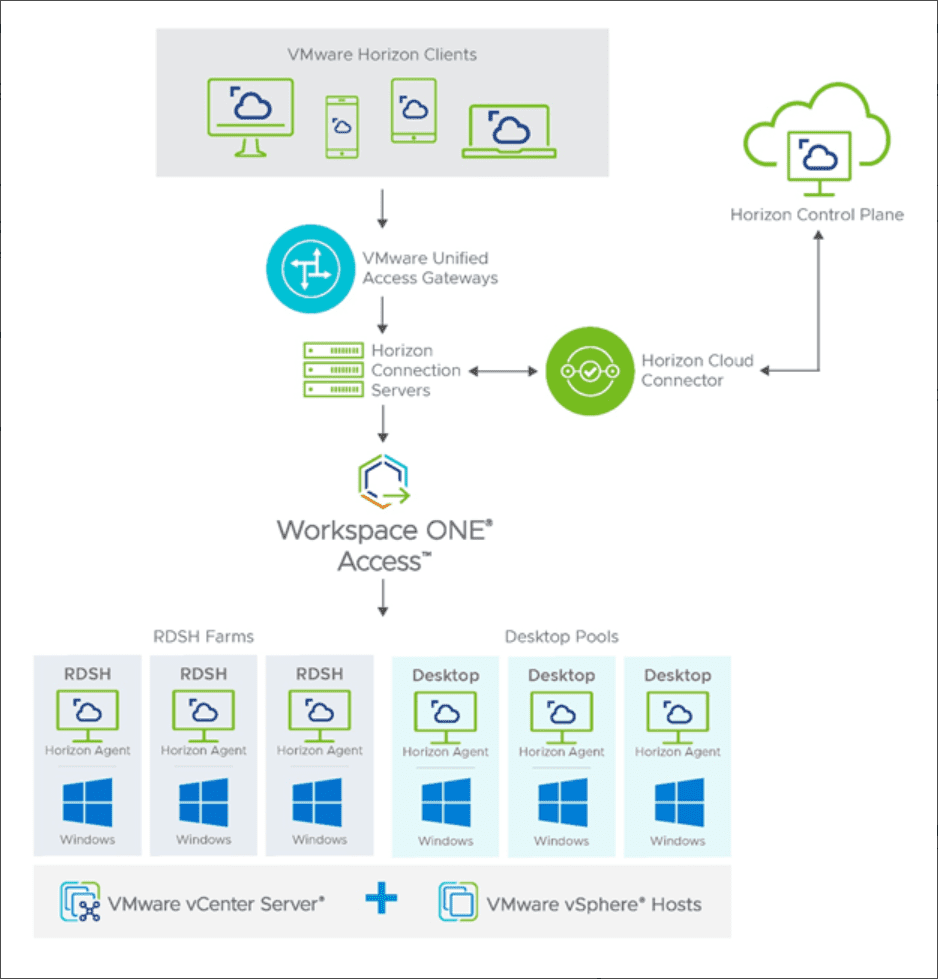
VMware Horizon Architecture and Logical Components
VMware Horizon has a robust architecture that is compromised of many different components that make up the end-to-end solution. The components of VMware Horizon architecture include:
- Horizon Client – The client is the piece that forms the protocol session connection to a Horizon Agent running in a virtual desktop, RDSH server, or physical machine
- Universal Access Gateway (UAG) – It provides secure edge services for the Horizon Client. The Horizon Client authenticates to a Connection Server through the Unified Access Gateway and then forms a protocol session connection to the UAG and then the Horizon Agent running in a virtual desktop or RDSH server.
- Horizon Connection Server – The Connection Server brokers and connects users to the Horizon Agent installed on VMs, physical hosts, and RDSH servers. The Connection Server authenticates user sessions through Active Directory, and grants access to the proper entitled resource.
- Horizon Agent – The agent is installed in the guest OS of the target VM or system. It allows the machine to be managed by the Connection Servers and allows a Horizon Client to connect using the protocol session to the Horizon Agent.
- RDSH Server – Microsoft Remote Desktop Servers that provide access to published applications and session-based remote desktops to end-users.
- Virtual Machine – Virtual machines can be configured as persistent or non-persistent desktops. Persistent desktops are usually assigned in a 1-to-1 fashion to a specific user. Non-persistent desktops are assigned in desktop pools that can be dynamically provisioned to users as needed.
- Physical Desktop – Counterintuitively, VMware Horizon can be used as a secure and efficient way to deliver connectivity to physical desktops to end-users. Starting with VMware Horizon 7.7, VMware introduced the ability to broker physical desktop machines with RDP. In Horizon 7.12, support was added for Blast protocol connectivity to physical desktops.
- Virtual Application – Horizon can be used with RDSH servers to provide virtual application delivery. Using the functionality of the published application in RDSH, VMware Horizon can deliver the published applications to assigned users.
Logical Components
There are other components of Horizon architecture that are considered to be logical components of the solution. Some of the components listed below are not absolutely required. However, they can be used to enhance a Horizon deployment and scale the capabilities, security, and performance of the solution.
- Workspace ONE Access – VMware Workspace ONE provides the solution for enterprise single sign-on (SSO) for the enterprise. It simplifies the access to apps, desktops, and other resources to the end-user. It can integrate with existing identity providers and provide a seamless login experience to create a smooth access workflow. It also offers application provisioning, a self-service catalogue, and conditional access.
- App Volumes Manager – VMware App Volumes Manager coordinates and orchestrates the delivery of applications by managing assignments of application volumes. These include packages and writable volumes that can easily assign applications to users, groups, and target computers.
- Dynamic Environment Manager – User profiles are also challenging in dynamic environments with multiple resources accessed by a single user. Dynamic Environment Manager enables seamless profile management by capturing user settings for the operating system and also end-user applications.
- VMware vSAN™ storage – VMware vSAN is a software-defined storage solution that offers many advantages in the enterprise. It can deliver high-performance, highly-scalable storage that can be seamlessly managed from the vSphere Client as part of the native VMware solution. It does this by aggregating locally attached storage in each ESXi host in the vSphere cluster and presenting it as a logical volume for virtual machines and modern workloads. When it comes to VMware Horizon environments that are mission-critical, you want to have highly-resilient storage that is scalable and performant. VMware Horizon environments backed by VMware vSAN work exceptionally well for this use case.
- VMware NSX-T Data Center – Another consideration for VMware Horizon environments and end-user computing is security. VMware NSX-T Data Center provides the network-based security needed in EUC environments. It allows easily creating secure, resilient, and software-defined networks that allow admins to take advantage of micro-segmentation for VMware Horizon workloads. Each virtual desktop can be isolated from all other virtual desktops using VMware NSX-T Data Center, bolstering security and protecting other critical Horizon infrastructure, such as the Connection Servers.
- Microsoft SQL Servers – It is recommended to have a dedicated Microsoft SQL Server to house the event databases required by VMware Horizon. Plan your VMware Horizon deployment accordingly.
Horizon Hybrid and Multicloud Architecture
VMware Horizon can be deployed in many different architecture designs. These include on-premises, in the cloud, or a combination of hybrid and multi-cloud architectures.
In the VMware Horizon hybrid deployment, infrastructure can run in an on-premises datacenter with the Horizon control plane running in the cloud as well as deploy on both on-premises and public cloud, and join the two. In addition, organizations can connect their existing Horizon 7 or Horizon 8 implementations to the Horizon Cloud Service using the Horizon Cloud Connector appliance.
The VMware Horizon Control Plane Services are designed to meet modern challenges for remote workers and connectivity. Organizations that use virtual desktops and apps from companies that only support cloud solutions can benefit from the Horizon Control Plane Services. Existing VDI implementations may only be able to work with cloud environments. The Horizon Control Plane allows managing all hybrid and multi-cloud deployments and configurations.
VMware Horizon hybrid architecture with the Horizon Control Plane
It provides many benefits outside of management, including:
The Horizon Control Plane Services
Just-in-time desktops and apps
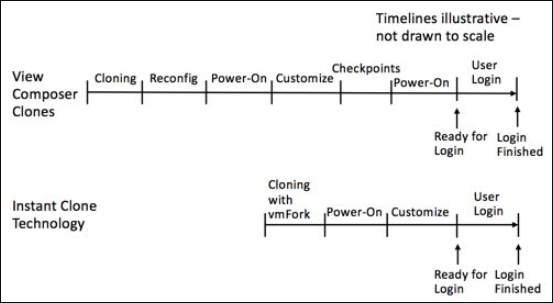
VMware Horizon technology allows organizations to provision “just-in-time” desktops and applications. Using a technology VMware calls Instant Clone Technology, entire desktops can be provisioned just-in-time. The Instant Clone Technology allows the rapid cloning of virtual machines in just a few seconds! Instant clones can configure, on average, one clone per second.
The Instant Clone Technology is really a radical evolution of what VMware Composer clones could do previously. With Instant Clone Technology, the steps required to provision a clone with VMware Composer are dramatically reduced. Note the comparison of the two processes below:
Comparing VMware Horizon Composer with Instant Clone Technology
The VMware Instant Clone Technology was born from a project called “vmFork” that uses rapid in-memory cloning of a running parent virtual machine and copy-on-write to deploy the virtual machines to production rapidly.
- Copy-on-write – The copy-on-write technology is an optimization strategy that forces tasks first to create a separate private copy of the data to prevent its changes from becoming visible to all other tasks. With copy-on-write, the parent VM is quiesced and then forked. The forking process creates two branches or variations of development, and the resulting clones receive unique MAC addresses, UUIDs, and other unique information.
Using the Instant Clone Technology with VDI provisioning is perfect for the just-in-time desktop and applications use case. New workstations can quickly be provisioned, just in time for the user to log into the environment. Then, using VMware App Volumes to attach AppStacks to the just-in-time desktops dynamically, you can have fully functional workstations with dynamically assigned applications in a matter of seconds, fully customized for each user.
Should you be using VMware Horizon?
VMware Horizon is a powerful remote connectivity solution that allows businesses today to solve the challenges of remote workers and connectivity needs. In addition, it enables businesses to scale their deployments with modern architectures, including hybrid cloud deployments and multi-cloud architectures.
With the new VMware Horizon Control Plane services, organizations can manage multiple VMware Horizon deployments across sites, clouds, and different infrastructures from the cloud. In addition, it opens up the possibility for organizations to use heterogeneous implementations of virtual desktops that may exist across on-premises and public cloud environments and aggregate these services for end-users.
VMware provides a rich set of additional solutions and services that seamlessly integrate with VMware Horizon and extend the solution’s capabilities, scalability, security, and management. These include VMware vSAN, VMware NSX-T Data Center, VMware Workspace ONE, Workspace ONE UEM, and VMware Anywhere Workspace.
For end-user clients, connecting to Workspace ONE or native VMware Horizon resources is as simple as browsing the solution’s service URLs. While the VMware Horizon Client provides the most robust connectivity experience for end-user clients, users can also use the HTML client to connect to virtual machines, physical desktops, and applications using a simple web browser.
The Instant Clone Technology provided by VMware Horizon allows just-in-time desktops and applications to be provisioned in seconds, a feat that is amazing to see and provides businesses with the capability to have exponentially more scale in providing virtual desktops to end-users. In addition, the dynamic capabilities offered by VMware Horizon allow companies to elastically scale up and scale down virtual desktops, even with on-premises infrastructure.
Source :
https://www.altaro.com/vmware/vmware-horizon/