Self-hosting a UniFi Network Server should only be done by experienced network administrators. For the best and most streamlined experience, we recommend running UniFi Network on a UniFi OS Console or other UniFi OS Host, such as a Cloud Key. This will eliminate compatibility risks associated with third-party software and hardware.* Other benefits of UniFi OS Hosts include:
Optimized hosting and management performance
Automatic scheduling of backups and updates
Seamless email and mobile push notifications for important system activity
*UniFi also offers the Cloud Key Enterprise (on-premise) and a native Cloud Hosting subscription for scaleable deployments managing hundreds of UniFi APs.
If you choose to continue, see below for instructions to install the UniFi Network Application on your device.
Instructions
Windows
Linux
macOS
Download the latest version of the UniFi Network application (UniFi-installer.exe) from the Download page.
The latest versions of the UniFi Network Application (7.3) require Java 11.
Previous versions (7.2) use Java 8.
Install only the x64 Java release and only one version of Java.
You will be prompted to install Java 11. Select the following options and download the x64 .msi file for Windows:
Package Type: JRE
Version: 11
Install Java, and set the Set JAVA_HOME variable to Will be installed on local hard drive.
After installing Java, continue the UniFi Network application installation and start it.
Ensure that any anti-virus/spyware programs and the Windows firewall are not blocking the application.
Open a browser, navigate to https://localhost:8443 and proceed when seeing the security warning.
1. Does the UniFi Network application have to run at all times?
If the UniFi Network application is turned off, adopted UniFi devices (access points, switches) will keep functioning.
However, it is highly recommended to keep the UniFi Network application running at at all times. This enables you gather accurate statistics and make configuration changes whenever needed.
If you are not able to keep the Self-Hosting Network Server running continuously, then we recommend to upgrade to a UniFi OS Console, which is optimized to run UniFi Network and other applications.
2. Can I manage UniFi Devices that are adopted by another UniFi Network application?
No. The UniFi Network application installed on Windows/macOS/Linux is not a viewer for other UniFi Network applications (running on UniFi OS Consoles or other hosts).
3. The UniFi Network application is running slow.
Verify if the Self-Hosted Network Server is capable of running the UniFi Network application. The more UniFi and client devices that are connected, the more resources that will be needed.
Please be aware that self-hosting the UniFi Network application is an advanced setup for those familiar with network administration. If you are experiencing poor performance, we recommend upgrading to a UniFi OS Console, which is optimized to run UniFi Network and other applications.
4. The UniFi Network application is not able to start.
Verify if the Self-Hosted Network Server is capable of running the UniFi Network application and that the correct version of Java is installed.
If you continue to experience issues, try installing the application on a different host machine.
Please be aware that self-hosting the UniFi Network application is an advanced setup for those familiar with network administration. If you are unable to get the UniFi Network application running on your host machine, we recommend upgrading to a UniFi OS Console, which is optimized to run UniFi Network and other applications.
5. The UniFi Network application starts up, but I do not see any nearby UniFi devices.
Make sure that the firewall on the host machine is allowing the ports needed by UniFi and that the UniFi Network application is not blocked by any anti-virus/spyware programs.
Also make sure that the UniFi devices and the application are on the same network. If not, then remote adoption is required.
6. I get a “Your connection is not private” warning when accessing via my browser.
This can be safely ignored. Proceed to the next page.
7. What are the UniFi Network application system requirements?
At a bare minimum, we recommend the following system requirements (make sure to read the Release Notes for more details about a particular version):
Operating system:
Linux: Ubuntu Desktop / Server 22.04; Debian 11 “Bullseye”
Windows: Windows 10; Windows Server 2016
macOS: Mavericks 10.9, 10.10 Yosemite, 10.11 El Capitan, 10.12 Sierra, 10.13 High Sierra, 10.14 Mojave, 10.15 Catalina.
Use advanced techniques as a last resort to update UniFi devices and UniFi software when it is not possible to do so via the user interface.
We highly recommend that most users enable automatic updates, or trigger updates through the user interface. See How to Update UniFi to learn more.
Update UniFi Devices via Web Application
Updating via the Device Property Panel
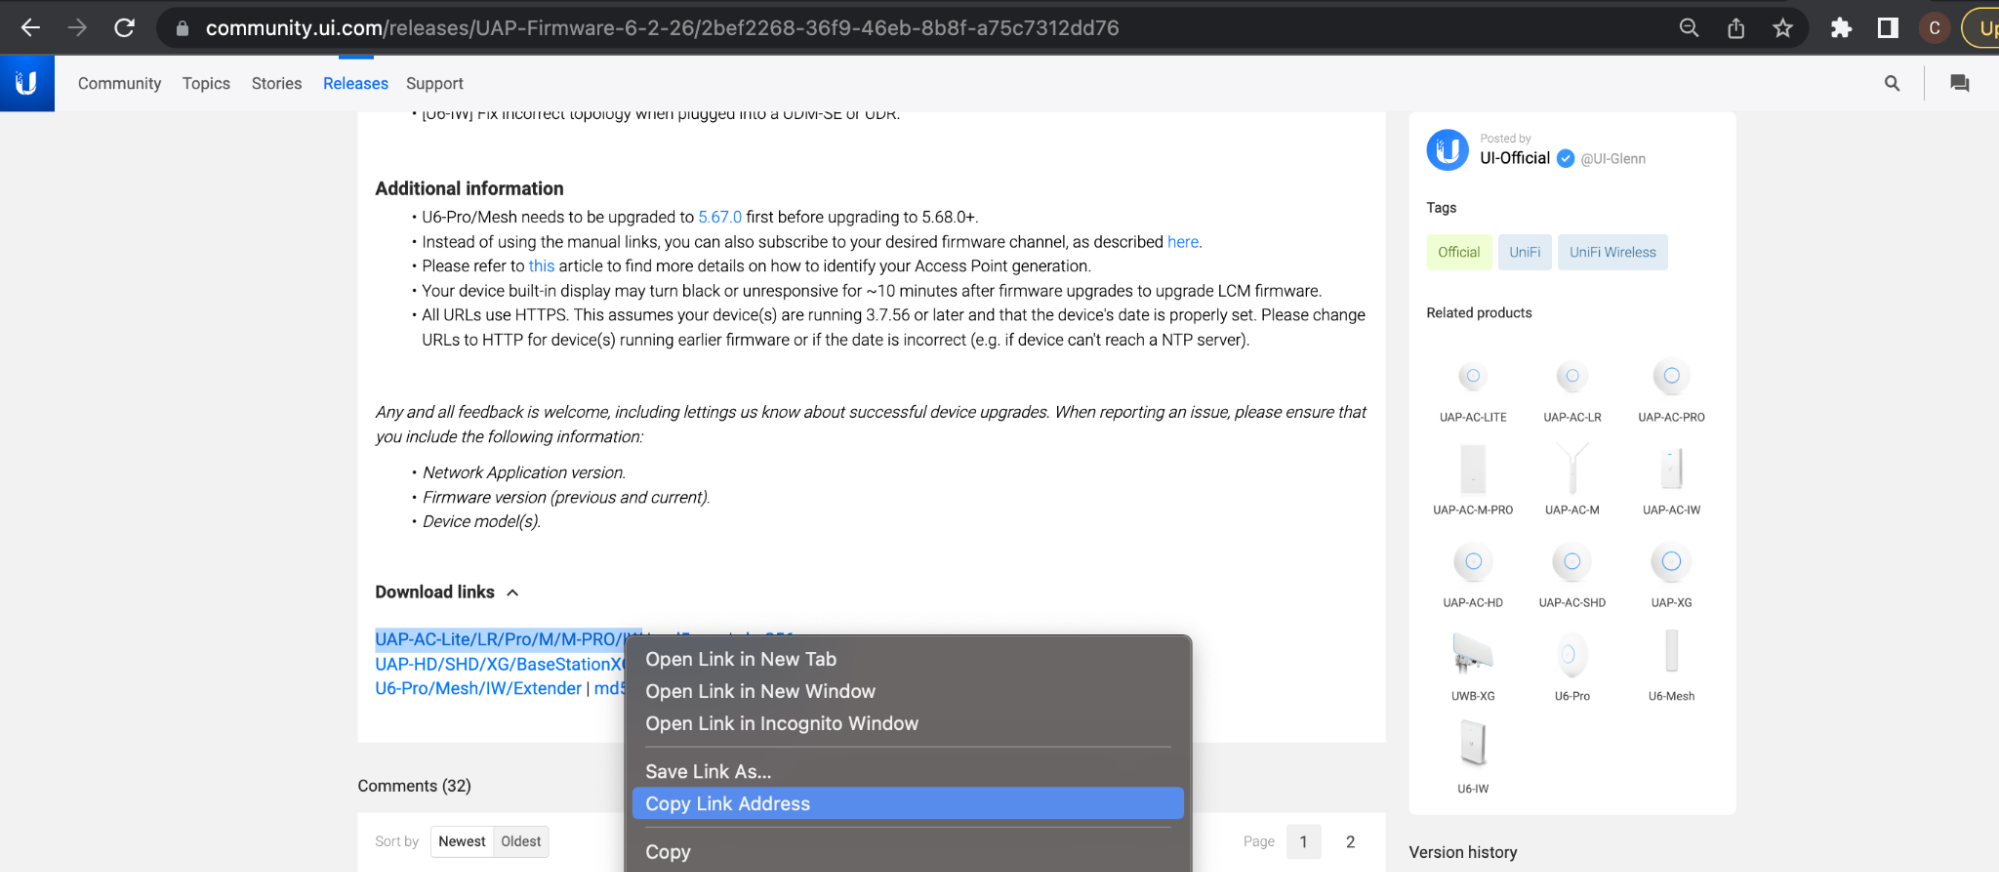
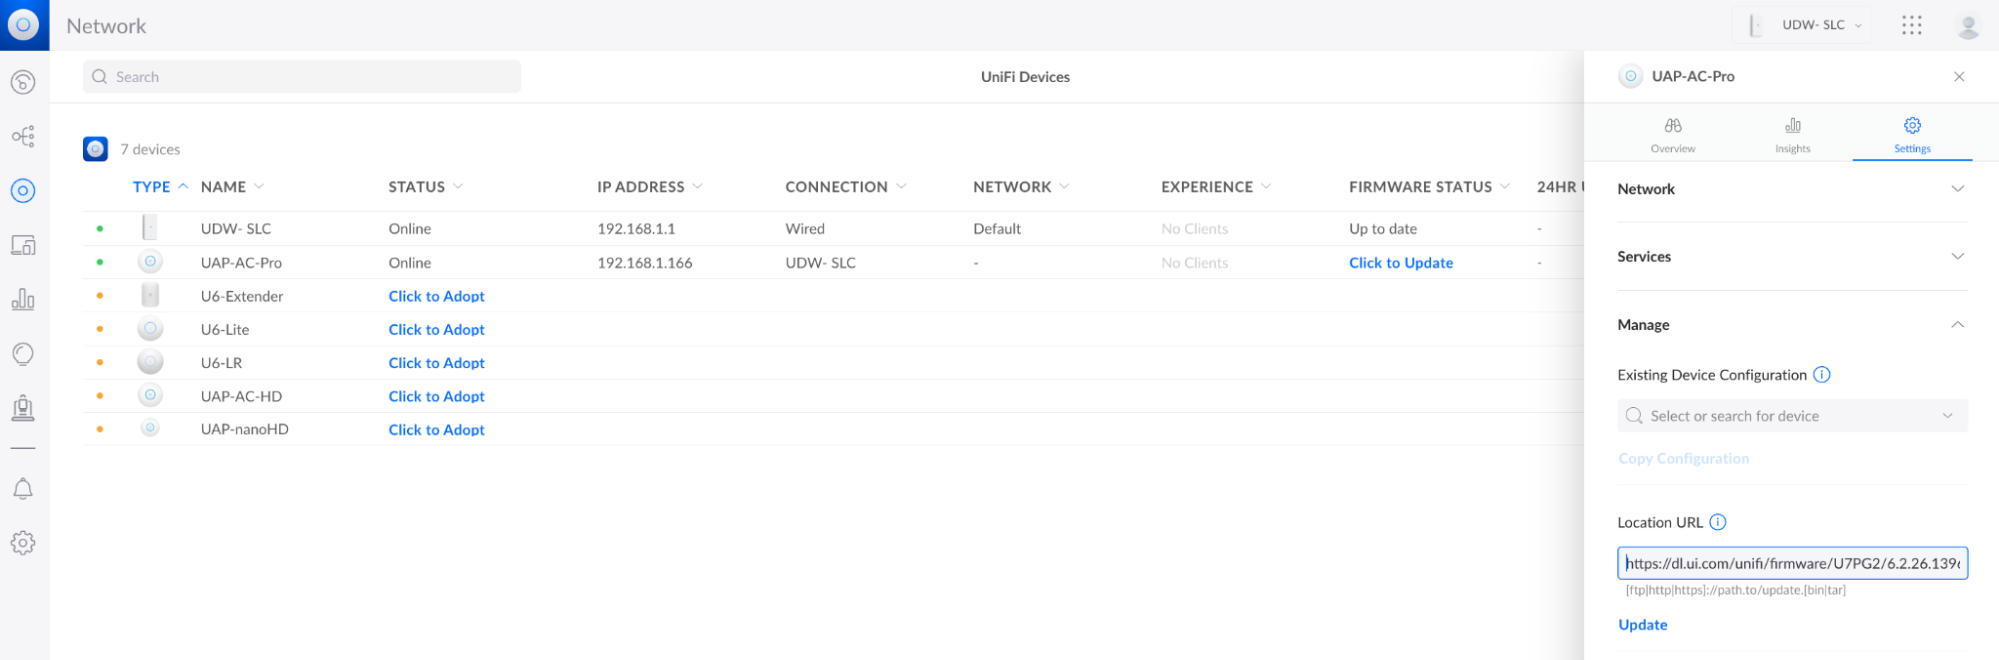
Use Case: You want to try Early Access firmware releases for specific devices, or you want to return to an official release after trying an EA release.
2. Paste the link in the address bar found in the Settings tab of the device’s properties panel.
Updating via Your Network Cache
Use Case: You prefer to download and store updates in your Network application so they can be used by other devices, as opposed to downloading multiple, device-specific files from the internet. This is an ideal solution for reducing bandwidth within high-volume networks that host a large number of similar UniFi devices. It is also suitable for the advanced users who disable internet access on their UniFi device’s management network.
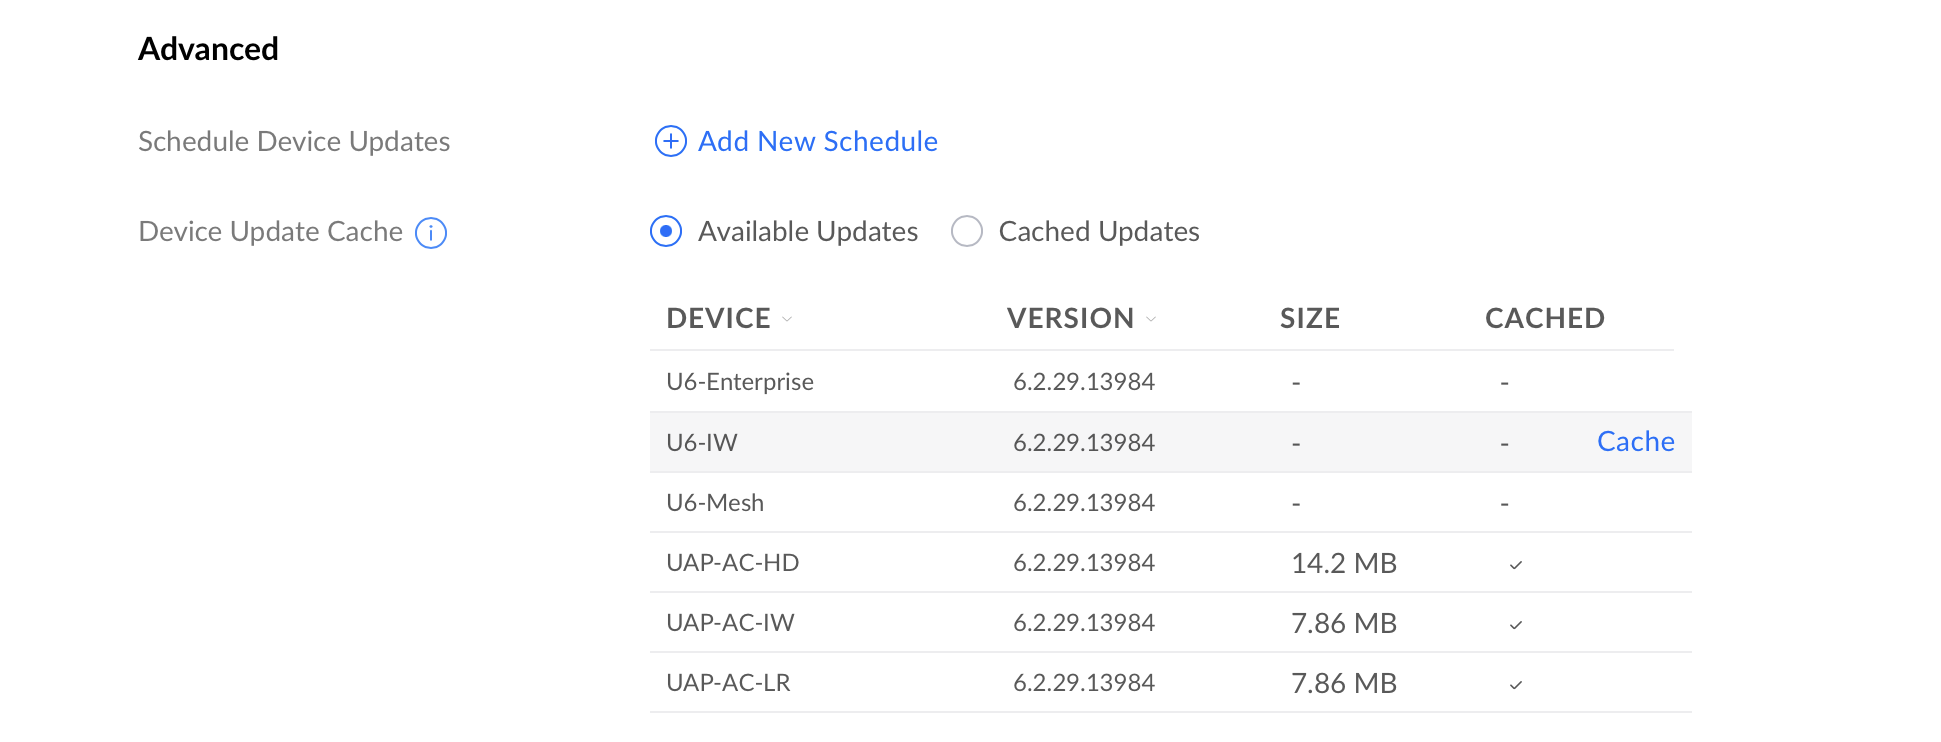
Device updates can be cached in your Network application’s System Settings. Once an update is cached, you can open to your UniFi Devices page and click Update Available.
Note: The Cache link will appear when you hover your cursor over an update.
Updating via SSH
Please note that SSH updating is not an officially supported process and may prevent your UniFi OS console from functioning. Only do this at the request of UI Support. It is only prescribed to work around specific scenarios, such as when:
Prior, traditional, update attempts have failed, likely due to an incorrect network configuration. For more details, see How to Update UniFi.
Your UniFi Network device is not being discovered or cannot be adopted because it has been preloaded with outdated firmware.
Your UniFI OS Console cannot be set up because it has been preloaded with an outdated version of UniFi OS.
Run the following command:upgrade paste_download_link_here Example:upgrade https://dl.ui.com/unifi/firmware/UAL6/5.60.1.12923/BZ.mt7621_5.60.1+12923.210416.1641.bin
Use the following SCP command to copy the file into the /tmp folder of your device from your workstation. This requires a compatible SCP application (e.g., Terminal on macOS and Linux, PuTTY/PowerShell on Windows).scp /folder_path/firmwarefile.bin <user>@<IP of device>:/tmp/fwupdate.binExample: scp /Users/alexpro/Desktop/BZ.mt7621_5.60.1+12923.210416.1641.bin Alex@192.168.1.219:/tmp/fwupdate.bin
Use the following SCP command to copy the file into the /tmp (/mnt/data for version 1.12 and below) folder of your device from your workstation. This requires a compatible SCP application (e.g., Terminal on macOS and Linux, PuTTY/PowerShell on Windows).scp /folder_path/firmwarefile.bin <user>@<IP of device>:/tmp/fwupdate.binExample: scp /Users/alexpro/Desktop/UDR-2.4.10.bin root@192.168.1.1:/tmp/fwupdate.binIf you are running Version 1.12 and below, use the following command: scp /folder_path/firmwarefile.bin <user>@<IP of device>:/mnt/data/fwupdate.binExample: scp /Users/alexpro/Desktop/UDR-2.4.10.bin root@192.168.1.1:/mnt/data/fwupdate.bin
Run the following command:upgrade <paste_download_link_here> Example: upgrade https://dl.ui.com/unifi/firmware/UGW3/4.4.56.5449062/UGW3.v4.4.56.5449062.tar
Use the following SCP command to copy the file into the /home/<user> folder of your USG from your workstation. This requires a compatible SCP application (e.g., Terminal on macOS and Linux, PuTTY/PowerShell on Windows).scp /folder_path/upgrade.tar <user>@<IP of device>:/home/<user>/upgrade.tarExample: scp /Users/alexpro/Desktop/upgrade.tar Alex@192.168.1.1:/home/Alex/upgrade.tar
Store the new application version on your device using the download link:curl -o “/tmp/unifi_sysvinit_all.deb” <network application link.deb>Example: curl -o “/tmp/unifi_sysvinit_all.deb” https://dl.ui.com/unifi/6.2.26-a79cb15f05/unifi_sysvinit_all.deb
Once downloaded, install the new version:apt-get install -y /tmp/unifi_sysvinit_all.deb
Following installation, remove the downloaded file:rm /tmp/unifi_sysvinit_all.deb
Updating Devices in a Broken State
In rare occurrences, a device may stop functioning. UniFi APs may be updated using our TFTP Recovery. This should only be used if your AP completely stops functioning as a last resort prior to submitting an RMA. UniFi OS Consoles and gateways my be updated using Recovery Mode. This should only be used if prompted on your device’s LCM screen.
Hard disks (HDD) enable the storage of recordings from Protect and Access, as well as voicemails from Talk. The Cloud Key Gen2 Plus requires an HDD, and comes with a 1TB disk pre-installed for your convenience.
Recommendations
Storage Type
Applicable UniFi Hosts
Recommended Storage
General Requirements
3.5″ HDD
Dream Machine Pro, Dream Machine SE, Network Video Recorders
There are UniFi OS backups and also application-specific backups. We strongly recommend using a UniFi OS backup for UniFi OS Hosts (i.e., Dream products, Cloud Key Gen2 Plus, and Network Video Recorders) because they capture backups for UniFi applications as well.
UniFi OS Backups
UniFi OS backups contain your entire system configuration, including settings for your UniFi OS Console, users, and applications. If Remote Access is enabled, UniFi OS Cloud backups are created weekly by default. You can also create additional Cloud backups or download localized backups at any time.
UniFi OS backups are useful when:
Restoring a prior system configuration after making network changes.
Migrating all applications to a new UniFi OS Console that is the same model as the original.
Note: Backups donot include data stored on an HDD, such as recorded Protect camera footage.
Application Backups
Each UniFi application allows you to back up and export its configuration. Application backups contain settings and device configurations specific to the that application.
Application backups are useful when:
You want to restore a prior application configuration without affecting your other applications.
You want to migrate a Self-Hosted Network Server application to a UniFi OS Console.
You want to migrate your devices between two different UniFi OS Console models.
You need to back up a self-hosted Network application.
Note: Backups donot include data stored on an HDD, such as recorded Protect camera footage.
UniFi OS Console Migration
UniFi OS backups also allow you to restore your system configuration should you ever need to replace your console with one ofthesame model.
To do so:
Create a Cloud backup or download a local backup. This can be done in your UniFi OS Settings.
Replace your old UniFi OS Console with the new one. All other network connections should remain unchanged.
Restore your system configuration on the new UniFi OS Console using the backup file. This can be done either during the initial setup or afterwards in your UniFi OS settings.
Note: Currently, UniFi OS backups cannot be used to perform cross-console migrations, but this capability will be added in a future update.
If you are migrating between two different console models, you will need to restore each application’s configuration with their individual backups. These file application backups will not include UniFi OS users or settings.
See below for more information on using the configuration backups during migrations.
Migrating UniFi Network
Before migrating, we recommend reviewing your Device Authentication Credentials found in your Network application’s System Settings. These can be used to recover adopted device(s) if the migration is unsuccessful.
Standard Migration
This is used when all devices are on the same Layer 2 network (i.e., all devices are on the same network/VLAN as the management application’s host device).
Note: If you are a home user managing devices in a single location and have not used the set-inform command or other advanced Layer 3 adoption methods, this is most likely the method for you.
Download the desired backup file (*.unf) from your original Network application’s System Settings.
Ensure that your new Network application is up to date. Backups cannot be used to restore older application versions.
Replace your old UniFi OS Console with the new one. All other network connections should remain unchanged.
Restore the backup file in the Network application’s System Settings.
Ensure that all devices appear as online in the new application. If they do not, you can try Layer 3 adoption, or factory-reset and readopt your device(s) to the new Network application.
If a device appears as Managed by Other, click on it to open its properties panel, then use its Device Authentication Credentials (from the original Network application’s host device) to perform an Advanced Adoption.
Migrating Applications That Manage Layer 3 Devices
This method is for users that have performed Layer 3 device adoption (e.g., devices are on a different network/VLAN than the application’s host device). This may also be useful when migrating to a Network application host that is not also a gateway.
Download the desired backup file (*.unf) from your original Network application’s System Settings.
Enable the Override Inform Host field on the original Network application’s host device, then enter the IP address of the new host device. This will tell your devices where they should establish a connection in order to be managed. Once entered, all devices in the old application should appear as Managed by Other.
When migrating to a Cloud Console, you can copy the Inform URL from the Cloud Console’s dashboard. You will need to remove the initial http:// and the ending :8080/inform.
Ensure that your new Network application is up to date. Backups cannot be used to restore older application versions.
Restore the backup file in the Network application’s System Settings.
Ensure that all devices appear as online in the new application. If they do not, you can try Layer 3 adoption, or factory reset and readopt your device(s) to the new application.
If a device appears as Managed by Other, click on it to open its properties panel, then use its Device Authentication Credentials (from the original Network application’s host) to perform an Advanced Adoption.
Exporting Individual Sites from a Multi-Site Host
Certain Network application hosts (e.g., Cloud Key, Cloud Console, self-hosted Network Server) can manage multiple sites. Site exportation allows you to migrate specific sites from one multi-site host to another. To do so:
Click Export Site in your Network application’s System Settings to begin the guided walkthrough.
Select the device(s) you wish to migrate to your new Network application.
Enter the Inform URL of your new host. This will tell your devices where they should establish a connection in order to be managed. Once entered, all devices in the old application should appear as Managed by Other in the new one.
When migrating to a Cloud Console, you can copy the Inform URL from the Cloud Console’s dashboard. You will need to remove the initial http:// and the ending :8080/inform.
Go to your new Network application and select Import Site from the site switcher located in the upper-left corner of your dashboard.
Note: You may need to enable Multi-Site Management in your System Settings.
Ensure that all devices appear as online in the new application. If they do not, you try Layer 3 adoption, or factory reset and readopt your device(s) to the new application.
If a device appears as Managed by Other, click on it to open its properties panel, then use its Device Authentication Credentials (from the original Network application’s host) to perform an Advanced Adoption.
Migrating UniFi Protect
We recommend saving your footage with the Export Clips function before migrating. Although we provide HDD migration instructions, it is not an officially supported procedure due to nuances in the RAID array architecture.
Standard Migration
Download the desired backup file (*.zip) from the original Protect application’s settings.
Ensure that your new Protect application is up to date. Backups cannot be used to restore older application firmware.
Replace your old UniFi OS Console with the new one. All other camera connections should remain unchanged.
Restore the backup file in the Protect application’s settings.
HDD Migration
Full HDD migration is not officially supported; however, some users have been able to perform successful migrations by ensuring consistent ordering when ejecting and reinstalling drives into their new console to preserve RAID arrays.
Note: This is only possible if both UniFi OS Consoles are the same model.
Remove the HDDs from the old console. Record which bay each one was installed in, but do not install them in the new console yet.
Turn on the new console and complete the initial setup wizard. Do not restore a Protect application or Cloud backup during initial setup.
Upgrade the new console and its Protect application to a version that is either the same or newer than the original console.
Shut down the new console, and then install the HDDs in the same bays as the original console.
Turn on the new console again. The Protect application should start with its current configuration intact, and all exported footage should be accessible.
You may need to replace a storage disk when upgrading to a larger storage capacity, or if your current disk has naturally degraded over time, as discussed in our article on Disk Health. UniFi OS makes this process incredibly simple.
Export any recordings you want to keep (all recordings on the disk will be lost).
How to Replace a Disk
All UniFi Hosts with removable disks can be opened and the disks swapped with ease.
Hosts with HDDs and SSDs (i.e., Dream Machines & Video Recorders): Simply press the disk tray to open it. Then take out and replace the disk in the same orientation.
Hosts with microSD cards (i.e., Dream Router & Dream Wall): Carefully pull the tray out of its slot, then replace the card in the same orientation.
Cloud Key Gen2 Plus and Devices “Managed by Other”
The Cloud Key Gen2 Plus is unique, because it operates entirely off its external storage. Replacing this disk will result in a new database. Any connected devices (i.e., Cameras & Access Points) will still be associated with the old database, and will appear as “Managed by Other.”
In this case, restoring from a backup will resync the devices with your Cloud Key. If you did not make a backup before replacing the storage, you will need to factory reset and readopt your device(s).
Ensure the following when replacing a disk in your CK G2 Plus:
No security devices are connected to the security slot on the side.
Your Cloud Key has been shut down from UniFi OS > Console Settings and is unplugged.
The HDD should not be removed or installed while the CK is powered on.
Replacing a Disk in an Array
The Network Video Recorder and Network Video Recorder Pro can maximize data protection by creating storage arrays across multiple disks. For more information, see Storage Protect and Data Redundancy
Remember:
Always replace a failed disk first before replacing an at-risk disk.
Replace one disk at a time, allowing storage to fully repair before replacing the next disk.
Repairing a disk takes significant work, and will impact overall performance.
Since 2014, the National Institute of Standards and Technology (NIST), a U.S. federal agency, has issued guidelines for managing digital identities via Special Publication 800-63B. The latest revision (rev. 3) was released in 2017, and has been updated as recently as 2019. Revision 4 was made available for comment and review; however, revision 3 is still the standard as of the time of this blog post.
Section 5.1.1 – Memorized Secrets provides recommendations for requirements around how users may create new passwords or make password changes, including guidelines around issues such as password strength. Special Publication 800-63B also covers verifiers (software, websites, network directory services, etc.) that validate and handle passwords during authentication and other processes.
Not all organizations must adhere to NIST guidelines. However, many follow NIST password policy recommendations even if it’s not required because they provide a good foundation for sound digital identity management. Indeed, strong password security helps companies block many cybersecurity attacks, including hackers, brute force attacks like credential stuffing and dictionary attacks. In addition, mitigating identity-related security risks helps organizations ensure compliance with a wide range of regulations, such as HIPAA, FISMA and SOX.
Quick List of NIST Password Guidelines
This blog explain many NIST password guidelines in detail, but here’s a quick list:
User-generated passwords should be at least 8 characters in length.
Machine-generated passwords should be at least 6 characters in length.
Users should be able to create passwords at least 64 characters in length.
All ASCII/Unicode characters should be allowed, including emojis and spaces.
Stored passwords should be hashed and salted, and never truncated.
Prospective passwords should be compared against password breach databases and rejected if there’s a match.
Passwords should not expire.
Users should be prevented from using sequential characters (e.g., “1234”) or repeated characters (e.g., “aaaa”).
Two-factor authentication (2FA) should not use SMS for codes.
Knowledge-based authentication (KBA), such as “What was the name of your first pet?”, should not be used.
Users should be allowed 10 failed password attempts before being locked out of a system or service.
Passwords should not have hints.
Complexity requirements — like requiring special characters, numbers or uppercase letters — should not be used.
Context-specific words, such as the name of the service or the individual’s username, should not be permitted.
You probably notice that some of these recommendations represent a departure from previous assumptions and standards. For example, NIST has removed complexity requirements like special characters in passwords; this change was made in part because users find ways to circumvent stringent complexity requirements. Instead of struggling to remember complex passwords and risking getting locked out, they may write their passwords down and leave them near physical computers or servers. Or they simply recycle old passwords based on dictionary words by making minimal changes during password creation, such as incrementing a number at the end.
NIST Guidelines
Now let’s explore the NIST guidelines in more detail.
Password length & processing
Length has long been considered a crucial factor for password security. NIST now recommends a password policy that requires all user-created passwords to be at least 8 characters in length, and all machine-generated passwords to be at least 6 characters in length. Additionally, it’s recommended to allow passwords to be at least 64 characters as a maximum length.
Verifiers should no longer truncate any passwords during processing. Passwords should be hashed and salted, with the full password hash stored.
Also the recommended NIST account lockout policy is to allow users at least 10 attempts at entering their password before being locked out.
Accepted characters
All ASCII characters, including the space character, should be supported in passwords. NIST specifies that Unicode characters, such as emojis, should be accepted as well.
Users should be prevented from using sequential characters (e.g., “1234”), repeated characters (e.g., “aaaa”) and simple dictionary words.
Commonly used & breached passwords
Passwords that are known to be commonly used or compromised should not be permitted. For example, you should disallow passwords in lists from breaches (such as the Have I Been Pwned? database, which contains 570+ million passwords from breaches), previously used passwords, well-known commonly used passwords, and context-specific passwords (e.g., the name of the service).
When a user attempts to use a password that fails this check, a message should be displayed asking them for a different password and providing an explanation for why their previous entry was rejected.
Reduced complexity & password expiration
As explained earlier in the blog, previous password complexity requirements have led to less secure human behavior, instead of the intended effect of tightening security. With that in mind, NIST recommends reduced complexity requirements, which includes removing requirements for special characters, numbers, uppercase characters, etc.
A related recommendation for reducing insecure human behavior is to eliminate password expiration.
No more hints or knowledge-based authentication (KBA)
Although password hints were intended to help users to create more complex passwords, users often choose hints that practically give away their passwords. Accordingly, NIST recommends not allowing password hints.
NIST also recommends not using knowledge-based authentication (KBA), such as questions like “What was the name of your first pet?”
To account for the growing popularity of password managers, users should be able to paste passwords.
SMS is no longer considered a secure option for 2FA. Instead, one-time code provider, such as Google Authenticator or Okta Verify, should be used.
How Netwrix Can Help
Netwrix offers several solutions specifically designed to streamline and strengthen access and password management:
Netwrix Password Policy Enforcer makes it easy to create strong yet flexible password policies that enhance security and compliance without hurting user productivity or burdening helpdesk and IT teams.
Netwrix Password Reset enables users to safely unlock their own accounts and reset or change their own passwords, right from their web browser. This self-service functionality dramatically reduces user frustration and productivity losses while slashing helpdesk call volume.
FAQ
What is NIST Special Publication 800-63B?
NIST’s Digital Identity Guidelines (Special Publication 800-63B) provides reliable recommendations for identity and access management, including effective password policies.
Why does NIST recommend reducing password complexity requirements?
While requiring complex passwords makes them more difficult for attackers to crack, it also makes passwords harder for users to remember. To avoid frustrating lockouts, users tend to respond with behaviors like writing down their credentials on a sticky note by their desk or choosing to periodically reuse the same (or nearly the same) password — which increase security risks. Accordingly, NIST now recommends less stringent complexity requirements.
Microsoft Active Directory (AD) is the central credential store for 90% of organizations worldwide. As the gatekeeper to business applications and data, it’s not just everywhere, it’s everything! Managing AD is a never-ending task, and securing it is even harder. At Netwrix, we talk to a lot of customers who are using our tools to manage and secure AD, and over the years, key strategies for tightening security and hardening AD to resist attacks have emerged. Here are 10 Active Directory security hardening tips that you can use in your environment:
Active Directory includes thousands of items and many moving elements to safeguard. A core method for increasing security is to decrease clutter by removing unused users, groups and machines. Stale AD objects may be abused by attackers, so deleting them reduces your attack surface.
You may also find seldom-used items. Use HR data and work with business stakeholders to determine their status; for example, for user accounts, determine the user’s manager. While this takes time, you’ll appreciate having it done during your next audit or compliance review.
Tip #2: Make it easy for users to choose secure passwords.
To prevent adversaries from compromising user credentials to enter your network and move laterally, passwords need to be hard to crack. But users simply cannot remember and manage multiple complex passwords on their own, so they resort to practices that weaken security, such as writing their passwords on sticky notes or simply incrementing a number at the end when they need to change them. That led security experts to weaken their recommendations concerning password complexity and resets.
However, with an enterprise password management solution, you can make it easy for users to create unique and highly secure passwords and manage them effectively, so you do not have to compromise on strong password requirements. A user needs to memorize just one strong password, and the tool manages all the others for them.
Tip #3: Don’t let employees have admin privileges on their workstations.
If an attacker gains control of a user account (which we all know happens quite a bit), their next step is often to install hacking software on the user’s workstation to help them move laterally and take over other accounts. If the compromised account has local admin rights, that task is easy.
But most business users do not actually need to install software or change settings very often, so you can reduce your risk by not giving them admin permissions. If they do need an additional application, they can ask the helpdesk to install it. Don’t forget to use Microsoft LAPS ensure all remaining local admin accounts have strong passwords and change them on a regular schedule.
Tip #4: Lock down service accounts.
Service accounts are used by applications to authenticate to AD. They are frequently targeted by attackers because they are rarely monitored, have elevated privileges and typically have passwords with no expirations. Accordingly, take a good look at your service accounts and restrict their permissions as much as possible. Sometimes service accounts are members of the Domain Admin’s group, but typically don’t need all of that access to function — you may need to check with the application vendor to find out the exact privileges needed.
It’s also important to change service account passwords periodically to make it even more difficult for attackers to exploit them. Doing this manually is difficult, so consider using the group managed service account (gMSA) feature, introduced in Windows Server 2016. When you use gMSAs, the operating system will automatically handle the password management of service accounts for you.
Tip #5: Eliminate permanent membership in security groups.
The Enterprise Admin, Schema Admin and Domain Admin security groups are the crown jewels of Active Directory, and attackers will do everything they can to get membership in them. If your admins have permanent membership in these groups, an attacker who compromises one of their accounts will have permanent elevated access in your domain.
To reduce this risk, strictly limit membership in all of these highly privileged group and, furthermore, make membership temporary. The Enterprise Admin and Schema Admin groups are not frequently used, so for these, this won’t be an issue. Domain Admin is needed much more, so a system for granting temporary membership will have to be set up.
Tip #6: Eliminate elevated permissions wherever possible.
There are three fairly common permissions that attackers need to execute attacks against AD: Reset Password, Change Group Membership and Replication. These permissions are harder to secure since they are so frequently used in daily operations.
Accordingly, you should monitor all changes to security group permissions or membership that would grant these rights to additional users. Even better, implement a privileged access management (PAM) solution that enables just-in-time temporary provisioning of these privileges.
Tip #7: Implement multifactor authentication (MFA)
MFA adds an extra layer of security by requiring users to verify their identity by providing at least two of the following types of authentication factors:
Something they know, such as a password, PIN or answer to a security question
Something they have, such as a code from a physical token or a smart card
Something they are, which means biometrics like a fingerprint, iris or face scan
Tip #8: Closely audit your Active Directory.
It is important to audit Active Directory for both non-secure settings and suspicious activity. In particular, you should perform regular risk assessment to mitigate security gaps, monitor for anomalous user activity, and promptly identify configuration drift in critical system files. It’s ideal to invest in tools that will automatically alert you to suspicious events and even respond automatically to block threats.
Tip #9: Secure DNS.
Securing DNS can help you to block a variety of attacks, including as domain hijacking and DNS spoofing. Steps to take include implementing DNSSEC, using a secure DNS server and regularly reviewing DNS settings.
Tip #10: Regularly back up Active Directory.
Having a recent backup of your Active Directory is crucial for recovery from cyber incidents, including ransomware attacks and natural disasters. Backups should be stored securely, tested regularly and be readily accessible to ensure your critical AD settings are recoverable in the event of a disaster.
Conclusion
Active Directory is an amazing system for controlling access. However, it’s only secure when it’s clean, understood, properly configured, closely monitored and tightly controlled. These tips are practical ways that you can tighten security and harden your Active Directory.
Frequently Asked Questions
What is hardening in Active Directory?
Hardening in Active Directory is the process of securing and strengthening the directory service to reduce the risk of data breaches and downtime. It involves controlling access to sensitive data, removing unnecessary objects, enforcing password policies and monitoring for suspicious activity.
What is domain controller hardening?
Domain controller hardening is the process of strengthening the servers that run Active Directory to reduce the risk of unauthorized access, data breaches and service disruption. It includes deactivating superfluous services, deploying security patches and updates, establishing firewall rules, and enforcing strong password practices.
What happens if a domain controller is compromised?
An adversary who compromises a domain controller can do significant damage, from accessing sensitive data to creating, modifying and deleting user accounts and other critical AD objects.
How do I secure Active Directory?
Securing Active Directory is an ongoing process that involves multiple layers of security controls. In particular, organizations need to implement strong password policies, limit user access, monitor for suspicious activity, keep machines patched and updated, secure domain controllers, use multifactor authentication (MFA) to add extra security, and educate employees on cybersecurity best practices and potential threats.
Active Directory security groups are used to grant users permissions to IT resources. Each security group is assigned a set of access rights, and then users are made members of the appropriate groups. Done right, this approach enables an accurate, role-based approach to user management and reduces IT workload.
Why should Security Groups Stay Secure?
Security groups should always be protected with clear security protocols because they govern user and computer access to resources that could be highly confidential, sensitive, and critical to the organization. Any oversight may result in security breaches and data theft with lasting consequences. Hence, you need to establish some best practices for using and managing security groups.
Key Best Practices
The following best practices can help you use security groups effectively.
Use Group Nesting to Simplify Access Management
Give each security group a unique, descriptive name
Limit each group’s permissions to the bare minimum
Make each user a member of only the required groups
Track group activity and changes to security groups
Pay attention to service accounts
Have group owners review their groups regularly, and remove groups that are no longer needed
Use privileged accounts only when required
Always create a recovery plan
Use Group Nesting to Simplify Access Management.
When we talk about group nesting, we refer to making an AD group a member of another group. This strategy enables us to give permissions across domains through universal groups. It works this way:
Give each security group a unique, descriptive name.
When security groups have unclear names, or multiple groups have similar names, such as ‘Sales Group 1’ and ‘Sales Group 2’, it’s difficult to ensure that they have the correct permissions and membership. To reduce risk, establish group naming standards that ensure consistency and uniqueness.
Limit each group’s permissions to the bare minimum.
The least privilege principle is the cornerstone of security. Make sure each security group is assigned only the permissions that its members need to complete their tasks. Granting excessive permissions to a group enables any group member — or an adversary who compromises their account — to abuse those rights.
Make each user a member of only the required groups.
Never add users to groups they do not need to be a part of. Moreover, remove them promptly from groups they no longer need to belong to, such as when they change roles within the organization. For example, when users change departments, remove them from the previous department’s groups and add them to the new department’s groups. That way, each user has access only to the resources they need, which reduces your organization’s attack surface area.
Track group activity and changes to security groups.
Any improper change to the permissions or membership of a security group puts the organization at increased risk of security incidents and business disruptions. Be especially vigilant about monitoring changes to highly privileged groups like Domain Admins and Enterprise Admins.
Look out for the following to detect suspicious behavior:
Unauthorized permission and membership changes
Unnecessary or unusual use of admin accounts
Failed password attempts
Locked out accounts
Disabled or removed antivirus software
At a minimum, log the events and regularly run reports to spot suspicious activity. Even better, use a tool that will alert you in real time to changes to critical security groups, or block those changes from happening in the first place.
Pay attention to service accounts.
A service account is a special user account created to run a particular application or service. Best practices for service accounts include the following:
Set secure passwords.
Do not make service accounts members of built-in privileged groups like Domain Admins.
Enforce least privilege by granting each service account the minimum access required to accomplish its tasks.
Have group owners review their groups regularly, and remove groups that are no longer needed.
Security groups are usually set up to provide access to resources for a particular project team— but when the project is over, the group is often not deleted. By requiring group owners to regularly review their groups, you can improve security by removing groups that are no longer needed.
As a best practice, disable or delete dormant accounts after about 45 days of inactivity. Set up a system to distinguish inactive accounts from active accounts, which would help in removing inactive accounts from security groups. Hackers can easily target unused accounts since no one keeps track of the account’s activities. And if that unused account is a member of multiple security groups, the implications could be devastating.
Use privileged accounts only when required.
Accounts that are members of privileged groups should be used only for performing administrative tasks that require elevated rights. For all other tasks, admins should use their regular user accounts. This strategy reduces the risk of attackers gaining control of an account that is a member of security groups with access to sensitive systems and data.
Always create a recovery plan.
Despite keeping security intact, data breaches may happen at times due to an error. As a proactive measure, have a recovery plan in place with due attention to recovering security groups. IT teams must be trained to handle such a situation with quick and intelligent decision-making.
Simplifying Security Group Management
Netwrix GroupID can help you effectively manage your Active Directory security groups. Here are some of the ways it can help you implement the best practices described above.
Establish and enforce standards for naming groups
Ensure the membership of security groups is accurate
Establish an attestation process for security groups
Set security groups to expire automatically
Set a default group approver
Establish and enforce standards for naming groups.
Netwrix GroupID helps you implement consistency and convention in group names with the following features:
Group name prefixes
Regular expressions
Templates for naming nested groups
Lists of blocked words
Ensure the membership of security groups is accurate.
Netwrix GroupID enables you to manage group membership with LDAP queries as an alternative to manually adding and removing users, thus ensuring that membership is always up to date.
Establish an attestation process for security groups.
Netwrix GroupID makes it easy for group owners to regularly review the attributes, membership, and permissions of their security groups, as well as whether the groups are still needed. This process helps maintain a check on groups.
Set security groups to expire automatically.
You can set an expiry date for a security group, such as a group created for a specific project. Netwrix GroupID sends an email notification to a group’s owner 30 days, 7 days and 1 day before the expiration date. If the group is not renewed, it is automatically deleted. Expired groups that have been deleted can be quickly restored if necessary.
You can easily exempt any security group from expiration, including the default security groups in Active Directory.
Set a default group approver.
You can designate a default approver for groups, who will receive expiry notifications for groups without owners.
Conclusion
Properly managing your Active Directory security groups is vital to protecting your IT systems and data. A solution like Netwrix GroupID can make it easy to implement the best practices detailed here.
How governments play a vital role in developing regulations, stopping supply chain attacks, and diminishing other threats to our way of life.
While new issues are always emerging in the world of cybersecurity, some have been present since the beginning, such as what role cybersecurity should play in government operations and, conversely, what role government should play in cybersecurity. The answer to this question continues to shift and evolve over time, but each new leap in technology introduces additional considerations. As we move into the AI era, how can government best keep citizens safe without constraining innovation and the free market — and how can the government use its defensive capabilities to retain an edge in the conflicts of tomorrow?
The day’s first session, “Cybersecurity and Military Defense in an Increasingly Digital World,” offered a deep dive into the latter question. Over the past 20 years, military conflicts have moved from involving just Land, Air and Sea to also being fought in Space and Cyber. While superior technology has given us an upper hand in previous conflicts, in some areas our allies — and our adversaries — are catching up or even surpassing us. In each great technological leap, companies and countries alike ascend and recede, and to keep our edge in the conflicts of the future, the U.S. will need to shed complacency, develop the right policies, move toward greater infrastructure security and tap the capabilities of the private sector.
SonicWall in particular is well-positioned to work with the federal government and the military. For years, we’ve helped secure federal agencies and defense deployments against enemies foreign and domestic, and have woked to shorten and simplify the acquisition and procurement process. Our list of certifications includes FIPS 140-2, Common Criteria, DoDIN APL, Commercial Solutions for Classified (CSfC), USGv6, IPv6 and TAA and others. And our wide range of certified solutions have been used in a number of government use cases, such as globally distributed networks in military deployments and federal agencies, tip-of-the-spear, hub-and-spoke, defense in-depth layered firewall strategies and more.
This new strategy was at the center of the day’s next session. In “The National Cyber Strategy as Roadmap to a Secure Cyber Future,” panelists outlined this strategic guidance, which was released just two months ago and offered a roadmap for how the U.S. should protect its digital ecosystem against malicious criminal and nation-state actors. The guidance consists of five pillars, all of which SonicWall is in accord with:
Pillar One: Defend Critical Infrastructure SonicWall offers several security solutions that align with Pillar One, including firewalls, intrusion prevention, VPN, advanced threat protection, email security, Zero-Trust network access and more. We’re also working to align with and conform to NIST SSDF and NIST Zero Trust Architecture standards.
Pillar Three: Shape Market Forces to Drive Security and Resilience
This pillar shifts liability from end users to software providers that ignore best practices, ship insecure or vulnerable products or integrate unvetted or unsafe third-party software. And as part of our efforts to aign with the NIST SSDF, we’re implementing a Software Bill of Materials (SBOM).
Pillar Four: Invest in a Resilient Future
Given CISA’s prominence in this guidance, any regulations created will likely include threat emulation testing, and will likely be mapped to threat techniques, such as MITRE ATT&CK. SonicWall Capture Client (our EDR solution) is powered by SentinelOne, which has been a participant in the MITRE ATT&CK evaluations since 2018 and was a top performer in the 2022 Evaluations.
Pillar Five: Forge International Partnerships to Pursue Shared Goals
An international company, SonicWall recognizes the importance of international partnerships and works to comply with global regulations such as GDPR, HIPAA, PCI-DSS and more. By sharing threat intelligence and collaborating no mitigation strategies, we work with governments and the rest of the cybersecurity community to pursue shared cybersecurity goals.
And with the continued rise in cybercrime, realizing these goals has never been more important. In “The State of Cybersecurity: Year in Review,” Mandiant CEO Kevin Mandia summarized findings from the 1,163 intrusions his company investigated in 2022. The good news, Mandia said, is that we’re detecting threats faster. In just ten years, we’ve gone from averaging 200 days to notice there’s a problem, to just 16 days currently — but at the same time, an increase in the global median dwell time for ransomware shows there’s still work to be done.
Mandia also outined the evolution of how cybercriminals are entering networks, from Unix platforms, to Windows-based attacks, and from phishing, to spearphishing to vulnerabilities — bringing patch management once again to the fore.
Deep within the RSAC Sandbox, where today’s defenders learn, play and test their skills, panelists convened to discuss how to stop attackers’ relentless attempts to shift left. “Software Supply Chain: Panel on Threat Intel, Trends, Mitigation Strategies” explained that while the use of third-party components increases agility, it comes with tremendous risk. More than 96% of software organizations rely on third-party code, 90% of which consists of open source—but the developers of this software are frequently single individuals or small groups who may not have time to incorporate proper security, or even know how. Our current strategy of signing at the end isn’t enough, panelists argued—to truly ensure safety, signing should be done throughout the process (otherwise known as “sign at the station”).
Israel provides an example of how a country can approach the issue of software supply chain vulnerability — among other things, the country has created a GitHub and browser extension allowing developers to check packages for malicious code — but much work would need to be done to implement the Israel model in the U.S. AI also provides some hope, but given its current inability to reliably detect malicious code, we’re still a long way from being able to rely on it. In the meantime, organizations will need to rely on tried-and-true solutions such as SBOMs to help guard against supply chain attacks in the near future.
But while AI has tremendous potential to help defenders, it also has terrible potential to aid attackers. In “ChatGPT: A New Generation of Dynamic Machine-Based Attacks,” the speakers highlighted ways that attackers are using the new generation of AI technology to dramatically improve social engineering attempts, expand their efforts to targets in new areas, and even write ransomware and other malicious code. In real time, the speakers demonstrated the difference between previous phishing emails and phishing generated by ChatGPT, including the use of more natural language, the ability to instantly access details about the target and the ability to imitate a leader or colleague trusted by the victim with a minimum of effort. These advancements will lead to a sharp increase in victims of phishing attacks, as well as things like Business Email Compromise.
And while there are guardrails in place to help prevent ChatGPT from being used maliciously, they can be circumvented with breathtaking ease. With the simple adjustment of a prompt, the speakers demonstrated, ransomware and other malicious code can be generated. While this code isn’t functional on its own, it’s just one or two simple adjustments away — and this capability could be used to rapidly increase the speed with which attacks are launched.
These capabilities are especially concerning given the rise in state-sponsored attacks. In “State of the Hack 2023: NSA’s Perspective,” NSA Director of Cybersecurity Rob Joyce addressed a packed house regarding the NSA’s work to prevent the increasing wave of nation-state threats. The two biggest nation-state threats to U.S. cybersecurity continue to be Russia and China, with much of the Russian effort centering around the U.S.’ assistance in the Russia/Ukraine conflict.
As we detailed in our SonicWall 2023 Cyber Threat Report, since the beginning of the conflict, attacks by Russia’s military and associated groups have driven a massive spike in cybercrime in Ukraine. The good news, Joyce said, is that Russia is currently in intelligence-gathering mode when it comes to the U.S., and is specifically taking care not to release large-scale NotPetya-type attacks. But Russia also appears to be playing the long game, and is showing no signs of slowing or scaling back their efforts.
China also appears to be biding its time — but unlike Russia, whose efforts appear to be focused around traditional military dominance, China is seeking technological dominance. Exploitation by China has increased so much that we’ve become numb to it, Joyce argued. And since these nation-state sponsored attackers don’t incur much reputational damage for their misdeeds, they’ve become increasingly brazen in their attacks, going so far as to require any citizen who finds a zero-day to pass details to the government and hosting competitions for building exploits and finding vulnerabilities. And the country is also making efforts to influence international tech standards in an attempt to tip scales in their favor for years to come.
The 2023 RSA Conference has offered a wealth of information on a wide variety of topics, but it will soon draw to a close. Thursday is the last day to visit the SonicWall booth (#N-5585 in Moscone North) and enjoy demos and presentations on all of our latest technology. Don’t head home without stopping by — and don’t forget to check back for the conclusion of our RSAC 2023 coverage!
In this blog entry, we provide technical details and analysis on the 3CX attacks as they happen. We also discuss available solutions which security teams can maximize for early detection and mitigate the impact of 3CX attacks.
By: Trend Micro Research March 30, 2023 Read time: 7 min (1870 words)
Updated on:
April 5, 2:39 a.m. EDT: We added Windows, Mac, and network commands to the Trend Micro Vision One™️ guide in the linked PDF.
April 4, 3:29 a.m. EDT: We added Trend Micro XDR filters to the solutions.
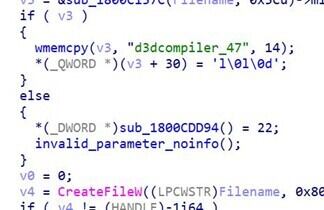
April 3, 2:33 a.m. EDT: We added details on d3dcompiler_47.dll‘s abuse of CVE-2013-3900 to make it appear legitimately signed.
April 1, 1:50 a.m. EDT: We added a guide on how Vision One can be used to search for potential threats associated with the 3CX desktop app.
March 31, 11:07 p.m. EDT: We added technical details, an analysis of the info-stealer payload, and information on Trend Micro XDR capabilities for investigating and mitigating risks associated with the 3CX desktop app.
March 31, 3:00 a.m. EDT: We added the execution flow diagram, a link to Trend Micro support page, and a list of Mac IOCs and detection names.
In late March 2023, security researchers revealed that threat actors abused a popular business communication software from 3CX — in particular, thereports mention that a version of the 3CX VoIP (Voice over Internet Protocol) desktop client was being employed to target 3CX’s customers as part of an attack.
On its forums, 3CX has posted an update that recommends uninstalling the desktop app and using the Progressive Web App (PWA) client instead. The company also mentioned that they are working on an update to the desktop app.
For a more comprehensive scope of protection against possible attacks associated with the 3CX Desktop App, the Trend Micro XDR platform can help organizations mitigate the impact by collecting and analyzing extensive activity data from various sources. By applying XDR analytics to the data gathered from its native products, Trend Micro XDR generates correlated and actionable alerts.
Trend Micro customers can also take advantage of Trend Micro Vision One™ to search for and monitor potential threats associated with the 3CX Desktop App, and to better understand observed attack vectors. For more information on how to utilize Trend Micro Vision One features, you may download the PDF guide here.
Additional guidance for Trend Micro customers including help with protection and detection can be found on our support page.
What is the compromised application?
The 3CX app is a private automatic branch exchange (PABX) software that provides several communication functions for its users, including video conferencing, live chat, and call management. The app is available on most major operating systems, including Windows, macOS, and Linux. Additionally, the client is available as a mobile application for both Android and iOS devices, while a Chrome extension and the PWA version of the client allow users to access the software through their browsers.
The issue was said to be limited to the Electron (non-web versions) of their Windows package (versions 18.12.407 and 18.12.416) and macOS clients (versions 18.11.1213, 18.12.402, 18.12.407 and 18.12.416).
According to the company’s website, more than 600,000 businesses and over 12 million daily users around the world use 3CX’s VoIP IPBX software.
How does the attack work?
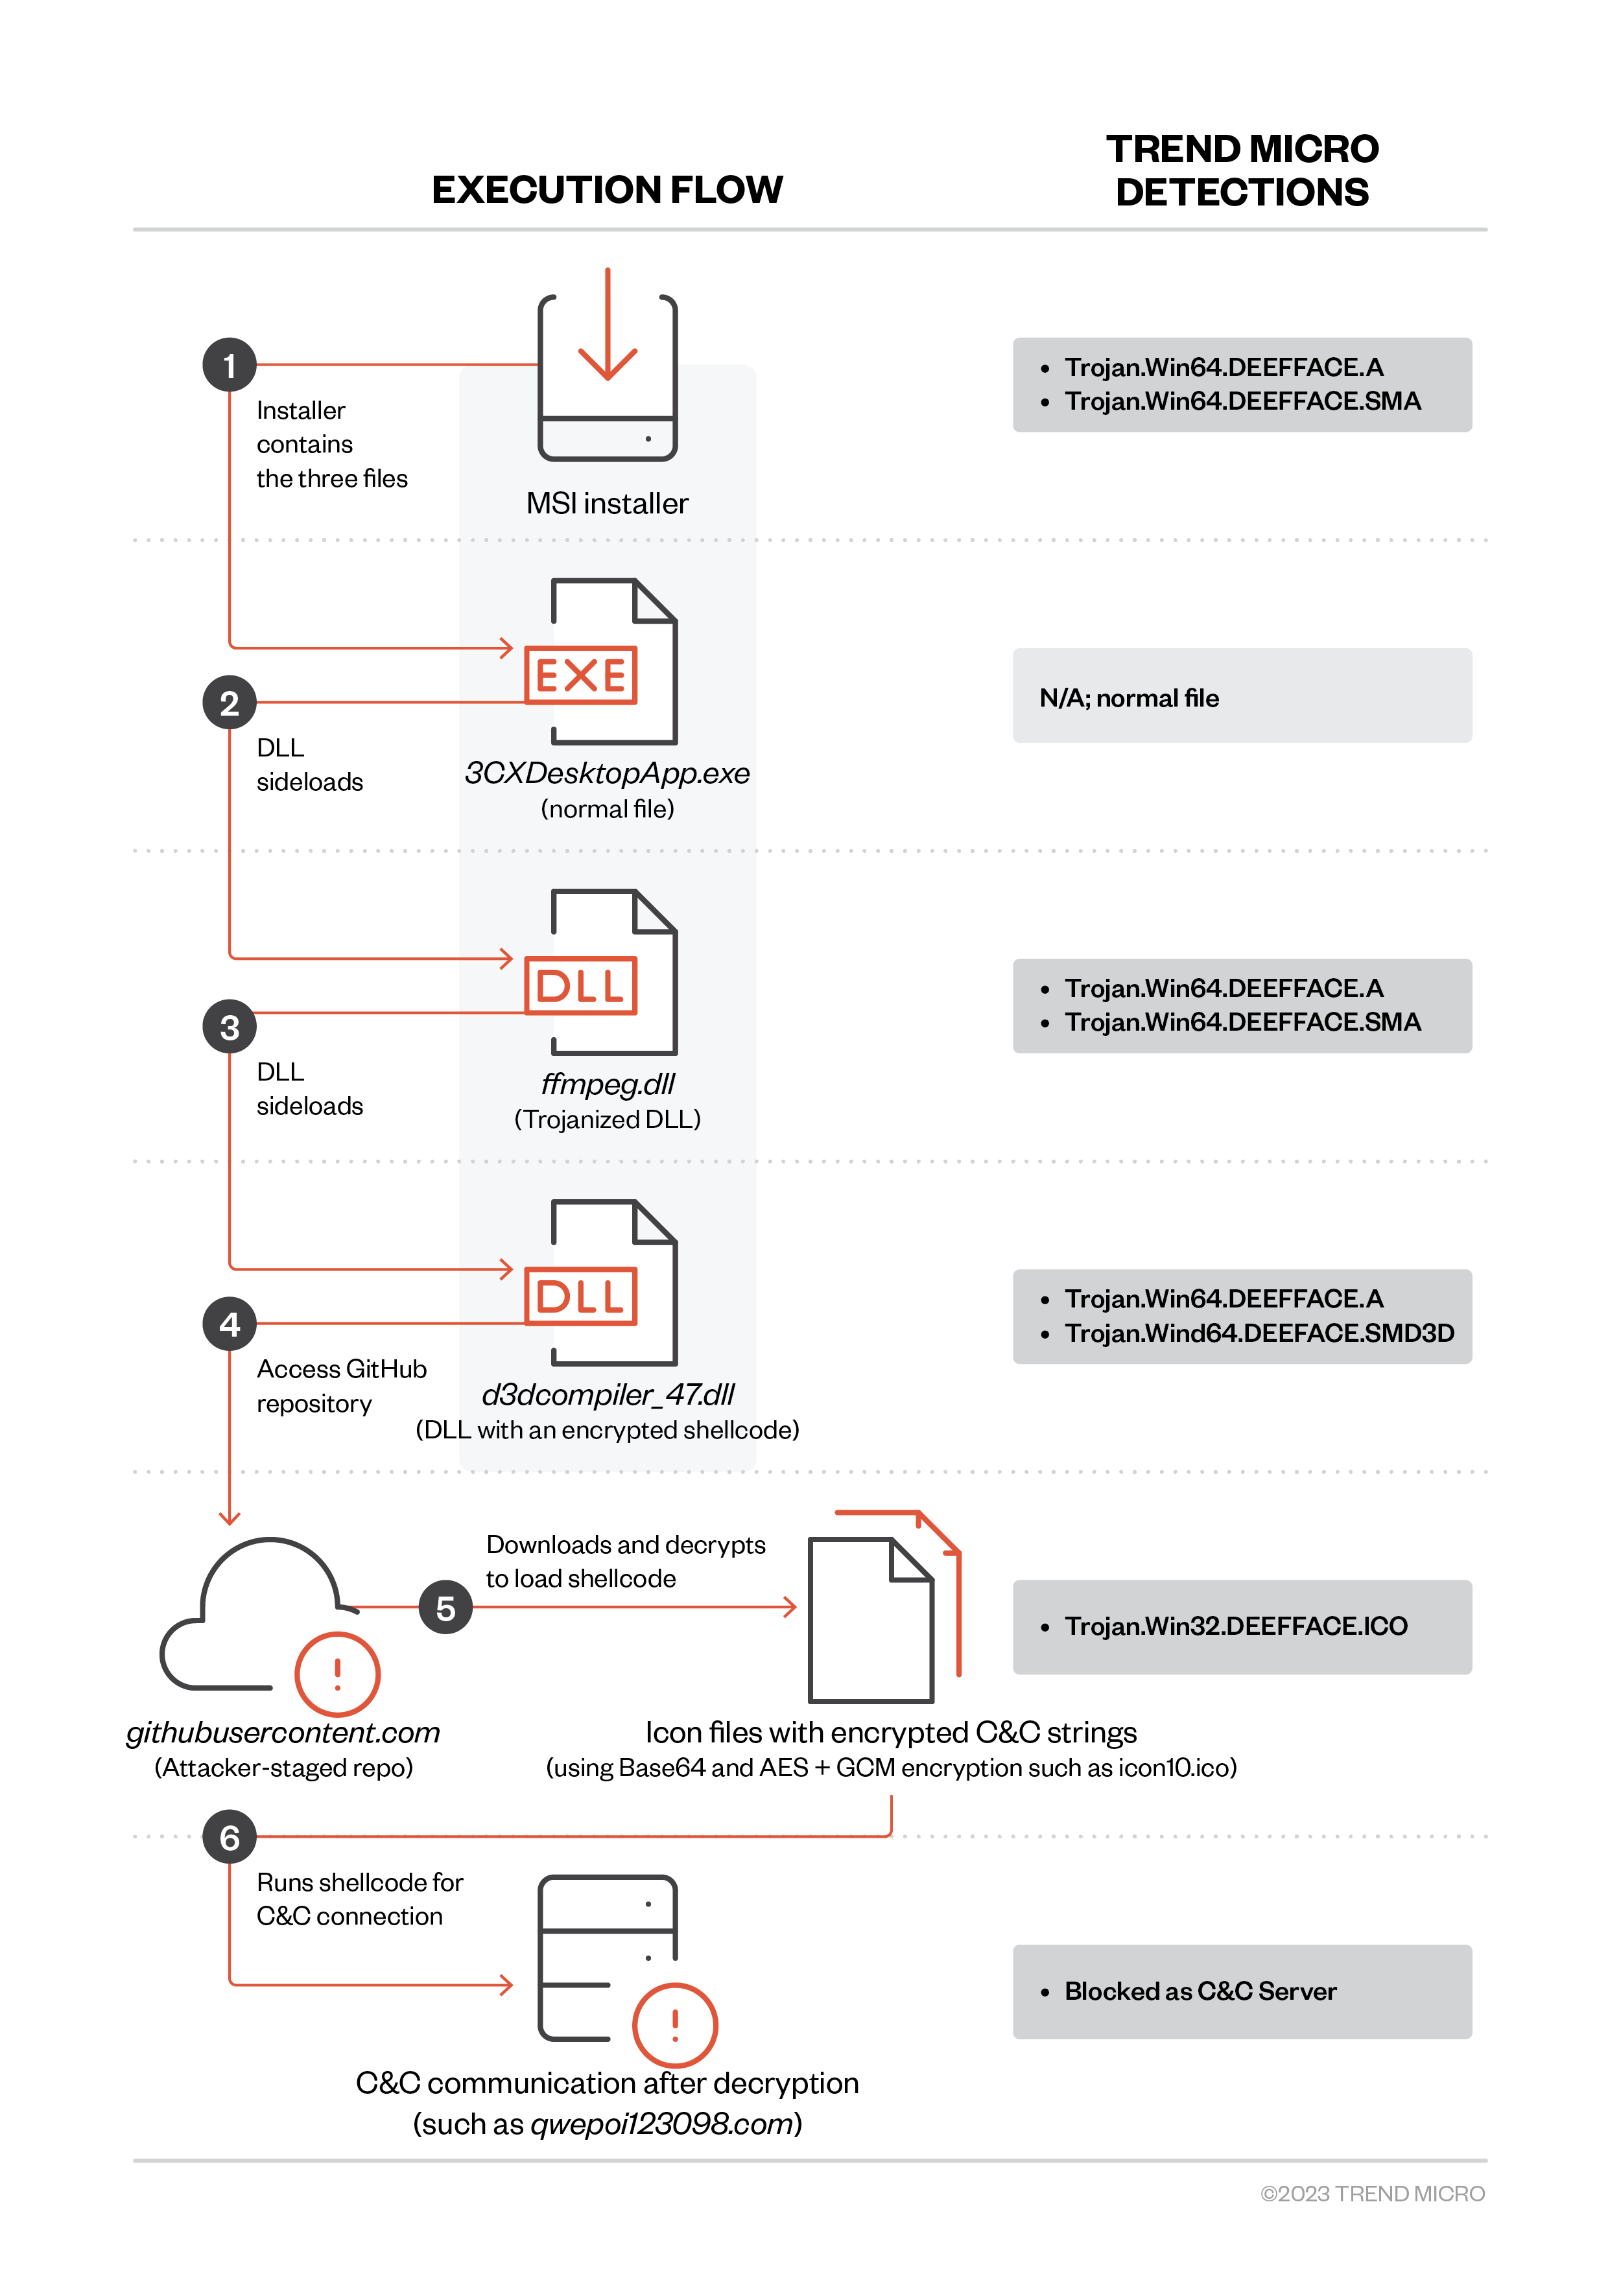
The attack is reportedly a multi-stage chain in which the initial step involves a compromised version of the 3CX desktop app. Based on initial analysis, the MSI package (detected by Trend Micro as Trojan.Win64.DEEFFACE.A and Trojan.Win64.DEEFFACE.SMA) is the one that is compromised with possible trojanized DLLs, since the .exe file has the same name.
The infection chain begins with 3CXDesktopApp.exe loading ffmpeg.dll (detected as Trojan.Win64.DEEFFACE.A andTrojan.Win64.DEEFFACE.SMA). Next, ffmpeg.dll reads and decrypts the encrypted code from d3dcompiler_47.dll (detected as Trojan.Win64.DEEFFACE.A and Trojan.Wind64.DEEFACE.SMD3D).
The decrypted code seems to be the backdoor payload that tries to access the IconStorages GiHub page to access an ICO file (detected as Trojan.Win32.DEEFFACE.ICO) containing the encrypted C&C server that the backdoor connects to in order to retrieve the possible final payload. In addition, d3dcompiler_47.dll also abuses CVE-2013-3900 to make it appear that it is legitimately signed.
Figure 1. The detailed execution flow and Trend Micro detections of the malicious files. The MSI installer contains the .exe and two .dll files. The main source of the detection in the MSI installer is “ffmpeg.dll,” which is the trojanized DLL.
As part of its attack routine, it contacts the servers noted in the list of indicators of compromise (IOCs) at the end of this blog entry. These domains are blocked by the Trend Micro Web Reputation Services (WRS).
Execution flow
Upon execution, the MSI package installer will drop the following files that are related to malicious behavior. Trend Micro Smart Scan Pattern (cloud-based) TBL 21474.300.40 can detect these files as Trojan.Win64.DEEFFACE.A.
3CXDesktopApp.exe: A normal file that is abused to load the trojanized DLL
ffmpeg.dll: A trojanized DLL used to read, load, and execute a malicious shellcode from d3dcompiler_47.dll
d3dcompiler_47.dll: A DLL appended with an encrypted shellcode after the fe ed fa ce hex string
Some conditions are necessary for execution. For example, the sleep timestamp varies depending on the following conditions: First, it checks if the manifest file is present, as well as if it is using a specified date. If the file is not present or if it is using the specified date, the timestamp will generate a random number and use the formula rand() % 1800000 + current date + 604800 (604,800 is seven days). After the date is computed, the malware will continue its routine.
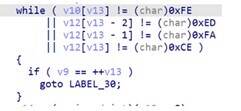
Upon execution of 3CXDesktopApp.exe, ffmpeg.dll, which seems to be a trojanized or patched DLL, will be loaded. It will still contain its normal functionalities, but it will have an added malicious function that reads d3dcompiler_47.dll to locate an encrypted shellcode after the fe ed fa ce hex strings.
Figure 2. Reading “d3dcompiler_47.dll” and locating the “fe ed fa ce” hex string
Upon decryption of the malicious shellcode using RC4 with the key, 3jB(2bsG#@c7, the shellcode will then try to access the GitHub repository that houses the ICO files containing the encrypted C&C strings that use Base64 encoding and AES + GCM encryption at the end of the image.
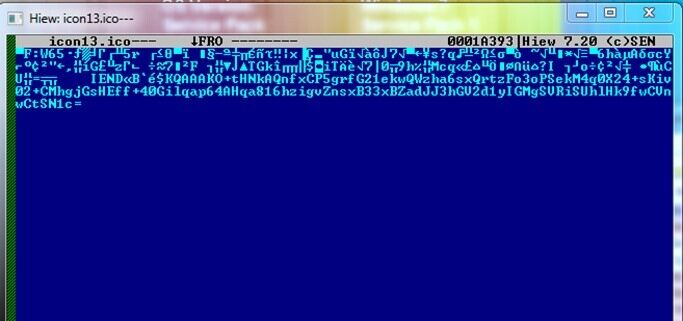
These B64 strings seem to be C&C domains that the shellcode tries to connect to for downloading other possible payloads. However, we were unable to confirm the exact nature of these payloads since the GitHub repository (raw.githubusercontent[.]com/IconStorages/images/main/) had already been taken down at the time of this writing. Note that the process exits when the page is inaccessible.
Figure 3. Code snippet showing the hard-coded GitHub repositoryFigure 4. An ICO file from the GitHub repository
The above description applies to the Windows version. The behaviour of the Mac version is broadly similar, although it only uses a subset of the Windows C&C domains.
Info-stealer payload analysis
Based on our ongoing analysis of attacks on 3CX and the behaviors observed, the following section details what we know so far about the payload’s attack vector.
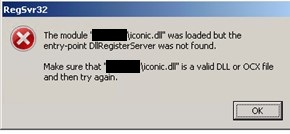
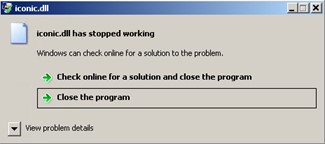
Payloads in investigated 3CX attacks are detected as TrojanSpy.Win64.ICONICSTEALER.THCCABC. Upon analysis of the payload named ICONIC Stealer, we discovered that if it is executed using regsvr32.exe as the DLL loader, it will display the following system error:
Figure 5. Error displayed upon executing the sample using “regsvr32.exe”
Meanwhile, if rundll32.exe is used as the DLL loader, it encounters a WerFault error and displays the following pop-up message:
Figure 6. Error displayed if “rundll32.exe” is used as the DLL loader
This indicates that the sample must be loaded by a specific application to proceed to its malicious routine.
ICONIC Stealer then checks for a file named config.json under the folder “3CXDesktopApp.”
Figure 7. Checking for “config.json”
ICONIC Stealer was then observed to steal the following system information:
HostName
DomainName
OsVersion
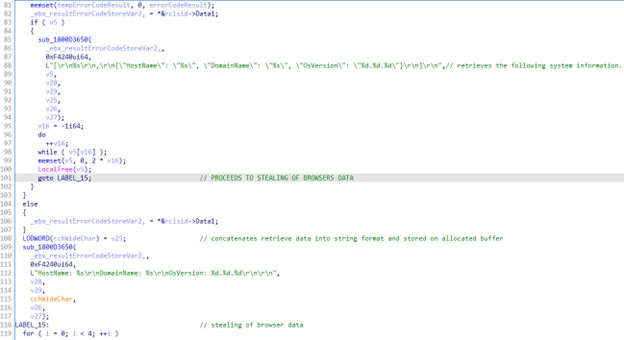
The gathered data will then be converted into a text-string format.
Figure 8. Converting gathered data into a text-string format
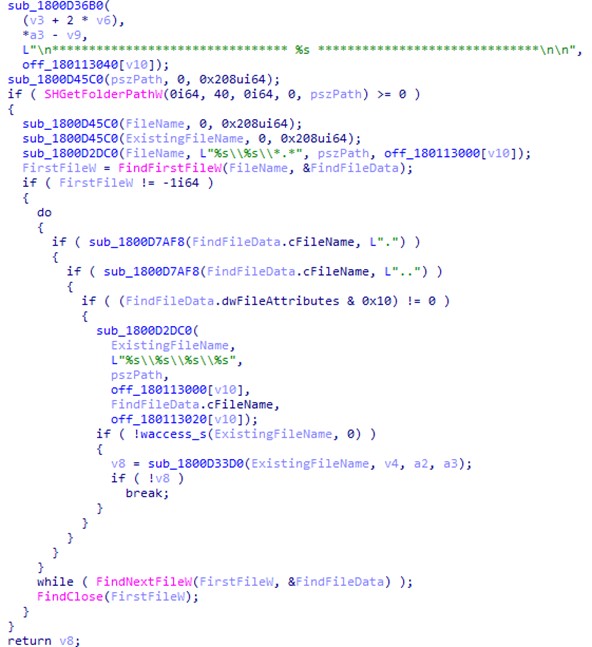
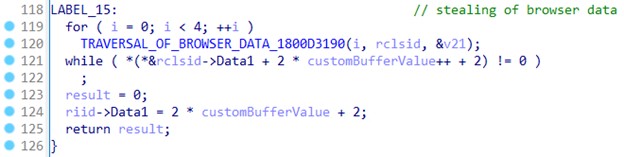
ICONIC Stealer then proceeds to its last behavior, which steals browser data. It uses the function shown in Figure 9 to traverse the infected system using predefined directories related to the browser’s history and other browser-related information.
Figure 9. Function for traversing the infected system
The following figure shows a list of predefined strings:
Figure 10. List of predefined strings
The system directories on the following list compose the targets identified in the partial analysis of the ICONIC Stealer’s behavior. More information will be provided as this blog is updated.
AppData\Local\Google\Chrome\User Data
AppData\Local\Microsoft\Edge\User Data
AppData\Local\BraveSoftware\Brave-Browser\User Data
AppData\Roaming\Mozilla\Firefox\Profiles
Browser
Target information
Chrome
History
Edge
History
Brave
History
Firefox
places.sqlite
Table 1. The targeted section of each browser. Note that “places.sqlite” stores the annotations, bookmarks, favorite icons, input history, keywords, and the browsing history of visited pages for Mozilla Firefox.
ICONIC Stealer was also found with the capability to limit the retrieved data to the first five hundred entries to ensure that the most recent browser activity is the data that is retrieved:
Figure 11. Limiting data to the first 500 entries
“UTF-16LE”, ‘SELECT url, title FROM urls ORDER BY id DESC LIMIT
“UTF-16LE”, ‘500’,0
“UTF-16LE”, ‘SELECT url, title FROM moz_places ORDER BY id DESC
“UTF-16LE”, ‘LIMIT 500’,0
Figure 12. Retrieved results stored on an allocated buffer
The gathered data will be passed to the main loader module to POST then back to the C&C server embedded in the main module.
What is its potential impact?
Due to its widespread use and its importance in an organization’s communication system, threat actors can cause major damage (for example, by monitoring or rerouting both internal and external communication) to businesses that use this software.
What can organizations do about it?
Organizations that are potentially affected should stop using the vulnerable version if possible and apply the patches or mitigation workarounds if these are available. IT and security teams should also scan for confirmed compromised binaries and builds and monitor for anomalous behavior in 3CX processes, with a particular focus on C&C traffic.
Meanwhile, enabling behavioral monitoring in security products can help detect the presence of the attack within the system.
The following domains are blocked by Trend Micro Web Reputation Services (WRS)
akamaicontainer[.]com
akamaitechcloudservices[.]com
azuredeploystore[.]com
azureonlinecloud[.]com
azureonlinestorage[.]com
dunamistrd[.]com
glcloudservice[.]com
journalide[.]org
msedgepackageinfo[.]com
msstorageazure[.]com
msstorageboxes[.]com
officeaddons[.]com
officestoragebox[.]com
pbxcloudeservices[.]com
pbxphonenetwork[.]com
pbxsources[.]com
qwepoi123098[.]com
sbmsa[.]wiki
sourceslabs[.]com
visualstudiofactory[.]com
zacharryblogs[.]com
Trend Micro XDR uses the following filters to protect customers from 3CX-related attacks:
Filter
ID
OS
Compromised 3CX Application File Indicators
F6669
macOS, Windows
DLL Sideloading of 3CX Application
F6668
Windows
Web Reputation Services Detection for Compromised 3CX Application
F6670
macOS, Windows
Suspicious Web Access of Possible Compromised 3CX Application
F6673
Windows
Suspicious DNS Query of Possible Compromised 3CX Application
F6672
Windows
Trend Micro Malware Detection Patterns for Endpoint, Servers (Apex One, Worry-Free Business Security Services, Worry-Free Business Security Standard/Advanced, Deep Security with anti-malware, among others), Mail, and Gateway (Cloud App Security, ScanMail for Exchange, IMSVA):
Starting with Trend Micro Smart Scan Pattern (cloud-based) TBL 21474.200.40, known trojanized versions of this application are being detected as Trojan Win64.DEEFFACE.A.
The Mac version of this threat is detected as Trojan.MacOS.FAKE3L3CTRON.A.
 Print
Print