Last updated: June 20, 2023
Robert Waters
Security Unified Endpoint Management DEX
Increases in attack surface size lead to increased cybersecurity risk. Thus, logically, decreases in attack surface size lead to decreased cybersecurity risk.
While some attack surface management solutions offer remediation capabilities that aid in this effort, remediation is reactive. As with all things related to security and risk management, being proactive is preferred.
The good news is that ASM solutions aren’t the only weapons security teams have in the attack surface fight. There are many steps an organization can take to lessen the exposure of its IT environment and preempt cyberattacks.
How do I reduce my organization’s attack surface?
Unfortunately for everyone but malicious actors, there’s no eliminating your entire attack surface, but the following best practice security controls detailed in this post will help you significantly shrink it:
- Reduce complexity
- Adopt a zero trust strategy for logical and physical access control
- Evolve to risk-based vulnerability management
- Implement network segmentation and microsegmentation
- Strengthen software and asset configurations
- Enforce policy compliance
- Train all employees on cybersecurity policies and best practices
- Improve digital employee experience (DEX)
As noted in our attack surface glossary entry, different attack vectors can technically fall under multiple types of attack surfaces — digital, physical and/or human. Similarly, many of the best practices in this post can help you reduce multiple types of attack surfaces.
For that reason, we have included a checklist along with each best practice that signifies which type(s) of attack surface a particular best practice primarily addresses.
#1: Reduce complexity
.
| Digital attack surface | Physical attack surface | Human attack surface |
| X | X |
.
Reduce your cybersecurity attack surface by reducing complexity. Seems obvious, right? And it is. However, many companies have long failed at this seemingly simple step. Not because it’s not obvious, but because it hasn’t always been easy to do.
Research from Randori and ESG reveals seven in 10 organizations were compromised by an unknown, unmanaged or poorly managed internet-facing asset over the past year. Cyber asset attack surface management (CAASM) solutions enable such organizations to identify all their assets — including those that are unauthorized and unmanaged — so they can be secured, managed or even removed from the enterprise network.
Any unused or unnecessary assets, from endpoint devices to network infrastructure, should also be removed from the network and properly discarded.
The code that makes up your software applications is another area where complexity contributes to the size of your attack surface. Work with your development team to identify where opportunities exist to minimize the amount of executed code exposed to malicious actors, which will thereby also reduce your attack surface.
#2: Adopt a zero trust strategy for logical and physical access control
.
| Digital attack surface | Physical attack surface | Human attack surface |
| X | X |
.
The National Institute of Standards and Technology (NIST) defines zero trust as follows:
“A collection of concepts and ideas designed to minimize uncertainty in enforcing accurate, least privilege per-request access decisions in information systems and services in the face of a network viewed as compromised.”
In other words, for every access request, “never trust, always verify.”
Learn how Ivanti can help you adopt the NIST CSF in The NIST Cybersecurity Framework (CSF): Mapping Ivanti’s Solutions to CSF Controls
Taking a zero trust approach to logical access control reduces your organization’s attack surface — and likelihood of data breaches — by continuously verifying posture and compliance and providing least-privileged access.
And while zero trust isn’t a product but a strategy, there are products that can help you implement a zero trust strategy. Chief among those products are those included in the secure access service edge (SASE) framework:
- Software-defined wide area network (SD-WAN)
- Secure web gateway (SWG)
- Cloud access security broker (CASB)
- Next-generation firewall (NGFW)
- Zero trust network access (ZTNA)
And though it’s not typically viewed in this manner, a zero trust strategy can extend beyond logical access control to physical access control. When it comes to allowing anyone into secure areas of your facilities, remember to never trust, always verify. Mechanisms like access cards and biometrics can be used for this purpose.
#3: Evolve to risk-based vulnerability management
.
| Digital attack surface | Physical attack surface | Human attack surface |
| X |
.
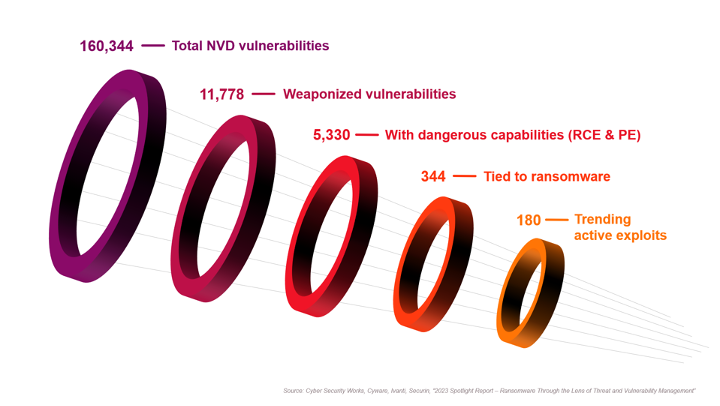
First, the bad news: the US National Vulnerability Database (US NVD) contains over 160,000 scored vulnerabilities and dozens more are added every day. Now, the good news: a vast majority of vulnerabilities have never been exploited, which means they can’t be used to perpetrate a cyberattack, which means they aren’t part of your attack surface.
In fact, a ransomware research report from Securin, Cyber Security Works (CSW), Ivanti and Cyware showed only 180 of those 160,000+ vulnerabilities were trending active exploits.
Comparison of total NVD vulnerabilities vs. those that endanger an organization
A legacy approach to vulnerability management reliant on stale and static risk scores from the Common Vulnerability Scoring System (CVSS) won’t accurately classify exploited vulnerabilities. And while the Cybersecurity & Infrastructure Security Agency Known Exploited Vulnerabilities (CISA KEV) Catalog is a step in the right direction, it’s incomplete and doesn’t account for the criticality of assets in an organization’s environment.
A true risk-based approach is needed. Risk-based vulnerability management (RBVM) — as its name suggests — is a cybersecurity strategy that prioritizes vulnerabilities for remediation based on the risk they pose to the organization.
Read The Ultimate Guide to Risk-Based Patch Management and discover how to evolve your remediation strategy to a risk-based approach.
RBVM tools ingest data from vulnerability scanners, penetration tests, threat intelligence tools and other security sources and use it to measure risk and prioritize remediation activities.
With the intelligence from their RBVM tool in hand, organizations can then go about reducing their attack surface by remediating the vulnerabilities that pose them the most risk. Most commonly, that involves patching exploited vulnerabilities on the infrastructure side and fixing vulnerable code in the application stack.
#4: Implement network segmentation and microsegmentation
.
| Digital attack surface | Physical attack surface | Human attack surface |
| X |
.
Once again, borrowing from the NIST glossary, network segmentation is defined as follows:
Splitting a network into sub-networks, for example, by creating separate areas on the network which are protected by firewalls configured to reject unnecessary traffic. Network segmentation minimizes the harm of malware and other threats by isolating it to a limited part of the network.
From this definition, you can see how segmenting can reduce your attack surface by blocking attackers from certain parts of your network. While traditional network segmentation stops those attackers from moving north-south at the network level, microsegmentation stops them from moving east-west at the workload level.
More specifically, microsegmentation goes beyond network segmentation and enforces policies on a more granular basis — for example, by application or device instead of by network.
For example, it can be used to implement restrictions so an IoT device can only communicate with its application server and no other IoT devices, or to prevent someone in one department from accessing any other department’s systems.
#5: Strengthen software and asset configurations
.
| Digital attack surface | Physical attack surface | Human attack surface |
| X |
.
Operating systems, applications and enterprise assets — such as servers and end user, network and IoT devices — typically come unconfigured or with default configurations that favor ease of deployment and use over security. According to CIS Critical Security Controls (CIS Controls) v8, the following can all be exploitable if left in their default state:
- Basic controls
- Open services and ports
- Default accounts or passwords
- Pre-configured Domain Name System (DNS) settings
- Older (vulnerable) protocols
- Pre-installation of unnecessary software
Clearly, such configurations increase the size of an attack surface. To remedy the situation, Control 4: Secure Configuration of Enterprise Assets and Software of CIS Controls v8 recommends developing and applying strong initial configurations, then continually managing and maintaining those configurations to avoid degrading security of software and assets.
Here are some free resources and tools your team can leverage to help with this effort:
- CIS Benchmarks List – Configuration recommendations for over 25 vendor product families
- NIST National Checklist Program (NCP) – Collection of checklists providing guidance on setting software security configurations
- CIS-CAT Lite — Assessment tool that helps users implement secure configurations for a range of technologies
#6: Enforce policy compliance
.
| Digital attack surface | Physical attack surface | Human attack surface |
| X | X |
.
It’s no secret that endpoints are a major contributor to the size of most attack surfaces — especially in the age of Everywhere Work when more employees are working in hybrid and remote roles than ever before. Seven in 10 government employees now work virtually at least part of the time.
It’s hard enough getting employees to follow IT and security policies when they’re inside the office, let alone when 70% of them are spread all over the globe.
Unified endpoint management (UEM) tools ensure universal policy compliance by automatically enforcing policies. This fact should come as no surprise to IT and security professionals, many of whom consider UEM a commodity at this point. In fact, Gartner predicts that 90% of its clients will manage most of their estate with cloud-based UEM tools by just 2025.
Nonetheless, UEM is the best option for enforcing IT and security policy compliance, so I’d be remiss to omit it from this list.
Read The Ultimate Guide to Unified Endpoint Management and learn about the key business benefits and endpoint security use cases for modern UEM solutions.
Additionally, beyond compliance, modern UEM tools offer several other capabilities that can help you identify, manage and reduce your attack surface:
- Have complete visibility into IT assets by discovering all devices on your network — a key ASM capability for organizations without a CAASM solution.
- Provision devices with the appropriate software and access permissions, then automatically update that software as needed — no user interactions required.
- Manage all types of devices across the entire lifecycle, from onboarding to retirement, to ensure they’reproperly discarded once no longer in use.
- Automatically enforce device configurations (refer to #5: Strengthen software and asset configurations to learn more about the importance of this capability).
- Support zero trust access and contextual authentication, vulnerability, policy, configuration and data management by integrating with identity, security and remote-access tools. For example, UEM and mobile threat defense (MTD) tools can integrate to enable you to enact risk-based policies to protect mobile devices from compromising the corporate network and its assets.
#7: Train all employees on cybersecurity policies and best practices
.
| Digital attack surface | Physical attack surface | Human attack surface |
| X |
.
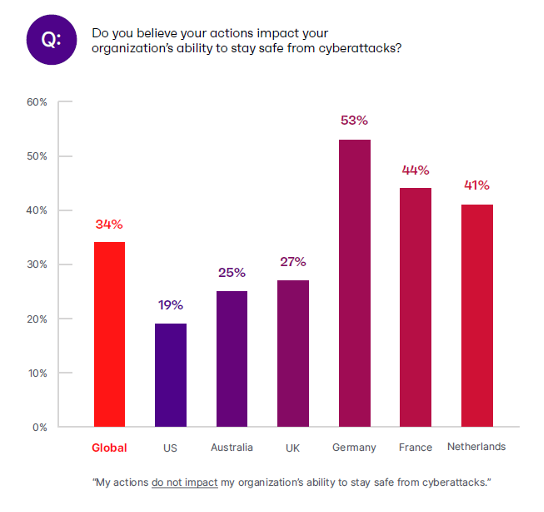
Seventy-four percent of breaches analyzed for the 2023 Verizon Data Breaches Investigation Report (DBIR) involved a human element.
Thus, it should come as no surprise when you review the data from Ivanti’s 2023 Government Cybersecurity Status Report and see the percentages of employees around the world that don’t believe their actions have any impact on their organization’s ability to avert cyberattacks:
Do employees think their own actions matter?
In the immortal words of Alexander Pope: “To err is human…” In cybersecurity terms: until AI officially takes over, humans will remain a significant part of your attack surface. And until then, human attack surfaces must be managed and reduced wherever possible.
Thus far, the best way to do that’s proven to be cybersecurity training, both on general best practices and company-specific policies — and definitely don’t forget to include a social engineering module.
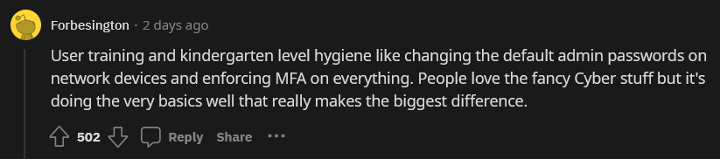
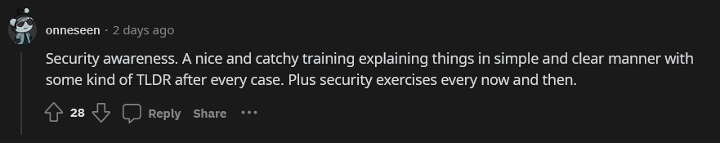
Many cybersecurity practitioners agree. When the question “In your experience, what security measure has been the most successful in preventing cyberattacks and data breaches?” was posed in Reddit’s r/cybersecurity subreddit, many of the top comments referenced the need for user education:


To once again borrow from CIS Controls v8, Control 14: Security Awareness and Skills Training encourages organizations to do the following: “Establish and maintain a security awareness program to influence behavior among the workforce to be security conscious and properly skilled to reduce cybersecurity risks to the enterprise.”
CIS — the Center for Internet Security — also recommends leveraging the following resources to help build a security awareness program:
- NIST® Special Publication (SP) 800-50 Infosec Awareness Training
- National Cyber Security Centre (NCSC) – 10 Steps to Cyber Security – Engagement and training
- EDUCAUSE – Awareness Campaigns
- National Cyber Security Alliance (NCSA)
- SANS Security Awareness Training Resources
Security and IT staff — not just those in non-technical roles — should also be receiving cybersecurity training relevant to their roles. In fact, according to the IT and security decision-makers surveyed by Randori and ESG for their 2022 report on The State of Attack Surface Management, providing security and IT staff with more ASM training would be the third most-effective way to improve ASM.
Ensuring partners, vendors and other third-party contractors take security training as well can also help contain your human attack surface.
#8: Improve digital employee experience (DEX)
.
| Digital attack surface | Physical attack surface | Human attack surface |
| X | X |
.
No matter how much cybersecurity training you provide employees, the more complex and convoluted security measures become, the more likely they are to bypass them. Sixty-nine percent of end users report struggling to navigate overly convoluted and complex security measures. Such dissatisfied users are prone to distribute data over unsecured channels, prevent the installation of security updates and deploy shadow IT.
That seems to leave IT leaders with an impossible choice: improve digital employee experience (DEX) at the cost of security or prioritize security over experience? The truth is, security and DEX are equally important to an organization’s success and resilience. In fact, according to research from Enterprise Management Associates (EMA), reducing security friction leads to far fewer breach events.
So what do you do? Ivanti’s 2022 Digital Employee Experience Report indicates IT leaders — with support from the C-suite — need to put their efforts toward providing a secure-by-design digital employee experience. While that once may have seemed like an impossible task, it’s now easier than ever thanks to an emerging market for DEX tools that help you measure and continuously improve employees’ technology experience.
Read the 2022 Digital Employee Experience Report to learn more about the role DEX plays in cybersecurity.
One area in which organizations can easily improve both security and employee experience is authentication. Annoying and inefficient to remember, enter and reset, passwords have long been the bane of end users.
On top of that, they’re extremely unsecure. Roughly half of the 4,291 data breaches not involving internal malicious activity analyzed for the 2023 Verizon DBIR were enabled through credentials — about four times the amount enabled by phishing — making them by far the most popular path into an organization’s IT estate.
Passwordless authentication software solves this problem. If you’d like to improve end user experience and reduce your attack surface in one fell swoop, deploy a passwordless authentication solution that uses FIDO2 authentication protocols. Both you and your users will rejoice when you can say goodbye to passwords written on Post-it Notes forever.
For more guidance on how to balance security with DEX, refer to the following resources:
- Getting Started with DEX eBook
- Gartner® Market Guide for DEX
- Effective Solutions for Digital Experience Management (DEX)
- Evolving Requirements for Digital Experience Management (DEX)
- A step‑by‑step guide to planning and measuring digital employee experience (DEX) on-demand webinar
- Building a business case for a digital employee experience (DEX) initiative on-demand webinar
Additional guidance from free resources
Ivanti’s suggested best practices for reducing your attack surface combine learnings from our firsthand experience plus secondhand knowledge gleaned from authoritative resources.
And while these best practices will indeed greatly diminish the size of your attack surface, there’s no shortage of other steps an organization could take to combat the ever-expanding size and complexity of modern attack surfaces.
Check out the following free resources — some of which were referenced above — for additional guidance on shrinking your attack surface:
- 2023 Cyberstrategy Tool Kit for Internal Buy-In from Ivanti in collaboration with Cyber Security Works (CSW)
- Australian Cyber Security Center (ACSC) Essential 8
- CIS Controls
- CISA Cyber Security Evaluation Tool (CSET)
- Ivanti Government Cybersecurity Status Report
- NIS2 (Directive (EU) 2022/2555)
- NIST Cybersecurity Framework (CSF)
- NIST Special Publication 800–207 – Zero Trust Architecture
Next steps
So, you’ve implemented all the best practices above and you’re wondering what’s next. As with all things cybersecurity, there’s no time for standing still. Attack surfaces require constant monitoring.
You never know when the next unmanaged BYOD device will connect to your network, the next vulnerability in your CRM software will be exploited or the next employee will forget their iPhone at the bar after a team happy hour.
On top of tracking existing attack vectors, you also need to stay informed about emerging ones. For example, the recent explosion of AI models is driving substantial attack surface growth, and it’s safe to say more technologies that open the door to your IT environment are on the horizon. Stay vigilant.
About Robert Waters
Robert Waters is the Lead Product Marketing Manager for endpoint security at Ivanti. His 15 years of marketing experience in the technology industry include an early stint at a Fortune 1000 telecommunications company and a decade at a network monitoring and managed services firm.
Robert joined Ivanti in November of 2022 and now oversees all things risk-based vulnerability management and patch management.
Source :
https://www.ivanti.com/blog/the-8-best-practices-for-reducing-your-organization-s-attack-surface