OT Security is Less Mature but Progressing Rapidly

By: Kazuhisa Tagaya – Trendmicro
August 14, 2023
Read time: 2 min (638 words)

The latest study said that OT security is less mature in several capabilities than IT security, but most organizations are improving it.

e asked participants whether OT security for cybersecurity capabilities is less mature or more mature than IT in their organizations with reference to the NIST CSF.

As an average of all items, 39.5% answered that OT has a lower level of maturity. (18% answered OT security is more mature, and 36.4% at the same level)

Categorizing security capabilities into the five cores of the NIST CSF and aggregating them for each core, the most was that Detect is lower maturity in OT security than in IT. (42%)

figure1
Figure1: What security capabilities in OT are lower than IT (NIST CSF 5 Core)

Furthermore, looking at the specific security capabilities, the score of “Cyber event detection” is the most(45.7%).

figure2
Figure2: What security capabilities in OT are lower than IT (detail)

The OT environment has more diverse legacy assets, and protocol stacks dedicated to ICS/OT, making it difficult to implement sensors to detect malicious behavior or apply the patches on the assets. The inability to implement uniform measures in the same way as IT security is an obstacle to increasing the maturity level.

Detection in OT: Endpoint and Network

The survey asked respondents about their Endpoint Detection and Response (EDR) and Network Security Monitoring (NSM) implementations to measure their visibility in their OT environments. They answered whether EDR (including antivirus) was implemented in the following three places.

  • Server assets running commercial OS (Windows, Linux, Unix): 41%
  • Engineering (engineering workstations, instrumentation laptops, calibration and test equipment) assets running commercial OS (Windows, Unix, Linux): 34%
  • Operator assets (HMI, workstations) running commercial OS (Windows, Linux, Unix): 33% 

In addition, 76% of organizations that have already deployed EDR said they plan to expand their deployment within 24 months.

figure3
Figure3: EDR deployment

We also asked whether NSM (including IDS) was implemented at the following levels referring to the Purdue model.

  • Purdue Level 4 (Enterprise): 30%
  • Purdue Level 3.5 (DMZ): 36%
  • Purdue Level 3 (Site or SCADA-wide): 38%
  • Purdue Level 2 (Control): 20%
  • Purdue Levels 1/0 (Sensors and Actuators): 8%

Like EDR, 70% of organizations that have already implemented NSM said they have plans to expand implementation within 24 months.

figure4
Figure4: NSM deployment

In this survey, EDR implementation rates tended to vary depending on the respondent’s industry and size of organization. The implementation rate of NSM was relatively high in DMZ and Level 3, and the implementation rate decreased according to the lower layers. But I think it is not appropriate to conclude the decisive trend from the average value in the questions, because there are variations in the places where they are implemented EDR and NSM depending on the organization. The implementation rate shown here is just a rough standard. Where and how much to invest depends on the environment and decision-making of the organization. Asset owners can use the result as a reference to see where to implement EDR and NSM and evaluate their implementation plans.

To learn about how to assess risk in your OT environment to invest appropriately, please refer to our practices of risk assessment in smart factories.

Reference:
Breaking IT/OT Silos with ICS/OT Visibility – 2023 SANS ICS/OT visibility survey

Source :
https://www.trendmicro.com/en_us/research/23/h/ot-security-2023.html

Top 10 AI Security Risks According to OWASP

By: Trend Micro
August 15, 2023
Read time: 4 min (1157 words)

The unveiling of the first-ever Open Worldwide Application Security Project (OWASP) risk list for large language model AI chatbots was yet another sign of generative AI’s rush into the mainstream—and a crucial step toward protecting enterprises from AI-related threats.

For more than 20 years, the Open Worldwide Application Security Project (OWASP) top 10 risk list has been a go-to reference in the fight to make software more secure. So it’s no surprise developers and cybersecurity professionals paid close attention earlier this spring when OWASP published an all-new list focused on large language model AI vulnerabilities.

OWASP’s move is yet more proof of how quickly AI chatbots have swept into the mainstream. Nearly half (48%) of corporate respondents to one survey said that by February 2023 they had already replaced workers with ChatGPT—just three months after its public launch. With many observers expressing concern that AI adoption has rushed ahead without understanding of the risks involved, the OWASP top 10 AI risk list is both timely and essential.

Large language model vulnerabilities at a glance

OWASP has released two draft versions of its AI vulnerability list so far: one in May 2023 and a July 1 update with refined classifications and definitions, examples, scenarios, and links to additional references. The most recent is labeled ‘version 0.5’, and a formal version 1 is reported to be in the works.

We did some analysis and found the vulnerabilities identified by OWASP fall broadly into three categories:

  1. Access risks associated with exploited privileges and unauthorized actions.
  2. Data risks such as data manipulation or loss of services.
  3. Reputational and business risks resulting from bad AI outputs or actions.

In this blog, we take a closer look at the specific risks in each case and offer some suggestions about how to handle them.

1. Access risks

Of the 10 vulnerabilities listed by OWASP, four are specific to access and misuse of privileges: insecure plugins, insecure output handling, permissions issues, and excessive agency.

According to OWASP, any large language model that uses insecure plugins to receive “free-form text” inputs could be exposed to malicious requests, resulting in unwanted behaviors or the execution of unauthorized remote code. On the flipside, plugins or applications that handle large language model outputs insecurely—without evaluating them—could be susceptible to cross-site and server-side request forgeries, unauthorized privilege escalations, hijack attacks, and more.

Similarly, when authorizations aren’t tracked between plugins, permissions issues can arise that open the way for indirect prompt injections or malicious plugin usage.

Finally, because AI chatbots are ‘actors’ able to make and implement decisions, it matters how much free reign (i.e., agency) they’re given. As OWASP explains, “When LLMs interface with other systems, unrestricted agency may lead to undesirable operations and actions.” Examples include personal mail reader assistants being exploited to propagate spam or customer service AI chatbots manipulated into issuing undeserved refunds.

In all of these cases, the large language model becomes a conduit for bad actors to infiltrate systems.

2. Data risks

Poisoned training data, supply chain vulnerabilities, prompt injection vulnerabilities and denials of serviceare all data-specific AI risks.

Data can be poisoned deliberately by bad actors who want to harm an organization. It can also be distorted inadvertently when an AI system learns from unreliable or unvetted sources. Both types of poisoning can occur within an active AI chatbot application or emerge from the large language model supply chain, where reliance on pre-trained models, crowdsourced data, and insecure plugin extensions may produce biased data outputs, security breaches, or system failures.

With prompt injections, ill-meaning inputs may cause a large language model AI chatbot to expose data that should be kept private or perform other actions that lead to data compromises.

AI denial of service attacks are similar to classic DOS attacks. They may aim to overwhelm a large language model and deprive users of access to data and apps, or—because many AI chatbots rely on pay-as-you-go IT infrastructure—force the system to consume excessive resources and rack up massive costs.

3. Reputational and business risks

The final OWASP vulnerability (according to our buckets) is already reaping consequences around the world today:overreliance on AI. There’s no shortage of stories about large language models generating false or inappropriate outputs from fabricated citations and legal precedents to racist and sexist language.

OWASP points out that depending on AI chatbots without proper oversight can make organizations vulnerable to publishing misinformation or offensive content that results in reputational damage or even legal action.
Given all these various risks, the question becomes, “What can we do about it?” Fortunately, there are some protective steps organizations can take. 

What enterprises can do about large language model vulnerabilities

From our perspective at Trend Micro, defending against AI access risks requires a zero-trust security stance with disciplined separation of systems (sandboxing). Even though generative AI has the ability to challenge zero-trust defenses in ways that other IT systems don’t—because it can mimic trusted entities—a zero-trust posture still adds checks and balances that make it easier to identify and contain unwanted activity. OWASP also advises that large language models “should not self-police” and calls for controls to be embedded in application programming interfaces (APIs).

Sandboxing is also key to protecting data privacy and integrity: keeping confidential information fully separated from shareable data and making it inaccessible to AI chatbots and other public-facing systems. (See our recent blog on AI cybersecurity policies for more.)

Good separation of data prevents large language models from including private or personally identifiable information in public outputs, and from being publicly prompted to interact with secure applications such as payment systems in inappropriate ways.

On the reputational front, the simplest remedies are to not rely solely on AI-generated content or code, and to never publish or use AI outputs without first verifying they are true, accurate, and reliable.

Many of these defensive measures can—and should—be embedded in corporate policies. Once an appropriate policy foundation is in place, security technologies such as endpoint detection and response (EDR), extended detection and response (XDR), and security information and event management (SIEM) can be used for enforcement and to monitor for potentially harmful activity.

Large language model AI chatbots are here to stay

OWASP’s initial work cataloguing AI risks proves that concerns about the rush to embrace AI are well justified. At the same time, AI clearly isn’t going anywhere, so understanding the risks and taking responsible steps to mitigate them is critically important.

Setting up the right policies to manage AI use and implementing those policies with the help of cybersecurity solutions is a good first step. So is staying informed. The way we see it at Trend Micro, OWASP’s top 10 AI risk list is bound to become as much of an annual must-read as its original application security list has been since 2003.

Next steps

For more Trend Micro thought leadership on AI chatbot security, check out these resources:

Source :
https://www.trendmicro.com/en_us/research/23/h/top-ai-risks.html

An Overview of the New Rhysida Ransomware Targeting the Healthcare Sector

By: Trend Micro Research
August 09, 2023
Read time: 7 min (1966 words)

Updated on August 9, 2023, 9:30 a.m. EDT: We updated the entry to include an analysis of current Rhysida ransomware samples’ encryption routine.  
Updated on August 14, 2023, 6:00 a.m. EDT: We updated the entry to include Trend XDR workbench alerts for Rhysida and its components.

Introduction

On August 4, 2023, the HHS’ Health Sector Cybersecurity Coordination Center (HC3) released a security alert about a relatively new ransomware called Rhysida (detected as Ransom.PS1.RHYSIDA.SM), which has been active since May 2023. In this blog entry, we will provide details on Rhysida, including its targets and what we know about its infection chain.

Who is behind the Rhysida ransomware?

Not much is currently known about the threat actors behind Rhysida in terms of origin or affiliations. According to the HC3 alert, Rhysida poses itself as a “cybersecurity team” that offers to assist victims in finding security weaknesses within their networks and system. In fact, the group’s first appearance involved the use of a victim chat support portal.

Who are Rhysida’s targets?

As mentioned earlier, Rhysida, which was previously known for targeting the education, government, manufacturing, and tech industries, among others — has begun conducting attacks on healthcare and public health organizations. The healthcare industry has seen an increasing number of ransomware attacks over the past five years.  This includes a recent incident involving Prospect Medical Holdings, a California-based healthcare system, that occurred in early August (although the group behind the attack has yet to be named as of writing).

Data from Trend Micro™ Smart Protection Network™ (SPN) shows a similar trend, where detections from May to August 2023 show that its operators are targeting multiple industries rather than focusing on just a single sector.

The threat actor also targets organizations around the world, with SPN data showing several countries where Rhysida binaries were detected, including Indonesia, Germany, and the United States.

Figure 1. The industry and country detection count for Rhysida ransomware based on Trend SPN data from May to August 2023

How does a Rhysida attack proceed?

Figure 2. The Rhysida ransomware infection chain

Rhysida ransomware usually arrives on a victim’s machine via phishing lures, after which Cobalt Strike is used for lateral movement within the system.

Additionally, our telemetry shows that the threat actors execute PsExec to deploy PowerShell scripts and the Rhysida ransomware payload itself. The PowerShell script (g.ps1), detected as Trojan.PS1.SILENTKILL.A, is used by the threat actors to terminate antivirus-related processes and services, delete shadow copies, modify remote desktop protocol (RDP) configurations, and change the active directory (AD) password.

Interestingly, it appears that the script (g.ps1) was updated by the threat actors during execution, eventually leading us to a PowerShell version of the Rhysida ransomware.

Rhysida ransomware employs a 4096-bit RSA key and AES-CTR for file encryption, which we discuss in detail in a succeeding section. After successful encryption, it appends the .rhysida extension and drops the ransom note CriticalBreachDetected.pdf.

This ransom note is fairly unusual — instead of an outright ransom demand as seen in most ransom notes from other ransomware families, the Rhysida ransom note is presented as an alert from the Rhysida “cybersecurity team” notifying victims that their system has been compromised and their files encrypted. The ransom demand comes in the form of a “unique key” designed to restore encrypted files, which must be paid for by the victim.

Summary of malware and tools used by Rhysida

  • Malware: RHYSIDA, SILENTKILL, Cobalt Strike
  • Tools: PsExec
Initial AccessPhishingBased on external reports, Rhysida uses phishing lures for initial access
Lateral MovementPsExecMicrosoft tool used for remote execution
Cobalt Strike3rd party tool abused for lateral movement
Defense EvasionSILENTKILLMalware deployed to terminate security-related processes and services, delete shadow copies, modify RDP configurations, and change the AD password
ImpactRhysida ransomwareRansomware encryption
Table 1. A summary of the malware, tools, and exploits used by Rhysida

A closer look at Rhysida’s encryption routine 
After analyzing current Rhysida samples, we observed that the ransomware uses LibTomCrypt, an open-source cryptographic library, to implement its encryption routine. Figure 3 shows the procedures Rhysida follows when initializing its encryption parameters. 

Figure 3. Rhysida’s parameters for encryption

Rhysida uses LibTomCrypt’s pseudorandom number generator (PRNG) functionalities for key and initialization vector (IV) generation. The init_prng function is used to initialize PRNG functionalities as shown in Figure 4. The same screenshot also shows how the ransomware uses the library’s ChaCha20 PRNG functionality.

rhysida_fig4
Figure 4. Rhysida’s use of the “init_prng” function

After the PRNG is initialized, Rhysida then proceeds to import the embedded RSA key and declares the encryption algorithm it will use for file encryption:

  •  
  • It will use the register_cipher function to “register” the algorithm (in this case, aes), to its table of usable ciphers.
  •  
  • It will use the find_cipher function to store the algorithm to be used (still aes), in the variable CIPHER.

Afterward, it will proceed to also register and declare aes for its Cipher Hash Construction (CHC) functionalities. 

Based on our analysis, Rhysida’s encryption routine follows these steps:

  1. After it reads file contents for encryption, it will use the initialized PRNG’s function, chacha20_prng_read, to generate both a key and an IV that are unique for each file.
  2. It will use the ctr_start function to initialize the cipher that will be used, which is aes (from the variable CIPHER), in counter or CTR mode.
  3. The generated key and IV are then encrypted with the rsa_encrypt_key_ex function.
  4. Once the key and IV are encrypted, Rhysida will proceed to encrypt the file using LibTomCrypt’s ctr_encrypt function.
Figure 5. Rhysida’s encryption routine

Unfortunately, since each encrypted file has a unique key and IV — and only the attackers have a copy of the associated private key — decryption is currently not feasible.

How can organizations protect themselves from Rhysida and other ransomware families?

Although we are still in the process of fully analyzing Rhysida ransomware and its tools, tactics, and procedures (TTPs), the best practices for defending against ransomware attacks still holds true for Rhysida and other ransomware families.

Here are several recommended measures that organizations implement to safeguard their systems from ransomware attacks:

  • Create an inventory of assets and data
  • Review event and incident logs
  • Manage hardware and software configurations.
  • Grant administrative privileges and access only when relevant to an employee’s role and responsibilities.
  • Enforce security configurations on network infrastructure devices like firewalls and routers.
  • Establish a software whitelist permitting only legitimate applications
  • Perform routine vulnerability assessments
  • Apply patches or virtual patches for operating systems and applications
  • Keep software and applications up to date using their latest versions
  • Integrate data protection, backup, and recovery protocols
  • Enable multifactor authentication (MFA) mechanisms
  • Utilize sandbox analysis to intercept malicious emails
  • Regularly educate and evaluate employees’ security aptitude
  • Deploy security tools (such as XDR) which are capable of detecting abuse of legitimate applications

Indicators of compromise

Hashes

The indicators of compromise for this entry can be found here.

MITRE ATT&CK Matrix

Initial AccessT1566 PhishingBased on external reports, Rhysida uses phishing lures for initial access.
ExecutionT1059.003 Command and Scripting Interpreter: Windows Command ShellIt uses cmd.exe to execute commands for execution.
T1059.001 Command and Scripting Interpreter: PowerShellIt uses PowerShell to create scheduled task named Rhsd pointing to the ransomware.
PersistenceT1053.005 Scheduled Task/Job: Scheduled TaskWhen executed with the argument -S, it will create a scheduled task named Rhsd that will execute the ransomware
Defense EvasionT1070.004 Indicator Removal: File DeletionRhysida ransomware deletes itself after execution. The scheduled task (Rhsd) created would also be deleted after execution.
T1070.001 Indicator Removal: Clear Windows Event LogsIt uses wevtutil.exe to clear Windows event logs.
DiscoveryT1083 File and Directory DiscoveryIt enumerates and looks for files to encrypt in all local drives.
T1082 System Information DiscoveryObtains the following information:Number of processorsSystem information
ImpactT1490 Inhibit System RecoveryIt executes uses vssadmin to remove volume shadow copies
T1486 Data Encrypted for ImpactIt uses a 4096-bit RSA key and Cha-cha20 for file encryption.It avoids encrypting files with the following strings in their file name:.bat.bin.cab.cmd.com.cur.diagcab.diagcfg.diagpkg.drv.dll.exe.hlp.hta.ico.msi.ocx.ps1.psm1.scr.sys.ini.Thumbs.db.url.isoIt avoids encrypting files found in the following folders:$Recycle.BinBootDocuments and SettingsPerfLogsProgramDataRecoverySystem Volume InformationWindows$RECYCLE.BINApzDataIt appends the following extension to the file name of the encrypted files:.rhysidaIt encrypts all system drives from A to Z.It drops the following ransom note:{Encrypted Directory}\CriticalBreachDetected.pdf
T1491.001 Defacement: Internal DefacementIt changes the desktop wallpaper after encryption and prevents the user from changing it back by modifying the NoChangingWallpaper registry value.

Trend Micro Solutions

Trend solutions such as Apex One Deep Security,  Cloud One Workload SecurityWorry-Free Business Security,  Deep Discovery Web InspectorTitanium Internet Security, and Cloud Edge can help protect against attacks employed by the Rhysida ransomware.

The following solutions protect Trend customers from Rhysida attacks:

Trend Micro solutionsDetection Patterns / Policies / Rules
Trend Micro Apex OneTrend Micro Deep SecurityTrend Micro Titanium Internet SecurityTrend Micro Cloud One Workload Security Trend Micro Worry-Free Business Security ServicesRansom.Win64.RHYSIDA.SMRansom.Win64.RHYSIDA.THEBBBCRansom.Win64.RHYSIDA.THFOHBCTrojan.PS1.SILENTKILL.SMAJCTrojan.PS1.SILENTKILL.A
Trend Micro Apex OneTrend Micro Deep SecurityTrend Micro Worry-Free Business Security ServicesTrend Micro Titanium Internet Security
 
RAN4056TRAN4052T
Trend Micro Apex OneTrend Micro Deep Discovery Web InspectorDDI Rule ID: 597 – “PsExec tool detected”DDI Rule ID: 1847 – “PsExec tool detected – Class 2″DDI Rule ID: 4524 – “Possible Renamed PSEXEC Service – SMB2 (Request)”DDI Rule ID: 4466 – “PsExec Clones – SMB2 (Request)”DDI Rule ID: 4571 – “Possible Suspicious Named Pipe – SMB2 (REQUEST)”DDI Rule ID: 4570 – “COBALTSTRIKE – DNS(RESPONSE)”DDI Rule ID: 4152 – “COBALTSTRIKE – HTTP (Response)”DDI Rule ID: 4469 – “APT – COBALTSRIKE – HTTP (RESPONSE)”DDI Rule ID: 4594 – “COBALTSTRIKE – HTTP(REQUEST) – Variant 3″DDI Rule ID: 4153 – “COBALTSTRIKE – HTTP (Request) – Variant 2″DDI Rule ID: 2341 – “COBALTSTRIKE – HTTP (Request)”DDI Rule ID: 4390 – “CobaltStrike – HTTPS (Request)”DDI Rule ID: 4870 – “COBEACON DEFAULT NAMED PIPE – SMB2 (Request)”DDI Rule ID: 4861 – “COBEACON – DNS (Response) – Variant 3″DDI Rule ID: 4860 – “COBEACON – DNS (Response) – Variant 2″DDI Rule ID: 4391 – “COBEACON – DNS (Response)”
Trend Micro Apex OneTrend Micro Deep Security Trend Micro Worry-Free Business Security ServicesTrend Micro Titanium Internet SecurityTrend Micro Cloud EdgeTroj.Win32.TRX.XXPE50FFF071

Trend Micro XDR uses the following workbench alerts to protect customers from Rhysida-related attacks:

Cobalt Strike

Workbench AlertID
Anomalous Regsvr32 Execution Leading to Cobalt Strike63758d9f-4405-4ec5-b421-64aef7c85dca
COBALT C2 Connectionafd1fa1f-b8fc-4979-8bf7-136db80aa264
Early Indicator of Attack via Cobalt Strike0ddda3c1-dd25-4975-a4ab-b1fa9065568d
Lateral Movement of Cobalt Strike Beacon5c7cdb1d-c9fb-4b1d-b71f-9a916b10b513
Possible Cobalt Strike Beacon45ca58cc-671b-42ab-a388-d972ff571d68
Possible Cobalt Strike Beacon Active Directory Database Dumping1f103cab-9517-455d-ad08-70eaa05b8f8d
Possible Cobalt Strike Connection85c752b8-93c2-4450-81eb-52ec6161088e
Possible Cobalt Strike Privilege Escalation Behavior2c997bac-4fc0-43b4-8279-6f2e7cf723ae
Possible Fileless Cobalt Strikecf1051ba-5360-4226-8ffb-955fe849db53

PsExec

Workbench AlertID
Possible Credential Access via PSEXESVC Command Execution0b870a13-e371-4bad-9221-be7ad98f16d7
Possible Powershell Process Injection via PSEXEC7fe83eb8-f40f-43be-8edd-f6cbc1399ac0
Possible Remote Ransomware Execution via PsExec47fbd8f3-9fb5-4595-9582-eb82566ead7a
PSEXEC Execution By Processe011b6b9-bdef-47b7-b823-c29492cab414
Remote Execution of Windows Command Shell via PsExecb21f4b3e-c692-4eaf-bee0-ece272b69ed0
Suspicious Execution of PowerShell Parameters and PSEXEC26371284-526b-4028-810d-9ac71aad2536
Suspicious Mimikatz Credential Dumping via PsExec8004d0ac-ea48-40dd-aabf-f96c24906acf

SILENTKILL

Workbench AlertID
Possible Disabling of Antivirus Software64a633e4-e1e3-443a-8a56-7574c022d23f
Suspicious Deletion of Volume Shadow Copy5707562c-e4bf-4714-90b8-becd19bce8e5

Rhysida

Workbench AlertID
Ransom Note Detection (Real-time Scan)16423703-6226-4564-91f2-3c03f2409843
Ransomware Behavior Detection6afc8c15-a075-4412-98c1-bb2b25d6e05e
Ransomware Detection (Real-time Scan)2c5e7584-b88e-4bed-b80c-dfb7ede8626d
Scheduled Task Creation via Command Line05989746-dc16-4589-8261-6b604cd2e186
System-Defined Event Logs Clearing via Wevtutil639bd61d-8aee-4538-bc37-c630dd63d80f

Trend Micro Vision One hunting query

Trend Vision One customers can use the following hunting query to search for Rhysida within their system:

processCmd:”powershell.exe*\\*$\?.ps1″ OR (objectFilePath:”?:*\\??\\psexec.exe” AND processCmd:”*cmd.exe*\\??\\??.bat”)

Source :
https://www.trendmicro.com/en_us/research/23/h/an-overview-of-the-new-rhysida-ransomware.html

What does the Allow, Deny & Discard do on an Sonicwall Access Rule?

Last Update : 07/25/2022

Description

This article explains the 3 Actions available on an access rule

Resolution

Firewall rules, in general, based on concept of Implicit Deny.  Implicit Deny basically means that the default answer to whether a communication is allowed to transit the firewall is always No or Deny.  Therefore, the majority of Access Rules tend to be Allow.  A firewall will process a communication, inbound or outbound, based on the highest priority rule to the lowest.  Once a rule is found with conditions that match, that rule is executed by the firewall.  Allow, Deny & Discard is the action that the firewall will take for any communication that meets the conditions of a particular Access Rule.  Should a communication come into the firewall and no Access Rule meets the condition to allow it through, the firewall will Drop the communication.

Gen7 Add access rule dialog box

Image

Allow – This means that the firewall will permit the communication to continue through the firewall to its destination.

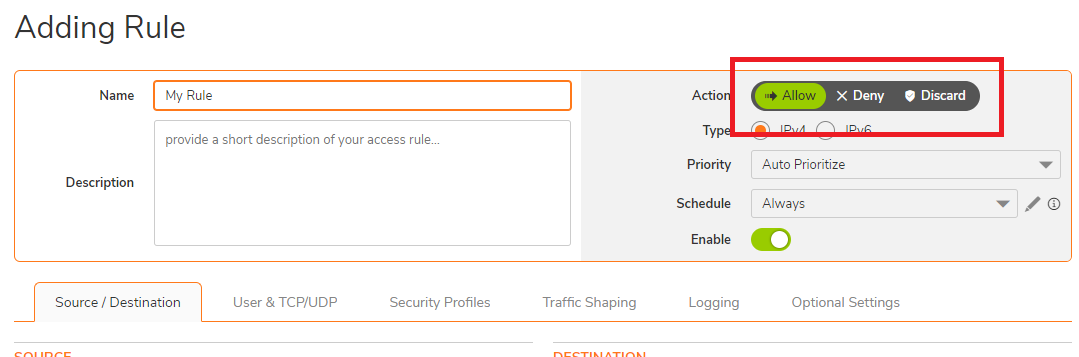
 NOTE: When creating a new access rule, the default Action on your firewall is set to Allow. 

Gen6 Add access rule dialog box

Deny – This means that when a communication is found to match the conditions of an Access Rule with the Deny action, the communication will not be permitted to proceed.  The communication is Dropped by the firewall.  A RST (reset) packet sent back to the originating device and the communication will be ended.  The RST packet is a communication that goes back to the originator of the traffic stating that the connection has been closed.  Under most circumstances, you should not have to write a Deny rule as Deny is the default action as described above.

 NOTE: Be advised that the RST packet is a normal part of network communications and is not unique to the SonicWall.

Discard – This option is much like Deny in that it will stop and drop the communication.  In this instance, the firewall will not send a RST packet as described in the Deny action above.  When the RST packet does not go back as with Deny, the originator has no confirmation that there is a device to respond at the IP address that is trying to reach.  Even if the originator suspects that it is a security function that is stopping it, they will still not know anything for sure.  This is essentially Stealth Mode applied at the Access Rule level.

Related Articles

Categories

Source :
https://www.sonicwall.com/support/knowledge-base/what-does-the-allow-deny-discard-do-on-an-access-rule/220725123655973/

Accessing Safemode when Sonicwall firewall is not reachable via CLI or GUI

Last Update : 05/09/2023

Description

This article describes how to put a SonicWall into safe mode through the GUI or through the command line interface (CLI).

You may require to follow this article for the following:

  • Firewall not accessible any longer due to configuration issues or other causes
  • Perform a firmware upgrade when it fails via normal means.
  • Perform a ROM/Safemode version upgrade.
  • Viewing the bootlogs or other diagnostic information.

 NOTE: Factory Reset via safemode is a required step when the device turns on but it is not reachable. A backup of the settings will be required after the factory reset or the firewall has to be reconfigured from scratch.

Resolution

ACCESSING SAFEMODE WHEN FIREWALL IS NOT REACHABLE VIA CLI/UI:

  1. Using a paperclip or similarly sized object, press and hold down the RST button located in the small hole on the front or back of the device (depending on the appliance) for at least 60 Seconds. Once the test light on the device becomes solid or begins to blink then the SonicWall is in safe mode.

     NOTE: On an NSsp 13700 or NSa Series appliance, press the button, but you do not need to hold it down.
  2. Connect a computer directly to the following Interface, depending on what model SonicWall you have, via an ethernet cable.
    1. Manually assign a static IP / subnet mask and Gateway (gateway will be the safemode firewall IP) on the connected computers NIC depending on the SonicWall appliance.
    2. Open the browser on the client connected to the firewall and go to: http://Enterherethe_Safemode_Firewall_IP

      Generation/ModelInterface to be used while in SafemodeSafemode Firewall IPRecommended IP to be set on clientGeneration 5X0192.168.168.168192.168.168.10 | 255.255.255.0Generation 6 & 7 | SOHO & TZ Devices
      X0192.168.168.168192.168.168.10 |  255.255.255.0Generation 6 & 7 | NSa/SM/NSsp DevicesMGMT Interface192.168.1.254192.168.1.10 | 255.255.255.0 CAUTION: Safemode is only available via HTTP so you have to manually type http:// otherwise the browser will automatically take you to https://.

       NOTE: For new safe mode options on Gen7, please refer: Safemode options on SonicWall Gen 7 devices

ACCESSING SAFEMODE VIA CLI

 NOTE: There is an E-CLI command safemode that restarts the firewall in SafeMode for Generation 7 (NSsp 13700 or NSa).

  1.  If you’re unfamiliar with how to access the SonicWall management using CLI please reference How to login to the appliance using the Command Line Interface (CLI).
  2. Once logged into the CLI, input the following commands.

    Safemode
    yes
  3. The SonicWall will reboot and enter safe mode.
    Image
  4. Reference the steps above to login to the safe mode GUI, beginning with “Connect a computer directly to the following Interface…”

Below you can find some additional information about what you can do in SafeMode:

Reset your firewall to Factory Default

  1. Select Current Firmware with Factory Default Settings and confirm.
  2. Your firewall will restart to factory default.
  3. After the reboot, login to the SonicWall management GUI via X0 Interface on the default firewall IP (192.168.168.168).
     NOTE: Make sure to modify the NIC Settings of the client connected to X0 to match the new firewall default settings (Gateway: 192.168.168.168 and NetMask: 255.255.255.0).

    Image

Upgrading the Gen 6 Firmware or ROM Version from Safe Mode

  1. Download the desired firmware version from MySonicWall.com or have the desired ROM Version on hand. ROM Packs are only available via SonicWall technical support.
     NOTE: Upgrading the ROM version only applies to Generation 6 NSA SonicWalls – 2600, 3600, 4600, 5600, and 6600. Unless you have been requested to upgrade the ROM version by SonicWall technical support do not attempt to do so.  
  2. Select Upload New Firmware and follow the prompt in the pop-up window to upload the firmware or ROM version to the SonicWall.
  3. You should now see the New Firmware or Uploaded ROM Pack on the safe mode GUI. You can boot to the new firmware or ROM by clicking the boot icon on the far right.
     NOTE: Booting to a new firmware or ROM version will reboot the SonicWall and exit safe mode. Make sure you’re completely finished with the SonicWall’s safe mode before selecting boot. 
  4. After the reboot, login to the SonicWall management GUI as you normally would. Navigate to Monitor | Current Status | System Status.
  5. On the Status screen you should see the new firmware version listed under Firmware Version or the new ROM version listed under Safemode Version.

Gen 7 (Using SafeMode to Upgrade Firmware):

  1. Once we enter the url in the web browser to get to the safe mode page on SonicWall Gen 7 devices, we need to authenticate using Maintenance Key.
  2. In the Maintenance Key prompt, type in or paste the key you got from MySonicWall and then click Authenticate. If your appliance is running SonicOS 7.0.1 and is not yet registered, use its Auth Code as the key. (To find the Maintenance key, please refer to: Safemode options on SonicWall Gen 7 devices)
    Image

  3. Safe mode page is displayed

    Image
  4. Click Upload Image, and then browse to the location where you saved the SonicOS firmware image, select the file, and click Upload.
  5. Click the Boot button in the row for Available Image Version and select one of the following:
    1. Boot Available Image with Current Configuration: Use this option to restart the appliance with your current configuration settings.
    2. Boot Available Image with Factory Default Configuration: Use this option to restart the appliance with factory default configuration settings. The configuration settings revert to default values, but logs and local backups remain in place.
    3. Boot Available Image with Backup Configuration: Use this option to restart the appliance with saved backup configuration settings. You can choose which backup to use. 

      Image
  6. In the confirmation dialog, click Boot to proceed.
  7. Wait while the firmware is installed, then booted. 
  8. Login to the SonicWall management GUI as you normally would.

Related Articles

Categories

Source :
https://www.sonicwall.com/support/knowledge-base/accessing-safemode-when-firewall-is-not-reachable-via-cli-or-gui/170507123738054/

How can I access the SonicWall Management Interface?

Last Update: 03/13/2023

Description

The SonicWall UTM appliance has a web-based graphical user interface for configuring the security appliance. This is the primary means of configuring the device.

Resolution

By default all the interfaces (ports like WAN,OPT or X1,X2) are unconfigured except the LAN or X0 interface. The LAN or X0 interface is pre-configured with an ip address of 192.168.168.168 and subnet mask of 255.255.255.0.

You could also determine the LAN or X0 interface IP address by using the Setup Tool (Windows SetupTool – https://software.sonicwall.com/UtilityTools/SetupTool.exe)

Image
Your UTM appliance package will contain, among other things, an Ethernet cable. Connect one end of the cable to the LAN or X0 interface of the SonicWall and the other end to a computer. Make sure the LED alongside LAN or X0 is lit solid.

As the UTM appliance is not pre-configured with DHCP, the computer connected to it must be configured with a static IP address. Set the computer IP address in the same subnet as the SonicWall LAN or X0.

 EXAMPLE:192.168.168.2 with subnet mask of 255.255.255.0.

Open an Internet browser and enter 192.168.168.168 in the address bar.

As this is the first time you are accessing the SonicWall UTM management interface, you will be presented with a wizard. You could follow the wizard to set a new admin password and other information. You could skip the wizard and login directly to the interface by clicking the click here link in the wizard prompt. 

Quick Configuration for Gen6 Appliances with SonicOS 6.5 & above.
Image

When attempting to login directly you will be prompted for a username and password. By default the username is admin and the password is password. Once successfully logged in you can change the password under Manage | Appliance | Base Settings | Administrator Name & Password.

Further configuration of the device can be done either manually, by navigating the tabs on the left-hand side of the interface, or by using the wizard. The wizard can be accessed by clicking on the Wizards icon at the top of the interface.

TROUBLESHOOTING
  • Make sure there is physical connectivity between the computer and the SonicWall.
  • It is always recommended to connect the computer directly to SonicWall instead of through a switch or hub.
  • The LAN or X0 interface LED should be lit solid. If the computer is a PC, the Network Connection Status should show connected.
  • Although SonicWall is Auto DBX capable, try a cross-over cable.
     TIP: If physical connection has been established but the user is unable to access the management interface try doing a ping to the IP address 192.168.168.168 from the computer.
    If the ping test passes and the user is unable to open the interface page in the browser,  try the following:
  1.  Reboot the SonicWall.
  2.  Clear the browser cache.

See also:

Related Articles

Categories

Source :
https://www.sonicwall.com/support/knowledge-base/how-can-i-access-the-sonicwall-management-interface/170503695604558/

Sonicwall Application Rule Common Configurations

Last Update 03/26/2020

Description

This document explains in detail how the SonicWall rulebase works and provides common configurations.

Topics include:

  • Application Rule tips
  • The SonicOS rulebase
  • App Rules positive matching
  • Inspection of encrypted traffic
  • Methods of designing a rulebase

Resolution

The SonicOS Rulebase
SonicWall has two rulebases, one for Stateful Packet Inspection (SPI), and one for Deep Packet Inspection (DPI). The SPI rulebase deals with socket filters that are defined between source and destination address objects to a combination of destination port and protocol, or a range of ports, called a service. Optionally, source ports can also be defined within the service which is more useful for legacy UDP services than for modern services that randomize the source port. A connection is established with the first UDP packet, or after a successful TCP handshake. All other protocols behave like UDP and establish a connection with the first packet.

App Rules, in contrast, monitor traffic of established connections. When an application is detected and a rule matches, the rule action is applied such as dropping the connection.
Access Rules are processed top-down, which means that on the first rule that is matched, (counted from the top) the rule action is applied, and the rulebase is exited. No further rulebase processing follows. This is the industry standard implementation for SPI rules. In contrast, no industry standard implementation exists for App Rules. In addition to standard top-down behavior known from SPI rules, some vendors match top down, but do not drop out with the first match. SonicOS does something in-between: rule order is non-deterministic because rules are internally optimized for processing speed. App Rules cannot overlap. Per definition, only one rule can match. If a matching rule is found, the rule action is applied.

Access Rules have Allowed, Deny, and Discard actions. The difference between Deny and Discard is that Deny sends a segment with TCP RST flag back, whereas Discard silently drops the packet. It is best to use Discard in most cases, unless that breaks something like long living dormant TCP connections that lack higher layer health monitoring as can be found in some legacy custom applications. Both actions terminate the connection and remove it from the connection table. App Rules can apply various actions but Allowed is not one of them. The reason is that App Rules check on an already established connection. By the very nature on how DPI works, the connection has to be established so that the DPI engine can look for clues within the data traffic to determine the application.

Access Rules are enforced between zones that have interfaces assigned. One zone may match to one or multiple interfaces. App Rules are enforced on ingress of a zone, or globally. Both Access Rules and App Rules can be assigned address objects and address groups. Only one object can be assigned per rule. If multiple objects in a rule are desired, a group needs to be created. Groups can be nested.
In addition to defining source and destination address objects in App Rules, source address exclusions can be defined so that App Rules do not overlap. Both Access Rules and App Rules can have socket services assigned. In contrast to Access Rules, App Rules cannot have service groups. Services are less often used in App Rules because App Signatures generally match independent of sockets. The reason to assign a service is to limit application matches to one specific socket, such as an Application on a cleartext HTTP socket that needs to be dropped. App Rules also may match on indirect traffic such as DNS when inspecting a Web session on an HTTP socket. This is often not obvious. In addition to dropping the connection that carries the service, control connections, or peripheral connections like DNS can be targeted by signatures within one App. This is a reason that one typically wants to leave the socket out of the match criteria for an App Rule.

App Rules match on applications which is the main difference to Access Rules that only match on a socket. A variety of match objects can be defined to match within a certain context such as file names, as well as categories, applications, and application sub lists like Social Networking, Facebook, and Like button. The same connection can match many different applications such as HTTP and Netflix. Users are treated as a filter – after a rule was matched. Users are not part of the match criteria of the rule itself. Vendors are not consistent in the implementation of users. Many implement it like SonicWall but some also make the user a match criteria. In SonicOS, an action is applied to all include users minus those users that overlap with exclude users. There is only one rule check; no other rule check is performed regardless whether the user matches or not. Access Rules and App Rules are similar in their behavior to unmatched users. Access Rules apply the inverse of the action such as Deny instead of Allowed, or vice versa. App Rules do not have an Allowed action by their very nature. Unmatched users are simply not applied any action. If the action is Drop, not matched traffic is simply passed without logging. The same is true for the No Action that produces a log for matched users. Remember that not matched users include all user(s) in exclude and all other users not in include. In other words, a rule is applied only to all include users that are not in exclude. All non-defined users are treated as not matching.

Exclude is a concept present in many objects in SonicOS. An exclude is a minus to an include, which means applied to the rule is only what is left of the include, once the exclude was subtracted. No matching of the rule applies to anything in the exclude. This is a bit complicated, but exclude users only matters if also at least partially part of the include. An exclude that does not overlap with an include has no function. This is the same behavior for other object types.

The user concept in SonicOS is a filter after a rule match was made. Only the leftover of include users after subtracting excluded users is applied to that particular matched rule. Users that do not match are no longer processed in the rulebase. This is important to understand.

Image

App Rules
IF source:

  • src-zone
  • src-ip MINUS excluded src-ip

AND IF destination:

  • dst-ip

AND IF application:

  • Apps identified by DPI MINUS excluded Apps, limited to socket

THEN

  • user MINUS excluded users filter
  • action: Drop, BWM, no-DPI, log, nothing

App Rules Positive Matching

While an Access Rule can determine the socket within the first one to three segments within a connection, App Rules match can only be determined deeper into the connection life, after the connection was established. This puts positive matching at a conundrum. How for instance do you permit a connection with Netflix, before you even know that the connection carries Netflix? And how do you make sure after Netflix in a connection stream was detected, that it does not carry other traffic, such as tunneled VPN traffic?

These are interesting questions, and essentially, there is no precise solution. Vendors differ in the implementation of App Rules. Some vendors focus on winning over firewall operators that are used to
maintaining SPI rulebases with hundreds or thousands of simple rules, by hiding the abstracts of an App Rules under the hood. The nice thing is that operators can treat App Rules the same way as Access Rules. It is also nice that migrating an Access Rule base into next-gen land is as easy as swapping socket service objects for App objects. The big disadvantage of this approach is that this is a very rough interface abstraction. A hacker who studies that specific interface abstraction can make traffic look like Netflix and tunnel malicious traffic through a rule that allows Netflix traffic.

SonicWall decided for the sake of efficacy not to implement such user interface abstraction. With SonicOS App Rules follow very closely the inner working of the DPI engine. If an App is detected, the operator can decide what to do about traffic following the detection. If we want to allow Netflix traffic, we really do not care about detecting Netflix at all. We care about detecting traffic that is NOT Netflix so that we can drop this. Whatever we do not drop, is implicitly allowed at the end of the App Rule base. This is the opposite from an Access Rule base where everything is implicitly dropped at the end of the rulebase. Rules are written in a way to disallow all the things that we do not want in our network excluding those Apps that we want. The easiest way to do this is per category. We drop traffic for instance from the entire Multimedia category, with the exclusion of Netflix that we are allowing. This would drop any traffic for which an App Signature exists in the category Multimedia that is NOT Netflix. At the same time, we still can drop traffic from other categories such as Proxies and protect ourselves from an evasion attack.

Inspection of Encrypted Traffic

Access Rules work the same whether traffic is cleartext or encrypted – unless traffic is tunneled within an encrypted connection. For App Rules, all encrypted traffic looks like tunneled as the App detection has to happen within the encrypted traffic stream.
SonicOS solves this problem via DPI-SSL. DPI-SSL client-side intercepts traffic from a client, decrypts it, scans it, re-encrypts it and sends it off on its way to the server. On the return wing, the opposite happens. Vendors who do not implement such functionality fly blind. They have devices that can be easily evaded by SSL or SSH encrypted traffic that already today makes up over 60% of the Internet traffic.

Methods of Designing a Rulebase

The first decision that is made is whether a rule should be an Access Rule or an App Rule. If a rule does not contain a service, or a socket can be clearly defined, then an Access Rule is the better approach. If a rule uses a generic socket, or can run on dynamic sockets, then an Access Rule needs to be chosen. As described above, Access Rules can be negative or positive, hence explicitly permit traffic, or drop traffic. App Rules by design can only be negative. Also, remember that App Rules cannot overlap, hence unlike with Access Rules, rule order does not matter. The author prepared a worksheet where you can turn a positive match into a negative match for an entire category. To allow an application, you deny the entire App Category with the exception of the allowed application. This is a simple approach to configure a positive match on an App Rule.

When you design rules with users, make sure to summarize users into user groups for common applications that are dropped. Again, focus on what is dropped. If you have a combination of networks with users, and networks without users, make sure that you put these networks without users in the src-ip exclude field when referencing a user. Because if you do not do that, the rule is skipped as networks without users would not match any include users, the rule is skipped, and you drop out of the rulebase. Everything that you do not explicitly deny in an App Rules is automatically allowed, just the opposite from an Access Rule where everything that is not explicitly allowed is implicitly denied at the end of the rulebase.

Examples
Admin: YouTube, Vudu, Hulu
Faculty: YouTube and Vudu
Students: YouTube
Nobody: Netflix
Rule 1: Netflix DENY Admin, Faculty, Students
Rule 2: Hulu DENY Faculty, Students
Rule 3: Vudu: DENY Students
Rule 4: MULTIMEDIA except Netflix, Hulu, Vudu DENY all-users

Make use of the spreadsheet to carefully plan out your rulebase before configuring it. On Tab Applications, chose a category in column B. Then in columns D through H check the field to TRUE for the users you want this application allowed. If you do not use users, simply use column D only. Columns J through N is the negative representation, converting a positive match to a negative match as it is entered in an App Rule. App Rules can only drop a connection AFTER an App was recognized. Hence, we cannot permit an App explicitly. Create an App Rule where you deny all users that show TRUE in columns J through N for that application. Put those apps that are allowed, FALSE in J through N, into the exclude Apps. Keep in mind that in SonicOS App Rules cannot overlap. Create non-overlapping rules with the help of excludes. In App Rules, the user group is only applied to include users. All users that are not in include, or excluded, are dropping out of the rule base without any action, and the packet is allowed. If you need a final explicit deny rule, you build rules with all app categories that are not users and simply drop this traffic.

Related Articles

Categories

Source :
https://www.sonicwall.com/support/knowledge-base/application-rule-common-configurations/180208123013371/

Shared Storage and Monitoring for VMware vSphere Cluster as a base building block with Software Defined Storage from StarWind

By Vladan SEGET | Last Updated: July 31, 2023

Shared storage is a critical component of a VMware vSphere cluster. In a vSphere cluster, multiple hosts are grouped together to provide a pool of computing resources that can be used to run virtual machines. These hosts are connected to shared storage, which provides a centralized location for storing virtual machine files, such as virtual disks and configuration files. This shared storage is accessible to all hosts in the cluster, allowing virtual machines to be migrated between hosts without the need to copy files between them.

Shared storage is a base building block without which most (if not all) cluster services will not work. Shared storage is a requirement for vSphere HA, DRS, FT or other cluster services.

What are the benefits of shared storage?

There are several benefits to using shared storage in a vSphere cluster. One of the most significant benefits is the ability to migrate virtual machines between hosts using vMotion. vMotion allows virtual machines to be moved between hosts without any downtime, allowing administrators to perform maintenance tasks or balance the load on the hosts without impacting the availability of virtual machines. This is possible because the virtual machine files are stored on shared storage, which is accessible to all hosts in the cluster.

Another benefit of shared storage is the ability to use advanced features such as High Availability (HA) and Distributed Resource Scheduler (DRS). HA provides automatic failover of virtual machines in the event of a host failure, while DRS provides load balancing of virtual machines across hosts in the cluster. Both of these features rely on shared storage to function properly.
There are several types of shared storage that can be used in a vSphere cluster, including Fibre Channel, iSCSI, and NFS. Each of these storage types has its own advantages and disadvantages, and the choice of storage type will depend on factors such as performance requirements, budget, and existing infrastructure.

In addition to choosing the right type of shared storage, it is also important to properly configure and manage the storage environment. This includes tasks such as setting up storage arrays, configuring storage networking, and monitoring storage performance. VMware provides a number of tools and best practices to help administrators manage shared storage in a vSphere cluster, including the vSphere Storage APIs, vSphere Storage DRS, and the vSphere Web Client.

StarWind SAN and NAS has another advantage over a hardware based storage array. This is cost. In addition, storage array, despite that you can have multiple PSUs or multiple CPUs or controller cards or NICs, you can only have a single motherboard, which is a still single point of failureStarWind SAN and NAS, that is a software based, is configured to run on at least 2-nodes where each node participate with its internal disks and RAM, to the storage pool created by StarWind. As a result, when you have a 1 host failure, the other host still has your VM file as the storage is simply mirrored. If you have vSphere HA, the restart of VMs on the remaining host is done automatically. Without vSphere HA you simply start those VMs manually from your remaining host.

What is StarWind SAN and NAS?

StarWind SAN and NAS is a software that turns your server or a group of servers into a powerful and easy-to-use storage appliance. It eliminates the need for expensive and complex storage hardware and provides a cost-effective and scalable storage solution for your virtualized environment.

Benefits of StarWind SAN and NAS for VMware vSphere

High Availability – StarWind SAN and NAS provides high availability by creating a redundant storage pool that can withstand hardware failures. It uses synchronous replication to keep the data in sync between the nodes, ensuring that there is no data loss in case of a failure.

Scalability – StarWind SAN and NAS is highly scalable and can be easily expanded by adding more nodes to the storage pool. This allows you to scale your storage capacity as your business grows, without having to invest in expensive hardware.

Cost-Effective – StarWind SAN and NAS is a cost-effective storage solution that eliminates the need for expensive hardware. It uses commodity hardware and turns it into a powerful storage appliance, reducing the overall cost of ownership.

Easy to Use – StarWind SAN and NAS is easy to use and can be set up in minutes. It comes with a user-friendly web-based interface that allows you to manage your storage pool and monitor its performance.

Performance – StarWind SAN and NAS provides high-performance storage that can meet the demands of your virtualized environment. It uses advanced caching algorithms to optimize the performance of your storage pool, ensuring that your virtual machines run smoothly.

Integration with VMware vSphere – StarWind SAN and NAS integrates seamlessly with VMware vSphere, providing a powerful and scalable storage solution for your virtualized environment. It supports all the features of VMware vSphere, including vMotion, High Availability, and Distributed Resource Scheduler.

StarWind Virtual SAN – StarWind Virtual SAN is a software that eliminates the need for physical shared storage by simply “mirroring” internal hard disks and flash between hypervisor servers. It creates a VM-centric and high-performing storage pool for a VMware cluster. This allows you to create a highly available and scalable storage solution for your virtualized environment.

Quote:

StarWind SAN & NAS supports hardware and software-based storage redundancy configurations. The solution allows turning your server with internal storage into a redundant storage array presented as NAS or SAN, exposing standard protocols such as iSCSI, SMB, and NFS. It features Web-based UI, Text-based UI, vCenter Plugin, and Command-line interface for your cluster-wide operations.

A while back, we have created a short video from the deployment process for vSphere. However, please note that this product is evolving and today, it might look a bit different. Check the latest StarWind SAN and NAS version here.

https://www.youtube.com/embed/4Wzzk-d_BOM
How about vCenter server appliance on 2-hosts config?

Note: in 2-node config, your vCenter server appliance (VCSA) should be stored on shared storage. If you running your VCSA from local storage on one of your ESXi hosts, you risking the downtime of your VCSA in case this particular host fails. This does not mean, however, that vSphere HA or other cluster services will fail. Not at all, as VCSA is used only to configure vSphere HA, not responsible in triggering the actual HA event! It mean you can perfectly “lose” your VCSA and still have your VMs restarted on the remaining host automatically.

Performance Improvements of vSphere cluster

StarWind SAN and NAS can improve the performance of VMware vSphere in several ways. One of the main ways is through the use of StarWind Virtual SAN for vSphere, which creates a VM-centric and high-performing storage pool for a VMware cluster. This allows for faster data access and improved performance for virtual machines. StarWind SAN and NAS also uses advanced caching algorithms to optimize the performance of the storage pool. This ensures that frequently accessed data is stored in cache, reducing the time it takes to access the data and improving overall performance.

In addition, StarWind SAN and NAS provides high availability and redundancy, which can improve performance by reducing downtime and ensuring that data is always available. This is achieved through synchronous replicationwhich keeps the data in sync between the nodes, ensuring that there is no data loss in case of a failure. It supports all the features of VMware vSphere, including vMotion, High Availability, and Distributed Resource Scheduler, which can further improve performance by allowing for workload balancing and resource optimization.

Final Words

In conclusion, shared storage is a critical component of a VMware vSphere cluster. It provides a centralized location for storing virtual machine files, allowing virtual machines to be migrated between hosts without downtime and enabling advanced features such as HA and DRS. Properly configuring and managing shared storage is essential for ensuring the availability and performance of virtual machines in a vSphere cluster.

StarWind SAN and NAS is a powerful and cost-effective storage solution that can be used with VMware vSphere. It provides high availability, scalability, and performance, making it an ideal storage solution for virtualized environments. Its seamless integration with VMware vSphere and support for all its features make it a must-have for any virtualized environment.

More posts about StarWind on ESX Virtualization:

More posts from ESX Virtualization:

PHD Virtual Backup 6.0

By Vladan SEGET | Last Updated: June 28, 2023

PHD Virtual Backup 6.0 – Backup, Restore, Replication and Instant recovery. PHD Virtual has released their new version of backup software for VMware vSphere environments. PHD Virtual backup 6.0 comes up with several completely new features. Those features that are specific to virtualized environments. In this review I’ll focus more on those new features instead on the installation process, which is fairly simple. This review contains images, which can be clicked and enlarged (most of them) to see all the details from the UI.

Now first something that I was not aware of. Even if I work as a consultant, I must say I focus most of the time on the technical side of a solution which I’m implementing and I leave the commercial (licensing) part to vendors or resellers.  But with this review I would like to point out that PHD Virtual Backup 6.0 is licensed on a per-host basis. Not CPU Socket like some vendors do, but also not per site like other vendors do. As a result, their price is a fraction of the cost of competitive alternatives.

Introduction of PHD Virtual Backup and Recovery 6.0

The PHD Virtual Backup 6.0 comes up with quite a few new features that I will try to cover in my review. One of them is the Instant Recovery, which enables to run VM directly from a backup location and initiate storage vMotion from within VMware vSphere to move the VM back to your SAN.

But PHD Virtual goes even further by developing a proprietary function to initiate the move of the VM by using PHD Motion. What is it? It’s an alternative for SMB users which does not have VMware Enterprise and Enterprise Plus License, which includes storage vMotion.

PHD Motion does not require VMware’s storage vMotion in order to work. It leverages multiple streams, intelligent data restore, direct storage recovery to copy a running state of a VM back to the SAN, while the VM still runs in the sandbox at the storage location. Therefore, it is much faster at moving the data back to production than storage vMotion.

The delta changes to the VM are maintained in another, separate temporary location.  So the final switch back to SAN happens fairly quickly since only the deltas of changes between the VM which runs from the backup and the VM which is located back on SAN, are quickly copied. So small planned downtime (about the time for a VM reboot) is necessary.

Installation of the Software

PHD Virtual Backup 6.0

The installation will take like 5 minutes, just to deploy the OVF into vCenter and configure the network interface, storage …. and that’s it. Pretty cool!

One of those differences from previous version of PHD Virtual backup is the Instant Recovery Configuration TAB, since this feature has just been introduced in the PHD Virtual Backup 6.0.

The Instant recovery feature is available for Virtual Full backups only. The full/incremental backup types are not currently supported for instant recovery, so if you select the full/incremental option, you might see that the Instant Recovery option isn’t available. Use Virtual Full option when configuring your backup jobs to take benefit of Instant recovery.

PHD Virtual Backup and Replication 6.0 If you choose the full/incremental backup type, the Instant VM recovery isn't currently supported

PHD Virtual backup 6.0 – Replication of VMs.

Replication – This feature requires at least one PHD VBA installed and configured with access to both environments – but if you will be using replication in larger environments, you may need additional PHD VBAs. For instance, one PHD VBA deployed at the primary site would be configured to run regular backups of your VMs while a second PHD VBA could be deployed to the DR site configured to replicate VMs from the primary site to the secondary location.

The replication of VMs is functionality that is very useful for DR plans. You can also configure the replication within the same site as well, and choose a different datastore ( and ESXi host) as a destination. This is my case, because I wanted to test this function, since my lab don’t have two different locations.

The replication job works the way that only the first replica is full copy. PHD VM replication takes data from existing backups and replicates those to a cold standby VM. After the VM is initially created during the first pass, PHD uses its own logic to transfer only the changes from the previous run.

You can see the first and second job, when finishes on the image below. The latter one took only 51 s.

PHD Virtual Backup 6.0 - Replication Jobs

Testing Failover – After the replica VM is created, you have the option to test each replica to validate your standby environment or to failover to your replicated VMs. There is a Start Test button in order to proceed.

PHD Virtual 6.0 - testing failover button

What’s happening during the test. At first, another snapshot is created of the Replica VM. This is only to have the ability to get back to the state before the test. See the image below.

PHD Virtual Backup 6.0 - Testing the Replication with the Failover Test Button

This second snapshot is deleted the moment when you’re done with the testing of that failover VM, you tested that the application is working etc…. The VM is powered off and it is rolled back to the state it was in prior to testing mode.

So when you click the Stop Test button (it changed text), the replica Status is changed back to STANDBY, once again click Refresh button to refresh the UI.

If you lose your primary site, you can go to the PHD console at the DR site and failover the VMs which has been replicated there.  You can recover your production environment there by starting the VMs that has been replicated.  And now, when you run your production (or at least the most critical VMs) from DR site, and because you don’t have a failover site anymore, you should consider start backing up those VMs in failover mode….. it will be helpful when failing back to the main primary site, when damages there gets repaired.

Why one would have to start doing backups as soon as the VMs are in failover state ? …. Here is a quick quote from the manual:

When ending Failover, any changes made to the replica VM will be lost the next time replication runs. To avoid losing changes, be sure to fail back the replica VM (backup and restore) to a primary site prior to ending Failover mode.

I can only highly recommend to read the manual where you’ll find all the step-by-steps and all those details. In this review I can’t focus to provide all those step-by-step procedures. The manual is a PDF file very good quality, with many screenshots and walk through guides. In addition, there are some nice FAQ which were certainly created as a result of feedback from customer’s sites. One of them is for example a FAQ for increasing backup storage and the step-by-step follows. Nice.

You can see the possibility to end the failover test with the Stop Test button.

PHD Virtual Backup 6.0 - end falover test.

Seeding – If you have some huge amount of data to replicate for the DR site you can seed the VMs data before configuring the replication process. The seeding process is process when you pre-populate the VMs to the DR site first. This can be done through removable USB drives, or small NAS device. When the seeding is complete, you can start creating the replication jobs to move only the subsequent changes.

In fact the seeding process is fairly simple. Here is the outline. First create full backup of VMs > copy those backups to NAS or USB for transport >  Go to the DR site and deploy PHD VBA and add the data that you have with you as a replication datastore > create and run replication job to replicate all the VMs from the NAS (USB) to your DR site > Remove the replication datastore and the NAS and create the replication job where you specify the the primary site datastore as a source. Only the small, incremental changes will be replicated and sent over the WAN.

PHD Virtual Backup 6.0 – File level Recovery

File level recovery is a feature that is used at most in virtual environments, when it comes to console manipulations. I think, since more frequently you (or your users) are in need for file restore, than VM crashes or corruption, so the full VM needs to be restored.

I’ve covered the the FLR process in the 5.1 version by creating an iSCSI target and then mounting the volume as an additional disk in computer management, but the option was greatly simplified in PHD Virtual Backup 6.0. In fact when you run the assistant, you have the now a choice between the creation of iSCSI target and create windows share. I took the option Create Windows share.

All the backup/recovery/replication tasks are done through assistants. The task is composed with just few steps:

First selecting the recovery point , then create a windows share (or iSCSI target) > and mount this share to finally be able to copy-paste the files that needs to be restored from withing that particular VM.

The process is fast and direct. It takes few clicks to get the files back to the user’s VM. You can see the part of the process on the images at left and bellow.

PHD Virtual Backup and Replication 6.0 - file level restore final shot - you can than easily copy paste the files you need

PHD Virtual Backup 6.0 – Instant VM Recovery and PHD Motion – as said in the beginning of my review, the PHD virtual backup 6.0 has the ability to run VMs directly from backup location.

The Instant VM Recovery works out of the box without further necessity to setup the temporarily storage location, but if needed, the location for temporary changes can be changed from the defaults. But there is usually no need to do so.

You can do it in Configuration > Instant VM Recovery.

There is a choice between the attached virtual disk and VBA’s backup storage.

PHD Virtual Backup 6.0 - configuration of temporary storage location for Instant VM recovery

Then we can have a look and see how the Instant VM recovery option works. Let’s start by selecting the recovery point that we would want to use for that. An XP VM which I backed up earlier will do. Right Click the point in time from which one you want to recover (usually the latest), and choose recover.

PHD Virtual Backup 6.0 - Instant VM Recovery

At the next screen there is many options. I checked the Power On VM after recovery and Recover using original storage and network settings from backup. Like this the VM is up and running with network connectivity as soon as possible. I did also checked the option to Automatically start PHD Motion Seeding, which will start copying the VM back to my SAN.

When the copy finishes I’ll receive a confirmation e-mail…..  Note that you have a possibility to schedule this task as well.

PHD Virtual Backup 6.0 - Instant VM recovery and PHD Motion

On the next screen you can see the final screen before you hit the submit button. You can make changes there if you want.

PHD Virtual Backup 6.0 - Instant VM recovery and PHD Motion

The VM is registered in my vCenter and started from the backup location. 1 min later my VM was up. The VM was running from temporary storage created by PHD Virtual backup 6.0. The temporary storage that I configured before, when setting up the software.

You can see on the image below which tasks are performed by PHD Virtual backup 6.0 in the background.

PHD Virtual Backup 6.0 - Instant VM Recovery with PHD Motion

So, we have the Instant VM Recovery tested and our VM is up and running. Now there are two options, depending if you have storage vMotion licensed or not.

With VMware Storage vMotion – If that’s the case, you can initiate storage vMotion from the temporary datastore created by PHD Virtual back to your datastore located on your SAN.

When the migration completes, open the PHD Console and click Instant VM Recovery. In the Current tab, select the VM that
you migrated and click End Instant Recovery to remove the VM from the list.

Using PHD Motion – If you don’t have storage vMotion, you can use PHD Motion. How it works… Let’s see. You remember that during the assistant launching the Instant VM recovery, we selected an option to start PHD Motion seeding.

This option will start to copy the whole VM back to the datastore on the SAN (in my case it’s the Freenas datastore). I checked that option to start Automatically PHD Motion seeding when setting up the job, remember?

You can see it in the properties of the VM being run in the Instant VM recovery mode. On the image below you can see the temporary datastore (PHDIR-423…….) and the final destination’s datastore of the VM (the Freenas datastore).

PHD Virtual Backup 6.0 - Instant VM Recovery and PHD Motion

This process will take some time. So when you go back to the PHD Virtual console, you choose the Instant VM Recovery Menu option > Current Tab, you’ll see that Complete PHD Motion is grayed out. That’s because of the above mentioned copy hasn’t finished. Well it really does not matter, since you (or your users) can still work and use the VM.

PHD Virtual Backup 6.0 - Instant VM Recovery and PHD Motion

And you can see on the image below that when the seeding process has finished, the button Complete PHD Motion became activ. (In fact, the software drops you an e-mail that the seeding process has finished copying

PHD Virtual Backup 6.0 - PHD Motion

And then, after few minutes the VM dissapears from this tab. The process has finished the copy of the deltas and the VM can be powered back on. It’s definitely a time saver, and when no storage vMotion licenses (in SMBs) are available, this solution can cut the the downtime quite impressively. The History tab shows you the details.

PHD Virtual Backup 6.0 - Instant VM recovery with PHD Motion

PHD Virtual Backup 6.0 – The E-mail Reporting Capabilities.

PHD Virtual Backup 6.0 has got the possibility to report on backup/replication jobs success (failure). The configuration of it it’s made mores simpler now than in previous release, since there is a big Test button there in order to send test e-mail. I haven’t had any issues after entering the information for my e-mail server, but in case you’re using different ports or you’re behind a firewall, this option is certainly very useful.

PHD Virtual Backup 6.0 - E-mail Reporting Capabilities

In v6, PHD made the email reports WAY more attractive.  They have a great job summary at the job and lots of great information in a nicely formatted chart that shows details for each VM and each virtual disk.  They even color code errors and warnings.  Very cool.

PHD Virtual Backup 6.0 - E-mail reports

PHD Exporter

PHD Virtual Backup .60 has also few tools bundled within the software suite which can be useful. PHD Exporter is one of them. This application can help when you need to archive VMs with data. Usually you would want to install this software on physical windows server which has got a tape library attached. It’s great because you can schedule existing backups to be exported as compressed OVF files. So if you ever had to recover from an archive, you wouldn’t even need PHD to do the recovery.

The tool basically connects itself to the location where the backups are stored and through an internal processing does extract those backup files to be stored temporary in a location that you configure when you setting up – it’s called staging location. Usually it’s a local storage. Then the files are sent to tape for archiving purposes.

Through the console you configure exporting jobs where the VM backups are exported to staging location.

PHD Exporter - Tool to export backups to Tape for archiving purposes

PHD Virtual Backup 6.0 is Application Aware Backup Solution

PHD virtual Backup 6.0 can make a transactionally-consistent backups of MS Exchange with the possibility to truncate the logs. Log truncation is supported for Microsoft Exchange running on Windows 2003 Server 64 bit SP2 and later and Windows Server 2008 R2 SP1 and later.

When an application aware backup is started, PHD Guest Tools initiates the quiesce process and an application-consistent VSS snapshot is created on the VM. The backup process continues and writes the data to the backup store while this snapshot exists on disk. When the backup process completes, post-backup processing options are executed and the VSS snapshot is removed from the guest virtual machine.

PHD Virtual Backup 6.0 provides small agent called PHD Guest Tools, which is installed inside of the VM.  This application performs the necessary application aware functions, including Exchange log truncation. Additionally, you can add your own scripts to perform tasks for other applications. Scripts can be added before and after a snapshot, and after a backup completes. So it looks like they’ve got all the bases covered for when you might want to execute something on your own. I’ve tested with an Exchange 2010 VM and it worked great!

I was nicely surprised with the deduplication performance at the destination datastore. Here is a screenshot from the dashboard where you can see that the Dedupe ration is 33:1 and saved space 1.4 TB.

PHD Virtual Backup 6.0 - The dashboard

During the few days that I had the chance and time to play with the solution in my lab I did not have to look often in the manual, but if you do plan using the replication feature with several remote sites, I highly recommend to read the manual which is as I already told you, good quality.

PHD Virtual Backup 6.0 provides many features that are useful and provide real value for VMware admins. Replication and Instant Recovery are features which becomes a necessity providing short RTO.

PHD Virtual Backup 6.0  is an agent-less backup solution (except VMs which needs Application aware backups) which don’t use physical hardware, but runs as a virtual appliance with 1CPU and 1Gigs of RAM.  This backup software solution can certainly have its place in today’s virtualized infrastructures running VMware vSphere.

Please note that this review was sponsored by PHD Virtual.

Source :
https://www.vladan.fr/phd-virtual-backup-6-0/

The five-day job: A BlackByte ransomware intrusion case study

July 6, 2023

As ransomware attacks continue to grow in number and sophistication, threat actors can quickly impact business operations if organizations are not well prepared. In a recent investigation by Microsoft Incident Response (previously known as Microsoft Detection and Response Team – DART) of an intrusion, we found that the threat actor progressed through the full attack chain, from initial access to impact, in less than five days, causing significant business disruption for the victim organization.

Our investigation found that within those five days, the threat actor employed a range of tools and techniques, culminating in the deployment of BlackByte 2.0 ransomware, to achieve their objectives. These techniques included:

  • Exploitation of unpatched internet-exposed Microsoft Exchange Servers
  • Web shell deployment facilitating remote access
  • Use of living-off-the-land tools for persistence and reconnaissance
  • Deployment of Cobalt Strike beacons for command and control (C2)
  • Process hollowing and the use of vulnerable drivers for defense evasion
  • Deployment of custom-developed backdoors to facilitate persistence
  • Deployment of a custom-developed data collection and exfiltration tool
BlackByte 2.0 ransomware attack chain by order of stages: initial access and privilege escalation, persistence and command and control, reconnaissance, credential access, lateral movement, data staging and exfiltration, and impact.
Figure 1. BlackByte 2.0 ransomware attack chain

In this blog, we share details of our investigation into the end-to-end attack chain, exposing security weaknesses that the threat actor exploited to advance their attack. As we learned from Microsoft’s tracking of ransomware attacks and the cybercriminal economy that enables them, disrupting common attack patterns could stop many of the attacker activities that precede ransomware deployment. This case highlights that common security hygiene practices go a long way in preventing, identifying, and responding to malicious activity as early as possible to mitigate the impact of ransomware attacks. We encourage organizations to follow the outlined mitigation steps, including ensuring that internet-facing assets are up to date and configured securely. We also share indicators of compromise, detection details, and hunting guidance to help organizations identify and respond to these attacks in their environments.  

Forensic analysis

Initial access and privilege escalation

To obtain initial access into the victim’s environment, the threat actor was observed exploiting the ProxyShell vulnerabilities CVE-2021-34473, CVE-2021-34523, and CVE-2021-31207 on unpatched Microsoft Exchange Servers. The exploitation of these vulnerabilities allowed the threat actor to:

  • Attain system-level privileges on the compromised Exchange host
  • Enumerate LegacyDN of users by sending Autodiscover requests, including SIDs of users
  • Construct a valid authentication token and use it against the Exchange PowerShell backend
  • Impersonate domain admin users and create a web shell by using the New-MailboxExportRequest cmdlet
  • Create web shells to obtain remote control on affected servers

The threat actor was observed operating from the following IP to exploit ProxyShell and access the web shell:

  • 185.225.73[.]244

Persistence

Backdoor

After gaining access to a device, the threat actor created the following registry run keys to run a payload each time a user signs in:

Registry keyValue nameValue data
HKEY_CURRENT_USER\Software\Microsoft\Windows\CurrentVersion\Run  MsEdgeMsErundll32 C:\Users\user\Downloads\api-msvc.dll,Default  
HKEY_CURRENT_USER\Software\Microsoft\Windows\CurrentVersion\Run  MsEdgeMsErundll32 C:\temp\api-msvc.dll,Default  
HKEY_CURRENT_USER\Software\Microsoft\Windows\CurrentVersion\Run  MsEdgeMsErundll32 C:\systemtest\api-system.png,Default

The file api-msvc.dll (SHA-256: 4a066569113a569a6feb8f44257ac8764ee8f2011765009fdfd82fe3f4b92d3e) was determined to be a backdoor capable of collecting system information, such as the installed antivirus products, device name, and IP address. This information is then sent via HTTP POST request to the following C2 channel:

  • hxxps://myvisit[.]alteksecurity[.]org/t

The organization was not using Microsoft Defender Antivirus, which detects this malware as Trojan:Win32/Kovter!MSR, as the primary antivirus solution, and the backdoor was allowed to run.

An additional file, api-system.png, was identified to have similarities to api-msvc.dll. This file behaved like a DLL, had the same default export function, and also leveraged run keys for persistence.

Cobalt Strike Beacon

The threat actor leveraged Cobalt Strike to achieve persistence. The file sys.exe (SHA-256: 5f37b85687780c089607670040dbb3da2749b91b8adc0aa411fd6280b5fa7103), detected by Microsoft Defender Antivirus as Trojan:Win64/CobaltStrike!MSR, was determined to be a Cobalt Strike Beacon and was downloaded directly from the file sharing service temp[.]sh:

  • hxxps://temp[.]sh/szAyn/sys.exe

This beacon was configured to communicate with the following C2 channel:

  • 109.206.243[.]59:443

AnyDesk

Threat actors leverage legitimate remote access tools during intrusions to blend into a victim network. In this case, the threat actor utilized the remote administration tool AnyDesk, to maintain persistence and move laterally within the network. AnyDesk was installed as a service and was run from the following paths:

  • C:\systemtest\anydesk\AnyDesk.exe
  • C:\Program Files (x86)\AnyDesk\AnyDesk.exe
  • C:\Scripts\AnyDesk.exe

Successful connections were observed in the AnyDesk log file ad_svc.trace involving anonymizer service IP addresses linked to TOR and MULLVAD VPN, a common technique that threat actors employ to obscure their source IP ranges.

Reconnaissance

We found the presence and execution of the network discovery tool NetScan being used by the threat actor to perform network enumeration using the following file names:

  • netscan.exe (SHA-256:1b9badb1c646a19cdf101ac4f6fdd23bc61eaab8c9f925eb41848cea9fd0738e)
  • netapp.exe (SHA-256:1b9badb1c646a19cdf101ac4f6fdd23bc61eaab8c9f925eb41848cea9fd0738e)

Additionally, execution of AdFind (SHA-256: f157090fd3ccd4220298c06ce8734361b724d80459592b10ac632acc624f455e), an Active Directory reconnaissance tool, was observed in the environment.

Credential access

Evidence of likely usage of the credential theft tool Mimikatzwas also uncovered through the presence of a related log file mimikatz.log. Microsoft IR assesses that Mimikatz was likely used to attain credentials for privileged accounts.

Lateral movement

Using compromised domain admin credentials, the threat actor used Remote Desktop Protocol (RDP) and PowerShell remoting to obtain access to other servers in the environment, including domain controllers.

Data staging and exfiltration

In one server where Microsoft Defender Antivirus was installed, a suspicious file named explorer.exe was identified, detected as Trojan:Win64/WinGoObfusc.LK!MT, and quarantined. However, because tamper protection wasn’t enabled on this server, the threat actor was able to disable the Microsoft Defender Antivirus service, enabling the threat actor to run the file using the following command:

explorer.exe P@$$w0rd

After reverse engineering explorer.exe, we determined it to be ExByte, a GoLang-based tool developed and commonly used in BlackByte ransomware attacks for collection and exfiltration of files from victim networks. This tool is capable of enumerating files of interest across the network and, upon execution, creates a log file containing a list of files and associated metadata. Multiple log files were uncovered during the investigation in the path:

  • C:\Exchange\MSExchLog.log

Analysis of the binary revealed a list of file extensions that are targeted for enumeration.

Figure-2.-Binary-analysis-showing-file-extensions-enumerated-by-explorer.exe_
Figure 2. Binary analysis showing file extensions enumerated by explorer.exe

Forensic analysis identified a file named data.txt that was created and later deleted after ExByte execution. This file contained obfuscated credentials that ExByte leveraged to authenticate to the popular file sharing platform Mega NZ using the platform’s API at:

  • hxxps://g.api.mega.co[.]nz
Figure 3. Binary analysis showing explorer.exe functionality for connecting to file sharing service MEGA NZ

We also determined that this version of Exbyte was crafted specifically for the victim, as it contained a hardcoded device name belonging to the victim and an internal IP address.

ExByte execution flow

Upon execution, ExByte decodes several strings and checks if the process is running with privileged access by reading \\.\PHYSICALDRIVE0:

  • If this check fails, ShellExecuteW is invoked with the IpOperation parameter RunAs, which runs explorer.exe with elevated privileges.

After this access check, explorer.exe attempts to read the data.txt file in the current location:

  • If the text file doesn’t exist, it invokes a command for self-deletion and exits from memory:
C:\Windows\system32\cmd.exe /c ping 1.1.1.1 -n 10 > nul & Del <PATH>\explorer.exe /F /Q
  • If data.txt exists, explorer.exe reads the file, passes the buffer to Base64 decode function, and then decrypts the data using the key provided in the command line. The decrypted data is then parsed as JSON below and fed for login function:
{    “a”:”us0”,    “user”:”<CONTENT FROM data.txt>”}

Finally, it forms a URL for sign-in to the API of the service MEGA NZ:

  • hxxps://g.api.mega.co[.]nz/cs?id=1674017543

Data encryption and destruction

On devices where files were successfully encrypted, we identified suspicious executables, detected by Microsoft Defender Antivirus as Trojan:Win64/BlackByte!MSR, with the following names:

  • wEFT.exe
  • schillerized.exe

The files were analyzed and determined to be BlackByte 2.0 binaries responsible for encryption across the environment. The binaries require an 8-digit key number to encrypt files.

Two modes of execution were identified:

  • When the -s parameter is provided, the ransomware self-deletes and encrypts the machine it was executed on.
  • When the -a parameter is provided, the ransomware conducts enumeration and uses an Ultimate Packer Executable (UPX) packed version of PsExec to deploy across the network. Several domain admin credentials were hardcoded in the binary, facilitating the deployment of the binary across the network.

Depending on the switch (-s or -a), execution may create the following files:

  • C:\SystemData\M8yl89s7.exe (UPX-packed PsExec with a random name; SHA-256: ba3ec3f445683d0d0407157fda0c26fd669c0b8cc03f21770285a20b3133098f)
  • C:\SystemData\wEFT.exe (Additional BlackByte binary)
  • C:\SystemData\MsExchangeLog1.log (Log file)
  • C:\SystemData\rENEgOtiAtES (A vulnerable (CVE-2019-16098) driver RtCore64.sys used to evade detection by installed antivirus software; SHA-256: 01aa278b07b58dc46c84bd0b1b5c8e9ee4e62ea0bf7a695862444af32e87f1fd)
  • C:\SystemData\iHu6c4.ico (Random name – BlackBytes icon)
  • C:\SystemData\BB_Readme_file.txt (BlackByte ReadMe file)
  • C:\SystemData\skip_bypass.txt (Unknown)

BlackByte 2.0 ransomware capabilities

Some capabilities identified for the BlackByte 2.0 ransomware were:

  • Antivirus bypass
    • The file rENEgOtiAtES created matches RTCore64.sys, a vulnerable driver (CVE-2049-16098) that allows any authenticated user to read or write to arbitrary memory
    • The BlackByte binary then creates and starts a service named RABAsSaa calling rENEgOtiAtES, and exploits this service to evade detection by installed antivirus software
  • Process hollowing
    • Invokes svchost.exe, injects to it to complete device encryption, and self-deletes by executing the following command:
      • cmd.exe /c ping 1.1.1.1 -n 10 > Nul & Del “PATH_TO_BLACKBYTE” /F /Q
  • Modification / disabling of Windows Firewall
    • The following commands are executed to either modify existing Windows Firewall rules, or to disable Windows Firewall entirely:
      • cmd /c netsh advfirewall set allprofiles state off
      • cmd /c netsh advfirewall firewall set rule group=”File and Printer Sharing” new enable=Yes
      • cmd /c netsh advfirewall firewall set rule group=”Network Discovery” new enable=Yes
  • Modification of volume shadow copies
    • The following commands are executed to destroy volume shadow copies on the machine:
      • cmd /c vssadmin Resize ShadowStorge /For=B:\ /On=B:\ /MaxSize=401MB
      • cmd /c vssadmin Resize ShadowStorage /For=B:\ /On=B:\ /MaxSize=UNBOUNDED
  • Modification of registry keys/values
    • The following commands are executed to modify the registry, facilitating elevated execution on the device:
      • cmd /c reg add HKLM\SOFTWARE\Microsoft\Windows\CurrentVersion\Policies\System /v LocalAccountTokenFilterPolicy /t REG_DWORD /d 1 /f
      • cmd /c reg add HKLM\SOFTWARE\Microsoft\Windows\CurrentVersion\Policies\System /v EnableLinkedConnections /t REG_DWORD /d 1 /f
      • cmd /c reg add HKLM\\SYSTEM\\CurrentControlSet\\Control\\FileSystem /v LongPathsEnabled /t REG_DWORD /d 1 /f
  • Additional functionality
    • Ability to terminate running services and processes
    • Ability to enumerate and mount volumes and network shares for encryption
    • Perform anti-forensics technique timestomping (sets the file time of encrypted and ReadMe file to 2000-01-01 00:00:00)
    • Ability to perform anti-debugging techniques

Recommendations

To guard against BlackByte ransomware attacks, Microsoft recommends the following:

  • Ensure that you have a patch management process in place and that patching for internet-exposed devices is prioritized; Understand and assess your cyber exposure with advanced vulnerability and configuration assessment tools like Microsoft Defender Vulnerability Management
  • Implement an endpoint detection and response (EDR) solution like Microsoft Defender for Endpoint to gain visibility into malicious activity in real time across your network
  • Ensure antivirus protections are updated regularly by turning on cloud-based protection and that your antivirus solution is configured to block threats
  • Enable tamper protection to prevent components of Microsoft Defender Antivirus from being disabled
  • Block inbound traffic from IPs specified in the indicators of compromise section of this report
  • Block inbound traffic from TOR exit nodes
  • Block inbound access from unauthorized public VPN services
  • Restrict administrative privileges to prevent authorized system changes

Conclusion

BlackByte ransomware attacks target organizations that have infrastructure with unpatched vulnerabilities.  As outlined in the Microsoft Digital Defense Report, common security hygiene practices, including keeping systems up to date, could protect against 98% of attacks.

As new tools are being developed by threat actors, a modern threat protection solution like Microsoft 365 Defender is necessary to prevent and detect the multiple techniques used in the attack chain, especially where the threat actor attempts to evade or disable specific defense mechanisms. Hunting for malicious behavior should be performed regularly in order to detect potential attacks that could evade detections, as a complementary activity for continuous monitoring from security tools alerts and incidents.

To understand how Microsoft can help you secure your network and respond to network compromise, visit https://aka.ms/MicrosoftIR.

Microsoft 365 Defender detections

Microsoft Defender Antivirus

Microsoft Defender Antivirus detects this threat as the following malware:

  • Trojan:Win32/Kovter!MSR
  • Trojan:Win64/WinGoObfusc.LK!MT
  • Trojan:Win64/BlackByte!MSR
  • HackTool:Win32/AdFind!MSR
  • Trojan:Win64/CobaltStrike!MSR

Microsoft Defender for Endpoint

The following alerts might indicate threat activity related to this threat. Note, however, that these alerts can be also triggered by unrelated threat activity.

  • ‘CVE-2021-31207’ exploit malware was detected
  • An active ‘NetShDisableFireWall’ malware in a command line was prevented from executing.
  • Suspicious registry modification.
  • ‘Rtcore64’ hacktool was detected
  • Possible ongoing hands-on-keyboard activity (Cobalt Strike)
  • A file or network connection related to a ransomware-linked emerging threat activity group detected
  • Suspicious sequence of exploration activities
  • A process was injected with potentially malicious code
  • Suspicious behavior by cmd.exe was observed
  • ‘Blackbyte’ ransomware was detected

Microsoft Defender Vulnerability Management

Microsoft Defender Vulnerability Management surfaces devices that may be affected by the following vulnerabilities used in this threat:

  • CVE-2021-34473
  • CVE-2021-34523
  • CVE-2021-31207
  • CVE-2019-16098

Hunting queries

Microsoft 365 Defender

Microsoft 365 Defender customers can run the following query to find related activity in their networks:

ProxyShell web shell creation events

DeviceProcessEvents| where ProcessCommandLine has_any ("ExcludeDumpster","New-ExchangeCertificate") and ProcessCommandLine has_any ("-RequestFile","-FilePath")

Suspicious vssadmin events

DeviceProcessEvents| where ProcessCommandLine has_any ("vssadmin","vssadmin.exe") and ProcessCommandLine has "Resize ShadowStorage" and ProcessCommandLine has_any ("MaxSize=401MB"," MaxSize=UNBOUNDED")

Detection for persistence creation using Registry Run keys

DeviceRegistryEvents | where ActionType == "RegistryValueSet" | where (RegistryKey has @"Microsoft\Windows\CurrentVersion\RunOnce" and RegistryValueName == "MsEdgeMsE")      or (RegistryKey has @"Microsoft\Windows\CurrentVersion\RunOnceEx" and RegistryValueName == "MsEdgeMsE")    or (RegistryKey has @"Microsoft\Windows\CurrentVersion\Run" and RegistryValueName == "MsEdgeMsE")| where RegistryValueData startswith @"rundll32"| where RegistryValueData endswith @".dll,Default"| project Timestamp,DeviceId,DeviceName,ActionType,RegistryKey,RegistryValueName,RegistryValueData

Microsoft Sentinel

Microsoft Sentinel customers can use the TI Mapping analytics (a series of analytics all prefixed with ‘TI map’) to automatically match the malicious domain indicators mentioned in this blog post with data in their workspace. If the TI Map analytics are not currently deployed, customers can install the Threat Intelligence solution from the Microsoft Sentinel Content Hub to have the analytics rule deployed in their Sentinel workspace. More details on the Content Hub can be found here:  https://learn.microsoft.com/azure/sentinel/sentinel-solutions-deploy

Microsoft Sentinel also has a range of detection and threat hunting content that customers can use to detect the post exploitation activity detailed in this blog in addition to Microsoft 365 Defender detections list above.

Indicators of compromise

The table below shows IOCs observed during our investigation. We encourage our customers to investigate these indicators in their environments and implement detections and protections to identify past related activity and prevent future attacks against their systems.

IndicatorTypeDescription
4a066569113a569a6feb8f44257ac8764ee8f2011765009fdfd82fe3f4b92d3eSHA-256api-msvc.dll (Backdoor installed through RunKeys)
5f37b85687780c089607670040dbb3da2749b91b8adc0aa411fd6280b5fa7103SHA-256sys.exe (Cobalt Strike Beacon)
01aa278b07b58dc46c84bd0b1b5c8e9ee4e62ea0bf7a695862444af32e87f1fdSHA-256rENEgOtiAtES (Vulnerable driver RtCore64.sys created by BlackByte binary)
ba3ec3f445683d0d0407157fda0c26fd669c0b8cc03f21770285a20b3133098fSHA-256[RANDOM_NAME].exe (UPX Packed PsExec created by BlackByte binary)
1b9badb1c646a19cdf101ac4f6fdd23bc61eaab8c9f925eb41848cea9fd0738eSHA-256“netscan.exe”, “netapp.exe (Netscan network discovery tool)
f157090fd3ccd4220298c06ce8734361b724d80459592b10ac632acc624f455eSHA-256AdFind.exe (Active Directory information gathering tool)
hxxps://myvisit[.]alteksecurity[.]org/tURLC2 for backdoor api-msvc.dll
hxxps://temp[.]sh/szAyn/sys.exeURLDownload URL for sys.exe
109.206.243[.]59IP AddressC2 for Cobalt Strike Beacon sys.exe
185.225.73[.]244IP AddressOriginating IP address for ProxyShell exploitation and web shell interaction

NOTE: These indicators should not be considered exhaustive for this observed activity.

Appendix

File extensions targeted by BlackByte binary for encryption:

.4dd.4dl.accdb.accdc.accde.accdr.accdt.accft
.adb.ade.adf.adp.arc.ora.alf.ask
.btr.bdf.cat.cdb.ckp.cma.cpd.dacpac
.dad.dadiagrams.daschema.db.db-shm.db-wal.db3.dbc
.dbf.dbs.dbt.dbv. dbx. dcb. dct. dcx
. ddl. dlis. dp1. dqy. dsk. dsn. dtsx. dxl
. eco. ecx. edb. epim. exb. fcd. fdb. fic
. fmp. fmp12. fmpsl. fol.fp3. fp4. fp5. fp7
. fpt. frm. gdb. grdb. gwi. hdb. his. ib
. idb. ihx. itdb. itw. jet. jtx. kdb. kexi
. kexic. kexis. lgc. lwx. maf. maq. mar. masmav
. mdb. mpd. mrg. mud. mwb. myd. ndf. nnt
. nrmlib. ns2. ns3. ns4. nsf. nv. nv2. nwdb
. nyf. odb. ogy. orx. owc. p96. p97. pan
. pdb. pdm. pnz. qry. qvd. rbf. rctd. rod
. rodx. rpd. rsd. sas7bdat. sbf. scx. sdb. sdc
. sdf. sis. spg. sql. sqlite. sqlite3. sqlitedb. te
. temx. tmd. tps. trc. trm. udb. udl. usr
. v12. vis. vpd. vvv. wdb. wmdb. wrk. xdb
. xld. xmlff. abcddb. abs. abx. accdw. and. db2
. fm5. hjt. icg. icr. kdb. lut. maw. mdn
. mdt       

Shared folders targeted for encryption (Example: \\[IP address]\Downloads):

UsersBackupVeeamhomeshome
mediacommonStorage ServerPublicWeb
ImagesDownloadsBackupDataActiveBackupForBusinessBackups
NAS-DCDCBACKUPDirectorFilesshare 

File extensions ignored:

.ini.url.msilog.log.ldf.lock.theme.msi
.sys.wpx.cpl.adv.msc.scr.key.ico
.dll.hta.deskthemepack.nomedia.msu.rtp.msp.idx
.ani.386.diagcfg.bin.mod.ics.com.hlp
 .spl.nls.cab.exe.diagpkg.icl.ocx.rom
.prf.thempack.msstyles.icns.mpa.drv.cur.diagcab
.cmd.shs      

Folders ignored:

windowsbootprogram files (x86)windows.oldprogramdata
intelbitdefendertrend microwindowsappsappdata
application datasystem volume informationperflogsmsocache 

Files ignored:

bootnxtntldrbootmgrthumbs.db
ntuser.datbootsect.bakautoexec.baticoncache.db
bootfont.bin   

Processes terminated:

teracopyteamviewernsservicensctrluranium
processhackerprocmonpestudioprocmon64x32dbg
x64dbgcff explorerprocexppslisttcpview
tcpvcondbgviewrammaprammap64vmmap
ollydbgautorunsautorunsscfilemonregmon
idaqidaq64immunitydebuggerwiresharkdumpcap
hookexplorerimportrecpetoolslordpesysinspector
proc_analyzersysanalyzersniff_hitwindbgjoeboxcontrol
joeboxserverresourcehackerfiddlerhttpdebuggerdumpit
rammaprammap64vmmapagntsvccntaosmgr
dbeng50dbsnmpencsvcinfopathisqlplussvc
mbamtraymsaccessmsftesqlmspubmydesktopqos
mydesktopservicemysqldmysqld-ntmysqld-optNtrtscan
ocautoupdsocommocssdonenoteoracle
outlookPccNTMonpowerpntsqbcoreservicesql
sqlagentsqlbrowsersqlservrsqlwritersteam
synctimetbirdconfigthebatthebat64thunderbird
tmlistenvisiowinwordwordpadxfssvccon
zoolz    

Services terminated:

CybereasonRansomFreevnetdbpcdSamSsTeraCopyService
msftesqlnsServiceklvssbridge64vapiendpointShMonitor
SmcinstSmcServiceSntpServicesvcGenericHostSwi_
TmCCSFtmlistenTrueKeyTrueKeySchedulerTrueKeyServiceHelper
WRSVCMcTaskManagerOracleClientCache80mfefirewbengine
mfemmsRESvcmfevtpsacsvrSAVAdminService
SepMasterServicePDVFSServiceESHASRVSDRSVCFA_Scheduler
KAVFSKAVFS_KAVFSGTkavfsslpklnagentmacmnsvc
masvcMBAMServiceMBEndpointAgentMcShieldaudioendpointbuilder
AntivirusAVPDCAgentbedbgEhttpSrv
MMSekrnEPSecurityServiceEPUpdateServicentrtscan
EsgShKernelmsexchangeadtopologyAcrSch2SvcMSOLAP$TPSAMAIntel(R) PROSet Monitoring
msexchangeimap4ARSMunistoresvc_1af40aReportServer$TPSMSOLAP$SYSTEM_BGC
W3SvcMSExchangeSRSReportServer$TPSAMAZoolz 2 ServiceMSOLAP$TPS
aphidmonitorserviceSstpSvcMSExchangeMTAReportServer$SYSTEM_BGCSymantec System Recovery
UI0DetectMSExchangeSAMSExchangeISReportServerMsDtsServer110
POP3SvcMSExchangeMGMTSMTPSvcMsDtsServerIisAdmin
MSExchangeESEraserSvc11710Enterprise Client ServiceMsDtsServer100NetMsmqActivator
stc_raw_agentVSNAPVSSPDVFSServiceAcrSch2SvcAcronis
CASAD2DWebSvcCAARCUpdateSvcMcAfeeavpsusDLPAgentService
mfewcBMR Boot ServiceDefWatchccEvtMgrccSetMgr
SavRoamRTVsc screenconnectransomsqltelemetrymsexch
vncteamviewermsolapveeambackup
sqlmemtasvsssophossvc$
mepocswuauserv   

Drivers that Blackbyte can bypass:

360avflt.sys360box.sys360fsflt.sys360qpesv.sys5nine.cbt.sys
a2acc.sysa2acc64.sysa2ertpx64.sysa2ertpx86.sysa2gffi64.sys
a2gffx64.sysa2gffx86.sysaaf.sysaalprotect.sysabrpmon.sys
accessvalidator.sysacdriver.sysacdrv.sysadaptivaclientcache32.sysadaptivaclientcache64.sys
adcvcsnt.sysadspiderdoc.sysaefilter.sysagentrtm64.sysagfsmon.sys
agseclock.sysagsyslock.sysahkamflt.sysahksvpro.sysahkusbfw.sys
ahnrghlh.sysaictracedrv_am.sysairship-filter.sysajfsprot.sysalcapture.sys
alfaff.sysaltcbt.sysamfd.sysamfsm.sysamm6460.sys
amm8660.sysamsfilter.sysamznmon.sysantileakfilter.sysantispyfilter.sys
anvfsm.sysapexsqlfilterdriver.sysappcheckd.sysappguard.sysappvmon.sys
arfmonnt.sysarta.sysarwflt.sysasgard.sysashavscan.sys
asiofms.sysaswfsblk.sysaswmonflt.sysaswsnx.sysaswsp.sys
aszfltnt.sysatamptnt.sysatc.sysatdragent.sysatdragent64.sys
aternityregistryhook.sysatflt.sysatrsdfw.sysauditflt.sysaupdrv.sys
avapsfd.sysavc3.sysavckf.sysavfsmn.sysavgmfi64.sys
avgmfrs.sysavgmfx64.sysavgmfx86.sysavgntflt.sysavgtpx64.sys
avgtpx86.sysavipbb.sysavkmgr.sysavmf.sysawarecore.sys
axfltdrv.sysaxfsysmon.sysayfilter.sysb9kernel.sysbackupreader.sys
bamfltr.sysbapfecpt.sysbbfilter.sysbd0003.sysbddevflt.sys
bdfiledefend.sysbdfilespy.sysbdfm.sysbdfsfltr.sysbdprivmon.sys
bdrdfolder.sysbdsdkit.sysbdsfilter.sysbdsflt.sysbdsvm.sys
bdsysmon.sysbedaisy.sysbemk.sysbfaccess.sysbfilter.sys
bfmon.sysbhdrvx64.sysbhdrvx86.sysbhkavka.sysbhkavki.sys
bkavautoflt.sysbkavsdflt.sysblackbirdfsa.sysblackcat.sysbmfsdrv.sys
bmregdrv.sysboscmflt.sysbosfsfltr.sysbouncer.sysboxifier.sys
brcow_x_x_x_x.sysbrfilter.sysbrnfilelock.sysbrnseclock.sysbrowsermon.sys
bsrfsflt.sysbssaudit.sysbsyaed.sysbsyar.sysbsydf.sys
bsyirmf.sysbsyrtm.sysbsysp.sysbsywl.sysbwfsdrv.sys
bzsenspdrv.sysbzsenth.sysbzsenyaradrv.syscaadflt.syscaavfltr.sys
cancelsafe.syscarbonblackk.syscatflt.syscatmf.syscbelam.sys
cbfilter20.syscbfltfs4.syscbfsfilter2017.syscbfsfilter2020.syscbsampledrv.sys
cdo.syscdrrsflt.syscdsgfsfilter.syscentrifyfsf.syscfrmd.sys
cfsfdrvcgwmf.syschange.syschangelog.syschemometecfilter.sys
ciscoampcefwdriver.sysciscoampheurdriver.sysciscosam.sysclumiochangeblockmf.syscmdccav.sys
cmdcwagt.syscmdguard.syscmdmnefs.syscmflt.syscode42filter.sys
codex.sysconduantfsfltr.syscontainermonitor.syscpavfilter.syscpavkernel.sys
cpepmon.syscrexecprev.syscrncache32.syscrncache64.syscrnsysm.sys
cruncopy.syscsaam.syscsaav.syscsacentr.syscsaenh.sys
csagent.syscsareg.syscsascr.syscsbfilter.syscsdevicecontrol.sys
csfirmwareanalysis.syscsflt.syscsmon.syscssdlp.sysctamflt.sys
ctifile.sysctinet.sysctrpamon.sysctx.syscvcbt.sys
cvofflineflt32.syscvofflineflt64.syscvsflt.syscwdriver.syscwmem2k64.sys
cybkerneltracker.syscylancedrv64.syscyoptics.syscyprotectdrv32.syscyprotectdrv64.sys
cytmon.syscyverak.syscyvrfsfd.syscyvrlpc.syscyvrmtgn.sys
datanow_driver.sysdattofsf.sysda_ctl.sysdcfafilter.sysdcfsgrd.sys
dcsnaprestore.sysdeepinsfs.sysdelete_flt.sysdevmonminifilter.sysdfmfilter.sys
dgedriver.sysdgfilter.sysdgsafe.sysdhwatchdog.sysdiflt.sys
diskactmon.sysdkdrv.sysdkrtwrt.sysdktlfsmf.sysdnafsmonitor.sys
docvmonk.sysdocvmonk64.sysdpmfilter.sysdrbdlock.sysdrivesentryfilterdriver2lite.sys
drsfile.sysdrvhookcsmf.sysdrvhookcsmf_amd64.sysdrwebfwflt.sysdrwebfwft.sys
dsark.sysdsdriver.sysdsfemon.sysdsflt.sysdsfltfs.sys
dskmn.sysdtdsel.sysdtpl.sysdwprot.sysdwshield.sys
dwshield64.syseamonm.syseaseflt.syseasyanticheat.syseaw.sys
ecatdriver.sysedevmon.sysednemfsfilter.sysedrdrv.sysedrsensor.sys
edsigk.syseectrl.syseetd32.syseetd64.syseeyehv.sys
eeyehv64.sysegambit.sysegfilterk.sysegminflt.sysegnfsflt.sys
ehdrv.syselock2fsctldriver.sysemxdrv2.sysenigmafilemondriver.sysenmon.sys
epdrv.sysepfw.sysepfwwfp.sysepicfilter.sysepklib.sys
epp64.sysepregflt.syseps.sysepsmn.sysequ8_helper.sys
eraser.sysesensor.sysesprobe.sysestprmon.sysestprp.sys
estregmon.sysestregp.sysestrkmon.sysestrkr.syseventmon.sys
evmf.sysevscase.sysexcfs.sysexprevdriver.sysfailattach.sys
failmount.sysfam.sysfangcloud_autolock_driver.sysfapmonitor.sysfarflt.sys
farwflt.sysfasdriverfcnotify.sysfcontrol.sysfdrtrace.sys
fekern.sysfencry.sysffcfilt.sysffdriver.sysfildds.sys
filefilter.sysfileflt.sysfileguard.sysfilehubagent.sysfilemon.sys
filemonitor.sysfilenamevalidator.sysfilescan.sysfilesharemon.sysfilesightmf.sys
filesystemcbt.sysfiletrace.sysfile_monitor.sysfile_protector.sysfile_tracker.sys
filrdriver.sysfim.sysfiometer.sysfiopolicyfilter.sysfjgsdis2.sys
fjseparettifilterredirect.sysflashaccelfs.sysflightrecorder.sysfltrs329.sysflyfs.sys
fmdrive.sysfmkkc.sysfmm.sysfortiaptfilter.sysfortimon2.sys
fortirmon.sysfortishield.sysfpav_rtp.sysfpepflt.sysfsafilter.sys
fsatp.sysfsfilter.sysfsgk.sysfshs.sysfsmon.sys
fsmonitor.sysfsnk.sysfsrfilter.sysfstrace.sysfsulgk.sys
fsw31rj1.sysgagsecurity.sysgbpkm.sysgcffilter.sysgddcv.sys
gefcmp.sysgemma.sysgeprotection.sysggc.sysgibepcore.sys
gkff.sysgkff64.sysgkpfcb.sysgkpfcb64.sysgofsmf.sys
gpminifilter.sysgroundling32.sysgroundling64.sysgtkdrv.sysgumhfilter.sys
gzflt.syshafsnk.syshbflt.syshbfsfltr.syshcp_kernel_acq.sys
hdcorrelatefdrv.syshdfilemon.syshdransomoffdrv.syshdrfs.sysheimdall.sys
hexisfsmonitor.syshfileflt.syshiofs.syshmpalert.syshookcentre.sys
hooksys.syshpreg.syshsmltmon.syshsmltwhl.syshssfwhl.sys
hvlminifilter.sysibr2fsk.sysiccfileioad.sysiccfilteraudit.sysiccfiltersc.sys
icfclientflt.sysicrlmonitor.sysiderafilterdriver.sysielcp.sysieslp.sys
ifs64.sysignis.sysiguard.sysiiscache.sysikfilesec.sys
im.sysimffilter.sysimfilter.sysimgguard.sysimmflex.sys
immunetprotect.sysimmunetselfprotect.sysinisbdrv64.sysino_fltr.sysintelcas.sys
intmfs.sysinuse.sysinvprotectdrv.sysinvprotectdrv64.sysionmonwdrv.sys
iothorfs.sysipcomfltr.sysipfilter.sysiprotect.sysiridiumswitch.sys
irongatefd.sysisafekrnl.sysisafekrnlmon.sysisafermonisecureflt.sys
isedrv.sysisfpdrv.sysisirmfmon.sysisregflt.sysisregflt64.sys
issfltr.sysissregistry.sysit2drv.sysit2reg.sysivappmon.sys
iwdmfs.sysiwhlp.sysiwhlp2.sysiwhlpxp.sysjdppsf.sys
jdppwf.sysjkppob.sysjkppok.sysjkpppf.sysjkppxk.sys
k7sentry.syskavnsi.syskawachfsminifilter.syskc3.syskconv.sys
kernelagent32.syskewf.syskfac.syskfileflt.syskisknl.sys
klam.sysklbg.sysklboot.syskldback.syskldlinf.sys
kldtool.sysklfdefsf.sysklflt.sysklgse.sysklhk.sys
klif.sysklifaa.sysklifks.sysklifsm.sysklrsps.sys
klsnsr.sysklupd_klif_arkmon.syskmkuflt.syskmnwch.syskmxagent.sys
kmxfile.syskmxsbx.sysksfsflt.sysktfsfilter.sysktsyncfsflt.sys
kubwksp.syslafs.syslbd.syslbprotect.syslcgadmon.sys
lcgfile.syslcgfilemon.syslcmadmon.syslcmfile.syslcmfilemon.sys
lcmprintmon.sysldsecdrv.syslibwamf.syslivedrivefilter.sysllfilter.sys
lmdriver.syslnvscenter.syslocksmith.syslragentmf.syslrtp.sys
magicbackupmonitor.sysmagicprotect.sysmajoradvapi.sysmarspy.sysmaxcryptmon.sys
maxproc64.sysmaxprotector.sysmbae64.sysmbam.sysmbamchameleon.sys
mbamshuriken.sysmbamswissarmy.sysmbamwatchdog.sysmblmon.sysmcfilemon32.sys
mcfilemon64.sysmcstrg.sysmearwfltdriver.sysmessage.sysmfdriver.sys
mfeaack.sysmfeaskm.sysmfeavfk.sysmfeclnrk.sysmfeelamk.sys
mfefirek.sysmfehidk.sysmfencbdc.sysmfencfilter.sysmfencoas.sys
mfencrk.sysmfeplk.sysmfewfpk.sysminiicpt.sysminispy.sys
minitrc.sysmlsaff.sysmmpsy32.sysmmpsy64.sysmonsterk.sys
mozycorpfilter.sysmozyenterprisefilter.sysmozyentfilter.sysmozyhomefilter.sysmozynextfilter.sys
mozyoemfilter.sysmozyprofilter.sysmpfilter.sysmpkernel.sysmpksldrv.sys
mpxmon.sysmracdrv.sysmrxgoogle.sysmscan-rt.sysmsiodrv4.sys
msixpackagingtoolmonitor.sysmsnfsflt.sysmspy.sysmssecflt.sysmtsvcdf.sys
mumdi.sysmwac.sysmwatcher.sysmwfsmfltr.sysmydlpmf.sys
namechanger.sysnanoavmf.sysnaswsp.sysndgdmk.sysneokerbyfilter
netaccctrl.sysnetaccctrl64.sysnetguard.sysnetpeeker.sysngscan.sys
nlcbhelpi64.sysnlcbhelpx64.sysnlcbhelpx86.sysnlxff.sysnmlhssrv01.sys
nmpfilter.sysnntinfo.sysnovashield.sysnowonmf.sysnpetw.sys
nprosec.sysnpxgd.sysnpxgd64.sysnravwka.sysnrcomgrdka.sys
nrcomgrdki.sysnregsec.sysnrpmonka.sysnrpmonki.sysnsminflt.sys
nsminflt64.sysntest.sysntfsf.sysntguard.sysntps_fa.sys
nullfilter.sysnvcmflt.sysnvmon.sysnwedriver.sysnxfsmon.sys
nxrmflt.sysoadevice.sysoavfm.sysoczminifilter.sysodfsfilter.sys
odfsfimfilter.sysodfstokenfilter.sysoffsm.sysomfltlh.sysosiris.sys
ospfile_mini.sysospmon.sysparity.syspassthrough.syspath8flt.sys
pavdrv.syspcpifd.syspctcore.syspctcore64.syspdgenfam.sys
pecfilter.sysperfectworldanticheatsys.syspervac.syspfkrnl.syspfracdrv.sys
pgpfs.syspgpwdefs.sysphantomd.sysphdcbtdrv.syspkgfilter.sys
pkticpt.sysplgfltr.sysplpoffdrv.syspointguardvista64f.syspointguardvistaf.sys
pointguardvistar32.syspointguardvistar64.sysprocmon11.sysproggerdriver.syspsacfileaccessfilter.sys
pscff.syspsgdflt.syspsgfoctrl.syspsinfile.syspsinproc.sys
psisolator.syspwipf6.syspwprotect.syspzdrvxp.sysqdocumentref.sys
qfapflt.sysqfilter.sysqfimdvr.sysqfmon.sysqminspec.sys
qmon.sysqqprotect.sysqqprotectx64.sysqqsysmon.sysqqsysmonx64.sys
qutmdrv.sysranpodfs.sysransomdefensexxx.sysransomdetect.sysreaqtor.sys
redlight.sysregguard.sysreghook.sysregmonex.sysrepdrv.sys
repmon.sysrevefltmgr.sysreveprocprotection.sysrevonetdriver.sysrflog.sys
rgnt.sysrmdiskmon.sysrmphvmonitor.sysrpwatcher.sysrrmon32.sys
rrmon64.sysrsfdrv.sysrsflt.sysrspcrtw.sysrsrtw.sys
rswctrl.sysrswmon.sysrtologon.sysrtw.sysruaff.sys
rubrikfileaudit.sysruidiskfs.sysruieye.sysruifileaccess.sysruimachine.sys
ruiminispy.sysrvsavd.sysrvsmon.sysrw7fsflt.sysrwchangedrv.sys
ryfilter.sysryguard.syssafe-agent.syssafsfilter.syssagntflt.sys
sahara.syssakfile.syssakmfile.syssamflt.syssamsungrapidfsfltr.sys
sanddriver.syssanta.syssascan.syssavant.syssavonaccess.sys
scaegis.sysscauthfsflt.sysscauthiodrv.sysscensemon.sysscfltr.sys
scifsflt.syssciptflt.syssconnect.sysscred.syssdactmon.sys
sddrvldr.syssdvfilter.sysse46filter.syssecdodriver.syssecone_filemon10.sys
secone_proc10.syssecone_reg10.syssecone_usb.syssecrmm.syssecufile.sys
secure_os.syssecure_os_mf.syssecurofsd_x64.syssefo.syssegf.sys
segiraflt.syssegmd.syssegmp.syssentinelmonitor.sysserdr.sys
serfs.syssfac.syssfavflt.syssfdfilter.syssfpmonitor.sys
sgresflt.sysshdlpmedia.sysshdlpsf.syssheedantivirusfilterdriver.syssheedselfprotection.sys
shldflt.syssi32_file.syssi64_file.syssieflt.syssimrep.sys
sisipsfilefiltersk.sysskyamdrv.sysskyrgdrv.sysskywpdrv.sys
slb_guard.syssld.syssmbresilfilter.syssmdrvnt.syssndacs.sys
snexequota.syssnilog.syssnimg.syssnscore.syssnsrflt.sys
sodatpfl.syssoftfilterxxx.syssoidriver.syssolitkm.syssonar.sys
sophosdt2.syssophosed.syssophosntplwf.syssophossupport.sysspbbcdrv.sys
spellmon.sysspider3g.sysspiderg3.sysspiminifilter.sysspotlight.sys
sprtdrv.syssqlsafefilterdriver.syssrminifilterdrv.syssrtsp.syssrtsp64.sys
srtspit.sysssfmonm.sysssrfsf.sysssvhook.sysstcvsm.sys
stegoprotect.sysstest.sysstflt.sysstkrnl64.sysstoragedrv.sys
strapvista.sysstrapvista64.syssvcbt.sysswcommfltr.sysswfsfltr.sys
swfsfltrv2.sysswin.syssymafr.syssymefa.syssymefa64.sys
symefasi.syssymevent.syssymevent64x86.syssymevnt.syssymevnt32.sys
symhsm.syssymrg.syssysdiag.syssysmon.syssysmondrv.sys
sysplant.sysszardrv.sysszdfmdrv.sysszdfmdrv_usb.sysszedrdrv.sys
szpcmdrv.systaniumrecorderdrv.systaobserveflt.systbfsfilt.systbmninifilter.sys
tbrdrv.systdevflt.systedrdrv.systenrsafe2.systesmon.sys
tesxnginx.systesxporter.systffregnt.systfsflt.systgfsmf.sys
thetta.systhfilter.systhreatstackfim.systkdac2k.systkdacxp.sys
tkdacxp64.systkfsavxp.systkfsavxp64.systkfsft.systkfsft64.sys
tkpcftcb.systkpcftcb64.systkpl2k.systkpl2k64.systksp2k.sys
tkspxp.systkspxp64.systmactmon.systmcomm.systmesflt.sys
tmevtmgr.systmeyes.systmfsdrv2.systmkmsnsr.systmnciesc.sys
tmpreflt.systmumh.systmums.systmusa.systmxpflt.sys
topdogfsfilt.systrace.systrfsfilter.systritiumfltr.systrpmnflt.sys
trufos.systrustededgeffd.systsifilemon.systss.syststfilter.sys
tstfsredir.syststregredir.systsyscare.systvdriver.systvfiltr.sys
tvmfltr.systvptfile.systvspfltr.systwbdcfilter.systxfilefilter.sys
txregmon.sysuamflt.sysucafltdriver.sysufdfilter.sysuncheater.sys
upguardrealtime.sysusbl_ifsfltr.sysusbpdh.sysusbtest.sysuvmcifsf.sys
uwfreg.sysuwfs.sysv3flt2k.sysv3flu2k.sysv3ift2k.sys
v3iftmnt.sysv3mifint.sysvarpffmon.sysvast.sysvcdriv.sys
vchle.sysvcmfilter.sysvcreg.sysveeamfct.sysvfdrv.sys
vfilefilter.sysvfpd.sysvfsenc.sysvhddelta.sysvhdtrack.sys
vidderfs.sysvintmfs.sysvirtfile.sysvirtualagent.sysvk_fsf.sys
vlflt.sysvmwvvpfsd.sysvollock.sysvpdrvnt.sysvradfil2.sys
vraptdef.sysvraptflt.sysvrarnflt.sysvrbbdflt.sysvrexpdrv.sys
vrfsftm.sysvrfsftmx.sysvrnsfilter.sysvrsdam.sysvrsdcore.sys
vrsdetri.sysvrsdetrix.sysvrsdfmx.sysvrvbrfsfilter.sysvsepflt.sys
vsscanner.sysvtsysflt.sysvxfsrep.syswats_se.syswbfilter.sys
wcsdriver.syswdcfilter.syswdfilter.syswdocsafe.syswfp_mrt.sys
wgfile.syswhiteshield.syswindbdrv.syswindd.syswinfladrv.sys
winflahdrv.syswinfldrv.syswinfpdrv.syswinload.syswinteonminifilter.sys
wiper.syswlminisecmod.syswntgpdrv.syswraekernel.syswrcore.sys
wrcore.x64.syswrdwizfileprot.syswrdwizregprot.syswrdwizscanner.syswrdwizsecure64.sys
wrkrn.syswrpfv.syswsafefilter.syswscm.sysxcpl.sys
xendowflt.sysxfsgk.sysxhunter1.sysxhunter64.sysxiaobaifs.sys
xiaobaifsr.sysxkfsfd.sysxoiv8x64.sysxomfcbt8x64.sysyahoostorage.sys
yfsd.sysyfsd2.sysyfsdr.sysyfsrd.syszampit_ml.sys
zesfsmf.syszqfilter.syszsfprt.syszwasatom.syszwpxesvr.sys
zxfsfilt.syszyfm.syszzpensys.sys  

Further reading

For the latest security research from the Microsoft Threat Intelligence community, check out the Microsoft Threat Intelligence Blog: https://aka.ms/threatintelblog.

To get notified about new publications and to join discussions on social media, follow us on Twitter at https://twitter.com/MsftSecIntel.

Source :
https://www.microsoft.com/en-us/security/blog/2023/07/06/the-five-day-job-a-blackbyte-ransomware-intrusion-case-study/