In a large organization, its very quite common to have many domain and child domain names. While performing task automation for set of computers in domain, its best practice to get domain name of a computer.
In this article, I will explain how to get domain name using PowerShell script and command line (CMD)
Get-WmiObject class in PowerShell management library find the domain name for computer and wmic command-line utility to get domain name using command line (cmd)
Let’s understand how to get domain name in PowerShell and command line with below examples.
In the above PowerShell script, Get-WmiObject gets the WMI classes in the root\cimv2 namespace of computer and uses Win32_ComputerSystem to get computer system information.
Second command select Name and Domain name of a computer.
Output of above command to get domain name of a computer as below
PowerShell Get Domain Name
Using Get-AdDomainController to get domain name
PowerShell Get-AdDomainController cmdlet in Active Directory get one or more domain controllers based on search criteria.
You can get domain name of a computer in active directory using PowerShell Get-AdDomainController cmdlet as below
My Hyper-V host is Server 2012 R2. I have a virtual machine (Server 2012 R2) with a checkpoint. When I right click on the checkpoint, there is no “Delete checkpoint… ” option. I need to delete this checkpoint so that it is merged with the parent VHDX. What is the best method for doing this?
– Question from social.technet.microsoft.com
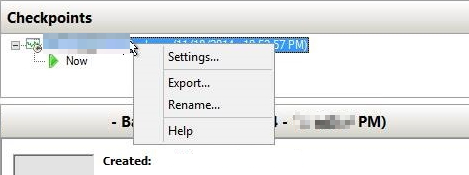
Have you ever encountered the situation where your Hyper-V cannot delete checkpoint because of “Delete” option missing? Right-clicking on the Hyper-V checkpoint, there are only “Settings”, “Export”, “Rename” and “Help” options left, why would this happen?
There are many reasons may cause Hyper-V snapshot delete option not available, such as connection error with the host, or a backup toolfailure. The most likely scenario is that the checkpoint created by a third-party tool was not deleted properly by the same tool.
More specifically, the checkpoints and associated .AVHDX files should be merged and deleted at the end of a backup – only the newer .AVHDX files should be kept. However, sometimes the checkpoints may be corrupted because the VM is in a locked or backed up state, or some other reason is preventing the deletion and merging. In this case, you may find the delete option missing, and Hyper-V cannot delete this checkpoint.
How to fix this? I will provide you 3 proven solutions, you can try them one by one. *They also work for cleaning up after a failed Hyper-V checkpoint.
How to solve Hyper-V cannot delete checkpoint (3 solutions)
When you are unable to delete checkpoint in Hyper-V, you can first try some regular troubleshooting means. If they cannot solve this issue, don’t worry, there are still some alternatives can help you delete Hyper-V checkpoint properly. I will cover all of them below.
Solution 1. Troubleshooting steps that you should try first
Before taking other measures, you can try some simple ways in Hyper-V Manager to see if you can make snapshot removal work. That is:
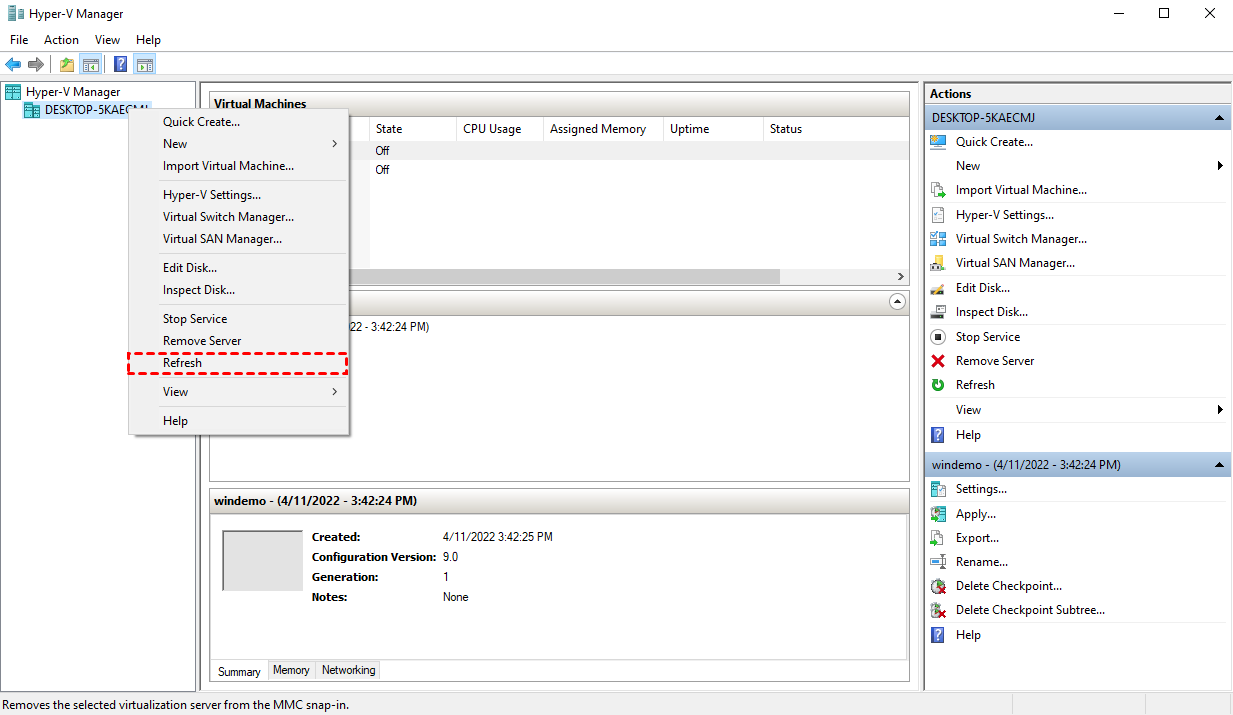
Right-click on the host name in Hyper-V Manager and select Refresh.
Close and restart the Hyper-V Manager.
Highlight the target checkpoint and use the [Delete] key on the keyboard. It should pop up a window confirming whether to delete the checkpoint or not.
If none of these ways can help, then you may need to try delete checkpoint Hyper-V with PowerShell.
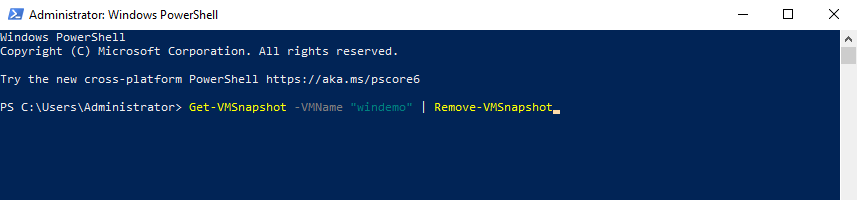
Solution 2. Properly delete Hyper-V checkpoint with PowerShell
Hyper-V PowerShell module is a bundle of cmdlets for creating, configuring and managing Microsoft Hyper-V hosts and virtual machines. It can be more a time efficient method than using GUI. You can use it remove any Hyper-V checkpoint that has no delete option.
Launch Windows PowerShell as administrator on the Hyper-V host, input and execute the following command to delete the checkpoint:
Once the command succeeded, you can see the merge progress for the particular VM. It may take some time depending on the snapshot size. After that, you should be able to modify the virtual machine configuration again.
If this method still cannot delete your Hyper-V checkpoint, turn to the next one.
Solution 3. Export and import Hyper-V VM to resolve checkpoint cannot delete
You can try Hyper-V export VM and import as suggested by some other users, which are also said can be used to solve the problem.
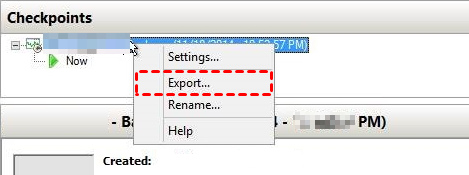
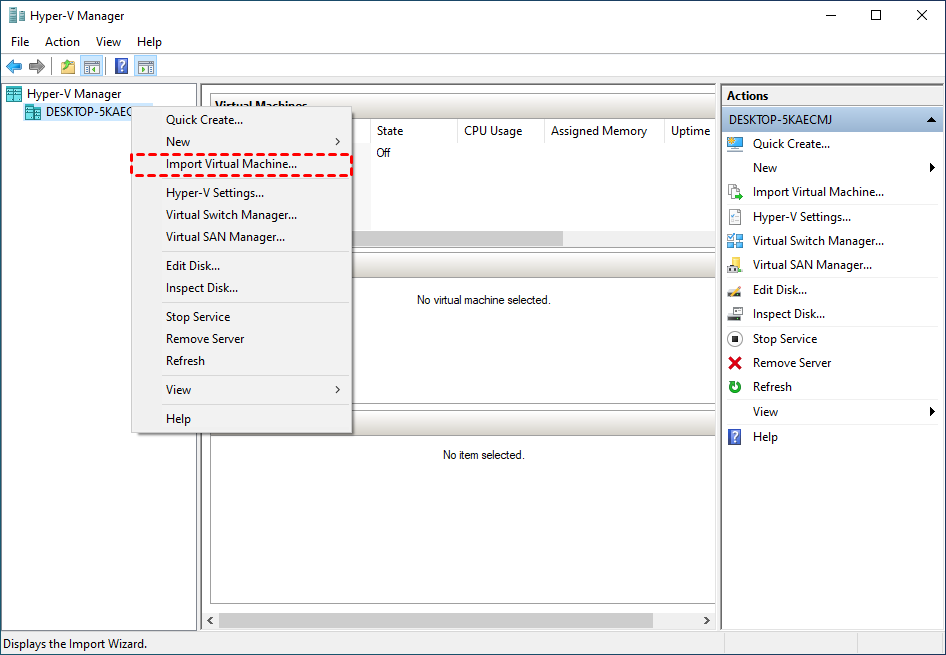
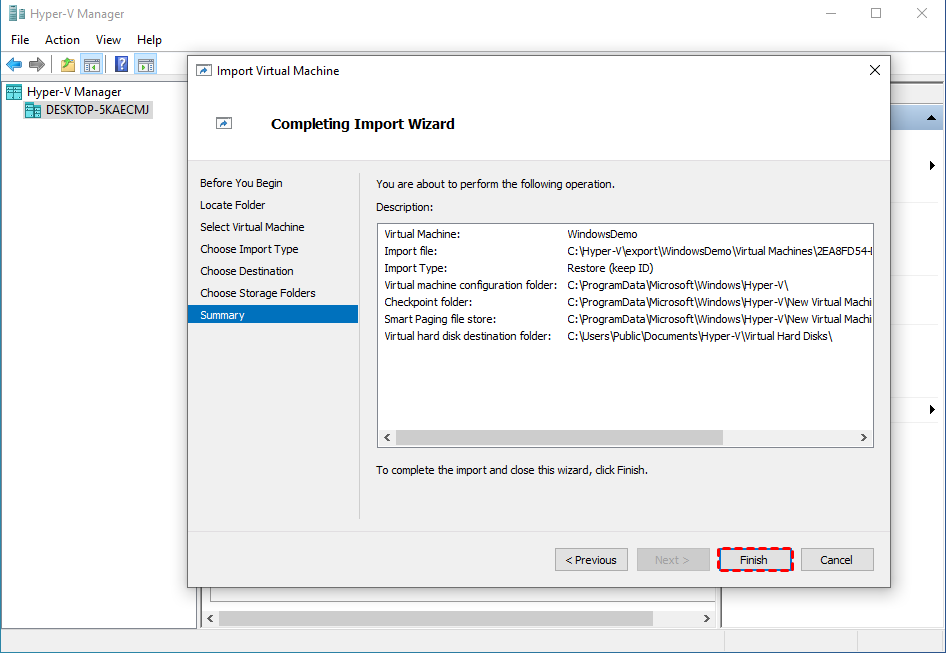
1. Launch Hyper-V Manager. Right-click on the name of the target checkpoint, and select Export…
2. In the pop-up window, click Browse to specify a network share as the storage destination to the exported files. And then click Export.
3. Right-click on the host name and select Import Virtual Machine… Click Next on the pop-up wizard.
4. On Locate Folder page, click Browse… to specify the folder containing the exported VM files. Click Next to continue.
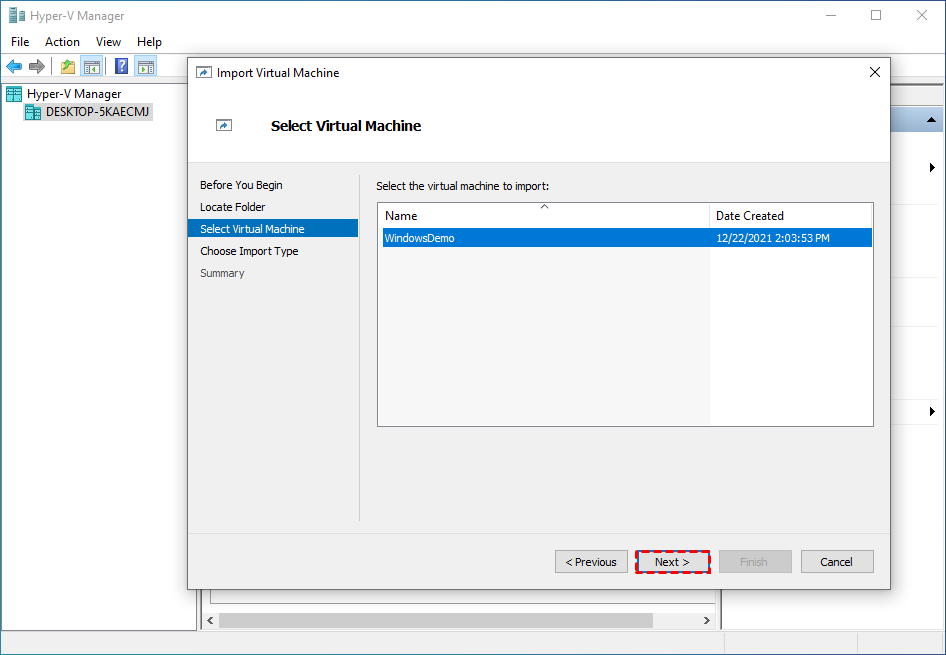
5. On Select Virtual Machine page, select the virtual machine to import, then click Next.
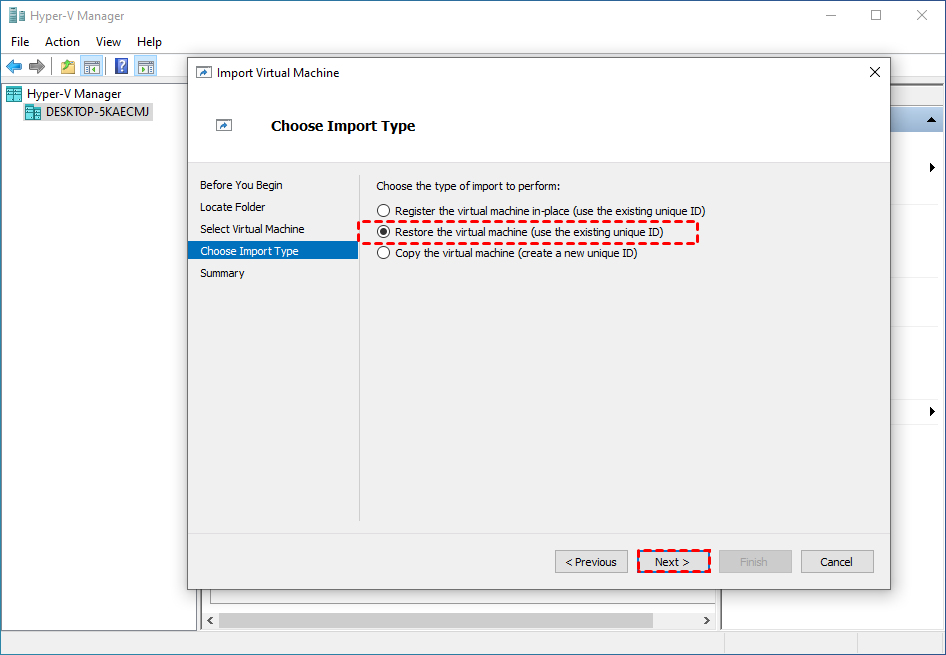
4. On Choose Import Type page, choose the type of import to perform:
Register the virtual machine in-place (use the existing unique ID): use the exported files in-place, and when the import has completed, the export files become the running state files and can’t be removed. The ID will be the same as the exported one.
Restore the virtual machine (use the existing unique ID): restore the VM to the specified or default location, with the same ID as the exported one. When the import has completed, the exported files remain intact and can be removed or imported again.
Copy the virtual machine (create a new unique ID): restore the VM to the specified or default location, and create a new unique ID. Which means the exported files remain intact and can be removed or imported again, and you can import the VM to the same host multiple times.
Click Next to continue.
5. Choose the second or the third option, the wizard will add 2 more pages for selecting storage.
On Choose Destination page, you can check Store the virtual machine in a different location option, and click Browse… to specify Virtual machine configuration folder, Checkpoint store, and Smart paging folder. Leave the option unchecked the wizard will import the files to default Hyper-V folders. Then click Next.
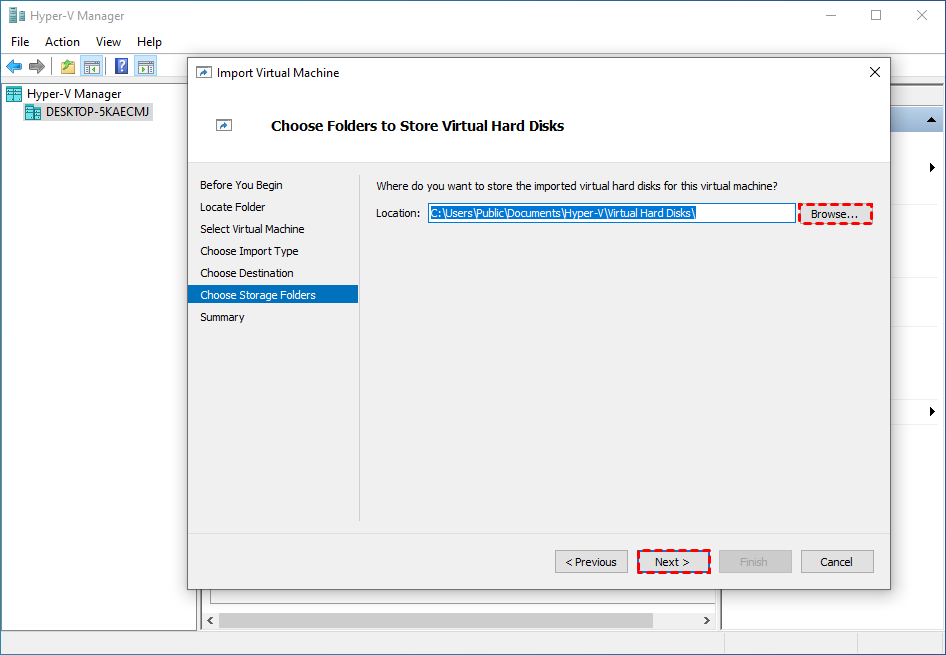
6. On Choose Storage Folders page, you can click Browse… to specify where you want to store the imported virtual hard disks for this VM, or leave the default location unchanged. Then click Next.
7. On Summary page, review the settings and click Finish to start restore.
Furthere reading: FAQ about Hyper-V delete checkpoint
The above describes how to solve the problem that the delete option disappears and the hyper-v checkpoint cannot be deleted. Besides, many users may have some other confusion about checkpoints. I have compiled some common questions and their answers here.
Q: Where are checkpoints stored on a Hyper-V host?
In general, the default location for storing checkpoint configuration files is:
And the default locations for storing AVHDX files (checkpoint storages) are:
Windows Server 2012R2 / Windows 8.1: C:UsersPublicDocumentsHyper-VVirtual Hard Disks
Windows Server 2012 / Windows 8: C:ProgramDataMicrosoftWindowsHyper-VNew Virtual MachineVirtual Hard Disks
Q: Can you directly delete checkpoint files (.avhdx)?
Whenever a checkpoint is deleted, Hyper-V merges the .vhdx and .avhdx files automatically, and the .avhdx files should be removed from the disk after the Hyper-V checkpoint merging process is complete. So a proper checkpoint deletion does not result in data loss.
It’s not a good idea to delete the .avhdx file in VM folder directly, because it may cause the checkpoint tree to fail.
The normal steps to delete a checkpoint is:
Open the Hyper-V Manager -> Select the virtual machine for which you need to remove checkpoints -> Locate the Checkpoints tab -> Right-click on the desired checkpoint -> click “Delete Checkpoint”. If asked to confirm the action, make sure the checkpoint is correct and click “Delete” again.
Note if you need to delete all subsequent checkpoints, right-click the earliest checkpoint and click “Delete Checkpoint Subtree”.
If you find some orphaned Hyper-V AVHDX files in the VM folder, but no snapshots on that VM, this may be because incomplete deletion or merging, you can refer to: delete Hyper-V AVHDX file without checkpoints.
Q: Hyper-V checkpoint delete vs merge
A checkpoint is any new change or save between the old state and the present, it stops writing to the actual disk and writes to the change disk.
Once you are satisfied and delete the checkpoint, the changes are written back/merged to the actual disk and are write enabled again. Therefore, deleting a checkpoint and merging a checkpoint are actuallythe same thing.
If you don’t want the changes, you just need to revert them and any changes since the checkpoint will be deleted.
Q: Can Hyper-V checkpoints be used as regular backup means?
The answer is NO. VM snapshot and backup are different from each other. Microsoft’s Hyper-V checkpoint is not a replacement of backup.
When you create a backup, you are creating a copy of your virtual machine. It stores complete data of VM. Backups in Hyper-V can be used to restore a whole VM and do not affect the performance.
When you create a checkpoint, you are creating a differencing disk based on the original virtual machine hard disk. If the original disk is damaged, the child disk is easy to be lost or damaged as well. All changes made after the checkpoint are re-directed to the child disk and leaves the original virtual machine disk read-only.
Meanwhile, checkpoints are running out of the memory of disk with a rapid speed, which will gradually to the poor performance of your virtual machines.
In short, Hyper-V checkpoint is just a secure “undo” button. If you want to test something quickly and restore the VM to a stable state, checkpoint in Hyper-V is convenient and fast to execute the process. But, if you want long-term and independent protection for VMs, you still need to find effective Hyper-V backup solution.
Better option for long-term protection: Image-based VM backup
As mentioned above, if you are looking for long-term data protection and the ability to quickly restore VMs to a usable state in the event of a disaster, then you are more suited to an image-based VM backup solution.
Here I’d like to introduce you AOMEI Cyber Backup, this free Hyper-V backup solution is designed to protect virtual machines from any data threats, whether you are using Hyper-V in Microsoft Windows Server 2022 / 2019 / 2016 / 2012 R2, Microsoft Windows 11 / 10 / 8 / 8.1 or Hyper-V Server 2019 / 2016 / 2012 R2.
You can use the software to simplify Hyper-V backup and management. If offers you the following benefits:
Easy-to-use: User-friendly interface to complete backup and restore process based on several clicks. Perpetual Free: No time limit for AOMEI Cyber Backup Free Edition to protect up to multiple virtual machines. Auto Backup Schedule: Schedule backups for multiple VMs at once and auto run it without powering off VMs. Centralized Management: Create and manage Hyper-V VM backups from the central console without installing Agent on each VM. Flexible Backup Strategy: Flexibly tracking data and store backups to different storages. Role Assignment: allows one administrator to create sub-accounts with limited privileges.
Please hit the button below to download and use AOMEI Cyber Backup for free:
*You can choose to install this VM backup software on either Windows or Linux system.
3 easy steps to perform free VM backup:
1. Open AOMEI Cyber Backup web client, and access to Source Device >> Hyper-V >> Add Hyper-V to bind your Hyper-V host, then enter the required information and click Confirm.
2. Access to Backup Task >> Create New Task to configure your Hyper-V backup task. In the opened wizard, you can select Hyper-V virtual machines to back up, the storages to save the backups.
Also, you can configure Schedule to select backup method as full / incremental backup, and specify the backup frequency on basis of daily / weekly / monthly to automatically run the Hyper-V backup task.
3. Start Backup: click Start Backup and select Add the schedule and start backup now, or Add the schedule only.
When completing the Hyper-V backup solution, you can monitor the backing up process on the main interface, and you can also check the Backup Log to see if there are any errors that result in your backup failure.
When you want to Restore a VM from the backup, you can select any backup version from the history, and Restore to original location easily.
✍While the Free Edition covers most of the VM backup needs, you can also upgrade to enjoy:
Backup Cleanup: Specify retention policy to delete old VM backups automatically, thus saving storage space.
Restore to new location: Make a clone of a virtual machine in the same or another datastore/host, without reinstalling or configuring a new VM.
Summary
If you find your Hyper-V snapshot no delete option, I summarized several ways to solve the problem Hyper-V cannot delete checkpoint in this article. Hope it could be helpful to you.
Besides this, you may encounter some other issues, such as Hyper-V VM running slow, stuck at restoring or saved state, Hyper-V VM no internet, failed to change state, etc. To prevent your virtual machines from getting all kinds of errors and eventual crashes, it’s always recommended to back up your VMs that are loaded with important data.
If you’re new to the world of virtualization, networking configuration can be one of the toughest concepts to grasp. Networking is also different in Hyper-V than in other hypervisors, so even those with years of experience can stumble a bit when meeting Hyper-V for the first time. This article will start by looking at the conceptual design of virtual networking in Hyper-V, configuration and then work through implementation best practices.
Networking Basics
Before beginning, it might be helpful to ensure that you have a solid grasp of the fundamentals of Ethernet and TCP/IP networking in general. Several articles that explain common aspects begin with this explanation of the OSI model.
The Hyper-V Virtual Switch
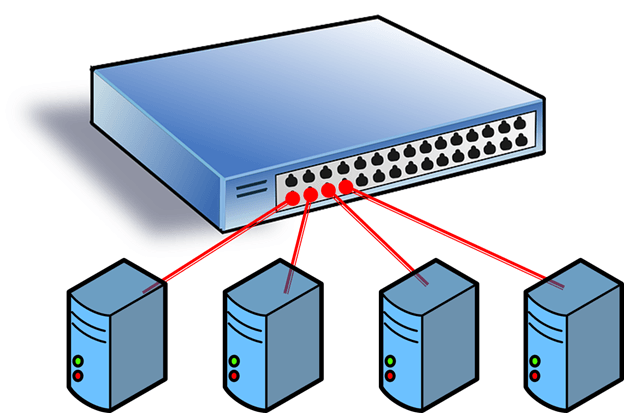
The single most important component of networking in Hyper-V is the virtual switch. There’s an in-depth article on the Hyper-V Virtual Switch on this blog, but for the sake of this article I’ll give you a basic introduction to the concept, within the bigger picture.
The key to understanding is realizing that it truly is a switch, just like a physical switch. It operates in layer 2 as the go-between for virtual switch ports. It directs packets to MAC addresses. It handles VLAN tagging. It can even perform some Quality of Service (QoS) tasks. It’s also responsible for isolating network traffic to the virtual adapter that is supposed to be receiving it. When visualized, the Hyper-V network switch should be thought of in the same way as a standard switch:
The next part of understanding the virtual switch is how it interacts with the host. To open that discussion, you must first become acquainted with the available types of virtual switches.
Virtual Switch Modes
There are three possible modes for the Hyper-V switch: private, internal, and public. Do not confuse these with IP addressing schemes or any other virtual networking configuration in a different technology.
Hyper-V’s Private Switch
The private switch allows communications among the virtual machines on its host and nothing else. Even the management operating system is not allowed to participate. This switch is purely logical and does not use any physical adapter in any way. “Private” in this sense is not related to private IP addressing. You can mentally think of this as a switch that has no ability to uplink to other switches.
Hyper-V’s Internal Switch
The internal switch is similar to the private switch with one exception: the management operating system can have a virtual adapter on this type of switch. This allows the management operating system to directly communicate with any virtual machines that also have virtual adapters on the same internal switch. Like the private switch, the internal switch does not have any relation to a physical adapter and therefore also cannot uplink to any another switch.
Hyper-V’s External Switch
The external switch type must be connected to a physical adapter. It allows communications between the physical network and the management operating system and the virtual adapters on virtual machines. Do not confuse this switch type with public IP addressing schemes or let its name suggest that it needs to be connected to an Internet-facing system. You can use the same private IP address range for the adapters on an external virtual switch that you’re using on the physical network it’s attached to. External in this usage means that it can connect to systems that are external to the Hyper-V host.
How to Conceptualize the External Virtual Switch
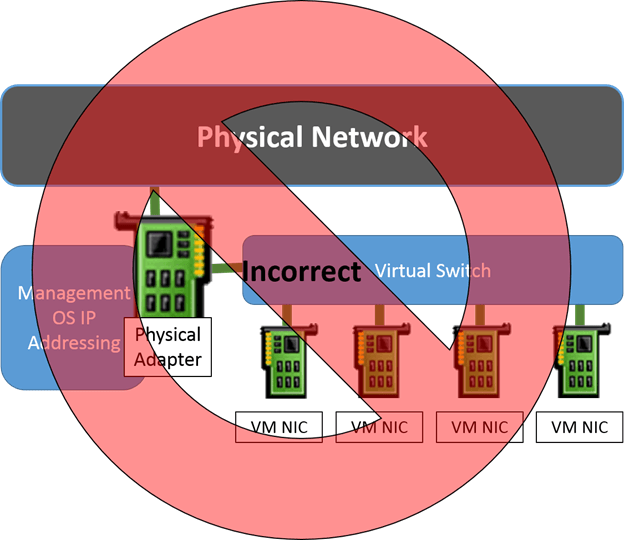
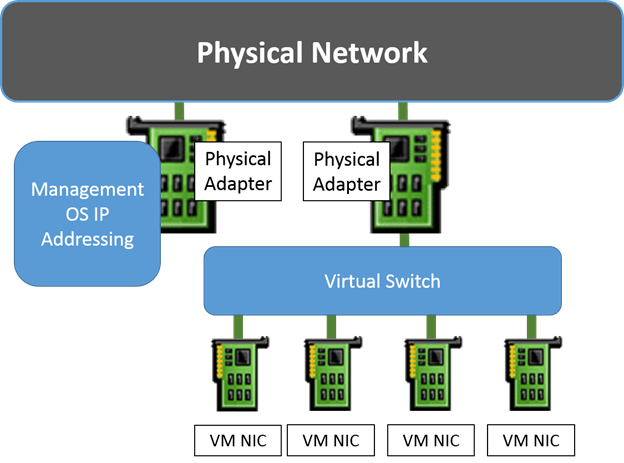
Part of what makes understanding the external virtual switch artificially difficult is the way that the related settings are worded. In the Hyper-V Manager GUI, it’s worded as Allow management operating system to share this network adapter. In PowerShell’s New-VMSwitch cmdlet, there’s an AllowManagementOS parameter which is no better, and its description — Specifies whether the parent partition (i.e. the management operating system) is to have access to the physical NIC bound to the virtual switch to be created. — makes it worse. What seems to happen far too often is that people read these and think of the virtual switch and the virtual adapters like this:
Unfortunately, this is not at all an accurate representation of Hyper-V’s virtual network stack. Once the virtual switch is bound to a physical adapter, that adapter is no longer used for anything else. TCP/IP, and most other items, are removed from it. The management operating system is quite simply unable to “share” it. If you attempt to bind anything else to the adapter, it’s quite probable that you’ll break the virtual switch.
In truth, the management operating system is getting a virtual network adapter of its own. That’s what gets connected to the virtual switch. That adapter isn’t exactly like the adapters attached to the virtual machines; it’s not quite as feature-rich. However, it’s nothing at all like actually sharing the physical adapter in the way that the controls imply. A better term would be, “Connect the management operating system to the virtual switch”. That’s what the settings really do. The following image is a much more accurate depiction of what is happening:
As you can see, the management operating system’s virtual adapter is treated the same way as that of the virtual machines’ adapters. Of course, you always have the option to take one or more physical adapters out of the virtual switch. Those will be used by the management operating system as normal. If you do that, then you don’t necessarily need to “share” the virtual switch’s adapter with the management operating system:
How to Use Physical NIC Teaming with the Hyper-V Virtual Switch
As of Windows Server 2012, network adapter teaming is now a native function of the Windows Server operating system. Teaming allows you combine two or more adapters into a single logical communications channel to distribute network traffic. Hyper-V Server can also team physical adapters.
When a teamed adapter is created, the individual adapters still appear in Windows but, in a fashion very similar to the virtual switch, can no longer be bound to anything except the teaming protocol. When the team is created, a new adapter is presented to the operating system. It would be correct to call this adapter “virtual”, since it doesn’t physically exist, but that can cause confusion with the virtual adapters used with the Hyper-V virtual switch. More common terms are team adapter or logical adapter, and sometimes the abbreviation tNIC is used.
Because teaming is not a central feature or requirement of Hyper-V, it won’t be discussed in detail here. Hyper-V does utilize native adapter teaming to great effect and, therefore, it should be used whenever possible. As a general rule, you should choose the Dynamic load balancing algorithm unless you have a clearly defined overriding need; it combines the best features of the Hyper-V Port and Transport Ports algorithms. As for whether or not to use the switch independent teaming mode or one of the switch dependent modes, that is a deeper discussion that involves balancing your goals against the capabilities of the hardware that is available to you. For a much deeper treatment of the subject of teaming with Hyper-V, consult the following articles in the Altaro blog:
How to Set Up a Native Team in Hyper-V Server 2012 – This article is mostly focused on the “how-to”. It was written too early to include a discussion of the new Dynamic algorithm. You can choose it as an alternative to the Hyper-V Port and hash algorithms.
Load-Balancing Algorithms – This article includes a complete discussion of all of the available load-balancing algorithms.
[thrive_leads id=’17165′]
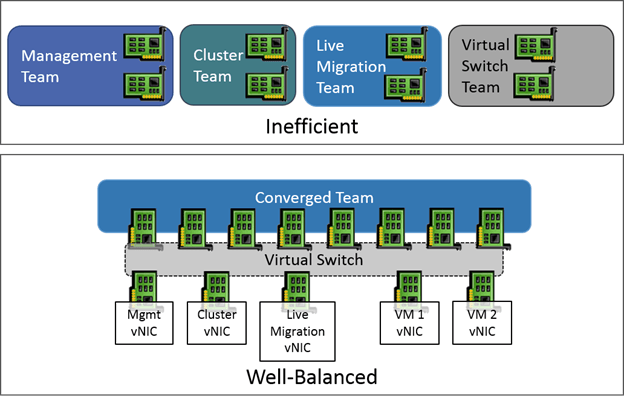
Hyper-V and Network Convergence
Network convergence simply means that multiple traffic types are combined in a single communications channel. To a certain degree, Hyper-V always does this since several virtual machines use the same virtual switch, therefore the same network hardware. However, that could all technically be classified under a single heading of “virtual machine traffic”, so it’s not quite convergence.
In the Hyper-V space, true convergence would include at least one other role and it would include at least two physical network adapters. The simplest way to achieve this is by teaming two or more adapters as talked about in the preceding section and then creating a virtual switch atop the team adapter. When the virtual switch is created, use the “share” option or PowerShell to create a virtual adapter for the management operating system as well. If that adapter is used for anything in the management operating system, then that is considered convergence. Other possible roles will be discussed later on.
While the most common convergence typically binds all adapters of the same speed into a single channel, that’s not a requirement. You may use one team for virtual machine traffic and another for the management operating system if you wish.
Hyper-V and Networking within a Cluster
Failover Clustering has its own special networking needs, and Hyper-V extends those requirements further. Each node begins with the same requirements as a standalone Hyper-V system: one management adapter and a virtual switch. A cluster adds the need for cluster-related traffic and Live Migration.
In versions prior to 2012, the only supported configuration required that all of these roles be separated into unique gigabit connections. With the enhancements introduced in 2012 and 2012 R2, these requirements are much more relaxed. There aren’t any published requirements with the new versions (although it could be argued that the requirements for 2008 R2 were never officially superseded, so they are technically still enforced). In practice, it’s been observed that it is absolutely necessary for there to be at least two unique cluster paths, but the rest can be adjusted up or down depending on your workloads.
The following describes each role and gives a brief description of its traffic:
Management: This role will carry all traffic for host-level backups and any host-related file sharing activities, such as accessing or copying ISO images from a remote system. During other periods, this role usually does not experience a heavy traffic load. The typical usage is for remote management traffic, such as RDP and WS-Man (PowerShell), which are very light.
Cluster Communications: Each node in the cluster continually communicates with all the other nodes in a mesh pattern to ensure that the cluster is still in operation. This operation is commonly known as the “heartbeat”, although network configuration information is also traded. Heartbeat traffic is typically very light, but it is extremely sensitive to latency. If it does not have a dedicated network, it can easily be drowned out by other operations, such as large file copies, which will cause nodes to lose quorum and fail over virtual machines even though nothing is technically wrong.
Cluster Shared Volumes: CSV traffic is not a unique role; it travels as part of standard cluster communications. When all is well, CSV traffic is fairly minimal, only passing CSV metadata information between the nodes. If a CSV goes into Redirected Access mode, then all traffic to and from that CSV will be handled by the owner node. If any other node needs to access that CSV, it will do so over a cluster network. The cluster will ensure that the normal cluster communications, such as heartbeat, are not sacrificed, but any struggles for bandwidths will cause virtual machines to perform poorly – and possibly crash. If your cluster does not use CSVs, then this traffic is not a concern.
Live Migration: Without constraints, a Live Migration operation will use up as much bandwidth as it can. The typical configuration provides a dedicated adapter for this role. With converged networking, the requirement is not as strict.
Virtual Machine traffic: VM traffic is arguably the most important in the cluster, but it also tends to not be excessively heavy. The traditional approach is to dedicate at least one adapter to the virtual switch.
While legacy builds simply separated these onto unique, dedicated gigabit pipes, you now have more options at your disposal.
SMB Enhancements for Cluster Communications
Cluster communications have always used the SMB protocol. The SMB protocol was upgraded substantially in 2012 and now has the ability to multichannel. This feature will auto-negotiate between the source and destination host and will automatically spread SMB traffic across all available adapters.
Whereas it used to be necessary to set networks for cluster communications and then modify metric assignments to guide traffic, the preferred approach in 2012 R2 is to simply designate two or more networks as cluster networks. The hosts will automatically balance traffic loads.
SMB Enhancements for Live Migration
If the cluster’s nodes are all set to use SMB for Live Migration, then it will take advantage of the same SMB enhancements that the standard cluster communications use. In this way, management traffic, cluster communications traffic, and Live Migration could all be run across only two distinct networks instead of two. This is potentially risky, especially if Redirected Access mode is triggered.
Converged Networking Benefits for Clustering
By using converged networks, you gain substantially more options with less hardware. SMB multichannel divides traffic across distinct networks – that is, unique subnets. By using converged networks, you can create more subnets than you have physical adapters.
This is especially handy for 10GbE adapters since few hosts will have more than two. It also has its place on 1GbE networks. You can simply combine all physical adapters into one single large team and create the same number of logical networks that you would have for a traditional role, but enable each of them for cluster communications and Live Migration. This way, SMB multichannel will be able to automatically load balance its needs. Remember that even with converged networking, it’s best to not combine all roles onto a single virtual or teamed adapter. SMB multichannel requires distinct subnets to perform its role and teaming balances some traffic according to the virtual adapter.
Quality of Service Benefits for Clustering
While the concern is rarely manifested, it is technically possible for one traffic type to fully consume a converged team. There are a number of QoS (Quality of Service) options available to prevent this from occurring. You can specifically limit SMB and/or Live Migration traffic and set maximums and minimums on virtual adapters.
Before you spend much time investigating these options, be aware that most deployments do not require this degree of control and will perform perfectly well with defaults. Hyper-V will automatically work to maintain a balance of traffic that does not completely drown out any particular virtual network adapter. Because the complexity of configuring QoS outweighs its benefits in the typical environment, this topic will not be investigated in this series. The most definitive work on the subject is available on TechNet.
How to Design Cluster Networks for Hyper-V
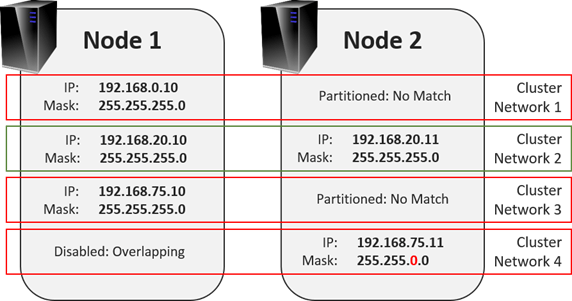
The one critical concept is that cluster networks are defined by TCP/IP subnet. The cluster service will detect every IP address and subnet mask on each node. From those, it will create a network for each unique subnet that it finds. If any node has more than one IP address in a subnet, the cluster service will use one and ignore the rest unless the first is removed. If the service finds networks that only some nodes have IP addresses for, the network will be marked as partitioned. A network will also be marked as partitioned if cluster communications are allowed but there are problems with inter-node traffic flow. The following diagram shows some sample networks and how clustering will detect them.
In the illustration, the only valid network is Cluster Network 2. The worst is Cluster Network 4. Due to the way the subnet is configured, it overlaps with all of the other networks. The cluster service will automatically lock the node 2 adapter with IP address 192.168.5.11 out of cluster communications and mark the network as None to indicate that it is disallowed for cluster communications.
Before building your cluster, determine the IP subnets that you’ll be using. It’s perfectly acceptable to create all-new networks if necessary. For cluster communications, the nodes will not intentionally communicate with anything other than the nodes in the same cluster. The minimum number of unique networks is two. One must be marked to allow client and cluster communications; this is the management network. One must be marked to allow cluster communications (client communications optional but not recommended). Further networks are optional, but will grant the cluster the opportunity to create additional TCP streams which can help with load-balancing across teamed adapters.
Hyper-V Networking Best Practices – Configuration in Practice
There isn’t any single “correct” way to configure networking in Hyper-V any more than there is a single “correct” way to configure a physical network. This section is going to work through a number of best practices and procedures to show you how things are done and provide guidance where possible. The best advice that anyone can give you is to not overthink it. Very few virtual machines will demand a great deal of networking bandwidth.
There are a few best practices to help you make some basic configuration decisions:
A converged network results in the best overall bandwidth distribution. It is extremely rare to have any situation in which a single network role will be utilizing an entire gigabit connection constantly. By dedicating one or more adapters to a single role, you prevent any other role from using that adapter, even when its owning role is idle.
A single TCP/IP stream can only use a single physical link. One of the most confusing things about teaming that new-comers face is that combining multiple links into a single team does not automatically mean that all traffic will automatically use all available links. It means that different communications streams will be balanced across available. Or, to make that more clear, you need at least four different communications streams to fully utilize four adapters in a team.
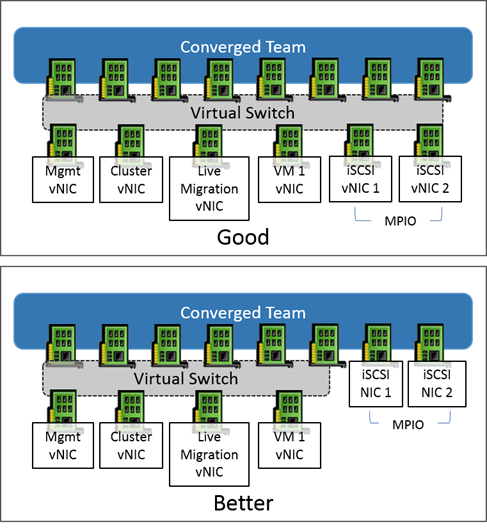
Avoid using iSCSI or SMB 3 directly with teaming. It is supported for both, but it is less efficient than using MPIO (for iSCSI) or SMB multichannel. It is supported to have multiple virtual network adapters on a team that are configured for iSCSI or SMB multichannel. However, you will always get the best performance for network storage by using unteamed adapters that are not bound to a virtual switch. This article explains how to configure MPIO.
If iSCSI and/or SMB connections are made through virtual adapters on a converged team, they will establish only one connection per unique IP address. Create multiple virtual adapters in order to enable MPIO and/or SMB multichannel.
For Failover Clustering, plan in advance what IP range you want to use for each role. For example:
Management: 192.168.10.0/24
Cluster communications/CSV: 192.168.15.0/24
Live Migration: 192.168.20.0/24
SMB network 1: 192.168.30.0/24
SMB network 2: 192.168.31.0/24
The only adapter in the management operating system that should have a default gateway is the management adapter. Assigning default gateways to other adapters will cause the system unnecessary difficulty when choosing outbound connections.
If cluster nodes have adapters that will only be used to communicate with back-end storage (iSCSI or SMB), exclude their networks from participating in cluster communications.
Only the management adapter should register itself in DNS.
Except for the one created by checking Allow the management operating system to share this network adapter, you cannot use the GUI to create virtual network adapters for the management operating system’s use.
You cannot use the GUI to establish a QoS policy for the virtual switch. The only time this policy can be selected is during switch creation.
If desired, virtual machines can have their IP addresses in the same range as any of the cluster roles. Failover Clustering does not see the ranges in use by virtual machines and will not collide with them.
The management operating system will allow you to team network adapters with different feature sets and even different speeds, but it is highly recommended that you not do this. Different features can result in odd behaviors as communication are load balanced. The system balances loads in round-robin fashion, not based on adapter characteristics (for instance, it will not prioritize a 10GbE link over a 1GbE link).
Networking QoS only applies to outbound communications. Inbound traffic will flow as quickly as it is delivered and can be processed.
10GbE links have the ability to outpace the processing capabilities of the virtual switch. A single virtual adapter or communications stream may top out at speeds as low as 3.5 Gbps, depending upon the processing power of the CPU. Balanced loads will be able to consume the entire 10GbE link, especially when offloading technologies, primarily VMQ, are in place and functional.
When teaming, choose the Dynamic load balancing algorithm unless you have a definite, verifiable reason not to. Do not prefer the Hyper-V Port mode simply based on its name; Dynamic combines the best aspects of the Hyper-V Port and Hash modes.
You can use iSCSI on a virtual machine’s virtual adapter(s) to connect it/them directly to network storage. You will have better performance and access to more features by connecting from the host and exposing storage to the guests through a VHDX. Virtual machines can have multiple network adapters, which enables you to connect the same virtual machine to different VLANs and subnets.
Avoid the creation of multiple virtual switches. Some other hypervisors require the administrator to create multiple virtual switches and attach them to the same hardware. Hyper-V allows only a single virtual switch per physical adapter or team. Likewise, it is not advisable to segregate physical adapters, whether standalone or in separate teams, for the purpose of hosting multiple virtual switches. It is more efficient to combine them into a single large team. The most common exception to this guideline is in situations where physical isolation of networks is required.
If your system is running a GUI edition of Windows Server, you can configure TCP/IP for all adapters using the traditional graphical tools. For all versions, you can also use sconfig.cmd for a guided process. This section shows how to perform these tasks using PowerShell. To keep the material as concise as possible, not all possible options will be shown. Refer to the introductory PowerShell article for assistance on using discovering the capabilities of cmdlets using Get-Help and other tools.
See Adapter Status (and Names to Use in Other Cmdlets)
Get-NetAdapter
Rename a Physical or Team Adapter
Rename-NetAdapter Name CurrentName NewName NewName
One final option that you may wish to consider is setting Jumbo Frames on your virtual adapters. A Jumbo Frame is any TCP/IP packet that exceeds the base size of 1514 bytes. It’s most commonly used for iSCSI connections, but can also help a bit with SMB 3 and Live Migration traffic. It’s not useful at all for traffic crossing the Internet and most regular LAN traffic doesn’t benefit much from it either. If you’d like to use it, the following post explains it in detail: https://www.altaro.com/hyper-v/how-to-adjust-mtu-jumbo-frames-on-hyper-v-and-windows-server-2012/. That particular article was written for 2012. The virtual switch in 2012 R2 has Jumbo Frames enabled by default, so you only need to follow the portions that explain how to set it on your physical and virtual adapters.
Configuring Virtual Switches and Virtual Adapters
All of the graphical tools for creating a virtual switch and setting up a single virtual adapter for the management operating system were covered in this previous article in the series. You cannot use the graphical tools to create any further virtual adapters for use by the management operating system. You also must use PowerShell to create your virtual switch if you want to control its QoS policy. The following PowerShell commands deal with the virtual switch and its adapters.
There are several things to note about this particular cmdlet:
The “InterfaceAlias” parameter shown above is actually an alias for “NetAdapterName”. The alias was chosen here because it aligns with the parameter name and output of Get-NetAdapter.
The cmdlet was typed with “vSwitch” as the virtual switch’s name, but you’re allowed to use anything you like. If your chosen name has a space in it, you must enclose it in single or double quotes.
If you do not specify the “AllowManagementOS” parameter or if you set it to true, it will automatically create a virtual adapter for the management operating system with the same name as the virtual switch. Skipping this automatic creation gives you greater control over creating and setting your own virtual adapters.
If you do not wish to enable SR-IOV on your virtual switch, it is not necessary to specify that parameter at all. It is shown here as a reminder that if you’re going to set it, you must set it when the switch is created. You cannot change this later.
The help documentation for Get-VMSwitch indicates that the default for “MinimumBandwidthMode” is “Weight”. This is incorrect. The default mode is “Absolute”. As with SR-IOV support, you cannot modify this setting after the switch is created.
Create a Private Virtual Switch
New-VMSwitch Name Isolated SwitchType Private MinimumBandwidthMode Weight
Many of the notes from the creation of the external switch apply here as well. The “EnableIOV” switch is not applicable to a private or internal switch at all. The “AllowManagementOS” switch is redundant: if the switch type is “Private” then no virtual adapter is created; if the switch type is “Internal”, then one is created. Adding one virtual adapter to the management OS on a Private switch will convert it to internal; removing all management OS virtual adapters from an Internal switch will make it Private.
Permanently Remove a Virtual Switch
Remove-VMSwitch Name vSwitch
This operation is permanent. The entire switch and all of its settings are lost. All virtual adapters in the management operating system on this switch are permanently lost. Virtual adapters in virtual machines connected to this switch are disconnected.
Add a Virtual Adapter to the Management OS
Add-VMNetworkAdapter ManagementOS SwitchName vSwitch Name 'New vAdapter'
The first thing to note is that, for some reason, this cmdlet uses “Add” instead of the normal “New” verb for creating a new object. Be aware that this new adapter will show up in Get-NetAdapter entries as vEthernet (New vAdapter) and that is the name that you’ll use for all such non-Hyper-V cmdlets. Use the same cmdlets from the previous section to configure
Retrieve a List of Virtual Adapters in the Management OS
Get-VMNetworkAdapter –ManagementOS
Rename a Virtual Adapter in the Management OS
Rename-VMNetworkAdapter ManagementOS Name CurrentName NewName NewName
How to Set VLAN Information for Hyper-V Virtual Adapters
Adapters for the management operating system and virtual machines can be assigned to VLANs. When this occurs, the Hyper-V virtual switch will handle the 802.1q tagging process for communications across the virtual switches and for packets to and from physical switches. As shown in the article on Virtual Machine settings, you can use Hyper-V Manager to change the VLAN for any of the adapters attached to virtual machines. You can only use PowerShell to change the VLAN for virtual adapters in the management operating system.
Retrieve the VLAN Assignments for All Virtual Adapters on the Host
GetVMNetworkAdapterVlan
You can use the “ManagementOS” parameter to see only adapters in the management operating system. You can use the “VMName” parameter with an asterisk to see only adapters attached to virtual machines.
Set the VLAN for a Virtual Adapter in the Management Operating System
Remove VLAN Tagging from all of a Virtual Machine’s Adapters
Set-VMNetworkAdapterVlan -VMName svtest –Untagged
If a virtual machine has more than one virtual adapter and you’d like to operate on it separately, that might require a bit more work. When the GUI is used to create virtual adapters for a virtual machine, they are always named Network Adapter, even if there are several. So, you’ll have to use PowerShell to rename them as they are created or you won’t be able to use the “VMNetworkAdapterName” to distinguish them. Instead, you can use Get-VMNetworkAdapter to locate other distinguishing features and pipe the output to cmdlets that accept VMNetworkAdapter objects. For example, you want to change the VLAN of only one adapter attached to the virtual machine named “svtest”. By using the tools inside the guest operating system, you’ve determined that the MAC address of the adapter you want to change is “00-15-5D-19-0A-24”. With the MAC address, you can change the VLAN of only that adapter by using the following PowerShell construct:
It is possible to use PowerShell to configure networking for your Failover Cluster, but it’s very inelegant with the current status of those cmdlets. At this time, they are not well-configured, so you must directly manipulate object property values and registry settings in fashions that are risky and error-prone. It is much preferred that you use Failover Cluster Manager to make these settings as explained in this article earlier on in the series.
Continue Exploring Networking
There’s a lot to digest in Hyper-V virtual networking. What you’ve seen so far truly is only the fundamentals. For a relatively simplistic deployment with no more than a few dozen virtual machines, you might not ever need any more information. As densities start to climb, the need to more closely tune networking increases. With gigabit adapters, your best option is to scale out. 10GbE adapters allow you to overcome physical CPU limitations with a number of offloading techniques, chief among these being VMQ. Begin your research on that topic by starting with the definitive article series on the subject, VMQ Deep Dive.
Otherwise, your best next steps are to practice with the PowerShell cmdlets. For example, learn how to use Set-VMNetworkAdapter to modify virtual adapters in similar fashion to the procedures you saw in the earlier GUI articles. With a little effort, you’ll be able to change groups of adapters at once. Hyper-V’s networking may be multi-faceted and complicated, but the level of control granted to you is equally vast.
Is your domain controller dead and do you want to manually remove it?
No problem.
In this guide, I’ll walk through two options to remove a domain controller. If you still have access to the server then option 1 is the preferred choice.
Option 1: Demote a Domain Controller Using Server Manager
Use this option if you still have access to the server.
Option 2: Manually Remove a Domain Controller
Use this option if the server is dead or you no longer have access to it.
In both examples, I’ll be using Windows Server 2016 server but these steps will work for Server 2012 and up.
Tip #1 Starting with Server 2008 domain controller metadata is cleaned up automatically. Windows Server 2003 server or earlier will require using the ntdsutil command to cleanup metadata. With that said you still need to manually remove the server from sites and services.
Tip #2 Make sure there are no other services running on the server (like DNS or DHCP) before shutting down the server. If you can avoid this you may save yourself a big headache.
Tip #3 If the domain controller you are removing has FSMO roles configured they will get transferred to another DC automatically. You can check this with the netdom query FSMO command.
If you don’t like video tutorials or want more details, then continue reading the instructions below.
Option 1: Demote a Domain Controller Using Server Manager
This is Microsoft’s recommended method for removing a domain controller.
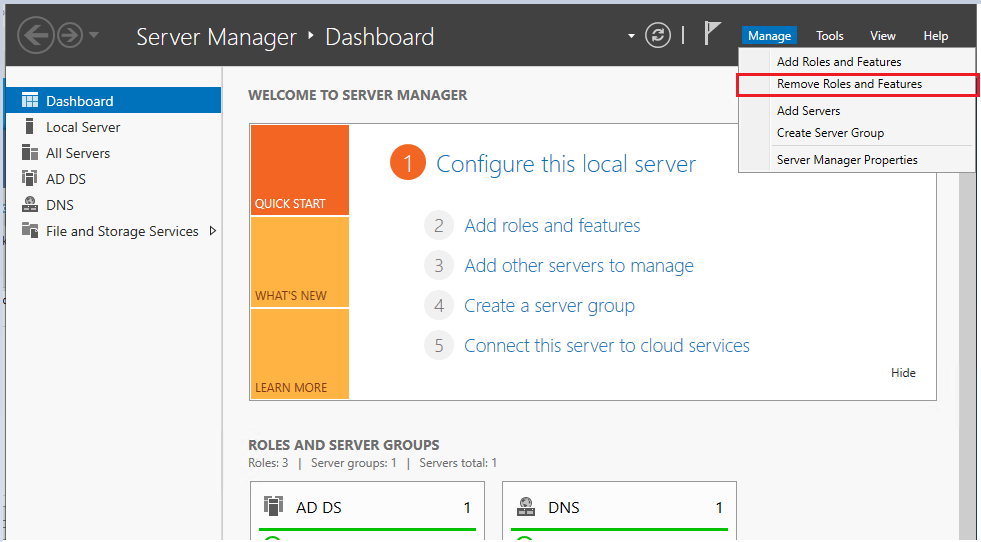
Step 1. Open Server Manager
Step 2. Select Manage ->”Remove Roles and Features”
Click next on the “Before you begin page”
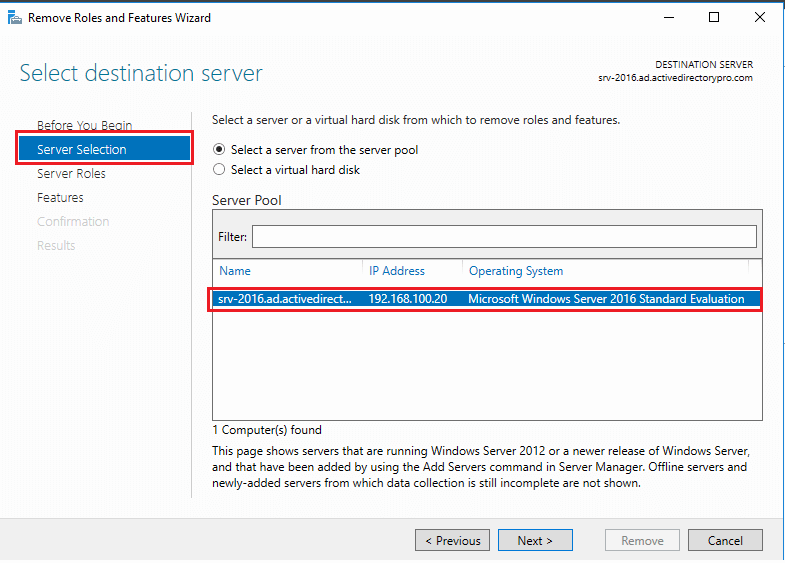
Step 3. On the server selection page, select the server you want to demote and click the next button.
In this example, I’m demoting server “srv-2016”
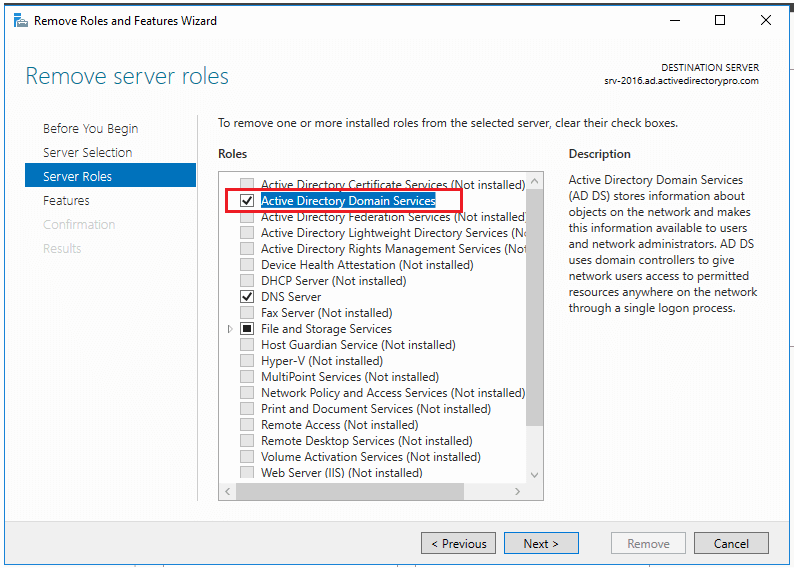
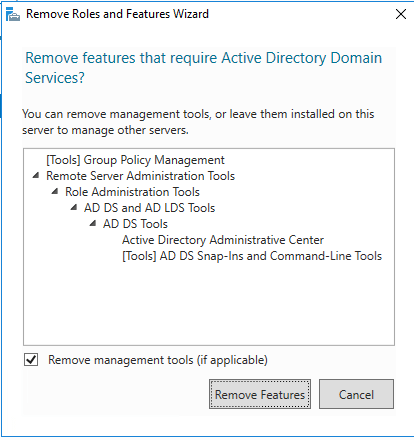
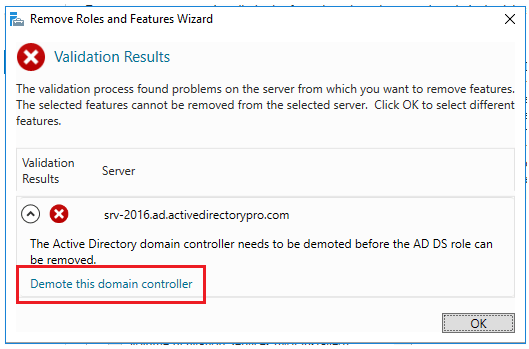
Step 4. Uncheck “Active Directory Domain Services” on the Server Roles page.
When you uncheck you will get a popup to remove features that require Active Directory Domain Services.
If you will plan on using the server to manage Active Directory then keep these installed. In this example, I plan to decommission the server so I will remove these management tools.
Step 5. Select Demote this domain controller
On the next screen make sure you DO NOT select “Force the removal of this domain controller”. You should only select this if you are removing the last domain controller in the domain.
You can also change credentials on this screen if needed.
Click Next
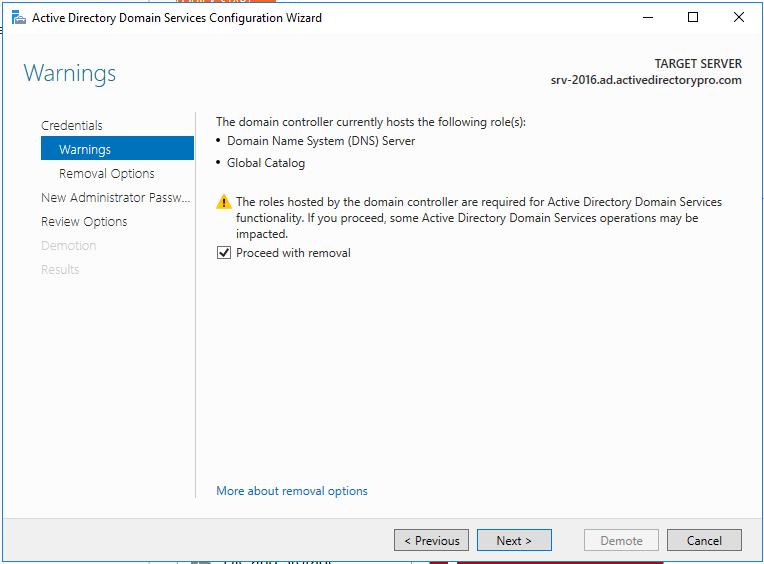
Step 6. On the warnings screen, it will give you a warning this server hosts additional roles. If you have client computers using this server for DNS you will need to update them to point to a different server since the DNS role will be removed.
Check the box “Proceed with removal and click next
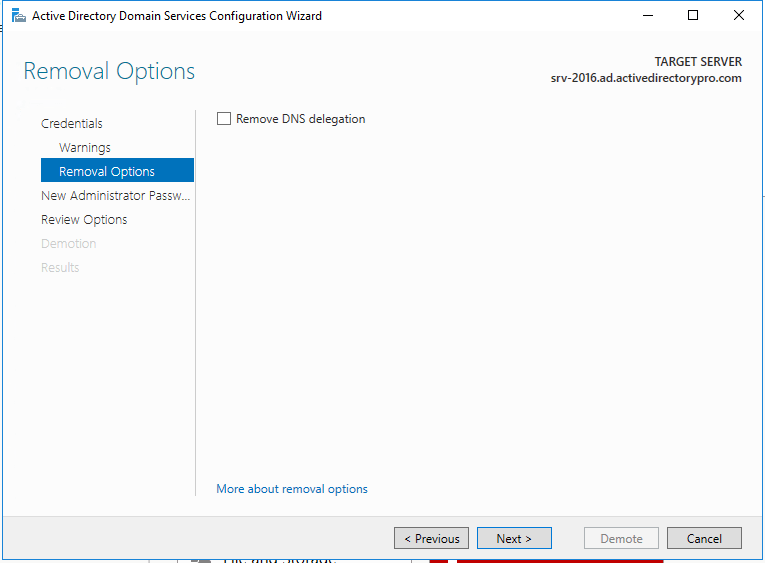
Step 7. If you have DNS delegation you can select “Remove DNS delegation and click next. In most cases, you will not have DNS delegation and can uncheck this box.
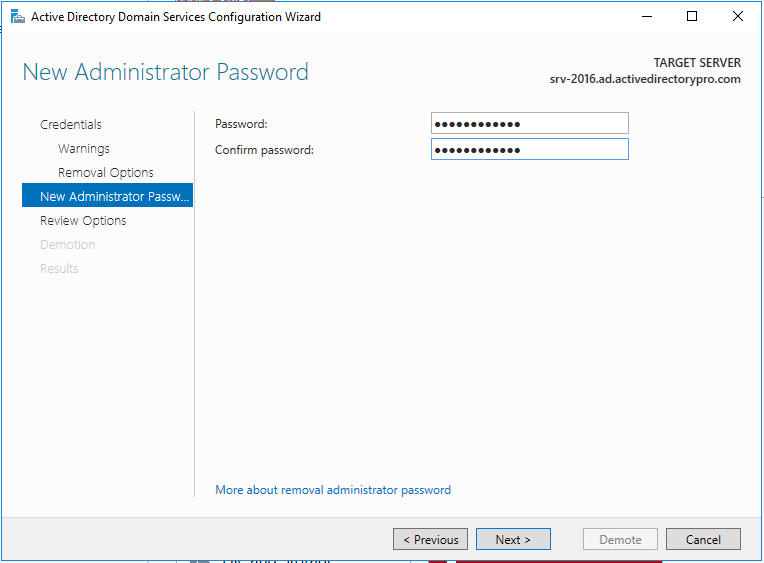
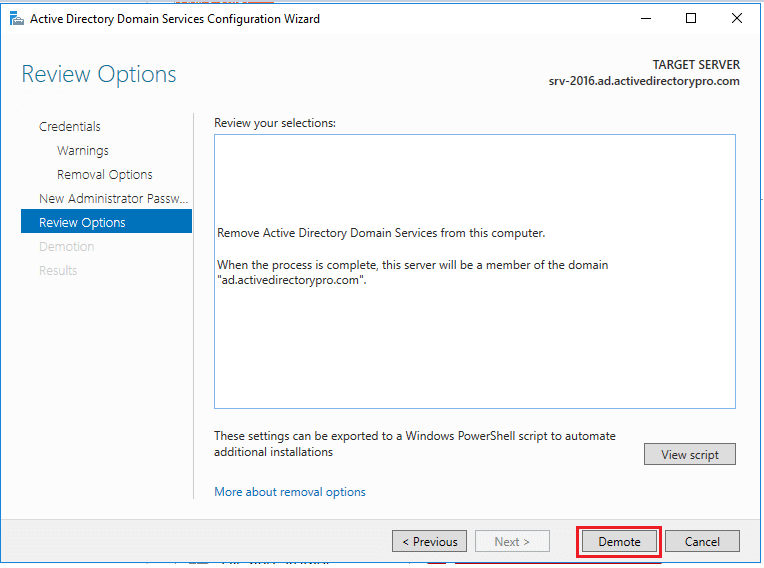
Step 8. Now put in the new administrator password. This will be for the local administrator account on this server.
Step 9. Review options and click “Demote”
#Tip – There is a “view script” button that generates a PowerShell script to automate all the steps we just walked through. If you have additional domain controllers to remove you could use this script.
When you click demote the server will be demoted and rebooted. Once it reboots the server will be a member server. You can log in with domain credentials to the server.
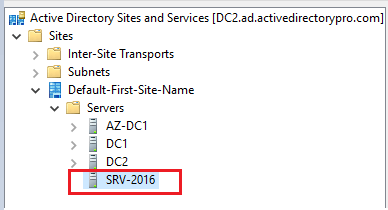
For some reason, Microsoft decided not to include sites and services in the cleanup process. Maybe it’s left there in case you want to promote the server back to a domain controller. If you are not going to promote the server back to a DC then follow these steps.
Open Active Directory Sites and Services and remove the server
You can see above the server I just demoted is still listed in sites and services. I’ll just right-click on it and delete it.
That is it for option 1. You can go into the “Domain Controllers” folder and verify the server is removed. It’s also a good idea to run dcdiag after removing a DC to make sure your environment has no major errors.
You may also need to review and test replication. You can use the repadmin command to test for replication issues.
Option 2: Manually Remove a Domain Controller
Use this option if the server is dead, disconnected, or you just can’t access it. There is really only 1 step.
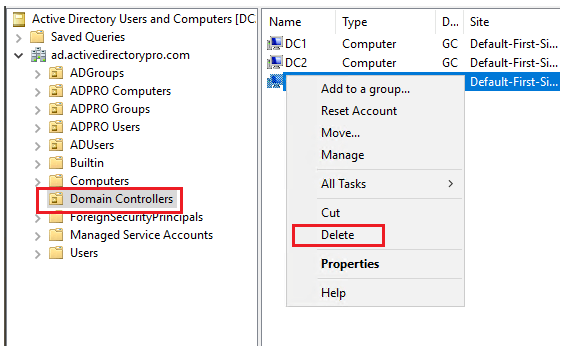
Step 1. On another domain controller or computer with RSAT tools open “Active Directory Users and Computers”
Go to the domain Controllers folder. Right click the domain controller you want to remove and click delete.
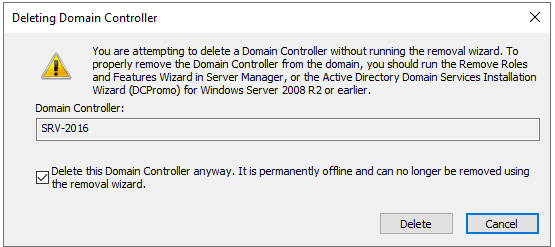
On the next screen select the box “Delete this Domain Controller anyway” and click delete”
If the DC is a global catalog server you will get an additional message to confirm the deletion. I’m going to click Yes.
That is pretty much it. Easy hu?
The last step would be to remove the server from Sites and Services just like I showed you in option 1.
As I mentioned at the top of this article starting with server 2008 the metadata cleanup is done automatically with both options. Most how to guides will tell you to open the command prompt and run the ntdsutil to cleanup the metadata. This is not needed if your server operating system is 2008 or above.
It seems easier to just manually remove the DC than going through the server manager wizard. Technically I’m not sure what the difference is but Microsoft recommends using the removal wizard if you can. Use the manual method as a last option.
Summary
In this guide, I showed you two methods for removing a domain controller. Microsoft has made this process very easy by automatically cleaning up the metadata starting with server 2008. As networks and systems are constantly changing there may come a time when you need to remove a domain controller. I’ve provided some Microsoft links below if you would like to read more about this topic.
In this tutorial, I will demonstrate moving Active Directory users from one domain to another.
I’m going to move 2747 users from one domain (running server 2019) to a new domain running server 2022. You can move accounts to an existing domain or a new one.
The tools used in this guide will work with domain controllers running 2008 and later operating systems. Also, you can move accounts in the same domain forest, a different forest, domain trust, or no trust.
Reasons for moving users:
Creating a test environment
Merging with another company
Moving or upgrading to a new server
No trust between domains
Moving users to a single domain (consolidating domains)
Steps for Moving Users From One Domain To Another Domain
To complete the move I will use some PowerShell scripts to re-create the OUs and groups. I’ll then use the export and import tool from the AD Pro Toolkit to move the accounts.
Note
This method does not migrate computer user profiles or SID history. It will move user data from Active Directory such as OUs, group membership, and user fields (address, manager, phone number, state, etc).
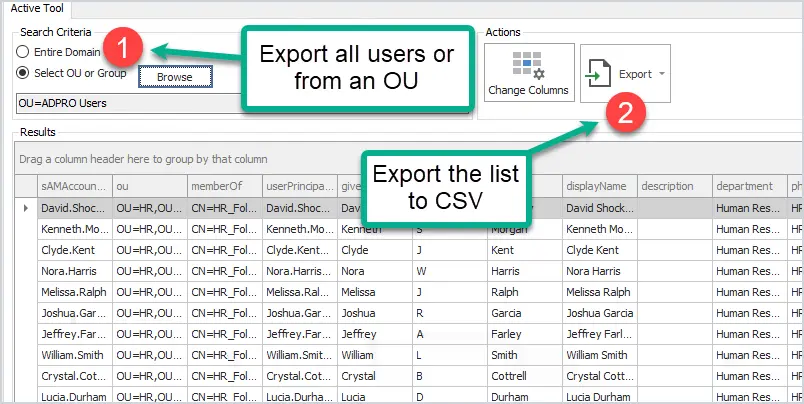
With the export tool, you can select to export from the entire domain, an OU or group.
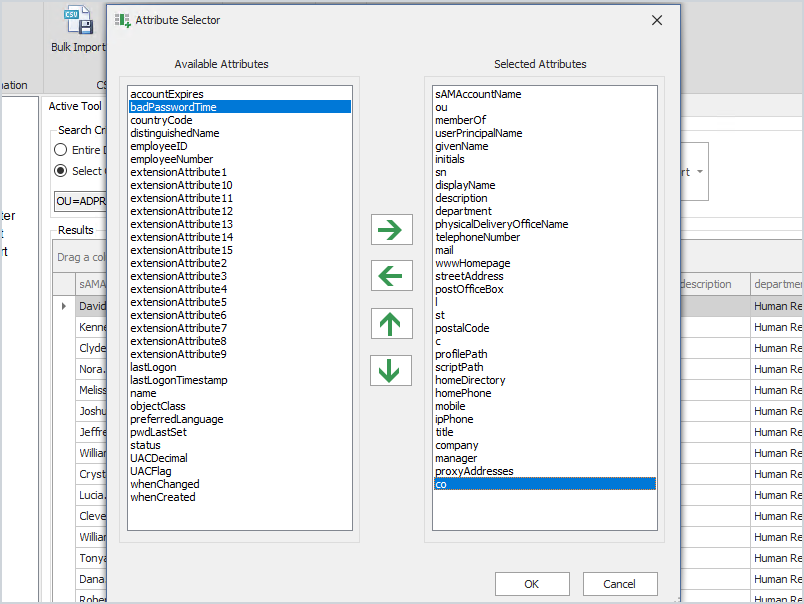
You can also change the columns to preserve user settings when moving to the new domain.
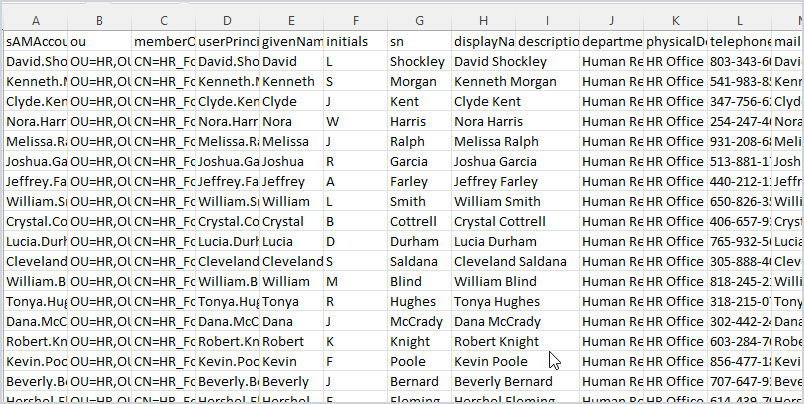
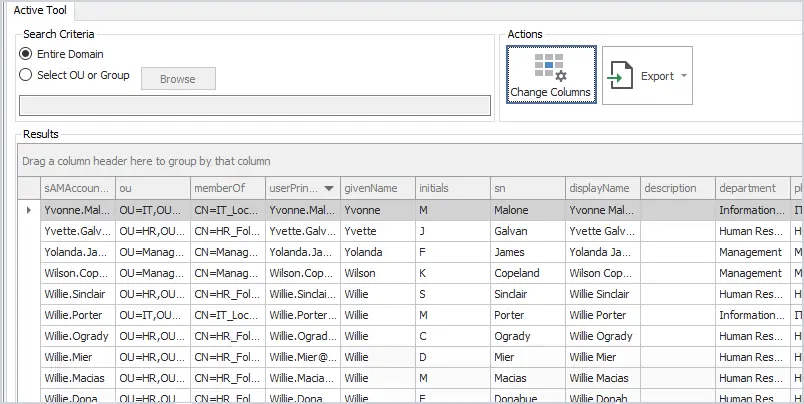
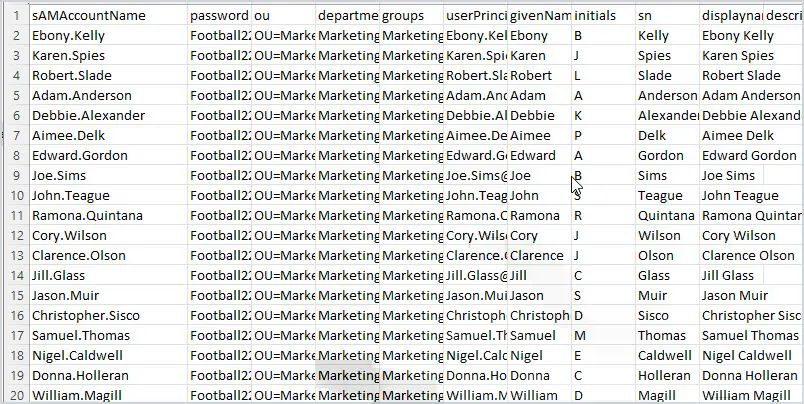
Below is a screenshot of the CSV file exported from my source domain. I exported 2747 users and it includes 31 columns of user properties. Again, you can use the attribute selector to add or remove columns. These user properties will be preserved and imported into the other domain.
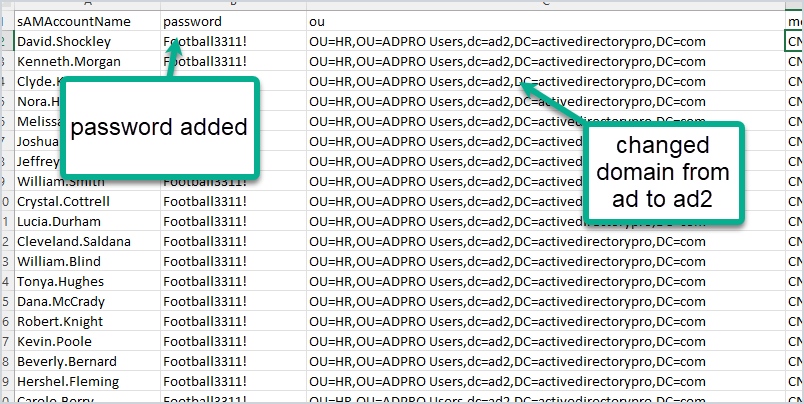
2. Modify CSV File for the new domain
To import these accounts into the new domain you will need to add a password column. If it is a different domain you will also need to modify the OU path. I’m going from ad.activedirectorypro.com to ad2.activedirectorypro.com so I’ll need to update the ou path. You can easily do this in excel with a search and replace.
You can change additional details in the CSV to reflect the new domain. For example, you can change proxyAddresses to the new domain name or change the userPrincipalName.
Now I’m ready to import all 2747 accounts into the new domain. This will import them into the new domain, add them into the OUs, add to groups and keep their user settings from the old domain.
3. Import Users Into the New Domain (or existing domain)
If you are moving the users to an existing domain you probably don’t need to create OUs or groups. If it’s a new domain and you want to replicate the AD structure of the source domain then you can use some PowerShell scripts. See the links below for step by step instructions.
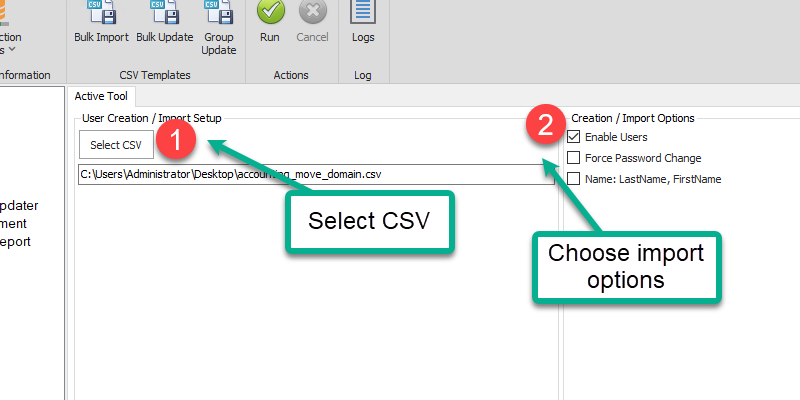
Select the CSV file, your import options, and click run.
When the import is complete you can check the logs and Active Directory to verify the import.
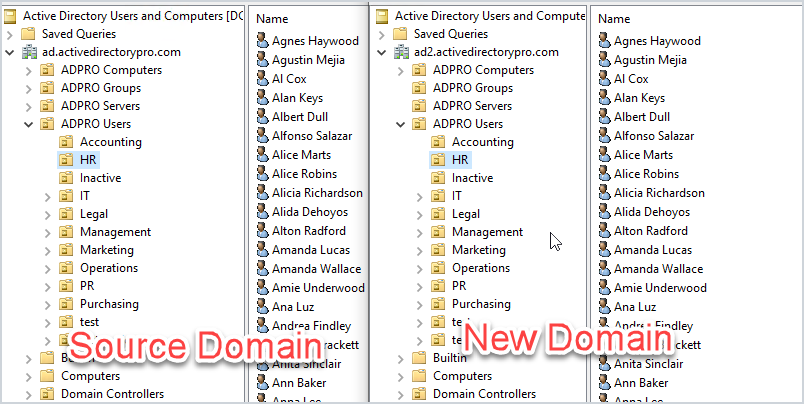
Above you can see a screenshot of the source and the new domain. All of the accounts are imported into the same OUs and groups.
Using the export and import tool makes it really easy to move users to a new domain while keeping their group membership and user properties from Active Directory. It also is very flexible as you can move users from an old domain such as 2008 to a newer server like 2019 or later.
You also don’t have to worry about trust relationships or connections between the two domains.
Below are some PowerShell commands to help you verify the numbers in Active Directory.
Count the Number of Active Directory Objects using PowerShell
Here are some PowerShell commands I used to count the number of objects in the source domain.
Get the number of AD users
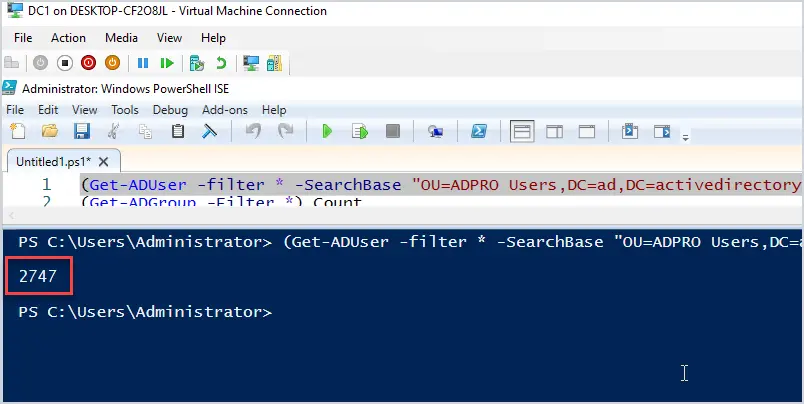
(Get-ADUser -filter *).count
The above command gets the count for all users in the domain. To get the count for just an OU use this command. Change the SearchBase to the path of your root OU.
2747 is the number of users in my source domain so this means all the users imported into the new domain successfully.
Get the number of AD Computers
(Get-ADComputer -Filter *).count
Get the number of Organizational Units
(Get-ADOrganizationalUnit -filter *).count
Get the number of AD Security groups
(Get-ADGroup -Filter *).Count
Conclusion
That’s how you move users from one domain to another using tools from the AD Pro Toolkit and PowerShell. An alternative to moving users to another domain is by using the Microsoft Active Directory Migration Tool. The ADMT (Active Directory Migration Tool) will migrate SID and computer profiles. The only problem with this tool is it is not updated, has no support, and often fails. It also is not as flexible as the method I demonstrated in this guide.
A list of the best Active Directory tools to help you simplify and automate Microsoft Active Directory management tasks.
The native Windows Administrative Tools are missing many features that administrators need to effectively do their jobs. Things like bulk operations and automation are just not possible with the Active Directory users and computer consoles.
The good news is there are many useful Active Directory Tools to choose from that can help you manage domain users, groups, and computers, generate reports, find security weaknesses, and more.
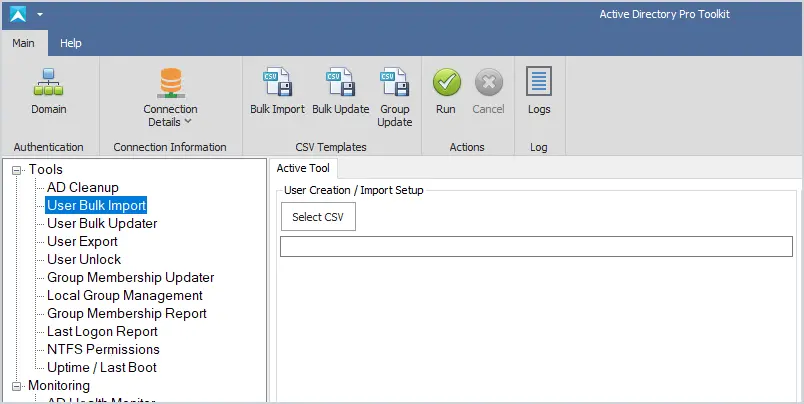
The Bulk Import tool makes it easy to import new user accounts into Active Directory from CSV. Includes a CSV template, sets multiple user attributes, and adds users to groups during the import. Automate the creation of new user accounts and simplify the user account provisioning process.
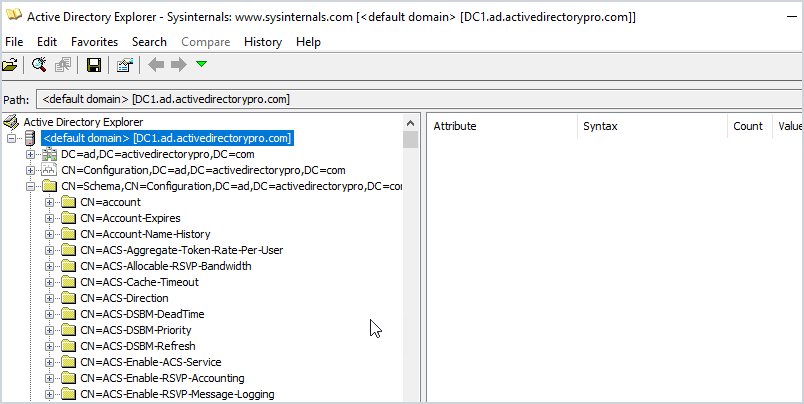
Active Directory Explorer is a browser to navigate the AD database, objects, permissions, and schema objects within Active Directory. The interface is similar to Active Directory users and computers but allows you to view advanced settings. This is not a tool you would use on a daily basis, this would be used for very specific tasks such as viewing an object’s attributes and security sessions.
Another neat feature is the ability to save a snapshot of the AD database. You can then load it for offline viewing and explore it like it was a live database. Again not a common use case.
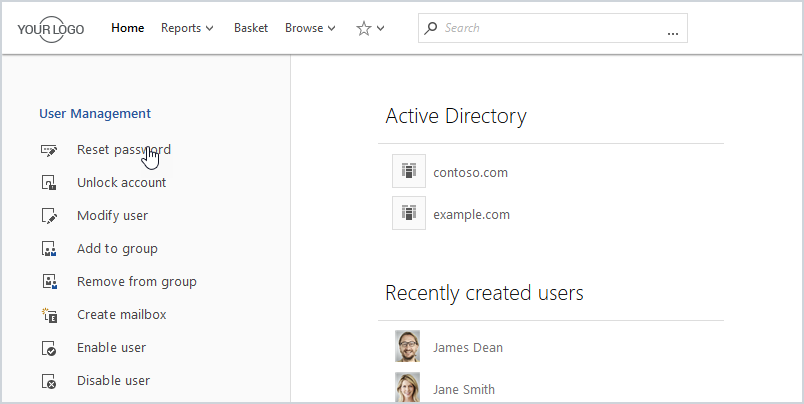
Adaxes is a premium product that automates many AD management tasks, like user provisioning, assigning permissions, creating mailboxes, delegation, and much more. All management tasks are done from a web interface and can be accessed from laptops, tablets, and phones. The web interface is fully customizable so you can view just want you to need. Also includes a user self service portal and a password self service portal.
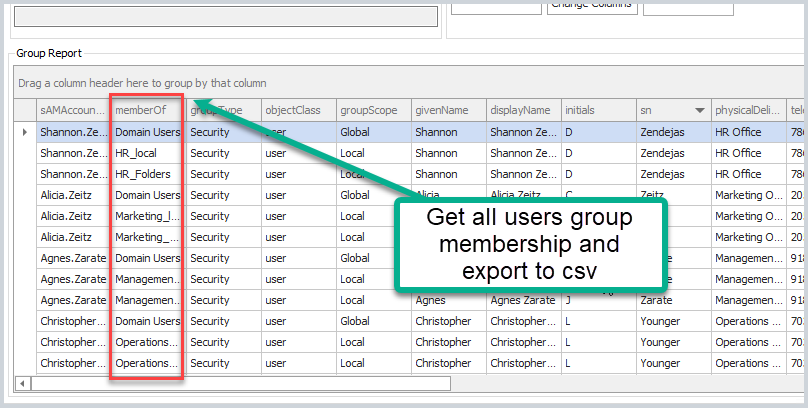
The user export tool lets you export all uses plus all common user fields to a CSV. Over 40 user fields can be added to the export by clicking the change columns button. This is a great tool if you need a report of all users, the groups they are a member of, OU, and more.
Key Features
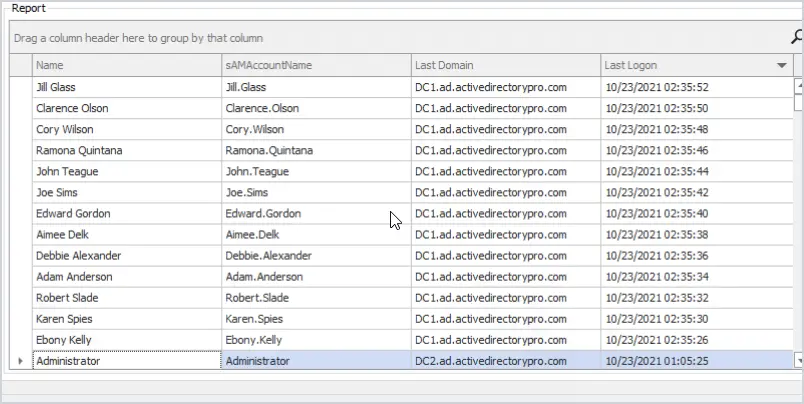
Find users TRUE last logon date from all domain controllers
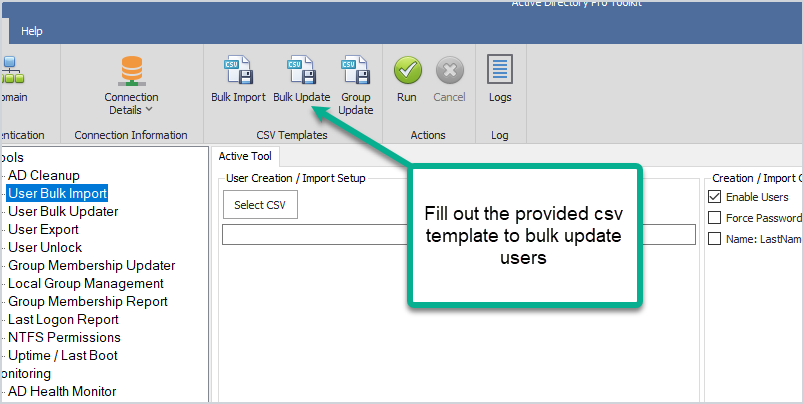
This tool lets you bulk update user account properties from CSV file. Some popular use cases are bulk updating user’s proxyaddresses, employeeid, addresses, manager, addresses, state, country, and so on.
All changes are sent to a log file which lets you keep track of changes and check for errors. This is a very popular tool!
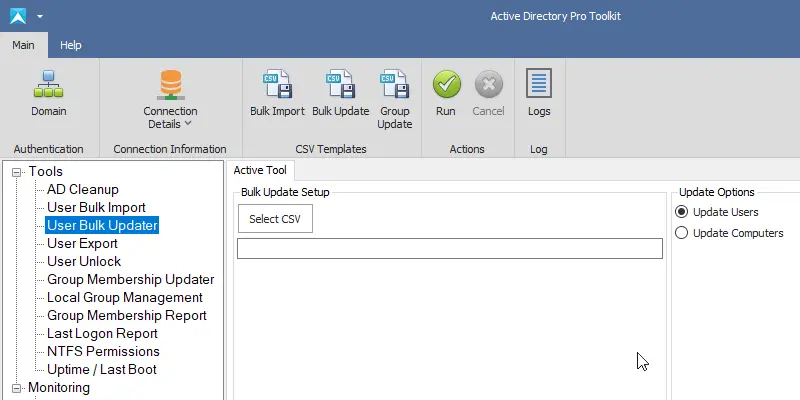
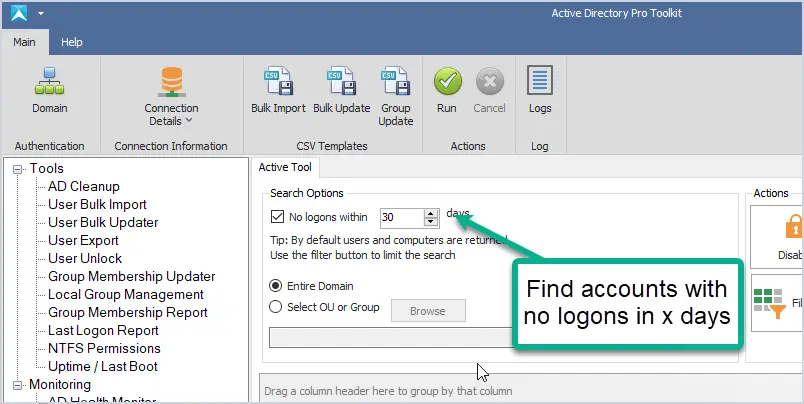
The AD Cleanup tool searches your domain for stale and inactive user accounts based on the account’s lastlogon attribute. You can also find disabled, expired, accounts that have never been used and empty groups.
It is recommended to run a cleanup process on your domain at least once a month, this tool can help simplify that cleanup process and secure your domain.
This utility was designed to Monitor Active Directory and other critical services like Azure, DNS, and DHCP. It will quickly spot domain controller issues, replication, performance issues with cloud services, failed logon attempts, and much more.
This is a premium tool that has a big price tag but it’s an incredible product. You can monitor all resources including applications, hardware, processes, and cloud systems. Everything is accessed from a single web console, you can get email alerts based on various thresholds.
If you want a simple tool to monitor your Active Directory services then this is a great tool.
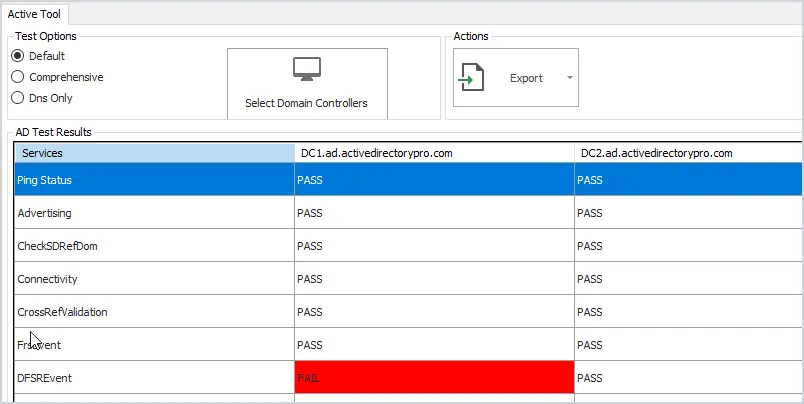
Check the health of your domain controllers with this easy to use tool. Runs 27 health checks on your servers to check for critical errors. Click on any failed test to quickly see the details.
Also includes an option to test DNS and check event logs for critical events.
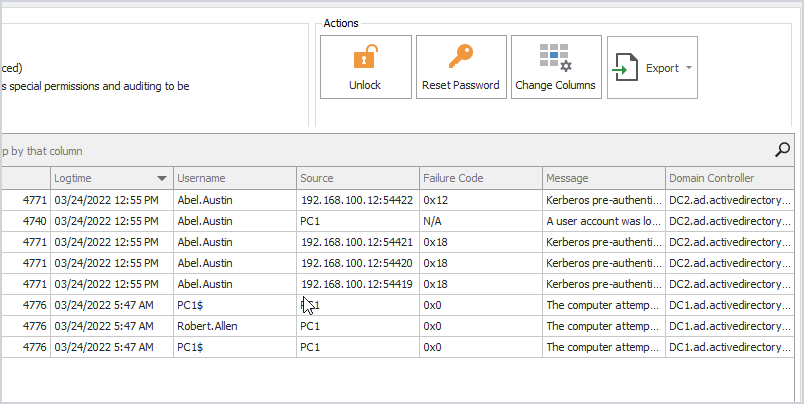
Find all locked users with the click of a button. Unlock, reset passwords or show advanced details like the source of the lockout and more. To pull the source computer you need to have auditing enabled, check the administrator guide for how to enable this.
Bulk add or remove users to Active Directory groups. You can bulk add users to a single group or multiple groups all at once. Very easy to use and saves a lot of time. Just add the users to the CSV template and the name of the group or groups you want to add them to.
The last logon reporter will get the user’s TRUE last logon time from all domain controllers in your domain. You can limit the search to the entire domain, organizational unit, or groups.
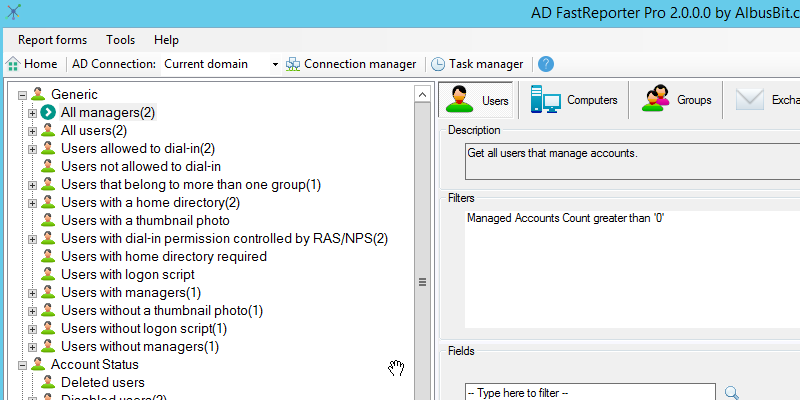
AD FastReporter has a large list of pre-built reports to pick from. Report on users, computers, groups, contacts, printers, group policy objects, and organizational units. Very easy to use but does have an older style interface.
Here is a small example of the reports you can run:
All users
Deleted Users
Users with a home directory
users without logon script
All computers
All domain controllers
Computers created in the last 30 days
Users created in the last 30 days
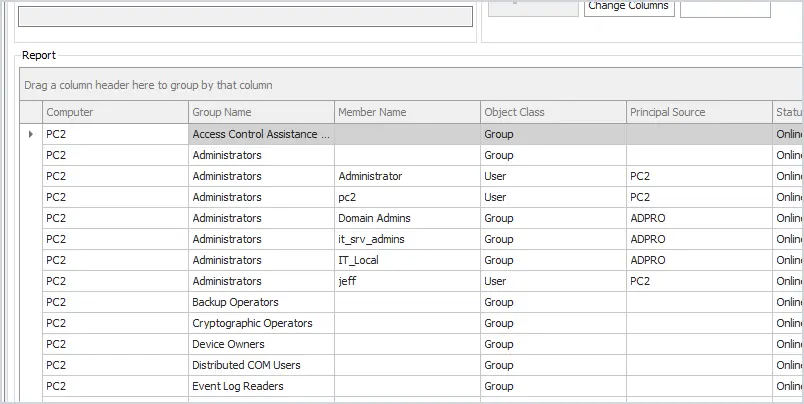
13. Local Group Report
This tool gets the local groups and group members on remote computers. You can quickly sort or filter the groups to get a list of all users and groups that have local administrator rights.
Report and export group membership has never been easier, select from the entire domain, groups, or organizational unit. This tool also helps to find nested security groups.
Key Features
The fastest way to get all domain gruops and group membership
Dovestones AD Reporting tool contains a large number of pre built reports. You can customize the report by selecting user attributes and defining which users to export.
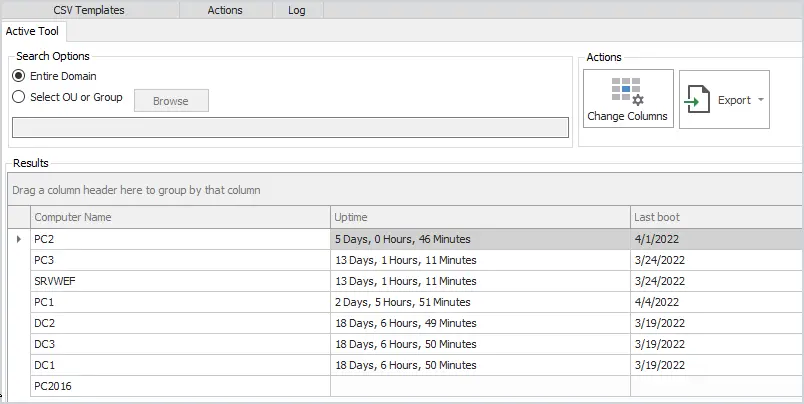
Get the uptime and last boot of remote computers. Report on the entire domain or select from an OU or group.
Very helpful during maintenance days to verify if computers have rebooted.
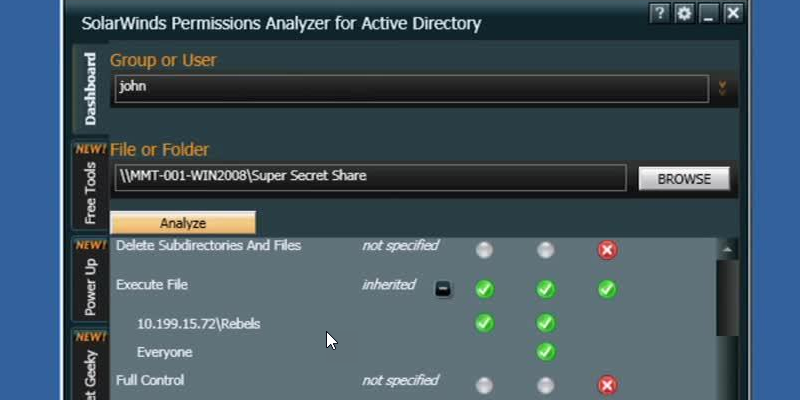
17. SolarWinds Permissions Analyzer
This FREE tool lets you get instant visibility into user and group permissions. Quickly check user or group permissions for files, network, and folder shares.
Analyze user permissions based on an individual user or group membership.
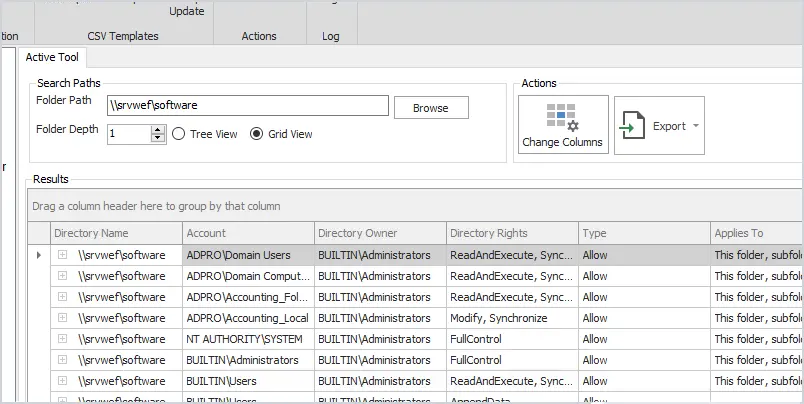
The NTFS permissions tool will report folder security for local, remote, and UNC folder permissions. The grid view comes with a powerful filter so you can search and limit the results to find specific permissions such as Active Directory groups.
Windows PowerShell is a very powerful tool that can automate many Active Directory and Windows tasks. The problem is it can be complex to learn some of the advanced functions. With that said there are plenty of cmdlets that can be used in a single line of code to do some pretty cool things in Windows.
Create new user account: New-Aduser
Create computer account: New-ADComputer
Create a security group: New-ADGroup
Create a organizational unit: New-ADOrganizationalUnit
Get domain details: Get-ADDomin
Get domain password policy: Get-ADDefaultDomainPasswordPolicy
Get group policy: get-GPO -all
Get all services: get-service
Find locked user accounts: Search-ADAccount -LockedOut
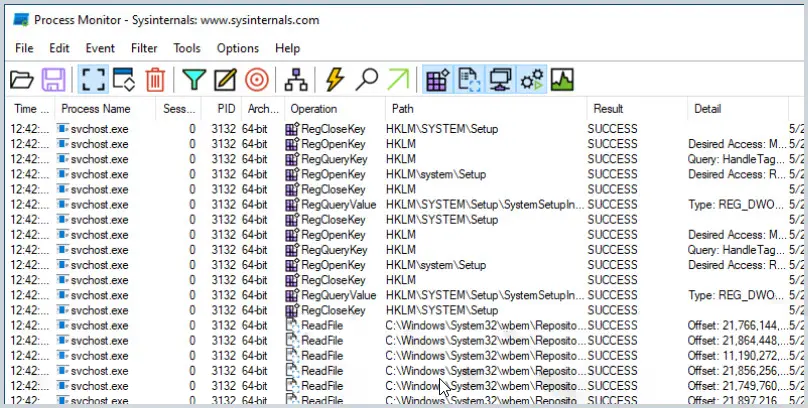
The Sysinternals is a suite of small GUI programs and command line utilities designed to troubleshoot and diagnose your Windows systems and applications. They are all portable, which means you don’t need to install them, you can just run the exe or commands with no installation required.
These utilities were created way back in 1996 by Mark Russinovich and then later acquired by Microsoft. There are a bunch of tools included I will list some of the popular ones.
Process Monitor – Shows real time file system, registry and process activity.
PsExec – Lets you execute programs on a remote system
PsKill – Kill local and remote processes
Sysmon – Logs system activity about process creations, network connection and changes to files
Psinfo – Shows info about a local or remote computer
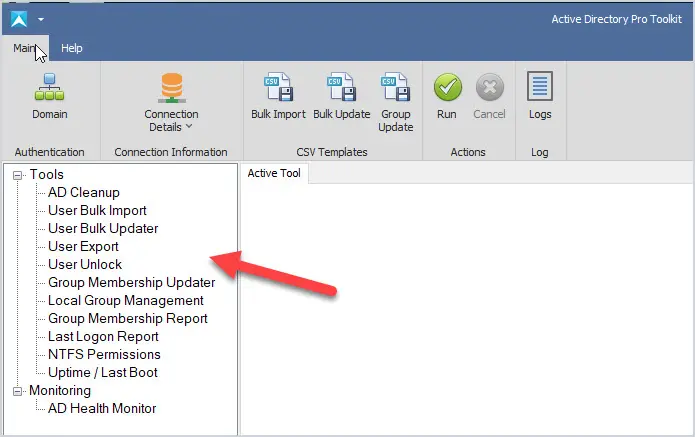
All-in-one Active Directory Toolkit
Our AD Pro Toolkit includes 12 Active Directory tools in a single interface.
The main benefit is it will save you time and make managing Active Directory easier. One of the most popular tasks of working with Active Directory is to create new user accounts. The built-in tools provide no options for bulk importing new accounts so it becomes very time-consuming. With the AD Pro Toolkit you can easily bulk import, bulk update, and disable user accounts.
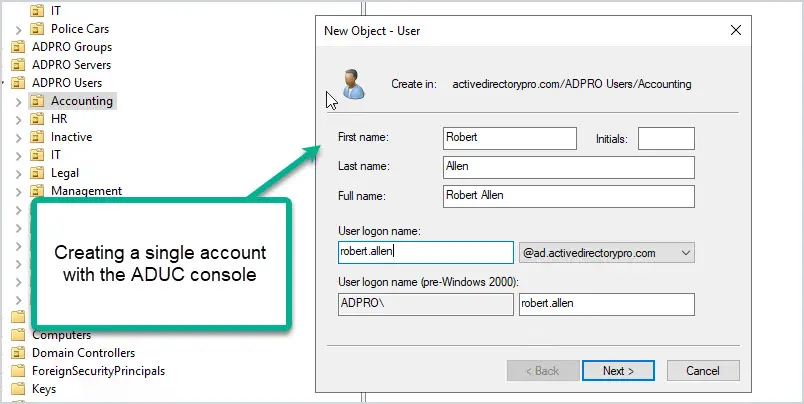
Below is a picture of how you would create an account with the built-in (ADUC) Active Directory Users and Computers console. Everything has to be manually entered and you have to go back and add users to groups.
Using Active Directory tools like the AD Bulk Import tool, you can bulk import thousands of accounts at once. Plus you can automatically set user accounts fields and add users to groups. Let me show you how easy it is.
Step 1: Fill out the provided CSV template.
The template includes all the common user fields you need to create a new account. Just fill out what you need and save the file.
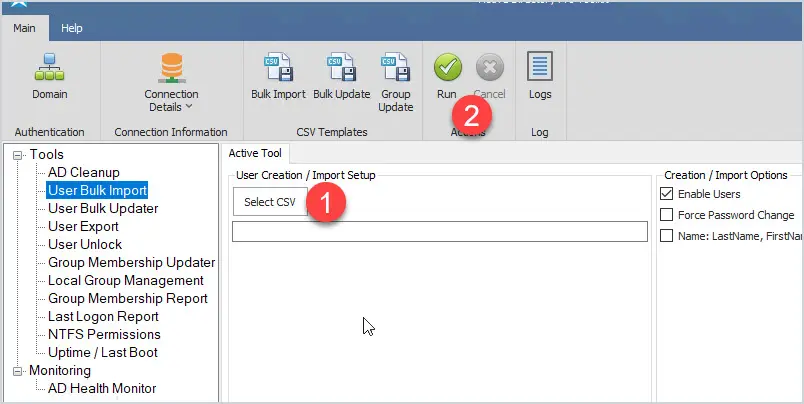
Step 2: Import new account
With this tool just select your CSV file and click run. This will import all of the account information from the CSV and automatically bulk create new Active Directory user accounts.
You can watch the import process and when complete you have a log file of the import.
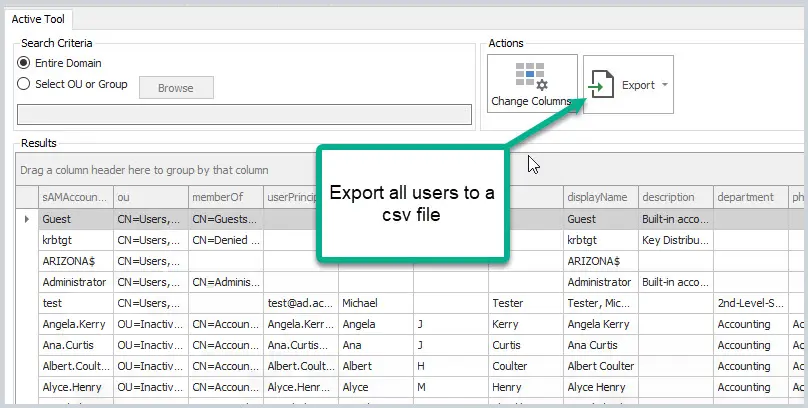
You will at some point be asked to export users to a CSV and again there is no easy built in option for this. When I was an administrator at a large organization I would get this request at least once a week and it was a pain. When I developed the user export tool this process became so easy I was able to have other staff members take it over.
The above picture is from the user export tool. This tool lets you easily export all users from the entire domain, an OU, or a group.
The ease of use is another benefit as many people don’t have time to learn PowerShell. PowerShell is a great tool and can do many things but it can be complex and time-consuming to learn. The AD Pro Toolkit has a very simple interface and you can start using it right away to perform many advanced tasks in your domain.
Frequently Asked Questions
Below are questions and answers regarding the AD Pro Toolkit.
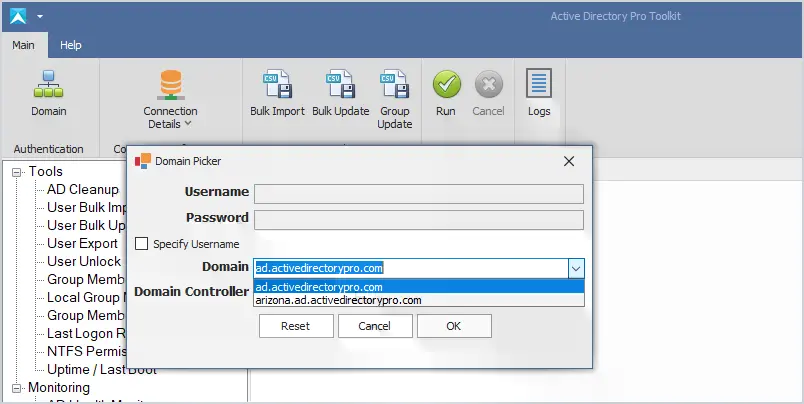
Does the AD Pro Tool support multiple domains?
Yes. It will auto-detect your domains based on current credentials. You can click the domain button to change authentication and connect to other domains or domain controllers.
Do you have a tool to help with account lockouts?
Yes, the user unlock tool can quickly display all locked users and the source of the lockout.
What is required to use the toolkit?
To create and bulk modify users you will need these rights in your Active Directory domain. This is often done by putting your account in the domain administrator group but can also be done by delegating these rights. Some tools like the last logon reporter, export, and group membership require no special permissions.
Do I need to know PowerShell or scripting?
No. All tools are very easy to use and require no scripting or PowerShell experience.
Is there a way to bulk update the manager, telephone numbers, and other user fields?
Yes, this is exactly what the bulk updater tool was created for. You can easily bulk update from a large list of user fields.
Can I bulk export or import on a scheduled task?
We are working on this right now. AD Cleanup, bulk import, update, and export tools will include an option to run on a scheduled task or from a script.
I was just hired and Active Directory is a mess. Can the Pro toolkit help?
The AD Cleanup tool can help you find old user and computer accounts and bulk disable or move them. We have many customers that use this tool to cleanup their domain environments.
Out-of-the-box QTS 5.0.1 automatically installs security updates by default. Nevertheless, if you update the firmware from QTS 5.0.0 to 5.0.1, QTS will keep your existing firmware update settings. We recommend checking your firmware update settings in Control Panel > Firmware Update.
Removed support for the following developer tools: Node.js v4, Node.js v6, Node.js v8, and Ruby on Rails.
Removed support for the following apps or tools: Mono, Perl, and AlarmClock. We recommend running these apps or tools using Container Station if needed.
When a release candidate has proven to be stable enough for public use, we name this release candidate as an official release. You will not be notified again for official firmware update if you have already updated your system to this release candidate.
New Features
Control Panel
QTS now supports access protection settings for RTRR and Rsync protocols in Control Panel > System > Security.
Administrators can now enforce 2-step verification on specific users or groups and then check their current verification status. After this enforcement, selected users must complete 2-step verification setup before proceeding to other operations.
To ensure device security, you can now choose to disable USB ports to block all USB devices or only USB storage devices.
Desktop & Login
You can now configure the desktop icon size and font size in Desktop > Task Bar > Options >Wallpaper.
File Station
You can now share a shared folder via a share link.
Network & Virtual Switch
Network & Virtual Switch now displays MTU (Maximum Transmission Unit) values for network interfaces.
SAMBA
QTS now supports Microsoft Windows Search Protocol. This allows you to perform quick searches for files and folders in NAS shared folders mounted on Windows 10 via SMB.
Storage&Snapshots
Storage & Snapshots now displays topology diagrams for SAS JBOD expansion enclosures to help visualize the arrangement of your storage devices.
To ensure the availability of your data, Storage & Snapshots now supports “Replace & Detach”, which allows you to copy data from a faulty disk to a spare disk and then safely detach the faulty disk.
You can now use exFAT on ARM-based models without purchasing an exFAT license. Note that we have already added this support for x86-based models in an earlier update.
Added support for TCG-Enterprise SEDs. Storage & Snapshots can now display SED types.
Snapshot Replica now supports 2-step verification.
You can now specify a snapshot deletion policy in Storage & Snapshots > Global Settings.
Enhancement
Control Panel
Added an option to force users to change their password upon their first login.
Added the following features in Control Panel to optimize the mechanism and workflow of firmware updates:
Merged live update settings and auto update settings into a single user interface.
Enhanced notifications for firmware updates. Users can choose to postpone or cancel updates before the scheduled update time.
Introduced a new update type: important security updates. We recommend selecting this update type in auto update settings to ensure your device security.
QTS now displays a warning message in Control Panel > System > Hardware > Hardware Resources when you select a graphics card installed on a PCIe slot that does not support PCIe passthrough.
When importing users, you can now choose to require imported users to change their password upon their first login.
Shortened the waiting period for auto firmware updates. QTS now starts an auto update within only one hour from the scheduled time if a new firmware version is available for your device.
Administrators can now choose to receive notifications upon login if a recommended firmware update is available. (This feature is enabled by default).
The default UPS policy is now set to “auto-protection mode” after NAS initialization.
You can now create a one-time power schedule.
QTS now provides an option in Control Panel to disable the power button. This prevents unexpected shutdown when users press the power button by accident.
To prevent malicious usernames and to ensure device security, QTS no longer allows usernames that contain the following characters: { } $ and the space character.
File Station
File Station can now convert Apple iWork files to Microsoft Office formats with CloudConvert API v2.
Optimized the results of file name sorting for all languages. This helps deliver more consistent sorting results.
File Station now provides more information for background tasks to help you understand the detail, status, and progress of each task.
Share links now display file thumbnails and allow you to select and download multiple files at the same time. We have also enhanced the UI design to improve your file sharing experience.
Network & Virtual Switch
Upgraded jQuery to 3.5.1.
Improved the information for the system default gateway and NCSI (Network Connectivity Status Indicator) in Network & Virtual Switch to better explain their behaviors.
The TS-x77XU and TS-x83XU models can now update firmware for their network interface cards via Advanced Network Driver.
PHP System Module
Upgraded the built-in PHP version to 7.4.20.
SAMABA
Users can now enable SMB signing for NAS devices that do not join a domain. To enable this setting, go to Control Panel > Network & File Services > Win/Mac/NFS/WebDAV > Microsoft Networking > Advanced Options.
To prevent malware and ransomware from exploiting SMB v1 vulnerabilities, QTS now automatically sets the lowest SMB version to SMB v2 if your lowest SMB version is SMB v1 before this firmware update.
Storage&Snapshots
Updated Seagate IronWolf Health Management (IHM) to 2.1.1 to add support for the following drive models: IronWolf 525 SSD 2TB(ZP2000NM30002), IronWolf 525 SSD 1TB(ZP1000NM30002), IronWolf 525 SSD 500GB(ZP500NM30002), IronWolf 16TB(ST16000VN001), IronWolf 14TB(ST14000VN0008), IronWolf Pro 20TB(ST20000NE000), IronWolf 18TB(ST18000VN000), IronWolf 4TB(ST4000VN006).
Storage & Snapshots now supports zooming in on hardware model drawings to display component details.
Improved the user interface of Snapshot Replica to further enhance usability and user experience.
Storage & Snapshots now also displays Snapshot Replica information in Overview > Volume/LUN.
Fixed Issues
Fixed an issue where user storage quota would be reset to the default value after users restarted the NAS.
Known Issues
QTS and QuTS hero with newer kernel versions do not support ATTO Fibre Channel adapters. If you have already installed an ATTO Fibre Channel adapter on your device, we do not recommend updating the firmware to QTS 5.0.1 or QuTS hero h5.0.1 for the time being.
Thunderbolt connection between the NAS and Mac sometimes cannot automatically resume after users restart the NAS.
Users cannot connect to the destination NAS of a Snapshot Replica job if their usernames contain a space.
After waking up from sleep, the TS-x51 and TS-x53 models cannot detect external drives that do not support sleep mode.
Network connection issues may occur when users add both 10 GbE ports of the QXG-10G2SF-CX4 network expansion card to a virtual switch.
Users sometimes cannot switch between different FEC (Forward Error Correction) modes for the QXG-25G2SF-CX6LX network expansion card.
On some earlier NAS models with ARM processors, heavy I/O operations may cause network connection issues for the QNA-UC5G1T USB-to-Ethernet adapter.
Other Changes
App Center
In App Center, the option “Allow installation of applications without a valid digital signature” is now disabled by default after firmware update.
Control Panel
Removed certain device information from the login screen to enhance device security.
To ensure device security, the “admin” account cannot use the default password (the MAC address of the first network adapter) when changing the password.
Desktop & Login
Instead of using the generic alias “appuser”, QuLog Center and Desktop Dashboard now display actual usernames when users access system resources and services via a client app.
To enhance device security, the system now asks the “admin” user to change the password when the user logs in with the default password (the MAC address of the first network adapter).
License
You no longer need a license to operate QuTScloud installed in Virtualization Station. Note that License Center 1.7.5 (or later) is required for this change.
Storage&Snapshots
For a more intuitive workflow, Storage & Snapshots now shows various options (such as “Remove” and “Expand”) on the “Action” menu in Pool/Volume Management.
Storage & Snapshots now provides clearer information for the results of IronWolf Health Management (IHM) tests. This allows you to easily check the health of your IronWolf drives.
You can now quickly identify and repair volumes that may have potential issues after a power outage or an abnormal shutdown. In Storage & Snapshots > Overview, we now add a link that allows you to perform a file system check on such volumes.
VJBOD currently does not support encrypted LUNs.
Adjusted some settings in the Volume Creation Wizard to enhance user experience. Thin volume is now the default volume type for volume creation.
Securing a Microsoft 365 tenant must start with identity.
Protecting identities is a fundamental part of Zero Trust and it’s the first “target” that most attackers look for. We used to say that attackers hack their way in, now we say they log in, using bought, found or stolen/phished credentials. This article will show you why MFA is so important and how to implement advanced security features in Azure AD such as PIM, Password protection, Conditional Access policies (also a strong part of Zero Trust), auditing and more.
Below is the first chapter from our free Microsoft 365 Security Checklist eBook. The Microsoft 365 Security Checklist shows you all the security settings and configurations you need to know for each M365 license to properly secure your environment. Download the full eBook and checklist spreadsheet.
Multi-Factor Authentication
It should be no surprise that we start with identity, it’s the new security perimeter or the new firewall and having a strong identity equals strong security. The first step to take here is implementing Multi Factor Authentication (MFA). It’s free for all Office / Microsoft tenants. If you want to use Conditional Access (CA) to enforce it (rather than just enabling users “in bulk”), you need Azure AD Premium P1+ licensing. A username and a simple password are no longer adequate (it never was, we just never had a simple, affordable, easy to use alternative) to protect your business.
Hand-in-hand with MFA you need user training. If your business is relying on users doing the right thing when they get the prompt on their phone – they MUST also know that if they get a prompt when they’re NOT logging in anywhere, they must click Block / No / Reject.
To enable MFA on a per-user basis, go to aad.portal.azure.com, login as an administrator, click Azure Active Directory – Security – MFA and click on the blue link “Additional cloud-based MFA settings”.
Additional MFA settings
There are two parts (tabs) on this page, “service settings” where you should disable app passwords (a workaround for legacy clients that don’t support MFA, shouldn’t be necessary in 2022), add trusted public IP addresses (so that users aren’t prompted when they’re in the corporate office – we and Microsoft recommend not using this setting), disabling Call and Text message to phone and remember MFA on trusted devices setting (1-365 days), Microsoft recommends either using CA policies to manage Sign-In frequency or setting this to 90 days. Phone call / text message MFA are not strong authentication methods and should not be used unless there’s no other choice.
On the user’s tab you can enable MFA for individual users or click bulk update and upload a CSV file with user accounts.
If you have AAD Premium P1, it’s better to use a CA policy to enforce MFA, it’s more flexible and the MFA settings page will eventually be retired.
Enforcing MFA with a Conditional Access Policy
A few words of caution, enabling MFA for all your administrators is a given today. Seriously, if you aren’t requiring every privileged account to use MFA (or 2FA / passwordless, see below), stop reading and go and do that right now. Yes, it’s an extra step and yes, you’ll get push back but there’s just no excuse – it’s simply unprofessional and you don’t belong in IT if you’re not using it. For what it is worth, I’ve been using Azure MFA for over seven years and require it for administrators at my clients – no exceptions.
Enabling MFA for all users is also incredibly important but takes some planning. You may have some users who refuse to run the Microsoft Authenticator app on their personal phone – ask for it to be put in their hiring contract. You need to train them as to why MFA is being deployed, what to do, both for authentic logins and malicious ones. Furthermore, you need to have a smooth process for enrolling new users and offboarding people who are leaving.
You should also strongly consider creating separate (cloud only) accounts for administrators. They don’t require a license and it separates the day-to-day work of a person who only performs administrative actions in your tenant occasionally (or use PIM, Chapter 10).
MFA protects you against 99.9% of identity-based attacks but it’s not un-phishable. Stronger alternatives include biometrics such as Windows Hello for Business (WHFB) and 2FA hardware keys which bring you closer to the ultimate in identity security: passwordless.
Legacy Authentication
However, it’s not enough to enable MFA for all administrators and users, the bad guys can still get in with no MFA prompt in sight. The reason is that Office 365 still supports legacy protocols that don’t support modern authentication / MFA. You need to disable these; you can’t just turn them off, you need to check if there are legitimate applications / workflows / scripts that use any of them. Go to aad.portal.azure.com, login as a Global Administrator, click Azure Active Directory – Monitoring – Sign-in logs. Change the time to last one month, and click Add filters, then click Client app and then None Selected, in the drop-down pick all 13 checkboxes under Legacy Authentication Clients and click Apply.
Filtering Azure AD Sign-in logs for legacy authentication
This will show you all the logins over the last month that used any of the legacy protocols. If you get a lot of results, add a filter for Status and add Success to filter out password stuffing attacks that failed. Make sure you check the four different tabs for interactive / non-interactive, service principals and managed identity sign-ins.
You’ll now need to investigate the logins. In my experience there will be some users who are using Android / Apple mail on smartphones; point them to the free Outlook app instead (Apple mail can be configured to use modern authentication). There’s also likely to be line-of-business (LOB) applications and printers / scanners that send emails via Office 365, so you’ll need updates for these. Alternatively, you can use another email service for these such as smtp2go.
Once you have eliminated all legitimate legacy authentication protocol usage you can disable it in two ways, it’s best to use both. Start by creating a Conditional Access policy based on the new template to block it, also go to admin.microsoft.com, Settings – Org settings – Services – Modern authentication and turn off basic authentication protocols.
Disable legacy authentication protocols in the M365 Admin Center
Break Glass accounts
Create at least one, preferably two break glass accounts, also known as emergency access accounts. These accounts are exempted from MFA, all CA policies and PIM (see below) and have very long (40 characters+), complex passwords. They’re only used if AAD MFA is down, for example, to gain access to your tenant to temporarily disable MFA or a similar setting, depending on the outage.
A second part to this is that you want to be notified if these accounts are ever used. One way to do this is to send your Azure AD sign-in logs to Azure Monitor (also known as Log Analytics), with instructions here. Another option is to use Microsoft Sentinel (which is built on top of Log Analytics) and create an Analytics rule.
Microsoft Sentinel alert rule when a Break Glass account is used
Security Defaults
If yours is a very small business, with few requirements for flexibility, the easiest way to set up Azure AD with MFA for everyone, plus several other security features enabled, is to turn on Security Defaults. Note that you can’t have break-glass accounts or other service accounts with Security Defaults as there’s no way to configure exceptions. Go to Properties for your Azure AD tenant and scroll to the bottom, and click on Manage Security defaults, here you can enable and disable it.
Privileged Identity Management
It’s worth investing in Azure Active Directory (AAD) Premium P2 for your administrator’s accounts and enabling Privileged Identity Management (PIM). This means their accounts are ordinary user accounts who are eligible to elevate their privileges to whatever administrator type they are assigned (see Chapter 10).
If you’re not using PIM, create dedicated admin accounts in AAD only. Don’t sync these accounts from on-premises but enforce MFA and strong passwords. Since they won’t be used for day-to-day work, they won’t require an M365 license.
Password Protection
After MFA, your second most important step is banning bad passwords. You’re probably aware that we’ve trained users to come up with bad passwords over the last few decades with “standard” policies (at least 8 characters, uppercase, lowercase, special character and numbers) which results in P@ssw0rd1 and when they’re forced to change it every 30 days, P@ssw0rd2. Both NIST in the US and GHCQ in the UK now recommends allowing (but not enforcing) the use of upper / lowercase etc., but not mandating frequent password changes and instead of checking the password at the time of creation against a list of known, common bad passwords and blocking those. In Microsoft’s world that’s called Password protection which is enabled for cloud accounts by default. There’s a global list of about 2000 passwords (and their variants) that Microsoft maintains, based on passwords they find in dumps, and you should add (up to 1000) company-specific words (brands, locations, C-suite people’s names, local sports teams, etc.) for your organization.
You find Password protection in the AAD portal – Security – Authentication Methods.
Password protection settings
Remember, you don’t have to add common passwords to the list, they’re already managed by Microsoft, just add company / region specific words that your staff are likely to use.
If you’re syncing accounts from Active Directory on-premises to AAD, you should also extend Password protection to your DCs. It involves the installation of an agent on each DC, a proxy agent, and a reboot of each DC.
Continuous Access Evaluation
This feature has been in preview for quite some time but is now in general availability. Before Continuous Access Evaluation (CAE), when you disabled a user’s account, or they changed location (from the office to a public Wi-Fi for example) it could be up to one hour before their state was re-evaluated and new policies applied, or they were blocked from accessing services. With CAE, this time is much shorter, in most cases in the order of a few minutes. It’s turned on by default for all tenants (unless you were part of the preview and intentionally disabled it). Another benefit of CAE is that tokens are now valid for 28 hours, letting people keep working during a shorter Azure AD outage. You can disable CAE in a CA policy, but it’s not recommended.
Conditional Access policies
We’ve mentioned Conditional Access (CA) policies several times already as it’s a crucial component of strong identity security and Zero Trust. Unlike other recommendations, there isn’t a one size fit all set of CA policies we can give you, however (at a minimum) you should have policies for:
Require MFA for admins (see MFA above)
Require MFA for users (see MFA above)
Require MFA for Azure management
Block legacy authentication (see MFA above)
Require compliant or Hybrid AAD joined device for admins
Require compliant or Hybrid AAD joined device for users
Block access to M365 from outside your country
Require MFA for risky sign-ins (if you have AAD Premium P2)
Require password change for high-risk users (if you have AAD Premium P2)
This is all going to be a lot easier going forward with the new policy templates for identity and devices. Go to Azure AD – Security – Conditional Access – New policy – Create a new policy from templates. Another step to take is to create a system for managing the lifecycle of policies and there’s an API for backing up and updating policies, that you can access in several ways, including PowerShell. There’s even a tutorial to set up a backup system using a Logic App.
Conditional Access policy templates for identity
A common question is if there’s a priority when policies are evaluated and there isn’t, they’re all processed together for a particular sign-in, from a specific device and location to an individual application. If there are multiple policies with different controls (MFA + compliant device), all controls must be fulfilled for access. And if there are conflicting policies with different access (block vs grant), block access will win.
To get you started, here are the step-by-step instructions for a policy blocking access to M365 from outside your country, appropriate for most small and medium businesses that only operate in one or a few countries. Keep in mind that travelling staff may be caught out by this so make sure you align with business objectives and be aware that this won’t stop every attack as a VPN or TOR exit node can make it appear as if the attacker is in your country, but it’s one extra step they must take. Remember, you don’t have to run faster than the Fancy Bear, just faster than other companies around you.
Start by going to Azure AD – Security – Conditional Access – Named locations and click +Countries location and call the location Blocked countries. Leave Determine location by IP address, a new feature is using GPS location from the Microsoft Authenticator app which will be more accurate once all your users are using Azure AD MFA (and therefore can be located via GPS). Click the box next to Name to select all countries, then find the one(s) that you need to allow login from and click Create.
Creating a Named Location for a Conditional Access Policy
Go to Azure AD – Security – Conditional Access – New policy – Create new policy and name your policy with a name that clearly defines what the policy does and adheres to your naming standard. Click on All Users… and Include All users and Exclude your Break Glass accounts.
Click on No cloud apps… and select All cloud apps. Select 0 conditions… and click Not configured under Locations. Pick Selected locations under Include and select your newly created location. Finally, under Access controls – Grant, click 0 controls selected and then Block access.
CA policies can be either in Report-only mode where you can look at reports of what they would have blocked and control they would have enforced, or they can be turned on / off. Report-only can be handy to make sure you don’t get fired for accidentally locking everyone out but turn this policy on as soon as possible.
Conditional Access policy to block logins from outside Australia
A common question is, how can I control how often users are prompted for MFA or signing in again? While it might be counterintuitive, the default in Azure AD is a rolling windows of 90 days. Remember, if you change a user’s password, block non-compliant devices, or disable an account (plus any number of other CA policies you have in place that might affect the security posture of the session), it’ll automatically require new authentications. Don’t prompt the users for authentication when nothing has changed because if you do it too frequently, they’re more likely to approve a malicious login.
Branding Log-on Pages
While in the Azure AD portal, click on Company branding and add a company-specific Sign-in page background image (1920x1080px) and a Banner logo (280x60px). Note that these files have to be small (300 KB and 10 KB respectively) so you may have to do some fancy compression. This isn’t just a way to make users feel at home when they see a login page, in most cases when attackers send phishing emails to harvest credentials, they’ll send users to a fake login page that looks like the generic Office 365 one, not your custom one which is another clue that should alert your users to the danger. Also – Windows Autopilot doesn’t work unless you have customized AAD branding.
Edit Azure AD Company Branding images
Self Service Password Reset
The benefit of Self Service Password Reset (SSPR) is to lower the load on your help desk to manage password resets for users. Once enabled, users must register various ways of being identified when they’re resetting their password, mobile app notification/code, email (non-Office 365), mobile/office phone call, security questions (not available to administrators, plus you can create custom questions). If you are synchronizing user accounts from AD to Azure AD, take care in setting up SSPR as the passwords must be written back to AD from the cloud once changed.
Configuring Self Service Password Reset in Azure AD
Unified Auditing
Not restricted to security but nevertheless, a fundamental building block is auditing across Microsoft 365. Go to the Microsoft 365 Defender portal and find Audit in the left-hand menu (it’s almost at the end). If for some reason unified auditing isn’t enabled in your tenant a yellow banner will give you a button to turn it on (it’s on by default for new tenants). Once enabled, click the Audit retention policies tab, and create a policy for your tenant. You want to ensure that you have logs to investigate if there’s a breach and you want them kept for as long as possible.
With Business Premium you get a maximum of 90 days of retention and Microsoft 365 E5 gives you one year, but you want to make sure to create a policy to set this, rather than rely on the default policy (which you can’t see). Give the policy a name, a description and add all the record types, one by one. This policy will now apply to all users (including new ones that are created) for all activities. Only use the Users option when you want to have a specific policy for a particular user. Give the policy a priority, 1 is the highest and 10,000 is the lowest.
Create an audit retention policy for maximum retention
Integrating applications into Azure AD
One of the most powerful but often overlooked features (at least in SMBs) is the ability to use Azure AD to publish applications to your users. Users can go to myapps.microsoft.com (or office.com) and see tiles for all applications they have access to. But there’s more to that story. Say, for example, you have a shared, corporate Twitter account that a few executives and marketing staff should have access to. Instead of sharing a password amongst them all and having to remember to reset it if someone leaves the organization, you can create a security group in AAD, add the relevant users, link Twitter to the group and they’ll automatically have access – without knowing the password to the account. There are a lot more actions you can take here to simplify access and secure management of applications, here’s more information.
Azure AD Connect
If you’re synchronizing accounts from Active Directory to Azure Active Directory (AAD), check the configuration of AAD Connect and make sure you’re not replicating an entire domain or forest to AAD. There’s no reason that service accounts etc. should be exposed in both directories, start the AAD Connect wizard on the server where it’s installed and double-check that only relevant OUs are synchronized. One other thing to note here is the fact that any machine running Azure AD Connect should be treated with the same care (in terms of security) as a domain controller. This is because AAD Connect requires the same level of access as AD itself and has the ability to read password hashes. Making sure security best practices for access, patching, etc. are followed to the letter for the system running AAD connect is critically important.
The M365 Identity Checklist
Work through the Identity checklist.
Enable MFA for administrators
Enable MFA for users
Create cloud-only administrator accounts for privileged users / occasional administrators
Disable app passwords
(Configure trusted IPs)
Disable text message MFA
Disable phone call MFA
Remember MFA trusted devices 90 days
Train staff in using MFA correctly
Use Windows Hello where possible
Use FIDO2 / 2FA keys where possible
Investigate legacy authentication protocol usage in AAD Sign-in logs
Block legacy authentication with CA Policy
Block legacy authentication in M365 Admin Center
Create two Break glass accounts and exempt from MFA, CA Policies etc.
Configure alerting if a Break glass account is used
Enable Security Defaults in AAD (consider the limitations)
Enable PIM (AAD Premium P2) for all admin users
Add organization-specific words to Password protection
Deploy Password protection in AD on-premises
CA Policy Require MFA for admins
CA Policy Require MFA for users
CA Policy Require MFA for Azure management
CA Policy Block legacy authentication
CA Policy Require compliant or Hybrid AAD joined device for admins
CA Policy Require compliant or Hybrid AAD joined device for users
CA Policy Block access to M365 from outside your country
Require MFA for risky sign-ins [Only for E5)
Require password change for high-risk users [Only for E5)
Create custom branding logos and text in Azure AD
Enable and configure Self Service Password Reset, including password writeback
Go Further than Identity to Protect your M365 Tenant
There you have it, all the most important steps to take to make sure your users’ identities are kept secure, and therefore your tenant and its data also safeguarded. Keen to learn and do more?
The Microsoft 365 Security Checklist has another nine chapters of security recommendations each with its own checklist for:
Exactly how vulnerable is VMware infrastructure to Ransomware?
Historically and like most malware, ransomware has been targeting Windows operating systems primarily. However, cases of Linux and MacOS being infected are being seen as well. Attackers are being more proficient and keep evolving in their attacks by targeting critical infrastructure components leading to ransomware attacks on VMware ESXi. In this article, you’ll learn how Ransomware targets VMware infrastructure and what you can do to protect yourself.
What is Ransomware?
Ransomware are malicious programs that work by taking the user’s data hostage in exchange for a hefty ransom.
There are essentially 2 types of Ransomware (arguably 3):
Crypto Ransomware: Encrypts files so that the user cannot access them. This is the one we are dealing with in this blog.
Locker Ransomware: Lock the user out of his computer by encrypting system files.
Scareware: Arguably a third type of ransomware that is actually a fake as it only locks the screen by displaying the ransom page. Scanning the system with an Antivirus LiveCD will get rid of it quite easily.
A user computer on the corporate network is usually infected through infected USB drives or social engineering techniques such as phishing emails and shady websites. Another occurrence includes attacking a remote access server publicly exposed through brute-force attacks.
The malware then uses a public key to encrypt the victim’s data, which can span to mapped network drives as well. After which the victim is asked to make a payment to the attacker using bitcoin or some other cryptocurrency in exchange for the private key to unlock the data, hence the term Ransomware. If the victim doesn’t pay in time, the data will be lost forever.
As you can imagine, authorities advise against paying the ransom as there is no guaranty the bad actor will deliver on his end of the deal so you may end up paying the big bucks and not recover your data at all.
Can Ransomware affect VMware?
While infecting a Windows computer may yield a reward if the attacker gets lucky, chances are the OS will simply be reinstalled, no ransom is paid and the company will start tightening security measures. Game over for the bad guys.
Rather than burning bridges by locking a user’s workstation, they now try to make a lateral move from the infected workstation and target critical infrastructure components such as VMware ESXi. That way they hit a whole group of servers at once.
“VMware ESXi ransomware impact all the VMs running on the hypervisor”
From the standpoint of an attacker, infesting a vSphere host, or any hypervisor for that matter, is an “N birds, 1 stone” type of gig. Instead of impacting one workstation or one server, all the virtual machines running on the host become unavailable. Such an attack will wreak havoc in any enterprise environment!
How does a Ransomware Attack Work?
In the case of targeted attacks, the bad actor works to gain remote access to a box in the local network (LAN), usually a user computer, and then make a lateral move to access the management subnet and hit critical infrastructure components such as VMware ESXi.
There are several ways a ransomware attack on VMware ESXi can happen but reports have described the following process.
“The ransomware attack on VMware ESXi described in this blog is broken down into 5 stages”
Stage 1: Access local network
Gaining access to the LAN usually goes either of 2 ways:
A malware is downloaded in a phishing email or from a website. It can also come from an infected USB stick.
The attacker performs a Brute force attack against a remote access server exposed to the internet. This seems more unusual as it involves more resources and knowledge of the target. Brute force attacks are also often caught by DDoS protection mechanisms.
“Ransomware spread through malicious email attachments, websites, USB sticks”
Stage 2: Escalate privileges
Once the attacker has remote access to a machine on the local network, be it a workstation or a remote desktop server, he will try to escalate privileges to open doors for himself.
Several reports mentioned attackers leveraging CVE-2020-1472 which is a vulnerability in how the Netlogon secure channel connections are done. The attacker would use the Netlogon Remote Protocol (MS-NRPC) to connect to a domain controller and gain domain administrator access.
Stage 3: Access management network
Once the bad actors have domain administrator privileges, they can already deal a large amount of damage to the company. In the case of a ransomware attack on VMware ESXi, they will use it to gain access to machines on the management network, in which the vCenter servers and vSphere ESXi servers live.
Note that they might even skip this step if the company made the mistake to give user workstations access to the management network.
Stage 4: VMware ESXi vulnerabilities
When the attackers are in the management network, you can only hope that all the components in your infrastructure have the latest security patches installed and strong password policies. At this point, they are the last line of defense, unless a zero-day vulnerability is being leveraged in which case there isn’t much you can do about it.
Several remote code execution vulnerabilities have been exploited over the last year or so against VMware ESXi servers and vCenter servers.
The two critical vulnerabilities that give attackers access to vSphere hosts relate to the Service Location Protocol (SLP) used by vSphere to discover devices on the same network. By sending malicious SLP commands, the attacker can execute remote code on the host.
CVE-2019-5544: Heap overwrite issue in the OpenSLP protocol in VMware ESXi.
CVE-2020-3992: Use-after-free issue in the OpenSLP protocol in VMware ESXi.
CVE-2021-21985: Although no attack mentions it, we can assume the vCenter Plug-in vulnerability discovered in early 2021 can be a vector of attack as well. Accessing vSphere hosts is fairly easy once the vCenter is compromised.
They can then enable SSH to obtain interactive access and sometimes even change the root password or SSH keys of the hosts.
Note that the attacker may not even need to go through all that trouble if he manages to somehow recover valid vCenter of vSphere credentials. For instance, if they are stored in the web browser or retrieved from the memory of the infected workstation.
Stage 5: Encrypt datastore and request ransom
Now that the attacker has access to the VMware ESXi server, he will go through the following steps to lock your environment for good.
Uninstall Fault Domain Manager or fdm (HA agent) used to reboot VMs in case of failure.
Shut down all the virtual machines.
Encrypt all virtual machine files using an ELF executable, derived from an encrypting script that targets Linux machines. This file is usually named svc-new and stored in /tmp.
Write a ransom file to the datastore for the administrator to find.
Note that there are variations of the ransomware attack on VMware ESXi, which themselves are ever-evolving. Meaning the steps described above represent one way things can happen but your mileage may very well vary.
How to protect yourself from ransomware attacks on VMware ESXi
If you look online for testimonies, you will find that the breach never comes from a hooded IT mastermind in an ill-lit room that goes through your firewalls by frantically typing on his keyboard like in the movies.
The reality is nowhere near as exciting. 9 times out of 10, it will be an infected attachment in a phishing email or a file downloaded on a shady website. This is most often the doing of a distracted user that didn’t check the link and executed the payload without thinking twice.
Ensure at least the following general guidelines are being enforced in your environment to establish a first solid line of defense:
VMware environment-related recommendations
If you need to open internet access on your vCenter, enforce strong edge firewall rules and proxy access to specific domains. Do not expose vCenter on the internet!!! (Yes, it’s been done).
Set VMware ESXi shell and SSH to manual start and stop.
Don’t use the same password on all the hosts and out-of-band cards.
Some recommend not to add Active Directory as an Identity Source in vCenter Server. While this certainly removes a vector of attack, configuring Multi-Factor Authentication also mitigates this risk.
Industry standards
Educate your users and administrators through educational campaigns.
Ensure the latest security patches are installed as soon as possible on all infrastructure components as well as backups servers, workstations…
Segregate the management subnets from other subnets.
Connect to the management network through a jump server. It is critical that the jump server must:
Be secured and up to date
Accessible only through Multifactor authentication (MFA)
Must only allow a specific IP range.
Restrict network access to critical resources only to trained administrators.
Ensure AD is secured and users/admins are educated on phishing attacks.
Apply least privilege policy.
Use dedicated and named accounts.
Enforce strong password policies.
Segregate Admin and Domain admin accounts on AD.
Log out users on inactivity on Remote Desktop Servers.
Don’t save your infrastructure password in the browser.
Use Multi-Factor Authentication (MFA) where possible, at least on admin accounts.
Forward infrastructure logs to a Syslog server for trail auditing.
Ensure all the workstations and servers have a solid antivirus with regularly updated definitions.
Where do backups fit in all this?
While there are decryption tools out there, they will not always work. In fact, they almost never will.
Restoring from backup is essentially the only way known to date that you can use to recover from a ransomware attack on VMware ESXi. You can use Altaro VM Backup to ensure your environment is protected.
Because attackers know this well, they will try to take down the backup infrastructure and erase all the files so your only option left is to pay the ransom. Which, as mentioned previously, is no guaranty that you get your files back.
Because of it, it is paramount to ensure your backup infrastructure is protected and secure by following best practices:
Avoid Active Directory Domain integration or use multi-factor authentication (MFA).
Do not use the same credentials for access to the VMware and Backup infrastructures.
NIST controls for data integrity (National Institute of Standards and Technology)
VMware documents solutions for combatting ransomware by incorporating the National Institute of Standards and Technology (NIST) controls specific to data integrity. You can find VMware’s recommendations and implementation of the NIST in this dedicated document:
“National Institute of Standards and Technology logo”
The NIST framework is broken down into 5 functions:
In the VMware document linked above, you will find Detect, Protect and Respond recommendations that apply to various environments such as private cloud, hybrid cloud or end-user endpoints.
So How Worried Should I be?
Ransomware have always been one of the scary malware as they can deal a great amount of damage to a company, up to the point of causing some of them to go into bankruptcy. However, let us not get overwhelmed by these thoughts as you are not powerless against them. It is always best to act than to react.
In fact, there is no reason for your organization to get hit by a ransomware as long as you follow all the security best practices and you don’t cut corners. It might be tempting at some point to add an ALLOW ALL/ALL firewall rule to test something, give a user or service account full admin rights, patch a server into an extra VLAN or whatever action you know for a fact would increase your security officer’s blood pressure. In such a case, even if there is a 99.9% chance things are fine, think of the consequences it could have on the company as a whole should you hit that 0.1% lurking in the back.
If you are reading this and you have any doubts regarding the security of your infrastructure, run a full audit of what is currently in place and draw a plan to bring it into compliance with the current industry best practices as soon as possible. In any case, patch your systems as soon as possible, especially if you are behind!
A VMware vSphere environment includes many components to deliver business-critical workloads and services. However, there is a feature of today’s modern VMware vSphere infrastructure that is arguably underutilized – the VMware Content Library. Nevertheless, it can be a powerful tool that helps businesses standardize the workflow using files, templates, ISO images, vApps, scripts, and other resources to deploy and manage virtual machines. So how can organizations manage resources across sites with the VMware Content Library?
What is the VMware Content Library?
Most VI admins will agree with multiple vCenter Servers in the mix, managing files, ISOs, templates, vApps, and other resources can be challenging. For example, have you ever been working on one cluster and realized you didn’t have the ISO image copied to a local datastore that is accessible, and you had to “sneakernet” the ISO where you could mount and install it? What about virtual machine templates? What if you want to have the virtual machine templates in one vCenter Server environment available to another vCenter Server environment?
The VMware Content Library is a solution introduced in vSphere 6.0 that allows customers to keep their virtual machine resources synchronized in one place and prevent the need for manual updates to multiple templates and copying these across between vCenter Servers. Instead, administrators can create a centralized repository using the VMware Content Library from which resources can be updated, shared, and synchronized between environments.
Using the VMware Content Library, you essentially create a container that can house all of the important resources used in your environment, including VM-specific objects like templates and other files like ISO image files, text files, and other file types.
The VMware Content Library stores the content as a “library item.” Each VMware Content Library can contain many different file types and multiple files. VMware gives the example of the OVF file that you can upload to your VMware Content Library. As you know, the OVF file is a bundle of multiple files. However, when you upload the OVF template, you will see a single library entry.
VMware has added some excellent new features to the VMware Content Library features in the past few releases. These include the ability to add OVF security policies to a content library. The new OVF security policy was added in vSphere 7.0 Update 3. It allows implementing strict validation for deploying and updating content library items and synchronizing templates. One thing you can do is make sure a trusted certificate signs the templates. To do this, you can deploy a signing certificate for your OVFs from a trusted CA to your content library.
Another recent addition to the VMware Content Library functionality introduced in vSphere 6.7 Update 1 is uploading a VM template type directly to the VMware Content Library. Previously, VM templates were converted to an OVF template type. Now, you can work directly with virtual machine templates in the VMware Content Library.
VMware Content Library types
VMware Content Library enables managing resources across sites using two different types of content libraries. These include the following:
Local Content Library – A local content library is a VMware Content Library used to store and manage content residing in a single vCenter Server environment. Suppose you work in a single vCenter Server environment and want to have various resources available across all your ESXi hosts to deploy VMs, vAPPs, install from ISO files, etc. In that case, the local content library allows doing that. With the local content library, you can choose to Publish the local content library. When you publish the Content Library, you are making it available to be subscribed to or synchronized.
Subscribed Content Library – The other type of Content Library is the subscribed content library. When you add a subscribed VMware Content Library type, you are essentially downloading published items from a VMware Content Library type that has published items as mentioned in the Local Content Library section. In this configuration, you are only a consumer of the VMware Content Library that someone else has published. It means when creating the Content Library, the publish option was configured. You can’t add templates and other items to the subscribed VMware Content Library type as you can only synchronize the content of the subscribed Content Library with the content of the published Content Library.
With a subscribed library, you can choose to download all the contents of the published Content Library immediately once the subscribed Content Library is created. You can also choose to download only the metadata for items in the published Content Library and download the entire contents of the items you need. You can think of this as a “files on-demand” type feature that only downloads the resources when these are required.
Below is an example of the screen when configuring a content library that allows creating either a Local Content Library or the Subscribed Content Library:
Choosing the content library type
Create a local or subscription Content Library in vSphere 7
Creating a new VMware Content Library is a relatively straightforward and intuitive process you can accomplish in the vSphere Client. Let’s step through the process to create a new VMware Content Library. We will use the vSphere Web Client to manage and configure the Content Library Settings.
Using the vSphere Web Client to manage the Content Library
First, click the upper left-hand “hamburger” menu in the vSphere Client. You will see the option Content Libraries directly underneath the Inventory menu when you click the menu.
Choosing the Content Libraries option to create a manage Content Libraries
Under the Content Libraries screen, you can Create new Content Libraries.
Creating a new Content Library in the vSphere Client
It will launch the New Content Library wizard. In the Name and Location screen, name the new VMware Content Library.
New Content Library name and location
On the Configure content library step, you configure the content library type, including configuring a local content library or a subscribed content library. Under the configuration for Local content library, you can Enable publishing. If publishing is enabled, you can also enable authentication.
Configuring the Content Library type
When you configure publishing and authentication, you can configure a password on the content library.
Step 3 is the Apply security policy step. It allows applying the OVF default policy to protect and enforce strict validation while importing and synchronizing OVF library items.
Choosing to apply the OVF default policy
The VMware Content Library needs to have a storage location that will provide the storage for the content library itself. First, select the datastore you want to use for storing your content library. The beauty of the content library is that it essentially publishes and shares the items in the content library itself, even though they may be housed on a particular datastore.
Select the storage to use for storing items in the VMware Content Library
Finally, we are ready to complete the creation of the Content Library. Click Finish.
Finishing the creation of the VMware Content Library
Once the VMware Content Library is created, you can see the details of the library, including the Publication section showing the Subscription URL.
Viewing the settings of a newly created VMware Content Library
As a note. If you click the Edit Settings hyperlink under the Publication settings pane, you can go in and edit the settings of the Content Library, including the publishing options, authentication, changing the authentication password, and applying a security policy.
Editing the settings of a VMware Content Library
Creating a subscribed VMware Content Library
As we mentioned earlier, configuring a subscribed content library means synchronizing items from a published content library. In the New Content Library configuration wizard, you choose the Subscribed content library option to synchronize with a published content library. Then, enter the subscription URL for the published content library when selected. As shown above, this URL is found in the settings of the published content library.
You will need to also place a check in the Enable authentication setting if the published content library was set up with authentication. Then, enter the password configured for the published content library. Also, note the configuration for downloading content. As detailed earlier, you can choose to synchronize items immediately, meaning the entire content library will be fully downloaded. Or, you can select when needed, which acts as a “files on demand” configuration that only downloads the resources when needed.
Configuring the subscribed content library
Choose the storage for the subscribed Content Library.
Add storage for the subscribed VMware Content Library
Ready to complete adding a new subscribed VMware Content Library. Click Finish.
Ready to complete adding a subscribed VMware Content Library
Interestingly, you can add a subscribed VMware Content Library that is subscribed to the same published VMware Content Library on the same vCenter Server.
Published and subscribed content library on the same vCenter Server
What is Check-In/Check-Out?
A new feature included with VMware vSphere 7 is versioning with the VMware Content Library. So often, with virtual machine templates, these are frequently changed, updated, and configured. As a result, it can be easy to lose track of the changes made, the user making the modifications, and track the changes efficiently.
Now, VMware vSphere 7 provides visibility into the changes made to virtual machine templates with a new check-in/check-out process. This change embraces DevOps workflows with a way for IT admins to check in and check out virtual machine templates in and out of the Content Library.
Before the new check-in/check-out feature, VI admins might use a process similar to the following to change a virtual machine template:
Convert a virtual machine template to a virtual machine
Place a snapshot on the converted template to machine VM
Make whatever changes are needed to the VM
Power the VM off and convert it back to a template
Re-upload the VM template back to the Content Library
Delete the old template
Internally notify other VI admins of the changes
Now, VI admins can use a new capability in vSphere 7.0 and higher to make changes to virtual machine templates more seamlessly and track those changes effectively.
Clone as template to Library
The first step is to house the virtual machine template in the Content Library. Right-click an existing virtual machine to use the new functionality and select Clone as Template to Library.
Clone as Template to Library functionality to use the check-in and check-out feature
As a note, if you see the Clone to Library functionality instead of Clone as Template to Library, it means you have not converted the VM template to a virtual machine. If you right-click a VM template, you only get the Clone to Library option. If you select Clone to Template, it only allows cloning the template in a traditional way to another template on a datastore.
Right-clicking and cloning a VM template only gives the option to Clone to Library
Continuing with the Clone to Library process, you will see the Clone to Template in Library dialog box open. Select either New template or Update the existing template.
Clone to Template in Library
In the vCenter Server tasks, you will see the process begin to Upload files to a Library and Transfer files.
Uploading a virtual machine template to the Content Library
When you right-click a virtual machine and not a virtual machine template, you will see the additional option of Clone as Template to Library.
Clone as Template to Library
It then brings up a more verbose wizard for the Clone Virtual Machine To Template process. The first screen is the Basic information where you define the Template type (can be OVF or VM Template), the name of the template, notes, and select a folder for the template.
Configuring basic information for the clone virtual machine to template process
On the Location page, you select the VMware Content Library you want to use to house the virtual machine template.
Select the VMware Content Library to house the virtual machine template
Select a compute resource to house your cloned VM template.
Select the compute resource for the virtual machine template
Select the storage for the virtual machine template.
Select storage to house the VM template
Finish the Clone Virtual Machine to Template process.
Finish the clone of the virtual machine to template in the VMware Content Library
If you navigate to the Content Library, you will see the template listed under the VM Templates in the Content Library.
Viewing the VM template in the Content Library
Checking templates in and out
If you select the radio button next to the VM template, the Check Out VM From This Template button will appear to the right.
Launching the Check out VM from this template
When you click the button, it will launch the Check out VM from VM Template wizard. First, name the new virtual machine that will be created in the check-out process.
Starting the Check out VM from VM template
Select the compute resource to house the checked-out virtual machine.
Selecting a compute resource
Review and finish the Check out VM from VM template process. You can select to power on VM after check out.
Review and Finish the Check out VM from VM Template
The checked-out virtual machine will clone from the existing template in the Content Library. Also, you will see an audit trail of the check-outs from the Content Library. You are directed to Navigate to the checked-out VM to make updates. Note you then have the button available to Check In VM to Template.
Virtual machine template is checked out and deployed as a virtual machine in inventory
If you navigate to the Inventory view in the vSphere Client, you will see the machine has a tiny blue dot in the lower left-hand corner of the virtual machine icon.
Viewing the checked-out VM template as a virtual machine in vSphere inventory
After making one small change, such as changing the virtual network the virtual machine is connected to, we see the option appear to Check In VM to Template.
Check In VM to Template
It will bring up the Check In VM dialog box, allowing you to enter notes and then click the Check In button.
Check In the VM
We see the audit trail of changes reflected in the Content Library with the notes we entered in the Check in notes.
Virtual machine template checked back in with the notes entered in the check-in process
You will also see a new Versioning tab displayed when you view the virtual machine template in the inventory view.
Viewing the versioning of a virtual machine template in the inventory view
VMware Content Library Roles
There are various privileges related to Content Library privileges. VMware documents the following privileges that can be assigned to a custom VMware Content Library Role.
Privilege Name
Description
Required On
Content library.Add library item
Allows addition of items in a library.
Library
Content library.Add root certificate to trust store
Allows addition of root certificates to the Trusted Root Certificates Store.
vCenter Server
Content library.Check in a template
Allows checking in of templates.
Library
Content library.Check out a template
Allows checking out of templates.
Library
Content library.Create a subscription for a published library
Allows creation of a library subscription.
Library
Content library.Create local library
Allows creation of local libraries on the specified vCenter Server system.
vCenter Server
Content library.Create or delete a Harbor registry
Allows creation or deletion of the VMware Tanzu Harbor Registry service.
vCenter Server for creation. Registry for deletion.
Content library.Create subscribed library
Allows creation of subscribed libraries.
vCenter Server
Content library.Create, delete or purge a Harbor registry project
Allows creation, deletion, or purging of VMware Tanzu Harbor Registry projects.
Registry
Content library.Delete library item
Allows deletion of library items.
Library. Set this permission to propagate to all library items.
Content library.Delete local library
Allows deletion of a local library.
Library
Content library.Delete root certificate from trust store
Allows deletion of root certificates from the Trusted Root Certificates Store.
vCenter Server
Content library.Delete subscribed library
Allows deletion of a subscribed library.
Library
Content library.Delete subscription of a published library
Allows deletion of a subscription to a library.
Library
Content library.Download files
Allows download of files from the content library.
Library
Content library.Evict library item
Allows eviction of items. The content of a subscribed library can be cached or not cached. If the content is cached, you can release a library item by evicting it if you have this privilege.
Library. Set this permission to propagate to all library items.
Content library.Evict subscribed library
Allows eviction of a subscribed library. The content of a subscribed library can be cached or not cached. If the content is cached, you can release a library by evicting it if you have this privilege.
Library
Content library.Import Storage
Allows a user to import a library item if the source file URL starts with ds:// or file://. This privilege is disabled for content library administrator by default. Because an import from a storage URL implies import of content, enable this privilege only if necessary and if no security concern exists for the user who performs the import.
Library
Content library.Manage Harbor registry resources on specified compute resource
Allows management of VMware Tanzu Harbor Registry resources.
Compute cluster
Content library.Probe subscription information
This privilege allows solution users and APIs to probe a remote library’s subscription info including URL, SSL certificate, and password. The resulting structure describes whether the subscription configuration is successful or whether there are problems such as SSL errors.
Library
Content library.Publish a library item to its subscribers
Allows publication of library items to subscribers.
Library. Set this permission to propagate to all library items.
Content library.Publish a library to its subscribers
Allows publication of libraries to subscribers.
Library
Content library.Read storage
Allows reading of content library storage.
Library
Content library.Sync library item
Allows synchronization of library items.
Library. Set this permission to propagate to all library items.
Content library.Sync subscribed library
Allows synchronization of subscribed libraries.
Library
Content library.Type introspection
Allows a solution user or API to introspect the type support plug-ins for the content library service.
Library
Content library.Update configuration settings
Allows you to update the configuration settings.
Library
No vSphere Client user interface elements are associated with this privilege.
Content library.Update files
Allows you to upload content into the content library. Also allows you to remove files from a library item.
Library
Content library.Update library
Allows updates to the content library.
Library
Content library.Update library item
Allows updates to library items.
Library. Set this permission to propagate to all library items.
Content library.Update local library
Allows updates of local libraries.
Library
Content library.Update subscribed library
Allows you to update the properties of a subscribed library.
Library
Content library.Update subscription of a published library
Allows updates of subscription parameters. Users can update parameters such as the subscribed library’s vCenter Server instance specification and placement of its virtual machine template items.
Library
Content library.View configuration settings
Allows you to view the configuration settings.
Library
No vSphere Client user interface elements are associated with this privilege.
Advanced Content Library settings
Several advanced configuration settings are configurable with the VMware Content Library. You can get to these by navigating to Content Libraries > Advanced.
This setting enables automatic synchronization of subscribed content libraries.
Library Auto Sync Refresh Interval (minutes)
The Interval between two consequent automatic synchronizations of the subscribed content library. This interval is measured in minutes.
Library Auto Sync Setting Refresh Interval (seconds)
This is the Interval after which the refresh interval for the automatic synchronization settings of the subscribed library will be updated if it has been changed. It is measured in seconds. A change in the refresh interval requires a restart of vCenter Server.
Library Auto Sync Start Hour
This setting refers to the time of day when the automatic synchronization of a subscribed content library begins
Library Auto Sync Stop Hour
This setting refers to the time of day when the automatic synchronization of a subscribed content library stops. Automatic synchronization stops until the start hour.
Library Maximum Concurrent Sync Items
The maximum number of items concurrently synchronizing for each subscribed library.
Max concurrent NFC transfers per ESX host
The maximum concurrent NFC transfers per ESXi host limit
Maximum Bandwidth Consumption
The bandwidth usage threshold. It is measured in Mbps across all transfers where 0 means unlimited bandwidth.
Maximum Number of Concurrent Priority Transfers
The Concurrent transfer limit for priority files. Tranfers are queued if the bandwidth limit is exceeded. This threadpool is used only to transfer priority objects. For example, if you change the concurrent transfer limit for priority files, such as OVF, you must restart vCenter Server.
Maximum Number of Concurrent Transfers
Concurrent transfer limit. When exceeded, the transfers are queued. If you change the concurrent transfer limit, it requires a restart of vCenter Server.
To properly protect your VMware environment, use Altaro VM Backup to securely backup and replicate your virtual machines. We work hard perpetually to give our customers confidence in their VMware backup strategy.
To keep up to date with the latest VMware best practices, become a member of the VMware DOJO now (it’s free).
Wrapping up
The VMware Content Library provides a centralized repository that allows keeping required file resources, virtual machine templates, ISO images vApps, and other files synchronized and available across the vSphere datacenter. In vSphere 7, the Content Library allows organizations to have a better way to keep up with and track changes to virtual machine templates. Using the new check-in/check-out process, VI admins can track changes made with each check-out and ensure these are documented and synchronized back to the Content Library.
It effectively provides a solution to remove the need to copy files between ESXi hosts or vSphere clusters and have what you need to install guest operating systems or deploy virtual machine templates. In addition, the subscribed Content Library allows synchronizing vCenter Server content libraries so that many other vCenter Servers can take advantage of the files already organized in the published Content Library.
The VMware Content Library is one of the more underutilized tools in the VI admin’s toolbelt that can bring about advantages in workflow, efficiency, and time spent finding and organizing files for deploying VMs and OS’es. In addition, the recent feature additions and improvements, such as check-ins/check-outs, have provided a more DevOps approach to tracking and working with deployment resources.