Ubiquiti UniFi – USG/UDM: Port Forwarding Configuration and Troubleshooting

With UniFi Network you can forward UDP and TCP ports to an internal LAN device using the Port Forwarding feature on the Dream Machine (UDM and UDM Pro) and USG models.

Requirements

  • Applicable to the latest firmware on all UDM and USG models.
  • The Port Forwarding feature is designed to only work on WAN1 on the USG models, but it can use both WAN1 and WAN2 on the UDM-Pro.
  • It is necessary to manually configure a Destination NAT (DNAT) + WAN firewall rule(s) to forward ports on the WAN2 interface on the USG models, see the section below.

Frequently Asked Questions (FAQ)

Do I need to manually create firewall rules for Port Forwarding?Can I forward ports on the WAN2 interface of the UDM/USG?How does the Port Forwarding feature interact with UPnP?Do I need to manually configure Hairpin NAT?Can I limit which remote devices are allowed to use the forwarded ports? My Port Forwarding rule does not work, what should I do?

Configuring a Port Forwarding Rule

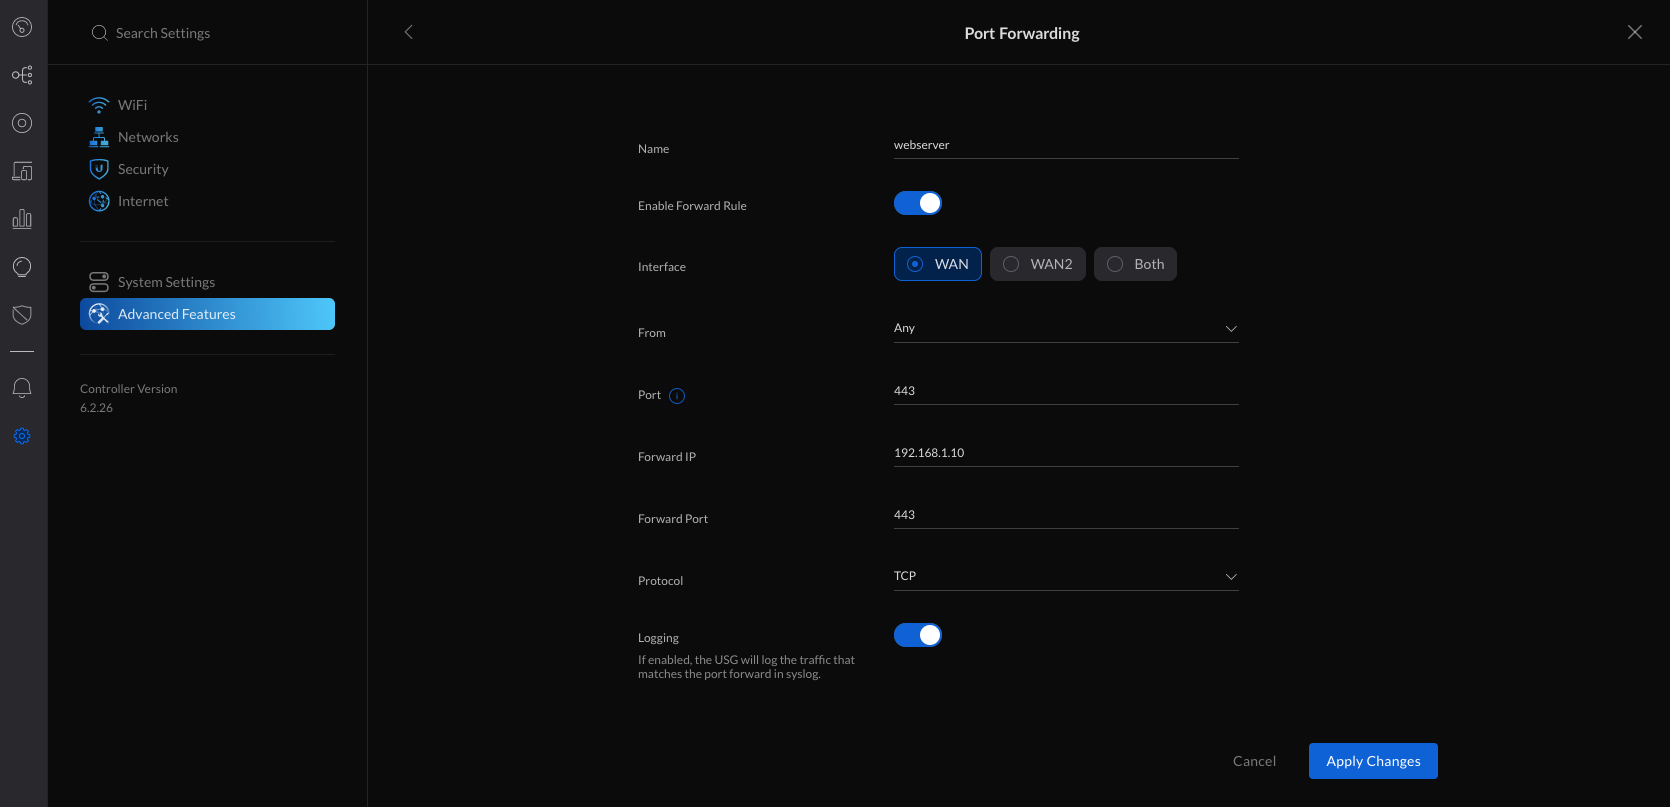
1. Navigate to Settings > Advanced Features > Advanced Gateway Settings and create new port forwarding.

2. Fill in the settings:

  • Name: webserver
  • Enable Forward Rule: turn this on when ready to activate this rule
  • Interface: WAN / WAN2 / Both (UDM Pro only)
  • From: Anywhere or Limited
  • Port: 443
  • Forward IP: 192.168.1.10
  • Forward Port: 443
  • Protocol: TCP
  • Logging: Optional
From:The clients on the Internet that are allowed to use the Port Forwarding rule. Set to Anywhere by default, meaning all hosts. It is possible to limit the allowed hosts by specifying an IP address (for example 198.51.100.1) or subnet range (for example 198.51.100.0/24). 
Port:The WAN port that the clients on the Internet connect to, for example 443. This does not need to match the port used on the internal LAN host. You can forward TCP port 10443 to TCP port 443, for example.
Forward IP:The IP address used by the internal LAN host, for example 192.168.1.10.
Forward Port:The port used by the internal LAN host, for example TCP port 443.
port-forwarding.wan.png

3. Apply the changes.

Note: On the USG models, it is necessary to manually configure a Destination NAT (DNAT) + WAN firewall rule to forward ports on the WAN2 interface, see the section below.

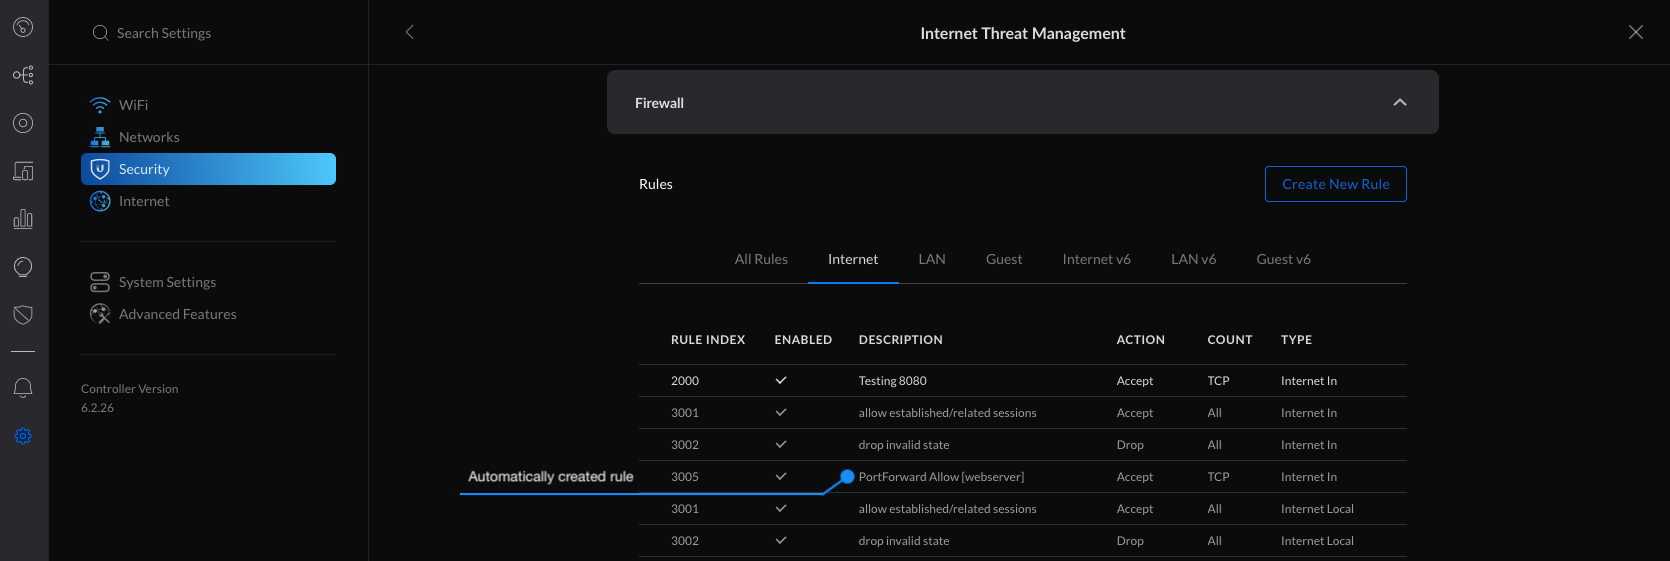
4. The firewall rule(s) needed for the new Port Forwarding rule you created are automatically added.

5. You can verify the automatically created rules in the Settings > Security > Internet Threat Management > Firewall > Internet section.

firewall.internet.automatic.rule.png

USG/USG-Pro: Forwarding Ports on WAN2 using Destination NAT

ATTENTION: This is an advanced configuration that requires creating and modifying the config.gateway.json file. See the UniFi – USG/USG-Pro: Advanced Configuration Using JSON article for more information on using the JSON file.

Follow the steps below to forward ports on the WAN2 interface of the USG models. It is necessary to manually create a Destination NAT (DNAT) rule using the Command Line Interface (CLI) and a custom Firewall Rule using the UniFi Network application. Afterwards, the config.gateway.json file needs to be created or updated to incorporate the custom configuration into UniFi Network.

1. Begin by creating a new custom Firewall Rule within  Settings > Security > Internet Threat Management > Firewall > Internet section.

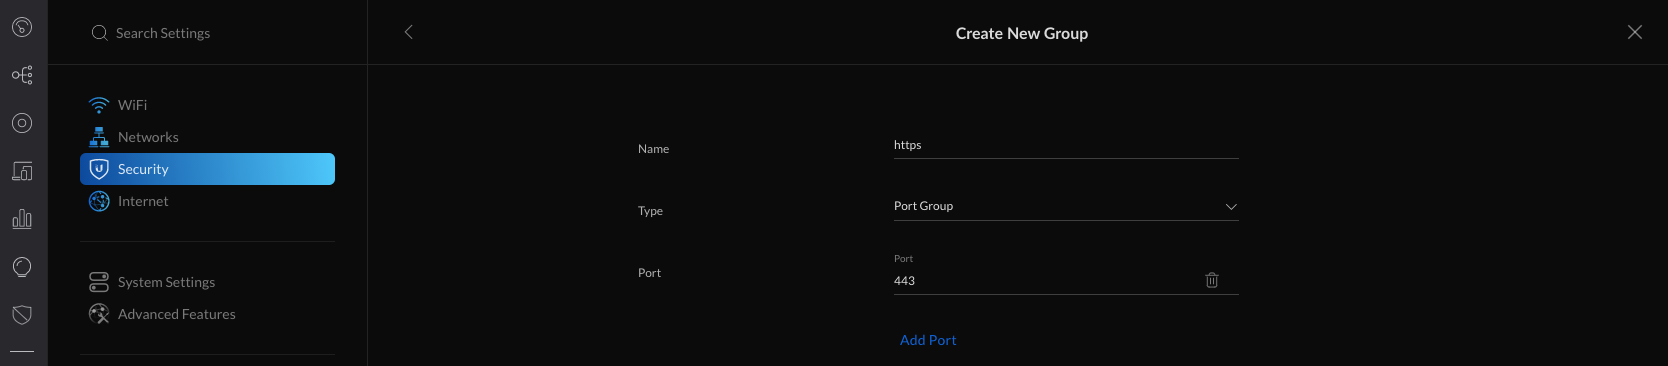
2. Create a new Firewall Port Group by clicking Create New Group.

firewall.internet.png

3. Fill in the information and specify the port that needs to be allowed through the firewall (443 in this example) and apply changes.

  • Name: https
  • Type: Port Group
  • Port: 443
firewall.create-new-group.png

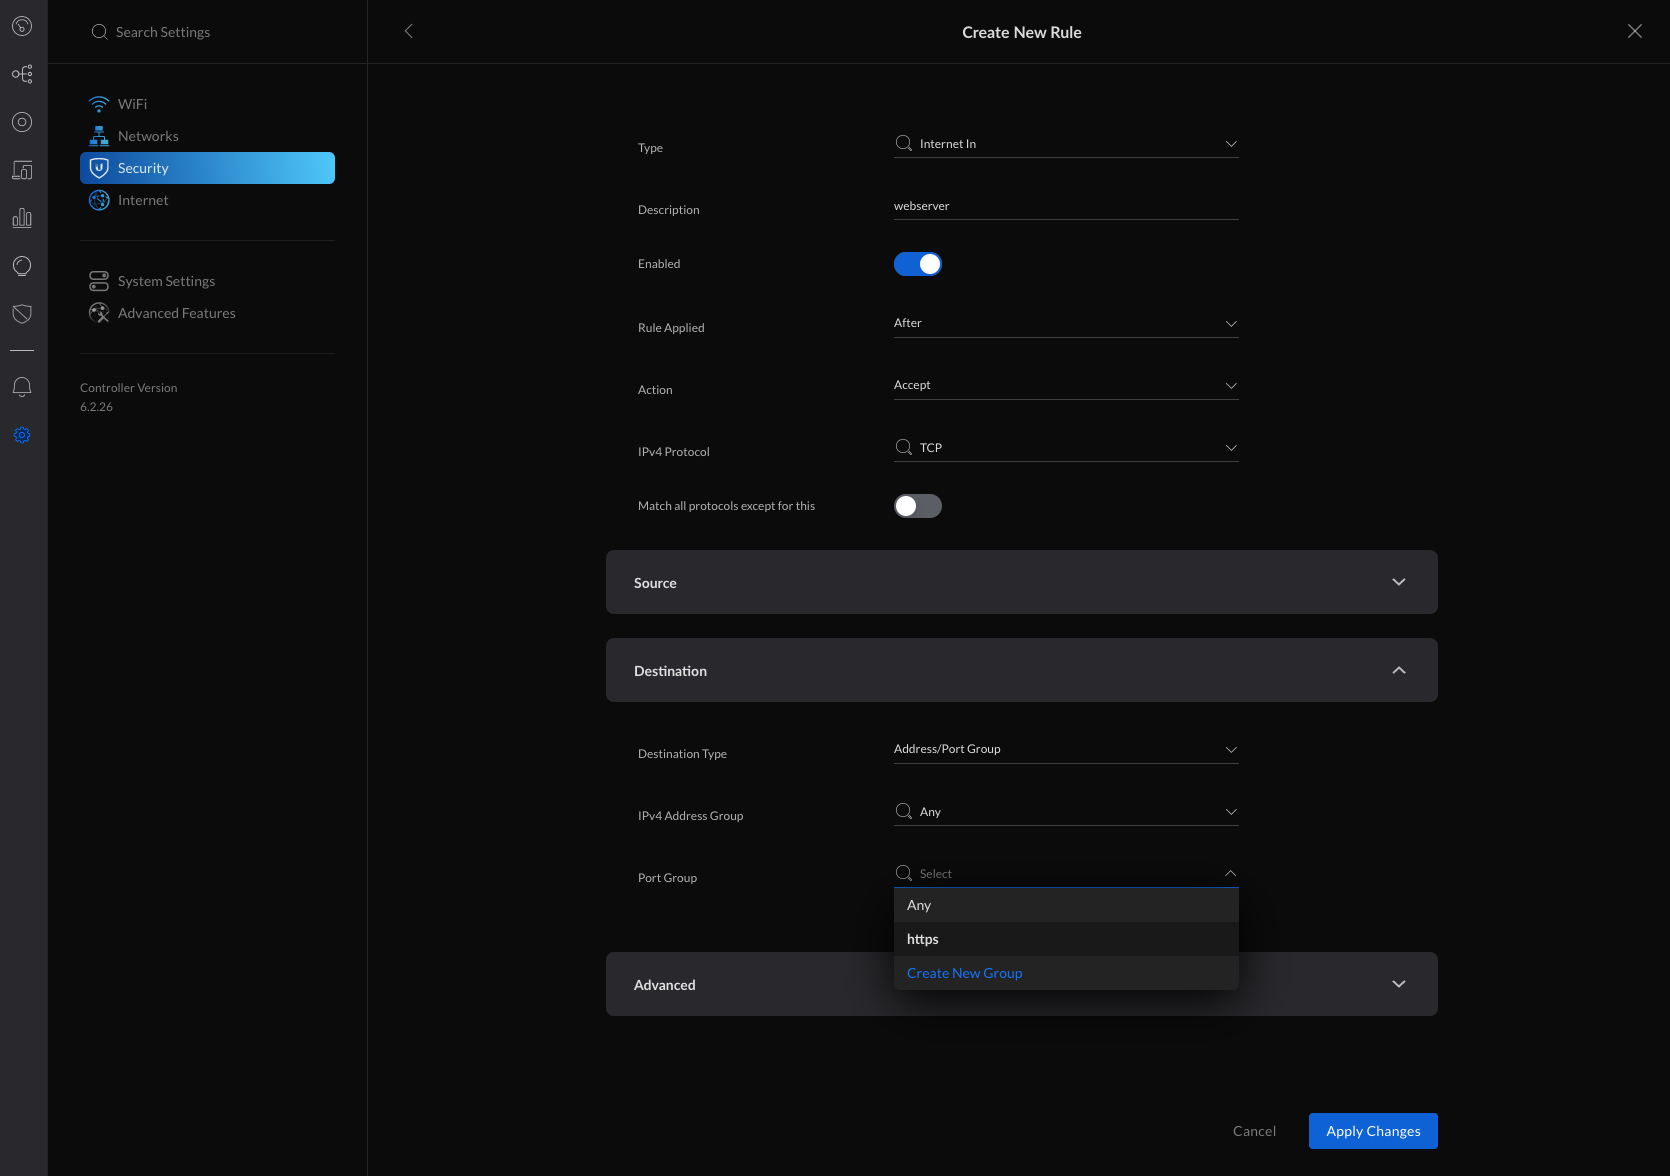
4. Navigate to    Settings > Security > Internet Threat Management > Firewall > Internet and create new rule.

5. Fill in the information, selecting the previously created Port Group and apply changes.

  • General
    • Type: Internet In
    • Description: webserver
    • Enabled: turned on when ready to take this rule live
    • Rule Applied: After (after predefined rules)
    • Action: Accept
    • IPv4 Protocol: TCP
    • Match all protocols except for this: disabled
  • Source: Optional
  • Destination
    • Destination Type: Address/Port Group
    • IPv4 Address Group: Any
    • Port Group: https (select from any previously created firewall port groups)
  • Advanced: Optional
firewall.create-new-rule.png

6. The next step is to access the USG using the Command Line Interface (CLI) and add a custom Destination NAT (DNAT) rule. SSH access to your devices must be enabled within    Settings > System Settings > Controller Configuration > Device SSH Authentication.

7. Connect to the USG via SSH.SSH using WindowsSSH using macOS

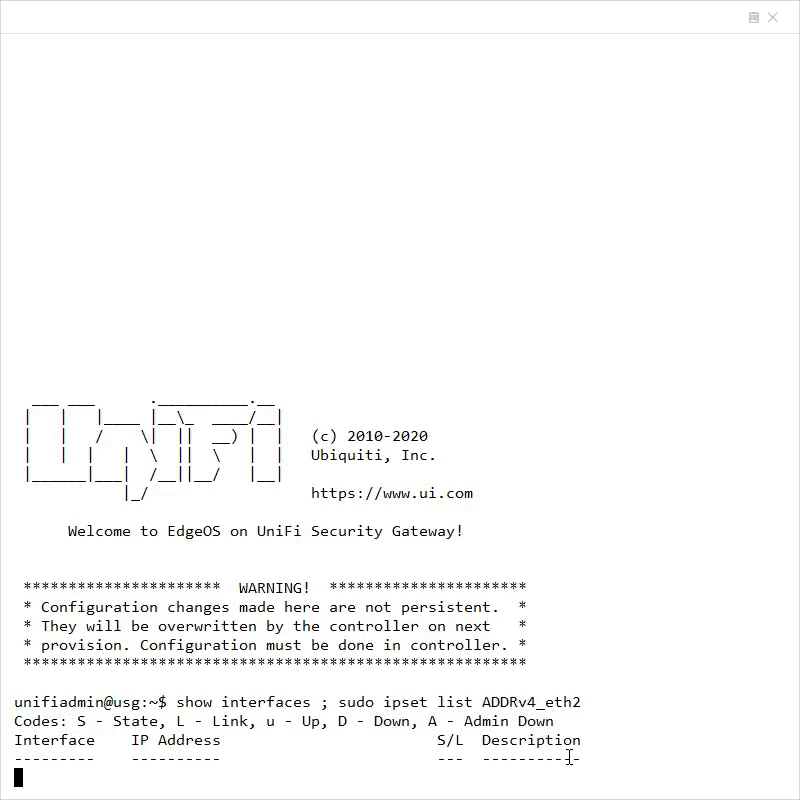
8. Verify that the WAN2 interface is UP and that it is assigned an IP address by running the following command: 

show interfaces ; sudo ipset list ADDRv4_eth2

Click to copy

unifiadmin@usg:~$ show interfaces 
Codes: S - State, L - Link, u - Up, D - Down, A - Admin Down
Interface    IP Address                        S/L  Description                 
---------    ----------                        ---  -----------                 
eth0         203.0.113.1/24                    u/u  WAN                         
eth1         192.168.1.1/24                    u/u  LAN                         
eth2         192.0.2.1/24                      u/u  WAN2                           
lo           127.0.0.1/8                       u/u                              
             ::1/128                          
unifiadmin@usg:~$ sudo ipset list ADDRv4_eth2
Name: ADDRv4_eth2
Type: hash:net
Revision: 3
Header: family inet hashsize 1024 maxelem 65536
Size in memory: 16792
References: 1
Members:
192.0.2.1

NOTE: The ADDRv4_eth2 is a special address group that automatically uses the IP address that is assigned to the eth2 interface. On the USG-Pro, the WAN2 interface uses eth3 instead and thus the address group will be ADDRv4_eth3.

9. Enter configuration mode by typing configure and hitting enter.

10. Add the Destination NAT rule for the WAN2 interface of the USG/USG-Pro (replace eth2 with eth3 for the USG-Pro):

set service nat rule 4001 description 'webserver'
set service nat rule 4001 destination group address-group ADDRv4_eth2
set service nat rule 4001 destination port 443
set service nat rule 4001 inbound-interface eth2
set service nat rule 4001 inside-address address 192.168.1.10
set service nat rule 4001 inside-address port 443
set service nat rule 4001 protocol tcp
set service nat rule 4001 type destination

Click to copy

11. Commit the changes and exit back to operational mode by typing commit ; exit and hitting enter.

This is an example of the process:

custom-dnat-rule.gif

12. Use the mca-ctrl -t dump-cfg command to display the entire config in JSON format:

mca-ctrl -t dump-cfg

Click to copy

13. The Destination NAT section of the configuration in JSON format can then be used in the config.gateway.json file.

{
       "service": {
                "nat": {
                        "rule": {
                                "4001": {
                                        "description": "webserver",
                                        "destination": {
                                                "group": {
                                                        "address-group": "ADDRv4_eth2"
                                                },
                                                "port": "443"
                                        },
                                        "inbound-interface": "eth2",
                                        "inside-address": {
                                                "address": "192.168.1.10",
                                                "port": "443"
                                        },
                                        "protocol": "tcp",
                                        "type": "destination"
                                }
                        }
                }
       }
}

Click to copy

14. See the UniFi – USG/USG-Pro: Advanced Configuration Using JSON article for more information on how to create and modify the config.gateway.json file.

Troubleshooting Port Forwarding Issues

Refer to the troubleshooting steps below if the Port Forwarding or custom Destination NAT rule is not working. Either of the following options can be the cause:   Possible Cause #1 – The USG/UDM is located behind NAT and does not have a public IP address.   Possible Cause #2 – The UDM/USG is already forwarding the port to another device or has UPnP enabled.   Possible Cause #3 – The traffic from the Internet clients is not reaching the WAN interface of the UDM/USG.  Possible Cause #4 – The LAN host is not allowing the port through the local firewall or does not have the correct route configured. 

Source :
https://help.ui.com/hc/en-us/articles/235723207-UniFi-USG-UDM-Port-Forwarding-Configuration-and-Troubleshooting

Ubiquiti UniFi – Layer 3 Adoption for Remote UniFi Network Applications

Layer 3 adoption is the process of adopting a UniFi device to a remote UniFi Network application.

You might use Layer 3 adoption for applications located in the cloud (e.g. on Amazon EC2) or NOC.

For regular device adoption, see UniFi – Device adoption.

Overview

In many deployments where it’s not possible to have the UniFi Network host running on-premise, you can run the UniFi Network application in the Cloud or your NOC. For example, for a large-scale project with many devices there are a few possible methods for the adoption of devices:

  • Take a laptop to the device’s site to perform adoption via Chrome browser (easiest method).
  • When you’re at the site, open a browser and navigate to Cloud: either the UniFi Remote Access Portal or the UniFi Network application (when launched using Cloud).
  • Create a virtual application instance on Amazon EC2.
  • Either configure the DHCP server or DNS server.

Initial setup

Please make sure you’re familiar with how a regular L2 adoption on UniFi works (where the devices and UniFi Network application are on the same network) before attempting L3 (remote) adoption. Also, remember that in order to adopt, the following conditions must be true in order to have internet access and also have access to the router from within the network (locally):

1. WAN port connected to the Internet.
2. LAN port connected locally to access management features on the router (USG or third party).

UniFi APs have a default inform URL http://unifi:8080/inform. Thus, the purpose of using DHCP option 43 or DNS is to allow the AP to know the IP of the UniFi Network application host.

If you encounter discovery issues please use the UniFi – Troubleshooting Device Adoption article to help you troubleshoot the issue.

After installing the Discovery tool plugin (freely available in Chrome Web Store) on a computer running Chrome browser, any locally-available, unmanaged UniFi Devices (i.e., same L2 network as your computer) will appear as “Pending Adoption” in the UniFi Cloud Access Portal as well as your UniFi Network application itself (in the Devices section in both cases). To access the application remotely Remote Access will have to be enabled.

Via UniFi OS

1. Go to https://unifi.ui.com and login with your Ubiquiti SSO credentials.

2. Navigate to the Devices section.

3. The device to be adopted will appear as ready to be adopted. Click Adopt.

unifi-devices.wireless.adoption.png

Via the UniFi Remote Access Portal

1. Go to https://network.unifi.ui.com/ and log in with your Ubiquiti SSO credentials.

2. Go to the Devices section and locate the model with the Pending Adoption status. Click ADOPT.

3. In the Adopt window that will appear, select the UniFi Network host and the site that will be adopting the device (for multi-site hosts) and click Adopt.

Via the UniFi Network application

1. Launch UniFi Network, go to the Devices section, find the device that is to be adopted with the status “Pending Adoption” and click Adopt under Actions.

DNS

You’ll need to configure your DNS server to resolve ‘unifi’ to your UniFi Network host’s IP address. Make sure that the device can resolve the UniFi Network domain name. For example, if you are setting http://XYZ:8080/inform, then ping from the device to determine if XYZ is resolvable/reachable. Or you may also use FQDN for the application inform URL: http://FQDN:8080/inform

Troubleshooting: Device (with static IP) fails to connect to the L3 UniFi Network application

  • When configuring a device from DHCP to static in the UniFi Network application, make sure you have put the IP of DNS. If not, then the device cannot contact DNS to resolve UniFi Network’s domain name.
  • If the device has been reset, make sure that you have “informed” the device twice (using the Discovery Utility) about the UniFi Network application’s location. See steps in the section above.

DHCP Option 43

If using Ubiquiti’s EdgeMAX routers, then DHCP option 43 can be done by just entering the IP address of the UniFi Network host in the “unifi” field on the DHCP-server.NOTE: The UniFi Security Gateway (USG) will not use DHCP option 43 to add the UniFi Network application location when obtaining a DHCP lease on the WAN interface.

To use DHCP option 43 you’ll need to configure your DHCP Server. We provide some third party examples below, but please refer to the manufacturer’s support documentation for up to date instructions. For example:

Linux’s ISC DHCP server: dhcpd.conf

# ...
option space ubnt;
option ubnt.unifi-address code 1 = ip-address;

class "ubnt" {
        match if substring (option vendor-class-identifier, 0, 4) = "ubnt";
        option vendor-class-identifier "ubnt";
        vendor-option-space ubnt;
}

subnet 10.10.10.0 netmask 255.255.255.0 {
        range 10.10.10.100 10.10.10.160;
        option ubnt.unifi-address 201.10.7.31;  ### UniFi Network host IP ###
        option routers 10.10.10.2;
        option broadcast-address 10.10.10.255;
        option domain-name-servers 168.95.1.1, 8.8.8.8;
        # ...
}

Cisco CLI

# assuming your UniFi is at 192.168.3.10
ip dhcp pool <pool name>
network <ip network> <netmask>
default-router <default-router IP address>
dns-server <dns server IP address>
option 43 hex 0104C0A8030A # 192.168.3.10 -> CO A8 03 0A

# Why 0104C0A8030A ?
#
# 01: suboption
# 04: length of the payload (must be 4)
# C0A8030A: 192.168.3.10

Mikrotik CLI

/ip dhcp-server option add code=43 name=unifi value=0x0104C0A8030A
/ip dhcp-server network set 0 dhcp-option=unifi

# Why 0104C0A8030A ?
#
# 01: suboption
# 04: length of the payload (must be 4)
# C0A8030A: 192.168.3.10

User Tip: Find more DHCP Option 43 instructions in the User Notes & Tips section.

SSH

If you can SSH into the device, it’s possible to do L3 adoption via CLI command:

1. Make sure the device is running updated firmware. See this guide: UniFi – Changing the Firmware of a UniFi Device.

2. Make sure the device is in the factory default state. If it’s not, run the following command:

sudo syswrapper.sh restore-default

3. SSH into the device and type the following and hit enter, substituting “ip-of-host” with the IP address of the host of the UniFi Network application:

set-inform http://ip-of-host:8080/inform

4. After issuing the set-inform, the UniFi device will show up for adoption in the Devices section of UniFi Network. Once you click Adopt, the device will appear to go offline or have the status of “Adopting” then proceed to “Provision” and “Connected”.

Source :
https://help.ui.com/hc/en-us/articles/204909754-UniFi-Layer-3-Adoption-for-Remote-UniFi-Network-Applications

Ubiquiti UniFi – How to Create and Restore a Backup

This article describes how to generate a backup of the UniFi Network application as well as how to restore it. This article does not cover the Auto Backup feature. You may see this article for more information on that subject: UniFi – How to Configure Auto Backup.

Note: This article is applicable to current UniFi Network application versions. Instructions on backups for older versions can be found at the bottom of this page in the “Method 3: Restoring from the /data Directory” section. As always, we suggest you update to the newest software and firmware available.

Introduction

The UniFi backup file has an extension of .unifi and contains the settings and the database for the UniFi Network application. The database is not included in a “settings only” backup. The backup also includes the config.propertiessystem.properties and config.gateway.json advanced configuration files, maps, and any customized files in a site’s portal folder. You can download a backup at any time from the Network application following the steps below.

Generate a New Backup

To generate a new UniFi backup file (.unifi), on your UniFi OS Console:

  1. Access and log into your UniFi OS Console at unifi.ui.com or locally via its IP address.
  2. Go to System Settings Advanced and enable the Back up Device toggle if disabled.
  3. Click Download to download your backup file. 

You can also use the Backup Scheduler to schedule creating a backup at a certain occurrence and time. 

Screenshot_2021-05-05_at_14.13.24.png

Restore a Backup

Method 1: Restore in the UniFi Network application

To restore a backup you have previously generated:

  1. Access and log into your UniFi OS Console at unifi.ui.com or locally via its IP address.
  2. Go to System Settings > Advanced and click the Restore in the “Restore Device” section.
  3. Select the necessary settings in the Restore Backup pop-up window:
    1. Select the device on the Device Selection drop-down field which you will restore from a backup.
    2. Confirm that you will restore your device either to the latest backup or select another backup from a list by clicking on the here text button.
    3. Enter your SSO account password and click Restore to begin the restoring process. 

Once you confirm, the backup restoration will begin. This process takes a few minutes. Do not disconnect while the application is working on this. Once the new backup is restored, the application will restart.

Method 2: Restore in the UniFi Startup Wizard

If beginning a new installation, it will be easier to just use the option of restore from a previous backup as soon as the UniFi Startup Wizard launches, and select your .unf file.

Method 3: Restore from the /data Directory

Note: This method is for older Network application versions and is not recommended. For security reasons, we suggest always upgrading to the newest release available. If you still wish to use this method, click on the link below.

Click here to display Method 3: Restoring from the /data Directory.

Change the Inform Address for All Devices in the Network application

ATTENTION:Use this method with caution. After completing these steps the devices will be setting the inform address to the new IP address or FQDN specified.  

It may be desired to change the IP address or FQDN that the UniFi devices on multiple sites are reporting to after an application restore. This process is typically used when migrating from one functional UniFi OS Console to a new install.

  1. Download a backup file from the current UniFi OS Console.
  2. Install the Network application on the new UniFi OS Console. 
  3. Restore the backup that came from step 1 and let the upload process finish.
  4. Log into the new UniFi OS Console. 
  5. On the old UniFi OS Console’s Network application, go to Settings > System > Other Configuration and enable the Override Inform Host toggle.
  6. Type in the new UniFi OS Console’s Hostname or IP Address field. 
  7. Select Apply Changes.

After the changes are applied the old UniFi OS Console will send the configuration to adopted and currently connected devices stating the inform host is now what was input in the Hostname or IP Address field.

If this was performed correctly, the devices should start appearing in the new UniFi OS Console. This should not take longer than 5 minutes but can be longer depending on the number of devices, the physical proximity of the devices, and new UniFi OS Console’s technical specification.

Source :
https://help.ui.com/hc/en-us/articles/204952144-UniFi-How-to-Create-and-Restore-a-Backup

GoDaddy Breached – Plaintext Passwords – 1.2M Affected

This morning, GoDaddy disclosed that an unknown attacker had gained unauthorized access to the system used to provision the company’s Managed WordPress sites, impacting up to 1.2 million of their WordPress customers. Note that this number does not include the number of customers of those websites that are affected by this breach, and some GoDaddy customers have multiple Managed WordPress sites in their accounts.

According to the report filed by GoDaddy with the SEC [1], the attacker initially gained access via a compromised password on September 6, 2021, and was discovered on November 17, 2021 at which point their access was revoked. While the company took immediate action to mitigate the damage, the attacker had more than two months to establish persistence, so anyone currently using GoDaddy’s Managed WordPress product should assume compromise until they can confirm that is not the case.

It appears that GoDaddy was storing sFTP credentials either as plaintext, or in a format that could be reversed into plaintext. They did this rather than using a salted hash, or a public key, both of which are considered industry best practices for sFTP. This allowed an attacker direct access to password credentials without the need to crack them.

According to their SEC filing: “For active customers, sFTP and database usernames and passwords were exposed.

We attempted to contact GoDaddy for comment and to confirm our findings, but they did not immediately respond to our requests for comment.

What did the attacker have access to?

The SEC filing indicates that the attacker had access to user email addresses and customer numbers, the original WordPress Admin password that was set at the time of provisioning, and SSL private keys. All of these could be of use to an attacker, but one item, in particular, stands out:

During the period from September 6, 2021, to November 17, 2021, the sFTP and database usernames and passwords of active customers were accessible to the attacker. 

GoDaddy stored sFTP passwords in such a way that the plaintext versions of the passwords could be retrieved, rather than storing salted hashes of these passwords, or providing public key authentication, which are both industry best practices.

We confirmed this by accessing the user interface for GoDaddy Managed Hosting and were able to view our own password, shown in the screenshot below. When using public-key authentication or salted hashes, it is not possible to view your own password like this because the hosting provider simply does not have it.

You’ll also note that the system is using port 22, which is Secure File Transfer Protocol. There are several kinds of sFTP, and this confirms that they’re using sFTP via SSH, which is encrypted, and designed to be one of the most secure ways to transfer files. Storing plaintext passwords, or passwords in a reversible format for what is essentially an SSH connection is not a best practice.

GoDaddy appears to acknowledge that they stored database passwords as plaintext or in a reversible format. These are also retrievable via their user interface. Unfortunately storing database passwords as plaintext is quite normal in a WordPress setting, where the database password is stored in the wp-config.php file as text. What is more surprising, in this breach, is that the password that provides read/write access to the entire filesystem via sFTP is stored as plaintext.

What could an attacker do with this information?

While the SEC filing emphasizes the potential phishing risk posed by exposed email addresses and customer numbers, the risk posed by this is minimal compared to the potential impact of exposed sFTP and database passwords.

Although GoDaddy immediately reset the sFTP and Database passwords of all the impacted sites, the attacker had nearly a month and a half of access during which they could have taken over these sites by uploading malware or adding a malicious administrative user. Doing so would allow the attacker to maintain persistence and retain control of the sites even after the passwords were changed.

Additionally, with database access, the attacker would have had access to sensitive information, including website customer PII (personally identifiable information) stored on the databases of the impacted sites, and may have been able to extract the contents of all impacted databases in full. This includes information such as the password hashes stored in the WordPress user accounts databases of affected sites, and customer information from e-Commerce sites.

An attacker could similarly gain control on sites that had not changed their default admin password, but it would be simpler for them to simply use their sFTP and database access to do so.

On sites where the SSL private key was exposed, it could be possible for an attacker to decrypt traffic using the stolen SSL private key, provided they could successfully perform a man-in-the-middle (MITM) attack that intercepts encrypted traffic between a site visitor and an affected site.

What should I do if I have a GoDaddy Managed WordPress site?

GoDaddy will be reaching out to impacted customers over the next few days. In the meantime, given the severity of the issue and the data the attacker had access to, we recommend that all Managed WordPress users assume that they have been breached and perform the following actions:

  • If you’re running an e-commerce site, or store PII (personally identifiable information), and GoDaddy verifies that you have been breached, you may be required to notify your customers of the breach. Please research what the regulatory requirements are in your jurisdiction, and make sure you comply with those requirements.
  • Change all of your WordPress passwords, and if possible force a password reset for your WordPress users or customers. As the attacker had access to the password hashes in every impacted WordPress database, they could potentially crack and use those passwords on the impacted sites.
  • Change any reused passwords and advise your users or customers to do so as well. The attacker could potentially use credentials extracted from impacted sites to access any other services where the same password was used. For example, if one of your customers uses the same email and password on your site as they use for their Gmail account, that customer’s Gmail could be breached by the attacker once they crack that customer’s password.
  • Enable 2-factor authentication wherever possible. The Wordfence plugin provides this as a free feature for WordPress sites, and most other services provide an option for 2-factor authentication.
  • Check your site for unauthorized administrator accounts.
  • Scan your site for malware using a security scanner.
  • Check your site’s filesystem, including wp-content/plugins and wp-content/mu-plugins, for any unexpected plugins, or plugins that do not appear in the plugins menu, as it is possible to use legitimate plugins to maintain unauthorized access.
  • Be on the lookout for suspicious emails – phishing is still a risk, and an attacker could still use extracted emails and customer numbers to obtain further sensitive information from victims of this compromise.

Conclusion

The GoDaddy Managed WordPress data breach is likely to have far-reaching consequences. GoDaddy’s Managed WordPress offering makes up a significant portion of the WordPress ecosystem, and this affects not only site owners, but their customers. The SEC filing says that “Up to 1.2 million active and inactive Managed WordPress customers” were affected. Customers of those sites are most likely also affected, which makes the number of affected people much larger.

For the time being, anyone using GoDaddy’s Managed WordPress offering should assume their sites have been compromised until further information becomes available, and follow the steps we have provided in this article. We will update the article if more information becomes available.

References:

  1. GoDaddy SEC Report: https://www.sec.gov/Archives/edgar/data/1609711/000160971121000122/gddyblogpostnov222021.htm

Note: All product names, logos, and brands are property of their respective owners in the United States and/or other countries. All company, product, and service names used on this page are for identification purposes only. Use of these names, logos, and brands does not imply endorsement.

Source :
https://www.wordfence.com/blog/2021/11/godaddy-breach-plaintext-passwords/

How to block the Windows 11 update from being installed on your PC

Microsoft finally pulled back the curtain on Windows 11 last month. The company once said that Windows 10 would be the last ever version of the desktop operating system, but plans changed. Windows 11 will roll out to the general public later this year. As long as you’ve got a compatible device, you’ll be able to upgrade and take advantage of all the new features. But what if you’d prefer to stay on Windows 10 for the time being? Thankfully, if you want to block Windows 11, you can do so with relative ease. Read on to find out how.

Microsoft already made it clear that the Windows 11 update won’t be forced upon Windows 10 users at launch. If you want to upgrade, you will have to do so manually by heading to Settings > Update & Security > Windows Update. Simply avoid that menu once Windows 11 launches and you should not have to worry about the update trying to install itself any time soon.

As Ghacks notes in an extensive guide, you can go even further to block Windows 11. If you Windows 10 Pro, Education, or Enterprise, it is possible to delay feature update installations. You can do so with the Group Policy Editor and Windows Registry, but you might not want to take action yet. Windows 10 version 21H2 is also in the works, and you will block it as well if you disable feature updates.

It might be best to hold off, but here’s what you need to do to block Windows 11:

Block Windows 11 with Group Policy Editor

  1. Open the Start Menu.
  2. Type gpedit.msc and load the Group Policy Editor once it is displayed in the search results.
  3. Go to Local Computer Policy > Computer Configuration > Administrative Templates > Windows Components > Windows Update > Windows Update for Business
  4. Double-click on “Select the target feature update version”.
  5. Set the policy to Enabled.
  6. Type 21H1 into the field.
  7. Close the Group Policy Editor.

Block Windows 11 with Registry Editor

  1. Open the Start Menu.
  2. Type regedit.exe and select the Registry Editor search result.
  3. Go to HKEY_LOCAL_MACHINE\SOFTWARE\Policies\Microsoft\Windows\WindowsUpdate.
  4. Set the Dword TargetReleaseVersion to 1. If the value does not exist, right-click on Windows Update, and select New > Dword (32-bit) Value.
  5. Set the value of TargetReleaseVersionInfo to 21H1. If the value does not exist, right-click on Windows Update, and select New > String Value.
  6. Restart the PC.

Once Windows 10 21H2 appears on Microsoft’s website, you can switch over to it instead.

There are sure to be some bugs and issues in Windows 11 at launch. The new features and refreshed design should be enough to convince most users to update, but now you know how to block it. Microsoft plans to support Windows 10 through 2025. In other words, there’s no rush to update if you’re happy with what Windows 10 currently offers.

Source :
https://bgr.com/tech/how-to-block-the-windows-11-update-from-being-installed-on-your-pc/

Twitch Suffers Massive 125GB Data and Source Code Leak Due to Server Misconfiguration

Interactive livestreaming platform Twitch acknowledged a “breach” after an anonymous poster on the 4chan messaging board leaked its source code, an unreleased Steam competitor from Amazon Game Studios, details of creator payouts, proprietary software development kits, and other internal tools.

The Amazon-owned service said it’s “working with urgency to understand the extent of this,” adding the data was exposed “due to an error in a Twitch server configuration change that was subsequently accessed by a malicious third party.”

“At this time, we have no indication that login credentials have been exposed,” Twitch noted in a post published late Wednesday. “Additionally, full credit card numbers are not stored by Twitch, so full credit card numbers were not exposed.”

The forum user claimed the hack is designed to “foster more disruption and competition in the online video streaming space” because “their community is a disgusting toxic cesspool.” The development was first reported by Video Games Chronicle, which said Twitch was internally “aware” of the leak on October 4. The leak has also been labeled as “part one,” suggesting that there could be more on the way.

The massive trove, which comes in the form of a 125GB Torrent, allegedly includes —

  • The entirety of Twitch’s source code with commit history “going back to its early beginnings”
  • Proprietary software development kits and internal AWS services used by Twitch
  • An unreleased Steam competitor, codenamed Vapor, from Amazon Game Studios
  • Information on other Twitch properties like IGDB and CurseForge
  • Creator revenue reports from 2019 to 2021
  • Mobile, desktop and console Twitch clients, and
  • Cache of internal “red teaming” tools designed to improve security

The leak of internal source code poses a serious security risk in that it allows interested parties to search for vulnerabilities in the source code. While the data doesn’t include password related details, users are advised to change their credentials as a precautionary measure and turn on two-factor authentication for additional security.

Source :
https://thehackernews.com/2021/10/twitch-suffers-massive-125gb-data-and.html

New U.S. Government Initiative Holds Contractors Accountable for Cybersecurity

The U.S. government on Wednesday announced the formation of a new Civil Cyber-Fraud Initiative that aims to hold contractors accountable for failing to meet required cybersecurity requirements in order to safeguard public sector information and infrastructure.

“For too long, companies have chosen silence under the mistaken belief that it is less risky to hide a breach than to bring it forward and to report it,” said Deputy Attorney General Monaco in a press statement. “Well that changes today, [and] we will use our civil enforcement tools to pursue companies, those who are government contractors who receive federal funds, when they fail to follow required cybersecurity standards — because we know that puts all of us at risk.”

The Civil Cyber-Fraud Initiative is part of the U.S. Justice Department’s (DoJ) efforts to build resilience against cybersecurity intrusions and holding companies to task for deliberately providing deficient cybersecurity products or services, misrepresenting their cybersecurity practices or protocols, or violating their obligations to monitor and report cybersecurity incidents and breaches.

To that end, the government intends to utilize the False Claims Act (FCA) to go after contractors and grant recipients for cybersecurity-related fraud by failing to secure their networks and notify about security breaches adequately.

In addition, the DoJ also announced the launch of a National Cryptocurrency Enforcement Team (NCET) to dismantle criminal abuse of cryptocurrency platforms, particularly focusing on “crimes committed by virtual currency exchanges, mixing and tumbling services, and money laundering infrastructure actors.”

The developments also come nearly a week after the U.S. Federal Communications Commission (FCC) laid out new rules to prevent subscriber identity module (SIM) swapping scams and port-out fraud, both of which are tactics orchestrated to transfer users’ phone numbers and service to a different number and carrier under the attacker’s control.

The FCC’s proposal would require amending existing Customer Proprietary Network Information (CPNI) and Local Number Portability rules to mandate wireless carriers to adopt secure methods of confirming the customer’s identity before transferring their phone number to a new device or carrier. On top of that, the changes also suggest requiring providers to immediately notify customers whenever a SIM change or port request is made on their accounts.

Source :
https://thehackernews.com/2021/10/us-justice-dept-launches-civil-cyber.html

CISA, NIST Says Use Cybersecurity Control Systems

Last July 2021, US President Joe Biden signed a memorandum on improving the US’s cybersecurity for critical infrastructure control systems. It establishes a voluntary initiative, encouraging collaboration between the federal government and the critical infrastructure community to improve cybersecurity control.

In line with this memorandum, the Department of Homeland Security (DHS) is instructed to lead the development of preliminary cross-sector control system cybersecurity performance goals and sector-specific performance goals within one year of the memorandum.

The Cybersecurity and Infrastructure Security Agency (CISA), together with the National Institute of Standards and Technology (NIST) performed a primary crosswalk of available control system resources, recommending practices that were produced by the US government and the private sector.

The crosswalk focused on various cybersecurity documents related to best practices and risk mitigation. These documents include CISA Cyber EssentialsNISTIR 8183, Rev 1, “Cybersecurity Framework Version 1.1 Manufacturing Profile, and CISA Pipeline Cyber Risk Mitigation.

Upon review, CISA and NIST have determined nine categories of recommended cybersecurity practices, using the categories as the foundation for preliminary control systems cybersecurity performance goals.

The nine categories are:

  • Risk Management and Cybersecurity Governance, which aims to “identify and document cybersecurity control systems using established recommended practices”.
  • Architecture and Design, which has the objective of integrating cybersecurity and resilience into system architecture in line with established best practices.
  • Configuration and Change Management. This category aims to documents and control hardware and software inventory, system settings, configurations, and network traffic flows during the control system hardware and software lifecycles.
  • Physical Security, which aims to limit physical access to systems, facilities, equipment, and other infrastructure assets to authorized users.
  • System and Data Integrity, Availability, and Confidentiality. This category aims to protect the control system and its data against corruption, compromise, or loss.
  • Continuous Monitoring and Vulnerability Management, which aims to implement and perform continuous monitoring of control systems cybersecurity threats and vulnerabilities.
  • Training and Awareness aims to train personnel to have the fundamental knowledge and skills needed to determine control systems cybersecurity risks.
  • Incident Response and Recovery. This category aims to implement and test control system response and recovery plans with clearly defined roles and responsibilities.
  • Supply Chain Risk Management, which aims to identify risks associated with control system hardware, software, and manage services.

CISA explained that the nine categories’ goals outlined above are “foundational activities for effective risk management”, representing high-level cybersecurity best practices. The agency also said that these are not an exhaustive guide to all facets of an effective cybersecurity program.

As cyber threats and risks become more and more sophisticated and difficult to mitigate, it is important for critical infrastructure owners to future-proof their enterprises, minimizing operational risks and disturbances.

Apart from practices identified by CISA and NIST, owners and users should understand various practical countermeasures that should be considered during their planning and design phases.

Check out our “Best Practices for Securing Smart Factories: Three Steps to Keep Operations Running” to learn more about security issues, defense strategies, and the benefit of efficiently securing factories with minimal TCO.

Source :
https://www.trendmicro.com/en_us/research/21/j/cisa-nist-says-use-cybersecurity-control-systems.html

Helping Apache Servers stay safe from zero-day path traversal attacks (CVE-2021-41773)

On September 29, 2021, the Apache Security team was alerted to a path traversal vulnerability being actively exploited (zero-day) against Apache HTTP Server version 2.4.49. The vulnerability, in some instances, can allow an attacker to fully compromise the web server via remote code execution (RCE) or at the very least access sensitive files. CVE number 2021-41773 has been assigned to this issue. Both Linux and Windows based servers are vulnerable.

An initial patch was made available on October 4 with an update to 2.4.50, however, this was found to be insufficient resulting in an additional patch bumping the version number to 2.4.51 on October 7th (CVE-2021-42013).

Customers using Apache HTTP Server versions 2.4.49 and 2.4.50 should immediately update to version 2.4.51 to mitigate the vulnerability. Details on how to update can be found on the official Apache HTTP Server project site.

Any Cloudflare customer with the setting normalize URLs to origin turned on have always been protected against this vulnerability.

Additionally, customers who have access to the Cloudflare Web Application Firewall (WAF), receive additional protection by turning on the rule with the following IDs:

  • 1c3d3022129c48e9bb52e953fe8ceb2f (for our new WAF)
  • 100045A (for our legacy WAF)

The rule can also be identified by the following description:

Rule message: Anomaly:URL:Query String - Multiple Slashes, Relative Paths, CR, LF or NULL.

Given the nature of the vulnerability, attackers would normally try to access sensitive files (for example /etc/passwd), and as such, many other Cloudflare Managed Rule signatures are also effective at stopping exploit attempts depending on the file being accessed.

How the vulnerability works

The vulnerability leverages missing path normalization logic. If the Apache server is not configured with a require all denied directive for files outside the document root, attackers can craft special URLs to read any file on the file system accessible by the Apache process. Additionally, this flaw could also leak the source of interpreted files like CGI scripts and, in some cases, also allow the attacker to take over the web server by executing shell scripts.

For example, the following path:

$hostname/cgi-bin/../../../etc/passwd

would allow the attacker to climb the directory tree (../ indicates parent directory) outside of the web server document root and then subsequently access /etc/passwd.

Well implemented path normalization logic would correctly collapse the path into the shorter $hostname/etc/passwd by normalizing all ../ character sequences nullifying the attempt to climb up the directory tree.

Correct normalization is not easy as it also needs to take into consideration character encoding, such as percent encoded characters used in URLs. For example, the following path is equivalent to the first one provided:

$hostname/cgi-bin/.%2e/%2e%2e/%2e%2e/etc/passwd

as the characters %2e represent the percent encoded version of dot “.”. Not taking this properly into account was the cause of the vulnerability.

The PoC for this vulnerability is straightforward and simply relies on attempting to access sensitive files on vulnerable Apache web servers.

Exploit Attempts

Cloudflare has seen a sharp increase in attempts to exploit and find vulnerable servers since October 5.

graph of CVE-2021-41773 exploit attempts showing a sharp increase since 2021-10-05

Most exploit attempts observed have been probing for static file paths — indicating heavy scanning activity before attackers (or researchers) may have attempted more sophisticated techniques that could lead to remote code execution. The most commonly attempted file paths are reported below:

/cgi-bin/.%2e/.git/config
/cgi-bin/.%2e/app/etc/local.xml
/cgi-bin/.%2e/app/etc/env.php
/cgi-bin/.%2e/%2e%2e/%2e%2e/etc/passwd

Conclusion

Keeping web environments safe is not an easy task. Attackers will normally gain access and try to exploit vulnerabilities even before PoCs become widely available — we reported such a case not too long ago with Atlassian’s Confluence OGNL vulnerability.

It is vital to employ all security measures available. Cloudflare features such as our URL normalization and the WAF, are easy to implement and can buy time to deploy any relevant patches offered by the affected software vendors.

Source :
https://blog.cloudflare.com/helping-apache-servers-stay-safe-from-zero-day-path-traversal-attacks/

What happened on the Internet during the Facebook outage

It’s been a few days now since Facebook, Instagram, and WhatsApp went AWOL and experienced one of the most extended and rough downtime periods in their existence.

When that happened, we reported our bird’s-eye view of the event and posted the blog Understanding How Facebook Disappeared from the Internet where we tried to explain what we saw and how DNS and BGP, two of the technologies at the center of the outage, played a role in the event.

In the meantime, more information has surfaced, and Facebook has published a blog post giving more details of what happened internally.

As we said before, these events are a gentle reminder that the Internet is a vast network of networks, and we, as industry players and end-users, are part of it and should work together.

In the aftermath of an event of this size, we don’t waste much time debating how peers handled the situation. We do, however, ask ourselves the more important questions: “How did this affect us?” and “What if this had happened to us?” Asking and answering these questions whenever something like this happens is a great and healthy exercise that helps us improve our own resilience.

Today, we’re going to show you how the Facebook and affiliate sites downtime affected us, and what we can see in our data.

1.1.1.1

1.1.1.1 is a fast and privacy-centric public DNS resolver operated by Cloudflare, used by millions of users, browsers, and devices worldwide. Let’s look at our telemetry and see what we find.

First, the obvious. If we look at the response rate, there was a massive spike in the number of SERVFAIL codes. SERVFAILs can happen for several reasons; we have an excellent blog called Unwrap the SERVFAIL that you should read if you’re curious.

In this case, we started serving SERVFAIL responses to all facebook.com and whatsapp.com DNS queries because our resolver couldn’t access the upstream Facebook authoritative servers. About 60x times more than the average on a typical day.

Mean query rate by response code

If we look at all the queries, not specific to Facebook or WhatsApp domains, and we split them by IPv4 and IPv6 clients, we can see that our load increased too.

As explained before, this is due to a snowball effect associated with applications and users retrying after the errors and generating even more traffic. In this case, 1.1.1.1 had to handle more than the expected rate for A and AAAA queries.

Resolver: Mean query rate by queryType, A and AAAA only

Here’s another fun one.

DNS vs. DoT and DoH. Typically, DNS queries and responses are sent in plaintext over UDP (or TCP sometimes), and that’s been the case for decades now. Naturally, this poses security and privacy risks to end-users as it allows in-transit attacks or traffic snooping.

With DNS over TLS (DoT) and DNS over HTTPS, clients can talk DNS using well-known, well-supported encryption and authentication protocols.

Our learning center has a good article on “DNS over TLS vs. DNS over HTTPS” that you can read. Browsers like Chrome, Firefox, and Edge have supported DoH for some time now, WAP uses DoH too, and you can even configure your operating system to use the new protocols.

When Facebook went offline, we saw the number of DoT+DoH SERVFAILs responses grow by over x300 vs. the average rate.

DNS vs Do* (SERVFAIL only)
DoH vs DNS (SERVAIL only)
DoH vs DNS vs DoT (SERVFAIL only)

So, we got hammered with lots of requests and errors, causing traffic spikes to our 1.1.1.1 resolver and causing an unexpected load in the edge network and systems. How did we perform during this stressful period?

Quite well. 1.1.1.1 kept its cool and continued serving the vast majority of requests around the famous 10ms mark. An insignificant fraction of p95 and p99 percentiles saw increased response times, probably due to timeouts trying to reach Facebook’s nameservers.

Response time quantiles

Another interesting perspective is the distribution of the ratio between SERVFAIL and good DNS answers, by country. In theory, the higher this ratio is, the more the country uses Facebook. Here’s the map with the countries that suffered the most:

During the Facebook outage October 2021: ratio between SERVFAIL/good answers per country

Here’s the top twelve country list, ordered by those that apparently use Facebook, WhatsApp and Instagram the most:

CountrySERVFAIL/Good Answers ratio
Turkey7.34
Grenada4.84
Congo4.44
Lesotho3.94
Nicaragua3.57
South Sudan3.47
Syrian Arab Republic3.41
Serbia3.25
Turkmenistan3.23
United Arab Emirates3.17
Togo3.14
French Guiana3.00

Impact on other sites

When Facebook, Instagram, and WhatsApp aren’t around, the world turns to other places to look for information on what’s going on, other forms of entertainment or other applications to communicate with their friends and family. Our data shows us those shifts. While Facebook was going down, other services and platforms were going up.

To get an idea of the changing traffic patterns we look at DNS queries as an indicator of increased traffic to specific sites or types of site.

Here are a few examples.

Other social media platforms saw a slight increase in use, compared to normal.

DNS queries to Social Media sites

Traffic to messaging platforms like Telegram, Signal, Discord and Slack got a little push too.

DNS queries to Messaging Services

Nothing like a little gaming time when Instagram is down, we guess, when looking at traffic to sites like Steam, Xbox, Minecraft and others.

DNS queries to Gaming Sites

And yes, people want to know what’s going on and fall back on news sites like CNN, New York Times, The Guardian, Wall Street Journal, Washington Post, Huffington Post, BBC, and others:

DNS queries to News Sites

Attacks

One could speculate that the Internet was under attack from malicious hackers. Our Firewall doesn’t agree; nothing out of the ordinary stands out.

Layer 7 attacks during the Facebook outage October 2021

Network Error Logs

Network Error Logging, NEL for short, is an experimental technology supported in Chrome. A website can issue a Report-To header and ask the browser to send reports about network problems, like bad requests or DNS issues, to a specific endpoint.

Cloudflare uses NEL data to quickly help triage end-user connectivity issues when end-users reach our network. You can learn more about this feature in our help center.

If Facebook is down and their DNS isn’t responding, Chrome will start reporting NEL events every time one of the pages in our zones fails to load Facebook comments, posts, ads, or authentication buttons. This chart shows it clearly.​​

NEL (Network Error Logs)

WARP

Cloudflare announced WARP in 2019, and called it “A VPN for People Who Don’t Know What V.P.N. Stands For” and offered it for free to its customers. Today WARP is used by millions of people worldwide to securely and privately access the Internet on their desktop and mobile devices. Here’s what we saw during the outage by looking at traffic volume between WARP and Facebook’s network:

WARP usage to Facebook ASN during the outage

You can see how the steep drop in Facebook ASN traffic coincides with the start of the incident and how it compares to the same period the day before.

Our own traffic

People tend to think of Facebook as a place to visit. We log in, and we access Facebook, we post. It turns out that Facebook likes to visit us too, quite a lot. Like Google and other platforms, Facebook uses an army of crawlers to constantly check websites for data and updates. Those robots gather information about websites content, such as its titles, descriptions, thumbnail images, and metadata. You can learn more about this on the “The Facebook Crawler” page and the Open Graph website.

Here’s what we see when traffic is coming from the Facebook ASN, supposedly from crawlers, to our CDN sites:

Traffic from facebook ASN 32934

The robots went silent.

What about the traffic coming to our CDN sites from Facebook User-Agents? The gap is indisputable.

Requests with Facebook browser (User Agent)

We see about 30% of a typical request rate hitting us. But it’s not zero; why is that?

We’ll let you know a little secret. Never trust User-Agent information; it’s broken. User-Agent spoofing is everywhere. Browsers, apps, and other clients deliberately change the User-Agent string when they fetch pages from the Internet to hide, obtain access to certain features, or bypass paywalls (because pay-walled sites want sites like Facebook to index their content, so that then they get more traffic from links).

Fortunately, there are newer, and privacy-centric standards emerging like User-Agent Client Hints.

Core Web Vitals

Core Web Vitals are the subset of Web Vitals, an initiative by Google to provide a unified interface to measure real-world quality signals when a user visits a web page. Such signals include Largest Contentful Paint (LCP), First Input Delay (FID), and Cumulative Layout Shift (CLS).

We use Core Web Vitals with our privacy-centric Web Analytics product and collect anonymized data on how end-users experience the websites that enable this feature.

One of the metrics we can calculate using these signals is the page load time. Our theory is that if a page includes scripts coming from external sites (for example, Facebook “like” buttons, comments, ads), and they are unreachable, its total load time gets affected.

We used a list of about 400 domains that we know embed Facebook scripts in their pages and looked at the data.

Pageload times quantiles

Now let’s look at the Largest Contentful Paint. LCP marks the point in the page load timeline when the page’s main content has likely loaded. The faster the LCP is, the better the end-user experience.

Largest Contentful Paint quantiles

Again, the page load experience got visibly degraded.

The outcome seems clear. The sites that use Facebook scripts in their pages took 1.5x more time to load their pages during the outage, with some of them taking more than 2x the usual time. Facebook’s outage dragged the performance of  some other sites down.

Conclusion

When Facebook, Instagram, and WhatsApp went down, the Web felt it. Some websites got slower or lost traffic, other services and platforms got unexpected load, and people lost the ability to communicate or do business normally.

Source :
https://blog.cloudflare.com/during-the-facebook-outage/

Exit mobile version