A physical disk resource may not come online on a Microsoft cluster node

This article helps solve an issue where a physical disk resource doesn’t come online on a cluster node.

Applies to:   Windows Server 2012 R2
Original KB number:   981475

Symptoms

On a cluster node that is running Windows Server, a physical disk resource may enter the Failed state when you try to move a group that contains the physical disk resource. If you restart the cluster node that has the physical disk resource that did not come online, the problem is temporarily resolved.

When this problem occurs, the following entries are logged in the Cluster log for the physical disk resource that entered the failed state:

000020cc.000014d0::<DateTime> ERR Physical Disk <Disk Q:>:
DiskspCheckPath: GetFileAttrs(Q:) returned status of 87.
000020cc.000014d0::<DateTime> WARN Physical Disk <Disk Q:>:
DiskspCheckDriveLetter: Checking drive name (Q:) returns 87

Additionally, the following events are logged in the System Event log:

Event Type: Error
Event Source: ClusSvc
Event Category: Physical Disk Resource
Event ID: 1066
Date: <date>
Time: <time>
User: N/A
Computer: <node name>
Description: Cluster disk resource “Disk Q:” is corrupt. Run ‘ChkDsk /F’ to repair problems. The volume name for this resource is “<\?\Volume{4323d41e-1379-11dd-9538-001e0b20dfe6}>”. If available, ChkDsk output will be in the file “C:\WINDOWS\Cluster\ChkDsk_Disk2_SigB05E593B.log”. ChkDsk may write information to the Application Event Log with Event ID 26180.

Event Type: Error
Event Source: ClusSvc
Event Category: Physical Disk Resource
Event ID: 1035
Date: <date>
Time: <time>
User: N/A
Computer: <node name>
Description: Cluster disk resource ‘Disk Q:’ could not be mounted.

Similarly, on a Windows Server cluster node you may see following entries are logged in the Cluster log:

00000db0.00000868::<DateTime> WARN [RES] Physical Disk <Cluster Disk 1>: OnlineThread: Failed to get volume guid for device \?\GLOBALROOT\Device\Harddisk15\Partition1. Error 3
00000db0.00000868::<DateTime> WARN [RES] Physical Disk <Cluster Disk 1>: OnlineThread: Failed to set volguid ??\Volume{3cb36133-0d0b-11df-afcf-005056ab58b9}. Error: 183.
00000db0.00000868::<DateTime> INFO [RES] Physical Disk <Cluster Disk 1>: VolumeIsNtfs: Volume \?\GLOBALROOT\Device\Harddisk15\Partition1\ has FS type NTFS

Cause

This problem is known to occur when antivirus software that is not cluster-aware is installed, upgraded, or reconfigured. For example, this problem is known to occur after you install or migrate to Symantec Endpoint Protection 11.0 Release Update 5 (RU5) on the cluster nodes.

Resolution

To resolve this problem, follow these steps:

  1. Verify that this problem is caused by Symantec Endpoint Protection (SEP) 11.0 Release Update 5 (RU5). To do this, run the Handle.exe utility immediately after the issue occurs on the cluster node where the physical disk resource did not come online.At an elevated command prompt, type the following command, and then press ENTER: Handle.exe -a -u drive_letter. NoteThe drive_letter placeholder is the drive designation for the cluster drive that did not come online.For example, assume that the drive designation for the cluster drive that did not come online is drive Q. To run the Handle.exe utility in this scenario, type the following command, and then press ENTER: Handle.exe -a -u Q:.The problem is caused by the Symantec application if you receive the following message that identifies the Smc.exe process as the process that owns the handle:Handle v3.42
    Copyright (C) 1997-2008 Mark Russinovich
    Sysinternals – www.sysinternals.comSmc.exe pid: 856 NT AUTHORITY\SYSTEM 66C: Q:
  2. If the problem is caused by the Symantec application, contact Symantec to obtain Symantec Endpoint Protection 11 Release Update 6 (RU6), which was released to resolve this issue.

More information

For more information about the Handle.exe utility, see Handle v4.22.

The third-party products that this article discusses are manufactured by companies that are independent of Microsoft. Microsoft makes no warranty, implied or otherwise, about the performance or reliability of these products.

Source :
https://docs.microsoft.com/en-us/troubleshoot/windows-server/high-availability/physical-disk-resource-not-come-online

Microsoft Cluster Shared Volume (CSV) Inside Out

In this blog we will take a look under the hood of the cluster file system in Windows Server 2012 R2 called Cluster Shared Volumes (CSV). This blog post is targeted at developers and ISV’s who are looking to integrate their storage solutions with CSV.

Note: Throughout this blog, I will refer to C:\ClusterStorage assuming that the Windows is installed on the C:\ drive. Windows can be installed on any available drive and the CSV namespace will be built on the system drive, but instead of using %SystemDrive%\ClusterStorage\ I’ve used C:\ClusteredStorage for better readability since C:\ is used as the system drive most of the time.

Components


Cluster Shared Volume in Windows Server 2012 is a completely re-architected solution from Cluster Shared Volumes you knew in Windows Server 2008 R2. Although it may look similar in the user experience – just a bunch of volumes mapped under the C:\ClusterStorage\ and you are using regular windows file system interface to work with the files on these volumes, under the hood, these are two completely different architectures. One of the main goals is that in Windows Server 2012, CSV has been expanded beyond the Hyper-V workload, for example Scale-out File Server and in Windows Server 2012 R2 CSV is also supported with SQL Server 2014.

First, let us look under the hood of CsvFs at the components that constitute the solution.


thumbnail image 1 of blog post titled 


							Cluster Shared Volume (CSV) Inside Out

Figure 1:

CSV Components and Data Flow Diagram


The diagram above shows a 3 node cluster. There is one shared disk that is visible to Node 1 and Node 2. Node 3 in this diagram has no direct connectivity to the storage. The disk was first clustered and then added to the Cluster Shared Volume. From the user’s perspective, everything will look the same as in the Windows 2008 R2. On every cluster node you will find a mount point to the volume: C:\ClusterStorage\Volume1. The “VolumeX” naming can be changed, just use Windows Explorer and rename like you would any other directory.  CSV will then take care of synchronizing the updated name around the cluster to ensure all nodes are consistent.  Now let’s look at the components that are backing up these mount points.

Terminology

The node where NTFS for the clustered CSV disk is mounted is called the Coordinator Node. In this context, any other node that does not have clustered disk mounted is called Data Servers (DS). Note that coordinator node is always a data server node at the same time. In other words, coordinator is a special data server node when NTFS is mounted.

If you have multiple disks in CSV, you can place them on different cluster nodes. The node that hosts a disk will be a Coordinator Node only for the volumes that are located on that disk. Since each node might be hosting a disk, each of them might be a Coordinator Node, but for different disks. So technically, to avoid ambiguity, we should always qualify “Coordinator Node” with the volume name. For instance we should say: “Node 2 is a Coordinator Node for the Volume1”. Most of the examples we will go through in this blog post for simplicity will have only one CSV disk in the cluster so we will drop the qualification part and will just say Coordinator Node to refer to the node that has this disk online.

Sometimes we will use terms “disk” and “volume” interchangeably because in the samples we will be going through one disk will have only one NTFS volume, which is the most common deployment configuration. In practice, you can create multiple volumes on a disk and CSV fully supports that as well. When you move a disk ownership from one cluster node to another, all the volumes will travel along with the disk and any given node will be the coordinator for all volumes on a given disk. Storage Spaces would be one exception from that model, but we will ignore that possibility for now.


This diagram is complicated so let’s try to break it up to the pieces, and discuss each peace separately, and then hopefully the whole picture together will make more sense.

On the Node 2, you can see following stack that represents mounted NTFS. Cluster guarantees that only one node has NTFS in the state where it can write to the disk, this is important because NTFS is not a clustered file system.  CSV provides a layer of orchestration that enables NTFS or ReFS (with Windows Server 2012 R2) to be accessed concurrently by multiple servers. Following blog post explains how cluster leverages SCSI-3 Persistent Reservation commands with disks to implement that guarantee https://techcommunity.microsoft.com/t5/Failover-Clustering/Cluster-Shared-Volumes-CSV-Disk-Ownership….


thumbnail image 2 of blog post titled 


							Cluster Shared Volume (CSV) Inside Out

Figure 2:

CSV NTFS stack


Cluster makes this volume hidden so that Volume Manager (Volume in the diagram above) does not assign a volume GUID to this volume and there will be no drive letter assigned. You also would not see this volume using mountvol.exe or using FindFirstVolume() and FindNextVolume() WIN32 APIs.

On the NTFS stack the cluster will attach an instance of a file system mini-filter driver called CsvFlt.sys at the altitude 404800. You can see that filter attached to the NTFS volume used by CSV if you run following command:

>fltmc.exe instances


Filter       Volume Name                      Altitude   Instance Name

———  —————————      ———  ———————-

<skip>
CsvFlt     \Device\HarddiskVolume7   404800     CsvFlt Instance

<skip>


Applications are not expected to access the NTFS stack and we even go an extra mile to block access to this volume from the user mode applications. CsvFlt will check all create requests coming from the user mode against the security descriptor that is kept in the cluster public property SharedVolumeSecurityDescriptor. You can use power shell cmdlet “Get-Cluster | fl SharedVolumeSecurityDescriptor” to get to that property. The output of this PowerShell cmdlet shows value of the security descriptor in self-relative binary format ( http://msdn.microsoft.com/en-us/library/windows/desktop/aa374807(v=vs.85).aspx 🙁
PS > Get-Cluster | fl SharedVolumeSecurityDescriptorSharedVolumeSecurityDescriptor : {1, 0, 4, 128…}


CsvFlt plays several roles:

  • Provides an extra level of protection for the hidden NTFS volume used for CSV
  • Helps provide a local volume experience (after all CsvFs does look like a local volume). For instance you cannot open volume over SMB or read USN journal. To enable these kinds of scenarios CsvFs often times marshals the operation that need to be performed to the CsvFlt disguising it behind a tunneling file system control. CsvFlt is responsible for converting the tunneled information back to the original request before forwarding it down-the stack to NTFS.
  • It implements several mechanisms to help coordinate certain states across multiple nodes. We will touch on them in the future posts. File Revision Number is one of them for example.

The next stack we will look at is the system volume stack. On the diagram above you see this stack only on the coordinator node which has NTFS mounted. In practice exactly the same stack exists on all nodes.


thumbnail image 3 of blog post titled 


							Cluster Shared Volume (CSV) Inside Out

Figure 3:

System Volume Stack


The CSV Namespace Filter (CsvNsFlt.sys) is a file system mini-filter driver at an altitude of 404900:
>fltmc instances
Filter            Volume Name          Altitude      Instance Name
————  ———————  ————  ———————-
<skip>
CsvNSFlt      C:                             404900        CsvNSFlt Instance
<skip>


CsvNsFlt plays the following roles:

  • It protects C:\ClusterStorage by blocking unauthorized attempts that are not coming from the cluster service to delete or create any files or subfolders in this folder or change any attributes on the files. Other than opening these folders about the only other operation that is not blocked is renaming the folders. You can use command prompt or explorer to rename C:\ClusterStorage\Volume1 to something like C:\ClusterStorage\Accounting.  The directory name will be synchronized and updated on all nodes in the cluster.
  • It helps us to dispatch the block level redirected IO. We will cover this in more details when we talk about the block level redirected IO later on in this post.

The last stack we will look at is the stack of the CSV file system. Here you will see two modules CSV Volume Manager (csvvbus.sys), and CSV File System (CsvFs.sys). CsvFs is a file system driver, and mounts exclusively to the volumes surfaced up by CsvVbus.


thumbnail image 4 of blog post titled 


							Cluster Shared Volume (CSV) Inside Out

Figure 5:

CsvFs stack

Data Flow


Now that we are familiar with the components and how they are related to each other, let’s look at the data flow.

First let’s look at how Metadata flows. Below you can see the same diagram as on the Figure 1. I’ve just kept only the arrows and blocks that is relevant to the metadata flow and removed the rest from the diagram.


thumbnail image 5 of blog post titled 


							Cluster Shared Volume (CSV) Inside Out

Figure 6:

Metadata Flow


Our definition of metadata operation is everything except read and write. Examples of metadata operation would be create file, close file, rename file, change file attributes, delete file, change file size, any file system control, etc. Some writes may also, as a side effect cause a metadata change. For instance, an extending write will cause CsvFs to extend all or some of the following: file allocation size, file size and valid data length. A read might cause CsvFs to query some information from NTFS.

On the diagram above you can see that metadata from any node goes to the NTFS stack on Node 2. Data server nodes (Node 1 and Node 3) are using Server Message Block (SMB) as a protocol to forward metadata over.

Metadata are always forwarded to NTFS. On the coordinator node CsvFs will forward metadata IO directly to the NTFS volume while other nodes will use SMB to forward the metadata over the network.

Next, let’s look at the data flow for the Direct IO . The following diagram is produced from the diagram on the Figure 1 by removing any blocks and lines that are not relevant to the Direct IO. By definition Direct IO are the reads and writes that never go over the network, but go from CsvFs through CsvVbus straight to the disk stack. To make sure there is no ambiguity I’ll repeat it again: – Direct IO bypasses volume stack and goes directly to the disk.

thumbnail image 6 of blog post titled 


							Cluster Shared Volume (CSV) Inside Out


Figure 7:

Direct IO Flow


Both Node 1 and Node 2 can see the shared disk – they can send reads and writes directly to the disk completely avoiding sending data over the network. The Node 3 is not in the diagram on the Figure 7 Direct IO Flow since it cannot perform Direct IO, but it is still part of the cluster and it will use block level redirected IO for reads and writes.

The next diagram shows a File System Redirected IO request flows. The diagram and data flow for the redirected IO is very similar to the one for the metadata from the Figure 6 Metadata Flow:


thumbnail image 7 of blog post titled 


							Cluster Shared Volume (CSV) Inside Out

Figure 8
File System Redirected IO Flow


Later we will discuss when CsvFs uses the file system redirected IO to handle reads and writes and how it compares to what we see on the next diagram – Block Level Redirected IO :


thumbnail image 8 of blog post titled 


							Cluster Shared Volume (CSV) Inside Out

Figure 9:

Block Level Redirected IO Flow


Note that on this diagram I have completely removed CsvFs stack and CSV NTFS stack from the Coordinator Node leaving only the system volume NTFS stack. The CSV NTFS stack is removed because Block Level Redirected IO completely bypasses it and goes to the disk (yes, like Direct IO it bypasses the volume stack and goes straight to the disk) below the NTFS stack. The CsvFs stack is removed because on the coordinating node CsvFs would never use Block Level Redirected IO, and would always talk to the disk. The reason why Node 3 would use Redirected IO, is because Node 3 does not have physical connectivity to the disk. A curious reader might wonder why Node 1 that can see the disk would ever use Block Level Redirected IO. There are at least two cases when this might be happening. Although the disk might be visible on the node it is possible that IO requests will fail because the adapter or storage network switch is misbehaving. In this case, CsvVbus will first attempt to send IO to the disk and on failure will forward the IO to the Coordinator Node using the Block Level Redirected IO. The other example is Storage Spaces – if the disk is a Mirrored Storage Space, then CsvFs will never use Direct IO on a data server node, but instead it will send the block level IO to the Coordinating Node using Block Level Redirected IO.  In Windows Server 2012 R2 you can use the Get-ClusterSharedVolumeState cmdlet to query the CSV state (direct / file level redirected / block level redirected) and if redirected it will state why.

Note that CsvFs sends the Block Level Redirected IO to the CsvNsFlt filter attached to the system volume stack on the Coordinating Node. This filter dispatches this IO directly to the disk bypassing NTFS and volume stack so no other filters below the CsvNsFlt on the system volume will see that IO. Since CsvNsFlt sits at a very high altitude, in practice no one besides this filter will see these IO requests. This IO is also completely invisible to the CSV NTFS stack. You can think about Block Level Redirected IO as a Direct IO that CsvVbus is shipping to the Coordinating Node and then with the help of the CsvNsFlt it is dispatched directly to the disk as a Direct IO is dispatched directly to the disk by CsvVbus.

What are these SMB shares?


CSV uses the Server Message Block (SMB) protocol to communicate with the Coordinator Node. As you know, SMB3 requires certain configuration to work. For instance it requires file shares. Let’s take a look at how cluster configures SMB to enable CSV.

If you dump list of SMB file shares on a cluster node with CSV volumes you will see following:
> Get-SmbShare
Name                  ScopeName           Path                        Description
——–                ————-           —-                          ———–
ADMIN$               *                           C:\Windows             Remote Admin
C$                         *                           C:\                           Default share
ClusterStorage$   CLUS030512         C:\ClusterStorage   Cluster Shared Volumes Def…
IPC$                      *                                                           Remote IPC


There is a hidden admin share that is created for CSV, shared as ClusterStorage$. This share is created by the cluster to facilitate remote administration. You should use it in the scenarios where you would normally use an admin share on any other volume (such as D$). This share is scoped to the Cluster Name. Cluster Name is a special kind of Network Name that is designed to be used to manage a cluster. You can learn more about Network Name in the following blog post.  You can access this share using the Cluster Name, i.e. \\<cluster name>\ClusterStorage$

Since this is an admin share, it is ACL’d so only members of the Administrators group have full access to this share. In the output the access control list is defined using Security Descriptor Definition Language (SDDL). You can learn more about SDDL here http://msdn.microsoft.com/en-us/library/windows/desktop/aa379567(v=vs.85).aspx
ShareState                        : Online
ClusterType                      : ScaleOut
ShareType                        : FileSystemDirectory
FolderEnumerationMode : Unrestricted
CachingMode                   : Manual
CATimeout                        : 0
ConcurrentUserLimit         : 0
ContinuouslyAvailable      : False
CurrentUsers                     : 0
Description                        : Cluster Shared Volumes Default Share
EncryptData                       : False
Name                                 : ClusterStorage$
Path                                   : C:\ClusterStorage
Scoped                              : True
ScopeName                       : CLUS030512
SecurityDescriptor             : D:(A;;FA;;;BA)


There are also couple hidden shares that are used by the CSV. You can see them if you add the IncludeHidden parameter to the get-SmbShare cmdlet. These shares are used only on the Coordinator Node. Other nodes either do not have these shares or these shares are not used:
> Get-SmbShare -IncludeHidden
Name                                           ScopeName         Path                                                  Description
—-                                               ———               —-                                                    ———–
17f81c5c-b533-43f0-a024-dc…    *                          \\?\GLOBALROOT\Device\Hard 
ADMIN$                                       *                          C:\Windows                                       Remote Admin
C$                                                 *                          C:\                                                      Default share
ClusterStorage$                           VPCLUS030512    C:\ClusterStorage                              Cluster Shared Volumes Def…
CSV$                                            *                           C:\ClusterStorage
IPC$                                             *                                                                                     Remote IPC


Each Cluster Shared Volume hosted on a coordinating node cluster creates a share with a name that looks like a GUID. This is used by CsvFs to communicate to the hidden CSV NTFS stack on the coordinating node. This share points to the hidden NTFS volume used by CSV. Metadata and the File System Redirected IO are flowing to the Coordinating Node using this share.
ShareState                           : Online
ClusterType                          : CSV
ShareType                            : FileSystemDirectory
FolderEnumerationMode    : Unrestricted
CachingMode                      : Manual
CATimeout                           : 0
ConcurrentUserLimit            : 0
ContinuouslyAvailable          : False
CurrentUsers                        : 0
Description                           :
EncryptData                          : False
Name                                    : 17f81c5c-b533-43f0-a024-dc431b8a7ee9-1048576$
Path                                      : \\?\GLOBALROOT\Device\Harddisk2\ClusterPartition1\
Scoped                                  : False
ScopeName                          : *
SecurityDescriptor                : O:SYG:SYD:(A;;FA;;;SY)(A;;FA;;;S-1-5-21-2310202761-1163001117-2437225037-1002)
ShadowCopy                         : False
Special                                   : True
Temporary                             : True


On the Coordinating Node you also will see a share with the name CSV$. This share is used to forward Block Level Redirected IO to the Coordinating Node. There is only one CSV$ share on every Coordinating Node:
ShareState                          : Online
ClusterType                         : CSV
ShareType                           : FileSystemDirectory
FolderEnumerationMode   : Unrestricted
CachingMode                     : Manual
CATimeout                          : 0
ConcurrentUserLimit           : 0
ContinuouslyAvailable         : False
CurrentUsers                       : 0
Description                          :
EncryptData                         : False
Name                                  : CSV$
Path                                     : C:\ClusterStorage
Scoped                                : False
ScopeName                         : *
SecurityDescriptor               : O:SYG:SYD:(A;;FA;;;SY)(A;;FA;;;S-1-5-21-2310202761-1163001117-2437225037-1002)
ShadowCopy                       : False
Special                                 : True
Temporary                           : True


Users are not expected to use these shares – they are ACL’d so only Local System and Failover Cluster Identity user (CLIUSR) have access to the share.

All of these shares are temporary – information about these shares is not in any persistent storage, and when node reboots they will be removed from the Server Service. Cluster takes care of creating the shares every time during CSV start up.

Conclusion


You can see that that Cluster Shared Volumes in Windows Server 2012 R2 is built on a solid foundation of Windows storage stack, CSVv1, and SMB3.

Thanks!
Vladimir Petter
Principal Software Development Engineer
Clustering & High-Availability
Microsoft

Additional Resources:


To learn more, here are others in the Cluster Shared Volume (CSV) blog series:

Cluster Shared Volume (CSV) Inside Out

Cluster Shared Volume Diagnostics

Cluster Shared Volume Performance Counters

Cluster Shared Volume Failure Handling

Troubleshooting Cluster Shared Volume Auto-Pauses – Event 5120

Troubleshooting Cluster Shared Volume Recovery Failure – System Event 5142

Cluster Shared Volume – A Systematic Approach to Finding Bottlenecks

Source :
https://techcommunity.microsoft.com/t5/failover-clustering/cluster-shared-volume-csv-inside-out/ba-p/371872

Ubiquiti UniFi – Run the Network Application as a Windows Service

Windows services are often useful since they are background applications that don’t require any attention from the end-user. The service launches upon startup, without any intervention from the user. The service is a direct replacement for running the Network application manually (via the icon or a scheduled task), so there is no need to run the UniFi Network application if it is being run as a Windows service.

This article describes how to set up the UniFi Network application to run as a Windows service, and how to update it when it’s running this way.NOTES & REQUIREMENTS:

  • Applicable to the latest UniFi application versions for Windows.
  • This article applies to UniFi applications that are installed on Windows Desktop (Windows 10) and not Windows Server versions.
  • It is recommended to only install the x64 version of Java 8 for the UniFi Cloud Access Portal to work properly.
  • Make sure to allow the ports used by the UniFi application through the Windows Firewall. See the UniFi – Ports Used article for more information. 

How to set up the UniFi Network application as a Windows Service

ATTENTION: It is recommended to only install the x64 version of Java 8 for the UniFi Cloud Access Portal to work properly. However, older versions of the Network application may require both x64 and x86 Java to be installed on a Windows x64 system.

1. Close any instances of the UniFi Network application on the computer. If the UniFi Network application was just installed, make sure to open the application manually at least once, or let it run at the end of the wizard. Once you see the message UniFi Network application (a.b.c) started, the application may be closed.CLI:Open an administrative Windows Command Prompt (CMD) window.

2. Change the directory to the location of UniFi installation.

cd "%UserProfile%\Ubiquiti UniFi\"

Click to copy

3. Once in the root of the UniFi folder, run the following command to install the UniFi Network application service:

java -jar lib\ace.jar installsvc

Click to copy

4. Wait for the installation to complete, indicated by the Complete Installation log message.

5. Start the service with the command below: 

java -jar lib\ace.jar startsvc

Click to copy

6. Open a browser and navigate to the application’s IP address or https://localhost:8443.

How to upgrade a UniFi Network application that is running as a Windows Service

1. Create a backup of your Network application.CLI:Open an administrative Windows Command Prompt (CMD) window.

2. Change the directory to the location of UniFi installation.

cd "%UserProfile%\Ubiquiti UniFi\"

Click to copy

3. Once in the root of the UniFi folder, issue the following to uninstall the Network application service:

java -jar lib\ace.jar uninstallsvc

Click to copy

4. Wait for the service uninstall process to complete. 

5. Launch the Network application and update it through the Settings section. Alternatively, download the latest installation file from the Downloads section.

6. Repeat the steps from the section above after the new Network application version is installed.

Source :
https://help.ui.com/hc/en-us/articles/205144550-UniFi-Run-the-Network-Application-as-a-Windows-Service

Microsoft releases new APIs for managing Windows Update

New Microsoft Graph APIs released today in public preview allow developers and IT professionals to manage Windows 10 updates and expedite Windows 10 security updates in enterprise environments.

Microsoft Graph is an API platform that helps developers create apps capable of accessing Microsoft 365, Windows 10, and Enterprise Mobility + Security data.

Access to deployment service update management capabilities

“By connecting deployment service capabilities with Microsoft Graph, app developers can easily build rich update management tools and extend these experiences with contextual user data (such as leveraging a user’s calendar data when scheduling an update),” Microsoft Principal Program Manager David Mebane explained.

The deployment service Mebane refers to is the Windows Update for Business deployment service, a cloud service announced by Microsoft in March and providing control over the approval, scheduling, monitoring, and safeguarding of Windows Update controls.

With its release, Microsoft has expanded Windows Update device management features available to IT pros, making it possible to:• Schedule update deployments to begin on a specific date (ex: deploy 20H2 to these devices on March 14, 2021)
• Stage deployments over a period of days or weeks using rich expressions (ex: deploy 20H2 to 500 devices per day, beginning on March 14, 2021)
• Bypass pre-configured Windows Update for Business policies to immediately deploy a security update across your organization when emergencies arise
• Ensure coverage of hardware and software in your organization through deployments that are tailored to your unique device population through automatic piloting
• Leverage Microsoft ML to automatically identify and pause deployments to devices that are likely to be impacted by a safeguard hold
• Manage driver and firmware updates just like feature updates and quality updates

The Microsoft Graph API released today in public preview further extend these fine-grained controls, allowing customers to interact with the deployment service via apps that can help them:• Approve and schedule specific feature updates to be delivered from Windows Update on a specific date – including skipping or not taking feature updates.
• Stage deployments over a period of days or weeks using rich expressions (ex: deploy 20H2 to 500 devices per day, beginning on May 11, 2021)
• Bypass pre-configured Windows Update for Business policies to immediately deploy a security update across your organization.
• Deliver safer update results by leveraging automatic pilots for any deployment.

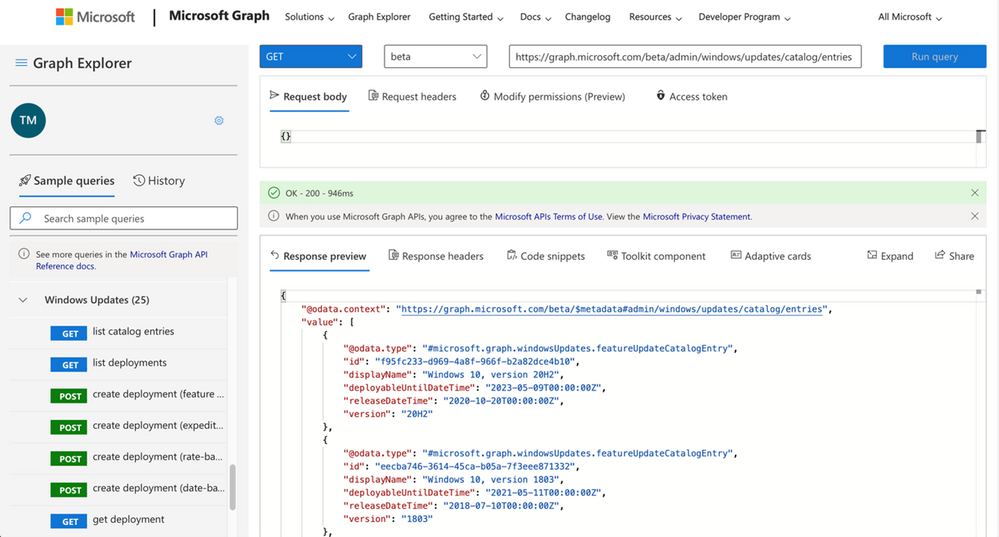
Microsoft-Graph-API-Windows-Updates
Deployment service interaction via Microsoft Graph Explorer (Microsoft)

Available starting today

Customers with supported Windows or Microsoft 365 subscriptions can access the deployment services through the new APIs starting today.

To start using the new Microsoft Graph APIs today, you need one of the following subscriptions: 

  • Windows 10 Enterprise E3 or E5 (included in Microsoft 365 F3, E3, or E5)
  • Windows 10 Education A3 or A5 (included in Microsoft 365 A3 or A5)
  • Windows Virtual Desktop Access E3 or E5
  • Microsoft 365 Business Premium

Devices compatible with the deployment service must be Azure AD joined or Hybrid AD joined, and run Pro, Enterprise, Education, or Pro Education editions of Windows 10, version 1709 or later.

Further information on enrolling devices for management, managing feature updates, and expediting security updates is available here.

Source :
https://www.bleepingcomputer.com/news/microsoft/microsoft-releases-new-apis-for-managing-windows-update/

Microsoft: Windows needs at least 8 hours online to update reliably

Microsoft says that Windows devices need to be online for at least eight hours to get the latest updates and have them correctly installed after they’re released through Windows Update.

The amount of time devices running Windows are powered on and connected to Windows Update is tracked by Microsoft as ‘Update Connectivity.’ 

This measurement correlates the systems’ lack of enough connected time with why they’re not up to date while also making it easier to understand why some devices are unlikely to get recently released updates successfully.

According to David Guyer, a Microsoft Program Manager for Windows Updates in MEM, Windows devices need at least 8 hours online to get the latest updates and successfully install them.

“One of the most impactful things we explored was how much time a device needs to be powered on and connected to Windows Update to be able to successfully install quality and feature updates,” said Guyer.

“What we found is that devices that don’t meet a certain amount of connected time are very unlikely to successfully update. Specifically, data shows that devices need a minimum of two continuous connected hours, and six total connected hours after an update is released to reliably update.

“This allows for a successful download and background installations that are able to restart or resume once a device is active and connected.”

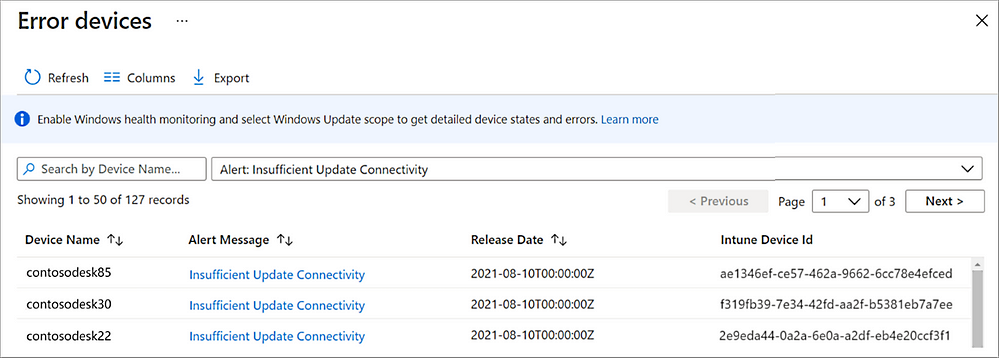
You can track devices with insufficient Update Connectivity via Microsoft Intune by navigating to Devices > Monitor and selecting either the Feature update failures or the Windows Expedited update failures report.

Insufficient Update Connectivity alerts can also be found via the Summary report in Intune by going to Reports > Windows updates > Reports > Windows Expedited update report.

Microsoft Intune Update Connectivity  alerts
Microsoft Intune Update Connectivity alerts (Microsoft)

When looking at Windows 10 devices that are not fully updated and not meeting minimum connectivity requirements, Microsoft saw that:

  • Approximately 50% of devices not on a serviced build of Windows 10 do not meet the minimum Update Connectivity measurement.
  • Approximately 25% of Windows 10 devices on a serviced build but have security updates that are more than 60 days out of date have less than the minimum Update Connectivity.

“When troubleshooting update issues, we have found it is best to select devices that have sufficient Update Connectivity,” Guyer added.

“If a device has insufficient Update Connectivity, then investigating other update issues is complicated because the low Update Connectivity can create new issues that go away once there’s enough connectivity.”

In related news, Microsoft began testing a smarter delivery method for Windows update improvements dubbed ‘Update Stack Package,’ which would deliver improvements to the update experience outside of major OS updates before monthly or feature Windows updates.

The company also redesigned cumulative updates in Windows 11 to allow security and quality updates to install faster as they are approximately 40% smaller than their Windows 10 counterparts.

Last year, Redmond released new APIs for managing Windows Update that enable devs and IT professionals to expedite Windows 10 security updates in enterprise environments.

Source :
https://www.bleepingcomputer.com/news/microsoft/microsoft-windows-needs-at-least-8-hours-online-to-update-reliably/

How to install the Microsoft Visual C++ 2015 Runtime

If you start a program and receive an error stating that the program you are trying to run needs the Microsoft Visual C++ 2015 Runtime, you can use this tutorial to install the package so that your program works again.

When developers create a Windows program using Microsoft Visual Studio 2015, there are specific dynamic link libraries (DLLs) that their programs are linked to work correctly.

These DLLs are distributed through the Microsoft Visual C++ 2015 Runtime, and if the package is not installed, users will encounter errors stating that DLLs are missing or you need to install the runtime.

As an example, the video game Valorant released an update today that did not include the Microsoft Visual C++ 2015 Runtime, causing the game not to work after the update was installed.

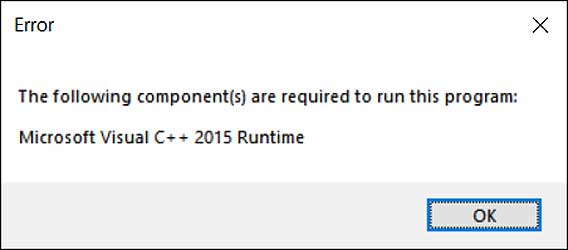
When users launch Valorant, they are instead greeted with the following error.

Missing Microsoft Visual C++ 2015 Runtime error

“The following component(s) are required to run this program: Microsoft Visual C++ 2015 Runtime”

The good news is that it is really easy to fix this problem by downloading and install the runtime from Microsoft’s website.

To install the Microsoft Visual C++ 2015 Runtime, please follow these steps:

  1. Go to the Microsoft Visual C++ 2015 Redistributable page from Microsoft and click on the Download button.
  2. You will be brought to a page where it asks you to select whether you want to download the 32-bit or 64-bit version of Windows. Select the version you need and click the Next button. If you are unsure what version you need, you can use this tutorial to determine what you need.

    BleepingComputer suggests that you download and install both the x86 AND x64 versions of the runtime to not run into issues in the future.
  3. The files will now be download to your computer. Once downloaded, double-click on the downloaded vc_redist.x64.exe file. 
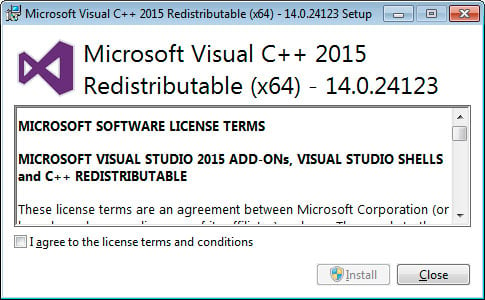
  4. The Microsoft Visual C++-2015 Redistributable screen will be displayed and ask you to agree to the license terms and conditions. Put a checkmark in the “I agree” box and then click on the Install button.Microsoft Visual C++-2015 RedistributableMicrosoft Visual C++-2015 Redistributable
  5. If Windows prompts you to allow the program to make changes or continue, click on the Yes or Allow button.
  6. When done, the program will display a message stating that it was successfully installed.Redistributable InstalledRedistributable Installed
  7. Now perform the same steps to install the vc_redist.x86.exe runtime.
  8. You can now close the installer.

If you already had the Visual C++ 2015 Runtime installed, you can run the above redistributables and perform a repair.

Perform a Repair
Perform a Repair

You can now try to run the program that previously gave the missing runtime error, and it should work again.

Source :
https://www.bleepingcomputer.com/tutorials/how-to-install-the-microsoft-visual-c-2015-runtime/

How to start Microsoft Windows in Safe Mode

Introduction

Windows Safe Mode is a way of booting up your Windows operating system in order to run administrative and diagnostic tasks on your installation. When you boot into Safe Mode the operating system only loads the bare minimum of software that is required for the operating system to work. This mode of operating is designed to let you troubleshoot and run diagnostics on your computer. Windows Safe Mode loads a basic video drivers so your programs may look different than normal.

For Win98/ME, XP, Vista and Windows 7 there are two methods of booting into Safe Mode, while 95 and 2000 only have one. We will describe these methods below:

F8 – By pressing the F8 key right when Windows starts, usually right after you hear your computer beep when you reboot it, you will be brought to a menu where you can choose to boot into safe mode. If it does not work on the first try, reboot and try again as you have to be quick when you press it. I have found that during boot up right after the computer shows you all the equipment , memory, etc installed on your computer, if you start lightly tapping the F8 key you will usually be able to get to the desired menu.

System Configuration Utility – You can use the System Configuration Utility, or MSCONFIG, found in Windows 98, ME, XP, Windows Vista, and Windows 7 to make Windows boot into Safe Mode on the next reboot. We will go into specific details in the sections below. Please note, that you should not force your computer to boot into Safe Mode using the System Configuration Utility if you suspect you are infected with malware as the malware may corrupt keys required to boot into Safe Mode. You can read more about this here.

Windows 95

Windows 95 can only boot into Safe Mode using the F8 method as it does not have a System Configuration Utility.

Using the F8 Method:

  1. Restart your computer.
  2. When the machine first starts it will generally list some equipment that is installed in your machine, amount of memory, hard drives installed etc. When it is finished with that it will say “Starting Windows 95”. Immediately after seeing “Starting Windows 95” press the F8 key.
  3. You will now be presented with a menu. Select the option for Safe Mode using the arrow keys.
  4. Then press enter on your keyboard to boot into Safe Mode.
  5. Do whatever tasks you require and when you are done reboot to boot back into normal mode.

Windows 98/ME

NOTE: Windows ME may look slightly different than what is shown in the images below. You should still have no problem following along.

Using the F8 Method:

  1. Restart your computer.
  2. When the machine first starts again it will generally list some equipment that is installed in your machine, amount of memory, hard drives installed etc. At this point you should gently tap the F8 key repeatedly until you are presented with a menu.
  3. When you have the menu on the screen. Select the option for Safe Mode using the arrow keys.
  4. Then press enter on your keyboard to boot into Safe Mode.
  5. Do whatever tasks you require and when you are done reboot to boot back into normal mode.

Using the System Configuration Tool Method:

Step 1: Close all programs so that you have nothing open and are at the desktop.

Step 2: Click on the Start button then click on Run.

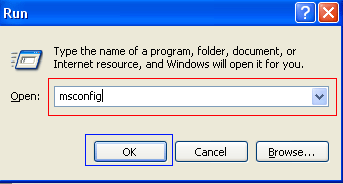
Step 3: In the Run field type msconfig as shown in the image below.


Figure 1. Starting Msconfig

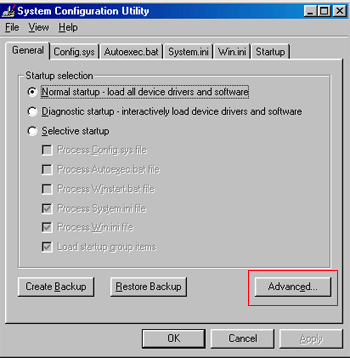
Step 4: Press the OK button and the System Configuration Utility will start up. You will then see a screen similar to Figure 2 below.


Figure 2. SCU Startup Screen

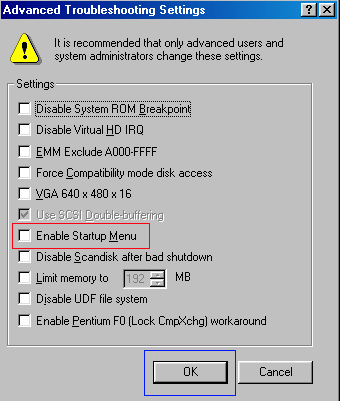
Step 5: You should now press the Advanced button designated by the red box in the figure above and you will see a screen similar to figure 3 below.


Figure 3. Advanced Options

Step 6: Place a check mark in the checkbox labeled “Enable Startup Menu” designated by the red box in Figure 3 above. Then press the OK button and then the OK button again. Windows 98/ME will now prompt if you would like to reboot as shown in Figure 4 below.


Figure 4. Confirm Reboot

Step 7: Press the Yes button and your computer will restart into Safe Mode.

Step 8: When the computer boots up perform what diagnostic or troubleshooting tasks you require.

Step 9. When you are finished with these tasks, complete steps 1-7 again, but in Step 6 this time uncheck the checkbox labeled “Enable Startup Menu”.

Step 10: Reboot the computer back into normal mode.

Windows 2000

Windows 2000 can only boot into Safe Mode using the F8 method as it does not have a System Configuration Utility.

Using the F8 Method:

  1. Restart your computer.
  2. When the machine first starts again it will generally list some equipment that is installed in your machine, amount of memory, hard drives installed etc. When that is completed it will start loading Windows.
  3. When you see the screen that has a black and white bar at the bottom stating “Starting Windows”, tap the F8 key repeatedly until you get to the Windows 2000 Advanced Options Menu
  4. At this menu use the arrow keys to select the Safe Mode option, which is usually the first in the list.
  5. Press the enter key.
  6. Your computer will continue booting, but now will boot into Safe Mode.
  7. Do whatever tasks you require and when you are done reboot to boot back into normal mode.

Windows XP

Using the F8 Method:

  1. Restart your computer.
  2. When the machine first starts again it will generally list some equipment that is installed in your machine, amount of memory, hard drives installed etc. At this point you should gently tap the F8 key repeatedly until you are presented with a Windows XP Advanced Options menu.
  3. Select the option for Safe Mode using the arrow keys.
  4. Then press enter on your keyboard to boot into Safe Mode.
  5. Do whatever tasks you require and when you are done reboot to boot back into normal mode.

Using the System Configuration Tool Method:

Note: If you are having trouble entering Safe Mode via the F8 method, you should not use this method to force it to startup into safe mode. For reasons why, you should read this.

Step 1: Close all programs so that you have nothing open and are at the desktop.

Step 2: Click on the Start button then click on Run.

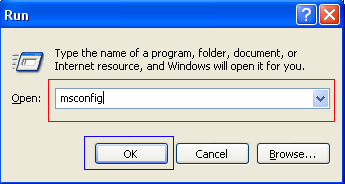
Step 3: In the Run field type msconfig as shown in the image below.


Figure 4. Starting Msconfig

Step 4: Press the OK button and the System Configuration Utility will start up. You will then see a screen similar to Figure 5 below.


Figure 5. Starting the System Configuration Utility

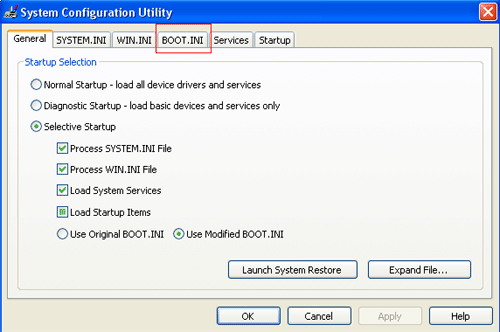
Step 5: Click on the tab labeled “BOOT.INI” which is designated by the red box in Figure 5 above. You will then be presented with a screen similar to Figure 6 below.


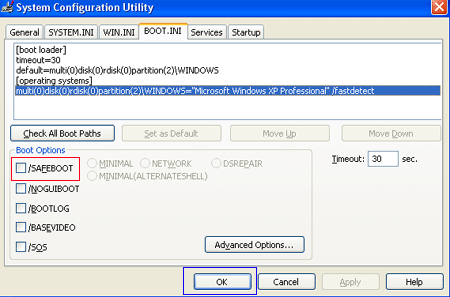
Figure 6. BOOT.INI Tab

Step 6: Put a check mark in the checkbox labeled “/SAFEBOOT” designated by the red box in Figure 6 above. Then press the OK button. After pressing the button you will be presented with a confirmation box as shown in Figure 7 below.


Figure 7. Confirm Reboot

Step 7: Press the Restart button and let the computer reboot. It will now boot up into Safe Mode.

Step 8: When the computer boots up do what diagnostic or troubleshooting tasks that you need to do.

Step 9. When are finished with your tasks, complete steps 1-7 again, but in Step 6 this time uncheck the checkbox labeled “/SAFEBOOT”. Then click on the General tab and set it for Normal startup.

Step 10: Reboot the computer back into normal mode.

Windows Vista

Using the F8 Method:

  1. Restart your computer.
  2. When the computer starts you will see your computer’s hardware being listed. When you see this information start to gently tap the F8 key repeatedly until you are presented with the Windows Vista Advanced Boot Options.
  3. Select the Safe Mode option using the arrow keys.
  4. Then press the enter key on your keyboard to boot into Vista Safe Mode.
  5. When Windows starts you will be at a typical logon screen. Logon to your computer and Vista will enter Safe mode.
  6. Do whatever tasks you require, and when you are done, reboot to go back into normal mode.

Using the System Configuration Tool Method:

Note: If you are having trouble entering Safe Mode via the F8 method, you should not use this method to force it to startup into safe mode. For reasons why, you should read this.

  1. Close any running programs and open Windows so you are back at the desktop.
     
  2. Click on the Start () button.
     
  3. In the Start Menu Search Box () type msconfig and press enter on your keyboard.
     
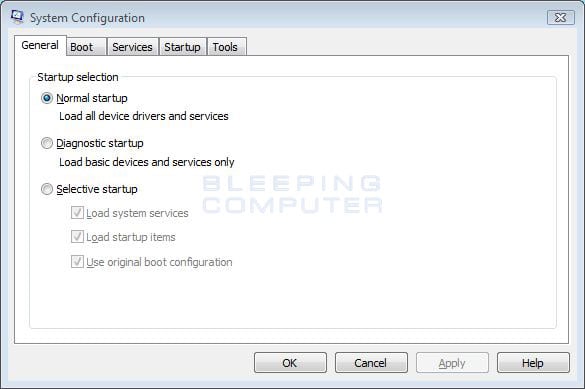
  4. The System Configuration utility will open and you will see a screen similar to the one below.


     Vista System Configuration Utility
    Figure 8. Vista System Configuration Utility


    Click on the Boot tab.
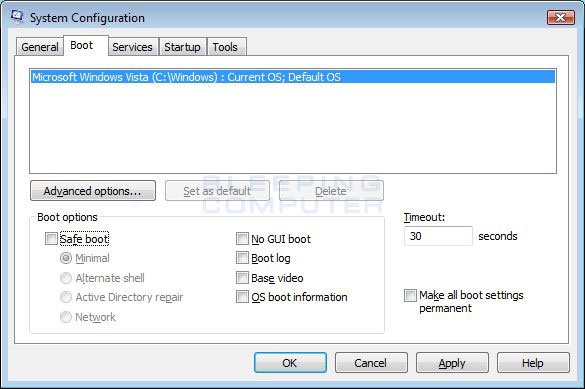
  5. You will now be at the Boot options screen as shown below.


     Vista Boot tab in the System Configuration utility
    Figure 9. Vista Boot tab in the System Configuration utility


    Put a check mark in the checkbox labeled Safe boot
     
  6. Press the Apply button and then press the OK button.
     
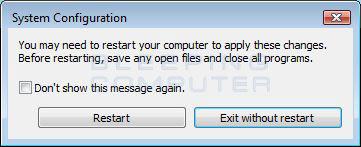
  7. You will now be presented with a prompt stating that you need to reboot the computer to apply the change.


     Restart Prompt
    Figure 10. Restart Prompt


    Click on the Restart button to reboot your computer.
     
  8. Your computer will now restart directly into Safe Mode. When you get to the Vista logon screen, log on to the computer and perform any necessary tasks.
     
  9. When done with your tasks, from within Safe Mode, start msconfig.
     
  10. When the program is open, and you are on the General tab, select the option labeled Normal Startup.
     
  11. Then press the Apply button and then the OK button.
     
  12. When the programs prompts you to reboot, allow it to do so, and you will boot back into Windows Vista in normal mode.

Windows 7

Using the F8 Method:

  1. Restart your computer.
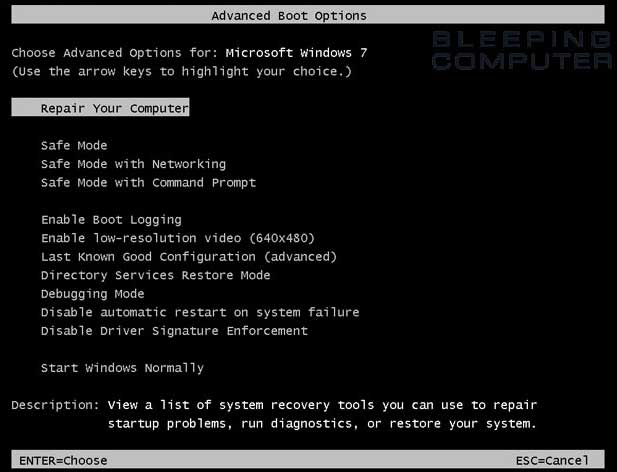
  2. When the computer starts you will see your computer’s hardware being listed. When you see this information start to gently tap the F8 key on your keyboard repeatedly until you are presented with the Windows 7 Advanced Boot Options screen as shown in the image below.

     Figure 11. Windows 7 Advanced Boot Options screen
    Figure 11. Windows 7 Advanced Boot Options screen
  3. Using the arrow keys, select the Safe Mode option you want.
  4. Then press the enter key on your keyboard to boot into Windows 7 Safe Mode.
  5. When Windows starts you will be at a typical logon screen. Logon to your computer and Windows 7 will enter Safe mode.
  6. Do whatever tasks you require, and when you are done, reboot to go back into normal mode.

Using the System Configuration Tool Method:

Note: If you are having trouble entering Safe Mode via the F8 method, you should not use this method to force it to startup into safe mode. For reasons why, you should read this.

  1. Close any running programs and open Windows so you are back at the desktop.
     
  2. Click on the Start () button.
     
  3. In the Start Menu Search Box type msconfig as shown in Figure 12 below.

     Figure 12. Windows 7 Search box
    Figure 12. Windows 7 Search box

    Then press enter on your keyboard.
     
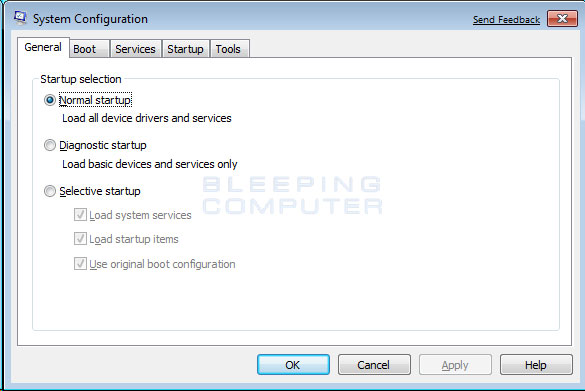
  4. The System Configuration utility will open and you will see a screen similar to the one below.


     Vista System Configuration Utility
    Figure 13. Windows 7 System Configuration Utility


    Click on the Boot tab.
     
  5. You will now be at the Boot screen as shown below.


     Vista Boot tab in the System Configuration utility
    Figure 14. Windows 7 Boot tab in the System Configuration utility


    Put a check mark in the checkbox labeled Safe boot
     
  6. Press the Apply button and then press the OK button.
     
  7. You will now be presented with a prompt stating that you need to reboot the computer to apply the change.


     Figure 15. Restart Prompt
    Figure 15. Restart Prompt


    Click on the Restart button to reboot your computer.
     
  8. Your computer will now restart directly into Safe Mode. When you get to the Windows 7 logon screen, log on to the computer and perform any necessary tasks.
     
  9. When done with your tasks, from within Safe Mode, start msconfig.
     
  10. When the program is open, and you are on the General tab, select the option labeled Normal Startup.
     
  11. Then press the Apply button and then the OK button.
     
  12. When the programs prompts you to reboot, allow it to do so, and you will boot back into Windows 7 in normal mode.

Windows 8

For a detailed tutorial on how to boot Windows 8 into Safe Mode, please see this tutorial: How to start Windows 8 in Safe Mode

Using the Advanced startup options method:

  1. From the Windows Start screen, type Advanced startup and when the search results appear, click on the Settings category and then click on the Advanced startup options search option.
     
  2. When the Settings screen opens, scroll down and click on the Restart now button under the Advanced Startup category and your computer will restart.
     
  3. When the Advance startup menu appears, click on the Troubleshoot option.
     
  4. Then click on the Advanced Options button.
     
  5. Finally click on the Startup Settings option and then click on the Restart button. Your computer will now restart again.
     
  6. When you get to the Startup Settings screen, press the number for the Safe Mode option you wish to use.
     
  7. Do whatever tasks you require, and when you are done, reboot to go back into normal mode.


Using the System Configuration Tool Method:

Note: If you are having trouble entering Safe Mode via the Advanced Startup menu, you should not use this method to force it to startup into safe mode. For reasons why, you should read this.

  1. Go to the Windows Start screen and type msconfig. When the msconfig search results appears, click on it.
     
     
  2. The System Configuration utility will open and you will see a screen similar to the one below.


     Vista System Configuration Utility
    Click on the Boot tab.
     
  3. You will now be at the Boot screen as shown below.


     Vista Boot tab in the System Configuration utility


    Put a check mark in the checkbox labeled Safe boot
     
  4. Press the Apply button and then press the OK button.
     
  5. You will now be presented with a prompt stating that you need to reboot the computer to apply the change.


     Figure 15. Restart Prompt


    Click on the Restart button to reboot your computer.
     
  6. Your computer will now restart directly into Safe Mode. When you get to the Windows 8 logon screen, log on to the computer and perform any necessary tasks.
     
  7. When done with your tasks, from within Safe Mode, go back to the Start screen by pressing the Tab key on your keyboard. Then start msconfig again by typing msconfig and then clicking on its search result.
     
  8. When the program is open, and you are on the General tab, select the option labeled Normal Startup.
     
  9. Then press the Apply button and then the OK button.
     
  10. When the programs prompts you to reboot, allow it to do so, and you will boot back into Windows 8 in normal mode.

Windows 10

For a detailed tutorial on how to boot Windows 10 into Safe Mode, please see this tutorial: How to Start Windows 10 in Safe Mode with Networking

  1. Press the Ctrl+Alt+Delete keys a the same time to enter the Windows security screen.
     
  2. While holding down the Shift key, click on the Power button (Windows 10 Power Button) and then click on Restart.
     
  3. When Windows 10 restarts, you will be at the Choose an Option screen as shown below. At this screen, click on the Troubleshoot button to access the Troubleshoot options.
     
  4. At the Troubleshoot screen, click on the Advanced Options button to open the advanced options screen.
     
  5. At the Advanced Options screen, click on the Startup Settings option. This will open the Startup Settings screen.
     
  6. At the Startup Settings screen, click on the Restart button. Windows will now restart.
     
  7. After restarting you will be shown a Startup Settings screen. At this screen you should press the number 5 key on your keyboard to enter Safe Mode with Networking.
     
  8. Your computer will now reboot. Once rebooted, you will be at a login prompt. Login to access Safe mode with Networking.

Problems that can occur by forcing Safe Mode using the System Configuration Utility

It is possible to make your computer continuously boot up into safe mode using the System Configuration utility as described above. The program does this by changing your boot.ini file, the settings file that configures your computer’s boot sequence, and adding the /safeboot argument to your operating systems startup line. An example of this can be seen below.

Original[operating systems]
multi(0)disk(0)rdisk(0)partition(2)\WINDOWS=”Microsoft Windows XP Professional” /FASTDETECT /NOEXECUTE=OPTIN
After using MsConfig.exe[operating systems]
multi(0)disk(0)rdisk(0)partition(2)\WINDOWS=”Microsoft Windows XP Professional” /FASTDETECT /NOEXECUTE=OPTIN /safeboot:minimal

When you are done using safe mode, you would then run the System Configuration utility again and uncheck the /Safeboot option, thus removing the /safeboot argument from the boot.ini file, and allowing your computer to boot up normally.

On a computer that is operating properly this is normally not a problem. Unfortunately, though, a new trick that some of the more recent malware are using is to delete certain Windows Registry keys so that your computer can not properly boot into safe mode. It is in these situations that using the System Configuration utility to boot into safe mode can cause the computer to become inoperable for many users.

This is because once you set the computer to boot into Safe Mode using /Safeboot, it will continuously attempt to start Safe Mode until the /safeboot argument is removed from the boot.ini. Since the malware is not allowing us to actually boot into safe mode, you have no way of getting to a point where you can run the System Configuration utility again to uncheck the /Safeboot option. Thus, you are stuck with a computer constantly attempting to get into safe mode and not being able to do so.

If a situation like this has happened to you it is possible to fix this problem by renaming your boot.ini file. The first step would be to use a boot disk to start your computer. If your computer does not have a floppy disk, then you can typically boot off the Windows CD that came with your computer in order to access the Windows Recovery Console. More information about the Windows Recovery Console can be found here. Once booted to a command prompt, you would simply rename your C:\Boot.ini file to another name like C:\Boot.ini.bak. The command to rename the file at the command prompt is:

ren C:\Boot.ini Boot.ini.bak

Once the file is renamed, you can then remove the boot disk and reboot your computer to get back to normal mode. When booting up after the rename, do not be surprised if you see an error stating that you do not have a valid Boot.ini file. When you get back to normal Windows mode, you can then rename C:\Boot.ini.bak to C:\Boot.ini and run Msconfig again to remove the /safeboot flag.

Conclusion

It is not uncommon when people are helping you troubleshoot your computer that they tell you to enter Safe Mode. With this tutorial you should now know how to enter Safe Mode when it is required.

If you have any questions please feel free to post them in our tech support forums.

Source :
https://www.bleepingcomputer.com/tutorials/how-to-start-windows-in-safe-mode/

Microsoft .NET Framework 4.7.2 offline installer for Windows

About Microsoft .NET Framework 4.7.2

Microsoft .NET Framework 4.7.2 is a highly compatible, in-place update to .NET Framework 4, 4.5, 4.5.1, 4.5.2, 4.6, 4.6.1, 4.6.2, 4.7, and 4.7.1.

  • The offline package can be used in situations in which the web installer cannot be used because of a lack of Internet connectivity. This package is larger than the web installer and does not include the language packs. We recommend that you use the web installer instead of the offline installer for optimal efficiency and bandwidth requirements.
  • When you install this package, the following packages or updates are installed per your operating system:
    • In Windows 7 Service Pack 1 (SP1) and Windows Server 2008 R2 SP1, .NET Framework 4.7.2 is listed as an installed product under the Programs and Features item in Control Panel.
    • In Windows Server 2012, Update for Microsoft Windows (KB4054542) is listed under the Installed Updates item in Control Panel.
    • In Windows 8.1 or Windows Server 2012 R2, Update for Microsoft Windows (KB4054566) is displayed under the Installed Updates item in Control Panel.
    • In Windows 10 Anniversary Update (version 1607), Windows 10 Creators Update (version 1703) and Windows Server 2016, Update for Microsoft Windows (KB4054590) is listed under the Installed Updates item in Control Panel.
    • In Windows 10 Fall Creators Update (version 1709), Update for Microsoft Windows (KB4073120) is listed under the Installed Updates item in Control Panel.

Microsoft .NET Framework 4.7.2 is available on Windows Update and on Windows Server Update Service (WSUS). It will be offered as a recommended update on Windows Update.

Note The package installer (NDP472-KB4054530-x86-x64-AllOS-ENU.exe) was updated on July 10, 2018. If you downloaded the installer before July 10, 2018, we recommend that you download the latest version (4.7.3081.0) of the installer to get the additional fixes included in the update.

Download information

The following files are available for download from the Microsoft Download Center:

For information about how to download Microsoft support files, see How to obtain Microsoft support files from online services.

Virus-scan claim

Issues that are fixed in this update

The following issues are fixed for .NET Framework 4.7.2.

SQL Server (SQL)

  • Fixes an issue in which the .NET Framework API SqlConnection.ConnectionString property is used to set a null or empty connection string. In this situation, a Null Reference Exception (NRE) occurs when you use the API together with .NET Framework 4.7.2. [611802, System.Data.dll, Bug]
  • Fixes an issue in which you connect to Azure SQL DB and MultipleActiveResultSets=true is used in the connection string together with System.Data.SqlClient.SqlConnection. In this situation, the async query operations cause a bad TDS protocol request stream to be sent from the client. This causes the Async Query APIs to fail. [620109, System.Data.dll , Bug]

Windows Presentation Framework (WPF)

  • Adds an AppContext switch that opts out of some work that was done during AppDomain or process shutdown. This issue can reduce (but not eliminate) the possibility of a crash in applications that make unwarranted assumptions about the timing of the finalizer thread. [593963, WindowsBase.dll, Bug]
  • Fixes a crash in WPF that occurs when you multiple characters are replaced by a single character (in a different language than the original text) by using IMEPad. [605996, PresentationFramework.dll, Bug]
  • Combo box grouped items now report children correctly through UIAutomation. [605922, PresentationFramework.dll, Bug]

More information

This version of .NET Framework runs side-by-side with .NET Framework 3.5 SP1 and earlier versions. However, it performs an in-place update for .NET Framework 4, 4.5, 4.5.1, 4.5.2, 4.6, 4.6.1, 4.6.2, 4.7, and 4.7.1.

Known issues

  • Applications that rely on .NET Framework to initialize a COM component and that run with restricted permissions may fail to start or run correctly, and return “access denied,” “class not registered,” or “internal failure occurred for unknown reasons” errors.
  • For known issues with .NET Framework 4.7.2 see Known issues for .NET Framework 4.7.2.

Command-line switches for this update

For more information about the various command-line options that are supported by this update, see the “Command-Line options” section in .NET Framework Deployment Guide for Developers.

Restart requirement

You may have to restart the computer after you install this update. We recommend that you exit all applications that are using .NET Framework before you install this update.

Supported operating systems

Microsoft .NET Framework 4.7.2 (Offline Installer) supports the following operating systems:

  • Windows Server 2016 (version 1709)
  • Windows 10 Anniversary Update (version 1607) (x86 and x64)
  • Windows 10 Creators Update (version 1703) (x86 and x64)
  • Windows 10 Fall Creators Update (version 1709) (x86 and x64)
  • Windows Server 2012 R2 (x64)
  • Windows 8.1 (x86 and x64)
  • Windows Server 2012 (x64)
  • Windows Server 2008 R2 Service Pack 1 (x64)
  • Windows 7 Service Pack 1 (x86 and x64)

    Source :
    https://support.microsoft.com/en-us/topic/microsoft-net-framework-4-7-2-offline-installer-for-windows-05a72734-2127-a15d-50cf-daf56d5faec2

What Is VMware Horizon and How Does It Work?

Businesses today have been forced to switch to remote working to ensure continued business continuity. After the pandemic began in early 2020, it caused a shift to a majority remote workforce, seemingly overnight. With the change to a distributed workforce, new requirements have emerged for businesses around availability, security, and flexibility.

Virtual Desktop Infrastructure (VDI) is a solution that allows connecting remote workers with virtual desktops and applications running in a corporate data center. VMware Horizon is a VDI solution offered by VMware that provides a robust feature set and capabilities for remote workers. So what is VMware Horizon, and how does it work?

What is VMware Horizon?

Today, the work from anywhere model is no longer optional for businesses. Providing accessibility, flexibility, and connectivity from anywhere for the distributed workforce allows remote employees to remain productive no matter where they are located.

As the pandemic escalated, businesses quickly found legacy on-premises desktop and app virtualization platforms that predated the widespread use of the cloud were not equipped for current challenges. It led to many companies struggling to provide the distributed workforce with fast and reliable access to apps they need for business productivity.

VMware Horizon is an end-to-end solution for managing and delivering virtualized or physical desktops and virtual application delivery to end-users. It allows creating and brokering connections to Windows & Linux virtual desktops, Remote Desktop Services (RDS) applications, and desktops. It can also deliver Linux-hosted applications.

VMware Horizon is a Virtual Desktop Infrastructure (VDI) solution, a core component of VMware’s digital workspace for businesses looking to deliver virtual desktops and applications to their workforce. It provides the tooling and capabilities that enable access from any device and is deeply integrated with other VMware solutions and services such as VMware NSX, VMware Workspace One, vSAN, and others.

VMware Horizon provides secure and robust connectivity for remote workers


VMware Horizon provides secure and robust connectivity for remote workers

Recent VMware Horizon versions have evolved to provide desktop resources on-premises, in the cloud, hybrid clouds, and multi-cloud environments.

VMware Horizon Editions

VMware Horizon is provided in three editions:

  • Horizon Standard
  • Horizon Advanced
  • Horizon Enterprise

All three editions provide the components needed for end-to-end virtual desktop deployment.

What are the key capabilities / features of VMware Horizon?

  • VMware Horizon is a flexible and agile hybrid cloud platform.
  • It enables businesses to utilize existing datacenter based resources, including transforming on-premises desktop and app environments without redeploying.
  • It provides the ability to leverage the cloud for additional capacity and use cases
  • Choose if and when you transition workloads to optimize performance and lower the cost of on-premises environments.
  • It lets you leverage cloud-native control plane services. As a result, it reduces costs, improves productivity, and shifts IT focus from manual tasks to automated processes.
  • Manage and monitor your deployment from one central management GUI.
  • It offers the ability to meet remote user needs keeping employees connected to desktops and apps from anywhere and any device with a single login. It doesn’t matter where the data resides, on-premises or in the cloud.
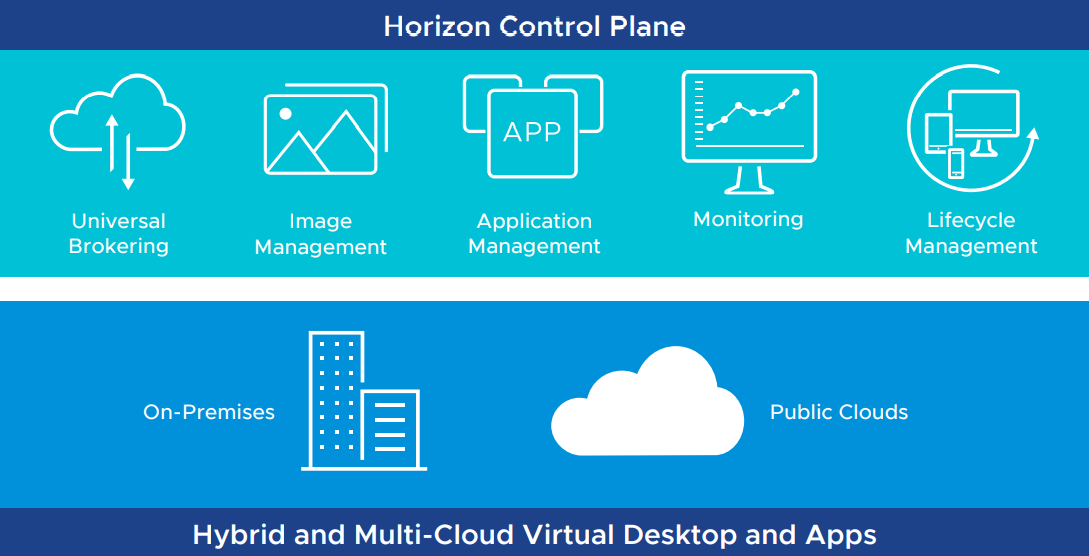
  • The Horizon control plane delivers the ability to deploy, manage, and scale, virtual desktops, and apps across hybrid cloud environments.
  • Horizon is a modern platform for securely delivering virtual desktops and apps across the hybrid cloud, keeping employees connected, productive and engaged, anytime and anywhere.

Deliver applications and desktops automatically and in real-time

One of the key benefits and use cases of VMware Horizon is to deliver applications and desktops automatically and in real-time. Today, many organizations are using VMware Horizon as the vehicle that allows remote workers to connect to virtual machine resources or physical workstations in the corporate network, without VPN, or exposing an RDP server to the outside world.

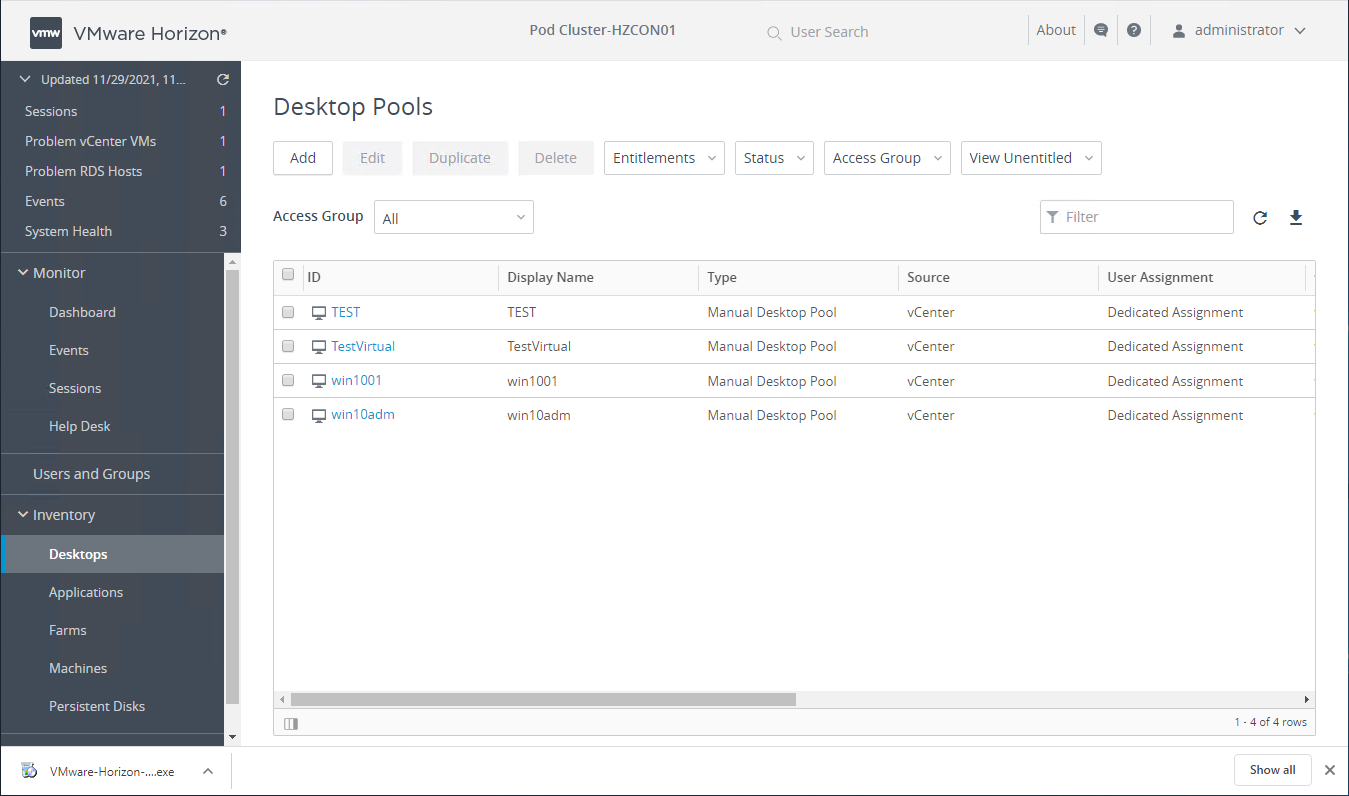
Administrators configure desktop pools consisting of a single desktop or multiple desktops that end-users can connect to and utilize. When there are multiple virtual machines or physical desktops in a single pool, users will be placed on an available desktop resource in the pool.

Desktop pools consist of:

  • Automated desktop pools – An automated desktop pool uses a vCenter Server template or virtual machine snapshot to generate new machines. The machines can be created when the pool is created or generated on demand based on pool usage.
  • Manual desktop pools – A manual desktop pool provides access to an existing set of machines. Any machine that can install the VMware Horizon agent is supported. These include both vCenter virtual machines and physical desktops.
  • RDS Desktop pools – A Microsoft RDS desktop pool provides RDS sessions as machines to Horizon users. The Horizon Connection Server manages the RDS sessions in the same way as normal machines. Microsoft RDS hosts are supported on vCenter virtual machines and physical computers.
Viewing VMware Horizon Desktop Pools


Viewing VMware Horizon Desktop Pools

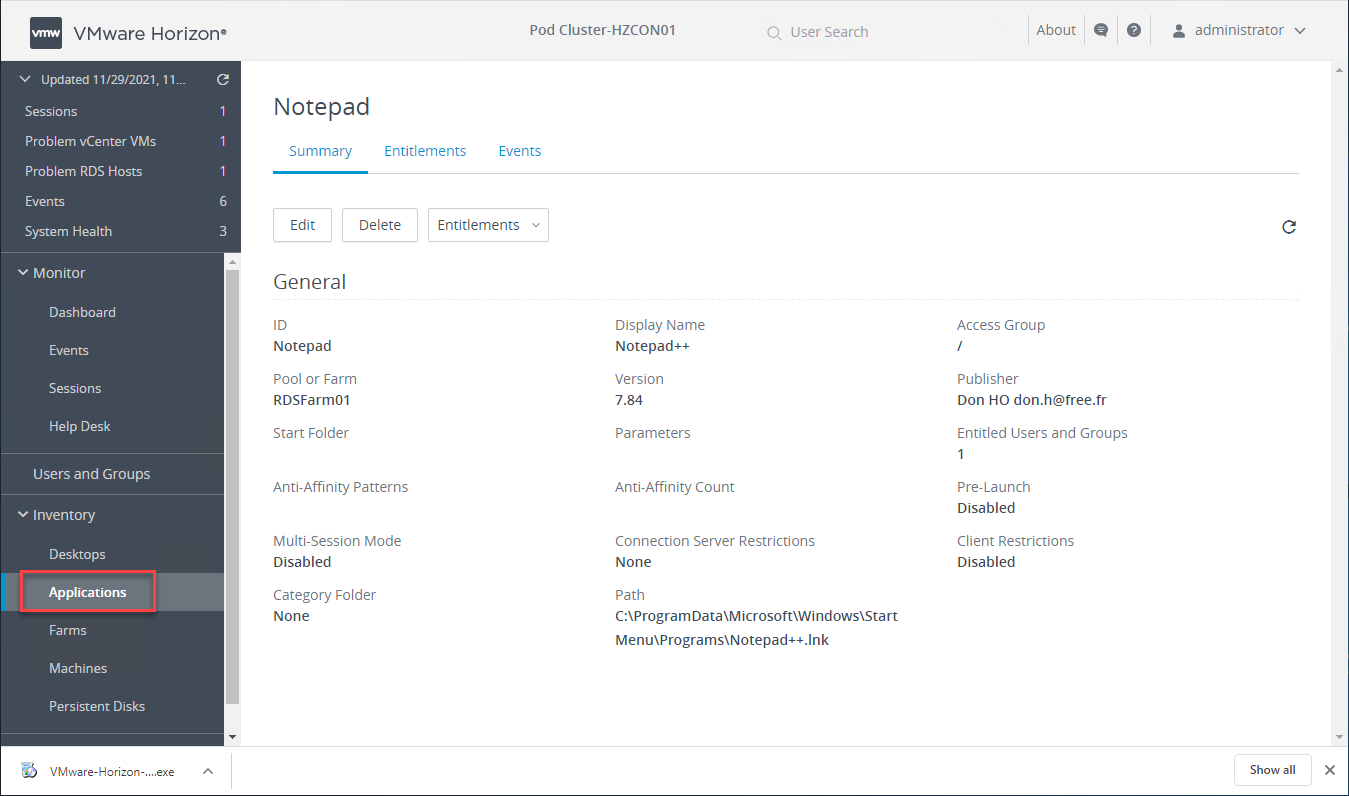
Application Pools provide remote workers with access to published applications, either from a desktop pool or RDS farm.

Viewing a published application in VMware Horizon


Viewing a published application in VMware Horizon

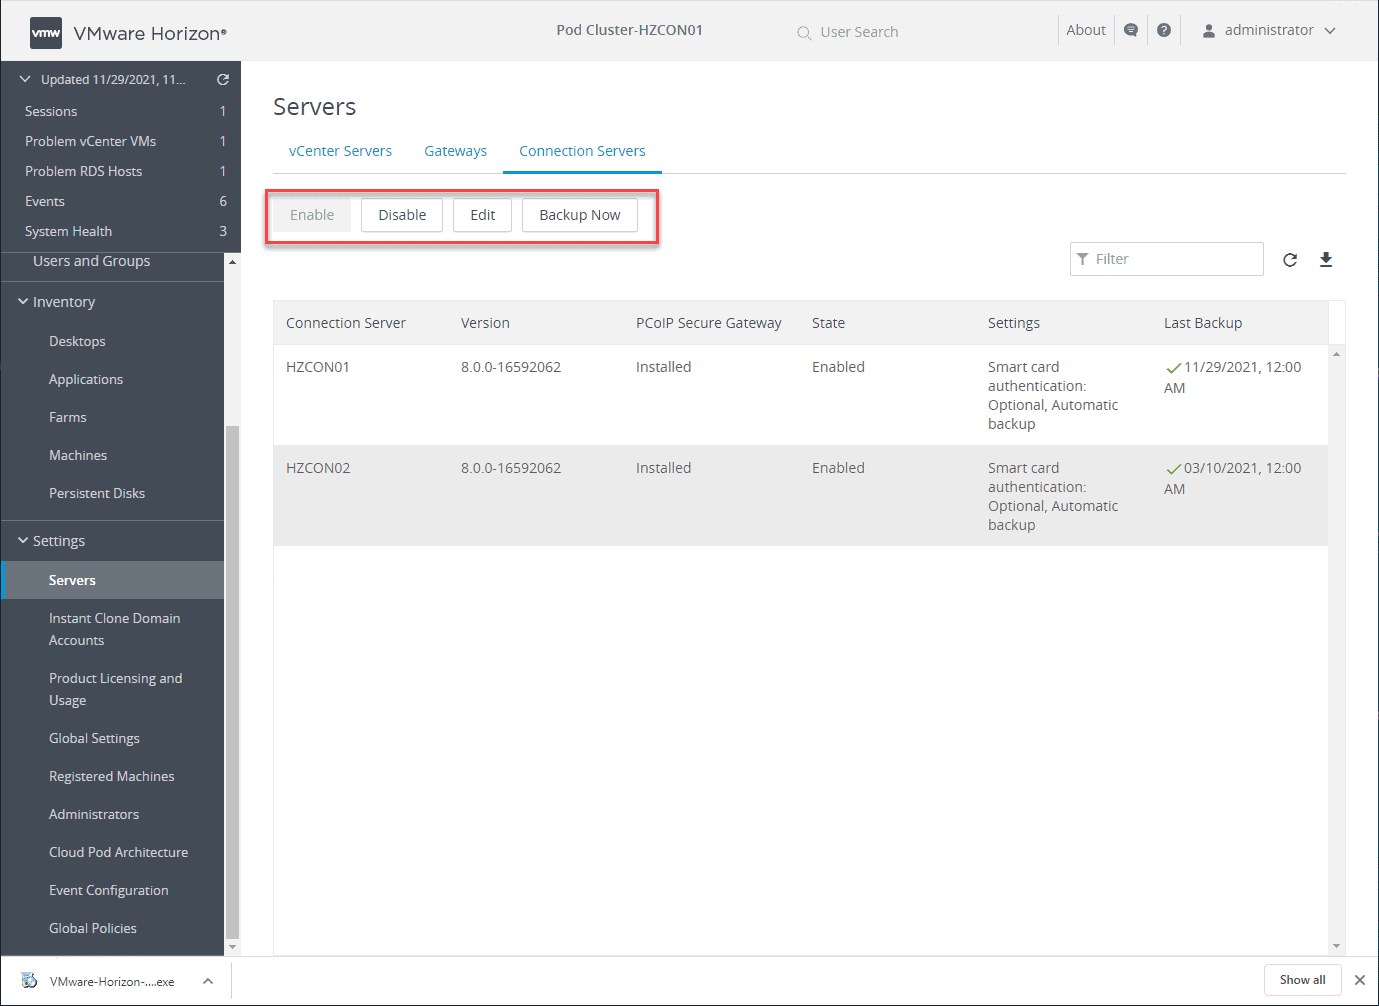
It also allows quickly performing maintenance tasks such as enabling or disabling specific Horizon Connection Servers and performing backup operations. You can also add vCenter Server environments and integrate your Unified Access Gateways to the environment.

Performing maintenance operations in the VMware Horizon Administration Console


Performing maintenance operations in the VMware Horizon Administration Console

Simplify management and maintenance tasks

One of the key areas that VMware Horizon provides quick time to value is the area of management and maintenance. The VMware Horizon Administration Console is an HTML 5 web console that is quick and intuitive. All of the tasks are very wizard-driven with natural workflows.

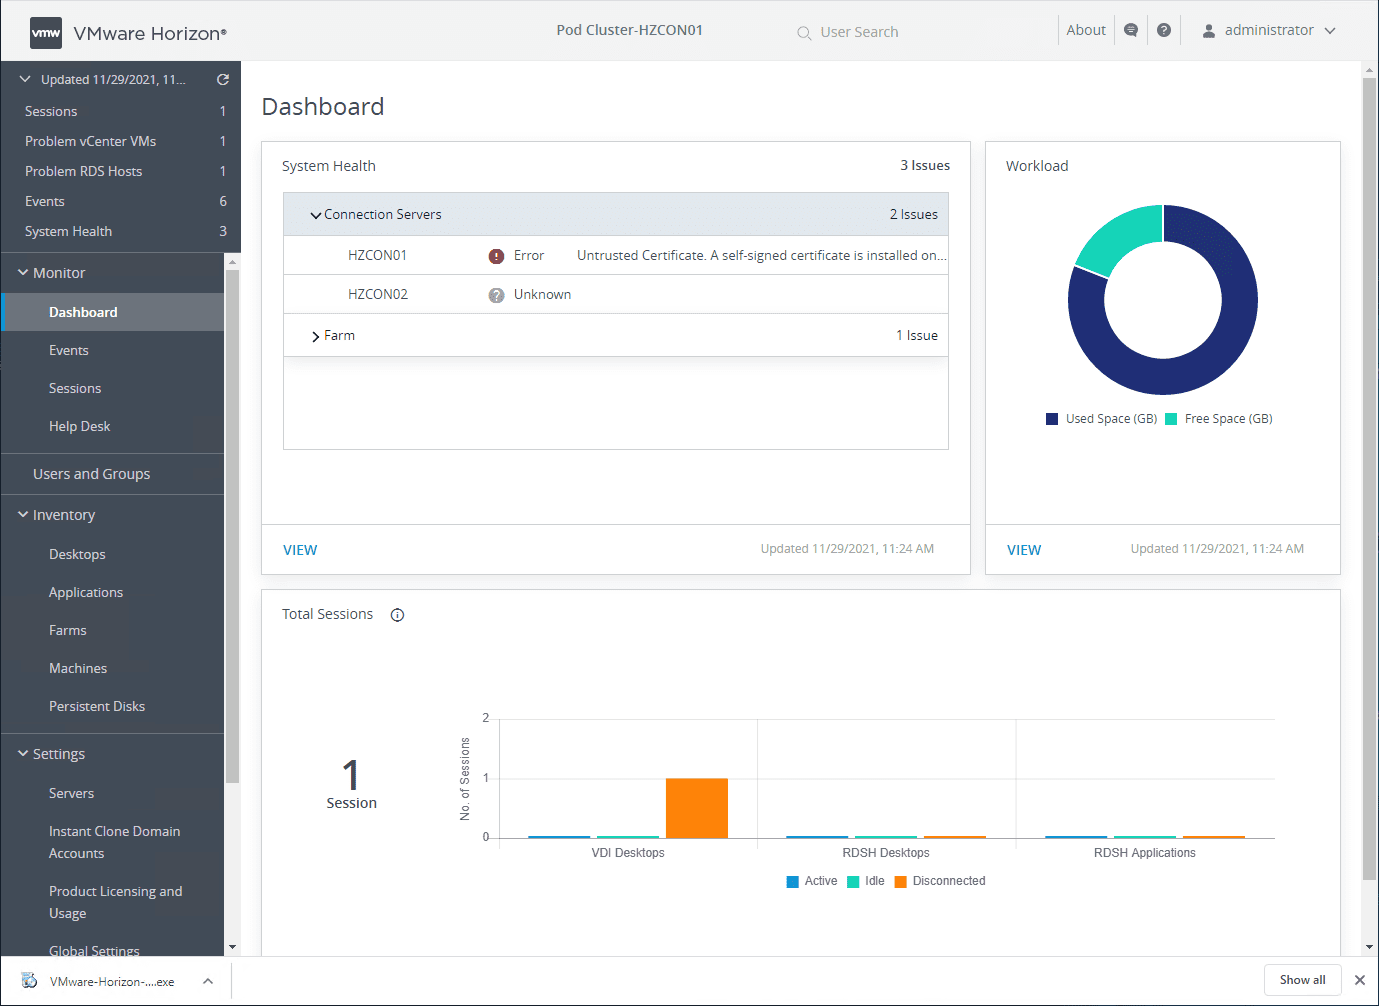
In the VMware Horizon Administration Console, administrators can easily see:

  • Problem vCenter VMs
  • Problem RDS hosts
  • Events
  • System Health

The VMware Horizon Monitoring dashboard quickly shows the overall system health, sessions, workload, VDI desktops, RDSH desktops, RDSH applications, and other information.

Viewing the VMware Horizon monitoring dashboard


Viewing the VMware Horizon monitoring dashboard

Keep sensitive data safe and enforce endpoint compliance

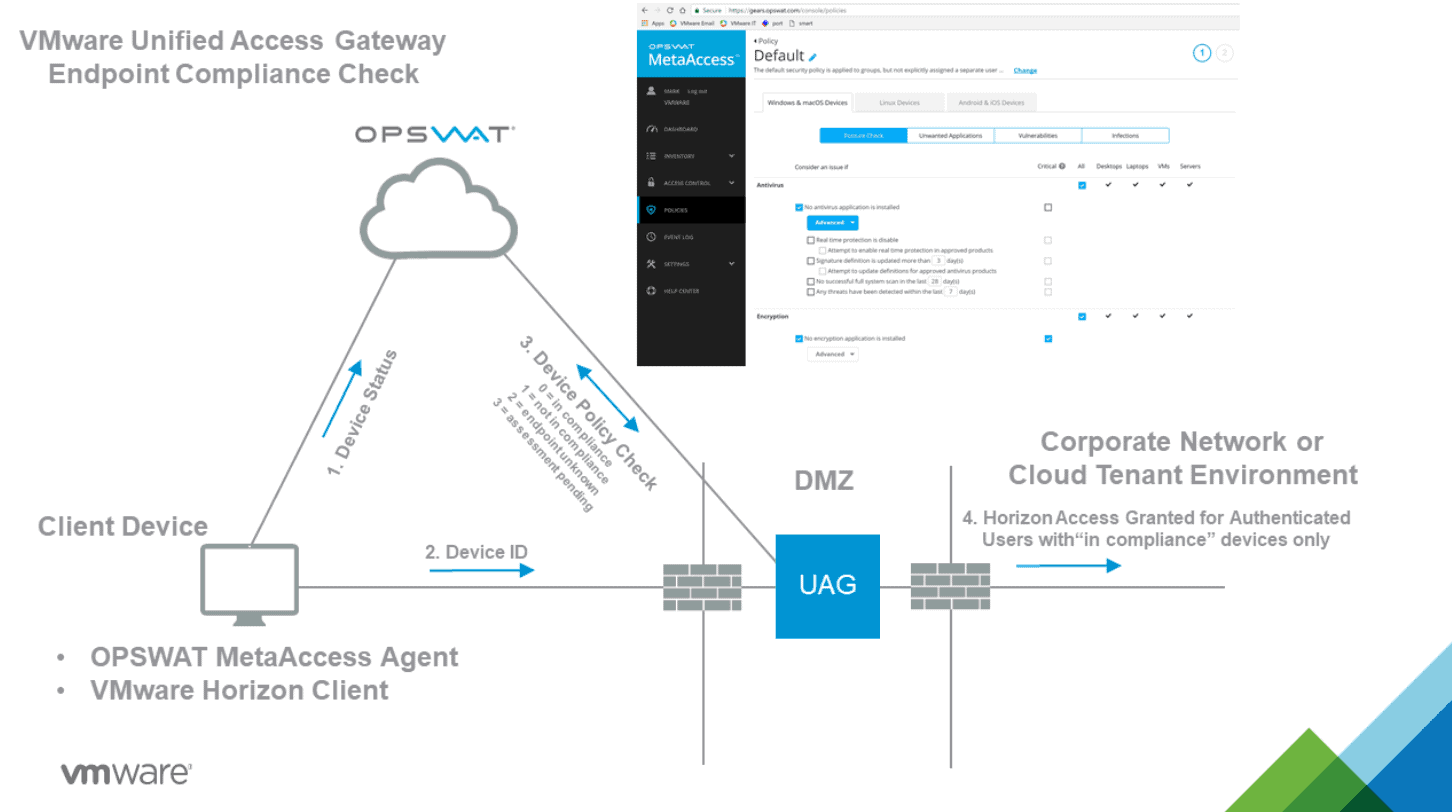
Several tools and VMware Horizon configurations help keep business-critical and sensitive data safe and enforce endpoint compliance. For example, the Endpoint Compliance Checks feature is part of the Unified Access Gateway (UAG) that provides a layer of security for clients accessing Horizon resources. The Endpoint Compliance Checks helps to verify end-user client compliance to predefined policies. These may include antivirus policy or encryption policy on endpoints.

Currently, a couple of endpoint compliance check providers offer the ability to check compliance of endpoints. These include:

  • OPSWAT – The OPSWAT MetaAccess persistent agent or the OPSWAT MetaAccess on-demand agent on the Horizon Client communicates the compliance status to an OPSWAT instance. It can then enforce policies related to the health of the endpoint and the allowed access to Horizon resources
OPSWAT Endpoint Compliance Checks


OPSWAT Endpoint Compliance Checks

  • Workspace ONE Intelligence (Risk Analytics) – The Workspace ONE Intelligence platform has a risk analytics feature. It can assess both user and device risk by identifying behaviours that affect security and calculating a risk score for each device and user. Based on the risk score, policies can define whether or not clients can connect and access resources.

End-user components

There are only a couple of different components required for end-user clients for VMware Horizon. Actually, you can use either a browser to connect to the Horizon environment or the VMware Horizon Client. Most modern clients feature an HTML5-capable browser that allows connecting to VMware Horizon.

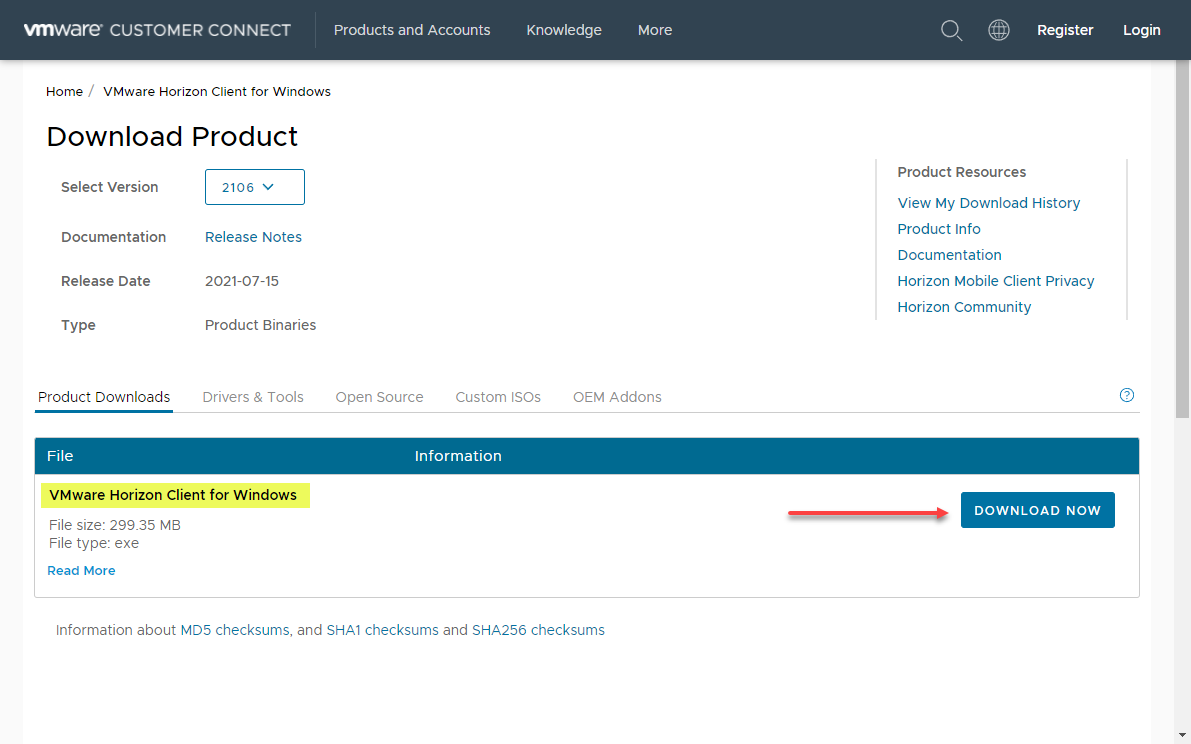
While you can connect to VMware Horizon-enabled endpoints using a web browser, the most robust connection experience is provided with the VMware Horizon Client. However, a question often comes up with the VMware Horizon Client – is it free?

The VMware Horizon Client is indeed a free download from the VMware Customer Connect portal. Also, there is no need to provide an email address and sign up for an account. You can find the most recent download of the VMware Horizon Clients here:

Downloading the VMware Horizon Client


Downloading the VMware Horizon Client

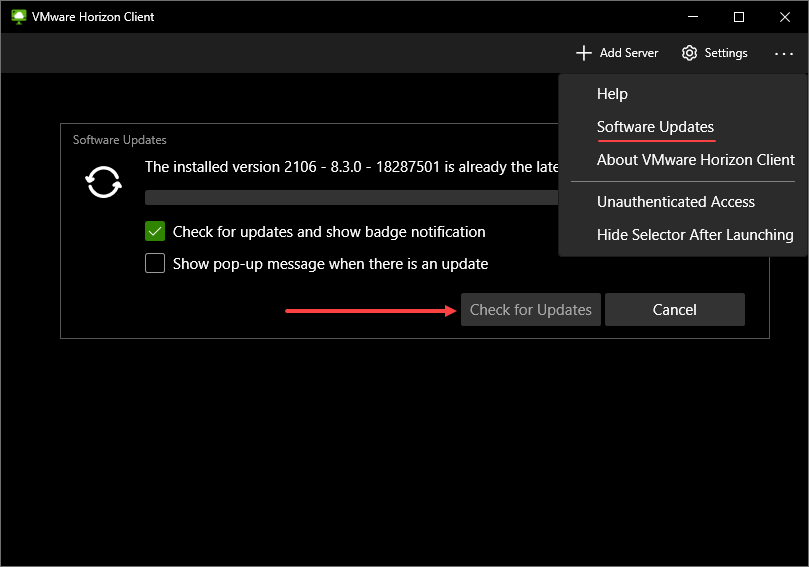
The availability and ease of downloading the VMware Horizon Client help to ensure remote workers can easily download, install, and connect to VMware Horizon resources. Another great feature built into the VMware Horizon Client is checking for and updating the client directly from the interface.

Checking for updates to VMware Horizon Client


Checking for updates to VMware Horizon Client

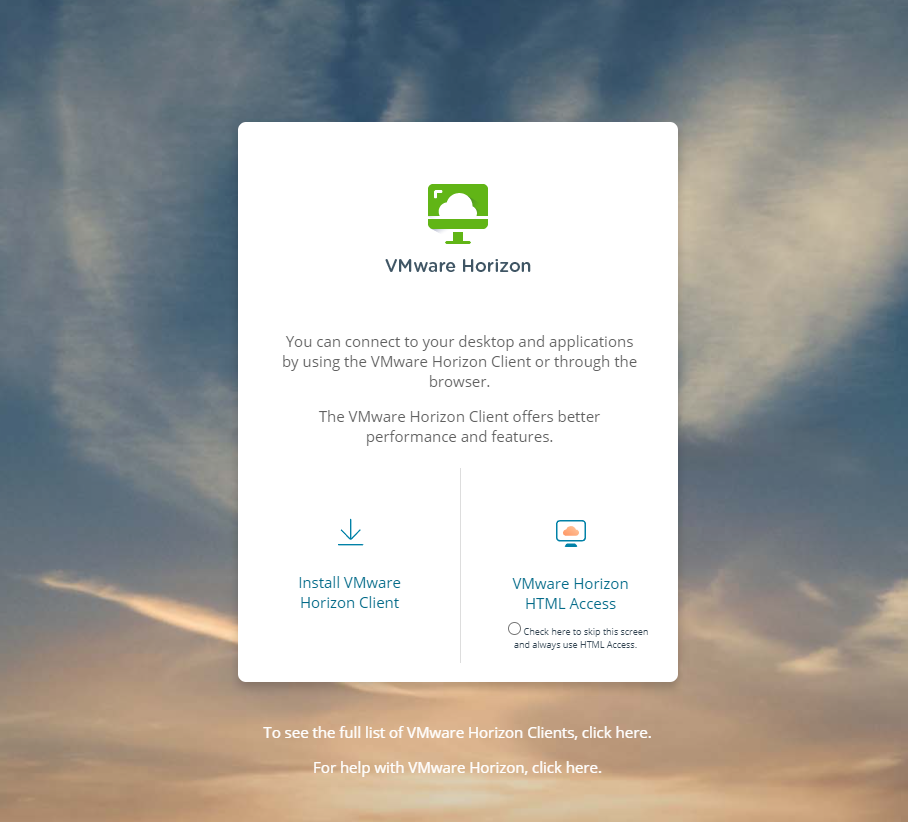
When remote workers browse to the public URL of the Unified Access Gateway, the UAG presents the Horizon Connection Server web page, allowing users to download the client or connect to their assigned resources using the VMware Horizon HTML access link.

Browsing to the VMware Horizon web access


Browsing to the VMware Horizon web access

VMware Workspace ONE UEM additional components

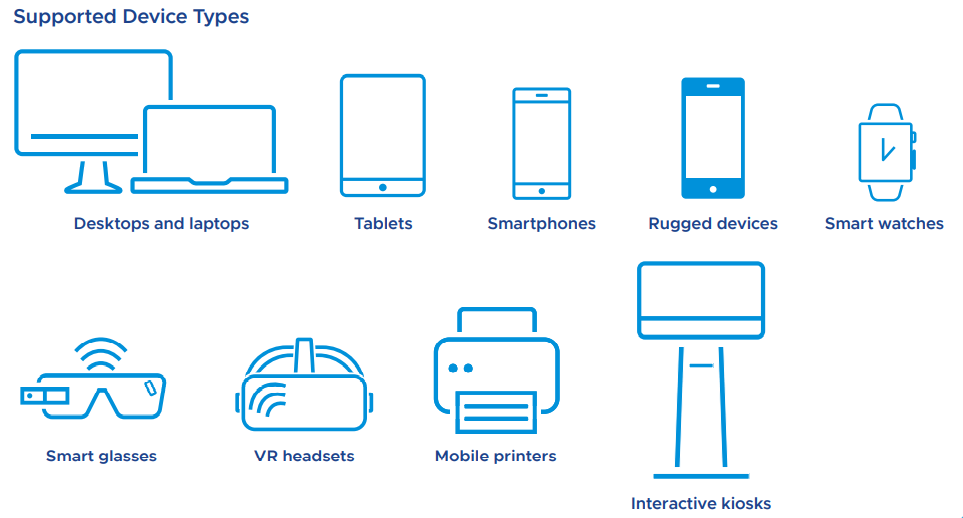
Organizations using cloud-based VMware Workspace ONE can simplify access to the cloud, mobile, and enterprise applications from various types of devices. Workspace ONE Unified Endpoint Management (UEM) is a single solution for modern, over-the-air management of desktops, mobile, rugged, wearables, and IoT.

Supported devices with Workspace ONE UEM

It manages and secures devices and apps, taking advantage of native MDM capabilities in IOS and Android and the mobile-cloud management efficiencies found in modern versions of Windows, Mac, and Chrome OS.

Supported devices with Workspace ONE UEM

Managing clients with Workspace ONE UEM requires the Workspace ONE UEM agent is installed on the devices for management. It can be installed manually, scripted installations, or by using GPOs. Organizations can also make use of the Workspace ONE Intelligent Hub for an easily integrated digital workspace solution designed to improve employee engagement and productivity through a single app.

Read more about VMware Workspace ONE Intelligent Hub here:

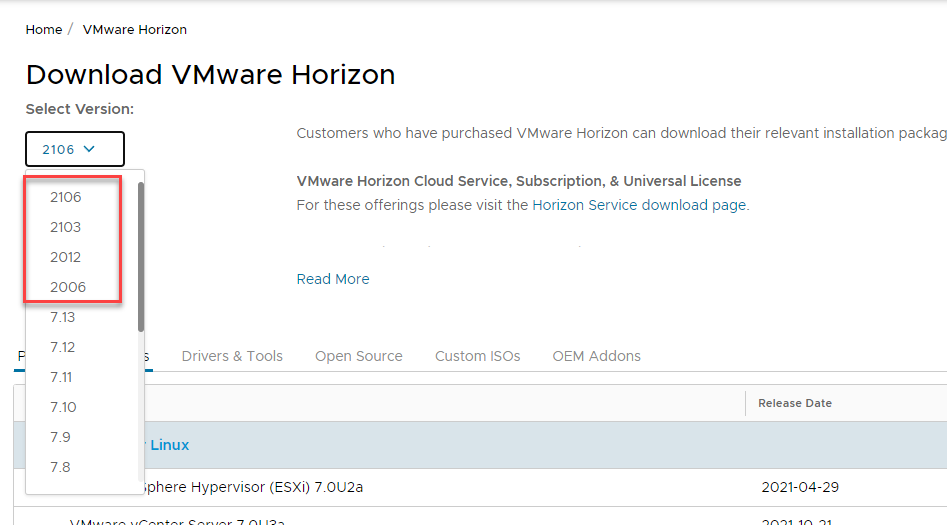
The New Naming Format for VMware Horizon 8

VMware has departed a bit from the conventional naming convention associated with legacy versions of VMware Horizon previously. While the older versions of VMware Horizon were named according to a “major.minor” release name, VMware has adopted a release cadence style “YYMM” naming convention, denoting the year and month of the release, much like other software vendors have adopted in the last couple of years.

VMware Horizon 8 is denoted with a new naming convention in the YYMM format


VMware Horizon 8 is denoted with a new naming convention in the YYMM format

If you see any of the VMware Horizon versions that start with at least a “20,” these are synonymous with VMware Horizon 8 across various documentation.

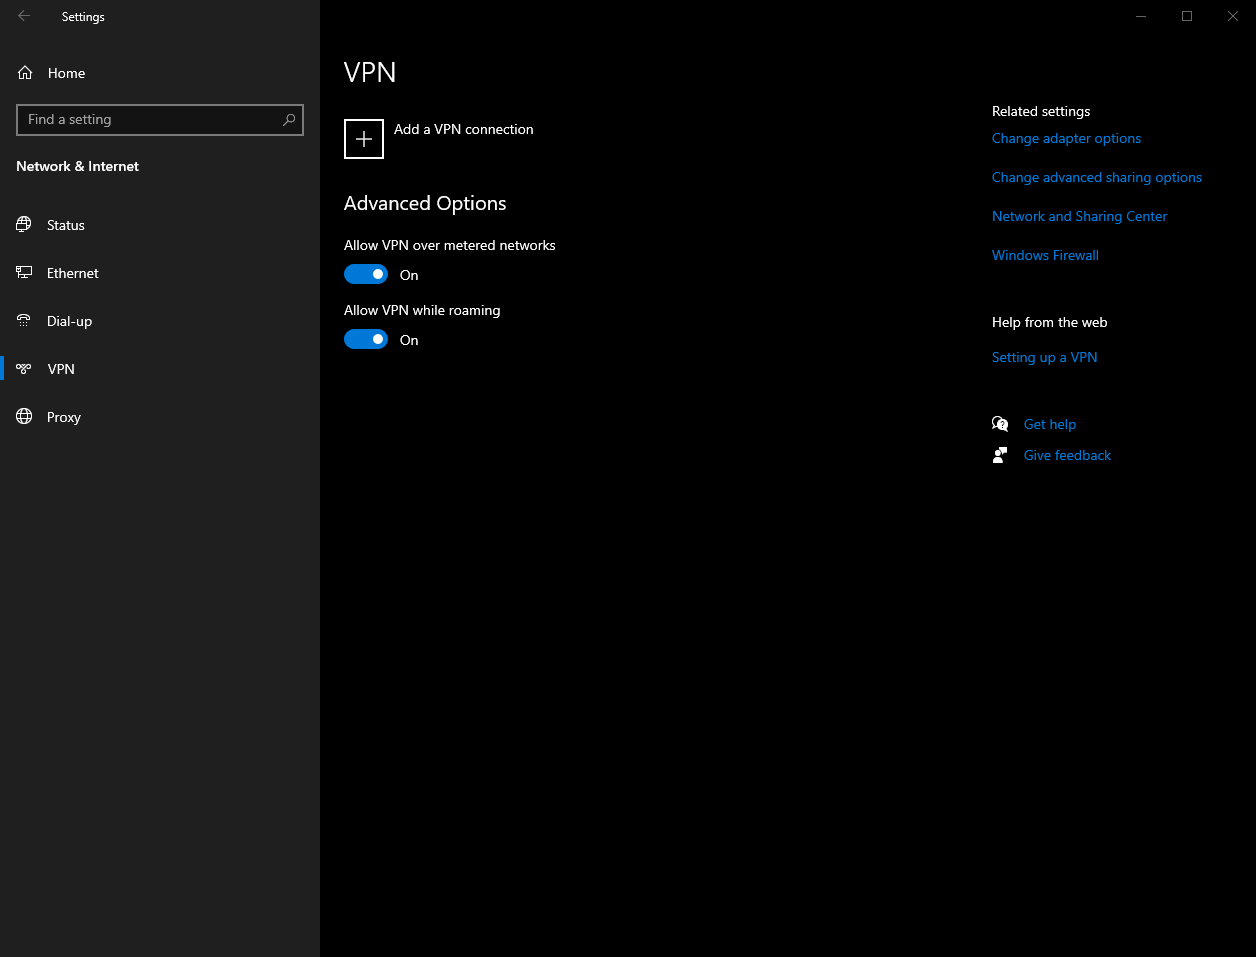
Is VMware Horizon a VPN?

There are many ways that enterprise organizations have traditionally delivered access to internal resources for remote employees. Virtual Private Network (VPN) has historically been a prevalent and familiar way for end-users to access business-critical resources that reside on the internal corporate network from the Internet.

While VPN is more secure than simply placing internal resources accessible directly from the Internet (not recommended), it also has its share of security issues. With VPN connections, a VPN client is loaded on the client workstation, laptop, or other devices, creating a secure, encrypted tunnel between the client and a VPN terminator, such as a firewall or other VPN device.

VPNs traditionally have been used for remote connectivity


VPNs traditionally have been used for remote connectivity

While this secures and encrypts the communication between the client and the internal network, it essentially makes the end-user device part of the network. You can think of a VPN connection as simply a “long patch cable” between the corporate network switch and the client. There are ways to secure VPN connections and scope down the resources the external clients can see. However, it opens the door to potentially connecting a client with malware to the corporate network. It also creates the possibility of easy data exfiltration from the corporate network to the client.

VPN connections are also notoriously complex and cumbersome to manage and maintain. Admins must manage each VPN client individually in most cases. In addition, each VPN connection is its own tunnel to the corporate network, creating the need for tedious management of multiple tunnels.

VMware Horizon provides a solution that is not VPN-based and solves the challenges mentioned above with traditional VPN connections. Note the following:

  • Remote users connect to virtual or physical desktops that are provisioned inside the corporate network. It means the end-user remote client is not directly connected to the corporate network
  • While the Horizon Client is recommended for the most robust experience connecting to the VMware Horizon environment, end-users can also connect to provisioned resources over a simple web browser connection, with no client required.
  • VPNs may not work with all types of devices. VMware Horizon connectivity, either via the Horizon Client or web browser connection, means almost any modern device with web connectivity can allow a user to connect to VMware Horizon resources
  • Admins have a consolidated and centrally managed set of infrastructure as a connectivity point, either with the Unified Access Gateways (recommended for secure external connectivity) or the Horizon Connection Servers
  • Combined with VMware NSX-T Data Center, administrators can easily secure the connectivity between VMware Horizon resources and which resources users can hit, making it an identity-driven solution

VMware Anywhere Workspace

VMware Horizon is a core component of the VMware Anywhere Workspace. What is the VMware Anywhere Workspace? It is a holistic solution that combines multiple components required for effective and efficient secure remote access, including:

  • Digital workspace solution – Provided by VMware Horizon cloud services or on-premises resources
  • Endpoint security – Organizations can seamlessly secure their remote worker interface with VMware NSX-T Data Center and VMware Carbon Black.
  • Secure Access Service Edge (SASE) – Secure access service edge platform that converges industry-leading cloud networking and cloud security to deliver flexibility, agility, security, and scale for enterprise environments of all sizes.

Note how VMware Horizon fits into the various aspects of VMware Anywhere Workspace:

  • It helps to manage multi-modal employee experience – With the VMware Anywhere Workspace, VMware Horizon can help deliver a familiar desktop and application experience across workspace locations and devices.
  • Security and the distributed edge – VMware Horizon delivers access to desktops and applications to any endpoint.
  • Anywhere Workspace Integrations – Workspace SEcurity brings Carbon Black together with Workspace ONE UEM and VMware Horizon

VMware Horizon Architecture and Logical Components

VMware Horizon has a robust architecture that is compromised of many different components that make up the end-to-end solution. The components of VMware Horizon architecture include:

  • Horizon Client – The client is the piece that forms the protocol session connection to a Horizon Agent running in a virtual desktop, RDSH server, or physical machine
  • Universal Access Gateway (UAG) – It provides secure edge services for the Horizon Client. The Horizon Client authenticates to a Connection Server through the Unified Access Gateway and then forms a protocol session connection to the UAG and then the Horizon Agent running in a virtual desktop or RDSH server.
  • Horizon Connection Server – The Connection Server brokers and connects users to the Horizon Agent installed on VMs, physical hosts, and RDSH servers. The Connection Server authenticates user sessions through Active Directory, and grants access to the proper entitled resource.
  • Horizon Agent – The agent is installed in the guest OS of the target VM or system. It allows the machine to be managed by the Connection Servers and allows a Horizon Client to connect using the protocol session to the Horizon Agent.
  • RDSH Server – Microsoft Remote Desktop Servers that provide access to published applications and session-based remote desktops to end-users.
  • Virtual Machine – Virtual machines can be configured as persistent or non-persistent desktops. Persistent desktops are usually assigned in a 1-to-1 fashion to a specific user. Non-persistent desktops are assigned in desktop pools that can be dynamically provisioned to users as needed.
  • Physical Desktop – Counterintuitively, VMware Horizon can be used as a secure and efficient way to deliver connectivity to physical desktops to end-users. Starting with VMware Horizon 7.7, VMware introduced the ability to broker physical desktop machines with RDP. In Horizon 7.12, support was added for Blast protocol connectivity to physical desktops.
  • Virtual Application – Horizon can be used with RDSH servers to provide virtual application delivery. Using the functionality of the published application in RDSH, VMware Horizon can deliver the published applications to assigned users.

Logical Components

There are other components of Horizon architecture that are considered to be logical components of the solution. Some of the components listed below are not absolutely required. However, they can be used to enhance a Horizon deployment and scale the capabilities, security, and performance of the solution.

  • Workspace ONE Access – VMware Workspace ONE provides the solution for enterprise single sign-on (SSO) for the enterprise. It simplifies the access to apps, desktops, and other resources to the end-user. It can integrate with existing identity providers and provide a seamless login experience to create a smooth access workflow. It also offers application provisioning, a self-service catalogue, and conditional access.
  • App Volumes Manager – VMware App Volumes Manager coordinates and orchestrates the delivery of applications by managing assignments of application volumes. These include packages and writable volumes that can easily assign applications to users, groups, and target computers.
  • Dynamic Environment Manager – User profiles are also challenging in dynamic environments with multiple resources accessed by a single user. Dynamic Environment Manager enables seamless profile management by capturing user settings for the operating system and also end-user applications.
  • VMware vSAN storage – VMware vSAN is a software-defined storage solution that offers many advantages in the enterprise. It can deliver high-performance, highly-scalable storage that can be seamlessly managed from the vSphere Client as part of the native VMware solution. It does this by aggregating locally attached storage in each ESXi host in the vSphere cluster and presenting it as a logical volume for virtual machines and modern workloads. When it comes to VMware Horizon environments that are mission-critical, you want to have highly-resilient storage that is scalable and performant. VMware Horizon environments backed by VMware vSAN work exceptionally well for this use case.
  • VMware NSX-T Data Center – Another consideration for VMware Horizon environments and end-user computing is security. VMware NSX-T Data Center provides the network-based security needed in EUC environments. It allows easily creating secure, resilient, and software-defined networks that allow admins to take advantage of micro-segmentation for VMware Horizon workloads. Each virtual desktop can be isolated from all other virtual desktops using VMware NSX-T Data Center, bolstering security and protecting other critical Horizon infrastructure, such as the Connection Servers.
  • Microsoft SQL Servers – It is recommended to have a dedicated Microsoft SQL Server to house the event databases required by VMware Horizon. Plan your VMware Horizon deployment accordingly.

Horizon Hybrid and Multicloud Architecture

VMware Horizon can be deployed in many different architecture designs. These include on-premises, in the cloud, or a combination of hybrid and multi-cloud architectures.

In the VMware Horizon hybrid deployment, infrastructure can run in an on-premises datacenter with the Horizon control plane running in the cloud as well as deploy on both on-premises and public cloud, and join the two. In addition, organizations can connect their existing Horizon 7 or Horizon 8 implementations to the Horizon Cloud Service using the Horizon Cloud Connector appliance.

The VMware Horizon Control Plane Services are designed to meet modern challenges for remote workers and connectivity. Organizations that use virtual desktops and apps from companies that only support cloud solutions can benefit from the Horizon Control Plane Services. Existing VDI implementations may only be able to work with cloud environments. The Horizon Control Plane allows managing all hybrid and multi-cloud deployments and configurations.

VMware Horizon hybrid architecture with the Horizon Control Plane


VMware Horizon hybrid architecture with the Horizon Control Plane

It provides many benefits outside of management, including:

  • Universal brokering
  • Image management
  • Application management
  • Monitoring
  • Lifecycle management
The Horizon Control Plane Services


The Horizon Control Plane Services

Just-in-time desktops and apps

VMware Horizon technology allows organizations to provision “just-in-time” desktops and applications. Using a technology VMware calls Instant Clone Technology, entire desktops can be provisioned just-in-time. The Instant Clone Technology allows the rapid cloning of virtual machines in just a few seconds! Instant clones can configure, on average, one clone per second.

The Instant Clone Technology is really a radical evolution of what VMware Composer clones could do previously. With Instant Clone Technology, the steps required to provision a clone with VMware Composer are dramatically reduced. Note the comparison of the two processes below:

Comparing VMware Horizon Composer with Instant Clone Technology


Comparing VMware Horizon Composer with Instant Clone Technology

The VMware Instant Clone Technology was born from a project called “vmFork” that uses rapid in-memory cloning of a running parent virtual machine and copy-on-write to deploy the virtual machines to production rapidly.

  • Copy-on-write – The copy-on-write technology is an optimization strategy that forces tasks first to create a separate private copy of the data to prevent its changes from becoming visible to all other tasks. With copy-on-write, the parent VM is quiesced and then forked. The forking process creates two branches or variations of development, and the resulting clones receive unique MAC addresses, UUIDs, and other unique information.

Using the Instant Clone Technology with VDI provisioning is perfect for the just-in-time desktop and applications use case. New workstations can quickly be provisioned, just in time for the user to log into the environment. Then, using VMware App Volumes to attach AppStacks to the just-in-time desktops dynamically, you can have fully functional workstations with dynamically assigned applications in a matter of seconds, fully customized for each user.

Should you be using VMware Horizon?

VMware Horizon is a powerful remote connectivity solution that allows businesses today to solve the challenges of remote workers and connectivity needs. In addition, it enables businesses to scale their deployments with modern architectures, including hybrid cloud deployments and multi-cloud architectures.

With the new VMware Horizon Control Plane services, organizations can manage multiple VMware Horizon deployments across sites, clouds, and different infrastructures from the cloud. In addition, it opens up the possibility for organizations to use heterogeneous implementations of virtual desktops that may exist across on-premises and public cloud environments and aggregate these services for end-users.

VMware provides a rich set of additional solutions and services that seamlessly integrate with VMware Horizon and extend the solution’s capabilities, scalability, security, and management. These include VMware vSAN, VMware NSX-T Data Center, VMware Workspace ONE, Workspace ONE UEM, and VMware Anywhere Workspace.

For end-user clients, connecting to Workspace ONE or native VMware Horizon resources is as simple as browsing the solution’s service URLs. While the VMware Horizon Client provides the most robust connectivity experience for end-user clients, users can also use the HTML client to connect to virtual machines, physical desktops, and applications using a simple web browser.

The Instant Clone Technology provided by VMware Horizon allows just-in-time desktops and applications to be provisioned in seconds, a feat that is amazing to see and provides businesses with the capability to have exponentially more scale in providing virtual desktops to end-users. In addition, the dynamic capabilities offered by VMware Horizon allow companies to elastically scale up and scale down virtual desktops, even with on-premises infrastructure.

Source :
https://www.altaro.com/vmware/vmware-horizon/

Microsoft releases emergency fixes for Windows Server, VPN bugs

Microsoft has released emergency out-of-band (OOB) updates to address multiple issues caused by Windows Updates issued during the January 2022 Patch Tuesday.

“Microsoft is releasing Out-of-band (OOB) updates today, January 18, 2022, for some versions of Windows,” the company said.

“This update addresses issues related to VPN connectivity, Windows Server Domain Controllers restarting, Virtual Machines start failures, and ReFS-formatted removable media failing to mount.”

All OOB updates released today are available for download on the Microsoft Update Catalog, and some of them can also be installed directly through Windows Update as optional updates.

You will have to manually check for updates if you want to install the emergency fixes through Windows Update because they are optional updates and will not install automatically.

The following updates can only be downloaded and installed via the Microsoft Update Catalog:

Updates for these Windows versions are also available through Windows Update as an optional update:

  • Windows 11, version 21H1 (original release): KB5010795
  • Windows Server 2022: KB5010796
  • Windows 10, version 21H2: KB5010793
  • Windows 10, version 21H1: KB5010793
  • Windows 10, version 20H2, Windows Server, version 20H2: KB5010793
  • Windows 10, version 20H1, Windows Server, version 20H1: KB5010793
  • Windows 10, version 1909, Windows Server, version 1909: KB5010792
  • Windows Server 2019: KB5010791 (Released on 1/18/22)
  • Windows 10, version 1607, Windows Server 2016: KB5010790
  • Windows 10, version 1507: KB5010789
  • Windows 7 SP1: KB5010798
  • Windows Server 2008 SP2: KB5010799

January Windows updates issues and fixes

As BleepingComputer reported after this month’s Patch Tuesday, the latest Windows Server updates were causing a series of severe issues for administrators.

According to admin reports, Windows domain controllers were being plagued by spontaneous reboots, Hyper-V was no longer starting on Windows servers, and Windows Resilient File System (ReFS) volumes were no longer accessible after deploying the January 2022 updates.

Windows 10 users and administrators also reported problems with L2TP VPN connections after installing the recent Windows 10 and Windows 11 cumulative updates and seeing “Can’t connect to VPN.” errors.

Those who cannot immediately install today’s out-of-band updates can remove the KB5009624, KB5009557, KB5009555, KB5009566, and KB5009543 updates causing these issues from an Elevated Command Prompt with the following commands:

Windows Server 2012 R2: wusa /uninstall /kb:5009624 
Windows Server 2019: wusa /uninstall /kb:5009557 
Windows Server 2022: wusa /uninstall /kb:5009555
Windows 10: wusa /uninstall /kb:5009543
Windows 11: wusa /uninstall /kb:5009566

However, since Microsoft also bundles all the security updates with these Windows cumulative updates, removing them will also remove all fixes for vulnerabilities patched during the January 2022 Patch Tuesday. 

Windows admins and users need to consider the risks of unpatched vulnerabilities impacting their systems versus the disruption caused by the issues stemming from this month’s Windows updates.

Source :
https://www.bleepingcomputer.com/news/microsoft/microsoft-releases-emergency-fixes-for-windows-server-vpn-bugs/