I will use this article to show you how to perform the most common day-to-day operations: requesting certificates from a Windows Certification Authority.
I used “SSL” in the title because most people associate that label with certificates. For the rest of the article, I will use the more apt “PKI” label.
The PKI Certificate Request and Issuance Process
Fundamentally, the process of requesting and issuing PKI certificates does not depend on any particular vendor technology. It follows this pattern:
- A public and private key is generated to represent the identity.
- A “Certificate Signing Request” (CSR) is generated using the public key and some information about the identity.
- The certification authority uses information from the CSR, its own public key, authorization information, and a “signature” generated by its private key to issue a certificate.

The particulars of these steps vary among implementations. You might have some experience generating CSRs to send to third-party signers. You might also have some experience using web or MMC interfaces. All the real magic happens during the signing process, though. Implementations also vary on that, but they all create essentially the same final product.
I want you to focus on the issuance portion. You do not need to know in-depth details unless you intend to become a security expert. However, you do need to understand that certificate issuance follows a process. Sometimes, an issuer might automate that process. You may have encountered one while signing up for a commercial web certificate. Let’s Encrypt provides a high degree of automation. At the other end, “Extended Validation” certificates require a higher level of interaction. At the most extreme, one commercial issuer used to require face-to-face contact before issuing a certificate. Regardless of the degree, every authority defines and follows a process that determines whether or not it will issue.
In your own environment, you can utilize varying levels of automation. More automation means more convenience, but also greater chances for abuse. Less automation requires greater user and administrative effort but might increase security. I lean toward more automation, myself, but will help you to find your own suitable solutions.
Auto-Enroll Method
I am a devoted fan of auto-enrollment for certificates. You only need to set up a basic group policy object, tie it to the right places, and everything takes care of itself.
If you recall from the previous article on certificate templates, you control who has the ability to auto-enroll a certificate by setting security on the template. You use group policy to set the scope of who will attempt to enroll a certificate.

In the above graphic, the template’s policy allows all members of the default security group named “Domain Computers” to auto-enroll. Only the example “Certified Computers” OU links a group policy that allows auto-enrollment. Therefore, only members of the Certified Computers OU will receive the certificate. However, if Auto-Enroll is ever enabled for any other OU that contains members of the “Domain Computers” group, those members will receive certificates as well.
In summary, in order for auto-enroll to work, an object must:
- Have the Autoenroll security permission on the certificate template
- Fall within the scope of a group policy that enables it to auto-enroll certificates
You saw how to set certificate template security permissions in the previous article. We’ll go to the auto-enrollment policies next.
Auto-Enrollment Group Policies
The necessary policies exist at Computer or User Configuration\Policies\Windows Settings\Security Settings\Public Key Policies\. I am concerned with two policies: Certificate Services Client – Auto-Enrollment Settings and Certificate Services Client – Certificate Enrollment Policy.
First, Certificate Services Client – Auto-Enrollment Settings. To get going, you only need to set Configuration Model to Enabled. The default enrollment policy uses Windows Authentication to pull certificate information from Active Directory. If you’ve followed my directions, then you have an Active-Directory-integrated certification authority and this will all simply work. You will need to perform additional configuration if you need other enrollment options (such as requesting certificates from non-domain accounts).

Second, Certificate Services Client – Certificate Enrollment Policy. You only need to set Configuration Model to Enabled. Choose other options as desired.

I think the first option explains itself. The second, Update certificates that use certificate templates, allow the certificate bearer to automatically request a replacement certificate when the certificate has updates. I showed you how to do that in the previous article.
Auto-Enrollment Security Implications
In general, you should not have many concerns with automatic certificate issuance. As followed so far, my directions keep everything under Active Directory’s control. However, you can enable auto-enrollment using other techniques, such as simple user/password verification via a URI. Anyone with local administrative powers can set local policies. Certificate templates can allow the requester to specify certificate subject names. Furthermore, some systems, like network access controls, sometimes simply require a particular certificate.
Think through who can request a certificate and who will accept them when configuring auto-enrollment scopes.
MMC Enrollment Procedure
MMC enrollment provides a great deal of flexibility. You can request certificates for you, your computer, or another entity entirely. It works on every single version of Windows and Windows Server in support, as long as they have a GUI. Since you can connect the console to another computer, you can overcome the need for a GUI. The procedure takes some effort to explain, but don’t let that deter. Once you have the hang of it, you can get through the process quickly.
First, you need to access the necessary console.
Accessing Certificate MMCs on Recent Windows Versions
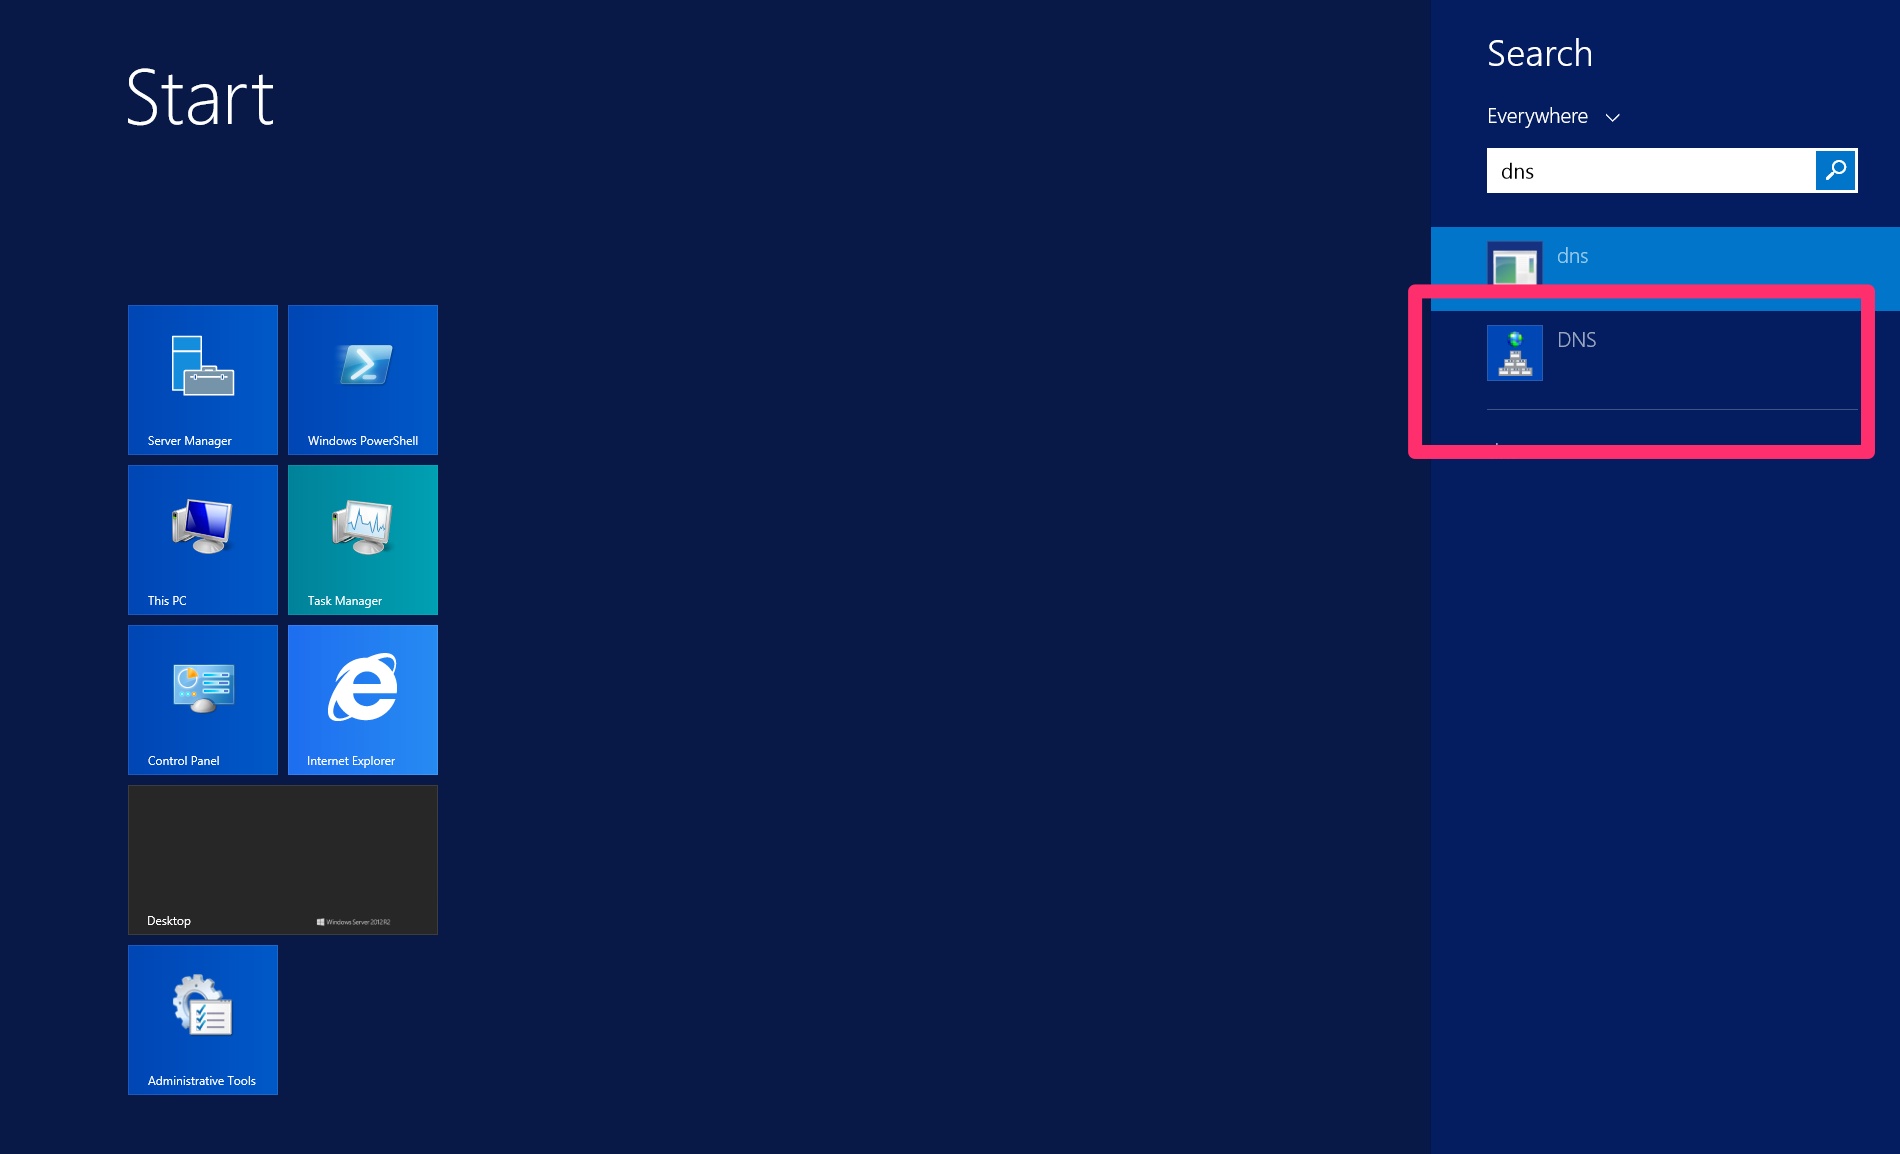
On Windows 10 or Windows Server 2016+, just open up the Start menu and start typing “certificate”. At some point, Cortana will figure out what you want and show you these options:

These options will work only for the local computer and the current user. If you want to target another computer, you can follow the upcoming steps.
Note: If you will use the console to request a certificate on behalf of another entity, it does not matter which console you start. The certificate template must allow exporting the private key for this mode to have any real use.
Accessing Specific Certificate MMCs Directly
On any version of Windows, you can quickly access the local computer and user certificates by calling their console snap-ins. You can begin from the Start menu, a Run dialog, or a command prompt. For the local computer, you must run the console using elevated credentials. Just enter the desired snap-in name and press Enter:
- certlm.msc: Local machine certificates
- certmgr.msc: Current user certificates
Note: If you will use the console to request a certificate on behalf of another entity, it does not matter which console you start. The certificate template must allow exporting the private key for this mode to have any real use.
Manually Add Specific Certificate Targets in MMC
You can manually add the necessary snap-in(s) from an empty MMC console.
- From the Start menu, any Run dialog, or a command prompt (elevated, if you need to use a different account to access the desired target), run mmc.exe.

- From the File menu, select Add/Remove Snap-in…

- Highlight Certificates and click Add:

- Choose the object type to certify. In this context, My user account means the account currently running MMC. If you pick My user account, the wizard finishes here.

- If you picked Service account or Computer account in step 4, the wizard switches to the computer selection screen. If you choose any computer other than local, you will view that computer’s certificate stores and changes will save to those stores. If you choose Computer account, the wizard finishes here.

- If you selected Service account in step 4, you will now have a list of service accounts to choose from.

- If you want, you can repeat the above steps to connect one console to multiple targets:

- Once you have the target(s) that you like, click OK on the Add or Remove Snap-ins window. You will return to the console and your target(s) will appear in the left pane’s tree view.
Using the Certificates MMC Snap-In to Request Certificates
Regardless of how you got here, certificate requests all work the same way. We operate in the Personal branch, which translates to the My store in other tools.

Requesting a Certificate Using Template Defaults
You can quickly enroll a certificate template with template defaults. This is essentially the manual corollary to auto-enroll. You could use this method to perform enrollment on behalf of another entity, provided that you the template allows you to override the subject name. For that, you must have selected a console that matches the basic certificate type (a user console can only request user certificates and a computer console can only request computer certificates). You must also use an account with Enroll permissions on the desired template. I recommend that you only use this method to request certificates for the local computer or your current user. Skip to the next section for a better way to request certificates for another entity.
To request a certificate using a template’s defaults:
- Right-click Certificates and click Request New Certificate.

- The first screen is informational. The next screen asks you for a certificate enrollment policy. Thus far, we only have the default policy. You would use the Configured by you policy if you needed to connect without Active Directory. Click Next.

- You will see certificate templates that you have Enroll permissions for and that match the scope of the console. In this screenshot, I used a computer selection, so it has computer certificates. If you expand Details, it will show some of the current options set in the certificate. If you click Properties, you can access property sheets to control various aspects of the certificate. I will go over some of those options in the next section. Remember that the certificate template to manually supply subject name information or it will ignore any such settings in your requests. Click Enroll when you are ready. The certificate will appear in the list.

Once you have a certificate in your list, double-click it or right-click it and click Open. Verify that the certificate looks as expected. If you requested the certificate for another entity, you will find the Export wizard on the certificate’s All Tasks context menu.
Creating an Advanced Certificate Request
You can use MMC to create an advanced certificate request. Most importantly, this process works offline by creating a standard certificate signing request file (CSR). Since it does not check your permissions in real time, you have much greater flexibility. I recommend that you use this method when requesting certificates on behalf of another entity. Follow these steps:
- Right-click Certificates, go to All Tasks, then Advanced Operations, and click Create Custom Request.

- The first screen is informational only. Click Next. On the next screen, choose your enrollment policy. If you’ve followed my guide, you only have two (real) choices: the default Active Directory policy or a completely custom policy. You could also choose to create a new local policy, which I will not cover. If you pick the Active Directory policy, it will allow you to pick from all of its known templates, which you can customize if needed. If you choose to Proceed without enrollment policy, you will start with an empty template and need to provide almost every detail. Make your selection and click Next.

- I took this screenshot after choosing the Active Directory enrollment policy. I then selected one base template. You can see that you also have options for the CSR format to use. If you chose to proceed without a policy, your Template options are No template (CNG key) or No template (Legacy key). CNG (Certificate Next Generation) creates v3 certificates while the Legacy option generates v2 certificates. Practically, they mostly deal with how the private key is stored and accessed. Common Microsoft apps (like IIS) work with CNG. Legacy works with almost everything, so choose that if you need to guess.

- On the Certificate Information screen, you will either see the template name that you chose or Custom request if you did not select an enrollment policy. To the right of that, near the edge of the dialog, click the down-pointing triangle next to Details. If you selected a policy, that will show the defaults. If you did not, it will show empty information. Click the Properties button to access property sheets where you can specify certificate options. Look at the screenshot in step 3 in the previous section. I will show the details dialog in the next section. Click Next when you have completed this screen.
- Choose the output file name and format. Most CAs will work with either type. Most prefer the default of Base64.

- You can now process the request on your Certification Authority.
Configuring Advanced Certificate Options in a Request
As mentioned step 3 in the above directions on using MMC to request a default template and in step 4 of the advanced request, you can use the Properties button on the Details section to modify parts of the certificate request prior to submitting it to the CA. If you selected a template that requires you to supply information, you will see an additional link that opens this dialog. You should always take care to inspect such a certificate after issuance to ensure that the CA honored the changes.
I will not cover every single detail. We will look at a few common items.
- General: These fields are cosmetic. They appear when you see the certificate in the list.

- Subject: This busy tab contains identity information about the certificate holder. If the template only allows Active Directory information, then the CA will not accept anything that you enter here. For each type on the left, you can add multiple values. Make certain that you Add items so that they move to the right panes! Some of the more important parts:
- Subject Name group: The fields in this group appear all combine to describe the certificate holder.
- Common name: The primary identity of the certificate. Use a fully-qualified domain name for a computer or a full name for a user. Modern browsers no longer accept the value in the common name for authentication. Other tools still expect it. Always provide a value for this field to ensure the completeness of the subject group.
- Country, Locality, Organization, etc.: Public CAs often require several of these other identity fields.
- Alternative Name group: The fields in this group appear in the “Subject Alternate Name” (SAN) section of a certification. Browsers and some other tools will match entries in the SAN fields with the URL or other access points
- DNS: Use this field to designate fully-qualified and short names that clients might use to access the certificate holder. Since web browsers no longer use the common name, enter all names that the owner might present during communications, including what you entered as the common name. Only use short names with LAN-scoped certificates. For instance, I might have a certificate with a common name of “internalweb.sironic.life” and give it an alternative DNS entry of “internalweb”. For load-balanced servers in a farm, I might have multiple DNS entries like “webserver1.sironic.life”, “webserver2.sironic.life”, etc.
- IP Address (v4 and v6): If clients will access the certified system by IP address, you might want to add those IPs in these fields.

- Extensions: The extensions govern how the bearer can use the issued certificate. Especially take note of the Extended Key Usage options.

- Private Key: You don’t have a huge amount of private key options. In particular, you may wish to make the private key exportable.

The wizard will contain your options in the certificate request. The CA may choose to issue the certificate without accepting all of them.
Handling Certificate Signing Requests from a Linux System on a Microsoft Certification Authority
You can use a utility on a non-Windows system to create certificate requests. Linux systems frequently employ OpenSSL. These non-Microsoft tools generally do not know anything about templates, which the Windows Certification Authority requires. You could use the MMC tool on a Windows system to request a certificate on behalf of another. But, if you have a certificate signing request file, you can use the certreq.exe tool on a Windows system to specify a template during the request.
You can use OpenSSL to create CSRs fairly easily. Most of the one-line instructions that you will find today still generate basic requests that identify the system with the Common Name field. Modern browsers will reject such a certificate. So, generating a usable CSR takes a bit more work.
- Locate openssl.cnf on your Linux system (some potential locations: /etc/pki/tls, /etc/ssl). I recommend creating a backup copy. Open it in the text editor of your choice.
- Locate the [ req ] section. Find the following line, and remove the # that comments it out (or add it if it is not present):
- Locate the section named [ v3_req ]. Create one if you cannot find it. Add the following line:
|
|
subjectAltName = @alt_names
|
- Create a section named [ alt_names ]. Use it to add at least the system’s Common Name. You can use it to add as many names as you like. It will also accept IP addresses. If you will host the system on an internal network, you can use short names as well. Remember that most public CAs will reject CSRs with single-level alternative names because it looks like you are trying to make a certificate for a top-level domain.
|
|
[ alt_names ]
DNS.1 = pkidemo.sironic.life
DNS.2 = pkidemo # only works internally
DNS.3 = load-balanced-pkidemo.sironic.life
IP.1 = 192.168.20.47
IP.2 = 10.10.60.3
|
- Make any other changes that you like. Remember that if the CA has a preset value for a setting, it will override. Save the file and exit your editor.
- Make sure that you’re in a directory that your current user account can write in and that you can transfer files out of. You could:
- Execute the following (feel free to research these options and change any to fit your needs):
|
|
openssl req -new -newkey rsa:2048 -keyout demo.key -out demo.csr -nodes
|
- You will receive prompts for multiple identifier fields. If you explicitly set them in openssl.cnf, then it will present them as defaults and you can press Enter to accept them. I recommend skipping the option to create a challenge password. That does not passphrase-protect the key. To do that, you first need to run openssl with the genpkey command, then pass the generated key file to the openssl req command using the key parameter instead of newkey/keyout. A ServerFault respondent explains the challenge password and key passphrase well, and includes an example.
- Move the key file to a properly secured location and set permissions accordingly. Remember that if anyone ever accesses this file, then your key, and therefore any certificate generated for it, is considered compromised. Do not transfer it off of its originating system! Example location: /etc/pki/tls/private.
- Transfer the CSR file to a Windows system using the tool of your choice.
- On the Windows system, ensure that you have logged on with an account that has Enroll permissions for the template that you wish to use.
- Discover the Name of the template. Do not use the Display Name (which is usually the Name, with spaces). You can uncover the name with PowerShell if you have the ADCSAdministration module loaded. Use Get-CATemplate:

Alternatively, open up the Certification Authority snap-in and access template management. Find the template you want to use and open its properties sheet. Check the Template name field.

- On the Windows system where you transferred the file, run the following, substituting your file name and template name:
|
|
certreq -submit -attrib "CertificateTemplate:SironicWebServerManual"
|
- The utility will ask you to browse to the request file. You may need to change the filter to select all files.

- You will next need to select the certification authority.

- The utility will show the CA’s response to your request. If it issues a certificate, it will prompt you to save it. Be aware that even though you can choose any extension you like, it will always create an x509 encoded certificate file.

At this point, you have your certificate and the request/signing process is complete. However, in the interest of convenience, follow these steps to convert the x509 certificate into PEM format (which most tools in Linux will prefer):
- Transfer the certificate file back to the Linux system.
- Run the following:
|
|
openssl x509 -in pkidemo.crt -outform PEM -out pkidemo.pem
|
- Move the created file to its final location (such as /etc/pki/tls/certs).
This procedure has multiple variants. Check the documentation or help output for the commands.
Deprecated Web Enrollment Method
Once upon a time, Microsoft built an ASP page to facilitate certificate requests. They have not updated it for quite some time, and as I understand it, have no plans to update it in the future. It does still work, though, with some effort. One thing to be aware of: it can only provide v2 (legacy) certificates. It was not updated to work with v3 (CNG). If a certificate template specifies the newer cryptography provider, web enrollment will not present it as an enrollable option. Certificates must use the Legacy Cryptographic Service Provider.

First, you must issue it a certificate. It responds on 80 and 443, but some features behave oddly on a port 80 connection. Installation of the Web Enrollment role creates the web site and enables it for 443, but leaves it without a certificate.

Follow the steps in the previous article to set up a web server certificate (requires Server Authentication extended key usage). Once you finish that, use one of the MMC methods above to request a certificate for the site. Remember to use its FQDN and optionally its NetBIOS names as DNS fields on the Subject tab. Then, follow these steps to assign it to the certificate server’s web site:
- Open Internet Information Services (IIS) Manager on the system running the Web Enrollment service or on any system that can connect to it.
- Highlight the server in the left pane. In the right pane, under IIS, double-click Server Certificates.

- The newly-issued certificate should appear here. Highlight it and click Enable automatic rebind of renewed certificate in the right pane. If it does not appear here, verify that it appears in MMC and reload this page. If it still does not appear, then you made a mistake during the certificate request or issuance process.
- In the left pane, drill down from the server name to Sites, then Default Web Site. Right-click Default web site and click Edit Bindings. You can also find a Bindings link in the far right pane.

- Double-click the https line or highlight it and click Edit… at the right.

- Under SSL certificate, choose the newly-issued certificate. Click OK, then Close to return to IIS Manager.

- Drill down under Default web site and click on CertSrv. In the center pane, double-click Authentication.

- In the center pane, highlight Windows Authentication. It should already be Enabled. In the right pane, click Providers.

- NTLM should appear in the provider list. If it does not, use the drop-down to select it, then Add to put it in the list. Use the Up button to move NTLM to the top of the list. Ensure that your dialog looks like the following screenshot, then click OK.

You can now access the site via https://yourcertserver.domain.tld/certsrv. You will need to supply valid credentials. It will display the start screen, where you can begin your journey.

Because of the v2 certificate limitation, I neither use nor recommend this site for certificate requests. However, it does provide a convenient access point for your domain’s certificate chain and CRL.
Alternative Request Methods
The methods that I displayed above are the easiest and most universally-applicable ways to request certificates. However, anything that generates a CSR may suffice. Some tools have interfaces that can communicate directly with your certificate server. Some examples:
- certreq.exe: Microsoft provides a built-in command-line based tool for requesting certificates. You can use it to automate bulk requests without involving auto-enroll. Read up on its usage on docs.microsoft.com.
- IIS Manager
- Exchange Management Console
Other tools exist.
What’s Next
At this point, you can create PKI certificate templates and request them. With an Active Directory-integrated certificate system, all should work easily for you. However, if you were following the directions for the custom request, you ended up with a CSR. Passing a CSR to the certification authority requires different tools. In the next article, I will show how to perform routine operations from the Certification Authority side, such as accepting CSRs and revoking certificates.
Source :
https://www.altaro.com/hyper-v/request-ssl-windows-certificate-server/