In this guide, I’ll show you how to deploy the open source time tracking app Kimai in a Docker container. Kimai is free, browser-based (so it’ll work on mobile devices), and is extremely flexible for just about every use case.
It has a stopwatch feature where you can start/stop/pause a worklog timer. Then, it accumulates the total into daily, weekly, monthly or yearly reports, which can be exported or printed as invoices.
It supports single or multi users, so you can even track time for your entire department. All statistics are visible on a beautiful dashboard, which makes historical time-tracking a breeze.
Why use Kimai Time Tracker?
For my scenario, I am salaried at work. However, since I’m an IT Manager, I often find myself working after hours or on weekends to patch servers, reboot systems, or perform system and infrastructure upgrades. Normally, I use a pen and paper or a notetaking app to track overtime, although this is pretty inefficent. Sometimes I forget when I started or stopped, or if I’ve written down the time on a notepade at home, I can’t view that time at work.
And when it comes to managing a team of others who also perform after hours maintenance, it becomes even harder to track their total overtime hours.
Over the past few weeks, I stumbled across Kimai and really love all the features. Especially when I can spin it up in a docker or docker compose container!
If you don’t have Docker installed, follow this guide: https://smarthomepursuits.com/how-to-install-docker-ubuntu/
If you don’t have Docker-Compose installed, follow this guide: https://smarthomepursuits.com/how-to-install-portainer-with-docker-in-ubuntu-20-04/
In this tutorial, we will be installing Kimai for 1 user using standard Docker run commands. Other users can be added from the webui after initial setup.
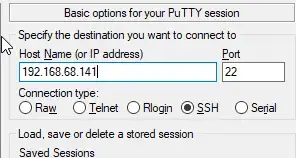
Step 1: SSH into your Docker Host
Open Putty and SSH into your server that is running docker and docker compose.
Step 2: Create Kimai Database container
Enter the command below to create a new database to use with Kimai. You can copy and paste into Putty by right-clicking after copy, or CTRL+SHIFT+V into other ssh clients.
sudo docker run --rm --name kimai-mysql \
    -e MYSQL_DATABASE=kimai \
    -e MYSQL_USER=kimai \
    -e MYSQL_PASSWORD=kimai \
    -e MYSQL_ROOT_PASSWORD=kimai \
    -p 3399:3306 -d mysql
Step 3: Start Kimai
Next, start the Kimai container using the already created database. If you look at the Kimai github page, you’ll notice that this isn’t the same command as what shows there.
Here’s the original command (which I’m not using):
docker run --rm --name kimai-test -ti -p 8001:8001 -e DATABASE_URL=mysql://kimai:kimai@${HOSTNAME}:3399/kimai kimai/kimai2:apacheAnd here’s my command. I had to explicitly add TRUSTED_HOSTS, the ADMINMAIL and ADMINPASS, and change the ${HOSTNAME} to the IP address of your docker host. Otherwise, I wasn’t able to access Kimai from other computers on my local network.
- Green = change port here if already in use
- Red = Add the IP address of your docker host
- Orange = Manually specifying the admin email and password. This is what you’ll use to log in with.
- Blue = Change to docker host IP address
sudo docker run --rm --name kimai -ti -p 8001:8001 -e TRUSTED_HOSTS=192.168.68.141,localhost,127.0.0.1 -e ADMINMAIL=example@gmail.com -e ADMINPASS=8charpassword -e DATABASE_URL=mysql://kimai:kimai@192.168.68.141:3399/kimai kimai/kimai2:apacheNote that 8 characters is the minimum for the password.
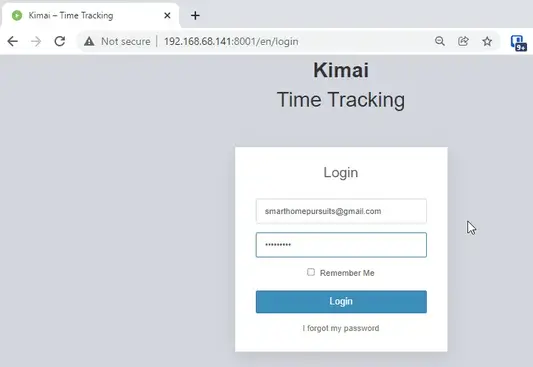
Step 4: Log In via Web Browser
Next, Kimai should now be running!
To check, you can go to your http://dockerIP:8001 in a web browser (192.168.68.141:8001)
Then simply log in with the credentials you created.
Step 5: Basic Setup
This app is extremely powerful and customizeable, so I won’t be going over all the available options since everyone has different needs.
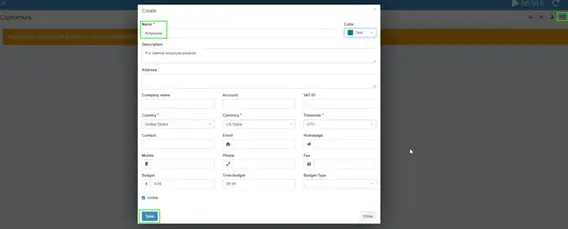
Like I mentioned earlier, I’m using Kimai for overtime tracking only, so the first step for me is to create a new “customer”.
Create a Customer
This is sort of unintuitive, but you need to create a customer before you can start tracking time to a project. I’m creating a generic “Employee” customer.
Click Customers on the left sidebar, then click the + button in the top right corner.
Create A Project
Click Projects on the left sidebar:
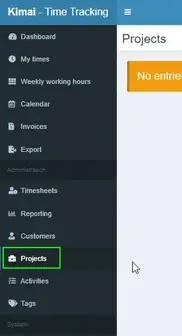
Then click the + button in the top right corner.
Add a name, choose the customer you just created, and then choose a date range.

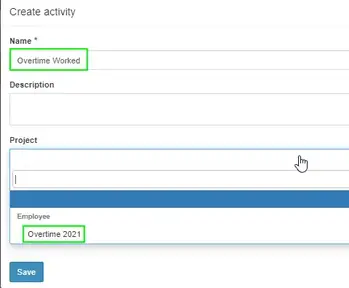
Create An Activity
Click Activity on the left, then create an activity. I’m calling mine Overtime Worked and assigning it to the Project “Overtime 2021” I just created.
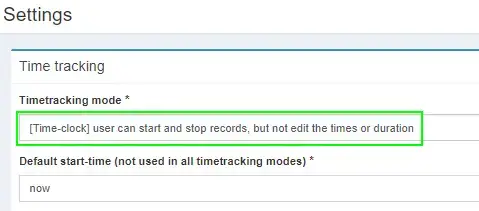
Step 6: Change “Timetracking Mode” to Time-clock
Click Settings. Under Timetracking mode, change it to Time-Clock. This will let you click the Play button to start/stop time worked vs having to manually enter start and stop times.
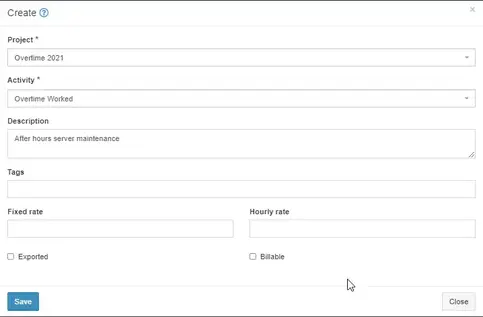
Step 7: Start Tracking Time!
To start tracking time, simply click the timer widget in the top right corner.

A screen will pop up asking you what project and activity you want to apply the time to.
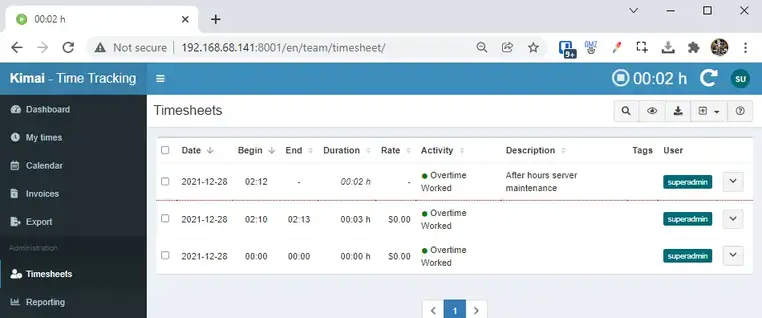
The selfhosted stopwatch will start tracking time right after. You can then view the timesheets for yourself under the My Times section or for all users under the Timesheets or Reporting tabs.
Wrapping Up
Hopefully this guide helped you get Kimai installed and setup! If you have any questions, feel free to let me know in the comments below and I’ll do my best to help you out.
My Homelab Equipment
Here is some of the gear I use in my Homelab. I highly recommend each of them.
- Server 2019 w/ Hyper-V
- Case: Fractal Design Node 804
- Graphics Card: NVIDEA Quadro K600
- CPU: AMD Ryzen 7 2700
The full list of server components I use can be found on my Equipment List page.
Source :
https://smarthomepursuits.com/how-to-install-kimai-time-tracking-app-in-docker/
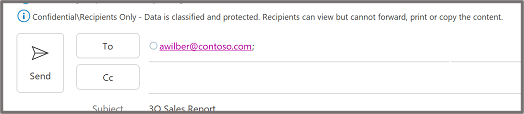
 Important: Sensitivity is not available if your Office account isn’t a work account, and if your administrator hasn’t configured any sensitivity labels and enabled the feature for you.
 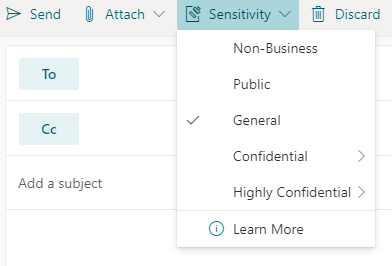 Note: If your organization has configured a website to learn more about their sensitivity labels, you will also see a Learn More option.
 Important: Sensitivity is not available if your Office account isn’t a work account with a Office 365 Enterprise E3 or Office 365 Enterprise E5 license assigned, or if your administrator hasn’t configured any sensitivity labels and enabled the feature for you .
 Note: If your organization has configured a website to learn more about their sensitivity labels, you will also see a Learn More option.
 menu.
menu.