The “License of HA Pair doesn’t match” or “HA License Sync Error” log message will repeat every 15 minutes if licensing of the Primary and Backup firewalls is not equivalent. This message is intended to alert the firewall administrator that not all services configured on the Primary will be active on the Backup firewall.
For example: The error message may occur if the number of Network Anti-Virus licenses are different on the Primary and Backup appliances, or, if the Primary has Content Filtering Service (CFS) but the Backup does not, there will be no CFS functionality if the Backup becomes the active firewall.
Resolution for SonicOS 7.X
This release includes significant user interface changes and many new features that are different from the SonicOS 6.5 and earlier firmware. The below resolution is for customers using SonicOS 7.X firmware.
Step 1: Synchronize the licenses on both the devices.
Log into the Backup SonicWall’s unique LAN IP address. The management interface should now display Logged Into: Secondary Device in the upper left corner. If all licenses are not already synchronized with the Primary unit, follow these steps:
Navigate to the Device | Settings | Licenses page and click Synchronize in the upper right corner.
From the Device | Diagnostics | DNS Name Lookup page, use the “Lookup Name or IP” option to see if the DNS servers listed in the SonicWall WAN Interface are resolving the license manager URL “licensemanager.SonicWall.com” on both units. TIP: If the DNS servers are not resolving, try changing the DNS IP addresses on the SonicWall WAN Interface and then try to synchronize the licenses.
If the backup unit is not registered, navigate to the Device | Settings | Licenses page and register the SonicWall security appliance on mySonicWall.com. This allows the SonicWall licensing server to synchronize the licenses.
Step 2: Verify the licenses on www.mySonicWall.com
To use the High Availability feature, you must register both the SonicWall appliances on mySonicWall.com as Associated Products.
Both appliances must be the same SonicWall model,
Must be registered under the same mySonicWall.com user account,
And must be separately licensed for SonicOS Enhanced.
NOTE: The SonicOS Enhanced license is not shareable between the primary and the backup appliances. Both appliances must be licensed separately.
Verify the HA Secondary device on mySonicWall.com account:
Click on the Primary UTM appliance (e.g. TZ 670) and scroll down to Associated Products section.
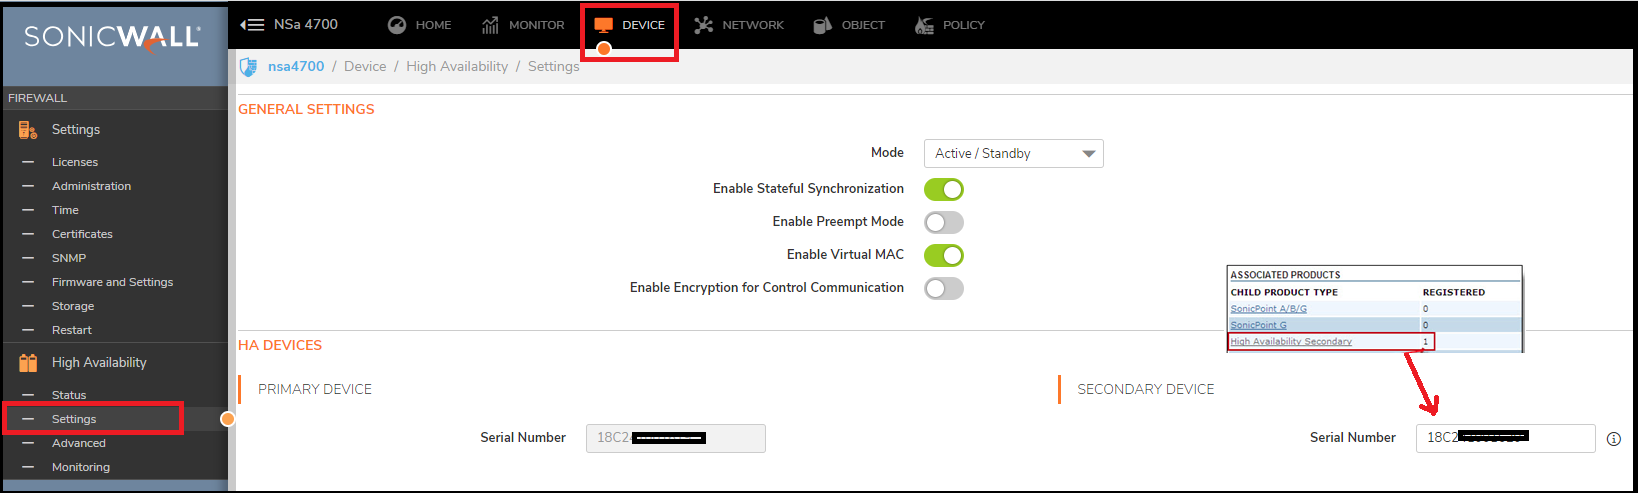
Click on High Availability Secondary and ensure that the Serial number of device matches with the Backup SonicWall entry on the Devices | High Availability | Settings page of your Primary SonicWall appliance.
Please Note that the backup appliance of your high availability pair is referred to as the HA Secondary unit on mySonicWall.com. After the appliances are associated as an HA Pair, they can share licenses.
Step 3: Adding secondary UTM appliance under the HA pair on mySonicWall.com
If you have not registered/Associated the HA Secondary device on the mySonicWall.com, follow these steps:
Registering the Secondary/Backup UTM appliance from the SonicWall Management Interface
Important: After registering new SonicWall appliances on mySonicWall.com, you must also register the backup appliance from the SonicOS management interface while logged into its individual management IP address. This allows the backup unit to synchronize with the SonicWall license server (licensemanager.SonicWall.com) and share licenses with the associated primary appliance.
Step 4: Accessing the Secondary UTM appliance and Synchronizing the Licenses
On the Device |High Availability | Monitoring page, you can configure unique management IP addresses for both units in the HA Pair which allows you to log in to each unit independently for management purposes. See also Configuring High Availability Monitoring settings
Also you can configure Logical/Probe IP addressfor SonicWall to monitor a reliable device on one or more of the connected networks. Failure to periodically communicate with the device by the Active unit in the HA Pair will trigger a failover to the Idle unit. If neither unit in the HA Pair can connect to the device, no action will be taken.
NOTE: The Primary IP Address and Backup IP Address fields must be configured with independent IP addresses on a LAN interface, such as X0, (or a WAN interface, such as X1, for probing on the WAN) to allow logical probing to function correctly.
In the Logical Probe IP Address field, enter the IP address of a downstream device on the LAN network that should be monitored for connectivity. Typically, this should be a downstream router or server. (If probing is desired on the WAN side, an upstream device should be used.) The Primary and Backup appliances will regularly ping this probe IP address. If both can successfully ping the target, no failover occurs. If neither can successfully ping the target, no failover occurs, because it is assumed that the problem is with the target, and not the SonicWall appliances. But, if one appliance can ping the target but the other appliance cannot, failover will occur to the appliance that can ping the target.
Step 5: Try to synchronize the licenses again on both the devices.
Step 6: You may also try to upgrade the firmware to the latest version and try to synchronize the licenses again.
This release includes significant user interface changes and many new features that are different from the SonicOS 6.2 and earlier firmware. The below resolution is for customers using SonicOS 6.5 firmware.
Step 1: Synchronize the licenses on both the devices.
Log into the Backup SonicWall’s unique LAN IP address. The management interface should now display Logged Into: Backup SonicWall Status: (green ball) Active in the upper right corner. If all licenses are not already synchronized with the Primary unit, follow these steps:
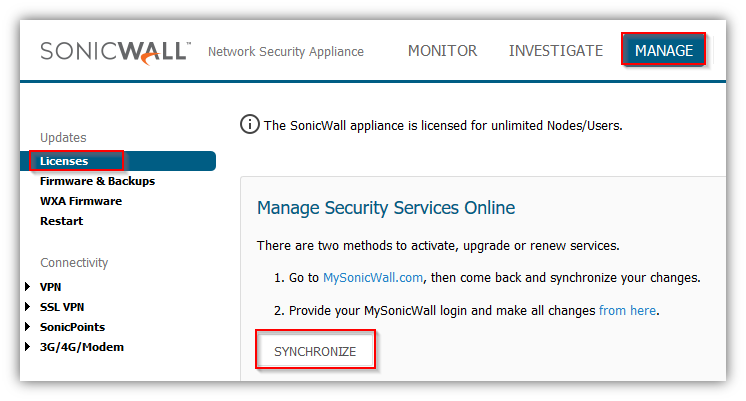
Navigate to the Manage | Licenses page and click Synchronize.
From the Investigate | Tools | System Diagnostics page, use the “DNS Name Lookup” option under Diagnostic Tool drop down menu to see if the DNS servers listed in the SonicWall WAN Interface are resolving the license manager URL “licensemanager.SonicWall.com” on both units. TIP: If the DNS servers are not resolving, try changing the DNS IP addresses on the SonicWall WAN Interface and then try to synchronize the licenses.
If the backup unit is not registered, navigate to the Manage | Licenses page and register the SonicWall security appliance on mySonicWall.com. This allows the SonicWall licensing server to synchronize the licenses.
Step 2: Verify the licenses on www.mySonicWall.com
To use the High Availability feature, you must register both the SonicWall appliances on mySonicWall.com as Associated Products.
Both appliances must be the same SonicWall model,
Must be registered under the same mySonicWall.com user account,
And must be separately licensed for SonicOS Enhanced.
NOTE: The SonicOS Enhanced license is not shareable between the primary and the backup appliances. Both appliances must be licensed separately.
Verify the HA Secondary device on mySonicWall.com account:
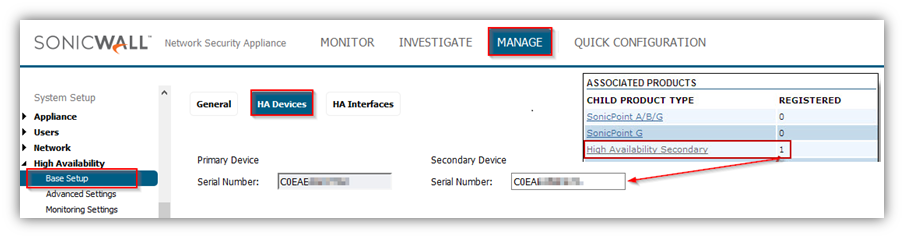
Click on the Primary UTM appliance (e.g. TZ 600) and scroll down to Associated Products section.
Click on High Availability Secondary and ensure that the Serial number of device matches with the Backup SonicWall entry on the Manage | High Availability | Base Setup | HA Devices page of your Primary SonicWall appliance.
Please Note that the backup appliance of your high availability pair is referred to as the HA Secondary unit on mySonicWall.com. After the appliances are associated as an HA Pair, they can share licenses.
Step 3: Adding secondary UTM appliance under the HA pair on mySonicWall.com
If you have not registered/Associated the HA Secondary device on the mySonicWall.com, follow these steps:
Registering the Secondary/Backup UTM appliance from the SonicWall Management Interface
Important: After registering new SonicWall appliances on mySonicWall.com, you must also register the backup appliance from the SonicOS management interface while logged into its individual management IP address. This allows the backup unit to synchronize with the SonicWall license server (licensemanager.SonicWall.com) and share licenses with the associated primary appliance.
Step 4: Accessing the Secondary UTM appliance and Synchronizing the Licenses
On the Manage |HighAvailability | Monitoring Settings page, you can configure unique management IP addresses for both units in the HA Pair which allows you to log in to each unit independently for management purposes. See also Configuring High Availability Monitoring settings.
Also you can configure Logical/Probe IP address for SonicWall to monitor a reliable device on one or more of the connected networks. Failure to periodically communicate with the device by the Active unit in the HA Pair will trigger a failover to the Idle unit. If neither unit in the HA Pair can connect to the device, no action will be taken.
NOTE: The Primary IP Address and Backup IP Address fields must be configured with independent IP addresses on a LAN interface, such as X0, (or a WAN interface, such as X1, for probing on the WAN) to allow logical probing to function correctly.
In the Logical Probe IP Address field, enter the IP address of a downstream device on the LAN network that should be monitored for connectivity. Typically, this should be a downstream router or server. (If probing is desired on the WAN side, an upstream device should be used.) The Primary and Backup appliances will regularly ping this probe IP address. If both can successfully ping the target, no failover occurs. If neither can successfully ping the target, no failover occurs, because it is assumed that the problem is with the target, and not the SonicWall appliances. But, if one appliance can ping the target but the other appliance cannot, failover will occur to the appliance that can ping the target.
Step 5: Try to synchronize the licenses again on both the devices.
Step 6: You may also try to upgrade the firmware to the latest version and try to synchronize the licenses again.
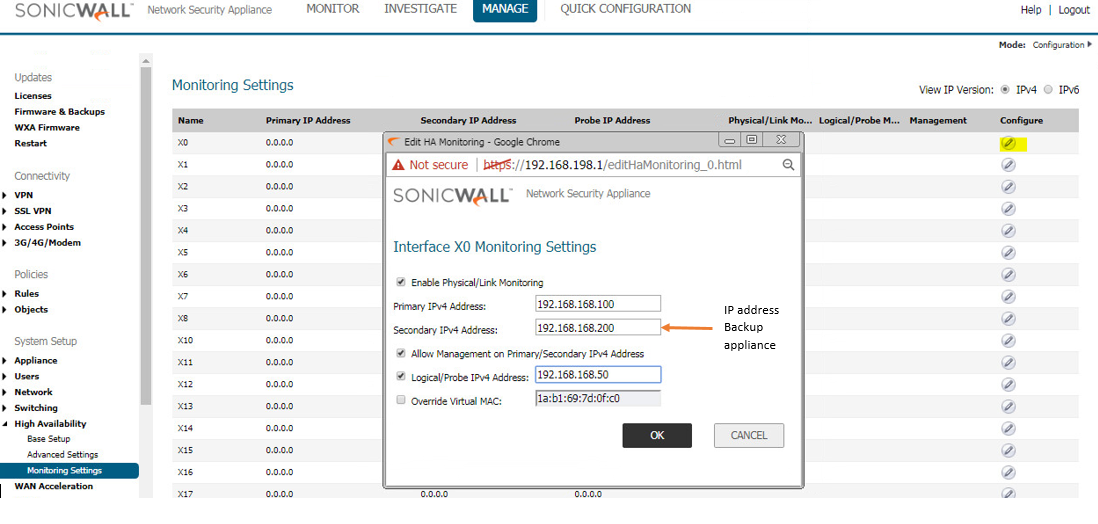
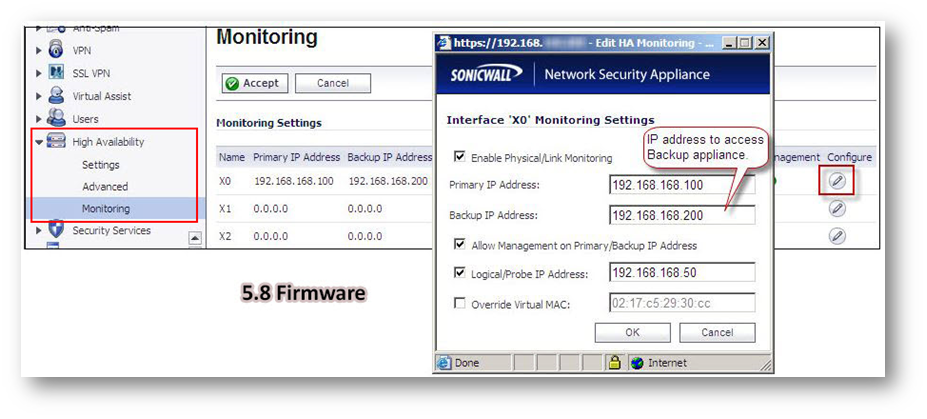
On the High Availability | Monitoring page, you can configure both physical and logical interface monitoring. By enabling physical interface monitoring, you enable link detection for the designated HA interfaces. The link is sensed at the physical layer to determine link viability. Logical monitoring involves configuring the SonicWall to monitor a reliable device on one or more of the connected networks. Failure to periodically communicate with the device by the Active unit in the HA Pair will trigger a Failover to the Idle unit. If neither unit in the HA Pair can connect to the device, no action will be taken.
The Primary and Backup IP addresses configured on this page are used for multiple purposes.
As independent management addresses for each unit (supported on all physical interfaces).
To allow synchronization of licenses between the Idle unit and the SonicWall licensing server .
As the source IP addresses for the probe pings sent out during logical monitoring.
When using logical monitoring, the HA Pair will ping the specified Logical Probe IP address target from the Primary as well as from the Backup SonicWall. The IP address set in the Primary IP Address or Backup IP Address field is used as the source IP address for the ping. If both units can successfully ping the target, no Failover occurs. If both cannot successfully ping the target, no Failover occurs, as the SonicWalls will assume that the problem is with the target, and not the SonicWalls. But, if one SonicWall can ping the target but the other SonicWall cannot, the HA Pair will Failover to the SonicWall that can ping the target.
Resolution for SonicOS 7.X
This release includes significant user interface changes and many new features that are different from the SonicOS 6.5 and earlier firmware. The below resolution is for customers using SonicOS 7.X firmware.
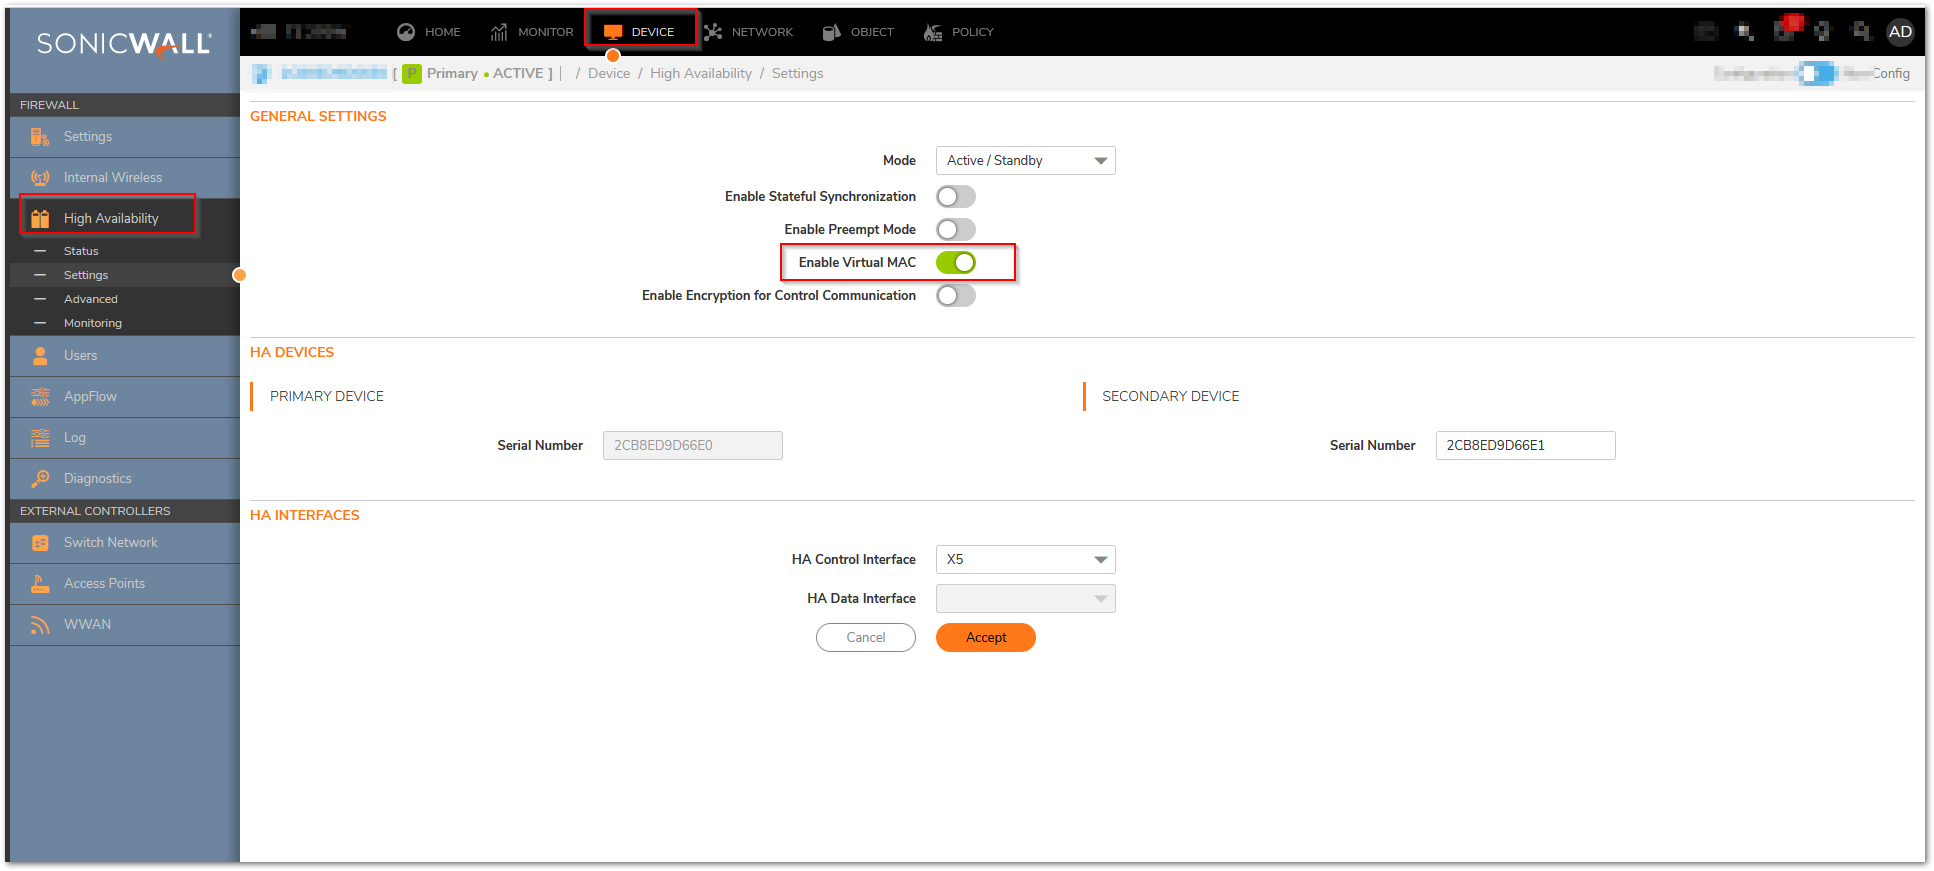
The configuration tasks on the High Availability |Monitoring page are performed on the Primary unit and then are automatically synchronized to the Backup.
Login as an administrator to the SonicOS user interface on the Primary SonicWall.
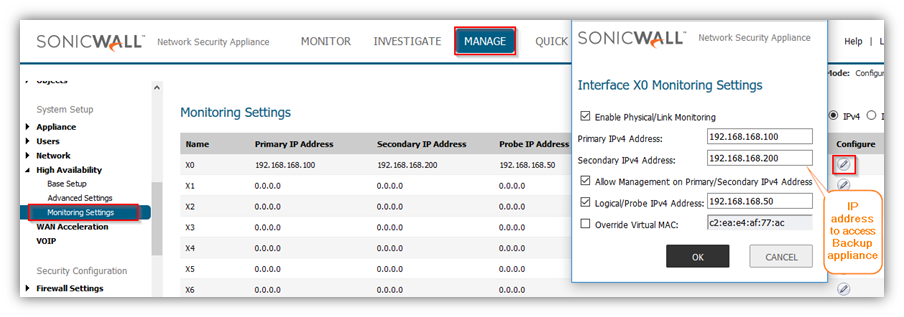
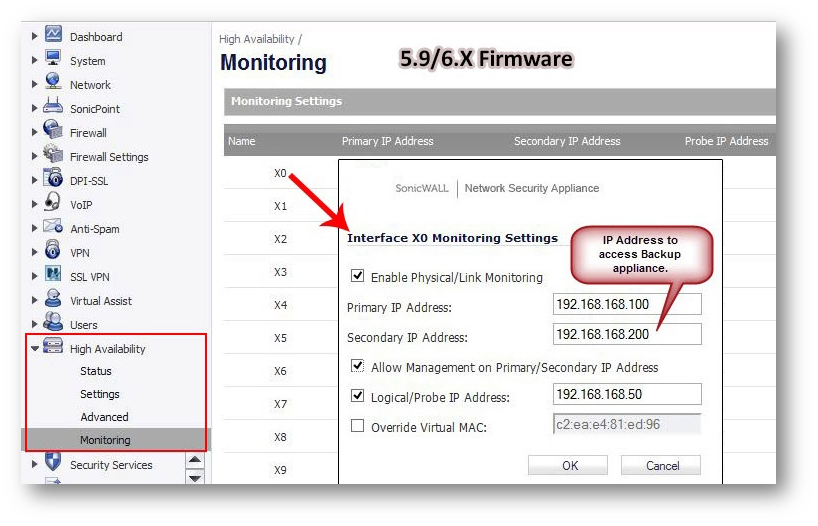
Go to Device In top menu , navigate to High Availability | Monitoring Settings .
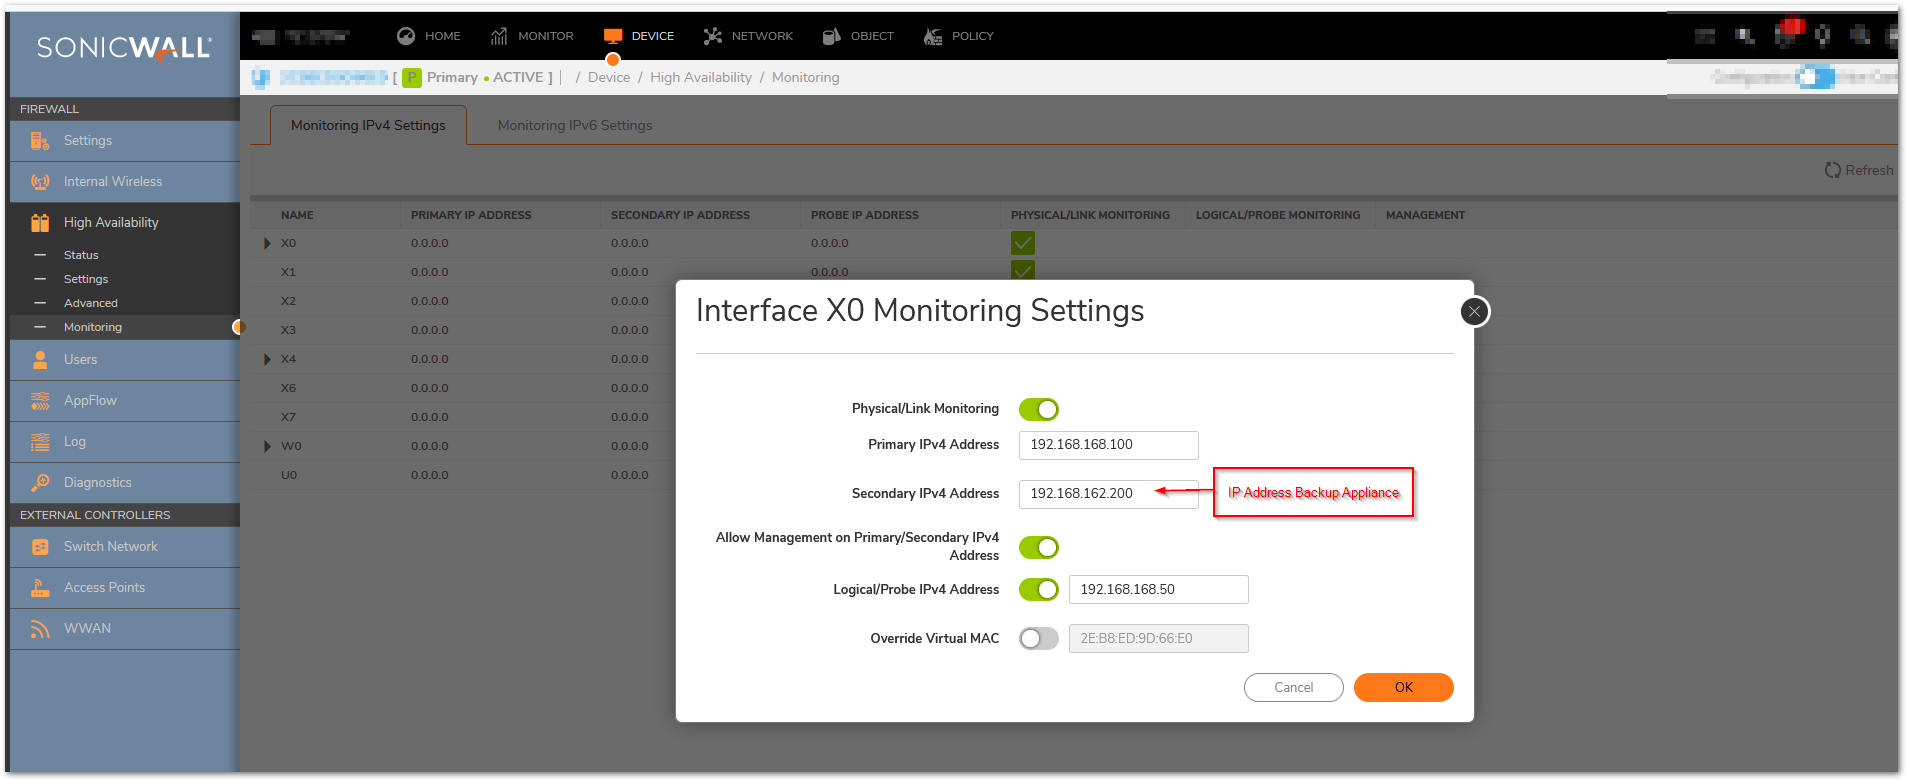
Click Configure icon for an interface on the LAN, such as X0.
To enable link detection between the designated HA interfaces on the Primary and Backup units, leave the Enable Physical / Link Monitoring checkbox selected.
In the Primary IP Address field, enter the unique LAN management IP address of the Primary unit.
In the Backup IP Address field, enter the unique LAN management IP address of the Backup unit.
Configuring unique management IP addresses for both units in the HA Pair allows you to log in to each unit independently for management purposes. Note that non-management traffic is ignored if it is sent to one of these IP addresses. The Primary and Backup SonicWall security appliances’ unique LAN IP addresses cannot act as an active gateway; all systems connected to the internal LAN will need to use the virtual LAN IP address as their gateway.
The management IP address of the Backup/Idle unit is used to allow license synchronization with the SonicWall licensing server, which handles licensing on a per-appliance basis (not per-HA Pair). Even if the Backup unit was already registered on MySonicWall before creating the HA association, you must use the link on the Device | Settings | Licenses page to connect to the SonicWall server while accessing the Backup appliance through its management IP address.
Select the Allow Management on Primary/Backup IP Address checkbox. When this option is enabled for an interface, a green icon appears in the interface’s management column in the Monitoring Settings table on the High Availability | Monitoring page. Management is only allowed on an interface when this option is enabled.
In the Logical Probe IP Address field, enter the IP address of a downstream device on the LAN network that should be monitored for connectivity.Typically, this should be a downstream router or server. (If probing is desired on the WAN side, an upstream device should be used.) The Primary and Backup appliances will regularly ping this probe IP address. If both can successfully ping the target, no failover occurs. If neither can successfully ping the target, no failover occurs, because it is assumed that the problem is with the target, and not the SonicWall appliances. But, if one appliance can ping the target but the other appliance cannot, failover will occur to the appliance that can ping the target.
NOTE: The Primary IP Address and Backup IP Address fields must be configured with independent IP addresses on a LAN interface, such as X0, (or a WAN interface, such as X1, for probing on the WAN) to allow logical probing to function correctly.
Optionally, to manually specify the virtual MAC address for the interface, select Override Virtual MAC and enter the MAC address in the field. The format for the MAC address is six pairs of hexadecimal numbers separated by colons, such as A1:B2:C3:d4:e5:f6. Care must be taken when choosing the Virtual MAC address to prevent configuration errors.
Note:There is a design change on Gen7 in the way MAC Addresses are handled for the HA native vs. monitoring. GEN7 uses the Virtual MAC for all interface IPs, both the Virtual IPs and Primary / Secondary Monitoring IPs, Hence the MAC addresses of the X0 Interface IP(Or any VLAN under X0), will have the same MAC address as of the Primary firewall X0 monitoring IP, the same applies for all the interfaces X1, X2, wherever monitoring IPs will be configured.
To configure monitoring on any of the other interfaces, repeat the above steps.
When finished with all High Availability configuration, click Accept. All settings will be synchronized to the Idle unit automatically.
Resolution for SonicOS 6.5
This release includes significant user interface changes and many new features that are different from the SonicOS 6.2 and earlier firmware. The below resolution is for customers using SonicOS 6.5 firmware.
The configuration tasks on the High Availability |Monitoring page are performed on the Primary unit and then are automatically synchronized to the Backup.
Login as an administrator to the SonicOS user interface on the Primary SonicWall.
Go to Manage In top menu , navigate to High Availability | Monitoring Settings .
Click Configure icon for an interface on the LAN, such as X0.
To enable link detection between the designated HA interfaces on the Primary and Backup units, leave the Enable Physical / Link Monitoring checkbox selected.
In the Primary IP Address field, enter the unique LAN management IP address of the Primary unit.
In the Backup IP Address field, enter the unique LAN management IP address of the Backup unit.
Configuring unique management IP addresses for both units in the HA Pair allows you to log in to each unit independently for management purposes. Note that non-management traffic is ignored if it is sent to one of these IP addresses. The Primary and Backup SonicWall security appliances’ unique LAN IP addresses cannot act as an active gateway; all systems connected to the internal LAN will need to use the virtual LAN IP address as their gateway.
The management IP address of the Backup/Idle unit is used to allow license synchronization with the SonicWall licensing server, which handles licensing on a per-appliance basis (not per-HA Pair). Even if the Backup unit was already registered on MySonicWall before creating the HA association, you must use the link on the System | Licenses page to connect to the SonicWall server while accessing the Backup appliance through its management IP address.
Select the Allow Management on Primary/Backup IP Address checkbox. When this option is enabled for an interface, a green icon appears in the interface’s management column in the Monitoring Settings table on the High Availability | Monitoring page. Management is only allowed on an interface when this option is enabled.
In the Logical Probe IP Address field, enter the IP address of a downstream device on the LAN network that should be monitored for connectivity.Typically, this should be a downstream router or server. (If probing is desired on the WAN side, an upstream device should be used.) The Primary and Backup appliances will regularly ping this probe IP address. If both can successfully ping the target, no failover occurs. If neither can successfully ping the target, no failover occurs, because it is assumed that the problem is with the target, and not the SonicWall appliances. But, if one appliance can ping the target but the other appliance cannot, failover will occur to the appliance that can ping the target.
NOTE: The Primary IP Address and Backup IP Address fields must be configured with independent IP addresses on a LAN interface, such as X0, (or a WAN interface, such as X1, for probing on the WAN) to allow logical probing to function correctly.
Optionally, to manually specify the virtual MAC address for the interface, select Override Virtual MAC and enter the MAC address in the field. The format for the MAC address is six pairs of hexadecimal numbers separated by colons, such as A1:B2:C3:d4:e5:f6. Care must be taken when choosing the Virtual MAC address to prevent configuration errors.When the Enable Virtual MAC checkbox is selected on the Manage |High Availability| Base Setup page, the SonicOS firmware automatically generates a Virtual MAC address for all interfaces. Allowing the SonicOS firmware to generate the Virtual MAC address eliminates the possibility of configuration errors and ensures the uniqueness of the Virtual MAC address, which prevents possible conflicts.
To configure monitoring on any of the other interfaces, repeat the above steps.
When finished with all High Availability configuration, click Accept. All settings will be synchronized to the Idle unit automatically.
Resolution for SonicOS 6.2 and Below
The below resolution is for customers using SonicOS 6.2 and earlier firmware. For firewalls that are generation 6 and newer we suggest to upgrade to the latest general release of SonicOS 6.5 firmware.
The configuration tasks on the High Availability |Monitoring page are performed on the Primary unit and then are automatically synchronized to the Backup.
Login as an administrator to the SonicOS user interface on the Primary SonicWall.
In the left navigation pane, navigate to High Availability | Monitoring.
Click Configure icon for an interface on the LAN, such as X0.
To enable link detection between the designated HA interfaces on the Primary and Backup units, leave the Enable Physical Interface Monitoring checkbox selected.
In the Primary IP Address field, enter the unique LAN management IP address of the Primary unit.
In the Backup IP Address field, enter the unique LAN management IP address of the Backup unit.
Configuring unique management IP addresses for both units in the HA Pair allows you to log in to each unit independently for management purposes. Note that non-management traffic is ignored if it is sent to one of these IP addresses. The Primary and Backup SonicWall security appliances’ unique LAN IP addresses cannot act as an active gateway; all systems connected to the internal LAN will need to use the virtual LAN IP address as their gateway.
The management IP address of the Backup/Idle unit is used to allow license synchronization with the SonicWall licensing server, which handles licensing on a per-appliance basis (not per-HA Pair). Even if the Backup unit was already registered on MySonicWall before creating the HA association, you must use the link on the System | Licenses page to connect to the SonicWall server while accessing the Backup appliance through its management IP address.
Select the Allow Management on Primary/Backup IP Address checkbox. When this option is enabled for an interface, a green icon appears in the interface’s Management column in the Monitoring Settings table on the High Availability | Monitoring page. Management is only allowed on an interface when this option is enabled.
In the Logical Probe IP Address field, enter the IP address of a downstream device on the LAN network that should be monitored for connectivity.Typically, this should be a downstream router or server. (If probing is desired on the WAN side, an upstream device should be used.) The Primary and Backup appliances will regularly ping this probe IP address. If both can successfully ping the target, no failover occurs. If neither can successfully ping the target, no failover occurs, because it is assumed that the problem is with the target, and not the SonicWall appliances. But, if one appliance can ping the target but the other appliance cannot, failover will occur to the appliance that can ping the target.
NOTE:The Primary IP Address and Backup IP Address fields must be configured with independent IP addresses on a LAN interface, such as X0, (or a WAN interface, such as X1, for probing on the WAN) to allow logical probing to function correctly.
Optionally, to manually specify the virtual MAC address for the interface, select Override Virtual MAC and enter the MAC address in the field. The format for the MAC address is six pairs of hexadecimal numbers separated by colons, such as A1:B2:C3:d4:e5:f6. Care must be taken when choosing the Virtual MAC address to prevent configuration errors.When the Enable Virtual MAC checkbox is selected on the High Availability| Advanced page, the SonicOS firmware automatically generates a Virtual MAC address for all interfaces. Allowing the SonicOS firmware to generate the Virtual MAC address eliminates the possibility of configuration errors and ensures the uniqueness of the Virtual MAC address, which prevents possible conflicts.
Click OK.
To configure monitoring on any of the other interfaces, repeat the above steps.
When finished with all High Availability configuration, click Accept. All settings will be synchronized to the Idle unit automatically.
In the first post in this series, we covered common PHP encoding techniques and how they’re used by malware to hide from security analysts and scanners. In today’s post, we’re going to dive a little bit deeper into other obfuscation techniques that make use of other features available in PHP.
Obfuscation Redux
In the first post in this series, we defined Obfuscation as the process of concealing the purpose or functionality of code or data so that it evades detection and is more difficult for a human or security software to analyze, but still fulfills its intended purpose. One of the main contributing factors to the popularity of PHP is its ease of use, but the same functionality that makes it easy to use also makes it easy to abuse, often in ways that were never intended.
The techniques covered in this post are often simpler and “hackier” than the ones listed in the previous article, and most of them are less reliable as indicators of malicious activity individually, as several of them typically need to be combined in order to achieve sufficient obfuscation. These techniques are also often easier for a human analyst to spot, but they are also more difficult to detect using scanning tools due to the wide variety of permutations available. Such simpler obfuscation methods can also be creatively combined with encoding techniques, granting malware authors a formidable array of tactics to avoid detection.
While it is not practical to cover every possible technique in active use, this article will detail the more commonly found methods, and help illustrate the wide range of possibilities when decoding obfuscated malware. Several of the methods we will cover today, such as comment abuse, can be combined into almost infinite variations with minute changes, thus rendering them completely undetectable to traditional hash-based malware scanning and even partially slowing down regular expression-based scanning of the type used by Wordfence.
Fortunately, while these methods do make analysis more difficult, and can slow down scanning, their presence in certain combinations is a strong signal of malicious activity, and the malware detection signatures used by the Wordfence plugin and Wordfence CLI are tuned to detect these combinations with astoundingly few false positives. Wordfence CLI in particular is useful in these cases, as it is highly performant and can run multithreaded jobs, compensating for any speed penalties imposed by these techniques.
Comment Abuse
PHP has several methods of adding code comments that you may already be familiar with. Well-commented code is considered a best practice, as it makes it much easier to maintain software and pay off technical debt, but comments can also be used for illicit purposes.
PHP uses three styles of comments:
//, denoting a single line comment that ends on the next line.
#, likewise a single line comment that ends on the next line, though this is less common than ‘//’.
/*, the beginning of a multiline comment, which can only closed with */.
Multiline comments are particularly useful to malware authors because they are ignored by PHP, and do not have to extend over multiple lines. This means that an attacker can “break up” their code to evade scanners using comments. For instance, the following code block prints “Hello, World!”:
1234
<?phpecho/*blah*/"Hello, World!"/*blah*/;
While this is a very basic example, more complicated examples can be found in real malware, such as the following snippet, which makes use of several additional obfuscation techniques, including octal escape sequences and invisible null bytes:
While we’re not going to fully analyze this malware today, it already presents problems for many scanners. For instance, a scanner searching for the very first line of code, function ed_ixpn() would fail to find it because of the comments. While detection using regular expressions, such as the ones used by the Wordfence Plugin scanner and Wordfence CLI are capable of detecting malware of this type, it still imposes a performance penalty on detection due to the enormous number of possible variations.
Concatenation Catastrophe
PHP makes string concatenation very simple via the dot . operator. This allows programmers to join two separate strings with minimal hassle. For instance, the following code outputs “Hello, World!”:
1
<?php echo“He”.”llo,”.”wor”.”ld”;
There are a large number of legitimate use cases for string concatenation, so it’s generally only an indicator of malicious activity when combined with several other obfuscation techniques. The malware sample we shared earlier provides a good example of this, with octal encoding concatenated with the return values of various functions, which we’ll get to in a later section.
Index Fun
PHP, like most languages, stores text strings as arrays of characters, each with a defined position or index. This makes it possible to assemble arbitrary commands and data from a string containing the required characters, using the array index of each character and the concatenation operator. For instance, the following code prints “Hello, World!”:
1234
<?php$string="Wow, what a cool Helpful research device!";echo$string[17].$string[18].$string[19].$string[19].$string[1].$string[3].$string[4].$string[0].$string[1].$string[25].$string[15].$string[34].$string[40];
PHP arrays start with an index of 0, meaning that $string[0] in the example above would be “W”, the first letter of “Wow, what a cool Helpful research device!”. By concatenating letters from different parts of that text string, it’s possible to assemble an entirely different text string.
This method can be very helpful for hiding the underlying text being assembled from human researchers and security scan tools alike, and though it does have the occasional legitimate use in selecting chunks of text, when used extensively it is a strong indicator of malicious activity, though it typically needs to be combined with additional techniques such as evaluating the resulting string or passing it to a function.
Math, Not Even Once
PHP allows mathematical operations within other functionality. One of the interesting features in the malware snippet – $disdcrxh_(564-452) – demonstrates this, with it turning out as $disdcrxh_112 due to the subtraction of 564 and 452 in the parenthesis. This functionality can likewise be combined with the string index technique mentioned above. For example, the following code prints out “Hello, World!”:
123
<?php$string="Wow, what a cool Helpful research device!";echo$string[(15+2)].$string[(20-2)].$string[(10+9)].$string[(29-10)].$string[(5-4)].$string[(1+2)].$string[(2+2)].$string[(5-5)].$string[(12-11)].$string[(5*5)].$string[(5*3)].$string[34].$string[(160/4)];
This adds an additional obfuscation layer that can make it even more difficult to determine the code’s functionality without executing it. However, it is incredibly rare for this type of code to be used legitimately, so the presence of this technique is typically an indicator of malicious activity.
String Reversals
One of the most basic functions in PHP’s text string manipulation libraries is strrev, which is used to reverse strings of text. For instance, the following code snippet prints out “Hello, World!”:
1
<?php echostrrev("!dlroW ,olleH");
While not particularly effective at obfuscation on its own, it can be combined with the techniques in this article as well as nearly all of the techniques in our previous article on encoding to make it even more difficult to decode malicious functionality. While it has a number of legitimate use cases, the presence of strrev alongside two or more additional encoding or obfuscation techniques is often a reliable indicator of compromise.
Variable, Dynamic, and Anonymous Functions
PHP has the ability to use variables to store function names as variables and then invoke those functions using the variable. This is widely used by legitimate software, but can also be combined with several other techniques, such as string concatenation, in which case it is often an indicator of malicious activity. For instance, the following code snippet prints out “Hello, World!”:
This can also be combined with dynamic function invocation using methods such as call_user_func, which accepts a function for its first parameter and any arguments to be passed to that function in subsequent parameters. As with variable function names, this is widely used in legitimate code, but it can still make analysis more difficult, especially for automated tools looking primarily for more basic function call syntax. For example, the following code snippet prints out “Hello, World!”:
Finally, PHP also allows for anonymous functions, which are exactly what they sound like – functions without a name. These can be combined with variable assignment as shown:
While anonymous functions are widely used in legitimate code, it is possible to use them in combination with other features to make it more difficult for automated scanning tools or human analysts to keep track of code flow and as such are useful for obfuscation.
We’ve begun to combine obfuscation layers in our examples to provide a better picture of the type of obfuscation often found in the wild, and there’s still more to come.
GOTO Labels
One of the oldest and most basic code functions is the goto statement. While some legitimate software still uses GOTO statements, the functionality is considered poor coding practice and is not widely used, though it reflects how the code operates at a fundamental level far more accurately than more modern syntax. Its primary use in obfuscation is similar to comment abuse in that it breaks up the code so that it is more difficult to determine the control flow.
For example, the following code snippet prints out “Hello, World!” if and only if $_GET['input'] is present and set to ‘hello’, otherwise it prints “Sorry”:
PHP uses the include and require functions to include and execute code located in a separate file. This is almost universally used, and occasionally the .inc extension is used instead of PHP for files to be included. However, one particular feature that is ripe for abuse is that PHP will include files with any extension and execute them as code. This allows attackers to upload the bulk of their malicious code as a file with an allowed extension, often an image extension such as .ico or .png, and then simply include that file from a loader file with a PHP extension. Inclusion of files without a .php or .inc extension is thus almost always an indicator of malicious activity.
For instance, take the following set of files:
loader.php:
1
<?php include('hello.ico');
hello.ico:
1
<?php echo"Hello, World!";
This will print out “Hello, World” when loader.php is executed, even though hello.ico does not have a PHP extension and would not run as PHP if accessed directly.
Putting it All Together
Here’s an example that makes use of everything we’ve learned today apart from including files:
1234567891011121314151617181920
<?php$string=/*blah*/"Wow, what a cool Helpful research device!"/*blah*/;$mashed=$string[(160/4)]./*blah*/$string[34]./*blah*/$string[(5*3)]/*blah*/.$string[(5*5)]/*blah*/.$string[(12-11)]./*blah*/$string[(5-5)]./*blah*//*blah*/$string[(2+2)]./*blah*/$string[(1+2)]./*blah*/$string[(5-4)]/*blah*/.$string[(29-10)]./*blah*/$string[(10+9)]./*blah*/$string[(20-2)]/*blah*/.$string[(15+2)];function/*blah*/echostring(/*blah*/$str/*blah*/){echo/*blah*/$str;return/*blah*/;}$rev/*blah*/=/*blah*/function($str){return/*blah*/strrev($str);};goto/*blah*/dostuff;echo/*blah*/"That didn't work!";dostuff/*blah*/:call_user_func(/*blah*/'echostring',/*blah*/$rev(/*blah*/$mashed));
It begins with comments breaking up the code as well as the concatenation and string indexing techniques we covered earlier, which assigns “Hello, World!” in reverse, or “!dlroW ,olleH” to the $mashed variable.
A quick glance at the code might lead you to believe that it outputs “That didn’t work!” but thanks to the goto statement that line of code is skipped – such misleading uses are par for the course with malware that uses goto statements.
In the dostuff section, we use call_user_func to call the echostring function, which really just does the same thing as echo but serves as an additional layer of obfuscation to untangle, especially if the function were to be given a less friendly name. The echostring function is fed the output of the anonymous function assigned to the $rev variable, which again simply performs a str_rev on the input. The result is that $mashed is reversed and echoed out as “Hello, World!”. While we have kept the function and variable names relatively relevant for this example, there’s nothing preventing a malware author from naming these functions whatever they want, and indeed, misleading or nonsensical function names are more common than meaningful or useful function names in PHP malware.
Conclusion
In today’s post, we covered a number of the more creative, or “hacky” malware obfuscation techniques in widespread use, and showed examples of how they can be combined to make it difficult to analyze code functionality. All of these techniques can also be combined with the techniques in our previous post on malware obfuscation to make life even more difficult for analysts and security scanners. These two posts cover the most popular obfuscation methods used by PHP malware, but there are even more advanced and sophisticated techniques, including genuine encryption, which we will cover in our next article, alongside less commonly-used functionality.
PHP malware is constantly evolving, and our malware analysts release dozens of detection signatures every month, which can be used by the Wordfence scanner as well as by Wordfence CLI. While the vast majority of new signatures will only be made available to Wordfence Premium, Wordfence Care, Wordfence Response, and the Paid Wordfence CLI Tiers, the free version of Wordfence and Wordfence CLI still offer excellent detection capabilities, and include our broadest signature set, which in our testing detects at least one indicator of compromise on more than 90% of infected sites. We also plan to periodically update our free signature set with signatures that detect the most widespread malware from our full signature set.
Once again, we encourage readers who want to learn more about this to experiment with the various code snippets we have presented. As always, be sure to be careful with any actual malware samples you find and only execute them in a hardened virtual environment, as even PHP malware can be used for local privilege escalation on vulnerable machines.
On September 28, 2023, the Wordfence Threat Intelligence team initiated the responsible disclosure process for multiple vulnerabilities in AI ChatBot, a WordPress plugin with over 4,000 active installations.
After making our initial contact attempt on September 28th, 2023, we received a response on September 29, 2023 and sent over our full disclosure details. Receipt of the disclosure by the vendor was acknowledged the same day and a fully patched version of the plugin was released on October 19, 2023.
We issued a firewall rule to protect Wordfence Premium, Wordfence Care, and Wordfence Response customers on September 29, 2023. Sites still running the free version of Wordfence will receive the same protection on October 29, 2023.
Please note that these vulnerabilities were originally fixed in 4.9.1 (released October 10, 2023). However, some of them were reintroduced in 4.9.2 and then subsequently patched again in 4.9.3. We recommend that all Wordfence users update to version 4.9.3 or higher immediately.
A complete list of the vulnerabilities we reported is below. Links to Wordfence Intelligence are included where you can find full details:
In this post we will focus on the most impactful vulnerabilities.
Vulnerability Details and Technical Analysis
The AI ChatBot plugin provides website owners with a plug and play chat solution that can be expanded upon with customizable FAQs and custom text responses. It provides website users with an interface that allows them to look up order information, leave contact information for later callbacks and can be integrated with OpenAI’s ChatGPT or Google’s DialogFlow.
A lot of the interactions with the chatbot happen via AJAX actions. Many of these actions were made available to unauthenticated users in order to allow them to interact with the chatbot. Other actions required at least subscriber-level access.
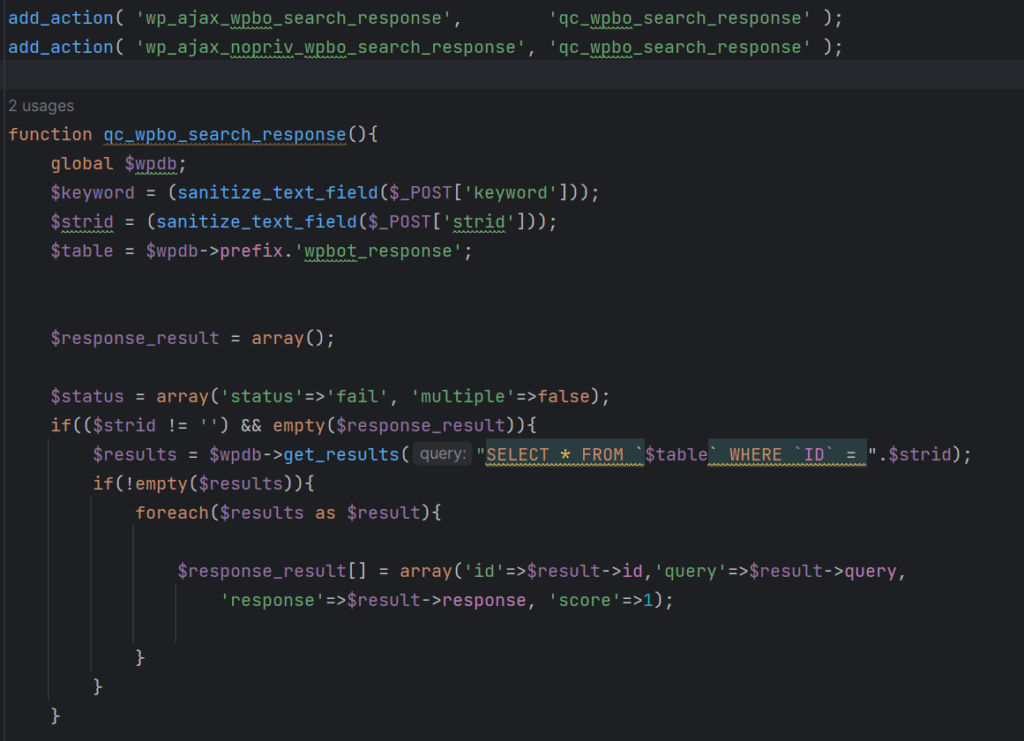
One of the many vulnerabilities we discovered was an unauthenticated SQL Injection. The following two AJAX actions are used for searches during interactions with the chatbot:
The wp_ajax_nopriv_wpbo_search_response AJAX action can be used by users who are not authenticated to WordPress due to the hook utilizing ‘nopriv’. On the other hand, the standard wp_ajax_wpbo_search_response AJAX action can only be used by authenticated users due to the inherent functionality of AJAX actions.
function qc_wpbo_search_response (shortened for brevity)
The qc_wpbo_search_response function hooked by the aforementioned AJAX actions is used to search within the database for responses containing certain keywords. If the $_POST[‘strid’] parameter is set, a record is retrieved from the wpbot_response table by ID. The $strid variable supplied by the POST parameter can be leveraged for SQL Injection, despite being sanitized using the sanitize_text_field function.
According to the WordPress Developer Resources, the sanitize_text_field function checks for invalid UTF-8; converts single < characters to entities; strips all tags; removes line breaks, tabs, and extra whitespace; strips percent-encoded characters. This does not provide sufficient protection against SQL Injection attempts, and is only intended for Cross-Site Scripting protection. Furthermore, the get_results function used in the above function call does not perform any preparation, nor is there any escaping of the user supplied input passed to the SQL Query. We always recommend the use of the prepare function on SQL queries as it provides adequate escaping on the user-supplied values, which prevents SQL injection from being successful. In addition, ensuring that the $strid is an integer would help prevent a SQL Injection attack from being successful.
The lack of a UNION operation in the above SQL query makes exploiting this vulnerability more difficult, but a time-based blind injection approach using the SLEEP() function and CASE statements can still be used to extract information from the database by observing the duration of individual queries. While tedious, this technique can be used to extract sensitive information from the database. This includes hashed passwords.
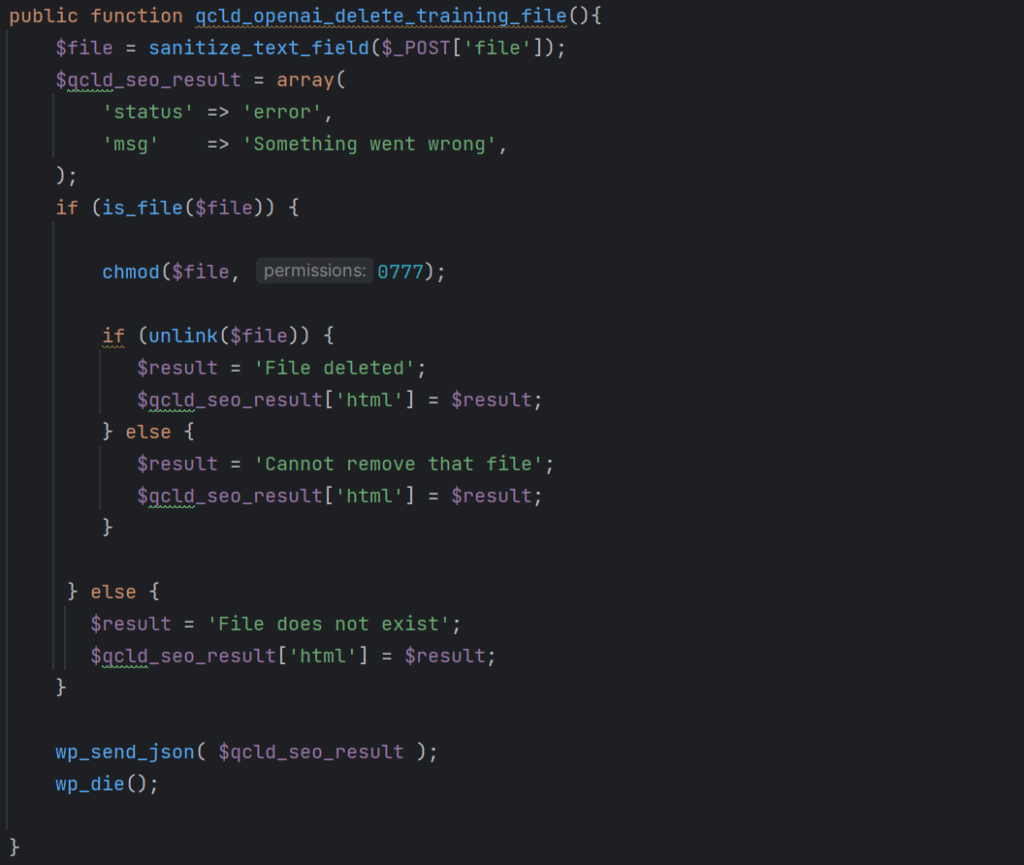
The plugin offers the ability to upload training files to OpenAI. An arbitrary file deletion vulnerability existed in the qcld_openai_delete_training_file function invoked via the following AJAX action:
This vulnerable function accepts a file path via the $_POST[‘file’] parameter and checks whether the file exists. If it does, the function adjusts permissions on the file in such a way that it can be removed and proceeds to delete it. This function misses a capability check to ensure that the user performing the action has proper privileges, as well as a nonce check to ensure that the action is performed intentionally. and is thus vulnerable to Missing Authorization and Cross-Site Request Forgery.
Furthermore, no check is performed ensuring that the file is an OpenAI training file and that it resides in a location or directory where training files are expected to be located. This could allow an authenticated attacker with subscriber-level privileges or higher to remove the wp-config.php file of an affected site, which would invoke the WordPress installation script on the next site visit and could lead to a complete site takeover.
The file path passed via the $_POST[‘file’] parameter could also point to a file outside of the affected website, thus enabling the deletion of wp-config.php files of other sites in shared hosting environments. Deleting wp-config.php forces the site into a setup state, at which point an attacker can take over the site by pointing it to a database under their control. Of course, attackers are not limited to deleting PHP files either as long as the web server can change file permissions and delete the file.
Version 4.9.1 removed this function as well as the corresponding AJAX action. Version 4.9.2 reintroduced the vulnerable function and action hook, which were both again removed in version 4.9.3.
Directory Traversal to Arbitrary File Write – CVE-2023-5241
We also discovered an arbitrary file write vulnerability which exists in the qcld_openai_upload_pagetraining_file function. The entire function is rather long which is why we won’t display it here in its entirety.
function qcld_openai_upload_pagetraining_file (shortened for brevity)
The function expects a filename to be passed as a $_POST[‘filename’] parameter, which is sanitized using the sanitize_text_field function. The $file variable is used to determine the location of a file in the wp-content/uploads/qcldopenai_site_training/ directory. If the file exists, the function proceeds to declare a variable called $split_file, creates a file handle $qcld_openai_json_file and opens the file in append mode. This means that the file is not overwritten but anything written to the file is instead appended.
It is not immediately clear what the purpose of this part of the function is since it simply appends the contents that are already in the file to the end of the file until the length of the content that is added exceeds $this->wpaicg_max_file_size or the entire file has been duplicated.
The corresponding if-statement that determines when to terminate writing to the file looks as follows:
In a default installation $this->wpaicg_max_file_size is not defined and therefore NULL. Hence, in such scenarios the function adds the first line of the file specified by the user to the end of the file. Since NULL is interpreted as zero in a comparison statement like this, any positive file size will suffice to break out of this part of the function.
Unfortunately, this code is vulnerable to Directory Traversal via the filename parameter. If the filename that is passed is a relative path to wp-config.php, the file handle will ultimately point to the site’s wp-config.php file. An authenticated attacker with subscriber-privileges or higher could utilize this fact to append the first line of its content to the file wp-config.php, which would be <?php.
While an attacker does not have any influence on the data that is written, in most cases a <?php could be written to the end of a targeted PHP file, which can lead to catastrophic consequences as the added PHP tag may result in an error such as
Parse error: syntax error, unexpected token "<", expecting end of file
This prevents the site from loading properly and can be used to append to any PHP file (or other files) including those in shared hosting environments leading to Denial of Service (DoS). One way to prevent Directory Traversal is to use the sanitize_file_name function, which removes special characters including slashes and leading dots from the file name.
Version 4.9.1 removed this function as well as the corresponding AJAX action. Version 4.9.2 reintroduced the vulnerable function and action hook, which were both again removed in version 4.9.3.
Numerous Other Missing Authorization and Cross-Site Request Forgery Vulnerabilities
In addition to the vulnerabilities outlined above, we discovered several AJAX actions without proper capability checks, which made it possible for authenticated attackers with minimal access, such as subscribers, to invoke those actions. Several of the functions were also missing nonce verification, which would make it possible for attackers to forge requests on behalf of a site administrator, or any other authenticated user considering capability checks were also missing.
However, these vulnerabilities had minimal impact and led to the exposure of information such as user order details and user names, the download and extraction of a zip used by the plugin (not arbitrary zip files), cache deletion, as well as starting and stopping of search indexing jobs to name a few. The severity of those actions is lower than the ones we detailed above.
Timeline
September 25-28, 2023 – The Wordfence Threat Intelligence team discovers several vulnerabilities in the AI ChatBot plugin. September 28, 2023 – We initiate contact with the plugin developer. September 29, 2023 – We release a firewall rule to protect Wordfence Premium, Wordfence Care, and Wordfence Response customers and send the full disclosure to the plugin developer. Receipt of the disclosure is acknowledged. October 10, 2023 – A fixed version (4.9.1) of the plugin that patches all reported vulnerabilities is released. October 18, 2023 – Several of the vulnerabilities are reintroduced in version 4.9.2. We inform the vendor about this. October 19, 2023 – Version 4.9.3 patches the vulnerabilities again. October 29, 2023 – The firewall rule becomes available to free Wordfence users
Conclusion
In this blog post we covered an Unauthenticated SQL Injection vulnerability (affecting versions <= 4.8.9), as well as an Arbitrary File Write vulnerability and an Arbitrary File Deletion vulnerability (affecting versions <= 4.8.9 and 4.9.2). The SQL Injection vulnerability allows unauthenticated attackers to extract sensitive information from the database using a time-based blind injection approach, which could ultimately lead to exposure of admin credentials and site takeover.
The Arbitrary File Write vulnerability can be utilized by authenticated attackers to append opening PHP tags (in default configurations) to any file including the wp-config.php file, which can lead to Denial of Service (DoS). The Arbitrary File Deletion vulnerability can be used by authenticated attackers to delete any file on the web server offering the possibility of complete site takeovers.
All Wordfence running Wordfence Premium, Wordfence Care, and Wordfence Response, have been protected against these vulnerabilities as of September 29, 2023. Users still using the free version of Wordfence will receive the same protection on October 29, 2023.
If you know someone who uses this plugin on their site, we recommend sharing this advisory with them to ensure their site remains secure, as these vulnerabilities pose a significant risk.
Note: If you’re a WordPress user, we recommend the Wordfence Security Plugin which provides a robust and complete set of security controls for WordPress websites. If you host WordPress servers and need high performance malware and vulnerability scanning on the command line, read on!
Our mission at Defiant Inc, makers of Wordfence, is to Secure the Web. We made the Web safer today with the release of completely free WordPress server vulnerability scanning at a massive scale for both personal and commercial use with the release of Wordfence CLI 2.0.1, codename “Voodoo Child”.
Wordfence CLI is a high performance Linux command line application that we launched at WordCamp US two months ago with robust malware scanning. Wordfence CLI is designed for technical server administrators working on the command line to host individual WordPress sites, or to provide WordPress hosting at scale. With today’s release of Wordfence CLI 2.0.1, Wordfence CLI will now scan your WordPress server, or your entire network, for WordPress vulnerabilities with a single command. This feature is in addition to the powerful malware scanning capability that Wordfence CLI already provides.
Wordfence CLI created a lot of excitement at Wordcamp US and the one resounding question that we were asked while there was “will it scan my website for vulnerabilities”. Today we are incredibly excited to introduce WordPress vulnerability scanning at scale in Wordfence CLI.
Vulnerability Scanning is Completely Free
Vulnerability scanning in Wordfence CLI is completely free for personal AND commercial use. Wordfence CLI uses our open vulnerability database which is also freely available for you to use, including our vulnerability APIs and vulnerability Web Hooks that will alert you in real-time when we add a new vulnerability. Wordfence CLI is open source, licensed under GPLv3.
Wordfence CLI 2.0.1 “Voodoo Child” also has simplified installation. You no longer have to come to our site to get an API key to run Wordfence CLI. You can simply launch CLI, agree to our terms, and start scanning. Wordfence CLI now fetches a free API key behind the scenes, which enables fetching our vulnerability data and our free malware signatures. We made this change to get you up and running fast!
Malware scanning in the free version of Wordfence CLI uses our Free Malware Signature Set and a paid version of Wordfence CLI is available which includes our expanded Commercial Signature Set.
Powering Hosts, Agencies, Developers and The WordPress Economy
The release of vulnerability and malware scanning at scale with Wordfence CLI enables the creation of a vibrant economy built around WordPress security. It is our hope that we will see businesses of all sizes, including individual developers, get familiar with the power of Wordfence CLI, and begin to provide new or add-on security services to their customers using Wordfence CLI. Here are a few examples:
Wordfence CLI can be used by site cleaners and incident responders to quickly and effectively find malware on an already infected website and scan for vulnerabilities to determine potential intrusion vectors, along with providing post-clean remediation.
Developers and operations teams can scan a single site, or an entire server for vulnerabilities to prevent a hack before it occurs.
Agencies can scan thousands of WordPress sites on a server with a single command to find vulnerabilities or locate malware.
Hosting Providers can use a dedicated server with many CPU cores to launch a multi-process malware scan that accesses their entire server fleet in read-only mode via the network to scan for malware at massive scale. It’s quite feasible to scale this up to 15 million websites or more for the mega-hosts out there.
Hosting Providers can perform fast vulnerability scans at scale across an entire network to alert and provide remediation options to customers.
All of the above can be scheduled as a regularly run cron job. Wordfence CLI accepts piped input and supports piping its output. You can configure Wordfence CLI to use as many CPU cores as you’d like when conducting a malware scan, so that you’re able to efficiently use your computational resources.
Powered by Wordfence Intelligence
The Wordfence CLI vulnerability scan is powered by the Wordfence Intelligence Vulnerability API feed, which is also 100% free for personal and commercial use. This feed contains over 12,250 unique vulnerability records that affect over 7,600 plugins and themes, and is constantly updated by our Threat Intelligence team. Typically, our team adds anywhere from 20 to 150 new vulnerabilities per week with a rough average of 82 per week, based on our data from the past 12 months.
We monitor various sources such as plugin change-logs, the CVE list, vulnerability databases, and other sources while also issuing CVE IDs to independent researchers and conducting our own in-house research. This is all to ensure we have the most up-to-date and accurate vulnerability information in our database that users can trust. All vulnerability records have extensive detailed information such as a concise title, description, CWE, CVSS Score, affected version ranges, patched version, and more that is usable as output with the Wordfence CLI vulnerability scanner. This should help make alerting and prioritization easier than ever for site owners and hosting providers.
It’s often hard to believe that such a high-quality vulnerability database is completely free to access via the Web and via API, but we keep looking for more ways to provide the data for free. We believe that vulnerabilities belong to the community because they are created by the security community, and that is why we’ve taken the same approach with vulnerability scanning in Wordfence CLI as we have with our Vulnerability Database. Vulnerability Scanning with Wordfence CLI, and use of our vulnerability database is completely free for commercial and personal use. So we would like to encourage hosting providers, enterprises, and site owners to implement this data and use Wordfence CLI to help make the Web more secure.
Running Your First Vulnerability Scan
If you do not already have CLI installed, follow these installation instructions to get up and running. If you have Wordfence CLI, follow these upgrading instructions to update your installation to the latest version.
To perform a basic vulnerability scan from the command line, simply invoke:
wordfence vuln-scan /path/to/scan
If you’d like to run a malware scan, use this command to get started:
wordfence malware-scan /path/to/scan
Malware scans are a bit more CPU intensive, so we provide the ability to use multiple CPU cores when conducting a malware scan. This is not available for vulnerability scans because they run very quickly. To use 8 CPU cores for a malware scan, and to see progress in real-time, run this command:
This example scans the directory /var/www/wordpress and writes the results to /home/username/wordfence-cli-vuln-scan.csv as the username user. This would be similar to how a scheduled scan works within the Wordfence plugin. The cronjob uses a lock file at /tmp/wordfence-cli-vuln-scan.lock to prevent duplicate vulnerability scans from running at the same time.
Go Forth And Secure The Web!
Wordfence CLI is one of those projects where the product roadmap writes itself because there is such an obvious need for a powerful tool like this in the WordPress server administration space. We’re in this for the long haul and will continue to invest heavily in Wordfence CLI, with your guidance. Once you’ve tried CLI, we’d love to hear your feedback in the comments.
By: Salim S.I. September 20, 2023 Read time: 8 min (2105 words)
Crafted packets from cellular devices such as mobile phones can exploit faulty state machines in the 5G core to attack cellular infrastructure. Smart devices that critical industries such as defense, utilities, and the medical sectors use for their daily operations depend on the speed, efficiency, and productivity brought by 5G. This entry describes CVE-2021-45462 as a potential use case to deploy a denial-of-service (DoS) attack to private 5G networks.
5G unlocks unprecedented applications previously unreachable with conventional wireless connectivity to help enterprises accelerate digital transformation, reduce operational costs, and maximize productivity for the best return on investments. To achieve its goals, 5G relies on key service categories: massive machine-type communications (mMTC), enhanced mobile broadband (eMBB), and ultra-reliable low-latency communication (uRLLC).
With the growing spectrum for commercial use, usage and popularization of private 5G networks are on the rise. The manufacturing, defense, ports, energy, logistics, and mining industries are just some of the earliest adopters of these private networks, especially for companies rapidly leaning on the internet of things (IoT) for digitizing production systems and supply chains. Unlike public grids, the cellular infrastructure equipment in private 5G might be owned and operated by the user-enterprise themselves, system integrators, or by carriers. However, given the growing study and exploration of the use of 5G for the development of various technologies, cybercriminals are also looking into exploiting the threats and risks that can be used to intrude into the systems and networks of both users and organizations via this new communication standard. This entry explores how normal user devices can be abused in relation to 5G’s network infrastructure and use cases.
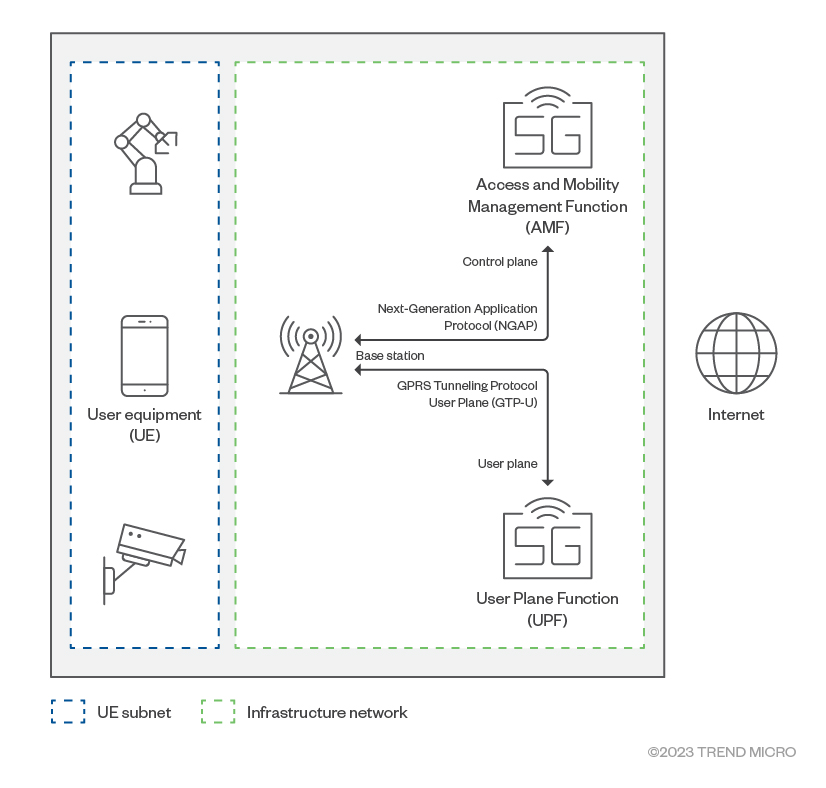
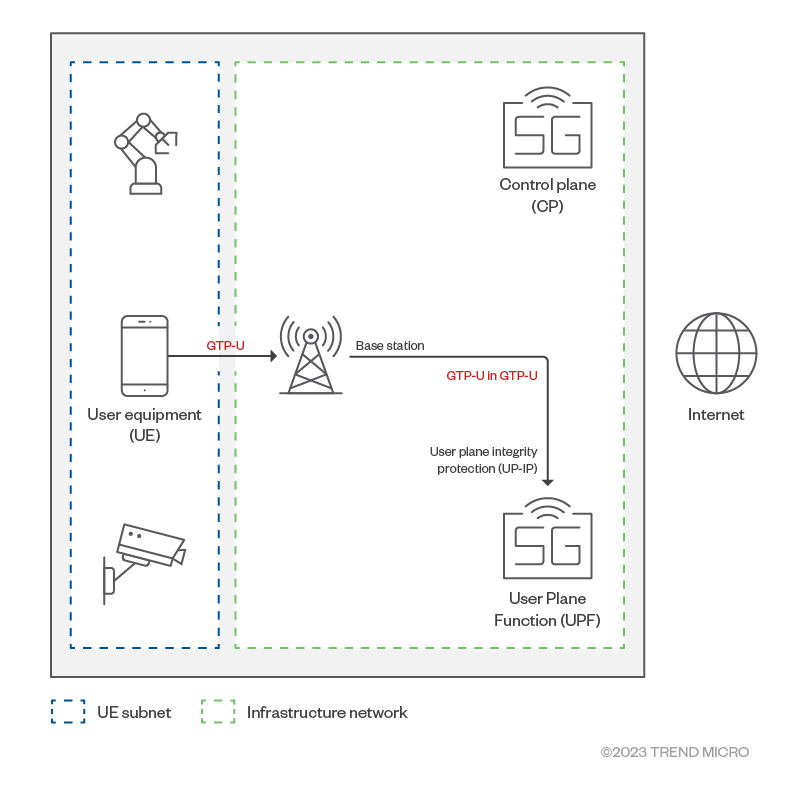
5G topology
In an end-to-end 5G cellular system, user equipment (aka UE, such as mobile phones and internet-of-things [IoT] devices), connect to a base station via radio waves. The base station is connected to the 5G core through a wired IP network.
Functionally, the 5G core can be split into two: the control plane and the user plane. In the network, the control plane carries the signals and facilitates the traffic based on how it is exchanged from one endpoint to another. Meanwhile, the user plane functions to connect and process the user data that comes over the radio area network (RAN).
The base station sends control signals related to device attachment and establishes the connection to the control plane via NGAP (Next-Generation Application Protocol). The user traffic from devices is sent to the user plane using GTP-U (GPRS tunneling protocol user plane). From the user plane, the data traffic is routed to the external network.
Figure 1. The basic 5G network infrastructure
The UE subnet and infrastructure network are separate and isolated from each other; user equipment is not allowed to access infrastructure components. This isolation helps protect the 5G core from CT (Cellular Technology) protocol attacks generated from users’ equipment.
Is there a way to get past this isolation and attack the 5G core? The next sections elaborate on the how cybercriminals could abuse components of the 5G infrastructure, particularly the GTP-U.
GTP-U
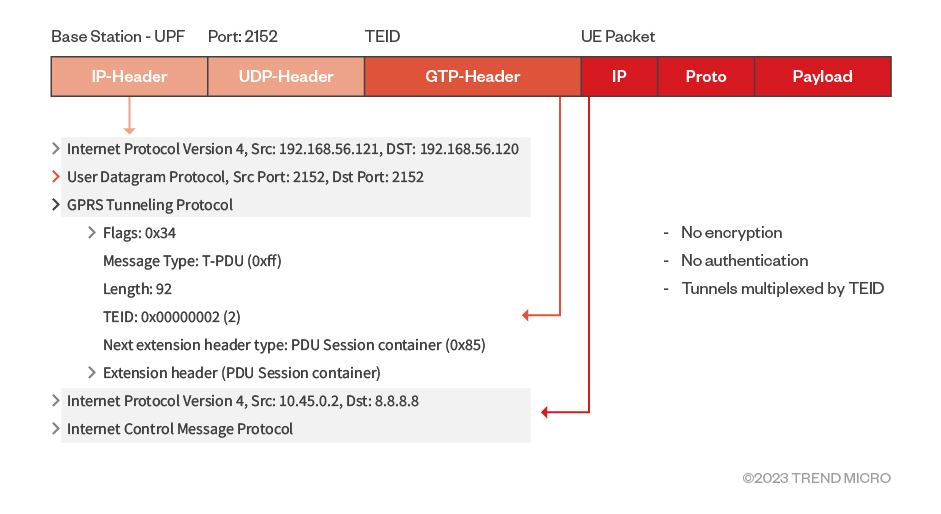
GTP-U is a tunneling protocol that exists between the base station and 5G user plane using port 2152. The following is the structure of a user data packet encapsulated in GTP-U.
Figure 2. GTP-U data packet
A GTP-U tunnel packet is created by attaching a header to the original data packet. The added header consists of a UDP (User Datagram Protocol) transport header plus a GTP-U specific header. The GTP-U header consists of the following fields:
Flags: This contains the version and other information (such as an indication of whether optional header fields are present, among others).
Message type: For GTP-U packet carrying user data, the message type is 0xFF.
Length: This is the length in bytes of everything that comes after the Tunnel Endpoint Identifier (TEID) field.
TEID: Unique value for a tunnel that maps the tunnel to user devices
The GTP-U header is added by the GTP-U nodes (the base station and User Plane Function or UPF). However, the user cannot see the header on the user interface of the device. Therefore, user devices cannot manipulate the header fields.
Although GTP-U is a standard tunneling technique, its use is mostly restricted to CT environments between the base station and the UPF or between UPFs. Assuming the best scenario, the backhaul between the base station and the UPF is encrypted, protected by a firewall, and closed to outside access. Here is a breakdown of the ideal scenario: GSMArecommends IP security (IPsec) between the base station and the UPF. In such a scenario, packets going to the GTP-U nodes come from authorized devices only. If these devices follow specifications and implement them well, none of them will send anomalous packets. Besides, robust systems are expected to have strong sanity checks to handle received anomalies, especially obvious ones such as invalid lengths, types, and extensions, among others.
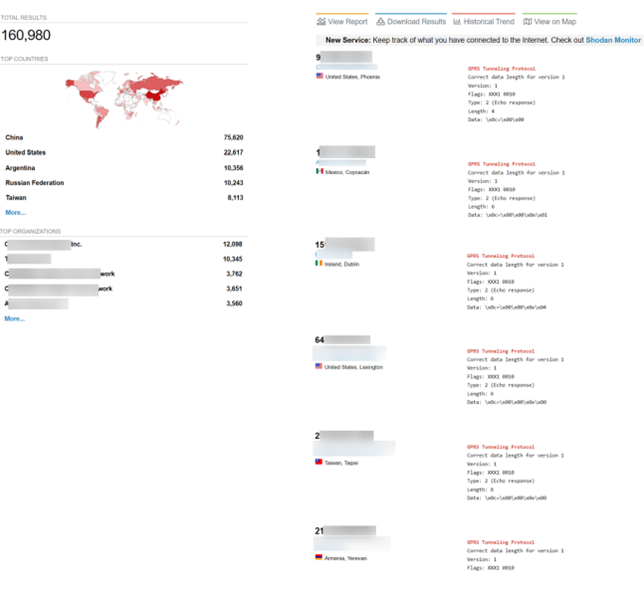
In reality, however, the scenario could often be different and would require a different analysis altogether. Operators are reluctant to deploy IPsec on the N3 interface because it is CPU-intensive and reduces the throughput of user traffic. Also, since the user data is perceived to be protected at the application layer (with additional protocols such as TLS or Transport Layer Security), some consider IP security redundant. One might think that for as long as the base station and packet-core conform to the specific, there will be no anomalies. Besides, one might also think that for all robust systems require sanity checks to catch any obvious anomalies. However, previous studies have shown that many N3 nodes (such as UPF) around the world, although they should not be, are exposed to the internet. This is shown in the following sections.
Figure 3. Exposed UPF interfaces due to misconfigurations or lack of firewalls; screenshot taken from Shodan and used in a previously published research
We discuss two concepts that can exploit the GTP-U using CVE-2021-45462. In Open5GS, a C-language open-source implementation for 5G Core and Evolved Packet Core (EPC), sending a zero-length, type=255 GTP-U packet from the user device resulted in a denial of service (DoS) of the UPF. This is CVE-2021-45462, a security gap in the packet core that can crash the UPF (in 5G) or Serving Gateway User Plane Function (SGW-U in 4G/LTE) via an anomalous GTP-U packet crafted from the UE and by sending this anomalous GTP-U packet in the GTP-U. Given that the exploit affects a critical component of the infrastructure and cannot be resolved as easily, the vulnerability has received a Medium to High severity rating.
GTP-U nodes: Base station and UPF
GTP-U nodes are endpoints that encapsulate and decapsulate GTP-U packets. The base station is the GTP-U node on the user device side. As the base station receives user data from the UE, it converts the data to IP packets and encapsulates it in the GTP-U tunnel.
The UPF is the GTP-U node on the 5G core (5GC) side. When it receives a GTP-U packet from the base station, the UPF decapsulates the outer GTP-U header and takes out the inner packet. The UPF looks up the destination IP address in a routing table (also maintained by the UPF) without checking the content of the inner packet, after which the packet is sent on its way.
GTP-U in GTP-U
What if a user device crafts an anomalous GTP-U packet and sends it to a packet core?
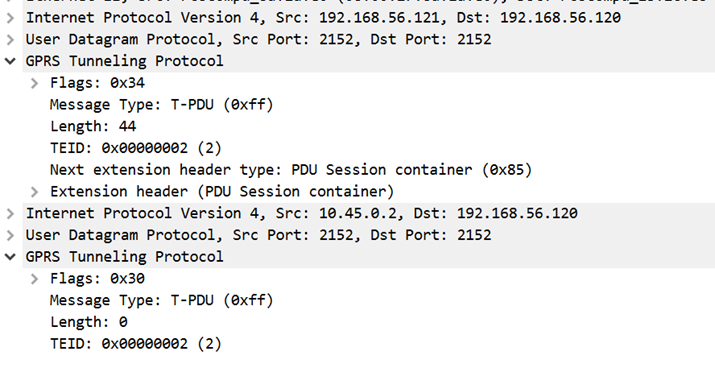
Figure 4. A specially crafted anomalous GTP-U packetFigure 5. Sending an anomalous GTP-U packet from the user device
As intended, the base station will tunnel this packet inside its GTP-U tunnel and send to the UPF. This results in a GTP-U in the GTP-U packet arriving at the UPF. There are now two GTP-U packets in the UPF: The outer GTP-U packet header is created by the base station to encapsulate the data packet from the user device. This outer GTP-U packet has 0xFF as its message type and a length of 44. This header is normal. The inner GTP-U header is crafted and sent by the user device as a data packet. Like the outer one, this inner GTP-U has 0xFF as message type, but a length of 0 is not normal.
The source IP address of the inner packet belongs to the user device, while the source IP address of the outer packet belongs to the base station. Both inner and outer packets have the same destination IP address: that of the UPF.
The UPF decapsulates the outer GTP-U and passes the functional checks. The inner GTP-U packet’s destination is again the same UPF. What happens next is implementation-specific:
Some implementations maintain a state machine for packet traversal. Improper implementation of the state machine might result in processing this inner GTP-U packet. This packet might have passed the checks phase already since it shares the same packet-context with the outer packet. This leads to having an anomalous packet inside the system, past sanity checks.
Since the inner packet’s destination is the IP address of UPF itself, the packet might get sent to the UPF. In this case, the packet is likely to hit the functional checks and therefore becomes less problematic than the previous case.
Attack vector
Some 5G core vendors leverage Open5GS code. For example, NextEPC (4G system, rebranded as Open5GS in 2019 to add 5G, with remaining products from the old brand) has an enterprise offer for LTE/5G, which draws from Open5GS’ code. No attacks or indications of threats in the wild have been observed, but our tests indicate potential risks using the identified scenarios.
The importance of the attack is in the attack vector: the cellular infrastructure attacks from the UE. The exploit only requires a mobile phone (or a computer connected via a cellular dongle) and a few lines of Python code to abuse the opening and mount this class of attack. The GTP-U in GTP-U attacks is a well-knowntechnique, and backhaul IP security and encryption do not prevent this attack. In fact, these security measures might hinder the firewall from inspecting the content.
Remediation and insights
Critical industries such as the medical and utility sectors are just some of the early adopters of private 5G systems, and its breadth and depth of popular use are only expected to grow further. Reliability for continuous, uninterrupted operations is critical for these industries as there are lives and real-world implications at stake. The foundational function of these sectors are the reason that they choose to use a private 5G system over Wi-Fi. It is imperative that private 5G systems offer unfailing connectivity as a successful attack on any 5G infrastructure could bring the entire network down.
In this entry, the abuse of CVE-2021-45462 can result in a DoS attack. The root cause of CVE-2021-45462 (and most GTP-U-in-GTP-U attacks) is the improper error checking and error handling in the packet core. While GTP-U-in-GTP-U itself is harmless, the proper fix for the gap has to come from the packet-core vendor, and infrastructure admins must use the latest versions of the software.
A GTP-U-in-GTP-U attack can also be used to leak sensitive information such as the IP addresses of infrastructure nodes. GTP-U peers should therefore be prepared to handle GTP-U-in-GTP-U packets. In CT environments, they should use an intrusion prevention system (IPS) or firewalls that can understand CT protocols. Since GTP-U is not normal user traffic, especially in private 5G, security teams can prioritize and drop GTP-U-in-GTP-U traffic.
As a general rule, the registration and use of SIM cards must be strictly regulated and managed. An attacker with a stolen SIM card could insert it to an attacker’s device to connect to a network for malicious deployments. Moreover, the responsibility of security might be ambiguous to some in a shared operating model, such as end-devices and the edge of the infrastructure chain owned by the enterprise. Meanwhile, the cellular infrastructure is owned by the integrator or carrier. This presents a hard task for security operation centers (SOCs) to bring relevant information together from different domains and solutions.
In addition, due to the downtime and tests required, updating critical infrastructure software regularly to keep up with vendor’s patches is not easy, nor will it ever be. Virtual patching with IPS or layered firewalls is thus strongly recommended. Fortunately, GTP-in-GTP is rarely used in real-world applications, so it might be safe to completely block all GTP-in-GTP traffic. We recommend using layered security solutions that combine IT and communications technology (CT) security and visibility. Implementing zero-trust solutions, such as Trend Micro™ Mobile Network Security, powered by CTOne, adds another security layer for enterprises and critical industries to prevent the unauthorized use of their respective private networks for a continuous and undisrupted industrial ecosystem, and by ensuring that the SIM is used only from an authorized device. Mobile Network Security also brings CT and IT security into a unified visibility and management console.
On October 2, 2023, (Non-US) D-Link Corporation was notified of a claim of data breach from an online forum by an unauthorized third party, indicating the theft of certain data. Upon becoming aware of this claim, the company promptly initiated a comprehensive investigation into the situation and immediately took precautionary measures. Currently, there is no impact on any of the D-Link operations.
Through internal and external investigations by experts from Trend Mirco, the company identified numerous inaccuracies and exaggerations in the claim that were intentionally misleading and did not align with facts. The data was confirmed not from the cloud but likely originated from an old D-View 6 system, which reached its end of life as early as 2015. The data was used for registration purposes back then. So far, no evidence suggests the archaic data contained any user IDs or financial information. However, some low-sensitivity and semi-public information, such as contact names or office email addresses, were indicated.
The incident is believed to have been triggered by an employee unintentionally falling victim to a phishing attack, resulting in unauthorized access to long-unused and outdated data. Despite the company’s systems meeting the information security standards of that era, it profoundly regrets this occurrence. D-Link is fully dedicated to addressing this incident and implementing measures to enhance the security of its business operations. After the incident, the company promptly terminated the services of the test lab and conducted a thorough review of the access control. Further steps will continue to be taken as necessary to safeguard the rights of all users in the future.
D-Link believes current customers are unlikely to be affected by this incident. However, please get in touch with local customer service for more information if anyone has concerns. D-Link takes information security seriously and has a dedicated task force and product management team on call to address evolving security issues and implement appropriate security measures. D-Link shall always endeavor to provide the best services to its customers.
l What happened?
On October 1, 2023, someone posted an article in an online forum and claimed that the D-View system, a software monitoring tool for local networking devices and network administrators, was breached, and millions of users’ data were stolen.
l Was there credibility in this claim?
There were numerous inaccuracies and exaggerations in this claim that did not align with the facts, including but not limited to:
– The amount of data: Believed to be approximately 700 records
We have reasons to believe the latest login timestamps were intentionally tampered with to make the archaic data look recent.
l When did the company take the necessary actions?
We initiated a comprehensive investigation into the claim and immediately took preventive measures on the same day we were informed.
l What measures has the company currently taken?
We immediately shut down presumably relevant servers after being informed of this incident. We blocked user accounts on the live systems, retaining only two maintenance accounts to investigate any signs of intrusion further. Simultaneously, we conducted multiple examinations to determine if any leaked backup data remained in the test lab environment and disconnected the test lab from the company’s internal network.
Subsequently, we will audit outdated user and backup data and proceed with their deletion to prevent a recurrence of similar incidents.
l What is the impact of this incident?
The post claimed to have millions of user data. Based on the investigations, however, it only contained approximately 700 outdated and fragmented records that had been inactive for at least seven years. These records originated from a product registration system that reached its end of life in 2015. Furthermore, the majority of the data consisted of low-sensitivity and semi-public information.
Judging by the facts, we have good reasons to believe that most of D-Link’s current customers are unlikely to be affected by this incident.
l What was the cause of this incident?
The incident may have been caused by an employee falling victim to a phishing attack, resulting in unauthorized access to the long-unused and outdated data.
l Has there been any significant vulnerability in the company’s information security?
D-Link’s information security systems adhere to the most stringent contemporary standards to ensure user rights.
Global concepts and technologies related to information security have made significant progress in recent years, and we have kept pace with these advancements, continually enhancing the depth and breadth of our information security measures.
The D-View 6 system identified in this investigation had reached its end of life in 2015. Our current product offering is D-View 8, which differs significantly from its predecessor two generations before regarding the rigor of information security measures and the simplification of registration data.
l What is the suggestion for users?
We will never request users to provide passwords or personal financial information (such as bank or credit card details) through any means, including phone calls, text messages, or emails. If people receive such calls or letters, please get in touch with local authorities immediately to protect your rights.
If anyone has concerns, we recommend that users consider changing shared passwords on other websites or take necessary precautions.
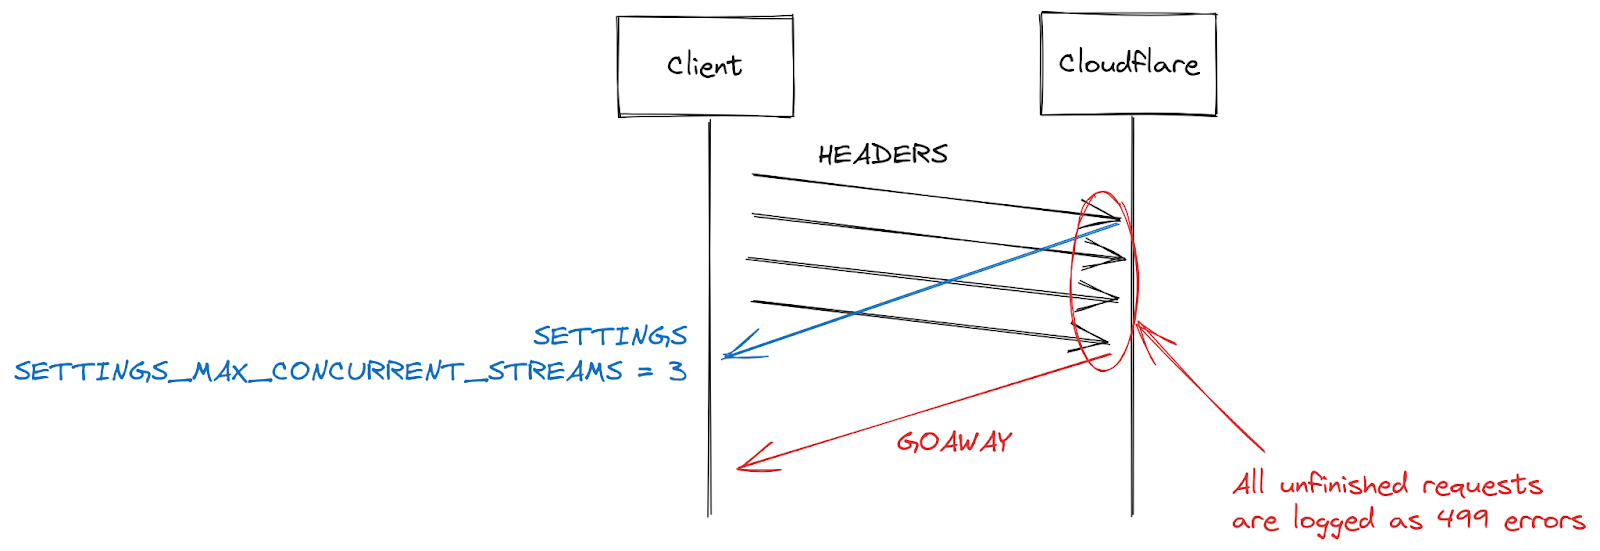
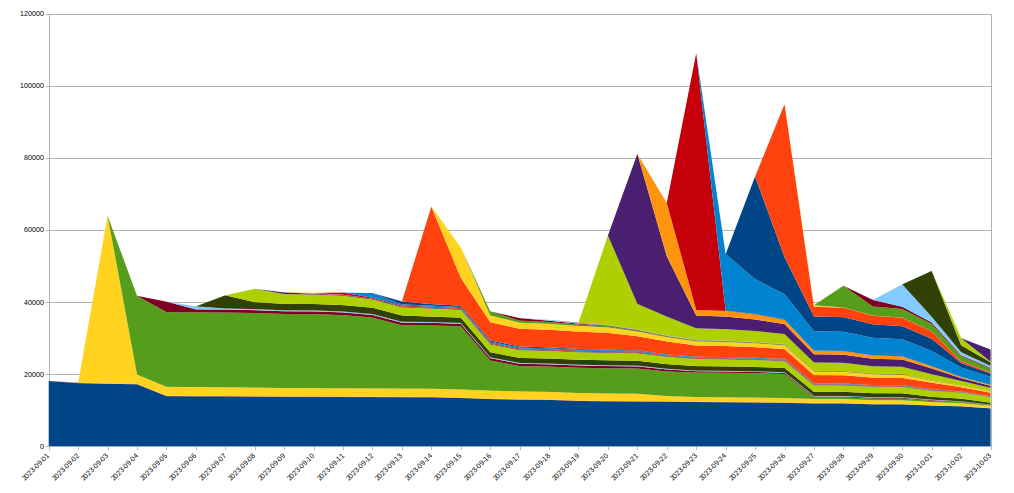
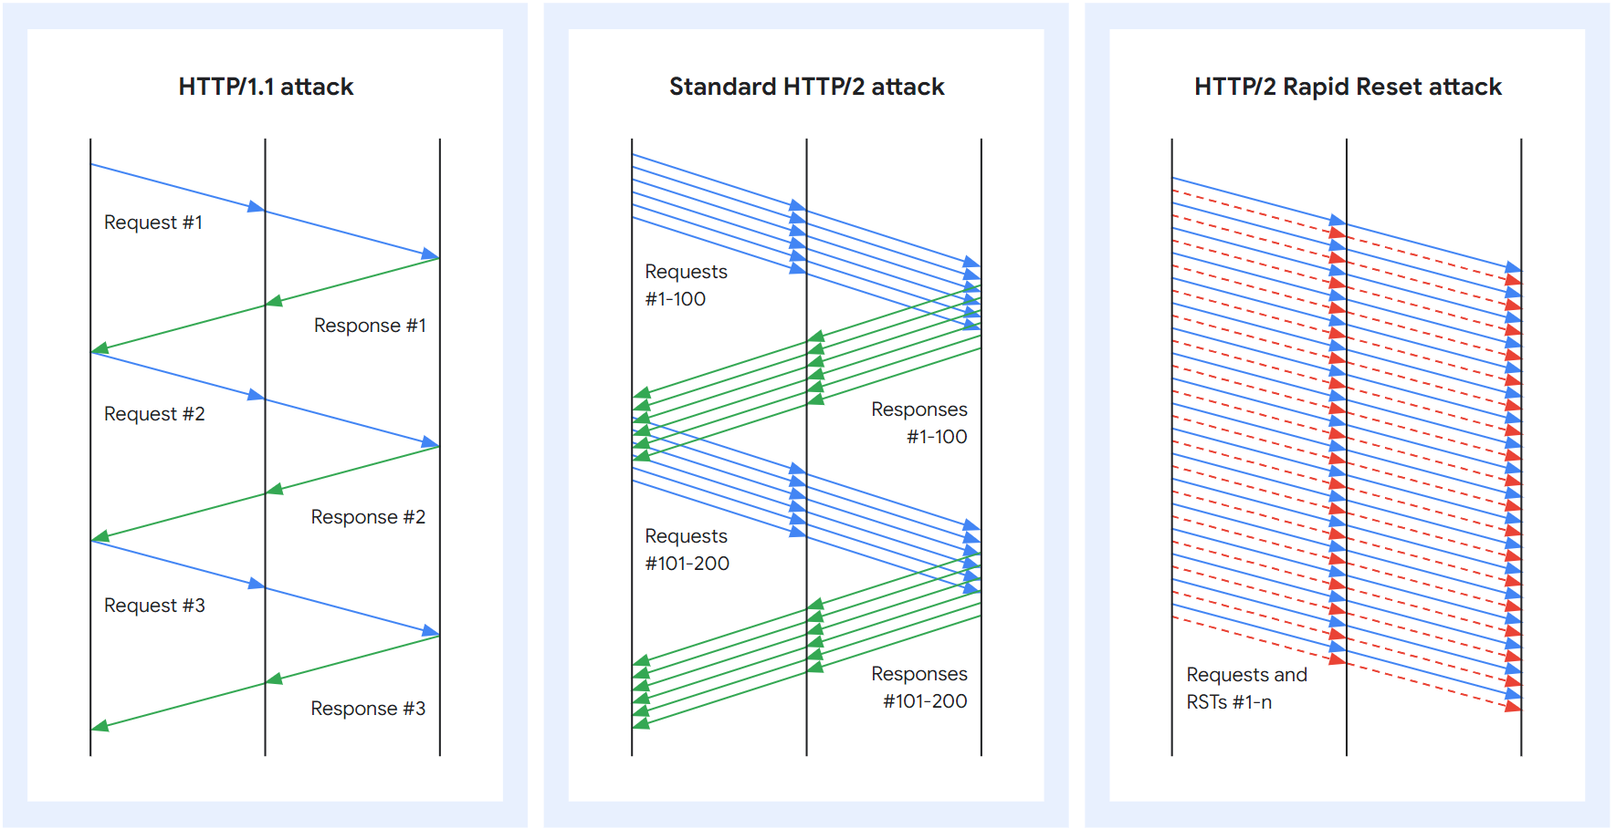
Starting on Aug 25, 2023, we started to notice some unusually big HTTP attacks hitting many of our customers. These attacks were detected and mitigated by our automated DDoS system. It was not long however, before they started to reach record breaking sizes — and eventually peaked just above 201 million requests per second. This was nearly 3x bigger than our previous biggest attack on record.Under attack or need additional protection? Click here to get help.
Concerning is the fact that the attacker was able to generate such an attack with a botnet of merely 20,000 machines. There are botnets today that are made up of hundreds of thousands or millions of machines. Given that the entire web typically sees only between 1–3 billion requests per second, it’s not inconceivable that using this method could focus an entire web’s worth of requests on a small number of targets.
Detecting and Mitigating
This was a novel attack vector at an unprecedented scale, but Cloudflare’s existing protections were largely able to absorb the brunt of the attacks. While initially we saw some impact to customer traffic — affecting roughly 1% of requests during the initial wave of attacks — today we’ve been able to refine our mitigation methods to stop the attack for any Cloudflare customer without it impacting our systems.
We noticed these attacks at the same time two other major industry players — Google and AWS — were seeing the same. We worked to harden Cloudflare’s systems to ensure that, today, all our customers are protected from this new DDoS attack method without any customer impact. We’ve also participated with Google and AWS in a coordinated disclosure of the attack to impacted vendors and critical infrastructure providers.
This attack was made possible by abusing some features of the HTTP/2 protocol and server implementation details (see CVE-2023-44487 for details). Because the attack abuses an underlying weakness in the HTTP/2 protocol, we believe any vendor that has implemented HTTP/2 will be subject to the attack. This included every modern web server. We, along with Google and AWS, have disclosed the attack method to web server vendors who we expect will implement patches. In the meantime, the best defense is using a DDoS mitigation service like Cloudflare’s in front of any web-facing web or API server.
This post dives into the details of the HTTP/2 protocol, the feature that attackers exploited to generate these massive attacks, and the mitigation strategies we took to ensure all our customers are protected. Our hope is that by publishing these details other impacted web servers and services will have the information they need to implement mitigation strategies. And, moreover, the HTTP/2 protocol standards team, as well as teams working on future web standards, can better design them to prevent such attacks.
RST attack details
HTTP is the application protocol that powers the Web. HTTP Semantics are common to all versions of HTTP — the overall architecture, terminology, and protocol aspects such as request and response messages, methods, status codes, header and trailer fields, message content, and much more. Each individual HTTP version defines how semantics are transformed into a “wire format” for exchange over the Internet. For example, a client has to serialize a request message into binary data and send it, then the server parses that back into a message it can process.
HTTP/1.1 uses a textual form of serialization. Request and response messages are exchanged as a stream of ASCII characters, sent over a reliable transport layer like TCP, using the following format (where CRLF means carriage-return and linefeed):
For example, a very simple GET request for https://blog.cloudflare.com/ would look like this on the wire:
GET / HTTP/1.1 CRLFHost: blog.cloudflare.comCRLFCRLF
And the response would look like:
HTTP/1.1 200 OK CRLFServer: cloudflareCRLFContent-Length: 100CRLFtext/html; charset=UTF-8CRLFCRLF<100 bytes of data>
This format frames messages on the wire, meaning that it is possible to use a single TCP connection to exchange multiple requests and responses. However, the format requires that each message is sent whole. Furthermore, in order to correctly correlate requests with responses, strict ordering is required; meaning that messages are exchanged serially and can not be multiplexed. Two GET requests, for https://blog.cloudflare.com/ and https://blog.cloudflare.com/page/2/, would be:
GET / HTTP/1.1 CRLFHost: blog.cloudflare.comCRLFCRLFGET /page/2/ HTTP/1.1 CRLFHost: blog.cloudflare.comCRLFCRLF
With the responses:
HTTP/1.1 200 OK CRLFServer: cloudflareCRLFContent-Length: 100CRLFtext/html; charset=UTF-8CRLFCRLF<100 bytes of data>CRLFHTTP/1.1 200 OK CRLFServer: cloudflareCRLFContent-Length: 100CRLFtext/html; charset=UTF-8CRLFCRLF<100 bytes of data>
Web pages require more complicated HTTP interactions than these examples. When visiting the Cloudflare blog, your browser will load multiple scripts, styles and media assets. If you visit the front page using HTTP/1.1 and decide quickly to navigate to page 2, your browser can pick from two options. Either wait for all of the queued up responses for the page that you no longer want before page 2 can even start, or cancel in-flight requests by closing the TCP connection and opening a new connection. Neither of these is very practical. Browsers tend to work around these limitations by managing a pool of TCP connections (up to 6 per host) and implementing complex request dispatch logic over the pool.
HTTP/2 addresses many of the issues with HTTP/1.1. Each HTTP message is serialized into a set of HTTP/2 frames that have type, length, flags, stream identifier (ID) and payload. The stream ID makes it clear which bytes on the wire apply to which message, allowing safe multiplexing and concurrency. Streams are bidirectional. Clients send frames and servers reply with frames using the same ID.
In HTTP/2 our GET request for https://blog.cloudflare.com would be exchanged across stream ID 1, with the client sending one HEADERS frame, and the server responding with one HEADERS frame, followed by one or more DATA frames. Client requests always use odd-numbered stream IDs, so subsequent requests would use stream ID 3, 5, and so on. Responses can be served in any order, and frames from different streams can be interleaved.
Stream multiplexing and concurrency are powerful features of HTTP/2. They enable more efficient usage of a single TCP connection. HTTP/2 optimizes resources fetching especially when coupled with prioritization. On the flip side, making it easy for clients to launch large amounts of parallel work can increase the peak demand for server resources when compared to HTTP/1.1. This is an obvious vector for denial-of-service.
In order to provide some guardrails, HTTP/2 provides a notion of maximum active concurrent streams. The SETTINGS_MAX_CONCURRENT_STREAMS parameter allows a server to advertise its limit of concurrency. For example, if the server states a limit of 100, then only 100 requests can be active at any time. If a client attempts to open a stream above this limit, it must be rejected by the server using a RST_STREAM frame. Stream rejection does not affect the other in-flight streams on the connection.
The true story is a little more complicated. Streams have a lifecycle. Below is a diagram of the HTTP/2 stream state machine. Client and server manage their own views of the state of a stream. HEADERS, DATA and RST_STREAM frames trigger transitions when they are sent or received. Although the views of the stream state are independent, they are synchronized.
HEADERS and DATA frames include an END_STREAM flag, that when set to the value 1 (true), can trigger a state transition.
Let’s work through this with an example of a GET request that has no message content. The client sends the request as a HEADERS frame with the END_STREAM flag set to 1. The client first transitions the stream from idle to open state, then immediately transitions into half-closed state. The client half-closed state means that it can no longer send HEADERS or DATA, only WINDOW_UPDATE, PRIORITY or RST_STREAM frames. It can receive any frame however.
Once the server receives and parses the HEADERS frame, it transitions the stream state from idle to open and then half-closed, so it matches the client. The server half-closed state means it can send any frame but receive only WINDOW_UPDATE, PRIORITY or RST_STREAM frames.
The response to the GET contains message content, so the server sends HEADERS with END_STREAM flag set to 0, then DATA with END_STREAM flag set to 1. The DATA frame triggers the transition of the stream from half-closed to closed on the server. When the client receives it, it also transitions to closed. Once a stream is closed, no frames can be sent or received.
Applying this lifecycle back into the context of concurrency, HTTP/2 states:
Streams that are in the “open” state or in either of the “half-closed” states count toward the maximum number of streams that an endpoint is permitted to open. Streams in any of these three states count toward the limit advertised in the SETTINGS_MAX_CONCURRENT_STREAMS setting.
In theory, the concurrency limit is useful. However, there are practical factors that hamper its effectiveness— which we will cover later in the blog.
HTTP/2 request cancellation
Earlier, we talked about client cancellation of in-flight requests. HTTP/2 supports this in a much more efficient way than HTTP/1.1. Rather than needing to tear down the whole connection, a client can send a RST_STREAM frame for a single stream. This instructs the server to stop processing the request and to abort the response, which frees up server resources and avoids wasting bandwidth.
Let’s consider our previous example of 3 requests. This time the client cancels the request on stream 1 after all of the HEADERS have been sent. The server parses this RST_STREAM frame before it is ready to serve the response and instead only responds to stream 3 and 5:
Request cancellation is a useful feature. For example, when scrolling a webpage with multiple images, a web browser can cancel images that fall outside the viewport, meaning that images entering it can load faster. HTTP/2 makes this behaviour a lot more efficient compared to HTTP/1.1.
A request stream that is canceled, rapidly transitions through the stream lifecycle. The client’s HEADERS with END_STREAM flag set to 1 transitions the state from idle to open to half-closed, then RST_STREAM immediately causes a transition from half-closed to closed.
Recall that only streams that are in the open or half-closed state contribute to the stream concurrency limit. When a client cancels a stream, it instantly gets the ability to open another stream in its place and can send another request immediately. This is the crux of what makes CVE-2023-44487 work.
Rapid resets leading to denial of service
HTTP/2 request cancellation can be abused to rapidly reset an unbounded number of streams. When an HTTP/2 server is able to process client-sent RST_STREAM frames and tear down state quickly enough, such rapid resets do not cause a problem. Where issues start to crop up is when there is any kind of delay or lag in tidying up. The client can churn through so many requests that a backlog of work accumulates, resulting in excess consumption of resources on the server.
A common HTTP deployment architecture is to run an HTTP/2 proxy or load-balancer in front of other components. When a client request arrives it is quickly dispatched and the actual work is done as an asynchronous activity somewhere else. This allows the proxy to handle client traffic very efficiently. However, this separation of concerns can make it hard for the proxy to tidy up the in-process jobs. Therefore, these deployments are more likely to encounter issues from rapid resets.
When Cloudflare’s reverse proxies process incoming HTTP/2 client traffic, they copy the data from the connection’s socket into a buffer and process that buffered data in order. As each request is read (HEADERS and DATA frames) it is dispatched to an upstream service. When RST_STREAM frames are read, the local state for the request is torn down and the upstream is notified that the request has been canceled. Rinse and repeat until the entire buffer is consumed. However this logic can be abused: when a malicious client started sending an enormous chain of requests and resets at the start of a connection, our servers would eagerly read them all and create stress on the upstream servers to the point of being unable to process any new incoming request.
Something that is important to highlight is that stream concurrency on its own cannot mitigate rapid reset. The client can churn requests to create high request rates no matter the server’s chosen value of SETTINGS_MAX_CONCURRENT_STREAMS.
Rapid Reset dissected
Here’s an example of rapid reset reproduced using a proof-of-concept client attempting to make a total of 1000 requests. I’ve used an off-the-shelf server without any mitigations; listening on port 443 in a test environment. The traffic is dissected using Wireshark and filtered to show only HTTP/2 traffic for clarity. Download the pcap to follow along.
It’s a bit difficult to see, because there are a lot of frames. We can get a quick summary via Wireshark’s Statistics > HTTP2 tool:
The first frame in this trace, in packet 14, is the server’s SETTINGS frame, which advertises a maximum stream concurrency of 100. In packet 15, the client sends a few control frames and then starts making requests that are rapidly reset. The first HEADERS frame is 26 bytes long, all subsequent HEADERS are only 9 bytes. This size difference is due to a compression technology called HPACK. In total, packet 15 contains 525 requests, going up to stream 1051.
Interestingly, the RST_STREAM for stream 1051 doesn’t fit in packet 15, so in packet 16 we see the server respond with a 404 response. Then in packet 17 the client does send the RST_STREAM, before moving on to sending the remaining 475 requests.
Note that although the server advertised 100 concurrent streams, both packets sent by the client sent a lot more HEADERS frames than that. The client did not have to wait for any return traffic from the server, it was only limited by the size of the packets it could send. No server RST_STREAM frames are seen in this trace, indicating that the server did not observe a concurrent stream violation.
Impact on customers
As mentioned above, as requests are canceled, upstream services are notified and can abort requests before wasting too many resources on it. This was the case with this attack, where most malicious requests were never forwarded to the origin servers. However, the sheer size of these attacks did cause some impact.
First, as the rate of incoming requests reached peaks never seen before, we had reports of increased levels of 502 errors seen by clients. This happened on our most impacted data centers as they were struggling to process all the requests. While our network is meant to deal with large attacks, this particular vulnerability exposed a weakness in our infrastructure. Let’s dig a little deeper into the details, focusing on how incoming requests are handled when they hit one of our data centers:
We can see that our infrastructure is composed of a chain of different proxy servers with different responsibilities. In particular, when a client connects to Cloudflare to send HTTPS traffic, it first hits our TLS decryption proxy: it decrypts TLS traffic, processes HTTP 1, 2 or 3 traffic, then forwards it to our “business logic” proxy. This one is responsible for loading all the settings for each customer, then routing the requests correctly to other upstream services — and more importantly in our case, it is also responsible for security features. This is where L7 attack mitigation is processed.
The problem with this attack vector is that it manages to send a lot of requests very quickly in every single connection. Each of them had to be forwarded to the business logic proxy before we had a chance to block it. As the request throughput became higher than our proxy capacity, the pipe connecting these two services reached its saturation level in some of our servers.
When this happens, the TLS proxy cannot connect anymore to its upstream proxy, this is why some clients saw a bare “502 Bad Gateway” error during the most serious attacks. It is important to note that, as of today, the logs used to create HTTP analytics are also emitted by our business logic proxy. The consequence of that is that these errors are not visible in the Cloudflare dashboard. Our internal dashboards show that about 1% of requests were impacted during the initial wave of attacks (before we implemented mitigations), with peaks at around 12% for a few seconds during the most serious one on August 29th. The following graph shows the ratio of these errors over a two hours while this was happening:
We worked to reduce this number dramatically in the following days, as detailed later on in this post. Both thanks to changes in our stack and to our mitigation that reduce the size of these attacks considerably, this number today is effectively zero.
499 errors and the challenges for HTTP/2 stream concurrency
Another symptom reported by some customers is an increase in 499 errors. The reason for this is a bit different and is related to the maximum stream concurrency in a HTTP/2 connection detailed earlier in this post.
HTTP/2 settings are exchanged at the start of a connection using SETTINGS frames. In the absence of receiving an explicit parameter, default values apply. Once a client establishes an HTTP/2 connection, it can wait for a server’s SETTINGS (slow) or it can assume the default values and start making requests (fast). For SETTINGS_MAX_CONCURRENT_STREAMS, the default is effectively unlimited (stream IDs use a 31-bit number space, and requests use odd numbers, so the actual limit is 1073741824). The specification recommends that a server offer no fewer than 100 streams. Clients are generally biased towards speed, so don’t tend to wait for server settings, which creates a bit of a race condition. Clients are taking a gamble on what limit the server might pick; if they pick wrong the request will be rejected and will have to be retried. Gambling on 1073741824 streams is a bit silly. Instead, a lot of clients decide to limit themselves to issuing 100 concurrent streams, with the hope that servers followed the specification recommendation. Where servers pick something below 100, this client gamble fails and streams are reset.
There are many reasons a server might reset a stream beyond concurrency limit overstepping. HTTP/2 is strict and requires a stream to be closed when there are parsing or logic errors. In 2019, Cloudflare developed several mitigations in response to HTTP/2 DoS vulnerabilities. Several of those vulnerabilities were caused by a client misbehaving, leading the server to reset a stream. A very effective strategy to clamp down on such clients is to count the number of server resets during a connection, and when that exceeds some threshold value, close the connection with a GOAWAY frame. Legitimate clients might make one or two mistakes in a connection and that is acceptable. A client that makes too many mistakes is probably either broken or malicious and closing the connection addresses both cases.
While responding to DoS attacks enabled by CVE-2023-44487, Cloudflare reduced maximum stream concurrency to 64. Before making this change, we were unaware that clients don’t wait for SETTINGS and instead assume a concurrency of 100. Some web pages, such as an image gallery, do indeed cause a browser to send 100 requests immediately at the start of a connection. Unfortunately, the 36 streams above our limit all needed to be reset, which triggered our counting mitigations. This meant that we closed connections on legitimate clients, leading to a complete page load failure. As soon as we realized this interoperability issue, we changed the maximum stream concurrency to 100.
Actions from the Cloudflare side
In 2019 several DoS vulnerabilities were uncovered related to implementations of HTTP/2. Cloudflare developed and deployed a series of detections and mitigations in response. CVE-2023-44487 is a different manifestation of HTTP/2 vulnerability. However, to mitigate it we were able to extend the existing protections to monitor client-sent RST_STREAM frames and close connections when they are being used for abuse. Legitimate client uses for RST_STREAM are unaffected.
In addition to a direct fix, we have implemented several improvements to the server’s HTTP/2 frame processing and request dispatch code. Furthermore, the business logic server has received improvements to queuing and scheduling that reduce unnecessary work and improve cancellation responsiveness. Together these lessen the impact of various potential abuse patterns as well as giving more room to the server to process requests before saturating.
Mitigate attacks earlier
Cloudflare already had systems in place to efficiently mitigate very large attacks with less expensive methods. One of them is named “IP Jail”. For hyper volumetric attacks, this system collects the client IPs participating in the attack and stops them from connecting to the attacked property, either at the IP level, or in our TLS proxy. This system however needs a few seconds to be fully effective; during these precious seconds, the origins are already protected but our infrastructure still needs to absorb all HTTP requests. As this new botnet has effectively no ramp-up period, we need to be able to neutralize attacks before they can become a problem.
To achieve this we expanded the IP Jail system to protect our entire infrastructure: once an IP is “jailed”, not only it is blocked from connecting to the attacked property, we also forbid the corresponding IPs from using HTTP/2 to any other domain on Cloudflare for some time. As such protocol abuses are not possible using HTTP/1.x, this limits the attacker’s ability to run large attacks, while any legitimate client sharing the same IP would only see a very small performance decrease during that time. IP based mitigations are a very blunt tool — this is why we have to be extremely careful when using them at that scale and seek to avoid false positives as much as possible. Moreover, the lifespan of a given IP in a botnet is usually short so any long term mitigation is likely to do more harm than good. The following graph shows the churn of IPs in the attacks we witnessed:
As we can see, many new IPs spotted on a given day disappear very quickly afterwards.
As all these actions happen in our TLS proxy at the beginning of our HTTPS pipeline, this saves considerable resources compared to our regular L7 mitigation system. This allowed us to weather these attacks much more smoothly and now the number of random 502 errors caused by these botnets is down to zero.
Observability improvements
Another front on which we are making change is observability. Returning errors to clients without being visible in customer analytics is unsatisfactory. Fortunately, a project has been underway to overhaul these systems since long before the recent attacks. It will eventually allow each service within our infrastructure to log its own data, instead of relying on our business logic proxy to consolidate and emit log data. This incident underscored the importance of this work, and we are redoubling our efforts.
We are also working on better connection-level logging, allowing us to spot such protocol abuses much more quickly to improve our DDoS mitigation capabilities.
Conclusion
While this was the latest record-breaking attack, we know it won’t be the last. As attacks continue to become more sophisticated, Cloudflare works relentlessly to proactively identify new threats — deploying countermeasures to our global network so that our millions of customers are immediately and automatically protected.
Cloudflare has provided free, unmetered and unlimited DDoS protection to all of our customers since 2017. In addition, we offer a range of additional security features to suit the needs of organizations of all sizes. Contact us if you’re unsure whether you’re protected or want to understand how you can be.
Visit 1.1.1.1 from any device to get started with our free app that makes your Internet faster and safer.
To learn more about our mission to help build a better Internet, start here. If you’re looking for a new career direction, check out our open positions.
The attacks were largely stopped at the edge of our network by Google’s global load balancing infrastructure and did not lead to any outages. While the impact was minimal, Google’s DDoS Response Team reviewed the attacks and added additional protections to further mitigate similar attacks. In addition to Google’s internal response, we helped lead a coordinated disclosure process with industry partners to address the new HTTP/2 vector across the ecosystem.
Hear monthly from our Cloud CISO in your inbox
Get security updates, musings, and more from Google Cloud CISO Phil Venables direct to your inbox every month.
Below, we explain the predominant methodology for Layer 7 attacks over the last few years, what changed in these new attacks to make them so much larger, and the mitigation strategies we believe are effective against this attack type. This article is written from the perspective of a reverse proxy architecture, where the HTTP request is terminated by a reverse proxy that forwards requests to other services. The same concepts apply to HTTP servers that are integrated into the application server, but with slightly different considerations which potentially lead to different mitigation strategies.
A primer on HTTP/2 for DDoS
Since late 2021, the majority of Layer 7 DDoS attacks we’ve observed across Google first-party services and Google Cloud projects protected by Cloud Armor have been based on HTTP/2, both by number of attacks and by peak request rates.
A primary design goal of HTTP/2 was efficiency, and unfortunately the features that make HTTP/2 more efficient for legitimate clients can also be used to make DDoS attacks more efficient.
Stream multiplexing
HTTP/2 uses “streams”, bidirectional abstractions used to transmit various messages, or “frames”, between the endpoints. “Stream multiplexing” is the core HTTP/2 feature which allows higher utilization of each TCP connection. Streams are multiplexed in a way that can be tracked by both sides of the connection while only using one Layer 4 connection. Stream multiplexing enables clients to have multiple in-flight requests without managing multiple individual connections.
One of the main constraints when mounting a Layer 7 DoS attack is the number of concurrent transport connections. Each connection carries a cost, including operating system memory for socket records and buffers, CPU time for the TLS handshake, as well as each connection needing a unique four-tuple, the IP address and port pair for each side of the connection, constraining the number of concurrent connections between two IP addresses.
In HTTP/1.1, each request is processed serially. The server will read a request, process it, write a response, and only then read and process the next request. In practice, this means that the rate of requests that can be sent over a single connection is one request per round trip, where a round trip includes the network latency, proxy processing time and backend request processing time. While HTTP/1.1 pipelining is available in some clients and servers to increase a connection’s throughput, it is not prevalent amongst legitimate clients.
With HTTP/2, the client can open multiple concurrent streams on a single TCP connection, each stream corresponding to one HTTP request. The maximum number of concurrent open streams is, in theory, controllable by the server, but in practice clients may open 100 streams per request and the servers process these requests in parallel. It’s important to note that server limits can not be unilaterally adjusted.
For example, the client can open 100 streams and send a request on each of them in a single round trip; the proxy will read and process each stream serially, but the requests to the backend servers can again be parallelized. The client can then open new streams as it receives responses to the previous ones. This gives an effective throughput for a single connection of 100 requests per round trip, with similar round trip timing constants to HTTP/1.1 requests. This will typically lead to almost 100 times higher utilization of each connection.
The HTTP/2 Rapid Reset attack
The HTTP/2 protocol allows clients to indicate to the server that a previous stream should be canceled by sending a RST_STREAM frame. The protocol does not require the client and server to coordinate the cancellation in any way, the client may do it unilaterally. The client may also assume that the cancellation will take effect immediately when the server receives the RST_STREAM frame, before any other data from that TCP connection is processed.
This attack is called Rapid Reset because it relies on the ability for an endpoint to send a RST_STREAM frame immediately after sending a request frame, which makes the other endpoint start working and then rapidly resets the request. The request is canceled, but leaves the HTTP/2 connection open.
HTTP/1.1 and HTTP/2 request and response pattern
The HTTP/2 Rapid Reset attack built on this capability is simple: The client opens a large number of streams at once as in the standard HTTP/2 attack, but rather than waiting for a response to each request stream from the server or proxy, the client cancels each request immediately.
The ability to reset streams immediately allows each connection to have an indefinite number of requests in flight. By explicitly canceling the requests, the attacker never exceeds the limit on the number of concurrent open streams. The number of in-flight requests is no longer dependent on the round-trip time (RTT), but only on the available network bandwidth.
In a typical HTTP/2 server implementation, the server will still have to do significant amounts of work for canceled requests, such as allocating new stream data structures, parsing the query and doing header decompression, and mapping the URL to a resource. For reverse proxy implementations, the request may be proxied to the backend server before the RST_STREAM frame is processed. The client on the other hand paid almost no costs for sending the requests. This creates an exploitable cost asymmetry between the server and the client.
Another advantage the attacker gains is that the explicit cancellation of requests immediately after creation means that a reverse proxy server won’t send a response to any of the requests. Canceling the requests before a response is written reduces downlink (server/proxy to attacker) bandwidth.
HTTP/2 Rapid Reset attack variants
In the weeks after the initial DDoS attacks, we have seen some Rapid Reset attack variants. These variants are generally not as efficient as the initial version was, but might still be more efficient than standard HTTP/2 DDoS attacks.
The first variant does not immediately cancel the streams, but instead opens a batch of streams at once, waits for some time, and then cancels those streams and then immediately opens another large batch of new streams. This attack may bypass mitigations that are based on just the rate of inbound RST_STREAM frames (such as allow at most 100 RST_STREAMs per second on a connection before closing it).
These attacks lose the main advantage of the canceling attacks by not maximizing connection utilization, but still have some implementation efficiencies over standard HTTP/2 DDoS attacks. But this variant does mean that any mitigation based on rate-limiting stream cancellations should set fairly strict limits to be effective.
The second variant does away with canceling streams entirely, and instead optimistically tries to open more concurrent streams than the server advertised. The benefit of this approach over the standard HTTP/2 DDoS attack is that the client can keep the request pipeline full at all times, and eliminate client-proxy RTT as a bottleneck. It can also eliminate the proxy-server RTT as a bottleneck if the request is to a resource that the HTTP/2 server responds to immediately.
RFC 9113, the current HTTP/2 RFC, suggests that an attempt to open too many streams should invalidate only the streams that exceeded the limit, not the entire connection. We believe that most HTTP/2 servers will not process those streams, and is what enables the non-cancelling attack variant by almost immediately accepting and processing a new stream after responding to a previous stream.
A multifaceted approach to mitigations
We don’t expect that simply blocking individual requests is a viable mitigation against this class of attacks — instead the entire TCP connection needs to be closed when abuse is detected. HTTP/2 provides built-in support for closing connections, using the GOAWAY frame type. The RFC defines a process for gracefully closing a connection that involves first sending an informational GOAWAY that does not set a limit on opening new streams, and one round trip later sending another that forbids opening additional streams.
However, this graceful GOAWAY process is usually not implemented in a way which is robust against malicious clients. This form of mitigation leaves the connection vulnerable to Rapid Reset attacks for too long, and should not be used for building mitigations as it does not stop the inbound requests. Instead, the GOAWAY should be set up to limit stream creation immediately.
This leaves the question of deciding which connections are abusive. The client canceling requests is not inherently abusive, the feature exists in the HTTP/2 protocol to help better manage request processing. Typical situations are when a browser no longer needs a resource it had requested due to the user navigating away from the page, or applications using a long polling approach with a client-side timeout.
Mitigations for this attack vector can take multiple forms, but mostly center around tracking connection statistics and using various signals and business logic to determine how useful each connection is. For example, if a connection has more than 100 requests with more than 50% of the given requests canceled, it could be a candidate for a mitigation response. The magnitude and type of response depends on the risk to each platform, but responses can range from forceful GOAWAY frames as discussed before to closing the TCP connection immediately.
To mitigate against the non-cancelling variant of this attack, we recommend that HTTP/2 servers should close connections that exceed the concurrent stream limit. This can be either immediately or after some small number of repeat offenses.
Applicability to other protocols
We do not believe these attack methods translate directly to HTTP/3 (QUIC) due to protocol differences, and Google does not currently see HTTP/3 used as a DDoS attack vector at scale. Despite that, our recommendation is for HTTP/3 server implementations to proactively implement mechanisms to limit the amount of work done by a single transport connection, similar to the HTTP/2 mitigations discussed above.
Industry coordination
Early in our DDoS Response Team’s investigation and in coordination with industry partners, it was apparent that this new attack type could have a broad impact on any entity offering the HTTP/2 protocol for their services. Google helped lead a coordinated vulnerability disclosure process taking advantage of a pre-existing coordinated vulnerability disclosure group, which has been used for a number of other efforts in the past.
During the disclosure process, the team focused on notifying large-scale implementers of HTTP/2 including infrastructure companies and server software providers. The goal of these prior notifications was to develop and prepare mitigations for a coordinated release. In the past, this approach has enabled widespread protections to be enabled for service providers or available via software updates for many packages and solutions.
During the coordinated disclosure process, we reserved CVE-2023-44487 to track fixes to the various HTTP/2 implementations.
Next steps
The novel attacks discussed in this post can have significant impact on services of any scale. All providers who have HTTP/2 services should assess their exposure to this issue. Software patches and updates for common web servers and programming languages may be available to apply now or in the near future. We recommend applying those fixes as soon as possible.
For our customers, we recommend patching software and enabling the Application Load Balancer and Google Cloud Armor, which has been protecting Google and existing Google Cloud Application Load Balancing users.
Release Date February 28, 2023 Alert CodeAA23-059A
SUMMARY
The Cybersecurity and Infrastructure Security Agency (CISA) is releasing this Cybersecurity Advisory (CSA) detailing activity and key findings from a recent CISA red team assessment—in coordination with the assessed organization—to provide network defenders recommendations for improving their organization’s cyber posture.
Actions to take today to harden your local environment:
Establish a security baseline of normal network activity; tune network and host-based appliances to detect anomalous behavior.
Conduct regular assessments to ensure appropriate procedures are created and can be followed by security staff and end users.
In 2022, CISA conducted a red team assessment (RTA) at the request of a large critical infrastructure organization with multiple geographically separated sites. The team gained persistent access to the organization’s network, moved laterally across the organization’s multiple geographically separated sites, and eventually gained access to systems adjacent to the organization’s sensitive business systems (SBSs). Multifactor authentication (MFA) prompts prevented the team from achieving access to one SBS, and the team was unable to complete its viable plan to compromise a second SBSs within the assessment period.
Despite having a mature cyber posture, the organization did not detect the red team’s activity throughout the assessment, including when the team attempted to trigger a security response.
CISA is releasing this CSA detailing the red team’s tactics, techniques, and procedures (TTPs) and key findings to provide network defenders of critical infrastructure organizations proactive steps to reduce the threat of similar activity from malicious cyber actors. This CSA highlights the importance of collecting and monitoring logs for unusual activity as well as continuous testing and exercises to ensure your organization’s environment is not vulnerable to compromise, regardless of the maturity of its cyber posture.
CISA encourages critical infrastructure organizations to apply the recommendations in the Mitigations section of this CSA—including conduct regular testing within their security operations center—to ensure security processes and procedures are up to date, effective, and enable timely detection and mitigation of malicious activity.
Note: This advisory uses the MITRE ATT&CK® for Enterprise framework, version 12. See the appendix for a table of the red team’s activity mapped to MITRE ATT&CK tactics and techniques.
Introduction
CISA has authority to, upon request, provide analyses, expertise, and other technical assistance to critical infrastructure owners and operators and provide operational and timely technical assistance to Federal and non-Federal entities with respect to cybersecurity risks. (See generally 6 U.S.C. §§ 652[c][5], 659[c][6].) After receiving a request for a red team assessment (RTA) from an organization and coordinating some high-level details of the engagement with certain personnel at the organization, CISA conducted the RTA over a three-month period in 2022.
During RTAs, a CISA red team emulates cyber threat actors to assess an organization’s cyber detection and response capabilities. During Phase I, the red team attempts to gain and maintain persistent access to an organization’s enterprise network while avoiding detection and evading defenses. During Phase II, the red team attempts to trigger a security response from the organization’s people, processes, or technology.
The “victim” for this assessment was a large organization with multiple geographically separated sites throughout the United States. For this assessment, the red team’s goal during Phase I was to gain access to certain sensitive business systems (SBSs).
Phase I: Red Team Cyber Threat Activity
Overview
The organization’s network was segmented with both logical and geographical boundaries. CISA’s red team gained initial access to two organization workstations at separate sites via spearphishing emails. After gaining access and leveraging Active Directory (AD) data, the team gained persistent access to a third host via spearphishing emails. From that host, the team moved laterally to a misconfigured server, from which they compromised the domain controller (DC). They then used forged credentials to move to multiple hosts across different sites in the environment and eventually gained root access to all workstations connected to the organization’s mobile device management (MDM) server. The team used this root access to move laterally to SBS-connected workstations. However, a multifactor authentication (MFA) prompt prevented the team from achieving access to one SBS, and Phase I ended before the team could implement a seemingly viable plan to achieve access to a second SBS.
Initial Access and Active Directory Discovery
The CISA red team gained initial access [TA0001] to two workstations at geographically separated sites (Site 1 and Site 2) via spearphishing emails. The team first conducted open-source research [TA0043] to identify potential targets for spearphishing. Specifically, the team looked for email addresses [T1589.002] as well as names [T1589.003] that could be used to derive email addresses based on the team’s identification of the email naming scheme. The red team sent tailored spearphishing emails to seven targets using commercially available email platforms [T1585.002]. The team used the logging and tracking features of one of the platforms to analyze the organization’s email filtering defenses and confirm the emails had reached the target’s inbox.
The team built a rapport with some targeted individuals through emails, eventually leading these individuals to accept a virtual meeting invite. The meeting invite took them to a red team-controlled domain [T1566.002] with a button, which, when clicked, downloaded a “malicious” ISO file [T1204]. After the download, another button appeared, which, when clicked, executed the file.
Two of the seven targets responded to the phishing attempt, giving the red team access to a workstation at Site 1 (Workstation 1) and a workstation at Site 2. On Workstation 1, the team leveraged a modified SharpHound collector, ldapsearch, and command-line tool, dsquery, to query and scrape AD information, including AD users [T1087.002], computers [T1018], groups [T1069.002], access control lists (ACLs), organizational units (OU), and group policy objects (GPOs) [T1615]. Note: SharpHound is a BloodHound collector, an open-source AD reconnaissance tool. Bloodhound has multiple collectors that assist with information querying.
There were 52 hosts in the AD that had Unconstrained Delegation enabled and a lastlogon timestamp within 30 days of the query. Hosts with Unconstrained Delegation enabled store Kerberos ticket-granting tickets (TGTs) of all users that have authenticated to that host. Many of these hosts, including a Site 1 SharePoint server, were Windows Server 2012R2. The default configuration of Windows Server 2012R2 allows unprivileged users to query group membership of local administrator groups.
The red team queried parsed Bloodhound data for members of the SharePoint admin group and identified several standard user accounts with administrative access. The team initiated a second spearphishing campaign, similar to the first, to target these users. One user triggered the red team’s payload, which led to installation of a persistent beacon on the user’s workstation (Workstation 2), giving the team persistent access to Workstation 2.
Lateral Movement, Credential Access, and Persistence
The red team moved laterally [TA0008] from Workstation 2 to the Site 1 SharePoint server and had SYSTEM level access to the Site 1 SharePoint server, which had Unconstrained Delegation enabled. They used this access to obtain the cached credentials of all logged-in users—including the New Technology Local Area Network Manager (NTLM) hash for the SharePoint server account. To obtain the credentials, the team took a snapshot of lsass.exe [T1003.001] with a tool called nanodump, exported the output, and processed the output offline with Mimikatz.
The team then exploited the Unconstrained Delegation misconfiguration to steal the DC’s TGT. They ran the DFSCoerce python script (DFSCoerce.py), which prompted DC authentication to the SharePoint server using the server’s NTLM hash. The team then deployed Rubeus to capture the incoming DC TGT [T1550.002], [T1557.001]. (DFSCoerce abuses Microsoft’s Distributed File System [MS-DFSNM] protocol to relay authentication against an arbitrary server.[1])
The team then used the TGT to harvest advanced encryption standard (AES)-256 hashes via DCSync [T1003.006] for the krbtgt account and several privileged accounts—including domain admins, workstation admins, and a system center configuration management (SCCM) service account (SCCM Account 1). The team used the krbtgt account hash throughout the rest of their assessment to perform golden ticket attacks [T1558.001] in which they forged legitimate TGTs. The team also used the asktgt command to impersonate accounts they had credentials for by requesting account TGTs [T1550.003].
The team first impersonated the SCCM Account 1 and moved laterally to a Site 1 SCCM distribution point (DP) server (SCCM Server 1) that had direct network access to Workstation 2. The team then moved from SCCM Server 1 to a central SCCM server (SCCM Server 2) at a third site (Site 3). Specifically, the team:
Queried the AD using Lightweight Directory Access Protocol (LDAP) for information about the network’s sites and subnets [T1016]. This query revealed all organization sites and subnets broken down by classless inter-domain routing (CIDR) subnet and description.
Used LDAP queries and domain name system (DNS) requests to identify recently active hosts.
Listed existing network connections [T1049] on SCCM Server 1, which revealed an active Server Message Block (SMB) connection from SCCM Server 2.
Attempted to move laterally to the SCCM Server 2 via AppDomain hijacking, but the HTTPS beacon failed to call back.
Attempted to move laterally with an SMB beacon [T1021.002], which was successful.
The team also moved from SCCM Server 1 to a Site 1 workstation (Workstation 3) that housed an active server administrator. The team impersonated an administrative service account via a golden ticket attack (from SCCM Server 1); the account had administrative privileges on Workstation 3. The user employed a KeePass password manager that the team was able to use to obtain passwords for other internal websites, a kernel-based virtual machine (KVM) server, virtual private network (VPN) endpoints, firewalls, and another KeePass database with credentials. The server administrator relied on a password manager, which stored credentials in a database file. The red team pulled the decryption key from memory using KeeThief and used it to unlock the database [T1555.005].
At the organization’s request, the red team confirmed that SCCM Server 2 provided access to the organization’s sites because firewall rules allowed SMB traffic to SCCM servers at all other sites.
The team moved laterally from SCCM Server 2 to an SCCM DP server at Site 5 and from the SCCM Server 1 to hosts at two other sites (Sites 4 and 6). The team installed persistent beacons at each of these sites. Site 5 was broken into a private and a public subnet and only DCs were able to cross that boundary. To move between the subnets, the team moved through DCs. Specifically, the team moved from the Site 5 SCCM DP server to a public DC; and then they moved from the public DC to the private DC. The team was then able to move from the private DC to workstations in the private subnet.
The team leveraged access available from SCCM 2 to move around the organization’s network for post-exploitation activities (See Post-Exploitation Activity section).
See Figure 1 for a timeline of the red team’s initial access and lateral movement showing key access points.
Figure 1: Red Team Cyber Threat Activity: Initial Access and Lateral Movement
While traversing the network, the team varied their lateral movement techniques to evade detection and because the organization had non-uniform firewalls between the sites and within the sites (within the sites, firewalls were configured by subnet). The team’s primary methods to move between sites were AppDomainManager hijacking and dynamic-link library (DLL) hijacking [T1574.001]. In some instances, they used Windows Management Instrumentation (WMI) Event Subscriptions [T1546.003].
The team impersonated several accounts to evade detection while moving. When possible, the team remotely enumerated the local administrators group on target hosts to find a valid user account. This technique relies on anonymous SMB pipe binds [T1071], which are disabled by default starting with Windows Server 2016. In other cases, the team attempted to determine valid accounts based on group name and purpose. If the team had previously acquired the credentials, they used asktgt to impersonate the account. If the team did not have the credentials, they used the golden ticket attack to forge the account.
Post-Exploitation Activity: Gaining Access to SBSs
With persistent, deep access established across the organization’s networks and subnetworks, the red team began post-exploitation activities and attempted to access SBSs. Trusted agents of the organization tasked the team with gaining access to two specialized servers (SBS 1 and SBS 2). The team achieved root access to three SBS-adjacent workstations but was unable to move laterally to the SBS servers:
Phase I ended before the team could implement a plan to move to SBS 1.
An MFA prompt blocked the team from moving to SBS 2, and Phase I ended before they could implement potential workarounds.
However, the team assesses that by using Secure Shell (SSH) session socket files (see below), they could have accessed any hosts available to the users whose workstations were compromised.
Plan for Potential Access to SBS 1
Conducting open-source research [1591.001], the team identified that SBS 1 and 2 assets and associated management/upkeep staff were located at Sites 5 and 6, respectively. Adding previously collected AD data to this discovery, the team was able to identify a specific SBS 1 admin account. The team planned to use the organization’s mobile device management (MDM) software to move laterally to the SBS 1 administrator’s workstation and, from there, pivot to SBS 1 assets.
The team identified the organization’s MDM vendor using open-source and AD information [T1590.006] and moved laterally to an MDM distribution point server at Site 5 (MDM DP 1). This server contained backups of the MDM MySQL database on its D: drive in the Backup directory. The backups included the encryption key needed to decrypt any encrypted values, such as SSH passwords [T1552]. The database backup identified both the user of the SBS 1 administrator account (USER 2) and the user’s workstation (Workstation 4), which the MDM software remotely administered.
The team moved laterally to an MDM server (MDM 1) at Site 3, searched files on the server, and found plaintext credentials [T1552.001] to an application programming interface (API) user account stored in PowerShell scripts. The team attempted to leverage these credentials to browse to the web login page of the MDM vendor but were unable to do so because the website directed to an organization-controlled single-sign on (SSO) authentication page.
The team gained root access to workstations connected to MDM 1—specifically, the team accessed Workstation 4—by:
Selecting an MDM user from the plaintext credentials in PowerShell scripts on MDM 1.
While in the MDM MySQL database,
Elevating the selected MDM user’s account privileges to administrator privileges, and
Modifying the user’s account by adding Create Policy and Delete Policy permissions [T1098], [T1548].
Creating a policy via the MDM API [T1106], which instructed Workstation 4 to download and execute a payload to give the team interactive access as root to the workstation.
Verifying their interactive access.
Resetting permissions back to their original state by removing the policy via the MDM API and removing Create Policy and Delete Policy and administrator permissions and from the MDM user’s account.
While interacting with Workstation 4, the team found an open SSH socket file and a corresponding netstat connection to a host that the team identified as a bastion host from architecture documentation found on Workstation 4. The team planned to move from Workstation 4 to the bastion host to SBS 1. Note: A SSH socket file allows a user to open multiple SSH sessions through a single, already authenticated SSH connection without additional authentication.
The team could not take advantage of the open SSH socket. Instead, they searched through SBS 1 architecture diagrams and documentation on Workstation 4. They found a security operations (SecOps) network diagram detailing the network boundaries between Site 5 SecOps on-premises systems, Site 5 non-SecOps on-premises systems, and Site 5 SecOps cloud infrastructure. The documentation listed the SecOps cloud infrastructure IP ranges [T1580]. These “trusted” IP addresses were a public /16 subnet; the team was able to request a public IP in that range from the same cloud provider, and Workstation 4 made successful outbound SSH connections to this cloud infrastructure. The team intended to use that connection to reverse tunnel traffic back to the workstation and then access the bastion host via the open SSH socket file. However, Phase 1 ended before they were able to implement this plan.
Attempts to Access SBS 2
Conducting open-source research, the team identified an organizational branch [T1591] that likely had access to SBS 2. The team queried the AD to identify the branch’s users and administrators. The team gathered a list of potential accounts, from which they identified administrators, such as SYSTEMS ADMIN or DATA SYSTEMS ADMINISTRATOR, with technical roles. Using their access to the MDM MySQL database, the team queried potential targets to (1) determine the target’s last contact time with the MDM and (2) ensure any policy targeting the target’s workstation would run relatively quickly [T1596.005]. Using the same methodology as described by the steps in the Plan for Potential Access to SBS 1 section above, the team gained interactive root access to two Site 6 SBS 2-connected workstations: a software engineering workstation (Workstation 5) and a user administrator workstation (Workstation 6).
The Workstation 5 user had bash history files with what appeared to be SSH passwords mistyped into the bash prompt and saved in bash history [T1552.003]. The team then attempted to authenticate to SBS 2 using a similar tunnel setup as described in the Access to SBS 1 section above and the potential credentials from the user’s bash history file. However, this attempt was unsuccessful for unknown reasons.
On Workstation 6, the team found a .txt file containing plaintext credentials for the user. Using the pattern discovered in these credentials, the team was able to crack the user’s workstation account password [T1110.002]. The team also discovered potential passwords and SSH connection commands in the user’s bash history. Using a similar tunnel setup described above, the team attempted to log into SBS 2. However, a prompt for an MFA passcode blocked this attempt.
See figure 2 for a timeline of the team’s post exploitation activity that includes key points of access.
Figure 2: Red Team Cyber Threat Activity: Post Exploitation
Command and Control
The team used third-party owned and operated infrastructure and services [T1583] throughout their assessment, including in certain cases for command and control (C2) [TA0011]. These included:
Cobalt Strike and Merlin payloads for C2 throughout the assessment. Note: Merlin is a post-exploit tool that leverages HTTP protocols for C2 traffic.
The team maintained multiple Cobalt Strike servers hosted by a cloud vendor. They configured each server with a different domain and used the servers for communication with compromised hosts. These servers retained all assessment data.
Two commercially available cloud-computing platforms.
The team used these platforms to create flexible and dynamic redirect servers to send traffic to the team’s Cobalt Strike servers [T1090.002]. Redirecting servers make it difficult for defenders to attribute assessment activities to the backend team servers. The redirectors used HTTPS reverse proxies to redirect C2 traffic between the target organization’s network and the Cobalt Strike team servers [T1071.002]. The team encrypted all data in transit [T1573] using encryption keys stored on team’s Cobalt Strike servers.
A cloud service to rapidly change the IP address of the team’s redirecting servers in the event of detection and eradication.
Content delivery network (CDN) services to further obfuscate some of the team’s C2 traffic.
This technique leverages CDNs associated with high-reputation domains so that the malicious traffic appears to be directed towards a reputation domain but is actually redirected to the red team-controlled Cobalt Strike servers.
The team used domain fronting [T1090.004] to disguise outbound traffic in order to diversify the domains with which the persistent beacons were communicating. This technique, which also leverages CDNs, allows the beacon to appear to connect to third-party domains, such as nytimes.com, when it is actually connecting to the team’s redirect server.
Phase II: Red Team Measurable Events Activity
The red team executed 13 measurable events designed to provoke a response from the people, processes, and technology defending the organization’s network. See Table 1 for a description of the events, the expected network defender activity, and the organization’s actual response.
Measurable Event
Description
MITRE ATT&CK Technique(s)
Expected Detection Points
Expected Network Defender Reactions
Reported Reactions
Internal Port Scan
Launch scan from inside the network from a previously gained workstation to enumerate ports on target workstation, server, and domain controller system(s).
Network Monitoring and Analysis ToolsIntrusion Detection or Prevention SystemsEndpoint Protection Platform
Detect target hosts and portsIdentify associated scanning processAnalyze scanning host once detectedDevelop response plan
None
Comprehensive Active Directory and Host Enumeration
Perform AD enumeration by querying all domain objects from the DC; and enumerating trust relationships within the AD Forest, user accounts, and current session information from every domain computer (Workstation and Server).
Detect account creationIdentify source of changeVerify change with system ownerDevelop response plan
None
Workstation Admin Lateral Movement—Workstation to Workstation
Use a previously compromised workstation admin account to upload and execute a payload via SMB and Windows Service Creation, respectively, on several target Workstations.
Valid Accounts: Domain Accounts [T1078.002]Remote Services: SMB/Windows Admin Shares, Sub-technique [T1021.002]Create or Modify System Process: Windows Service [T1543.003]
Windows Event Logs
Detect account compromiseAnalyze compromised hostDevelop response plan
None
Domain Admin Lateral Movement—Workstation to Domain Controller
Use a previously compromised domain admin account to upload and execute a payload via SMB and Windows Service Creation, respectively, on a target DC.
Valid Accounts: Domain Accounts [T1078.002]Remote Services: SMB/Windows Admin Shares, Sub-technique [T1021.002]Create or Modify System Process: Windows Service [T1543.003]
Windows Event Logs
Detect account compromiseTriage compromised hostDevelop response plan
None
Malicious Traffic Generation—Domain Controller to External Host
Establish a session that originates from a target Domain Controller system directly to an external host over a clear text protocol, such as HTTP.
Endpoint Protection PlatformEndpoint Detection and Response
Detect and identify source IP and source process of malicious trafficInvestigate destination IP addressTriage compromised hostDevelop response plan
Malicious file was removed by antivirus
Ransomware Simulation
Execute simulated ransomware on multiple Workstation systems to simulate a ransomware attack.Note: This technique does NOT encrypt files on the target system.
N/A
End User Reporting
Investigate end user reported eventTriage compromised hostDevelop response Plan
Four users reported event to defensive staff
Findings
Key Issues
The red team noted the following key issues relevant to the security of the organization’s network. These findings contributed to the team’s ability to gain persistent, undetected access across the organization’s sites. See the Mitigations section for recommendations on how to mitigate these issues.
Insufficient host and network monitoring. Most of the red team’s Phase II actions failed to provoke a response from the people, processes, and technology defending the organization’s network. The organization failed to detect lateral movement, persistence, and C2 activity via their intrusion detection or prevention systems, endpoint protection platform, web proxy logs, and Windows event logs. Additionally, throughout Phase I, the team received no deconflictions or confirmation that the organization caught their activity. Below is a list of some of the higher risk activities conducted by the team that were opportunities for detection:
Phishing
Lateral movement reuse
Generation and use of the golden ticket
Anomalous LDAP traffic
Anomalous internal share enumeration
Unconstrained Delegation server compromise
DCSync
Anomalous account usage during lateral movement
Anomalous outbound network traffic
Anomalous outbound SSH connections to the team’s cloud servers from workstations
Lack of monitoring on endpoint management systems. The team used the organization’s MDM system to gain root access to machines across the organization’s network without being detected. Endpoint management systems provide elevated access to thousands of hosts and should be treated as high value assets (HVAs) with additional restrictions and monitoring.
KRBTGT never changed. The Site 1 krbtgt account password had not been updated for over a decade. The krbtgt account is a domain default account that acts as a service account for the key distribution center (KDC) service used to encrypt and sign all Kerberos tickets for the domain. Compromise of the krbtgt account could provide adversaries with the ability to sign their own TGTs, facilitating domain access years after the date of compromise. The red team was able to use the krbtgt account to forge TGTs for multiple accounts throughout Phase I.
Excessive permissions to standard users. The team discovered several standard user accounts that have local administrator access to critical servers. This misconfiguration allowed the team to use the low-level access of a phished user to move laterally to an Unconstrained Delegation host and compromise the entire domain.
Hosts with Unconstrained Delegation enabled unnecessarily. Hosts with Unconstrained Delegation enabled store the Kerberos TGTs of all users that authenticate to that host, enabling actors to steal service tickets or compromise krbtgt accounts and perform golden ticket or “silver ticket” attacks. The team performed an NTLM-relay attack to obtain the DC’s TGT, followed by a golden ticket attack on a SharePoint server with Unconstrained Delegation to gain the ability to impersonate any Site 1 AD account.
Use of non-secure default configurations. The organization used default configurations for hosts with Windows Server 2012 R2. The default configuration allows unprivileged users to query group membership of local administrator groups. The red team used and identified several standard user accounts with administrative access from a Windows Server 2012 R2 SharePoint server.
Additional Issues
The team noted the following additional issues.
Ineffective separation of privileged accounts. Some workstations allowed unprivileged accounts to have local administrator access; for example, the red team discovered an ordinary user account in the local admin group for the SharePoint server. If a user with administrative access is compromised, an actor can access servers without needing to elevate privileges. Administrative and user accounts should be separated, and designated admin accounts should be exclusively used for admin purposes.
Lack of server egress control. Most servers, including domain controllers, allowed unrestricted egress traffic to the internet.
Inconsistent host configuration. The team observed inconsistencies on servers and workstations within the domain, including inconsistent membership in the local administrator group among different servers or workstations. For example, some workstations had “Server Admins” or “Domain Admins” as local administrators, and other workstations had neither.
Potentially unwanted programs. The team noticed potentially unusual software, including music software, installed on both workstations and servers. These extraneous software installations indicate inconsistent host configuration (see above) and increase the attack surfaces for malicious actors to gain initial access or escalate privileges once in the network.
Mandatory password changes enabled. During the assessment, the team keylogged a user during a mandatory password change and noticed that only the final character of their password was modified. This is potentially due to domain passwords being required to be changed every 60 days.
Smart card use was inconsistent across the domain. While the technology was deployed, it was not applied uniformly, and there was a significant portion of users without smartcard protections enabled. The team used these unprotected accounts throughout their assessment to move laterally through the domain and gain persistence.
Noted Strengths
The red team noted the following technical controls or defensive measures that prevented or hampered offensive actions:
The organization conducts regular, proactive penetration tests and adversarial assessments and invests in hardening their network based on findings.
The team was unable to discover any easily exploitable services, ports, or web interfaces from more than three million external in-scope IPs. This forced the team to resort to phishing to gain initial access to the environment.
Service account passwords were strong. The team was unable to crack any of the hashes obtained from the 610 service accounts pulled. This is a critical strength because it slowed the team from moving around the network in the initial parts of the Phase I.
The team did not discover any useful credentials on open file shares or file servers. This slowed the progress of the team from moving around the network.
MFA was used for some SBSs. The team was blocked from moving to SBS 2 by an MFA prompt.
There were strong security controls and segmentation for SBS systems. Direct access to SBS were located in separate networks, and admins of SBS used workstations protected by local firewalls.
MITIGATIONS
CISA recommends organizations implement the recommendations in Table 2 to mitigate the issues listed in the Findings section of this advisory. These mitigations align with the Cross-Sector Cybersecurity Performance Goals (CPGs) developed by CISA and the National Institute of Standards and Technology (NIST). The CPGs provide a minimum set of practices and protections that CISA and NIST recommend all organizations implement. CISA and NIST based the CPGs on existing cybersecurity frameworks and guidance to protect against the most common and impactful threats, tactics, techniques, and procedures. See CISA’s Cross-Sector Cybersecurity Performance Goals for more information on the CPGs, including additional recommended baseline protections.
Issue
Recommendation
Insufficient host and network monitoring
Establish a security baseline of normal network traffic and tune network appliances to detect anomalous behavior [CPG 3.1]. Tune host-based products to detect anomalous binaries, lateral movement, and persistence techniques.Create alerts for Windows event log authentication codes, especially for the domain controllers. This could help detect some of the pass-the-ticket, DCSync, and other techniques described in this report.From a detection standpoint, focus on identity and access management (IAM) rather than just network traffic or static host alerts.Consider who is accessing what (what resource), from where (what internal host or external location), and when (what day and time the access occurs).Look for access behavior that deviates from expected or is indicative of AD abuse.Reduce the attack surface by limiting the use of legitimate administrative pathways and tools such as PowerShell, PSExec, and WMI, which are often used by malicious actors. CISA recommends selecting one tool to administer the network, ensuring logging is turned on [CPG 3.1], and disabling the others.Consider using “honeypot” service principal names (SPNs) to detect attempts to crack account hashes [CPG 1.1].Conduct regular assessments to ensure processes and procedures are up to date and can be followed by security staff and end users.Consider using red team tools, such as SharpHound, for AD enumeration to identify users with excessive privileges and misconfigured hosts (e.g., with Unconstrained Delegation enabled).Ensure all commercial tools deployed in your environment are regularly tuned to pick up on relevant activity in your environment.
Lack of monitoring on endpoint management systems
Treat endpoint management systems as HVAs with additional restrictions and monitoring because they provide elevated access to thousands of hosts.
KRBTGT never changed
Change the krbtgt account password on a regular schedule such as every 6 to 12 months or if it becomes compromised. Note that this password change must be carefully performed to effectively change the credential without breaking AD functionality. The password must be changed twice to effectively invalidate the old credentials. However, the required waiting period between resets must be greater than the maximum lifetime period of Kerberos tickets, which is 10 hours by default. See Microsoft’s KRBTGT account maintenance considerations guidance for more information.
Excessive permissions to standard users and ineffective separation of privileged accounts
Implement the principle of least privilege:Grant standard user rights for standard user tasks such as email, web browsing, and using line-of-business (LOB) applications.Periodically audit standard accounts and minimize where they have privileged access.Periodically Audit AD permissions to ensure users do not have excessive permissions and have not been added to admin groups.Evaluate which administrative groups should administer which servers/workstations. Ensure group members administrative accounts instead of standard accounts.Separate administrator accounts from user accounts [CPG 1.5]. Only allow designated admin accounts to be used for admin purposes. If an individual user needs administrative rights over their workstation, use a separate account that does not have administrative access to other hosts, such as servers.Consider using a privileged access management (PAM) solution to manage access to privileged accounts and resources [CPG 3.4]. PAM solutions can also log and alert usage to detect any unusual activity and may have helped stop the red team from accessing resources with admin accounts. Note: password vaults associated with PAM solutions should be treated as HVAs with additional restrictions and monitoring (see below).Configure time-based access for accounts set at the admin level and higher. For example, the just-in-time (JIT) access method provisions privileged access when needed and can support enforcement of the principle of least privilege, as well as the Zero Trust model. This is a process in which a network-wide policy is set in place to automatically disable administrator accounts at the AD level when the account is not in direct need. When individual users need the account, they submit their requests through an automated process that enables access to a system but only for a set timeframe to support task completion.
Hosts with Unconstrained Delegation enabled
Remove Unconstrained Delegation from all servers. If Unconstrained Delegation functionality is required, upgrade operating systems and applications to leverage other approaches (e.g., constrained delegation) or explore whether systems can be retired or further isolated from the enterprise. CISA recommends Windows Server 2019 or greater.Consider disabling or limiting NTLM and WDigest Authentication if possible, including using their use as criteria for prioritizing updates to legacy systems or for segmenting the network. Instead use more modern federation protocols (SAML, OIDC) or Kerberos for authentication with AES-256 bit encryption [CPG 3.4].If NTLM must be enabled, enable Extended Protection for Authentication (EPA) to prevent some NTLM-relay attacks, and implement SMB signing to prevent certain adversary-in-the-middle and pass-the-hash attacks CPG 3.4]. See Microsoft Mitigating NTLM Relay Attacks on Active Directory Certificate Services (AD CS) and Microsoft Overview of Server Message Block signing for more information.
Use of non-secure default configurations
Keep systems and software up to date [CPG 5.1]. If updates cannot be uniformly installed, update insecure configurations to meet updated standards.
Lack of server egress control
Configure internal firewalls and proxies to restrict internet traffic from hosts that do not require it. If a host requires specific outbound traffic, consider creating an allowlist policy of domains.
Large number of credentials in a shared vault
Treat password vaults as HVAswith additional restrictions and monitoring [CPG 3.4]:If on-premise, require MFA for admin and apply network segmentation [CPG 1.3]. Use solutions with end-to-end encryption where applicable [CPG 3.3].If cloud-based, evaluate the provider to ensure use of strong security controls such as MFA and end-to-end encryption [CPG 1.3, 3.3].
Inconsistent host configuration
Establish a baseline/gold-image for workstations and servers and deploy from that image [CPG 2.5]. Use standardized groups to administer hosts in the network.
Potentially unwanted programs
Implement software allowlisting to ensure users can only install software from an approved list [CPG 2.1].Remove unnecessary, extraneous software from servers and workstations.
Mandatory password changes enabled
Consider only requiring changes for memorized passwords in the event of compromise. Regular changing of memorized passwords can lead to predictable patterns, and both CISA and the National Institute of Standards and Technology (NIST) recommend against changing passwords on regular intervals.
Additionally, CISA recommends organizations implement the mitigations below to improve their cybersecurity posture:
Provide users with regular training and exercises, specifically related to phishing emails [CPG 4.3]. Phishing accounts for majority of initial access intrusion events.
Reduce the risk of credential compromise via the following:
Place domain admin accounts in the protected users group to prevent caching of password hashes locally; this also forces Kerberos AES authentication as opposed to weaker RC4 or NTLM.
Implement Credential Guard for Windows 10 and Server 2016 (Refer to Microsoft: Manage Windows Defender Credential Guard for more information). For Windows Server 2012R2, enable Protected Process Light for Local Security Authority (LSA).
Refrain from storing plaintext credentials in scripts [CPG 3.4]. The red team discovered a PowerShell script containing plaintext credentials that allowed them to escalate to admin.
Upgrade to Windows Server 2019 or greater and Windows 10 or greater. These versions have security features not included in older operating systems.
As a long-term effort, CISA recommends organizations prioritize implementing a more modern, Zero Trust network architecture that:
Leverages secure cloud services for key enterprise security capabilities (e.g., identity and access management, endpoint detection and response, policy enforcement).
Upgrades applications and infrastructure to leverage modern identity management and network access practices.
Centralizes and streamlines access to cybersecurity data to drive analytics for identifying and managing cybersecurity risks.
Invests in technology and personnel to achieve these goals.
CISA encourages organizational IT leadership to ask their executive leadership the question: Can the organization accept the business risk of NOT implementing critical security controls such as MFA? Risks of that nature should typically be acknowledged and prioritized at the most senior levels of an organization.
VALIDATE SECURITY CONTROLS
In addition to applying mitigations, CISA recommends exercising, testing, and validating your organization’s security program against the threat behaviors mapped to the MITRE ATT&CK for Enterprise framework in this advisory. CISA recommends testing your existing security controls inventory to assess how they perform against the ATT&CK techniques described in this advisory.
To get started:
Select an ATT&CK technique described in this advisory (see Table 3).
Align your security technologies against the technique.
Test your technologies against the technique.
Analyze your detection and prevention technologies’ performance.
Repeat the process for all security technologies to obtain a set of comprehensive performance data.
Tune your security program, including people, processes, and technologies, based on the data generated by this process.
CISA recommends continually testing your security program, at scale, in a production environment to ensure optimal performance against the MITRE ATT&CK techniques identified in this advisory.
The team used the following tools:Cobalt Strike and Merlin payloads for C2.KeeThief to obtain a decryption key from a KeePass databaseRubeus and DFSCoerce in an NTLM relay attack
The team elevated account privileges to administrator and modified the user’s account by adding Create Policy and Delete Policy permissions.During Phase II, the team created local admin accounts and an AD account; they added the created AD account to a domain admins group.
During Phase II, the team leveraged compromised workstation and domain admin accounts to execute a payload via Windows Service Creation on target workstations and the DC.
Event Triggered Execution: Windows Management Instrumentation Event Subscription
The team obtained the cached credentials from a SharePoint server account by taking a snapshot of lsass.exe with a tool called nanodump, exporting the output and processing the output offline with Mimikatz.
The team ran the DFSCoerce python script, which prompted DC authentication to a server using the server’s NTLM hash. The team then deployed Rubeus to capture the incoming DC TGT.
The team queried AD for AD users (during Phase I and II), including for members of a SharePoint admin group and several standard user accounts with administrative access.
The team moved laterally with an SMB beacon.During Phase II, they used compromised workstation and domain admin accounts to upload a payload via SMB on several target Workstations and the DC.
Use Alternate Authentication Material: Pass the Hash
The team ran the DFSCoerce python script, which prompted DC authentication to a server using the server’s NTLM hash. The team then deployed Rubeus to capture the incoming DC TGT.
The team remotely enumerated the local administrators group on target hosts to find valid user accounts. This technique relies on anonymous SMB pipe binds, which are disabled by default starting with Server 2016.During Phase II, the team established sessions that originated from a target Workstation and from the DC directly to an external host over a clear text protocol.
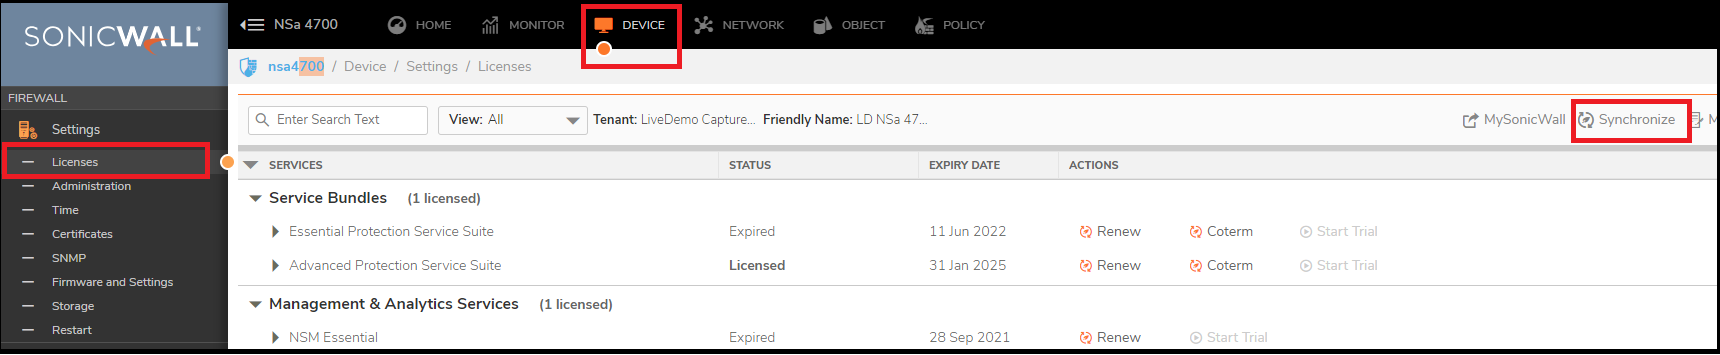
 TIP: If the DNS servers are not resolving, try changing the DNS IP addresses on the SonicWall WAN Interface and then try to synchronize the licenses.
 NOTE: The SonicOS Enhanced license is not shareable between the primary and the backup appliances. Both appliances must be licensed separately.