Coca-Cola, the world’s largest soft drinks maker, has confirmed in a statement to BleepingComputer that it is aware of the reports about a cyberattack on its network and is currently investigating the claims.
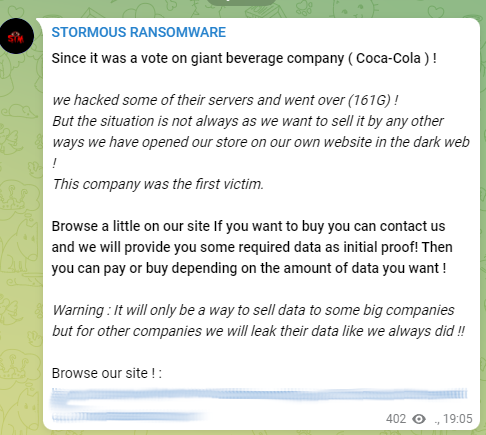
The American beverage giant has started to investigate after the Stormous gang said that it successfully breached some of the company’s servers and stole 161GB of data.
Stormous announcing the victimization of Coca Cola
The threat actors listed a cache of the data for sale on their leak site, asking 1.65 Bitcoin, currently converted to around $64,000.
Coca-Cola listing on Stormous leak site
Among the files listed, there are compressed documents, text files with admin, emails, and passwords, account and payment ZIP archives, and other type of sensitive information.
Who is Stormous
Although they claim to be a ransomware group, there is no indication at this time that they are deploying file-encrypting malware on their victim networks.
Closer to a data extortion group, Stormous has stated that they would take action against hacker attacks against Russia in the wake of the invasion into Ukraine.
Stormous message
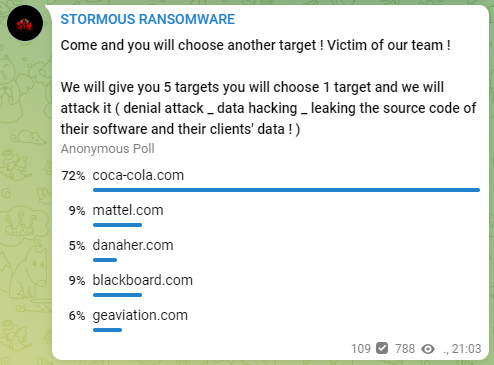
This is the first time Stormous has posted a stolen data set. Last week, the gang asked their followers to vote on who should be their next victim.
The attack promised denial-of-service, hacking, leaking of software source code and client data. Coca-Cola won the poll with 72% of the votes. The gang said that it took them only a few days to breach the company.
Poll held on the Stormous Telegram
Coca-Cola and the other victim choices in Stormous’ poll show anti-Western stance. Previously, the group claimed Epic Games as their victim.
They announced that they stole 200 gigabytes of data and details of 33 million users of Epic store and games. However, there has been no confirmation about the legitimacy of the data, so Stormous’ reputation about these claims has yet to be established.
Coca-Cola has not confirmed that their data was stolen. The company told BleepingComputer that it is currently collaborating with law enforcement and that the investigation into the alleged Stormous attack has not revealed a negative impact yet.
The threat actor behind the prolific Emotet botnet is testing new attack methods on a small scale before co-opting them into their larger volume malspam campaigns, potentially in response to Microsoft’s move to disable Visual Basic for Applications (VBA) macros by default across its products.
Calling the new activity a “departure” from the group’s typical behavior, Proofpoint alternatively raised the possibility that the latest set of phishing emails distributing the malware show that the operators are now “engaged in more selective and limited attacks in parallel to the typical massive scale email campaigns.”
Emotet, the handiwork of a cybercrime group tracked as TA542 (aka Mummy Spider or Gold Crestwood), staged a revival of sorts late last year after a 10-month-long hiatus following a coordinated law enforcement operation to take down its attack infrastructure.
Since then, Emotet campaigns have targeted thousands of customers with tens of thousands of messages in several geographic regions, with the message volume surpassing over one million per campaign in select cases.
The new “low volume” email campaign analyzed by the enterprise security firm involved the use of salary-themed lures and OneDrive URLs hosting ZIP archives that contain Microsoft Excel Add-in (XLL) files, which, when executed, drop and run the Emotet payload.
The new set of social engineering attacks is said to have taken place between April 4, 2022, and April 19, 2022, when other widespread Emotet campaigns were put on hold.
The absence of macro-enabled Microsoft Excel or Word document attachments is a significant shift from previously observed Emotet attacks, suggesting that the threat actor is pivoting away from the technique as a way to get around Microsoft’s plans to block VBA macros by default starting April 2022.
The development also comes as the malware authors last week fixed an issue that prevented potential victims from getting compromised upon opening the weaponized email attachments.
“After months of consistent activity, Emotet is switching things up,” Sherrod DeGrippo, vice president of threat research and detection at Proofpoint, said.
“It is likely the threat actor is testing new behaviors on a small scale before delivering them to victims more broadly, or to distribute via new TTPs alongside its existing high-volume campaigns. Organizations should be aware of the new techniques and ensure they are implementing defenses accordingly.”
Google on Tuesday officially began rolling out a new “Data safety” section for Android apps on the Play Store to highlight the type of data being collected and shared with third-parties.
“Users want to know for what purpose their data is being collected and whether the developer is sharing user data with third parties,” Suzanne Frey, Vice President of product for Android security and privacy, said. “In addition, users want to understand how app developers are securing user data after an app is downloaded.”
The transparency measure, which is built along the lines of Apple’s “Privacy Nutrition Labels,” was first announced by Google nearly a year ago, in May 2021.
The Data safety section, which will show up against every app listing on the digital storefront, presents a unified view of what data is being collected, for what purpose it’s being used, and how it’s handled, while also highlighting what data is being shared with third-parties.
On top of that, the labels can also show an “app’s security practices, like encryption of data in transit and whether users can ask for data to be deleted,” Frey noted, in addition to validating those practices against security standards such as the Mobile Application Security Verification Standard (MASVS).
The feature is expected to be gradually made available to all users, while giving app developers a deadline of July 20, 2022 to complete the section and keep them updated should they change the apps’ functionality or data handling methods.
That said, Data safety is expected to face similar concerns to that of Apple’s in that the system is built entirely on an honor system, which requires app developers to be truthful and clear-cut about what they do with the data, and not list inaccurate labels.
Apple has since said that it would routinely audit labels for accuracy, thereby ensuring that the labels are reliable and don’t give users a false sense of security about the data being collected and shared.
Google, last year, had said that it intends to institute a mechanism in place that requires developers to furnish accurate information, and that it will mandate them to fix misrepresentations should it identify instances of policy violations.
While the search giant has explicitly stated that its app review process is not designed to certify the accuracy and completeness of the data safety declarations provided by third-party app developers, it’s outlining strong measures to handle such transgressions.
The company is warning that it will be taking suitable enforcement measures when it identifies a deviation from the information provided in the section. Failing to ensure compliance can result in blocked updates or removal from Google Play.
“When Google becomes aware of a discrepancy between your app behavior and your declaration, we may take appropriate action, including enforcement action,” the company said in an updated support article.
Even though streaming video on demand has been around since well before the pandemic, it sure did skyrocket in use worldwide when the majority of people were stuck at home self-isolating. Streaming apps helped us survive being isolated from the outside world and restricted from doing the normal stuff that we do day-to-day.
There are lots of streaming apps out there, but during our ranking of the top ten apps, here’s what we were looking for most:
Price — How much you’ll need to shell out to watch.
Amount of content — Is there tons of selection and variety of content to binge-watch?
Content quality — Are you going to get the best movies and TV shows or are you going to suffer from boredom?
Unique content — Can you watch originals and one-of-a-kind show that others can’t provide?
Content update frequency — After being a couch potato for a month, do you get any new content, or have they already shown everything they’ve got?
With that being said, let’s proceed with our list of top streaming apps!
Netflix
More than 200 million subscribers.
Worldwide service.
Has a wide range of content.
Best original content.
Between $9.99 and $19.99 for a monthly subscription.
Up to 4 simultaneous streams.
Disney+
130 million subscribers.
Available in North and South America, North and Western Europe, and Asia-Pacific.
Full of shows that are safe for kids, heart-warming and nostalgic content.
Has great original content from Marvel.
$7.99 for a monthly subscription (an additional fee for movie content is required).
Up to 4 simultaneous streams.
Hulu & Hulu+ Live TV
Around 45 million subscribers.
Available in the United States.
Provides shows that have been previously aired.
Access to different live channels (Hulu+ Live TV).
Has original content.
Either $6.99 or $12.99 for a monthly subscription (Hulu).
Either $66.99 or 75.99 for a monthly subscription (Hulu + Live TV).
Up to 2 simultaneous streams.
HBO Max
More than 70 million subscribers.
Available in the US, Latin America, and Central and Eastern Europe.
Over 2,000 titles to choose from.
Has some very popular originals.
Either $9.99 or $14.99 for a monthly subscription.
Up to 3 simultaneous streams.
Peacock
24 million subscribers.
Available in Austria, Germany, Ireland, Italy, the UK, and the US.
Provides classic TV shows and movies.
Available for free or premium ($4.99 for a monthly subscription).
Up to 3 simultaneous streams.
Paramount+
32 million subscribers.
Available in Australia, Canada, Central America, South America, Northern Europe, and the Middle East.
Content from MTV, Comedy Central, Paramount, and CBS.
Either $4.99 or $9.99 for a monthly subscription (with or without commercial plans).
Up to 3 simultaneous streams.
Amazon Prime Video
175 million subscribers.
Available worldwide.
Around 12,000 titles to choose from.
Either $8.99 or $14.99 for a monthly subscription.
Up to 3 simultaneous streams.
Discovery+
22 million subscribers.
Available in the US, Brazil, Canada, Japan, the UK, Spain, the Philippines, and more.
Content from different TV channels.
Around 1,500 different titles.
Either $4.99 or $6.99 for a monthly subscription (ad-free for the higher price).
Up to 4 simultaneous streams.
Apple TV+
20 million subscribers.
Available worldwide.
Only shows original content.
$4.99 for a monthly subscription.
Up to 6 simultaneous streams.
iQIYI
103 million subscribers.
Available worldwide.
iQIYI originals and other licensed content from vendors.
Either $0.99 or $6.99 for a monthly subscription (upgrade to VIP for more content).
Up to 2 or 4 simultaneous streams (depending on the plan).
Aside from the ones listed above, here are some other available streaming apps.
iFlix
25 million subscribers.
Available in Asia.
YouTube Premium
50 million subscribers.
Available in 101 countries.
ESPN+
21 million subscribers.
Available in the United States.
Rakuten TV
Viki
Crunchyroll
WeTV
There are lots of new and emerging apps out there, but we need to be wary about the apps we install on our devices, specifically on our mobile phones (especially Android devices). If you accidentally download a malicious app, it could steal your private information or even hijack your phone. Read more about this potential danger here.
With that being said, it’s a great idea to download Trend Micro Mobile Security so that you can verify that the apps you use are 100% safe. Trend Micro Mobile Security also safeguards against fraudulent sites, identity theft, and features performance-boosting tools.
Once your device is protected, you can easily find a comfortable area to relax in and start binge-watching your favorite shows and movies using your chosen streaming service!
Your UniFi deployment is only as good as the planning behind it. There are two important questions to consider as you build your dream system and determine how to optimize its performance. The first is whether or not your equipment can be seamlessly integrated into your space.
We have you covered there with our Design Center, the interactive visualization tool that allows you to map out a custom network uniquely suited for your location. Check out our brief video overview to learn more.
The UniFi product suite is vast, cohesive, and designed to be highly scalable so you can build and support networks of any size. That means you have myriad options when it comes to choosing your ideal devices, applications, and functionality, so we strongly recommend taking your time during the planning process. Once you’ve finalized your deployment, then comes the all-important follow-up question:
Do I have what I need to run all of this?
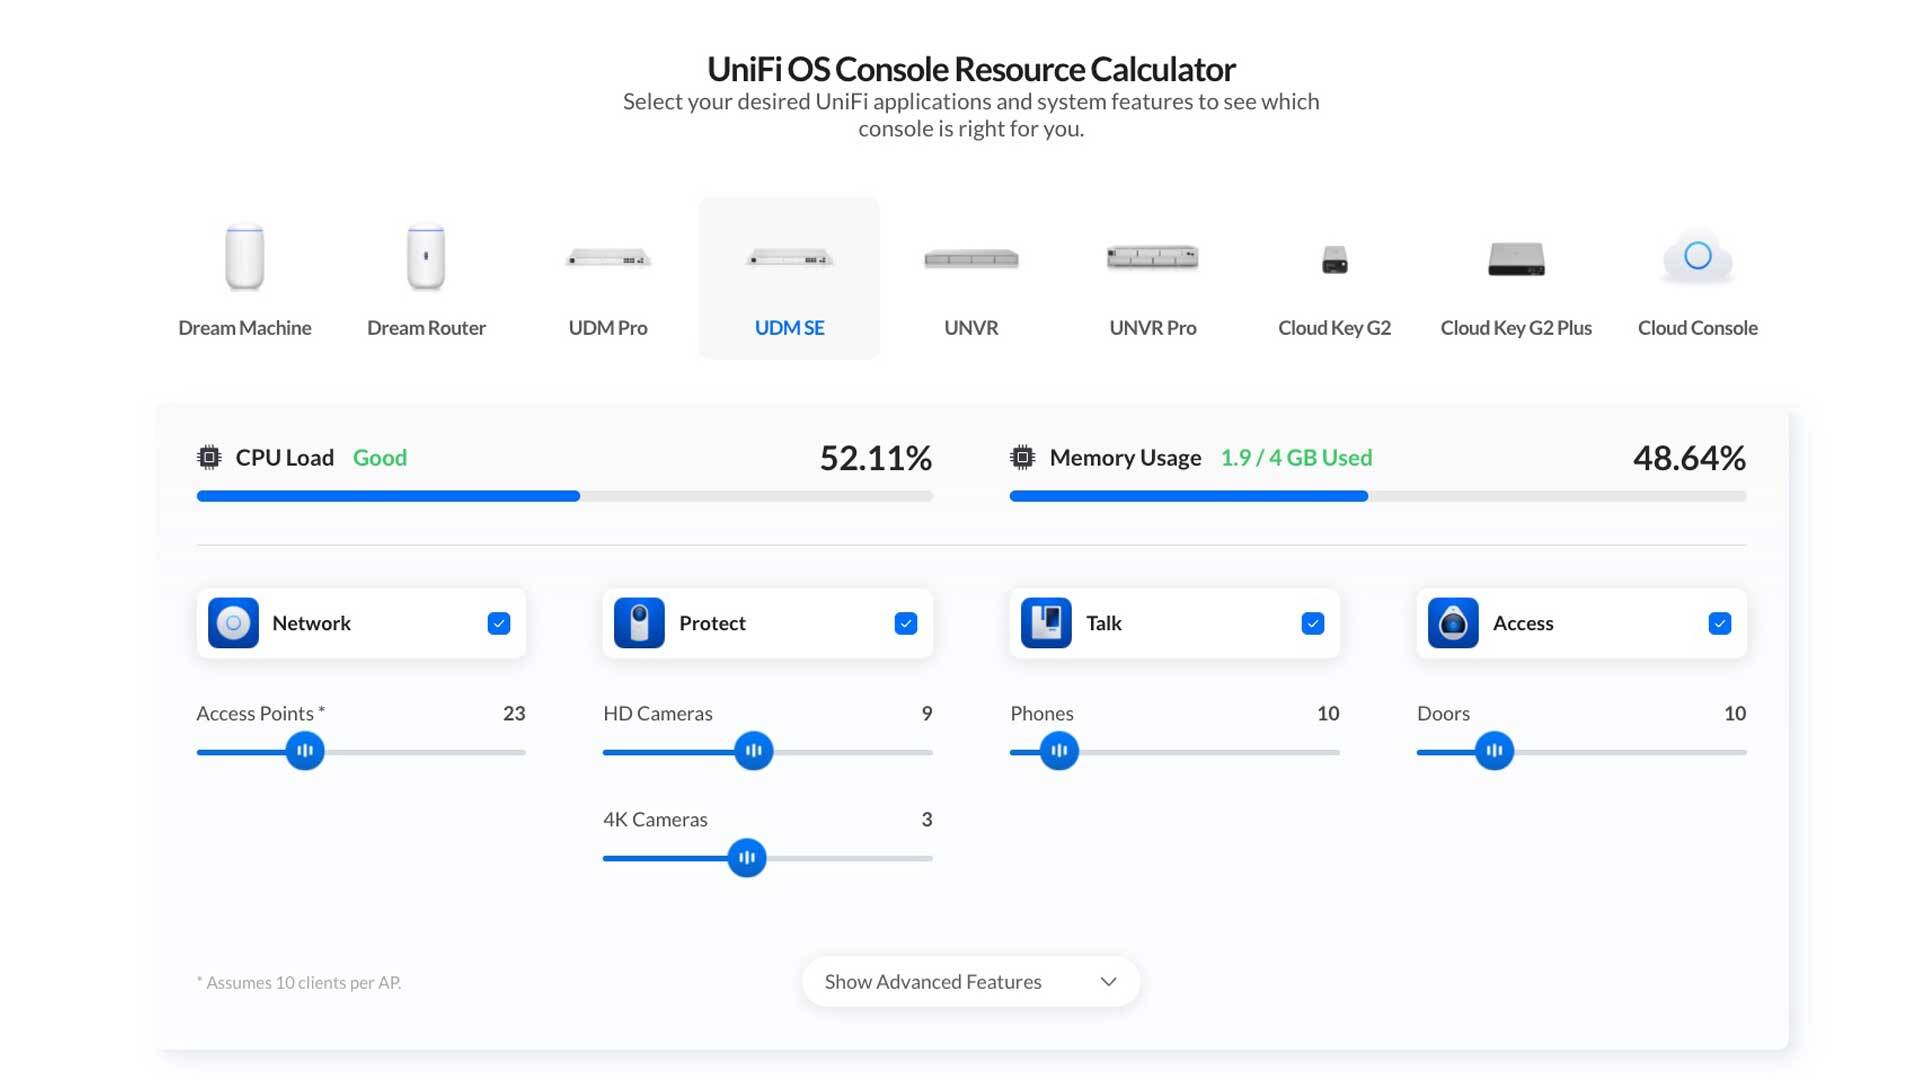
With that in mind, we’re very excited to introduce the UniFi OS Console Resource Calculator: a brand-new modal that not only provides console-specific processing and memory caps with a single click, but gives dynamic approximations of how well each console can support various deployment types.
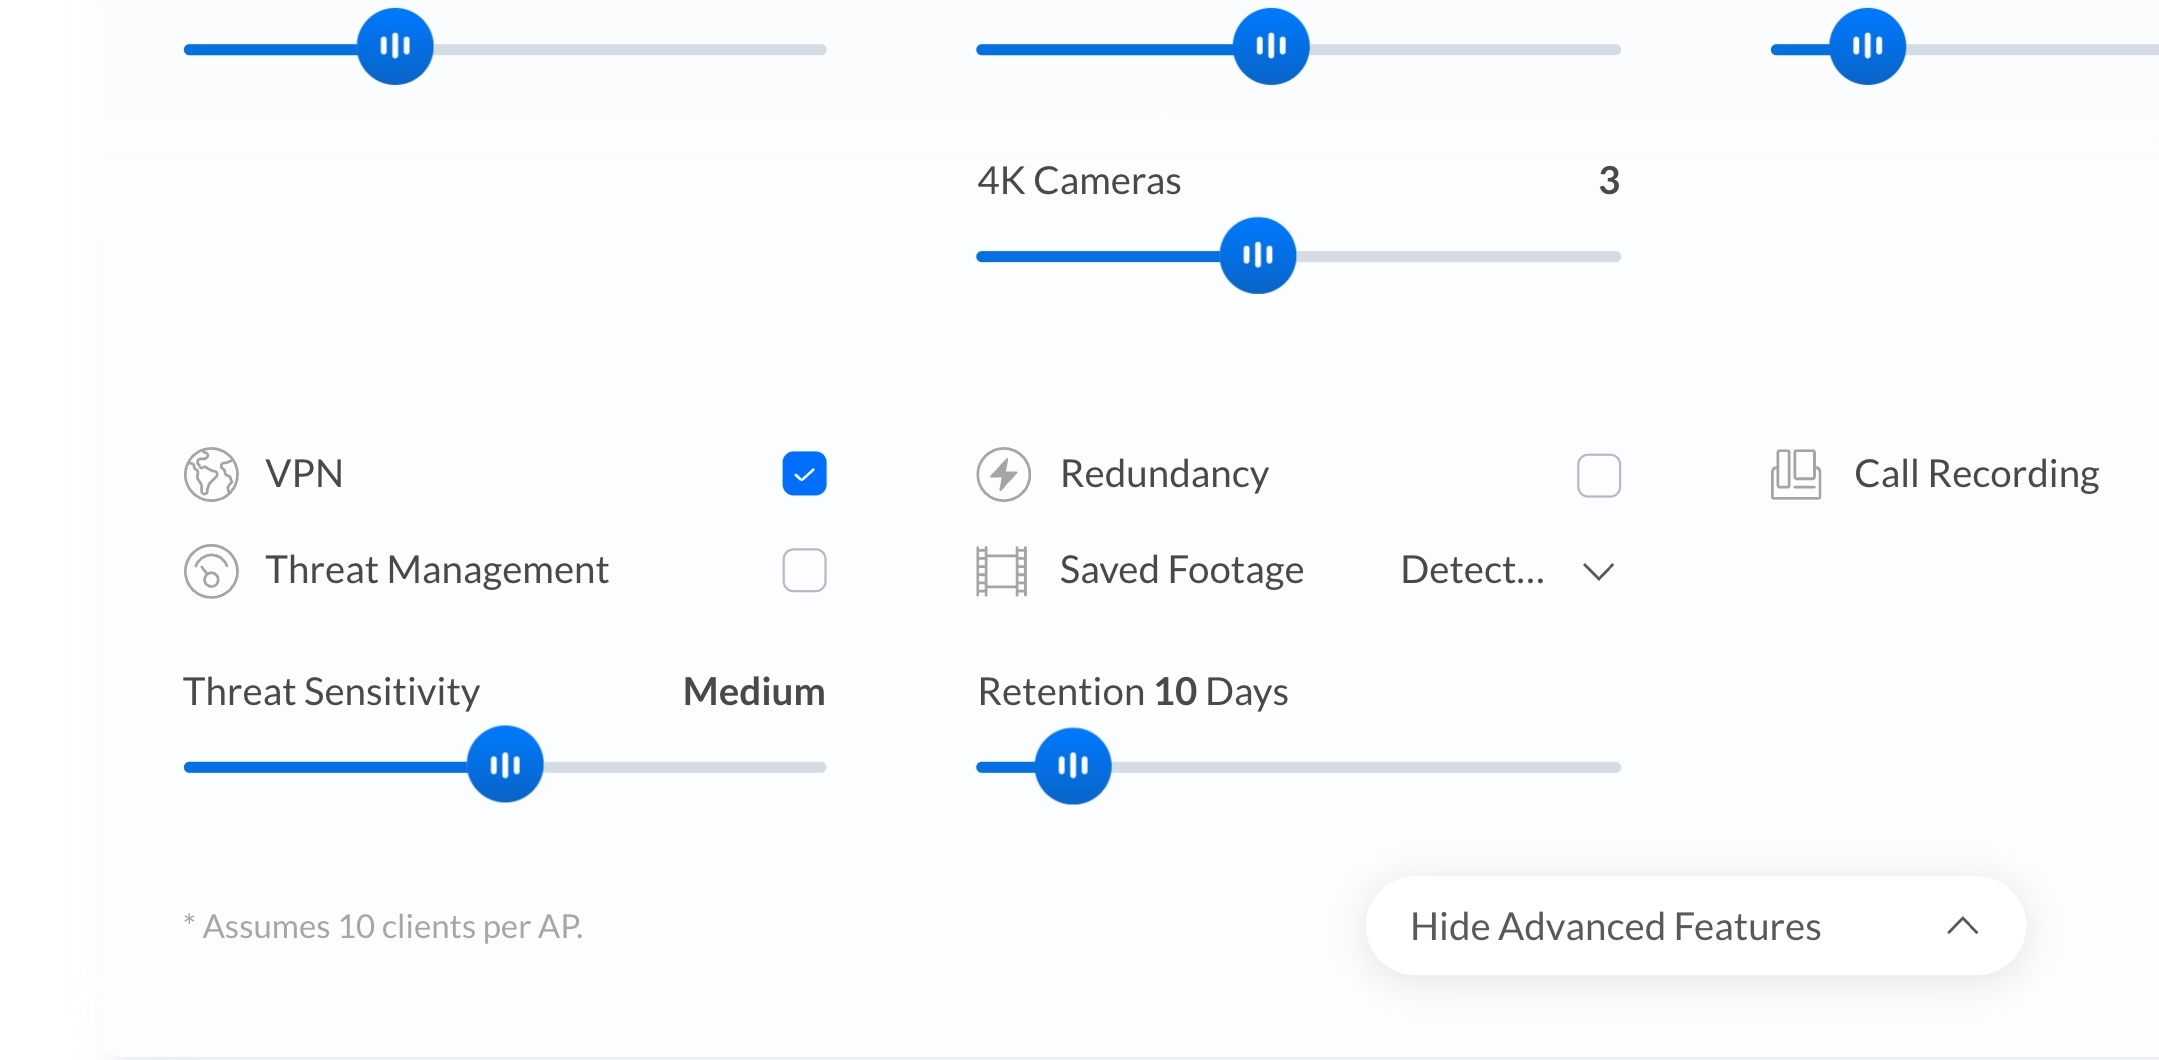
Granularity is the name of the game with our new calculator. Our top priority is ensuring that every user can fully capture each component of their system so they know exactly what console is right for them. After selecting a console and the applications it will run, you have a wealth of customization options to help you specify how many devices you’re connecting, how they will function, and whether or not they will have advanced configurations.
As you make your adjustments, you’ll see how each console’s CPU and memory are impacted, helping you determine whether you’ve chosen the right model or you require one with higher specs. Take a look at the calculator in action in our April edition of Ubiquiti Insider:
Simplifying IT isn’t just about making networking technology more accessible and intuitive; it’s about giving users a deeper understanding of how their system works and what’s needed to support it. We’re very proud of this new innovation because it’s directly tied to our greatest pursuit: delivering the best system performance and user experience possible.
We really can’t wait for you to try the resource calculator, so take it for a spin here and let us know what you think on the Ubiquiti Community forum. Also, be sure to check back soon for more news on the ever-expanding world of UniFi!
The WordPress block directory is a new way that WordPress users can discover, install and test third-party WordPress blocks from within the WordPress block editor. Introduced in WordPress 5.5, the WordPress Block Directory makes it easier to find the WordPress block that best fits your needs.
If you haven’t yet heard of the WordPress block directory, you’re not alone. In this guide, we’ll cover everything you need to know about the new block directory. We’ll also explain how to start using the Block Director to streamline your content workflow.In this Guide
The WordPress Block Directory is a category of free WordPress plugins that provide third-party WordPress blocks for use within the WordPress block editor.
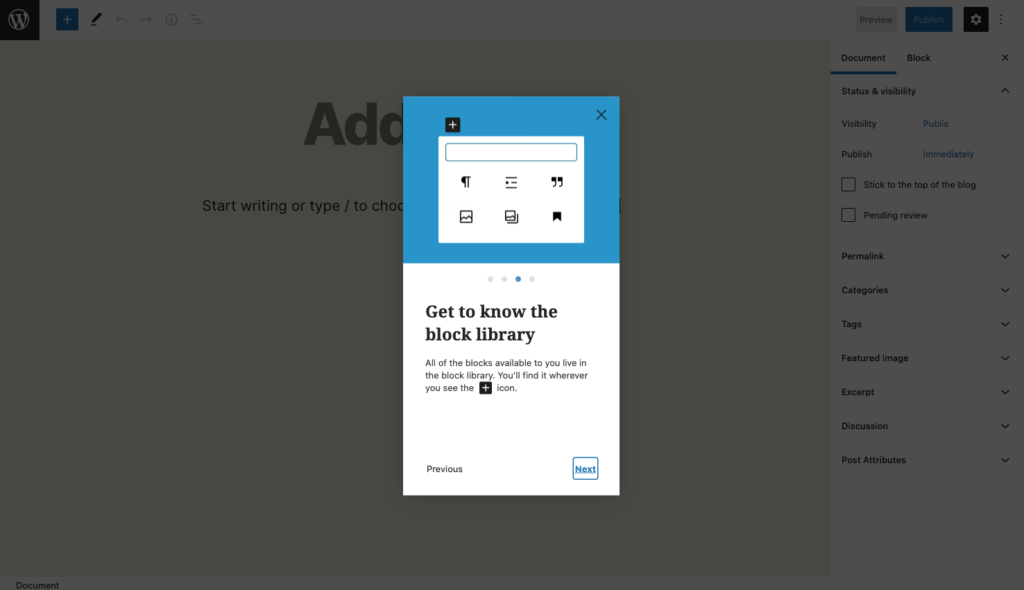
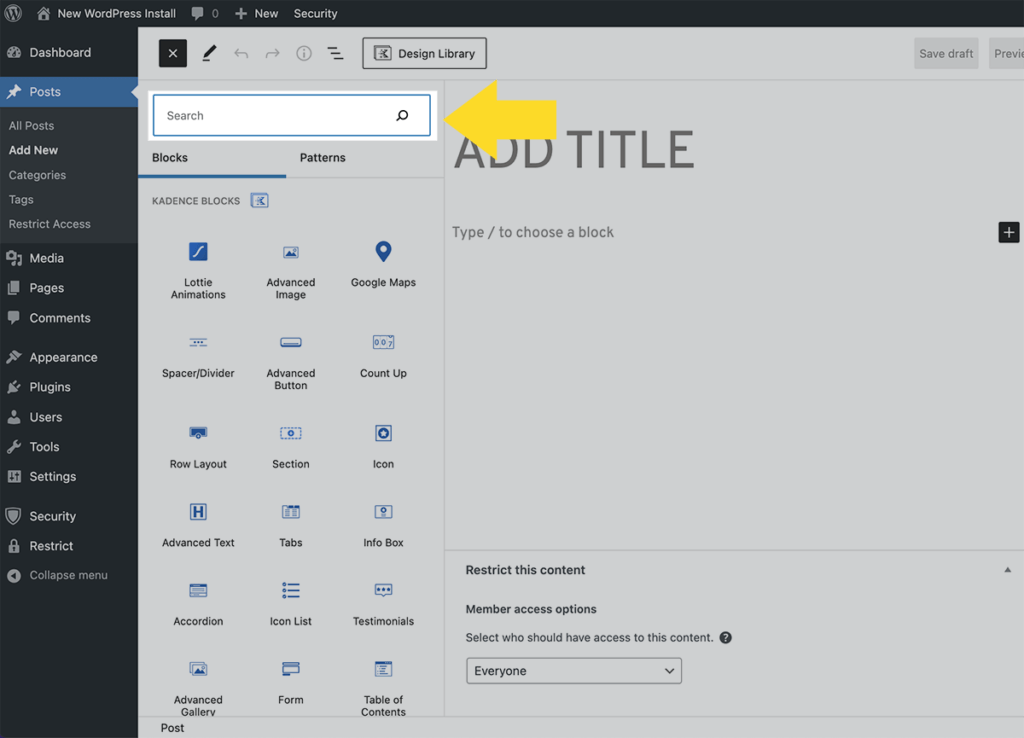
The new WordPress block directory is built right into the block editor, so you can install new block types to your site without ever leaving the editor. The block directory is designed to make it easier for users to search and install WordPress blocks directly from the block editor, so you can quickly add the type of block you need into your content.
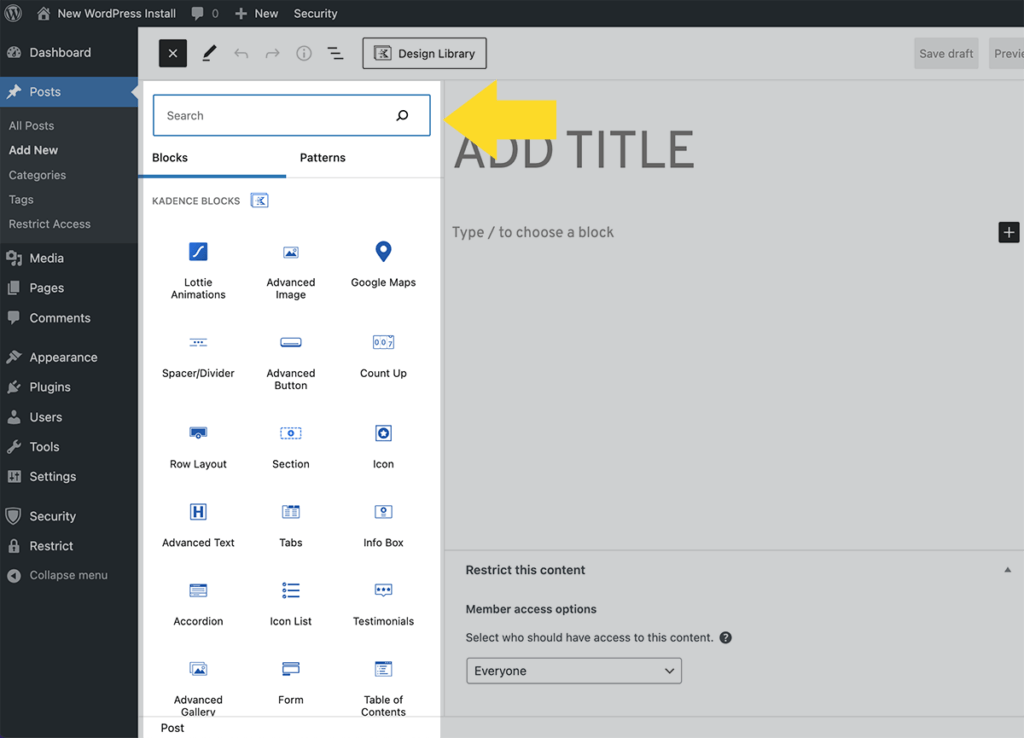
To search the WordPress block directory, use the “+” icon on the top left of the page to use the new block inserter and search for available blocks.
Here are a few important things to note about the WordPress block directory:
The block directory search functionality is only available to WordPress user roles who have the permission to add or install plugins.
If you add a third-party block from the block directory, the corresponding WordPress plugin will be installed on your site. So if you see a new plugin installed on your website, and you don’t remember installing it, check to see if the plugin is a WordPress block plugin.
The WordPres block directory pulls in both built-in default WordPress blocks and third-party WordPress block plugins so you can install them directly from your page/post editor.
Search results of third-party block plugins depend a few requirements that developers must meet (covered in more detail later in this article).
History of the WordPress Block Directory
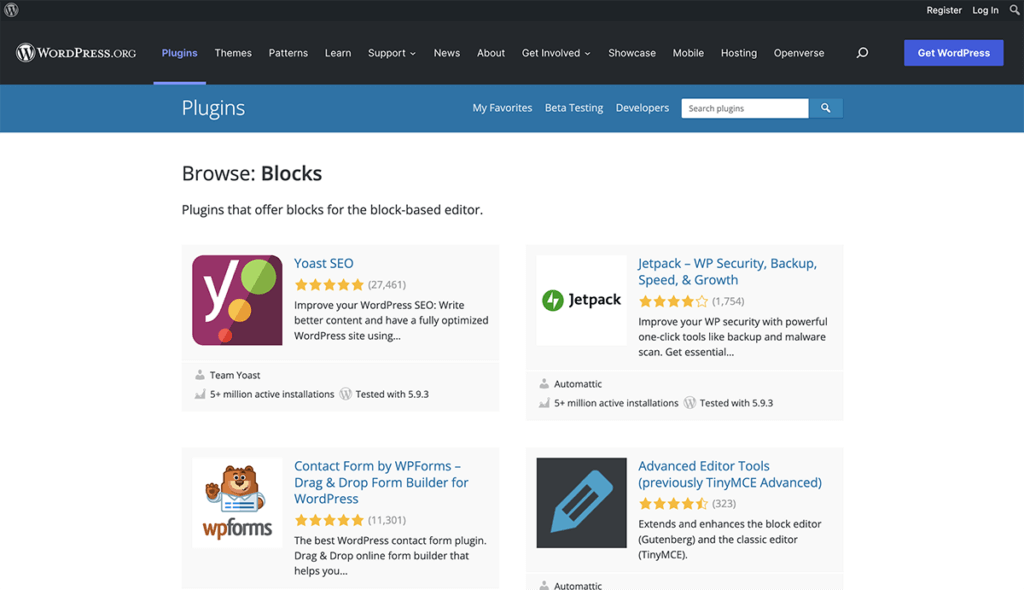
The WordPress block directory is the result of WordPress core discussions about how block plugins need to be distinguished from other free plugins available on the WordPress.org plugin directory.
The WordPress block directory endeavor was a cross-team development effort that involved major updates on:
The WordPress plugin update processes
The WordPress plugin repository
Integration into the WordPress block editor’s Inserter
The 8.4 version of the featured Gutenberg WordPress plugin was when the block directory was merged into the WordPress core; on August 11, 2020 in WordPress 5.5.
The Purpose of WordPress Block Directory
A new WordPress block directory is included in the main WordPress.org plugin directory, so you’re either browsing regular WordPress plugins or single block-enabled plugins.
The block directory is designed to help distinguish block plugins, which are javascript-only and register only WordPress blocks, versus traditional WordPress plugins that have more functionality.
What Are WordPress Blocks?
WordPress blocks are page elements that you can use from within the WordPress block editor to help organize and design the content of your blog posts and pages. From images to quotes to lists and media embeds, there’s a WordPress block for just about everything.
Built-in Default WordPress Blocks
WordPress comes with a library of built-in default blocks. Here’s a table of some of the most frequently-used blocks. This table includes some of the default WordPress blocks included with WordPress in the new block editor.
WordPress block
Description
Audio
Embed a simple audio player.
Buttons
Drive conversions with beautiful buttons.
Categories
Display a list of all categories.
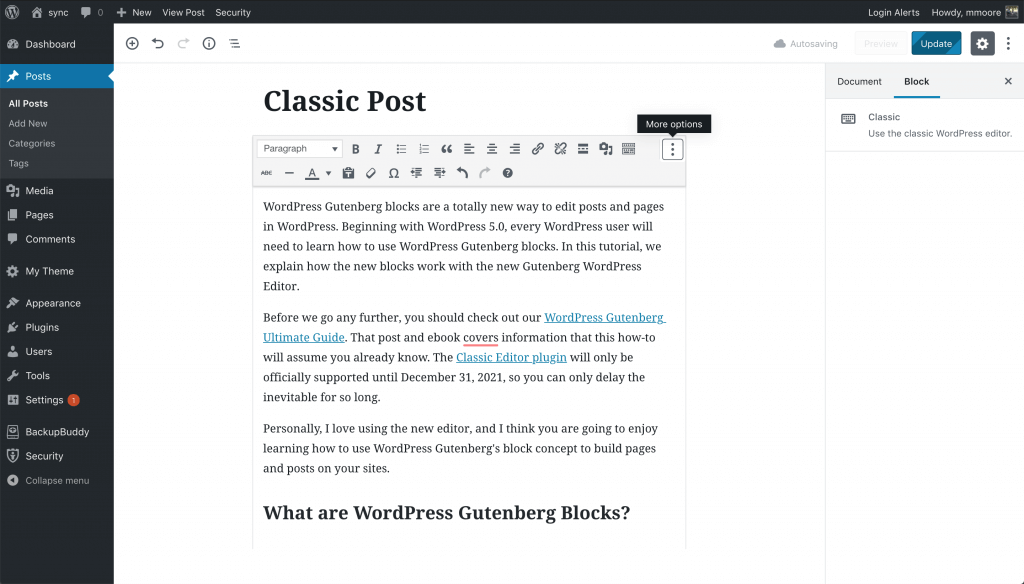
Classic
Use the classic WordPress editor
Code
Display code snippets that respect your spacing and tabs.
Columns
Add a block that displays content in multiple columns, then add whatever content blocks you’d like.
Cover
Add an image or video with a text overlay – great for headers.
Embed
Embed videos, images, tweets, audio, and other content from external sources.
File
Add a link to a downloadable file.
Gallery
Display multiple images in a rich gallery.
Heading
Introduce new sections and organize content to help visitors (and search engines) understand the structure of your content.
Image
Insert an image to make a visual statement.
Latest post
Display a list of your most recent posts.
List
Create a bulleted or numbered list.
Paragraph
The building block of all narrative.
Pull quote
Give special visual interest to a quote from your text.
Quote
Give quoted text visual emphasis.
More
Adds a “Read more” element
Separator
Create a break between ideas or sections with a horizontal separator.
Add white space between blocks and customize height.
When you login to your Admin dashboard (assuming that you’re using WordPress 5.0 or higher) and click to write a new post, immediately you’ll notice a panel for content editing that’s based on blocks.
Previously, this section of your post editor was one big content field that contained standard text formatting controls.
When comparing the old version of the editor to the new block-based version, this was a major upgrade for users.
The overall editing experience within the new version is a lot more streamlined and free of distractions. It gives you clear visibility to your main “canvas” without other elements that were mostly unneeded.
WordPress Block Library Plugins
In addition to the built-in WordPress blocks, other plugins like Kadence Blocks add even more blocks to the WordPress block library. The Kadence Blocks plugin adds even more power to the block editor, adding page builder features.https://wordpress.org/plugins/kadence-blocks/embed/#?secret=Q4GmBAmiJd#?secret=hdsqudoOKw
For example, Kadence Blocks custom blocks include:
Row Layout – Create rows with nested blocks either in columns or as a container. Give style to your rows with a background, overlay, padding, etc.
Advanced Gallery – Create stunning photo galleries, carousels, and sliders! Enable custom links, captions, and more. Plus you can select the image size for performance.
Form – Our powerful form block allows you to easily create a contact or marketing form and style it within the block editor.
Advanced Text – Create a heading or paragraph and define sizes for desktop, tablet and mobile along with font family, colors, etc.
Advanced Button – Create an advanced button or a row of buttons. Style each one, including hover controls. Plus you can use an icon and display them side-by-side.
Tabs – Create custom vertical or horizontal tabs with advanced styling controls. Each tab content is an empty canvas able to contain any other blocks.
Accordion – Create beautiful accordions! Each pane is able to contain any other block, customize title styles, content background, and borders.
Testimonials – Create confidence in your brand or product by showing off beautiful and unique testimonials. Display add as a carousel or a grid.
Icon – Choose from over 1500+ SVG icons to add into your page and style the size, colors, background, border, etc. You can also add multiple icons side-by-side.
Spacer / Divider – Easily create a divider and determine the space around it or just create some space in your content. You can even define the height per screen size.
Info Box – Create a box containing an icon or image and, optionally, a title, description, and learn more text. Style static and hover separately.
Icon List – Add beautiful icons to your lists and make them more engaging and attract viewers’ attention. Over 1500 icons to choose from and unlimited styles.
Countdown – Increase your conversions by adding a sense of urgency to your offering. Pro includes evergreen campaigns as well.
Posts – Display a clean grid of posts anywhere on your site, great for your homepage where you want to tease your blog.
Table of Contents – Allow your readers to navigate your content easily with a table of contents block. Includes smooth scroll to anchor.
Lottie Animation – You can import lottie animations into your site. You can choose how the animation plays and control animation speeds, loops, etc.
Count Up – An animated count up or down to a certain value. Great for displaying stats.
Google Maps – Embed a Google Map on your site.
Advanced Image – An image block with greater controls and advanced features.
What is a WordPress Block Plugin?
AWordPress block pluginis a relatively small, simple WordPress plugin that provides a single WordPress block. The plugin is the block, essentially.
The WordPress block directory helps organize third-party block plugins in a category separate from traditional WordPress plugins so they are easier to search and install.
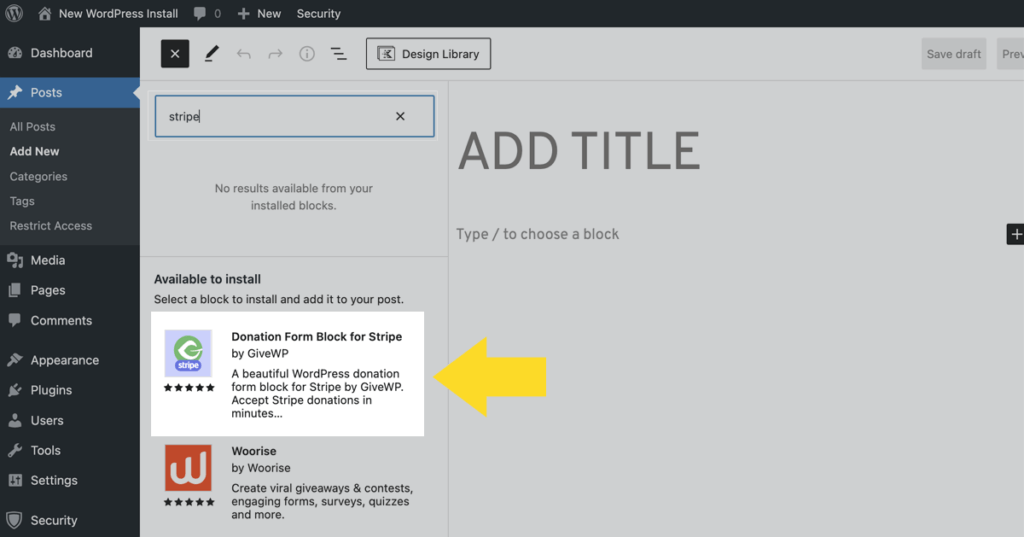
For example, the Donation Form Block for Stripe by GiveWP adds a Stripe-powered donation form to your website in a few seconds with a single WordPress block. Once installed, the block is easily inserted into your WordPress website and is designed to be easily customized to fit your needs.
What are Block-Enabled Plugins?
In a nutshell, block-enabled plugins are “traditional” WordPress plugins that include blocks you can use within the block editor. The WordPress plugin directory has also started distinguishing “Block-enabled plugins” to highlight plugins that utilize block functionality.
As you start working on new content for your site, whether it’s a new page or a blog post, you’ll notice that every content piece you include (such as an image or a paragraph of text) is converted into its own block.
You can basically think of a block like a wrapper that’s placed around each piece of content that you include on your post or page. But the block system doesn’t change anything about the content pieces individually, or how they appear on your website. An image is still an image and doesn’t appear any different to the end-user.
You’ll find that creating content with blocks is highly intuitive. When you start creating a new page or post, WordPress invites you to choose your block type or begin writing text.
When you complete a paragraph of text, hit enter and WordPress automatically transitions you to a new block.
When you want to add a different block besides a text paragraph, simply click the “+” icon, located within the block editor in the upper-left corner.
Each block type available for you to choose from is highly customizable in many ways. With a little time and experimentation, you’ll be able to make any block look exactly how you envisioned.
Benefits of the Block Editor
The introduction of the block-based editor has brought a number of benefits to WordPress content creators.
First, you can much more easily rearrange your blocks within each page than the previous editor allowed you to do. Every block has individual controls that allow you to move the block up or down one spot. You can also use the drag and drop function to move blocks around manually.
In previous WordPress editors, moving content around was a pain. First, you had to cut and paste content into the areas that you wanted to put them. Often, doing this caused a lot of formatting issues; although more so with some text editors than others. At times, users would lose entire content sections prior to moving them because they accidentally copied over it in their clipboard.
These aren’t issues that you’ll experience with blocks, and they’re a lot more maneuverable as well.
How Do I Use the WordPress Block Directory?
Now that we’ve discussed what WordPress Blocks are, let’s look into the new WordPress block directory.
The idea behind the block directory is not that complicated. But it’s highly useful for developers and site designers once they understand how to properly utilize the tool.
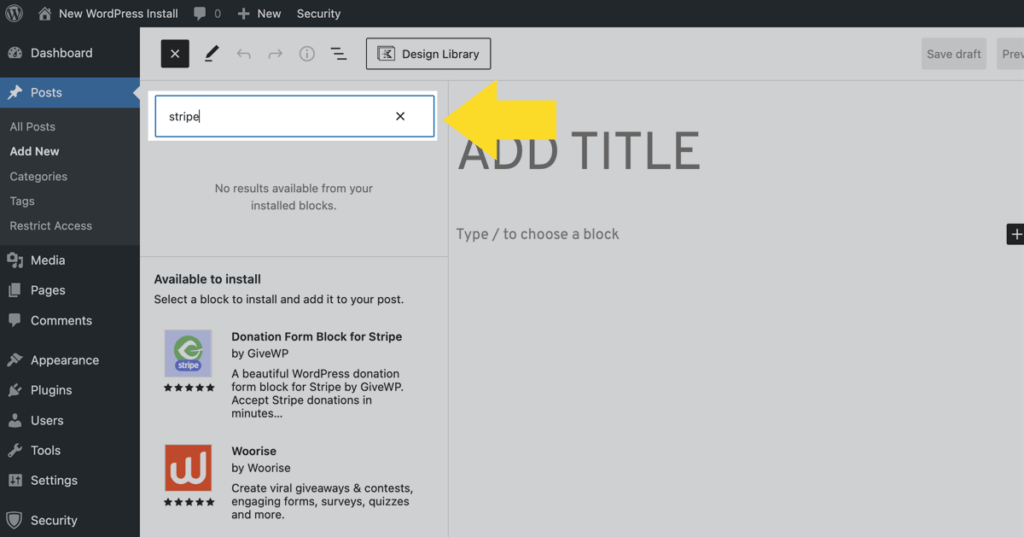
When a WordPress user wants to use a block that’s not available in the default WordPress blocks available locally in their editor, they can head to the search field of the Inserter and type in a keyword, such as “menu” or “team.”
Behind the scenes, the intuitive system first runs a search on the user’s local site. If it’s unable to find the specific block that’s being searched for, it starts searching the block directory: A designated part of the overall WordPress plugin repository that houses single block plugins.
When the system finds blocks that match the current search term, those blocks are displayed within the Inserter, with a preview section available for the user to review.
At this point, the designer decides which block they want to utilize, then clicks on the “Add Block” button. This causes a single-block plugin to be installed and activated, while the designer continues creating the post or page.
If the first block selection wasn’t the best choice, a user can then go back and search for a different block that can also be installed. This allows users a quick and easy way to test different block elements in their designs.
Keep in mind that the block directory can only be accessed by content creators that have full site rights and privileges to install and activate WordPress plugins.
Searching for WordPress Blocks
The search function works really well. The only problem is the current lack of plugins in the repository. It’s important to remember that the block directory is still very new and it’s overall functionality isn’t finalized.
Designers Steven Dufresne and Enrique Sanchez (along with others) have been actively exploring different considerations and variations of the flow for searching, selecting and installing block plugins within the editor.
For example, what happens when a user runs a search and a block plugin shows up in the Inserter that the user already has installed in their editor? Should it display “Disable Block” for that particular search result?
What if the search result displays a block plugin that the user has installed but deactivated? Should it display “Activate Block” for this result?
As you can see, there are many questions that remain up in the air regarding block searches and how they’re delivered.
The discussion is onoging with the designers and developers.
For the WordPress block directory to work, there are several factors that need to perfectly align.
First, the Directory has to have a unique section that’s designated only for single-block plugins to populate the search. There are many plugins that have two or more blocks that cannot be allowed to show in the block directory search feed.
After this, the Directory search feature must return its results within a format that can be displayed in the Inserter.
The block editor then has to run a process that searches the WordPress Plugin directory by way of REST-API. Then, the Inserter requires a method that will allow it to install and activate site plugins.
To do this, it must be able to consider the current user’s site privileges. Only site administrators have the ability to install and activate plugins.
For a plugin author to have their plugin be a part of the block directory, they have to provide a block.json file and an image to be displayed in the search results. It’s also important for plugin authors to remember that users will need additional information about the plugin, in the preview area, before they decide to download it.
In most cases, a user will want to see a plugin’s:
User ratings
Author information
Date of last plugin update
This helps push forward the decision-making process for users trying to decide which blocks to use on their site. After all, a lot of people don’t decide on things based only on how they look. They want to know what’s under the hood as well.
For the block editor, it would be a good idea (although an extremely difficult proposition that will no doubt require a lot of tweaking down the road) to automatically monitor the discarded plugins and make sure that unused blocks are uninstalled from the site after saving the post.
It’s also important to avoid the potential of a “block graveyard” within the site. With an updated Block Manager, this problem should be solved. It was talked about last year by Mel Choyce-Dawn as a part of the initial block directory designs. But it wasn’t a part of the initial release.
WordPress Single Block Plugins List
If you head over to the WordPress plugin repository, you’ll be able to browse WordPress block-enabled plugins that will feed your search results within the WordPress block editor.
At the time of this writing, there are only six pages of results available to browse. And in reality, only about half of those showing in the plugin repository search are actually going to be visible within the block editor via the Inserter.
With a quick spot check, it seems like a lot of them are completely missing the required block.json files. In those cases, the plugins will not be visible in the WordPress block editor search results, but you will see them in the WordPress plugin repository.
This seems to be improving within the last month, however, as final requirements have been more thoroughly documented and key guidelines published. A lot more of the plugin authors are starting to update their plugins to make sure they’re 100% searchable within the block editor.
Some examples of current, fully tested single-block plugins on the block directory include the Donation Form Block for Stripe by GiveWP.
How To Install a New WordPress Block
The block installation process should be seamless and intuitive for the user. At least it should be in theory.
Basically, all a user needs to do is to click on the “Add Block” button without ever exiting the block editor. The desired new block then immediately becomes available.
You’ll probably find out that in some cases you’ll get an error message that will ask you to try the installation again. But before you do, make sure to check and see if the plugin actually was installed and the block available for use.
In many cases, it seems like the error message is, in and of itself, an error and the block is ready to go. As time moves on, more of these minor bugs will be worked out and this useful new feature called the WordPress block directory will be running smoothly.
Block Directory Plugin Author Guidelines
Near the end of 2019, the Meta Team Lead Alex Sheils published an initial draft of WordPress block plugin guidelines for those who want to have a plugin added to the block Directory. It has since been updated with more detailed requirements as of just a few months ago.
To sum up the key points, plugins on the block Directory must have these specific characteristics:
Contain only one single block
Not have UI outside of the post editor
Have a minimum amount of server-side code
Must be structured according to certain specs and include a readme.txt file
Some additional rules that governed the first release of the block directory have been met with some controversy by plugin authors, due to how strict the rules were. However, the restrictions on the Directory weren’t intended on stifling plugin creators.
The goal is to keep the types of blocks that return into the block editor restricted to a specific protocol and type.
That was especially important on the initial release, where it wasn’t a case where more results would be better. The results needed to be very specific within the Inserter.
Knowing that, these additional rules apply to all plugin authors that want to get their plugin on the WordPress block directory:
Block plugins are created to use in the Block Editor
Block plugins must be separate blocks
The title of the plugin must reflect the title of the block
The plugin has to include a specific block.json file
The plugin author cannot charge a fee or require payment for funcationality. Paid accounts also are not allowed
The plugin should be able to function independently
It cannot, in any way, promote other plugins, themes or blocks
Think about the block directory sort of like an immature plant that you’ve just put into the ground. You know that you need to watch it and protect it so that it’ll grow into a bigger and better version of itself.
The block directory is no different.
As the design and development team continues to watch, listen and problem-solve, the Directory will begin to evolve into a place where plugin authors and users find a lot of value.
If you’re a plugin author and your plugin doesn’t yet meet the requirements to be on the block directory, keep in mind that it’s still welcomed on the normal WordPress plugins directory.
The Future of the WordPress Block Directory and Block-Enabled Plugins
The block directory has the potential to really extend the design functionality of the WordPress platform. It gives content creators a quick and streamlined way to extend their content creation capabilities with fingertip access to dozens of useful single blocks.
Even with the continuously moving parts, the first release of the block directory is a major milestone that should be celebrated by content creators and plugin authors alike.
Those of you reading this around the time of its publishing are on the cutting edge of the block directory and what it’s going to become. Now is a great time for you to consider some additional WordPress training that will show you other areas of WordPress, like the block directory, that you haven’t yet discovered.
As you continue to grow through the learning curve while turning your site into the success that you envision, remember that mistakes can (and will) happen. That’s why it’s so important to have a WordPress backup plugin and WordPress security plugin protecting your site at all times.
With everything in place, your website can continue to grow and evolve just like the WordPress block directory.
Adesigner friend discovered a new website creation tool. It claimed to be super-easy to use. Just drag and drop. See results right away. No coding. What’s not to like about that?
She built her new website and worked hard to make the site exactly as she wanted. Then she launched it.
That’s when the makers of the website creation tool proudly announced version 2.0. All new, from the ground up. Even better. More features. Easier to use.
Just one hitch. A minor one. Hardly worth mentioning: There was no way to migrate a website built in the old version. That was bad. What made it really bad was that version 1 would shut down in a few months.
My friend’s new website suddenly had the lifespan of a mayfly. Pretty, but destined to disappear.Let’s face it, it’s quite a task to build a website — one that works well for you, is aligned with your business, and effectively connects with your ideal audience. Doing all that well takes time and effort. So, of course, we count on our new website serving us well for a long time to come.Let’s face it, it’s quite a task to build a website — one that works well for you, is aligned with your business, and effectively connects with your ideal audience. Doing all that well takes time and effort. So, of course, we count on our new website serving us well for a long time to come.
If you’ve had your website for several years, you now have lots of content created over that long time. It definitely would be disastrous to one fine day find out what powers the website has been end-of-lifed.
So how can we avoid ending up like my friend, with a new, but dead-on-arrival, website? Or with an existing website that can no longer be updated?
The 2 Key Components of Future-Proofing
It starts before we build anything on a new website and involves 2 key components:
Adopting a future-proofing mindset
Future-proofing the technology
It’s tempting to view future-proofing a website as a done-and-forget it action. Because it’s an ongoing process. As much mindset as technology.
First, let’s look at developing a future-proofing mindset. Then it will be easier to consider the tech impact of future-proofing.
1. Adopting a Future-Proofing Mindset
Web technology is constantly changing, as are best practices and security concerns.
If we don’t understand (and accept that), at some point any new website will be outdated. Obsolete. Probably sooner rather than later.
WordPress introduced a new blog post editor in 2018. A major upgrade that changed how we approached writing and posting new content.
Many website owners were upset. They didn’t want to change how they edited post content. Not that they liked the old editor. But they had found ways to work with it. It was familiar. They might even use plugins to improve the editing experience.
Now here was something new. A major change that upset existing workflows. It didn’t help that the first iteration still lacked some refinement.
Others, like me, switched to the new block editor early and found that it truly speeded up posting. Plus it really was easier to work with.
In this change WordPress gave us a choice: Adopt early or later, either is okay. They even told us we had several years before they’d shut down the old editor. The only choice that is not okay, is to never adopt.
Being aware of new developments and recognizing when they affect our WordPress websites
Years ago we designed websites for computer screens. The biggest arguments were about what size computer screen. Designers fretted about pixel-perfect alignment.
Those few people who insisted on visiting websites from their mobile phones were content with dumbed-down mobile versions of websites. But most website owners didn’t worry about mobile browsing.
Today 2/3 of all web browsing is from mobile devices. Google now bases their SEO ranking on how a website shows up on mobile devices. It’s no longer okay to have a dumbed-down website for mobile visitors. Or to ignore them by having a desktop-only website.
Yet I still regularly see websites that are desktop-only. Clearly some website owners haven’t gotten the message. They persist with websites that are not future-proofed. Gradually slipping into oblivion.A future-proofing mindset means paying attention to changes in the online world and recognizing when it’s the right time to adapt and adopt. Often when we do, we find that the new way is clearly better and we really would never want to go back to the old ways.A future-proofing mindset means paying attention to changes in the online world and recognizing when it’s the right time to adapt and adopt. Often when we do, we find that the new way is clearly better and we really would never want to go back to the old ways.
What we don’t want to happen is to one day find out that functionality we relied on has been obsoleted, turned off and now my website doesn’t work anymore. Which of course hurts the business relying on that website bringing in customers.
Fortunately, when a change is announced, there is often a planned a transition time until full implementation. We have time to learn how to master the new approach. We may even be able to approach a major change with a hybrid approach, combining the best of 2 worlds and takes some pressure off today while ensuring that we’ll be ready for the future.
Tips for developing a future-proofing mindset
Become friends with your website — it’s an integral part of your business.
Stay up-to-date with WordPress developments on the official Make WordPress blog.
Be curious and explore how changes in the online world can help your business grow.
Be open to change.
2. Future-Proofing the Technology of WordPress
Choose wisely, we must
It might be tempting to go for that brand-new website builder that has every bell-and-whistle imaginable. But will it be around for years to come?
WordPress has been with us for since 2003! All that time, updates and new versions have been released regularly.
However, WordPress is just one part of the puzzle. There are three main components we’ll need to consider:
Theme — controls what the website looks like and much of the functionality
Page Builder — makes design, layout and editing easier
Plugins — add specific functionalities and integrations
Together these components form the technical base of a website and must be regularly updated to ensure full functionality and keep the website safe and secure.
Let’s look how to future-proof each component of WordPress.
WordPress Core
WordPress started as a blogging solution. Then folks like me concluded that managing content for the entire website in a database would make life easier. It wasn’t long before WordPress grew into a great tool for powering entire websites.
If you could look at the very first version of WordPress core next to the current one, they would seem a world apart. Yet there has never once been a time when a new version was incompatible with older sites.
For example, in 2018 when WordPress released a new editing experience (block editor) for posts, they outlined a roadmap for several years, so we could all see where development was going. Nobody was being left behind. Yes, some features (like the old editor) will eventually be turned off, but there is ample time to upgrade.
For instance, once I started using the new block editor for my blogs, old posts just showed up in a classic block. For site visitors, nothing changed.
I can leave those classic block posts as is. Or turn them into blocks and get all the benefits of the new editor with one click.
That’s future-proofing at work.
In Spring 2022, WordPress took the next step by releasing full site editing. You can now use blocks to add and edit content anywhere on the website and do much layout and design that formerly could only happen through hands-on coding or in a page builder. Again, it’s your choice to start using this new feature right now or take some time to learn more about it.
This gradual roll-out of features and backward compatibility builds confidence that WordPress will continue to be a great website platform for years to come.
Tips for Future-Proofing WordPress Core
Stay up-to-date with WordPress developments on the official Make WordPress blog.
Be aware of the changes included in each new version of WordPress.
Embrace the block editor.
Themes
Once upon a time there were themes for just about every kind of site that could be imagined. They came with pre-made layouts and places to drop in content. You wanted to change the look of the website, you got a new theme.
Since the theme is at the heart of a website (2nd only to WordPress), we have to select carefully. If you switch to another theme, the entire design and layout of your website will go away. Yes, the content is still there, but you’ll have lots of work in the new theme to get things to show up where you want them to.
Fortunately, the days of those specialized, fill-in-the-blanks themes are gone. Today, a future-proof theme is really a framework that lets you create the site you want.
In 2021, I switched to using the Kadence Theme for all my website development work. It’s very lightweight and extremely customizable. You can start with a blank canvas. Or choose from a library of starter sites. Except you’re not limited to an entire starter site. Like one page? Pick that. How about just a row or an element of a starter design? Copy it to your own site and insert your content.
The result is a site that’s truly yours.
Kadence is built for block editing and comes with a library of blocks, letting you easily create even complex layouts. And customize them to your heart’s content.
In many ways, Kadence gave us full site editing with blocks before WordPress officially turned on the feature.
In fact, Kadence does a lot of things with blocks that I used to need a page builder for. That’s of course the ultimate promise of full site editing: Everything done with blocks and no need for page builders.
At the same time Kadence plays nice with page builders. Which means I can choose on a page by page basis to create with Kadence blocks or use a page builder. I have even built pages where part of the layout comes from a page builder and part from Kadence blocks or elements. Everything seamless to the website visitor.
Kadence is fairly new on the market, but is aggressively developed and I expect it to be around for a long time to come.
Tips for Future-Proofing Themes
Make sure your theme is being actively developed alongside the latest developments in WordPress core
Select/switch to a theme that is specifically ready for full site editing and block editing
Page Builders
Page builders have been with us for quite a while. They help us customize page design and layout without having to write code. Plus you can see the layout and design you’re creating as you go.
However, the future of WordPress is now full site editing, where you use blocks to build not just posts, but for content everywhere on the site. That means eventually, page builders won’t be needed.
How soon that day comes varies for each of us. There’s definitely a learning curve for full site editing. Because full site editing is new, it’s still rough around the edges. Controls can be confusing or lacking (meaning I’d have to add custom styling [CSS] or code to get the look I want).
For those reasons, the safe approach for now (in 2022) is to still use a page builder. Because we’re used to how they work.
It is, however, important to select the right page builder.
Some page builders are shortcode-based. Meaning if you were to turn off the page builder, there would be no content on the page. Just some shortcodes. Actual content is hidden inside the database and will stay there, unless you are a database geek and know how to extract it.
A better choice is a page builder that places actual content on the page, along with code needed for styling/layout. If you remove the page builder, everything is still on the page. While it won’t display as when the page builder was active, you can access the content and work with it.
All page builders add code to the website, increasing load time. But some page builders add a lot more code than others.
For future-proofing, select a page builder that is lightweight and that doesn’t rely on shortcodes for everything. Then content is still accessible if you were to remove the page builder one day. Or if that page builder were to become defunct.
Note that there is no direct migration path from page builder formatted content to full site editing. Or from one page builder to another page builder. But at least the content is still on the page.
My choice is BeaverBuilder. It adds less weight than many competitors and it doesn’t rely on shortcodes.
BeaverBuilder can also be used on a page by page basis. Meaning you only use it for pages where you need it. A website I recently built has 49 pages and about half use BeaverBuilder, while the others don’t (block editing). As a rule, I also don’t use the page builder at all for blog posts. Because block editing lets me handle content there with much less added code weight.
Tips for Future-Proofing Page Builders
Select a page builder that is light weight and that doesn’t rely on shortcodes for content placement. Then content is still accessible if the page builder is removed or becomes defunct.
To further future-proof your website, start now to learn how to build pages using blocks instead of a page builder. Remember, it’s a page-by-page choice.
Plugins
WordPress websites rely on plugins for a wide range of different purposes. Security, backup, adding specific functionalities, integrations with other services. Even page builders are plugins. And extended features of your theme could come in plugin form.
Plugins may be the hardest area to future-proof. Why? Because many plugin developers don’t publish roadmaps. And sometimes even plugins that have been around for a long time suddenly go away.
Fortunately, there are usually several options for plugins to provide a particular functionality. So we can switch to using an alternative.
Tips for Future-Proofing Plugins
On your website, make certain to update plugins regularly and remove any unused ones.
From time to time also review the plugins on your site and make sure you really still need them. Don’t let a plugin hang around just because it’s always been there.
Invest in premium plugins with active development and support.
Ready for the Future?
WordPress is a great platform to build your website on. One that has been with us for years and will be there for the long haul.
With a future-proofing mindset and care in selecting the tech, a WordPress website built today will still work next year or five years from now. Because there is a real path forward.
I have a couple websites originally built with WordPress in 2010. Everything about them has been updated multiple times. Today they run the latest version of WordPress. There was never a time that WordPress came out with a new version that didn’t include a way to upgrade older websites. Even when block editing came along, it didn’t mess anything up.
That’s how flexible and future-ready WordPress is. When applying best practices and keeping a future-focused mindset, we can rest assured that today’s website will be around for tomorrow and beyond.
No matter how big or small your WordPress site, unwanted WordPress spam in comments sections, site registrations and contact form messages are issues that you’ll need to address.
Left unchecked, WordPress spam comments and spam user registration issues can quickly take over your site with intrusive content that detracts from the message your site is intended to portray.
In this guide, we’ll take you step-by-step through the process of stopping WordPress comment spam. You’ll also learn the best ways to prevent spam registration WordPress messages, end spam user registration efforts, stop WordPress contact form spam, and a lot more. Let’s take a closer look.In This Guide:
Spam has been an annoying, and often serious issue since the Internet became a staple in our lives. In the early days of being online, we became familiar with spam when unsolicited messages started to overtake our email inboxes, promoting everything from car insurance to cheap vacations. In fact, you probably continue to deal with this kind of unwanted spam every time you log into your email.
When discussing the spam that bombards a WordPress website, it’s a more multi-faceted subject than traditional email spam.
In a nutshell, WordPress spam attacks happen in many forms. As a WordPress site owner, chances are that you’ve dealt with these 3 types of WordPress spam:
Comment spam
User registration spam,
Contact form spam
While these WordPress spam attempts are, of course, highly annoying to both you and your site visitors, it’s important to understand that there are also some major security components that are tied to the spam you’re experiencing.
While attacking and defeating WordPress spam head-on might seem like an overwhelming task, protecting your site actually isn’t that difficult. All you need is the right approach and the best tools.
With the many different types of spam attacks happening on WordPress, it’s important to understand the different approaches that spammers take. Then we’ll look at the specific tools and tips that will allow you to take full control of the problem.
WordPress Contact Form Spam Explained
For most websites, a contact form is an absolute necessity. Contact forms help facilitate communication between you and your site visitors in a way that’s streamlined and user-friendly.
However, spammers see your contact form as a way to further promote their agenda.
WordPress contact form spam is different than other types of spam that attack your site. This is because your contact form requires the use of a plugin, unlike site registrations and comments that are natively built-in to your WordPress core installation.
When employing a contact form, you can choose from popular WordPress forms plugins such as Gravity Forms, Ninja Forms, or Contact Form 7. Just as each of these contact form plugins has its own unique set of features, they also employ different ways of eliminating WordPress contact form spam.
The specific features to protect your site from spam will be found in the settings of the plugin you choose. In some cases, you may need to download and install a companion plugin for full spam protection.
More on that later.
How To Stop WordPress Contact Form Spam
While the annoyance factor of receiving contact form spam emails is high, the solution for stopping them dead in their tracks is quite simple.
The first thing you’ll want to do is install a WordPress spam blocker plugin like Askismet.
If you’re using WPBruiser or Akismet, it’s good to know that either one is ready to work in unison with a wide variety of WordPress contact form plugins. In fact, Akismet will work directly out-of-the-box with Jetpack, Ninja Forms, Gravity Forms and Contact Form 7.
Conversely, WPBruiser is a little different in the way it combats WordPress contact form spam. WPBruiser requires a commercial extension in order to work with your WordPress contact form plugin.
With that said, WPBruiser has a much wider range than Akismet for spam protection options on plugins such as Formidable Forms, Fast Secure Contact Form, and the other popular contact form plugins detailed above.
Additionally, you’ll get a free Jetpack contact form extension in the core WPBruiser plugin installation.
No matter the contact form plugin you’re using, Akismet and WPBruiser will use robust spam blocking tools to help keep your contact forms safe from unwanted spam messages.
WordPress User Registration Spam Explained
The WordPress user registration feature is built directly into WordPress core.
The user registration feature is extremely useful for:
Membership sites
Online communities
eCommerce site customer accounts
Unfortunately, spam user registration is an area where spammers can easily focus their bots on malicious spam attacks. To prevent spam registration WordPress issues, it’s important to look at the root of the problem. WordPress stop spam registrations begins there.
A spam user registration consists of a phony site registration by spam bots that intend on spreading their message throughout your site. These spam user registrations will often lead to spam comments in your blog. They can even lead to more malicious attacks involving site security or a cluttered site with an unwanted front-facing membership directory.
What’s more, many WordPress plugins and themes have security vulnerabilities that can allow low-level site users, such as subscribers, to garner access to the administrative settings on your site. This is an important reason to prevent spam registrations WordPress is infamous for.
While the security flaws in themes and plugins typically require a spammer to work in a roundabout method to exploit the built-in vulnerabilities, it’s important to understand that even the most dormant-looking WordPress user registration spam account could be waiting and ready to exploit your site at any time.
Understanding the need to prevent spam registration WordPress attacks is the first step to solving the issue. Then, it’s time to employ a robust spam user registration blocker to put the issue to rest.
The aforementioned WPBruiser plugin will go a long way toward preventing WordPress user registration spam. It’s your first layer of defense in the WordPress stop spam registrations game.
However, there are a few other simple steps you should take in the WordPress stop spam registrations battle. Make sure to read this guide until the end for full details.
WordPress Comment Spam Explained
When you use the built-in WordPress comment section on your website, you’re automatically inviting conversation from users and readers.
Unfortunately, you’re also inviting a bunch of unwanted spam comments. These spam comments distract users from meaningful conversations about your content and severely muddy the overall experience for the user.
As discussed, spambots are constantly looking to exploit vulnerabilities in your WordPress security, which is a major reason to download and install the best WordPress security plugin.
But these same bots also search out and exploiting your comments section in a very malicious way. If you leave your site unprotected, the spambots will litter your entire site with more nonsense comments than you can keep up with. And they can do it in an extremely short timeframe.
WordPress Comment Spam Examples
WordPress comment spam, aside from the obvious blatant advertisements or garbled-up characters that don’t make sense, should quickly stand out to you because they’re highly complementary, but don’t contain any specific information or questions.
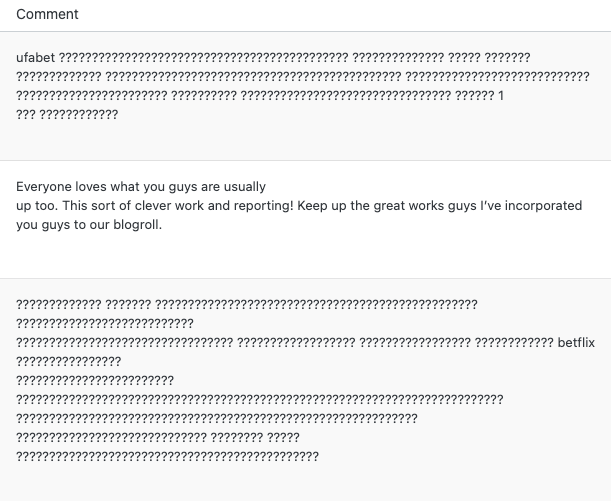
For example, you may see WordPress spam comments that read something like:
“Great blog you’ve got here! Beyond that, your website loads quickly and is easy to use. What site host do you use? Would it be possible to get your affiliate link to the host you use? I really wish my site would load as fast as yours. This is great $4/month hosting with a free domain and SSL, if you’re interested.”
“It looks like you’ve really thought through all of what you’ve presented in this post. Your words are very convincing and I think they’ll work. Even still, the posts your write are perfect for newbies. I do think that you should lengthen your future posts a bit. But thank you for this one.”
“I’m a frequent blogger and sincerely appreciate the information you’ve presented. The article really piqued my interest from the very first word. I just bookmarked your site and will check back for new content once every week. I also subscribed to your RSS feed.”
As you can see, these types of comments are very general and don’t address anything specific about your content. Once you understand this very obvious WordPress comment spam technique, they become quite easy to spot.
You may also see lots of question marks in a spam comment. Lots of question marks are a good indicator of spam.
Is Having a Comment Section On WordPress Worth the Trouble?
The easiest and most effective way to immediately put a stop to WordPress comment spam is to simply turn off the commenting function. If you’re not committed to keeping up with user comments, this is the best way to be free from spam comments cluttering up your site.
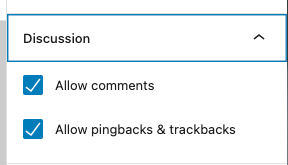
To turn off comments on individual posts and pages, you can do so from Post or Page settings. Scroll down to the Discussion section.
There are also several comment disabling options from the WordPress dashboard > Settings > Discussion page. From this screen, you can enable additional settings that can help curb comment spam, like requiring users to register to comment.
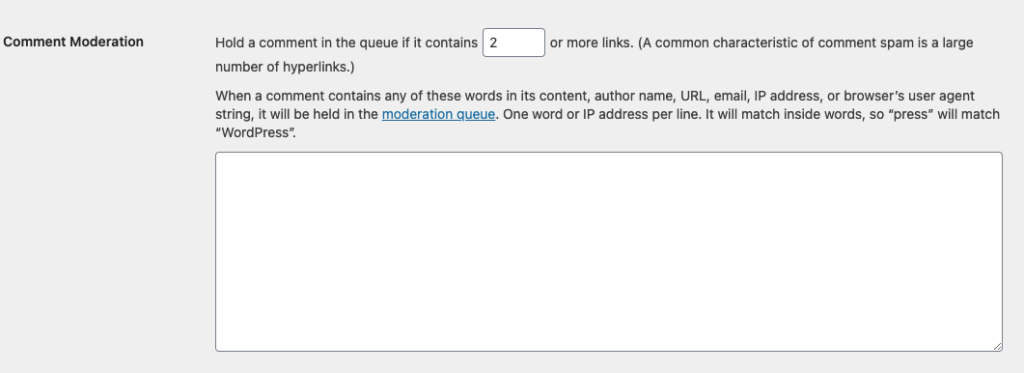
The WordPress comment moderation field on this page also allows you to set certain words or even IP addresses that will flag a comment to be held in the comment moderation queue, meaning the comment won’t automatically go live on your site.
That said, there are many different types of WordPress sites that have a need for a live and active comments section. This is especially true for blog sites that are content-based and thrive with heavy user interaction.
If your website falls under that category, the first thing you need to do is stop the spam comments from overtaking your little slice of the online world.
Stopping spam comments is going to take a healthy combination of plugins, along with some common sense spam administrative practices.
To start out, the default WordPress settings for the comment section (Settings > Discussion) can easily be adjusted to limit the harm that comment spammers do. When you look under the “Other Comment Settings” heading, it’s important to check the box next to “Automatically close comments on posts older than ___ days,” and “Users must be registered and logged in to comment.”
These are fast resolutions that’ll cut down on your WordPress comment spam immediately.
How to Stop WordPress Spam Comments
If you’ve chosen to make your comments active, the next best thing to do is install a WordPress spam blocker plugin. The plugins you can use for this purpose typically require very little in terms of ongoing maintenance and are quite simple to use.
After the initial setup process, these tools will do their job to keep you from dealing first-hand with the spam that continually bombards your comments.
1. Use a Spam Blocker Plugin like Akismet
Akismet is the first spam blocker to look at for preventing spam comments. It’s one of the few default plugins that come in every installation of WordPress core. Because of this, many WordPress users find Akismet to be one of the best WordPress spam blockers for comment section spam.https://wordpress.org/plugins/akismet/embed/#?secret=2x8NVUsWwL#?secret=Mm1J0eHr1Y
The Askismet plugin works 24 hours per day to filter out any potential spam comments and set questionable ones aside for your moderation. But beyond that, Akismet has a discard feature that automatically blocks out all known spam, which saves you the time and hassle of ever seeing it.
While Akismet does offer a free spam comment blocking feature, it’s important to note that your protection is normally only as good as what you’re willing to pay for. If you’re running a personal site or blog with relatively low traffic, you should be able to get away with running on the free plan.
If, however, your site is for business and pulls in a lot of traffic and comments, it’s best to upgrade to one of the paid commercial protection plans. The paid plans for commercial and business sites begin at only $5 per month. That small fee is more than worth it when you consider the amount of spam that you’ll never need to deal with.
WPBruiser is another option for fully ridding your comments section of unwanted spam posts.
With the WPBruiser application, you’ll get a customizable and free WordPress comment spam blocker plugin that doesn’t rely on any other third-party services. In other words, you won’t need to fumble around with API keys or open your site up to additional privacy or security concerns.
This plugin creates a comment blacklist, which prevents spam bots from even submitting comments at all. You can also set the plugin to clear out your logs after a specified period of time, and it won’t slow down your site like some other spam plugins.
More Powerful WordPress Spam Protection Techniques
To prevent spam registrations WordPress gives us several more options. WordPress user registration spam, comment spam and contact form spam are all enemies of running a successful WordPress website.
1. WordPress CAPTCHA or reCAPTCHA
While we’ve already covered WordPress stop spam registrations techniques and know how to prevent spam registration WordPress is infamously famous for, putting a complete end to spam requires implementing a CAPTCHA.
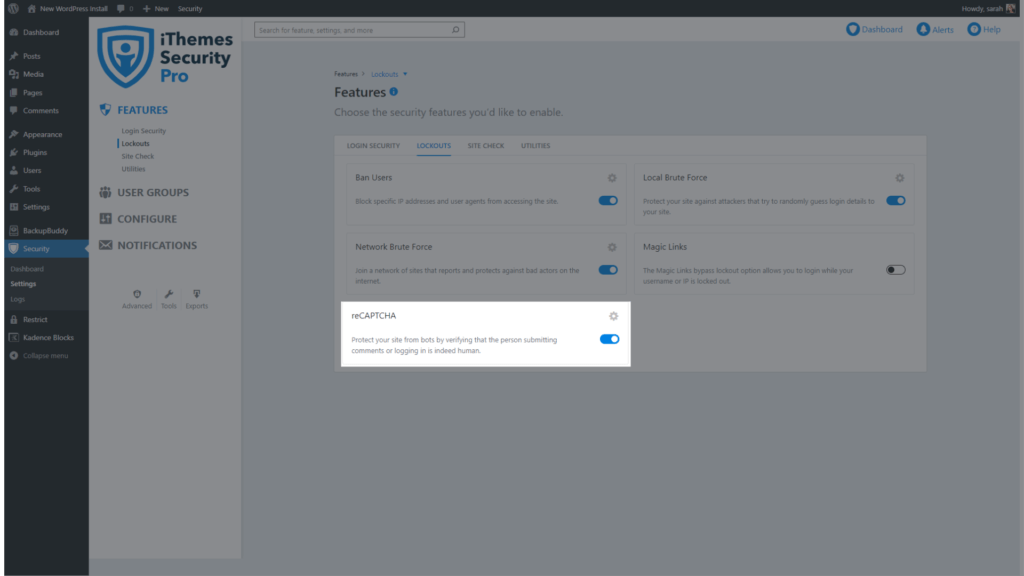
The best way to do this is by using the iThemes Security Pro plugin to add a WordPress reCAPTCHA to all user comments, user registrations, password resets and logins. This is an incredibly effective tool that determines exactly what a bot is and who your real users are.
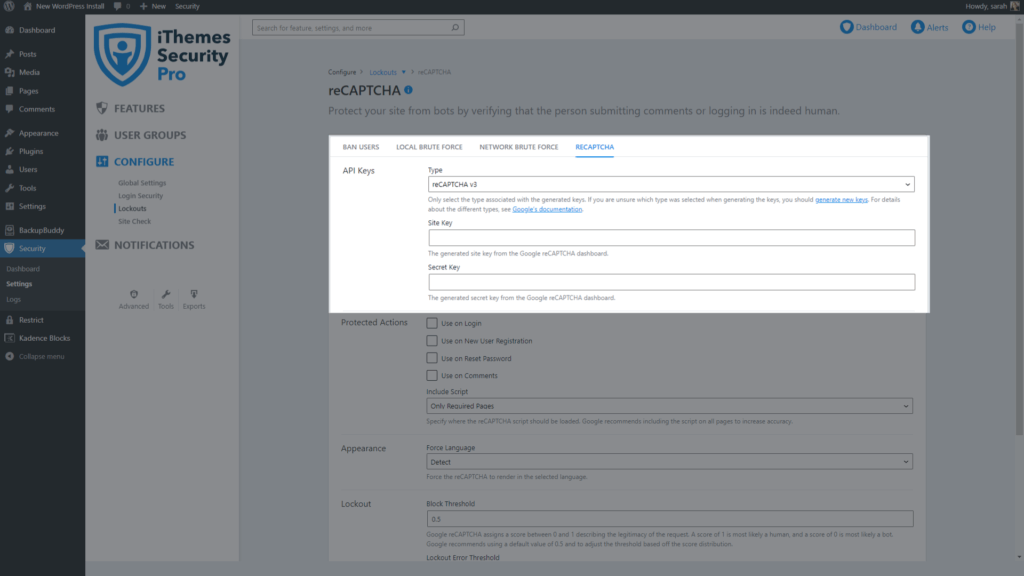
To get started using Google reCAPTCHA, enable the option on the main page of the security settings.
The next step is to select which version of reCAPTCHA you want to use and generate your keys from your Google admin.Note: We recommend using reCAPTCHA v3. We cover each of the 3 versions in more detail in the Understanding Different reCAPTCHA versions section.)
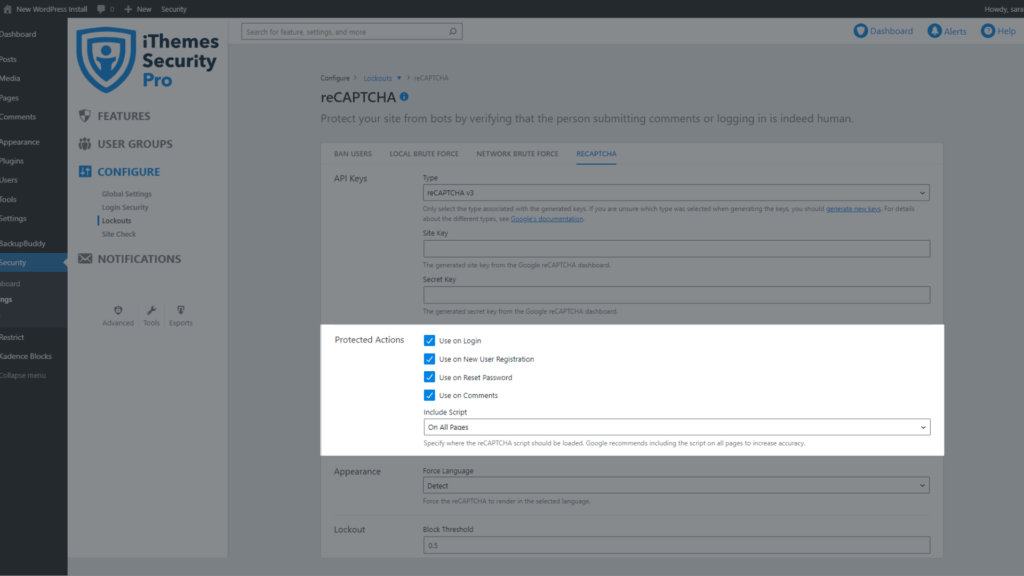
Now enable reCAPTCHA on your WordPress user registration, reset password, login, and comments.
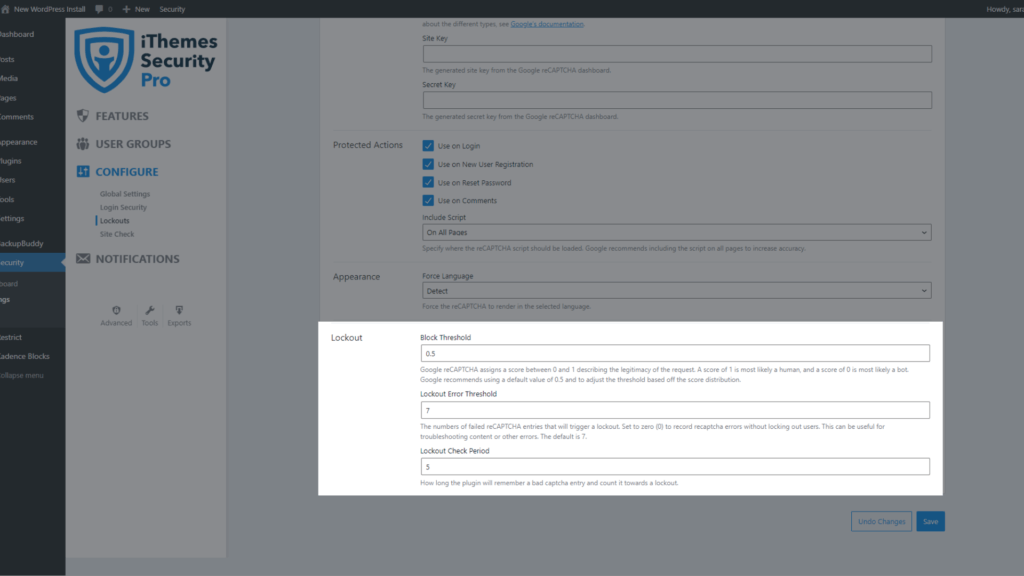
Finally, set the number of failed reCAPTCHAs need to trigger a lockout with the Lockout Error Threshold.
Selecting different versions of reCAPTCHA will display different settings.
2. Honeypots
Another helpful idea for throwing bots off your tail is to create a “honeypot field.” This is a form that’s hidden within your page’s code and is invisible to any real people that browse your WordPress site.
However, it attracts spambots.
They view it as another contact form or field to clutter up with spam messages.
The idea with this technique is that the bots will fill out the honeypot field, unaware that it will immediately expose them as spam. The entry is immediately rejected and the message will never land your inbox or cause any other mayhem on your site.
The honeypot technique, in theory, is a simple way to filter spam out of your life. But the reality is that it can sometimes be hit-and-miss. Some of today’s more sophisticated bots may be capable of getting around your honeypot trap.
While a lot of WordPress security plugins and contact form plugins include built-in honeypot features, make sure it isn’t the only solution you use. When you combine it with CAPTCHA and a spam filter plugin, you’ll have robust, multi-layered protection from spam attacks.
It’s also critical to employ a powerful WordPress backup plugin such as BackupBuddy. With the sophistication of today’s spambots, they can wreak all kinds of havoc on your site without warning. If and when that happens, the BackupBuddy plugin will automatically have a fully-functioning backup copy of your WordPress site ready to go, that you can get online immediately.
Make Spam on WordPress a Problem of the Past
WordPress stop spam registrations is a process that none of us want to deal with. However, to prevent spam registration WordPress has given us powerful tools to use.
As we’ve covered in this guide, spam on WordPress comes in many different forms, including emails, comments, and spam registrations. Fortunately, the techniques and tools discussed in this article will give you a strong upper hand on reducing spam on WordPress to an absolute minimum.
Remember, spam is a constant nuisance and, unfortunately, part of our everyday lives. It’s safe to say that none of us, or our websites, are immune to the problem. As such, we have to limit its impact.
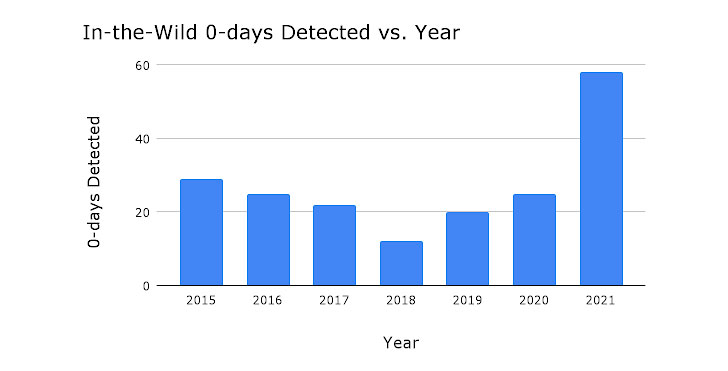
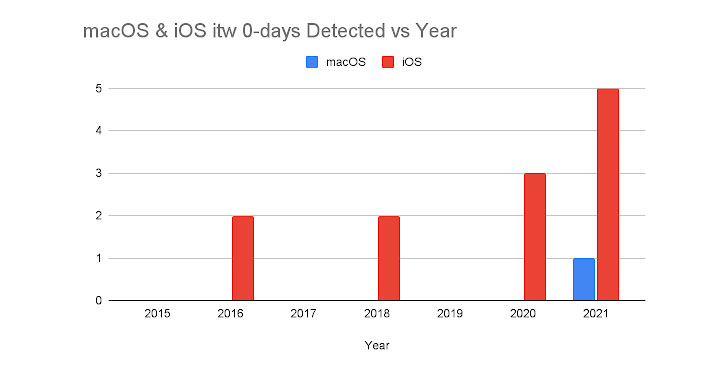
Google Project Zero called 2021 a “record year for in-the-wild 0-days,” as 58 security vulnerabilities were detected and disclosed during the course of the year.
The development marks more than a two-fold jump from the previous maximum when 28 0-day exploits were tracked in 2015. In contrast, only 25 0-day exploits were detected in 2020.
“The large uptick in in-the-wild 0-days in 2021 is due to increased detection and disclosure of these 0-days, rather than simply increased usage of 0-day exploits,” Google Project Zero security researcher Maddie Stonesaid.
“Attackers are having success using the same bug patterns and exploitation techniques and going after the same attack surfaces,” Stone added.
The tech giant’s in-house security team characterized the exploits as similar to previous and publicly known vulnerabilities, with only two of them markedly different for the technical sophistication and use of logic bugs to escape the sandbox.
Both of them relate to FORCEDENTRY, a zero-click iMessage exploit attributed to the Israeli surveillanceware company NSO Group. “The exploit was an impressive work of art,” Stone said.
The sandbox escape is “notable for using only logic bugs,” Google Project Zero researchers Ian Beer and Samuel Groß explained last month. “The most striking takeaway is the depth of the attack surface reachable from what would hopefully be a fairly constrained sandbox.”
A platform-wise breakdown of these exploits shows that most of the in-the-wild 0-days originated from Chromium (14), followed by Windows (10), Android (7), WebKit/Safari (7), Microsoft Exchange Server (5), iOS/macOS (5), and Internet Explorer (4).
Of the 58 in-the-wild 0-days observed in 2021, 39 were memory corruption vulnerabilities, with the bugs stemming as a consequence of use-after-free (17), out-of-bounds read and write (6), buffer overflow (4), and integer overflow (4) flaws.
It’s also worth noting that 13 out of the 14 Chromium 0-days were memory corruption vulnerabilities, most of which, in turn, were use-after-free vulnerabilities.
What’s more, Google Project Zero pointed out the lack of public examples highlighting in-the-wild exploitation of 0-day flaws in messaging services like WhatsApp, Signal, and Telegram as well as other components, including CPU cores, Wi-Fi chips, and the cloud.
“This leads to the question of whether these 0-days are absent due to lack of detection, lack of disclosure, or both?,” Stone said, adding, “As an industry we’re not making 0-day hard.”
“0-day will be harder when, overall, attackers are not able to use public methods and techniques for developing their 0-day exploits,” forcing them “to start from scratch each time we detect one of their exploits.”
Today, many companies are facing the challenge of digitalization, moving their physical commerce to the online world. This is not as easy as it seems, because depending on the type of store and the way it makes sales or contacts with customers, it will need one type of platform or another. Some opt for a classic website, while others opt for CMS functionalities such as WordPress.
In order to make these decisions, it is important to have IT and sales expertise or, failing that, a specialized consultancy.
Many companies recognize that they need to work digitally, but lack the resources to bring in full-time specialists. It seems that the usual format of companies is inflexible when it comes to incorporating this talent that makes periodic rather than daily contributions. To counteract this, the freelance format appears. Thanks to various platforms, it is possible to find different professional profiles and agree on a project-based collaboration, with a fixed and delimited cost.
Table of Contents
What Is The Purpose Of The .Htaccess File?
The necessary aspects for a website to function correctly are content management, programming and files such as .htaccess. This is a hypertext access that serves as a file to configure the software called Apache. It is a widespread server software, but it needs a series of directions to program its behavior to a certain extent.
The .htaccess file indicates the possibilities of action that a user has when entering the web. It can also limit certain actions to give us more control over our own website.
Another use is to configure the server to react to failures in the user’s connection. This will improve the so-called UX or user experience and serve to channel certain user actions.
It also has special relevance when it comes to making a site load better. Optimization is key, and not just to reduce users waiting time. The loading state of a page affects in part the chances of that page appearing among Google’s top results. Therefore, if our website uses the .htaccess file to prioritize load time optimization, it will not only improve the experience of current users but also attract different users.
The .htaccess file is a small document but it can serve as a gateway to an efficient and functional page. According to the parameters and rules entered, when a user enters the site the server directs traffic to the home page that appears in .htaccess. If there are any errors, the server directs the user to a failure page called 404, which is also customizable to some extent. So a bad configuration can be a risk since it will ruin a lot of visits that could be potential customers. This is why it is advisable to leave these files in the hands of professionals.
If there is one aspect that many entrepreneurs need to focus on, it is IT. The shortcomings in this regard have caused many viable projects to stagnate in their digital adaptation phase.
To prevent this from happening, the best thing to do is to have a programmer specialized in WordPress, especially at the start of the project. This professional is used to dealing with the WordPress computer system, programming, file types and promotional options. It is becoming more and more common for companies that do not have their own IT department to hire freelance programmers sporadically for specific periods or for specific actions. This type of contracting is becoming more and more common, as it helps to save costs in small and medium-sized businesses, where sustaining a full-time employee is a significant economic effort.
WordPress And .Htaccess
WordPress is one of the most popular virtual sites among businesses today. Its intuitive website designs and paid promotion options allow many users to do business on the Internet on a daily basis. The .htaccess file also plays a key role in this format.
There are a couple of aspects that are worth relating about WordPress as a beneficiary of .htaccess technology. To begin with, .htaccess files can refer to the entirety of a website, that is, to indicate the desired behavior in any section of it. However, there is also the option of assigning this type of document to each directory, which opens up the possibility of customizing different subsections.
We are talking about a very important element to restrict entry to some server folders, IP addresses, etc. As we can see, these are very necessary protection functions in the current cybersecurity context.
Optimizations For Our .Htaccess File
Different optimizations can be made in this document to take advantage of each and every one of its functionalities. In addition, as our WordPress website is used, it will be necessary to make adjustments that make sense. It is important to remember that, before modifying the .htaccess file, professionals usually make a backup copy. This is because, in case of failure (which can occur even for spelling issues), the page could be out of order. To make things easier, it is recommended to create a duplicate edition and apply the following tips.
Customize The 404 Error Page
The 404 error page is one of the most annoying pages for users because, in many cases, they do not know how they ended up there. Customizing this section allows you to give specific indications or explanations.
Home Page
The .htaccess file allows you to define a default home page, which does not have to be the same as the main page. Many people running personal projects use the “About Us” section as their home page.
Bringing Visitors From Our Old Website
When a client had an old website that has been replaced by another one, it is important to redirect people who enter the old domain. This way they will understand that the content has been moved.
Protect .Htaccess Modification
Parameters must be set so that this master sheet cannot be modified by third parties.
Block Bots And Users
This can be done from .htaccess. It is a way to prevent unwanted access to the website and to protect it from possible attacks.