The security of your WordPress website depends on the systems you implement to protect it and strengthen its security. With the increase in automatic password cracking, your users’ confidential information and access to your site are more at risk than ever.
That’s why it’s so important to further protect your WordPress site by adding two-factor authentication. Because your site is only as secure as your weakest password.
In this article, I’m going to tell you what two-factor authentication or identification is, why it’s so important and how to implement it on your site with easy to use and configure plugins.
Table of Contents
What Is Two-Factor Identification?
Two-factor authentication (2FA) is a type of multi-factor authentication (MFA) and is an additional layer of protection for your website. It is an additional user verification tool, for when someone logs into their account on your WordPress site.
In a standard WordPress setup, a user only has to specify a username and password to log in. Both can be guessed by dictionary attacks or if they are very weak.
When you add two-factor identification to your WordPress site, first, the user will have to enter their username and password as usual, but that’s not the end of it.
Then he will have to provide other information that proves that it is really him who wants to log in. In addition to the password, this information can be one of the following:
Something that only the user knows, usually a password or PIN code.
Something that only the user has, such as a physical device, a phone or a hardware key.
Something to prove that it is you, such as biometric data like a fingerprint or facial scan.
This data can be presented in a variety of different forms, which include:
A text message or phone call that gives a unique code to access.
Biometric proof such as the phone’s fingerprint sensor.
A separate app that users can download that gives them time-based codes that they can enter.
For example, if a user wants to log into a WordPress site, they must first enter their username and password (something only the user knows) . Then, enter two-factor identification, either asking them to verify their identity with a unique code sent by text message or a time-based code in an authentication application (something only the user has).
Or, on a higher security site like a bank might require the username and password (something only the user knows) first. Then, they might require a time-expired PIN code using their card (something only the user has) on a card reader and, as an added benefit, fingerprint scanning if you are logging in via your phone (something to prove you are who you say you are).
Why You Should Add Two-Factor Identification To Your WordPress Site
It’s easier than you think for someone to steal your password. In addition, most of your site users and team members use very weak passwords.
In fact, it probably won’t be news to you that cybercrime is on the rise. In recent years, personal data breaches, data loss and password exposure have been on the rise and are expected to cost the world 5 billion euros annually by 2022.
No matter the size of your website, the rise in automated password hacking means your site could benefit from some additional layers of security.
Enforcing strong WordPress passwords for your users is incredibly important for the security of your website. However, a strong password alone is not enough. One slip of user error could result in a hacker gaining access to your site and could put your customer or user data at risk.
The good news is that this can be stopped by implementing two-factor authentication in WordPress. In fact, even if one of your passwords was breached, the hacker would be stopped at the next stage. Indeed, the second factor would be the last one.
Still not convinced? Here are the benefits of two-factor identification:
Your data will be more secure : A weak password will no longer be the reason for unwanted access to your website.
You will be protected against fraud: 2FA reduces the likelihood that an attacker can impersonate a user.
Your team will have more freedom: Employees can securely access documents and data without putting the information at risk.
You will increase your users’ confidence: Your customers will appreciate that you are taking extra steps to ensure that their data is secure.
Reduce future costs: If your site is protected, you won’t have to spend money to fix it.
Now that we know the benefits of 2FA for your website and your business, it’s time to install it on your WordPress.
How To Add Two-Factor Authentication To Your WordPress Site
The easiest and fastest way to set up WordPress two-factor authentication is to install a plugin.
But as it is becoming more and more complicated to choose among the many plugins for every need, let’s take a look at the easiest 2FA plugins to implement and configure.
What Do You Need To Use 2FA Double Verification?
The only thing you will need, apart from your WordPress web administrator or editor user account and a plugin that includes the activation of double authentication, is a mobile app such as Google Authenticator or Authy, free for iOS and Android, installed on your mobile or tablet.
2FA With WordFence Login Security
Although you already know that I do not recommend it, if for some reason you already use the WordFence plugin, you should know that regarding the two-factor identification this utility is already included, both within the complete plugin and through a plugin that only offers this specific tool, which is recommended in itself: WordFence Login Security.
No matter what you choose, if it is the complete WordFence plugin or the WordFence Login Security plugin, or any of the following, the steps to activate and start using the double identification are exactly the same.
Activate the dual authentication.
Install a two-factor authentication app on your mobile device (Google Authenticator, Authy, etc.).
With the double authentication app, scan the QR code to add the application (your website) to the app.
Save the backup codes, in case you lose your mobile device to be able to log in without the app.
The next time you log in, in addition to the username/email + password, you will be asked for temporary expiration numbers generated by the authentication app for your application (web).
Then the settings:
For which user profiles the double authentication will be mandatory/optional/inactive.
Whether to allow the optional 30-day grace period (so that the user can choose not to be prompted every day).
Require 2FA for XML-RPC connections (recommended)
Also add reCAPTCHA (unnecessary)
Enable NTP protocol (recommended)
WooCommerce integration (optional)
As you’ll see, it delivers perfectly and works flawlessly, so – although I don’t recommend using Wordfence as a security plugin – the Wordfence Login Security plugin is a good option for adding double authentication to your WordPress site.
2FA With IThemes Security
As you may already know, this plugin was one of my favorites until the summer of 2021 when they decided to totally complicate the interface, forcing you to go through a wizard that made difficult what was once simple.
However, if you still use this plugin for the security of your WordPress website, it also includes the option to enable double identification, which you will find in the wizard.
After activating it, and only after completing the tedious setup wizard, you will be able to configure two-factor authentication.
In the settings you will be able to choose the double verification methods:
Mobile App
Email
Backup ID codes
The most common is to choose the mobile app, but if you opt only for the confirmation email method, or only the mobile app, I always recommend activating the backup codes, which are always a lifesaver.
Once you activate them, on the next login, users will be prompted to initiate the login process by double-identification, using the methods you have activated.
Once activated, it is very simple and intuitive.
What is more complicated is how to define for which users to activate double verification, because for this you will have to configure iThemes Security by creating groups of users and, for each one, decide what you activate and how. This is the part that they complicated so much with the damn wizard, and why I currently do not recommend this security plugin.
2FA With SG Security
Another way to enable two-factor identification in WordPress is via SiteGround Security, currently my favorite security plugin, which can be installed on any WordPress site, even if it is not hosted by SiteGround.
The best part is that, like everything in this security plugin, activating two-factor authentication is just one click.
Once two-factor identification is enabled, the next time an administrator or editor user accesses your WordPress site, they will first have to enter their username and password, and then they will be prompted for the temporary expiration numbers generated by the mobile authentication app, and can check the box to not be asked again for it for 30 days.
After logging in, you will be shown the backup codes, encouraged to save them in a safe place, and you will be able to log in.
Subsequently, each user will have the QR code and security code on their profile settings page, as well as the backup codes, in case they forgot to save them on their first two-factor authentication login.
SG Security’s 2-factor identification works with the main double authentication mobile apps, such as Google Authenticator and Authy, and at the moment it is activated by default for administrators and editors, the user profiles with more access and, consequently, more sensitive, although it is planned to extend it to other profiles.
It does not have as many settings as the other plugins, but it makes up for it with simplicity, something that many users value positively, me among them, especially with these new technologies, which tend to be difficult for most users, so although for advanced configurations it could fall short, it seems to me a more than valid option, and above all simple to implement and configure.
2FA With WP 2FA
The last option I will recommend you is a specific plugin for two-factor identification, and that I consider to be the best among the many that there are just for this utility: WP 2FA.
As soon as you install it and activate it, a configuration wizard will start, totally recommended, that will ask you for the methods you want to activate, which users to require the double identification and a few more settings, as you can see in the following screenshots:
As we have already seen before a bit of the terminology of this technology I will not get repetitive, because basically, the wizard settings are the same as in other plugins, so the screenshots are pretty self-explanatory and easy to understand.
Only the screens will change depending on whether you choose identification via mobile app or email.
With this you would have finished configuring the basic settings, but there is still more, because being a specific plugin it has quite a few additional settings, which are not shown in the initial wizard, that you should review.
For this you have a new item in the administration called WP 2FA, with two additional settings configuration pages:
2FA Policies
Settings
2FA Policies
In the 2FA policy you will be able to:
Select the available dual-ID methods
Choose for which profiles to force double identification
Define a grace period or not
Whether an external 2FA settings page will be created for the users or the settings will be in the WordPress admin
Choose where to redirect users to after setting up their 2FA page
Whether users will be able to disable 2FA in their profile or not
WP 2FA Settings
General
In the settings section you will find 3 tabs, namely:
Email settings: Here you can customize the texts and more options of the emails sent by the double authentication system.
General settings: A few technical settings about how the plugin works, which you will normally not have to modify.
White label: You will be happy to know that you can customize the texts that are shown to users in the double authentication process.
As you can see, it is the most complete of all in terms of customization possibilities, there is no possible competition in this regard.
It also has a premium version, payable, but it is not really necessary except for applying double-ID expiration policies, statistics and little else.
What Is The Best 2FA Two-Factor Identification Plugin?
I think it is clear that the most complete is WP 2FA, there is no doubt. The fact that it is a specialized 2FA plugin is noticeable, and beats any of the other options, for customization, for settings, for everything.
Now, should you install a specific 2FA plugin if your security plugin already offers this tool?
Well I think that, unless you NEED some specific functionality offered by the specific plugin and it is not available in your security plugin, I would use the 2FA feature of your security plugin, for not overloading plugin headers in your site, activating more code, having to maintain more plugins, etc. For economy of resources you could say.
If you have a WordPress website you probably think that you are already doing maintenance of your site, and it is not true and you should probably not do it yourself. WordPress web maintenance is essential, and should always be done by professionals, not WordPress publishers, but web maintenance professionals for WordPress.
But why should WordPress web maintenance be done by professionals? why shouldn’t I do it myself, if I even installed WordPress? doesn’t WordPress have automatic updates and shit like that?
Table of Contents
No One Can Be An Expert At Everything
If you want your website to have stability, good performance and be secure, it must be maintained by professional experts in various disciplines, which you alone will never master, mainly for 2 reasons:
It is not your goal in life
You can’t be an expert at everything
As much as you like WordPress and technology you can’t know everything or at least be an expert in everything, you need professionals specialized in different disciplines to make correct web maintenance:
Servers
Web Security
SEO On Page
WordPress Core
Plugin development
Theme development
Performance and resource optimization
Upgrades Are Not Perfect
Yes, WordPress even offers automatic updates in the background, but I’m sorry to discourage you: they are NOT SAFE, ever, for several reasons.
To begin with, no update is routinary, not even minor versions or maintenance and/or security updates, no matter if they are for plugins, themes or WordPress itself.
You should always check that the update does not require any additional action, that it does not modify styles or operations of any tool, that it does not alter the resulting HTML in the pages, that it does not negatively affect the performance and speed of the pages, or simply that it does not bring down the web.
Only a WordPress maintenance service that, before each update is performed, tests the possible consequences on a copy of the website, and only applies them after proving that nothing is broken, is a sufficient guarantee.
Let alone with updates in online stores, where sometimes it is required to update the database, with what that entails, and where it is always latent in what updates will affect sales, orders, customers, etc..
A professional WordPress maintenance service acts differently:
It disables all automatic updates.
Analyze and know in advance all the changes of the updates and what they can affect.
Tests the updates before on a test site, copy of the real one.
Makes backups just before any updates on the real web.
Update the real site.
Check the live site for anything that may have been affected, updating the database if necessary, and making adjustments if there are visible or operational changes.
In case of problems restore the site with the backup from just before the upgrade, to restart the process before a second attempt.
Plugins And Themes Do Not Always Work Well Together
Not only in updates, simply by installing a new plugin you can break the website, duplicate theme functionalities or ruin the SEO of the website by duplicating structured data, HTML tags or PHP functions of the theme or other plugins.
Code execution priorities should be reviewed. Sometimes it is better that a new code/plugin is loaded from the theme functions, or just the opposite, before the theme is loaded, or even before any plugin is loaded, working as a must-have plugin. Order often matters, and you can’t know all the plugins, themes, let alone the code.
A professional web maintenance service must take into account all these dependencies, to avoid problems and, if they occur, know how to solve them quickly.
It is a matter of each service, but in my case I do not allow my WordPress maintenance clients to install plugins, I require them to always ask the maintenance team to install and activate them, for several reasons:
Sometimes we already know in advance that a plugin is not going to work well.
Sometimes we already know in advance which plugin is best for the client’s need.
We always make an additional backup before installing any plugin, in case there are problems when activating it, to recover the website instantly.
Nothing you do in a web installation is trivial, and there is nothing better than relying on professionals with experience in many other websites instead of launching into the adventure testing themes and plugins and then regretting it, without being able to use your website, losing sales, contacts or business for having “tried on your own”.
Internet And WordPress Change And Evolve
Do you have several hours a day to keep yourself up to date on all the new technologies and threats that are on the Internet? Do you test every new WordPress, plugins and themes that come out to adopt the best technology for your website? do you know up to the minute the new algorithms, changes and requirements of Google?
If the answer to all these questions is a resounding “Yes” then perhaps you do not need to rely on different specialists.
If you hire a specialized WordPress maintenance service you can be sure that you will not get stuck and that they will always advise you on all the possible improvements you can make to your website.
A Business Critical Website Needs Constant Attention
Finally, perhaps the most important thing when deciding whether to take care of the maintenance of a WordPress website yourself or to entrust these tasks to professionals is that the web, like your business, needs constant attention and care, and …
If you take care of the business, who takes care of the website?
If you take care of the web, who takes care of the business?
As the person in charge of a business, you should focus your efforts on your business, not on the tools that support or serve the business.
Just as you would not take care of the maintenance of fire extinguishers or lighting of a physical store, but you would be taking care of customers and looking for new sales and promotion opportunities, it makes no sense or logic that you neglect your business to take care of plugins, themes, codes, PHP versions or Apache or LiteSpeed servers, caches or the latest Google algorithm.
If you want your business to move forward you should start thinking about the business, and let other specialists take care of the maintenance (web and others), who will guarantee that the tool will not be a problem for the business.
As you already know all my websites are hosted with SiteGround and it is the hosting that I always recommend for performance, support and also for the extras and improvements they bring to any WordPress website.
Table of Contents
Why SiteGround?
Among these extras, some really important features for WordPress sitesare:
Specific server optimizations for WordPress sites.
3 levels of server caching: NGINX Direct Delivery, Dynamic Cache and Memcached
Full, one-click restorable daily backups
WordPress site-specific security rules and firewalls
Own premium optimizations plugin totally free, that WAS only available on sites hosted by SiteGround
And yes, I say “WAS only available on SiteGround hosted sites” because since version 7.0.0.0 you can now install the SG Optimizerpremium optimizations plugin for free on your WordPress website, regardless of which hosting company it is hosted with.
SG Optimizer
Exactly, from now on you can install the SG Optimizer plugin on your WordPress website, no matter if it is hosted on SiteGround or not. You can have a free optimization plugin with features that are usually only offered by paid optimization plugins.
You install it like any other WordPress plugin, activate it and that’s it.https://wordpress.org/plugins/sg-cachepress/embed/#?secret=AfXGZTamFP#?secret=ZN138Km8WC
You will have a new menu in the WordPress administration, with all the optimization tools of SG Optimizer.
Let’s see what optimizations the plugin offers, indicating those that are available on any hosting or only on sites hosted on SiteGround, because some of the optimizations, depending on server systems, will only be available on SiteGround, but they are the least, most of the optimizations you can take advantage of them on any hosting.
And don’t worry that it will be difficult to configure, the whole plugin is very easy to use, designed for all types of users, with or without technical knowledge.
Improvements
With version 7.0.0.0 SiteGround has not only introduced the improvement that it can be used on any hosting, it has also added enhancements to existing features and some new ones:
NEW – Plugin available for non SiteGround hosted users.
NEW – File-based full page caching
NEW – File-based full page cache for logged in users
NEW – Preload cache (requires FB cache)
NEW – Compression level settings for individual images
Code reprogramming and general improvements
Improved HTML minimization
Improved deferred loading exclusions
Improved automatic emptying of custom content types
Improved cache exclusion for wp-json URLs
Improved option to test cache on URLs
Improved CloudFlare detection
Improved WooCommerce email verification support
Improved WP-CLI support
After testing these changes on several of my sites where I still kept WP Rocket to optimize some aspects that the previous versions of SG Optimizer did not solve well, I have ended up uninstalling WP Rocket, also here at WPHelp, as I now get better times and more optimized pages just with the tools of the SG Optimizer plugin.
Problems With Hosting Companies
Although in principle the SG Optimizer plugin can be used on any hosting, you may encounter some problems with some hosting companies.
Here are the ones that I know of or that you have informed me about, and the solution…
SG Optimizer And GoDaddy
If you have tried to install the SG Optimizer plugin on a GoDaddy hosting you will have found that it won’t let you, that it blocks its installation, just like it does with a lot of other plugins blocked on GoDaddy.
In this case, it’s probably just that it won’t let you install it because prior to version 7.0 SG Optimizer could not be installed on other hostings, and now you can.
My recommendation is that you contact GoDaddy and inform them that this has changed and that there is no security or performance (negative) reason for them to block the installation of the plugin, and that they can remove it from their list of blocked plugins.
Why Do GoDaddy And Some Other Hosting Companies Block The Installation Of WordPress Plugins?
This will not only happen with GoDaddy. There are other hosting companies that, for various reasons, block the installation of various plugins, almost always security and optimization (cache, etc.).
This is usually because their hosting plans are oriented to user profiles with little knowledge and they prefer to block access to certain plugins to avoid configuration errors or possible incompatibilities that would generate more work for their support teams.
Other times it is simply because they prefer to have very closed hosting plans, with basic but secure configurations that, again, generate as few problems and support requests as possible.
This is the way it is.
What Is SG Optimizer Missing?
Yes, this optimization plugin is one of(if not “the”) the best we have available. And you can see it easily changing your optimization plugin with this one and seeing the differences in tests.
But despite this, in my opinion, SG Optimizer still lacks a setting to be perfect: Adding missing dimensions of images. This setting does have WP Rocket but in my tests, overall, on no occasion did WP Rocket manage to outperform in scores and main web metrics the results with SG Optimizer, even being on a hosting that did not take advantage of SiteGround’s caching systems, nor the automatic image optimization or the conversion to WebP.
Of course, testing can vary depending on the type of website and page being analyzed, and in each case you’ll need to adjust different parameters of the optimization plugin tools, adding exclusions, etc. But it’s great to have a free optimization plugin as powerful as SG Optimizer and with so many tools that are usually paid.
And if you want to have all the full features, including their own servers, then I recommend you to host your websites on SiteGround.
If you want to offer a website as optimized as possible there are many ways to do it, but a basic one is to use image formats that offer the highest quality with the lowest possible file weight, as images are one of the heaviest elements of any website.
When choosing image formats we usually have several options at the moment, compatible with most browsers:
JPG – Normally compressed format, does not support transparency.
PNG – Uncompressed format, supports transparency.
WebP – Compressed or uncompressed format, supports transparency.
And yes, we can optimize our web load quite a bit using these formats properly, but we can go even further, using what in the main web metrics (Core Web Vitals) is called new-generation image formats, and this is where AVIF comes in.
Table of Contents
AVIF
In 2018 AVIF came out, or AV1 image format, an image format that uses the same compression algorithms as video files, offering high quality at minimum weights.
If we talk about new image formats, AVIF solves the major problems of WebP (which again has little, since it has been with us for 10 years).
We could consider AVIF an update of the WebP format, since both are based on video coding algorithms.
But if we talk about limitations, WebP is limited to a color depth of 8 bits, and can only store color at half the image resolution. This results in saturated, smeared or pixelated color edges.
In contrast, AVIF supports full 10-bit and 12-bit resolutions, with high dynamic range (HDR).
AVIF also uses a new compression method, called chroma-from-luma. To give you an idea of why it makes a difference, most image formats store brightness and color saturation separately, but AVIF uses the brightness channel to adjust the color channel, as they are usually related.
The result is smaller file sizes and sharper edges at all image sizes.
In this gallery the differences can be better appreciated:
AVIF Compatibility With Browsers
Currently the AVIF image format is only recognized by Chrome browsers (since version 85), also on Android, Firefox (since version 91) and Opera Mobile (since version 62), with support planned for Safari, but not yet known for Edge.
How To Save As AVIF Or Convert To AVIF Format
The next problem we are going to encounter is that many of the tools included in current operating systems do not allow saving as AVIF, so we will have to initially have the images in other formats and then convert the images to AVIF format.
I personally like the free web service Squoosh, which allows you to convert images to and from almost any format, including AVIF.
It also allows you to see the result of the conversion as you go along, both visually and in terms of the resulting size.
In any case, AVIF support is being incorporated into modern operating systems. For example, Microsoft allows displaying AVIF files in Paint and the file manager since Windows 10.
For all other operating systems, we can open and export files as AVIF from the cross-platform editor GIMP.
How To Use AVIF In WordPress
The first stumbling block to be able to use the AVIF image format in WordPress is the supported MIME types.
WordPress Does Not Allow Uploading AVIF Files
In fact, currently even WordPress does not allow uploading SVG and WebP formats by default, and of course not even AVIF format files.
To bypass this limitation I recommend that you add the following function to your customizations plugin, or failing that to the functions.php file of the active child theme:
You would only need the $mime_types [ 'avif' ] line to add AVIF compatibility but by the way I have added other formats that you might need soon, like webp, heic or heif, you’re welcome.
When you save the changes you will be able to upload these new file formats.
Upload AVIF Via FTP
Another way to bypass this WordPress restriction is to upload the files directly by FTP or from the file manager of the hosting and copy the URL to use it later, but it is too complicated, at least from my point of view.
Plugins For WordPress To Support AVIF Files
On the other hand, if you don’t feel comfortable adding codes you can use the Mime Types Plus plugin to add the new formats from a more visual interface.
Also ImageEngine’s CDN supports AVIF, and through its plugin allows the delivery of these formats.
Plugins For Serving AVIF Image Files
The easiest way to start using AVIF format image files is through plugins, although there is little to choose from at the moment.
One that does a good job is ShortPixel Image Optimizer, which allows you to convert to WebP and AVIF, as well as deliver these new formats to your website, albeit with paid credits.
Serving AVIF Images Via HTML
If you are comfortable with HTML it is easy to provide images in AVIF and other formats using the tag, for example:
WordPress, with a global deployment of more than 40% of the entire web, it is important that it adopts new technologies and formats that, like AVIF, contribute to making a faster and more accessible web for everyone.
The AVIF format allows to deliver high quality images and low weight, but above all with less bandwidth consumption than other formats, and this is especially important in countries where the available bandwidth is not as we are used to in the first world.
WordPress has a great potential, but also a great responsibility, to contribute to make a better web, more accessible to all, and this would be another small step.
In this post we will be going through connecting Windows Admin Center to Azure to allow management of Azure VM’s. To install WAC see previous post.
The Azure integration allows the management of Azure and on-prem servers from a single console.
First step is to register WAC with Azure, Open the WAC admin console and go to settings tab.
Go to the Azure in the gateway settingsCopy the code and click on the enter code hyperlink and enter the code
Sign-in using an admin account on the Azure tenant.
Now go back to WAC and click connect to finish the registration
Once WAC is registered it require admin application permission to be granted to the application registration in Azure
Now that the registration is completed we can now add Azure VM’s to WAC go to add and select Azure VM
Select the subscription (if there are multiple subscription in your tenant), resource group and VM that will be added.
Once the Azure VM is added, to allow management there will need to be management ports opened to allow a connection between WAC and the Azure VM. If you are using a site to site VPN you can just allow the ports over the VPN connection.
I have a public IP associated with my VM and I will be modifying my network security group to allow the ports from my public IP.
I wont be going through configuring an NSG as this was covered in a previous post.
On the VM itself you need to enable winrm and allow port 5985 through the windows firewall if enabled. This can be done by running the two command below from an admin PowerShell session.
winrm quickconfig Set-NetFirewallRule -Name WINRM-HTTP-In-TCP-PUBLIC -RemoteAddress Any
Once the NSG is configured we should then be able to connect to the VM.
Below shows the overview of the VMWe can also now connect to the VM using integrated RDP console in WAC
WAC also allows us to manage services, scheduled tasks, backups, check event logs and other admin task, along with connecting using remote PowerShell directly from WAC.
I recently had a to move around a few thousand EMS licences to enable MFA for Office 365 and Azure, I decided to do two quick scripts to remove and add back the licences to the required users. I thought I would do a quick post on how I moved the licences.
As always any scripts should be tested on a subset of users before running on larger groups to test that they work as expected.
For this script we need the Office365 PowerShell module installed.
To check if the module is installed run
Get-Module -ListAvailable MSOnline
First step is to get the AccountSKU to do this run
Import-Module MSonline and then Connect-MsolService
Get-MsolAccountSku | Select-Object AccountSkuId
To make things easier and more repeatable in case I need to remove or add other licence I am using Out-GridView -PassThru to select the CSV file and also the licence SKU.
First Out-GridView is for the Csv file with UserPrincipalName (UPN)
The second is to select the SKU to be removed
Once the two items are selected the script will then run The full remove license script is below. The only part that needs to be updated is the $csv variable to point to the correct folder where the csv files will be kept.
## Bulk Remove licenses ##
## Select Csv file
$csv = Get-ChildItem -Path C:\temp\Office365Licence\Remove\ -File | Out-GridView -PassThru

## Import Csv
$users = Import-Csv $csv.FullName

## Select Account SKU to be removed
$accountSKU  = Get-MsolAccountSku | Select-Object AccountSkuId | Out-GridView -PassThru

## Loop through each user in the Csv
foreach($user in $users){
Write-Host "Removing $($accountSKU.AccountSkuId) licence from $($user.UserPrincipalName)" -ForegroundColor Yellow

## Remove licence
Set-MsolUserLicense -UserPrincipalName $user.UserPrincipalName -RemoveLicenses $accountSKU.AccountSkuId
}
The add script is the same only I added a check to confirm if the user requires the licence. The only part that needs to be updated is the $csv variable to point to the correct folder where the csv files will be kept.
Just a note on this I was applying the licence to existing users who where already setup with a usage location so if this is not set the script will error out.
## Bulk Add licences ##
## Select Csv file
$csv = Get-ChildItem -Path C:\temp\Office365Licence\Add\ -File | Out-GridView -PassThru

## Import Csv
$users = Import-Csv $csv.FullName

## Select Account SKU to be removed
$accountSKU  = Get-MsolAccountSku | Select-Object AccountSkuId | Out-GridView -PassThru

## Loop through each user in the Csv
foreach ($user in $users) {

## Check if Licence is already applied
$check = Get-MsolUser -UserPrincipalName $user.UserPrincipalName | Select-Object UserPrincipalName,Licenses
Write-Warning "checking for $($accountsku.AccountSkuId) on $($user.UserPrincipalName)"
if ($check.Licenses.AccountSkuId -notcontains $accountsku.AccountSkuId){

## Add licence
Write-Warning "Adding $($accountSKU.AccountSkuId) licence to $($users.UserPrincipalName)"
Set-MsolUserLicense -UserPrincipalName $user.UserPrincipalName -AddLicenses $accountSKU.AccountSkuId

}
else
{
## Licence already applied
Write-Host "$($user.UserPrincipalName) has $($accountsku.AccountSkuId) licence assigned" -ForegroundColor Green

}
}
During a recent audit we wanted to confirm what users had MFA enabled in Office 365. We use conditional access policy to enforce MFA.
We wanted to check each users to see if they had setup MFA and had a method configured. We also wanted to get information on licensing status and assigned licenses.
The only pre-req for using the script is that the MSOnline Powershell module is installed.
To install the MSOline module open and admin PowerShell windows and run
Install-Module -Name MSOnline
To confirm the module is installed run the below command.
Get-Module -ListAvailable MSOnline
First we need to connect to MS Online to do this run
Connect-MsolService
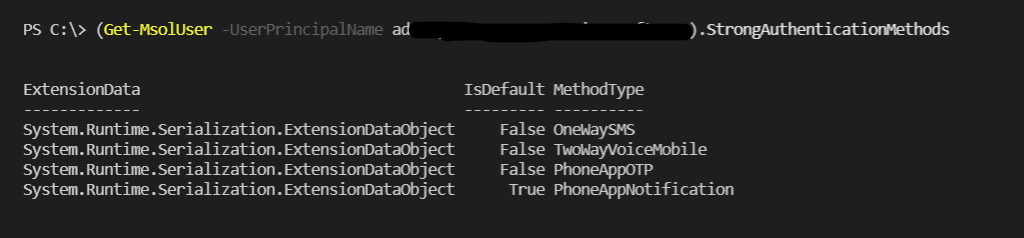
Once connected to check the MFA status I will be using the StrongAuthenticationMethods properties as if MFA is configured for the user there will be a default method set.
For users that haven’t configured MFA no StrongAuthenticationMethods is set.
Picking just 10 Linux open source security tools isn’t easy, especially when network professionals and security experts have dozens if not several hundred tools available to them.
There are different sets of tools for just about every task—network tunneling, sniffing, scanning, mapping. And for every environment—Wi-Fi networks, Web applications, database servers.
We consulted a group of experts (Vincent Danen, vice president of product security, RedHat; Casey Bisson, head of product growth, BluBracket; Andrew Schmitt, a member of the BluBracket Security Advisory Panel; and John Hammond, senior security researcher, Huntress) to develop this list of must-have Linux security tools.Linux security: Cmd provides visibility, control over user activity
Most of them listed here are free and open source. The two that cost money are Burp Suite Pro and Metasploit Pro. Both are considered indispensible in any enterprise program of vulnerability assessment and penetration testing.
1. Aircrack-ng for Wi-Fi network security
Aircrack-ng is a suite of tools for security testing wireless networks and Wi-Fi protocols. Security pros use this wireless scanner for network administration, hacking, and penetration testing. It focuses on:
Monitoring: Packet capture and export of data to text files for further processing by third-party tools.
Attacking: Replay attacks, deauthentication, fake access points via packet injection.
Testing: Checking Wi-Fi cards and driver capabilities.
Cracking: WEP and WPA PSK (WPA 1 and 2).
According to the Aircrack-ng website, all tools are command line, which allows for heavy scripting. The tool works primarily on Linux, but also Windows, macOS, FreeBSD, OpenBSD, NetBSD, as well as Solaris and even eComStation 2.
Burp Suite Professional is a web application testing suite used for assessing online website security. Burp Suite operates as a local proxy solution that lets security pros decrypt, observe, manipulate, and repeat web requests (HTTP/websockets) and responses between a web server and a browser.
The tool comes with a passive scanner that lets security pros map out the site and check for potential vulnerabilities as they manually crawl the site. The Pro version also offers a very useful active web vulnerability scanner that allows for further vulnerability detection. Burp Suite is extensible via plugins, so security pros can develop their own enhancements. The Pro version has the most robust plugins, making Burp a multi-tool suite of very useful web attack tools.
Cost: The professional version costs $399. There’s also an enterprise version that enables multiple concurrent scans that can be used by application development teams.
3. Impacket for pen testing network protocols
This collection of tools is essential for pen testing network protocols and services. Developed by SecureAuth, Impacket operates as a collection of Python classes for working with network protocols. Impacket focuses on providing low-level access to packets, and for some protocols such as SMB1-3 and MSRPC, the protocol implementation itself. Security pros can construct packets from scratch, as well as parsed from raw data. The object-oriented API makes it fairly easy to work with deep hierarchies of protocols. Impacket supports the following protocols:
ethernet, Linux;
IP, TCP, UDP, ICMP, IGMP, ARP;
IPv4 and IPv6;
NMB and SMB1, SMB2 and SMB3;
MSRPC Version 5, over different transports: TCP, SMB/TCP, SMB/NetBIOS and HTTP;
Plain, NTLM and Kerberos authentications, using password/hashes/tickets/keys;
Portions of TDS (MSSQL) and LDAP protocol implementation
Cost: Free as long as the user gives SecureAuth credit. Impacket is provided under a slightly modified version of the Apache Software License. Security pros can review it here and compare it to the official Apache Software License.
4. Metasploit: A super-tool for detecting exploits
An exploitation framework from Rapid7 that is used for general penetration testing and vulnerability assessments, security pros consider it a “super tool” that contains working versions of nearly every known exploit in existence.
Metasploit enables security pros to scan networks and endpoints (or import NMAP scan results) for vulnerabilities and then perform any possible exploitation automatically to takeover systems.
According to a recent Rapid7 blog post, capturing credentials has been a critical and early phase in the playbook of many security testers. Metasploit has facilitated this for years with protocol-specific modules, all under the auxiliary/server/capture function. Security pros can start and configure each of these modules individually, but now there’s a capture plug-in that streamlines the process.
Cost: Metasploit Pro, which comes with commercial support from Rapid7, starts at $12,000 per year, but there is also a free version.
5. NCAT probes network connectivity
From the makers of NMAP, NCAT is a successor to the popular NETCAT. It facilitates reading and writing data over a network from the command line, but adds features such as SSL encryption. Security experts say NCAT has become crucial for hosting TCP/UDP clients and servers to send/receive arbitrary data from victim and attacking systems. It’s also a popular tool for establishing a reverse shell or exfiltrating data. NCAT was written for the NMAP Project and stands as the culmination of the currently splintered family of NETCAT incarnations. It’s designed as a reliable back-end tool to execute network connectivity to other apps and users. NCAT works with IPv4 and IPv6 and offers the ability to chain NCATs together, redirect TCP, UDP, and SCTP ports to other sites, as well as SSL support.
Cost: Free open source tool.
6. NMAP scans and maps networks
NMAP is a command-line network scanning tool that uncovers accessible ports on remote devices. Many security pros consider NMAP the most important and effective tool on our list— the tool is so powerful it’s become obligatory for pen testers. NMAP’s flagship feature is scanning network ranges for active servers, and then all of its ports for operating system, service and version discovery. Via NMAP’s scripting engine, it then performs further automated vulnerability detection and exploitation against any service it finds. NMAP supports dozens of advanced techniques for mapping out networks filled with IP filters, firewalls, routers, and other obstacles. This includes many TCP and UDP port scanning mechanism, OS detection, version detection, and ping sweeps. Security pros have used NMAP to scan large networks of hundreds of thousands of machines.
Cost: Free open source tool.
7. ProxyChains for network tunneling
The de facto standard for network tunneling, ProxyChains lets security pros issue proxy commands from their attacking Linux machine through various compromised machines to traverse network boundaries and firewalls, while evading detection. They use it when they want to use the Linux operating system to hide their identity on a network. ProxyChains routes the TCP traffic of pen testers through the following proxies: TOR, SOCKS, and HTTP. TCP reconnaissance tools such as NMAP are compatible – and the TOR network is used by default. Security pros also use ProxyChains to evade firewalls and in IDS/IPS detecting.
Cost: Free open source tool.
8. Responder simulates attacks on DNS systems
Responder is an NBT-NS (NetBIOS Name Service), LLMNR (Link-Local Multicast Name Resolution) and mDNS (multicast DNS) poisoner that is used by penetration testers to simulate an attack aimed at stealing credentials and other data during the name resolution process when no record is found by the DNS server.
The latest version of Responder (v. 3.1.1.0) comes with full IPv6 support by default, which lets security pros perform more attacks on IPv4 and IPv6 networks. This is important because Responder had lacked IPv6 support and therefore missed several attack paths. This was especially true on IPv6-only networks or even mixed IPv4/IPv6 networks, particularly when you take into consideration that IPv6 has become the preferred network stack on Windows.
Cost: Free open source software.
9. sqlmap looks for SQL injection flaws in database servers
sqlmap is an open source penetration testing tool that automates the process of detecting and exploiting SQL injection flaws that could be used to take over database servers. The tool comes with a powerful detection engine, and boasts many features for penetration testing including database fingerprinting, accessing the underlying file system and executing commands on the operating system via out-of-band connections.
Security pros say it helps them automate SQL discovery and injection attacks against all major SQL back-ends. It supports a wide range of database servers, including MySQL, Oracle, PostgreSQL, Microsoft SQL Server, Microsoft Access, IBM DB2, SQLite, Firebird, Sybase, SAP MaxDB and HSQLDB. It also supports various kinds of SQL injection attacks, including boolean-based blind, time-based blind, error-based, stacked queries, and out-of-band.
Cost: Free open source software.
10. Wireshark: Popular network protocol analyzer
Wireshark, which has been around since 1998, is a network protocol analyzer, commonly called a network interface sniffer. The latest update is Version 3.6.3.
Wireshark lets security pros observe a device’s network behavior to see which other devices it is communicating with (IP addresses) and why. In some older network topologies, network requests from other devices pass through the network interface of a security pro’s device, allowing them to observe the entire network’s traffic, not just their own. Security experts say it’s a great tool to figure out where the DNS servers and other services are for further exploitation of the network. Wireshark runs on most computing platforms, including Windows, MacOs, Linux, and Unix.
Cost: Free open source software.Join the Network World communities on Facebook and LinkedIn to comment on topics that are top of mind.
Readers of this blog won’t need much convincing that today’s digital threat landscape is complex and formidable. Where I expect to find more skepticism is around the prospect of a quick, simple, yet powerful security upgrade to your existing infrastructure.
You’re not wrong to be skeptical.
It’s exceedingly rare when two security technologies, from two different vendors, actually strengthen one another. Much more often the opposite is true, when a lack of identity continuity allows security vulnerabilities and usability barriers to take root in the small gaps between disparate identity systems.
But that’s what makes Daon’s new partnership with Broadcom Software, and our native integration with Symantec SiteMinder, so noteworthy. It really is a fast, simple, affordable way to make SiteMinder even better at what it already does so well—protecting the applications that your business relies on.
Authentication is nice, but is it enough?
SiteMinder has always been highly effective at ensuring that only users with the right identity credentials can gain access to your applications. It manages multiple types of authentication credentials and flow, applying the appropriate mechanism to balance security and convenience.
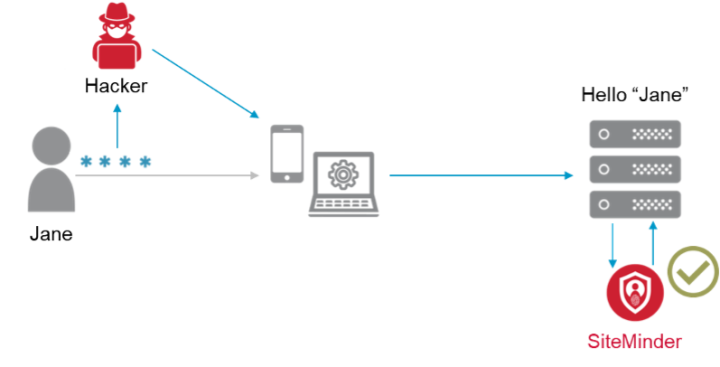
But in today’s world of ubiquitous password breaches, intercepted OTPs, and stolen devices, there is a quite reasonable and growing level of concern around the inviolability of those very credentials.
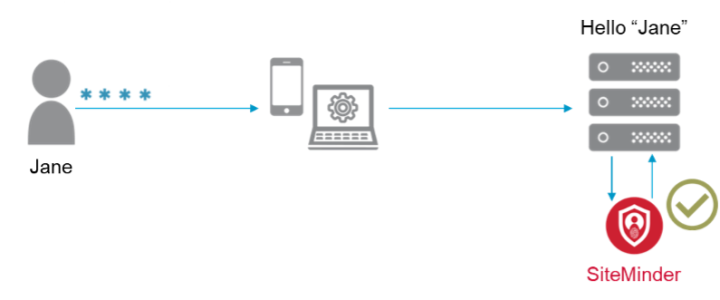
At any point along the user journey, how are we to be sure that the identity credentials meant for “Jane” are still, and solely, in her possession?
The Strengths & Weaknesses of Multifactor Authentication
Two-factor authentication solutions like Symantec VIP that utilize multifactor credentials and contextual risk analysis are a critical step in strengthening the authentication process and providing greater confidence that users are who they claim to be.
But this classic model of authentication—including even the strongest, most secure biometric authentication factors like fingerprint authentication—has a limitation. Authenticating that a user’s fingerprint matches the fingerprint on file does not, in itself, prove that the fingerprint belongs to a legitimate user (e.g., Jane). What if the person who submitted the original reference fingerprint was not actually Jane? Or what if someone other than Jane gains access to her account through other means and then changes the reference fingerprint to match their own?
A fast, simple, affordable way to make SiteMinder even better at what it already does so well—protecting the applications that your business relies on.
Consumer biometric authentication tools like TouchID and FaceID are plagued by this vulnerability. On an iPhone or Android phone, you can circumvent the biometric security with a simple password, then proceed in seconds to replace all the biometric reference data on that device. What seemed at first glance like robust biometric security is in fact nothing more than an elaborate password proxy.
And there’s a second problem, too.
As Katie Deighton recently wrote in The Wall Street Journal, “Consumers who use two-factor authentication are finding that changing a phone number or neglecting to write down recovery codes can leave them inadvertently locked out of online accounts.”
When authentication becomes too dependent on a trusted device, genuine SiteMinder users who lose a device, have a device stolen, or change to a new device may find themselves suddenly unable to access their SiteMinder-protected applications.
Introducing Daon Identity Proofing
Real-time identity proofing is the next step in the evolution of authentication. It requires a biometric factor (your face) that can be easily verified against a trusted source document (your government-issued photo ID)—something that’s readily available to users but that cannot be altered without detection.
With ID in hand, a user can quickly snap some photos of the document’s front and back, and then a selfie. In seconds, machine learning algorithms will verify the document, match the selfie to the document image, and use “liveness detection” to prevent spoofing with a photo or video recording. Voilà—the user is authenticated as if they’d presented their credentials to you in person, but with the convenience that digital users have come to expect from all their online interactions. What’s more, this capability can be easily implemented into your Symantec SiteMinder environment through a simple, standards-based OIDC interface.
Your Path Forward
We couldn’t be more delighted that Broadcom Software chose to partner with Daon to bring this powerful capability to SiteMinder users everywhere. Broadcom Software selected us because we’ve been the global leader in biometric identity assurance for over two decades—chosen to secure over a billion identities around the world, performing more than 250 million authentications each day, and trusted by iconic international brands like American Airlines, Hyatt, PNC, Experian, Carnival, and hundreds more.
I hope you’ll watch the short video below for some additional information, and when you’re ready, we invite you to come learn just how easy and affordable biometric identity proofing can be by visiting us here.
Do you want to use Google Search Console to grow your website traffic?
Google Search Console is a powerful free tool created by Google to help website owners understand how Google sees their website. Unfortunately, most businesses don’t know how to effectively use the full power of Google Search Console to increase their website traffic.
In this article, we will show you how to properly use Google Search Console to improve your website SEO and get more visitors.
What is Google Search Console?
Google Search Console is a free tool offered by Google to help website owners monitor and maintain their site’s presence in Google search results.
It provides essential marketing data that you need to start tracking from day one. It also alerts you about errors, security issues, and indexing problems that may affect your website’s search rankings.
You can use all this information in your WordPress SEO strategy to increase your website traffic.
The sad part is that most businesses don’t utilize the full power of Google Search Console because most of them think that just adding their website to Google Search Console is enough.
There’s so much more that you can do with the tool.
If you’re not leveraging all of the powerful features that Google Search Console offers, then you’re missing out.
Luckily, we’re here to help. We have created this ultimate Google Search Console guide to help you grow your website like a Pro.
Note: Since this is a comprehensive guide, we have added a table of contents for easier navigation.
If you haven’t already done so, then you need to go ahead and add your website to Google Search Console. It is really simple and will only take a few minutes.
You’ll be asked to sign in using a Google / Gmail account. Once logged in, you will need to enter your website URL.
Google Search Console offers 2 methods for site verification, including domain name or URL prefix. We recommend using the URL Prefix method as it provides more flexibility.
Do remember that Google considers HTTP and HTTPS as two different protocols. It also considers https://www.example.com and https://example.com as two different websites.
You’ll need to make sure that you enter the correct URL of your website.
If you are unsure, then simply login to your WordPress admin area and go to Settings » General page. There you will see your website’s URL in the site address field.
After entering your website address, click on the ‘Continue’ button.
Next, you will be asked to verify ownership of your website. There are several ways to do that, but we will show the HTML tag method because it is the easiest one.
Click on the HTML tag to expand it and then copy the code inside it.
Next, you’ll need to add the code to your WordPress website so that Google can verify the ownership. However, this requires coding, which can be tricky for beginners.
Upon activation, you can go to AIOSEO » General Settings page and then click the ‘Webmaster Tools’ tab. Next, select the ‘Google Search Console’ option under Webmaster Tools Verification.
After that, go ahead and enter the code you copied earlier from Google Search Console into the ‘Google Verification Code’ box.
Don’t forget to click on the ‘Save Changes’ button to store your changes.
You can now go back to Google Search Console settings and click on the ‘Verify’ button.
Google Search Console will now look for the HTML tag in your website code and show you a success message.
That’s all. You have successfully added your site to Google Search Console. You can now click on the ‘Go to Property’ link to visit your Google Search Console dashboard.
Note: if Google Search Console cannot verify your website after you have added the code in Insert Headers and Footer plugin, then you need to make sure to clear your WordPress cache and try again.
2. Adding an XML Sitemap
An XML sitemap is a way for website owners to tell search engines about all the pages that exist on their website. It also tells search engines which links on your website are more important than others.
Adding an XML sitemap to your website helps search engines better crawl your website. While it doesn’t give you a boost in search rankings, it can definitely help search engines index your content more efficiently.
The best part is that if you installed All in One SEO (AIOSEO) in the first step, then the plugin automatically adds an XML sitemap to your site.
To see the sitemap, you can head over to All in One SEO » Sitemaps and make sure that the toggle for ‘Enable Sitemap’ is switched on.
The plugin will automatically generate an XML sitemap for your website, and you can find it at the URL that looks like this:
http://example.com/sitemap_index.xml
Don’t forget to replace example.com with your own domain name. You can now submit this URL in Google Search Console.
Next, head over to the Google Search Console dashboard and then click on the ‘Sitemaps’ option from the left column. After that, you can paste the URL and click the ‘Submit’ button.
Google Search Console will now check your sitemap and use it to improve your website’s crawling. You can go through our guide on how to add a sitemap page in WordPress for more details.
3. Connect Google Search Console to Google Analytics
Connecting Google Search Console to your Google Analytics account helps you analyze search console data in Google Analytics. This provides you with a new perspective on your top-performing content and keywords.
If you haven’t already done so, then you will need to install Google Analytics on your WordPress website.
We recommend using MonsterInsights for that. It is the best Google Analytics plugin for WordPress, and it will automatically show your top keywords from Google Search Console in your WordPress admin area.
To connect Google Search Console to your Analytics account, you need to head over to Google Analytics dashboard for your website. From the bottom left corner of the screen, click on the ‘Admin’ button.
Google Analytics will now switch to the admin view. From here, you need to click on the ‘Property Settings’ section and then click on the ‘Adjust Search Console’ button.
On the next screen, you need to click on the Add button to select your website.
Analytics will now take you to the Google Search Console website showing you the list of all websites you have added to the search console. Select the property you want to link to Google Analytics from the dropdown menu.
After that, you’ll need to select the Google Analytics property you’d like to connect with Search Console and click the ‘Continue’ button.
You’ll now see a popup window showing that you’ve successfully connected Google Analytics and Search Console.
That’s all. You have successfully connected your Google Search Console data to your Analytics account. You can go back to the Google Analytics Search Console settings page to see the connected Search Console and click the ‘Save’ button.
You can now view the newly unclocked Search Console reports in your Google Analytics account under Acquisition reports. It also helps unlock keywords not provided in Google Analytics.
The first report you will find there is the ‘landing pages’ report.
For each landing page, you’ll see the impressions (number of times a page appeared in search results), clicks, click-through rate (CTR), and average position in the search results. Combined with that page’s analytics parameters like bounce rate, sessions, and pages per session.
Clicking a landing page will show you the actual keywords that brought users to this landing page.
Next, you can Switch to the ‘Countries’ report, and you will see countries listed in the same order. This helps in creating content and geolocation marketing campaigns for people from different regions.
The devices report will show you how your site performed in desktop, mobile, and tablet search results.
Next, Queries are the most important of all reports among this data. It shows you the keyword data missing from your Google Analytics reports. You can see which search terms are driving traffic to your site.
4. Finding and Fixing Search Indexing Issues
The most helpful feature of Google Search Console is that you can troubleshoot indexing errors.
These errors can affect your search rankings by stopping the search engine from crawling and indexing the pages on your website.
You can easily locate these errors under the Coverage report.
It shows you which pages from your website are indexed by Google and which pages resulted in an error or a warning.
Next, scroll down, and you will see the detailed list of all the errors. Clicking on a link will open the detailed view, where you will also find the link to learn more about the error and how to fix it.
Following are a few common indexing errors you may see:
404 error – This error means that the crawler followed a URL and saw a 404 error.
Soft 404 error – This error occurs when the crawler sees a 404 error page, but the page’s status code is sending a 200 (success) message to the browser.
Server error – This means that your website server timed out or didn’t respond. This could happen if your website were under heavy traffic, was under maintenance, or unavailable for any other reason.
Not followed – This error occurs when Google is not able to follow a content type. This could be a flash, javascript, iframe, or other resources that the crawler cannot fetch.
Now let’s take a look at how to fix some of these crawl errors.
5. Fixing 404 Errors in Google Search Console
First, you need to keep in mind that not all 404 errors are equal. You can safely ignore some of them and only fix those that are actually an error.
For example, if you deleted a blog post and don’t want to redirect users to a newer post, then it is ok to let Google see a 404 error page. Google will eventually deindex that page if it keeps seeing the 404 error.
However, the reason Google wants you to look at those 404 errors is that you may not be aware of them. For example, you accidentally deleted something or forgot to redirect users to the new updated version.
Simply click on the error in the Index Coverage report, and it will show you all the pages displaying that error. Carefully review the pages and if you see a page that shouldn’t be there, then copy its URL and open it in a new browser window.
If you see a 404 error page in your browser, then this means that you need to fix this page.
Now, if it is a page that no longer exists but you have a newer or similar version of it, then you would want to redirect users to that page. See our guide on how to set up redirects in WordPress.
However, sometimes 404 errors may occur due to a misconfiguration in WordPress permalink structure. To fix this, simply visit Settings » Permalinks and then click on the ‘Save Changes’ button without changing anything.
6. Fixing Soft 404 Errors in Google Search Console
Soft 404 errors are a bit tricky to troubleshoot.
Basically, these errors occur when the Google bot sees what looks like a 404 error document instead of content. However, your server is sending a 200 (success) code. Normally, your server sends a 200 success code when a page is displayed without an error or redirect.
To resolve soft 404 errors, go ahead and click on the errors in the Coverage report to view the list of affected pages.
Now, you need to open the page in a new browser tab to see what’s happening. If the page displays correctly, then you can safely ignore the error.
On the other hand, if the page is showing a 404 error document, then you may want to investigate further.
Start by clicking the ‘Submitted URL seems to be a Soft 404’ link from the Coverage report. Next, you can open the link in a new tab to check if it’s not a false alarm.
If the page is valid and you want it to appear in the search results, then simply click the ‘VALIDATE FIX’ button. Google will then recrawl the page and change the status error.
If the WordPress search function causes the soft 404 errors you are seeing, then the easiest solution is to stop the Google bot from crawling search URLs.
To do that you need to add the following lines to your robots.txt file.
123
User-agent: *Disallow: /?s=Disallow: /search/
Usually, Google Bot doesn’t crawl search URLs. However, some spammers might try to spam Google search console reports by linking to search URLs with random strings. This way, they hope you will see their link in your Search Console report and click on it.
If the affected URLs are not searched queries, then you may want to redirect them to a proper page on your site.
7. Fixing Server Error in Google Search Console
Server Errors in Google Search Console are caused by a number of reasons. The most common of them is when your server times out during a crawl, throws an unexpected error or does not appear to be online.
Use the ‘URL inspection’ tool to make sure that the affected URL is working.
If it is working, then you can ignore the error. If you are on a reliable WordPress hosting provider, then most server errors would disappear automatically.
However, if you can confirm the error by visiting the URL, then there are several things you can do to fix it. See our list of most common WordPress errors guide to find a fix for the specific error message you are seeing.
8. Finding and Fixing Security Issues
Security issues not only stop Google from crawling your website, but they could also cause a sudden drop in search traffic. Google may temporarily remove affected pages, show a warning to users, and drop a page’s ranking.
Security issues will be highlighted on the overview screen as you login to your Google Search Console account. The most common security issue is websites affected by malware and trojans.
While security issues are automatically triggered, manual actions are the penalties that are imposed by human staff from the Google Search team after a careful review. If a manual action is taken against your website, then this is pretty significant and can immediately take away all your search traffic.
These manual actions usually occur when a website is involved in illegal activities, spamming, and other fraudulent or fishy activities.
Clicking on the Manual Actions link will show you the actions in your search console report. You will also find detailed information about the issue that triggered it and how to clean it up.
Once you have removed the objectionable content, you can click on the request review button. Your website will now be reviewed and reconsidered by the Google Search team, and they can decide on removing the penalty.
10. Using Google Search Console To Grow Traffic
Now that we have covered the technical bits, let’s get to the fun part of growing your website traffic by utilizing the data available in Search Console.
Google Search Console helps you uncover keyword data, find out your top-performing keywords, and discover hundreds of potential keywords where you can easily rank and get more traffic.
We will also look at links and how to use them to improve search rankings.
Ready? Let’s get started.
11. Mining Keyword Data in Google Search Console
Keywords are the search terms users type in search engines to find information.
Marketers and website owners can optimize their content to target desired keywords and improve their chances of appearing on top in search results.
Previously, keyword data was available in website stats and analytics reports in Google Analytics. However, Google encrypted that information in 2013 when they switched to HTTPS.
As a result, if you try to view search queries in Google Analytics, you’ll most likely see ‘not provided’ keywords. A simple solution to this issue is connecting Google Analytics with Search Console.
You can also view the keyword data in your Google Search Console reports.
It gives you a full view of the keywords your website is ranking for, average position, clicks, and impressions (number of times your site appears for that keyword).
You can see this information in your Google Search Console reports under the ‘Performance’ tab.
On the top, you will see a graph of your website’s performance in search results. Below that, you will see the keywords data, which you can filter by position, impression, and click-through rate.
You can sort this data by clicking on any column or using the filter option to narrow down the results.
You can also switch to the Pages tab to see the performance of your pages in search results.
Clicking on any page in the list will filter the results for that page. You can then switch to the ‘Queries’ tab to see the keywords that bring the traffic to that particular page.
Now that we have covered how to browse and view this data, let’s see how actually to use this in your SEO and content planning.
12. Finding Low-hanging Keywords That You Can Easily Rank
A lot of your pages may be ranking on page 2 or 3 of Google search results for different keywords. These are the keywords that you can quickly work on to rank higher and get more traffic.
Let’s find out those keywords.
In your Performance report, click on the filter icon and then select the ‘Position’ option. Next, you’ll be looking for keywords where the average position is higher than 7.
Search Console will now only show the keywords where your site appears on an average position of 7 or higher. Now, click twice on the position column to sort the list in ascending order.
As you scroll down, you will find tons of keywords that rank between 7 and 30. All these keywords are low-hanging fruits where you can easily rank higher.
To view more results, scroll to the bottom and select a higher number for ‘Rows per page.’
When choosing the keywords to work on, you would want to choose keywords based on their number of impressions. Higher impressions mean more search traffic for those keywords.
To do that, you can export the data in CSV format and then open it in spreadsheet software.
Now that you have mined the low-hanging keywords with higher impressions, the question is how do you improve your rankings for those keywords?
Here are some tips to help you improve your rankings for those keywords.
1. Improve the content by adding more useful information
The #1 reason your page isn’t ranking for a keyword is that Google finds other content more valuable. To counter that, you need to review your article or blog post and add helpful content.
Look at the articles ranking on top five positions for that keyword and cover all the information that your article is missing in more detail.
We are not saying that you should just add more text to it. You need to make it more useful, informative, and comprehensive.
2. Evaluate On-page SEO
Use All in One SEO (AIOSEO) to improve the on-page SEO score for that article. It gives practical tips on improving a page by analyzing the content, keyword density, title, readability, links, and more.
You can also check out our guide on the SEO audit checklist to boost your rankings.
3. Increase time users spend on that page
Google considers it a success when users click on a search result and spend time viewing it. This means your content needs to be highly engaging and instantly provide users with the information they were looking for.
Here are some crazy simple things you can do to increase user engagement.
Use images – users find images much easier to look at than text. Adding more images makes it easier for users to scan the information and keeps them engaged.
Use videos – Videos are the most engaging form of content available. Adding video to a page significantly increases the time users spend viewing that page.
Make text more readable – Use smaller paragraphs, lots of white space, simpler sentences, and keep your style casual and conversational. All these things make reading easier for users.
Links play an important role in WordPress SEO. Search engines use them as a metric to determine how important a page is and where it should rank in search results.
The Links report in Google Search helps you see your website’s performance in terms of links.
It shows you external links, internal links, top linking sites, and top linking text. More importantly, it shows top linking sites, how often they link to your site, and how many pages they link to.
Let’s see how you can use these reports to get more backlinks, improve internal links, and boost your rankings.
14. Getting More Backlinks from Third-Party Websites
Search console shows third-party websites that have linked to your site in the ‘Top linking sites’ report. You can expand the report by clicking on the ‘More’ link at the bottom.
If you click on a domain name to expand the report, you will see all the pages they have linked to. Next, click on each page to get the exact URL linked to that particular page.
You can now use this data to get more backlinks for your site. Simply visit the website and see how they have linked to you. After that, see what other content they have where your site can be linked from.
Next, simply reach out to the website via email or contact form on their website.
First, thank them for linking to your article and then politely mention that they may want to include a link to an article of yours.
Now, this direct approach may not always work. In that case, you need to be creative. You can offer them to write a guest post for their blog, leave comments on their articles, follow them on social media, or retweet their articles.
Repeat the process for all important external links on your website. With consistent effort, you can get proper backlinks without spending any money.
15. Improving Internal Links to Boost Rankings
It is harder to get third-party websites to link to your content. However, it is way easier to link to your own content from your own site. This practice is called internal linking.
Internal linking helps search engines understand the context and relationships among different pages on your website. It also helps them understand which pages are important based on how often you have linked to them.
This is why you should make internal linking a habit when writing new content on your website or blog.
Now let’s see how to use the links reports in Search Console to help you build internal links.
In Google Search Console, click on the Links report and then click on the ‘More’ link under the ‘Internal Links’ column. The report shows how often you have linked to other pages on your site.
Go ahead and click the filter icon and then select the ‘Target page’ option.
Search Console will now show you how many pages are linking to this page. You can now compare it with other pages and see whether pages with more internal links are ranking higher than posts with many internal links.
If that’s the case, then go ahead and start adding internal links to pages that you want to rank higher. Make sure you are only linking to the article when it makes sense. Adding links where they don’t make sense would create a bad user experience.
16. Using Core Web Vitals in Search Console
Did you know that Google now considers your website loading speed as a ranking factor?
In 2020, Google introduced Core Web Vitals that measures how fast your website is and help the search engine measure your site’s user experience.
In Google Search Console, you can view the ‘Core Web Vitals’ report under the Experience menu on your left. It provides a complete report about your site’s speed score for mobile and desktop.
The best part is that you also get recommendations on how to improve your Core Web Vitals score and improve your site’s load time.
Rich snippets or schema markup allows Google to display additional information in its search results. These include star ratings, prices, reviews, and more.
Rich snippets make your page more noticeable in the search results. As a result, you get more clicks and website traffic.
Many WordPress themes automatically include some basic structured data. If you publish recipes, run a reviews site, or an online store, then rich snippets can give your site an SEO boost.
Google Search Console makes it very easy to find pages that are displaying rich snippets. It also shows the type of rich snippets for your website.
You can view them by going to ‘Overview’ and then scrolling down to the ‘Enhancements’ section.
The real useful part is that the report allows you to quickly look at pages that have errors while displaying rich snippets so that you can fix them.
18. Using Search Console to Improve Mobile Usability
Nearly 63% of all Google searches in the United States come from mobile devices. That’s why Google gives an SEO bump to mobile-friendly websites in the search results.
Google has a Mobile-Friendly test tool that allows you to quickly examine a page. The Mobile Usability report in Search Console tells you how Google sees your entire website in mobile performance.
If you see errors on this page, then this means that these issues may affect your site’s rankings.
To see the affected pages, you can scroll down to the ‘Details’ section and click on the error.
Poorly coded WordPress themes or plugins cause most mobile usability issues. The easiest way to fix those issues is by using a better responsive WordPress theme.
19. Use URL Inspection Tool in Search Console
The URL Inspection tool in Google Search Console provides information about a page if it’s on Google search results or not.
You can check the status of a page and also request Google to recrawl a page. To start, simply enter a URL in the top search bar.
Google Search Console will then show you the status of the page is indexed by Google. If it’s not indexed, then you’ll see a message saying ‘URL is not on Google.’
You can click the ‘Requesting Indexing’ button and request Google to manually fetch the page from your website.
Besides that, you can scroll down and see more details in the ‘Coverage’ report. It will show information about sitemaps, crawl history, and indexing.
You can also live test a URL and see if there is an indexable version available. If there is, then simply click the ‘Request Indexing’ option.
20. Removing URLs from Google Search
So far, we have focused on using Search Console to get your content indexed and improve rankings in Google Search. However, sometimes you may want to remove content from Google Search as well.
One way to do this is to add a noindex meta tag to the page you want to remove from search results. However, depending on how often Google crawls your website, this could take some time before your page actually disappears from search results.
Search Console’s Remove URL tool allows you to request a URL to be removed from the search results. Simply click on ‘Removals’ under Index in the menu on your left.
Now click on the ‘New Request’ button, and a popup window will appear. Go ahead and enter the URL you want to remove, select whether you want to remove this URL only or with this prefix, and click the ‘Next’ button.
Google will now block the URL from its search results for about six months. You can add as many URLs as you want and see them in the Removals section in the Search Console.
21. Adding Users to Access Google Search Console
If you have a marketing team or you have hired someone to help you with SEO, then those users may need access to Google search console data.
Search Console allows you to easily add users and give them access to view all reports without sharing your Google account credentials with them.
To add a new user, simply click on the Settings » Users and permissions option under Property settings and then click on ‘Add User’ button.
Next, you need to provide the user’s valid Google account email address and select permission to grant them.
There are two types of permission levels. The full permission level will give them access to everything, including the ability to add new users. Restricted permissions will allow them to view the data but not add new users.
After choosing a permission level, click on the ‘Add’ button to save your changes.
The user you added will now receive an email notification, so they can login and view Google Search Console data for your website.
Helpful Resources
Following helpful resources on WPBeginner will help you further improve your website’s performance in search engines.
Ultimate WordPress SEO Guide – Our complete step by step WordPress SEO guide will walk you through complete WordPress SEO setup like a pro.
WordPress Performance Guide – Step by step guide to improve your WordPress speed and performance for higher search rankings and better user experience.
WordPress Security Guide – Keep your WordPress site secure with this complete WordPress security guide for beginners.
Tracking User Engagement – This guide helps you learn how to track user activity on your website and use it to plan your growth strategy.
Convert visitors into Customers – If you run an online store, then this guide will show you how to convert search traffic into paying customers.


 Copy the code and click on the enter code hyperlink and enter the code


 We can also now connect to the VM using integrated RDP console in WAC


 The full remove license script is below. The only part that needs to be updated is the $csv variable to point to the correct folder where the csv files will be kept.