If you’re looking to offer a more affordable (and easier to build) solution for a client’s business, online portfolio, and much more, you may want to consider a one-page WordPress website.
One-page websites are simple, popular and — when built on Managed WordPress — easy for nearly anyone to maintain.
However, dialing in the one-page design isn’t always a simple task for website designers, especially when you’re used to taking on larger or more complex projects. Luckily you’ve come to this post. Here, we look at tips to help create a solid one-page website design. Here’s what we’ll cover:
Determine whether one page is enough
Create a strategy for content
Build an anchor menu for easy navigation
Understand the audience
Make scrolling easier
Make the website mobile-friendly
Develop strong CTAs
Avoid large text blocks
Optimize for search engines
Include social media accounts
Be creative with the contact block
Why a one-page WordPress website?
One-page website designs have gained increased popularity among business owners and web designers because they’re simple, easy and trendy. But while one-page websites are ideal for different types of business, they are not a one-fits-all solution.
Before settling on a one-page website, ensure it is ideal for your client. You may want to create a one-page website if they don’t have a lot of content or many different elements. A single-page website may be ideal for clients who:
Want to create an online portfolio or personal website
Sell a few products or services
Have one-time events such as conferences and weddings
Need a campaign-specific landing page
On the other hand, a one-page WordPress website may not be ideal, for example, if their content is complex or they sell lots of different products or services with tons of information.
Tips for creating a one-page WordPress website
Less is more in design, and web design is not an exception. After all, the fewer pages a site has, the more it will be appealing to visitors. A good one-page design will communicate a story effectively, promote a brand and drive conversions.
However, that doesn’t mean that creating a one-page WordPress website is a simple task. Without the right gameplan, you may end up with a single page that isn’t attractive and doesn’t serve your marketing purposes.
To that end, here are steps to follow for a perfect one-page website design:
Determine whether one page is enough
Before you take any step, it’s best to determine whether the situation calls for one page or a classic website. Depending on the type of client you’re helping, one kind of website might be better than another — you need to weigh the options to determine which type of website will work.
As stated earlier, a one-page WordPress website should have a simple yet robust design that is user friendly. It often displays only a small amount of text but more images.
Due to its long scrolling design, you have the option to be creative and decide the order in which content appears.
One-page website design offers a good user experience. Since the content appears in a linear fashion, visitors won’t get lost in multiple pages. These sites also render well on mobile and tablets, and are easy to maintain.
A classic website comes with a homepage alongside other pages, often services, a contact page, and FAQ. The main advantage of a classic web design over a one page is that it allows you to display tons of content about products or services.
With the classic design, you get the option to display each piece of content on a dedicated page, allowing more thorough descriptions. But if you decide that a one-page WordPress website is best, move to the next step.
Create a strategy for content
The first step to creating a one-page WordPress website is to plan out content. One page allows you to control the order in which content appears. The idea is to ensure the order is both logical and intuitive.
Be careful with what you place above the fold or what the visitor sees before scrolling down the site. Ideally, the main message should entice visitors.
Like any other website, a one-page WordPress website could include an about section, services and products, more about the offering, an FAQ section, CTAs, a photo gallery and contact information.
How you prioritize this content will determine how effective the one-page design will be. Remove unnecessary information to keep content as simple and organized as possible.
Build an anchor menu for easy navigation
Unlike a classic website (where each item links to a page of its own), a one-page WordPress website menu links to a different section of the same page. As a result, you need to build an anchor menu to link each section.
These are three important steps to help create an anchor menu for a good one-page design:
Create an anchor — An anchor will help users navigate to a particular part of your one-page design. While some templates come with built-in anchors, there’s usually an option to rename, move or delete them.
Link anchors to the menu — Linking the site’s menu to anchors makes it easier for visitors to go to a specific section. The idea is to select the corresponding section to attach an anchor to, which will help in the navigation.
Create a menu order — Linking the menu to anchors isn’t enough. You should ensure the order in the menu corresponds to the order of section. Single-page website designs involve a lot of scrolling. As such, ensure that the menu is always visible by freezing it. Fortunately, this is easily achievable via plugins such as WP Floating Menu.
Understand the audience
When it comes to a one-page WordPress website, you have only one page to display many sections. That’s why it is important to identify gaps in every section and fill those gaps to improve user experience and overall site performance.
Analyzing which sections have gaps and making the necessary changes is paramount. To achieve this, you need to group your visitors based on location, demographics, source, behaviors, devices they use, and other such criteria.
You can collect this data for clients if you install proper analytic tools like Google Analytics on the site. Ensure that you have everything set up to get required data and determine the metric to track.
Tracking user behavior for a classic website with multiple pages is straightforward. But things get rather complicated when it comes to a single-page website.
Luckily, free tools like Google Tag Manager will help track activities on a one-page website. This tool will enable you to track different actions on the site and provide more insights regarding the needs and expectations of a target audience.
Make scrolling easier
A one-page WordPress website involves a lot of scrolling. Don’t make visitors keep scrolling down the site to find what they are looking for — make it as simple as possible.
A scroll-top button (yep, there are plugins for that) and anchor links make navigation easier and fast. You may also want to use parallax scrolling (make the background move a different speed from the foreground content) to keep your users engaged when scrolling until they find what they are looking for.
No matter how creative you want to be with navigation, you shouldn’t ignore usability. After all, visitors are real humans, so ensure they can easily find the content they need.
Make the website mobile-friendly
People spend more time on smartphones or tablets than desktops. You may also have heard about mobile-first indexing, where Google considers the mobile version of the content for indexing and ranking.
As a result, ensure the website is functional and looks as good on mobile as desktop. Adapting to the mobile version shouldn’t cause headaches if you use a readymade CMS like WordPress.
Develop strong CTAs
Strong CTAs for the one-page WordPress website are essential. This command phrase, such as “Buy Now” or “Sign Up,” takes the form of a button or hyperlink to increase sales or conversion.
To get the most from a CTA, it needs to:
Be logical, intuitive and concise
Encourage visitors to take action
Unique from other graphical elements
Placed at strategic places for users’ view
Once you have CTA content, link the button to an anchor to make it easy for visitors to navigate a particular section.
Avoid large text blocks
Having too much text on one page can hurt conversions. After all, users expect as brief a chain of actions as possible (e.g. visit > see what you need > take the required action).
Imagine if, during the second step, there’s tons of text for the user to read.
Include only the information that directs users to a CTA, and presents it in a brief and straightforward manner. If you have a lot of information to share with users, create a separate blog and link it to a unique place on the website.
Optimize for search engines
The need for search engine optimization for any website cannot be overstated. When it comes to a one-page WordPress website, you only have one page to rank for several keywords, and you have fewer things to optimize than a classic website.
However, this doesn’t mean that you cannot optimize the single-page website. Yes, it may be a bit challenging, but it’s possible. That said, here are things to remember when optimizing a one-page website:
Improve page speed
Page speed refers to the time it takes to display a page content fully. In our case, this is the time it takes to display one page of website content.
A significant number of visitors will leave a page that takes more than three seconds to load.
And if your website loads slowly, Google and other search engines will consider it to have a bad user experience. That’s why you need to analyze your site loading speed and optimize it.
Luckily, Google has a free tool to help analyze your website speed. To analyze your website, go to PageSpeed Insights and enter the URL. This tool will help analyze how a site performs on both desktop and mobile devices.
Once you get insights into what is slowing down the website, try to resolve all errors to improve website speed.
Optimize each section for SEO
Treat each section of the one-pager as a separate page and optimize it for SEO. The idea here is to ensure that each section of your one-page website has a heading tag to tell what the section is all about.
Next, optimize each section for the primary and related keywords. You also need to optimize text blocks for those keywords and include alt texts in images.
Ensure content is fresh and relevant
Content is king, but only if it’s fresh and relevant for an audience and search engines. Content is not static. To keep up with the ever-changing Google algorithms, pitch content updates to your client so the website can rank higher on SERPs.
Include social media accounts
Social media can provide a perfect way to improve an online presence. As such, connect your client’s Instagram, Facebook, and LinkedIn profiles with their one-page WordPress website to help improve traffic to the site.
One way to achieve this is by adding an Instagram feed. Doing this will provide an opportunity to share the latest photos of your client’s business with visitors.
Another perfect way to incorporate social media profiles into the website is to place icons for all business social media accounts. Users will see these elements as they scroll the website, providing a perfect way to further interact with a business.
Be creative with the contact block
Last but not least, make sure visitors can easily find contact information on the site. That said, consider placing phone numbers, email addresses, blogs, and social media links in a separate block at the top of the site.
The idea is to ensure that users will not need to scroll to the bottom to see contact information. After all, this can be troublesome, especially if the site has many media components that can load slowly when there’s a poor internet connection.
Closing thoughts on the one-page WordPress website
Creating a one-page WordPress website has many benefits, including better SEO potential, it’s faster and easier to maintain, intuitive to use, and easy to organize. Once you determine that a single website is best for your client, the above tips will help you get a perfect one-pager going.
Wondering how to improve your website’s SEO and increase web traffic fast? There are plenty of actionable steps you can take today. Most don’t even require a web developer or coding knowledge to get started.
Below we’ll review 12 best practises you can easily work into your business plans to help you:
Rank higher in search engines
Grow your audience
Attract more leads
We’ll also give you tips on how GoDaddy can help you on your journey, plus share plenty of free resources you can refer to along the way.
1. Optimize your URLs
Optimizing your URLs is a good way to improve SEO quickly. It’s something that takes little effort but can help boost your rankings when done right. Here are a few best practices to look out for.
Screenshot of Page Title editor inside GoDaddy Website Builder.
Go for shorter URL titles
When it comes to URLs, you want to keep them short and compelling. Shorter URLs are often easier to remember, which makes them more shareable and higher ranking. Make sure your URL is free of fluff words (like “and” or “for”) and easy to understand.
Note: GoDaddy’s Website Builder automatically optimizes your URL title for you by limiting it to 25 characters. Simply type in your URL title into the designated text box for “Page Title” and you’re done. It also fills in any spaces with hyphens following web convention.
Include primary keywords
Adding a primary keyword to your URL is another best practice for optimization and should also be applied to your:
Meta title: This is the blue header in the search engine results page
Meta description: This is the copy that sits beneath the meta title
On-page title: This is the actual title of your work at the top
Aim for placing your keyword closer to the beginning of your URL title for optimal results.
Keep it relevant
URLs should also be relevant to the content you’re displaying on that specific page. Keeping them aligned with the page copy allows Google’s search bots to easily understand and identify the information for search queries.The more relevant your information is to a search query, the higher it ranks on Google.
Think about how relevant it will be for future use. You don’t want it to be overly specific that it becomes less relevant over time.
For example, you can make a URL more applicable for future use if you avoid adding a specific year at the end. Peek the following URL endings to see how they contrast.
Instead of a URL that ends in: .com/best-fathers-day-gifts-2022
Go for something like: .com/best-fathers-day-gifts
If other websites link to your page, the URL without the year enables that page to keep hold of any authority and associated rankings in the future.
Screenshot of URL title settings inside GoDaddy Website Builder.
A note on changing URL titles
Editing your URL title is an option using GoDaddy’s Website Builder, but it’s not recommended you make any changes when dealing with older existing pages.
Changing an existing URL can hurt your SEO and result in decreased traffic, since it’s likely you have backlinks attached to the post you’re trying to change. This means that anytime someone finds the old link through a partnering site or newsletter, they might end up at the dead link instead.
Unless you really need to for rebranding purposes, it’s best you avoid this route to prevent any damage to you SEO.
2. Optimize metadata
Screenshot showing where to write a meta title and meta description inside GoDaddy Website Builder.
The term “metadata” comes up a lot when researching how to improve SEO quickly. It refers to the data on a webpage that provides Google with information about a particular site. In other words, it’s data that describes other data.
By itself, metadata won’t affect SEO rankings. But it can help in the following areas:
Boost engagement
Increase click-through rates
Give you the upper edge over your competitors
It’s a small piece of the SEO puzzle that is often overlooked but can be beneficial when combined with other best practices. Let’s look at two ways to improve your meta data below.
Meta descriptions
Meta descriptions appear in the search results page underneath the meta title. It often gives a quick snippet of what the web page is about and typically includes a call to action (CTA) to encourage more clicks.
Examples of these CTAs could look like:
“Shop now”
“Schedule an appointment”
“Click here to read more”
As noted earlier, you’ll want to include a primary keyword within the description and keep the copy to 155 characters or less. The primary keyword will also appear in bold anytime it matches a searcher’s query.
Meta titles
The meta title (aka title tag) is the text shown in large blue font in the search engine results page. It’s often the first thing searchers will see and can sometimes be confused with the H1 tag.
However, the meta title and H1 tag are two separate things.
The meta title is named with SEO and Google in mind, while an H1 tag is more for the user’s benefit. A lot of times digital marketers will use the same title for both the meta title and H1 tag to cause less confusion for users.
When naming your meta title, you should always:
Screenshot of meta title editor inside GoDaddy Website Builder.Include a primary keyword at the start. An exception should be made for well-known brands or local businesses who should add their business name to the start.
Accurately describe what’s on page. Make sure you showcase what people want to see and use actionable words that’ll generate more clicks.
Ensure each title tag is unique. Look at competitors for ideas but don’t copy. Keep it short and sweet like: Tall Men’s Clothing | Tall Jeans, Pants & Coats | ABC.
Keep it to 65 characters or less. This includes spaces, so avoid going over if you don’t want search engines to automatically truncate it for you. Title tags may be rewritten by Google if it thinks there’s a more suitable one for the searcher’s query. If you need to test the length, you can use free online tools like this meta title counter to help you.
Editing the meta title and meta description is easy using GoDaddy’s Website Builder. Simply use the editor and go to the page you need optimized. Click on Settings (cog symbol) and then select Get Found on Google to edit what you need.
3. Check your speed
An important element of improving SEO is speed. The time it takes for your webpage to load will affect whether your users stay to engage or bounce back in search of something better.
Between July and August 2021, Google rolled out a measure of core web vitals (CWV) to help website owners evaluate their overall page performance.
Here’s a quick breakdown of each one for reference:
Largest contentful paint (LCP): This refers to the largest block of text, video, or visuals that take up the most amount of time to load after a user clicks on your site.
First input delay (FID): This is the amount of time it takes for a browser to respond to a user’s first interaction on your site (typically when they click on a link or tap on a button).
Cumulative layout shift (CLS): This has to do with any layout shifts your user be experiencing as they interact with your page. Too many unexpected shifts could result in a bad user experience if left unchecked.
One best practice is to score below 1.3 seconds when reaching the First Byte. This means that the overall responsiveness and speediness of your website should fall within this time frame after a user clicks onto your site from a search query.
How to optimize your CWV score
Rankings are affected by a CWV score, so it’s best to aim high in good rankings to increase web traffic.
Google’s search advocate, John Mueller, noted in a recent YouTube discussion that if a site had lost or gained traffic steadily over the period of the CWV roll out, then it was likely related to the website’s CWV score.
GoDaddy’s Website Builder scores nearly 68% in good CWV rankings and outperforms most other competitors. It’s a great option to consider if you’re looking for low-hassle performance speed on your site. Plus, it includes other fool-proof elements like SSL certificates and more.
GoDaddy scores higher than other competitors when it comes to Google’s CWV rankings.
For non-GoDaddy sites, your biggest priority is to minimize image sizes before uploading to your site. Try using an image compressor to cut down on load time and apply a lazy loading plugin if you have a WordPress site. This will display all images below the fold only when the user scrolls down.
4. Find the right keywords for your content
Improving SEO means creating content Google can easily comprehend. That’s why optimizing with keywords helps. It allows Google bots to decipher what your page is about so that it can provide relevant results to search queries.
Let’s take a look at some best practices for keyword usage.
How to choose the best keywords
When creating content for your site, try to think of phrases and terms your target audience may be typing into a search query. For example, if you’re a retailer that specializes in kid’s clothing, you could aim for keywords like:
Toddler girl dresses for spring
Zipper onesies for baby boys
Activewear for boys and girls
Keep an eye on your competitors and note how they utilize their keywords for search queries.
It’s important to know the keywords your competitors are ranking for that you are not.
Let these findings guide you when deciding what keywords to create for your own content. Ensure your version is better optimized and more informative to win the upper edge.
Where to include primary keywords
Here are other areas where you should include primary keywords throughout your text:
Each page on your site: Include a primary keyword for every 60 – 150 words in each of your posts. Ensure they sound natural and avoid keyword stuffing to prevent Google from penalizing you.
On-page title: Make sure each page on your website has a primary keyword within the on-page title at the top.
First 100 words of every page: Include a primary keyword in your opening paragraph for each post. The sooner you introduce it, the better.
It’s also best to add a secondary keyword that’s similar in meaning to your primary keyword. This provides Google with extra information (or clues) to what your page is about.
Example of how a page title is automatically marked up as H1 tags for SEO using GoDaddy Website Builder, despite the over-sized font on the page.
Editor’s Note: GoDaddy’s website builder automatically assigns your primary keyword as a required H1 header tag in the backend, so there’s no extra coding necessary for you. This makes things easier any time you want to adjust the font size or style. Simply edit as you go.
Keyword length
When it comes to keyword length, there are two things to remember:
Short keywords with a large volume are harder to rank for and are more competitive
Longer keyword phrases with three to five words are easier to rank for and are less competitive
Let’s imagine you run a clothing shop. Instead of choosing a generalized keyword like “T-shirts,” you can opt for something more specific like “cruelty-free vegan T-shirts.” The competition for the longer phrase is lower and has a better chance at ranking higher on Google.
Duplicate keywords
On a similar note, you want to avoid including the same keywords and phrases on multiple pages of your website. This is known as keyword cannibalization and could lead users to the wrong page when they enter your site from a search query. It’s also not good for bounce-back rates.
The same goes for duplicate content. Try to avoid creating posts that are similar in topic, since this could confuse the search engine bots.
An example would be targeting “divorce lawyer near Los Angeles” on one page and “how to find a divorce lawyer near me” on another. The angles are too similar for Google to recognize the difference.
Helpful tools and resources
To help you optimize strategically, you can use the following tools when deciding which keywords to go for:
Google’s Keyword Planner: This is a tool for finding keywords that many digital marketers tend to utilize – especially in advertising. But you don’t need to be an advertiser to use it. Anyone can sign up for free and use it for insight on keyword search volume.
KWFinder: If you’re looking for a tool with more advanced features, try KWFinder. It offers a free trial and helps you find keywords that are easy to rank for.
Keyword Tool: Ecommerce store owners can find extra ideas using predictive search tools like this one. It gives you free keyword search suggestions for Amazon, eBay and more.
Remember, it’s best to avoid using keywords that have volumes in the highest and lowest categories. Refer to these tools any time you need help.
5. Write for your audience
Developing content that improves SEO quickly should be centred around your audience first and foremost.
You need to know who you are trying to target before you begin writing posts for your website.
This will allow you to create content that is genuinely helpful to potential customers visiting your site. It’s also something Google will reward you for in rankings and will lead users to CTAs that apply to:
Purchases
Email sign-ups
Inquiries and more
When drafting content for your site, you should note that there are two main categories to consider:
Standard pages and blog posts: These typically consist of informational content. A standard page should have a minimum of 300 words, while a blog post should have 700 or more.
Ecommerce product pages: Ecommerce pages focus more on product details. The recommended word count for these pages should range between 120-200 words.
Let’s discuss them even further to help you better understand why both are important for improving SEO.
Pages and blog posts
Pages and blog posts provide informational content to users but differ in the type of content displayed. Pages are more static and don’t often need updating (like About Me or Contact pages), while blog posts provide constant updates to queries that are relevant to your product or service.
Google ranks all web pages according to a mixture of:
Relevancy for the searcher
Value of content on a page
The page’s uniqueness
A website’s overall authority
Authority takes time and is something you earn as your audience grows. It’s not something you can control right away. But optimizing the other categories can help you achieve authority success down the line.
Dwell time
Google rewards websites with higher rankings if searchers stick around for a while (aka dwell time).
To increase dwell time, owners should write for their prospective customer and not for Google.
Write as if you are encouraging a friend to take the next step with your business offer. Use words that inspire and provide informative content that helps users with pain points.
Ecommerce product pages
Ecommerce pages provide users with information about your product or service, but also convinces them to follow-through with a purchase.
Example of product page description with 156 words on an ecommerce site.
Many ecommerce sites miss out on visibility due to lack of content, which makes it hard to rank.
A general recommendation to improve SEO is to start by optimizing product and service pages first. You can do this by:
Using long-tail keywords: This helps increase opportunities in competitive spaces and even converts better with keywords that are low in search volume. It’s better to have a small increase in web traffic and sales, rather than none.
Hitting the 120-200 minimum word count: Do this for all products in your online catalogue and avoid writing beyond this range. Writing too much could be a distraction to the potential sale.
Uploading enticing images: Try to aim for at least three images per product, including one that shows it in use. You might also consider adding product-specific text to images that highlight dimensions and special features.
Avoid copying manufacturer descriptions: Google will consider this duplicate content and you’ll end up taking a hit to your SEO.
Blogging is the most efficient way to increase web traffic online. They serve many purposes but are often used for informational content. Even Airbnb and Paypal use blog posts to attract visitors to their site.
Here are just a few ways blogs can improve SEO rankings for your site:
Drive organic traffic to your site: Incorporating long tail keywords into your posts can help bring new users into your site via Google.
Increase dwell time: Posts that have engaging content will keep users on your site longer.
Boost authority: Informational posts are often picked up by other sites who want to linkback to your site as a source.
Focus on quality over volume
When it comes to blog content, you want to ensure your posts offer users valuable information that’s helpful and relevant.Don’t post articles for the sake of filling up space on your site.
Instead, aim to solve customer problems by answering common questions they might have.
For example, a wedding planner might write a long form article titled “What does a wedding planner do?” to address a common query users search for.
Remember to focus on one primary keyword per blog post and scatter it throughout the text naturally. Combining words like “How”, “What” and “Why” with your keyword will make it sound more helpful for users and Google alike.
Ensure your posts are easy to read
You can make readability more convenient for your users by:
Using short sentences
Keeping paragraphs concise
Optimizing images for quicker page loads
This will allow users to quickly scan the text for information they need. Plus, it makes it easier for Google bots to crawl you site for ranking purposes.
Another best practise is to highlight important information by:
It’s also useful for ecommerce sites to include links to priority products and category pages on relevant blog posts. Just remember to make it sound natural and not too spammy.
Continue to audit older posts
Do revisit your old blog posts on a regular basis and update or extend them when possible. Google hates inactive dusty sites and will reward sites with fresh new content.
Don’t forget that your blog posts must also include a title tag and meta description. Be sure you include your keywords in the meta data and that it is up-to-date with Google’s standards.
Images are the second-most popular way to search online. They help users find what they’re looking for and serve as a visual guide in their buying journey.
But if you’re not optimizing your images before uploading, you might be missing out on valuable SEO rankings.
A couple of good ways you can improve SEO using images is so to:
Include alt text: Alt text (aka image alt or alt attributes) helps search engines understand what the image is about. It also helps with accessibility for users with screen readers and displays when browsers can’t process images correctly.
Compress images: This helps boost your on-page loading speed and can be done using Photoshop or by using a site like TingPNG before uploading.
Optimizing for both areas will make it easier for Google to crawl and decipher your site. But if you need a little more help with alt text, read the section below.
Key notes for writing alt text
Despite the latest advances in technology, search engine crawlers can’t see images like humans do. They must rely on the accompanying alt text to help them out.
One best practice for alt text is to keep it simple. These descriptions are meant be short and should include 125 characters or less (including spaces). There’s no need for gimmicks or extra filler worlds like “this is an image of …” Simply describe what the image is about in the most direct way possible.
Screenshot showing where to add image alt text inside GoDaddy Website Builder.
For example, the alt text for the image above could be, “Close up of someone holding a pair of glasses.”
Image optimization made easy
GoDaddy’s Website Builder makes it easy to edit alt text on images. Simply click on an image insider the editor and write your alt text in the box designated for “Image description.”
You can also use GoDaddy’s Website Builder to automatically compress your images, along with any other large files you may have already uploaded.
8. Is your site mobile friendly?
Making your site mobile-friendly is an important factor for Google rankings. It’s a primary reason why mobile-first indexing was created and adds to the overall convenience for users on-the-go.
Users should be able to experience your website on a mobile or tablet device the same way they do on a desktop.
It needs to be easily accessible without needing to pinch or squeeze to view your content.
Google’s Mobile-Friendly tool is a great way to test your website when optimizing for mobile devices. Or if you don’t want to hassle with checking yourself, GoDaddy’s Website Builder has standard built-in mobile responsiveness.
9. Submit your sitemap
A sitemap helps search engines crawl your website and index it faster. It consists of a file that contains all the URLs on your page, plus metadata that shows each one’s importance and the date they were last updated.
If you’re not using GoDaddy or a content management system (CMS) like WordPress, you’ll need to create one using a tool like XML sitemap generator.
Submitting your sitemap to Google is the last step in this process. You can do this by logging into your Google Search Console (GSC) account and entering it in the “Sitemaps” tab in the side bar.
Backlinko has a great step-by-step guide if you need extra help importing your sitemap link into your account.
10. Experiment with backlinking
Sometimes other websites will link to your site when they want to refer to you as a source of information. This is considered backlinking and it helps boost your authority when Google notices they are coming from relevant and reputable websites.
Another tactic is to partner with other websites in your industry and guest blog on their site. This allows you to share your expertise with similar audiences so that you can backlink and gain new leads.
It also helps to include links to other relevant blogs on your site whenever you find valuable information you can share with your audience.
Local businesses can make use of additional opportunities in search engines with things like Google My Business (GMB). This allows brick and mortar or service businesses to reach local audiences in the surrounding area through rich search results.
In other words, your business can have a dedicated profile with Google that appears any time someone submits a query for relevant businesses in their area. It typically includes things like:
Your website’s URL address
Photos that highlight your business or services
Customer reviews and more
All of this info can be optimized to improve SEO and there are plenty of other distinct things to do to increase website’s traffic locally. You can find more information about local SEO with this handy guide from our blog.
12. Measure your success
Google Analytics (GA) is a free tool for monitoring website traffic from any source. Many digital marketers use it to collect insight on:
Target audiences
Website performance
Ad campaigns
However, it can be a bit intimidating if you’ve never used it before. GA contains a wide variety of reports and data that take time learning how to navigate.
It can also be a challenge to set it up, since it requires a bit of coding knowledge to get started.
To make things easier, GoDaddy’s Website Builder integrates with Google Search Console to track search engine performance for you. It also provides technical SEO suggestions to help improve your website.
Most GoDaddy Website Builder plans show traffic insights you can access within your account.
Most plans for GoDaddy’s Website Builder also include a simplified window inside the platform for essential organic performance. This makes is so there’s no need to log in anywhere else until you’re ready for more advanced steps. It’s a great launching point for beginners interested in learning more about GA.
If you want to have a competitive edge in today’s online marketplace, you need to ensure your business is ranking on search engines. The best way to do that is to improve SEO on your site, so that search bots can crawl it and easily determine what your site is about.The more SEO-friendly your site is, the higher it’ll rank in search queries.
Users with GoDaddy’s Website Builder have the upper hand since it includes built-in benefits like:
Standardized mobile optimization
Automatic XML sitemaps that don’t need to be maintained
SSL certificate with HTTPS for data encryption
Access to Google Search Console
You also get the added benefit of 24/7 support in case you need extra help determining your next move. And you can even opt for additional plans (like GoDaddy’s SEO Services) to help boost your online presence even more.
Remember, improving SEO for your site is all about time and dedication. Now’s the time to jump in and capitalize on opportune moments that get your business noticed online.
With attacks on healthcare rising dramatically, SonicWall’s Capture Cloud Platform helps ensure patient care delivery is more efficient, resilient and secure.
Within the last 30 days, data breaches at nearly 40 healthcare organizations across 20 U.S. states compromised almost 1.8 million individual records, according to the U.S. Department of Health and Human Services (HHS).
Unfortunately, this is just a snapshot of what’s shaping up to be another blistering year: The HHS breach disclosure report indicates that more than 9.5 million records have been affected thus far in 2022 (Figure 1), following last year’s record high of almost 45 million patients impacted.
As the frequency of attacks on the healthcare sector continues to rise worldwide — with recent attacks in Costa Rica, France and Canada, among many others — the global total is sure to be much higher.
How Healthcare Hacks Occur
Hacking incidents involving network servers and email remain the leading attack vectors, making up more than 80% of the total count (Figure 2).
Figure 1
Figure 2
Each patient profile contains rich demographic and health information, consisting of eighteen identifiers as defined under the HIPPA privacy rule. The 18 identifiers include:
Name
Addresses
All dates, including the individual’s birthdate, admission date, discharge date, date of death, etc.
Telephone numbers
Fax number
Email address
Social Security Number (SSN)
Medical record number
Health plan beneficiary number
Account number
Certificate or license number
Vehicle identifiers and serial numbers, including license plate numbers
Device identifiers and serial numbers
Web URL
Internet Protocol (IP) address
Biometric identifiers, such as finger or voice print
Full-face photo
Any other characteristic that could uniquely identify the individual
Threat actors favor electronic health records (EHR) or personal health records (PHR) because they’re useful in a wide array of criminal applications, such as identity theft, insurance fraud, extortion and more. Because there are so many ways this data can be used fraudulently, cybercriminals are able to fetch a higher price for it on the dark web. Meanwhile, these illegal actions cause long-term financial and mental stress for those whose information has been stolen.
Even though we have well-funded, fully equipped anti-hacking agencies across international jurisdictions, cybercriminals can still act with impunity and without fear of getting caught. With hacking tactics, techniques and procedures (TTP) evolving and getting better at evading detection, healthcare facilities can no longer risk having inadequate or unprepared defensive capabilities.
For many of those who have been caught flatfooted, the impacts on affected patients, providers and payers have been catastrophic. Besides the risks that data breaches pose to healthcare delivery organizations (HDOs), they can also dramatically affect facilities’ ability to provide lifesaving care. In a recent Ponemon Institute report, 36 percent of surveyed healthcare organizations said they saw more complications from medical procedures and 22 percent said they experienced increased death rates due to ransomware attacks.
When lives depend on the availability of the healthcare system, healthcare cybersecurity must do more and better to ensure patient safety and anytime, anywhere care.
How SonicWall Can Help
For the past three decades, SonicWall has worked with providers to help build a healthier healthcare system. During this time, our innovations have allowed us to meet new expectations regarding improving security, increasing operation efficiencies and reducing IT costs.
Today, SonicWall works with each organization individually to establish a comprehensive defense strategy that matches their business goals and positions care professionals for success. By leveraging our depth and breadth of experience in healthcare industry operations and processes, SonicWall helps HDOs avoid surprises and spend more time focused on their primary mission: ensuring the health and well-being of the communities they serve.
The journey from “I think I’m secured” to “I’m sure I’m secured” starts with the SonicWall Boundless Cybersecurity approach. This approach binds security, central management, advanced analytics and unified threat management across SonicWall’s entire portfolio of security solutions to form the Capture Cloud Platform. The architectural diagram in Figure 3 shows how SonicWall network, edge, endpoint, cloud, wireless, zero trust access, web, email, mobile and IoT security solutions comes together as one security platform.
Figure 3
With the SonicWall Capture Cloud Platform, HDOs’ cybersecurity can do more and better by composing a custom, layered defense strategy to fit their specific needs or deploying the entire stack to establish a consistent security posture across their critical infrastructure. Combining these security solutions gives HDOs the necessary layered defense, along with a security framework to govern centrally, manage risks and comply with data protection laws.
Participate in a discussion about the impacts of rapid changes on society and businesses, pushing new development of better and more effective cybersecurity.
Think about your life without computers and other digital devices we now take for granted. If you took inventory, how many devices are in your business, at your home and on your person right at this moment? Now consider the experience of earlier generations; their entertainment, travel, communication, and even simple things like reading a newspaper or a book.
Industrial Revolutions change lives and produce excellent opportunities for growth for individuals and society. We have experienced five so far, with the first starting around 1750 and the fifth rolling out only a few years ago. So, we’re very well experienced in recognizing their implications and absorbing their benefits as well. We’re also experts in evolving from the enormous disruptions they bring.
First and Second Revolutions: The Evolution of Industries
The First Industrial Revolution was the harbinger of a massive wave of innovation. Factories sprung up in major cities, and people began producing more products than ever before. But as productivity increased, the number of jobs decreased, and the living standards of specific segments of society fell hard. Eventually, society (and economics) filled in with new jobs that serviced fledgling heavy industries. Companies needed more skilled workers to build the machines that made more machines. As a result, high-paying jobs returned, and society recovered.
But then came the Second Industrial Revolution, also known as the Technological Revolution, because it ushered in a phase of rapid scientific discovery and industrial standardization. From the late 19th century through much of the early 20th, mass production transformed factories into conveyors of productivity. As a result, while we endured a new phase of job losses and societal upheavals, we also saw the rise of highly skilled workers and higher-paying jobs that afforded better homes and greater mobility.
Third and Fourth Revolutions: The Evolution of Modern Society
The Third Industrial Revolution began in the later parts of the 20th century as the need for better automation triggered the advent of electronics, then computers, followed by the invention of the Internet. Technological advancements began fundamental economic transformation and, along with it, greater volatility. In addition, new methods of communication converged with rapid global urbanization and new energy regimes such as renewable sources.
Then came the Fourth Industrial Revolution, which some argue ended just before the pandemic. The blaze of technological advancements from the previous period facilitated the introduction of personal computing, mobile devices and the Internet of Things (IoT) – developments that forced us to redefine the boundaries between the physical, digital, and biological worlds. Advancements in artificial intelligence (AI), robotics, 3D printing, genetic engineering, quantum computing, and other technologies added to social pressures that blurred traditional boundaries to the point of confusion.
The Fifth Industrial Revolution: Societal Fusion
Many global thinkers believe we are in the throes of a Fifth Industrial Revolution (also “5IR”) that inaugurated new metrics for productivity that go beyond measuring the output of humans and machines in the workplace. We are witnessing a fusion of human abilities and machine efficiencies in this context. The physical, digital and biological spheres are now interchangeable and intertwined. So, it’s not just about connecting people to machines but also about connecting devices to other machines, all in the name of human creativity and productivity.
One remarkable aspect of 5IR is that it is happening at an unprecedented rate. For example, accelerated by the COVID pandemic, remote network and wireless communication saw an enormous surge as Work-From-Home became a permanent fixture for the Western workforce; thus, workplace and home were fused. And along with that fusion came education and home. But other fusions are more challenging to discern, such as information and misinformation, news and propaganda, political action and terrorism, and so on, which leads us to the fusion between crime and cybersecurity.
Learn and Explore the Impacts of the 5IR and Cybersecurity
Interestingly, a very high percentage of successful ransomware hits are due to people bypassing or ignoring cybersecurity protocols simply because they don’t believe they could ever become a victim. Unfortunately, the same can be said about organizations that have not yet prioritized updating their security technology. Many owners and managers don’t understand the threats and think that ransomware only happens to bigger companies. Current threat reports prove that the impulse to avoid and dodge better cybersecurity is incorrect, and that’s the part that we’re struggling with the most.
The $10.5T question (est. cost of cybercrime per year by 2025) is how much effort we will expend to correct this trend. Cybercrime is one of the most complex byproducts of our “revolutions.” As a result of the surge in new threats, technology and behavior is rapidly evolving. Taking responsibility and deploying new cybersecurity technology will help us mitigate today’s risks.
Book your seat to learn more during our next MINDHUNTER #9 episode in June.
This month, the Cisco Umbrella team – in conjunction with Talos – has witnessed the rise of complex cyberattacks. In today’s edition of the Cybersecurity Threat Spotlight, we unpack the tactics, techniques, and procedures used in these attacks.
Want to see how Cisco Umbrella can protect your network? Sign up for a free trial today!
BlackCat Ransomware
Threat Type: Ransomware
Attack Chain:
Description: BlackCat – also known as “ALPHV”- is a ransomware which uses ransomware-as-a-service model and double ransom schema (encrypted files and stolen file disclosure). It first appeared in November 2021 and, since then, targeted companies have been hit across the globe.
BlackCat Spotlight: BlackCat ransomware has quickly gained notoriety for being used in double ransom (encrypted files and stolen file disclosure) attacks against companies. While it targets companies across the globe, more than 30% of the compromises happened to companies based in the U.S.
There is a connection between the BlackCat, BlackMatter and DarkSide ransomware groups, recently confirmed by the BlackCat representative. Attack kill chain follows the blueprint of other human-operated ransomware attacks: initial compromise, followed by an exploration and data exfiltration phase, then attack preparation and finally, the ransomware execution. The key aspect of such attacks is that adversaries take time exploring the environment and preparing it for a successful and broad attack before launching the ransomware. Some of the attacks took up to two weeks from the initial to final stage, so it is key to have capabilities to detect such activities to counter them.
Target Geolocations: U.S., Canada, EU, China, India, Philippines, Australia Target Data: Sensitive Information, Browser Information Target Businesses: Any Exploits: N/A
Mitre ATT&CK for BlackCat
Initial Access: Valid Accounts: Local Accounts
Discovery: Account Discovery System Information Discovery Network Service Discovery File and Directory Discovery Security Software Discovery ADrecon Sofperfect Network Scanner
Which Cisco Products Can Block: Cisco Secure Endpoint Cisco Secure Firewall/Secure IPS Cisco Secure Malware Analytics Cisco Umbrella
ZingoStealer
Threat Type: Information Stealer
Attack Chain:
Description: ZingoStealer is an information stealer released by a threat actor known as “Haskers Gang.” The malware leverages Telegram chat features to facilitate malware executable build delivery and data exfiltration. The malware can exfiltrate sensitive information like credentials, steal cryptocurrency wallet information, and mine cryptocurrency on victims’ systems. ZingoStealer has the ability to download additional malware such as RedLine Stealer and the XMRig cryptocurrency mining malware.
ZingoStealer Spotlight: Cisco Talos recently observed a new information stealer, called “ZingoStealer” that has been released for free by a threat actor known as “Haskers Gang.” This information stealer, first introduced to the wild in March 2022, is currently undergoing active development and multiple releases of new versions have been observed recently. In many cases, ZingoStealer is being distributed under the guise of game cheats, cracks and code generators.
The stealer is an obfuscated .NET executable which downloads files providing core functionality an attacker-controlled server. The malware can exfiltrate sensitive information like credentials, steal cryptocurrency wallet information, and mine cryptocurrency on victims’ systems. The malware is also used as a loader for other malware payloads, such as RedLine Stealer and the XMRig cryptocurrency mining malware.
Target Geolocations: CIS Target Data: User Credentials, Browser Data, Financial and Personal Information, Cryptocurrency Wallets, Data From Browser Extensions Target Businesses: Any Exploits: N/A
Mitre ATT&CK for ZingoStealer
Initial Access: Trojanized Applications
Credential Access: Credentials from Password Stores Steal Web Session Cookie Unsecured Credentials Credentials from Password Stores: Credentials from Web Browsers
Discovery: Account Discovery Software Discovery Process Discovery System Time Discovery System Service Discovery System Location Discovery
Persistence: Registry Run Keys/Startup Folder Scheduled Task/Job: Scheduled Task
Privilege Escalation: N/A
Execution: User Execution Command and Scripting Interpreter: PowerShell
Evasion: Obfuscated Files or Information
Collection: Archive Collected Data: Archive via Utility Data Staged: Local Data Staging
Command and Control: Application Layer Protocol: Web Protocols
Which Cisco Products Can Block: Cisco Secure Endpoint Cisco Secure Email Cisco Secure Firewall/Secure IPS Cisco Secure Malware Analytics Cisco Umbrella Cisco Secure Web Appliance
BumbleBee Loader
Threat Type: Loader
Attack Chain:
Description: BumbleBee is a loader that has anti-virtualization checks and loader capabilities. The goal of the malware is to take a foothold in the compromised system to download and execute additional payloads. BumbleBee was observed to load Cobalt Strike, shellcode, Sliver and Meterpreter malware.
BumbleBee Spotlight: Security researchers noticed the appearance of the new malware being used by Initial Access Brokers, which previously relied on BazaLoader and IcedID malware. Dubbed BumbleBee due to presence of unique User-Agent “bumblebee” in early campaigns, this malware appears to be in active development.
It already employs complex anti-virtualization techniques, as well as uses asynchronous procedure call (APC) injection to launch the shellcode and LOLBins to avoid detections. Delivery chain relies on user interaction to follow the links and open malicious ISO or IMG file. Loader achieves persistence via scheduled task which launches Visual Basic Script to load BumbleBee DLL. Afterwards, the execution malware communicates with the Command-and-Control server and downloads additional payloads such as Cobalt Strike, shellcode, Sliver and Meterpreter. Threat actors using such payloads have been linked to ransomware campaigns.
Target Geolocations: Canada, U.S., Japan Target Data: N/A Target Businesses: Any Exploits: N/A
Mitre ATT&CK for BumbleBee
Initial Access: Malspam
Persistence: Scheduled Task/Job
Execution: Scheduled Task/Job: Scheduled Task Command and Scripting Interpreter: Virtual Basic User Execution: Malicious File
Evasion: System Binary Proxy Execution: Rundll32 Virtualization/Sandbox Evasion: System Checks Process Injection: Asynchronous Procedure Call
Discovery: System Information Discovery System Network Configuration Discovery System Network Connections Discovery
SC Awards from SC Media are known for honoring the best people, products and companies in cybersecurity. One of the industry’s most respected media outlets, SC Media enlists a select pool of experts from the information security community to review more than 800 entries in 35+ categories.
Last year Cisco Umbrella took home SC’s top award for Best SME Security Solution, and we are thrilled to be a finalist again this year – with the winner to be announced in August.
Small and mid-size enterprises need an effective, easy-to-deploy security solution
We firmly believe small and medium-sized businesses deserve big protection. The chilling statistic that 60% of small- and medium-sized businesses go out of business within six months of a cyberattack1 underscores the need for an effective and easy to implement security solution for companies that are likely to have little or no dedicated IT staff.
Blocking threats before they reach the network, endpoints, and end users, Umbrella enables even small IT teams to monitor and respond to threats effectively – like it does for Cape Air.
Cape Air uses Cisco Umbrella to simplify operations and improve security
Headquartered in Hyannis, Massachusetts, Cape Air is a regional airline that provides service to some of the world’s most beautiful destinations. But when frequent malware infections disrupt core services and the customer experience, the brand reputation suffers. For Cape Air, service delays due to malware infections became a common challenge.
Brett Stone, Cape Air’s network operations manager needed to stop threats before they caused service outages. He recognized that Cisco Umbrella could help Cape Air reduce infections since it blocks malware, phishing, command-and-control requests, and other threats at the DNS layer before a connection is even established.
He configured Umbrella within 30 minutes — and saw immediate results:
“From the moment we deployed Umbrella, it was like night and day in the number of tickets we had open because of infections and PCs that kept getting compromised in the past. We were amazed because the next day we didn’t have to fix these problems anymore. Then we could do all those other things that were important to us; we finally had time for them.” – Brett Stone
Stone recalls how malware remediation used to consume all of Cape Air’s network technicians’ time. “Before Umbrella, I had three technicians working 40 hours a week, and all they did for a year was fix malware infections and reimage computers,” Stone recalls. “Thankfully, those days are gone. Now we have zero, or rarely one, malware infection. I don’t remember the last time something got through Cisco Umbrella within the last year or two.”
Want to learn more about how Cisco Umbrella serves small-to-midsize businesses?
Threats are never going to stop coming. But with simple deployment and powerful protection, visibility, and performance, Cisco Umbrella can provide the big protection you need.
Check out our ebook Big Threats to Small Business to learn more about how we meet the unique cybersecurity needs of small and medium sized businesses. And if you’re ready to see our solution in action, check out a free Cisco Umbrella Live Demo.
In recent years, management interfaces on servers like a Baseboard Management Controller (BMC) have been the target of cyber attacks including ransomware, implants, and disruptive operations. Common BMC vulnerabilities like Pantsdown and USBAnywhere, combined with infrequent firmware updates, have left servers vulnerable.
We were recently informed from a trusted vendor of new, critical vulnerabilities in popular BMC software that we use in our fleet. Below is a summary of what was discovered, how we mitigated the impact, and how we look to prevent these types of vulnerabilities from having an impact on Cloudflare and our customers.
Background
A baseboard management controller is a small, specialized processor used for remote monitoring and management of a host system. This processor has multiple connections to the host system, giving it the ability to monitor hardware, update BIOS firmware, power cycle the host, and many more things.
Access to the BMC can be local or, in some cases, remote. With remote vectors open, there is potential for malware to be installed on the BMC from the local host via PCI Express or the Low Pin Count (LPC) interface. With compromised software on the BMC, malware or spyware could maintain persistence on the server.
According to the National Vulnerability Database, the two BMC chips (ASPEED AST2400 and AST2500) have implemented Advanced High-Performance Bus (AHB) bridges, which allow arbitrary read and write access to the physical address space of the BMC from the host. This means that malware running on the server can also access the RAM of the BMC.
These BMC vulnerabilities are sufficient to enable ransomware propagation, server bricking, and data theft.
Impacted versions
Numerous vulnerabilities were found to affect the QuantaGrid D52B cloud server due to vulnerable software found in the BMC. These vulnerabilities are associated with specific interfaces that are exposed on AST2400 and AST2500 and explained in CVE-2019-6260. The vulnerable interfaces in question are:
An attacker might be able to update the BMC directly using SoCFlash through inband LPC or BMC debug universal async receiver-transmitter (UART) serial console. While this might be thought of as a usual path in case of total corruption, this is actually an abuse within SoCFlash by using any open interface for flashing.
Mitigations and response
Updated firmware
We reached out to one of our manufacturers, Quanta, to validate that existing firmware within a subset of systems was in fact patched against these vulnerabilities. While some versions of our firmware were not vulnerable, others were. A patch was released, tested, and deployed on the affected BMCs within our fleet.
Cloudflare Security and Infrastructure teams also proactively worked with additional manufacturers to validate their own BMC patches were not explicitly vulnerable to these firmware vulnerabilities and interfaces.
Reduced exposure of BMC remote interfaces
It is a standard practice within our data centers to implement network segmentation to separate different planes of traffic. Our out-of-band networks are not exposed to the outside world and only accessible within their respective data centers. Access to any management network goes through a defense in depth approach, restricting connectivity to jumphosts and authentication/authorization through our zero trust Cloudflare One service.
Reduced exposure of BMC local interfaces
Applications within a host are limited in what can call out to the BMC. This is done to restrict what can be done from the host to the BMC and allow for secure in-band updating and userspace logging and monitoring.
Do not use default passwords
This sounds like common knowledge for most companies, but we still follow a standard process of changing not just the default username and passwords that come with BMC software, but disabling the default accounts to prevent them from ever being used. Any static accounts follow a regular password rotation.
BMC logging and auditing
We log all activity by default on our BMCs. Logs that are captured include the following:
Authentication (Successful, Unsuccessful)
Authorization (user/service)
Interfaces (SOL, CLI, UI)
System status (Power on/off, reboots)
System changes (firmware updates, flashing methods)
We were able to validate that there was no malicious activity detected.
What’s next for the BMC
Cloudflare regularly works with several original design manufacturers (ODMs) to produce the highest performing, efficient, and secure computing systems according to our own specifications. The standard processors used for our baseboard management controller often ship with proprietary firmware which is less transparent and more cumbersome to maintain for us and our ODMs. We believe in improving on every component of the systems we operate in over 270 cities around the world.
OpenBMC
We are moving forward with OpenBMC, an open-source firmware for our supported baseboard management controllers. Based on the Yocto Project, a toolchain for Linux on embedded systems, OpenBMC will enable us to specify, build, and configure our own firmware based on the latest Linux kernel featureset per our specification, similar to the physical hardware and ODMs.
OpenBMC firmware will enable:
Latest stable and patched Linux kernel
Internally-managed TLS certificates for secure, trusted communication across our isolated management network
Fine-grained credentials management
Faster response time for patching and critical updates
While many of these features are community-driven, vulnerabilities like Pantsdown are patched quickly.
Extending secure boot
You may have read about our recent work securing the boot process with a hardware root-of-trust, but the BMC has its own boot process that often starts as soon as the system gets power. Newer versions of the BMC chips we use, as well as leveraging cutting edgesecurity co-processors, will allow us to extend our secure boot capabilities prior to loading our UEFI firmware by validating cryptographic signatures on our BMC/OpenBMC firmware. By extending our security boot chain to the very first device that has power to our systems, we greatly reduce the impact of malicious implants that can be used to take down a server.
Conclusion
While this vulnerability ended up being one we could quickly resolve through firmware updates with Quanta and quick action by our teams to validate and patch our fleet, we are continuing to innovate through OpenBMC, and secure root of trust to ensure that our fleet is as secure as possible. We are grateful to our partners for their quick action and are always glad to report any risks and our mitigations to ensure that you can trust how seriously we take your security.
Since my previous blog about Secondary DNS, Cloudflare’s DNS traffic has more than doubled from 15.8 trillion DNS queries per month to 38.7 trillion. Our network now spans over 270 cities in over 100 countries, interconnecting with more than 10,000 networks globally. According to w3 stats, “Cloudflare is used as a DNS server provider by 15.3% of all the websites.” This means we have an enormous responsibility to serve DNS in the fastest and most reliable way possible.
Although the response time we have on DNS queries is the most important performance metric, there is another metric that sometimes goes unnoticed. DNS Record Propagation time is how long it takes changes submitted to our API to be reflected in our DNS query responses. Every millisecond counts here as it allows customers to quickly change configuration, making their systems much more agile. Although our DNS propagation pipeline was already known to be very fast, we had identified several improvements that, if implemented, would massively improve performance. In this blog post I’ll explain how we managed to drastically improve our DNS record propagation speed, and the impact it has on our customers.
How DNS records are propagated
Cloudflare uses a multi-stage pipeline that takes our customers’ DNS record changes and pushes them to our global network, so they are available all over the world.
The steps shown in the diagram above are:
Customer makes a change to a record via our DNS Records API (or UI).
The change is persisted to the database.
The database event triggers a Kafka message which is consumed by the Zone Builder.
The Zone Builder takes the message, collects the contents of the zone from the database and pushes it to Quicksilver, our distributed KV store.
Quicksilver then propagates this information to the network.
Of course, this is a simplified version of what is happening. In reality, our API receives thousands of requests per second. All POST/PUT/PATCH/DELETE requests ultimately result in a DNS record change. Each of these changes needs to be actioned so that the information we show through our API and in the Cloudflare dashboard is eventually consistent with the information we use to respond to DNS queries.
Historically, one of the largest bottlenecks in the DNS propagation pipeline was the Zone Builder, shown in step 4 above. Responsible for collecting and organizing records to be written to our global network, our Zone Builder often ate up most of the propagation time, especially for larger zones. As we continue to scale, it is important for us to remove any bottlenecks that may exist in our systems, and this was clearly identified as one such bottleneck.
Growing pains
When the pipeline shown above was first announced, the Zone Builder received somewhere between 5 and 10 DNS record changes per second. Although the Zone Builder at the time was a massive improvement on the previous system, it was not going to last long given the growth that Cloudflare was and still is experiencing. Fast-forward to today, we receive on average 250 DNS record changes per second, a staggering 25x growth from when the Zone Builder was first announced.
The way that the Zone Builder was initially designed was quite simple. When a zone changed, the Zone Builder would grab all the records from the database for that zone and compare them with the records stored in Quicksilver. Any differences were fixed to maintain consistency between the database and Quicksilver.
This is known as a full build. Full builds work great because each DNS record change corresponds to one zone change event. This means that multiple events can be batched and subsequently dropped if needed. For example, if a user makes 10 changes to their zone, this will result in 10 events. Since the Zone Builder grabs all the records for the zone anyway, there is no need to build the zone 10 times. We just need to build it once after the final change has been submitted.
What happens if the zone contains one million records or 10 million records? This is a very real problem, because not only is Cloudflare scaling, but our customers are scaling with us. Today our largest zone currently has millions of records. Although our database is optimized for performance, even one full build containing one million records took up to 35 seconds, largely caused by database query latency. In addition, when the Zone Builder compares the zone contents with the records stored in Quicksilver, we need to fetch all the records from Quicksilver for the zone, adding time. However, the impact doesn’t just stop at the single customer. This also eats up more resources from other services reading from the database and slows down the rate at which our Zone Builder can build other zones.
Per-record build: a new build type
Many of you might already have the solution to this problem in your head:
Why doesn’t the Zone Builder just query the database for the record that has changed and propagate just the single record?
Of course this is the correct solution, and the one we eventually ended up at. However, the road to get there was not as simple as it might seem.
Firstly, our database uses a series of functions that, at zone touch time, create a PostgreSQL Queue (PGQ) event that ultimately gets turned into a Kafka event. Initially, we had no distinction for individual record events, which meant our Zone Builder had no idea what had actually changed until it queried the database.
Next, the Zone Builder is still responsible for DNS zone settings in addition to records. Some examples of DNS zone settings include custom nameserver control and DNSSEC control. As a result, our Zone Builder needed to be aware of specific build types to ensure that they don’t step on each other. Furthermore, per-record builds cannot be batched in the same way that zone builds can because each event needs to be actioned separately.
As a result, a brand new scheduling system needed to be written. Lastly, Quicksilver interaction needed to be re-written to account for the different types of schedulers. These issues can be broken down as follows:
Create a new Kafka event pipeline for record changes that contain information about the changed record.
Separate the Zone Builder into a new type of scheduler that implements some defined scheduler interface.
Implement the per-record scheduler to read events one by one in the correct order.
Implement the new Quicksilver interface for the per-record scheduler.
Below is a high level diagram of how the new Zone Builder looks internally with the new scheduler types.
It is critically important that we lock between these two schedulers because it would otherwise be possible for the full build scheduler to overwrite the per-record scheduler’s changes with stale data.
It is important to note that none of this per-record architecture would be possible without the use of Cloudflare’s black lie approach to negative answers with DNSSEC. Normally, in order to properly serve negative answers with DNSSEC, all the records within the zone must be canonically sorted. This is needed in order to maintain a list of references from the apex record through all the records in the zone. With this normal approach to negative answers, a single record that has been added to the zone requires collecting all records to determine its insertion point within this sorted list of names.
Bugs
I would love to be able to write a Cloudflare blog where everything went smoothly; however, that is never the case. Bugs happen, but we need to be ready to react to them and set ourselves up so that next time this specific bug cannot happen.
In this case, the major bug we discovered was related to the cleanup of old records in Quicksilver. With the full Zone Builder, we have the luxury of knowing exactly what records exist in both the database and in Quicksilver. This makes writing and cleaning up a fairly simple task.
When the per-record builds were introduced, record events such as creates, updates, and deletes all needed to be treated differently. Creates and deletes are fairly simple because you are either adding or removing a record from Quicksilver. Updates introduced an unforeseen issue due to the way that our PGQ was producing Kafka events. Record updates only contained the new record information, which meant that when the record name was changed, we had no way of knowing what to query for in Quicksilver in order to clean up the old record. This meant that any time a customer changed the name of a record in the DNS Records API, the old record would not be deleted. Ultimately, this was fixed by replacing those specific update events with both a creation and a deletion event so that the Zone Builder had the necessary information to clean up the stale records.
None of this is rocket surgery, but we spend engineering effort to continuously improve our software so that it grows with the scaling of Cloudflare. And it’s challenging to change such a fundamental low-level part of Cloudflare when millions of domains depend on us.
Results
Today, all DNS Records API record changes are treated as per-record builds by the Zone Builder. As I previously mentioned, we have not been able to get rid of full builds entirely; however, they now represent about 13% of total DNS builds. This 13% corresponds to changes made to DNS settings that require knowledge of the entire zone’s contents.
When we compare the two build types as shown below we can see that per-record builds are on average 150x faster than full builds. The build time below includes both database query time and Quicksilver write time.
From there, our records are propagated to our global network through Quicksilver.
The 150x improvement above is with respect to averages, but what about that 4000x that I mentioned at the start? As you can imagine, as the size of the zone increases, the difference between full build time and per-record build time also increases. I used a test zone of one million records and ran several per-record builds, followed by several full builds. The results are shown in the table below:
Build Type
Build Time (ms)
Per Record #1
6
Per Record #2
7
Per Record #3
6
Per Record #4
8
Per Record #5
6
Full #1
34032
Full #2
33953
Full #3
34271
Full #4
34121
Full #5
34093
We can see that, given five per-record builds, the build time was no more than 8ms. When running a full build however, the build time lasted on average 34 seconds. That is a build time reduction of 4250x!
Given the full build times for both average-sized zones and large zones, it is apparent that all Cloudflare customers are benefitting from this improved performance, and the benefits only improve as the size of the zone increases. In addition, our Zone Builder uses less database and Quicksilver resources meaning other Cloudflare systems are able to operate at increased capacity.
Next Steps
The results here have been very impactful, though we think that we can do even better. In the future, we plan to get rid of full builds altogether by replacing them with zone setting builds. Instead of fetching the zone settings in addition to all the records, the zone setting builder would just fetch the settings for the zone and propagate that to our global network via Quicksilver. Similar to the per-record builds, this is a difficult challenge due to the complexity of zone settings and the number of actors that touch it. Ultimately if this can be accomplished, we can officially retire the full builds and leave it as a reminder in our git history of the scale at which we have grown over the years.
In addition, we plan to introduce a batching system that will collect record changes into groups to minimize the number of queries we make to our database and Quicksilver.
Does solving these kinds of technical and operational challenges excite you? Cloudflare is always hiring for talented specialists and generalists within our Engineering and other teams.
It is common that you come across the WordPress 404 or “WordPress site permalinks not working” error on your website if it is not maintained properly. But there are times when your website is under maintenance and your visitors will be automatically directed to a 404 error page.
Are you facing a WordPress 404 error or a “WordPress page not found” error? Don’t freak out! We have a solution for you.Table of Contents
The 404 error is an HTTP response code that occurs when a user clicks on a link to a missing page or a broken link. The web hosting server will automatically send the user an error message that says, for example, “404 Not Found”.
You have changed your post/page slug but haven’t redirected the old URL
You don’t have file permission
You have opened an incorrect URL
Poorly coded plugin/theme
Many WordPress themes offer creative layout & content options to display the 404 error page. Cloudways’s 404 error has custom design and layout too:
Managed WordPress Hosting Starting from $10/month.
Enjoy hassle-free hosting on a cloud platform with guaranteed performance boosts.Try Now
How to Fix WordPress 404 Error in 8 Simple Steps
In this tutorial, I am going to show you how to easily fix the WordPress “404 not found” error on your website. So let’s get started!
1. Clear Browser History & Cookies
The very first troubleshooting method that I perform is clearing the browser cache and cookies. Or you can try to visit your site incognito.
2. Set Up Your Permalink
If, apart from your homepage, your other WordPress website pages give you a 404 page not found error, you can follow these steps to resolve the issue.
Log in to your WordPress Dashboard
Go to Settings → Permalinks
Select the Default settings
Click Save Changes button
Change the settings back to the previous configuration (the once you selected before Default). Put the custom structure back if you had one.
Click Save Settings
Note: If you are using a custom structure, then copy/paste it in the Custom Base section.
This solution could fix the WordPress 404 not found or “WordPress permalinks not working” error. If it doesn’t work, you’ll need to edit the .htaccess file in the main directory of your WordPress installation (where the main index.php file resides). 404 errors are also usually due to misconfigured .htaccess file or file permission related issues.
3. Restore Your .httaccess File
.htaccess is a hidden file, so you must set all files as visible in your FTP.
Note: It’s alway recommended to backup your site before editing any files or pages.
First login to your server using FTP. Download the .htaccess file which is located in the same location as folders like /wp-content/ wp-admin /wp-includes/.
Next, open this file in the text editor of your choice.
Visit the following link and copy/paste the version of the code that is most suitable for your website. Save the .htaccess file and upload it to the live server.
For example, if you have Basic WP, use the code below.
If you have changed the URL of any specific page and haven’t redirected it yet, it’s time to redirect the old URL to your new URL. There are two easy ways to redirect your old post/page: via plugin and htaccess file.
If you are comfortable working with htaccess, add the following code to your htaccess file. Don’t forget to replace the URLs with your own website.
For an easier way, install the Redirection Plugin and go to WordPress Dashboard > Tools > Redirection. Complete the setup and Add new redirection.
5. Disabling Plugins/Theme
It’s possible that an un-updated or poorly coded plugin is causing the 404 error on your WordPress site. To check this, you need to deactivate all our plugins.
Access your WordPress files using an FTP like FileZilla. Go to public_html > wp-content and change the plugins folder name to something like myplugins.
Now go back to your browser to check if the website starts working or not. If the error has been resolved then one of the plugins is the culprit.
Note: If it’s not resolved then simply change the myplugins folder name to plugins and move to the next troubleshoot method.
If it’s resolved, change the myplugins folder name to plugins and open your WordPress dashboard to find the culprit. Go to Plugins > Installed Plugins. Activate each plugin one by one and check if your website is working. This way you can find the problematic plugin and resolve your WordPress 404 error.
6. Change and Update WordPress URL in Database
Maybe you’re seeing this error on your WordPress website.
“The requested URL was not found on this server. If you entered the URL manually, please check your spelling and try again.”
Go to your PHPMyAdmin, navigate to your database name, and select wp-option. For example, blog > wp-option.
Now change the URL. For example, from https://www.abc.com/blog/ to http://localhost/blog.
7. Fix WordPress 404 Error on Local Servers
Many designers and developers install WordPress on their desktops and laptops using a local server for staging purposes. A common problem with local server installations of WordPress is the inability to get permalink rewrite rules to work. You might try to change the permalinks for posts and pages, but eventually the website shows the WordPress “404 Not Found” error.
Fixing Errors is Easier With Cloudways
Try Our managed cloud hosting for a hassle-free experience
In this situation, turn on the rewrite module in your WAMP, XAMPP, or MAMP installation. For the purpose of this tutorial, I am using WAMP. Navigate to the taskbar and find the WAMP icon. After that navigate to Apache → Apache modules.
It will enable a long list of modules that you can toggle on and off. Find the one called “rewrite_module” and click it so that it is checked.
Then check out whether your permalinks are working or not again.
8. Alternative Method
Navigate to the local server. Find the Apache folder, then go to the “conf” folder. Navigate to httpd.conf file. Search for a line which looks like:
#LoadModule rewrite_module modules/mod_rewrite.so
Just remove the “#” sign so it looks like this:
LoadModule rewrite_module modules/mod_rewrite.so
Conclusion
I hope you find this guide helpful and that you were able to solve your “WordPress 404 page error” or “WordPress permalinks not working” problem. Have you figured out any other way to get rid of this problem? Please share your solutions with us in the provided comment section below.
WordPress 404 errors usually occur when you have removed certain pages from your website and haven’t redirected them to other pages that are live. Sometimes, WordPress 404 page errors can also occur when you have changed a URL of a specific page.
Q. How do I test a 404 error?
There are multiple tools you can use to test WordPress 404 errors, like Deadlinkchecker.
Q. How to redirect WordPress 404 pages?
On your WordPress dashboard, navigate to Tools > Redirection. There you can apply redirection by pasting the broken URL in the source box and the new URL in the Target box.
Q. How to edit a WordPress 404 page?
On your WordPress dashboard, navigate to Appearance > Theme Editor. Find the file named “404.php file” and edit the file yourself or using the help of a WordPress developer.
The world moves fast sometimes. Just two years ago, organizations were talking vaguely about the need to transform digitally, and ransomware began to make headlines outside the IT media circle. Fast forward to 2022, and threat actors have held oil pipelines and critical food supply chains hostage, while many organizations have passed a digital tipping point that will leave them forever changed. Against this backdrop, CISOs are increasingly aware of running disjointed point products’ cost, operational, and risk implications.
That’s why Trend Micro is transforming from a product- to a platform-centric company. From the endpoint to the cloud, we’re focused on helping our customers prepare for, withstand, and rapidly recover from threats—freeing them to go further and do more. Analysts seem to agree.
Unprecedented change
The digital transformation that organizations underwent during the pandemic was, in some cases, unprecedented. It helped them adapt to a new reality of remote and now hybrid working, supply chain disruption, and rising customer expectations. The challenge is that these investments in cloud infrastructure and services are broadening the corporate attack surface. In many cases, in-house teams are drowning in new attack techniques and cloud provider features. This can lead to misconfigurations which open the door to hackers.
Yet even without human error, there’s plenty for the bad guys to target in modern IT environments—from unpatched vulnerabilities to accounts protected with easy-to-guess or previously breached passwords. That means threat prevention isn’t always possible. Instead, organizations are increasingly looking to augment these capabilities with detection and response tooling like XDR to ensure incidents don’t turn into large-scale breaches. It’s important that these tools are able to prioritize alerts. Trend Micro found that as many as 70% of security operations (SecOps) teams are emotionally overwhelmed with the sheer volume of alerts they’re forced to deal with.
SecOps staff and their colleagues across the IT function are stretched to the limit by these trends, which are compounded by industry skills shortages. The last thing they need is to have to swivel-chair between multiple products to find the right information.
What Gartner says
Analyst firm Gartner is observing the same broad industry trends. In a recent report, it claimed that:
Vendors are increasingly divided into “platform” and “portfolio” providers—the latter providing products with little underlying integration
By 2025, 70% of organizations will reduce to a maximum of three the number of vendors they use to secure cloud-native applications
By 2027, half of the mid-market security buyers will use XDR to help consolidate security technologies such as endpoint, cloud, and identity
Vendors are increasingly integrating diverse security capabilities into a single platform. Those which minimize the number of consoles and configuration planes, and reuse components and information, will generate the biggest benefits
The power of one
This is music to our ears. It is why Trend Micro introduces a unified cybersecurity platform, delivering protection across the endpoint, network, email, IoT, and cloud, all tied together with threat detection and response from our Vision One platform. These capabilities will help customers optimize protection, detection, and response, leveraging automation across the key layers of their IT environment in a way that leaves no coverage gaps for the bad guys to hide in.
There are fewer overheads and hands-on decisions for stretched security teams with fewer vendors to manage, a high degree of automation, and better alert prioritization. Trend Micro’s unified cybersecurity platform vision also includes Trend Micro Service One for 24/7/365 managed detection, response, and support—to augment in-house skills and let teams focus on higher-value tasks.
According to Gartner, the growth in market demand for platform-based offerings has led some vendors to bundle products as a portfolio despite no underlying synergy. This can be a “worst of all worlds,” as products are neither best-of-breed nor do they reduce complexity and overheads, it claims.
We agree. That’s why Trend Micro offers a fundamentally more coherent platform approach. We help organizations continuously discover an ever-changing attack surface, assess risks and then take streamlined steps to mitigate that risk—applying the right security at the right time. That’s one vision, one platform, and total protection.
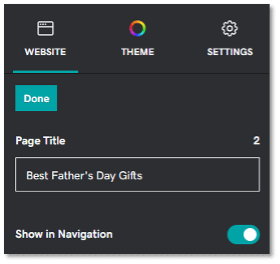


 Screenshot of meta title editor inside GoDaddy Website Builder.Include a primary keyword at the start. An exception should be made for well-known brands or local businesses who should add their business name to the start.
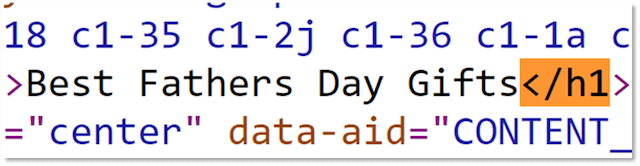


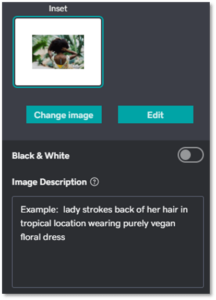

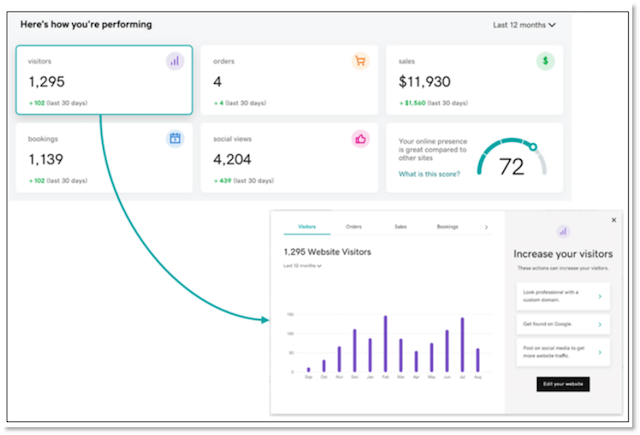


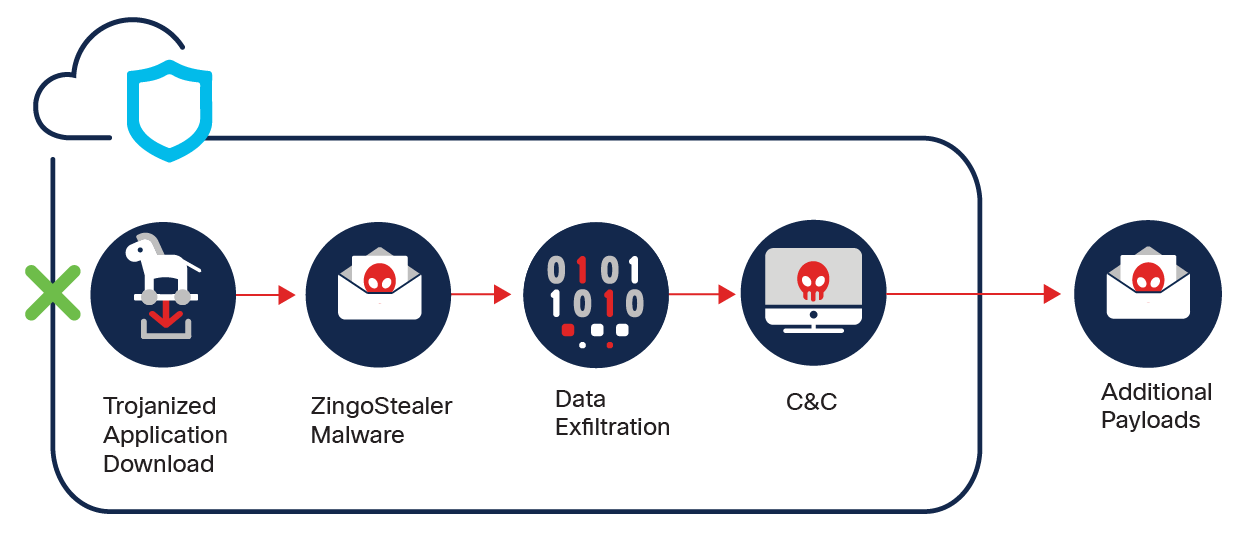


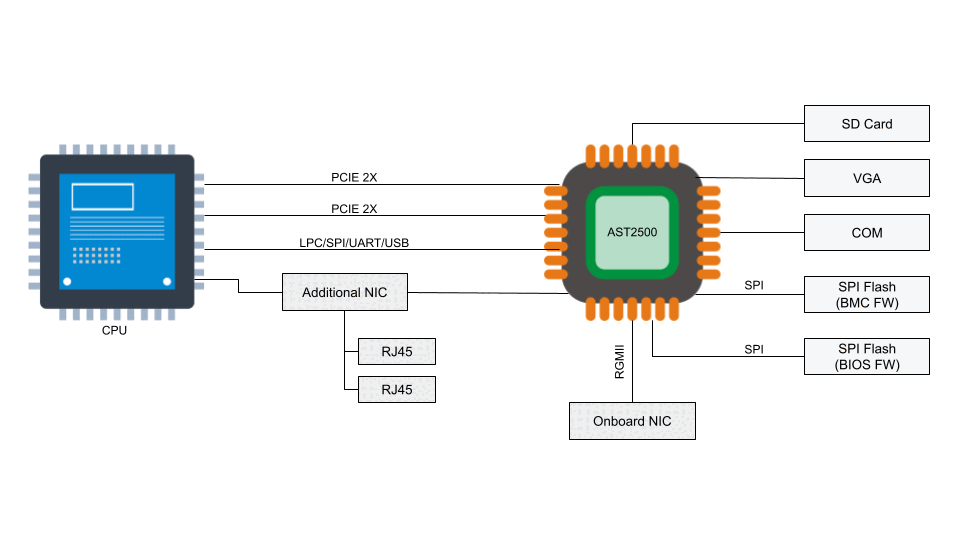
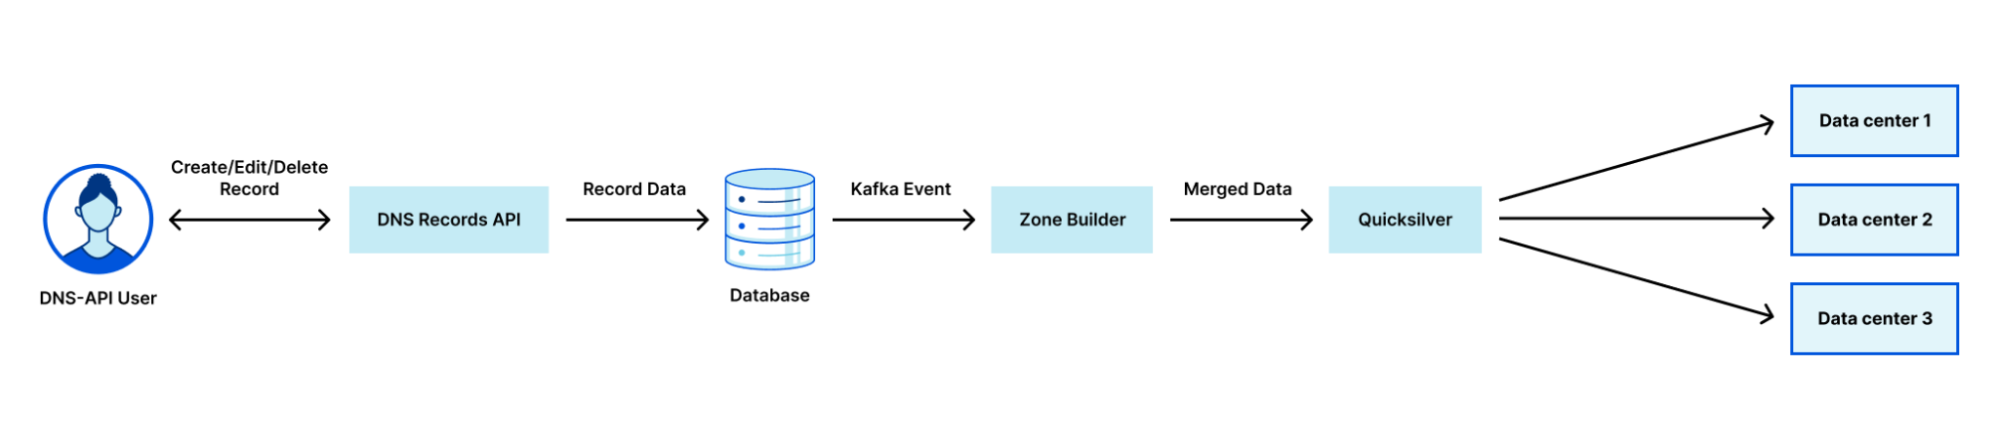
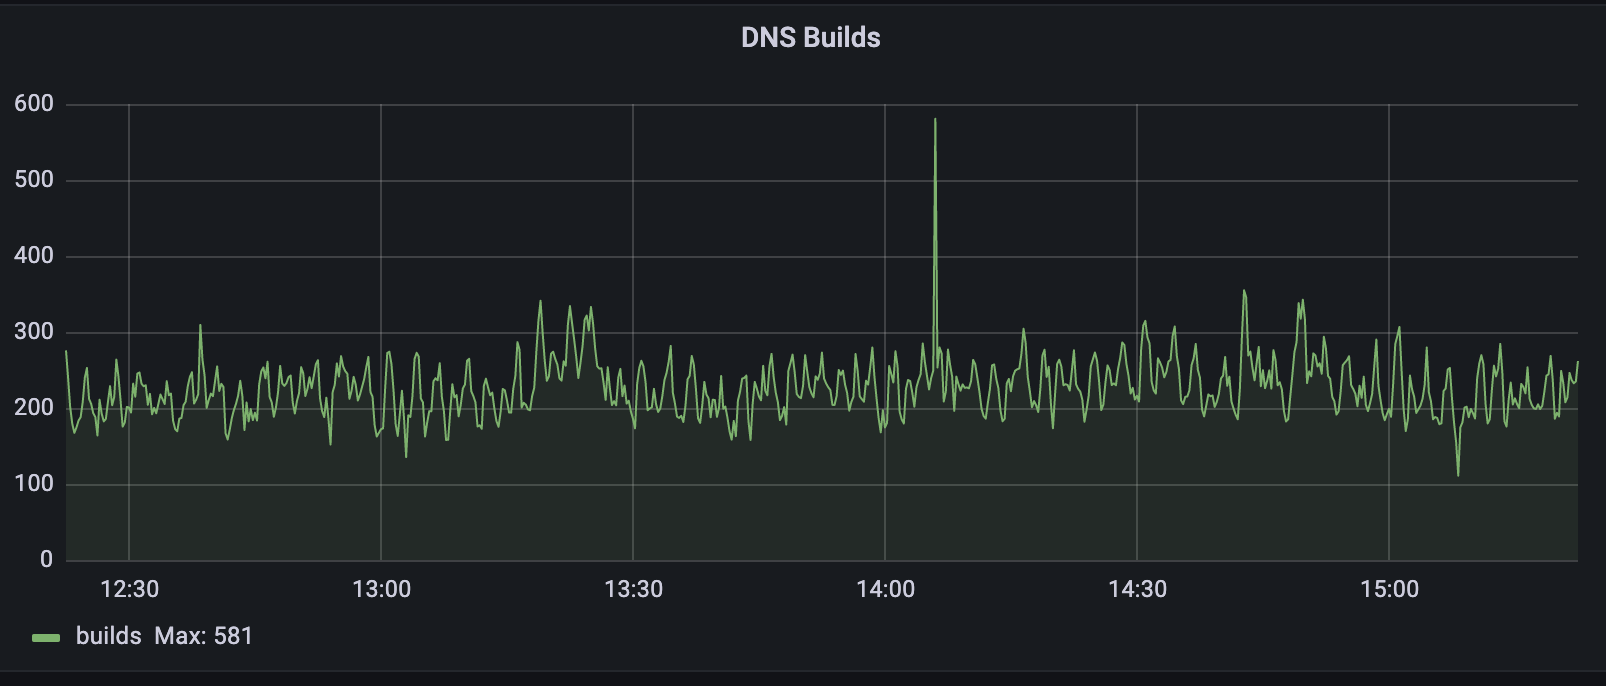
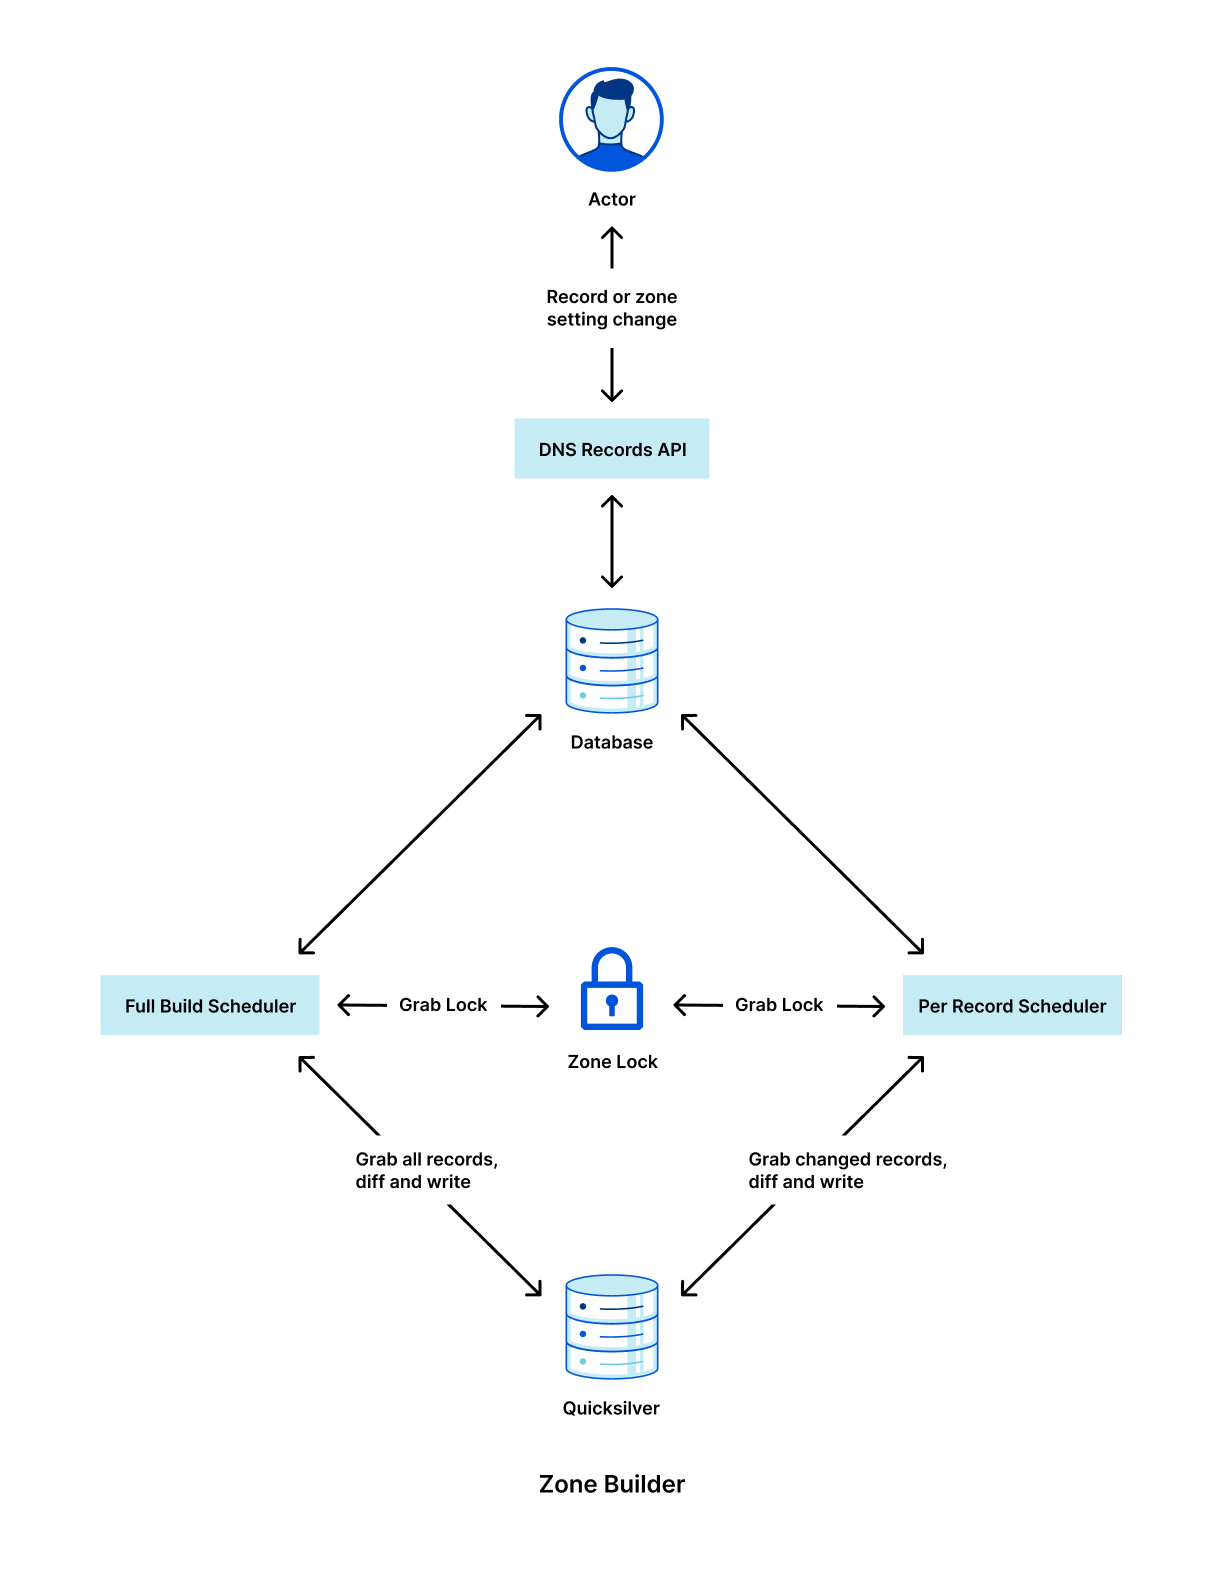
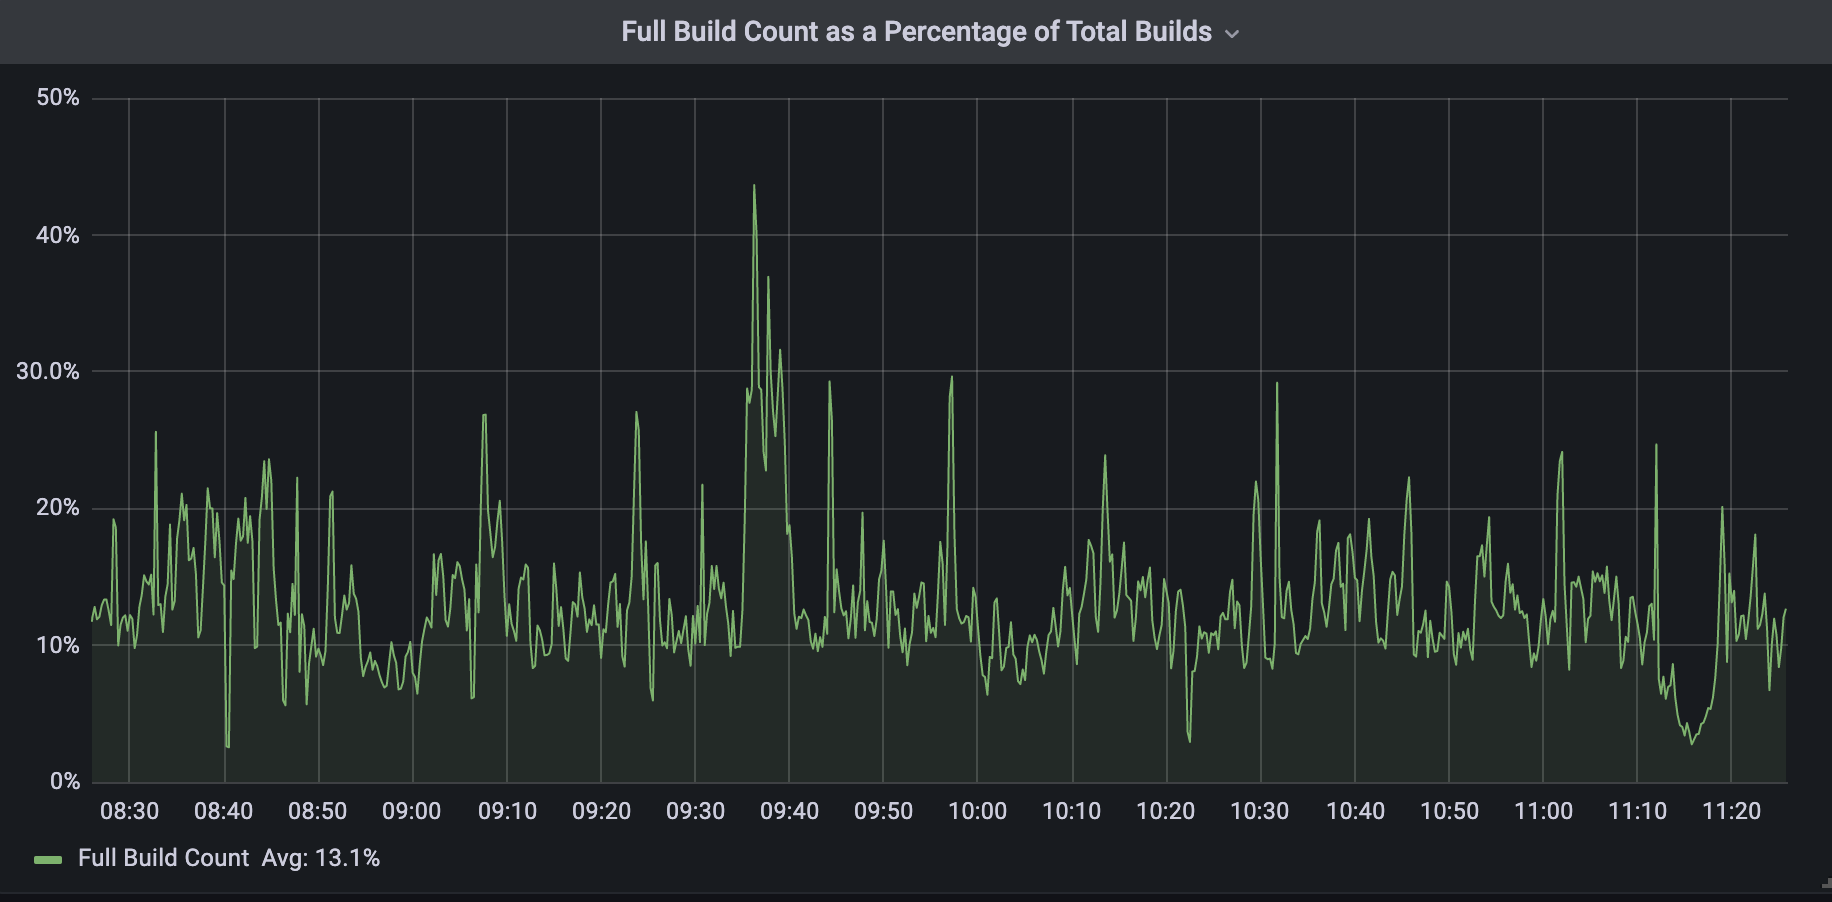
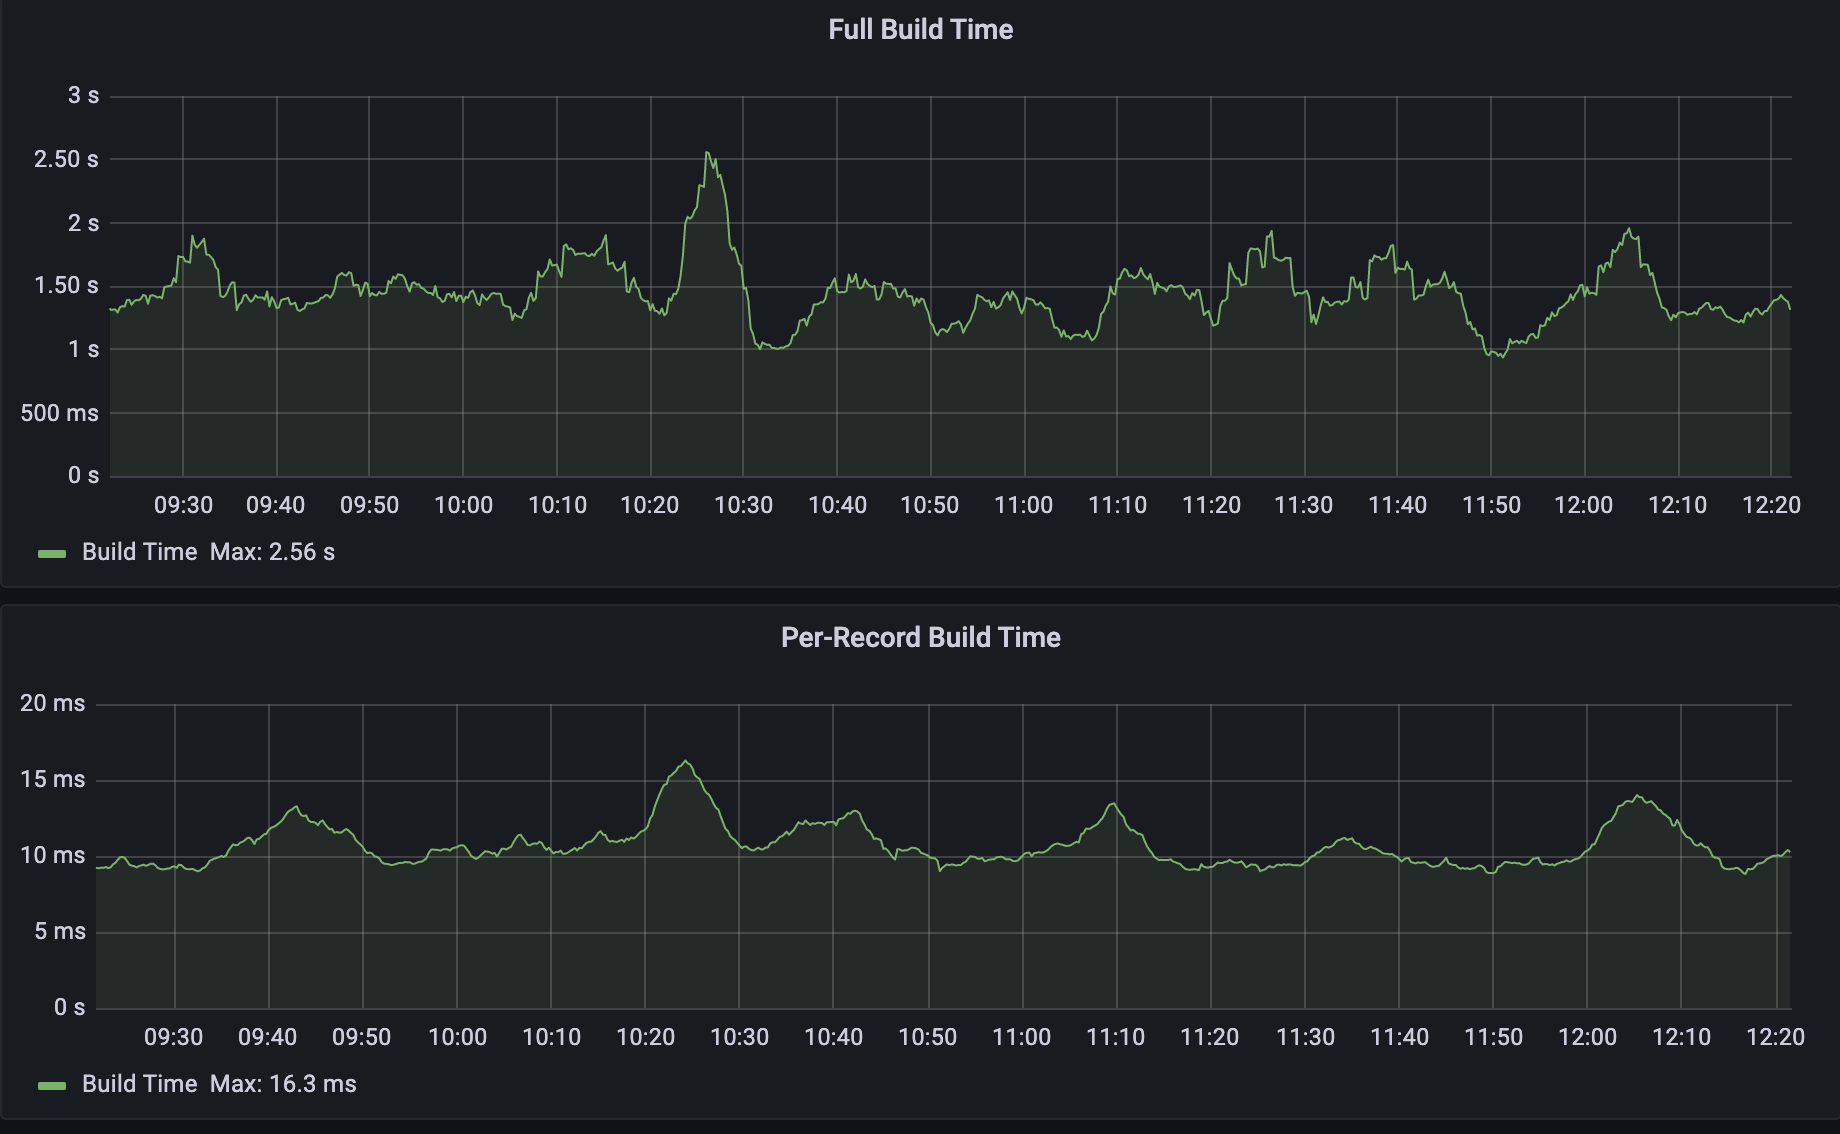

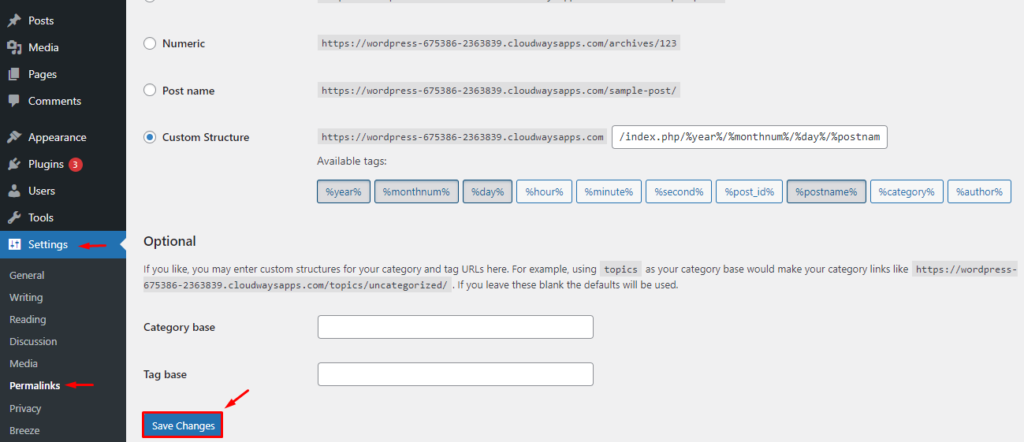
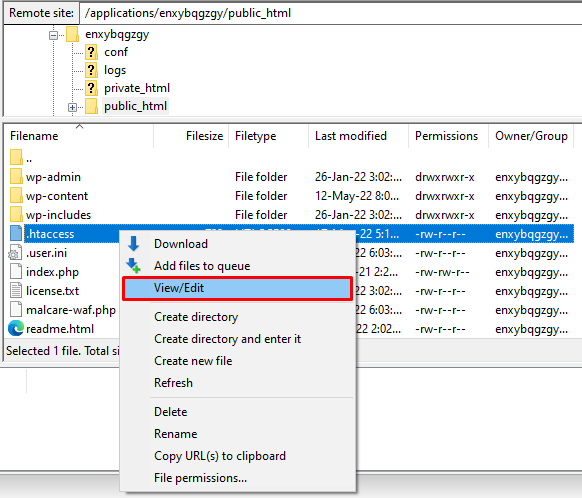
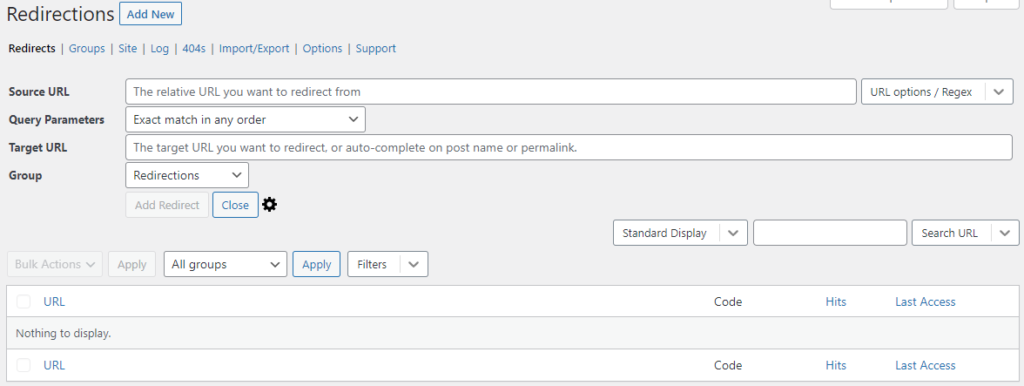
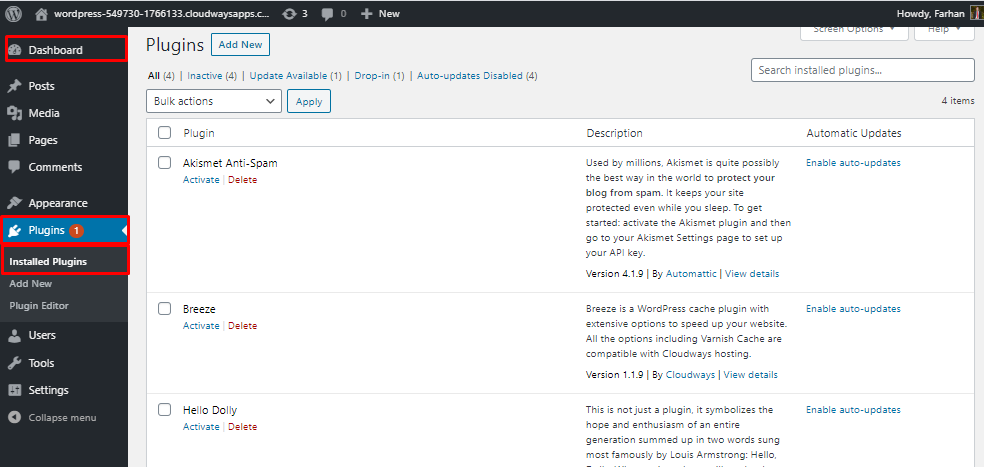
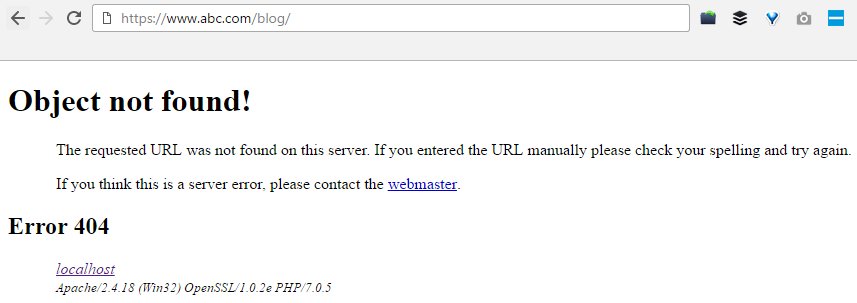
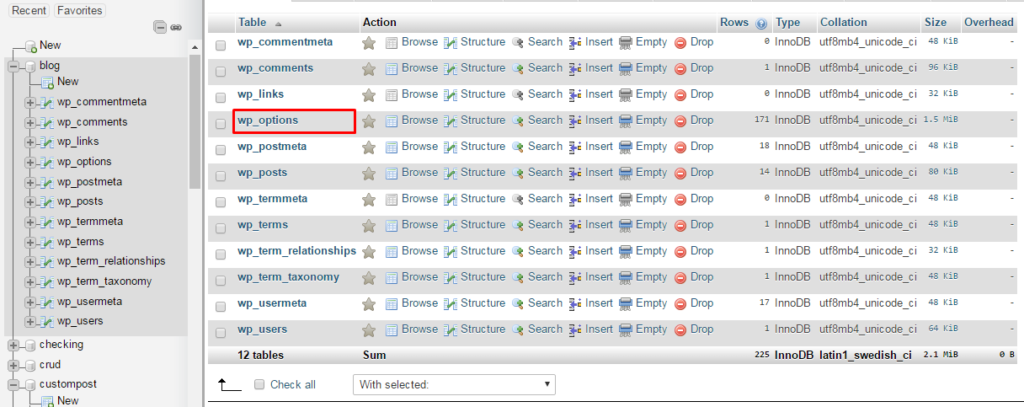
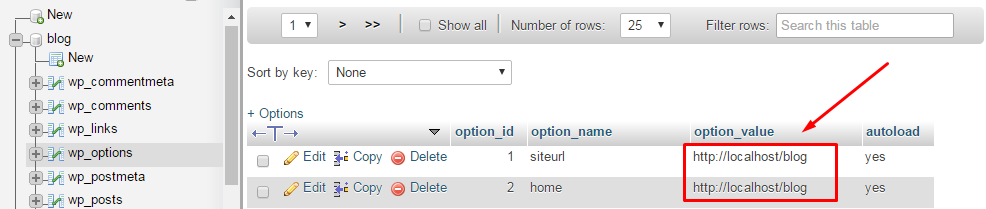