BEC attacks are a $1.8 billion dollar racket — and statistically, your business will be targeted sooner rather than later. Watch this webinar to learn how to stop them.
If asked which of the threat types tracked by the FBI causes the most financial damage, most people would say ransomware.
They’d be wrong.
In 2021, the FBI’s Internet Crime Complaint Center (IC3) received 19,954 Business Email Compromise (BEC) reports, with adjusted losses totaling almost $2.4 billion. That’s an average of more than $120,270 per incident, compared with just under $13,200 per incident for ransomware attacks.
Since the FBI began tracking these threats in 2013, tens of billions in financial losses have been recorded, resulting from nearly 170,000 incidents in 178 countries.
So why hasn’t this threat risen to the notoriety of ransomware?
During many ransomware attacks, business operations grind to a halt. When a company loses access to customer information, payment systems and mission-critical applications, it often becomes clear in short order that something is wrong.
But BEC attacks are comparatively silent. Even when these attacks have a huge impact on an organization’s bottom line, operations can generally continue as usual. As a result, businesses frequently opt to keep these attacks out of the public eye to avoid risking reputation damage and loss of trust.
But although ransomware still dominates security news, the growing frequency, volume and cost of BEC attacks have begun attracting more attention.
As a result, BEC attacks have become a top threat concern for many organizations today, according to a recent SonicWall-sponsored white paper by Osterman Research. “How to Deal with Business Email Compromise” reports primary research data from an in-depth customer survey of 119 respondents, each of which has direct knowledge of how their organization is addressing or planning to address the risk of BEC.
The results from this study offer a look at how security influencers and decision-makers are taking BEC into account when formulating their spending plans for the next 12 months. For example, while just 46% of organizations said they considered protecting against BEC attacks “important” or “extremely important” 12 months ago, 76% said they considered it important or extremely important today.
80%
Organizations indicating that protecting against BEC attacks in 2023 is of high importance
The data also shows that three-fifths of organizations in the study view protecting against BEC attacks as one of their top five security priorities.
62%
Organizations ranking protecting against BEC attacks as one of their top five priorities.
How BEC Attacks Fly Under the Radar
But what makes BEC attacks so dangerous when compared with other forms of cyberattacks? And why are they harder to stop?
BEC is a specialized type of phishing attack that relies on social engineering. They often use a proven pretexting technique to engineer a quick introduction and establish a believable scenario in order to manipulate the victim to take a specific action.
While these attacks can target employees at any level of an organization, they generally start with an attacker impersonating a person with authority, such as a CEO or CFO, a manager, or a supplier. The attacker uses the authority figure’s identity to start a chain of plausible (but fake) requests to gain monetary payment. This typically involves instructing someone in accounts payable, someone in HR or even someone with a company credit card to pay a fake invoice, transfer funds, send gift cards or make payroll payouts. The urgent tone of these messages encourages the victim to respond or act quickly, bypassing any checks and balances that may be in place.
Compared with other forms of cyberattacks, BEC attacks are among the hardest to detect because the threat signals are far less obvious. Relying on trickery and impersonation, the approach is very subtle, and the actual delivery generally doesn’t use weaponized URLs or malicious attachments, which are easily detected.
In addition, the email content and the delivery mechanism are usually of higher quality and often tailored to target a specific person or persons. With little to no apparent sign of a threat, these messages can bypass most email security filters to reach the inbox — and the absence of any sort of alert, such as a contextual warning advising them to exercise caution, leaves the victim more vulnerable to falling for the scam.
Because so many of these scams are successful, their use has grown dramatically — today, roughly 80% of companies targeted by BEC attacks each year. While there isn’t much you can do to avoid being targeted, there’s plenty you can do to safeguard your organization’s finances. To learn more about BEC attacks and how to stop them, check out our webinar, “Can You Stop the Imposters in Your Inbox?”
We examine Azure’s Managed Identities service and its security capability in a threat model as developers’ go-to feature for managing secrets and credentials.
Authentication and authorization play crucial parts when securing resources. Authentication verifies that the service or user accessing the secured resources has provided valid credentials, while authorization makes sure that they have sufficient permissions for the request itself.
Broken Access Control is listed among the top 10 OWASP prevalent web application issues from 2017 to 2021, and we have previously written about the importance of secrets management used for authentication. This occurs when an unauthorized user can access, modify, delete, or perform actions within an application or system that is outside the set permissions or policies, malicious or unintended. Broken access control has become the number one concern in the organization’s list, and in this article, we discuss Azure’s Managed Identities service inside the cloud service provider (CSP) to tackle the said web application issue.
Managing system and user identities
Managed Identities for Azure allows users to authenticate certain services available within the CSP. This is done by providing the cloud application a token used for service authentication. We distinguish between two types of managed identities: system-assigned identities and user-assigned identities. To differentiate, system-assigned identities are restricted from one to the resource, which means that different user roles can’t be applied to the same resource. On the other hand, user-managed identities solve this problem and we can imagine them as user roles.
Figure 1. Usage of Managed Identities
For instance, we want to use an Azure storage account within a serverless application for saving our application records. For this purpose, we decided to use a system-managed identity.
This practically means:
Enable managed identities inside a serverless function
Grant serverless functions the necessary permissions for storage account access
Figure 2. Enabling managed identities in a serverless function
After that, we can start using the managed identity for authentication to the storage account. In the following sections, we will look at how the managed identities interface is technically implemented within the serverless environment and the corresponding security implications based on our recent research.
Managing identities in the serverless environment
To make it work, the serverless environment runs a special .NET application process named “dotnet TokenServiceContainer.dll.” This process listens on a localhost and port 8081 to accept HTTP requests. The endpoint for requesting a token is http://localhost:8081/msi/token, and the required parameters specifies that the API version used and resource identifier for which the service requests the token. Optionally, it uses “client_id,” which is a parameter used when a managed user identity token is requested. The request also needs a specific X-IDENTITY-HEADER, and the needed value is present inside IDENTITY_HEADER or an MSI_SECRET environmental variable.
After receiving this token request, the request is delegated to the endpoint within the CSP (another service) and provides the requested token. The endpoint is publicly available and is a part of the *.identity.azure.net subdomain based on the region of the serverless application. By design and public access to the endpoint the service requires authentication, and this is done using a X509 client certificate. This certificate is unique to the specific application ID (meaning the serverless function has a one-to-one pairing of certificate and app ID) and valid for 180 days. If the request is successful, it returns a JSON response with a bearer token valid for one day.
From that perspective, the security standard is high, which is expected from a CSP service. However, there is one hidden danger and that is the certificate itself. The certificate can be leaked by leaking environmental variables.
The Managed Service Identity (MSI) certificate is part of the encrypted container context, which can be accessed inside using a URL-specified CONTAINER_START_CONTEXT_SAS_URI and decrypted using the CONTAINER_ENCRYPTION_KEY variable. Once the certificate is leaked, it can be used to obtain the token outside the scope of CSP services and successfully used for publicly available service endpoints as it would be called from the CSP service.
Threat model and scenario
Figure 4. PoC of getting token using leaked environmental variables from Managed Identity service
At this point, we should emphasize that to be able to abuse the retained token, a certain factor (or malicious actor) must first leak these environmental variables and there must be an assigned role within the requested resource, the pre-requisites being the identities enabled and the role set for the application. This means there are no default roles unless explicitly specified within the CSP settings.
However, as this example of potential compromise shows from a gap leaking environmental variables of a Linux endpoint, using environmental variables for storing sensitive information is not a valid secure approach as they are by default inherited into the child process. Considering that the information is available inside the environment itself and that the certificate contains all the information provided, the endpoint for getting the token now becomes publicly available. A threat actor can get the authentication token outside of the CSP’s service and get all the permissions as the original user.
In this example, the token provider service within the serverless environment is running under a different user. Why is the client certificate available not only for this user in the form of a file with permissions only for that user? This allows a compromised serverless function to leak it and obtain the access token from the external service. But while the unauthorized user can’t get additional privileges other than what the function has, this is enough to conduct activities inside the environment that can have a range of damaging effects. By moving a client certificate into the security boundary of token service user and setting access permissions for the token service user as read-only, we guarantee that even in case of a compromise, the client certificate could not be leaked and used outside the CSP service without additional lateral movement.
The security chain is only as strong as its weakest parts. And while CSP services are not inherently insecure, small design weaknesses put together with improper user configurations could lead to bigger, more damaging consequences. Design applications, environments, and all their related variables with security in mind. If possible, avoid using environmental variables. Following best security practices such as applying the principle of least privilege helps to mitigate the consequences of a breach.
In this report, we highlight the notable email threats of 2021, including over 33.6 million high-risk email threats (representing a 101% increase from 2020’s numbers) that we’ve detected using the Trend Micro Cloud App Security platform.
Email is an integral cog in the digital transformation machine. This was especially true in 2021, when organizations found themselves trying to keep business operations afloat in the middle of a pandemic that has forever changed how people work. At a time when the workplace had already largely shifted from offices to homes, malicious actors continued to favor email as a low-effort yet high-impact attack vector to disseminate malware.
Email is not only popular among cybercriminals for its simplicity but also for its efficacy. In fact, 74.1% of the total threats blocked by Trend Micro in 2021 are email threats. Meanwhile, the 2021 Internet Crime Report by the FBI’s Internet Crime Complaint Center (IC3) states that there was “an unprecedented increase in cyberattacks and malicious cyber activity” last year, with business email compromise (BEC) being among the top incidents.
In this report, we discuss the notable email threats of 2021 based on the data that we’ve gathered using the Trend Micro™ Cloud App Security™, a security solution that supplements the preexisting security features in email and collaboration platforms.
Malware detections surge as attacks become more elaborate, targeted
The Trend Micro Cloud App Security solution detected and thwarted a total of 3,315,539 total malware files in 2021. More urgently, this number represents an increase of a whopping 196% from 2020’s numbers. There were also huge spikes in both known and unknown malware detections in 2021 at 133.8% and 221%, respectively.
Cybercriminals worked overtime to attach malware in malicious emails in 2021 using advanced tactics and social engineering lures. In January, we saw how Emotet sent spam emails that used hexadecimal and octal representations of IP addresses for detection evasion in its delivery of malware such as TrickBot and Cobalt Strike.
In May last year, we reported on Panda Stealer, an information stealer that targets cryptocurrency wallets and credentials via spam emails. We also shared an update on APT-C-36 (aka Blind Eagle), an advanced persistent threat (APT) group targeting South American entities using a spam campaign that used fraudulent emails impersonating Colombia’s national directorate of taxes and customs and even fake infidelity email lures.
QAKBOT operators also resumed their spam campaign in late 2021 after an almost three-month hiatus and abused hijacked email threads to lead victims to both QAKBOT and the SquirrelWaffle malware loader.
Meanwhile, ransomware detections continued to decline in 2021, a consistent trend that we have been seeing in previous years. Last year, the Trend Micro Cloud App Security solution detected and blocked 101,215 ransomware files — a 43.4% decrease compared to 2020’s detections.
The reason behind this continuing decline is possibly two-fold: One, unlike legacy ransomware that focuses on the quantity of victims, modern ransomware focuses on waging highly targeted and planned attacks to yield bigger profits. Since today’s ransomware actors no longer abide by the spray-and-pray ransomware model, the number of attacks are no longer as massive as the number that we witnessed in ransomware’s early days. We identified the other reason in our year-end roundup report: That is, it’s possible that ransomware detections are down because our cybersecurity solutions continue to block an increasing number of ransomware affiliate tools each year, including TrickBot and BazarLoader. This could have prevented ransomware attacks from being successfully executed on victim environments.
Known, unknown, and overall credential phishing attacks rose in 2021
Based on Trend Micro Cloud App Security data, 6,299,883 credential phishing attacks were detected and blocked in 2021, which accounts for a 15.2% overall increase. Similar to last year, the number of known credential phishing attacks is greater than the unknown ones. However, this year, the percentage of increase is at a staggering 72.8%.
When comparing 2020 and 2021’s numbers, we saw an 8.4% increase in the number of detections for known credential phishing links, while a 30% growth is observed in the number of detections for unknown credential phishing links.
Abnormal Security noted the increase in overall credential phishing attacks in one 2021 report and stated that credential phishing is attributed to 73% of all advanced threats that they’ve analyzed.
We have also documented the rise in credential phishing attacks from previous years. In fact, in the first half of 2019, the Trend Micro Cloud App Security solution detected and blocked 2.4 million credential phishing attacks alone.
BEC’s small numbers bring big business losses
The Trend Micro Cloud App Security solution intercepted a total of 283,859 BEC attacks in 2021. Compared with 2020’s BEC detections, this number represents a 10.61% decrease. Interestingly, there is an 82.7% increase in this year’s BEC attacks that were detected using Writing Style DNA, while there is a 38.59% decrease in attacks that have been blocked using the antispam engine.
Overall, BEC numbers have consistently been on a downward trend since 2020. But the reduction in BEC victims doesn’t equate to a dip in cybercriminal profits. According to the FBI’s IC3, BEC accounted for US$2.4 billion in adjusted losses for both businesses and consumers in 2021. According to the same organization, BEC losses have reached over US$43 billion between June 2016 and December 2021 for both domestic and international incidents.
We have also observed how BEC actors continuously tweak their tactics for ill gain. In August last year, our telemetry showed a gradual increase in BEC detections. Upon investigation, we discovered that instead of impersonating company executives and upper management personnel, this BEC-related email campaign impersonated and targeted ordinary employees for money transfers and bank payroll account changes.
Covid-19 lures, cybercriminal campaigns behind massive jump in phishing numbers
The Trend Micro Cloud App Security solution data shows that a total of 16,451,166 phishing attacks were detected and blocked in 2021. This is a 137.6% growth from 2020’s phishing numbers.
In contrast to last year’s numbers, we saw a significant jump in phishing attacks detected via spam count this year — a whopping 596% increase, to be specific. Meanwhile, we observed a notable 15.26% increase in credential phishing count compared to last year.
These high numbers reflect organizations’ sentiments about phishing attacks. According to a survey in an Osterman Research report titled “How to Reduce the Risk of Phishing and Ransomware,” organizations were “concerned” or “extremely concerned” about phishing attempts making their way to end users and employees failing to spot phishing and social engineering attacks before accessing a link or attachment.
While they kicked off majority of Covid-19-related phishing emails and sites in 2020, cybercriminals still exploited the global pandemic for financial gain. Last year, Mexico-based medical laboratory El Chopo shared that a fraudulent website that looked identical to the company’s had been launched. On that website, users could schedule a vaccination appointment after paying MXN2,700 (approximately US$130). To make the fake website appear credible, the malicious actors behind it added fake contact information such as email addresses and social media pages that victims can use for inquiries.
Early last year, we reported on a wave of phishing emails that pretended to be coming from national postal systems. This campaign attempted to steal credit card numbers from 26 countries. We also investigated a spear-phishing campaign that used Pegasus spyware-related emails to lead victims into downloading a file stealer. This campaign targeted high-ranking political leaders, activists, and journalists in 11 countries.
Protect emails, endpoints, and cloud-based services and apps from attacks with Trend Micro Cloud App Security
Organizations should consider a comprehensive multilayered security solution such as Trend Micro Cloud App Security. It supplements the preexisting security features in email and collaboration platforms like Microsoft 365 and Google Workspace (formerly known as G Suite) by using machine learning (ML) to analyze and detect any suspicious content in the message body and attachments of an email. It also acts as a second layer of protection after emails and files have passed through Microsoft 365 or Gmail’s built-in security.
Trend Micro Cloud App Security uses technologies such as sandbox malware analysis, document exploit detection, and file, email, and web reputation technologies to detect malware hidden in Microsoft 365 or PDF documents. It provides data loss prevention (DLP) and advanced malware protection for Box, Dropbox, Google Drive, SharePoint Online, OneDrive for Business, and Salesforce while also enabling consistent DLP policies across multiple cloud-based applications. It also offers seamless integration with an organization’s existing cloud setup, preserving full user and administrator functionality, providing direct cloud-to-cloud integration through vendor APIs, and minimizing the need for additional resources by assessing threat risks before sandbox malware analysis.
Trend Micro Cloud App Security stands on the cutting edge of email and software-as-a-service (SaaS) security, offering ML-powered features that combat two of the primary email-based threats: BEC and credential phishing. Writing Style DNA can help determine if an email is legitimate by using ML to check a user’s writing style based on past emails and then comparing suspicious emails against it. Computer vision, on the other hand, combines image analysis and ML to check branded elements, login forms, and other site content. It then pools this information with site reputation elements and optical character recognition (OCR) to check for fake and malicious sites — all while reducing instances of false positives to detect credential phishing email.
This security solution also comes with an option to rescan historical URLs in users’ email metadata and perform continued remediation (automatically taking configured actions or restoring quarantined messages) using newer patterns updated by Web Reputation Services.
This is a significant option since users’ email metadata might include undetected suspicious or dangerous URLs that have only recently been discovered. The examination of such metadata is thus an important part of forensic investigations that help determine if your email service has been affected by attacks. This solution also officially supports the Time-of-Click Protection feature to protect Exchange Online users against potential risks when they access URLs in incoming email messages.
Trend Micro Cloud App Security also comes with the advanced and extended security capabilities of Trend Micro XDR, providing investigation, detection, and response across your endpoints, email, and servers.
Today, there is no question that IT admins are busier than ever, juggling multiple tasks and responsibilities. These include managing and administering Exchange email services, both on-premises and in the cloud. Exchange Online is an extremely popular solution for organizations to host mail services as many businesses have migrated email and file storage to the public cloud. PowerShell is a great scripting language that allows admins to make the best use of their time by automating common tasks and day-to-day activities.
Why use PowerShell?
Before considering PowerShell specifically in the context of Exchange Online, why should admins consider using PowerShell in general? Today, PowerShell has quickly become one of the most popular and fully-featured scripting languages. Many software vendors are developing and releasing their own PowerShell modules, allowing admins to control, configure, and manage many different solutions across the board with the familiar PowerShell syntax.
IT admins, especially Windows admins, are familiar with PowerShell as version 1.0 was released in 2006 for Windows Server 2003, Windows XP SP2, and Windows Vista. In addition, Windows PowerShell is included in modern Windows Server and client operating systems, with the newer PowerShell Core as an optional download.
PowerShell is both familiar and understandable for many admins, given its verb-noun constructs and very human-readable syntax. However, even for non-developers, writing simple PowerShell one-liner scripts can significantly reduce the number of manual tasks performed daily.
PowerShell is also very extensible. As mentioned, third-party software vendors can write their own PowerShell snap-ins and modules to integrate into the PowerShell framework, allowing PowerShell to be customized to work with many different software solutions. Third-party vendors are not the only ones that have extensively used Powershell modules and cmdlets. Most modern Microsoft software and cloud solutions have their own PowerShell modules, allowing for seamless automation, including configuration and management.
What is Exchange Online (EXO)?
Microsoft Exchange Online (EXO) is a hosted unified messaging solution that provides email, calendaring, contacts, and task management from a wide range of devices. Exchange Online is a modern counterpart to the traditional Exchange on-premises solutions organizations have used for decades. In addition, Exchange Online can leverage modern Microsoft technologies, including Azure Active Directory. With Exchange Online’s Azure integration, organizations have the tools needed to support the modern hybrid workforce worldwide.
Exchange Online is the email component included in an Office 365 or Microsoft 365 subscription. However, you can purchase Exchange Online services without the other components of Office/Microsoft 365. With Exchange Online, you retain control over the messaging services offered to your users.
Microsoft Exchange Online PowerShell
Exchange Online includes the ability to administer, configure, and manage your Exchange Online environment using PowerShell. In addition, Exchange Online Powershell provides many robust cmdlets allowing administrators to automate many common tasks.
The Exchange Online PowerShell V2 module is the latest iteration and release of the Exchange Online module and provides modern features, such as the ability to work with multi-factor authentication (MFA). With MFA, organizations can greatly bolster the security of their PowerShell sessions by requiring more than one authentication factor, such as a one-time code delivered via an authenticator app or text message.
Automated Configuration and Benefits of Exchange Online PowerShell
IT admins may ask why they would want to use PowerShell instead of simply using the GUI that is familiar and does most of what they way to do. When performing specific tasks one time or only a few times during a day on one object, the GUI tools are well suited to carry out these tasks and are quite efficient at carrying out a single job or a few tasks in an ad-hoc way. However, there are multiple reasons why you would use PowerShell instead of the Exchange Online GUI management tools. These include:
Bulk operations
Data filtering
Data piping
Bulk operations
GUI management tools do not scale well when dealing with tasks that may need to be performed on multiple users or other objects. Also, what if you need to carry out specific tasks on hundreds of objects on a schedule? GUI management tools are not suited for doing this. For example, can you imagine manually changing an attribute on hundreds of Exchange Online users through the GUI? It would be extremely time-consuming and not very efficient.
When needing to perform bulk operations on multiple objects, PowerShell is much better suited at doing this than the Exchange Online GUI. For example, when manually changing values and attributes on an object numerous times through a GUI, there is a high likelihood a mistake can be made. However, if you use PowerShell to make the changes, the actions are repeated precisely each time the code updates the object, eliminating mistakes due to human error.
Making changes using a PowerShell script on hundreds of users might take minutes or less, whereas making the same changes manually through the GUI might take hours. It can save many hours and manual labour for low-level administrative tasks.
Data filtering
One of the powerful reasons to use PowerShell with Exchange Online is the data filtering capabilities of PowerShell. Powershell is a powerful object-oriented scripting language that can pull out objects and filter data in ways that may not be available in the Exchange Online Management GUI.
When you think about it, GUI tools only allow filtering by the specific criteria built into the GUI tool or management console. If the specific filter you need is not available, you can’t see the information in the way you need it displayed. In addition, GUI tools generally do not provide IT admins with the filtering and data extraction capabilities of command-line tools and scripting languages.
With the filtering capabilities built into PowerShell for Exchange Online, IT admins can query and filter data as needed. PowerShell is an object-oriented scripting language that can return various data objects. For example, let’s say you want to get the archivestatus attribute from all your user mailboxes. You could do that with a simple PowerShell one-liner as follows:
get-mailbox | select name, archivestatus
With Exchange Online PowerShell, getting the value of any mailbox attribute is the same as following this simple syntax shown above. Now, things get more interesting by piping returned values and data into other PowerShell cmdlets.
Data piping
Another powerful capability of data filtering with PowerShell is to take the data returned from a data query with a filter and then pipe the return into another PowerShell command. This simple feature contained natively in PowerShell allows querying for specific matching objects such as mailboxes and then doing something with those returned objects, such as running another Exchange Online PowerShell cmdlet on them.
A very simple example of piping your return data into another PowerShell cmdlet is a simple “out-file” cmdlet. It allows you to export your returned data to a simple text file.
But, you can do anything you want with the pipe from a get-mailbox, get-user, or other PowerShell “get” command. You can think of the workflow like this: you are querying for a specific list of objects that match the filter criteria you have specified and then take that set of matching objects and then feed these into another PowerShell cmdlet.
Manually Configuring Exchange Online PowerShell
To get started using Exchange Online PowerShell cmdlets, you need first to install the required PowerShell modules to work with Exchange Online PowerShell. The Exchange Online PowerShell module is part of several modules that fall under the umbrella of services contained in Microsoft 365. As mentioned earlier, the Exchange Online service can be purchased as a standalone product or included with the mail services offered by Microsoft 365.
Each of the Microsoft 365 services has its own PowerShell modules, including:
Azure Active Directory (Azure AD)
Exchange Online
SharePoint Online
Skype for Business Online
Teams
If you are explicitly working with Exchange Online (EXO), two modules are needed to interact with the low-level Azure AD user objects and the Exchange Online mailboxes:
Azure Active Directory (Azure AD) PowerShell – Allows querying the Azure Active Directory environment users, attributes, etc
Exchange Online PowerShell – Allows querying and performing critical tasks at the mailbox level for users with Exchange Online mailboxes
Let’s see how to install both of these PowerShell modules for specifically interacting with Exchange Online via PowerShell.
Azure Active Directory (Azure AD)
First, we are going to install the AzureAD PowerShell module. As a note. It does not matter if you install the AzureAD module first or the ExchangeOnline module. To install the module, run the following cmdlet:
Install-Module AzureAD
Accept the warning message displayed regarding the untrusted repository by typing “Y.” Learn more about AzureAD PowerShell module cmdlet reference here: AzureAD Module | Microsoft Docs.
Installing AzureAD PowerShell module using Windows Terminal
Installing Exchange Online PowerShell Module
Now, installing the Exchange Online PowerShell module is the same process. To install the Exchange Online Powershell module, run the following cmdlet:
Install-Module ExchangeOnlineManagement
Installing the ExchangeOnlineManagement PowerShell module
Accept the warning message displayed regarding the untrusted repository by typing “Y.” For details on using the Exchange Online Management PowerShell, look at Microsoft’s Exchange Online PowerShell documentation here: Exchange Online PowerShell | Microsoft Docs.
Allowing all of the features of Exchange Online to PowerShell
By default, all accounts you create in Microsoft 365 can connect to and use Exchange Online PowerShell. However, IT admins can use Exchange Online PowerShell to enable or disable a user’s ability to use Exchange Online PowerShell in the environment.
As a security note, just because a user can connect to Exchange Online PowerShell, it does not give them administrator access. A user’s permissions in Exchange Online are defined by the built-in role-based access control (RBAC) used by Exchange Online.
Using the Exchange Online PowerShell cmdlets shown below, Exchange administrators can enable or disable users’ access to Exchange Online PowerShell.
To enable or disable for multiple users based on a user attribute, you can also use the filtering and piping features discussed above with Exchange Online PowerShell. To enable Exchange Online Powershell for users with a specific Title, like “Manager,” you can do the following:
Connecting to Exchange Online PowerShell with Basic Authentication
If you search for connecting to Exchange Online PowerShell, you will see reference to basic authentication and modern authentication. To follow best practices, don’t attempt to use Basic Authentication any longer. All organizations at this point need to be switching to modern authentication with MFA enabled.
There is an additional reason. Microsoft is deprecating Basic Authentication access to Exchange Online on October 1, 2022. With this announcement, starting on October 1, 2022, they will begin disabling Basic Authentication for Outlook, EWS, RPS, POP, IMAP, and EAS protocols in Exchange Online. SMTP Auth will also be disabled if it is not being used. Read the official announcement here.
If you want to use the older Exchange Online Remote connection using Basic Authentication, you can view those instructions from Microsoft here. Again, note this method will be deprecated later this year.
Connecting to Exchange Online PowerShell with Modern Authentication
To connect to Exchange Online, use the Exchange Online PowerShell V2 module (installation shown above) to connect to your Exchange Online environment. The EXO PowerShell V2 module uses modern authentication and works with multi-factor authentication (MFA) for securing your Exchange Online PowerShell environment.
To connect to your Exchange Online environment, you need to import the ExchangeOnlineManagement module and then use the Connect-ExchangeOnline cmdlet.
Import-Module ExchangeOnlineManagement
Connect-ExchangeOnline -ShowProgress $true
Connecting to Exchange Online using the Connect-ExchangeOnline cmdlet
It will bring up the login box to log into your Office/Microsoft 365 account. It allows taking advantage of the MFA configured for the account, etc.
Logging into Exchange Online with the Exchange Online PowerShell management module
The Top 10 Most Common Tasks in Exchange Online PowerShell
Now that we have installed the Exchange Online PowerShell module, what are some common tasks we can accomplish using Exchange Online PowerShell? Let’s take a look at the following:
Getting Migration information
Getting mailboxes
Viewing mailbox statistics
Increasing deleted items retention
Enable Mailbox Audit Logging
Identify inactive mailboxes
Identify mailboxes enabled with forwarding
Setting mailbox autoreply configuration
Assigning roles to users
Identifying ActiveSyncDevices
1. Getting Migration Information
You may be migrating users from one Exchange Server, such as on-premises, to another Exchange Server (Exchange Online). The Get-MigrationUser cmdlet is a great command to check the status of a migration batch used to migrate user batches.
One of the most basic tasks an Exchange admin needs to carry out is getting information about mailboxes. The most basic cmdlet to use for this use case is the Get-Mailbox cmdlet. The Get-Mailbox cmdlet is generally used with piping into other cmdlets to pull mailboxes meeting specific filters and then performing configuration on the mailboxes queried with the Get-Mailbox cmdlet.
Using the Get-Mailbox cmdlet to get mailbox information in Exchange Online
3. Viewing mailbox statistics
A common task of Exchange admins is keeping an eye on the size of mailboxes in the environment, so these do not become unwieldy. Using the Get-MailboxStatistics cmdlet allows getting the size information, the number of messages it contains, and the last time it was accessed.
Get-MailboxStatistics -identity <username>
Using the Get-MailboxStatistics cmdlet in Exchange Online to get mailbox information
4. Increasing deleted items retention
By default, Exchange Online is configured to retain deleted items for 14 days. However, this limit can be increased easily for users using the Exchange Online PowerShell module cmdlet Set-Mailbox.
The Set-Mailbox cmdlet allows configuring many aspects of the user mailbox in Exchange Online
5. Enable Mailbox Audit Logging
Even though audit logging is on by default for all organizations in Microsoft 365, only users with E5 licenses will return mailbox audit log events in audit log searches. If you want to retrieve audit log events for users without an E5 license, PowerShell is a great way to do that. You can use the Exchange Online PowerShell cmdlet one-liner:
Getting the last logon time using Exchange Online PowerShell
7. Identify mailboxes enabled with forwarding
What if you want to identify mailboxes enabled with a forwarding address as these have not been documented? You can easily do this with another useful Exchange Online PowerShell one-liner:
Get-mailbox -ResultSize Unlimited| where {$_.ForwardingAddress -ne $Null} | select DisplayName,ForwardingAddress
8. Setting mailbox autoreply configuration
A user may forget to set their autoreply configuration. If they go away on vacation or if there is a need to set the autoreply on a user mailbox for other reasons, you can easily accomplish this using PowerShell. It eliminates the need to log in as that user and do this interactively in Outlook.
To do this, you can use the Set-MailboxAutoReplyConfiguration cmdlet. It allows setting both an internal message and an external message for the mailbox.
Setting autoreply messages using PowerShell
9. Manage roles for groups
Using the New-ManagementRoleAssignment cmdlet, you can assign a management role to a management role group, management role assignment policy, user, or universal security group.
New-ManagementRoleAssignment -Role “Mail Recipients” -SecurityGroup “Tier 2 Help Desk”
Assigning management roles using the New-ManagementRoleAssignment cmdlet
10. Identifying ActiveSync Devices
Identifying and seeing ActiveSync Devices in use in the organization can easily be accomplished with Exchange Online PowerShell using the Get-MobileDevice cmdlet.
Getting mobile devices paired with Exchange Online Users
To properly protect your Hyper-V virtual machines, use Altaro VM Backup to securely backup and replicate your virtual machines. We work hard perpetually to give our customers confidence in their Hyper-V backup strategy.
To keep up to date with the latest Hyper-V best practices, become a member of the DOJO | Hyper-V now (it’s free).
The Future is Automated
Many organizations are now migrating and hosting their mail services in the cloud. Exchange Online provides businesses with a great way to host their mail services in Microsoft’s cloud infrastructure, either as a standalone subscription or part of their Office/Microsoft 365 subscription.
While Exchange admins can undoubtedly use the GUI management tools for daily tasks, Exchange Online PowerShell provides a great way to automate and carry out everyday tasks much more quickly, efficiently, and using automation. The Exchange Online PowerShell module is easy to install. In addition, it provides quick time to value by allowing Exchange admins to easily query and configure multiple objects in their Exchange Online environments.
Used in automated processes, Exchange Online PowerShell allows Exchange admins to carry out tasks consistently and in a way that helps to eliminate human error from mundane low-level tasks.
A new phishing campaign has been targeting U.S. organizations in the military, security software, manufacturing supply chain, healthcare and pharmaceutical sectors to steal Microsoft Office 365 and Outlook credentials.
The operation is ongoing and the threat actor behind it uses fake voicemail notifications to lure victims into opening a malicious HTML attachment.
Campaign overview
According to researchers at cloud security company ZScaler, the recently discovered campaign shares tactics, techniques, and procedures (TTPs) with another operation analyzed in mid-2020.
The threat actors leverage email services in Japan to route their messages and spoof the sender’s address, making it look like the emails come from an address belonging to the targeted organization.
Email headers(Zscaler)
The email has an HTML attachment that uses a music note character in the naming to make it appear as if the file is a sound clip. In reality, the file contains obfuscated JavaScript code that takes the victim to a phishing site.
Message used in the phishing campaign(Zscaler)
The URL format follows an assembly system that considers the targeted organization’s domain to make it appear as if the site is a legitimate subdomain.
Phishing domain naming scheme(Zscaler)
The redirection process first takes the victim to a CAPTCHA check, which is designed to evade anti-phishing tools and increases the illusion of legitimacy for the victims.
Typical CAPTCHA step on phishing site(Zscaler)
The CAPTCHA check was also used in a 2020 campaign that ZScaler’s ThreatLabZ researchers analyzed and it continues to be an effective middle step that helps increase the phishing success rate.
Once the users pass this step, they are redirected to a genuine-looking phishing page that steals Microsoft Office 365 accounts.
The final destination of the redirections is a phishing page(Zscaler)
Those careful enough would notice that the domain of the login page doesn’t belong to Microsoft or their organization and is one of the following:
briccorp[.]com
bajafulfillrnent[.]com
bpirninerals[.]com
lovitafood-tw[.]com
dorrngroup[.]com
lacotechs[.]com
brenthavenhg[.]com
spasfetech[.]com
mordematx[.]com
antarnex[.]com
This is why before submitting, or even before starting to type their username and password, users should always check and confirm they are on a real login portal and not a fake one.
Typically, recipients are logged into the account, which should make suspicious a request to log in once more to listen to the voicemail.
Voicemail-themed phishing using HTML attachments has been used since at least 2019, but it is still effective, especially with careless employees.
A webmail application enables organizations to host a centralized, browser-based email client for their members. Typically, users log into the webmail server with their email credentials, then the webmail server acts as a proxy to the organization’s email server and allows authenticated users to view and send emails.
With so much trust being placed into webmail servers, they naturally become a highly interesting target for attackers. If a sophisticated adversary could compromise a webmail server, they can intercept every sent and received email, access password-reset links, and sensitive documents, impersonate personnel and steal all credentials of users logging into the webmail service.
This blog post discusses a vulnerability that the Sonar R&D team discovered in Horde Webmail. The vulnerability allows an attacker to fully take over an instance as soon as a victim opens an email the attacker sent. At the time of writing, no official patch is available.
Impact
The discovered code vulnerability (CVE-2022-30287) allows an authenticated user of a Horde instance to execute arbitrary code on the underlying server.
The vulnerability can be exploited with a single GET request which can be triggered via Cross-Site-Request-Forgery. For this, an attacker can craft a malicious email and include an external image that when rendered exploits the vulnerability without further interaction of a victim: the only requirement is to have a victim open the malicious email.
The vulnerability exists in the default configuration and can be exploited with no knowledge of a targeted Horde instance. We confirmed that it exists in the latest version. The vendor has not released a patch at the time of writing.
Another side-effect of this vulnerability is that the clear-text credentials of the victim triggering the exploit are leaked to the attacker. The adversary could then use them to gain access to even more services of an organization. This is demonstrated in our video:
In the following sections, we go into detail about the root cause of this vulnerability and how attackers could exploit it.
Background – Horde Address Book configuration
Horde Webmail allows users to manage contacts. From the web interface, they can add, delete and search contacts. Administrators can configure where these contacts should be stored and create multiple address books, each backed by a different backend server and protocol.
The following snippet is an excerpt from the default address book configuration file and shows the default configuration for an LDAP backend:
As can be seen, this LDAP configuration is added to an array of available address book backends stored in the $cfgSources array. The configuration itself is a key/value array containing entries used to configure the LDAP driver.
CVE-2022-30287 – Lack of type checking in Factory class
When a user interacts with an endpoint related to contacts, they are expected to send a string identifying the address book they want to use. Horde then fetches the corresponding configuration from the $cfgSources array and manages the connection to the address book backend.
The following code snippet demonstrates typical usage of this pattern:
The code snippet above shows how the parameter $source is received and passed to the create() method of the Turba_Factory_Driver. Turba is the name of the address book component of Horde.
Things start to become interesting when looking at the create() method:
turba/lib/Factory/Driver.php
 51     public function create($name, $name2 = '', $cfgSources = array())
 52     {
 53     // …
 57         if (is_array($name)) {
 58             ksort($name);
 59             $key = md5(serialize($name));
 60             $srcName = $name2;
 61             $srcConfig = $name;
 62         } else {
 63             $key = $name;
 64             $srcName = $name;
 65             if (empty($cfgSources[$name])) {
 66                 throw new Turba_Exception(sprintf(_("The address book \"%s\" does not exist."), $name));
 67             }
 68             $srcConfig = $cfgSources[$name];
 69         }
On line 57, the type of the $name parameter is checked. This parameter corresponds to the previously shown $source parameter. If it is an array, it is used directly as a config by setting it to $srcConfig variable. If it is a string, the global $cfgSources is accessed with it and the corresponding configuration is fetched.
This behavior is interesting to an attacker as Horde expects a well-behaved user to send a string, which then leads to a trusted configuration being used. However, there is no type checking in place which could stop an attacker from sending an array as a parameter and supplying an entirely controlled configuration.
Some lines of code later, the create() method dynamically instantiates a driver class using values from the attacker-controlled array:
With this level of control, an attacker can choose to instantiate an arbitrary address book driver and has full control over the parameters passed to it, such as for example the host, username, password, file paths etc.
Instantiating a driver that enables an attacker to execute arbitrary code
The next step for an attacker would be to inject a driver configuration that enables them to execute arbitrary code on the Horde instance they are targeting.
We discovered that Horde supports connecting to an IMSP server, which uses a protocol that was drafted in 1995 but never finalized as it was superseded by the ACAP protocol. When connecting to this server, Horde fetches various entries. Some of these entries are interpreted as PHP serialized objects and are then unserialized.
The following code excerpt from the _read() method of the IMSP driver class shows how the existence of a __members entry is checked. If it exists, it is deserialized:
turba/lib/Driver/Imsp.php
223   if (!empty($temp['__members'])) {
224      $tmembers = @unserialize($temp['__members']);
225   }
By default, Horde blocks any images in HTML emails that don’t have a data: URI. An attacker can bypass this restriction by using the HTML tags <picture> and <source>. A <picture> tag allows developers to specify multiple image sources that are loaded depending on the dimensions of the user visiting the site. The following example bypasses the blocking of external images:
At the time of writing, no official patch is available. As Horde seems to be no longer actively maintained, we recommend considering alternative webmail solutions.
Timeline
Date
Action
2022-02-02
We report the issue to the vendor and inform about our 90 disclosure policy
2022-02-17
We ask for a status update.
2022-03-02
Horde releases a fix for a different issue we reported previously and acknowledge this report.
2022-05-03
We inform the vendor that the 90-day disclosure deadline has passed
Summary
In this blog post, we described a vulnerability that allows an attacker to take over a Horde webmail instance simply by sending an email to a victim and having the victim read the email.
The vulnerability occurs in PHP code, which is typically using dynamic types. In this case, a security-sensitive branch was entered if a user-controlled variable was of the type array. We highly discourage developers from making security decisions based on the type of a variable, as it is often easy to miss language-specific quirks.
Amplification attacks are one of the most common distributed denial of service (DDoS) attack vectors. These attacks are typically categorized as flooding or volumetric attacks, where the attacker succeeds in generating more traffic than the target can process, resulting in exhausting its resources due to the amount of traffic it receives.
In this blog, we start by surveying the anatomy and landscape of amplification attacks, while providing statistics from Azure on most common attack vectors, volumes, and distribution. We then describe some of the countermeasures taken in Azure to mitigate amplification attacks.
DDoS amplification attacks, what are they?
Reflection attacks involve three parties: an attacker, a reflector, and a target. The attacker spoofs the IP address of the target to send a request to a reflector (e.g., open server, middlebox) that responds to the target, a virtual machine (VM) in this case. For the attack to be amplified the response should be larger than the request, resulting in a reflected amplification attack. The attacker’s motivation is to create the largest reflection out of the smallest requests. Attackers achieve this goal by finding many reflectors and crafting the requests that result in the highest amplification.
Figure 1. Reflected amplification attack
The root cause for reflected amplification attacks is that an attacker can force reflectors to respond to targets by spoofing the source IP address. If spoofing was not possible, this attack vector would be mitigated. Lots of effort has thus been made on disabling IP source address spoofing, and many organizations prevent spoofing nowadays so that attackers cannot leverage their networks for amplification attacks. Unfortunately, a significant number of organizations still allow source spoofing. The Spoofer project shows that a third of the IPv4 autonomous systems allow or partially allow spoofing.
UDP and TCP amplification attacks
Most attackers utilize UDP to launch amplification attacks since reflection of traffic with spoofed IP source address is possible due to the lack of proper handshake.
While UDP makes it easy to launch reflected amplification attacks, TCP has a 3-way handshake that complicates spoofing attacks. As a result, IP source address spoofing is restricted to the start of the handshake. Although the TCP handshake allows for reflection, it does not allow for easy amplification since TCP SYN+ACK response is not larger than TCP SYN. Moreover, since the TCP SYN+ACK response is sent to the target, the attacker never receives it and can’t learn critical information contained in the TCP SYN+ACK needed to complete the 3-way handshake successfully to continue making requests on behalf of the target.
Figure 2. Reflection attack in TCP
In recent years, however, reflection and amplification attacks based on TCP have started emerging.
Independent research found newer TCP reflected amplification vectors that utilize middleboxes, such as nation-state censorship firewalls and other deep packet inspection devices, to launch volumetric floods. Middleboxes devices may be deployed in asymmetric routing environments, where they only see one side of the TCP connection (e.g., packets from clients to servers). To overcome this asymmetry, such middleboxes often implement non-compliant TCP stack. Attackers take advantage of this misbehavior – they do not need to complete the 3-way handshake. They can generate a sequence of requests that elicit amplified responses from middleboxes and can reach infinite amplification in some cases. The industry has started witnessing these kinds of attacks from censorship and enterprise middle boxes, such as firewalls and IDPS devices, and we expect to see this trend growing as attackers look for more ways to create havoc utilizing DDoS as a primary weapon.
Carpet bombing is another example of a reflected amplification attack. It often utilizes UDP reflection, and in recent years TCP reflection as well. With carpet bombing, instead of focusing the attack on a single or few destinations, the attacker attacks many destinations within a specific subnet or classless inter-domain routing (CIDR) block (for example /22). This will make it more difficult to detect the attack and to mitigate it, since such attacks can fly below prevalent baseline-based detection mechanisms.
Figure 3. Carpet bombing attack
One example of TCP carpet bombing is TCP SYN+ACK reflection, where attacker sends spoofed SYN to a wide range of random or pre-selected reflectors. In this attack, amplification is a result of reflectors that retransmit the TCP SYN+ACK when they do not get a response. The amplification of the TCP SYN+ACK response itself may not be large, and it depends on the number of retransmissions sent by the reflector. In Figure 3, the reflected attack traffic towards each of the target virtual machines (VMs) may not be enough to bring them down, however, collectively, the traffic may well overwhelm the targets’ network.
UDP and TCP amplification attacks in Azure
In Azure, we continuously work to mitigate inbound (from internet to Azure) and outbound (from Azure to internet) amplification attacks. In the last 12 months, we mitigated approximately 175,000 UDP reflected amplification attacks. We monitored more than 10 attack vectors, where the most common ones are NTP with 49,700 attacks, DNS with 42,600 attacks, SSDP with 27,100 attacks, and Memcached with 18,200 attacks. These protocols can demonstrate amplification factors of up to x4,670, x98, x76 and x9,000 respectively.
Figure 4. UDP reflected amplification attacks observed from April 1, 2021, to March 31, 2022
We measured the maximum attack throughput in packets per second for a single attack across all attack vectors. The highest throughput was a 58 million packets per second (pps) SSDP flood in August last year, in a short attack campaign that lasted 20 minutes on a single resource in Azure.
Figure 5. Maximum pps recorded for a single attack observed from April 1, 2021, to March 31, 2022
TCP reflected amplification attacks are becoming more prevalent, with new attack vectors discovered. We encounter these attacks on Azure resources utilizing diverse types of reflectors and attack vectors.
One such example is a TCP reflected amplification attack of TCP SYN+ACK on an Azure resource in Asia. Attack reached 30 million pps and lasted 15 minutes. Attack throughput was not high, however there were approximately 900 reflectors involved, each with retransmissions, resulting in a high pps rate that can bring down the host and other network infrastructure elements.
Figure 6. TCP SYN+ACK amplification attack volume on an Azure resource in Asia
We see many TCP SYN+ACK retransmissions associated with the reflector that doesn’t get the ACK response from the spoofed source. Here is an example of such a retransmission:
The retransmitted packet was sent 60 seconds after the first.
Mitigating amplification attacks in Azure
Reflected amplification attacks are here to stay and pose a serious challenge for the internet community. They continue to evolve and exploit new vulnerabilities in protocols and software implementations to bypass conventional countermeasures. Amplification attacks require collaboration across the industry to minimize their effect. It is not enough to mitigate such attacks at a certain location, with a pinpoint mitigation strategy. It requires intertwining of network and DDoS mitigation capabilities.
Azure’s network is one of the largest on the globe. We combine multiple DDoS strategies across our network and DDoS mitigation pipeline to combat reflected amplification DDOS attacks.
On the network side, we continuously optimize and implement various traffic monitoring, traffic engineering and quality of service (QoS) techniques to block reflected amplification attacks right at the routing infrastructure. We implement these mechanisms at the edge and core of our wide area networks (WAN) network, as well as within the data centers. For inbound traffic (from the Internet), it allows us to mitigate attacks right at the edge of our network. Similarly, outbound attacks (those that originate from within our network) will be blocked right at the data center, without exhausting our WAN and leaving our network.
On top of that, our dedicated DDoS mitigation pipeline continuously evolves to offer advanced mitigation techniques against such attacks. This mitigation pipeline offers another layer of protection, on top of our DDoS networking strategies. Together, these two protection layers provide comprehensive coverage against the largest and most sophisticated reflected amplification attacks.
Since reflected amplification attacks are typically volumetric, it is not only enough to implement advanced mitigation strategies, but also to maintain a highly scalable mitigation pipeline to be able to cope with the largest attacks. Our mitigation pipeline can mitigate more than 60Tbps globally, and we continue to evolve it by adding mitigation capacity across all network layers.
Different attack vectors require different treatment
UDP-based reflected amplification attacks are tracked, monitored, detected, and mitigated for all attack vectors. There are various mitigation techniques to combat these attacks, including anomaly detection across attacked IP addresses, L4 protocols, and tracking of spoofed source IPs. Since UDP reflected amplification attacks often create fragmented packets, we monitor IP fragments to mitigate them successfully.
TCP-based reflected amplification attacks take advantage of poor TCP stack implementations, and large set of reflectors and targets, to launch such attacks. We adopt our mitigation strategies to be able to detect and block attacks from attackers and reflectors. We employ a set of mitigations to address TCP SYN, TCP SYN+ACK, TCP ACK, and other TCP-based attacks. Mitigation combines TCP authentication mechanisms that identify spoofed packets, as well as anomaly detection to block attack traffic when data is appended to TCP packets to trigger amplification with reflectors.
Figure 7. Amplification attack detection
Get started with Azure DDoS Protection to protect against amplification attacks
Azure’s DDoS mitigation platform mitigated the largest ever DDoS attacks in history by employing a globally distributed DDoS protection platform that scales beyond 60Tbps. We ensure our platform and customers’ workloads are always protected against DDoS attacks. To enhance our DDoS posture, we continuously collaborate with other industry players to fight reflected amplification attacks.
Azure customers are protected against Layer 3 and Layer 4 DDoS attacks as part of protecting our infrastructure and cloud platform. However, Azure DDoS Protection Standard provides comprehensive protection for customers by auto-tuning the detection policy to the specific traffic patterns of the protected application. This ensures that whenever there are changes in traffic patterns, such as in the case of flash crowd event, the DDoS policy is automatically updated to reflect those changes for optimal protection. When a reflected amplification attack is launched against a protected application, our detection pipeline detects it automatically based on the auto-tuned policy. The mitigation policy, that is automatically set for customers, without their need to manually configure or change it, includes the needed countermeasures to block reflected amplification attacks.
Protection is simple to enable on any new or existing virtual network and does not require any application or resource changes. Our recently released Azure built-in policies allow for better management of network security compliance by providing great ease of onboarding across all your virtual network resources and configuration of logs.
To strengthen the security posture of applications, Azure’s network security services can work in tandem to secure your workloads, where DDoS protection is one of the tools we provide. Organizations that pursue zero trust architecture can benefit from our services to achieve better protection.
If you’re looking to offer a more affordable (and easier to build) solution for a client’s business, online portfolio, and much more, you may want to consider a one-page WordPress website.
One-page websites are simple, popular and — when built on Managed WordPress — easy for nearly anyone to maintain.
However, dialing in the one-page design isn’t always a simple task for website designers, especially when you’re used to taking on larger or more complex projects. Luckily you’ve come to this post. Here, we look at tips to help create a solid one-page website design. Here’s what we’ll cover:
Determine whether one page is enough
Create a strategy for content
Build an anchor menu for easy navigation
Understand the audience
Make scrolling easier
Make the website mobile-friendly
Develop strong CTAs
Avoid large text blocks
Optimize for search engines
Include social media accounts
Be creative with the contact block
Why a one-page WordPress website?
One-page website designs have gained increased popularity among business owners and web designers because they’re simple, easy and trendy. But while one-page websites are ideal for different types of business, they are not a one-fits-all solution.
Before settling on a one-page website, ensure it is ideal for your client. You may want to create a one-page website if they don’t have a lot of content or many different elements. A single-page website may be ideal for clients who:
Want to create an online portfolio or personal website
Sell a few products or services
Have one-time events such as conferences and weddings
Need a campaign-specific landing page
On the other hand, a one-page WordPress website may not be ideal, for example, if their content is complex or they sell lots of different products or services with tons of information.
Tips for creating a one-page WordPress website
Less is more in design, and web design is not an exception. After all, the fewer pages a site has, the more it will be appealing to visitors. A good one-page design will communicate a story effectively, promote a brand and drive conversions.
However, that doesn’t mean that creating a one-page WordPress website is a simple task. Without the right gameplan, you may end up with a single page that isn’t attractive and doesn’t serve your marketing purposes.
To that end, here are steps to follow for a perfect one-page website design:
Determine whether one page is enough
Before you take any step, it’s best to determine whether the situation calls for one page or a classic website. Depending on the type of client you’re helping, one kind of website might be better than another — you need to weigh the options to determine which type of website will work.
As stated earlier, a one-page WordPress website should have a simple yet robust design that is user friendly. It often displays only a small amount of text but more images.
Due to its long scrolling design, you have the option to be creative and decide the order in which content appears.
One-page website design offers a good user experience. Since the content appears in a linear fashion, visitors won’t get lost in multiple pages. These sites also render well on mobile and tablets, and are easy to maintain.
A classic website comes with a homepage alongside other pages, often services, a contact page, and FAQ. The main advantage of a classic web design over a one page is that it allows you to display tons of content about products or services.
With the classic design, you get the option to display each piece of content on a dedicated page, allowing more thorough descriptions. But if you decide that a one-page WordPress website is best, move to the next step.
Create a strategy for content
The first step to creating a one-page WordPress website is to plan out content. One page allows you to control the order in which content appears. The idea is to ensure the order is both logical and intuitive.
Be careful with what you place above the fold or what the visitor sees before scrolling down the site. Ideally, the main message should entice visitors.
Like any other website, a one-page WordPress website could include an about section, services and products, more about the offering, an FAQ section, CTAs, a photo gallery and contact information.
How you prioritize this content will determine how effective the one-page design will be. Remove unnecessary information to keep content as simple and organized as possible.
Build an anchor menu for easy navigation
Unlike a classic website (where each item links to a page of its own), a one-page WordPress website menu links to a different section of the same page. As a result, you need to build an anchor menu to link each section.
These are three important steps to help create an anchor menu for a good one-page design:
Create an anchor — An anchor will help users navigate to a particular part of your one-page design. While some templates come with built-in anchors, there’s usually an option to rename, move or delete them.
Link anchors to the menu — Linking the site’s menu to anchors makes it easier for visitors to go to a specific section. The idea is to select the corresponding section to attach an anchor to, which will help in the navigation.
Create a menu order — Linking the menu to anchors isn’t enough. You should ensure the order in the menu corresponds to the order of section. Single-page website designs involve a lot of scrolling. As such, ensure that the menu is always visible by freezing it. Fortunately, this is easily achievable via plugins such as WP Floating Menu.
Understand the audience
When it comes to a one-page WordPress website, you have only one page to display many sections. That’s why it is important to identify gaps in every section and fill those gaps to improve user experience and overall site performance.
Analyzing which sections have gaps and making the necessary changes is paramount. To achieve this, you need to group your visitors based on location, demographics, source, behaviors, devices they use, and other such criteria.
You can collect this data for clients if you install proper analytic tools like Google Analytics on the site. Ensure that you have everything set up to get required data and determine the metric to track.
Tracking user behavior for a classic website with multiple pages is straightforward. But things get rather complicated when it comes to a single-page website.
Luckily, free tools like Google Tag Manager will help track activities on a one-page website. This tool will enable you to track different actions on the site and provide more insights regarding the needs and expectations of a target audience.
Make scrolling easier
A one-page WordPress website involves a lot of scrolling. Don’t make visitors keep scrolling down the site to find what they are looking for — make it as simple as possible.
A scroll-top button (yep, there are plugins for that) and anchor links make navigation easier and fast. You may also want to use parallax scrolling (make the background move a different speed from the foreground content) to keep your users engaged when scrolling until they find what they are looking for.
No matter how creative you want to be with navigation, you shouldn’t ignore usability. After all, visitors are real humans, so ensure they can easily find the content they need.
Make the website mobile-friendly
People spend more time on smartphones or tablets than desktops. You may also have heard about mobile-first indexing, where Google considers the mobile version of the content for indexing and ranking.
As a result, ensure the website is functional and looks as good on mobile as desktop. Adapting to the mobile version shouldn’t cause headaches if you use a readymade CMS like WordPress.
Develop strong CTAs
Strong CTAs for the one-page WordPress website are essential. This command phrase, such as “Buy Now” or “Sign Up,” takes the form of a button or hyperlink to increase sales or conversion.
To get the most from a CTA, it needs to:
Be logical, intuitive and concise
Encourage visitors to take action
Unique from other graphical elements
Placed at strategic places for users’ view
Once you have CTA content, link the button to an anchor to make it easy for visitors to navigate a particular section.
Avoid large text blocks
Having too much text on one page can hurt conversions. After all, users expect as brief a chain of actions as possible (e.g. visit > see what you need > take the required action).
Imagine if, during the second step, there’s tons of text for the user to read.
Include only the information that directs users to a CTA, and presents it in a brief and straightforward manner. If you have a lot of information to share with users, create a separate blog and link it to a unique place on the website.
Optimize for search engines
The need for search engine optimization for any website cannot be overstated. When it comes to a one-page WordPress website, you only have one page to rank for several keywords, and you have fewer things to optimize than a classic website.
However, this doesn’t mean that you cannot optimize the single-page website. Yes, it may be a bit challenging, but it’s possible. That said, here are things to remember when optimizing a one-page website:
Improve page speed
Page speed refers to the time it takes to display a page content fully. In our case, this is the time it takes to display one page of website content.
A significant number of visitors will leave a page that takes more than three seconds to load.
And if your website loads slowly, Google and other search engines will consider it to have a bad user experience. That’s why you need to analyze your site loading speed and optimize it.
Luckily, Google has a free tool to help analyze your website speed. To analyze your website, go to PageSpeed Insights and enter the URL. This tool will help analyze how a site performs on both desktop and mobile devices.
Once you get insights into what is slowing down the website, try to resolve all errors to improve website speed.
Optimize each section for SEO
Treat each section of the one-pager as a separate page and optimize it for SEO. The idea here is to ensure that each section of your one-page website has a heading tag to tell what the section is all about.
Next, optimize each section for the primary and related keywords. You also need to optimize text blocks for those keywords and include alt texts in images.
Ensure content is fresh and relevant
Content is king, but only if it’s fresh and relevant for an audience and search engines. Content is not static. To keep up with the ever-changing Google algorithms, pitch content updates to your client so the website can rank higher on SERPs.
Include social media accounts
Social media can provide a perfect way to improve an online presence. As such, connect your client’s Instagram, Facebook, and LinkedIn profiles with their one-page WordPress website to help improve traffic to the site.
One way to achieve this is by adding an Instagram feed. Doing this will provide an opportunity to share the latest photos of your client’s business with visitors.
Another perfect way to incorporate social media profiles into the website is to place icons for all business social media accounts. Users will see these elements as they scroll the website, providing a perfect way to further interact with a business.
Be creative with the contact block
Last but not least, make sure visitors can easily find contact information on the site. That said, consider placing phone numbers, email addresses, blogs, and social media links in a separate block at the top of the site.
The idea is to ensure that users will not need to scroll to the bottom to see contact information. After all, this can be troublesome, especially if the site has many media components that can load slowly when there’s a poor internet connection.
Closing thoughts on the one-page WordPress website
Creating a one-page WordPress website has many benefits, including better SEO potential, it’s faster and easier to maintain, intuitive to use, and easy to organize. Once you determine that a single website is best for your client, the above tips will help you get a perfect one-pager going.
Wondering how to improve your website’s SEO and increase web traffic fast? There are plenty of actionable steps you can take today. Most don’t even require a web developer or coding knowledge to get started.
Below we’ll review 12 best practises you can easily work into your business plans to help you:
Rank higher in search engines
Grow your audience
Attract more leads
We’ll also give you tips on how GoDaddy can help you on your journey, plus share plenty of free resources you can refer to along the way.
1. Optimize your URLs
Optimizing your URLs is a good way to improve SEO quickly. It’s something that takes little effort but can help boost your rankings when done right. Here are a few best practices to look out for.
Screenshot of Page Title editor inside GoDaddy Website Builder.
Go for shorter URL titles
When it comes to URLs, you want to keep them short and compelling. Shorter URLs are often easier to remember, which makes them more shareable and higher ranking. Make sure your URL is free of fluff words (like “and” or “for”) and easy to understand.
Note: GoDaddy’s Website Builder automatically optimizes your URL title for you by limiting it to 25 characters. Simply type in your URL title into the designated text box for “Page Title” and you’re done. It also fills in any spaces with hyphens following web convention.
Include primary keywords
Adding a primary keyword to your URL is another best practice for optimization and should also be applied to your:
Meta title: This is the blue header in the search engine results page
Meta description: This is the copy that sits beneath the meta title
On-page title: This is the actual title of your work at the top
Aim for placing your keyword closer to the beginning of your URL title for optimal results.
Keep it relevant
URLs should also be relevant to the content you’re displaying on that specific page. Keeping them aligned with the page copy allows Google’s search bots to easily understand and identify the information for search queries.The more relevant your information is to a search query, the higher it ranks on Google.
Think about how relevant it will be for future use. You don’t want it to be overly specific that it becomes less relevant over time.
For example, you can make a URL more applicable for future use if you avoid adding a specific year at the end. Peek the following URL endings to see how they contrast.
Instead of a URL that ends in: .com/best-fathers-day-gifts-2022
Go for something like: .com/best-fathers-day-gifts
If other websites link to your page, the URL without the year enables that page to keep hold of any authority and associated rankings in the future.
Screenshot of URL title settings inside GoDaddy Website Builder.
A note on changing URL titles
Editing your URL title is an option using GoDaddy’s Website Builder, but it’s not recommended you make any changes when dealing with older existing pages.
Changing an existing URL can hurt your SEO and result in decreased traffic, since it’s likely you have backlinks attached to the post you’re trying to change. This means that anytime someone finds the old link through a partnering site or newsletter, they might end up at the dead link instead.
Unless you really need to for rebranding purposes, it’s best you avoid this route to prevent any damage to you SEO.
2. Optimize metadata
Screenshot showing where to write a meta title and meta description inside GoDaddy Website Builder.
The term “metadata” comes up a lot when researching how to improve SEO quickly. It refers to the data on a webpage that provides Google with information about a particular site. In other words, it’s data that describes other data.
By itself, metadata won’t affect SEO rankings. But it can help in the following areas:
Boost engagement
Increase click-through rates
Give you the upper edge over your competitors
It’s a small piece of the SEO puzzle that is often overlooked but can be beneficial when combined with other best practices. Let’s look at two ways to improve your meta data below.
Meta descriptions
Meta descriptions appear in the search results page underneath the meta title. It often gives a quick snippet of what the web page is about and typically includes a call to action (CTA) to encourage more clicks.
Examples of these CTAs could look like:
“Shop now”
“Schedule an appointment”
“Click here to read more”
As noted earlier, you’ll want to include a primary keyword within the description and keep the copy to 155 characters or less. The primary keyword will also appear in bold anytime it matches a searcher’s query.
Meta titles
The meta title (aka title tag) is the text shown in large blue font in the search engine results page. It’s often the first thing searchers will see and can sometimes be confused with the H1 tag.
However, the meta title and H1 tag are two separate things.
The meta title is named with SEO and Google in mind, while an H1 tag is more for the user’s benefit. A lot of times digital marketers will use the same title for both the meta title and H1 tag to cause less confusion for users.
When naming your meta title, you should always:
Screenshot of meta title editor inside GoDaddy Website Builder.Include a primary keyword at the start. An exception should be made for well-known brands or local businesses who should add their business name to the start.
Accurately describe what’s on page. Make sure you showcase what people want to see and use actionable words that’ll generate more clicks.
Ensure each title tag is unique. Look at competitors for ideas but don’t copy. Keep it short and sweet like: Tall Men’s Clothing | Tall Jeans, Pants & Coats | ABC.
Keep it to 65 characters or less. This includes spaces, so avoid going over if you don’t want search engines to automatically truncate it for you. Title tags may be rewritten by Google if it thinks there’s a more suitable one for the searcher’s query. If you need to test the length, you can use free online tools like this meta title counter to help you.
Editing the meta title and meta description is easy using GoDaddy’s Website Builder. Simply use the editor and go to the page you need optimized. Click on Settings (cog symbol) and then select Get Found on Google to edit what you need.
3. Check your speed
An important element of improving SEO is speed. The time it takes for your webpage to load will affect whether your users stay to engage or bounce back in search of something better.
Between July and August 2021, Google rolled out a measure of core web vitals (CWV) to help website owners evaluate their overall page performance.
Here’s a quick breakdown of each one for reference:
Largest contentful paint (LCP): This refers to the largest block of text, video, or visuals that take up the most amount of time to load after a user clicks on your site.
First input delay (FID): This is the amount of time it takes for a browser to respond to a user’s first interaction on your site (typically when they click on a link or tap on a button).
Cumulative layout shift (CLS): This has to do with any layout shifts your user be experiencing as they interact with your page. Too many unexpected shifts could result in a bad user experience if left unchecked.
One best practice is to score below 1.3 seconds when reaching the First Byte. This means that the overall responsiveness and speediness of your website should fall within this time frame after a user clicks onto your site from a search query.
How to optimize your CWV score
Rankings are affected by a CWV score, so it’s best to aim high in good rankings to increase web traffic.
Google’s search advocate, John Mueller, noted in a recent YouTube discussion that if a site had lost or gained traffic steadily over the period of the CWV roll out, then it was likely related to the website’s CWV score.
GoDaddy’s Website Builder scores nearly 68% in good CWV rankings and outperforms most other competitors. It’s a great option to consider if you’re looking for low-hassle performance speed on your site. Plus, it includes other fool-proof elements like SSL certificates and more.
GoDaddy scores higher than other competitors when it comes to Google’s CWV rankings.
For non-GoDaddy sites, your biggest priority is to minimize image sizes before uploading to your site. Try using an image compressor to cut down on load time and apply a lazy loading plugin if you have a WordPress site. This will display all images below the fold only when the user scrolls down.
4. Find the right keywords for your content
Improving SEO means creating content Google can easily comprehend. That’s why optimizing with keywords helps. It allows Google bots to decipher what your page is about so that it can provide relevant results to search queries.
Let’s take a look at some best practices for keyword usage.
How to choose the best keywords
When creating content for your site, try to think of phrases and terms your target audience may be typing into a search query. For example, if you’re a retailer that specializes in kid’s clothing, you could aim for keywords like:
Toddler girl dresses for spring
Zipper onesies for baby boys
Activewear for boys and girls
Keep an eye on your competitors and note how they utilize their keywords for search queries.
It’s important to know the keywords your competitors are ranking for that you are not.
Let these findings guide you when deciding what keywords to create for your own content. Ensure your version is better optimized and more informative to win the upper edge.
Where to include primary keywords
Here are other areas where you should include primary keywords throughout your text:
Each page on your site: Include a primary keyword for every 60 – 150 words in each of your posts. Ensure they sound natural and avoid keyword stuffing to prevent Google from penalizing you.
On-page title: Make sure each page on your website has a primary keyword within the on-page title at the top.
First 100 words of every page: Include a primary keyword in your opening paragraph for each post. The sooner you introduce it, the better.
It’s also best to add a secondary keyword that’s similar in meaning to your primary keyword. This provides Google with extra information (or clues) to what your page is about.
Example of how a page title is automatically marked up as H1 tags for SEO using GoDaddy Website Builder, despite the over-sized font on the page.
Editor’s Note: GoDaddy’s website builder automatically assigns your primary keyword as a required H1 header tag in the backend, so there’s no extra coding necessary for you. This makes things easier any time you want to adjust the font size or style. Simply edit as you go.
Keyword length
When it comes to keyword length, there are two things to remember:
Short keywords with a large volume are harder to rank for and are more competitive
Longer keyword phrases with three to five words are easier to rank for and are less competitive
Let’s imagine you run a clothing shop. Instead of choosing a generalized keyword like “T-shirts,” you can opt for something more specific like “cruelty-free vegan T-shirts.” The competition for the longer phrase is lower and has a better chance at ranking higher on Google.
Duplicate keywords
On a similar note, you want to avoid including the same keywords and phrases on multiple pages of your website. This is known as keyword cannibalization and could lead users to the wrong page when they enter your site from a search query. It’s also not good for bounce-back rates.
The same goes for duplicate content. Try to avoid creating posts that are similar in topic, since this could confuse the search engine bots.
An example would be targeting “divorce lawyer near Los Angeles” on one page and “how to find a divorce lawyer near me” on another. The angles are too similar for Google to recognize the difference.
Helpful tools and resources
To help you optimize strategically, you can use the following tools when deciding which keywords to go for:
Google’s Keyword Planner: This is a tool for finding keywords that many digital marketers tend to utilize – especially in advertising. But you don’t need to be an advertiser to use it. Anyone can sign up for free and use it for insight on keyword search volume.
KWFinder: If you’re looking for a tool with more advanced features, try KWFinder. It offers a free trial and helps you find keywords that are easy to rank for.
Keyword Tool: Ecommerce store owners can find extra ideas using predictive search tools like this one. It gives you free keyword search suggestions for Amazon, eBay and more.
Remember, it’s best to avoid using keywords that have volumes in the highest and lowest categories. Refer to these tools any time you need help.
5. Write for your audience
Developing content that improves SEO quickly should be centred around your audience first and foremost.
You need to know who you are trying to target before you begin writing posts for your website.
This will allow you to create content that is genuinely helpful to potential customers visiting your site. It’s also something Google will reward you for in rankings and will lead users to CTAs that apply to:
Purchases
Email sign-ups
Inquiries and more
When drafting content for your site, you should note that there are two main categories to consider:
Standard pages and blog posts: These typically consist of informational content. A standard page should have a minimum of 300 words, while a blog post should have 700 or more.
Ecommerce product pages: Ecommerce pages focus more on product details. The recommended word count for these pages should range between 120-200 words.
Let’s discuss them even further to help you better understand why both are important for improving SEO.
Pages and blog posts
Pages and blog posts provide informational content to users but differ in the type of content displayed. Pages are more static and don’t often need updating (like About Me or Contact pages), while blog posts provide constant updates to queries that are relevant to your product or service.
Google ranks all web pages according to a mixture of:
Relevancy for the searcher
Value of content on a page
The page’s uniqueness
A website’s overall authority
Authority takes time and is something you earn as your audience grows. It’s not something you can control right away. But optimizing the other categories can help you achieve authority success down the line.
Dwell time
Google rewards websites with higher rankings if searchers stick around for a while (aka dwell time).
To increase dwell time, owners should write for their prospective customer and not for Google.
Write as if you are encouraging a friend to take the next step with your business offer. Use words that inspire and provide informative content that helps users with pain points.
Ecommerce product pages
Ecommerce pages provide users with information about your product or service, but also convinces them to follow-through with a purchase.
Example of product page description with 156 words on an ecommerce site.
Many ecommerce sites miss out on visibility due to lack of content, which makes it hard to rank.
A general recommendation to improve SEO is to start by optimizing product and service pages first. You can do this by:
Using long-tail keywords: This helps increase opportunities in competitive spaces and even converts better with keywords that are low in search volume. It’s better to have a small increase in web traffic and sales, rather than none.
Hitting the 120-200 minimum word count: Do this for all products in your online catalogue and avoid writing beyond this range. Writing too much could be a distraction to the potential sale.
Uploading enticing images: Try to aim for at least three images per product, including one that shows it in use. You might also consider adding product-specific text to images that highlight dimensions and special features.
Avoid copying manufacturer descriptions: Google will consider this duplicate content and you’ll end up taking a hit to your SEO.
Blogging is the most efficient way to increase web traffic online. They serve many purposes but are often used for informational content. Even Airbnb and Paypal use blog posts to attract visitors to their site.
Here are just a few ways blogs can improve SEO rankings for your site:
Drive organic traffic to your site: Incorporating long tail keywords into your posts can help bring new users into your site via Google.
Increase dwell time: Posts that have engaging content will keep users on your site longer.
Boost authority: Informational posts are often picked up by other sites who want to linkback to your site as a source.
Focus on quality over volume
When it comes to blog content, you want to ensure your posts offer users valuable information that’s helpful and relevant.Don’t post articles for the sake of filling up space on your site.
Instead, aim to solve customer problems by answering common questions they might have.
For example, a wedding planner might write a long form article titled “What does a wedding planner do?” to address a common query users search for.
Remember to focus on one primary keyword per blog post and scatter it throughout the text naturally. Combining words like “How”, “What” and “Why” with your keyword will make it sound more helpful for users and Google alike.
Ensure your posts are easy to read
You can make readability more convenient for your users by:
Using short sentences
Keeping paragraphs concise
Optimizing images for quicker page loads
This will allow users to quickly scan the text for information they need. Plus, it makes it easier for Google bots to crawl you site for ranking purposes.
Another best practise is to highlight important information by:
It’s also useful for ecommerce sites to include links to priority products and category pages on relevant blog posts. Just remember to make it sound natural and not too spammy.
Continue to audit older posts
Do revisit your old blog posts on a regular basis and update or extend them when possible. Google hates inactive dusty sites and will reward sites with fresh new content.
Don’t forget that your blog posts must also include a title tag and meta description. Be sure you include your keywords in the meta data and that it is up-to-date with Google’s standards.
Images are the second-most popular way to search online. They help users find what they’re looking for and serve as a visual guide in their buying journey.
But if you’re not optimizing your images before uploading, you might be missing out on valuable SEO rankings.
A couple of good ways you can improve SEO using images is so to:
Include alt text: Alt text (aka image alt or alt attributes) helps search engines understand what the image is about. It also helps with accessibility for users with screen readers and displays when browsers can’t process images correctly.
Compress images: This helps boost your on-page loading speed and can be done using Photoshop or by using a site like TingPNG before uploading.
Optimizing for both areas will make it easier for Google to crawl and decipher your site. But if you need a little more help with alt text, read the section below.
Key notes for writing alt text
Despite the latest advances in technology, search engine crawlers can’t see images like humans do. They must rely on the accompanying alt text to help them out.
One best practice for alt text is to keep it simple. These descriptions are meant be short and should include 125 characters or less (including spaces). There’s no need for gimmicks or extra filler worlds like “this is an image of …” Simply describe what the image is about in the most direct way possible.
Screenshot showing where to add image alt text inside GoDaddy Website Builder.
For example, the alt text for the image above could be, “Close up of someone holding a pair of glasses.”
Image optimization made easy
GoDaddy’s Website Builder makes it easy to edit alt text on images. Simply click on an image insider the editor and write your alt text in the box designated for “Image description.”
You can also use GoDaddy’s Website Builder to automatically compress your images, along with any other large files you may have already uploaded.
8. Is your site mobile friendly?
Making your site mobile-friendly is an important factor for Google rankings. It’s a primary reason why mobile-first indexing was created and adds to the overall convenience for users on-the-go.
Users should be able to experience your website on a mobile or tablet device the same way they do on a desktop.
It needs to be easily accessible without needing to pinch or squeeze to view your content.
Google’s Mobile-Friendly tool is a great way to test your website when optimizing for mobile devices. Or if you don’t want to hassle with checking yourself, GoDaddy’s Website Builder has standard built-in mobile responsiveness.
9. Submit your sitemap
A sitemap helps search engines crawl your website and index it faster. It consists of a file that contains all the URLs on your page, plus metadata that shows each one’s importance and the date they were last updated.
If you’re not using GoDaddy or a content management system (CMS) like WordPress, you’ll need to create one using a tool like XML sitemap generator.
Submitting your sitemap to Google is the last step in this process. You can do this by logging into your Google Search Console (GSC) account and entering it in the “Sitemaps” tab in the side bar.
Backlinko has a great step-by-step guide if you need extra help importing your sitemap link into your account.
10. Experiment with backlinking
Sometimes other websites will link to your site when they want to refer to you as a source of information. This is considered backlinking and it helps boost your authority when Google notices they are coming from relevant and reputable websites.
Another tactic is to partner with other websites in your industry and guest blog on their site. This allows you to share your expertise with similar audiences so that you can backlink and gain new leads.
It also helps to include links to other relevant blogs on your site whenever you find valuable information you can share with your audience.
Local businesses can make use of additional opportunities in search engines with things like Google My Business (GMB). This allows brick and mortar or service businesses to reach local audiences in the surrounding area through rich search results.
In other words, your business can have a dedicated profile with Google that appears any time someone submits a query for relevant businesses in their area. It typically includes things like:
Your website’s URL address
Photos that highlight your business or services
Customer reviews and more
All of this info can be optimized to improve SEO and there are plenty of other distinct things to do to increase website’s traffic locally. You can find more information about local SEO with this handy guide from our blog.
12. Measure your success
Google Analytics (GA) is a free tool for monitoring website traffic from any source. Many digital marketers use it to collect insight on:
Target audiences
Website performance
Ad campaigns
However, it can be a bit intimidating if you’ve never used it before. GA contains a wide variety of reports and data that take time learning how to navigate.
It can also be a challenge to set it up, since it requires a bit of coding knowledge to get started.
To make things easier, GoDaddy’s Website Builder integrates with Google Search Console to track search engine performance for you. It also provides technical SEO suggestions to help improve your website.
Most GoDaddy Website Builder plans show traffic insights you can access within your account.
Most plans for GoDaddy’s Website Builder also include a simplified window inside the platform for essential organic performance. This makes is so there’s no need to log in anywhere else until you’re ready for more advanced steps. It’s a great launching point for beginners interested in learning more about GA.
If you want to have a competitive edge in today’s online marketplace, you need to ensure your business is ranking on search engines. The best way to do that is to improve SEO on your site, so that search bots can crawl it and easily determine what your site is about.The more SEO-friendly your site is, the higher it’ll rank in search queries.
Users with GoDaddy’s Website Builder have the upper hand since it includes built-in benefits like:
Standardized mobile optimization
Automatic XML sitemaps that don’t need to be maintained
SSL certificate with HTTPS for data encryption
Access to Google Search Console
You also get the added benefit of 24/7 support in case you need extra help determining your next move. And you can even opt for additional plans (like GoDaddy’s SEO Services) to help boost your online presence even more.
Remember, improving SEO for your site is all about time and dedication. Now’s the time to jump in and capitalize on opportune moments that get your business noticed online.
The world moves fast sometimes. Just two years ago, organizations were talking vaguely about the need to transform digitally, and ransomware began to make headlines outside the IT media circle. Fast forward to 2022, and threat actors have held oil pipelines and critical food supply chains hostage, while many organizations have passed a digital tipping point that will leave them forever changed. Against this backdrop, CISOs are increasingly aware of running disjointed point products’ cost, operational, and risk implications.
That’s why Trend Micro is transforming from a product- to a platform-centric company. From the endpoint to the cloud, we’re focused on helping our customers prepare for, withstand, and rapidly recover from threats—freeing them to go further and do more. Analysts seem to agree.
Unprecedented change
The digital transformation that organizations underwent during the pandemic was, in some cases, unprecedented. It helped them adapt to a new reality of remote and now hybrid working, supply chain disruption, and rising customer expectations. The challenge is that these investments in cloud infrastructure and services are broadening the corporate attack surface. In many cases, in-house teams are drowning in new attack techniques and cloud provider features. This can lead to misconfigurations which open the door to hackers.
Yet even without human error, there’s plenty for the bad guys to target in modern IT environments—from unpatched vulnerabilities to accounts protected with easy-to-guess or previously breached passwords. That means threat prevention isn’t always possible. Instead, organizations are increasingly looking to augment these capabilities with detection and response tooling like XDR to ensure incidents don’t turn into large-scale breaches. It’s important that these tools are able to prioritize alerts. Trend Micro found that as many as 70% of security operations (SecOps) teams are emotionally overwhelmed with the sheer volume of alerts they’re forced to deal with.
SecOps staff and their colleagues across the IT function are stretched to the limit by these trends, which are compounded by industry skills shortages. The last thing they need is to have to swivel-chair between multiple products to find the right information.
What Gartner says
Analyst firm Gartner is observing the same broad industry trends. In a recent report, it claimed that:
Vendors are increasingly divided into “platform” and “portfolio” providers—the latter providing products with little underlying integration
By 2025, 70% of organizations will reduce to a maximum of three the number of vendors they use to secure cloud-native applications
By 2027, half of the mid-market security buyers will use XDR to help consolidate security technologies such as endpoint, cloud, and identity
Vendors are increasingly integrating diverse security capabilities into a single platform. Those which minimize the number of consoles and configuration planes, and reuse components and information, will generate the biggest benefits
The power of one
This is music to our ears. It is why Trend Micro introduces a unified cybersecurity platform, delivering protection across the endpoint, network, email, IoT, and cloud, all tied together with threat detection and response from our Vision One platform. These capabilities will help customers optimize protection, detection, and response, leveraging automation across the key layers of their IT environment in a way that leaves no coverage gaps for the bad guys to hide in.
There are fewer overheads and hands-on decisions for stretched security teams with fewer vendors to manage, a high degree of automation, and better alert prioritization. Trend Micro’s unified cybersecurity platform vision also includes Trend Micro Service One for 24/7/365 managed detection, response, and support—to augment in-house skills and let teams focus on higher-value tasks.
According to Gartner, the growth in market demand for platform-based offerings has led some vendors to bundle products as a portfolio despite no underlying synergy. This can be a “worst of all worlds,” as products are neither best-of-breed nor do they reduce complexity and overheads, it claims.
We agree. That’s why Trend Micro offers a fundamentally more coherent platform approach. We help organizations continuously discover an ever-changing attack surface, assess risks and then take streamlined steps to mitigate that risk—applying the right security at the right time. That’s one vision, one platform, and total protection.


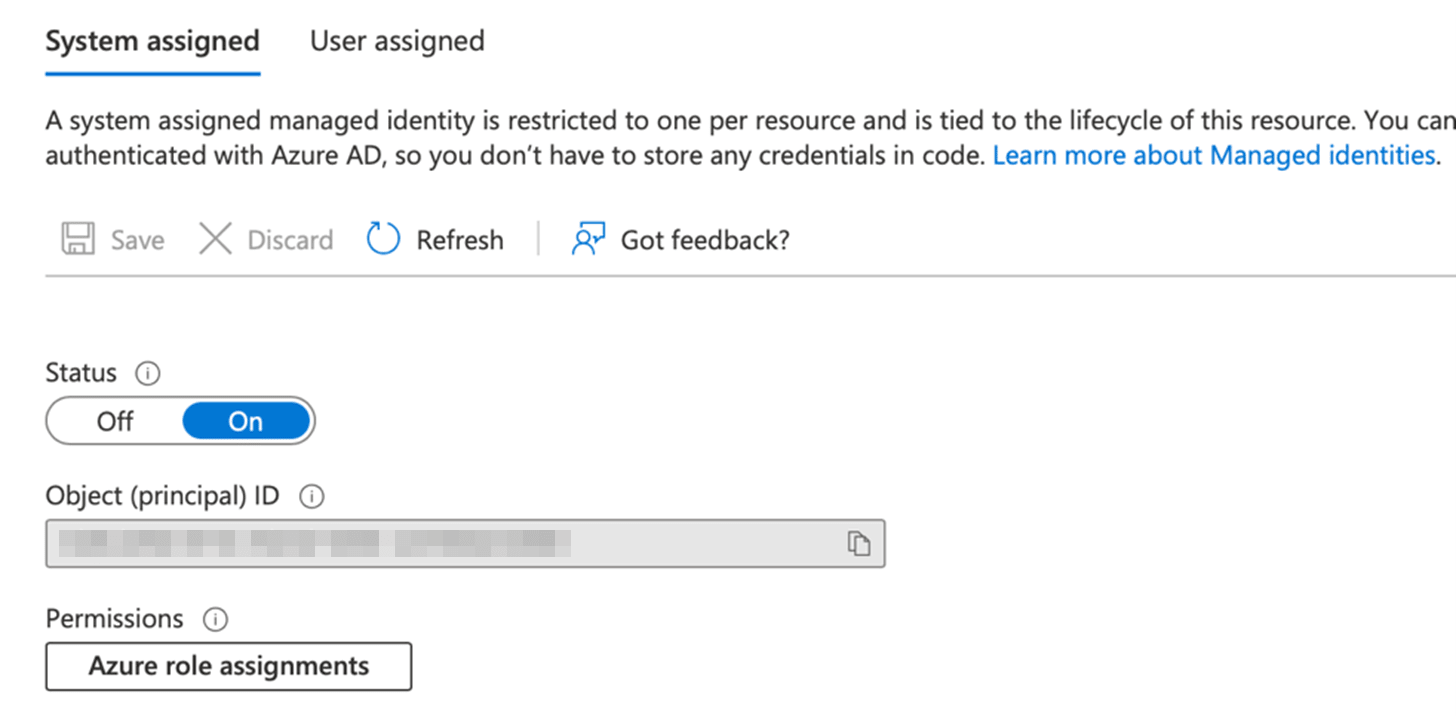
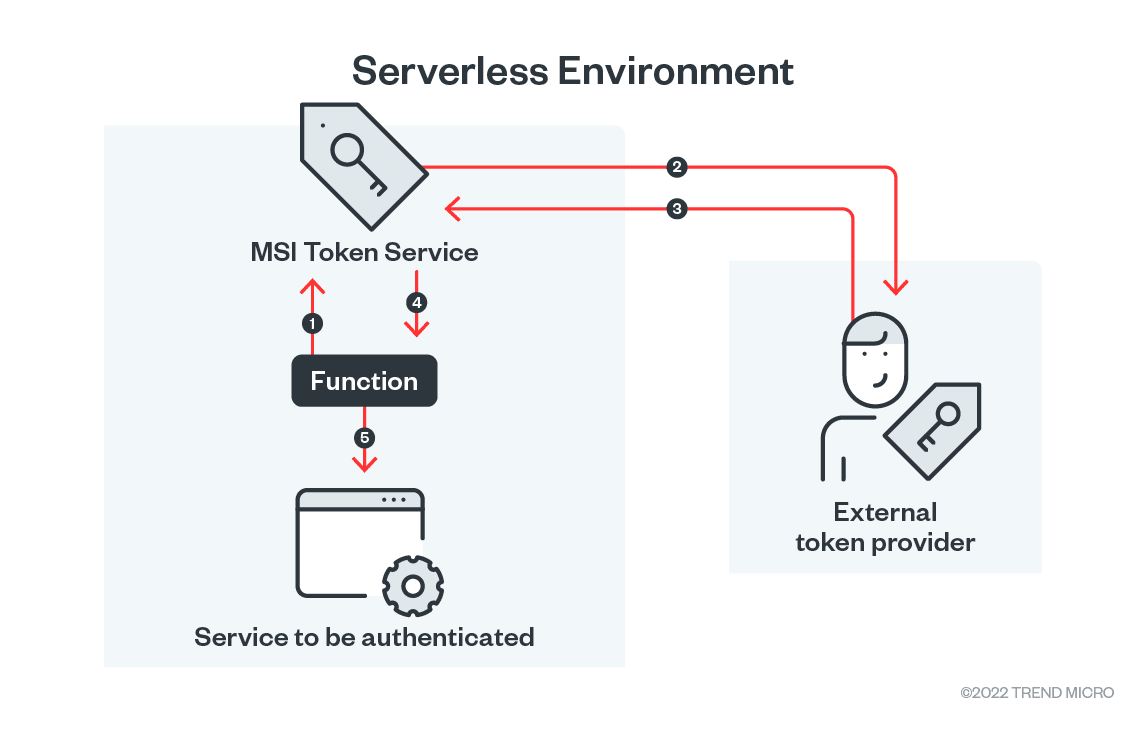
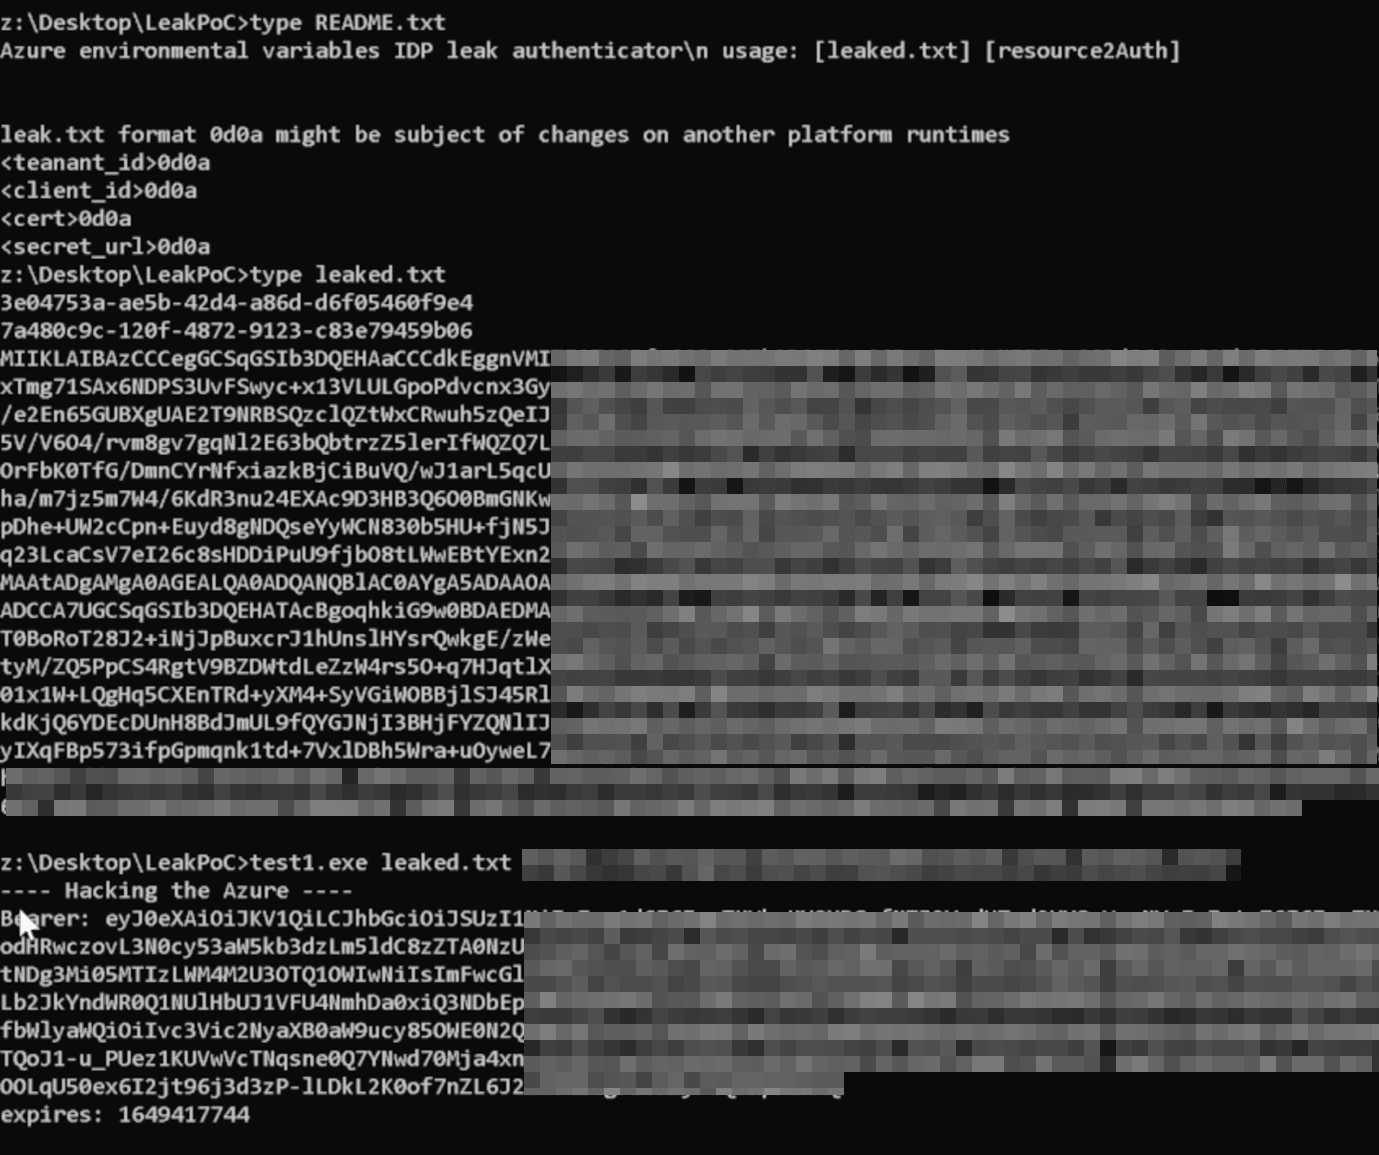
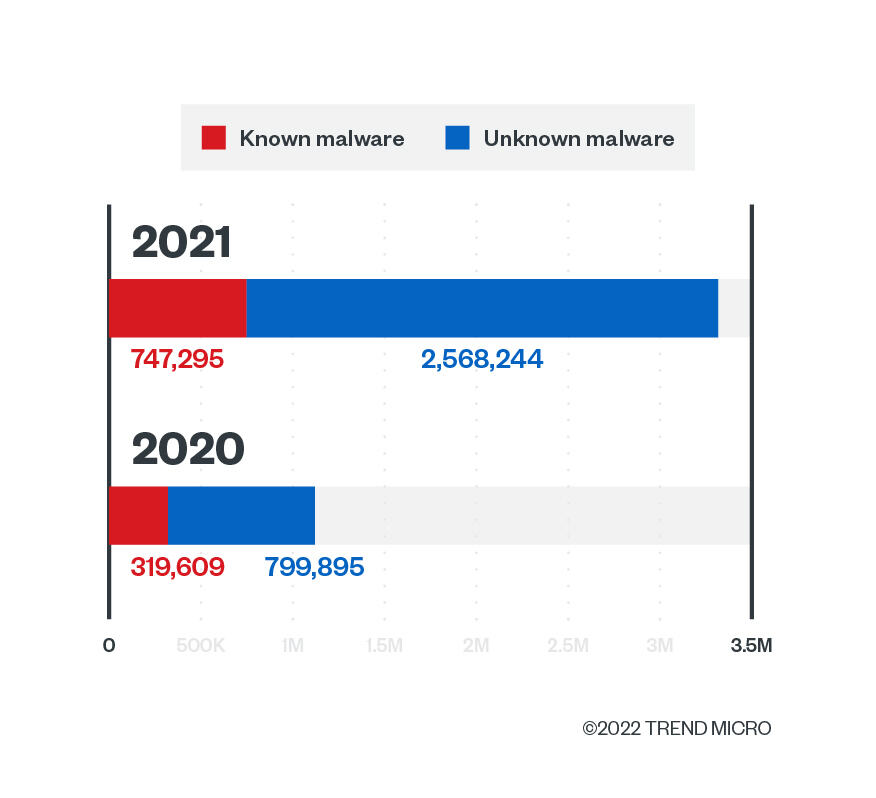
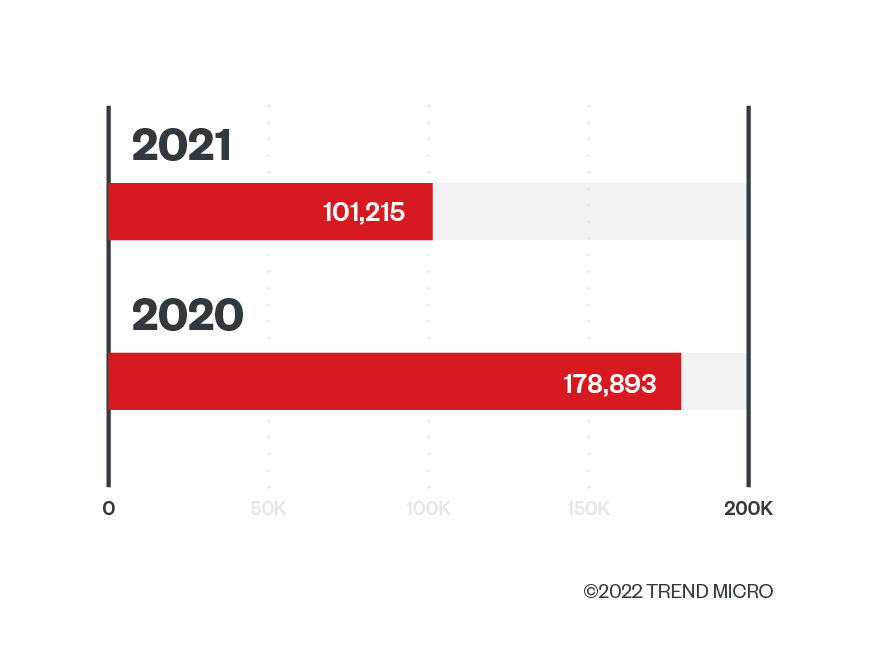
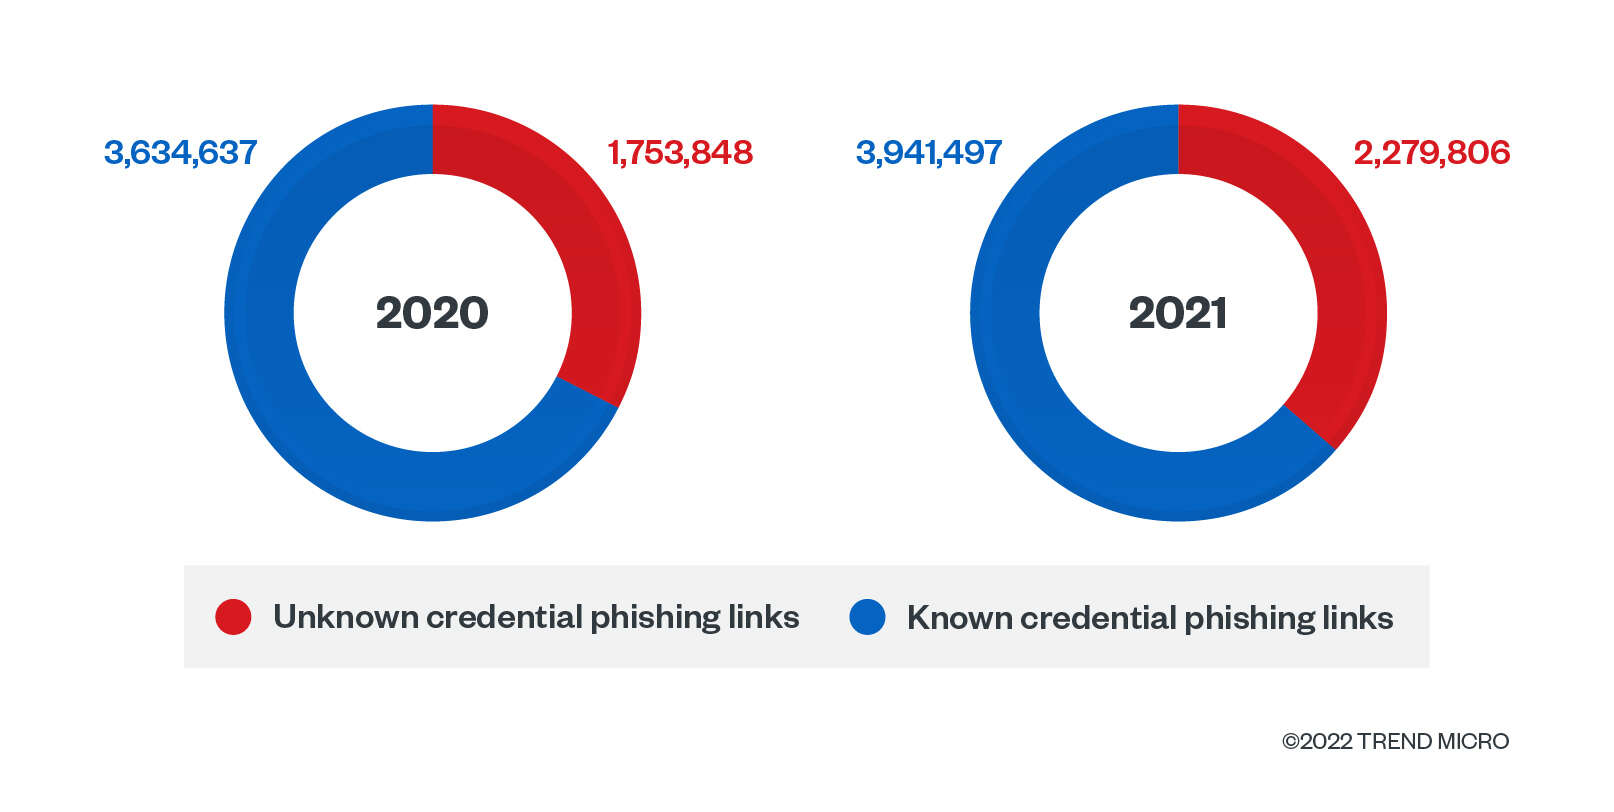

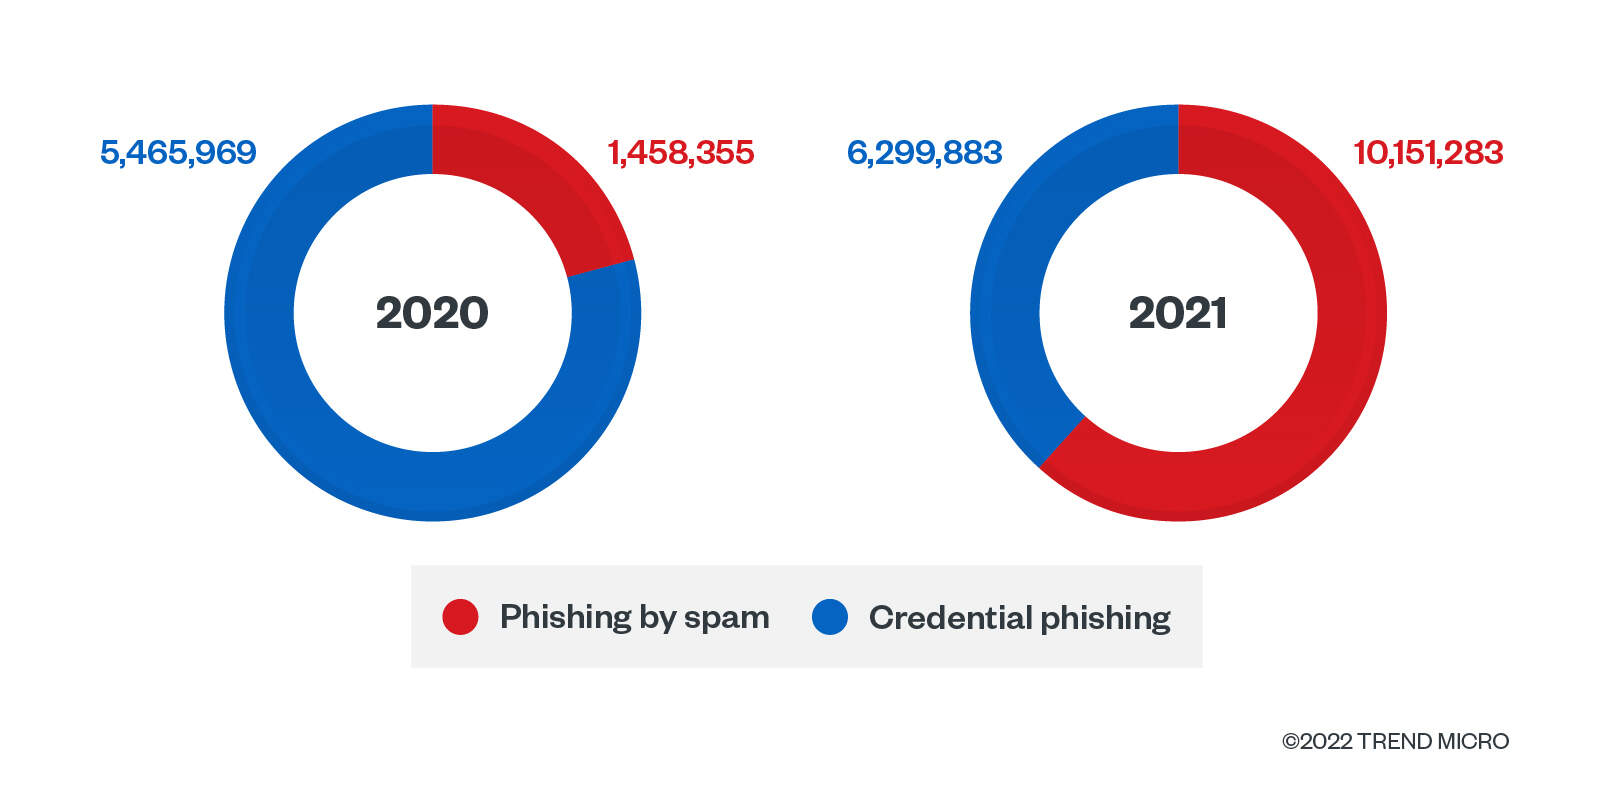


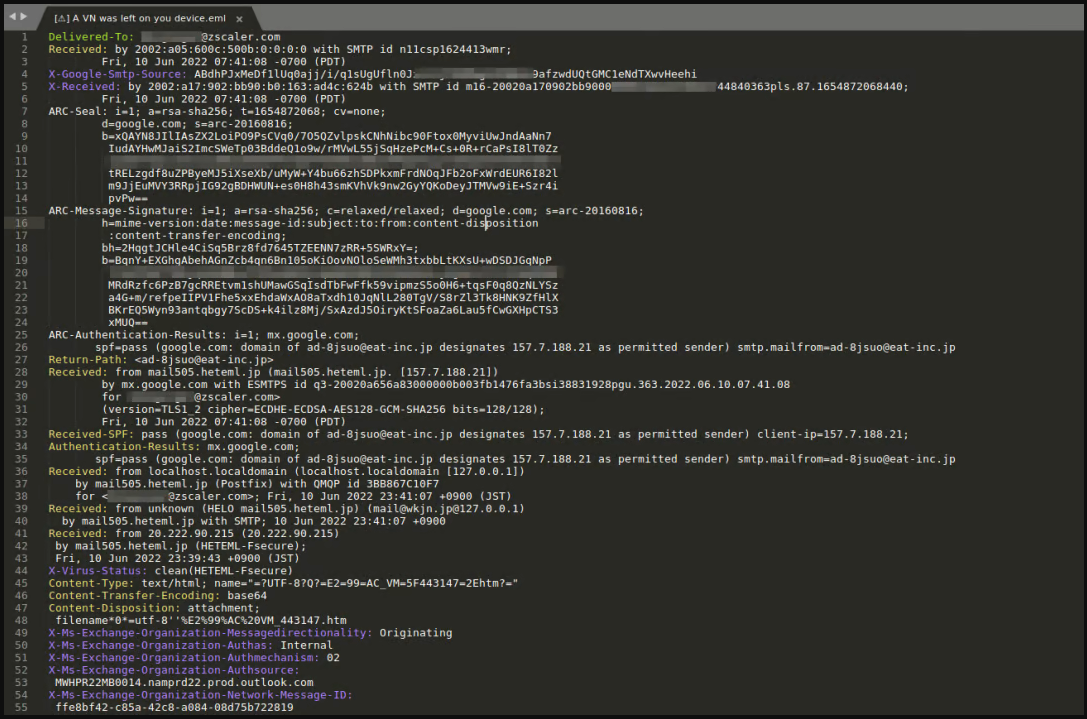
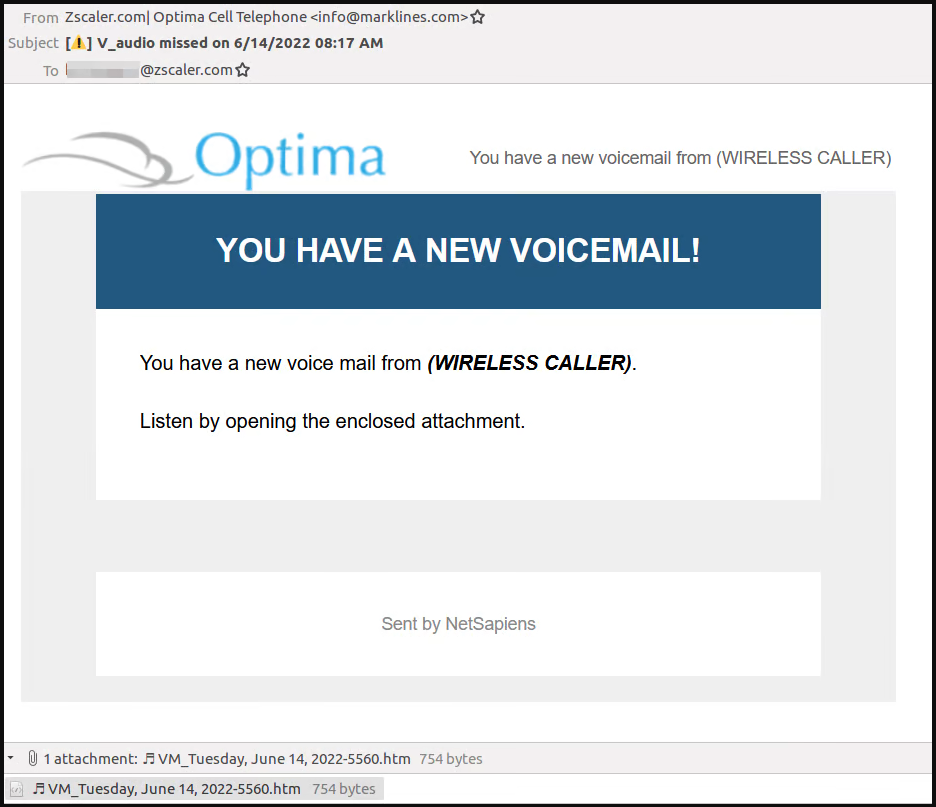
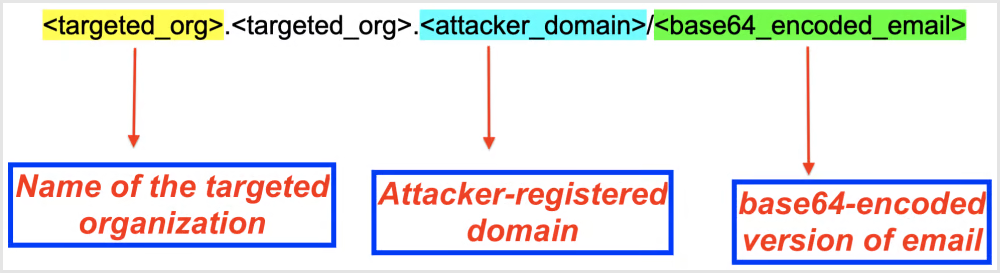

.png)


 Screenshot of meta title editor inside GoDaddy Website Builder.Include a primary keyword at the start. An exception should be made for well-known brands or local businesses who should add their business name to the start.


