How to set up myQNAPcloud to remotely access a QNAP NAS

Requirements

Register your NAS with myQNAPcloud

  1. Log in to your QNAP NAS.
  2. Open myQNAPcloud.
  3. Click Get Started.

    The Welcome to myQNAPcloud! window appears.
  4. Follow the steps to register your NAS. Click Next to move to the next step.
    1. Enter your QNAP ID and Password.
    2. Enter a Device name for your NAS.
      Note: This name is used to identify your NAS on myQNAPcloud and must be unique across all users.
    3. Choose what NAS services will be enabled and the Access Control setting.

      Your device is registered on myQNAPcloud.

      A summary page displays all the registration details and services guidelines of your NAS.

Remotely access your QNAP NAS with myQNAPcloud

  1. Go to https://www.myqnapcloud.com/.
  2. Sign in using your QNAP Account.
    Note: If you are already signed in you are automatically redirected to My Devices .
  3. Go to My Devices.
    The devices registered to your QNAP Account are displayed.
  4. Click the ”  ” button next to the device to display the device IP and SmartURL.
  5. Click SmartURL.

    A login page for your NAS appears.

Source :
https://www.qnap.com/en/how-to/tutorial/article/how-to-set-up-myqnapcloud-to-remotely-access-a-qnap-nas

How to back up your Mac to QNAP NAS using Time Machine

Requirements:

  • QNAP NAS with QTS 4.3.0 (or later).

There are two ways to back up your Mac to a QNAP NAS: using QTS or HBS 3.

QTS: Go to “Perform Time Machine Backup to your QNAP NAS”.
HBS 3: Go to “Back up Mac with the shared Time Machine account in HBS 3”

  • Perform Time Machine Backup to your QNAP NAS
    • (Optional) Create a designated Time Machine backup user and shared folder
    • Configure Time Machine to use QNAP NAS for backups
  • Back up Mac with the shared Time Machine account in HBS 3
    • Set up shared Time Machine account
    • Configure Time Machine to use QNAP NAS for backups

Perform Time Machine Backup to your QNAP NAS

  • (Optional) Create a designated Time Machine backup user and shared folder
    1. Create a Time Machine backup user.
      Tip: A dedicated Time Machine user account can be created to provide additional security and the ability to set storage quotas for each Mac.
      • Open Control Panel.
      • Go to Privilege > Users.
      • Click Create.
      • Select Create a User.
      • Click Create.
    2. Create a Time Machine backup shared folder.
      • Open Control Panel.
      • Go to Privilege > Shared Folders.
      • Click Create.
      • Select Shared Folder.
      • Enter a Folder Name.
      • Click Next.
      • Give the Time Machine backup user RW access privileges.
      • Click Next.
      • Check Set this folder as the Time Machine backup folder (macOS).
      • Click Finish.
    3. Configure QTS to use SMB 3
      1. Open Control Panel.
      2. Go to Network & File Services > Win/Mac/NFS > Microsoft Networking.
      3. Click Advanced Options.
      4. Under Highest SMB version select SMB 3.
      5. Click Apply.
  • Configure Time Machine to use QNAP NAS for backups
    1. Connect the NAS to your Mac
      • Open Finder on your Mac.
      • Open the Go menu.
      • Click Connect to Server.
      • Enter smb://<NAS name.local or IP address>.
      • Enter the username and password of the backup user account.

        Note:
        If your NAS is a member of a domain then you should log in using the domain name and user account. For example, if your NAS is named qnapnas and you want to connect using local NAS user account nasuser1, then your username is qnapnas\nasuser1.
      • This can be your NAS account or the dedicated Time Machine user account.
      • Select the NAS shared backup folder.
    2. Open Time Machine.
    3. Click Select Backup Disk.
    4. Select the NAS shared backup folder.
    5. Click Use Disk.
    6. Enter the username and password of the backup user account.
      Tip: This can be your NAS account or a dedicated Time Machine user account.
    7. Click Connect.
      Result: You can now use Time Machine to back up this Mac to your NAS.

Back up Mac with a shared Time Machine account in HBS 3

  • Set up the shared Time Machine account
    1. Open HBS 3.
    2. Go to Services > Time Machine.
    3. Check Use shared Time Machine account.
    4. Enter a password for the Time Machine account.
    5. (Optional) Set a storage quota.
    6. Select Maximum
    7. Enter the total capacity in GB.
      Important: If the backup data size is greater than the quota, the Time Machine backup will fail.
    8. Click Apply.
  • Configure Time Machine to use QNAP NAS for backups
    1. Connect the NAS to your Mac
      • Open Finder on your Mac.
      • Open the Go menu.
      • Click Connect to Server.
      • Enter smb://<NAS name.local or IP address>/TMBackup.
      • Enter the username TimeMachine and the password you created earlier.
    2. Open Time Machine.
    3. Click Select Backup Disk.
    4. Select the NAS shared folder TMBackup.
    5. Click Use Disk.
    6. Enter the username TimeMachine and the password you created earlier.

      Note:
      If your NAS is a member of a domain then you should log in using the domain name and user account. For example, if your NAS is named qnapnas and you want to connect using local NAS user account nasuser1, then your username is qnapnas\nasuser1.
    7. Click Connect.
      Result: You can now use Time Machine to back up this Mac to your NAS.

      Tip: Backups can be located under the shared folder TMbackup.

Source :
https://www.qnap.com/en/how-to/tutorial/article/how-to-back-up-your-mac-to-qnap-nas-using-time-machine

Cisco SD-WAN vManage Software Unauthenticated Access to Messaging Services Vulnerability

  • A vulnerability in the binding configuration of Cisco SD-WAN vManage Software containers could allow an unauthenticated, adjacent attacker who has access to the VPN0 logical network to also access the messaging service ports on an affected system.This vulnerability exists because the messaging server container ports on an affected system lack sufficient protection mechanisms. An attacker could exploit this vulnerability by connecting to the messaging service ports of the affected system. To exploit this vulnerability, the attacker must be able to send network traffic to interfaces within the VPN0 logical network. This network may be restricted to protect logical or physical adjacent networks, depending on device deployment configuration. A successful exploit could allow the attacker to view and inject messages into the messaging service, which can cause configuration changes or cause the system to reload.Cisco has released software updates that address this vulnerability. There are workarounds that address this vulnerability.This advisory is available at the following link:
    https://tools.cisco.com/security/center/content/CiscoSecurityAdvisory/cisco-sa-vmanage-msg-serv-AqTup7vs

Affected Products

  • Vulnerable ProductsThis vulnerability affects Cisco devices if they are running a vulnerable release of Cisco SD-WAN vManage Software.For information about which Cisco software releases are vulnerable, see the Fixed Software section of this advisory.Products Confirmed Not VulnerableOnly products listed in the Vulnerable Products section of this advisory are known to be affected by this vulnerability.Cisco has confirmed that this vulnerability does not affect the following Cisco products:
    • IOS XE SD-WAN Software
    • SD-WAN vBond Orchestrator Software
    • SD-WAN vEdge Cloud Routers
    • SD-WAN vEdge Routers
    • SD-WAN vSmart Controller Software

Workarounds

  • There is a workaround that addresses this vulnerability.Administrators can use access control lists (ACLs) to block ports 4222, 6222, and 8222, which are used by Cisco SD-WAN vManage Software messaging services. They may be configured in the following ways depending on deployment:
    • Configure ACLs on Cisco IOS devices. For information about preventing exploitation of Cisco IOS devices, see Protecting Your Core: Infrastructure Protection Access Control Lists.
    • Configure ACLs at the firewall that protects Cisco SD-WAN vManage Software. For information about Cisco Adaptive Security Appliance (ASA) and Cisco Firepower Threat Defense (FTD) ACL configuration, see Cisco ASA Series Firewall CLI Configuration Guide: Access Control Lists.
    • Cisco Cloud Controllers ACLs (Inbound Rules allowed list) are managed through the Self-Service Portal. Customers will have to review their ACL configurations on the Self-Service Portal to ensure that they are correct. This does not involve updating the controller version. By default, Cisco-hosted devices are protected against the issue described in the advisory unless the customer has explicitly allowed access. For more information, see Cisco SD-WAN Cloud Hosted Controllers Provisioning.
    While these workarounds have been deployed and were proven successful in a test environment, customers should determine the applicability and effectiveness in their own environment and under their own use conditions. Customers should be aware that any workaround or mitigation that is implemented may negatively impact the functionality or performance of their network based on intrinsic customer deployment scenarios and limitations. Customers should not deploy any workarounds or mitigations before first evaluating the applicability to their own environment and any impact to such environment.

Fixed Software

  • Cisco has released free software updates that address the vulnerability described in this advisory. Customers may only install and expect support for software versions and feature sets for which they have purchased a license. By installing, downloading, accessing, or otherwise using such software upgrades, customers agree to follow the terms of the Cisco software license:
    https://www.cisco.com/c/en/us/products/end-user-license-agreement.htmlAdditionally, customers may only download software for which they have a valid license, procured from Cisco directly, or through a Cisco authorized reseller or partner. In most cases this will be a maintenance upgrade to software that was previously purchased. Free security software updates do not entitle customers to a new software license, additional software feature sets, or major revision upgrades.When considering software upgrades, customers are advised to regularly consult the advisories for Cisco products, which are available from the Cisco Security Advisories page, to determine exposure and a complete upgrade solution.In all cases, customers should ensure that the devices to be upgraded contain sufficient memory and confirm that current hardware and software configurations will continue to be supported properly by the new release. If the information is not clear, customers are advised to contact the Cisco Technical Assistance Center (TAC) or their contracted maintenance providers.Customers Without Service ContractsCustomers who purchase directly from Cisco but do not hold a Cisco service contract and customers who make purchases through third-party vendors but are unsuccessful in obtaining fixed software through their point of sale should obtain upgrades by contacting the Cisco TAC: https://www.cisco.com/c/en/us/support/web/tsd-cisco-worldwide-contacts.htmlCustomers should have the product serial number available and be prepared to provide the URL of this advisory as evidence of entitlement to a free upgrade.Fixed ReleasesCustomers are advised to upgrade to an appropriate fixed software release as indicated in the following table(s):Cisco SD-WAN vManage Software ReleaseFirst Fixed ReleaseEarlier than 20.3Migrate to a fixed release.20.3Migrate to a fixed release.20.620.6.420.7Migrate to a fixed release.20.8Migrate to a fixed release.20.920.9.1Note: It is the customer’s responsibility to upgrade their cloud controllers to the latest version in which this vulnerability is fixed.The Cisco Product Security Incident Response Team (PSIRT) validates only the affected and fixed release information that is documented in this advisory.

Exploitation and Public Announcements

  • The Cisco PSIRT is not aware of any public announcements or malicious use of the vulnerability that is described in this advisory.

Source

  • Cisco would like to thank Orange Business for reporting this vulnerability.

URL

Revision History

UniFi – Console and Gateway Recovery Mode

The Recovery Mode User Interface (UI) is a special interface for UniFi OS Consoles (UDMP, UNVR, etc.) and gateways used to recover from various failure modes (indicated on the LCM screen of that device). From the Recovery Mode, you can perform the following actions:

  • Reset to Factory Defaults: Completely reset the device. Note this will also wipe out any stored backup files.
  • Reboot: Restart the device and re-load the existing configuration.
  • Power-off: Initiate a software shutdown on the device, after which you can safely remove the power cable.
  • Check Filesystems: Check the integrity of the file system. 
  • Firmware Update: Upload a previously downloaded firmware image (.bin) file in order to upgrade the firmware.

You should only resort to using recovery mode if you are prompted by the LCM screen found on your device. 

Performing a Device Recovery

  1. Download the most recent firmware for your device. You can find information on our latest releases here.
  2. Completely power-off the UniFi device and unplug it from its power source.
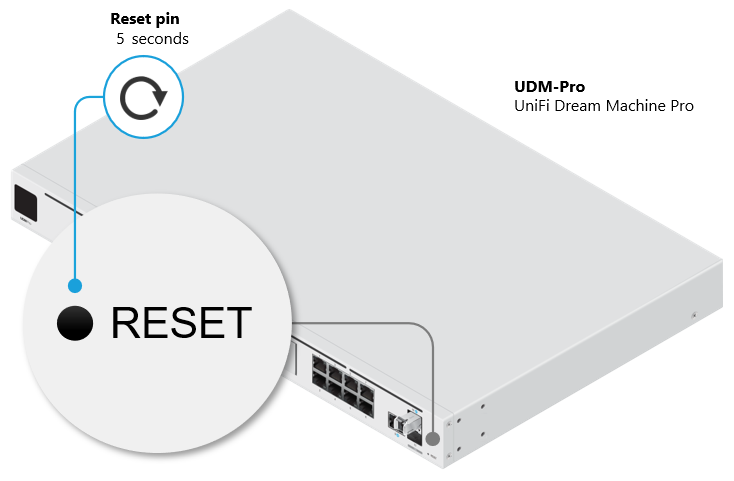
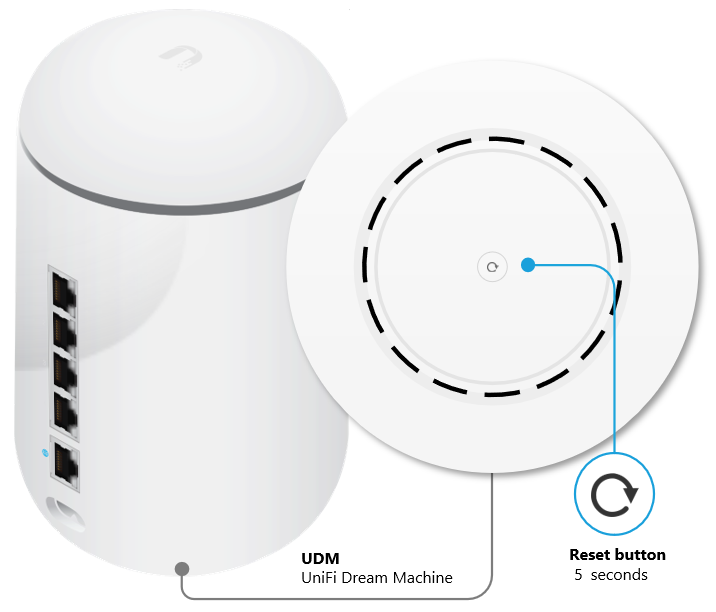
  3. Press and hold the reset button and then power on the device by connecting it to the power source once again.udm-pro-topology.pngudm-topology.png
  4. Keep the reset button pressed for about 5 seconds. After some time the display (in supported models) will indicate that the gateway is in Recovery Mode.
  5. Connect an Ethernet cable from your computer to the first LAN port (port 1) on the UniFi gateway.

    Note: Port 1 is always the first one. Either the top port, or the top left corner one, depending on the layout of your device’s ports.
  6. Configure a static IP address on your computer in the 192.168.1.0/24 range (for example 192.168.1.11). Windows ClientmacOS clientNote: If a wireless adapter is enabled and connected to another network it could conflict with the connection to the UniFi device. Disable the wireless adapter if necessary. 
  7. Open a compatible web browser navigate to http://192.168.1.30 to access the Recovery Mode UI. 

    Note: The Recovery Mode UI is accessible via HTTP only and not HTTPS. It is possible that your browser will automatically try to redirect your session to HTTPS. Make sure to navigate to the http://192.168.1.30 address and use a different browser if necessary.
  8. Select Firmware Update > Choose and browse your computer for the previously download firmware (.bin) image file.
  9. Wait for the upgrade process to complete and reboot the device afterwards.

    Source :
    https://help.ui.com/hc/en-us/articles/360043360253-UniFi-Console-and-Gateway-Recovery-Mode

UniFi – Login with SSH (Advanced)

We do not recommend using SSH unless instructed by one of our Support Engineers as part of advanced troubleshooting. Inexperienced users risk making changes that may degrade network performance, or even worse, completely break your deployment. Proceed with caution.

Requirements

1. You are connected to the same local network as the device/console you plan to connect with via SSH. This may consist of using a laptop connected to the same WiFi network, or hardwired directly to the device.

2. SSH is enabled. UniFi Network devices and UniFi OS Consoles have independent SSH settings.

  • UniFi OS Consoles – Following setup, SSH is automatically disabled. It must be enabled in your UniFi OS System Settings.
  • UniFi Network Devices – Following setup, SSH is automatically enabled. The credentials consist of a random string of characters.

3. The device you are using has a command line interface (CLI) capable of establishing a Secure Shell (SSH) connection. Linux and macOS devices can use their native terminal. Windows OS requires PowerShell or PuTTY.

Establishing an SSH Connection

The format of the command used to establish an SSH connection is as follows:

ssh <username>@<ip-address>

The <username> for UniFi OS Consoles (UDM Pro / UNVR / Cloud Key) and UniFi Gateways (UXG Pro) is always ‘root’. For example, a Dream Machine Pro (gateway) with an IP address of 192.168.1.1 can be accessed as follows:

ssh root@192.168.1.1

Note: The UXG will use <username> = ‘root’, but the <password> will be the shared password set in your UniFi Network Application.

Default Credentials

Prior to setup/adoption, devices have a set of default credentials. 

UniFi – Advanced Updating Techniques

We recommend that most users enable automatic updates.  Doing so allows you to specify when your UniFi deployment automatically checks for and installs updates. 

UniFi OS Console and application update preferences can be configured in your UniFi OS Settings. Please note, though, that self-hosted UniFi Network applications do not offer automatic updating.

UniFi Network device update preferences are set in your Network application’s System Settings. Devices managed by other UniFi applications are automatically updated within their respective applications.

Manually Update UniFi Devices via Web Application

Updating via the Device Property Panel

Use Case: You want to try Early Access firmware releases for specific devices, or you want to return to an official release after trying an EA release.

1. Copy the firmware release link from community.ui.com/releases.

image1.png

2. Paste the link in the address bar found in the Settings tab of the device’s properties panel.

image2.png

Updating via Your Network Cache

Use Case: You prefer to download and store updates in your Network application so they can be used by other devices, as opposed to downloading multiple, device-specific files from the internet. This is an ideal solution for reducing bandwidth within high-volume networks that host a large number of similar UniFi devices. It is also suitable for the advanced users who disable internet access on their UniFi device’s management network.

Device updates can be cached in your Network application’s System Settings. Once an update is cached, you can open to your UniFi Devices page and click Update Available.

Note: The Cache link will appear when you hover your cursor over an update.image3.png

Updating via SSH

Note: SSH updating is not a typical or recommended method. It is only prescribed to work around specific scenarios, such as when:

  • Prior traditional update attempts have failed. A successful SSH update will help verify if initial failures resulted from incorrect network configuration. For more details, see Troubleshooting Device Updates.
  • Your UniFi Network device is not being discovered or cannot be adopted because it has been preloaded with outdated firmware.
  • Your UniFI OS Console cannot be set up because it has been preloaded with an outdated version of UniFi OS.

UAP/USW (Internet) 

  1. Copy the update link from community.ui.com/releases.
  2. SSH into your device.
  3. Run the following command:upgrade paste_download_link_here Exupgrade https://dl.ui.com/unifi/firmware/UAL6/5.60.1.12923/BZ.mt7621_5.60.1+12923.210416.1641.bin

UAP/USW (No Internet) 

  1. Download the desired firmware update from community.ui.com/releases.
  2. Use the following SCP command to copy the file into the /tmp folder of your device. This requires a compatible SCP application (e.g., Terminal on macOS and Linux, PuTTY/PowerShell on Windows).scp /folder_path/firmwarefile.bin <user>@<IP of device>:/tmp/fwupdate.binExscp /Users/alexpro/Desktop/BZ.mt7621_5.60.1+12923.210416.1641.bin Alex@192.168.1.219:/tmp/fwupdate.bin 
  3. Enter your SSH password when prompted.
  4. Run the following command:syswrapper.sh upgrade2 &

UDM/UDM Pro/UXG Pro (Internet)

  1. Copy the update link from community.ui.com/releases.
  2. SSH into your device.
  3. Run the following command:ubnt-upgrade paste_download_link_here Exubnt-upgrade https://fw-download.ubnt.com/data/udm/7675-udmpro-1.12.22-36b5213eaa2446aca8486f0b51e64cd3.bin

UDM/UDM Pro/UXG Pro (No Internet)

  1. Download the desired firmware update from community.ui.com/releases.
  2. Use the following SCP command to copy the file into the /mnt/data folder of your device. This requires a compatible SCP application (e.g., Terminal on macOS and Linux, PuTTY/PowerShell on Windows).scp /folder_path/firmwarefile.bin <user>@<IP of device>:/mnt/data/fwupdate.binExscp /Users/alexpro/Desktop/7675-udmpro-1.12.22-36b5213eaa2446aca8486f0b51e64cd3.bin Alex@192.168.1.219:/mnt/data/fwupdate.bin 
  3. Enter your SSH password when prompted.
  4. Run the following command:ubnt-upgrade /mnt/data/fwupdate.bin

UCK G2, UCK G2 Plus, UDM SE, UDR, UDW, UNVR, UNVR Pro (Internet)

  1. Copy the update link from community.ui.com/releases.
  2. SSH into your device.
  3. Run the following command:ubnt-systool fwupdate paste_download_link_here Exubnt-systool fwupdate https://fw-download.ubnt.com/data/unifi-dream/dd49-UDR-2.4.10-cd3afa000ebf4a4fb15374481539961c.bin

UCK G2, UCK G2 Plus, UDM SE, UDR, UDW, UNVR, UNVR Pro (No Internet)

  1. Download the desired firmware update from community.ui.com/releases.
  2. Use the following SCP command to copy the file into the /tmp folder of your device. This requires a compatible SCP application (e.g., Terminal on macOS and Linux, PuTTY/PowerShell on Windows).scp /folder_path/firmwarefile.bin <user>@<IP of device>:/tmp/fwupdate.binExscp /Users/alexpro/Desktop/dd49-UDR-2.4.10-cd3afa000ebf4a4fb15374481539961c.bin 
  3. Enter your SSH password when prompted.
  4. Run the following command:ubnt-systool fwupdate /tmp/fwupdate.bin

USG (Internet) 

  1. Copy the update link from community.ui.com/releases.
  2. SSH into your device.
  3. Run the following command:upgrade paste_download_link_here Exupgrade https://dl.ui.com/unifi/firmware/UGW3/4.4.56.5449062/UGW3.v4.4.56.5449062.tar

USG (No Internet) 

  1. Download the desired firmware update from community.ui.com/releases.
  2. Rename the file: upgrade.tar
  3. Use the following SCP command to copy the file into the /home/<user> folder of your USG. This requires a compatible SCP application (e.g., Terminal on macOS and Linux, PuTTY/PowerShell on Windows).scp /folder_path/upgrade.tar <user>@<IP of device>:/home/<user>/upgrade.tarExscp /Users/alexpro/Desktop/upgrade.tar Alex@192.168.1.1:/home/Alex/upgrade.tar
  4. Enter your SSH password when prompted.
  5. SSH into your device.
  6. Run the following command:sudo syswrapper.sh upgrade upgrade.tar

Manually Update the Network Application

  1. Download the desired application update from community.ui.com/releases.
  2. SSH into your device.
  3. Run the following command (UDM/UDM Pro Only):unifi-os shell
  4. Remove previously installed files:rm /tmp/unifi_sysvinit_all.deb &> /dev/null
  5. Store the new application version on your device using the download link:curl -o “/tmp/unifi_sysvinit_all.deb” <network application link.deb>Excurl -o “/tmp/unifi_sysvinit_all.deb” https://dl.ui.com/unifi/6.2.26-a79cb15f05/unifi_sysvinit_all.deb
  6. Once downloaded, install the new version:apt-get install -y /tmp/unifi_sysvinit_all.deb
  7. Following installation, remove the downloaded file:rm /tmp/unifi_sysvinit_all.deb

Updating Devices in a Broken State

In rare occurrences, a device may stop functioning. UniFi APs may be updated using our TFTP Recovery. This should only be used if your AP completely stops functioning as a last resort prior to submitting an RMA. UniFi OS Consoles and gateways my be updated using Recovery Mode. This should only be used if prompted on your device’s LCM screen.

Source :
https://help.ui.com/hc/en-us/articles/204910064-UniFi-Advanced-Updating-Techniques

UniFi – Getting Support Files and Logs

It may be necessary to provide support files to our team when troubleshooting issues. These contain detailed logs and information about what is happening with your UniFi system. Although sensitive information is generally removed, we do not recommend sharing these publicly.

There are two support files to be aware of:

  • UniFi OS Support File: This contains logs related to your UniFi OS Console, the installed applications, your adopted UniFi devices, and the client devices connected. 
    Navigating to unifi.ui.com (or signing in locally via IP address) > select your UniFi OS Console > Console Settings > Download Support File. Note that it will have a *.tgz extension.
  • UniFi Network Support File: This only contains information about your UniFi Network application, your adopted UniFi Network devices, and the connected clients. This should only be used if you are self-hosting the UniFi Network application on a Windows, macOS or Linux machine.
    Navigate to your UniFi Network Application > Settings > System > Download Network Support File. Note that it will have a *.supp extension.

Advanced

If the UOS Console or UniFi applications are inaccessible and you are not able to download the support file, you can download the logs by following these instructions. Please note, our support engineer will provide detailed information on which of the following will be required for troubleshooting.

1. SSH into the machine: ssh root@192.168.1.1

Note: If you need to change your SSH password, do so in the UniFi OS Settings, by navigating to unifi.ui.com (or signing in locally via IP address) > select your UniFi OS Console > Settings > System.

2. Create ZIP files for the logs. The commands’ format will be: tar -zcvf <file name> <folders path>.

  • UniFi OS logs: tar -zcvf unifi-core-logs.tar.gz /data/unifi-core/logs/
  • UniFi local portal (ULP) logs: tar -zcvf ulp-go-logs.tar.gz /data/ulp-go/log/
  • UniFi Network logs:
    • For UniFi Dream Machine consoles:tar -zcvf unifi-logs.tar.gz /data/unifi/logs/
    • For UniFi Cloud Key Gen2 consoles:tar -zcvf unifi-logs.tar.gz /usr/lib/unifi/logs
  • UniFi Protect logs:
    • Without external disks: tar -zcvf unifi-protect-logs.tar.gz /data/unifi-protect/logs/
    • With external disks: tar -zcvf unifi-protect-logs.tar.gz /srv/unifi-protect/logs/
  • UniFi Talk logs:
    • tar -zcvf unifi-talk-logs.tar.gz /var/log/unifi-talk/
    • tar -zcvf unifi-talk-base-logs.tar.gz /var/log/unifi-base/
    • tar -zcvf unifi-talk-freeswitch-logs.tar.gz /var/log/freeswitch/
  • UniFi Connect logs: tar -zcvf unifi-connect-logs.tar.gz /data/unifi-connect/log/
  • System logs:
    • ubnt-systool support /tmp/system
    • tar zcvf system.tar.gz /tmp/system

3. Open a new terminal window and run the SCP command to copy the logs from the UniFi OS Console and onto your computer (or system).

Note: The period (.) in the path variable means it will be copied onto the currently opened directory in the terminal. And the asterisk (*) stands for “all”. So the following command will copy everything with the extension tar.gz (i.e. all the logs you prepared in Step 2). 

scp root@192.168.1.1:/root/\*.gz .

4. Close both terminal windows to close the sessions.

If other logs are needed, our support agent will guide you and provide the necessary commands.

Source :
https://help.ui.com/hc/en-us/articles/360049956374-UniFi-Getting-Support-Files-and-Logs

UniFi Network – Updating Third-Party, non-Console UniFi Network Applications (Linux – Advanced)

This article provides the steps to update the UniFi Network application to the current stable release on a Debian or Ubuntu system via APT (Advanced Package Tool). If you run into issues following the process described in this article, please take a look at the scripts provided in this Community post that includes UniFi Network software installation on Ubuntu 18.04 and 16.04 and Debian 8/9.

Requirements

In order to update the UniFi Network application via APT, it is necessary to create source files or edit lines in an existing sources.list file with Linux text editors: vi or nano. The repo structure should be permanent, but if there are any changes they will be pointed out in the UniFi Network software version release posts, found in the Release section of the Community.

Before upgrading the UniFi Network application, make sure that you have backed up the UniFi Network Database. You will need to make sure that the user has sudo permissions. For more information about adding a user to sudo list, see this Debian article.

UniFi Network APT Steps

1. Install required packages before you begin with the following command:

sudo apt-get update && sudo apt-get install ca-certificates apt-transport-https

Click to copy

2. Use the following command to add a new source list:

echo 'deb https://www.ui.com/downloads/unifi/debian stable ubiquiti' | sudo tee /etc/apt/sources.list.d/100-ubnt-unifi.list

Click to copy

3. Add the GPG Keys. To add the GPG Keys use one of the two methods described below (Method A is recommended). When using the commands below, it is assumed you have sudo and wget installed, more information about sudo can be found here, and wget here.

User Tip: For Ubuntu 18.04, run the following commands before installing UniFi in step 4.

wget -qO - https://www.mongodb.org/static/pgp/server-3.4.asc | sudo apt-key add -
echo "deb https://repo.mongodb.org/apt/ubuntu xenial/mongodb-org/3.4 multiverse" | sudo tee /etc/apt/sources.list.d/mongodb-org-3.4.list
sudo apt-get update

Click to copy

See an example of what scripts the Community is using to install the UniFi Network application on Ubuntu 16.04 and 18.04 in this Community post.

(Method A) Install the following trusted key into /etc/apt/trusted.gpg.d

sudo wget -O /etc/apt/trusted.gpg.d/unifi-repo.gpg https://dl.ui.com/unifi/unifi-repo.gpg 

Click to copy

(Method B) Using apt-key.

sudo apt-key adv --keyserver keyserver.ubuntu.com --recv 06E85760C0A52C50 

Click to copy

4. Install and upgrade the UniFi Network application.

Note: On some Distributions, it’s possible an incompatible Java release can be installed during this step. We recommend running the following command before proceeding with this step, to restrict Ubuntu from automatically installing Java 11. If you wish to undo this later, replace “hold” with “unhold”.

sudo apt-mark hold openjdk-11-*

Install and upgrade the UniFi Network application with the following command:

sudo apt-get update && sudo apt-get install unifi -y

Click to copy

5.  This step may not be required, depending on the Linux distro you have. If your distro does not come with MongoDB, and it’s not available in their repo, then please see the MongoDB installation guide. You can find the latest installation guide for Ubuntu here, and Debian here. We recommend at least MongoDB 2.6.10. Some users have changed the backend to use MongoDB 3 successfully too.

6. The UniFi Network application should now be accessible at the computer’s configured local or public IP address, by typing that IP address in a browser’s navigation bar (Chrome is recommended). If it is not launching, use the following command: sudo service unifi start.

Other helpful commands are:

  • To stop the UniFi service: sudo service unifi stop
  • To restart the UniFi service: sudo service unifi restart
  • To see the status of UniFi service: sudo service unifi status

warning_25x25.png  We strongly recommend staying with the stable release, but for those users who wish to do otherwise, click here to expand and see possible suite names, as well as code names in the table within.

Log Files Location

Log files will be essential for any troubleshooting you might perform. Find them here:

  • /usr/lib/unifi/logs/server.log
  • /usr/lib/unifi/logs/mongod.log

If your application is running on a Unix/Linux based system, then you will require superuser (sudo) privileges to access these log files.

User Notes & Tips

These notes have been added thanks to user collaboration. Click to expand.

Source :
https://help.ui.com/hc/en-us/articles/220066768-UniFi-Network-Updating-Third-Party-non-Console-UniFi-Network-Applications-Linux-Advanced-

UniFi Network – Updating Third-Party, non-Console UniFi Network Applications

We recommend hosting your Network Application on a UniFi OS Console for the most seamless updating experience. In addition to providing the ability to toggle automatic Network Application updates, you can also initiate manual updates through the GUI.

Updating the Network Application

Updating your Network Application is very similar to the initial setup. You can download the latest version here

You will be required to close any running instances of the Network Application prior to the installation. Do not worry, your network will still continue to function as normal (devices will remain connected with internet access, and traffic will continue to be routed). 

After executing the file, the setup wizard will guide you through the process of updating your application. We always recommend downloading a backup file, found in your System Settings.

Note: macOS users may be required to move the downloaded file into the Applications folder, or right-click > open the file in order to begin the installation.

(Advanced) Updating via CLI on Linux-hosted Applications

It is also possible to use APT for managing updates on Debian and Ubuntu based installations. You may refer to this article for more details. This should only be attempted by users with appropriate knowledge of Linux.

Source :
https://help.ui.com/hc/en-us/articles/6330410381335-UniFi-Network-Updating-Third-Party-non-Console-UniFi-Network-Applications

UniFi Network – Self-Hosting your UniFi Network Without a Console (Advanced)

We strongly recommend that users opt for a UniFi OS Console instead of self-hosting the Network Application on third-party operating systems. 

Self-hosting the UniFi Network application on a home computer or 3rd party virtual machine (VM) requires extensive knowledge of computer engineering, networking, and security. Invalid host specifications or configurations may lead to system crashes, poor performance, and compromised network security.

A UniFi OS Console, on the other hand, takes all the guessing out of the picture as it is already optimized for running all of our UniFi Applications. It is also a significantly more secure solution for remote access, as this is hosted on your physical premises, as opposed to a third-party virtual machine in the cloud.

Note: Although a UI SSO account is required for remote access, it is possible to setup and use UniFi OS Consoles as local-only devices without the need for an SSO account.

For advanced users hoping for a scalable cloud-hosting approach, we also offer our own UniFi OS Cloud Console.

Configuration of third-party hosts is outside of Ubiquiti’s official support scope. If you still wish to self-host the UniFi Network Application, please be aware of the risks and proceed with caution.

Download and install the UniFi Network Application

The UniFi Network Application may be downloaded for Microsoft Windows, macOS, and Linux from this page. The Network application is provided as a simple installer for Microsoft Windows and macOS hosts.

For Linux, a .deb file is provided. This can be installed using the dpkg command on Debian or Ubuntu.

After installing the UniFi Network Application, you may launch it and follow the instructions to complete setup. You can access the configuration page by typing https://<IP_of_Network_Application_host>:8443 into the navigation bar of a browser while the application is running.

Frequently Asked Questions

What are the UniFi Network application system requirements?
At a bare-minimum, we recommend the following system requirements (make sure to read the Release Notes for more details about a particular version):

  • Operating system:
    • Linux: Ubuntu Desktop / Server 16.04; Debian 9 “Stretch”
    • Windows: Windows 10; Windows Server 2016
    • macOS: Mavericks 10.9, 10.10 Yosemite, 10.11 El Capitan, 10.12 Sierra, 10.13 High Sierra, 10.14 Mojave, 10.15 Catalina.
  • CPU: x86-64 Processor (Intel / AMD x64 Processors)
  • RAM: 2GB
  • Network: 100Mbps Wired Ethernet
  • HDD: Minimum 10GB free (20GB or more preferred)
  • Java: Java Runtime Environment (JRE) 8
  • Web Browser: Google Chrome
  • MongoDB: version 3.2 or later. Mongo is offered bundled: default is 2.4.14 (for macOS and Windows only).

Note: You will need to continually increase your system specs as you begin to adopt and manage more devices.

Does the UniFi Network application have to run at all times?
Although this is not required, we strongly recommend running the UniFi Network Application at all times. This enables you to configure your system at all times. It is also a requirement for proper statistics and reporting. 

I’m getting a Java-related error during setup, what do I do?
The UniFi Network application requires Java, so you’ll need to install Java 8 for your specific platform before re-running the installer.

The install is not finishing successfully, what could it be?
Make sure that all system requirements above are met and that all ports used by UniFi are opened. 

I’m getting a “Your connection is not private” security warning when accessing the UniFi Network Application in my browser, should I be concerned?
No, there is nothing to worry about. Simply proceed to the next page by clicking Advanced > Proceed.

Source :
https://help.ui.com/hc/en-us/articles/360012282453-UniFi-Network-Self-Hosting-your-UniFi-Network-Without-a-Console-Advanced-