How to restrict Active Directory RPC traffic to a specific port

This article describes how to restrict Active Directory (AD) replication remote procedure calls (RPC) traffic to a specific port in Windows Server.

Applies to:   all supported versions of Windows Server
Original KB number:   224196

Summary

By default, Active Directory replication remote procedure calls (RPC) occur dynamically over an available port through the RPC Endpoint Mapper (RPCSS) by using port 135. An administrator can override this functionality and specify the port that all Active Directory RPC traffic passes through. This procedure locks down the port.

When you specify ports to use by using the registry entries in More information, both Active Directory server-side replication traffic and client RPC traffic are sent to these ports by the endpoint mapper. This configuration is possible because all RPC interfaces supported by Active Directory are running on all ports on which it’s listening.

 Note

This article doesn’t describe how to configure AD replication for a firewall. Additional ports must be opened to make replication work through a firewall. For example, ports may need to be opened for the Kerberos protocol. To obtain a complete list of the required ports for services across a firewall, see Service overview and network port requirements for Windows.

More information

 Important

This section, method, or task contains steps that tell you how to modify the registry. However, serious problems might occur if you modify the registry incorrectly. Therefore, make sure that you follow these steps carefully. For added protection, back up the registry before you modify it. Then, you can restore the registry if a problem occurs. For more information about how to back up and restore the registry, see How to back up and restore the registry in Windows.

When you connect to an RPC endpoint, the RPC runtime on the client contacts the RPCSS on the server at a well-known port (135). And it obtains the port to connect to for the service supporting desired RPC interface. It assumes that the client doesn’t know the complete binding. It’s the situation with all AD RPC services.

The service registers one or more endpoints when it starts, and has the choice of a dynamically assigned port or a specific port.

If you configure Active Directory and Netlogon to run at port x as in the following entry, it becomes the ports that are registered with the endpoint mapper in addition to the standard dynamic port.

Use Registry Editor to modify the following values on each domain controller where the restricted ports are to be used. Member servers aren’t considered to be logon servers. So static port assignment for NTDS has no effect on member servers.

Member servers do have the Netlogon RPC Interface, but it’s rarely used. Some examples may be remote configuration retrieval, such as nltest /server:member.contoso.com /sc_query:contoso.com.

Registry key 1

HKEY_LOCAL_MACHINE\SYSTEM\CurrentControlSet\Services\NTDS\Parameters
Registry value: TCP/IP Port
Value type: REG_DWORD
Value data: (available port)

Restart the computer for the new setting to become effective.

Registry key 2

HKEY_LOCAL_MACHINE\SYSTEM\CurrentControlSet\Services\Netlogon\Parameters
Registry value: DCTcpipPort
Value type: REG_DWORD
Value data: (available port)

Restart the Netlogon service for the new setting to become effective.

 Note

When you use the DCTcpipPort registry entry, and you set it to the same port as the TCP/IP Port registry entry, you receive Netlogon error event 5809 under NTDS\Parameters. This indicates that the port configured is in use, and you should choose a different port.

You’ll receive the same event when you have a unique port, and you restart the Netlogon service on the domain controller. This behavior is by design. It occurs because of the way the RPC runtime manages its server ports. The port will be used after the restart, and the event can be ignored.

Administrators should confirm that the communication over the specified port is enabled if any intermediate network devices or software is used to filter packets between the domain controllers.

Frequently, you must also manually set the File Replication Service (FRS) RPC port because AD and FRS replication replicate with the same Domain Controllers. The FRS RPC port should use a different port.

Don’t assume that clients only use the Netlogon RPC services and thus only the setting DCTcpipPort is required. Clients are also using other RPC services such as SamRPC, LSARPC, and also the Directory Replication Services (DRS) interface. You should always configure both registry settings and open both ports on the firewall.

Known issues

After you specify the ports, you may encounter the following issues:

To resolve the issues, install the updates mentioned in the articles.

Source :
https://learn.microsoft.com/en-us/troubleshoot/windows-server/identity/restrict-ad-rpc-traffic-to-specific-port

Announcing OSV-Scanner: Vulnerability Scanner for Open Source

Posted by Rex Pan, software engineer, Google Open Source Security Team

Today, we’re launching the OSV-Scanner, a free tool that gives open source developers easy access to vulnerability information relevant to their project.

Last year, we undertook an effort to improve vulnerability triage for developers and consumers of open source software. This involved publishing the Open Source Vulnerability (OSV) schema and launching the OSV.dev service, the first distributed open source vulnerability database. OSV allows all the different open source ecosystems and vulnerability databases to publish and consume information in one simple, precise, and machine readable format.

The OSV-Scanner is the next step in this effort, providing an officially supported frontend to the OSV database that connects a project’s list of dependencies with the vulnerabilities that affect them.

OSV-Scanner

Software projects are commonly built on top of a mountain of dependencies—external software libraries you incorporate into a project to add functionalities without developing them from scratch. Each dependency potentially contains existing known vulnerabilities or new vulnerabilities that could be discovered at any time. There are simply too many dependencies and versions to keep track of manually, so automation is required.

Scanners provide this automated capability by matching your code and dependencies against lists of known vulnerabilities and notifying you if patches or updates are needed. Scanners bring incredible benefits to project security, which is why the 2021 U.S. Executive Order for Cybersecurity included this type of automation as a requirement for national standards on secure software development.

The OSV-Scanner generates reliable, high-quality vulnerability information that closes the gap between a developer’s list of packages and the information in vulnerability databases. Since the OSV.dev database is open source and distributed, it has several benefits in comparison with closed source advisory databases and scanners:

  • Each advisory comes from an open and authoritative source (e.g. the RustSec Advisory Database)
  • Anyone can suggest improvements to advisories, resulting in a very high quality database
  • The OSV format unambiguously stores information about affected versions in a machine-readable format that precisely maps onto a developer’s list of packages
  • The above all results in fewer, more actionable vulnerability notifications, which reduces the time needed to resolve them

Running OSV-Scanner on your project will first find all the transitive dependencies that are being used by analyzing manifests, SBOMs, and commit hashes. The scanner then connects this information with the OSV database and displays the vulnerabilities relevant to your project.

OSV-Scanner is also integrated into the OpenSSF Scorecard’s Vulnerabilities check, which will extend the analysis from a project’s direct vulnerabilities to also include vulnerabilities in all its dependencies. This means that the 1.2M projects regularly evaluated by Scorecard will have a more comprehensive measure of their project security.

What else is new for OSV?

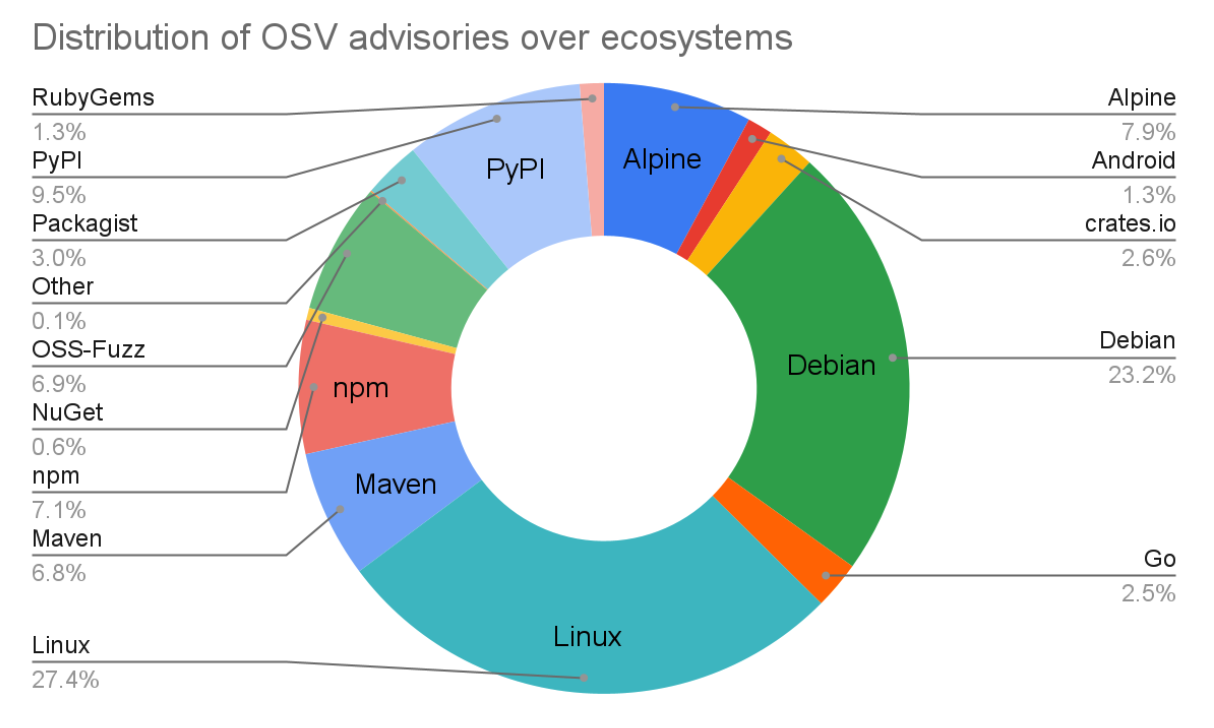
The OSV project has made lots of progress since our last post in June last year. The OSV schema has seen significant adoption from vulnerability databases such as GitHub Security Advisories and Android Security Bulletins. Altogether OSV.dev now supports 16 ecosystems, including all major language ecosystems, Linux distributions (Debian and Alpine), as well as Android, Linux Kernel, and OSS-Fuzz. This means the OSV.dev database is now the biggest open source vulnerability database of its kind, with a total of over 38,000 advisories from 15,000 advisories a year ago.

The OSV.dev website also had a complete overhaul, and now has a better UI and provides more information on each vulnerability. Prominent open source projects have also started to rely on OSV.dev, such as DependencyTrack and Flutter.

What’s next?

There’s still a lot to do! Our plan for OSV-Scanner is not just to build a simple vulnerability scanner; we want to build the best vulnerability management tool—something that will also minimize the burden of remediating known vulnerabilities. Here are some of our ideas for achieving this:

  • The first step is further integrating with developer workflows by offering standalone CI actions, allowing for easy setup and scheduling to keep track of new vulnerabilities.
  • Improve C/C++ vulnerability support: One of the toughest ecosystems for vulnerability management is C/C++, due to the lack of a canonical package manager to identify C/C++ software. OSV is filling this gap by building a high quality database of C/C++ vulnerabilities by adding precise commit level metadata to CVEs.
  • We are also looking to add unique features to OSV-Scanner, like the ability to utilize specific function level vulnerability information by doing call graph analysis, and to be able to automatically remediate vulnerabilities by suggesting minimal version bumps that provide the maximal impact.
  • VEX support: Automatically generating VEX statements using, for example, call graph analysis.

Try out OSV-Scanner today!

You can download and try out OSV-Scanner on your projects by following instructions on our new website osv.dev. Or alternatively, to automatically run OSV-Scanner on your GitHub project, try Scorecard. Please feel free to let us know what you think! You can give us feedback either by opening an issue on our Github, or through the OSV mailing list.

Source :
https://security.googleblog.com/2022/12/announcing-osv-scanner-vulnerability.html

Spikes in Attacks Serve as a Reminder to Update Plugins

The Wordfence Threat Intelligence team continually monitors trends in the attack data we collect. Occasionally an unusual trend will arise from this data, and we have spotted one such trend standing out over the Thanksgiving holiday in the U.S. and the first weekend in December. Attack attempts have spiked for vulnerabilities in two plugins.

The larger spikes have been from attempts to exploit an arbitrary file upload vulnerability in Kaswara Modern VC Addons <= version 3.0.1, for which a rule was added to the Wordfence firewall and available to Wordfence PremiumWordfence Care, and Wordfence Response users on April 21, 2021 and released to users of Wordfence Free on May 21, 2021. The other vulnerability is an arbitrary file upload and arbitrary file deletion vulnerability in the Adning Advertising plugin with versions <= 1.5.5, with our firewall rule being added on June 25, 2020 and made available to free users on July 25, 2020.

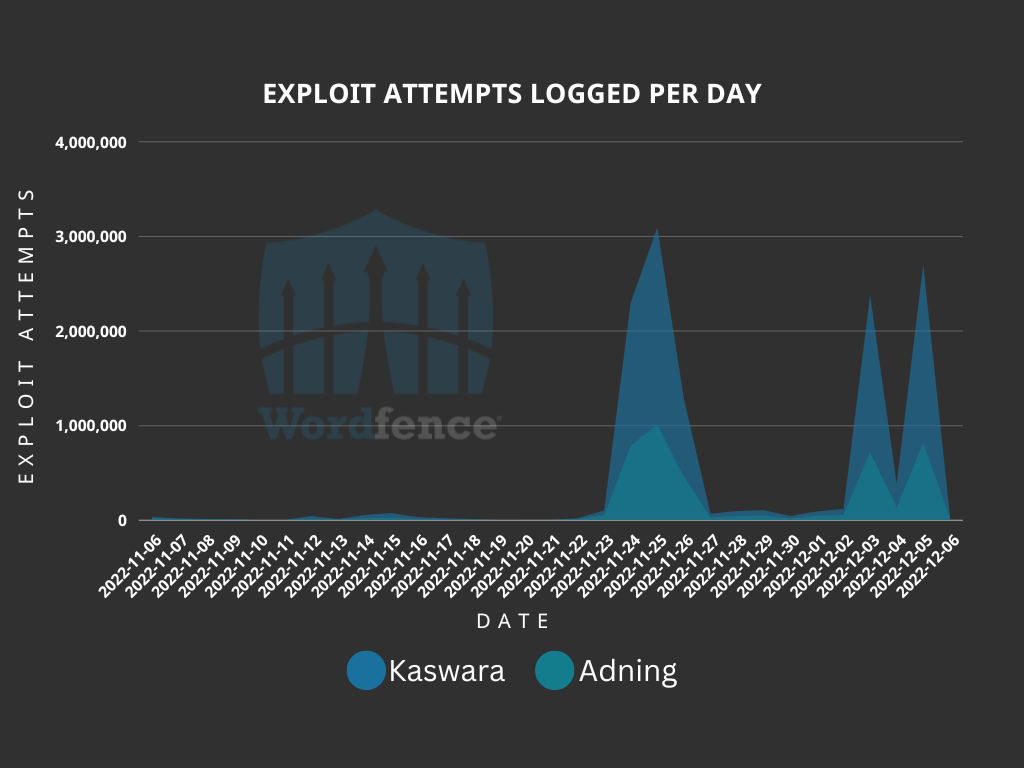
Kaswara and Adning exploit attempts per day

One thing that makes these spikes interesting is the fact that they are occurring over holidays and weekends. The first spike began on November 24, 2022, which was the Thanksgiving holiday in the United States. This spike lasted for three days. The second spike looked a little different, starting on Saturday, December 3, 2022, dropping on Sunday, and finishing with its peak on Monday. These spikes serve as an important reminder that malicious actors are aware that website administrators are not paying as close attention to their sites on holidays and weekends. This makes holidays and weekends a desirable time for attacks to be attempted.

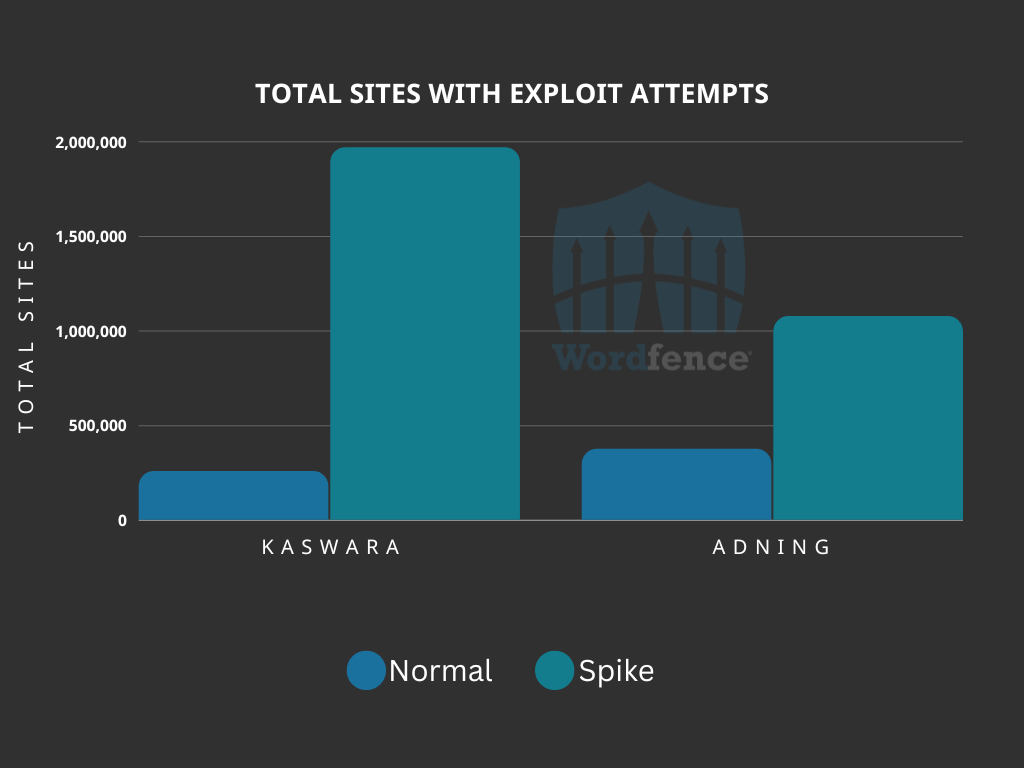
During these spikes, exploit attempts have been observed against the Kaswara vulnerability on 1,969,494 websites, and on 1,075,458 sites against the Adning vulnerability. In contrast, the normal volume of sites with exploit attempts being blocked is an average of 256,700 for the Kaswara vulnerability, and 374,801 for the Adning vulnerability.

Kaswara and Adning sites comparison with spikes

The Kaswara Modern VC Addons plugin had more than 10,000 installations at the time the vulnerability was disclosed on April 21, 2021, and has since been closed without a patch being released. As long as this plugin is installed, it leaves the site vulnerable to attacks that make it possible for unauthenticated attackers upload malicious files that could ultimately lead to a full site takeover due to the fact that the ability to upload PHP files to servers hosting WordPress makes remote code execution possible. Any WordPress website administrators who are still using the plugin should immediately remove the plugin and replace it with a suitable alternative if the functionality is still required for the site, even if you are protected by the Wordfence firewall, as the plugin has not been maintained and may contain other issues. We estimate that about 8,000 WordPress users are still impacted by a vulnerable version, making them an easy target.

The Adning Advertising plugin had more than 8,000 users when our Threat Intelligence team performed our initial investigation of vulnerability on June 24, 2020. After some analysis, we found two vulnerabilities in the plugin, one that would allow an unauthenticated attacker to upload arbitrary files, also leading to easy site takeover. We also found an unauthenticated arbitrary file deletion vulnerability that could just as easily be used for complete site compromise by deleting the wp-config.php file. After we notified the plugin’s author of the vulnerabilities, they quickly worked to release a patched version within 24 hours. Any users of the Adning Advertising plugin should immediately update to the latest version, currently 1.6.3, but version 1.5.6 is the minimum version that includes the patch. We estimate that about 680 WordPress users are still impacted by a vulnerable version of this plugin.

The key takeaway from these attack attempts is to make sure your website components are kept up to date with the latest security updates. When a theme or plugin, or even the WordPress core, has an update available, it should be updated as soon as safely possible for the website. Leaving unpatched vulnerabilities on the website opens a website up to possible attack.

Cyber Observables

The following are the common observables we have logged in these exploit attempts. If any of these are observed on a website or in logs, it is an indication that one of these vulnerabilities has been exploited. The IP addresses listed are specifically from the spikes we have seen over the Thanksgiving holiday and the first weekend in December.

Kaswara

Top ten IPs
  • 40.87.107.73
  • 65.109.128.42
  • 65.21.155.174
  • 65.108.251.64
  • 5.75.244.31
  • 65.109.137.44
  • 65.21.247.31
  • 49.12.184.76
  • 5.75.252.228
  • 5.75.252.229
Common Uploaded Filenames

There were quite a few variations of randomly named six-letter filenames, two are referenced below, but each one observed used the .zip extension.

  • a57bze8931.zip
  • bala.zip
  • jwoqrj.zip
  • kity.zip
  • nkhnhf.zip
Top Ten User-Agent Strings
  • Mozlila/5.0 (Linux; Android 7.0; SM-G892A Bulid/NRD90M; wv) AppleWebKit/537.36 (KHTML, like Gecko) Version/4.0 Chrome/60.0.3112.107 Moblie Safari/537.36
  • Mozlila/5.0 (Linux; Android 7.0; SM-G892A Bulid/NRD90M; wv) AppleWebKit/537.36 (KHTML, like Gecko) Version/4.0 Chrome/60.0.3112.107 Moblie Safari/537.36 X-Middleton/1
  • Mozilla/5.0 (Windows NT 6.1; WOW64) AppleWebKit/537.36 (KHTML, like Gecko) Chrome/36.0.1985.67 Safari/537.36
  • Amazon CloudFront
  • Mozilla/5.0 (X11; Linux x86_64) AppleWebKit/537.36 (KHTML, like Gecko) Chrome/80.0.3987.132 Safari/537.36
  • Mozilla/5.0 (Windows NT 5.1) AppleWebKit/537.36 (KHTML, like Gecko) Chrome/41.0.2224.3 Safari/537.36
  • Mozilla/5.0 (Macintosh; Intel Mac OS X 10_8_4) AppleWebKit/537.36 (KHTML, like Gecko) Chrome/49.0.2656.18 Safari/537.36
  • Mozilla/5.0 (X11; OpenBSD i386) AppleWebKit/537.36 (KHTML, like Gecko) Chrome/36.0.1985.125 Safari/537.36
  • Mozilla/5.0 (X11; Ubuntu; Linux x86_64) AppleWebKit/537.36 (KHTML, like Gecko) Chrome/55.0.2919.83 Safari/537.36
  • Mozilla/5.0 (Macintosh; Intel Mac OS X 10_9_2) AppleWebKit/537.36 (KHTML, like Gecko) Chrome/52.0.2762.73 Safari/537.36

Adning

Top Ten IPs
  • 65.109.128.42
  • 65.108.251.64
  • 65.21.155.174
  • 5.75.244.31
  • 65.109.137.44
  • 65.21.247.31
  • 5.75.252.229
  • 65.109.138.122
  • 40.87.107.73
  • 49.12.184.76
Common Uploaded Filenames

Most observed exploit attempts against the Adning plugin appeared to be nothing more than probing for the vulnerability, but in one instance the following filename was observed as a payload.

  • files
Top Ten User-Agent Strings
  • python-requests/2.28.1
  • Mozlila/5.0 (Linux; Android 7.0; SM-G892A Bulid/NRD90M; wv) AppleWebKit/537.36 (KHTML, like Gecko) Version/4.0 Chrome/60.0.3112.107 Moblie Safari/537.36
  • Mozilla/5.0 (Windows NT 10.0; Win64; x64; rv:88.0) Gecko/20100101 Firefox/88.0
  • Mozilla/5.0 (Windows NT 10.0; Win64; x64) AppleWebKit/537.36 (KHTML, like Gecko) Chrome/105.0.0.0 Safari/537.36
  • python-requests/2.28.1 X-Middleton/1
  • python-requests/2.26.0
  • python-requests/2.27.1
  • Mozilla/5.0 (Macintosh; Intel Mac OS X 10_15_7; @longcat) AppleWebKit/537.36 (KHTML, like Gecko) Chrome/103.0.0.0 Safari/537.36
  • Mozlila/5.0 (Linux; Android 7.0; SM-G892A Bulid/NRD90M; wv) AppleWebKit/537.36 (KHTML, like Gecko) Version/4.0 Chrome/60.0.3112.107 Moblie Safari/537.36 X-Middleton/1
  • ALittle Client
Conclusion

In this post we discussed two vulnerabilities that have spiked over the past two weekends. Removing or updating vulnerable plugins is always the best solution, but a Web Application Firewall like the one provided by Wordfence is important to block exploit attempts and can even protect your site from attacks targeting unknown vulnerabilities. The Wordfence firewall protects all Wordfence users, including Wordfence FreeWordfence PremiumWordfence Care, and Wordfence Response, against these vulnerabilities. Even with this protection in place, these vulnerabilities are serious as they can lead to full site takeover, and the Kaswara Modern VC Addons should be immediately removed, and the Adning Advertising plugin should immediately be updated.

Source :
https://www.wordfence.com/blog/2022/12/spikes-in-attacks-serve-as-a-reminder-to-update-plugins/

Google’s Virtual Desktop of the Future

Nick Yeager

Manager, Google Computing

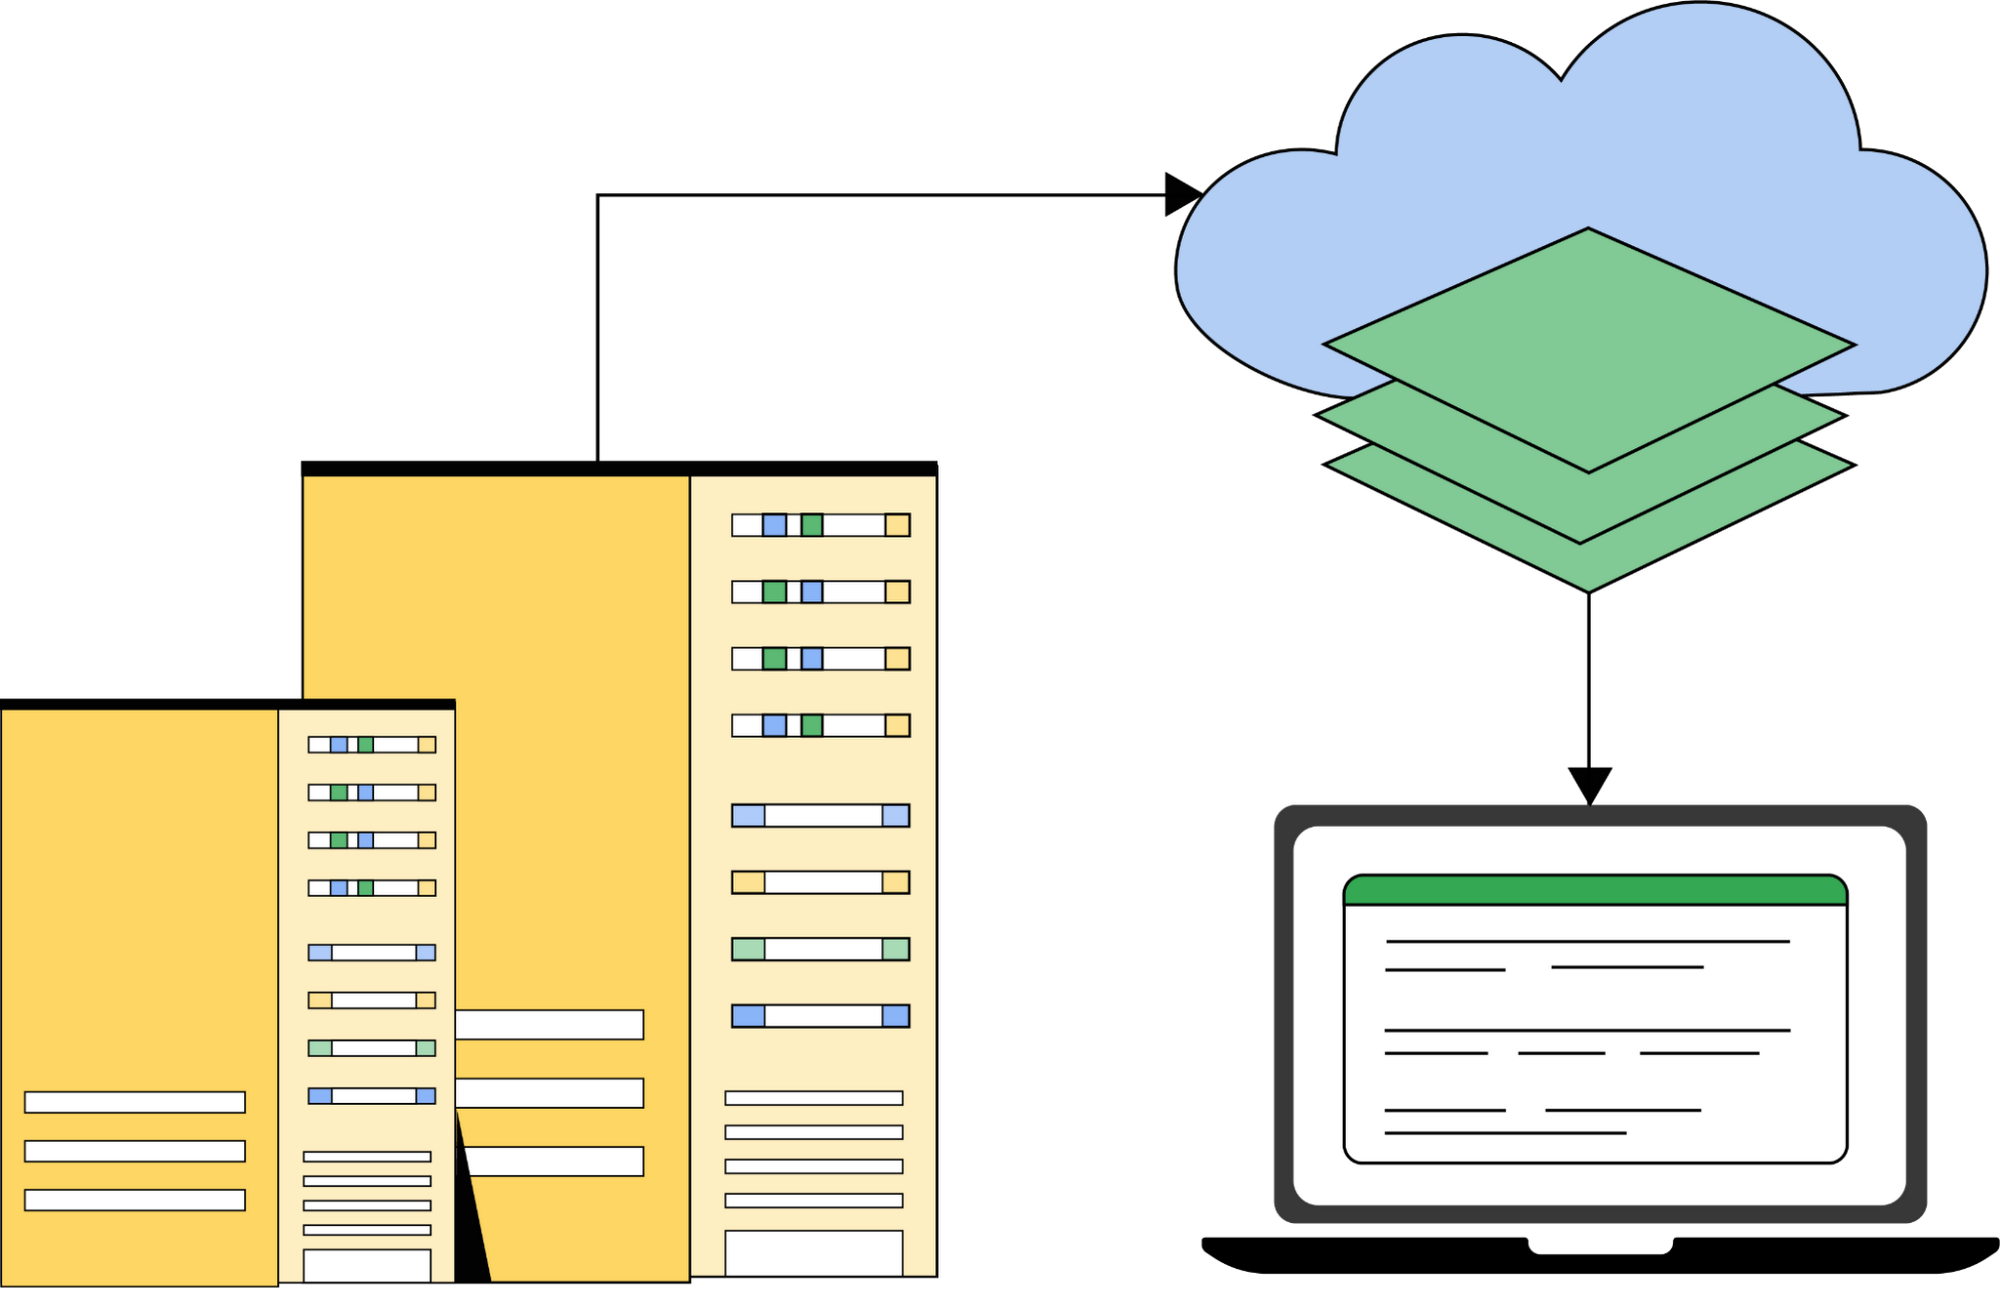
Did you know that most Google employees rely on virtual desktops to get their work done? This represents a paradigm shift in client computing at Google, and was especially critical during the pandemic and the remote work revolution. We’re excited to continue enabling our employees to be productive, anywhere! This post covers the history of virtual desktops and details the numerous benefits Google has seen from their implementation. 

https://storage.googleapis.com/gweb-cloudblog-publish/images/image3_6PhPZT5.max-2000x2000.png

Background

In 2018, Google began the development of virtual desktops in the cloud. A whitepaper was published detailing how virtual desktops were created with Google Cloud, running on Google Compute Engine, as an alternative to physical workstations. Further research had shown that it was feasible to move our physical workstation fleet to these virtual desktops in the cloud. The research began with user experience analysis – looking into how employee satisfaction of cloud workstations compared with physical desktops. Researchers found that user satisfaction of cloud desktops was higher than that of their physical desktop counterparts! This was a monumental moment for cloud-based client computing at Google, and this discovery led to additional analyses of Compute Engine to understand if it could become our preferred (virtual) workstation platform of the future.

Today, Google’s internal use of virtual desktops has increased dramatically. Employees all over the globe use a mix of virtual Linux and Windows desktops on Compute Engine to complete their work. Whether an employee is writing code, accessing production systems, troubleshooting issues, or driving productivity initiatives, virtual desktops are providing them with the compute they need to get their work done. Access to virtual desktops is simple: some employees access their virtual desktop instances via Secure Shell (SSH), while others use Chrome Remote Desktop — a graphical access tool. 

In addition to simplicity and accessibility, Google has realized a number of benefits from virtual desktops. We’ve seen an enhanced security posture, a boost to our sustainability initiatives, and a reduction in maintenance effort associated with our IT infrastructure. All these improvements were achieved while improving the user experience compared to our physical workstation fleet.

https://storage.googleapis.com/gweb-cloudblog-publish/images/image1_0EHHfvd.max-2000x2000.jpg

Example of Google Data Center

Analyzing Cloud vs Physical Desktops

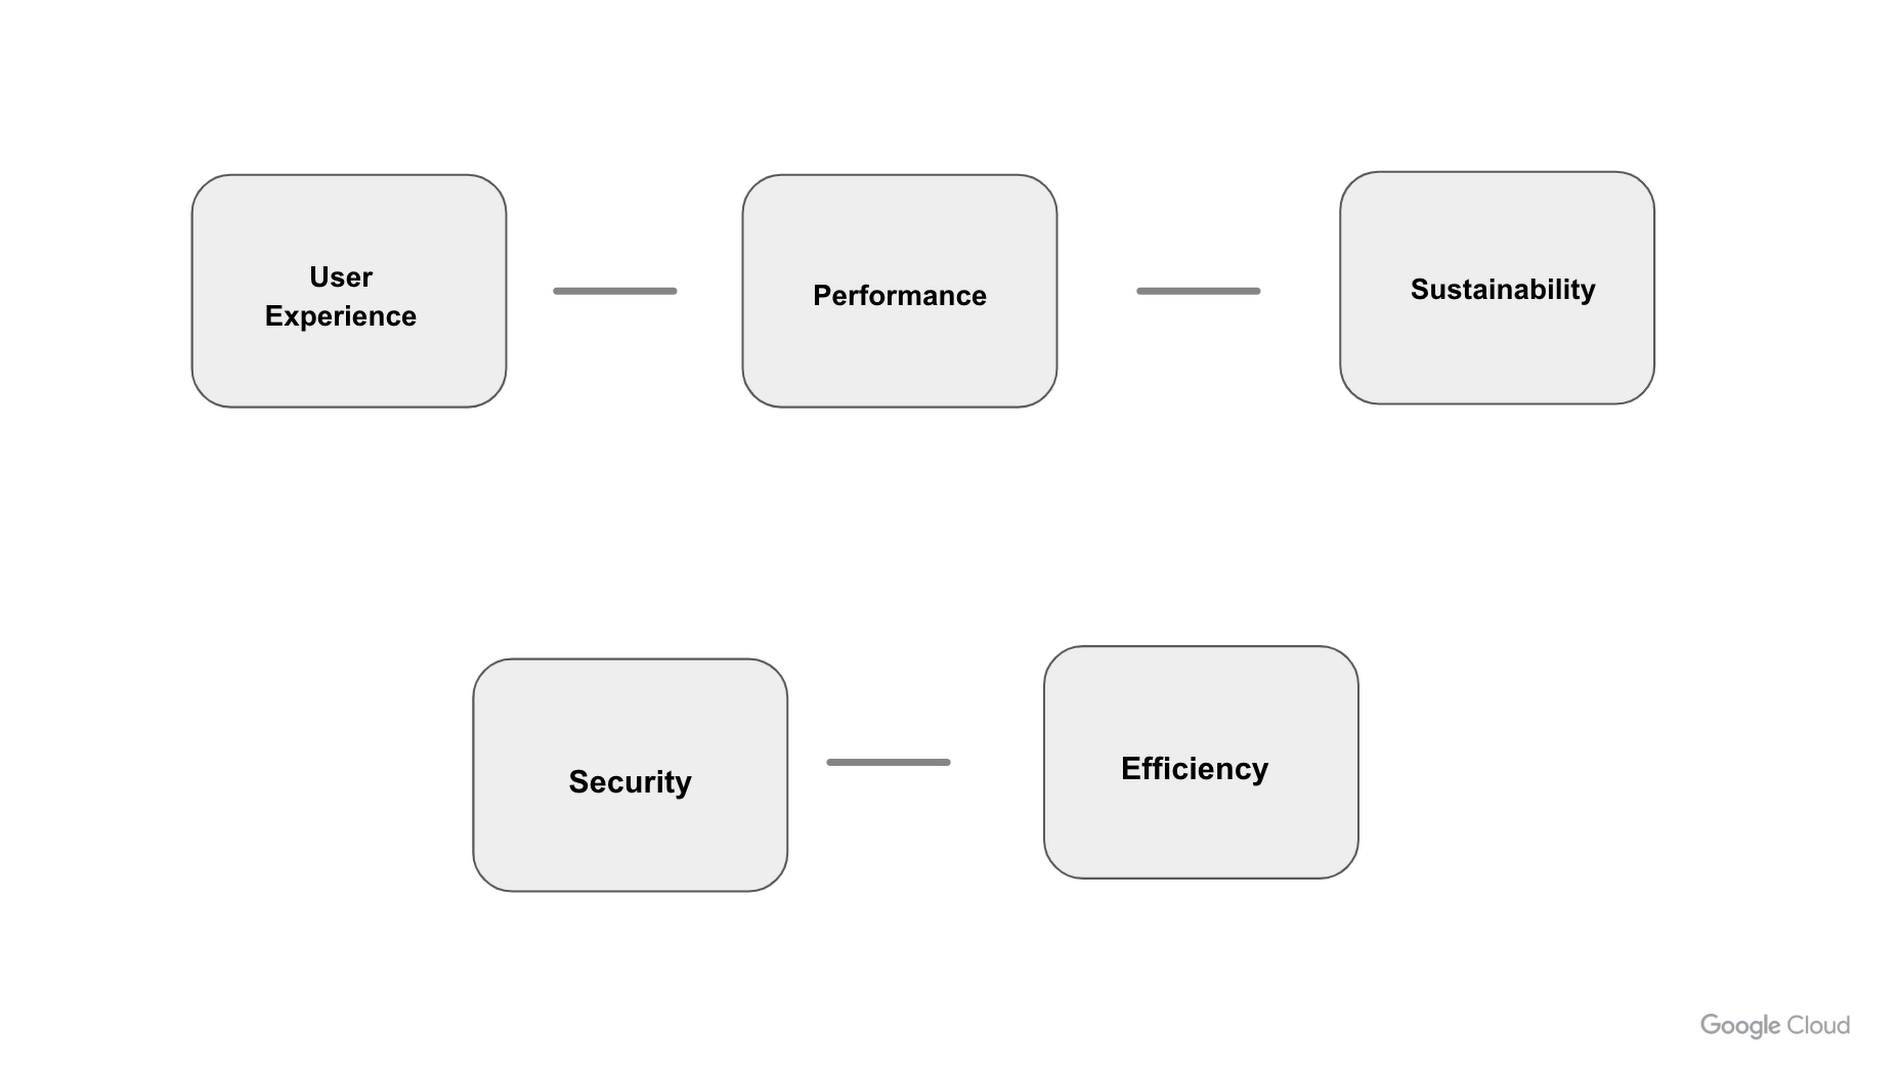
Let’s look deeper into the analysis Google performed to compare cloud virtual desktops and physical desktops. Researchers compared cloud and physical desktops on five core pillars: user experience, performance, sustainability, security, and efficiency.

https://storage.googleapis.com/gweb-cloudblog-publish/images/image4_6gvUvXe.max-1900x1900.png

User Experience

Before the transition to virtual desktops got underway, user experience researchers wanted to know more about how they would affect employee happiness. They discovered that employees embraced the benefits that virtual desktops offered. This included freeing up valuable desk space to provide an always-on, always available compute experience, accessible from anywhere in the world, and reduced maintenance overhead compared to physical desktops. 

Performance

From a performance perspective, cloud desktops are simply better than physical desktops. For example, running on Compute Engine makes it easy to spin-up on-demand virtual instances with predictable compute and performance – a task that is significantly more difficult with a physical workstation vendor. Virtual desktops rely on a mix of Virtual Machine (VM) families that Google developed based on the performance needs of our users. These include Google Compute Engine E2 high-efficiency instances, which employees might use for day-to-day tasks, to higher-performance N2/N2D instances, which employees might use for more demanding machine learning jobs. Compute Engine offers a VM shape for practically any computing workflow. Additionally, employees no longer have to worry about machine upgrades (to increase performance, for example) because our entire fleet of virtual desktops can be upgraded to new shapes (with more CPU and RAM) with a single config change and a simple reboot — all within a matter of minutes. Plus, Compute Engine continues to add features and new machine types, which means our capabilities only continue to grow in this space.

Sustainability

Google cares deeply about sustainability and has been carbon neutral since 2007. Moving from physical desktops to virtual desktops on Compute Engine brings us closer to Google sustainability goals of a net-neutral desktop computing fleet. Our internal facilities team has praised virtual desktops as a win for future workspace planning, because a reduction in physical workstations could also mean a reduction in first-time construction costs of new buildings, significant (up to 30%) campus energy reductions, and even further reductions in costs associated with HVAC needs and circuit size needs at our campuses. Lastly, a reduction in physical workstations also contributes to a reduction in physical e-waste and a reduction in the carbon associated with transporting workstations from their factory of origin to office locations. At Google’s scale, these changes lead to an immense win from a sustainability standpoint. 

Security

By their very nature, virtual desktops mitigate the ability for a bad actor to exfiltrate data or otherwise compromise physical desktop hardware since there is no desktop hardware to compromise in the first place. This means attacks such as USB attacks, evil maid attacks, and similar techniques for subverting security that require direct hardware access become worries of the past. Additionally, the transition to cloud-based virtual desktops also brings with it an enhanced security posture through the use of Google Cloud’s myriad security features including Confidential ComputingvTPMs, and more. 

Efficiency

In the past, it was not uncommon for employees to spend days waiting for IT to deliver new machines or fix physical workstations. Today, cloud-based desktops can be created instantaneously on-demand and resized on-demand. They are always accessible, and virtually immune from maintenance-related issues. IT no longer has to deal with concerns like warranty claims, break-fix issues, or recycling. This time savings enables IT to focus on higher priority initiatives all while reducing their workload. With an enterprise the size of Google, these efficiency wins added up quickly. 

Considerations to Keep in Mind

Although Google has seen significant benefits with virtual desktops, there are some considerations to keep in mind before deciding if they are right for your enterprise. First, it’s important to recognize that migrating to a virtual fleet requires a consistently reliable and performant client internet connection. For remote/global employees, it’s important they’re located geographically near a Google Cloud Region (to minimize latency). Additionally, there are cases where physical workstations are still considered vital. These cases include users who need USB and other direct I/O access for testing/debugging hardware and users who have ultra low-latency graphics/video editing or CAD simulation needs. Finally, to ensure interoperability between these virtual desktops and the rest of our computing fleet, we did have to perform some additional engineering tasks to integrate our asset management and other IT systems with the virtual desktops. Whether your enterprise needs such features and integration should be carefully analyzed before considering a solution such as this. However, should you ultimately conclude that cloud-based desktops are the solution for your enterprise, we’re confident you’ll realize many of the benefits we have!

Tying It All Together

Although moving Google employees to virtual desktops in the clouds was a significant engineering undertaking, the benefits have been just as significant.  Making this switch has boosted employee productivity and satisfaction, enhanced security, increased efficiency, and provided noticeable improvements in performance and user experience. In short, cloud-based desktops are helping us transform how Googlers get their work done. During the pandemic, we saw the benefits of virtual desktops in a critical time. Employees had access to their virtual desktop from anywhere in the world, which kept our workforce safer and reduced transmission vectors for COVID-19. We’re excited for a future where more and more of our employees are computing in the cloud as we continue to embrace the work-from-anywhere model and as we continue to add new features and enhanced capabilities to Compute Engine!

Source :
https://cloud.google.com/blog/topics/developers-practitioners/googles-virtual-desktop-future

How to Protect Your Microsoft Exchange Server 2019 with CrowdSec

Follow this step-by-step guide on installing CrowdSec on a Microsoft Exchange server to better protect against common cyberattacks and new threats.

This article is a direct translation of Florian Burnel’s article published on IT Connect. You can find the original article here.

We also have an article on installing CrowdSec on a Windows server with a tutorial on blocking brute force attacks on an RDP connection and blocking a scan of a website hosted on an IIS server.

I. Presentation

In this tutorial, we will dive into how to secure a Microsoft Exchange mail server with the CrowdSec collaborative firewall! Installing CrowdSec on a Microsoft Exchange server will allow you to protect against common attacks but also new threats.

A good example is the security breach ProxyNotShell which made headlines in October 2022: CrowdSec can detect exploit attempts and block malicious IP addresses, thanks to the fact that it contains a collection for IIS and attacks based on HTTP/HTTPS protocols. Other examples are more classic cases: brute force attacks on the Exchange webmail interface.

Due to how it functions, an Exchange server will be exposed to the Internet depending on the architecture of your IS (for example, the presence or absence of a reverse proxy). However, it must be able to communicate outward and also be reachable from the outside to send and receive emails to your users’ mailboxes.

This same server is also reachable through Webmail which allows users to check their emails from a browser. This implies the presence of an IIS web server that hosts both Webmail and Exchange Admin Center. Furthermore, when an Exchange server is compromised by a cyberattack, this mainly involves HTTP/HTTPS access: hence the interest in protecting yourself.

CrowdSec Windows - Protect OWA

This article is a continuation of my first article on installing an Exchange Server 2019 server. For the installation of the Microsoft Exchange Server itself, I invite you to read my previous tutorial.

In addition, I also encourage you to restrict access to the Exchange admin center.

II. Setting up CrowdSec on Windows

A. Installing the CrowdSec Agent

I already wrote about how to install CrowdSec on Windows in a previous article, but that was the Alpha version. Now, the CrowdSec agent for Windows is available in a stable version, which means that it is ready to be implemented in production.

Note: if you have previously installed the alpha version on your server, you must uninstall it before installing this new CrowdSec version.

First, you must download the MSI package from the official CrowdSec GitHub repository.

While it is installing, the CrowdSec MSI package will perform the following actions:

  • Install CrowdSec itself
  • Integrate the Windows Collection (details are available here)
  • Register the CrowdSec instance with the Central API
  • Register the CrowdSec service within Windows (automatic start)

Once done, begin the installation. Just follow the steps without making any changes. Then, allow about 2 minutes for the Agent to fully install. 

Install CrowdSec on Windows for Exchange Server

As soon as the CrowdSec Agent is in place, we have access to the “cscli” command line which allows you to manage your CrowdSec instance from it.

To list current collections:

cscli collections list

To list the current bouncers (none by default):

cscli bouncers list

CrowdSec Windows - List collections and bouncers

B. Installing the ISS Collection

On Windows, CrowdSec natively sets up the “crowdsecurity/windows“, but it is not enough to protect your Exchange server. We will need to add the IIS collection, which will also add two more collections to detect web attacks.

This collection is installed from this command:

cscli collections install crowdsecurity/iis

In just a few seconds after adding, we can list the installed collections to see the presence of the new collections.

CrowdSec Windows - Lister les collections

To justify what I said in the introduction about the ProxyNotShell vulnerability, we can look at the details of the “crowdsecurity/http-cve” collection. Here, we can see the presence of a detection scenario named “crowdsecurity/CVE-2022-41082” corresponding to this vulnerability.

cscli collections inspect crowdsecurity/http-cve

CrowdSec Windows - http-cve collection details

Let’s go to the next step.

C. Installing Windows Firewall Bouncer

Now, we must set up the “firewall” bouncer for Windows, otherwise, attacks will be detected, but not blocked. Click on the following link, then on the “Download” button to download the MSI package: https://hub.crowdsec.net/author/crowdsecurity/bouncers/cs-windows-firewall-bouncer

The installation is done in only a few clicks: just follow the wizard.

CrowdSec Windows - Installation du bouncer firewall

Once done, the command below will make it possible to see the presence of the bouncer.

cscli bouncers list

CrowdSec Windows - Lister les bouncers

Let’s go to the next step.

D. Add IIS log support

For CrowdSec to focus on the logs generated by IIS, and by extension, corresponding to the access to the OWA and ECP portals of Exchange, we must indicate to it the paths to the log files it will analyze.

To do this, you will need to edit the following: 

C:\ProgramData\CrowdSec\config\acquis.yaml

In order to add the following lines:

---
use_time_machine: true
filenames:
  - C:\inetpub\logs\LogFiles\*\*.log
labels:
  type: iis

You can see the presence of a “dynamic” path which is characterized by the presence of the wildcard character: “C:\inetpub\logs\LogFiles\*\*.log “. This value will allow CrowdSec to find and read log files located in the tree “C:\inetpub\logs\LogFiles\

In addition to the path to the log files, this configuration block we just added contains a parameter named use_time_machine. It is important because IIS does not write logs in real-time in the log file, but it writes new events in blocks, every minute. Thanks to this parameter, CrowdSec will read the date and time of each line to find its way and process the events chronologically, this avoids false positives. 

However, if you are not using the log files, but the event viewer, you should use this piece of code and not the one mentioned above:

---
source: wineventlog
event_channel: Microsoft-IIS-Logging/Logs
event_ids:  - 6200
event_level: information
labels:  
type: iis

Save the acquired.yaml file and you can close it.

Finally, we need to restart CrowdSec. This operation is done in PowerShell with this command:

Restart-Service crowdsec

CrowdSec setup is complete! Now let’s test it!

III. Is the Exchange server protected?

A. Brute force on OWA – Webmail Exchange 

There are several possible methods to perform a brute force attack on OWA. Of course, you could do this manually for testing, but you could also use something a bit more automated to simulate a brute-force attack. As for us, we will use a Bash script named “OWA BRUTE” that executes Hydra (an offensive tool compatible with many protocols to test a service’s authentication, equipment, etc. ) with specific parameters corresponding to Outlook Web Access.

The script is available on GitHub.

First, we need to install Hydra and Git. The first one is a prerequisite to use the script and perform our attack, while the second one will be used to clone the GitHub repository to get the Bash script (you can also copy and paste the script in a file…).

sudo apt-get update

sudo apt-get install hydra git

Once this is done, we clone the GitHub project in “/home/florian”:

cd /home/florian/

git clone

Then, we create a file “users.txt” in which we indicate some names of users. You can also recover a list on the Internet.

nano /home/florian/owabrute/users.txt

In the same sense, we create a file “passwords.txt” with the passwords to test.

nano /home/florian/owabrute/passwords.txt

Then, we move to the OWA BRUTE directory to add the execution rights on the Bash script.

cd /home/florian/owabrute/

chmod +x owabrute.sh

All that remains is to launch the attack by targeting “mail.domaine.fr” and then using our previously created files.

./owabrute.sh -d mail.domaine.fr -u ./users.txt -p ./passwords.txt

We can see that the script will test each combination. At the end, it will indicate if it has succeeded or not in finding a valid combination. However, CrowdSec will intervene…

We can see that the script will test each combination, in turn.  In the end, it will indicate whether or not it succeeded in finding a valid combination.  However, CrowdSec will intervene....

Indeed, if I look at my Exchange server, I can see that there is a new IP address blocked because of brute force (“crowdsecurity/windows-bf”). The CrowdSec agent has correctly blocked the IP address that caused this attack.

.

Since we are here to test, we can unblock our IP address manually:

cscli decisions delete –ip X.X.X.X

Let’s move on to a second test.

B. Scan Web on OWA

In the case where someone tries to scan your Web server, when IIS is used by Exchange, they can rely on various tools including Nikto which is used to analyze the security level of a Web server. For this example, OWA will be scanned with the Nikto tool: we will see if CrowdSec detects what is happening on the IIS server…

First of all, let’s install this tool:

sudo apt-get update

sudo apt-get install nikto

Then, we launch the scan to webmail:

nikto -h https://mail.domaine.fr/owa

The analysis will take several minutes…

The analysis will take several minutes...

…Except that after a while, CrowdSec will realize that this web client is performing suspicious actions and it will decide to block it. In the example below, we can see the reason “http-sensitive-files” which means that the client tried to access sensitive files.

In this second example, where we performed a completely different action compared to the first attempt, CrowdSec also managed to detect our malicious actions.

IV. Conclusion

We have just seen how to set up the CrowdSec agent on Windows to protect a Microsoft Exchange mail server! Here, I took the example of Exchange Server 2019, but it also applies to previous versions. With these two quick, but concrete examples, we could see the efficiency of CrowdSec!

I’ll also take this moment to remind you of the existence of the CrowdSec Console which allows you to follow the alerts raised by one or more CrowdSec Agents from a web-based console. To learn more about the implementation and all the functionalities, you can visit the Console page.

WRITTEN BY

Florian Burnel

Source :
https://www.crowdsec.net/blog/how-to-protect-microsoft-exchange-server-crowdsec

Pixel 7a renders leak providing a first look at the new Google mid-range

Pixel 7a Renders Leak

Rumors regarding the upcoming midrange Google Pixel phone – the Pixel 7a, have been swirling around for some time now with specs that seem more akin to a flagship phone than Google’s usual summer phone release. While some rumors say that the Pixel 7a could ship with a ceramic body, an upgraded camera setup, the same Tensor G2 processor, wireless charging, and a high-refresh-rate screen, high-resolution renders have now leaked that shed light on some, but not all, of the speculations. These renders come to us via Smartprix and OnLeaks, which include not only views of the device from different angles but also a 360-degree video for a more detailed look.360-degree view of the Pixel 7a render

The device retains the familiar Pixel design language with the camera bar that has been its iconic look since the Pixel 6. However, unlike the one found in the 6a, which was enclosed in all glass, this camera bar looks to be enveloped in brushed aluminum, although we cannot confirm the exact material just by looking at the renders. In comparison to the Pixel 6a, the dimensions reveal that the 7a will be just about the same height but will be a bit wider and thicker (152.4 x 72.9 x 9.0mm on the Pixel 7a vs. 152.2 x 71.8 x 8.9 mm on the Pixel 6a), but the difference seems so minimal it may not even register during day to day use.

When viewing the device from the front, one could see the noticeable larger bezels and thicker chin, which isn’t surprising for a Google mid-tier device. A punch-hole camera is found in the top-middle of the display, just like its predecessor, and the power button, volume rocker, and USB-C port seem to have been kept in the same location as well. Unfortunately, though, just like the Pixel 6a, there is no headphone jack in sight.

The leak also reports that the device will be available in two colorways, white and dark gray, with the white color chosen as the one pictured in the renders that features a silver frame around the device to match the same color of the camera bar. It is unknown if the dark gray option will have darker or even black rails and whether the camera bar will come in a matching color as well. Hopefully, there will be a third, more colorful option, just like “Lemongrass” was for the Pixel 6a.

Some of the rumors that remain unanswered by this leak include the material on the outside of the device, and frankly, with the renders being white, it does very little to debunk whether it will be ceramic or not. We also have no way of confirming one of the hottest rumors surrounding this device, which is its supposed 90Hz display, a detail that has made quite a few Pixel fans very happy. It looks like we’re going to have to wait a bit longer to get a bit more info, but knowing how these things usually go, we are probably not far off from the next 7a leak.

Source :
https://chromeunboxed.com/pixel-7a-renders-leak

Pixel Android 13 December update rolls out with lots of fixes

Pixel Software Update December 2022

Yesterday, new software features arrived to the Pixel family of devices via the usual Pixel Feature Drop. The new features for the Pixel phone included the promised free Google One VPN, Clear Calling, Recorder app speaker labels, Spatial Audio, new live wallpapers, and unified Security & Privacy settings, among others. Here is a summary of feature availability per device:

Source / ✝ Only available in English (US)

However, aside from the new exciting features, Pixel phones also received their monthly software update for December 2022 as well as the final and stable release for those enrolled in the Android 13 QPR1 betaEssentially, the December 2022 update (Build TQ1A.221205.011) includes the Pixel Feature drop plus the latest platform optimizations, bug fixes, and security patches that address areas such as device performance, stability, and connectivity. The list of issues fixed can be found below and it’s quite long:

Apps

  • Fix for issue causing text input to certain fields in the Phone app to display in a darker color
  • Fix for issue occasionally causing playback errors when seeking through video content in certain apps
  • Fix for issue occasionally preventing text messages from restoring from cloud backups during device setup
  • General improvements for background performance in certain Google apps

Audio

  • General improvements for USB audio support for various cables or accessories *[1]
  • General improvements to support various audio codecs with certain devices or accessories *[4]

Battery & Charging

  • Battery usage in Settings displays information since last full charge (up to 7 days) 
  • Fix for issue occasionally causing device to power off while Battery Share is active *[4]
  • Fix for issue occasionally causing higher battery usage during media playback with certain apps *[2]
  • Fix for issue occasionally preventing Adaptive charging from working in certain conditions *[2]
  • Fix for issue occasionally preventing wireless charging from working with certain accessories *[2]
  • General improvements for charging, battery usage or thermal performance in certain conditions *[1]

Biometrics

  • Fix for issue occasionally causing audio to skip when played over certain Bluetooth devices or accessories *[2]
  • Fix for issue occasionally delaying when the fingerprint icon is displayed on the lock screen *[1]
  • Fix for issue occasionally preventing fingerprint sensor from detecting touch while always-on display is active *[3]
  • Fix for issue where fingerprint enrollment may occasionally display visual glitches in certain conditions *[1]
  • Improvements for face unlock lock screen helper text shown in certain conditions *[2]

Bluetooth

  • Fix for issue causing music playback to continue without audible sound after ending a call while using certain Bluetooth accessories *[2]
  • Fix for issue occasionally causing audio to skip when played over certain Bluetooth devices or accessories *[2]
  • Fix for issue occasionally preventing audio switching between connected Bluetooth devices in certain conditions
  • Fix for issue occasionally preventing Bluetooth Low Energy devices from displaying a device name during pairing
  • Fix for issue occasionally preventing connection to car head units using older Bluetooth versions
  • Fix for issue occasionally preventing discovery of certain Bluetooth devices or accessories 
  • Fix for issue occasionally preventing previously paired Bluetooth devices from reconnecting
  • General improvements for Bluetooth stability and performance in certain conditions

Camera

  • Fix for issue occasionally causing Camera app to crash while zoomed in or switching modes *[2]
  • Fix for issue occasionally causing viewfinder preview to display a blank screen *[2]
  • Fix for issue where video that is recorded while switching between camera modes occasionally shows gaps in playback *[2]
  • General improvements for camera stability and performance in certain conditions

Display & Graphics

  • Fix for issue occasionally causing screen to flicker when waking from always-on display 
  • Fix for issue occasionally causing visual artifacts or glitches while using certain apps or games *[3]

Framework

  • Fix for issue occasionally causing notifications to display in a different color theme from the system
  • Fix for issue occasionally causing the wrong character to display after a new line in certain apps or UI elements
  • Fix for issue occasionally causing Work Profile app notifications to appear even if Work Profile is paused
  • Fix for issue occasionally preventing certain apps to rotate to landscape orientation
  • Fix for issue occasionally preventing keyboard from being dismissed while using certain apps

Sensors

  • Fix for issue occasionally preventing “tap to wake” or “lift to wake” from working in certain conditions *[1]
  • Fix for issue occasionally preventing Adaptive brightness from activating in certain conditions
  • Fix for issue occasionally preventing Quick Tap from triggering app or system shortcuts in certain conditions
  • Fix to improve Adaptive brightness transitions during phone calls in certain conditions *[1]
  • General improvements for proximity sensor performance under certain lighting conditions *[1]

System

  • General improvements for system stability and performance in certain conditions
  • General improvements to optimize device thermal performance in certain conditions or use cases *[1]

Telephony

  • Fix for issue causing reduced network or call stability under certain conditions *[2]
  • Fix for issue occasionally preventing network SIM cards from activating in certain conditions *[3]
  • General improvements for network connection stability and performance in certain conditions
  • General improvements for network connectivity after toggling airplane mode off
  • General improvements for switching between 3G to 4G on certain carrier networks
  • General improvements for VPN connection stability and performance on mobile networks under certain conditions
  • General improvements for Wi-Fi calling stability and performance for certain carriers or networks
  • Improve dual SIM network connectivity in certain conditions *[3]
  • Improve RCS messaging stability under certain conditions *[2]

Touch

  • General improvements for touch response and performance in certain conditions *[1]

User Interface

  • Change for home screen search bar behavior to open the Google app when tapping the G logo
  • Fix for issue occasionally causing “Pause work apps” button display over app drawer or in the wrong position
  • Fix for issue occasionally causing certain Settings toggles to appear disabled, or set to the wrong state
  • Fix for issue occasionally causing device color theme to change unexpectedly
  • Fix for issue occasionally causing home screen app icons to appear duplicated after adjusting grid size
  • Fix for issue occasionally causing home screen widgets or icons to appear small or scaled down in certain conditions
  • Fix for issue occasionally causing media player controls to appear invisible or hidden in notification shade
  • Fix for issue occasionally causing notification overflow dot to overlay app icons on lock screen
  • Fix for issue occasionally causing notifications to disappear or appear invisible in notification shade
  • Fix for issue occasionally causing screenshot captures to fail in certain conditions
  • Fix for issue occasionally causing suggested apps in Search to overlap or display over results
  • Fix for issue occasionally causing text to appear incorrectly cutoff or truncated at different font sizes
  • Fix for issue occasionally causing UI to reset after adjusting display resolution
  • Fix for issue occasionally causing wallpaper to appear black or empty in certain conditions
  • Fix for issue occasionally enabling touch interaction during the lock screen transition after screen is turned off
  • Fix for issue occasionally preventing media player album art from updating when content changes
  • Fix for issue occasionally preventing media player controls from displaying on lock screen
  • Fix for issue occasionally preventing screen to appear blank or frozen after launching certain apps
  • Fix for issue where incoming notifications would occasionally display over others listed in the notification shade
  • Fix to improve responsiveness of At A Glance home and lock screen widget for certain conditions or use cases
  • Fix to improve spacing for certain UI modals in device setup and Settings
  • General improvements for performance in certain UI transitions and animations

Wi-Fi

  • Fix for issue occasionally preventing hotspot from turning on in certain conditions *[1]
  • General improvements for Wi-Fi network connection stability & performance in certain conditions *[1]

*[1] Included on Pixel 6, Pixel 6 Pro, Pixel 6a, Pixel 7, Pixel 7 Pro
*[2] Included on Pixel 7, Pixel 7 Pro
*[3] Included on Pixel 6, Pixel 6 Pro, Pixel 6a
*[4] Included on Pixel 6, Pixel 6 Pro, Pixel 7, Pixel 7 Pro

All Pixel devices running Android 13 (Pixel 4a, 5, 5a, 6, 6 Pro, 6a, 7, 7 Pro) began receiving these upgrades yesterday. The rollout will continue over the next week in phases, so if your eligible device doesn’t show the update available yet, you may just need to wait a few more days. However, once the OTA (over-the-air) update becomes available for your device, you will receive a notification.

Source :
https://chromeunboxed.com/december-2022-pixel-phone-update

How to keep your Gmail Inbox free of Spam and Promotions

Gmail Spam Featured Image

Using its time-tested and refined algorithms, Gmail does a pretty good job of trying to keep our inboxes free of Spam, Junk emails, and unwanted promotions. It even utilizes inbox tabs to categorize your promotions, social, updates, and forum emails and keep them out of your primary email tab where your actual new emails are shown. However, even with all of these tools, filtering out unwanted emails is not 100% perfect, and a little manual input from us can go a long way. There are three ways that you can train Gmail to filter out unwanted emails from your inbox, which are as follows:

Inbox Categories

The first is the aforementioned inbox categories that can separate certain types of emails and display them on a different tab. Although initially done programmatically, this can be further tweaked so that you have the desired results.

To turn this feature on, navigate to your Gmail settings, then click on the Inbox tabMake sure the Inbox type is set to “Default,” then add a checkmark to the categories you wish to have in a separate tab. If you just want to keep out marketing emails, add a check to the “Promotions” category, then “Save Changes.”

You will now have a “Promotions” tab in your emails that you have the option to check if desired. If you see emails in there that you’d rather go straight to your Primary tab, just drag it out and into the main tab. Gmail will then ask if you would like for it to automatically do the same for future emails from the same sender.

I just want the steps!

  1. Go to Gmail settings
  2. Click on the Inbox tab
  3. Make sure the Inbox type is set to “Default”
  4. Add a check to the “Promotions” category
  5. Click on “Save Changes”

Gmail Filters

Utilizing Gmail filters is a manual process at first, but completely pays off once it’s set up and starts automatically filtering based on the parameters you have set. You can be very deliberate with your email filters, setting specific email addresses and/or domains to automatically go to Spam, or you can be more general and block out an entire email list that you may have been unwillingly made a part of. To do this, open the Spam email you would like to filter out in the future, then click on the three-dot menu, and select “Filter messages like these.”

Depending on the email, if Gmail detects that this was sent to a mailing list and not you directly, you will see an option to filter the email based on the list itself. Click on “Create filter,” and then choose to either archive or delete the email. If there are other emails in your inbox that match this filter, you should also see an option to apply it to all the matching conversations. Once you’ve chosen your desired action(s), click on “Create filter.”

I just want the steps!

  1. Open the Spam email you would like to filter out in the future
  2. Click on the three-dot menu
  3. Select “Filter messages like these”
  4. Click on “Create filter,” and then choose to either archive or delete the email
  5. Select option to apply it to all the matching conversations
  6. Click on “Create filter”

Reporting Spam in Inbox

Lastly, you can train Gmail to programmatically unsubscribe from an email list, mark the email as Spam, or do both at the same time. The latter is the most effective and recommended method, as it not only tries to unsubscribe you from the list but also marks it as Spam in case unsubscribing doesn’t go through as it should.

To just unsubscribe, you can click on the “Unsubscribe” link that appears beside the sender’s email address. Once you click there, you will receive a notification asking you to confirm that you want to go ahead and unsubscribe.

To both unsubscribe and mark the email as Spam, click on the exclamation mark that appears in the menu above the email, then confirm that you want to form “Report spam and unsubscribe.”

I just want the steps!

  1. To just unsubscribe, click on the “Unsubscribe” link that appears beside the sender’s email address, then confirm by clicking the blue “Unsubscribe” button
  2. To both unsubscribe and mark the email as Spam, click on the exclamation mark that appears in the menu above the email
  3. At the confirmation popup, click on “Report spam and unsubscribe”

Source :
https://chromeunboxed.com/how-to-filter-spam-promotions

How to record your Pixel phone’s screen without installing a third-party application

In the early days of Android phones, which is now over ten years ago, I remember having to go to the Android Marketplace to find a third-party application to record my screen. Many of the instances where I felt I needed to capture my display occurred when I wanted to explain to my friends or family how to use their handsets without having to talk them through it on a phone call.

Nowadays, pretty much all modern versions of Android have a built-in screen recorder that you can access with just a few taps. Today, I’m going to show you how to do that on your Pixel or Android 12+ device so you can quickly save short clips to your storage and share them with others!

You may find that you have the same needs I have in the past, or you may simply want to record gameplay footage of mobile titles for YouTube. In the case of the latter, Google Play Games does support direct recording and even has special tools for it, though it’s worth noting that these are currently absent on my device at the time of writing this!

Alright, so first, you’ll need to swipe down the notification shade at the top of your phone. Swipe down a second time to pull up the Quick Settings panel. From there, you should see the colored tiles pictured below. If you don’t see the “Screen record” tile, you can tap the pencil icon at the bottom right of the panel to edit which tiles are available to you.

Oh and don’t forget that the quick settings are paginated, so you can swipe left and right to swap between the pages available. If you do need to edit your settings panel to place the screen recorder on the front page or to drag it out of the extra tiles section, you can simply press and hold it and bring it up higher (see the middle image).

Once it’s available – and please don’t skip this step – clear your screen of any personal information. This includes notifications and widgets that feature notes, emails, messages, and more. All too often, I see people record their screens and leave certain things visible that could compromise their privacy.

Tap the “Screen record” tile, select your audio device, whether or not you want to record audio, to begin with, and whether you’re interested in capturing your screen touches using the dialogue box that pops up. Your notification shade will close, and a red timer counting down from three will appear in your status bar.

The moment this disappears, you’re officially recording! This means that anything you do from touching, swiping, opening apps, and more will be captured. At this point, please avoid opening banking apps, your email, personal Keep notes, and so on. You wouldn’t want anyone to steal your secret government documents or find out that you’re a millionaire, now would you?

I wish I had either or both of those problems, and I’m sure you do too. Anyways, once you’re finished recording, just go ahead and swipe down from the top of your screen again to call up your notification shade. Then, tap the huge, red “Recording screen” notice.

That’s it! You’re no longer recording. Wait just a moment and you’ll see your recorded video appear as its own separate notification that you can then watch, delete, share or even upload to Google photos for later. Have fun and be safe!

I just want the steps!1. Swipe down twice from the top of your phone
2. Edit the quick settings panel if you need to make the “Screen record” tile available” (tap the pencil icon!)
3. Tap the “Screen record” tile and choose if you want to record audio or screen touches. You may also need to select your microphone!
4. Wait for the red countdown timer in your status bar to expire
5. You’re now recording! Perform any actions you wish to capture 🙂
6. When you’re finished, swipe down from the top of your screen and tap the red recording notice.
7. Upload your new video to Google Photos, share it with a friend or delete it!

Source :
https://chromeunboxed.com/how-to-easily-record-your-pixel-phone-screen

Google has finally created a way to let you “natively” edit Office files on your Chromebook

Over the years, Google has done much to alleviate the pain of editing Microsoft Office files on Chromebooks, but in my opinion, the progress has felt like walking through mud. The only time we see significant improvements to this experience is when Google feels like making them. I’ve had a support ticket submitted since 2019 that complains about some of these issues, and no one addressed it. (23 days ago it was finally moved)

We have an on-going investigation in an internal doc (can’t be published here). But one thing to share is to re-confirm this issue reproduces on stock Android 11 as long as the user is using the internal Files app (Settings > Storage > Files) and not the Files By Google app where files open as editable instead of read-only.Chromium Bug report from 2019, comment from last year

Now, a new update in ChromeOS Canary, which was spotted a little while ago by C2 Productions on Twitter, shows the company testing out a new pop-up dialogue for Office Editing on its laptop operating system.

In the Files app, double-clicking a .docx or another Office-type file in your local storage will now present you with an option to either open it in Google Docs or Microsoft Office itself. Of course, you’ll have to have the app installed in order to trigger this, as well as the “Enable Office files upload workflow” developer flag enabled.

Source: C2 Productions on Twitter

to be fair, you’ve been able to select which program you’d like to open your files in for a few years now by selecting the “Open with” dropdown at the top of the Files app. This additional in-your-face pop-up is just more helpful and takes the burden off of the user to think about manually swapping the default program. Most device owners don’t do this, in my experience, and I can see why this change is being made.

What’s even more interesting, however, is what else this flag enables. Another image, which was also provided by C2 Productions, shows off a new “Move and Upload option for Office documents. You see, in order to edit files in the installed Office program, it has to be in One Drive. In the past, my frustration with writing traditional files on a Chromebook came from exactly this. No matter what I did to modify them from the local storage or Google Drive, they would open in ‘Read only’ mode.

Source: C2 Productions on Twitter

Okay, so the simple solution all of these years was to get a few lines of code to automate the copy-and-paste process of moving your docs into Microsoft’s cloud? Well, why didn’t they think of this sooner? Choosing “Microsoft Office” from the aforementioned pop-up then presents you with the option to do exactly that – move your information over to Google’s biggest competitor and allow you to use their tools.

It’s effectively an arrow pointing out of Google’s house saying “We tried, we can’t fix it – just go use the other guys”. It wouldn’t be right for me to skip mentioning the fact that Google Docs’ “Native Office Editing” updates have been really well implemented, but most people still prefer the name brand that Microsoft has brought to the table for the past few decades, and I can’t blame them.

I only care that this issue is permanently resolved and becomes a thing of the past. Anyone who chooses to use a Chromebook over a Windows machine should still be able to edit their files without the two companies fueding and pointing fingers at each other. I spent countless hours going back and forth between Google and Microsoft and both of them blamed the other for the ‘Read Only’ problem. This isn’t a perfect solution, but it’s better than we’ve had up until this point, so I’ll take it.

Source :
https://chromeunboxed.com/chromeos-office-file-editing-solution-at-last