Microsoft this week revealed that it had fended off a record number of distributed denial-of-service (DDoS) attacks aimed at its customers in 2021, three of which surpassed 2.4 terabit per second (Tbps).
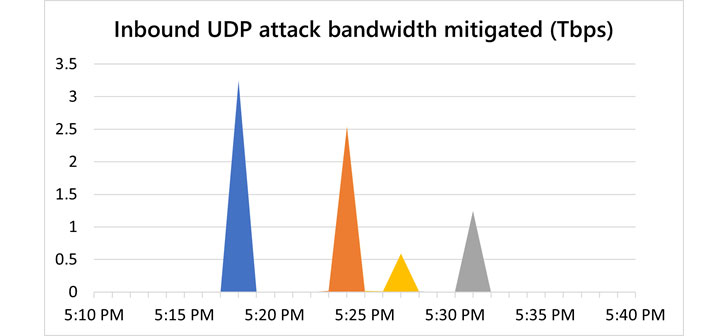
One of the DDoS attacks took place in November, targeting an unnamed Azure customer in Asia and lasted a total of 15 minutes. It hit a peak throughput of 3.47 Tbps and a packet rate of 340 million packets per second (pps), making it the largest attack ever reported in history.
“This was a distributed attack originating from approximately 10,000 sources and from multiple countries across the globe, including the United States, China, South Korea, Russia, Thailand, India, Vietnam, Iran, Indonesia, and Taiwan,” Alethea Toh, product manager of Azure Networking, said.
DDoS attacks occur when several compromised devices are employed as a conduit to overwhelm a targeted server, service, or network with a flood of internet traffic with the goal of overloading the systems and disrupting its regular services.
Then in December, Microsoft said it blocked two more attacks that surpassed 2.5 Tbps, both of which were aimed at customers in Asia. The first of the attacks was a 3.25 Tbps UDP attack, while the other intrusion was a 2.55 Tbps UDP flood that lingered for just a little over five minutes.
The report comes more than three months after the tech giant disclosed it acted to blunt a 2.4 Tbps DDoS attack in August 2021 targeting a European customer. Other previous record-breaking attacks include a 2.5 Tbps DDoS attack absorbed by Google in September 2017 and a volumetric strike aimed at Amazon Web Services in February 2020.
Microsoft said it observed a rise in attacks that lasted longer than an hour in the second half of 2021, whereas the proportion of short-lived attacks that were 30 minutes or less dropped from 74% to 57%. That said, the longer duration assaults are experienced as a sequence of multiple short, repeated burst attacks.
The company also said it mitigated an average of 1,955 attacks per day, with a maximum of 4,296 attacks recorded in a single day on August 10, 2021. For the entirety of H2 2021, no fewer than 359,713 unique attacks against its infrastructure were blocked, a 43% increase from the first half of 2021.
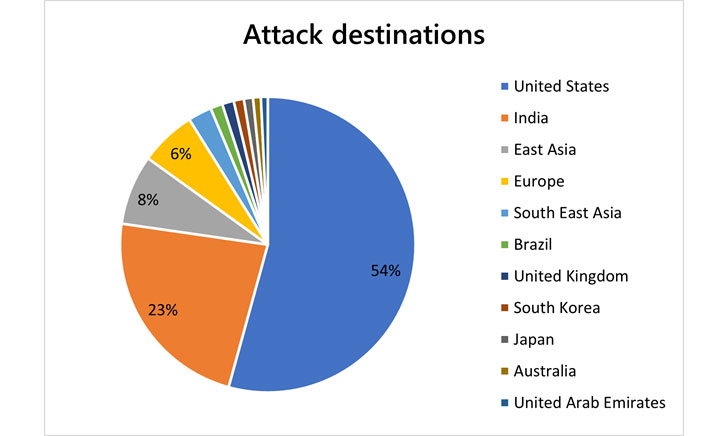
The gaming industry emerged as the hardest hit sector, followed by financial institutions, media, internet service providers (ISPs), retail, and supply chain entities. Most of the targeted organizations were located in the U.S., India, East Asia (Hong Kong), Brazil, the U.K., South Korea, Japan, Australia, and the U.A.E.
“We saw a sharp uptick in attacks in India, from just 2% of all attacks in the first half of 2021 to taking the second position at 23% of all attacks in the second half of 2021,” Toh said. “Another driving factor may be that the acceleration of digital transformation, for example, the ‘Digital India‘ initiative, has increased the region’s overall exposure to cyber risks.”
By default, the Windows 10 Start menu will open up in a size that accommodates all of the pinned items. For those who wish to use a larger Start screen, making the Start menu open in a full-screen mode is possible.
When the full-screen mode is enabled, the Start screen will overlay the entire desktop and provide a more generous amount of space to pin applications, and your live tiles will be larger.
If you wish to enable the Start full-screen mode, please follow these steps:
Click on the Start menu and then click on the Settings cog ( ) to open the Windows 10 Settings.
When the Settings open, click on Personalization and then Start.
In the Start settings, look for a setting named ‘Use Start full screen‘ and click on the toggle to enable the feature, as shown below.Enable Start full screen
You can now close the Start settings screen.
Now that you have enabled Start full screen mode, when you click on the Start button, the Start menu will be shown in full screen and overlay the entire desktop.
Start full screen
When using Start in full screen mode, you can close the Start menu at any time by pressing the Escape key on your keyboard or by clicking on another program or screen.
To disable Start full screen mode, just follow these steps again, but this time disable the ‘Use Start full screen’ setting.
One of the Windows 10 Start Menu features is a built-in Bing search when a local search fails to find anything. Whether it be due to privacy reasons, bugs, or just personal dislike, this article will explain how to disable Bing search in the Start Menu.
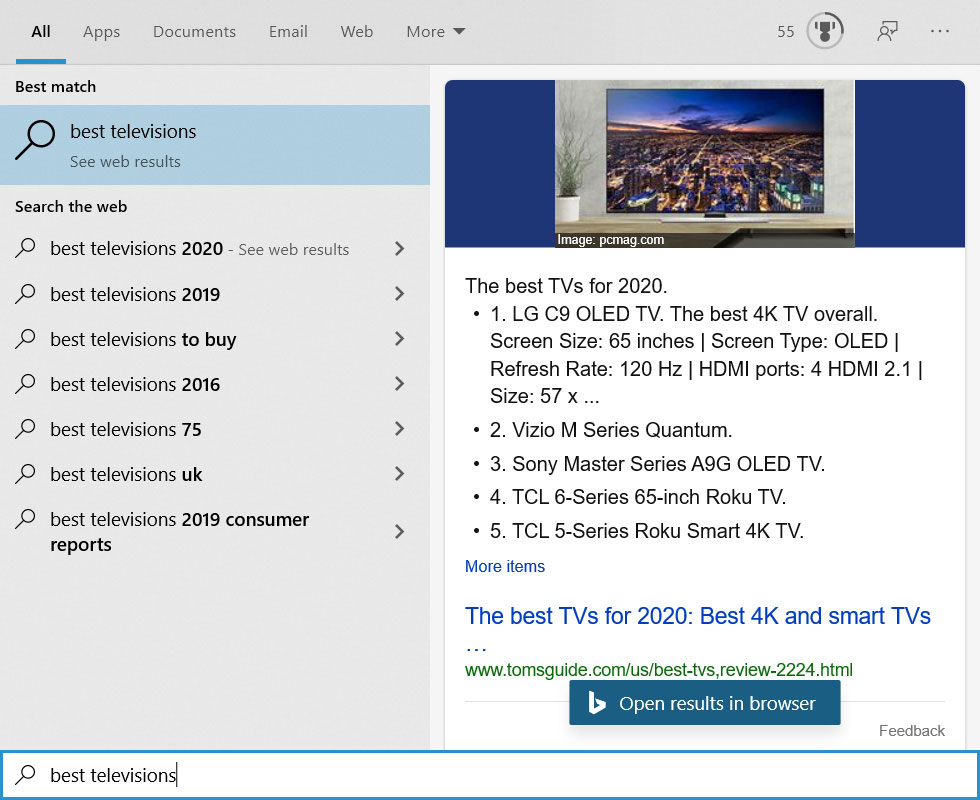
When you perform a search in the Windows 10 Start Menu, Windows will first look for local search results such as settings, files, or programs and display any that are found.
If there are no local results, Windows will then perform a Bing search for the search keyword and list the results in the Start Menu as shown below.
Blank search results in Start Menu
When logged into a Microsoft Account, these searches will be uploaded to Microsoft, who will then list them in your account’s Privacy Dashboard. This is a privacy concern for fear that Microsoft is using this data to track your browsing habits.
There have also been bugs in the Bing search component in the past that have caused the Windows 10 Start menu to appear completely blank. If you do not utilize the Bing search feature, disabling it could prevent those bugs in the future.
Below we have outlined two methods that can be used to disable Bing search in the Windows 10 Start Menu.
How to disable Bing search in the Windows 10 Start Menu
Unfortunately, for those who want to disable Bing search in the Start Menu, Microsoft does not provide an easy method.
Instead, Windows users need to modify the Registry so that it is using the following Registry values.
For those who feel comfortable modifying the Registry, we have instructions on setting the proper values using the Registry Editor.
For those who are not comfortable with Registry modifications, please see method two that contains an easy to use premade Registry file that makes the settings for you.
METHOD 1: DISABLE BING SEARCH RESULTS VIA THE GROUP POLICY EDITOR
Windows 10 Pro comes with the Group Policy editor, which you can use to disable Bing search in the Start Menu.
To disable Bing Search, follow these steps:
Search in the Start Menu for ‘gpedit.msc‘ and select it when the result appears.
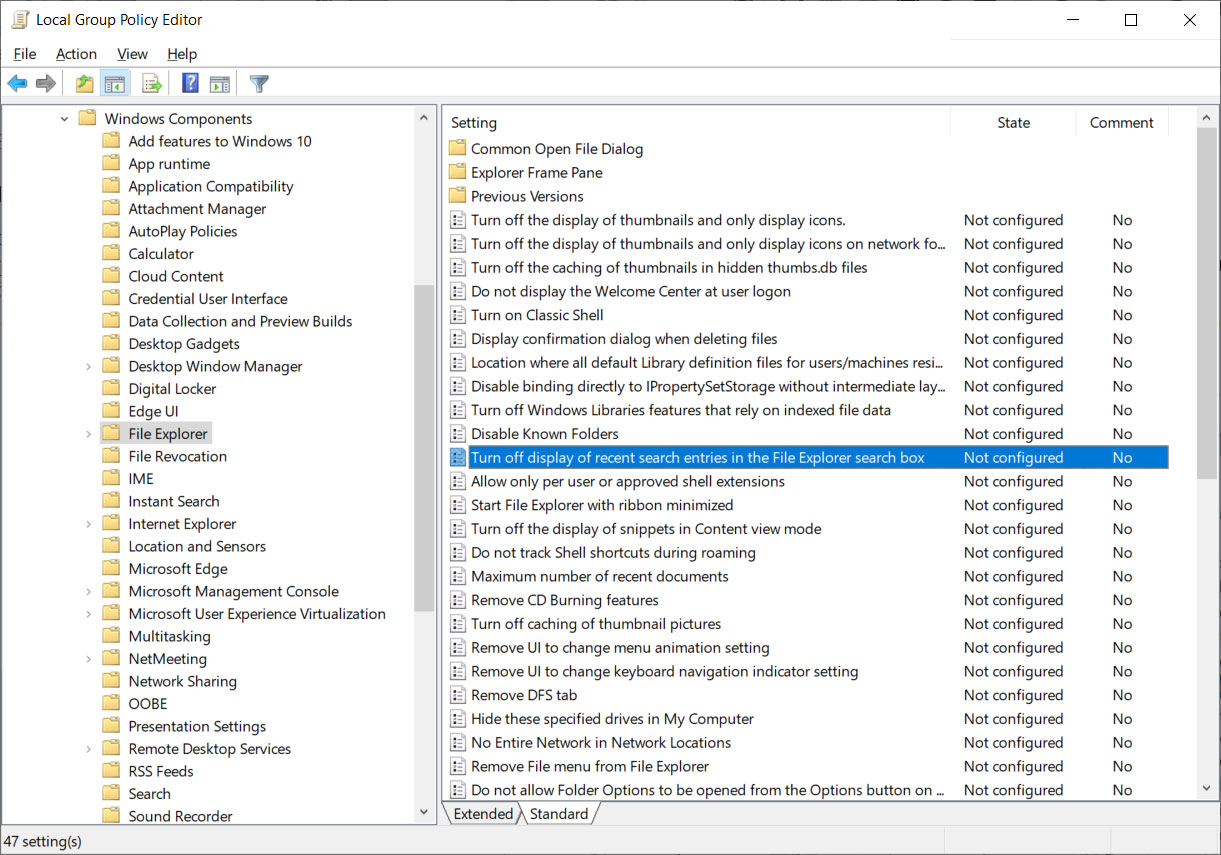
When the Group Policy Editor opens, navigate to the following path: User Configuration\Administrative Templates\Windows Components\File Explorer
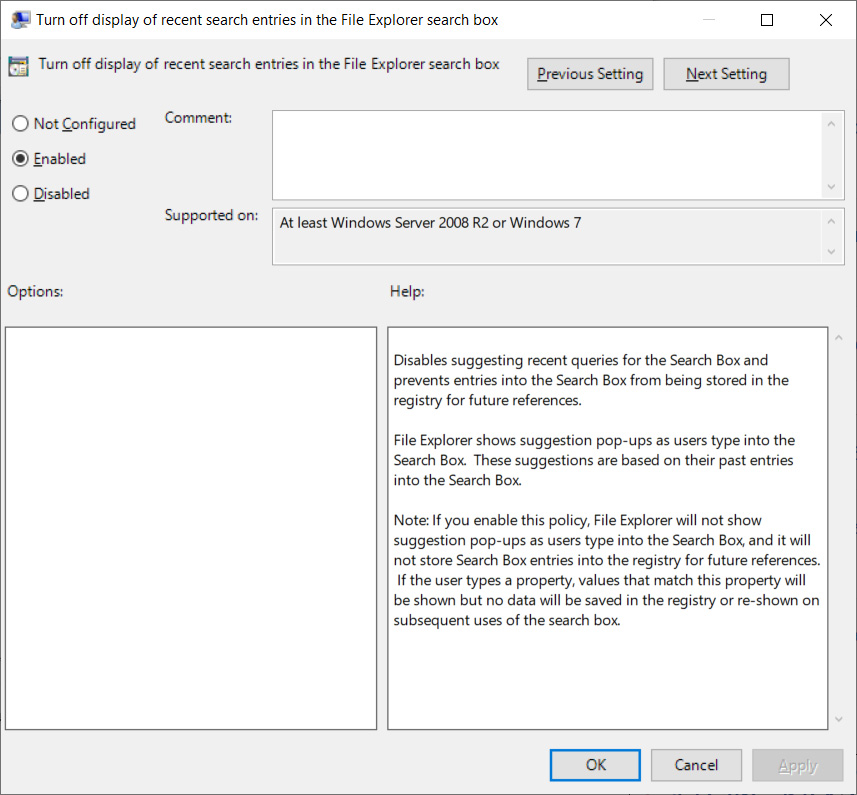
Under the File Explorer section, you will see a policy called ‘Turn off display of recent search entries in the File Explorer search box’ as shown below. Double-click on the policy to open it.
To disable Bing search, set this policy to ‘Enabled.’
When done, click on the Apply and then OK button to save the policy.
You can now close the Group Policy Editor and restart Windows Explorer or restart your computer.
Once restarted, Bing searches will no longer appear in the Start Menu.
METHOD 2: USE THE REGISTRY EDITOR TO DISABLE BING INTEGRATION
If you are using Windows 10 Home and are comfortable using the Windows Registry, you can disable Bing’s integration in Windows Search using the Registry editor.
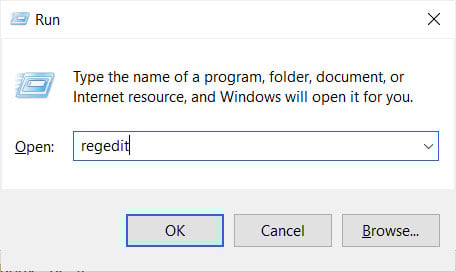
First, open the Windows Registry Editor by pressing the Windows key + the R key at the same time. This will open the Run: dialog and then type regedit and press the OK button.Starting Registry Editor
Windows will display a UAC prompt asking if you wish to allow the Registry Editor to make changes to the system. Press the Yes button to continue.
Navigate to the HKEY_CURRENT_USER\SOFTWARE\Policies\Microsoft\Windows\Explorer key. If the key does not exist, create the necessary folders until you are in the Explorer key.
Right-click on Explorer and select New and then DWORD (32-bit) Value, as shown below.New DWORD value
You will be prompted to enter the name of the new value. Type DisableSearchBoxSuggestions and press Enter on the keyboard. A new value will be created that should automatically be set to 0. Now double-click on BingSearchEnabled and set the value to 1 and then press the OK button.
When done, you should have the BingSearchEnabled value created and set to 1.
Once restarted, Bing search will no longer work in the Windows 10 Start Menu.
Bing Search disabled
Enable Bing integration again
To enable Bing integration again, simply disable the group policy or edit the Registry and delete the DisableSearchBoxSuggestions value under the HKEY_CURRENT_USER\SOFTWARE\Policies\Microsoft\Windows\Explorer Registry key.
Once again, restart the Explorer process or the computer, and Bing integration will work again.
Update 10/5/20: Added updated instructions on how to disable Bing search.
Microsoft said it won’t be fixing or is pushing patches to a later date for three of the four security flaws uncovered in its Teams business communication platform earlier this March.
The disclosure comes from Berlin-based cybersecurity firm Positive Security, which found that the implementation of the link preview feature was susceptible to a number of issues that could “allow accessing internal Microsoft services, spoofing the link preview, and, for Android users, leaking their IP address, and DoS’ing their Teams app/channels.”
Of the four vulnerabilities, Microsoft is said to have addressed only one that results in IP address leakage from Android devices, with the tech giant noting that a fix for the denial-of-service (DoS) flaw will be considered in a future version of the product. The issues were responsibly disclosed to the company on March 10, 2021.
Chief among the flaws is a server-side request forgery (SSRF) vulnerability in the endpoint “/urlp/v1/url/info” that could be exploited to glean information from Microsoft’s local network. Also discovered is a spoofing bug wherein the preview link target can be altered to point to any malicious URL while keeping the main link, preview image and description intact, allowing attackers to hide malicious links and stage improved phishing attacks.
The DoS vulnerability, which affects the Android version of Teams, could cause the app to crash simply by sending a message with a specially crafted link preview containing an invalid target instead of a legitimate URL. The last of the issues concerns an IP address leak, which also affects the Android app. By intercepting messages that include a link preview to point the thumbnail URL to a non-Microsoft domain, Positive Security said it’s possible to gain access to a user’s IP address and user agent data.
“While the discovered vulnerabilities have a limited impact, it’s surprising both that such simple attack vectors have seemingly not been tested for before, and that Microsoft does not have the willingness or resources to protect their users from them,” Positive Security’s co-founder Fabian Bräunlein said.
This article describes how to recover a bricked USW-Flex-Mini via recovery mode. The first step in the recovery process is to prepare a web server. See the subsections below on how to do that on each of the different operating systems: Windows, macOS and Ubuntu/Debian and then continue to the recovery instructions once that is done.
The first step in the recovery process is to prepare a web server. See the subsections below on how to do that on each of the different operating systems: Windows, macOS and Ubuntu/Debian.
How to Prepare a Web Server on Windows
1. Download Python for Windows (Executable Installer) here.
2. Open the downloaded file and make sure you select Add Python x.x to PATH during installation.
3. After the Python installation open Command Prompt as Administrator and confirm that Python is installed correctly with the command below:
python -V
4. Create a directory for the web server by running the commands below:
mkdir c:\webserver
cd c:\webserver
5. Start the Python web server on port 80. Note that the version of Python can be found with the command from step 3:
3. Create a directory for the web server by running the commands below:
cd ~
mkdir webserver
cd webserver
4. Start the Python web server on port 80. Note that the version of Python can be found with the command from step 2:
Python 3.x:
sudo "${python_version}" -m http.server 80
Python 2.x:
sudo "${python_version}" -m SimpleHTTPServer 80
How to Recover a USW Flex Mini
1. Prepare a web server as explained above, and set the server / computer’s IP to a static 192.168.1.99. The way to set a static IP on a computer will vary from platform to platform. Find instructions on how to do that in your product’s documentation (Windows, macOS or Ubuntu/Linux).
2. Download the latest firmware (found in Downloads), rename the binary to fwupdate.bin and place it in the directory that was created earlier (webserver).
3. Power down the switch by unplugging from the power source.
4. Press the switch’s reset button and hold it down as you provide power to the switch. Hold the reset button down for over 10 seconds during boot up. The LED pattern should be: blue-white-off blinking.
5. The USW-Flex-Mini should be updated after a while.
The method described in this article should help recover a “bricked” UniFi AP. This method will not void the device warranty, whereas opening the chassis for serial TTL will void your warranty. Most soft brick issues will be resolved via this procedure. If your issue continues unresolved, it might indicate a hardware issue that cannot be resolved via software. Feel free to contact support if you believe this to be the case.IMPORTANT:When Recovering UAP Gen1 Devices, The device itself will need approximately 5 minutes to finish recovering after the put command is entered.
TFTP for Windows
1. Prior to beginning the TFTP recovery, download the firmware for the device needed by visiting the UniFi Downloads section. Navigate to the UAP in question using the menu on the left, and find the latest firmware file. Confirm it is a .bin firmware file and not the UniFi Network application software file before downloading.
2. Once the correct firmware has been identified, download it and save it on your computer.
3. Unplug the ethernet cable from the UniFi AP.
4. Using a paperclip press and hold the UniFi AP’s reset button. Make sure you can feel it being depressed by the paperclip. Do not release the button until step 6.
5. While keeping the reset button pressed in, plug the ethernet cable back into the AP. Keep the reset button depressed until you see the device’s LED flashing in upgrade mode (read about LED patterns in this article). This may take up to 25 seconds. User Tip: The UAP will not respond to ping requests while in TFTP recovery mode, but will respond to ARP requests.
6. You may release the reset button. Now the device is in TFTP transfer mode.
7. Set a static IP on your Computer’s NIC. A static IP of 192.168.1.25, a subnet of 255.255.255.0 and gateway of 192.168.1.20 will work.
8. Plug the UniFi PoE injector’s LAN cable directly to your computer.
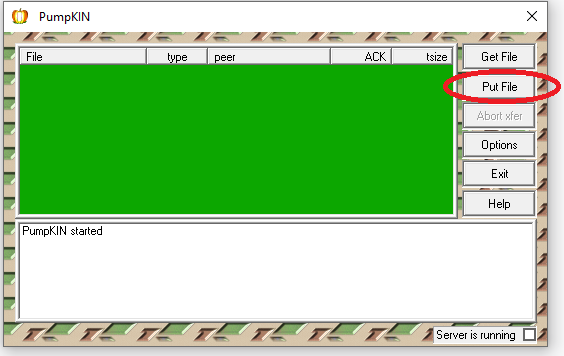
9. This example uses the Pumpkin TFTP software, which you can download here (clicking link will download the .exe file immediately) and disable the firewall or allow the Pumpkin connection. Click on “Put File”.
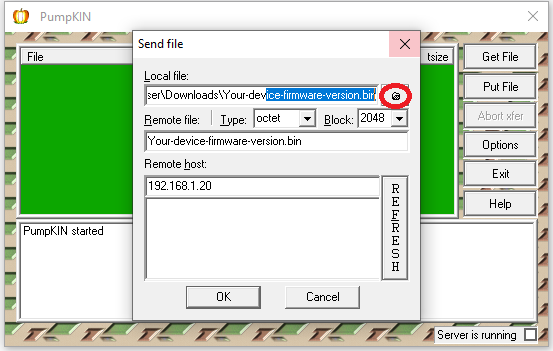
10. In “Local Files” browse for the firmware you downloaded and saved previously (in step 1).
11. In the “Remote host” field enter the gateway you had predetermined (192.168.1.20), then click OK.
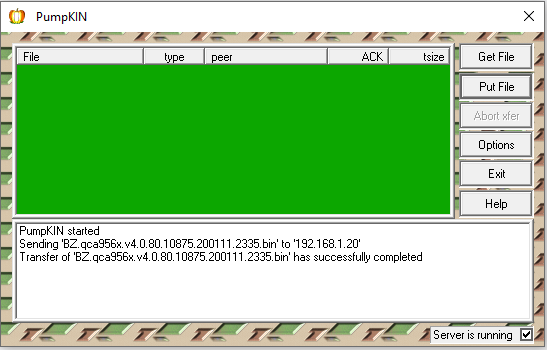
12. At this point, the file should begin transferring. The firmware will upgrade now and the device will automatically reboot once it has finished. Do not reboot it yourself.
TFTP for Linux & macOS
1. Prior to beginning the TFTP recovery, download the firmware for the device needed by visiting the UniFi Downloads section. Navigate to the UAP in question using the menu on the left, and find the latest firmware file. Confirm it is a .bin firmware file and not the UniFi Network application software file before downloading.
2. Once the correct firmware has been identified, download it and save it on your computer. You will need to know the exact path to your file, so for this example, we are moving the downloaded firmware file to /Users/username/.
3. Go to System Preferences > Network and set your computer’s network IP address to 192.168.1.25, subnet 255.255.255.0 and gateway 192.168.1.20. User Tip: Take note of what your IP address is before changing it. You will have to revert back to the original IP address on step 12.
4. On macOS Open Applications > Utilities > Terminal and type:
tftp
On Linux, open the command line application of choice and type the following (substituting the bolded path and firmware name for the name of the file you downloaded in step 2 and the path to where it is saved):
5. A tftp> command prompt will appear. You are ready to reset the AP and connect it to your computer, while it’s in “upgrade mode”.
6. Unplug the ethernet cable from the UniFi AP.
7. Using a paperclip press and hold the UniFi AP’s reset button. Make sure you can feel it being depressed by the paperclip. Do not release the button until step 9.
8. While keeping the reset button pressed in, plug the ethernet cable back into the AP. Keep the reset button depressed until you see the device’s LED flashing in upgrade mode (read about LED patterns in this article). This may take up to 25 seconds. User Tip: The UAP will not respond to ping requests while in TFTP recovery mode, but will respond to ARP requests.
9. You may release the reset button. Now the device is in TFTP transfer mode.
10. On the TFTP command line in Terminal, paste these four lines and hit enter:
connect 192.168.1.20
binary
rexmt 1
timeout 60
Click to copy
11. Type the command put followed by the path to the firmware downloaded in step 2 and hit enter. Following the example mentioned in step 2, something similar to this would be typed into the Terminal window:
put /Users/Alex/BZ.qca956x.v3.9.27.8537.180317.1235.bin
IMPORTANT:Remember you must substitute the bolded path and firmware file name with your own path and file name.
Once it is successful, you will see something like this in the Terminal window (bolded words will be different for each user):
tftp> connect 192.168.1.20
tftp> binary
tftp> rexmt 1
tftp> timeout 60
tftp> put /path/firmware.bin
Sent x bytes in y seconds
The file should begin transferring at this point. The firmware will upgrade and the device will automatically reboot once it has finished. Do not reboot it yourself.
12. Re-connect the PoE injector’s LAN cable into your router. Restore the network IP back to what it was before.User Tip: If your device is having trouble getting adopted by the UniFi Network application after this process, try forgetting the device by going to the UniFiDevices section, clicking on the UAP in question and then within the properties panel that pops up, go to Config (gear icon) > Manage Device > Forget this device. Click on the “Forget” button and try the process again.
While investigating a compromised site we discovered some suspicious code in a theme by AccessPress Themes (aka Access Keys), a vendor with a large number of popular themes and plugins. On further investigation, we found that all the themes and most plugins from the vendor contained this suspicious code, but only if downloaded from their own website. The same extensions were fine if downloaded or installed directly from the WordPress.org directory.
Due to the way the extensions were compromised, we suspected an external attacker had breached the website of AccessPress Themes in an attempt to use their extensions to infect further sites.
We contacted the vendor immediately, but at first we did not receive a response. After escalating it to the WordPress.org plugin team, our suspicions were confirmed. AccessPress Themes websites were breached in the first half of September 2021, and the extensions available for download on their site were injected with a backdoor.
Once we had established a channel for communicating with the vendor, we shared our detailed findings with them. They immediately removed the offending extensions from their website.
Most of the plugins have since been updated, and known clean versions are listed towards the bottom of this post. However, the affected themes have not been updated, and are pulled from the WordPress.org theme repository. If you have any of the themes listed towards the bottom of this post installed on your site, we recommend migrating to a new theme as soon as possible.
This disclosure concerns a large number of extensions, both plugins and themes. Skip to the list below, or read on for the details.
The infected extensions contained a dropper for a webshell that gives the attackers full access to the infected sites. The dropper is located in the file inital.php located in the main plugin or theme directory. When run it installs a cookie based webshell in wp-includes/vars.php. The shell is installed as a function just in front of the wp_is_mobile() function with the name of wp_is_mobile_fix(). This is presumably to not arouse suspicion to anybody casually scrolling through the vars.php file.
Once the shell is installed, the dropper will phone home by loading a remote image from the URL hxxps://www.wp-theme-connect.com/images/wp-theme.jpg with the url of the infected site and information about which theme it uses as query arguments. Finally, it will remove the dropper source file to avoid detection when the request is finished executing.
The webshell itself triggers if the user agent string in the request is wp_is_mobile and the request contains eight specific cookies. It pieces together and executes a payload from these supplied cookies.
We have also seen another, presumably older, variant of the backdoor directly embedded in the theme/plugin’s functions.php file. This variant uses the same mechanism with piecing together the payload from eight cookies, but does not filter on the request’s user agent string.
To ensure that the dropper is executed, the main plugin file (for plugins) or the functions.php file (for themes) have been modified with code to execute the inital.php file if it exists.
One striking detail from the timestamps of the compromised plugins is that they are all from early September. The majority are from September 6 and 7, with a few files from September 2 and 3. Similarly for the themes, all were compromised on September 22, except accessbuddy on September 9.
Also, the timestamps within the zip-archives are very uniform, with almost all files with the exact same timestamp, except for the modified main plugin file and the added dropper file that is stamped a few minutes later (usually about 2-5 minutes after the other files in the archive).
Looking at the timestamps for the zip-files downloaded from the wordpress.org repository however, we find a distribution of timestamps corresponding to when plugin/theme was actually updated. Also the distribution of timestamps within the archive is less uniform and reflects which files were updated in the release, and which are unchanged from an older release.
This suggests to us that the files from the AccessPress Themes’ website were modified intentionally, and as a coordinated action after they were originally released. The compromise seems to have been performed in two stages, one for the plugins and a later one for the themes. Each of them with some earlier attempts, possibly to fine tune the process.
Our investigation has only looked at the themes and plugins freely available from the AccessPress Themes’ website. We assume their paid pro themes are affected similarly, but we have not examined these. If you have any of these, please contact AccessPress Themes’ support for further advice.
Affected themes
If you have any of the themes below installed on your site, we recommend migrating to another theme as soon as you’re able to. AccessPress Themes has not yet provided any updates for any of these, and they have been pulled from the WordPress.org repository.
Theme slug
Version
accessbuddy
1.0.0
accesspress-basic
3.2.1
accesspress-lite
2.92
accesspress-mag
2.6.5
accesspress-parallax
4.5
accesspress-ray
1.19.5
accesspress-root
2.5
accesspress-staple
1.9.1
accesspress-store
2.4.9
agency-lite
1.1.6
aplite
1.0.6
bingle
1.0.4
bloger
1.2.6
construction-lite
1.2.5
doko
1.0.27
enlighten
1.3.5
fashstore
1.2.1
fotography
2.4.0
gaga-corp
1.0.8
gaga-lite
1.4.2
one-paze
2.2.8
parallax-blog
3.1.1574941215
parallaxsome
1.3.6
punte
1.1.2
revolve
1.3.1
ripple
1.2.0
scrollme
2.1.0
sportsmag
1.2.1
storevilla
1.4.1
swing-lite
1.1.9
the-launcher
1.3.2
the-monday
1.4.1
uncode-lite
1.3.1
unicon-lite
1.2.6
vmag
1.2.7
vmagazine-lite
1.3.5
vmagazine-news
1.0.5
zigcy-baby
1.0.6
zigcy-cosmetics
1.0.5
zigcy-lite
2.0.9
Table 1: Themes and versions compromised by the attack.
Affected plugins
If you have any of the following plugins with a version number in the Bad column installed on your site, we do recommend to upgrade to the version in the Clean column immediately. It’s worth noting that the plugins installed through WordPress.org are clean, even if they are listed in the Bad column. We still recommend upgrading to the known clean version to be on the safe side.
Plugins with no version number in the Clean column have not yet been upgraded, and we recommend replacing it with other plugins if at all possible.
Plugin slug
Bad
Clean
Note
accesspress-anonymous-post
2.8.0
2.8.1
1
accesspress-custom-css
2.0.1
2.0.2
accesspress-custom-post-type
1.0.8
1.0.9
accesspress-facebook-auto-post
2.1.3
2.1.4
accesspress-instagram-feed
4.0.3
4.0.4
accesspress-pinterest
3.3.3
3.3.4
accesspress-social-counter
1.9.1
1.9.2
accesspress-social-icons
1.8.2
1.8.3
accesspress-social-login-lite
3.4.7
3.4.8
accesspress-social-share
4.5.5
4.5.6
accesspress-twitter-auto-post
1.4.5
1.4.6
accesspress-twitter-feed
1.6.7
1.6.8
ak-menu-icons-lite
1.0.9
ap-companion
1.0.7
2
ap-contact-form
1.0.6
1.0.7
ap-custom-testimonial
1.4.6
1.4.7
ap-mega-menu
3.0.5
3.0.6
ap-pricing-tables-lite
1.1.2
1.1.3
apex-notification-bar-lite
2.0.4
2.0.5
cf7-store-to-db-lite
1.0.9
1.1.0
comments-disable-accesspress
1.0.7
1.0.8
easy-side-tab-cta
1.0.7
1.0.8
everest-admin-theme-lite
1.0.7
1.0.8
everest-coming-soon-lite
1.1.0
1.1.1
everest-comment-rating-lite
2.0.4
2.0.5
everest-counter-lite
2.0.7
2.0.8
everest-faq-manager-lite
1.0.8
1.0.9
everest-gallery-lite
1.0.8
1.0.9
everest-google-places-reviews-lite
1.0.9
2.0.0
everest-review-lite
1.0.7
everest-tab-lite
2.0.3
2.0.4
everest-timeline-lite
1.1.1
1.1.2
inline-call-to-action-builder-lite
1.1.0
1.1.1
product-slider-for-woocommerce-lite
1.1.5
1.1.6
smart-logo-showcase-lite
1.1.7
1.1.8
smart-scroll-posts
2.0.8
2.0.9
smart-scroll-to-top-lite
1.0.3
1.0.4
total-gdpr-compliance-lite
1.0.4
total-team-lite
1.1.1
1.1.2
ultimate-author-box-lite
1.1.2
1.1.3
ultimate-form-builder-lite
1.5.0
1.5.1
woo-badge-designer-lite
1.1.0
1.1.1
wp-1-slider
1.2.9
1.3.0
wp-blog-manager-lite
1.1.0
1.1.2
wp-comment-designer-lite
2.0.3
2.0.4
wp-cookie-user-info
1.0.7
1.0.8
wp-facebook-review-showcase-lite
1.0.9
wp-fb-messenger-button-lite
2.0.7
wp-floating-menu
1.4.4
1.4.5
wp-media-manager-lite
1.1.2
1.1.3
wp-popup-banners
1.2.3
1.2.4
wp-popup-lite
1.0.8
wp-product-gallery-lite
1.1.1
Table 2: Plugins, versions compromised by the attack as well as known clean versions,
Notes:
This plugin has not been updated, but is believed to be clean as the version on the AccessPress Themes website was an older version.
This plugin has not been updated, but is believed to be clean as it was not originally available on the AccessPress Themes website.
IOC’s
The following YARA rule can be used to check if the site has been infected. It will detect both the dropper part of the infection as well as the installed webshell.
123456789101112131415161718192021222324
rule accesspress_backdoor_infection{strings:// IoC's for the dropper$inject0 = "$fc = str_replace('function wp_is_mobile()',"$inject1 = "$b64($b) . 'function wp_is_mobile()',"$inject2 = "$fc);"$inject3 = "@file_put_contents($f, $fc);"// IoC's for the dumped payload$payload0 = "function wp_is_mobile_fix()"$payload1 = "$is_wp_mobile = ($_SERVER['HTTP_USER_AGENT'] == 'wp_is_mobile');"$payload2 = "$g = $_COOKIE;"$payload3 = "(count($g) == 8 && $is_wp_mobile) ?"$url0 = /https?:\/\/(www\.)?wp\-theme\-connect\.com(\/images\/wp\-theme\.jpg)?/condition:all of ( $inject* )or all of ( $payload* )or $url0}
Recommendations
If you have any themes or plugins installed directly from AccessPress Themes or any other place except WordPress.org, you should upgrade immediately to a safe version as indicated in the tables above. If no safe version is available, replace it with the latest version from WordPress.org.
Please note that this does not remove the backdoor from your system, so in addition you need to reinstall a clean version of WordPress to revert the core file modifications done during installation of the back door.
If you have a paid theme or plugin from AccessPress Themes/Access Keys, we advise contacting their support for help.
We strongly recommend that you have a security plan for your site that includes malicious file scanning and backups. Jetpack Security is one great WordPress security option to ensure your site and visitors are safe. Jetpack Scan has detected all variants of this back door and the dropper since September 30.
Timeline
2021-09-22: Jetpack Scan team discovers the dropper and back door in the FotoGraphy theme, and tries to contact vendor about the initial finding.
2021-09-27: Confirm presence of dropper + back door in all current free plugins and themes downloaded from vendors website.
2021-09-28: Confirm that dropper + back door is not present on downloads from wordpress.org
2021-09-29: Trying to contact vendor again, with updates on new findings.
2021-10-14: Escalated to WordPress plugins team to try to obtain contact with the vendor.
2021-10-15: Compromised extensions are removed from the vendor’s site.
2021-10-16: Response from vendor
2022-01-17: Most plugins have been upgraded to new versions, themes have been pulled from WordPress.org.
Researchers have disclosed a security shortcoming affecting three different WordPress plugins that impact over 84,000 websites and could be abused by a malicious actor to take over vulnerable sites.
“This flaw made it possible for an attacker to update arbitrary site options on a vulnerable site, provided they could trick a site’s administrator into performing an action, such as clicking on a link,” WordPress security company Wordfence said in a report published last week.
Tracked as CVE-2022-0215, the cross-site request forgery (CSRF) flaw is rated 8.8 on the CVSS scale and impacts three plugins maintained by Xootix —
Cross-site request forgery, also known as one-click attack or session riding, occurs when an authenticated end-user is tricked by an attacker into submitting a specially crafted web request. “If the victim is an administrative account, CSRF can compromise the entire web application,” OWASP notes in its documentation.
Specifically, the vulnerability has its origin in a lack of validation when processing AJAX requests, effectively enabling an attacker to update the “users_can_register” (i.e., anyone can register) option on a site to true and set the “default_role” setting (i.e., the default role of users who register at the blog) to administrator, granting complete control.
Login/Signup Popup is installed on over 20,000 sites, while Side Cart Woocommerce and Waitlist Woocommerce have been installed on more than 4,000 and 60,000 sites, respectively.
Following responsible disclosure by Wordfence researchers in November 2021, the issue has been addressed in Login/Signup Popup version 2.3, Side Cart Woocommerce version 2.1, and Waitlist Woocommerce version 2.5.2.
The findings come a little over a month after attackers exploited weaknesses in four plugins and 15 Epsilon Framework themes to target 1.6 million WordPress sites as part of a large-scale attack campaign originating from 16,000 IP addresses.
“Though this Cross-Site Request Forgery (CSRF) vulnerability is less likely to be exploited due to the fact that it requires administrator interaction, it can have a significant impact to a successfully exploited site and, as such, it serves as an incredibly important reminder to remain aware when clicking on links or attachments and to ensure that you are regularly keeping your plugins and themes up to date,” Wordfence’s Chloe Chamberland said.
On January 20, 2022, at around 9.30 p.m. (U.S. EST), SonicWall started to receive reports that some SonicOS 7.0 firewall users were experiencing service disruptions in the form of reboot loops or connectivity issues.
Cause
Certain firewalls running SonicOS 7.0 were not able to correctly process the signature update published on Jan. 20. During signature update parsing by one of the components within SonicOS, a corner case error condition led to a restart or connectivity disruption. Firewalls are designed to fetch new signatures on startup, so this process repeated after a restart.
Resolution
SonicWall updated the signatures to address the issue, including refreshed timestamps. Firewalls will automatically pull the full signature update so no end-user action is required. SonicWall has identified the root cause and implemented multiple changes to prevent future occurrences.
Alternate Workaround
Prior to receiving updated signatures that resolves the issue as outlined above, the following temporary workaround can be implemented as an alternate workaround by users who have physical access to the impacted device.
Unplug the WAN connection (If you are unable to log in to the firewall)
Log in to the firewall from the LAN
Navigate to the Diag page. This can be reached by typing in the LAN IP of the SonicWall in the browser, with https://IP/sonicui/7/m/mgmt/settings/diag. EXAMPLE: https://192.168.168.168/sonicui/7/m/mgmt/settings/diag.
Click on internal settings to access the internal settings page or diag page. Please search for the option “Enable Incremental updates to IDP, GAV and SPY signature databases.”
Disable (Uncheck) this setting and select ‘Accept.’ It is important to select ‘Accept’ for the setting to take effect.
Plug the WAN connection and restart the firewall.
Monitor the firewall to ensure this addresses the issue. If neither of the above resolutions work, please reach out to support for further assistance.
On December 23, 2021 the Wordfence Threat Intelligence team initiated the responsible disclosure process for a vulnerability we discovered in “WordPress Email Template Designer – WP HTML Mail”, a WordPress plugin that is installed on over 20,000 sites. This flaw made it possible for an unauthenticated attacker to inject malicious JavaScript that would execute whenever a site administrator accessed the template editor. This vulnerability would also allow them to modify the email template to contain arbitrary data that could be used to perform a phishing attack against anyone who received emails from the compromised site.
Wordfence Premium users received a firewall rule to protect against any exploits targeting this vulnerability on December 23, 2021. Sites still using the free version of Wordfence will receive the same protection on January 22, 2022.
We sent the full disclosure details to the developer on January 10, 2022, after multiple attempts to contact the developer and eventually receiving a response. The developer quickly acknowledged the report and released a patch on January 13, 2022.
We strongly recommend ensuring that your site has been updated to the latest patched version of “WordPress Email Template Designer – WP HTML Mail”, which is version 3.1 at the time of this publication.Description: Unprotected REST-API Endpoint to Unauthenticated Stored Cross-Site Scripting and Data Modification Affected Plugin:WordPress Email Template Designer – WP HTML Mail Plugin Slug: wp-html-mail Plugin Developer: codemiq Affected Versions: <= 3.0.9 CVE ID:CVE-2022-0218 CVSS Score: 8.3 (High) CVSS Vector:CVSS:3.1/AV:N/AC:L/PR:L/UI:N/S:C/C:L/I:L/A:N Researcher/s: Chloe Chamberland Fully Patched Version: 3.1
WP HTML Mail is a WordPress plugin developed to make designing custom emails simpler for WordPress site owners. It is compatible with various WordPress plugins like WooCommerce, Ninja Forms, BuddyPress, and more. The plugin registers two REST-API routes which are used to retrieve email template settings and update email template settings. Unfortunately, these were insecurely implemented making it possible for unauthenticated users to access these endpoints.
More specifically, the plugin registers the /themesettings endpoint, which calls the saveThemeSettings function or the getThemeSettings function depending on the request method. The REST-API endpoint did use the permission_callback function, however, it was set to __return_true which meant that no authentication was required to execute the functions. Therefore, any user had access to execute the REST-API endpoint to save the email’s theme settings or retrieve the email’s theme settings.
As this functionality was designed to implement setting changes for the email template, an unauthenticated user could easily make changes to the email template that could aid in phishing attempts against users that receive emails from the targeted site. Worse yet, unauthenticated attackers could inject malicious JavaScript into the mail template that would execute anytime a site administrator accessed the HTML mail editor.
As always, cross-site scripting vulnerabilities can be used to inject code that can add new administrative users, redirect victims to malicious sites, inject backdoors into theme and plugin files, and so much more. Combined with the fact that the vulnerability can be exploited by attackers with no privileges on a vulnerable site, this means that there is a high chance that unauthenticated attackers could gain administrative user access on sites running the vulnerable version of the plugin when successfully exploited. As such, we strongly recommend that you verify that your site is running the most up to date version of the plugin immediately.
Timeline
December 23, 2021 – Conclusion of the plugin analysis that led to the discovery of a Stored Cross-Site Scripting Vulnerability in the “WordPress Email Template Designer – WP HTML Mail” plugin. We develop and release a firewall rule to protect Wordfence users. Wordfence Premium users receive this rule immediately. We attempt to initiate contact with the developer. January 4, 2022 – We send an additional outreach attempt to the developer. January 10, 2022 – The developer confirms the inbox for handling the discussion. We send over the full disclosure details. January 11, 2022 – The developer acknowledges the report and indicates that they will work on a fix. January 13, 2022 – A fully patched version of the plugin is released as version 3.1. January 22, 2022 – The firewall rule becomes available to free Wordfence users.
Conclusion
In today’s post, we detailed a flaw in the “WordPress Email Template Designer – WP HTML Mail” plugin that made it possible for unauthenticated attackers to inject malicious web scripts that would execute whenever a site owner accessed the mail editor area plugin, which could lead to complete site compromise. This flaw has been fully patched in version 3.1.
We recommend that WordPress site owners immediately verify that their site has been updated to the latest patched version available, which is version 3.1 at the time of this publication.
Wordfence Premium users received a firewall rule to protect against any exploits targeting this vulnerability on December 23, 2021. Sites still using the free version of Wordfence will receive the same protection on January 22, 2022.
If you know a friend or colleague who is using this plugin on their site, we highly recommend forwarding this advisory to them to help keep their sites protected as this is a serious vulnerability that can lead to complete site takeover.
If your site has been compromised by an attack on this or any other plugin, our Professional Site Cleaning services can help you get back in business.
 Enable Start full screen
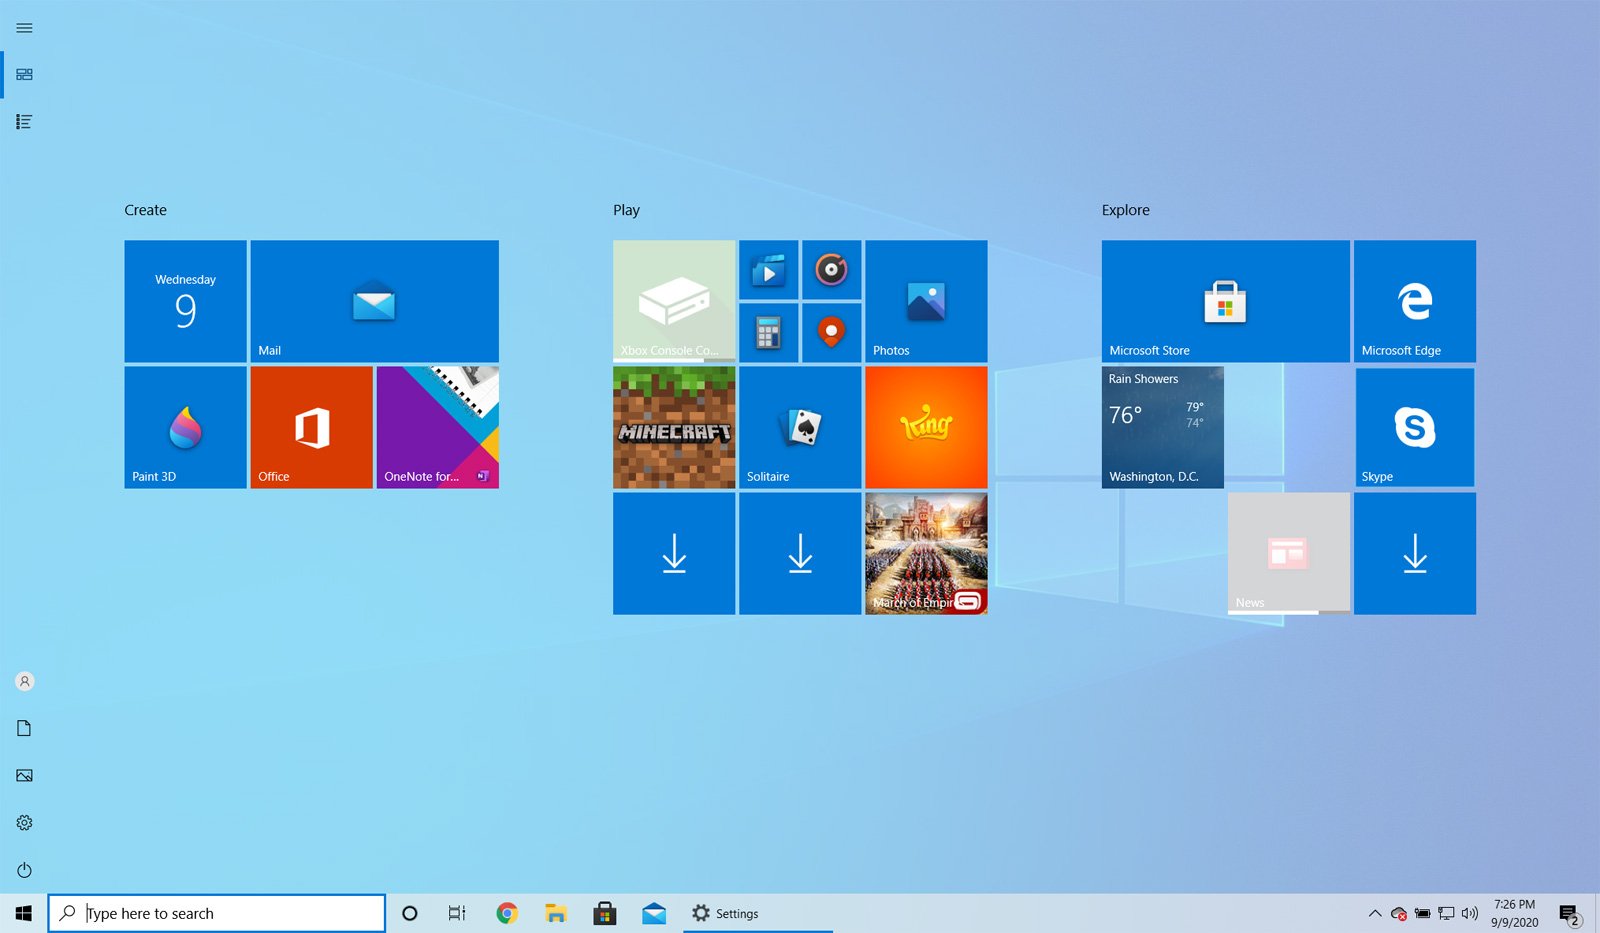
 Starting Registry Editor
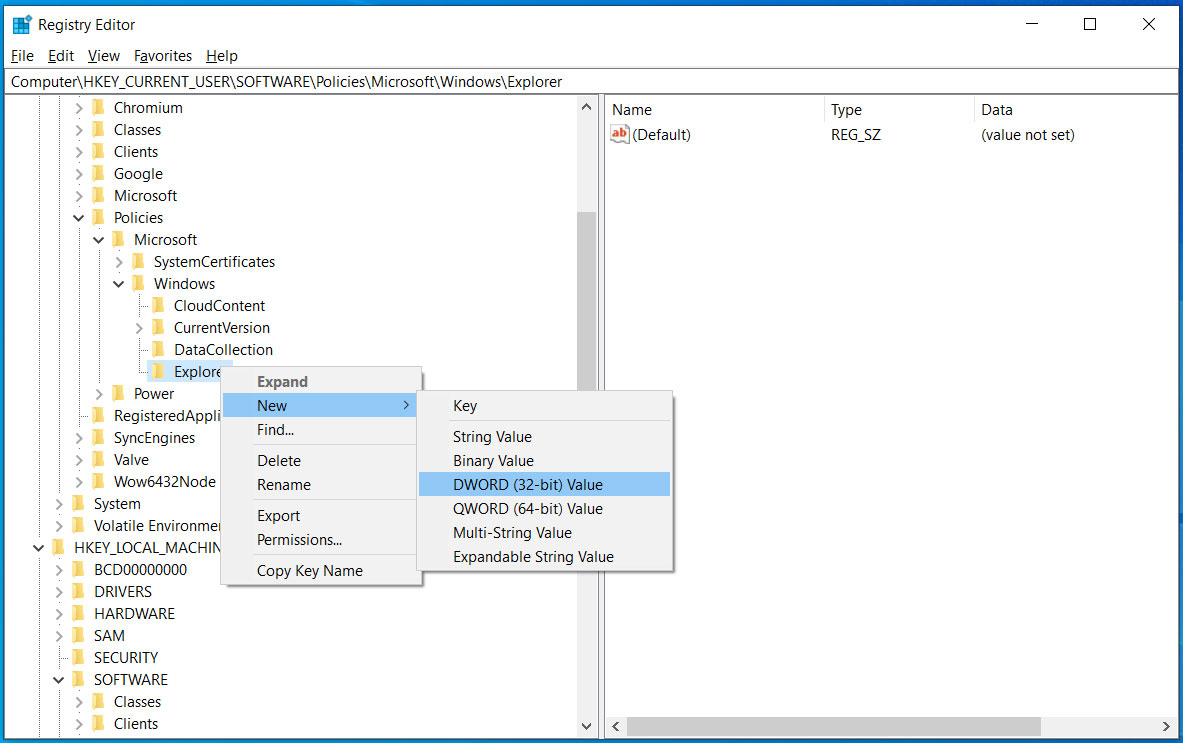 New DWORD value