Introduction
Windows Safe Mode is a way of booting up your Windows operating system in order to run administrative and diagnostic tasks on your installation. When you boot into Safe Mode the operating system only loads the bare minimum of software that is required for the operating system to work. This mode of operating is designed to let you troubleshoot and run diagnostics on your computer. Windows Safe Mode loads a basic video drivers so your programs may look different than normal.
For Win98/ME, XP, Vista and Windows 7 there are two methods of booting into Safe Mode, while 95 and 2000 only have one. We will describe these methods below:
F8 – By pressing the F8 key right when Windows starts, usually right after you hear your computer beep when you reboot it, you will be brought to a menu where you can choose to boot into safe mode. If it does not work on the first try, reboot and try again as you have to be quick when you press it. I have found that during boot up right after the computer shows you all the equipment , memory, etc installed on your computer, if you start lightly tapping the F8 key you will usually be able to get to the desired menu.
System Configuration Utility – You can use the System Configuration Utility, or MSCONFIG, found in Windows 98, ME, XP, Windows Vista, and Windows 7 to make Windows boot into Safe Mode on the next reboot. We will go into specific details in the sections below. Please note, that you should not force your computer to boot into Safe Mode using the System Configuration Utility if you suspect you are infected with malware as the malware may corrupt keys required to boot into Safe Mode. You can read more about this here.
Windows 95
Windows 95 can only boot into Safe Mode using the F8 method as it does not have a System Configuration Utility.
Using the F8 Method:
- Restart your computer.
- When the machine first starts it will generally list some equipment that is installed in your machine, amount of memory, hard drives installed etc. When it is finished with that it will say “Starting Windows 95”. Immediately after seeing “Starting Windows 95” press the F8 key.
- You will now be presented with a menu. Select the option for Safe Mode using the arrow keys.
- Then press enter on your keyboard to boot into Safe Mode.
- Do whatever tasks you require and when you are done reboot to boot back into normal mode.
Windows 98/ME
NOTE: Windows ME may look slightly different than what is shown in the images below. You should still have no problem following along.
Using the F8 Method:
- Restart your computer.
- When the machine first starts again it will generally list some equipment that is installed in your machine, amount of memory, hard drives installed etc. At this point you should gently tap the F8 key repeatedly until you are presented with a menu.
- When you have the menu on the screen. Select the option for Safe Mode using the arrow keys.
- Then press enter on your keyboard to boot into Safe Mode.
- Do whatever tasks you require and when you are done reboot to boot back into normal mode.
Using the System Configuration Tool Method:
Step 1: Close all programs so that you have nothing open and are at the desktop.
Step 2: Click on the Start button then click on Run.
Step 3: In the Run field type msconfig as shown in the image below.
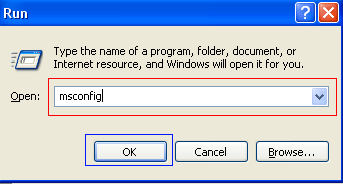
Figure 1. Starting Msconfig
Step 4: Press the OK button and the System Configuration Utility will start up. You will then see a screen similar to Figure 2 below.
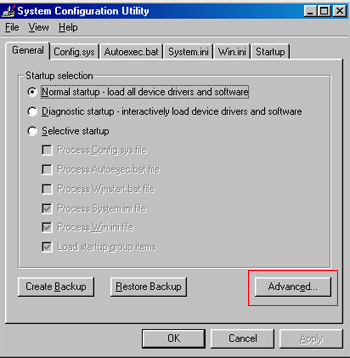
Figure 2. SCU Startup Screen
Step 5: You should now press the Advanced button designated by the red box in the figure above and you will see a screen similar to figure 3 below.
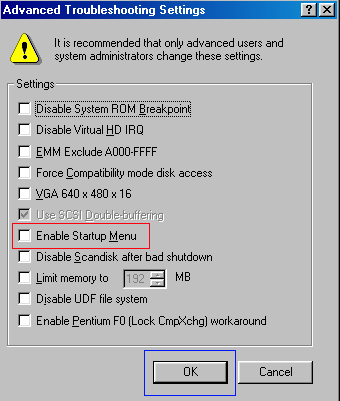
Figure 3. Advanced Options
Step 6: Place a check mark in the checkbox labeled “Enable Startup Menu” designated by the red box in Figure 3 above. Then press the OK button and then the OK button again. Windows 98/ME will now prompt if you would like to reboot as shown in Figure 4 below.
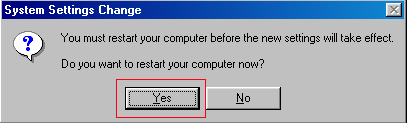
Figure 4. Confirm Reboot
Step 7: Press the Yes button and your computer will restart into Safe Mode.
Step 8: When the computer boots up perform what diagnostic or troubleshooting tasks you require.
Step 9. When you are finished with these tasks, complete steps 1-7 again, but in Step 6 this time uncheck the checkbox labeled “Enable Startup Menu”.
Step 10: Reboot the computer back into normal mode.
Windows 2000 can only boot into Safe Mode using the F8 method as it does not have a System Configuration Utility.
Using the F8 Method:
- Restart your computer.
- When the machine first starts again it will generally list some equipment that is installed in your machine, amount of memory, hard drives installed etc. When that is completed it will start loading Windows.
- When you see the screen that has a black and white bar at the bottom stating “Starting Windows”, tap the F8 key repeatedly until you get to the Windows 2000 Advanced Options Menu
- At this menu use the arrow keys to select the Safe Mode option, which is usually the first in the list.
- Press the enter key.
- Your computer will continue booting, but now will boot into Safe Mode.
- Do whatever tasks you require and when you are done reboot to boot back into normal mode.
Windows XP
Using the F8 Method:
- Restart your computer.
- When the machine first starts again it will generally list some equipment that is installed in your machine, amount of memory, hard drives installed etc. At this point you should gently tap the F8 key repeatedly until you are presented with a Windows XP Advanced Options menu.
- Select the option for Safe Mode using the arrow keys.
- Then press enter on your keyboard to boot into Safe Mode.
- Do whatever tasks you require and when you are done reboot to boot back into normal mode.
Using the System Configuration Tool Method:
Note: If you are having trouble entering Safe Mode via the F8 method, you should not use this method to force it to startup into safe mode. For reasons why, you should read this.
Step 1: Close all programs so that you have nothing open and are at the desktop.
Step 2: Click on the Start button then click on Run.
Step 3: In the Run field type msconfig as shown in the image below.
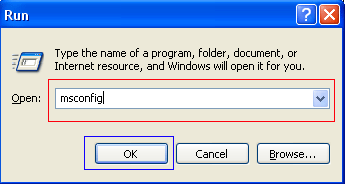
Figure 4. Starting Msconfig
Step 4: Press the OK button and the System Configuration Utility will start up. You will then see a screen similar to Figure 5 below.
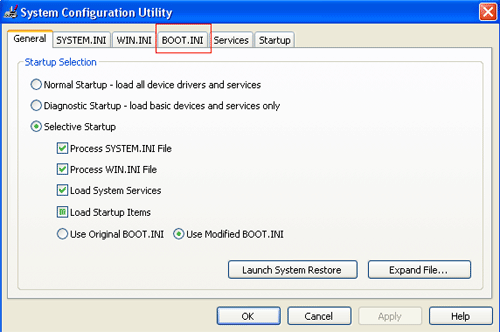
Figure 5. Starting the System Configuration Utility
Step 5: Click on the tab labeled “BOOT.INI” which is designated by the red box in Figure 5 above. You will then be presented with a screen similar to Figure 6 below.
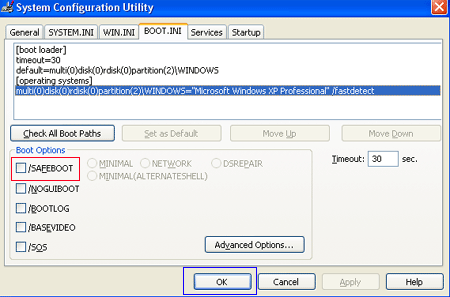
Figure 6. BOOT.INI Tab
Step 6: Put a check mark in the checkbox labeled “/SAFEBOOT” designated by the red box in Figure 6 above. Then press the OK button. After pressing the button you will be presented with a confirmation box as shown in Figure 7 below.
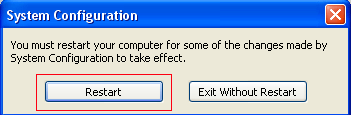
Figure 7. Confirm Reboot
Step 7: Press the Restart button and let the computer reboot. It will now boot up into Safe Mode.
Step 8: When the computer boots up do what diagnostic or troubleshooting tasks that you need to do.
Step 9. When are finished with your tasks, complete steps 1-7 again, but in Step 6 this time uncheck the checkbox labeled “/SAFEBOOT”. Then click on the General tab and set it for Normal startup.
Step 10: Reboot the computer back into normal mode.
Windows Vista
Using the F8 Method:
- Restart your computer.
- When the computer starts you will see your computer’s hardware being listed. When you see this information start to gently tap the F8 key repeatedly until you are presented with the Windows Vista Advanced Boot Options.
- Select the Safe Mode option using the arrow keys.
- Then press the enter key on your keyboard to boot into Vista Safe Mode.
- When Windows starts you will be at a typical logon screen. Logon to your computer and Vista will enter Safe mode.
- Do whatever tasks you require, and when you are done, reboot to go back into normal mode.
Using the System Configuration Tool Method:
Note: If you are having trouble entering Safe Mode via the F8 method, you should not use this method to force it to startup into safe mode. For reasons why, you should read this.
- Close any running programs and open Windows so you are back at the desktop.
- Click on the Start (
 ) button.
- In the Start Menu Search Box (
 ) type msconfig and press enter on your keyboard.
- The System Configuration utility will open and you will see a screen similar to the one below.
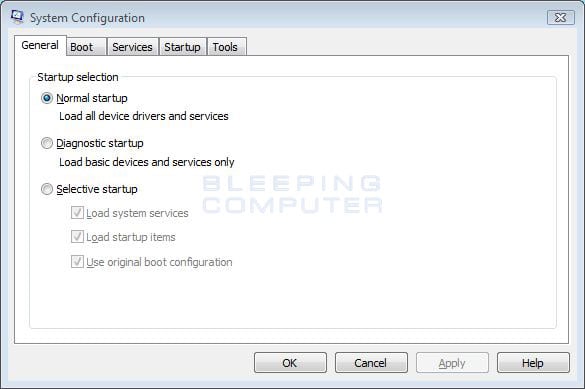
Figure 8. Vista System Configuration Utility
Click on the Boot tab. - You will now be at the Boot options screen as shown below.
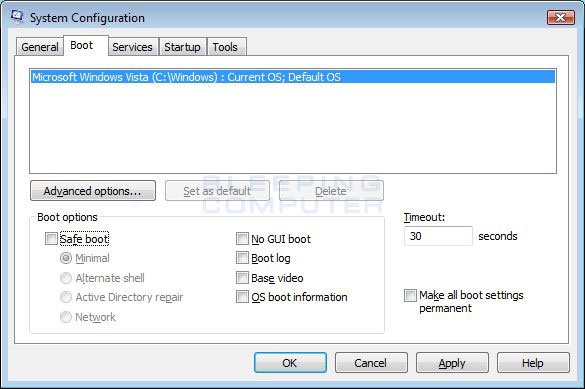
Figure 9. Vista Boot tab in the System Configuration utility
Put a check mark in the checkbox labeled Safe boot
- Press the Apply button and then press the OK button.
- You will now be presented with a prompt stating that you need to reboot the computer to apply the change.

Figure 10. Restart Prompt
Click on the Restart button to reboot your computer.
- Your computer will now restart directly into Safe Mode. When you get to the Vista logon screen, log on to the computer and perform any necessary tasks.
- When done with your tasks, from within Safe Mode, start msconfig.
- When the program is open, and you are on the General tab, select the option labeled Normal Startup.
- Then press the Apply button and then the OK button.
- When the programs prompts you to reboot, allow it to do so, and you will boot back into Windows Vista in normal mode.
Windows 7
Using the F8 Method:
- Restart your computer.
- When the computer starts you will see your computer’s hardware being listed. When you see this information start to gently tap the F8 key on your keyboard repeatedly until you are presented with the Windows 7 Advanced Boot Options screen as shown in the image below.
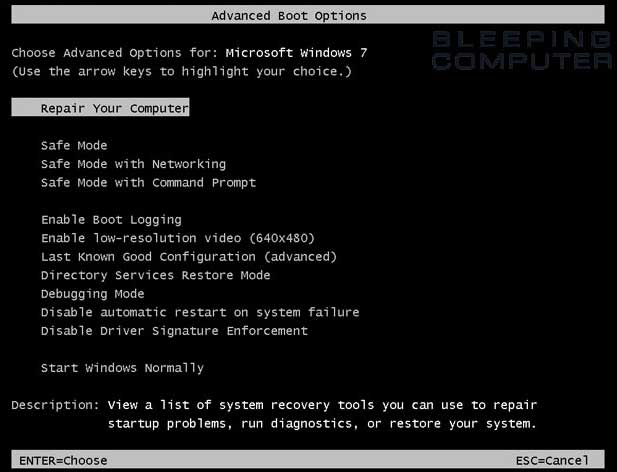
Figure 11. Windows 7 Advanced Boot Options screen - Using the arrow keys, select the Safe Mode option you want.
- Then press the enter key on your keyboard to boot into Windows 7 Safe Mode.
- When Windows starts you will be at a typical logon screen. Logon to your computer and Windows 7 will enter Safe mode.
- Do whatever tasks you require, and when you are done, reboot to go back into normal mode.
Using the System Configuration Tool Method:
Note: If you are having trouble entering Safe Mode via the F8 method, you should not use this method to force it to startup into safe mode. For reasons why, you should read this.
- Close any running programs and open Windows so you are back at the desktop.
- Click on the Start (
 ) button.
- In the Start Menu Search Box type msconfig as shown in Figure 12 below.

Figure 12. Windows 7 Search box
Then press enter on your keyboard.
- The System Configuration utility will open and you will see a screen similar to the one below.
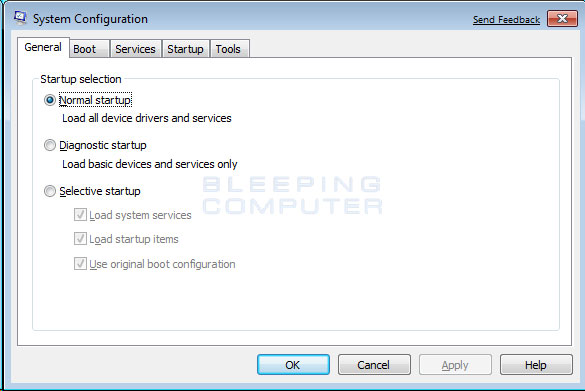
Figure 13. Windows 7 System Configuration Utility
Click on the Boot tab.
- You will now be at the Boot screen as shown below.
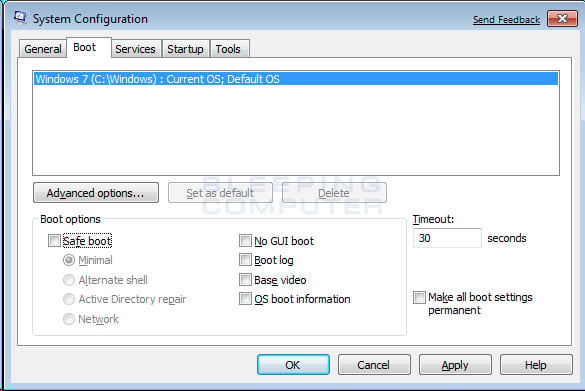
Figure 14. Windows 7 Boot tab in the System Configuration utility
Put a check mark in the checkbox labeled Safe boot
- Press the Apply button and then press the OK button.
- You will now be presented with a prompt stating that you need to reboot the computer to apply the change.
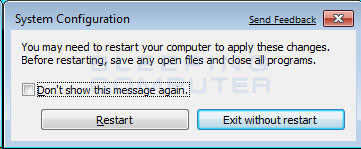
Figure 15. Restart Prompt
Click on the Restart button to reboot your computer.
- Your computer will now restart directly into Safe Mode. When you get to the Windows 7 logon screen, log on to the computer and perform any necessary tasks.
- When done with your tasks, from within Safe Mode, start msconfig.
- When the program is open, and you are on the General tab, select the option labeled Normal Startup.
- Then press the Apply button and then the OK button.
- When the programs prompts you to reboot, allow it to do so, and you will boot back into Windows 7 in normal mode.
Windows 8
For a detailed tutorial on how to boot Windows 8 into Safe Mode, please see this tutorial: How to start Windows 8 in Safe Mode
Using the Advanced startup options method:
- From the Windows Start screen, type Advanced startup and when the search results appear, click on the Settings category and then click on the Advanced startup options search option.
- When the Settings screen opens, scroll down and click on the Restart now button under the Advanced Startup category and your computer will restart.
- When the Advance startup menu appears, click on the Troubleshoot option.
- Then click on the Advanced Options button.
- Finally click on the Startup Settings option and then click on the Restart button. Your computer will now restart again.
- When you get to the Startup Settings screen, press the number for the Safe Mode option you wish to use.
- Do whatever tasks you require, and when you are done, reboot to go back into normal mode.
Using the System Configuration Tool Method:
Note: If you are having trouble entering Safe Mode via the Advanced Startup menu, you should not use this method to force it to startup into safe mode. For reasons why, you should read this.
- Go to the Windows Start screen and type msconfig. When the msconfig search results appears, click on it.
- The System Configuration utility will open and you will see a screen similar to the one below.
Click on the Boot tab.
- You will now be at the Boot screen as shown below.
Put a check mark in the checkbox labeled Safe boot
- Press the Apply button and then press the OK button.
- You will now be presented with a prompt stating that you need to reboot the computer to apply the change.
Click on the Restart button to reboot your computer.
- Your computer will now restart directly into Safe Mode. When you get to the Windows 8 logon screen, log on to the computer and perform any necessary tasks.
- When done with your tasks, from within Safe Mode, go back to the Start screen by pressing the Tab key on your keyboard. Then start msconfig again by typing msconfig and then clicking on its search result.
- When the program is open, and you are on the General tab, select the option labeled Normal Startup.
- Then press the Apply button and then the OK button.
- When the programs prompts you to reboot, allow it to do so, and you will boot back into Windows 8 in normal mode.
Windows 10
For a detailed tutorial on how to boot Windows 10 into Safe Mode, please see this tutorial: How to Start Windows 10 in Safe Mode with Networking
- Press the Ctrl+Alt+Delete keys a the same time to enter the Windows security screen.
- While holding down the Shift key, click on the Power button (
 ) and then click on Restart.
- When Windows 10 restarts, you will be at the Choose an Option screen as shown below. At this screen, click on the Troubleshoot button to access the Troubleshoot options.
- At the Troubleshoot screen, click on the Advanced Options button to open the advanced options screen.
- At the Advanced Options screen, click on the Startup Settings option. This will open the Startup Settings screen.
- At the Startup Settings screen, click on the Restart button. Windows will now restart.
- After restarting you will be shown a Startup Settings screen. At this screen you should press the number 5 key on your keyboard to enter Safe Mode with Networking.
- Your computer will now reboot. Once rebooted, you will be at a login prompt. Login to access Safe mode with Networking.
Problems that can occur by forcing Safe Mode using the System Configuration Utility
It is possible to make your computer continuously boot up into safe mode using the System Configuration utility as described above. The program does this by changing your boot.ini file, the settings file that configures your computer’s boot sequence, and adding the /safeboot argument to your operating systems startup line. An example of this can be seen below.
| Original | [operating systems] multi(0)disk(0)rdisk(0)partition(2)\WINDOWS=”Microsoft Windows XP Professional” /FASTDETECT /NOEXECUTE=OPTIN |
| After using MsConfig.exe | [operating systems] multi(0)disk(0)rdisk(0)partition(2)\WINDOWS=”Microsoft Windows XP Professional” /FASTDETECT /NOEXECUTE=OPTIN /safeboot:minimal |
When you are done using safe mode, you would then run the System Configuration utility again and uncheck the /Safeboot option, thus removing the /safeboot argument from the boot.ini file, and allowing your computer to boot up normally.
On a computer that is operating properly this is normally not a problem. Unfortunately, though, a new trick that some of the more recent malware are using is to delete certain Windows Registry keys so that your computer can not properly boot into safe mode. It is in these situations that using the System Configuration utility to boot into safe mode can cause the computer to become inoperable for many users.
This is because once you set the computer to boot into Safe Mode using /Safeboot, it will continuously attempt to start Safe Mode until the /safeboot argument is removed from the boot.ini. Since the malware is not allowing us to actually boot into safe mode, you have no way of getting to a point where you can run the System Configuration utility again to uncheck the /Safeboot option. Thus, you are stuck with a computer constantly attempting to get into safe mode and not being able to do so.
If a situation like this has happened to you it is possible to fix this problem by renaming your boot.ini file. The first step would be to use a boot disk to start your computer. If your computer does not have a floppy disk, then you can typically boot off the Windows CD that came with your computer in order to access the Windows Recovery Console. More information about the Windows Recovery Console can be found here. Once booted to a command prompt, you would simply rename your C:\Boot.ini file to another name like C:\Boot.ini.bak. The command to rename the file at the command prompt is:
ren C:\Boot.ini Boot.ini.bak
Once the file is renamed, you can then remove the boot disk and reboot your computer to get back to normal mode. When booting up after the rename, do not be surprised if you see an error stating that you do not have a valid Boot.ini file. When you get back to normal Windows mode, you can then rename C:\Boot.ini.bak to C:\Boot.ini and run Msconfig again to remove the /safeboot flag.
Conclusion
It is not uncommon when people are helping you troubleshoot your computer that they tell you to enter Safe Mode. With this tutorial you should now know how to enter Safe Mode when it is required.
If you have any questions please feel free to post them in our tech support forums.
Source :
https://www.bleepingcomputer.com/tutorials/how-to-start-windows-in-safe-mode/


 To remove the WINS IP and set NetBios option, we will use the set method in the WMI class.
 Once the script has run WINS should be removed and NetBios over Tcpip should be disabled this can be checked under the advanced properties on the NIC.


