Microsoft is planning to put a stop to enterprise data theft via email forwarding by disabling Office 365’s email forwarding to external recipients by default.
The company also wants to add improved external email forwarding controls which will allow Office 365 admins to enable the feature only to select employees in their organizations.
“External forwarding of email is a tactic used by attackers to exfiltrate data out of an organization and controlling that process is difficult,” Microsoft explains on the new feature’s Microsoft 365 roadmap entry.
“With this new feature, we are adding support for more granular controls that allow the Office 365 administrators to easily enable external forwarding for the right people in the organization through the outbound spam policy.”
The new feature is planned to be generally available and start to roll out to all environments with an Office 365 Advanced Threat Protection (ATP) plans starting with the fourth quarter of 2020.
How to stop auto-forwarding for emails
Until external email forwarding will be disabled by default, Microsoft provides step by step instructions on how to stop it manually to prevent hackers from stealing proprietary information by exfiltrating it to outside email addresses under their control.
To do this, you will have to create a custom mail flow rule by following these steps:• Go to the Exchange admin center, select Exchange, mail flow, and on the rules tab, select the plus sign and choose to create a new rule. • Select More options. Name your new rule. • Then open the drop-down to apply this rule if, select the sender and then is external internal. • Select Inside the organization, and then OK. • Choose to add condition, open the drop-down, select The message properties, then include the message type. • Open the select message type drop-down, choose Auto-forward, then OK. • Open the Do the following drop-down, select Block the message, then reject the message and include an explanation. • Enter the message text for your explanation, then select OK. • Scroll to the bottom and select Save.
Once the rule has been created, attackers will no longer be able to enable auto-forwarding for that user’s mailbox.
A video tutorial for this entire procedure is also embedded below.
Increase your org’s security
Redmond also has a list of ten measures you can take to boost your organization’s data security for both Microsoft 365 Business Standard and Microsoft 365 Business Premium service plans.
The list of tasks you need to go through to increase the security of your organization:1. Set up multi-factor authentication (MFA) to prevent hackers from taking over accounts if they know the password. 2. Train your users to use strong passwords, protect their devices, and enable security features on Windows 10 and Mac PCs. 3. Use dedicated admin accounts. 4. Raise the level of protection against malware in mail (guidance on how to do that is available in this training video). 5. Protect against ransomware by blocking file extensions commonly used for ransomware using mail flow rules. 6. Stop auto-forwarding for email. 7. Use Office Message Encryption. 8. Protect your email from phishing attacks using an ATP anti-phishing policy. 9. Protect against malicious attachments and files with ATP safe attachment policies. 10. Protect against phishing attacks with ATP Safe Links.
Redmond is also working on including automated malicious content blocking in Office 365 regardless of admin or user custom configurations unless manually overridden.
Once this new feature will be enabled, Office 365 will honor EOP/ATP malware analysis (detonation) verdicts to automatically block known malicious files and URLs.
In October 2019, Microsoft also enabled Authenticated Received Chain (ARC) for all hosted mailboxes to improve anti-spoofing detection. The ARC protocol supplements the DKIM and DMARC email authentication protocols as part of Internet Mail Handlers’ effort to combat email spoofing especially when dealing with forwarded messages.
Windows 10 and Windows 11 An eSIM lets you connect to the Internet over a cellular data connection. With an eSIM, you don’t need to get a SIM card from your mobile operator, and you can quickly switch between mobile operators and data plans.
For example, you might have one cellular data plan for work, and a different plan with another mobile operator for personal use. If you travel, you can get connected in more places by finding mobile operators with plans in that area.
Here’s what you’ll need:
A PC running Windows 10, Version 1703 or later. To see which version of Windows 10 your device uses, select the Start button, then select Settings > System > About .
A PC with an eSIM in it. Here’s how you can tell if your PC has an eSIM:
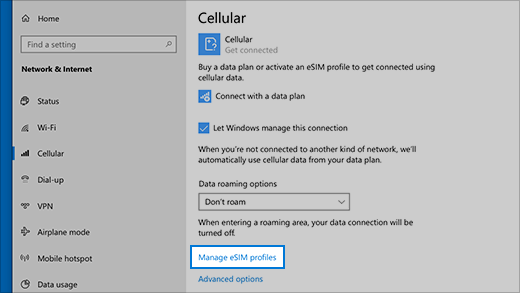
Select the Start button, then select Settings > Network & Internet > Cellular .
On the Cellular screen, look for a link near the bottom of the page that says Manage eSIM profiles. If that link appears, your PC has an eSIM.
Note: Some devices have both an eSIM and physical SIM card. If you don’t see Manage eSIM profiles but you do see Use this SIM for cellular data at the top of the Cellular settings screen, select the other SIM from the drop-down box, and then see if the Manage eSIM profiles link appears.
To add an eSIM profile
You’ll need to add an eSIM profile to get an Internet connection using cellular data.
If you have a PC from your organization, an eSIM profile might already be added to your PC. If you select Manage eSIM profiles and see an eSIM profile for a mobile operator you expect to find, you can skip this procedure and go to the next one to get connected.
Select the Start button, then select Settings > Network & Internet > Cellular > Manage eSIM profiles.
Under eSIM profiles, select Add a new profile.
To search for available profiles or use an activation code you have from your mobile operator, do one of the following:
Search for available profiles
Select Search for available profiles > Next.
When a profile you want to use is found, select Download.
Enter the confirmation code from your mobile operator in the corresponding box, then select Download.
After the profile is downloaded and installed, select Continue to find other profiles you might want and then repeat the previous steps.
Select Close when you have downloaded the profiles you want.
Use an activation code you have from your mobile operator
Select Let me enter an activation code I have from my mobile operator > Next.
If you have a QR code to scan for the activation code, choose which camera to use on your PC, and then scan the QR code.
The activation code should appear in the corresponding Activation code box. Select Next.
For the dialog box that asks Do you want to download this profile?, enter the confirmation code from your mobile operator into the corresponding box, and then select Download.
Select Close.
Optional: To give the profile a friendly name (for example, Work or Personal) to help you remember it, select the profile, select Edit name, type a name you’ll remember, and then select Save.
To connect to cellular data using an eSIM profile
Select the Start button, then select Settings > Network & Internet > Cellular > Manage eSIM profiles.
Under eSIM profiles, select the profile you want, and then select Use.
Select Yes for This will use cellular data from your data plan and may incur charges. Do you want to continue? You’ll be connected to a cellular data network and ready to go.
To switch between profiles
If you have more than one profile installed on your PC, you can switch between profiles to use a different mobile operator and data plan.
Select the Start button, then select Settings > Network & Internet > Cellular > Manage eSIM profiles.
Under eSIM profiles, select the profile you want to stop using, and then select Stop using.
Select Yes for You’ll be disconnected from this cellular network. Continue?
Select the different profile you want to use, then select Use.
To delete a profile
If you don’t want to use a profile anymore, you can delete it from your PC. If you delete the profile and want to add it again later, you’ll need to download the profile again and might need to contact your mobile operator.
Select the Start button, then select Settings > Network & Internet > Cellular > Manage eSIM profiles.
Under eSIM profiles, select the profile to delete, and then select Delete.
At the prompt that warns you that the profile will be permanently deleted, select Yes.
Note: If you have a PC from your organization, you might not be able to delete an eSIM profile because of a policy that’s set by your organization.
The privacy of our data has always been important. However, because we’re sharing more of it than ever before, being aware of data privacy and taking the necessary steps to protect it has never been more crucial. In this article, in celebration of Data Privacy Week, we cover why data privacy is so important, what can happen if your data were to fall into the wrong hands, and what you can do to protect your personal data.
Find out if your email address appeared in any data leaks
What is data privacy and why is it important?
Data privacy often refers to the practice of handling sensitive data in line with regulatory requirements. In most developed countries, there are specific data privacy laws in place that regulate how companies can collect, store, and share customer data.
While the EU has a comprehensive data privacy law, the General Data Protection Regulation (GDPR), which covers all different types of data, only three US states currently have similar, all-encompassing data privacy laws (California, Virginia, and Colorado). Instead, the US has many different laws designed to target specific types of data. For example, the Fair Credit Reporting Act (FCRA) protects information in your credit report, and the Family Educational Rights and Privacy Act (FERPA) protects students’ education reports from being freely accessible.
However, because of how much time we spend online nowadays, we’re putting more of our personal data out there for others to see than ever before. As a result, it is not only important to understand how protected your data is when you share it with a company, but also how private it is when you share it online.
How to protect your data privacy
Here are some of our top tips for data privacy protection:
Only give your data to trustworthy companies and websites — Perhaps you’ve come across a new online clothing store or seen an app on the app store that takes your fancy, but you’re unsure if you can trust the company. If you’ve never heard of the company before, it’s best to do some quick research to learn whether or not you can trust it with your data.
Think twice before sharing — With social media being such a big part of our everyday lives, it’s easy to forget that what we post online, stays online forever. Always think twice before sharing something online. Don’t publicly share personal information such as your address, phone number, or social security number.
Take advantage of privacy settings — On every website, app, and game that you use, make sure you’re taking advantage of the built-in privacy settings. By doing so, you’ll ensure that only people you know can view your information.
Use strong passwords and enable 2FA — When you create an online account, you almost always need to share lots of personal data — your full name, email address, and date of birth, for example. Although this data isn’t publicly accessible, if a hacker were to gain access to one of your accounts, they would be able to see all this information. To avoid this happening, make sure to use only strong, tough-to-hack passwords and that all your accounts have two-factor authentication (2FA) enabled.
Use a VPN on public Wi-Fi — Unprotected Wi-Fi networks are notoriously unsecure. Because no password is required to access them, nearby hackers can steal any data transferred over them. To protect yourself, always use a VPN on public Wi-Fi networks.
Data leaks in 2021 — T-Mobile, LinkedIn, Moncler & CoinMarketCap
The truth is, no matter how well a company abides by data privacy laws and how thoroughly it protects its customers’ data, it can never be 100% data leak-proof. In 2021 alone, a shocking number of companies suffered high-profile data leaks, including T-Mobile, LinkedIn, Moncler, and CoinMarketCap. Those leaks resulted in hundreds of millions of people having their sensitive personal data leaked, which is used by criminals to commit all sorts of crimes — with the most concerning of them all being identity theft.
According to the Federal Trade Commission, there were over 1 million reports of identity theft in 2021. Below are some of the things the FTC says criminals can do with your data:
Get new credit cards in your name.
Open a phone, electricity, or gas account in your name.
Steal your tax refund.
Get medical care under your name (and leave you with a huge bill!).
Pretend to be you if they get arrested.
Cybercriminals often put stolen data up for sale on underground forums on the regular internet, as well as the dark web. And as you can imagine, personal information that is particularly valuable to them can fetch a high price. On average, on the dark web, a driver’s license will go for $205, an ID card for $213, and a passport sells for a whopping $684!
How to stay protected from data leaks
You might be thinking that staying protected from data leaks is an impossible task, but the answer is easy: Trend Micro™ ID Security . Available for Android and iOS, Trend Micro™ ID Security can scan the internet and the dark web 24/7 for your personal information. If your data is leaked, the app notifies you immediately so you can take action to avoid people stealing your identity. If your information is out there, you’ll be the first to know!
Here are some of the features offered by Trend Micro™ ID Security :
Personal Data Protection Score — See exactly how safe your online personal data is with your customized Protection Score.
24/7 Comprehensive Personal Data Monitoring — ID Security can scan the internet and the dark web for all your personal information including up to 5 email addresses and bank account numbers, 10 credit card numbers, your Social Security number, and lots more.
Social Media Account Protection — Strengthen the security of your social media accounts. Be instantly alerted if your Facebook or Twitter account’s data is leaked by cybercriminals.
Microsoft has added SMTP MTA Strict Transport Security (MTA-STS) support to Exchange Online to ensure Office 365 customers’ email communication integrity and security.
“We have been validating our implementation and are now pleased to announce support for MTA-STS for all outgoing messages from Exchange Online,” the Exchange Online Transport Team said today.
With MTA-STS now available in Office 365, emails sent by users via Exchange Online will only be delivered using connections with both authentication and encryption, protecting the messages from interception and attack attempts.
This new standard strengthens Exchange Online email security and solves several SMTP security problems, including expired TLS certificates, the lack of support for secure protocols, and certificates not issued by trusted third parties or matching server domain names.
Before MTA-STS, emails sent through improperly secured TLS connections were exposed to various attacks, including downgrade and man-in-the-middle attacks.
“Downgrade attacks are possible where the STARTTLS response can be deleted, thus rendering the message in cleartext. Man-in-the-middle (MITM) attacks are also possible, whereby the message can be rerouted to an attacker’s server,” the Exchange team said.
“MTA-STS (RFC8461) helps thwart such attacks by providing a mechanism for setting domain policies that specify whether the receiving domain supports TLS and what to do when TLS can’t be negotiated, for example stop the transmission.”
Microsoft provides guidance on how to adopt MTA-STS, including where to host the policy file on your domain’s web infrastructure.https://www.youtube.com/embed/VY3YvrrHXJk
DANE for SMTP support also rolling out
Redmond is still working on rolling out DANE for SMTP (with DNSSEC support), which provides better protection for SMTP connections than MTA-STS does.
“We will deploy support for DANE for SMTP and DNSSEC in two phases. The first phase, DANE and DNSSEC for outbound email (from Exchange Online to external destinations), is slowly being deployed between now and March 2022. We expect the second phase, support for inbound email, to start by the end of 2022,” said The Exchange Team on Tuesday.
“We’ve been working on support for both MTA-STS and DANE for SMTP. At the very least, we encourage customers to secure their domains with MTA-STS,” Microsoft added today.
“You can use both standards on the same domain at the same time, so customers are free to use both when Exchange Online offers inbound protection using DANE for SMTP by the end of 2022. By supporting both standards, you can account for senders who may support only one method.”
Microsoft has already secured several domains it uses for email transport as a domain owner itself, including primary domains like outlook.com, hotmail.com, and live.com.
This ensures that all connections from senders who support MTA-STS are better protected from man-in-the-middle attacks.
Optional updates for Windows 10 and Windows 11 released in January have fixed performance problems when playing games, using the operating system, or even opening folders in File Explorer.
With the January 2022 updates, Microsoft introduced numerous bugs breaking LT2P VPN connections, causing domain controller reboots, and preventing Hyper-V from working.
Microsoft later released out-of-band updates to fix these issues, whose fixes were also rolled into the optional preview updates.
However, these optional updates seem to have fixed more than the reported bugs, as they are also resolving significant performance issues caused by the January updates.
Recent Windows updates caused performance hits
After installing the January 2022 KB5009543 update, Windows 10 users began to notice that Windows suffered from severe performance issues.
These performance issues included slow boots and slow response times when opening the Start Menu, launching apps, playing games, and performing pretty much all of the basic functions of the operating system. In general, Windows felt “laggy” after installing the updates.
“Prior to the update, it took maybe 2 minutes for my laptop to boot to the home screen. It now takes close to a half hour. I’m frustrated to the point where I’m now planning to disable updates and uninstall this update,” a user named Ninja_Bobcat posted on Reddit.
“This update has ruined my laptop in games, namely warzone and apex. Goes to 0 fps and huge stutters everywhere,” another person posted.
“My computer is incredibly slow after KB5009543 security update and KB5008876 windows update. It takes about 3 minutes for my computer to boot and maybe 2-3 minutes to open a tab on chrome. Absolutely killed my computer,” said a third Windows 10 user.
BleepingComputer replicated these performance issues after installing the January 2022 KB5009543 update on multiple laptops.
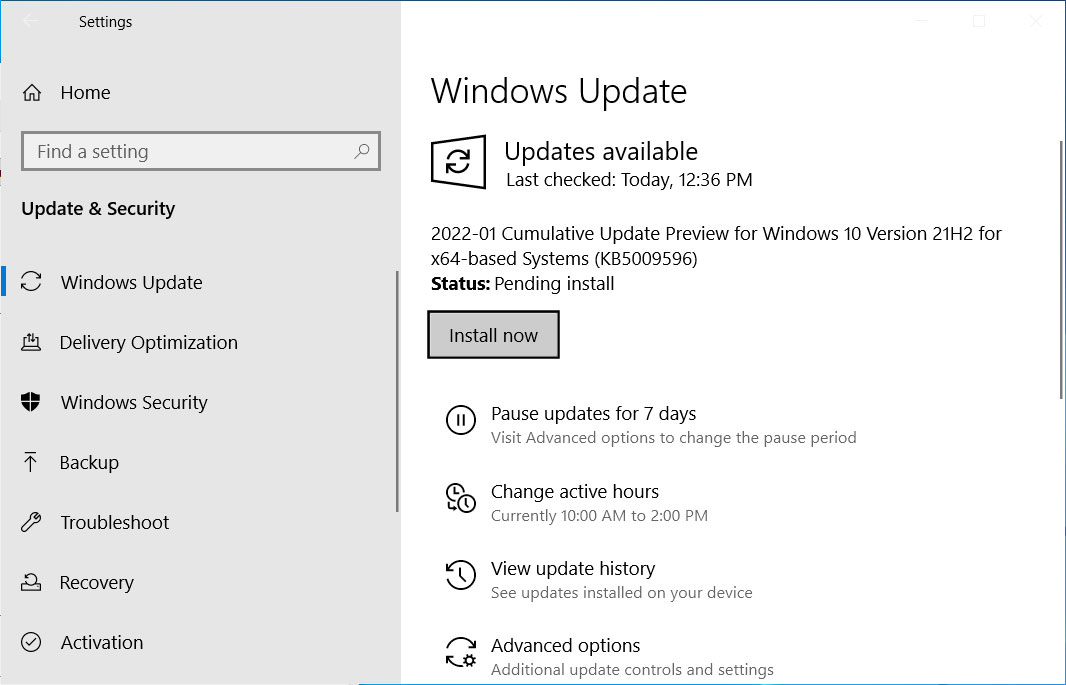
The good news is that BleepingComputer found that installing the optional KB5009596 preview update released late last month fixed these newly introduced performance issues.
Windows 10 KB5009596 optional update
However, as these updates are optional, many users will not know to install them. Thus, their performance issues will continue until the mandatory February 2022 Patch Tuesday updates are installed, which will include these fixes.
Windows users can install the optional updates by going into Settings, clicking on Windows Update, and manually performing a ‘Check for Updates.’
As this is an optional update, you will need to install the KB5009596 by clicking on the ‘Download and install’ link.
Windows 11 issues were fixed as well
Not to be outdone by Windows 10, Windows 11 has also been dealing with performance issues within File Explorer.
Users found that it was slow to switch between folders, browse folders, or select files when using File Explorer.
However, the optional Windows 11 KB5008353 cumulative update preview has resolved these issues, with users reporting that File Explorer is back to normal.
“I honestly lost hope because this issue has been there since I upgraded to Win11, other users were claiming it was solved but it wasn’t the case for everyone. However, this update seems to have fixed this issue for good amongst others of course,” a Windows 11 user posted on Reddit.
BleepingComputer has not been able to replicate the performance issues on Windows 11 to test the fix.
BleepingComputer has also reached out to Microsoft with further questions about what has been fixed but has not received a reply as of yet.
This article helps solve an issue where a physical disk resource doesn’t come online on a cluster node.
Applies to: Windows Server 2012 R2 Original KB number: 981475
Symptoms
On a cluster node that is running Windows Server, a physical disk resource may enter the Failed state when you try to move a group that contains the physical disk resource. If you restart the cluster node that has the physical disk resource that did not come online, the problem is temporarily resolved.
When this problem occurs, the following entries are logged in the Cluster log for the physical disk resource that entered the failed state:
000020cc.000014d0::<DateTime> ERR Physical Disk <Disk Q:>: DiskspCheckPath: GetFileAttrs(Q:) returned status of 87. 000020cc.000014d0::<DateTime> WARN Physical Disk <Disk Q:>: DiskspCheckDriveLetter: Checking drive name (Q:) returns 87
Additionally, the following events are logged in the System Event log:
Event Type: Error Event Source: ClusSvc Event Category: Physical Disk Resource Event ID: 1066 Date: <date> Time: <time> User: N/A Computer: <node name> Description: Cluster disk resource “Disk Q:” is corrupt. Run ‘ChkDsk /F’ to repair problems. The volume name for this resource is “<\?\Volume{4323d41e-1379-11dd-9538-001e0b20dfe6}>”. If available, ChkDsk output will be in the file “C:\WINDOWS\Cluster\ChkDsk_Disk2_SigB05E593B.log”. ChkDsk may write information to the Application Event Log with Event ID 26180.
Event Type: Error Event Source: ClusSvc Event Category: Physical Disk Resource Event ID: 1035 Date: <date> Time: <time> User: N/A Computer: <node name> Description: Cluster disk resource ‘Disk Q:’ could not be mounted.
Similarly, on a Windows Server cluster node you may see following entries are logged in the Cluster log:
00000db0.00000868::<DateTime> WARN [RES] Physical Disk <Cluster Disk 1>: OnlineThread: Failed to get volume guid for device \?\GLOBALROOT\Device\Harddisk15\Partition1. Error 3 00000db0.00000868::<DateTime> WARN [RES] Physical Disk <Cluster Disk 1>: OnlineThread: Failed to set volguid ??\Volume{3cb36133-0d0b-11df-afcf-005056ab58b9}. Error: 183. 00000db0.00000868::<DateTime> INFO [RES] Physical Disk <Cluster Disk 1>: VolumeIsNtfs: Volume \?\GLOBALROOT\Device\Harddisk15\Partition1\ has FS type NTFS
Cause
This problem is known to occur when antivirus software that is not cluster-aware is installed, upgraded, or reconfigured. For example, this problem is known to occur after you install or migrate to Symantec Endpoint Protection 11.0 Release Update 5 (RU5) on the cluster nodes.
Resolution
To resolve this problem, follow these steps:
Verify that this problem is caused by Symantec Endpoint Protection (SEP) 11.0 Release Update 5 (RU5). To do this, run the Handle.exe utility immediately after the issue occurs on the cluster node where the physical disk resource did not come online.At an elevated command prompt, type the following command, and then press ENTER: Handle.exe -a -u drive_letter. NoteThe drive_letter placeholder is the drive designation for the cluster drive that did not come online.For example, assume that the drive designation for the cluster drive that did not come online is drive Q. To run the Handle.exe utility in this scenario, type the following command, and then press ENTER: Handle.exe -a -u Q:.The problem is caused by the Symantec application if you receive the following message that identifies the Smc.exe process as the process that owns the handle:Handle v3.42 Copyright (C) 1997-2008 Mark Russinovich Sysinternals – www.sysinternals.comSmc.exe pid: 856 NT AUTHORITY\SYSTEM 66C: Q:
If the problem is caused by the Symantec application, contact Symantec to obtain Symantec Endpoint Protection 11 Release Update 6 (RU6), which was released to resolve this issue.
More information
For more information about the Handle.exe utility, see Handle v4.22.
The third-party products that this article discusses are manufactured by companies that are independent of Microsoft. Microsoft makes no warranty, implied or otherwise, about the performance or reliability of these products.
In this blog we will take a look under the hood of the cluster file system in Windows Server 2012 R2 called Cluster Shared Volumes (CSV). This blog post is targeted at developers and ISV’s who are looking to integrate their storage solutions with CSV.
Note: Throughout this blog, I will refer to C:\ClusterStorage assuming that the Windows is installed on the C:\ drive. Windows can be installed on any available drive and the CSV namespace will be built on the system drive, but instead of using %SystemDrive%\ClusterStorage\ I’ve used C:\ClusteredStorage for better readability since C:\ is used as the system drive most of the time.
Components
Cluster Shared Volume in Windows Server 2012 is a completely re-architected solution from Cluster Shared Volumes you knew in Windows Server 2008 R2. Although it may look similar in the user experience – just a bunch of volumes mapped under the C:\ClusterStorage\ and you are using regular windows file system interface to work with the files on these volumes, under the hood, these are two completely different architectures. One of the main goals is that in Windows Server 2012, CSV has been expanded beyond the Hyper-V workload, for example Scale-out File Server and in Windows Server 2012 R2 CSV is also supported with SQL Server 2014.
First, let us look under the hood of CsvFs at the components that constitute the solution.
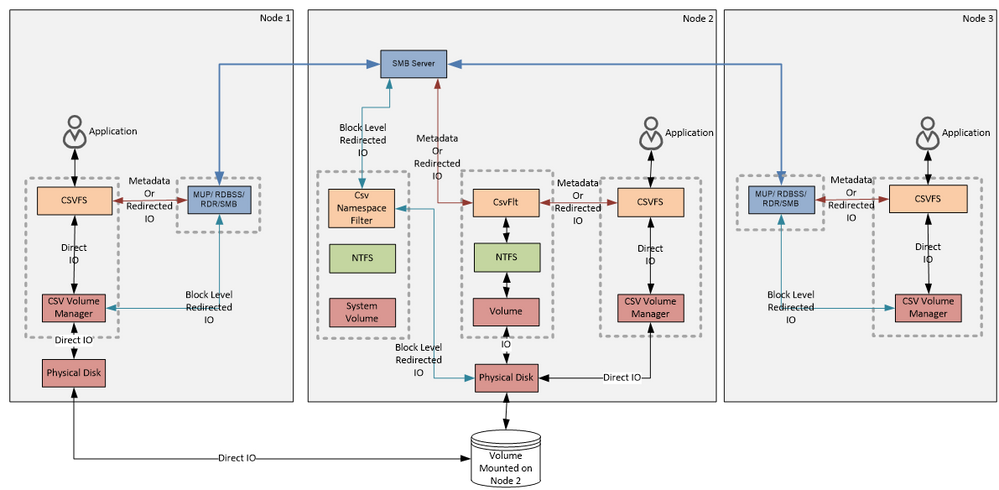
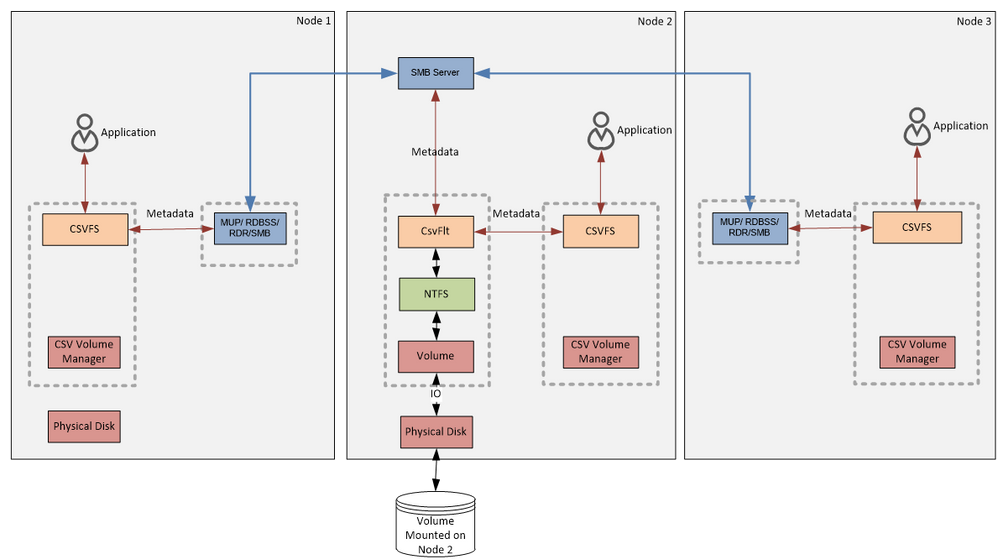
Figure 1:
CSV Components and Data Flow Diagram
The diagram above shows a 3 node cluster. There is one shared disk that is visible to Node 1 and Node 2. Node 3 in this diagram has no direct connectivity to the storage. The disk was first clustered and then added to the Cluster Shared Volume. From the user’s perspective, everything will look the same as in the Windows 2008 R2. On every cluster node you will find a mount point to the volume: C:\ClusterStorage\Volume1. The “VolumeX” naming can be changed, just use Windows Explorer and rename like you would any other directory. CSV will then take care of synchronizing the updated name around the cluster to ensure all nodes are consistent. Now let’s look at the components that are backing up these mount points.
Terminology
The node where NTFS for the clustered CSV disk is mounted is called the Coordinator Node. In this context, any other node that does not have clustered disk mounted is called Data Servers (DS). Note that coordinator node is always a data server node at the same time. In other words, coordinator is a special data server node when NTFS is mounted.
If you have multiple disks in CSV, you can place them on different cluster nodes. The node that hosts a disk will be a Coordinator Node only for the volumes that are located on that disk. Since each node might be hosting a disk, each of them might be a Coordinator Node, but for different disks. So technically, to avoid ambiguity, we should always qualify “Coordinator Node” with the volume name. For instance we should say: “Node 2 is a Coordinator Node for the Volume1”. Most of the examples we will go through in this blog post for simplicity will have only one CSV disk in the cluster so we will drop the qualification part and will just say Coordinator Node to refer to the node that has this disk online.
Sometimes we will use terms “disk” and “volume” interchangeably because in the samples we will be going through one disk will have only one NTFS volume, which is the most common deployment configuration. In practice, you can create multiple volumes on a disk and CSV fully supports that as well. When you move a disk ownership from one cluster node to another, all the volumes will travel along with the disk and any given node will be the coordinator for all volumes on a given disk. Storage Spaces would be one exception from that model, but we will ignore that possibility for now.
This diagram is complicated so let’s try to break it up to the pieces, and discuss each peace separately, and then hopefully the whole picture together will make more sense.
On the Node 2, you can see following stack that represents mounted NTFS. Cluster guarantees that only one node has NTFS in the state where it can write to the disk, this is important because NTFS is not a clustered file system. CSV provides a layer of orchestration that enables NTFS or ReFS (with Windows Server 2012 R2) to be accessed concurrently by multiple servers. Following blog post explains how cluster leverages SCSI-3 Persistent Reservation commands with disks to implement that guarantee https://techcommunity.microsoft.com/t5/Failover-Clustering/Cluster-Shared-Volumes-CSV-Disk-Ownership….
Figure 2:
CSV NTFS stack
Cluster makes this volume hidden so that Volume Manager (Volume in the diagram above) does not assign a volume GUID to this volume and there will be no drive letter assigned. You also would not see this volume using mountvol.exe or using FindFirstVolume() and FindNextVolume() WIN32 APIs.
On the NTFS stack the cluster will attach an instance of a file system mini-filter driver called CsvFlt.sys at the altitude 404800. You can see that filter attached to the NTFS volume used by CSV if you run following command:
Applications are not expected to access the NTFS stack and we even go an extra mile to block access to this volume from the user mode applications. CsvFlt will check all create requests coming from the user mode against the security descriptor that is kept in the cluster public property SharedVolumeSecurityDescriptor. You can use power shell cmdlet “Get-Cluster | fl SharedVolumeSecurityDescriptor” to get to that property. The output of this PowerShell cmdlet shows value of the security descriptor in self-relative binary format ( http://msdn.microsoft.com/en-us/library/windows/desktop/aa374807(v=vs.85).aspx 🙁 PS > Get-Cluster | fl SharedVolumeSecurityDescriptorSharedVolumeSecurityDescriptor : {1, 0, 4, 128…}
CsvFlt plays several roles:
Provides an extra level of protection for the hidden NTFS volume used for CSV
Helps provide a local volume experience (after all CsvFs does look like a local volume). For instance you cannot open volume over SMB or read USN journal. To enable these kinds of scenarios CsvFs often times marshals the operation that need to be performed to the CsvFlt disguising it behind a tunneling file system control. CsvFlt is responsible for converting the tunneled information back to the original request before forwarding it down-the stack to NTFS.
It implements several mechanisms to help coordinate certain states across multiple nodes. We will touch on them in the future posts. File Revision Number is one of them for example.
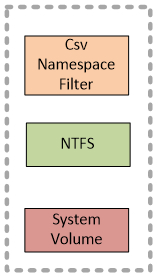
The next stack we will look at is the system volume stack. On the diagram above you see this stack only on the coordinator node which has NTFS mounted. In practice exactly the same stack exists on all nodes.
Figure 3:
System Volume Stack
The CSV Namespace Filter (CsvNsFlt.sys) is a file system mini-filter driver at an altitude of 404900: >fltmc instances Filter Volume Name Altitude Instance Name ———— ——————— ———— ———————- <skip> CsvNSFlt C: 404900 CsvNSFlt Instance <skip>
CsvNsFlt plays the following roles:
It protects C:\ClusterStorage by blocking unauthorized attempts that are not coming from the cluster service to delete or create any files or subfolders in this folder or change any attributes on the files. Other than opening these folders about the only other operation that is not blocked is renaming the folders. You can use command prompt or explorer to rename C:\ClusterStorage\Volume1 to something like C:\ClusterStorage\Accounting. The directory name will be synchronized and updated on all nodes in the cluster.
It helps us to dispatch the block level redirected IO. We will cover this in more details when we talk about the block level redirected IO later on in this post.
The last stack we will look at is the stack of the CSV file system. Here you will see two modules CSV Volume Manager (csvvbus.sys), and CSV File System (CsvFs.sys). CsvFs is a file system driver, and mounts exclusively to the volumes surfaced up by CsvVbus.
Figure 5:
CsvFs stack
Data Flow
Now that we are familiar with the components and how they are related to each other, let’s look at the data flow.
First let’s look at how Metadata flows. Below you can see the same diagram as on the Figure 1. I’ve just kept only the arrows and blocks that is relevant to the metadata flow and removed the rest from the diagram.
Figure 6:
Metadata Flow
Our definition of metadata operation is everything except read and write. Examples of metadata operation would be create file, close file, rename file, change file attributes, delete file, change file size, any file system control, etc. Some writes may also, as a side effect cause a metadata change. For instance, an extending write will cause CsvFs to extend all or some of the following: file allocation size, file size and valid data length. A read might cause CsvFs to query some information from NTFS.
On the diagram above you can see that metadata from any node goes to the NTFS stack on Node 2. Data server nodes (Node 1 and Node 3) are using Server Message Block (SMB) as a protocol to forward metadata over.
Metadata are always forwarded to NTFS. On the coordinator node CsvFs will forward metadata IO directly to the NTFS volume while other nodes will use SMB to forward the metadata over the network.
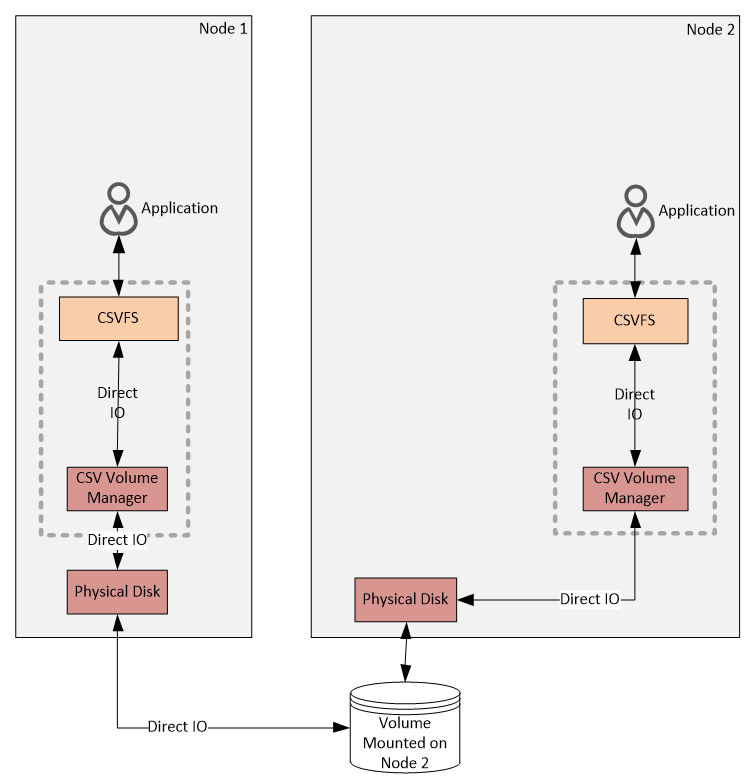
Next, let’s look at the data flow for the Direct IO . The following diagram is produced from the diagram on the Figure 1 by removing any blocks and lines that are not relevant to the Direct IO. By definition Direct IO are the reads and writes that never go over the network, but go from CsvFs through CsvVbus straight to the disk stack. To make sure there is no ambiguity I’ll repeat it again: – Direct IO bypasses volume stack and goes directly to the disk.
Figure 7:
Direct IO Flow
Both Node 1 and Node 2 can see the shared disk – they can send reads and writes directly to the disk completely avoiding sending data over the network. The Node 3 is not in the diagram on the Figure 7 Direct IO Flow since it cannot perform Direct IO, but it is still part of the cluster and it will use block level redirected IO for reads and writes.
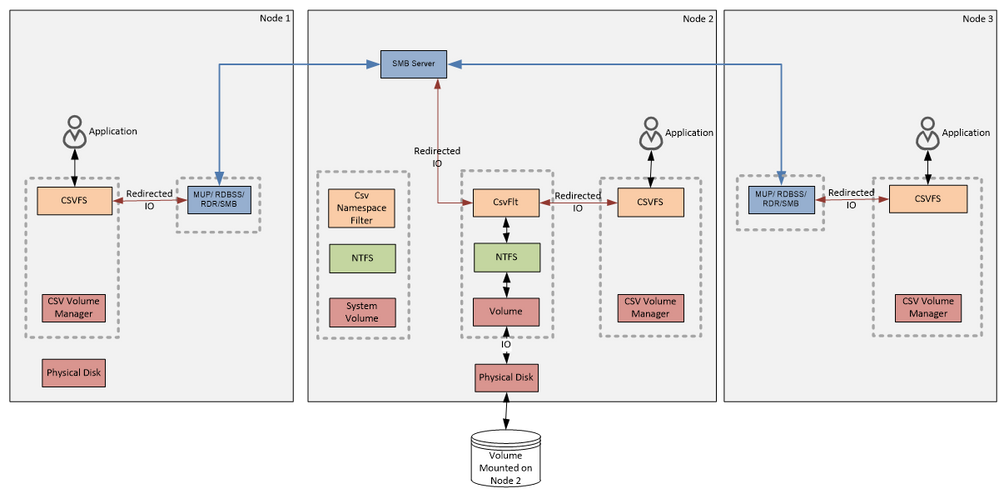
The next diagram shows a File System Redirected IO request flows. The diagram and data flow for the redirected IO is very similar to the one for the metadata from the Figure 6 Metadata Flow:
Figure 8 File System Redirected IO Flow
Later we will discuss when CsvFs uses the file system redirected IO to handle reads and writes and how it compares to what we see on the next diagram – Block Level Redirected IO :
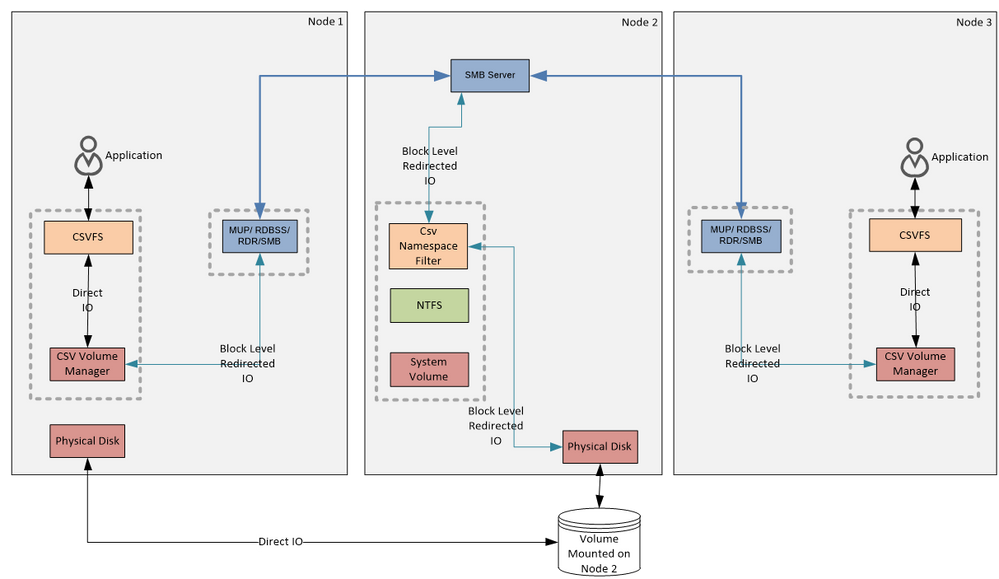
Figure 9:
Block Level Redirected IO Flow
Note that on this diagram I have completely removed CsvFs stack and CSV NTFS stack from the Coordinator Node leaving only the system volume NTFS stack. The CSV NTFS stack is removed because Block Level Redirected IO completely bypasses it and goes to the disk (yes, like Direct IO it bypasses the volume stack and goes straight to the disk) below the NTFS stack. The CsvFs stack is removed because on the coordinating node CsvFs would never use Block Level Redirected IO, and would always talk to the disk. The reason why Node 3 would use Redirected IO, is because Node 3 does not have physical connectivity to the disk. A curious reader might wonder why Node 1 that can see the disk would ever use Block Level Redirected IO. There are at least two cases when this might be happening. Although the disk might be visible on the node it is possible that IO requests will fail because the adapter or storage network switch is misbehaving. In this case, CsvVbus will first attempt to send IO to the disk and on failure will forward the IO to the Coordinator Node using the Block Level Redirected IO. The other example is Storage Spaces – if the disk is a Mirrored Storage Space, then CsvFs will never use Direct IO on a data server node, but instead it will send the block level IO to the Coordinating Node using Block Level Redirected IO. In Windows Server 2012 R2 you can use the Get-ClusterSharedVolumeState cmdlet to query the CSV state (direct / file level redirected / block level redirected) and if redirected it will state why.
Note that CsvFs sends the Block Level Redirected IO to the CsvNsFlt filter attached to the system volume stack on the Coordinating Node. This filter dispatches this IO directly to the disk bypassing NTFS and volume stack so no other filters below the CsvNsFlt on the system volume will see that IO. Since CsvNsFlt sits at a very high altitude, in practice no one besides this filter will see these IO requests. This IO is also completely invisible to the CSV NTFS stack. You can think about Block Level Redirected IO as a Direct IO that CsvVbus is shipping to the Coordinating Node and then with the help of the CsvNsFlt it is dispatched directly to the disk as a Direct IO is dispatched directly to the disk by CsvVbus.
What are these SMB shares?
CSV uses the Server Message Block (SMB) protocol to communicate with the Coordinator Node. As you know, SMB3 requires certain configuration to work. For instance it requires file shares. Let’s take a look at how cluster configures SMB to enable CSV.
If you dump list of SMB file shares on a cluster node with CSV volumes you will see following: > Get-SmbShare Name ScopeName Path Description ——– ————- —- ———– ADMIN$ * C:\Windows Remote Admin C$ * C:\ Default share ClusterStorage$ CLUS030512 C:\ClusterStorage Cluster Shared Volumes Def… IPC$ * Remote IPC
There is a hidden admin share that is created for CSV, shared as ClusterStorage$. This share is created by the cluster to facilitate remote administration. You should use it in the scenarios where you would normally use an admin share on any other volume (such as D$). This share is scoped to the Cluster Name. Cluster Name is a special kind of Network Name that is designed to be used to manage a cluster. You can learn more about Network Name in the following blog post. You can access this share using the Cluster Name, i.e. \\<cluster name>\ClusterStorage$
Since this is an admin share, it is ACL’d so only members of the Administrators group have full access to this share. In the output the access control list is defined using Security Descriptor Definition Language (SDDL). You can learn more about SDDL here http://msdn.microsoft.com/en-us/library/windows/desktop/aa379567(v=vs.85).aspx ShareState : Online ClusterType : ScaleOut ShareType : FileSystemDirectory FolderEnumerationMode : Unrestricted CachingMode : Manual CATimeout : 0 ConcurrentUserLimit : 0 ContinuouslyAvailable : False CurrentUsers : 0 Description : Cluster Shared Volumes Default Share EncryptData : False Name : ClusterStorage$ Path : C:\ClusterStorage Scoped : True ScopeName : CLUS030512 SecurityDescriptor : D:(A;;FA;;;BA)
There are also couple hidden shares that are used by the CSV. You can see them if you add the IncludeHidden parameter to the get-SmbShare cmdlet. These shares are used only on the Coordinator Node. Other nodes either do not have these shares or these shares are not used: > Get-SmbShare -IncludeHidden Name ScopeName Path Description —- ——— —- ———– 17f81c5c-b533-43f0-a024-dc… * \\?\GLOBALROOT\Device\Hard … ADMIN$ * C:\Windows Remote Admin C$ * C:\ Default share ClusterStorage$ VPCLUS030512 C:\ClusterStorage Cluster Shared Volumes Def… CSV$ * C:\ClusterStorage IPC$ * Remote IPC
Each Cluster Shared Volume hosted on a coordinating node cluster creates a share with a name that looks like a GUID. This is used by CsvFs to communicate to the hidden CSV NTFS stack on the coordinating node. This share points to the hidden NTFS volume used by CSV. Metadata and the File System Redirected IO are flowing to the Coordinating Node using this share. ShareState : Online ClusterType : CSV ShareType : FileSystemDirectory FolderEnumerationMode : Unrestricted CachingMode : Manual CATimeout : 0 ConcurrentUserLimit : 0 ContinuouslyAvailable : False CurrentUsers : 0 Description : EncryptData : False Name : 17f81c5c-b533-43f0-a024-dc431b8a7ee9-1048576$ Path : \\?\GLOBALROOT\Device\Harddisk2\ClusterPartition1\ Scoped : False ScopeName : * SecurityDescriptor : O:SYG:SYD:(A;;FA;;;SY)(A;;FA;;;S-1-5-21-2310202761-1163001117-2437225037-1002) ShadowCopy : False Special : True Temporary : True
On the Coordinating Node you also will see a share with the name CSV$. This share is used to forward Block Level Redirected IO to the Coordinating Node. There is only one CSV$ share on every Coordinating Node: ShareState : Online ClusterType : CSV ShareType : FileSystemDirectory FolderEnumerationMode : Unrestricted CachingMode : Manual CATimeout : 0 ConcurrentUserLimit : 0 ContinuouslyAvailable : False CurrentUsers : 0 Description : EncryptData : False Name : CSV$ Path : C:\ClusterStorage Scoped : False ScopeName : * SecurityDescriptor : O:SYG:SYD:(A;;FA;;;SY)(A;;FA;;;S-1-5-21-2310202761-1163001117-2437225037-1002) ShadowCopy : False Special : True Temporary : True
Users are not expected to use these shares – they are ACL’d so only Local System and Failover Cluster Identity user (CLIUSR) have access to the share.
All of these shares are temporary – information about these shares is not in any persistent storage, and when node reboots they will be removed from the Server Service. Cluster takes care of creating the shares every time during CSV start up.
Conclusion
You can see that that Cluster Shared Volumes in Windows Server 2012 R2 is built on a solid foundation of Windows storage stack, CSVv1, and SMB3.
Thanks! Vladimir Petter Principal Software Development Engineer Clustering & High-Availability Microsoft
Additional Resources:
To learn more, here are others in the Cluster Shared Volume (CSV) blog series:
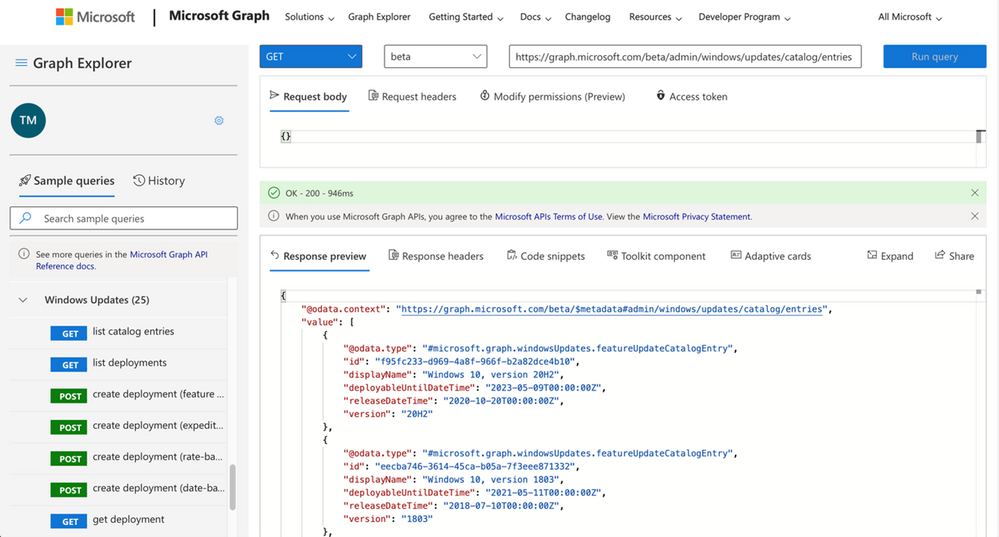
New Microsoft Graph APIs released today in public preview allow developers and IT professionals to manage Windows 10 updates and expedite Windows 10 security updates in enterprise environments.
Microsoft Graph is an API platform that helps developers create apps capable of accessing Microsoft 365, Windows 10, and Enterprise Mobility + Security data.
Access to deployment service update management capabilities
“By connecting deployment service capabilities with Microsoft Graph, app developers can easily build rich update management tools and extend these experiences with contextual user data (such as leveraging a user’s calendar data when scheduling an update),” Microsoft Principal Program Manager David Mebane explained.
The deployment service Mebane refers to is the Windows Update for Business deployment service, a cloud service announced by Microsoft in March and providing control over the approval, scheduling, monitoring, and safeguarding of Windows Update controls.
With its release, Microsoft has expanded Windows Update device management features available to IT pros, making it possible to:• Schedule update deployments to begin on a specific date (ex: deploy 20H2 to these devices on March 14, 2021) • Stage deployments over a period of days or weeks using rich expressions (ex: deploy 20H2 to 500 devices per day, beginning on March 14, 2021) • Bypass pre-configured Windows Update for Business policies to immediately deploy a security update across your organization when emergencies arise • Ensure coverage of hardware and software in your organization through deployments that are tailored to your unique device population through automatic piloting • Leverage Microsoft ML to automatically identify and pause deployments to devices that are likely to be impacted by a safeguard hold • Manage driver and firmware updates just like feature updates and quality updates
The Microsoft Graph API released today in public preview further extend these fine-grained controls, allowing customers to interact with the deployment service via apps that can help them:• Approve and schedule specific feature updates to be delivered from Windows Update on a specific date – including skipping or not taking feature updates. • Stage deployments over a period of days or weeks using rich expressions (ex: deploy 20H2 to 500 devices per day, beginning on May 11, 2021) • Bypass pre-configured Windows Update for Business policies to immediately deploy a security update across your organization. • Deliver safer update results by leveraging automatic pilots for any deployment.
Deployment service interaction via Microsoft Graph Explorer (Microsoft)
Available starting today
Customers with supported Windows or Microsoft 365 subscriptions can access the deployment services through the new APIs starting today.
To start using the new Microsoft Graph APIs today, you need one of the following subscriptions:
Windows 10 Enterprise E3 or E5 (included in Microsoft 365 F3, E3, or E5)
Windows 10 Education A3 or A5 (included in Microsoft 365 A3 or A5)
Windows Virtual Desktop Access E3 or E5
Microsoft 365 Business Premium
Devices compatible with the deployment service must be Azure AD joined or Hybrid AD joined, and run Pro, Enterprise, Education, or Pro Education editions of Windows 10, version 1709 or later.
Further information on enrolling devices for management, managing feature updates, and expediting security updates is available here.
Microsoft says that Windows devices need to be online for at least eight hours to get the latest updates and have them correctly installed after they’re released through Windows Update.
The amount of time devices running Windows are powered on and connected to Windows Update is tracked by Microsoft as ‘Update Connectivity.’
This measurement correlates the systems’ lack of enough connected time with why they’re not up to date while also making it easier to understand why some devices are unlikely to get recently released updates successfully.
According to David Guyer, a Microsoft Program Manager for Windows Updates in MEM, Windows devices need at least 8 hours online to get the latest updates and successfully install them.
“One of the most impactful things we explored was how much time a device needs to be powered on and connected to Windows Update to be able to successfully install quality and feature updates,” said Guyer.
“What we found is that devices that don’t meet a certain amount of connected time are very unlikely to successfully update. Specifically, data shows that devices need a minimum of two continuous connected hours, and six total connected hours after an update is released to reliably update.
“This allows for a successful download and background installations that are able to restart or resume once a device is active and connected.”
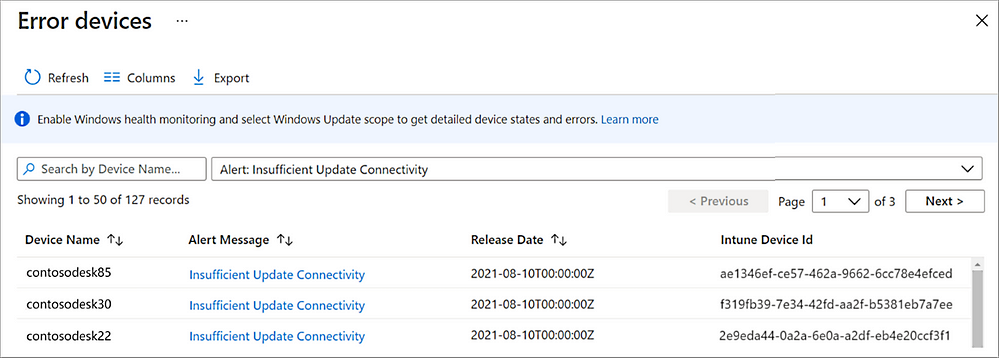
You can track devices with insufficient Update Connectivity via Microsoft Intune by navigating to Devices > Monitor and selecting either the Feature update failures or the Windows Expedited update failures report.
Insufficient Update Connectivity alerts can also be found via the Summary report in Intune by going to Reports > Windows updates > Reports > Windows Expedited update report.
Microsoft Intune Update Connectivity alerts (Microsoft)
When looking at Windows 10 devices that are not fully updated and not meeting minimum connectivity requirements, Microsoft saw that:
Approximately 50% of devices not on a serviced build of Windows 10 do not meet the minimum Update Connectivity measurement.
Approximately 25% of Windows 10 devices on a serviced build but have security updates that are more than 60 days out of date have less than the minimum Update Connectivity.
“When troubleshooting update issues, we have found it is best to select devices that have sufficient Update Connectivity,” Guyer added.
“If a device has insufficient Update Connectivity, then investigating other update issues is complicated because the low Update Connectivity can create new issues that go away once there’s enough connectivity.”
In related news, Microsoft began testing a smarter delivery method for Windows update improvements dubbed ‘Update Stack Package,’ which would deliver improvements to the update experience outside of major OS updates before monthly or feature Windows updates.
The company also redesigned cumulative updates in Windows 11 to allow security and quality updates to install faster as they are approximately 40% smaller than their Windows 10 counterparts.
Last year, Redmond released new APIs for managing Windows Update that enable devs and IT professionals to expedite Windows 10 security updates in enterprise environments.
Microsoft this week revealed that it had fended off a record number of distributed denial-of-service (DDoS) attacks aimed at its customers in 2021, three of which surpassed 2.4 terabit per second (Tbps).
One of the DDoS attacks took place in November, targeting an unnamed Azure customer in Asia and lasted a total of 15 minutes. It hit a peak throughput of 3.47 Tbps and a packet rate of 340 million packets per second (pps), making it the largest attack ever reported in history.
“This was a distributed attack originating from approximately 10,000 sources and from multiple countries across the globe, including the United States, China, South Korea, Russia, Thailand, India, Vietnam, Iran, Indonesia, and Taiwan,” Alethea Toh, product manager of Azure Networking, said.
DDoS attacks occur when several compromised devices are employed as a conduit to overwhelm a targeted server, service, or network with a flood of internet traffic with the goal of overloading the systems and disrupting its regular services.
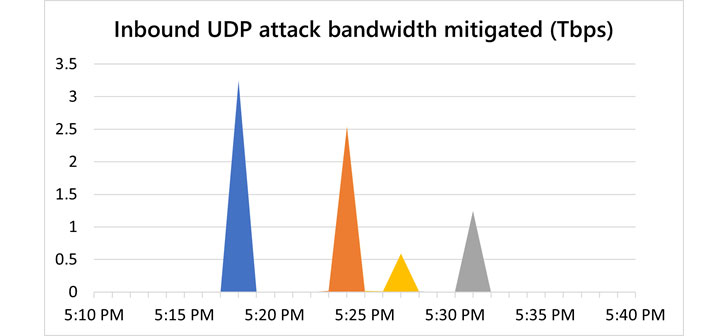
Then in December, Microsoft said it blocked two more attacks that surpassed 2.5 Tbps, both of which were aimed at customers in Asia. The first of the attacks was a 3.25 Tbps UDP attack, while the other intrusion was a 2.55 Tbps UDP flood that lingered for just a little over five minutes.
The report comes more than three months after the tech giant disclosed it acted to blunt a 2.4 Tbps DDoS attack in August 2021 targeting a European customer. Other previous record-breaking attacks include a 2.5 Tbps DDoS attack absorbed by Google in September 2017 and a volumetric strike aimed at Amazon Web Services in February 2020.
Microsoft said it observed a rise in attacks that lasted longer than an hour in the second half of 2021, whereas the proportion of short-lived attacks that were 30 minutes or less dropped from 74% to 57%. That said, the longer duration assaults are experienced as a sequence of multiple short, repeated burst attacks.
The company also said it mitigated an average of 1,955 attacks per day, with a maximum of 4,296 attacks recorded in a single day on August 10, 2021. For the entirety of H2 2021, no fewer than 359,713 unique attacks against its infrastructure were blocked, a 43% increase from the first half of 2021.
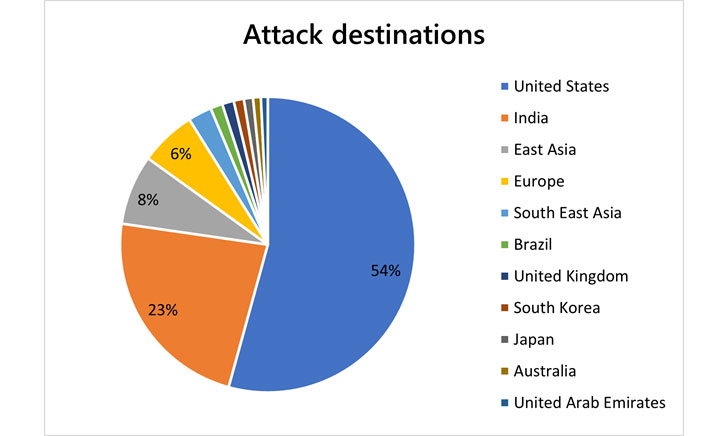
The gaming industry emerged as the hardest hit sector, followed by financial institutions, media, internet service providers (ISPs), retail, and supply chain entities. Most of the targeted organizations were located in the U.S., India, East Asia (Hong Kong), Brazil, the U.K., South Korea, Japan, Australia, and the U.A.E.
“We saw a sharp uptick in attacks in India, from just 2% of all attacks in the first half of 2021 to taking the second position at 23% of all attacks in the second half of 2021,” Toh said. “Another driving factor may be that the acceleration of digital transformation, for example, the ‘Digital India‘ initiative, has increased the region’s overall exposure to cyber risks.”