Wordfence 7.8.0 is out! A huge thanks to our quality assurance team, our team of developers and our ops team for planning, implementing and releasing Wordfence 7.8.0. This release has several fixes to make Wordfence even more robust, and includes a fundamental change in the way our signup works.
Since our launch in 2012, the signup flow for Wordfence has not required you to leave your own WordPress installation and come to our website. We briefly required this, but removed it 10 days after launch.
Wordfence has grown to a community of over 4 million active websites and a very large number of paying customers. Wordfence is now downloaded over 30,000 times every day. Today we spend a huge amount of money on providing the services that our free and paid community needs to stay secure. Privacy laws have also changed profoundly since 2012.
Scaling up our operations has required us to get better at capacity planning, which means knowing how many installations we’re getting, how many are bots or spam, who is communicating with our servers during a scan, and whether it is a real website running Wordfence, a nulled plugin or someone simply using our resources to power something unrelated to Wordfence.
Privacy laws have also added the need for us to be able to communicate with our free customers to alert them to privacy policy and terms of use changes.
This has required us to adjust our signup flow to match other popular plugins out there, like Akismet. Many customers may find this is a clearer signup workflow because we no longer need to shoehorn a complex user experience into a set of modals on a site where we don’t control presentation.
This change will not disrupt any of our existing free or paid customers. If you have a free API key that Wordfence automatically fetched when you installed it, that key will remain valid and your site will continue uninterrupted. If you have a paid Wordfence API key, your key will continue to work without disruption. We are not requiring any existing customers to visit our site to install a new key.
The only users this affects are new free Wordfence installations. The installation process is quite simple. You install Wordfence and are directed to our site. You can choose a paid or free option. If you choose the paid option, you’ll go through our checkout process as usual. If you choose free, we’ll email you your key. The email includes a button that you can click to automatically take you back to your site where your key will be automatically installed. The email also includes your Wordfence key in case you need to manually install it.
A side benefit of this new process is that our free customers will now have a record of their API key in their email inbox for future reference.
We’re including the full changelog for Wordfence 7.8.0 below. You’ll notice that we’ve mentioned that additional WooCommerce support is on its way, so keep an eye out for that.
Thanks for choosing Wordfence!
Mark Maunder – Wordfence Founder & CEO.
Wordfence 7.8.0 Changelog
Change: Updated Wordfence registration workflow
For new installations of Wordfence, registering for a new license key now occurs on wordfence.com instead of within the plugin interface. Allows us to provide a more complete signup experience for our free and paid customers. Also allows us to do better capacity planning.
Improvement: Added feedback when login form is submitted with 2FA
When logging in with two-factor authentication, the “Log In” button is now disabled during processing, so that it is clear the button was clicked. Sometimes on slower sites, it was hard to tell whether the login was going through, leading users to click more than once.
Fix: Restored click support on login button when using 2FA with WooCommerce
Clicking the “Log In” button after entering a 2FA code on a WooCommerce site was no longer working, while pressing “Enter” still worked. Both methods now work as expected. Additional support for WooCommerce is coming in the near future.
Fix: Corrected display issue with reCAPTCHA score history graph
The reCAPTCHA score history graph was sometimes displayed larger than intended when switching tabs. It now has a set size, so that it does not become unusually large.
Fix: Prevented errors on PHP caused by corrupted login timestamps
One Wordfence user reported an error on PHP 8, and upon investigation, we found that a timestamp for some user records contained invalid data instead of the expected timestamp. We don’t expect this to occur on other sites, but in case another plugin had modified the value, we now check the value before formatting it as a timestamp.
Fix: Prevented deprecation notices on PHP 8.2 related to dynamic properties
Future versions of PHP will no longer allow use of variables on an object unless they are previously declared. This is still allowed even in PHP 8.2, but PHP 8.2 can log a warning about the upcoming change, so Wordfence has been updated to declare a few variables where necessary, before using them.
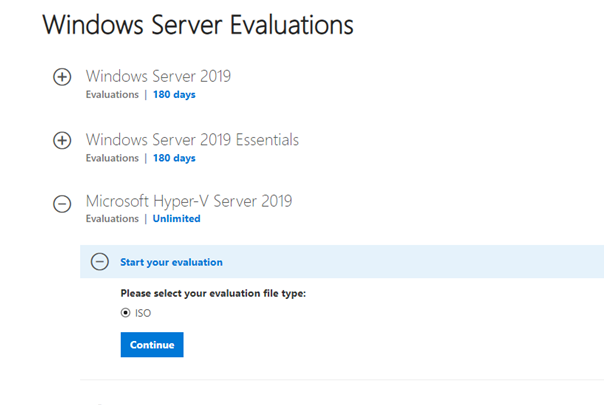
Microsoft Hyper-V Server is a free version of Windows hypervisor that can be used to run virtual machines. In this guide, we’ll look at how to install and configure Microsoft Hyper-V Server 2019 (this guide also applies to Hyper-V Server 2016).
Microsoft announced that they won’t not be releasing a Hyper-V Server 2022 version. This is because they are currently focusing on another strategic product, Azure Stack HCI.
Hyper-V Server 2019 is suitable for those who don’t want to pay for a hardware virtualization operating system. The Hyper-V has no restrictions and is completely free. Key benefits of Microsoft Hyper-V Server:
Support of all popular OSs. There are no compatibility problems. All Windows and modern Linux and FreeBSD operating systems support Hyper-V;
A lot of different ways to backup virtual machines: simple scripts, open-source software, free and commercial versions of popular backup programs;
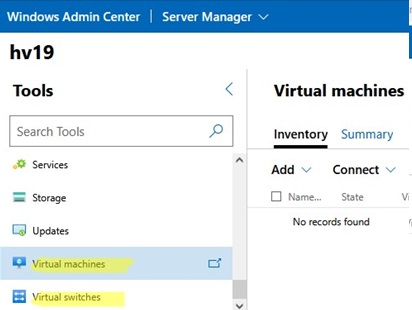
Although Hyper-V Server doesn’t have a Windows Server GUI (graphical management interface), you can manage it remotely using a standard Hyper-V Manager console or Windows Admin Center web interface;
Hyper-V Server is based on a popular Windows Server platform, familiar and easy to work with;
You can install Hyper-V on a pseudoRAID, for example, Inter RAID controller, or Windows software RAID;
You do not need to license your hypervisor, it is suitable for VDI or Linux VMs;
Low hardware requirements. Your processor must support software virtualization (Intel-VT or VMX by Intel, AMD-V/ SVM by AMD) and second-level address translation (SLAT) (Intel EPT or AMD RV). These processor options must be enabled in BIOS/UEFI/nested host. You can find full system requirements on the Microsoft website;
It is recommended to install Hyper-V on hosts with at least 4 GB RAM.
Do not confuse a Windows Server 2022/2019/2016 (Full GUI or Server Core edition) with the Hyper-V role installed with Free Microsoft Hyper-V Server 2019/2016. These are different products.
It is worth to note that if you are using a free hypervisor, you are still responsible for licensing your virtual machines. You can run any number of VMs running any open-source OS, like Linux, but you have to license your Windows virtual machines. If you are using Windows Server as a guest OS, you must license it by the number of physical cores on your Hyper-V host. See more details on Windows Server licensing in a virtual environment here.
What’s New in Microsoft Hyper-V Server 2019?
Let’s consider the new Hyper-V Server 2019 features in brief:
Added support for Shielded Virtual Machines for Linux;
VM configuration version 9.0 (with hibernation support);
ReFS deduplication support;
Core App Compatibility: the ability to run additional graphic management panels in the Hyper-V server console;
After clicking on the “Continue” button, a short registration form will appear. Fill in your data and select the language of the OS to be installed. Wait till the Hyper-V image download is over. The .iso file size is about 3 GB.
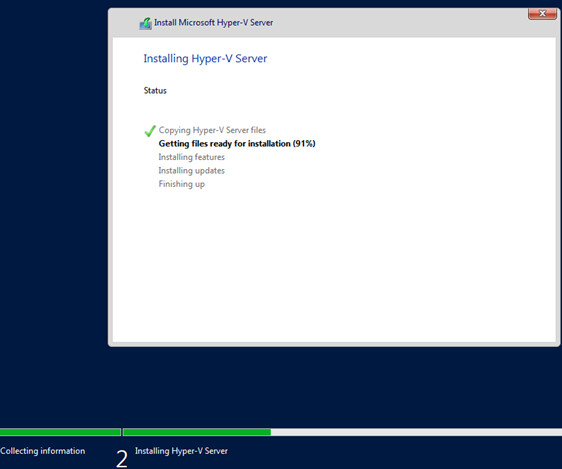
Installing Microsoft Hyper-V Server is identical to installing Windows 10/11 on a desktop computer. Just boot your server (computer) from the bootable USB flash drive with the Microsoft Hyper-V Server installation image (the easiest way to burn the ISO image to a USB drive is to use the Rufus tool). Then follow the instructions of the Windows setup wizard.
Manage Hyper-V Server Basic Settings Using Sconfig
After the installation, the system will prompt you to change the administrator password. Change it, and you will get to the hypervisor console.
Please note that Hyper-V Server does not have a familiar Windows GUI. You will have to configure most settings through the command line.
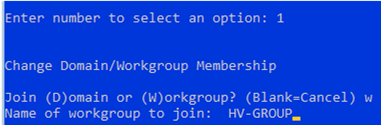
There are two windows on the desktop — the standard command prompt and the sconfig.cmd script window. You can use this script to perform the initial configuration of your Hyper-V server. Enter the number of the menu item you are going to work with in the “Enter number to select an option:” line.
The first menu item allows you to join your server to an AD domain or a workgroup;
Set a hostname for your Hyper-V Server;
Create a local administrator user (another account, besides the built-in administrator account). I’d like to note that when you enter the local administrator password, the cursor stays in the same place. However, the password and its confirmation are successfully entered;
Enable remote access to your server. Thus, you will be able to manage it using Server Manager, MMC consoles, and PowerShell, connect via RDP, check its availability using ping or tracert;
Configure Windows Update. Select one of the three modes:
Automatic (automatic update download and installation)
DownloadOnly (only download without installation)
Manual (the administrator decides whether to download or install the updates)
Download and install the latest Windows security updates.
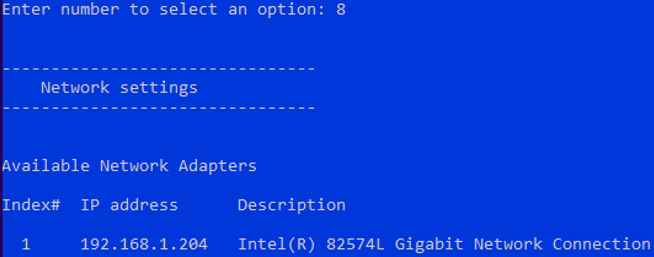
Configure your network adapter settings. By default, your server receives the IP address from the DHCP server. It is better to configure the static IP address here;
Set the date and time of your system.
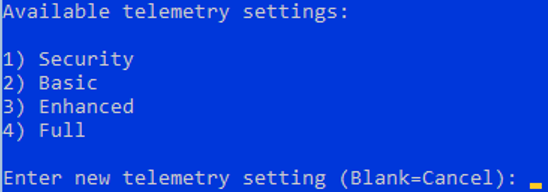
Configure the telemetry. The Hyper-V won’t allow you to disable it completely. Select the mode you want.
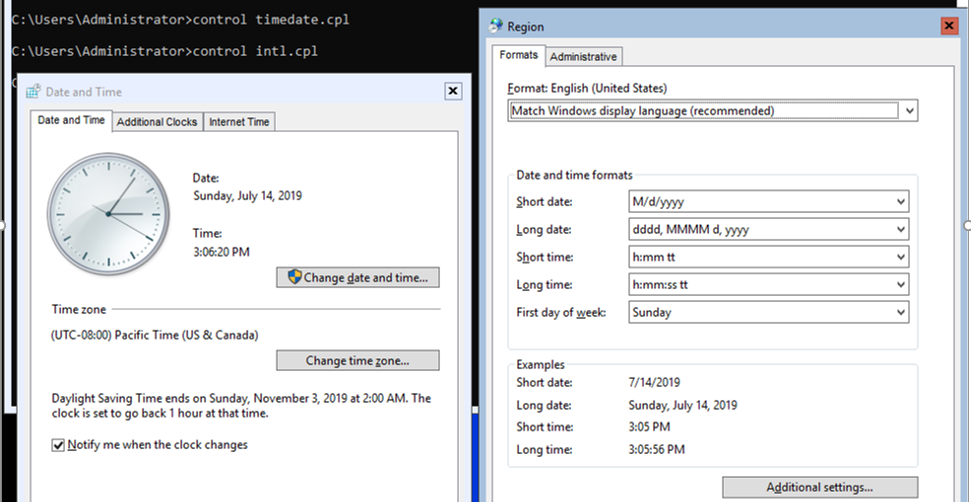
You can also configure the date, time, and time zone using the following command:
control timedate.cpl
Regional settings:
control intl.cpl
These commands will open standard Windows consoles.
Note! If you accidentally close all windows and see the black Hyper-V screen, press Ctrl+Shift+Esc to start the Task Manager (this keyboard shortcut works in an RDP session as well). You can use Task Manager to start the command prompt or the Hyper-V configuration tool (click File -> Run Task -> cmd.exe or sconfig.cmd).
How to Remotely Manage Hyper-V Server 2019?
To conveniently manage Free Hyper-V Server 2019 from the graphic interface, you can use:
Windows Admin Center – a web-based console;
Hyper-V Manager — can be installed both on Windows Server and Windows 10/11 desktop computers.
To manage the Hyper-V Server 2016/2019, you will need a computer running x64 Windows 10/11 Pro or Enterprise edition.
Remotely Manage a Non-Domain Hyper-V Server with Hyper-V Manager
Let’s look at how to remotely connect to a Hyper-V Server host from another Windows computer using the Hyper-V Manager console. In this article, we assume that you have a Hyper-V Server and a Windows 10 computer in the same workgroup.
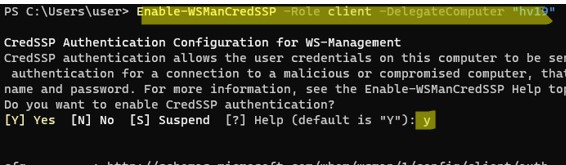
First, make settings on the Hyper-V Server. Start the PowerShell console (powershell.exe) and run the following commands:
Enable-PSRemoting
Enable-WSManCredSSP -Role server
Answer YES to all questions. Thus you will configure the automatic startup of the WinRM service and enable remote management rules in your firewall.
Now let’s move on to setting up the Windows 10 or 11 client computer that you will use to manage your Hyper-V Server host.
The Hyper-V server must be accessible by its hostname. In the domain network, it must correspond to the A-record on the DNS server. In a workgroup environment, you will have to create the A record manually on your local DNS or add it to the hosts file (C:\Windows\System32\drivers\etc\hosts) on a client computer. In our case, it looks like this:
192.168.13.55 HV19
You can add an entry to the hosts file using PowerShell:
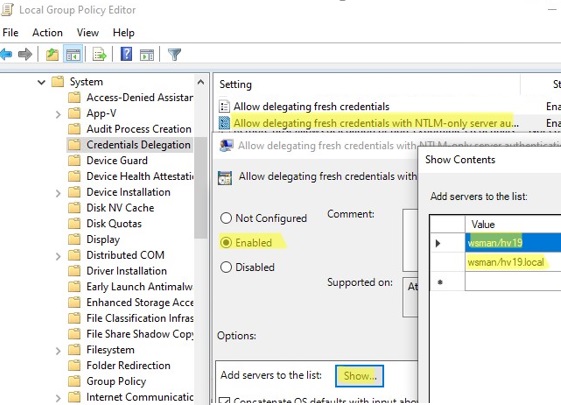
If the account you are using on a client computer differs from the Hyper-V administrator account (and it should be so), you will have to explicitly save your credentials used to connect to the Hyper-V server to the Windows Credential Manager. To do it, run this command:
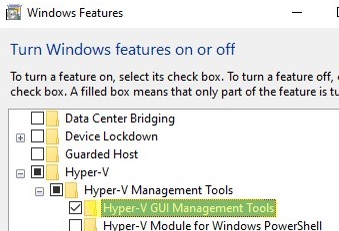
Now you need to install the Hyper-V Manager console in Windows. Open the Programs and Features snap-in and go to Turn Windows Features on or off. In the next window, find Hyper-V, and check Hyper-V GUI Management Tools to install it.
Also, you can install the Hyper-V Manager snap-in on Windows 10/11 using PowerShell:
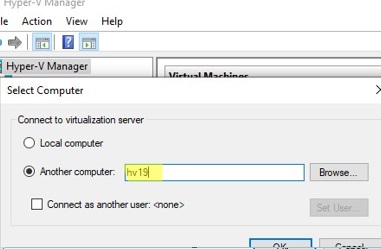
Run the Hyper-V Manager snap-in (virtmgmt.msc), right-click Hyper-V Manager and select Connect to Server. Specify the name of your Hyper-V Server.
Now you can manage Hyper-V Server settings, and create and manage virtual machines from the graphical console.
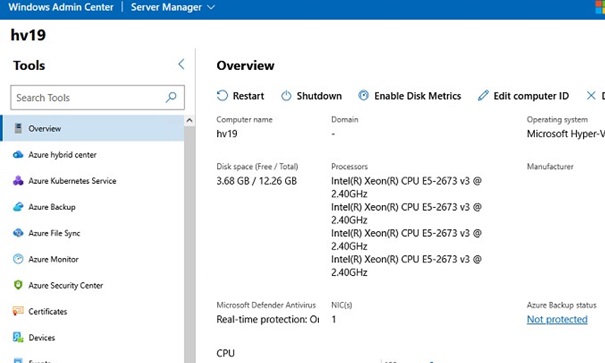
Managing Hyper-V Server with Windows Admin Center
You can use the Windows Admin Center (WAC) to remotely manage a Hyper-V Server host. WAC is a web-based console and dashboard to manage Windows Server, Server Core, and Hyper-V Server hosts.
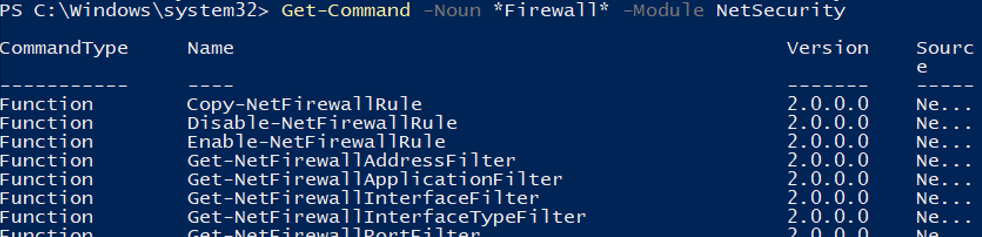
Enable the rules to allow SMB connections in Windows Defender Firewall on the Hyper-V Server:
Set-NetFirewallRule -DisplayGroup "File and Printer Sharing" -Enabled true -PassThru
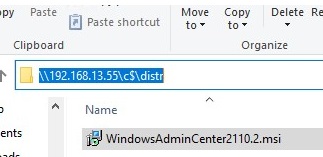
Now you need to download (https://aka.ms/WACDownload) and install the Windows Admin Center agent on your Hyper-V host. Download WindowsAdminCenter2110.2.msi on any Windows computer. You can copy the installation MSI file to the Hyper-V Server using a remote SMB connection to the administrative share C$. Run the following command on your Windows client device:
Win+R -> \\192.168.13.55\C$ and enter the Hyper-V administrator password. Create a folder and copy the MSI file to the Hyper-V Server host.
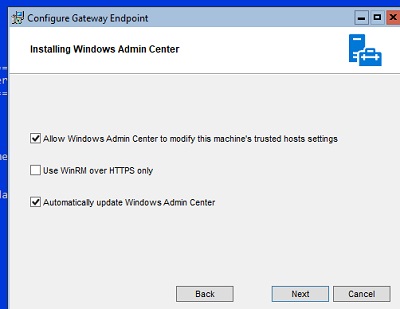
Now run the WAC installation from the Hyper-V console:
Next, I will look at some ways to manage Hyper-V Server settings using PowerShell
Configuring Hyper-V Server 2019 Host with PowerShell
You can configure Hyper-V Server settings using PowerShell. There are over 238 cmdlets available in the Hyper-V module for managing Hyper-V hosts and VMs.
Get-Command –Module Hyper-V | Measure-Object
Configure the automatic start of the PowerShell console (instead of cmd.exe) after logon.
Now, when you log into the server, a PowerShell prompt will appear.
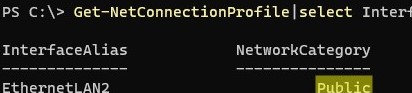
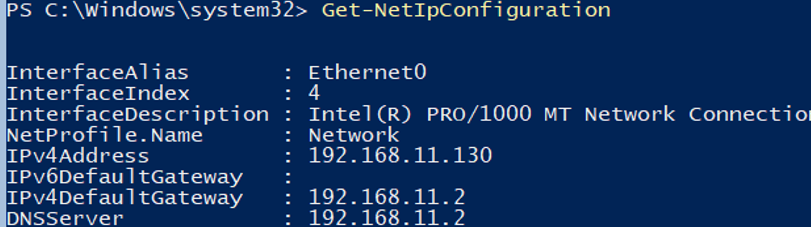
How to Configure Hyper-V Server 2019 Network Settings with PowerShell?
If you have not set the network settings using sconfig.cmd, you configure them through PowerShell. Using Get-NetIPConfiguration cmdlet, you can view the current IP configuration of network interfaces.
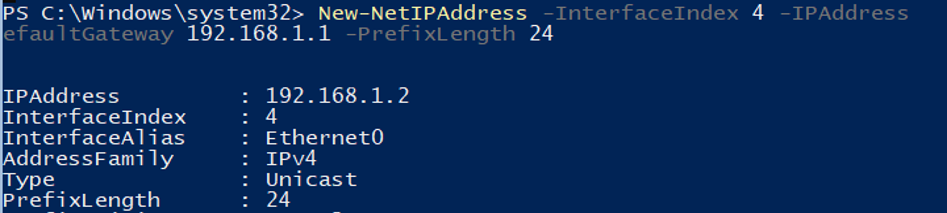
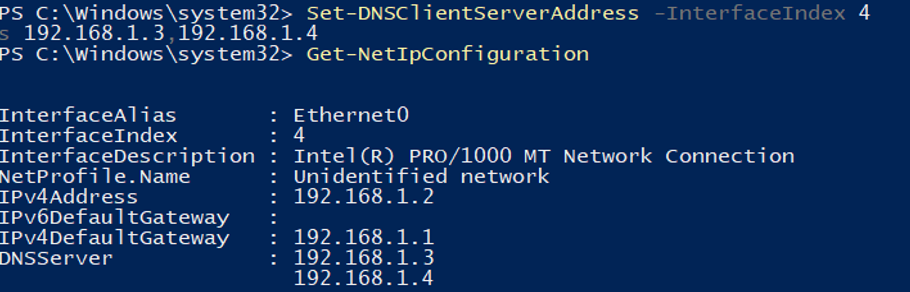
Use PowerShell to assign a static IP address, netmask, default gateway, and DNS server addresses. You can get the network adapter index (InterfaceIndex) from the output of the previous cmdlet.
We will use a separate partition on a physical disk to store Hyper-V files (virtual machine files and iso files). View the list of physical disks on your server.
Get-Disk
Create a new partition of the largest possible size on the drive and assign the drive letter D: to it. Use the DiskNumber from Get-Disk results.
New-Partition -DiskNumber 0 -DriveLetter D –UseMaximumSize
Then format the partition to NTFS and specify its label:
Format-Volume -DriveLetter D -FileSystem NTFS -NewFileSystemLabel "VMStorage"
Create a directory where you will store virtual machine settings and vhdx files using the New-Item cmdlet:
New-Item -Path "D:\HyperV\VHD" -Type Directory
Create D:\ISO folder to store OS installation ISO images (distros):
New-Item -Path D:\ISO -ItemType Directory
In order to create a shared network folder, use the New-SmbShare cmdlet. Grant full access permissions to the local server administrators group:
New-SmbShare -Path D:\ISO -Name ISO -Description "OS Distributives" -FullAccess "BUILTIN\Administrators"
For more information on the basic configuration of Hyper-V Server and Windows Server Core from the command line, see this article.
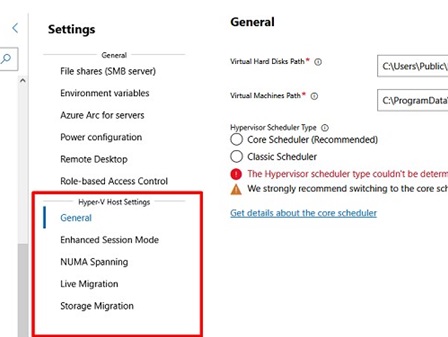
Configure Hyper-V Server Host Settings with PowerShell
List current Hyper-V Server host settings using this command:
Get-VMHost | Format-List
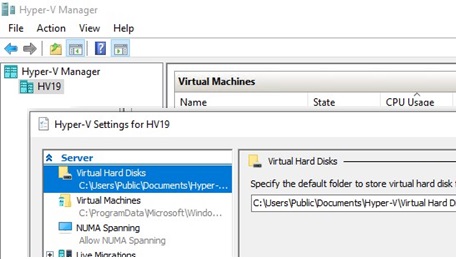
By default, Hyper-V stores virtual machine configuration files and virtual disks on the same partition where your operating system is installed. It is recommended to store VM files on a separate drive (partition). You can change the default VM folder path with this command:
Create an external switch connected to the physical NIC of the Hyper-V server. Your virtual machines will access the physical network through this network adapter.
Check the SR-IOV (Single-Root Input/Output (I/O) Virtualization) support:
Get-NetAdapterSriov
Get the list of connected network adapters:
Get-NetAdapter | where {$_.status -eq "up"}
Bind your virtual switch to the network adapter and enable SR-IOV support if it is available.
Hint. You won’t be able to enable or disable SR-IOV support after creating the vswitch. You will have to recreate the switch to change this parameter.
In this guide, I will show you how to deploy Dell SupportAssist using SCCM (ConfigMgr). We’ll get the latest version of the Dell SupportAssist tool, create an application in SCCM, and then deploy it to our computers.
According to Dell, the SupportAssist is an automated proactive and predictive support solution for computers and tablets. SupportAssist also evaluates the health of your servers, storage, and networking devices to eliminate downtime before it even starts.
When you purchase brand-new laptops and desktop computers from Dell, SupportAssist is already preinstalled. SupportAssist is installed on most Dell PCs with Windows 10 and Windows 11. You can find it by searching for “SupportAssist” in your Windows start menu. Home users can use the Dell SupportAssist tool to update drivers, including the system BIOS, and resolve problems.
Configuration Manager is the best choice for Dell SupportAssist deployment on multiple computers. You can deploy the Dell Support Assist to client computers and allows users to install it via Software Center. An added advantage of Dell SupportAssist deployment using SCCM is Dell provides .msi installer for application deployment for enterprises.
If you are using Configuration Manager to manage Dell laptops, you can use the application model to deploy Dell SupportAssist software to client computers using SCCM. The application can also be added to a task sequence, which lets you use the bare-metal deployment scenarios to install Dell SupportAssist on new laptops.
Let’s understand what exactly is the Dell SupportAssist tool and identify its features. The SupportAssist by Dell is the smart technology, available on your PC that will keep it running like new by removing viruses, detecting issues, optimizing settings and telling you when you need to make updates.
With SupportAssist tool, you can perform the following
Update your drivers and applications for peak PC performance
Remove virus and malware infested files before then can harm your system.
Scan your PCs hardware to find issues and deliver proactive and predictive support.
Clean files, tune performance, and adjust network settings to optimize speed, storage space and stability.
The Dell SupportAssist also has an OS Recovery environment that enables you to diagnose hardware issues, repair your computer, back up your files, or restore your computer to its factory state. The Dell Support Assist OS Recovery is only available on certain Dell laptops with a Microsoft Windows 10/11 operating system that was installed by Dell.
Download Dell SupportAssist MSI Installer
Dell provides the .msi installer for SupportAssist and the same installer can be used for deployment with SCCM. You can download the Dell SupportAssist .msi installer from the following direct download link. Note that this is an offline installer and will include all the installation files without having the system connect to internet to download further files.
Along with Dell SupportAssist msi installer, I recommend you to download a logo for the application. We will assign this logo to the Dell SupportAssist application in SCCM. Copy both the installer and logo to a separate folder on SCCM server or shared folder. We will reference the same folder when we create the Dell SupportAssist application in ConfigMgr.
Each MSI installer has a unique product code and this can be seen under the installer properties. Configuration Manager uses the product to detect if the Dell SupportAssist application already exists on system. If you are curious to know the detection method for Dell SupportAssist application, SCCM basically uses the MSI product code: {E0659C89-D276-4B77-A5EC-A8F2F042E78F} of the installer.
After you have created the Dell Support Assist application in SCCM, go to the Application deployment properties and switch to Detection Method tab. Here you can see the detection method used for Dell SupportAssist application. We see the MSI product code being used for the application detection.
Dell SupportAssist Detection Method
Create Dell SupportAssist Application in SCCM
Let’s create a new application for the Dell SupportAssist in SCCM.
Launch the Configuration Manager console.
Go to Software Library > Overview > Application Management.
Right-click Applications and select Create Application.
Create Dell SupportAssist Application in SCCM
On the General window, select Automatically detect information about this application from installation files. The application type should be Windows Installer (*.msi file) and specify the location of the Dell SupportAssist msi file. Click Next.
Create Dell SupportAssist Application in SCCM
With MSI installers, the Configuration Manager can import information such as product code, install commands, uninstall commands, detection methods etc. In the below screenshot, we see the product information has been populated from Dell SupportAssist MSI installer and imported into SCCM.
Application name: Dell SupportAssist
Publisher:
Software version:

Deployment type name: Dell SupportAssist - Windows Installer (*.msi file)
Product Code: {E0659C89-D276-4B77-A5EC-A8F2F042E78F}
Installation behavior: Install for system

Content location: \\corpcm\Sources\Applications\SupportAssist\
Number of files: 2
Content files:
dellSA_logo.jpg
SupportAssistx64-3.10.4.18.msi
Create Dell SupportAssist Application in SCCM
In the General Information tab, enter the basic information about the Dell Support Assist application. For example, you can specify the application name, publisher details, software version etc. The details that you specify here will be displayed to users when the Dell SupportAssist application is selected in Software Center.
The Configuration Manager also populates the silent installation command for Dell SupportAssist from the .msi installer. You may modify the existing command and add additional parameters supported for .msi installation.
Silent Command Line for Dell SupportAssist installation = msiexec /i "SupportAssistx64-3.10.4.18.msi" /q
Create Dell SupportAssist Application in SCCM
Review the Support Assist application settings on Summary window and click Next. On the Completion tab, click Close button to exit the create application wizard.
Create Dell SupportAssist Application in SCCM
This completes the steps to create application for Dell SupportAssist in SCCM. After this step, the application will appear in the Application node of Configuration Manager console.
Specify an Icon for Dell SupportAssist Application
Configuration Manager lets you specify a logo for Application via the Application Properties and this logo appears along with the application in Software Center. If you are looking to customize software center, use the following guide to customize software center appearance and branding. Assigning an application logo is not mandatory, but it helps users identify the application quickly in Software Center.
The newly created Dell SupportAssist application is located in Software Library\Overview\Application Management\Applications of Configuration Manager console. Right-click on Dell SupportAssist application and select Properties.
Specify an Icon for Dell SupportAssist Application
In the Application properties window, choose the Software Center tab. Click on Browse and select an icon for Dell SupportAssist and click Apply and OK.
Specify an Icon for Dell SupportAssist Application
Deploy Dell SupportAssist using SCCM | ConfigMgr
In this section, we will look at the steps to deploy the Dell SupportAssist using SCCM (ConfigMgr). The deploy software wizard contains steps where you can distribute the content to DP’s along with the application deployment.
When you perform Dell SupportAssist deployment using SCCM, you deploy it either to a device collection or user collection. Typically, applications are deployed to device collections, and we will use the same approach here. You can create device collections for Windows 10 and Windows 11 computers using the following guides.
Once the device collections are ready, you can deploy the application using the deploy software wizard. To deploy the Dell SupportAssist application, launch the Configuration Manager console. Navigate to Software Library\Overview\Application Management\Applications. Right-click Dell SupportAssist application and select Deploy.
Deploy Dell SupportAssist using SCCM
On the General page of Deploy Software Wizard, click Browse and select a device collection to which you want to deploy the Support Assist application. Click Next.
Deploy Dell SupportAssist using SCCM
On the Content page, click Add button and specify the distribution points to which you would like to distribute the Dell Support Assist application content. You may also select distribution point groups when you have numerous distribution points. Click Next to continue.
On the Scheduling tab, you can specify the schedule for the deployment. If you want to deploy the application as soon as possible, then don’t configure anything under Scheduling. Click Next.
Dell SupportAssist Deployment using SCCM
Specify the user experience settings for the application deployment. For user notifications, select the option “Display in Software Center and show all notifications“. Click Next to continue.
Deploy Dell SupportAssist using SCCM User Experience Settings
In the Alerts tab, click Next. Review all the Dell SupportAssist deployment settings on Summary tab and click Next. On the Completion window, click Close.
The Dell SupportAssist application is now distributed to the select distribution points and the client machines should now have the application listed in the Software Center. This completes the steps for Dell SupportAssist deployment with Configuration Manager.
Deploy Dell SupportAssist using SCCM Completion
Test Dell SupportAssist Deployment on Client Computers
After you have created the Dell SupportAssist application and deployed it to device collection, it’s time to test the deployment on devices. Log in to a client computer, and launch the Software center. Click on the Applications tab and select Dell SupportAssist application. To install the application, click the Install button.
Test Dell SupportAssist Deployment on Client Computers
The Dell Support Assist application is now downloaded from the local distribution point server for installation. The installation commands specified during the application creation are executed. You can monitor the application installation process by reviewing the AppEnforce.log located on the client computer.
To locate the AppEnforce.log file and other important files, refer to the SCCM Log files which contains all the log files for troubleshooting issues.
“Matched exit code 0 to a Success entry in the exit codes table” confirms that the Dell Support Assist application has been installed successfully on the computer. The uninstall command that we specified during application packaging should also work fine.
+++ Starting Install enforcement for App DT "Dell SupportAssist - Windows Installer (*.msi file)" ApplicationDeliveryType - ScopeId_67D9092A-81B2-464F-8F38-4D634303C416/DeploymentType_ccf9c1b2-8d31-4cab-87e9-56c700d64d52, Revision - 1, ContentPath - C:\Windows\ccmcache\2, Execution Context - System
    Performing detection of app deployment type Dell SupportAssist - Windows Installer (*.msi file)(ScopeId_67D9092A-81B2-464F-8F38-4D634303C416/DeploymentType_ccf9c1b2-8d31-4cab-87e9-56c700d64d52, revision 1) for system.
    Prepared working directory: C:\Windows\ccmcache\2
Found executable file msiexec with complete path C:\Windows\system32\msiexec.exe
    Prepared command line: "C:\Windows\system32\msiexec.exe" /i "SupportAssistx64-3.10.4.18.msi" /q /qn
Valid MSI Package path = C:\Windows\ccmcache\2\SupportAssistx64-3.10.4.18.msi
    Advertising MSI package [C:\Windows\ccmcache\2\SupportAssistx64-3.10.4.18.msi] to the system.
    Executing Command line: "C:\Windows\system32\msiexec.exe" /i "SupportAssistx64-3.10.4.18.msi" /q /qn with user context
    Working directory C:\Windows\ccmcache\2
    Post install behavior is BasedOnExitCode	AppEnforce
    Waiting for process 3896 to finish.  Timeout = 120 minutes
    Process 3896 terminated with exitcode: 0
    Looking for exit code 0 in exit codes table.
    Matched exit code 0 to a Success entry in exit codes table
Test Dell SupportAssist Deployment on Client Computers
By default, only members of the Domain Admins group have the remote RDP access to the Active Directory domain controllers‘ desktop. In this article we’ll show how to grant RDP access to domain controllers for non-admin user accounts without granting administrative privileges.
Many of you can quite reasonably ask: why would ordinary domain users should have access to the DC desktop? Indeed, in small or middle size infrastructures, when several administrators with the privileges of domain admins maintain them, you’ll hardly need this. In most cases, delegating some administrative permissions in Active Directory or using PowerShell Just Enough Administration (JEA) is sufficient.
However, in large corporate networks maintained by many administrators, it may become necessary to grant RDP access to the DC (usually to branch office DC’s or RODC) for different server admin groups, monitoring team, on-duty administrators, or other technical staffs. Also, from time to time some of the third-party services, not managed by the domain administrators, are deployed on the DC, and there’s a need to maintain these services.
Tip. Microsoft doesn’t recommend to install the Active Directory Domain Services and Remote Desktop Service role (terminal server) on a single server. If there is only one physical server, on which you want to deploy both DC and RDS, you’d better use virtualization, since Microsoft virtualization licensing policy allows you to run two virtual servers under the same Windows Server Standard license.
To Sign in Remotely, You Need the Rights to Sign in through Remote Desktop Services
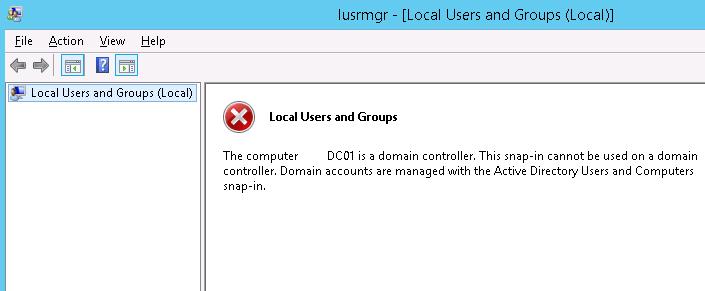
After the server has been promoted to the domain controller, you cannot manage local users and groups from the Computer Management mmc snap-in. When you try to open Local Users and Groups (lusrmgr.msc) console, the following error appears:
The computer xxx is a domain controller. This snip-in cannot be used on a domain controller. Domain accounts are managed with the Active Directory Users and Computers snap-in.
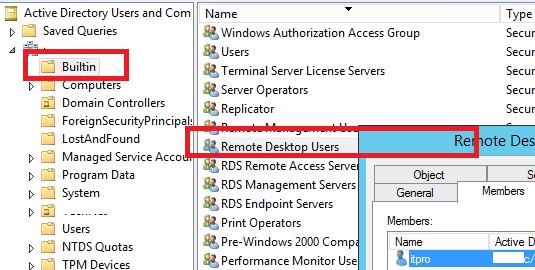
As you can see, there are no local groups on the domain controller. Instead of the local group Remote Desktop Users, the DC uses the built-in domain group Remote Desktop Users (located in the Builtin container). You can manage this group from the ADUC console or from the command prompt on the DC.
Display the members of the domain group Remote Desktop Users on the domain controller using the command:
net localgroup "Remote Desktop Users"
As you can see, it is empty. Add a domain user it-pro to it (in our example, it-pro is a regular domain user without administrative privileges):
net localgroup "Remote Desktop Users" /add corp\it-pro
Make sure that the user is added to this group:
net localgroup "Remote Desktop Users"
You can also verify that the user is now a member of the Remote Desktop Users domain group using the ADUC (dsa.msc) snap-in.
However, even after that, a user still cannot connect to the DC via Remote Desktop with the error:
To sign in remotely, you need the right to sign in through Remote Desktop Services. By default members of the Administrators group have this right. If the group you’re in does not have the right, or if the right has been removed from the Administrators group, you need to be granted the right manually.
Group Policy: Allow Log on through Remote Desktop Services
To allow a domain user or group a remote RDP connection to Windows, you must grant it the SeRemoteInteractiveLogonRight privileges. By default, only members of the Administrators group have this right. You can grant this permission using the Allow log on through Remote Desktop Services policy.
In Windows 2003 and older this policy is called Allow log on through terminal services.
To allow remote connection to the domain controllers for members of the Remote Desktop Users group you need to change the settings of this policy on your domain controller:
Launch the Local Group Policy Editor (gpedit.msc);
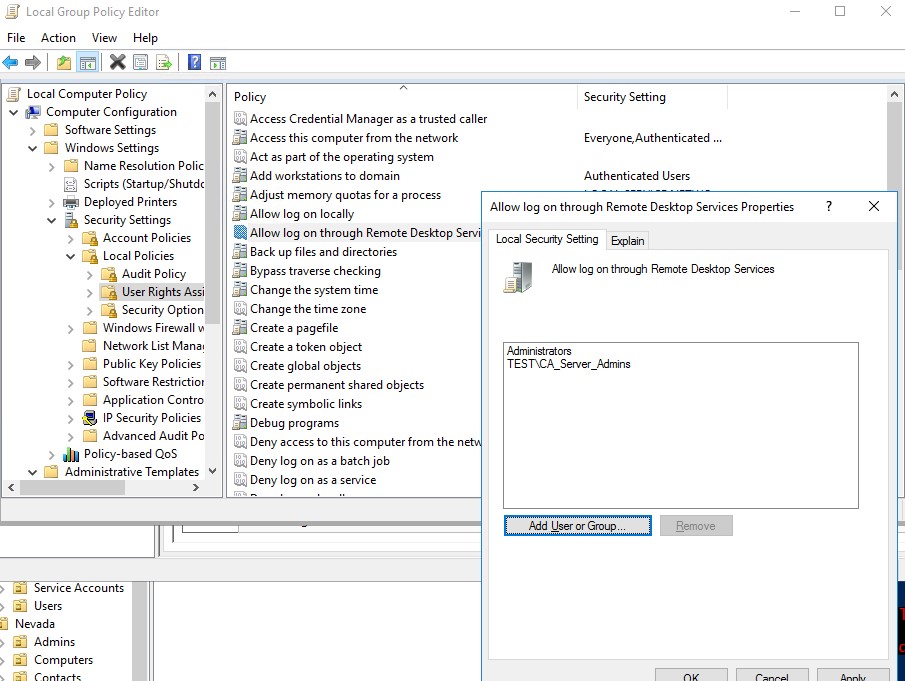
Go to the GPO section Computer Configuration -> Windows settings -> Security Settings -> Local policies -> User Rights Assignment;
Find the policy Allow log on through Remote Desktop Services;After the server is promoted to the DC, only the Administrators group (these are Domain Admins) remains in this local policy.
Edit the policy, add the domain group Remote Desktop Users (like this: domainname\Remote Desktop Users), or directly the domain user, or a group (domain\CA_Server_Admins) to it;
Note that the group that you added to the Allow log on through Remote Desktop Services policy should not be present in the “Deny log on through Remote Desktop Services” policy , because it has a higher priority (check the article Restricting Network Access under local accounts). In addition, if you are restricting the list of computers on which users can log on, you need to add the DC name to the properties of the AD account (LogonWorkstations user attribute).
Note. To allow a user to log on to the DC locally (via the server console), you must add the account or group to the policy “Allow log on locally”. By default, this permission is allowed for the following domain groups:
Backup Operators
Administrators
Print Operators
Server Operators
Account Operators
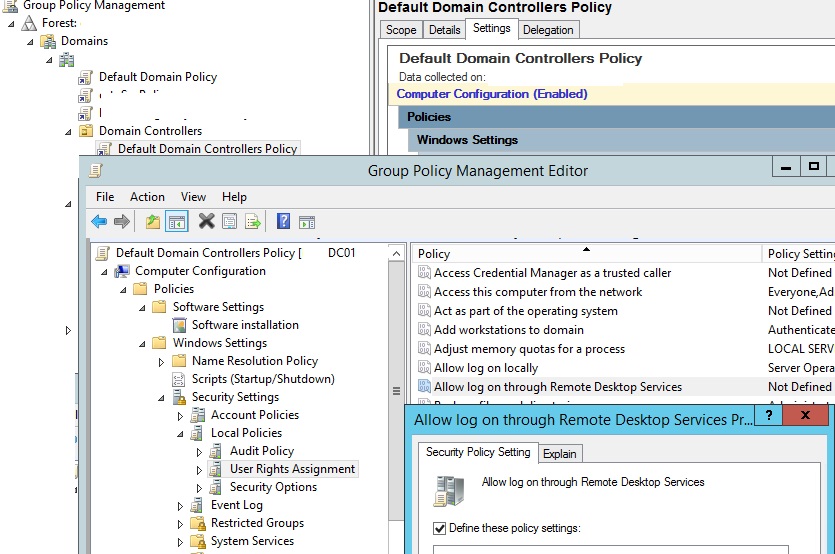
It is better to create a new security group in the domain, for example, AllowLogonDC and add user accounts to it that need remote access to the DC. If you want to allow access to all AD domain controllers at once, instead of editing of the Local Policy on each DC, it’s better to add a the user group to the Default Domain Controllers Policy using the GPMC.msc console (change the policy settings in the same section: Computer Configuration\Windows Settings\Security Settings\Local Policies\User Rights Assignment -> Allow log on through Remote Desktop Services).
Warning. If you change the Default Domain Controllers Policy, don’t forget to add the domain/enterprise administrator groups to the policy Allow log on through Remote Desktop Services, otherwise they will lose remote access to the DCs.
Now the users (groups) you added to the policy will be able to connect to the AD domain controllers via RDP.
If you need to grant non-administrator users the permissions to start/stop certain services on a DC, use the following guide.
The Requested RDP Session Access is Denied
In some cases, when connecting via RDP to a domain controller, an error may appear:
The requested session access is denied.
If you are connecting to the DC under a non-admin user account, this could be due to two problems:
You are trying to connect to the server console (using the mstsc /admin mode). This connection mode is only allowed for administrators. Try to connect to the server using mstsc.exe client in normal RDP mode (without /admin option);
The server may already have two active RDP sessions (by default, you can’t use more than two simultaneously RDP sessions on Windows Server without RDS role). You cannot log off other users without administrator permissions. You need to wait for the administrators to release one of the sessions.
If you plan to keep your existing on-prem exchange server then it can be used / utilized as a SMTP Relay server. Else, if you plan to decommission the exchange server for good, you can utilize Office365 as a SMTP Relay server to relay the emails.
There are three ways to setup SMTP Relay in Office 365:
SMTP Auth client Submission
Direct Send
Office 365 SMTP Relay
I recommend using either Office 365 SMTP Relay method or Direct Send method to configure SMTP Relay in Office 365. Please refer to the section Direct Send vs Office 365 SMTP Relay which will help you decide which one to use for your organization.
Below are some suggestions which can help you choose between Office 365 SMTP Relay and Direct Send method.
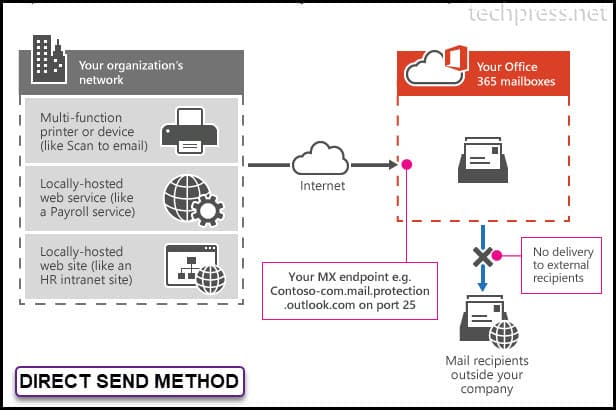
📌 Direct Send Method does not work if you want to send the email to External recipients for example any Gmail, Yahoo, Hotmail email address. Direct End method can send an email to External recipients if the External Organization is also using Office 365 to host the mailboxes.
📌If your requirement is to send emails to Internal and any External domain recipients then choose Office 365 SMTP Relay Method.
1.SMTP Auth client Submission Method
Below are the Pre-requisites for using SMTP Auth client submission method to configure SMTP relay in Office365:
A Licensed Office365 User Mailbox is required.
SMTP AUTH must be enabled for Mailbox which will be used to send the emails.
Device must support TLS 1.2 or above (Please check the vendor documentation to confirm this).
If your authentication policy disables basic authentication for SMTP, clients cannot use the SMTP AUTH protocol. Microsoft will disable Basic authentication for all new and existing tenants starting from 1st Oct 2022. Therefore, this is my least recommended option for configuration of SMTP relay in Office 365.
Direct Send vs Office 365 SMTP Relay
Direct Send method and Office 365 SMTP Relay method both use MX Endpoint of your domain to configure SMTP Relay. Both can be used when your environment has SMTP AUTH disabled.
Use Direct Send when you need to send messages to recipients in your own organization who have mailboxes in Office 365. Direct send will not work if you want to send email to External email address (Gmail, yahoo, hotmail etc.). However, If the external recipient mailboxes are also hosted on Office 365, it will work fine.
Direct Send does not require your device or application to have a static IP address to configure it. However, Static IP address is recommended so that an SPF record can be created for your domain. The SPF record helps avoid your messages being flagged as spam.
Direct Send and Office 365 Relay both does not require your device to Support TLS.
Source:Microsoft. How Direct Send Works ?
Featues
Direct Send
Office 365 SMTP Relay
Send to Internal Users
Yes
Yes
Send to External Users
No (Yes, for external recipients having Office365 Mailboxes)
Yes
Network Port Requirement
Port 25
Port 25
TLS Requirement
Optional
Optional
Requires Authentication
None
Device / Printer / Application must have Static IP address assigned.
2.Configure SMTP Relay in Office 365 using Direct Send method
In the previous section of this blog post, I have explianed the difference between Direct Send and Office 365 SMTP Relay method. If Direct Send meets your requirements and you do not have any requirements for sending an email to External recipients like Gmail, yahoo, hotmail etc. You can follow below steps to configure it.
1. Find MX Endpoint of your Domain
To find the MX Endpoint of your domain, You need to follow below steps:
Click on your organization domain name. For example: techpress.net.
Click on DNS records Tab.
You can find MX Endpoint on DNS records tab. Click on it to Open.
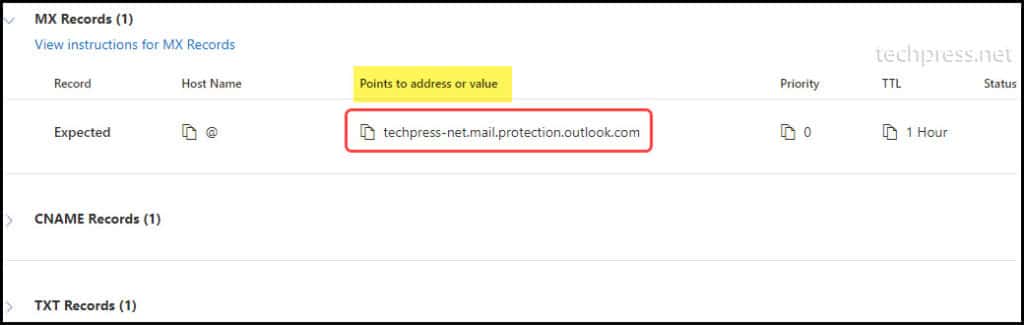
You will find the MX Endpoint under Points to address or value column. Click on it to copy it on a notepad.
The format of the MX Endpoint is yourdomain-com.mail.protection.outlook.com
Locate MX Endpoint of your domain from Microsoft 365 admin center
2. Find the Static IP Address of the Device or Application [Optional]
As Microsoft Recommends to use Static IP Address for Direct Send Method but its not mandatory. If your Device or Application is not using a static IP address, make sure you assign a static IP address and then note down the IP Address of the device on a notepad. We will add static IP address of the device in your domain’s SPF record.
3. Update SPF Record [Optional]
This is also an optional step but highly recommended by Microsoft. Updating SPF record with Static IP Address of your Device or Application will help to avoid your emails being marked as SPAM. SPF records identifies which servers are allowed to send emails on behalf of the your domain.
Example:
Device / Printer IP Address: 10.20.1.56
Currently configured SPF record: v=spf1 include:spf.protection.outlook.com -all
Add your Device / Application IP Address in the SPF record as below:
4. Configure your Device / Application for Direct Send SMTP Relay
Last and final step is to configure your Device / Application and add SMTP relay details so that Device / Application can send emails using the Direct Send SMTP Relay. In our Example, we will be using a Printer to configure Direct Send. Let’s see which SMTP settings needs to be configured on the Printer.
If you want to configure SMTP Relay for a device other than your printer, You can still use below SMTP details to configure it.
SMTP Server
Port
TLS
UserName
Password
MX Endpoint
For Example: <yourdomain>-<domain extension.mail.protection.outlook.com
25
Not Required (Recommendation is to enable if this option is available)
Any Email Address of your domain. This user does not require a mailbox. For example: myscanner@techpress.net
Not required (you can turn off SMTP Authentication)
Example:
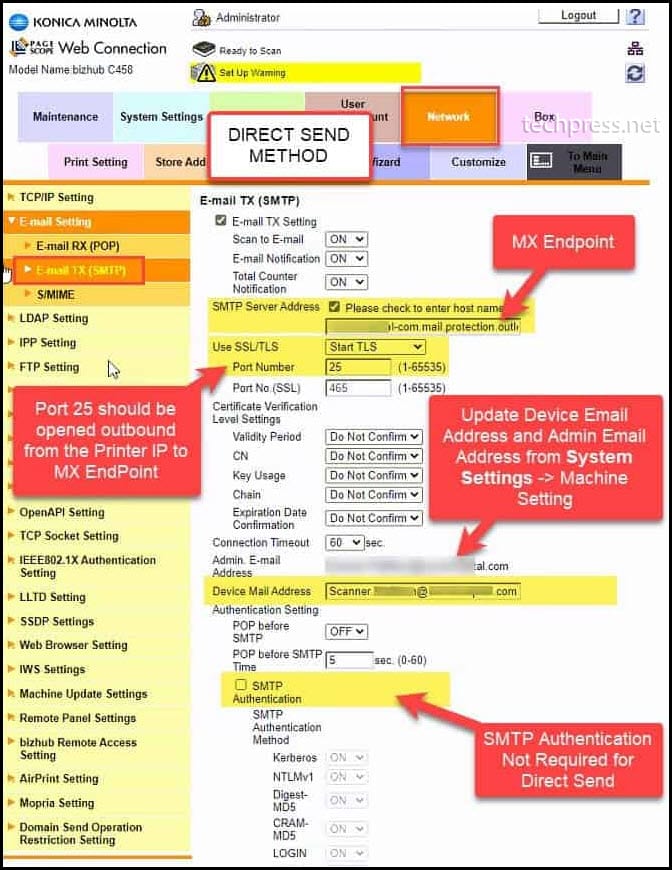
I have captured a screenshot of one of my Printers to show you how to configure Direct Send. You can use the same settings to configure Direct Send on any other device as well. This screenshot is just for your reference:
Office 365 SMTP Relay Direct Send method Configuration on Konika Minolta printer
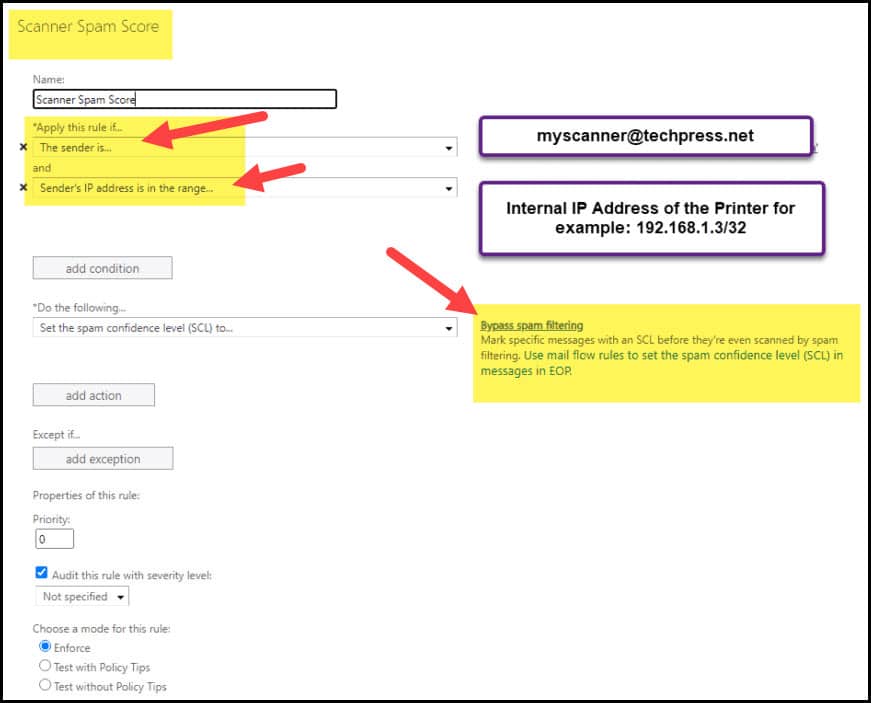
5. Create Bypass Spam Filtering Rule [Optional]
This step is optional and you do not need to create a bypass SPAM Filtering rule in Exchange Online. You have updated SPF record with your device IP address which should avoid the emails sent from your device to be marked as SPAM.
If your emails are still going into the SPAM folder. You can create a SPAM Bypass rule in office365 for the email ID which you have used to send the email from on the device.
Login to Exchange online management portal
Click on Mail flow -> Rule -> Create a Rule.
Create SPAM Bypass rule for the Device IP on Exchange Admin Center
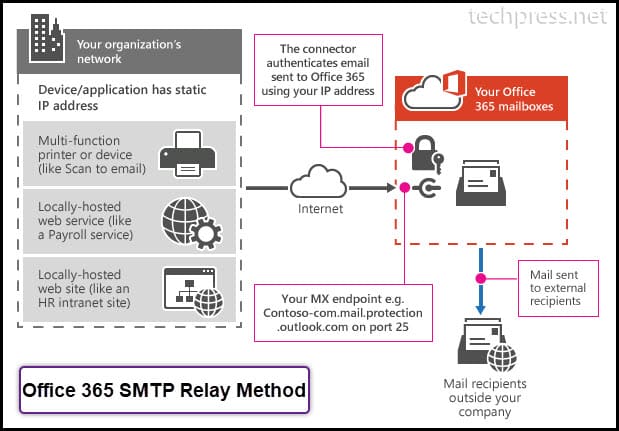
3. Configure using Office 365 SMTP Relay Method
Source: Microsoft. Office 365 SMTP Relay Method – How it Works?
Direct Send method has limitations of sending the emails to external recipients. However, Office 365 SMTP Relay does not have that kind of limitation in place. You can use Office 365 SMTP Relay Method to send the email to any External recipient. Let’s check the steps to configure Office 365 Relay on your Device.
1. Find Public IP Address of the Device or Application
First thing you need to do is to find the public IP address of the Device or Application. If your device is not assigned with a Public IP and is using Dynamic IP address, Please update it to use Static IP Address. Copy the IP address in a notepad. We will need this IP Address while configuring a Connector in Exchange Online.
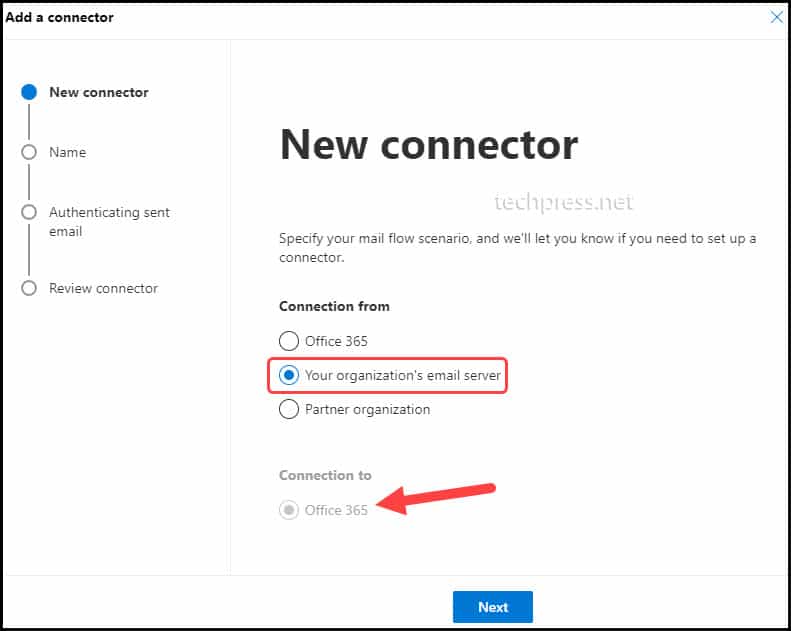
2. Create a Connector on Exchange Admin Center
Next step is to create a connector on Exchange Admin Center. Please follow below steps to create a connector:
On Add a Connector Page. Select Connection from Your organization’s email server and Connection to Office 365 and click on Next to proceed.
Create a new connector on Exchange Admin Center for configuration of SMTP Relay
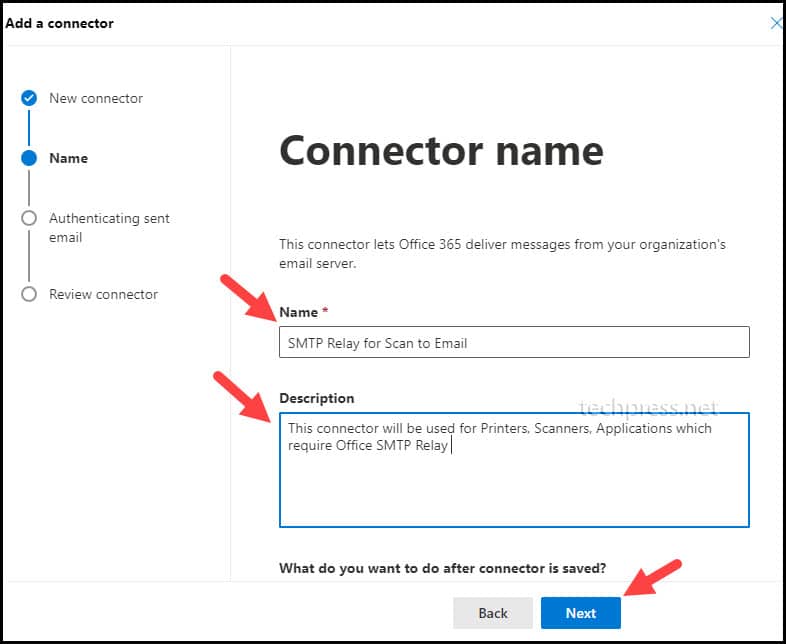
Provide a Connector Name and Description. Click on Next to Proceed.
Provide a Name and Description of the Connector
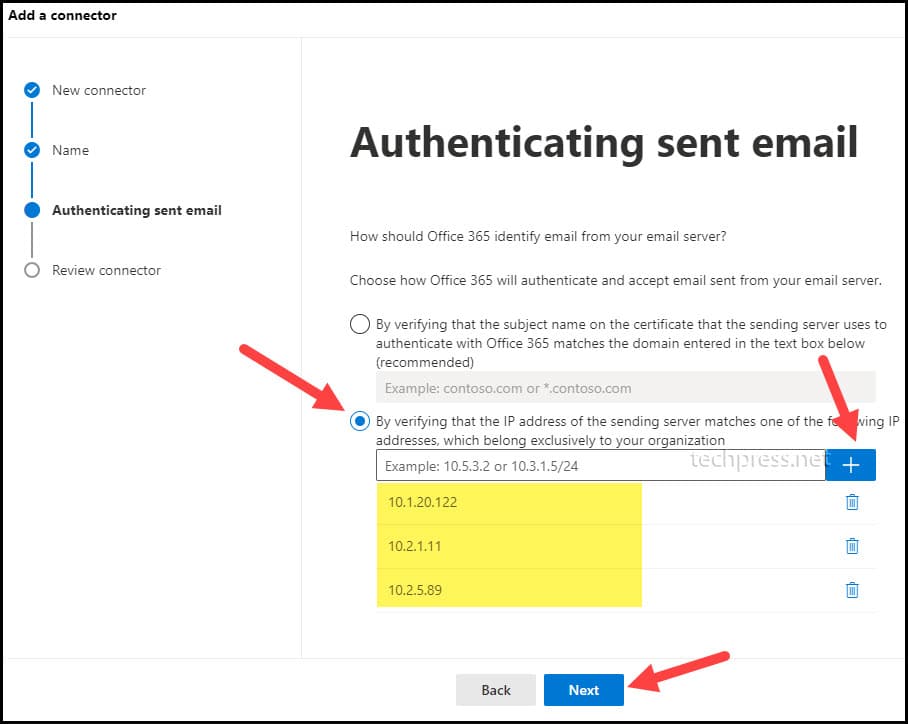
On Authenticating sent email page. Select the option “By verifying that the IP address of the sending server matches one of the following addresses, which belongs exclusively to your organization“.
Add your Device / Application IP Addresses into the list. Add all Device’s IP addresses which you want to configure for Office 365 SMTP Relay. For example, In my organization I have 3 Printers which I want to configure for SMTP Relay. Therefore I have added the IP addresses of those 3 printers here.
Add Printer IP Addresses in Authenticating sent email
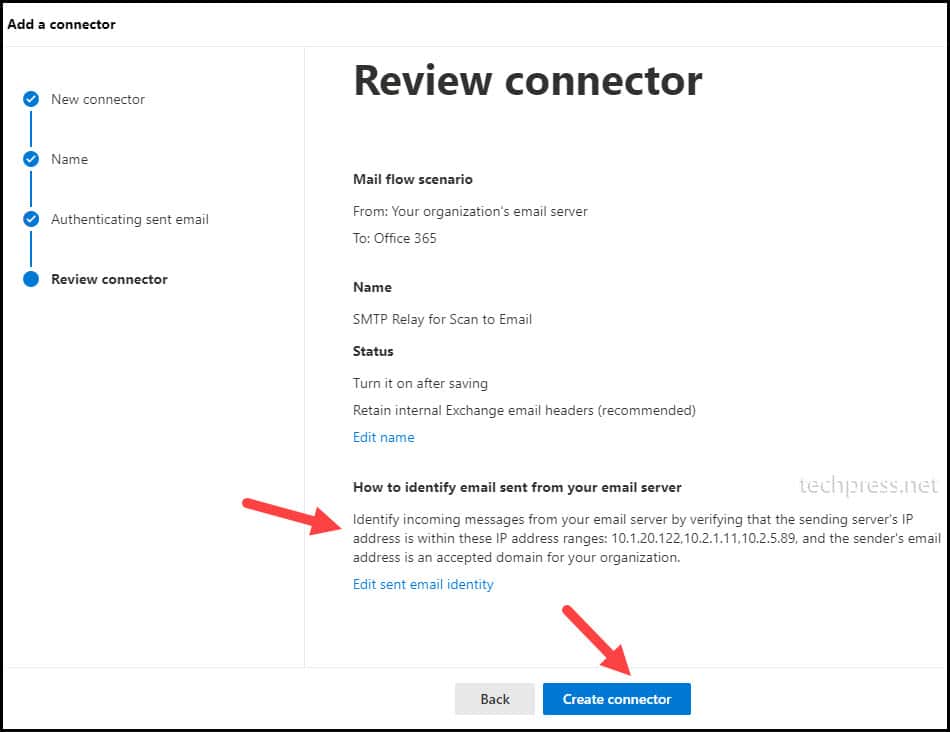
On Review connector page, you can review the connector configuration and click on Create connector to create this Connector.
Review Connector page on Exchange Admin Center
3. Update SPF Record
Now you need to update the SPF record and add all the Device IP’s in the SPF record which you added in the connector created on Exchange Admin Center.
Example:
Device / Printer IP Addresses: 10.1.20.122, 10.2.1.11 and 10.2.5.89.
Currently configured SPF record: v=spf1 include:spf.protection.outlook.com -all
Add your Device / Application IP Addresses in the SPF record as below:
Click on your organization domain name. For example: techpress.net.
Click on DNS records Tab.
You can find MX Endpoint on DNS records pag. Click on it to Open.
You will find the MX Record under Points to address or value column. Click on it to copy it on a notepad.
The format of the MX Endpoint is yourdomain-com.mail.protection.outlook.com
Locate MX Endpoint of your domain from Microsoft 365 admin center
5. Configure your Device / Application for Office 365 SMTP Relay
Last and final step is to configure your Device / Application and add SMTP relay details so that Device / Application can send emails using the Office 365 SMTP Relay.
SMTP Server
Port
TLS
UserName
Password
MX Endpoint
For Example: <yourdomain>-<domain extension.mail.protection.outlook.com
25
Not Required (Recommendation is to enable if this option is available)
Any Email Address of your domain. This user does not require a mailbox. For example: myscanner@techpress.net
Not required (you can turn off SMTP Authentication)
6. Create SPAM Bypass rule [Optional]
Please refer to the section of Configuration of SMTP Relay using Direct Send method where the steps to create SPAM bypass rule is given. This is an optional troubleshooting step and can be used in case the emails are being marked as SPAM.
Troubleshooting Office 365 SMTP Relay
Now we have setup Office 365 SMTP Relay. In case of any issues in email delivery, you can use below steps to troubleshoot.
Check SMTP AUTH at organization level
You can use below command to check SMTP AUTH at organization level. As we are not using SMTP client submission method, SMTP AUTH should be disabled.
Get-CASMailbox "Sonia Neil " | fl SmtpClientAuthenticationDisabled
Copy
If you see the output of the command as SmtpClientAuthenticationDisabled: That means this setting is controlled by the corresponding SmtpClientAuthenticationDisabled parameter on the Set-TransportConfig cmdlet for the whole organization.
Test Port 25 using Telnet
If you are facing any issues in email delivery then you can verify if Port 25 is opened or blocked on the Firewall. If Port 25 is blocked then you may need to ask the Network admin to open it for the device IP which is sending emails. You can follow below steps to test Port 25 via Telnet.
Launch Command Prompt on a PC (IP of the PC should be in the same subnet as Device / Printer / Application)
Type Command telnet <MX EndPoint> 25 and press Enter.
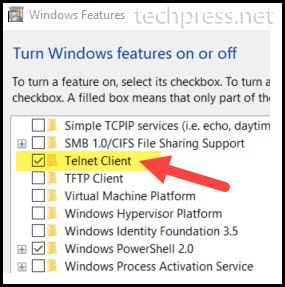
(If telnet command is not recognized on the Windows 10 or Windows 11 PC. The Please first Install Telnet Client by going to Start menu -> Type “Turn Windows featured on or off” and find Telnet Client, Select it and click OK).
Install Telnet Client on Windows
Once Telnet is installed on your Windows device. You can open a command prompt and type below command to test if Port 25 is opened or not.
Telnet <your MX endpoint> 25
Test Port 25 using Telnet
Once you enter on the above command, you should get a response from the server. Which means that Port 25 is opened.
Test Port 25 using Telnet
Send a Test email using Telnet
If you want to check the email delivery then you can use the Telnet command and send a test email. This test can confirm if there are any issues in email delivery. You can follow below steps to test a test email using telnet.
Login on a computer in the same subnet as the Device / Printer / Application.
Open Command prompt as administrator.
Type command Telnet <your MX endpoint> 25.
Send a Test email using Telnet
You will get a response back after press enter on the Telnet command. On Telnet Console Type below commands:
ehlo
mail from – Type from email address
rcpt to – Type recipient email address to send a test email.
If the recipient receives this test email then there is no issue witth email delivery.
ehlo
MAIL FROM:<myscanner@techpress.net>
250 2.1.0 Sender OK
RCPT TO:<internal email ID>
250 2.1.5 Recipient OK
DATA
354 Start mail input; end with <CRLF>.<CRLF>
SUBJECT:Hello World

This is a test message

Thanks,
John A.

. <Dot to end the email>
Copy
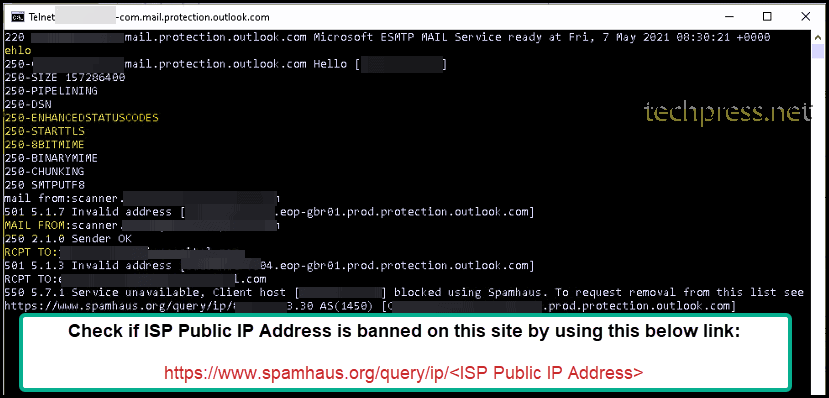
Check if ISP Public IP Address is banned
When you are sending an email using Telnet and if you get a message saying that your sending IP is banned. Then you need to unblock / remove your IP from banned list so that Devices on your network can send email.
Check if ISP Public IP Address is banned using Telnet
To remove your ISP Public IP Address from banned list, you need to login on https://senders.office.com and type your email ID and ISP Public IP Address of your organization. Follow the instuctions on the site to get your IP De-listed. This may take from 30 minutes to couple of hours to unblock your IP.
After you get your IP De-listed from https://senders.office.com. Try to send an email using Telnet again. This time if your IP is successfully de-listed, the recipient should receive the email.
Check if ISP Public IP Address is banned using Telnet
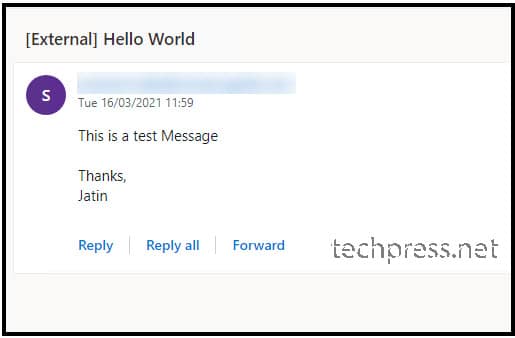
Test email has been received successfully.
Test email received using Telnet
Delisting / Unblock of ISP Public IP on Spamhaus.org
When you are sending an email using Telnet and if you get a message saying that service unavailable, Client host <your ISP Public IP address> blocked using Spamhaus. You need to visit the URL https://www.spamhaus.org/query/ip/<ISP Public IP Address> to get your IP De-listed.
Delisting / Unblock of ISP Public IP on Spamhaus.org
How to unblock your ISP Public IP on spamhaus.org
Please follow below steps to unblock your ISP Public IP from spamhaus.org.
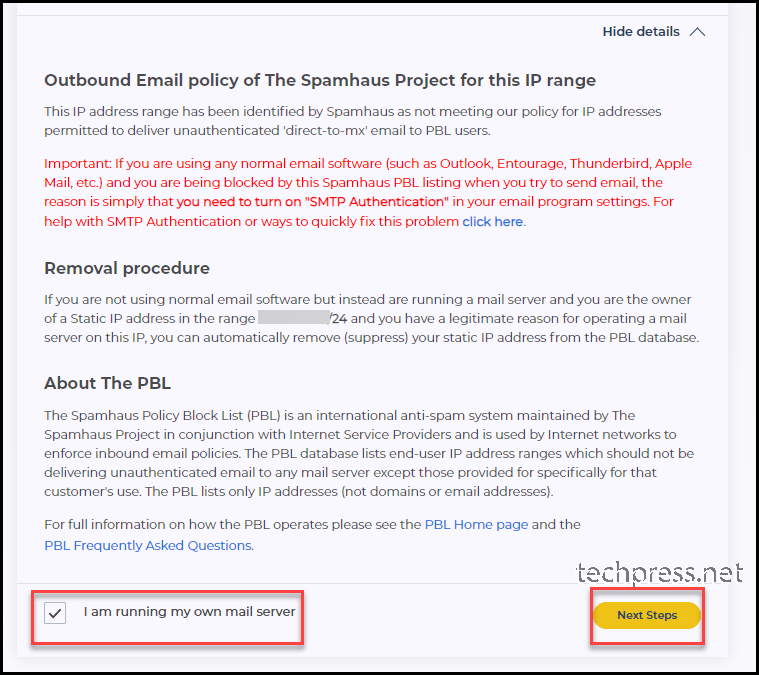
Once you land on https://www.spamhaus.org/query/ip/<ISP Public IP Address> site. Click on Show details and then click on “I am running my own mail server“.
Delisting / Unblock of ISP Public IP on Spamhaus.org
Select I am running my own mail server and clicon on Next steps.
Delisting / Unblock of ISP Public IP on Spamhaus.org
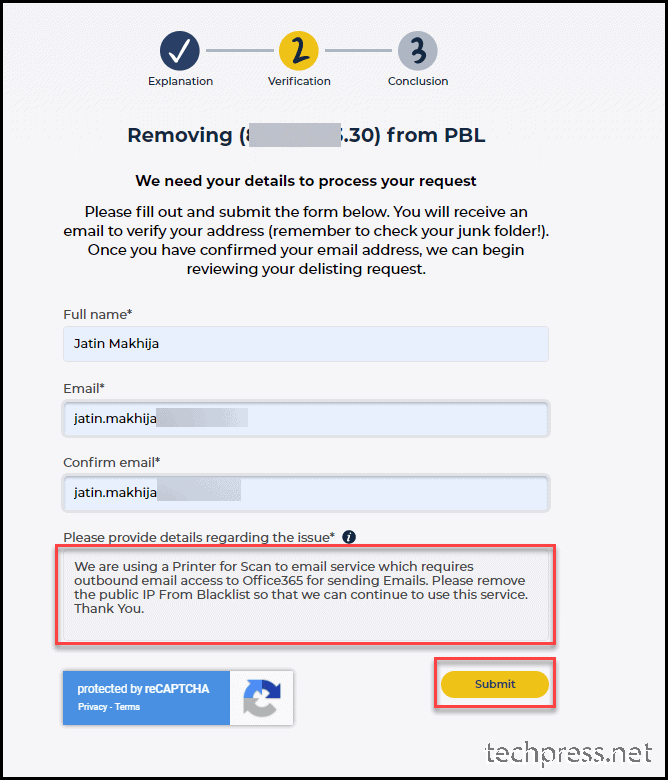
Complete the form for unblocking your ISP Public IP. Provide a Name, Email Address and Provide details regarding the issue. Once you complete this form. click on Submit button.
Delisting / Unblock of ISP Public IP on Spamhaus.org
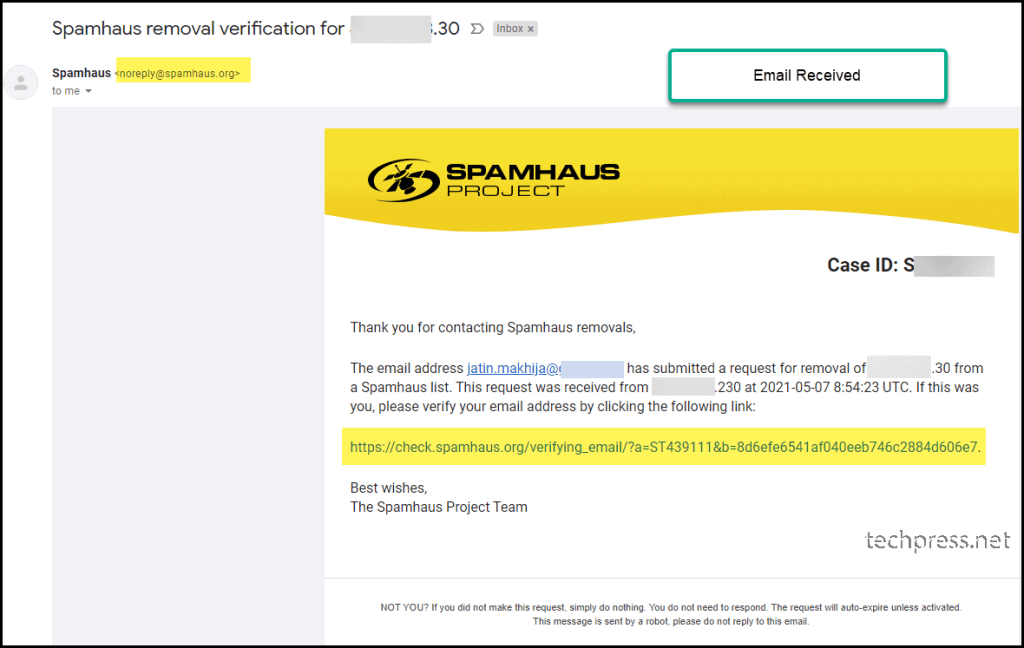
Form has been submitted. You can now wait for email verification link from Spamhaus.org.
Delisting / Unblock of ISP Public IP on Spamhaus.org
Below is the email I received to verify my email address. Click on the link in the email for Email Verification.
Delisting / Unblock of ISP Public IP on Spamhaus.org
Delisting has been successful. You can now try to use Telnet to send a test email to confirm email delivery issue has been rectifed. You can also check the Device / Printer / application to confirm if its able to send the email now.
Delisting / Unblock of ISP Public IP on Spamhaus.org
Conclusion
In this blog post, we have seem how to setup SMTP Relay in Office 365. There are three ways to configure it. But the most recommended option is Office 365 SMTP Relay Method. Second best method is Direct Send method which can be used if you do not have the requirements to send the emails to External recipients like gmail, yahoo etc.
Third method which is least recommended is SMTP Auth Submisson method. As It requires a licensed mailbox and SMTP AUTH to be enabled for that mailbox. There is a cost associated with licensed mailbox and Microsoft does not recommend SMTP AUTH to be enabled.
We have also see the troubleshooting steps in case of email delivery issues. These troubleshooting steps helped me fixed issues while working on Office 365 relay for Multiple clients.
Transport Layer Security (TLS) – TLS protocol is used to provide privacy and data integrity between two communicating applications. SSL and TLS are both cryptographic protocols but because SSL protocols does not providers sufficient level of security compared to TLS, SSL 2.0 and SSL 3.0 have been deprecated. TLS 1.0 was released in 1999, TLS 1.1 was released in 2006, TLS 1.2 was released in 2008 and TLS 1.3 was released in 2018.
Most of the companies and Internet Browsers are now moving to TLS 1.2 which is having better security algorithms than TLS 1.0 and TLS 1.1. TLS is more secure than SSL. Mozilla Firefox, Google Chrome, Apple and Microsoft are all ending support for TLS 1.0/1.1 in 2020, so its better to plan ahead of time and test all the applications and create Policies to disable TLS 1.0 and TLS 1.1 on Windows devices.
If you are interested in learning more about these protocols, differences between these protocols and security improvements – you can check Protocols RFC’s (Request for Comments) at these links TLS1.0 RFC, TLS 1.1 RFC, TLS 1.2 RFC and TLS 1.3 RFC.
Create a GPO in Active Directory to disable TLS 1.0 and TLS 1.1
We will be creating a Group policy object in Active directory to disable TLS 1.0 and TLS 1.1. You will need to create given registry keys and registry entries to control TLS protocols. Please find below steps to disable TLS 1.0 and TLS 1.1 on windows servers.
How to create a GPO in Active Directory to disable TLS 1.0 and TLS 1.1
Login on a domain controller as a domain administrator.
Open Group policy management console (Go to Start -> Run and type gpmc.msc and press Enter)
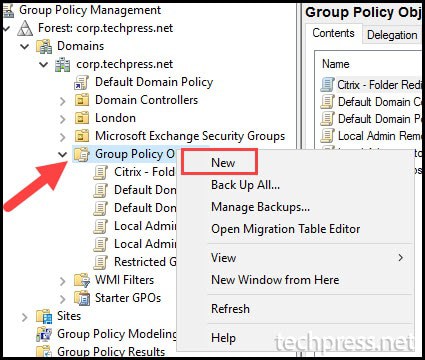
Expand Group Policy Objects Folder. Right-click on it and Select New.
Provide a Name of the GPO. For Example: Disable TLS 1.0 and TLS 1.1 Windows servers
Right click on the Group policy “Disable TLS 1.0 and TLS 1.1 Windows Servers” and click on Edit.
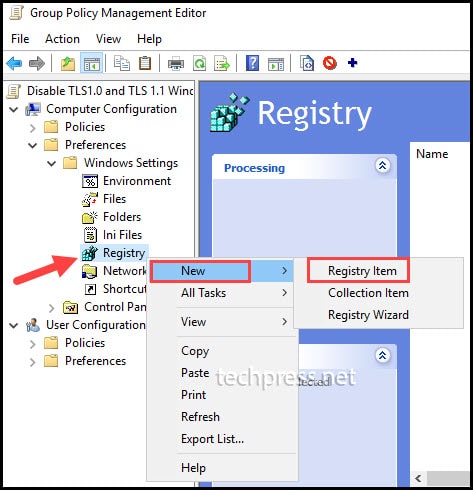
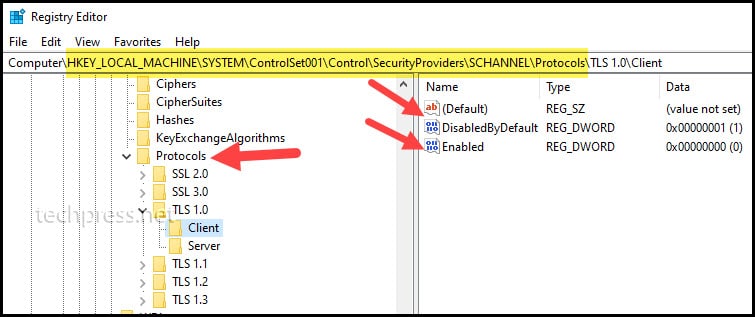
Go to Computer Configuration -> Preferences -> Windows settings -> Registry.
Right click on Registry -> click on New -> click on Registry Item.
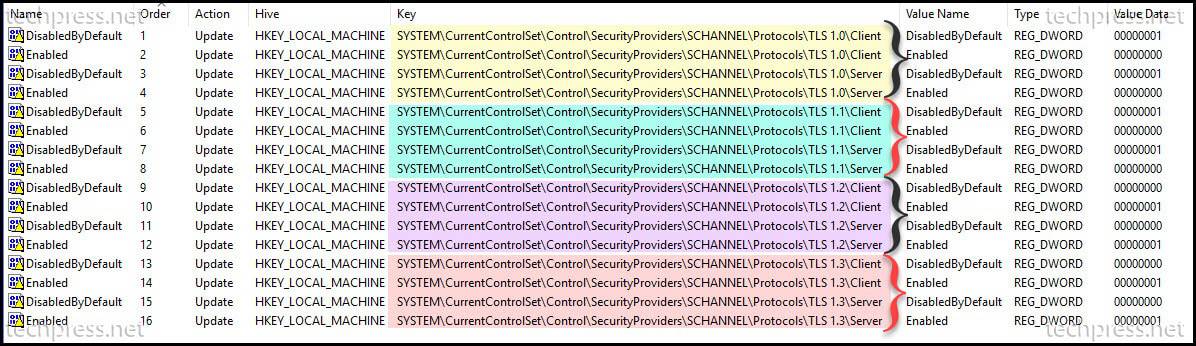
In the next step, we will create registry keys and registry entries to Disable TLS 1.0 and TLS 1.1. Its recommended to disable SSL 2.0 and SSL 3.0 as well. Most of the newer Windows operating systems have TLS 1.2 enabled by default. However, If you want to control TLS 1.2 and TLS 1.3 then you can use the given registry keys for TLS 1.2 and TLS 1.3.
After you click on Registry Item, A window will show where you can enter Information about the registry Item which you want to create. You need to provide below information about the registry Item:
Action: Select Update from the drop-down. Selecting Update will create the registry keys and registry entries if its not found on end users devices.
Hive: Select HKEY_LOCAL_MACHINE
Key Path: You can either browse to the registry path or provide a registry key to create / update.
Value Name: We will be creating two registry entries for each protocol. DisabledbyDefault and Enabled.
Value type: Select REG_DWORD.
Value type: Select 1 to Enable an 0 to disable.
Go through the process of creating an entry for each registry Item. Below screenshot shows that we have Disabled TLS 1.0, TLS 1.1 protocols and Enabled TLS 1.2 and TLS 1.3.
Once you create all the registry Items in the Group policy management console for Disable TLS 1.0 and TLS 1.1 Windows Servers GPO. You can link the GPO to the Organization Unit (OU) containing windows servers.
Please note that as this group policy object contains settings in Computer configuration which will target the Devices. A restart of the computer will be required so that registry entries can be created.
Disable TLS 1.0 and TLS 1.1 using IIS Crypto Tool
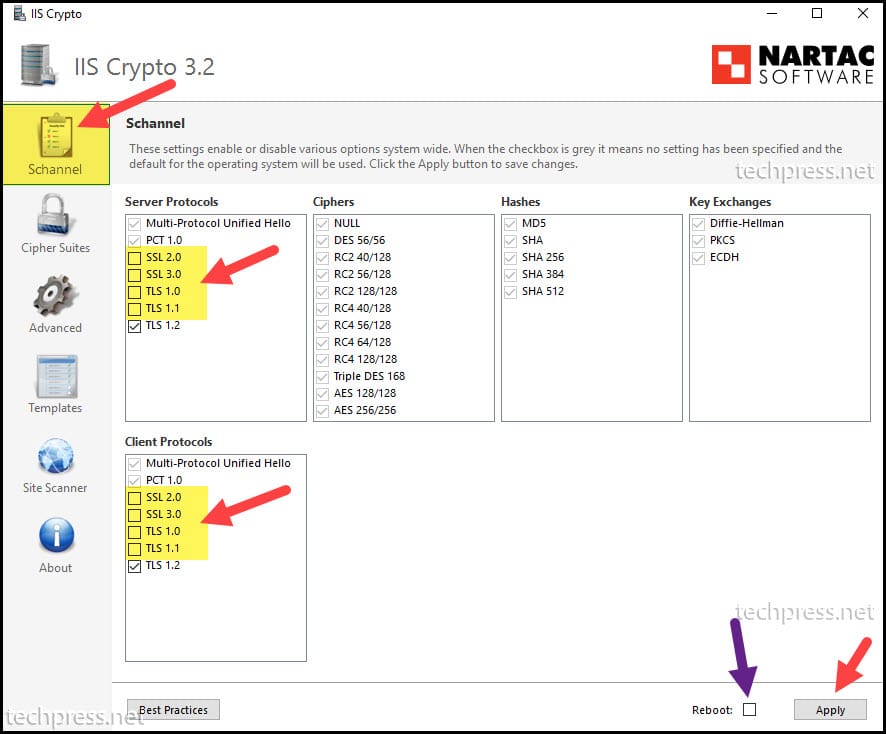
If your windows servers are not domain joined or you do not want to create group policy object in Active directory to disable deprecated SSL and TLS protocols. You can download and Install IIS Crypto tool on Windows server and manually select the checkboxes to Disable / Enable SSL / TLS protocols.
Please follow below steps to disable TLS 1.0 and TLS 1.1 using IIS Crypto Tool:
Login on Windows Server using administrator credentials.
Uncheck SSL 2.0, SSL 3.0, TLS 1.0 and TLS 1.1 from Server Protocols.
Uncheck SSL 2.0, SSL 3.0, TLS 1.0 and TLS 1.1 from Client Protocols.
Reboot the server.
Repeat Steps 1 to 6 on each server where you want to disable deprecated SSL and TLS protocols.
Disable deprecated SSL and TLS protocols using IIS Crypto Tool
Conclusion
In this blog post, we have seen how to disable TLS 1.0 and TLS 1.1 on windows servers. Its highly recommended to disable SSL 2.0 and SSL 3.0 as well. Newer Windows server operting systems have TLS 1.2 and TLS 1.3 enabled but you can still control these protocols using the given registry keys.
If you have only couple of servers and you do not want to create the Active directory group policy or your windows servers are standalone servers and not domain joined. You can use IIS Crypto tool to disable deprecated SSL and TLS protocols.
Transport Layer Security (TLS) – TLS protocol is used to provide privacy and data integrity between two communicating applications. SSL and TLS are both cryptographic protocols but because SSL protocols does not providers sufficient level of security compared to TLS, SSL 2.0 and SSL 3.0 have been deprecated. TLS 1.0 was released in 1999, TLS 1.1 was released in 2006, TLS 1.2 was released in 2008 and TLS 1.3 was released in 2018.
Most of the companies and Internet Browsers are now moving to TLS 1.2 which is having better security algorithms than TLS 1.0 and TLS 1.1. TLS is more secure than SSL. Mozilla Firefox, Google Chrome, Apple and Microsoft are all ending support for TLS 1.0/1.1 in 2020, so its better to plan ahead of time and test all the applications and create Policies to disable TLS 1.0 and TLS 1.1 on Windows machines.
If you are interested in learning more about these protocols, differences between these protocols and security improvements – you can check Protocols RFC’s (Request for Comments) at these links TLS1.0 RFC, TLS 1.1 RFC, TLS 1.2 RFC and TLS 1.3 RFC.
Disable SSL 2.0, SSL 3.0, TLS 1.0 and TLS 1.1 using Powershell
We can easily disable TLS 1.0 and TLS 1.1 using Powershell. However its recommended to also disable SSL 2.0, SSL 3.0 as well. We will be using below powershell code to create registry keys and registry entries. Once the registry keys are created, a reboot of that device will be required to complete the change.
Please note below Powershell Code needs to be run as an administrator as it needs to perform changes in Windows registry.
To run Powershell code on Windows 11 computer. Please use below steps:
Login on a Windows 11 PC as administrator.
Open Powershell Console as an administrator.
Run below piece of powershell code to enable / disable SSL / TLS Protocols.
In this blog post, we have checked the powershell codes to disable SSL 2.0, SSL 3.0, TLS 1.0 and TLS 1.1. We have checked the Powershell code to enable TLS 1.2 and TLS 1.3. Its highly recommended to disable old unsupported protocols to reduce the security risk on your computer.
Transport Layer Security (TLS) – TLS protocol is used to provide privacy and data integrity between two communicating applications. SSL and TLS are both cryptographic protocols but because SSL protocols does not providers sufficient level of security compared to TLS, SSL 2.0 and SSL 3.0 have been deprecated. TLS 1.0 was released in 1999, TLS 1.1 was released in 2006, TLS 1.2 was released in 2008 and TLS 1.3 was released in 2018.
Most of the companies and Internet Browsers are now moving to TLS 1.2 which is having better security algorithms than TLS 1.0 and TLS 1.1. TLS is more secure than SSL. Mozilla Firefox, Google Chrome, Apple and Microsoft are all ending support for TLS 1.0/1.1 in 2020, so its better to plan ahead of time and test all the applications and create Policies to disable TLS 1.0 and TLS 1.1 on Windows machines.
If you are interested in learning more about these protocols, differences between these protocols and security improvements – you can check Protocols RFC’s (Request for Comments) at these links TLS1.0 RFC, TLS 1.1 RFC, TLS 1.2 RFC and TLS 1.3 RFC.
Disable SSL 2.0, SSL 3.0, TLS 1.0 and TLS 1.1 using Powershell
We can easily disable TLS 1.0 and TLS 1.1 using Powershell. However its recommended to also disable SSL 2.0, SSL 3.0 as well. We will be using below powershell code to create registry keys and registry entries. Once the registry keys are created, a reboot of that device will be required to complete the change.
Please note below Powershell Code needs to be run as an administrator as it needs to perform changes in Windows registry.
To run Powershell code on Windows 10 computer. Please use below steps:
Login on a Windows 10 PC as administrator.
Open Powershell Console as an administrator.
Run below piece of powershell code to enable / disable SSL / TLS Protocols.
In this blog post, we have checked the powershell codes to disable SSL 2.0, SSL 3.0, TLS 1.0 and TLS 1.1. We have checked the Powershell code to enable TLS 1.2 and TLS 1.3. It’s highly recommended to disable old unsupported protocols to reduce the security risk on your computer.
An update was added to the end of the article explaining that any Authenticode-signed file, including executables, can be modified to bypass warnings.
A new Windows zero-day allows threat actors to use malicious stand-alone JavaScript files to bypass Mark-of-the-Web security warnings. Threat actors are already seen using the zero-day bug in ransomware attacks.
Windows includes a security feature called Mark-of-the-Web (MoTW) that flags a file as having been downloaded from the Internet and, therefore, should be treated with caution as it could be malicious.
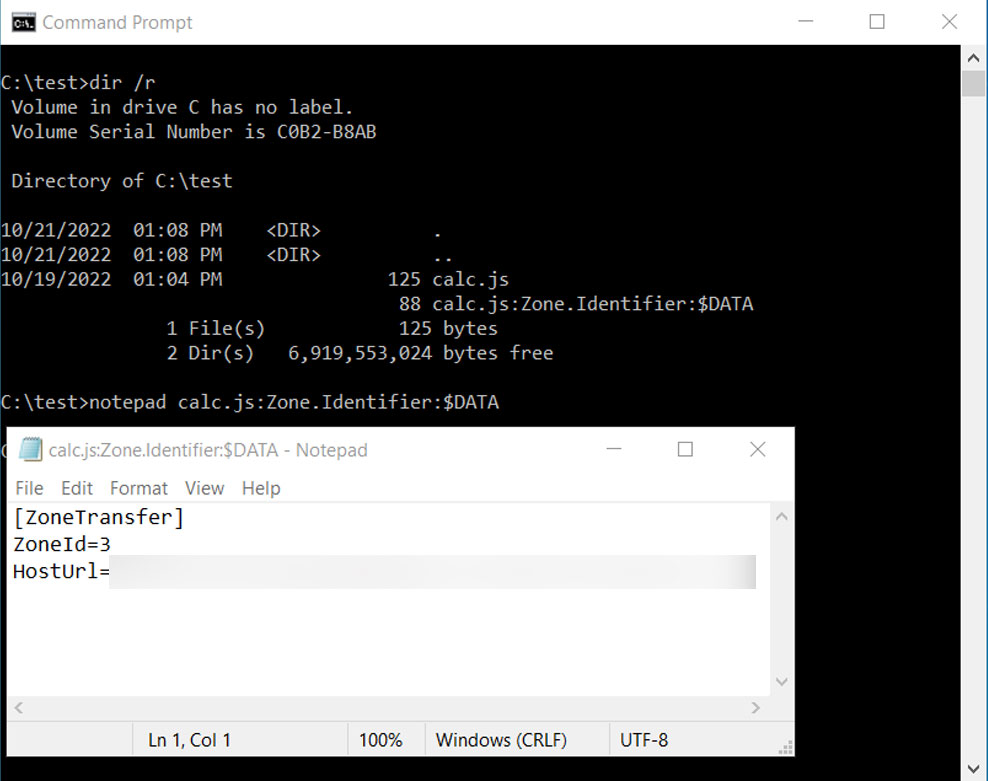
The MoTW flag is added to a downloaded file or email attachment as a special Alternate Data Stream called ‘Zone.Identifier,’ which can be viewed using the ‘dir /R’ command and opened directly in Notepad, as shown below.
The Mark-of-the-Web alternate data stream Source: BleepingComputer
This ‘Zone.Identifier’ alternate data stream includes what URL security zone the file is from (three equals the Internet), the referrer, and the URL to the file.
When a user attempts to open a file with the Mark-of-the-Web flag, Windows will display a warning that the file should be treated with caution.
“While files from the Internet can be useful, this file type can potentially harm your computer. If you do not trust the source, do not open this software,” reads the warning from Windows.
Windows security warning when opening files with MoTW flags Source: BleepingComputer
Microsoft Office also utilizes the MoTW flag to determine if the file should be opened in Protected View, causing macros to be disabled.
To be clear, we are not talking about JavaScript files commonly used on almost all websites, but .JS files distributed by threat actors as attachments or downloads that can run outside of a web browser.
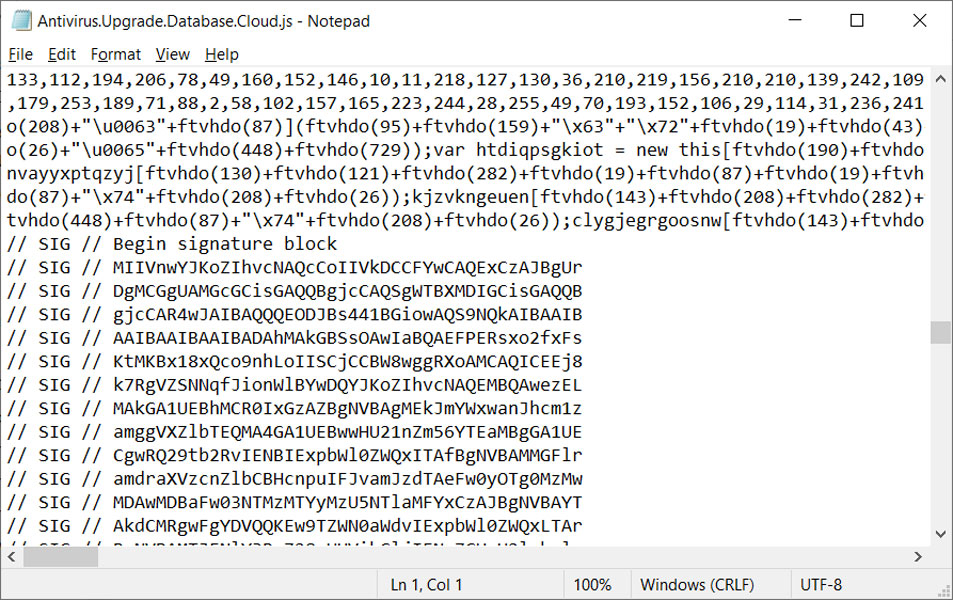
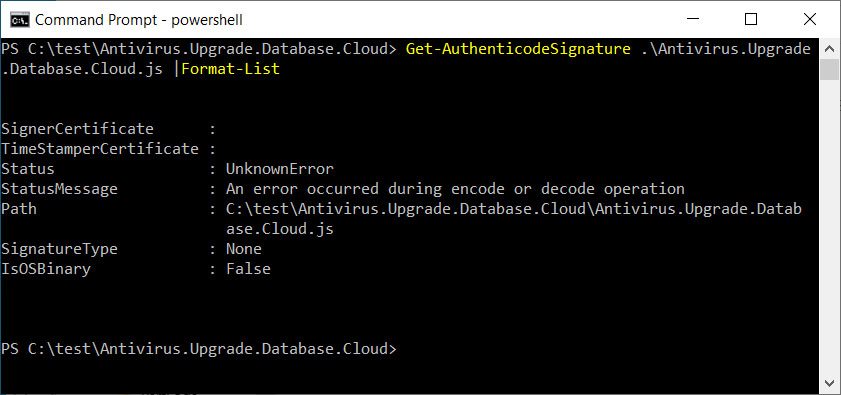
The JavaScript files seen distributed by the Magniber threat actors are digitally signed using an embedded base64 encoded signature block as described in this Microsoft support article.
JavaScript file used to install the Magniber Ransomware Source: BleepingComputer
After being analyzed by Will Dormann, a senior vulnerability analyst at ANALYGENCE, he discovered that the attackers signed these files with a malformed key.
Malformed signature in malicious JavaScript file Source: BleepingComputer
When signed in this manner, even though the JS file was downloaded from the Internet and received a MoTW flag, Microsoft would not display the security warning, and the script would automatically execute to install the Magniber ransomware.
Dormann further tested the use of this malformed signature in JavaScript files and was able to create proof-of-concept JavaScript files that would bypass the MoTW warning.
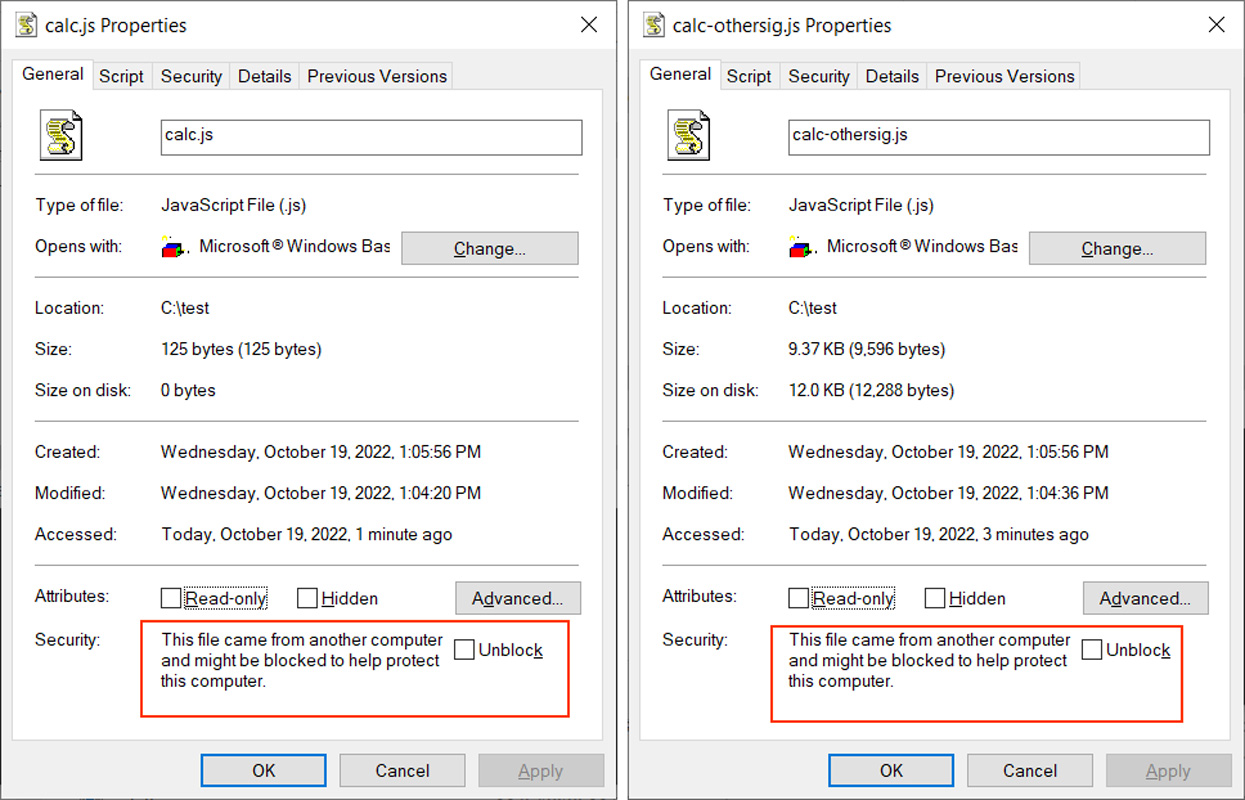
Both of these JavaScript (.JS) files were shared with BleepingComputer, and as you can see below, they both received a Mark-of-the-Web, as indicated by the red boxes, when downloaded from a website.
Mark-of-the-Web on Dormann’s PoC exploits Source: BleepingComputer
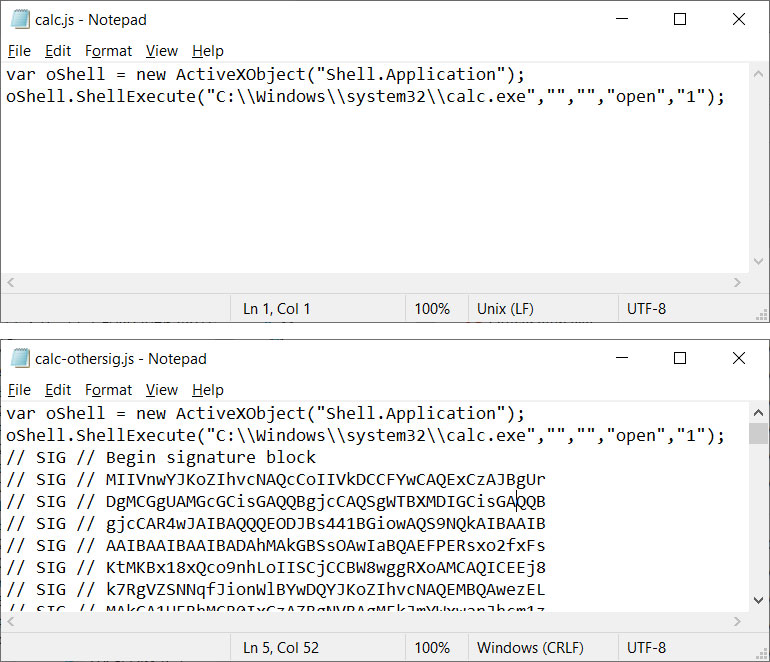
The difference between the two files is that one is signed using the same malformed key from the Magniber files, and the other contains no signature at all.
Dormann’s PoC Exploits Source: BleepingComputer
When the unsigned file is opened in Windows 10, a MoTW security warning is properly displayed.
However, when double-clicking the ‘calc-othersig.js,’ which is signed with a malformed key, Windows does not display a security warning and simply executes the JavaSript code, as demonstrated below.
Demonstration of the Windows zero-day bypassing security warnings Source: BleepingComputer
Using this technique, threat actors can bypass the normal security warnings shown when opening downloaded JS files and automatically execute the script.
BleepingComputer was able to reproduce the bug in Windows 10. However, for Windows 11, the bug would only trigger when running the JS file directly from an archive.
Dormann told BleepingComputer that he believes this bug was first introduced with the release of Windows 10, as a fully patched Windows 8.1 device displays the MoTW security warning as expected.
According to Dormann, the bug stems from Windows 10’s new ‘Check apps and files’ SmartScreen feature under Windows Security > App & Browser Control > Reputation-based protection settings.
“This issue is in the new-as-of-Win10 SmartScreen feature. And disabling “Check apps and files” reverts Windows to the legacy behavior, where MotW prompts are unrelated to Authenticode signatures,” Dormann told BleepingComputer.
“So that whole setting is unfortunately currently a tradeoff. On one hand, it does scan for baddies that are downloaded.”
“On the other, baddies that take advantage of this bug can get a LESS-SECURE behavior from Windows compared to when the feature is disabled.”
The zero-day vulnerability is particularly concerning as we know threat actors are actively exploiting it in ransomware attacks.
Dormann shared the proof-of-concept with Microsoft, who said they could not reproduce the MoTW security warning bypass.
However, Microsoft told BleepingComputer that they are aware of the reported issue and are investigating it.
Update 10/22/22
After the publication of this article, Dormann told BleepingComputer that threat actors could modify any Authenticode-signed file, including executables (.EXE), to bypass the MoTW security warnings.
To do this, Dormann says that a signed executable can be modified using a hex editor to change some of the bytes in the signature portion of the file and thus corrupt the signature.
Once the signature is corrupted, Windows will not check the file using SmartScreen, as if a MoTW flag was not present, and allow it to run.
“Files that have a MotW are treated as if there were no MotW if the signature is corrupt. What real-world difference that makes depends on what type of file it is,” explained Dormann.
If you haven’t patched CVE-2022-22954 yet, now would be an excellent time to do so.
Hackers have been exploiting a now-patched vulnerability in VMware Workspace ONE Access in campaigns to install various ransomware and cryptocurrency miners, a researcher at security firm Fortinet said on Thursday.
FURTHER READING
2 vulnerabilities with 9.8 severity ratings are under exploit. A 3rd loomsCVE-2022-22954 is a remote code execution vulnerability in VMware Workspace ONE Access that carries a severity rating of 9.8 out of a possible 10. VMware disclosed and patched the vulnerability on April 6. Within 48 hours, hackers reverse-engineered the update and developed a working exploit that they then used to compromise servers that had yet to install the fix. VMware Workspace ONE access helps administrators configure a suite of apps employees need in their work environments.
In August, researchers at Fortiguard Labs saw a sudden spike in exploit attempts and a major shift in tactics. Whereas before the hackers installed payloads that harvested passwords and collected other data, the new surge brought something else—specifically, ransomware known as RAR1ransom, a cryptocurrency miner known as GuardMiner, and Mirai, software that corrals Linux devices into a massive botnet for use in distributed denial-of-service attacks.
“Although the critical vulnerability CVE-2022-22954 is already patched in April, there are still multiple malware campaigns trying to exploit it,” Fortiguard Labs researcher Cara Lin wrote. Attackers, she added, were using it to inject a payload and achieve remote code execution on servers running the product.
The Mirai sample Lin saw getting installed was downloaded from http[:]//107[.]189[.]8[.]21/pedalcheta/cutie[.]x86_64 and relied on a command and control server at “cnc[.]goodpackets[.]cc. Besides delivering junk traffic used in DDoSes, the sample also attempted to infect other devices by guessing the administrative password they used. After decoding strings in the code, Lin found the following list of credentials the malware used:
hikvision
1234
win1dows
S2fGqNFs
root
tsgoingon
newsheen
12345
default
solokey
neworange88888888
guest
bin
user
neworang
system
059AnkJ
telnetadmin
tlJwpbo6
iwkb
141388
123456
20150602
00000000
adaptec
20080826
vstarcam2015
v2mprt
Administrator
1001chin
vhd1206
support
NULL
xc3511
QwestM0dem
7ujMko0admin
bbsd-client
vizxv
fidel123
dvr2580222
par0t
hg2x0
samsung
t0talc0ntr0l4!
cablecom
hunt5759
epicrouter
zlxx
pointofsale
nflection
admin@mimifi
xmhdipc
icatch99
password
daemon
netopia
3com
DOCSIS_APP
hagpolm1
klv123
OxhlwSG8
In what appears to be a separate campaign, attackers also exploited CVE-2022-22954 to download a payload from 67[.]205[.]145[.]142. The payload included seven files:
phpupdate.exe: Xmrig Monero mining software
config.json: Configuration file for mining pools
networkmanager.exe: Executable used to scan and spread infection
phpguard.exe: Executable used for guardian Xmrig miner to keep running
init.ps1: Script file itself to sustain persistence via creating scheduled task
clean.bat: Script file to remove other cryptominers on the compromised host
encrypt.exe: RAR1 ransomware
In the event RAR1ransom has never been installed before, the payload would first run the encrypt.exe executable file. The file drops the legitimate WinRAR data compression executable in a temporary Windows folder. The ransomware then uses WinRAR to compress user data into password-protected files.
The payload would then start the GuardMiner attack. GuardMiner is a cross-platform mining Trojan for the Monero currency. It has been active since 2020.
The attacks underscore the importance of installing security updates in a timely manner. Anyone who has yet to install VMware’s April 6 patch should do so at once.


.jpg)
