The Real Cost of Microsoft 365 Revealed

Estimating the real cost of a technology solution for a business can be challenging. There are obvious costs as well as many intangible costs that should be taken into account.

For on-premises solutions, people tend to include licensing and support maintenance contract costs, plus server hardware and virtualization licensing costs. For Software as a Service (SaaS) cloud solutions, it seems like it should be easier since there’s no hardware component, just the monthly cost per licensed user but this simplification can be misleading.

In this article we’re going to look at the complete picture of the cost of Microsoft 365 (formerly Office 365), how choices you as an administrator make can directly influence costs, and how you can help your business maximize the investment in OneDrive, SharePoint, Exchange Online and other services.

The Differences Between Office 365 & Microsoft 365

As covered in our article about the death of Office 2019 there are naming changes afoot in the Office ecosystem. The personal Office 365 subscriptions have changed and are now called Microsoft 365 Family (up to six people) and Personal along with the Office 365 Business SKUs, that top out at 300 users, has also been renamed. The new SKUs are Microsoft 365 Business Basic, Apps, Standard, and Premium.

There’s no reason to believe that this name change won’t eventually extend to the Enterprise SKUs but until it does, from a licensing cost perspective it’s important to separate the two. Office 365 E1, E3 and E5 gives you the well-known “Office” applications, either web-based or on your device, along with SharePoint Online, Exchange Online and OneDrive for Business in the cloud backend.

Microsoft 365 F3, E3 and E5, on the other hand, includes everything from Microsoft 365 plus Azure Active Directory Premium features (identity security), Enterprise Mobility & Security (EMS) / Intune for Mobile Device Management (MDM) and Mobile Application Management (MAM) along with Windows 10 Enterprise.
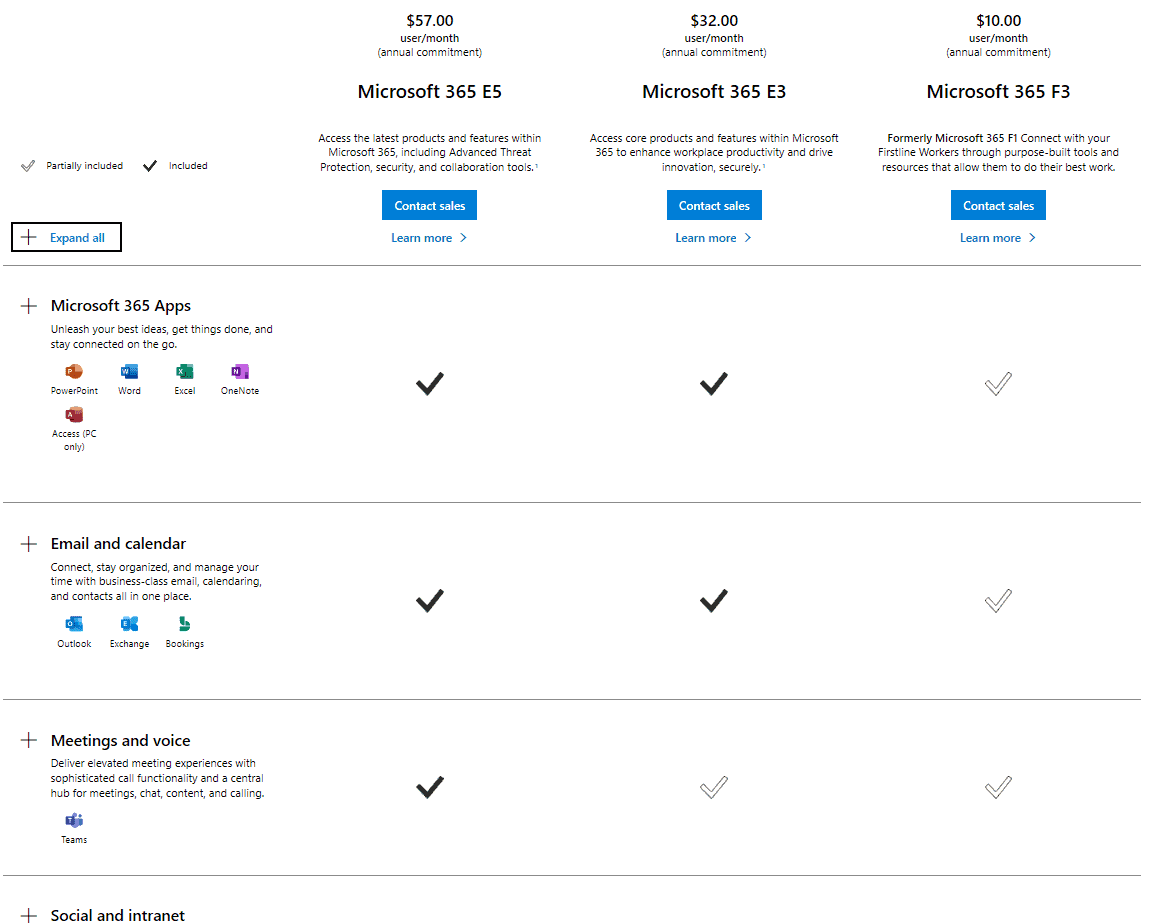
Comparing M365 plans

Comparing M365 plans

So, a decision that needs to be looked at early when you’re looking to optimize your cloud spend is whether your business is under 300 users and likely to stay that way for the next few years. If that’s the case you should definitely look at the M365 Business SKUs as they may fulfil your business needs, especially as Microsoft recently added several security features from AAD Premium P1 to M365 Business.

If you’re close to 300, expecting to grow or already larger, you’re going to have to pick from the Enterprise offerings. The next question is then, what’s the business need – do you just need to replace your on-premises Exchange and SharePoint servers with the equivalent cloud-based offerings? Or is your business looking to manage corporate-issued mobile devices (smartphones and tablets) with MDM or protect data on employee-owned devices? The latter is known as Bring Your Own Device (BYOD), sometimes called Bring Your Own Disaster. If you have those needs (and no other MDM in place today), the inclusion of Intune in M365 might be the clincher. If on the other hand, you need to protect your on-premises Active Directory (AD) against attacks using Azure Advanced Threat Protection (AATP) or inspect, understand and manage your users’ cloud usage through Microsoft Cloud App Security (MCAS) you’ll also need M365 E5, rather than just O365.
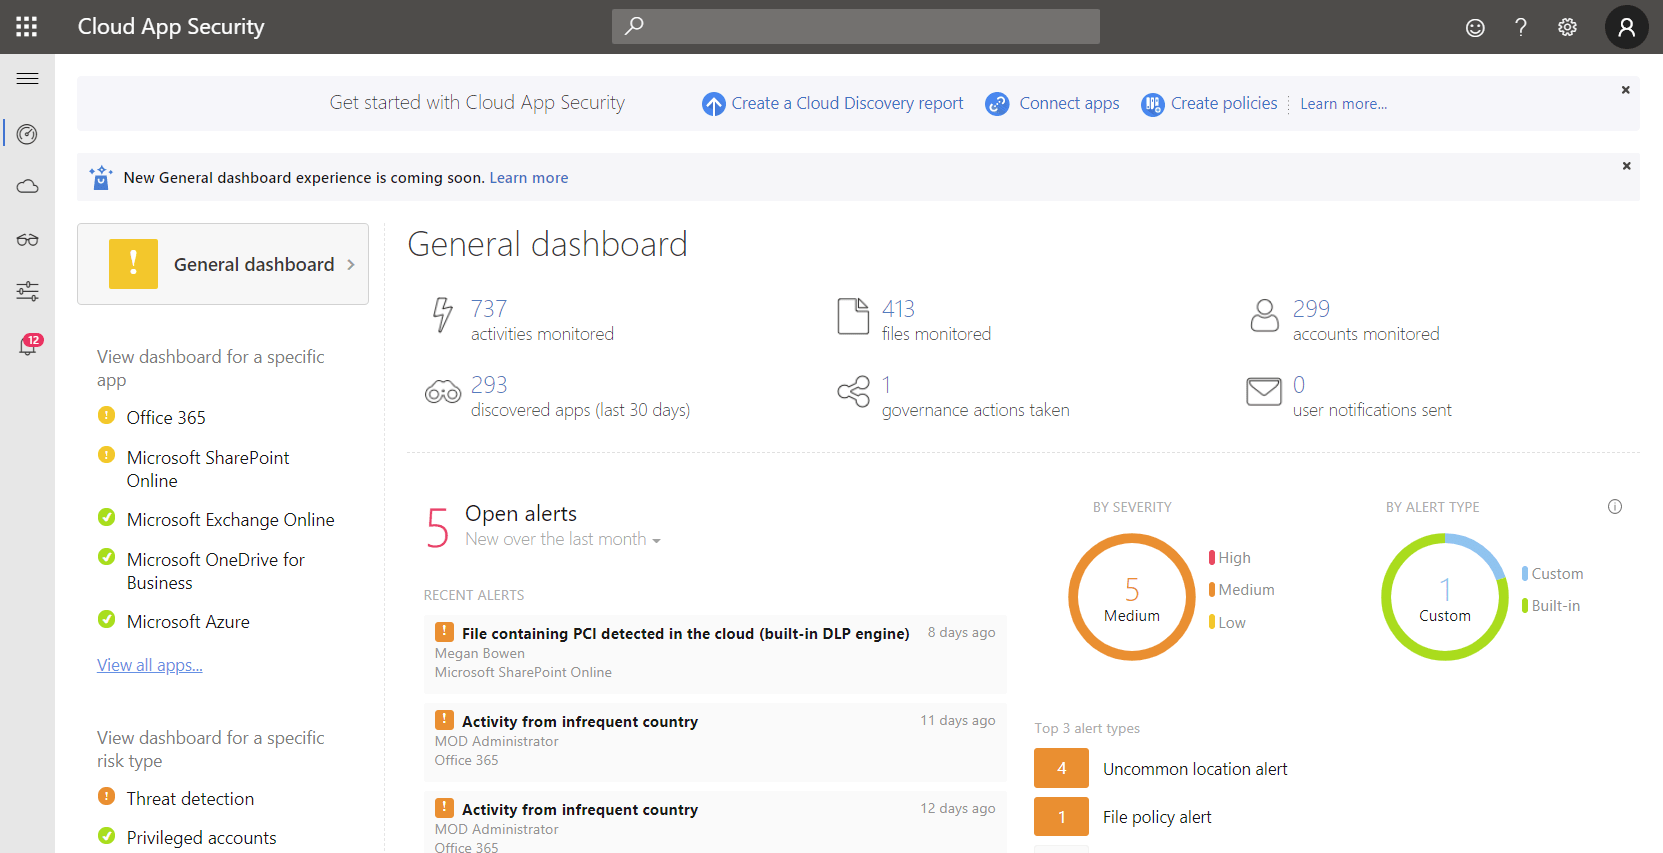
Microsoft 365 Cloud app security dashboard

Cloud app security dashboard

The difference is substantial, outfitting 1000 users with O365 E3 will cost you $ 240,000 per year, whereas moving up to M365 E3 will cost you $ 384,000. And springing for the whole enchilada with every security feature available in M365 E5 will cost you $ 684,000, nearly 3X the cost of O365 E3. Thus, you need to know what your business needs and tailor the subscriptions accordingly (see below for picking individual services to match business requirements).

Note that if you’re in the education sector you have different options (O365 A1, A3, and A5 along with M365 A1, A3, and A5) that are roughly equivalent to the corresponding Enterprise offerings but less costly. And charities/not-for-profits have options as well for both O365 and M365M365 Business Premium is free for up to 10 users for charities and $ 5 per month for additional users.

A la carte Instead of Bundles

There are two ways to optimize your subscription spend in O365 / M365. Firstly, you can mix licenses to suit the different roles of workers in your business. For instance, the sales staff in your retail chain stores are assigned O365 E1 licenses ($8 / month) because they only need web access to email and documents, the administrative staff in head office use O365 E3 ($20 / month) and the executive suite and other high-value personnel use the full security features in E5 ($35 / month). Substitute M365 F3, E3, and E5 in that example if you need the additional features in M365.

Secondly, you don’t have to use the bundles that are encapsulated in the E3, E5, etc. SKUs, and you can instead pick exactly the standalone services you need to meet your business needs. Maybe some users only need Exchange Online whereas other users only need Project Online. The breakdown of exactly what features are available across all the different plans and standalone services is beyond the scope of this article but the O365 and M365 service descriptions are the best places to start investigating.
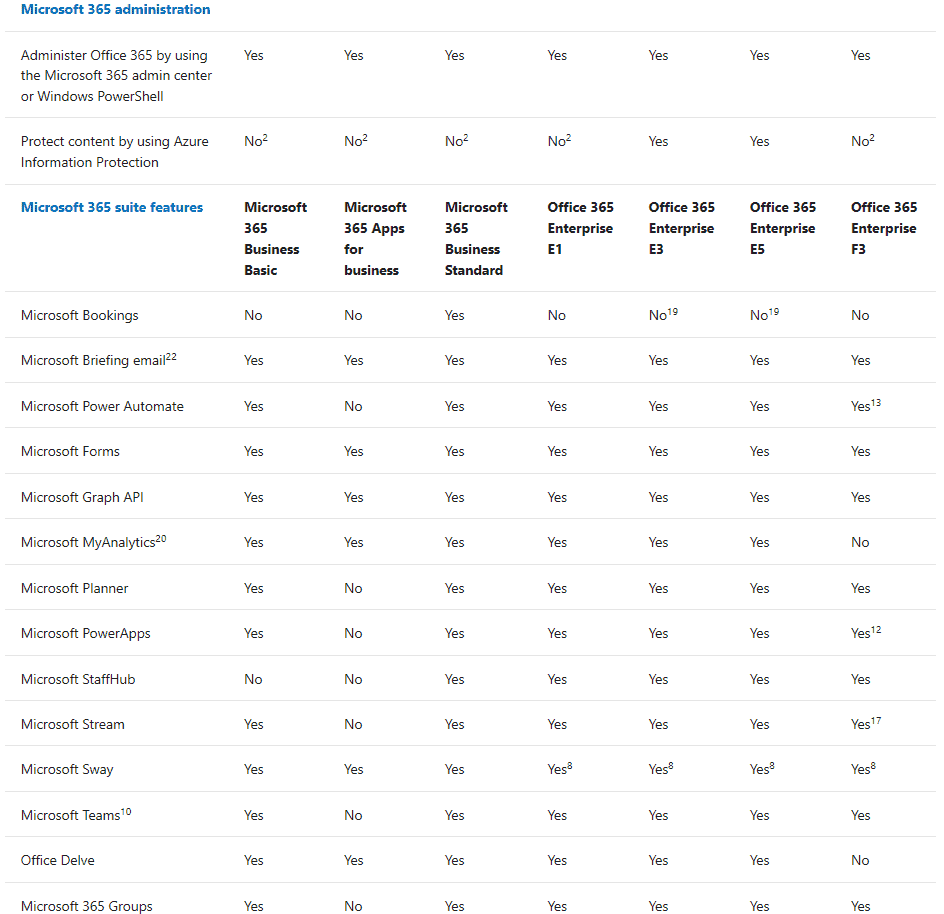
Excerpt from the O365 Service Description

Excerpt from the O365 Service Description

And if you’re a larger business (500 users+) you’re not going to pay list prices and instead these licenses will probably be part of a larger, multi-year, enterprise agreement with substantial discounts.

If You Hate Change

If you want to stay on-premises Exchange Server 2019 is available (only runs on Windows Server 2019), as is SharePoint Server 2019 and you can even buy the “boxed” version of Office 2019 with Word, Excel, etc. with no links to the cloud whatsoever. This is an option that moves away from the monthly subscription cost of M365 (there’s no way to “buy” M365 outright) and back to the traditional way of buying software packages every 2-5 years. Be aware that these on-premises products do NOT offer the same rich features that O365 / M365 provides, whether it’s the super-tight integration between Exchange Online and SharePoint Online, cloud-only services like Microsoft Teams that build on top of the overall O365 fabric or AI-powered design suggestions in the O365 versions of Word or PowerPoint. There’s no doubt that Microsoft’s focus is on cloud services, these are updated with new features on a daily basis, instead of every few years. If your business is looking to digitally transform, towards tech intensity (two recent buzzwords in IT with a kernel of truth in them) using on-premises servers and boxed software licensing is NOT going to get you there. But if you want to keep going like you always have, it’s an option.

And if you’re looking at this from a personal point of view, a free Microsoft account through Outlook.com does give you access to Office Online: Word, Excel, and PowerPoint in a browser. There’s even a free version of Microsoft Teams available.

Transforming your Business

There’s a joke going around at the moment about the Covid-19 pandemic bringing digital transformation to many businesses in weeks that would have taken years to achieve without it. There’s no doubt that adopting the power of cloud services has the power to truly change how you run your business for the better. A good example is moving internal communication from email to Teams, including voice and video calls and perhaps even replacing a phone system with cloud-based phone plans.

But these business improvements depend on the actual adoption of these new tools. And that requires a mindset shift for everyone. Start with your IT department, if they still see M365 as just cloud-hosted versions of their old on-premises servers they’re missing the much bigger picture of the integrated platform that O365 has become. Examples include services such as Data Loss Prevention (DLP), unified labeling and automatic encryption/protection of documents and data, and unified audit logging that spans ALL the workloads. So, make sure you get them on board with seeing O365 as a technology tool to transform the business, not just a place to store emails and documents in OneDrive. And adding M365 unlocks massive security benefits, enabling zero-trust (incredibly important as everyone is working from home), identity-based perimeters, and cloud usage controls. But if your IT or security folks aren’t on board with truly adopting these tools, they’re not going to make you any more secure. Here’s free IT administrator training for them.

Finally, you’re going to have to bring all the end-users on board with a good Adoption and Change Management (ACM) program, helping everyone understand these new services and what they can do to make their working lives better. This includes training but make sure you look to short, interactive, video-based modules that can be applied just when the user needs coaching on a particular tool, not long classroom-based sessions.

And all of that, for all the different departments, isn’t a once-off when you migrate to O365, it’s an ongoing process because the other superpower of the cloud is that it changes and improves ALL the time. This means you’ll need to assign someone to track the changes that are coming/in preview and ensure that the ones that really matter to your business are understood and adopted. The first place to look is the Microsoft 365 Message Center in the portal where you can also sign up for regular emails with summaries of what’s coming. Another good source is the Office 365 Weekly Blog.
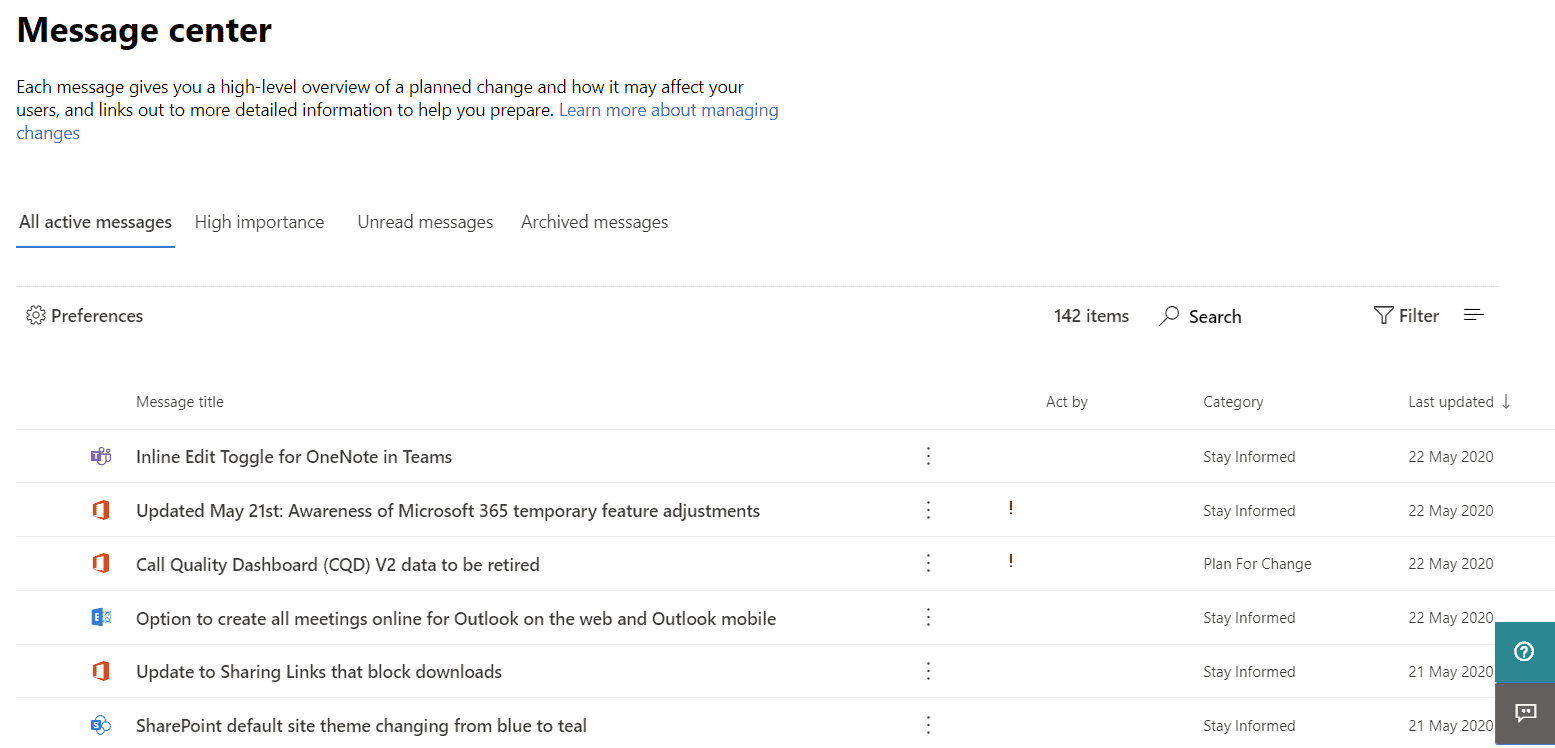
M365 portal Message Center

M365 portal Message Center

To help you track your usage and adoption of the different services in O365 there is a usage analytics integration with PowerBI. Use this information to firstly see where adoption can be improved and take steps to help users with those services and secondly to identify services and tools that your business isn’t using and perhaps don’t need, giving you options for changing license levels to optimize your subscription spend.
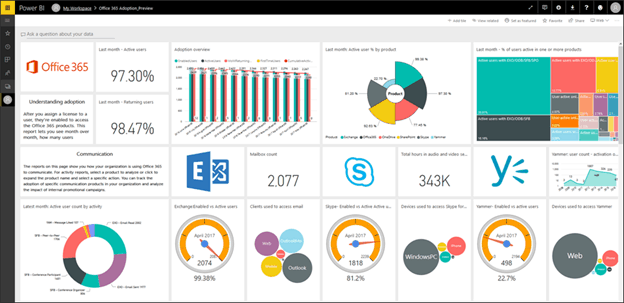
PowerBI Offie 365 Usage Analytics

PowerBI O365 Usage Analytics (courtesy of Microsoft)

Closing Notes

There’s another factor to consider as you’re moving from on-premises servers to Microsoft 365 and that’s the changing tasks of your IT staff. Instead of swapping broken hard drives in servers these people now need to be able to manage cloud services and automation with PowerShell and most importantly, see how these cloud services can be adopted to improve business outcomes.

A further potential cost to take into account is backup. Microsoft keeps four copies of your data, in at least two datacentres so they’re not going to lose it but if you need the ability to “go back in time” and see what a mailbox or SharePoint library looked like nine months ago, for instance, you’ll need a third-party backup service, further adding to your monthly cost.

And that’s part of the overall cost of using O365 or M365, training staff, adopting new features, different tasks for administrators and managing change requires people and resources, in other words, money. And that’s got to be factored into the overall cost using Microsoft 365, it’s not just the monthly license cost.

The final question is of course – is it worth it? Speaking as an IT consultant with clients (including a K-12 school with 100 students) who recently moved EVERYONE to work and study from home, supported by O365, Teams, and other cloud services, the answer is a resounding yes! There’s no way we could have managed that transition with only on-premises infrastructure to fall back on.

Source :
https://www.altaro.com/microsoft-365/real-cost-m365/
New Dell BIOS Bugs Affect Millions of Inspiron, Vostro, XPS, Alienware Systems

Five new security weaknesses have been disclosed in Dell BIOS that, if successfully exploited, could lead to code execution on vulnerable systems, joining the likes of firmware vulnerabilities recently uncovered in Insyde Software’s InsydeH2O and HP Unified Extensible Firmware Interface (UEFI).

Tracked as CVE-2022-24415, CVE-2022-24416, CVE-2022-24419, CVE-2022-24420, and CVE-2022-24421, the high-severity vulnerabilities are rated 8.2 out of 10 on the CVSS scoring system.

“The active exploitation of all the discovered vulnerabilities can’t be detected by firmware integrity monitoring systems due to limitations of the Trusted Platform Module (TPM) measurement,” firmware security company Binarly, which discovered the latter three flaws, said in a write-up.

“The remote device health attestation solutions will not detect the affected systems due to the design limitations in visibility of the firmware runtime.”

All the flaws relate to improper input validation vulnerabilities affecting the System Management Mode (SMM) of the firmware, effectively allowing a local authenticated attacker to leverage the system management interrupt (SMI) to achieve arbitrary code execution.

System Management Mode refers to a special-purpose CPU mode in x86 microcontrollers that’s designed for handling system-wide functions like power management, system hardware control, thermal monitoring, and other proprietary manufacturer-developed code.

Whenever one of these operations is requested, a non-maskable interrupt (SMI) is invoked at runtime, which executes SMM code installed by the BIOS. Given that SMM code executes at the highest privilege level and is invisible to the underlying operating system, the method makes it ripe for abuse to deploy persistent firmware implants.

A number of Dell products, including Alienware, Inspiron, Vostro line-ups, and Edge Gateway 3000 Series, are impacted, with the Texas-headquartered PC manufacturer recommending customers to upgrade their BIOS at the “earliest opportunity.”

“The ongoing discovery of these vulnerabilities demonstrate what we describe as ‘repeatable failures’ around the lack of input sanitation or, in general, insecure coding practices,” Binarly researchers said.

“These failures are a direct consequence of the complexity of the codebase or support for legacy components that get less security attention, but are still widely deployed in the field. In many cases, the same vulnerability can be fixed over multiple iterations, and still, the complexity of the attack surface leaves open gaps for malicious exploitation.”

Source :
https://thehackernews.com/2022/03/new-dell-bios-bugs-affect-millions-of.html

Microsoft rolling out new endpoint security solution for SMBs

Microsoft says its new endpoint security solution for small and medium-sized businesses (SMBs) known as Microsoft Defender for Business has hit general availability.

It has started rolling out to new and existing Microsoft 365 Business Premium customers worldwide starting today, March 1st.

Microsoft Defender for Business helps companies with up to 300 employees defend against cybersecurity threats, including malware, phishing, and ransomware in environments with Windows, macOS, iOS, and Android devices.

It comes with simplified client configuration via a wizard-driven setup, and it enables all recommended security policies out-of-the-box, making it easy to use even by organizations without dedicated security teams.

In November, Microsoft announced this new security solution at Microsoft Ignite 2021 in response to a 300% increase in ransomware attacks in the previous year, with more than 50% of them directly affecting SMBs, according to US Secretary of Homeland Security Alejandro Mayorkas.

Defender for Business began rolling out in preview worldwide in December when Microsoft also announced that it would be available as a standalone license directly from Microsoft and Microsoft Partner Cloud Solution Provider (CSP) channels at $3 per user per month.https://www.youtube.com/embed/umhUNzMqZto

Key features bundled with the Microsoft Defender for Business security suite include:

  • Simplified deployment and management for IT administrators who may not have the expertise to address today’s evolving threat landscape.
  • Next-generation antivirus protection and endpoint detection and response to detect and respond to sophisticated attacks with behavioral monitoring.
  • Automated investigation and remediation to help customers react quickly to threats.
  • Threat and vulnerability management proactively alerts users to weaknesses and misconfigurations in software.
  • Microsoft 365 Lighthouse integration with Microsoft Defender for Business for IT service providers to view security events across customers, with additional capabilities coming.

You can get Defender for Business as part of Microsoft 365 Business Premium and will not require onboarding or offboarding devices from Microsoft Defender for Endpoint P1 or P2.

“Defender for Business will be rolled out to existing Microsoft 365 Business Premium customers in the next few weeks. There is no action or additional transactions required and it will show up in the Microsoft 365 Defender portal under the section, Endpoints,” Microsoft said.

“Defender for Business will also be offered as a standalone solution and will be coming later this year. You can continue to preview the standalone solution by signing up at https://aka.ms/MDB-Preview.”

Source :
https://www.bleepingcomputer.com/news/microsoft/microsoft-rolling-out-new-endpoint-security-solution-for-smbs/

Use an eSIM to get a cellular data connection on your Windows PC

Windows 10 and Windows 11
An eSIM lets you connect to the Internet over a cellular data connection. With an eSIM, you don’t need to get a SIM card from your mobile operator, and you can quickly switch between mobile operators and data plans.

For example, you might have one cellular data plan for work, and a different plan with another mobile operator for personal use. If you travel, you can get connected in more places by finding mobile operators with plans in that area.

Here’s what you’ll need:

  • A PC running Windows 10, Version 1703 or later. To see which version of Windows 10 your device uses, select the Start  button, then select Settings  > System  > About .
  • A PC with an eSIM in it. Here’s how you can tell if your PC has an eSIM:
    1. Select the Start  button, then select Settings  > Network & Internet  > Cellular .
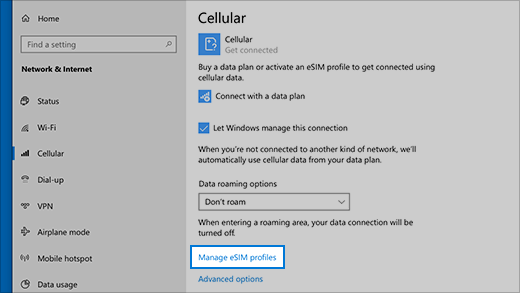
    2. On the Cellular screen, look for a link near the bottom of the page that says Manage eSIM profiles. If that link appears, your PC has an eSIM.

      Manage eSIM profiles

Note: Some devices have both an eSIM and physical SIM card. If you don’t see Manage eSIM profiles but you do see Use this SIM for cellular data at the top of the Cellular settings screen, select the other SIM from the drop-down box, and then see if the Manage eSIM profiles link appears.

To add an eSIM profile

You’ll need to add an eSIM profile to get an Internet connection using cellular data.

If you have a PC from your organization, an eSIM profile might already be added to your PC. If you select Manage eSIM profiles and see an eSIM profile for a mobile operator you expect to find, you can skip this procedure and go to the next one to get connected.

  1. Select the Start  button, then select Settings  > Network & Internet  > Cellular Manage eSIM profiles.
  2. Under eSIM profiles, select Add a new profile.
  3. To search for available profiles or use an activation code you have from your mobile operator, do one of the following:
    • Search for available profiles
      1. Select Search for available profiles > Next.
      2. When a profile you want to use is found, select Download.
      3. Enter the confirmation code from your mobile operator in the corresponding box, then select Download.
      4. After the profile is downloaded and installed, select Continue to find other profiles you might want and then repeat the previous steps.
      5. Select Close when you have downloaded the profiles you want.
    • Use an activation code you have from your mobile operator
      1. Select Let me enter an activation code I have from my mobile operator > Next.
      2. If you have a QR code to scan for the activation code, choose which camera to use on your PC, and then scan the QR code.
      3. The activation code should appear in the corresponding Activation code box. Select Next.
      4. For the dialog box that asks Do you want to download this profile?, enter the confirmation code from your mobile operator into the corresponding box, and then select Download.
      5. Select Close.
  4. Optional: To give the profile a friendly name (for example, Work or Personal) to help you remember it, select the profile, select Edit name, type a name you’ll remember, and then select Save.

To connect to cellular data using an eSIM profile

  1. Select the Start  button, then select Settings  > Network & Internet  > Cellular  > Manage eSIM profiles.
  2. Under eSIM profiles, select the profile you want, and then select Use.
  3. Select Yes for This will use cellular data from your data plan and may incur charges. Do you want to continue?
    You’ll be connected to a cellular data network and ready to go.

To switch between profiles

If you have more than one profile installed on your PC, you can switch between profiles to use a different mobile operator and data plan.

  1. Select the Start  button, then select Settings  > Network & Internet  > Cellular  > Manage eSIM profiles.
  2. Under eSIM profiles, select the profile you want to stop using, and then select Stop using.
  3. Select Yes for You’ll be disconnected from this cellular network. Continue?
  4. Select the different profile you want to use, then select Use.

To delete a profile

If you don’t want to use a profile anymore, you can delete it from your PC. If you delete the profile and want to add it again later, you’ll need to download the profile again and might need to contact your mobile operator.

  1. Select the Start  button, then select Settings  > Network & Internet  > Cellular  > Manage eSIM profiles.
  2. Under eSIM profiles, select the profile to delete, and then select Delete.
  3. At the prompt that warns you that the profile will be permanently deleted, select Yes.

Note: If you have a PC from your organization, you might not be able to delete an eSIM profile because of a policy that’s set by your organization.

Source :
https://support.microsoft.com/en-us/windows/use-an-esim-to-get-a-cellular-data-connection-on-your-windows-pc-0e255714-f8be-b9ef-9e84-f75b05ed98a3#WindowsVersion=Windows_10

Microsoft Windows 10 optional updates fix performance problems introduced last month

Optional updates for Windows 10 and Windows 11 released in January have fixed performance problems when playing games, using the operating system, or even opening folders in File Explorer.

With the January 2022 updates, Microsoft introduced numerous bugs breaking LT2P VPN connections, causing domain controller reboots, and preventing Hyper-V from working.

Microsoft later released out-of-band updates to fix these issues, whose fixes were also rolled into the optional preview updates.

However, these optional updates seem to have fixed more than the reported bugs, as they are also resolving significant performance issues caused by the January updates.

Recent Windows updates caused performance hits

After installing the January 2022 KB5009543 update, Windows 10 users began to notice that Windows suffered from severe performance issues.

These performance issues included slow boots and slow response times when opening the Start Menu, launching apps, playing games, and performing pretty much all of the basic functions of the operating system. In general, Windows felt “laggy” after installing the updates.

“Prior to the update, it took maybe 2 minutes for my laptop to boot to the home screen. It now takes close to a half hour. I’m frustrated to the point where I’m now planning to disable updates and uninstall this update,” a user named Ninja_Bobcat posted on Reddit.

“This update has ruined my laptop in games, namely warzone and apex. Goes to 0 fps and huge stutters everywhere,” another person posted.

“My computer is incredibly slow after KB5009543 security update and KB5008876 windows update. It takes about 3 minutes for my computer to boot and maybe 2-3 minutes to open a tab on chrome. Absolutely killed my computer,” said a third Windows 10 user.

BleepingComputer replicated these performance issues after installing the January 2022 KB5009543 update on multiple laptops.

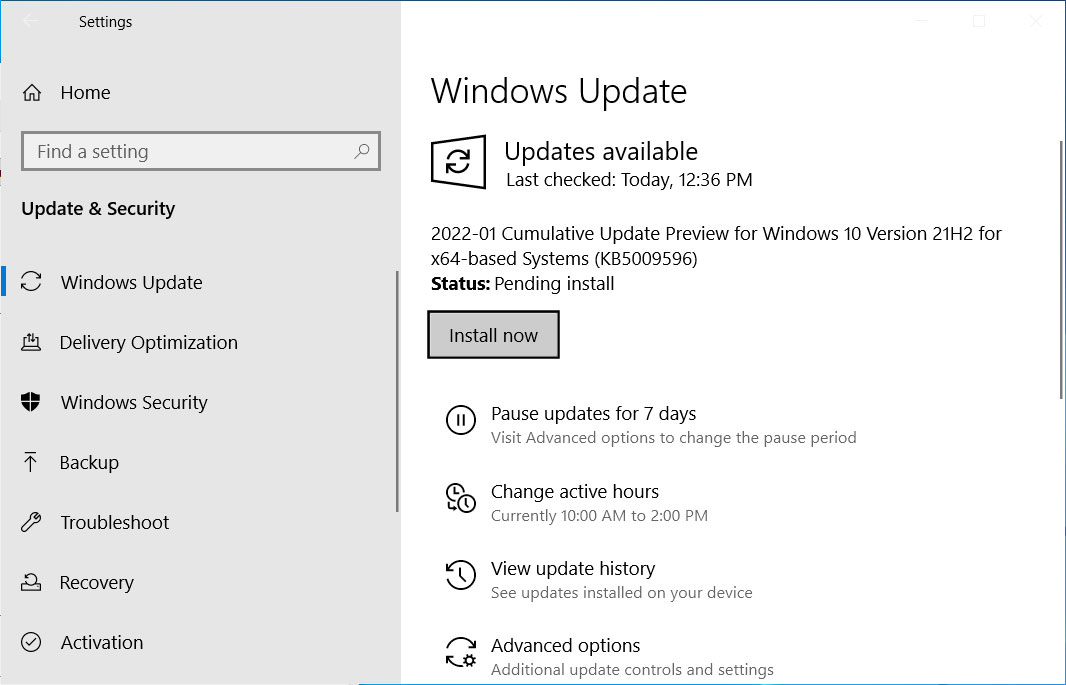
The good news is that BleepingComputer found that installing the optional KB5009596 preview update released late last month fixed these newly introduced performance issues.

Windows 10 KB5009596 optional update

However, as these updates are optional, many users will not know to install them. Thus, their performance issues will continue until the mandatory February 2022 Patch Tuesday updates are installed, which will include these fixes.

Windows users can install the optional updates by going into Settings, clicking on Windows Update, and manually performing a ‘Check for Updates.’

As this is an optional update, you will need to install the KB5009596 by clicking on the ‘Download and install’ link.

Windows 11 issues were fixed as well

Not to be outdone by Windows 10, Windows 11 has also been dealing with performance issues within File Explorer.

Users found that it was slow to switch between folders, browse folders, or select files when using File Explorer.

However, the optional Windows 11 KB5008353 cumulative update preview has resolved these issues, with users reporting that File Explorer is back to normal.

“I honestly lost hope because this issue has been there since I upgraded to Win11, other users were claiming it was solved but it wasn’t the case for everyone. However, this update seems to have fixed this issue for good amongst others of course,” a Windows 11 user posted on Reddit.

BleepingComputer has not been able to replicate the performance issues on Windows 11 to test the fix.

BleepingComputer has also reached out to Microsoft with further questions about what has been fixed but has not received a reply as of yet.

Source :
https://www.bleepingcomputer.com/news/microsoft/windows-10-optional-updates-fix-performance-problems-introduced-last-month/

Microsoft releases new APIs for managing Windows Update

New Microsoft Graph APIs released today in public preview allow developers and IT professionals to manage Windows 10 updates and expedite Windows 10 security updates in enterprise environments.

Microsoft Graph is an API platform that helps developers create apps capable of accessing Microsoft 365, Windows 10, and Enterprise Mobility + Security data.

Access to deployment service update management capabilities

“By connecting deployment service capabilities with Microsoft Graph, app developers can easily build rich update management tools and extend these experiences with contextual user data (such as leveraging a user’s calendar data when scheduling an update),” Microsoft Principal Program Manager David Mebane explained.

The deployment service Mebane refers to is the Windows Update for Business deployment service, a cloud service announced by Microsoft in March and providing control over the approval, scheduling, monitoring, and safeguarding of Windows Update controls.

With its release, Microsoft has expanded Windows Update device management features available to IT pros, making it possible to:• Schedule update deployments to begin on a specific date (ex: deploy 20H2 to these devices on March 14, 2021)
• Stage deployments over a period of days or weeks using rich expressions (ex: deploy 20H2 to 500 devices per day, beginning on March 14, 2021)
• Bypass pre-configured Windows Update for Business policies to immediately deploy a security update across your organization when emergencies arise
• Ensure coverage of hardware and software in your organization through deployments that are tailored to your unique device population through automatic piloting
• Leverage Microsoft ML to automatically identify and pause deployments to devices that are likely to be impacted by a safeguard hold
• Manage driver and firmware updates just like feature updates and quality updates

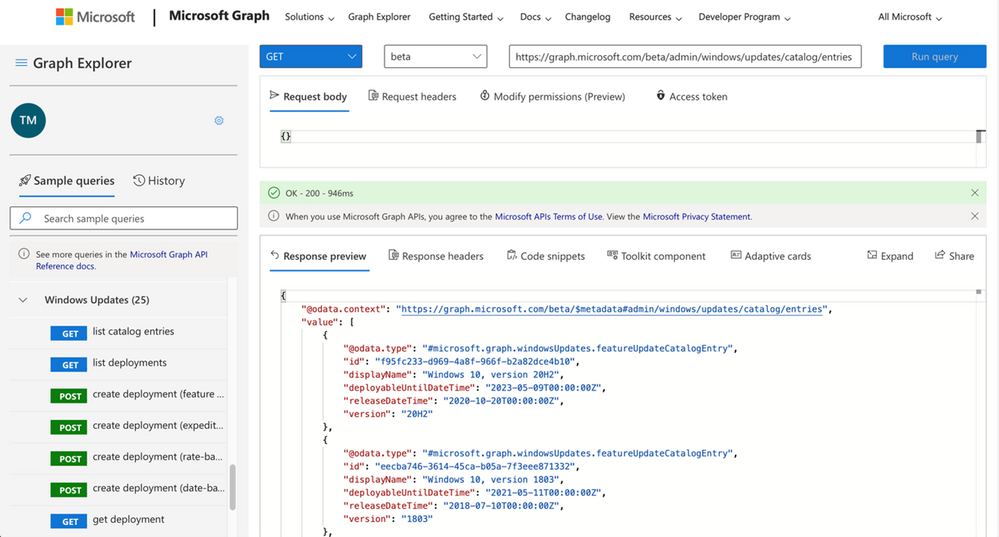
The Microsoft Graph API released today in public preview further extend these fine-grained controls, allowing customers to interact with the deployment service via apps that can help them:• Approve and schedule specific feature updates to be delivered from Windows Update on a specific date – including skipping or not taking feature updates.
• Stage deployments over a period of days or weeks using rich expressions (ex: deploy 20H2 to 500 devices per day, beginning on May 11, 2021)
• Bypass pre-configured Windows Update for Business policies to immediately deploy a security update across your organization.
• Deliver safer update results by leveraging automatic pilots for any deployment.

Microsoft-Graph-API-Windows-Updates
Deployment service interaction via Microsoft Graph Explorer (Microsoft)

Available starting today

Customers with supported Windows or Microsoft 365 subscriptions can access the deployment services through the new APIs starting today.

To start using the new Microsoft Graph APIs today, you need one of the following subscriptions: 

  • Windows 10 Enterprise E3 or E5 (included in Microsoft 365 F3, E3, or E5)
  • Windows 10 Education A3 or A5 (included in Microsoft 365 A3 or A5)
  • Windows Virtual Desktop Access E3 or E5
  • Microsoft 365 Business Premium

Devices compatible with the deployment service must be Azure AD joined or Hybrid AD joined, and run Pro, Enterprise, Education, or Pro Education editions of Windows 10, version 1709 or later.

Further information on enrolling devices for management, managing feature updates, and expediting security updates is available here.

Source :
https://www.bleepingcomputer.com/news/microsoft/microsoft-releases-new-apis-for-managing-windows-update/

Microsoft: Windows needs at least 8 hours online to update reliably

Microsoft says that Windows devices need to be online for at least eight hours to get the latest updates and have them correctly installed after they’re released through Windows Update.

The amount of time devices running Windows are powered on and connected to Windows Update is tracked by Microsoft as ‘Update Connectivity.’ 

This measurement correlates the systems’ lack of enough connected time with why they’re not up to date while also making it easier to understand why some devices are unlikely to get recently released updates successfully.

According to David Guyer, a Microsoft Program Manager for Windows Updates in MEM, Windows devices need at least 8 hours online to get the latest updates and successfully install them.

“One of the most impactful things we explored was how much time a device needs to be powered on and connected to Windows Update to be able to successfully install quality and feature updates,” said Guyer.

“What we found is that devices that don’t meet a certain amount of connected time are very unlikely to successfully update. Specifically, data shows that devices need a minimum of two continuous connected hours, and six total connected hours after an update is released to reliably update.

“This allows for a successful download and background installations that are able to restart or resume once a device is active and connected.”

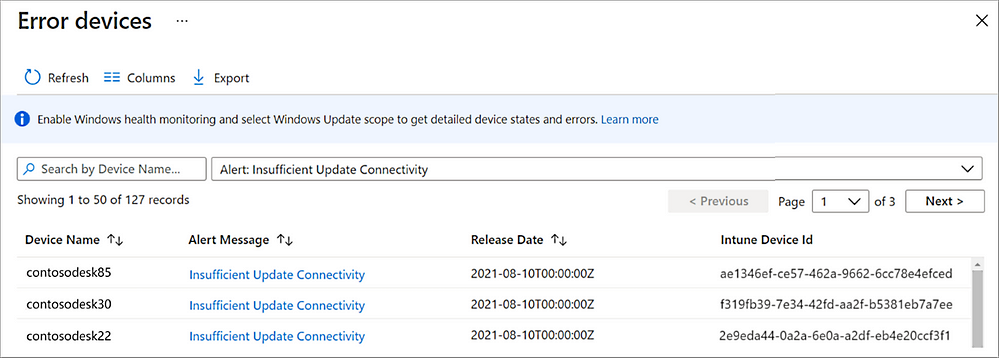
You can track devices with insufficient Update Connectivity via Microsoft Intune by navigating to Devices > Monitor and selecting either the Feature update failures or the Windows Expedited update failures report.

Insufficient Update Connectivity alerts can also be found via the Summary report in Intune by going to Reports > Windows updates > Reports > Windows Expedited update report.

Microsoft Intune Update Connectivity  alerts
Microsoft Intune Update Connectivity alerts (Microsoft)

When looking at Windows 10 devices that are not fully updated and not meeting minimum connectivity requirements, Microsoft saw that:

  • Approximately 50% of devices not on a serviced build of Windows 10 do not meet the minimum Update Connectivity measurement.
  • Approximately 25% of Windows 10 devices on a serviced build but have security updates that are more than 60 days out of date have less than the minimum Update Connectivity.

“When troubleshooting update issues, we have found it is best to select devices that have sufficient Update Connectivity,” Guyer added.

“If a device has insufficient Update Connectivity, then investigating other update issues is complicated because the low Update Connectivity can create new issues that go away once there’s enough connectivity.”

In related news, Microsoft began testing a smarter delivery method for Windows update improvements dubbed ‘Update Stack Package,’ which would deliver improvements to the update experience outside of major OS updates before monthly or feature Windows updates.

The company also redesigned cumulative updates in Windows 11 to allow security and quality updates to install faster as they are approximately 40% smaller than their Windows 10 counterparts.

Last year, Redmond released new APIs for managing Windows Update that enable devs and IT professionals to expedite Windows 10 security updates in enterprise environments.

Source :
https://www.bleepingcomputer.com/news/microsoft/microsoft-windows-needs-at-least-8-hours-online-to-update-reliably/

How to install the Microsoft Visual C++ 2015 Runtime

If you start a program and receive an error stating that the program you are trying to run needs the Microsoft Visual C++ 2015 Runtime, you can use this tutorial to install the package so that your program works again.

When developers create a Windows program using Microsoft Visual Studio 2015, there are specific dynamic link libraries (DLLs) that their programs are linked to work correctly.

These DLLs are distributed through the Microsoft Visual C++ 2015 Runtime, and if the package is not installed, users will encounter errors stating that DLLs are missing or you need to install the runtime.

As an example, the video game Valorant released an update today that did not include the Microsoft Visual C++ 2015 Runtime, causing the game not to work after the update was installed.

When users launch Valorant, they are instead greeted with the following error.

Missing Microsoft Visual C++ 2015 Runtime error

“The following component(s) are required to run this program: Microsoft Visual C++ 2015 Runtime”

The good news is that it is really easy to fix this problem by downloading and install the runtime from Microsoft’s website.

To install the Microsoft Visual C++ 2015 Runtime, please follow these steps:

  1. Go to the Microsoft Visual C++ 2015 Redistributable page from Microsoft and click on the Download button.
  2. You will be brought to a page where it asks you to select whether you want to download the 32-bit or 64-bit version of Windows. Select the version you need and click the Next button. If you are unsure what version you need, you can use this tutorial to determine what you need.

    BleepingComputer suggests that you download and install both the x86 AND x64 versions of the runtime to not run into issues in the future.
  3. The files will now be download to your computer. Once downloaded, double-click on the downloaded vc_redist.x64.exe file. 
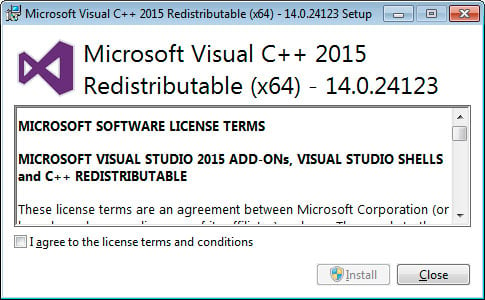
  4. The Microsoft Visual C++-2015 Redistributable screen will be displayed and ask you to agree to the license terms and conditions. Put a checkmark in the “I agree” box and then click on the Install button.Microsoft Visual C++-2015 RedistributableMicrosoft Visual C++-2015 Redistributable
  5. If Windows prompts you to allow the program to make changes or continue, click on the Yes or Allow button.
  6. When done, the program will display a message stating that it was successfully installed.Redistributable InstalledRedistributable Installed
  7. Now perform the same steps to install the vc_redist.x86.exe runtime.
  8. You can now close the installer.

If you already had the Visual C++ 2015 Runtime installed, you can run the above redistributables and perform a repair.

Perform a Repair
Perform a Repair

You can now try to run the program that previously gave the missing runtime error, and it should work again.

Source :
https://www.bleepingcomputer.com/tutorials/how-to-install-the-microsoft-visual-c-2015-runtime/

How to make the Start menu full screen in Microsoft Windows 10

By default, the Windows 10 Start menu will open up in a size that accommodates all of the pinned items. For those who wish to use a larger Start screen, making the Start menu open in a full-screen mode is possible.

When the full-screen mode is enabled, the Start screen will overlay the entire desktop and provide a more generous amount of space to pin applications, and your live tiles will be larger.

If you wish to enable the Start full-screen mode, please follow these steps:

  1. Click on the Start menu and then click on the Settings cog ( Settings Cog ) to open the Windows 10 Settings.
  2. When the Settings open, click on Personalization and then Start.
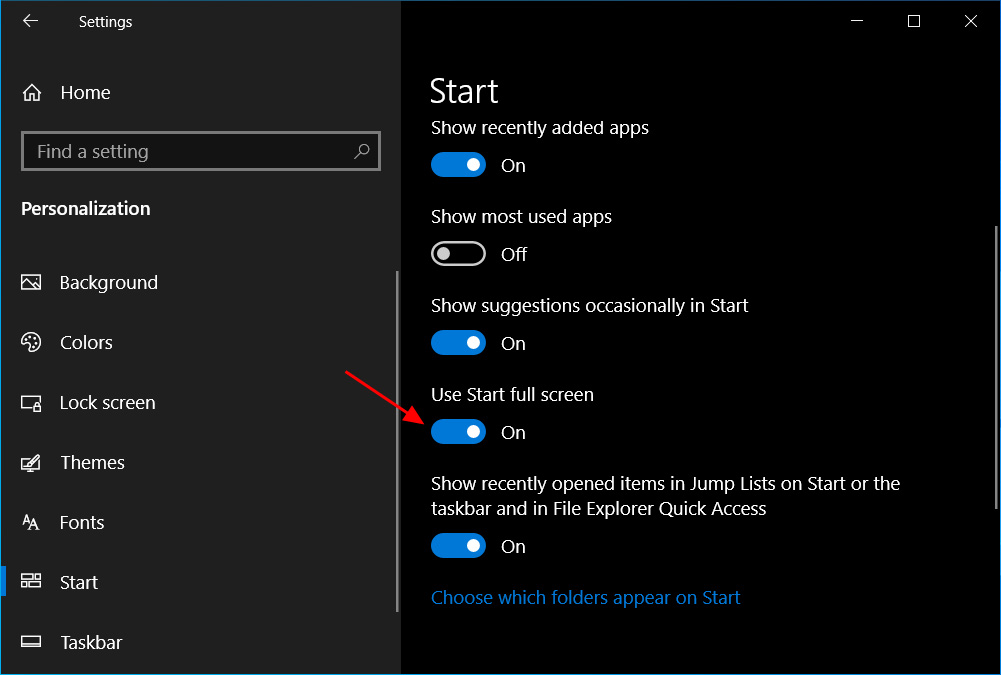
  3. In the Start settings, look for a setting named ‘Use Start full screen‘ and click on the toggle to enable the feature, as shown below.Enable Start full screenEnable Start full screen
  4. You can now close the Start settings screen.

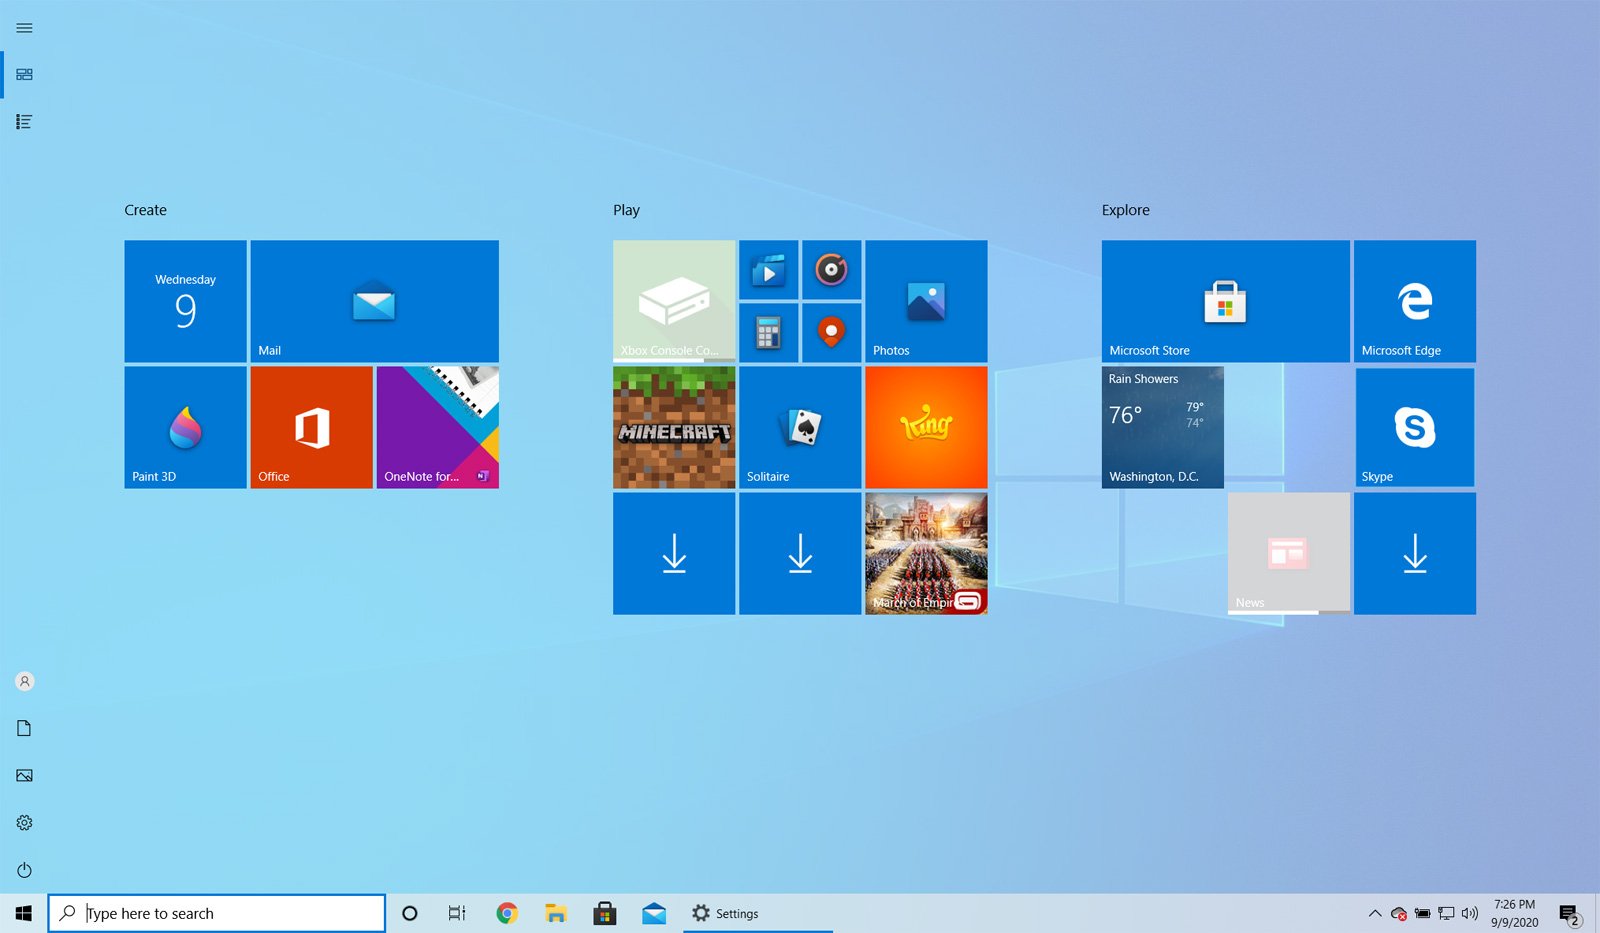
Now that you have enabled Start full screen mode, when you click on the Start button, the Start menu will be shown in full screen and overlay the entire desktop.

Start full screen
Start full screen

When using Start in full screen mode, you can close the Start menu at any time by pressing the Escape key on your keyboard or by clicking on another program or screen.

To disable Start full screen mode, just follow these steps again, but this time disable the ‘Use Start full screen’ setting.

Source :
https://www.bleepingcomputer.com/tutorials/how-to-make-the-start-menu-full-screen-in-windows-10/

How to Disable Bing Search in the Windows 10 Start Menu

One of the Windows 10 Start Menu features is a built-in Bing search when a local search fails to find anything. Whether it be due to privacy reasons, bugs, or just personal dislike, this article will explain how to disable Bing search in the Start Menu.

When you perform a search in the Windows 10 Start Menu, Windows will first look for local search results such as settings, files, or programs and display any that are found.

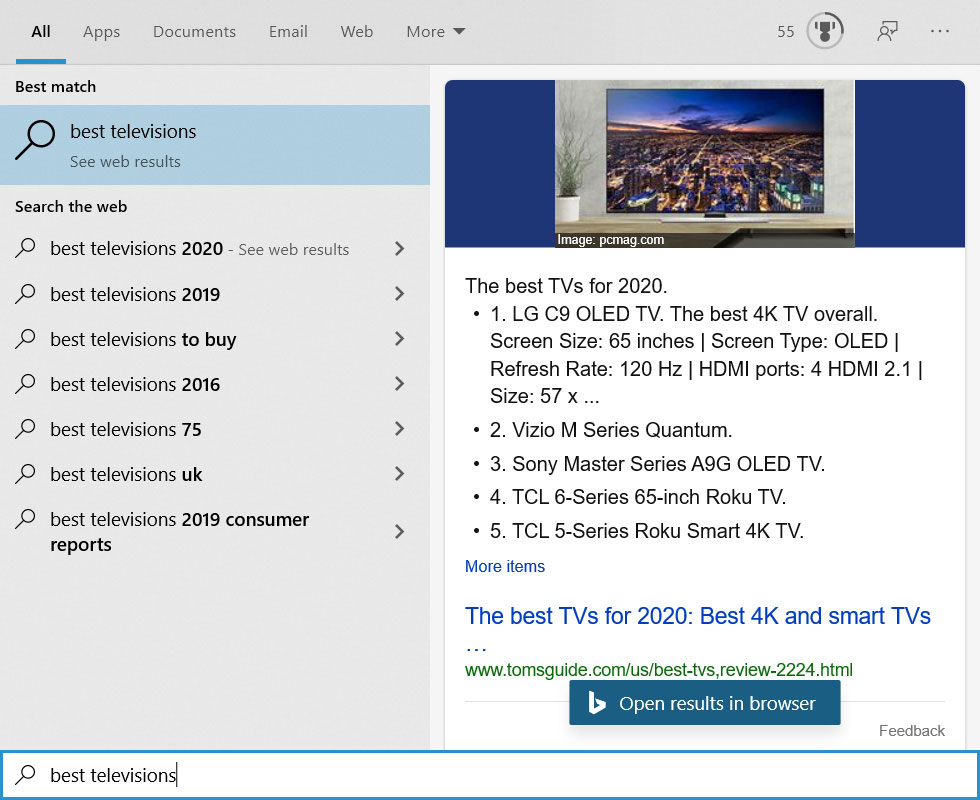
If there are no local results, Windows will then perform a Bing search for the search keyword and list the results in the Start Menu as shown below.

Blank search results in Start Menu

When logged into a Microsoft Account, these searches will be uploaded to Microsoft, who will then list them in your account’s Privacy Dashboard. This is a privacy concern for fear that Microsoft is using this data to track your browsing habits.

There have also been bugs in the Bing search component in the past that have caused the Windows 10 Start menu to appear completely blank. If you do not utilize the Bing search feature, disabling it could prevent those bugs in the future.

Below we have outlined two methods that can be used to disable Bing search in the Windows 10 Start Menu.

How to disable Bing search in the Windows 10 Start Menu

Unfortunately, for those who want to disable Bing search in the Start Menu, Microsoft does not provide an easy method.

Instead, Windows users need to modify the Registry so that it is using the following Registry values.

[HKEY_CURRENT_USER\SOFTWARE\Policies\Microsoft\Windows\Explorer]
“DisableSearchBoxSuggestions”=dword:00000001

For those who feel comfortable modifying the Registry, we have instructions on setting the proper values using the Registry Editor.

For those who are not comfortable with Registry modifications, please see method two that contains an easy to use premade Registry file that makes the settings for you.

METHOD 1: DISABLE BING SEARCH RESULTS VIA THE GROUP POLICY EDITOR

Windows 10 Pro comes with the Group Policy editor, which you can use to disable Bing search in the Start Menu.

To disable Bing Search, follow these steps:

  1. Search in the Start Menu for ‘gpedit.msc‘ and select it when the result appears.
  2. When the Group Policy Editor opens, navigate to the following path: User Configuration\Administrative Templates\Windows Components\File Explorer
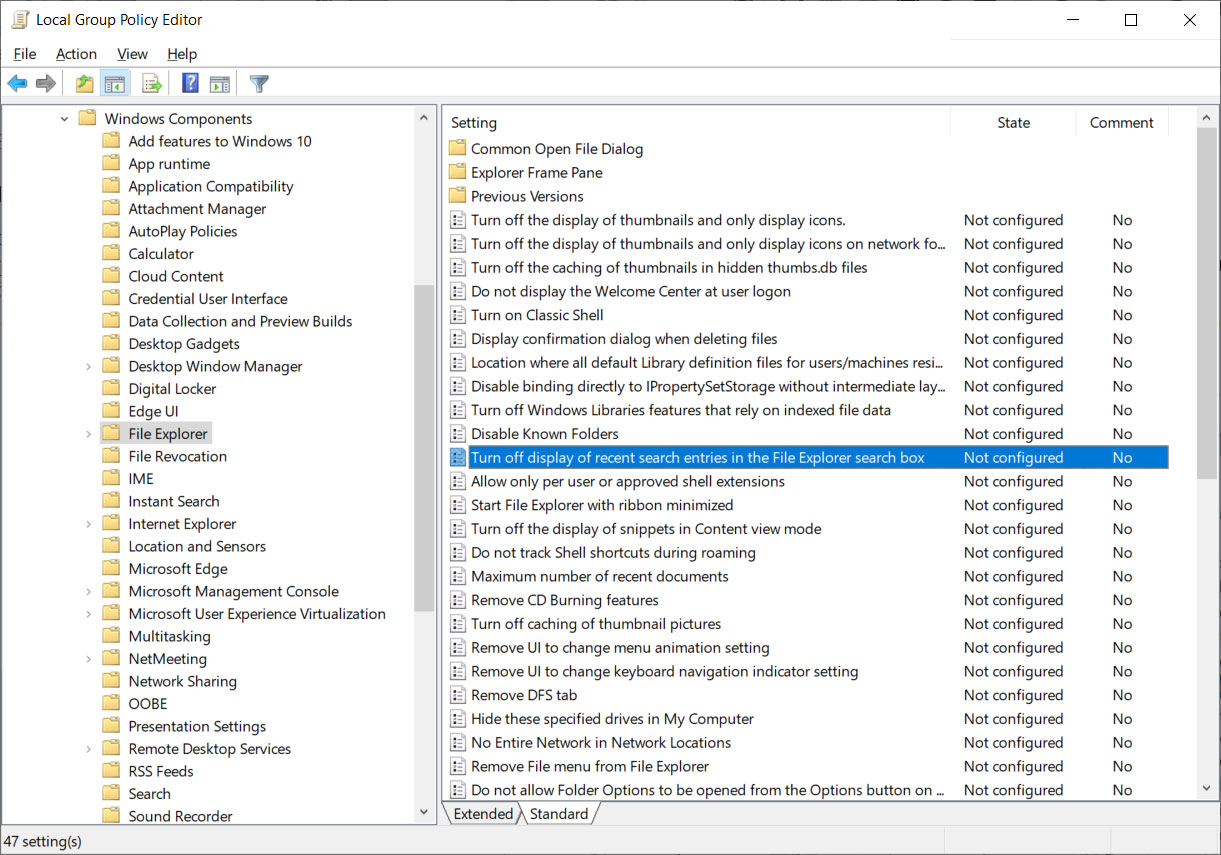
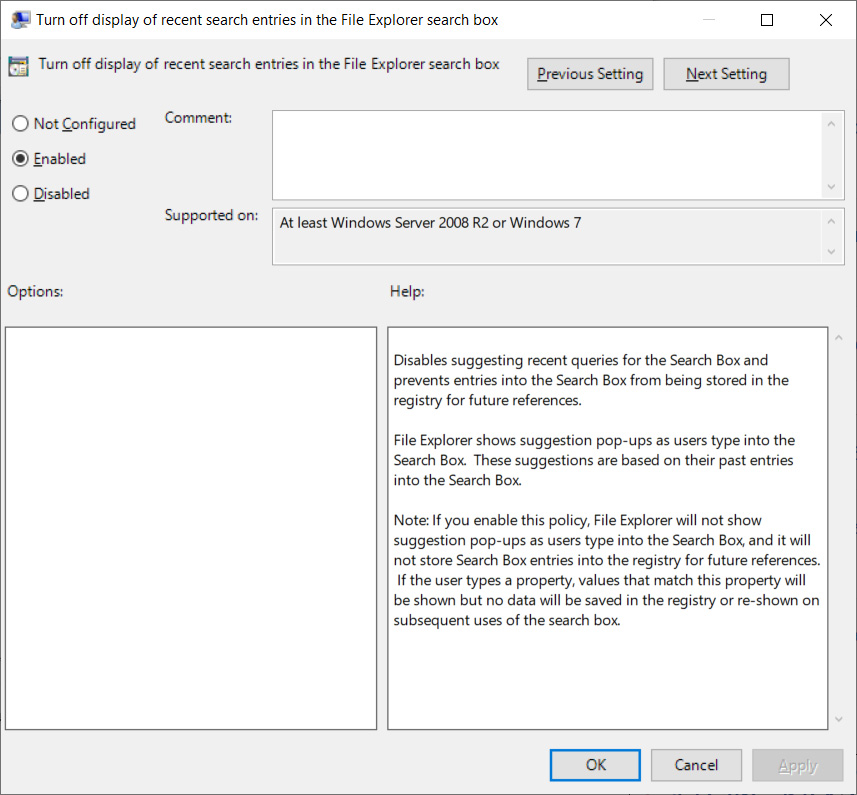
  3. Under the File Explorer section, you will see a policy called ‘Turn off display of recent search entries in the File Explorer search box’ as shown below. Double-click on the policy to open it.Group Policy
  4. To disable Bing search, set this policy to ‘Enabled.’Editor
  5. When done, click on the Apply and then OK button to save the policy.
  6. You can now close the Group Policy Editor and restart Windows Explorer or restart your computer.

Once restarted, Bing searches will no longer appear in the Start Menu.

METHOD 2: USE THE REGISTRY EDITOR TO DISABLE BING INTEGRATION

If you are using Windows 10 Home and are comfortable using the Windows Registry, you can disable Bing’s integration in Windows Search using the Registry editor.

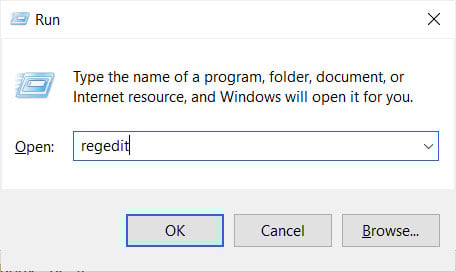
  1. First, open the Windows Registry Editor by pressing the Windows key + the R key at the same time. This will open the Run: dialog and then type regedit and press the OK button.Starting Registry EditorStarting Registry Editor
  2. Windows will display a UAC prompt asking if you wish to allow the Registry Editor to make changes to the system. Press the Yes button to continue.
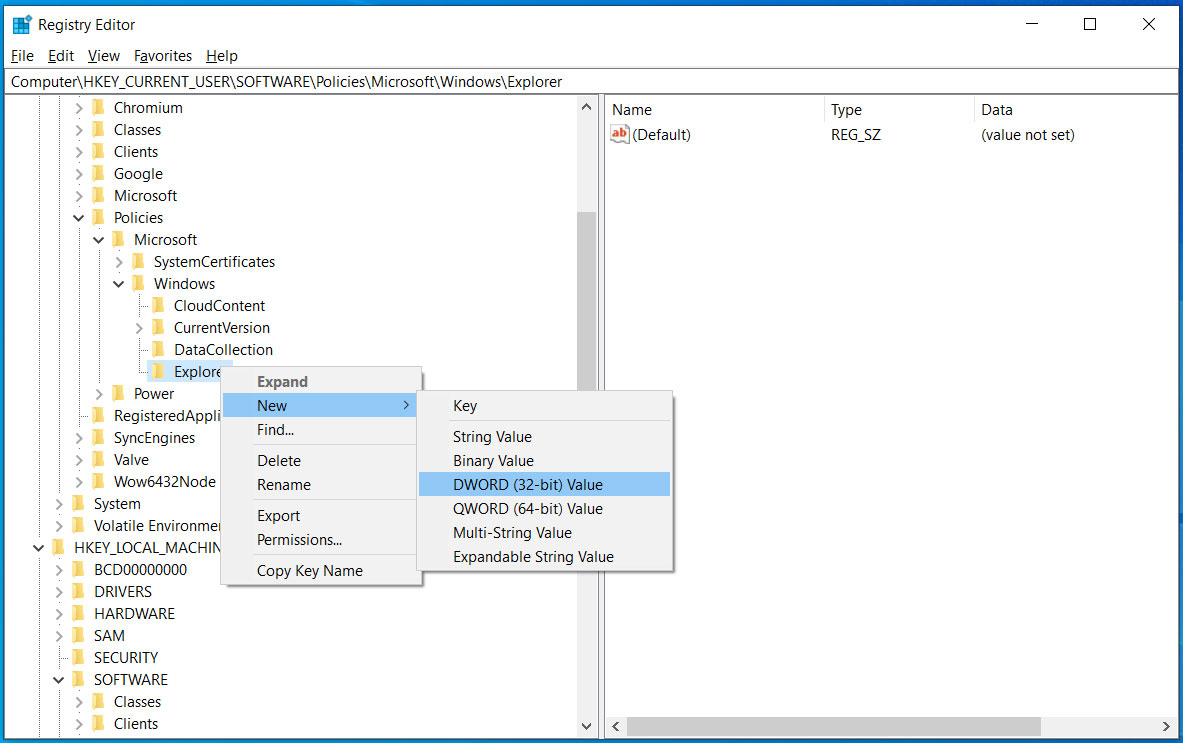
  3. Navigate to the HKEY_CURRENT_USER\SOFTWARE\Policies\Microsoft\Windows\Explorer key. If the key does not exist, create the necessary folders until you are in the Explorer key.
  4. Right-click on Explorer and select New and then DWORD (32-bit) Value, as shown below.New DWORD valueNew DWORD value
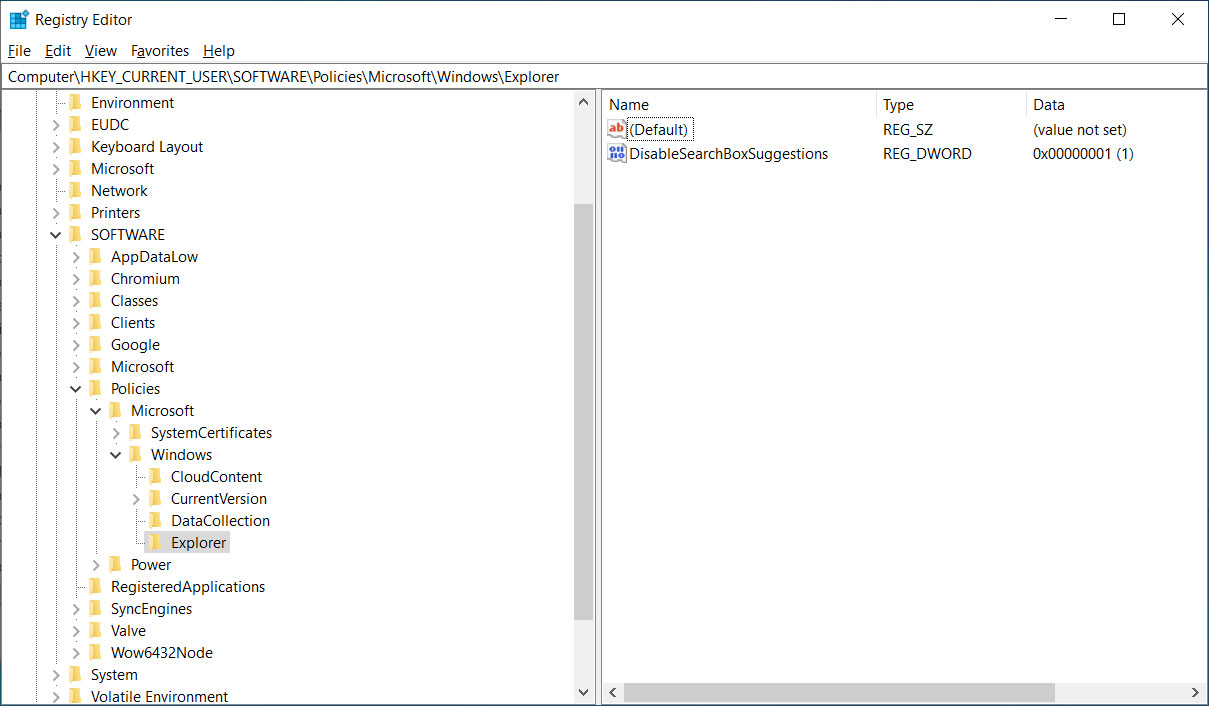
  5. You will be prompted to enter the name of the new value. Type DisableSearchBoxSuggestions and press Enter on the keyboard. A new value will be created that should automatically be set to 0. Now double-click on BingSearchEnabled and set the value to 1 and then press the OK button.
  6. When done, you should have the BingSearchEnabled value created and set to 1.DisableSearchBoxSuggestions value enabled
  7. You can now close the Registry Editor and restart Windows Explorer or restart your computer.

Once restarted, Bing search will no longer work in the Windows 10 Start Menu.

Bing Search disabled

Enable Bing integration again

To enable Bing integration again, simply disable the group policy or edit the Registry and delete the DisableSearchBoxSuggestions value under the HKEY_CURRENT_USER\SOFTWARE\Policies\Microsoft\Windows\Explorer Registry key.

Once again, restart the Explorer process or the computer, and Bing integration will work again.
 

Update 10/5/20: Added updated instructions on how to disable Bing search.

Source :
https://www.bleepingcomputer.com/tutorials/how-to-disable-bing-search-in-the-windows-10-start-menu/